*Use Screwdriver for Assembly Assembly Instructions 3 5 1c 1a 2b 2a Rear View 6 3x B D D 1b 1d 1c 3 1a 4 1 1. Connect Roosting Area Panels (1a, 1b, 1c, 1d) with Screws (A). Attach Nesting Box Floor Support (3) with Screws (A-On Front, B-On Back). Attach Ramp (4) with Screws (D). 2
*Use Screwdriver for Assembly Assembly Instructions 3 5 1c 1a 2b 2a Rear View 6 3x B D D 1b 1d 1c 3 1a 4 1 1. Connect Roosting Area Panels (1a, 1b, 1c, 1d) with Screws (A). Attach Nesting Box Floor Support (3) with Screws (A-On Front, B-On Back).
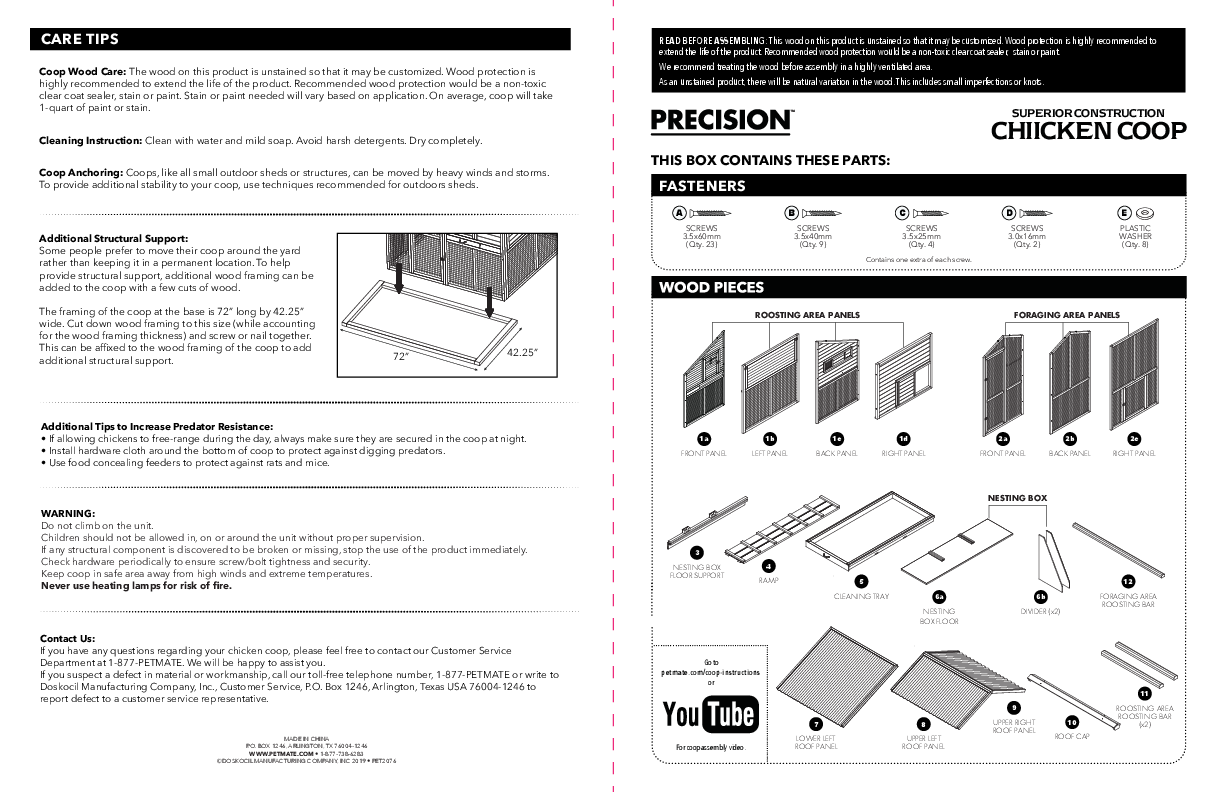
CARE TIPS
Coop Wood Care: The wood on this product is unstained so that it may be customized. Wood protection is highly recommended to extend the life of the product. Recommended wood protection would be a non-toxic clear coat sealer, stain or paint. Stain or paint needed will vary based on application. On average, coop will take 1-quart of paint or stain.
Cleaning Instruction: Clean with water and mild soap. Avoid harsh detergents. Dry completely.
Coop Anchoring: Coops, like all small outdoor sheds or structures, can be moved by heavy winds and storms. To provide additional stability to your coop, use techniques recommended for outdoors sheds.

Additional Structural Support: Some people prefer to move their coop around the yard rather than keeping it in a permanent location. To help provide structural support, additional wood framing can be added to the coop with a few cuts of wood.

The framing of the coop at the base is 72" long by 42.25"

wide. Cut down wood framing to this size (while accounting

for the wood framing thickness) and screw or nail together.

This can be affixed to the wood framing of the coop to add

additional structural support.

72"

42.25"

Additional Tips to Increase Predator Resistance: · If allowing chickens to free-range during the day, always make sure they are secured in the coop at night. · Install hardware cloth around the bottom of coop to protect against digging predators. · Use food concealing feeders to protect against rats and mice.
WARNING: Do not climb on the unit. Children should not be allowed in, on or around the unit without proper supervision. If any structural component is discovered to be broken or missing, stop the use of the product immediately. Check hardware periodically to ensure screw/bolt tightness and security. Keep coop in safe area away from high winds and extreme temperatures. Never use heating lamps for risk of fire.
Contact Us: If you have any questions regarding your chicken coop, please feel free to contact our Customer Service Department at 1-877-PETMATE. We will be happy to assist you. If you suspect a defect in material or workmanship, call our toll-free telephone number, 1-877-PETMATE or write to Doskocil Manufacturing Company, Inc., Customer Service, P.O. Box 1246, Arlington, Texas USA 76004-1246 to report defect to a customer service representative.
MADE IN CHINA P.O. BOX 1246, ARLINGTON, TX 76004-1246
WWW.PETMATE.COM · 1-877-738-6283 ©DOSKOCIL MANUFACTURING COMPANY, INC 2019 · PET2076

READ BEFORE ASSEMBLING: This wood on this product is unstained so that it may be customized. Wood protection is highly recommended to extend the life of the product. Recommended wood protection would be a non-toxic clear coat sealer, stain or paint. We recommend treating the wood before assembly in a highly ventilated area. As an unstained product, there will be natural variation in the wood. This includes small imperfections or knots.

SUPERIOR CONSTRUCTION
CHIICKEN COOP

THIS BOX CONTAINS THESE PARTS: FASTENERS

A
SCREWS 3.5x60mm (Qty. 23)

B
SCREWS 3.5x40mm
(Qty. 9)

C
SCREWS 3.5x25mm
(Qty. 4)
Contains one extra of each screw.

D
SCREWS 3.0x16mm
(Qty. 2)

E
PLASTIC WASHER (Qty. 8)

ROOSTING AREA PANELS

FORAGING AREA PANELS

1a FRONT PANEL

1b LEFT PANEL

1c BACK PANEL

1d RIGHT PANEL

2a FRONT PANEL

2b BACK PANEL

2c RIGHT PANEL

NESTING BOX

3
NESTING BOX FLOOR SUPPORT

4 RAMP

5 CLEANING TRAY

6a
NESTING BOX FLOOR

6b DIVIDER (x2)

12
FORAGING AREA ROOSTING BAR

Go to petmate.com/coop-instructions
or

For coop assembly video.

7
LOWER LEFT ROOF PANEL

8
UPPER LEFT ROOF PANEL

9
UPPER RIGHT ROOF PANEL

10 ROOF CAP

11
ROOSTING AREA ROOSTING BAR
(x2)

Assembly Instructions *Use Screwdriver for Assembly

1
1b
1a

3x

B

1c

3
1d D D

4

2
2c 2b
2a

5

8 7

1. Connect Roosting Area Panels (1a, 1b, 1c, 1d) with Screws (A). Attach Nesting Box Floor Support (3) with Screws (A-On Front, B-On Back).
Attach Ramp (4) with Screws (D).

2. Connect Foraging Area Panels (2a, 2b, 2c) with Screws (A).

3
Rear View

2b 1c
1a

4 12
11 11
6b 6b
2a 6a
5

3. Connect Foraging Area Panels (2a, 2b) to Roosting Area Panels (1a,1c) with Screws (A).

4. Insert Nesting Box Floor (6a) and Dividers (6b) into Roosting Area of coop. Insert Roosting Area Roosting Bars (11). Insert Foraging Area Roosting Bar (12). Insert Cleaning Tray (5).

6

5. Attach Lower Left Roof Panel (7) with Screws (B) and Plastic Washers (E). Attach Upper Left and Right Roof Panels (8 & 9)
with Screws (B) and Plastic Washers (E).
10
6. Attach Roof Cap (10) with Screws (C).
Adobe PDF library 15.00 Adobe Illustrator(R) 17.0