H870SPW Phoenix 2.0 User Manual
This manual provides comprehensive instructions for the H870SPW Phoenix 2.0 GPS Foldable Video Drone.
Product Overview
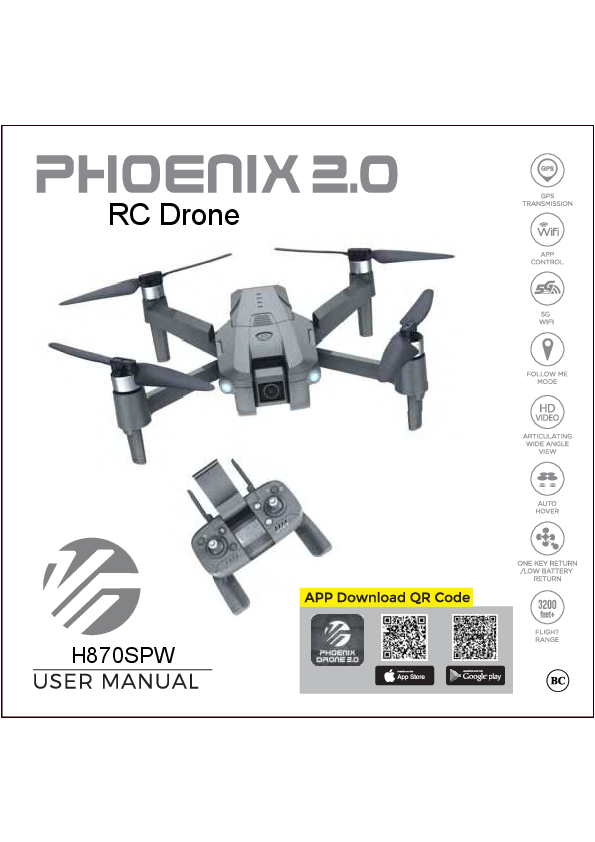
The Phoenix 2.0 drone, model DRCLSX10-NOC, is a GPS-enabled foldable video drone designed for outdoor flight. It features a 2K camera, advanced flight modes, and app control capabilities.
Key Features:
- GPS Mode for stable outdoor flight and Return to Home functionality.
- Normal Flying Mode for indoor use.
- 5G WiFi connectivity.
- HD Video and Articulating Wide-Angle View.
- Follow Me mode.
- Auto Hover.
- One Key Return / Low Battery Return.
- Flight Range up to 3200 feet.
Important Notes & Safety
FAA Registration
Drones weighing between 0.55 lbs (250 g) and 55 lbs (25 kg) must be registered online with the FAA at https://www.faa.gov/uas/registration. The provided FAA registration number must be marked on the drone.
User Manual
Read this manual carefully before use for optimal results and keep it for future reference. Video tutorials are also recommended for first-time users.
FCC Compliance
This device complies with Part 15 of the FCC Rules. Operation is subject to two conditions: no harmful interference and acceptance of received interference. The equipment has been tested and complies with Class B digital device limits. Specific FCC radiation exposure statements for the drone and remote are provided, emphasizing minimum distances and non-co-location with other transmitters.
Flight Safety Guidelines
- Operate the drone safely and responsibly, adhering to all local laws and regulations.
- Avoid flying near airports, crowds, or areas with dangerous goods.
- Fly in open areas, away from obstacles like power lines, trees, and water.
- Do not fly in adverse weather conditions (rain, snow, fog, strong winds).
- Maintain a safe distance (2 meters) from the aircraft during takeoff and landing.
- Keep the aircraft in a dry environment.
- Beginners should practice with experienced pilots.
- Do not fly under the influence of alcohol or drugs.
- Keep the remote controller at least 20 cm from your body.
- Never touch a flying or recently landed aircraft.
- Keep the aircraft away from heat sources.
- Recycle the aircraft responsibly according to local laws.
Setting Up Your Drone
Unfolding the Aircraft
Unfold the drone's arms before flight.
Battery Installation
Ensure the drone battery is fully charged. Insert it into the battery case at the rear of the aircraft until it clicks securely. Failure to do so may cause the aircraft to lose power mid-flight.
Remote Controller Setup
- Open the battery compartment on the rear of the remote controller using a screwdriver.
- Insert 3 AAA 1.5V batteries, observing correct polarity.
- Replace and secure the battery compartment cover.
Note: Do not mix battery types (rechargeable/non-rechargeable, old/new). Remove batteries if the controller will not be used for an extended period.
Device Components
Aircraft Components
- [1] Power switch
- [2] Propeller
- [3] Brushless motor
- [4] Battery
- [5] Undercarriage
- [6] Camera
- [7] Vision positioning lens
- [8] Bottom Lights
- [9] Toil sensor
Remote Controller
The remote controller features a display screen, control sticks for flight, various function buttons (GPS/Normal Mode, One Key Return, Headless Mode, Geomagnetic Calibration, Photo/Video, Speed Adjustment, Gimbal Trimmer, Follow Me), and power indicators.
Flight Modes
- GPS Mode: Automatically activated upon powering on. Suitable for outdoor flight, providing enhanced stability and Return to Home functionality. Indicated by "GPS ON" on the remote controller LCD.
- Normal Flying Mode: Activated by pressing and holding the GPS/Normal Flying Mode button. Suitable for indoor flight; does not support automatic return. Indicated by "GPS OFF" on the remote controller LCD.
Aircraft Status Indicator
LED indicators on the aircraft provide information about its status:
| Status | Front LED | Rear LED |
|---|---|---|
| Before finding GPS Signal | FLASHES BLUE | FLASHES GREEN |
| After finding GPS signal | BLUE | SOLID GREEN |
Rear Light Status Under GPS Mode:
- Flashes Quickly Green: Turn on Aircraft
- Flashes Slowly Green: Aircraft and Remote Connection
- Flashes Red+Green: Start Compass Calibration
- Flashes Green: Finish Compass Calibration
- Solid Green: Search GPS Signal
- Solid Red: Return To Home
- Flashes Red: Return to Home with Low Battery
- Flashes Red+Green: Headless Mode
- Flashes Slowly Red: Lose Connection
Return to Home (RTH)
The RTH function returns the aircraft to the last recorded Home Point. There are three types:
- Smart RTH: Initiated via the RTH button on the remote controller or the app when a strong GPS signal is available. The aircraft cannot avoid obstacles during RTH.
- Low Battery RTH: Automatically activated when the aircraft's battery is low. The aircraft returns to the takeoff point. If the battery depletes further, it will land safely. Indicated by a flashing RX battery icon and specific LED patterns (front blue lights on, rear red light flashes).
- Failsafe RTH: Activated if the remote controller and drone lose connection for over 6 seconds. The drone returns to the Home Point. Connection re-establishment stops the RTH process.
Note: The Home Point is the takeoff location if a strong GPS signal was acquired before takeoff.
Vision System
The Vision System, located at the bottom of the aircraft, comprises a camera and a ToF sensor for positioning. It works best indoors at altitudes below 5 meters and relies on ground texture, lighting, and flight height. Precision can be affected by various factors, including surface reflectivity, monochrome surfaces, low/high light conditions, and rapid movement.
Vision System Limitations:
- Avoid flying fast below 0.5m.
- Avoid monochrome or highly reflective surfaces.
- Avoid flying over water, glass, or moving objects.
- Avoid areas with dramatic light changes.
- Avoid extremely dark (<10 lux) or bright (>10,000 lux) surfaces.
- Avoid wind speeds above Level 1.
- Avoid surfaces without clear textures or with repeating textures.
- Control flight speed; below 1m altitude, speed should not exceed 3m/s.
Maintenance: Keep sensors clean. The system is effective up to 5 meters; beyond that, it switches to altitude mode.
Aircraft Power & Battery
Powering On/Off
- On: Press and hold the power button for 3 seconds. The aircraft beeps, and the rear light flashes.
- Off: Press the power button; the lights will turn off.
Aircraft Battery
- Capacity: 7.6 V 1950 mAh (2 pcs)
- Charging: Use the included charging base and USB cable. A 5V, 2A charger is recommended. Charging takes approximately 210-240 minutes. The green indicator on the charging base is on during charging and off when fully charged.
- Removal: Press buttons on both sides of the battery and lift upwards.
Safety Precautions: Ensure correct battery polarity, remove batteries before charging, and charge under adult supervision. Do not short-circuit terminals. Regularly inspect the charging cable for damage.
Propellers
Attaching Propellers
Install propellers A and B onto the corresponding motor shafts and tighten screws clockwise. Markings (A/B) are on the bottom of each propeller.
Detaching Propellers
Remove screws counter-clockwise and then detach the propellers.
Important: Ensure correct propeller installation. Handle propellers with care due to sharp edges. Use only original propellers. Do not touch spinning propellers.
App Download & Installation
Downloading the App
Download the "VTI Phoenix 2.0" application from the Apple App Store (iOS) or Google Play Store (Android) by searching or scanning the provided QR codes.
Connecting the App
- Power on the aircraft.
- Enable WiFi on your mobile device and connect to "Phoenix Drone ****".
- Once connected (WiFi symbol appears), open the "VTI Phoenix 2.0" app.
- Select your aircraft model and tap "GO" to enter the real-time image transmission interface.
Note: Ensure your mobile device supports 5G WiFi for optimal connection.
Photo & Video Saving
- Photos and videos can be saved to your phone (compressed) or an SD card (original resolution).
- If an SD card is used, files are saved to both the card and the app.
- Photo resolution: 4096x3072. Video resolution: 2048x1088 @ 30fps.
Micro SD Card Transfer
- Insert a Micro SD card (up to 64GB, Class 4/U1) into the aircraft.
- After flying, remove the card and insert it into a card reader.
- Connect the card reader to your computer's USB port to transfer files.
Note: Real-time image quality and FPV distance depend on your smartphone and flight environment. The DRCLSX10-NOC can transmit 2K videos up to 800 meters in ideal conditions.
Remote Controller & App Functions
Photo/Video Capture
- Photo: Tap the photo/video button on the controller or app.
- Video: Press and hold the photo/video button to start/stop recording.
- All captured media is saved to your phone.
One Key Unlock/Landing
- App: Tap the unlock button, then tap the takeoff/landing button.
- Controller: Press the unlock button, then press and hold the takeoff/landing button.
Note: The drone must be unlocked before takeoff.
Speed Adjustment
Cycle through speed modes (Low, Medium, High) by rolling the right throttle down. Each mode is indicated by beeps (1 beep for low, 2 for medium, 3 for high).
Point of Interest (Surrounding Flight Mode)
Activate by aiming at a point of interest and pressing the Surrounding Flight Mode button. The drone will circle the target. Use the right throttle stick to control circling direction, radius, and speed.
Gimbal Trimmer
Adjust the camera angle (up/down) within a 180-degree range using the gimbal trimmer.
Follow Me
Activate by pressing the Follow Me button in the app. The drone follows your smartphone's GPS location. Ensure a strong GPS connection and a horizontal distance greater than 8 meters between the drone and your phone.
Mobile Phone Holder
Open and adjust the mobile phone holder on the remote controller to fit your phone.
Flight Operations
Environmental Requirements
- Avoid extreme temperatures, snow, strong winds (Level 5+), rain, or fog.
- Fly in wide, open areas, away from tall structures and metal objects that can interfere with compass and GPS.
- Do not fly over people or animals.
- Avoid areas near power lines, base stations, or broadcasting towers.
- Performance may be affected at altitudes above 1000 ft.
- GPS is unavailable in polar regions.
Flight Limits and GEO Zones
Adhere to all laws and regulations. Flight limitations (altitude, distance, GEO Zones) are active by default in GPS Mode for safe and legal operation.
Pre-flight Checklist
- Ensure aircraft, remote controller, and mobile device are fully charged.
- Verify propellers are correctly installed and unfolded.
- Check that the camera lens is clean.
Calibrating Your Aircraft
Calibration is required when flying from a new location.
- Power On: Turn on the remote controller, then the aircraft. Unfold controller antennas.
- Pairing: The drone and controller pair automatically in GPS mode.
- Compass Calibration: Press and hold the geomagnetic calibration button. Rotate the aircraft horizontally (clockwise) until the rear light flashes yellow. Then, turn the head downwards and rotate vertically until the rear light flashes green. Place the drone on a flat surface and wait for the rear light to turn solid green (indicating sufficient GPS signal).
- Gyroscope Calibration: If the aircraft is not initializing properly, place it on a flat surface. Pull both control sticks down and to the left simultaneously for about 10 seconds until the lights stop flashing.
Calibration Notes: Avoid strong magnetic fields during calibration. Do not carry magnetic materials. Ensure the aircraft is on a horizontal surface for gyroscope calibration.
Locking and Unlocking the Aircraft
- Lock: Move the left throttle down-left and the right throttle down-right simultaneously. Rotors stop spinning.
- Unlock: Perform the same action to unlock. Rotors start spinning.
Basic Flight Operation
- Place the aircraft in an open area, facing its front.
- Power on the aircraft and remote controller.
- Connect the remote controller and aircraft, then perform initialization steps.
- Connect your phone to the DRCLSX10-NOC.
- Unlock the aircraft after gyroscope detection.
- Pull the throttle stick up to take off. Use left and right sticks for control.
- Pull the throttle stick down to land.
- Turn off the aircraft, remove the battery, and turn off the remote controller.
Video Tips
- Perform pre-flight checks.
- Adjust camera angles manually.
- Fly in good weather conditions.
- Conduct test flights to plan routes.
- Use gentle stick movements for smooth flight.
Appendix
Product Specifications
| Category | Specification |
|---|---|
| Aircraft Weight | Approx. 350g |
| Dimensions | Folded: 238x70x76mm; Unfolded: 334x338x76mm |
| Diagonal | 245mm |
| Max Ascent/Descent Speed | 2m/s / 1m/s |
| Max Speed | 28km/h |
| Flight Height Limitation | 120m |
| Max Flight Time | 20 minutes (no wind) |
| Max Wind Resistance | ≤Level 4 |
| GNSS | GPS |
| Hovering Accuracy | Indoor: Vertical ±0.2m, Horizontal ±0.8m; Outdoor: Vertical ±0.3m, Horizontal ±1.5m |
| Gimbal Controllable Range | Tilt: -90° to 90° |
| Camera Sensor | 1/3.2" CMOS, 8.08M Pixels |
| Lens | FOV: approx. 93°, Aperture: f/2.3 |
| ISO Range | Photo/Video: 100-1600 (Auto) |
| Shutter Speed | 1/30s-1/150s |
| Still Image Size | 4096x3072 |
| Video Resolution | 2K: 2048x1088 |
| Supported File System | FAT32 |
| Photo/Video Format | JPEG / MP4 (H.264) |
| SD Cards | Support Class 4 Micro SD up to 64G |
| Operating Temperature | 0°C - 70°C (Camera), 0°C - 45°C (Aircraft/Remote) |
| Remote Control Frequency | 2.440-2.471 GHz |
| Max Transmission Distance | 1.0 km |
| Remote Control Battery | 3x AAA |
| Charger Input | DC 5V 2A |
| Aircraft Battery Capacity | 1950 mAh |
| Aircraft Battery Voltage | 7.6 V |
| Aircraft Battery Type | LiPo |
| Aircraft Battery Energy | 14.82 Wh |
| Aircraft Battery Net Weight | Approx. 83g |
| Aircraft Battery Charging Time | Approx. 240 minutes |
| APP Name | VTI PHOENIX 2.0 |
| Image Transmission System | WIFI 5GHz |
| Real-time Image Transmission | 720p@20fps |
| Latency | 700-800ms |
| Required OS | iOS 11.0+ / Android 6.0+ |
VTI 1 Year Warranty
This warranty covers defects in material or workmanship under normal usage for one year from the purchase date for the original consumer purchaser. It does not cover damages from misuse, unauthorized repairs, tampering, modification, or accidents.
For Warranty Service: Contact Sakar International Inc. at 1-800-592-9541. Proof of purchase is required. Package and send defective products at your expense to the authorized service center.
