OSS TSD TKD 001
File info: application/pdf · 14 pages · 1.10MB
OSS TSD TKD 001
Tenant Billing Install / Configuration Guide v1
Technical Knowledge Tenant Biling User Guide © Copyright 2018, One SightSolutions Ltd Page 2 Installing the software First we will install the ‘tbs ...
Tenant Billing Install / Configuration Guide v1.1 - Onesight ...
The One Sightsolutions Tenant Billing module is supplied as an installable module that runs inside an installation of a Niagara 4 supervisor. It makes use of the ...
Full PDF Document

If the inline viewer fails, it will open the original document in compatibility mode automatically. You can also open the file directly.
Extracted Text
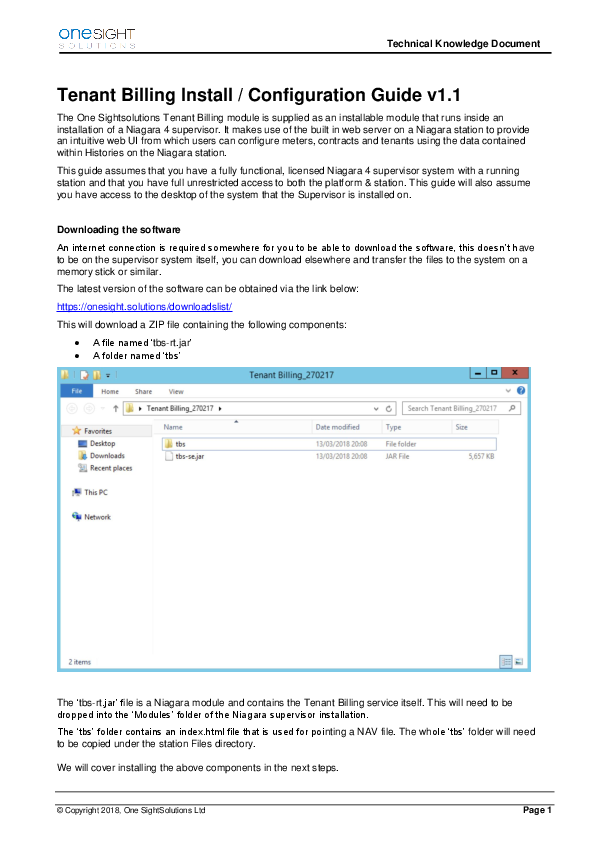
Technical Knowledge Document
Tenant Billing Install / Configuration Guide v1.1
The One Sightsolutions Tenant Billing module is supplied as an installable module that runs inside an installation of a Niagara 4 supervisor. It makes use of the built in web server on a Niagara station to provide an intuitive web UI from which users can configure meters, contracts and tenants using the data contained within Histories on the Niagara station. This guide assumes that you have a fully functional, licensed Niagara 4 supervisor system with a running station and that you have full unrestricted access to both the platform & station. This guide will also assume you have access to the desktop of the system that the Supervisor is installed on.
Downloading the software An internet connection is required somewhere for you to be able to download the software, this doesn't have to be on the supervisor system itself, you can download elsewhere and transfer the files to the system on a memory stick or similar. The latest version of the software can be obtained via the link below: https://onesight.solutions/downloadslist/ This will download a ZIP file containing the following components:
� A file named `tbs-rt.jar' � A folder named `tbs'

The `tbs-rt.jar' file is a Niagara module and contains the Tenant Billing service itself. This will need to be dropped into the `Modules' folder of the Niagara supervisor installation. The `tbs' folder contains an index.html file that is used for pointing a NAV file. The whole `tbs' folder will need to be copied under the station Files directory.
We will cover installing the above components in the next steps.

� Copyright 2018, One SightSolutions Ltd

Page 1

Installing the software

Technical Knowledge Document

First we will install the `tbs-rt.jar' file into the Niagara supervisor modules directory. On a Windows system this is typically located at `C:\Niagara\Niagara-4.x.x.x\Modules\'. Make sure you have extracted the files from the ZIP file you downloaded and copy `tbs-rt.jar' into the Niagara modules directory.
If you had Workbench open whilst copying the file, you will need to close it and reopen it in order for the new module to be visible when we get to that step.
The next step is to copy the `tbs' folder into your stations shared file directory. This is typically located at `C:\Niagara\Niagara-4.x.x.x\Daemon User Home\stations\yourStationName\shared\'. Copy the whole `tbs' folder into this location. This can also be done within Workbench itself by locating the `tbs' folder in the nav pane and dragging it into your station files directory. Either method will work.

Adding the service into your station
Before we can use the software, we need to add the Tenant billing service into the station that is running on the system. In order to do this, open a station connection using workbench if one is not already open and make your Palette visible. Search the palette for the `tbs' module, select it and click OK to view the available components within the module.

Once you have the Tenant Billing palette open, drag the `TenantBilling' component onto the `Config' node under your station.

� Copyright 2018, One SightSolutions Ltd

Tenant Biling User Guide.docx Page 2

Technical Knowledge Document When you drag the component onto the config node, leave it with the default name and click `OK'. The service is now installed. We must now verify that the `tbs' folder that we copied earlier exists under the `Files' node within the station.
A complete installation should look like the above. The `TenantBilling' component sitting under the Config node and the `tbs' folder sitting under the Files node. We can now move on the next step, licensing. Licensing the Software The software is licensed independently of the Niagara licensing mechanism and is activated by means of a key that must be generated by ourselves (One Sightsolutions) based upon the host ID of the Niagara system. Locate the host ID of your system, either by usual means such as Platform Administrator or by viewing the Property Sheet of the TenantBilling module and expanding the License menu.

Provide us with the host ID and we will send back a key which you will need to paste into the `Key' field, at which point the software will be licensed for the resources you have purchased. The key will look something like this:
5269hhac84938cab434b8jsg52f46d5d_e7b1a5c82772e0e05528jT08cb9883ef_25_1495928522172

� Copyright 2018, One SightSolutions Ltd

Tenant Biling User Guide.docx Page 3

Technical Knowledge Document Checking Web Server settings Now that the Tenant billing module is installed and licensed, you are nearly ready to open a web browser and view the user interface for the first time. However we suggest first checking to see what the station web service settings are, so that you know whether to browse using HTTP or HTTPS and on what port the web server is running on (if not default). You can see here that in my test station, I am using standard HTTP on the default port 80.
Therefore, based on the above, I know that the URL to browse to my station in a web browser will be http://myipaddress/ Yours may be https://myipaddress if using HTTPS which is the default on Niagara 4 systems. Or https://myipaddress:1234 if you are using a non-standard port for the web service. Either way, the web service property sheet in your station will be able to tell you what settings the web server is configured with. Creating a new Station user & NAV file It is good practice to create a new, separate user that will be used to access the Tenant Billing UI, this is so that we can set the default web profile & include a NAV file to ensure the correct page is loaded when the user logs on.

Our demo user here has the admin role and the Default Web Profile set to `Default Wb Web Profile'. There is also a nav file set that points this user to /tbs/index.html.

Please consult the Niagara 4 documentation for details on how to create users & nav files if you do not know already. This is considered standard practice for all Niagara engineers.

� Copyright 2018, One SightSolutions Ltd

Tenant Biling User Guide.docx Page 4

Technical Knowledge Document
Accessing the web interface You are now ready to access the Tenant Billing web interface for the first time. Browse to your station URL using a web browser either on a PC with network access to the Niagara system, or on the Niagara system itself. If you created a new user with a NAV file as shown in previous steps, then log in with those credentials. You should now see the following:

If you did not set a NAV file on a user earlier, then you will need to manually specify the exact URL when you log on.
To do this you will need to take the URL needed in order to access your station and prepend the following onto the end of it since we are using custom HTML web pages:
file/tbs/index.html
So in the case of my test station here, the full URL will be as follows:
http://myipaddress/file/tbs/index.html
Put this URL into the address bar of a web browser of a PC on a network that can reach this Niagara system, or do it from the Niagara system itself.
** A note on Browser compatibility
We have tested the User interface on all Major web browser including Google Chrome, Mozilla Firefox, Internet Explorer and Apple Safari. Although we have worked to resolve any bugs present in certain versions of certain web browsers, if you happen to notice something wrong, please contact us.

� Copyright 2018, One SightSolutions Ltd

Tenant Biling User Guide.docx Page 5

Technical Knowledge Document
Configuring the Tenant Billing System
Now that the service is installed and running, we can proceed to configuring it for use as a Tenant Billing system. We will assume that you have history present in your Niagara station already as this is a requirement.
The software has been designed in such a way as to be simple and intuitive. The main tabs along the top work from left to right, the order in which you must configure the system. The idea behind this is to provide a solution that is easy to configure and won't require intensive training for both initial set up and ongoing system growth.
Step 1: Create Buildings & Users

The first step is to create top level buildings to which tenants/meters/contracts will be assigned, as well as any additional user credentials should you wish individual tenants be able to view their own data, or building managers be able to see all the Tenants associated with a building.
At this point you do not need to fill out anything in the User Access tab. If you already know who requires access then feel free to add them now, or revisit this tab later on. Now move onto the Buildings tab.

� Copyright 2018, One SightSolutions Ltd

Tenant Biling User Guide.docx Page 6

Technical Knowledge Document
Buildings must be set up on the system as they are used as `containers' for Tenants that we will set up shortly. Create a new building and give it a name & fill out the address. A building manager does not have to be selected at this point but this ties in with the users you may have just created, or might create later on. The building manager role allows a single person to view all Tenant meter data associated with that Building and is ideal for a facilities manager type person. 2. Set Up Contracts Move over to the Contracts tab and click the "+" button to add a new contract. Assign it to a specific building or make it available to all buildings then give it a name. At this point you can then add any number of Fixed Charges or Taxes before clicking on the "New Season" tab.

A contract may be split into multiple Seasons, each of which may have multiple rates set on individual schedules. Whilst this allows for maximum flexibility, it is extremely easy to set up and the process to do so has been designed to be intuitive as possible.

� Copyright 2018, One SightSolutions Ltd

Tenant Biling User Guide.docx Page 7

Technical Knowledge Document
Give your first Season a name, in this example I am going to cover the whole year in a single season and break that season down into two events, day and night. You may add many events, they do not have to correspond with day or night as shown in my example. Now we must set up the schedule on a per week basis that applies the events we have just created. Move onto the Schedule tab.

Click & Drag over a period of time, one day at a time and you are able to apply any event you just created to that time slot. Select your event and click Add. Do this for every day or the week.

� Copyright 2018, One SightSolutions Ltd

Tenant Biling User Guide.docx Page 8

Technical Knowledge Document Now we must set a rate for each of our events, this is done on the rate tab as shown below:
After setting the rates we must save the new contract. In the bottom right there is an "Add" button. Click this, you will be prompted to confirm, and then your new contract is added onto the system.
2.1 Apportionment Billing The software is capable of performing apportionment billing. This provides the ability to split the utility bill from a supplier fairly across a selection of Tenants based upon their individual consumption. For example if you as a landlord received an electricity bill for �1000.00, this figure can be apportioned out across Tenants A, B and C as a percentage based on the sum of their individual meter readings. So if the sum of their consumption was 1000Kwh, Tenant A being 200Kwh, B being 500Kwh and C being 300Kwh, then the software would bill this as �200, �500 and �300 respectively. When creating a contract for Apportionment billing, select the `Split Utility Bill' option under Contract > General. Now create a single event and assign schedule as follows.

Ensure you enter the total utility bill into the variable charge field for this contract as follows:

You may now add/save the contract. Each tenant that has this Contract assigned to their individual meter in the Tenants set up stage later will now be billed based on this apportionment contract.

� Copyright 2018, One SightSolutions Ltd

Tenant Biling User Guide.docx Page 9

Technical Knowledge Document
3. Adding Meters & Linking Histories
Moving onto the Meters tab, click the add "+" button to add a new meter. Assign your meter to the relevant building and fill out the other details as shown below. Note the Serial No. may be a real meter serial number, or part of a numbering scheme created by yourself. Once filled out, click the folder icon next to the History box. At this point, you may navigate to the history in the Niagara station and select the required history that will feed this meter with data.

Once the history has been linked to the meter, click the `add' button and your meter will be added to the system.

� Copyright 2018, One SightSolutions Ltd

Tenant Biling User Guide.docx Page 10

Technical Knowledge Document
4. Creating Tenants & Assigning Meters/Contracts
Move onto the Tenants tab and click the add "+" button once again. You will now see the add Tenant form, fill out as required. Note the "auto email" check box, this controls whether or not the system will email the PDF bill automatically to the specific tenant email address each billing cycle.

Now click on the small "Meter" tab next to General. This is where we assign contracts to meters, and then said meters to our tenant.

On the right you see all available meters on the system. Use the dropdown next to the appropriate meter and select the contract you wish to assign. Now you may tick the box next to that meter and this meter/contract combination will be assigned to the tenant. Now click the "Add" button in the bottom right to save your new tenant.

� Copyright 2018, One SightSolutions Ltd

Tenant Biling User Guide.docx Page 11

Technical Knowledge Document
5. Viewing / Generating Bills
The billing tab provides an easy way to view/download the PDF bills for each Tenant, organized by billing period. If your history assigned the meter has data going back in time, and you set your tenant start date back in time as well, the system will have generated all bills up until the current period.

Bills will also be automatically emailed to Tenants in PDF format if the option was set. The raw PDF files may be found under a folder within the Niagara station as well if required.
Should you make a change on the system that effects the bills and makes existing bills incorrect or invalid, you may regenerate the bills from the Tenant area by clicking the regenerate bills button in the bottom left of each tenants set up page.

� Copyright 2018, One SightSolutions Ltd

Tenant Biling User Guide.docx Page 12

Technical Knowledge Document
6. Charts
Intended as a quick reference for checking if data exists, there is a charting tab that allows you to view data for each meter in chart form or via CSV export. This is useful for quickly checking if data is present over a selected timeframe without having to go into the Niagara station and look. The charting functionality is basic, but is only intended to be so and is not designed to replace a fully featured interactive dashboard type product.

� Copyright 2018, One SightSolutions Ltd

Tenant Biling User Guide.docx Page 13

Technical Knowledge Document 7. Settings / Customization In the top right, you will find the settings (cog) icon, from here you are able to change the system currency, define an email SMTP server for relaying emails and also upload custom logos for the whole system & each defined building.
Above you may specify SMTP server details that the system will use for sending out automatic bills. It is important you correctly specify this information as otherwise the mail this system sends will fail most antispam checks and reverse lookups, resulting in mail denied or landing in junk mail.

Logo's may be set system wide or on a per building basis as above.
Note** This software is under active development and as such new features will be implemented in subsequent versions and this guide will be updated accordingly. Please periodically keep up to date via our website to ensure you have the latest version of this document & accompanying software.

� Copyright 2018, One SightSolutions Ltd

Tenant Biling User Guide.docx Page 14