DogWatch MB-2 Product Features and Operating Instructions
Introduction
The DogWatch® MB-2 is a versatile dual-function transmitter designed for use with or without an attached boundary wire, providing a reliable system for pet containment and avoidance. This guide covers its features, installation, troubleshooting, and training procedures.
How the System Works
The MB-2 transmits a silent radio signal detected by a special receiver collar worn by your pet. The system creates a pet-free avoidance area or a containment area.
Without Boundary Wire (INT Mode):
The signal is transmitted a set distance from the transmitter, adjustable from 18 inches to 13 feet in diameter, creating a pet-free avoidance area.
With Boundary Wire (EXT Mode):
The signal originates from the installed boundary wire, allowing for custom shapes and sizes for avoidance or containment areas.
Signal Zones:
At the edge of the signal field, a warning zone alerts your pet with a beeping sound as they approach the boundary. If the pet enters the correction zone beyond the warning zone, they receive a safe, unpleasant sensation from the receiver collar. Through training, pets learn to associate the warning beep with the correction and stay within the safe area.
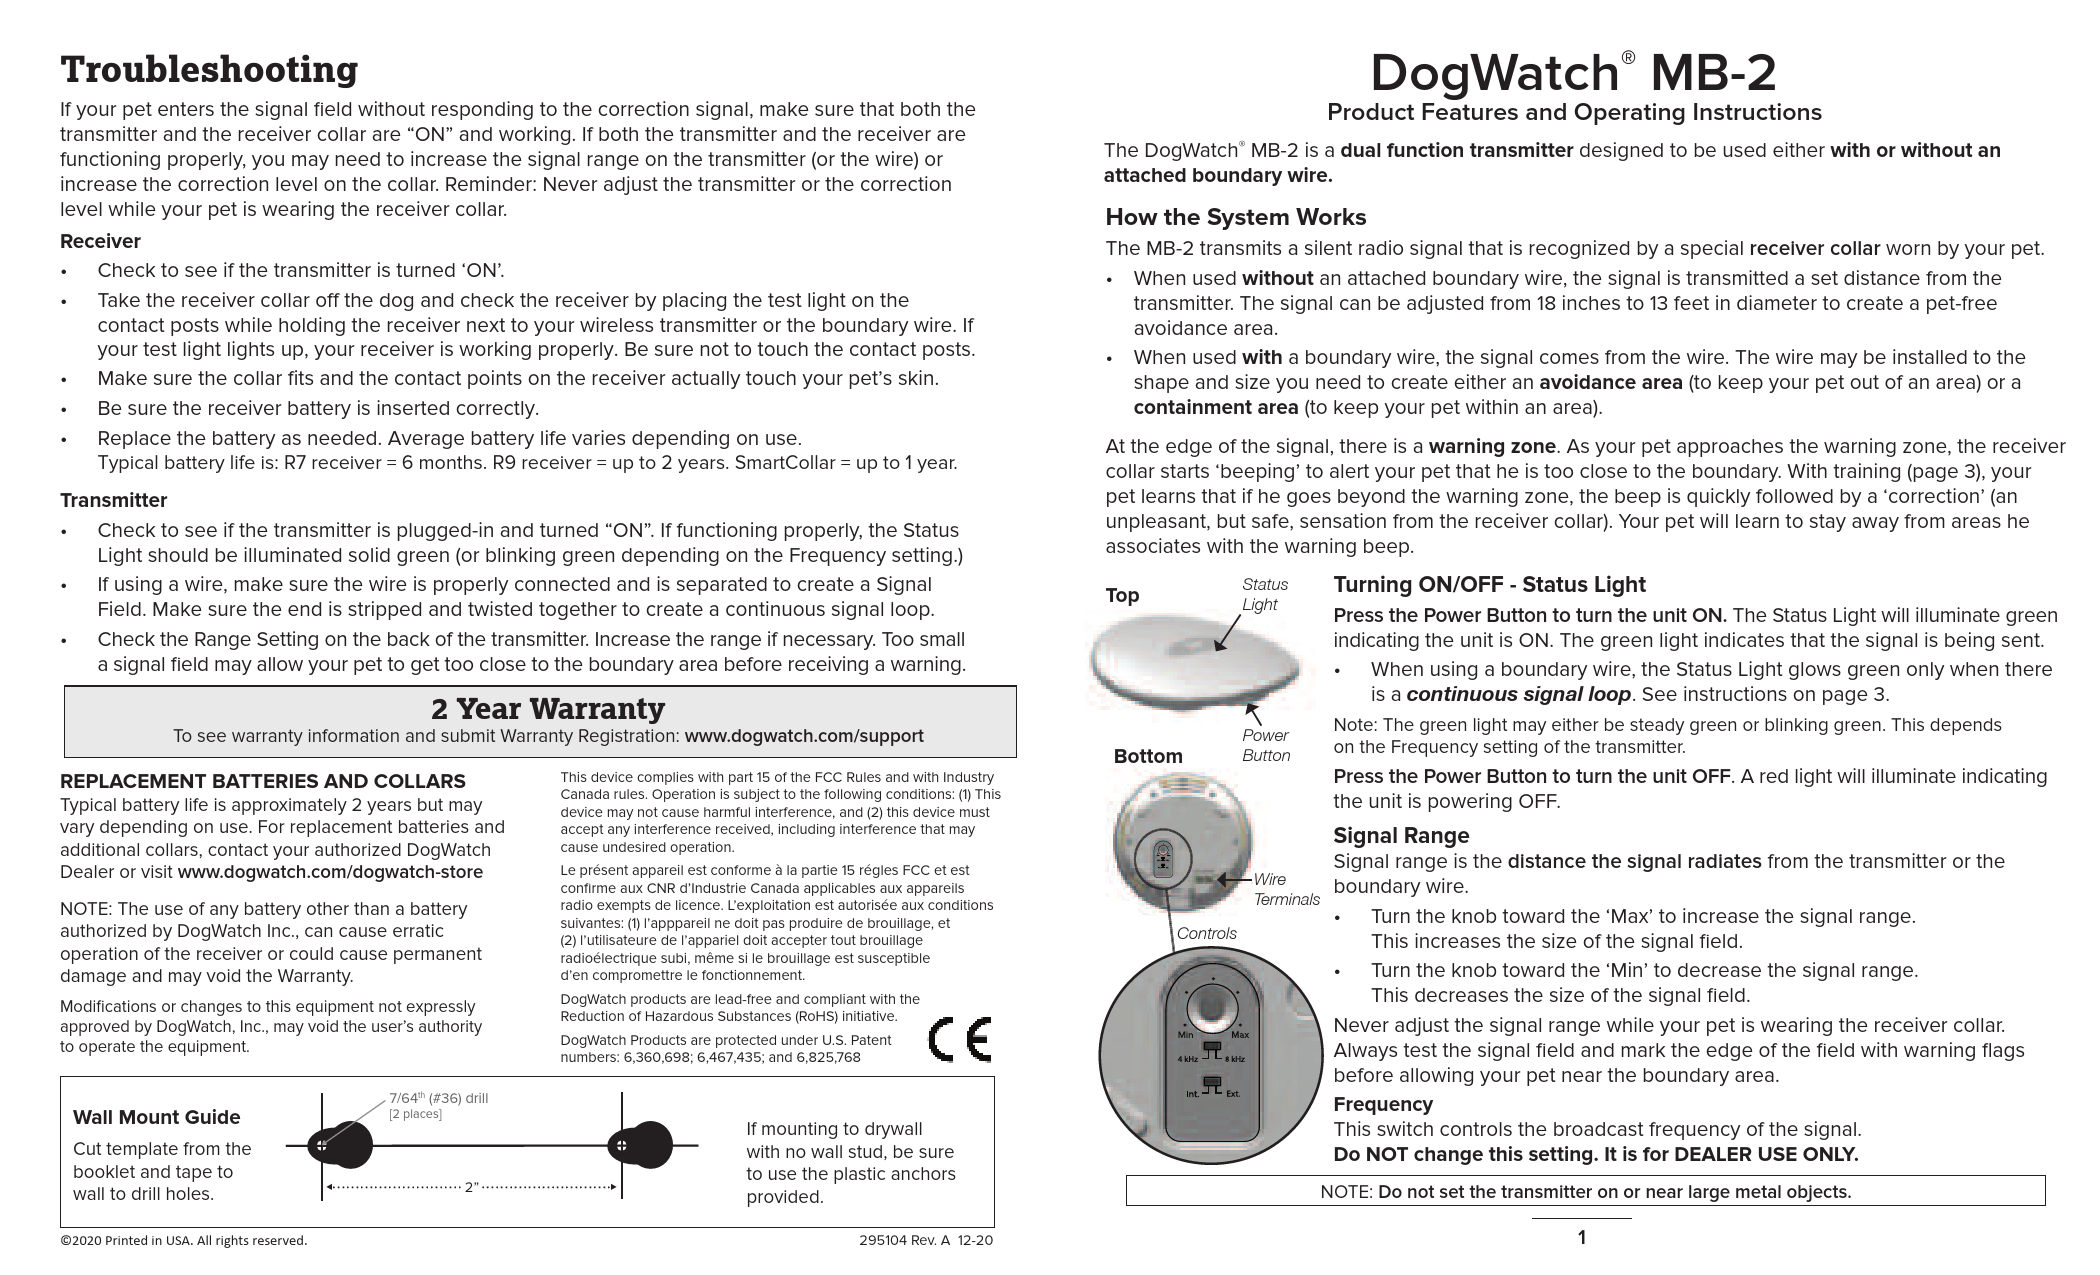
Product Features and Controls
Transmitter Components:
- Top: Contains the [Status Light] and [Wire Terminals].
- Bottom: Contains the [Power Button].
- Controls: Features a [Signal Range Knob] and a [Frequency Switch].
Turning ON/OFF - Status Light
Press the [Power Button] to turn the unit ON. The [Status Light] illuminates solid green, indicating the signal is being sent. When using a boundary wire, a continuous signal loop is required for the green light. Pressing the [Power Button] again turns the unit OFF, indicated by a red light.
Note: The green light may be steady or blinking, depending on the Frequency setting.
Signal Range
The [Signal Range Knob] adjusts the distance the signal radiates from the transmitter or boundary wire. Turn towards 'Max' to increase the signal field size, and towards 'Min' to decrease it. Never adjust the signal range while your pet is wearing the receiver collar. Always test the signal field and mark its edge with warning flags before allowing your pet near the area.
Frequency
The [Frequency Switch] controls the broadcast frequency. Do NOT change this setting; it is for DEALER USE ONLY.
NOTE: Do not place the transmitter on or near large metal objects.
Installation
The [INT/EXT Switch] on the back of the unit selects the operating mode. Both modes cannot be used simultaneously.
EXT - With a Boundary Wire
This mode allows for creating custom avoidance or containment areas using a boundary wire.
General Guidelines:
- Strip one end of the double-stranded wire and connect each strand to a wire terminal on the transmitter. Strip the other end and twist the wires together to form a continuous signal loop.
- Ensure wires do not interfere with household activities.
- Avoid installing boundary wires near baseboard heating units or large metal objects.
Creating a Continuous Loop:
A continuous signal loop is essential for a signal field. This is achieved by stripping and twisting the final ends of the boundary wire together.
Creating a Signal Field:
The supplied boundary wire is double-stranded. Separating the wires creates the signal field. The signal is absent when wires are adjacent. Separating them increases the signal field size and range. Signal fields can be created in single or multiple locations along the wire.
The boundary wire carries a radio signal and does not pose an electrical shock hazard. Boundary wire not separated for a signal field may emit a slight radio signal. If the wire becomes disconnected or damaged, an alarm sounds, and the [Status Light] blinks red and yellow.
INT - Without a Wire
This mode uses the transmitter alone to create an avoidance area.
Setting the Avoidance Area:
Set the signal range (see page 1). Place the MB-2 transmitter in the center of the desired pet-free area (e.g., on a counter, near a doorway). To locate the signal field, use the test light on the contact posts and move towards the transmitter until warning beeps are heard. Test the field and place training flags before introducing your dog.
When used without a wire, the signal radiates up to 6.5 feet in all directions from the transmitter.
Training
Proper training is crucial for the system's effectiveness.
Training Flags:
Place training flags around the edge of the warning zone to visually mark the boundary for your pet. Gradually remove flags as training progresses.
Training Procedure:
- Before placing the receiver collar on your pet, set up boundary flags at the edge of the signal field, just past the audible warning point.
- Ensure the receiver collar is snug, with contact points touching the pet's skin.
- Attach a leash to your pet's regular collar and approach the signal field. As you near the flags, shake a flag and say, "Watch out!" or "Careful!".
- Allow your pet to approach the flags. As they enter the warning zone, they will hear a beeping noise. If they retreat, offer praise. If they continue into the correction zone, they will receive a brief, safe correction. Immediately call out, "Watch out," and gently pull your pet out of the signal field with the leash.
- Repeat the approach. If the pet retreats at the audible warning, reinforce with praise. If they do not stop, repeat the steps. This may require several sessions over days. Allow for rest and play time.
- For each new boundary area, place flags at the signal field edge and retrain your pet.
Troubleshooting
If your pet enters the signal field without responding to the correction, ensure both the transmitter and receiver collar are ON and functioning. Adjustments may be needed for signal range or correction level. Never adjust the transmitter or correction level while your pet is wearing the receiver collar.
Receiver Issues:
- Verify the transmitter is ON.
- Test the receiver by placing the test light on the contact posts while holding the receiver near the transmitter or boundary wire. A lit test light indicates a working receiver.
- Ensure the collar fits correctly and contact points touch the pet's skin.
- Check that the receiver battery is inserted correctly.
- Replace the battery as needed. Typical battery life: R7 receiver = 6 months, R9 receiver = up to 2 years, SmartCollar = up to 1 year.
Transmitter Issues:
- Confirm the transmitter is plugged in and turned ON. A solid green [Status Light] indicates proper function (or blinking green depending on Frequency setting).
- If using a wire, ensure it is properly connected and separated to create a signal field, with ends twisted together for a continuous loop.
- Check and increase the [Signal Range Setting] if the signal field is too small.
Warranty and Support
2 Year Warranty: For warranty information and registration, visit www.dogwatch.com/support.
Replacement Batteries and Collars: Contact your authorized DogWatch Dealer or visit www.dogwatch.com/dogwatch-store for replacements. Typical battery life is approximately 2 years, but may vary.
NOTE: Using unauthorized batteries may cause erratic operation, permanent damage, or void the warranty. Modifications not expressly approved by DogWatch, Inc. may void the user's authority to operate the equipment.
Compliance and Legal Information
FCC and Industry Canada Compliance: This device complies with Part 15 of the FCC Rules and Industry Canada rules. Operation is subject to the following conditions: (1) This device may not cause harmful interference, and (2) this device must accept any interference received, including interference that may cause undesired operation.
French Translation: Le présent appareil est conforme à la partie 15 des règles FCC et aux CNR d'Industrie Canada applicables aux appareils radio exempts de licence. L'exploitation est autorisée aux conditions suivantes : (1) l'appareil ne doit pas produire de brouillage, et (2) l'utilisateur de l'appareil doit accepter tout brouillage radioélectrique subi, même si le brouillage est susceptible d'en compromettre le fonctionnement.
RoHS Compliance: DogWatch products are lead-free and compliant with the Reduction of Hazardous Substances (RoHS) initiative.
Patents: DogWatch Products are protected under U.S. Patent numbers: 6,360,698; 6,467,435; and 6,825,768.
©2020 Printed in USA. All rights reserved. 295104 Rev. A 12-20
Wall Mount Guide
A guide for wall mounting is provided. It includes a template to cut out and tape to the wall for drilling holes. The recommended drill bit size is 7/64th (#36). For mounting on drywall without a stud, use the provided plastic anchors.
