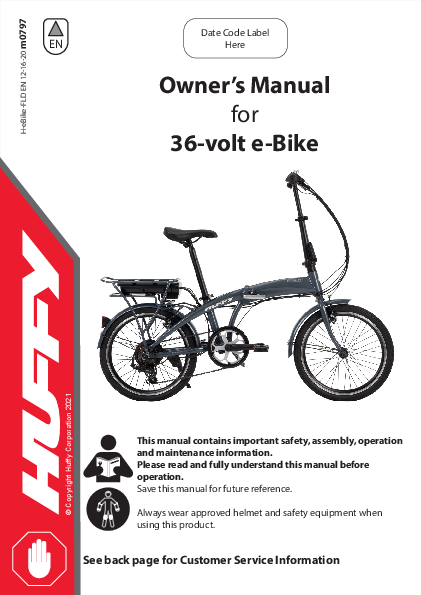
Owner's Manual for 36-volt e-Bike
Brand: Huffy
Model: 36-volt e-Bike (H-eBike-FLD, m0797)
Date Code Label: Here
This manual contains important safety, assembly, operation, and maintenance information. Please read and fully understand this manual before operation. Save this manual for future reference. Always wear approved helmet and safety equipment when using this product. See back page for Customer Service Information.
Owner's Manual Index
- Safety and Warnings: Pages 2-6
- Bike ID and Sizing: Page 7
- Parts and Assembly: Pages 8-18
- Operating your e-Bike: Pages 19-23
- Maintenance and Service: Pages 24-33 (General Info, Battery Storage, Replacement and Disposal)
- Troubleshooting: Page 34
- Warranty: Page 35
Back Cover:
- Return and Service Contact information
- Registration QR Code Link
- Assembly QR Code Link
Tools Recommended: (Metric Wrenches)
IMPORTANT! Before using the unit for the first time, fully charge the Battery. The Battery Charger will shut off when the Battery is fully charged, but never charge longer than 12 hours.
Warnings and Safety
e-Bikes Introduction
MEANINGS OF WARNINGS:
⚠️ This symbol is important. See the word "CAUTION" or "WARNING" which follows it. The word "CAUTION" is before mechanical instructions. If you do not obey these instructions, mechanical damage or failure of a part of the bicycle can occur. The word "WARNING" is before personal safety instructions. If you do not obey these instructions, injury to the rider or to others can occur.
Riding an e-bike is similar to riding a regular bike but offers a motor that provides assisted power when pedalling.
⚠️WARNINGS:
- When mounting your e-bike, always apply full front and rear brake lever pressure to keep the unit from moving while mounting and do not put feet on the pedals until you are sitting on the seat.
- Your e-bike travels at higher speeds than most riders are used to when pedaling a traditional bike. It is very important that you are aware of your surroundings and obstacles around you and be extra careful when you first start moving. It's important to watch the path surface you are on which can cause tires to slip or flatten.
- An electric bike is heavier and requires more time to stop due to weight and faster speeds. Practice starting, riding, and stopping in a closed space with no other vehicles and always ride with hands near the brake levers.
- Before riding, familiarize yourself with the product's operation.
- Do not become distracted by the Display. Change Display settings only when stopped.
- Never ride at speeds faster than you are comfortable with.
- Always start riding with the lowest assist speed.
- Avoid riding this product on wet, frozen, oily, or unpaved surfaces or under the influence of drugs and/or alcohol. Avoid uneven surfaces, potholes, surface cracks, and obstacles.
- Avoid riding in rain and wet weather and always store e-bike indoors.
- Always obey State and Local Laws when using this product. Serious injury can result from the unsafe operations of this vehicle.
- This product is not designed to be jumped. If jumped, even from the curb, the e-bike frame could break causing serious injury or death. If jumped, the warranty is void.
e-Bike Range:
- Higher assist setting will shorten the distance your e-bike can travel.
- Always keep tires at proper inflation pressure (shown on side walls).
- Heavier riders will shorten riding range.
- Hills or rough terrain will shorten riding range.
- Starting and stopping affects riding range.
- Always fully charge your e-Bike before each ride.
This "Class 1" e-Bike complies with Federal Governments guidelines, with regard to total watts and top speed.
WARNING - TO AVOID SERIOUS INJURY:
Failure of the rider to obey the following Safety Warnings can result in serious injury or death. Check local laws governing the use of electrical vehicles.
- ADULT RIDERS ONLY.
- DO NOT USE THE VEHICLE IN AN UNSAFE MANNER OR AT AN UNSAFE SPEED. Not intended for jumps - this can damage the product.
- CHOKING HAZARD: Small parts, adult assembly required.
- Before using this product, fully understand the controls and safety issues. Riders must demonstrate the capability and skill to handle the vehicle and operate its controls to avoid falls or collisions.
- Obey all traffic regulations, signs, and signals.
- Before each ride, check that the steering system is correctly adjusted and that all connection components are firmly secured and not broken.
- While using the product, keep hands and fingers away from wheels and other moving parts to avoid danger of pinching or entrapment.
- Riders should always wear a properly fitted helmet that complies with U.S. Consumer Product Safety Commission (CPSC) Standard 16 CFR 1203 or equivalent standard for your country.
- Always wear shoes. Gloves, knee and elbow pads recommended.
- Ride on the correct side of the road, in a single file, and in a straight line.
- There are additional hazards of using the vehicle in areas other than private grounds.
- If possible, avoid riding at night, dusk, dawn, and any other time of poor visibility.
- IF YOU MUST RIDE AT NIGHT OR AT TIME OF POOR VISIBILITY:
- Use a correctly installed headlight and taillight.
- Headlights are required by all states for nighttime riding and taillights are required in some states.
- Battery-powered lights or flashing safety lights are also recommended.
- MAKE YOURSELF MORE VISIBLE TO MOTORISTS.
- Reflectors: For your own safety, do not ride the bicycle if the reflectors are incorrectly installed, damaged, or missing. Make sure the front and rear reflectors are vertical. Do not allow the visibility of the reflectors to be blocked by clothing or other articles. Clean the reflectors, as necessary, with soap and a damp cloth.
- Wear light-colored or reflective clothing, such as a reflective vest and reflective bands for your arms and legs.
- Use reflective tape on your helmet.
- USE EXTRA CAUTION IN WET WEATHER:
- Ride slowly on damp surfaces because the tires will slide more easily.
- Allow increased braking distance in wet weather.
- AVOID HAZARDS TO PREVENT LOSS OF CONTROL OR DAMAGE TO YOUR WHEELS:
- Be aware of drain grates, soft road edges, gravel or sand, potholes or ruts, wet leaves, or uneven paving.
- Cross railroad tracks at a right angle to prevent the loss of control.
- Do not carry any passengers.
- Do not carry any items or attach anything to your bicycle that could hinder your vision, hearing, or control.
WARNING - TO AVOID SERIOUS INJURY:
- Do not ride with both hands off the handlebar.
- Do not tow or push the product.
- Do not modify the product.
- Replace worn or broken parts immediately with original equipment.
- If anything does not operate properly, discontinue use.
- DO NOT TAMPER WITH THE ELECTRICAL SYSTEM: Doing so may create a short, causing the fuse to trip or other damage including fire.
- Risk of Fire: Do not bypass fuse. Replace only with original size and type.
- The supply terminals are not to be short-circuited.
- Non-rechargeable batteries are not to be recharged.
- Batteries are to be inserted with the correct polarity.
- Rechargeable batteries are only to be charged by adults.
- The battery chargers used with the product are to be regularly examined for damage to the cord, plug, enclosure, and other parts, and in the event of such damage, they must not be used until the damage has been repaired.
- Changes or modifications to this unit not expressly approved by the party responsible for compliance could void the user's authority to operate the equipment.
- Do not use the vehicle in unsafe conditions such as snow, rain, loose dirt, mud, sand, or fine gravel. This may result in unexpected action such as tip over and skidding. Using the vehicle in loose dirt, mud, sand, or fine gravel may damage the electronics and gear box inside the vehicle.
- Do not overload the vehicle. Do not drive in very hot weather; components may overheat.
- Do not allow water or other liquids to come in contact with the battery or other electric components.
⚠️WARNING: ALWAYS WEAR YOUR HELMET WHEN RIDING THIS PRODUCT!
- Helmet should sit level on your head and low on your forehead. Exposed forehead can result in serious injury.
- Adjust the strap sliders below the ear on both sides.
- Buckle the chin strap. Adjust strap until it is snug.
- No more than two fingers should fit between the strap and your chin.
- A proper fitting helmet should be comfortable and not rock forward/backward or side to side.
Lithium-Ion Battery & Charger Warnings:
The following safety hazards may result in serious injury or death to the user of the vehicle:
- Battery Charger for Indoor use only. Use of a battery or charger other than the supplied rechargeable battery and charger may cause a fire or explosion. Only use the supplied rechargeable battery (or lead-acid or lithium suitable replacement) and charger with the vehicle.
- Using the rechargeable battery and charger for any other product may result in overheating, fire, or explosion. Never use the rechargeable battery and charger with another product.
- Explosive gases are created during charging. Charge the battery in a well-ventilated area.
- Do not charge the battery near heat or flammable materials.
- All large lithium batteries are a potential fire risk and should be charged in a safe place, preferably in the middle of a garage floor.
- Never charge a lithium battery unsupervised inside a house or building.
- Only an adult who has read and understands the safety warnings should handle, charge, or recharge the battery.
- Contact between the positive and negative terminals may result in fire or explosion. Avoid direct contact between the terminals. Picking up the battery by the wires or charger can cause damage to the battery and may result in a fire. Always pick up the battery by its case or handles.
- Battery must be handled by adults only. Liquids on the battery may cause fire or electric shock. Always keep all liquids away from the battery and keep the battery dry.
- Contact or exposure to battery leakage may cause serious injury. If contact or exposure occurs, immediately call your physician. If the chemical is on the skin or in the eyes, flush with cool water for 15 minutes. If the chemical was swallowed, immediately give the person water or milk. Do not give water or milk if the patient is vomiting or has a decreased level of alertness. Do not induce vomiting.
- Battery Posts, terminals, and related accessories contain lead and lead compounds (acid), chemicals known to cause cancer, reproductive harm, and are toxic and corrosive. Never open the battery.
- Tampering or modifying the electric circuit system may cause a shock, fire, or explosion and permanently damage the system. Exposed wiring and circuitry in the charger may cause electric shock. Always keep the charger housing closed.
- Non-rechargeable batteries are not to be recharged.
- Batteries are to be inserted with the correct polarity.
- The supply terminals are not to be short-circuited.
- Batteries are only to be charged by adults.
- The battery chargers used with the product are to be regularly examined for damage to the cord, plug, enclosure, and other parts, and in the event of such damage, they must not be used until the damage has been repaired.
Introduction
Owner's Bicycle Identification Record
NOTE: This information is only available on the bicycle itself.
Each bicycle has a Recovery Code stamped into the frame. The Recovery Code 1 can be found on the bottom of the crank housing as shown.
Write this number below to keep it for future reference.
If the bicycle is stolen, give this number and a description of the bicycle to the police. This will help them find the bicycle.
Recovery Code:
Purchase Date:
Model Name:
Fitting the Rider to the Bicycle
To determine the correct size of bicycle for the rider:
- Straddle the assembled bicycle with feet shoulder width apart and flat on the ground.
- There must be at least 1" (2.5 cm) of clearance 1 between the highest part of the top tube 2 and the crotch of the rider with tires properly inflated.
- The minimum leg-length for the rider is the highest part of the top tube plus 1" (2.5 cm) 3.
NOTE: See Assembly sections for Seat adjustment.
- Adjust the seat height so that you can put the heel of one foot on a pedal with leg extended straight A - and so the opposite foot can reach the ground with tip of foot B. This will give your knees a slight bend when pedalling with the ball of the foot.
Parts Assembly
The diagram shows the e-bike with various parts numbered for identification. Refer to the table below for descriptions.
| No. | Description | No. | Description |
|---|---|---|---|
| 1 | Frame | 17 | Rear Reflector |
| 2 | Front Wheel Assembly | 18 | Pedal Set |
| 3 | Tire (x2) | 19 | Kickstand (not shown - various styles) |
| 4 | Tube (x2) | 20 | Crank Set |
| 5 | Rear Wheel Assembly | 21 | Crank Bearings |
| 6 | Wheel Retainer (x2) | 22 | Shift Grip |
| 7 | Axle Nut (x4) | 23 | Grips (pair) |
| 8 | Front Fender and Hardware | 24 | Chain |
| 9 | Fork | 25 | Rear Brake |
| 10 | Rear Fender and Hardware | 26 | Front Brake |
| 11 | Handlebar | 27 | Rear Derailleur |
| 12 | Handlebar/Stem Lock Clamp | 28 | Brake Lever Set |
| 13 | Seat and Hardware | 29 | Bell (if equipped) |
| 14 | Seat Clamp | 30 | Drive Battery |
| 15 | Seat Post | 31 | Drive Power Switch |
| 16 | Front Reflector |
Introduction to Assembly
This Owner's Manual may be made for several different style products. Some illustrations may vary slightly from the actual product.
- Follow instructions completely.
- If the product has any parts that are not described in this manual, look for separate "Special Instructions" that are supplied with the unit.
- All features, components, and accessories are not included on all models.
- Use the Index page to locate specific sections of this manual.
- Please read through this entire manual before beginning assembly or maintenance.
- If you are not confident with assembling this unit, contact customer service.
⚠️WARNING: Keep small parts away from children during assembly.
NOTE: All of the directions (right, left, front, rear, etc.) in this manual are as seen by the rider while seated.
Do not dispose of the carton and packaging until you complete the assembly of the product. This can prevent accidentally discarding parts of the unit.
Radio Frequency Information (if applicable)
⚠️WARNING: Changes or modifications to this unit not expressly approved by the party responsible for compliance could void the user's authority to operate the equipment.
This device complies with Part 15 of the FCC Rules. Operation is subject to the following two conditions: (1) this device may not cause harmful interference, and (2) this device must accept any interference received, including interference that may cause undesired operation.
NOTE: This equipment has been tested and found to comply with the limits for a Class B digital device, pursuant to Part 15 of the FCC Rules. These limits are designed to provide reasonable protection against harmful interference in a residential installation. This equipment generates, uses, and can radiate radio frequency energy and, if not installed and used in accordance with the instructions, may cause harmful interference to radio communications. However, there is no guarantee that interference will not occur in a particular installation. If this equipment does cause harmful interference to radio or television reception, which can be determined by turning the equipment off and on, the user is encouraged to try to correct the interference by one or more of the following measures:
- Reorient or relocate the receiving antenna.
- Increase the separation between the equipment and receiver.
- Connect the equipment into an outlet on a circuit different from that to which the receiver is connected.
- Consult the dealer or an experienced radio/TV technician for help.
Folding and Locking the Frame
STEPS:
- With Lock Lever A open, fold Front/Back Frame B into locking position.
- Fold Lock Lever A CLOSED so that it locks FIRMLY into position. Some force will be needed. If the lever closes too easy or too hard, adjust Screw C so the Lock Lever closes securely with some force.
- Close Locking Tab D so that it fits into the slot as shown.
⚠️WARNING: Failure to follow these instructions could result in the lock coming loose with serious injury to rider or others.
Diagram Description: Shows the frame locking mechanism with lever A, frame part B, adjustment screw C, and locking tab D. Arrows indicate the folding and locking actions.
Unfold the Stem
STEPS:
- With Lock Lever A open, fold Stem/Handlebar B upright and into locking position.
- Fold Lock Lever A UP so that it locks FIRMLY into position. Some force will be needed. If the lever closes too easy or too hard, adjust Screw C so the Lock Lever closes securely with some force.
- Pull Locking Tab D UP and pull the lock lever back to unlock.
⚠️WARNING: Failure to follow these instructions could result in the lock device coming loose with serious injury to rider or others.
Diagram Description: Illustrates unfolding the stem. Shows lock lever A, stem/handlebar B, adjustment screw C, and locking tab D. Arrows indicate the sequence of operations.
Adjusting the Handlebar Height
STEPS:
- Adjust Handlebar to a comfortable riding position.
- As needed, open and close the Quick Release Lever A with one hand and tighten or loosen the Adjusting Nut B by hand, so that you first feel resistance when closing the Quick Release Lever.
- Push the Quick Release Lever to the "CLOSE" position to set the Handlebar position. It will take some force to clamp securely so that the Quick Release Lever lays against the Clamp Body.
⚠️WARNING: Failure to follow these instructions could result in lock device coming loose with serious injury to rider or others.
Diagram Description: Shows the handlebar area with Quick Release Lever A and Adjusting Nut B. An arrow indicates the adjustment direction.
Pedal Installation
⚠️CAUTION: There is a RIGHT pedal marked R and a LEFT pedal marked L.
- The pedal marked R has right-hand threads. Tighten it in a clockwise direction.
- The pedal marked L has left-hand threads. Tighten it in a counterclockwise direction (anti-clockwise).
- Turn the right pedal marked R into the right side of the crank arm, and the left pedal marked L into the left side of the crank arm.
TIGHTEN THE PEDALS:
Make sure the threads of each pedal are fully into the crank arm - Tighten securely.
⚠️WARNING: Ensure pedals are secure in crank arms so they will not loosen. Periodically check tightness.
UNFOLDING THE PEDALS:
STEPS:
- Turn each Pedal 90° OUT and they will SNAP locked into horizontal position.
- To fold Pedals again, push IN and rotate 90° up or down into folded position.
⚠️WARNING: Do not use bike if pedals are not SNAPPED fully into horizontal riding position. Failure to follow these instructions could result in lock device coming loose with serious injury to rider or others.
Diagram Description: Shows the crankset with R and L pedals. Illustrates pedal unfolding steps with arrows and numbered stages.
Seat Installation
⚠️WARNING: To prevent the Seat coming loose and possible loss of control, the "MIN-IN" (minimum insertion) mark A on the Seat Post must be BELOW the top of the Seat Tube B.
STEP 1 - INSERT SEAT POST INTO SEAT TUBE:
- If needed, loosen Seat Post Clamp Screw or open the Quick Release Lever E.
- Point the Seat forward and put the Seat Post C into the Seat Tube B with the "MIN-IN" marks A BELOW the top of the Seat Tube as shown.
STEP 2 - QUICK RELEASE LEVER: (various models)
⚠️CAUTION: Operate the Quick Release Lever by HAND ONLY - DO NOT USE TOOLS.
- As needed, open and close the Quick Release Lever with one hand and tighten or loosen the Adjusting Nut G by hand, so that you first feel resistance to the Quick Release Lever when it is in the "OPEN" position 1.
- Push the Quick Release Lever to the “CLOSE” position 2 - It will take strong force to clamp securely so that the Quick Release Lever lays against the Seat Post Clamp F.
⚠️WARNING: You must use strong force to move the Quick Release Lever securely to the "CLOSE" position 2. This ensures that the seat does not move during normal operation.
STEP 3 - MAX INSERTION
⚠️WARNING: If your seatpost projects from the frame beyond the maximum insertion marks, it is possible that your seatpost may break or hit the ground, causing you to lose control or fall.
Diagram Description: Shows seat post insertion into the seat tube, highlighting the 'MIN-IN' mark. Details the operation of the quick release lever and adjusting nut for seat post clamping.
Seat Bolt Saddle Adjustment (various models)
SINGLE BOLT CLAMP:
- Loosen the clamp bolt A sufficiently to allow any serrations B on the mechanism to disengage before changing the saddle's angle.
- With serrations fully re-engaged and saddle in a comfortable riding position, tighten the clamp bolt A securely to ensure the saddle will not come loose.
⚠️WARNING: Serrations on the mating surfaces of the clamp can wear with use and adjustment. Check that the clamp is tight and secure before each ride.
DUAL CLAMP:
- Loosen clamp bolt/nut C as needed and adjust seat to a comfortable riding position.
- With clamp fully on seat post as shown, tighten bolt/nut C securely so that seat does not move when in use.
Testing Seat Clamp and Post Clamp Tightness
To test the tightness of the seat clamp and the post clamp:
- Try to turn the seat side-to-side and to move the front of the seat up and down.
- If the seat moves in the seat clamp:
- Loosen the Seat clamp nut.
- Put the seat in the correct position and tighten the seat clamp tighter than before.
- Do this test again, until the seat does not move in the seat clamp.
- If the seat post moves in the seat tube clamp:
- Loosen the seat clamp lever.
- Put the seat post in the correct position and tighten the seat clamp nut tighter than before.
- If necessary, tighten or loosen hand nut so that quick release tightens securely.
- Do this test again, until the seat post does not move in the seat tube clamp.
Diagram Description: Shows single bolt clamp mechanism with bolts A and serrations B. Shows dual clamp mechanism with bolt/nut C.
Tires (as equipped)
MAINTENANCE:
- Frequently check the tire inflation pressure because all tires lose air slowly over time. For extended storage, keep weight off of the tires.
- Do not use unregulated air hoses to inflate the tire/tubes. An unregulated hose can suddenly over inflate tires and cause them to burst.
- Replace worn tires.
⚠️WARNING: Do not ride or sit on the unit if a tire is under inflated. This can damage the tire, inner tube, and rim.
INFLATING THE TIRES:
- Use a hand or a foot pump to inflate the tires.
- Service station meter-regulated air hoses are also acceptable.
- The maximum inflation pressure is shown on the tire sidewall.
Before adding air to any tire, make sure the edge of the tire (the bead) is the same distance from the rim, all around the rim, on both sides of the tire A. If the tire does not appear to be seated correctly, release air from the inner tube until you can push the bead of the tire into the rim where necessary. Add air slowly and stop frequently to check the tire seating and the pressure, until you reach the correct inflation pressure.
Diagram Description: Shows two tire cross-sections. The left shows an incorrectly seated tire bead (marked with X). The right shows a correctly seated tire bead (marked with ✓) with arrows indicating proper inflation.
Drive Battery Installation
STEPS:
- Insert Key A and turn left to Unlocked position.
- Position Battery B as shown and slide fully into position.
- Turn Key right to LOCKED position.
- Gently pull backwards on battery to ensure it does not move or come loose.
NOTE: Before using Battery Drive System, turn Battery Switch C ON and follow Operation instructions included with this product.
Diagram Description: Shows the rear rack of the e-bike with the drive battery being installed. Highlights the key lock mechanism (A) and the battery itself (B), along with the battery switch (C).
Charging the Drive Battery:
⚠️IMPORTANT! Before using the unit for the first time, fully charge the Battery. Battery Charger will shut off when Battery is fully charged, but never charge longer than 12 hours.
NOTE: Your e-Bike Li-Ion Battery can be charged either installed in the bike or removed.
WARNINGS:
- All large Li-Ion batteries are a potential fire risk and should be charged in a safe place, preferably outside or in the middle of a garage floor.
- Never charge a lithium battery unsupervised inside a house or building.
- Only an adult who has read and understands the safety warnings should handle, charge, or recharge the battery.
- See other Battery Warnings in this manual.
- Check the drive battery and charger (supply cord, connector) for wear and damage before charging. Do not charge the battery if damage has occurred. Only replace with the same type and voltage rechargeable battery and charger supplied by the manufacturer.
- Only use the rechargeable battery (or equivalent replacement) and charger supplied with your vehicle.
- The drive battery should be charged when depleted, or if not used regularly, once a month. Failure to charge the battery as directed will cause permanent damage to the battery and will void the warranty.
- Charge only when battery has cooled to room temperature after a ride.
STEPS:
- Turn power switch OFF.
- Locate Charging Port A.
- Plug Charger plug into unit Charging Port.
- Plug Charger into Wall outlet.
- When battery is fully charged, un-plug charger from the wall outlet and disconnect from charger port.
NOTES:
- Press Button B to check battery charge Level.
- The charger may feel warm during the charging. If excessively hot, unplug and replace.
- This product has charging protection: When charging, all functions are turned OFF.
Diagram Description: Shows the battery pack with charging port A and a button B to check charge level.
Using the Battery Drive System
BATTERY POWER
- Before using Battery Drive System, turn Battery Switch A to ON position.
ENGAGE BATTERY ASSIST:
- Press the Green Thumb Button B to engage Battery Assist. (Button will light Green). Battery Assist will engage after a few pedal revolutions.
Diagram Description: Shows the handlebar with a grip shift and a green button B labeled 'Battery Assist'. Also shows the battery with a switch A labeled 'Battery Power'.
Shift System
Parts of the Shift System:
- Right-hand Shift Lever A operates the Rear Derailleur B.
- Rear Sprocket Set C.
Operation:
Operate the shift system as follows:
- The rider turns the rear shift control around the handlebar (for twist shift models) or moves the shift lever (thumb shift models) to an index position.
- When the rear shift control moves into each position with a “click” sound, the shift is complete.
- The shift control pulls a cable wire that is attached to the rear derailleur.
- The derailleur moves and guides the chain from one sprocket to another.
- If there is some chain noise after the shift, turn the rear shift control a small amount to "trim" the rear derailleur.
Diagram Description: Shows a bicycle with the shift lever labeled A, the rear derailleur labeled B, and the rear sprockets labeled C.
Shift System - continued
⚠️CAUTION: Do not force the shift lever. Shift only when pedaling forward and without strong force. Do not backpedal. Backpedaling can cause the chain to come off the sprockets. Backpedaling and shifting while not pedaling can damage the sprockets and stretch the cable wire.
There is no "correct gear" in which to ride the bicycle. The "correct gear" is the one that is comfortable to you.
To select a gear while riding (this model has only one Front Sprocket A) (fig B):
- While pedaling, shift the chain onto different rear sprocket.
- You will feel a difference in the rhythm and ease of pedaling.
- Shift the chain to the gear that allows you to pedal at a rhythm and effort that is comfortable to you.
- When riding uphill or against the wind, you may wish to shift the chain onto a larger rear sprocket B.
Diagram Description: Figure B shows a front sprocket (A) and rear sprockets (B), illustrating gear selection.
Rear Derailleur Adjustments
The rear derailleur has two adjusting screws. The “low” adjusting screw, sometimes marked L, limits how far the rear derailleur and chain can move toward the wheel. The "high" adjusting screw, sometimes marked H, limits how far the rear derailleur and chain can move away from the wheel.
Put the "high" adjusting screw in the correct position as follows (fig D):
- Shift the chain onto the smallest rear sprocket. Loosen Nut C of the cable clamp.
- Turn the lever Barrel Adjuster A and rear Derailleur Adjustor B all the way IN (fig C).
- Turn the "high" adjusting Screw G so the Jockey Roller D is in line with the outside edge of the smallest rear Sprocket E.
- Remove the slack from the cable wire and tighten the Nut of the cable clamp.
Diagram Description: Figure C shows the rear derailleur mechanism. Figure D illustrates the adjustment process for the high limit screw, showing components A through H and sprockets E.
Maintenance
e-Bikes Maintenance:
GENERAL: The vehicle should be checked for damage, missing, or badly worn parts before each use. If any part of the product does not operate properly – discontinue use.
- Check the tightness of the fasteners before each use. Replace any fasteners that are damaged.
- Inspect the product frequently. Failure to inspect the product and to make repairs or adjustments, as necessary, can result in injury to the rider or to others. Make sure all parts are correctly assembled and adjusted as written in this manual and any "Special Instructions."
- Immediately replace any damaged, missing, or badly worn parts.
- Make sure all fasteners are correctly tightened as written in this manual and any "Special Instructions." Parts that are not tight enough can be lost or operate poorly. Over tightened parts can be damaged. Make sure any replacement fasteners are the correct size and type.
- Check the tightness of the wheels.
- Keep the product clean and free of dirt, dust, and water. This will prolong the useful life of the product.
- Always remove the battery when replacing a component or performing maintenance.
- Periodically check your e-Bike's wiring and motor condition and mounting.
- Always store your e-Bike indoors. Bikes left outside in weather can deteriorate very quickly. Store your e-Bike in a clean, dry environment. Do not cover with plastic, which will hold moisture inside and affect your bike's electrical system.
- Store your battery indoors during cold weather to optimize battery performance.
⚠️CAUTION: Self-locking nuts and other self-locking devices may lose their effectiveness when re-used.
CLEANING: Do not submerge the drive unit in water or wash with a pressurized hose. Keep all components clean, especially the battery pack contact points. Clean carefully with a soft, damp cloth using only mild soap and water.
STORAGE: Always store the battery pack in a cool, dry place. Keep it away from sources of heat, such as stoves and heaters. During periods of prolonged storage, the battery pack should be charged at least once every 6 months at a minimum of 60% or every 3 months at 40%. Do not charge higher than 60% when storing.
NOTE: If the instructions in this manual or any "Special Instructions" are not sufficient for you, please contact customer service.
Tires Maintenance:
- Frequently check the tire inflation pressure because all tires lose air slowly over time. For extended storage, keep the weight off the tires.
- Do not use unregulated air hoses to inflate the tire/tubes. An unregulated hose can suddenly over inflate tires and cause them to burst.
- Replace worn tires.
⚠️WARNING: Do not ride or sit on the unit if a tire is under inflated. This can damage the tire, inner tube, and rim.
Inflating the Tires:
- Use a hand or a foot pump to inflate the tires.
- Service station meter-regulated air hoses are also acceptable.
- The maximum inflation pressure is shown on the tire sidewall.
- If two inflation pressures are on the tire sidewall, use the higher pressure for on-road riding and the lower pressure for off-road riding.
- The lower pressure will provide better tire traction and a more comfortable ride.
Before adding air to any tire, make sure the edge of the tire (the bead) is the same distance from the rim, all around the rim, on both sides of the tire. If the tire does not appear to be seated correctly, release air from the inner tube until you can push the bead of the tire into the rim where necessary. Add air slowly and stop frequently to check the tire seating and the pressure, until you reach the correct inflation pressure.
Diagram Description: Shows two tire cross-sections. The left shows an incorrectly seated tire bead (marked with X). The right shows a correctly seated tire bead (marked with ✓) with arrows indicating proper inflation.
Linear Pull Brake System Adjustment - Before Starting
IF EQUIPPED: The Following Sections Describe Final Brake System Adjustments Required Before Riding.
- Inflate Tires to recommended pressure on Tire side wall.
- Make sure Tire is centered in Fork.
- If Needed, Re-attach Front Brake Cable:
- Squeeze the two Brake arms A together.
- Insert the Brake Cable Guide B into the cutout in the Guide Bracket C.
- Make sure the Brake Cable Guide B is seated securely in the Guide Bracket cutout.
Check tightness of the cantilever mounting Bolt A (fig A):
- Make sure each cantilever mounting Bolt is tightened securely.
Center brake shoes on rim:
- Turn the Adjustment Screw B on the cantilever arm to move the arm in or out so each Brake Shoe C is the same distance from the rim.
- Squeeze the brake lever two times.
- Do this step again, until both brake shoes are the same distance from the rim.
Diagram Description: Shows brake arms being squeezed, brake cable guide and bracket, cantilever mounting bolt, and brake shoe centering adjustment.
Linear Pull Brake System - Adjustment continued
NOTE: The front and rear break adjustments are the same.
⚠️WARNING: You must adjust the front and rear brakes before you ride the bicycle.
Step 1: Put the brake shoes B in the correct position (fig B):
- Loosen the Screw A of each Brake Shoe B.
- Adjust each Brake Shoe so it is flat against the rim and aligned with the curve of the rim.
- Make sure each Brake Shoe does not rub the tire.
- If the surface of the Brake Shoe has arrows, make sure the arrows point toward the rear of the bicycle.
- Hold each Brake Shoe in position and tighten the Screw.
Step 2: Test the tightness of each Brake Shoe:
- Try to move each Brake Shoe out of position.
- If a Brake Shoe moves, do Step 1 again, but tighten the nut tighter than before.
- Do this test again, until each Brake Shoe does not move.
Step 3. Stretching the cable (fig B):
- Hold both Brake Shoes against the rim.
- Loosen the cable clamp Screw C.
- Pull the Cable D tight and tighten the Screw.
⚠️WARNING: Do not over tighten the cable clamp Screw. Over tightening the cable clamp Screw may cut the cable and cause injury to the rider or to others.
- Squeeze each brake lever firmly 20 times.
- Hold both Brake Shoes against the rim and loosen the cable clamp Screw.
- Pull the Cable tight and tighten the cable clamp Screw.
Diagram Description: Figure B shows the brake caliper, brake shoes, rim, cable clamp, and cable adjustment.
Linear Pull Brake System Adjustment - continued
PUT THE BRAKE SHOES THE CORRECT DISTANCE FROM THE RIM:
- If desired, adjust Brake Levers G to a comfortable distance from the grip using the Adjustment Screw H. Turning the screw IN brings it closer to the grip.
- Make sure brake line Sheaths A, B are seated correctly.
- Position each Brake Shoe C 1/16 inch away from the rim:
- Turn the caliper brake adjusting Screws D in or out to make the adjustment.
- If the Brake Shoes C cannot be positioned the correct distance from the rim, hold both Brake Shoes against the rim and loosen the cable clamp Screw E.
- Squeeze the Brake Arms F together and pull or loosen the cable wire slightly.
- Tighten the cable clamp Screw E.
⚠️WARNING: Do not over tighten the cable clamp. Over tightening the cable clamp may cut the cable and cause injury to the rider or to others.
- Repeat these steps until the brake shoes are 1/16 inch from the rim and the Brake Lever G does not go all the way to the grip when squeezed (fig C).
⚠️WARNING: Do not move the brake shoes away from a wheel rim that is not true (straight). This can cause the caliper brake to be less effective and unsafe. To allow safe adjustment of the caliper brake, have a bicycle service shop true the wheel.
Diagram Description: Figure C illustrates positioning brake shoes 1/16 inch from the rim, using adjustment screws D, cable clamp E, and brake arms F. It also shows brake levers G and adjustment screw H.
Linear Pull Brake Pad Replacement
- If necessary, loosen brake cable Adjustment Bolt A.
- Loosen and remove brake pad Bolt/Screws B.
- Remove old Brake Shoe C.
- Install new Brake Shoe, making sure it is pointing forward and lined up evenly with the Wheel Rim D.
- Tighten brake pad Bolt/Screw and Adjustment Bolt according to Torque Chart.
⚠️WARNING: Replace Brake Pad with same model and type as original.
Diagram Description: Shows brake pad replacement steps, highlighting adjustment bolt A, pad bolt/screws B, brake shoe C, and wheel rim D.
Lubrication
⚠️WARNING: Do not over lubricate. If oil gets on the wheel rims or the brake shoes, it will reduce brake performance and a longer distance to stop the bicycle will be necessary. Injury to the rider or to others can occur.
- The chain can throw excess oil onto the wheel rim. Wipe excess oil off the chain.
- Keep all oil off the surfaces of the pedals where your feet rest.
- Using soap and hot water, wash all oil off the wheel rims, the brake shoes, the pedals, and the tires.
- Rinse with clean water and dry completely before you ride.
Using a light machine oil (20 W), lubricate the bicycle according to the following table:
| What | When | How |
|---|---|---|
| Pedals | every six months | Put four drops of oil where the axles go into the pedals. |
| Chain | every six months | Put one drop of oil on each roller of the chain. Wipe all excess oil off the chain. |
| Derailleurs | every six months | Put one drop of oil on each pivot point of the derailleurs. |
| Brake Levers | every six months | Put one drop of oil on the pivot point of each brake lever. |
| Wheel Brakes | every six months | Put one drop of oil on the pivot point of each cantilever brake. |
| Brake and cable | every six months | Put four drops of oil into both ends of each cable. Allow oil to soak back along the cable wire. |
| Rear Sprocket Cluster | every six months | Lay the bicycle on its left side. Slowly turn the rear wheel clockwise. Put four drops of oil in the crack between the rear sprockets (which are stationary) and the freewheel body (which is turning clockwise). |
| Shock Fork | every six months | Lift up the rubber fork boot and dab a small amount of grease on the fork leg just above the plastic bushing. |
Inspection of the Bearings
Maintenance: Frequently check the bearings of the bicycle. Have a bicycle service shop lubricate the bearings once a year or any time they do not pass the following tests:
Headset Bearings: The fork should turn freely and smoothly at all times. With the front wheel off the ground, you should not be able to move the fork up, down, or side-to-side in the head tube.
Crank Bearings: The crank should turn freely and smoothly at all times and the front sprockets should not be loose on the crank. You should not be able to move the pedal end of the crank from side-to-side.
Wheel Bearings: Lift each end of the bicycle off the ground and slowly spin the raised wheel by hand. The bearings are correctly adjusted if:
- The wheel spins freely and easily.
- The weight of the spoke reflector, when you put it toward the front or rear of the bicycle, causes the wheel to spin back and forth several times.
- There is no side-to-side movement at the wheel rim when you push it to the side with light force.
Drive Battery Replacement
STEPS:
- Insert Key A and turn left to Unlocked position.
- Remove Battery B as shown by pulling straight backwards.
- Gently pull backwards on battery to ensure it does not move or come loose.
INSTALL NEW BATTERY:
- Insert Key A and turn left to Unlocked position.
- Position new Battery B as shown and slide fully into position.
- Turn Key right to LOCKED position.
- Gently pull backwards on battery to ensure it does not move or come loose.
NOTE: Before using Battery Drive System, turn Battery Switch C ON and follow Operation instructions included with this product.
Diagram Description: Shows the rear rack of the e-bike with the drive battery being removed/installed. Highlights the key lock mechanism (A) and the battery itself (B), along with the battery switch (C).
Lithium-Ion Battery Storage and Disposal
Do not leave batteries unused for extended periods of time, either in the product or in storage. When a battery has been unused for 6 months, check the charge status and charge or dispose of the battery as appropriate.
STORAGE:
- Charge or discharge the battery to approximately 50% of capacity before storage.
- Charge the battery to approximately 50% of capacity at least once every six months.
- Remove the battery and store it separately from the product.
- Store the battery at temperatures between 5 °C and 20 °C (41 °F and 68 °F).
- Do not store battery in extreme hot or cold temperatures.
- Wipe the battery clean with a dry cloth prior to storage. Wash cloth separate from other clothes.
BATTERY DISPOSAL:
- Lithium-Ion batteries must be recycled or disposed of in an environmentally sound manner.
- Lithium-Ion batteries are subject to disposal and recycling regulations that vary by country and region. Always check and follow your applicable regulations before disposing of any battery.
- Do not dispose of battery in a fire. The battery may explode or leak acid.
- Do not dispose of the battery in household trash. The incineration, land filling, or mixing of sealed Li-ion/lead-acid batteries with household trash is prohibited by law.
- Return an exhausted battery to a federal or state approved Li-ion/lead-acid battery recycler. (check local battery disposal regulations).
Troubleshooting
| Symptoms | Possible Cause | Solution |
|---|---|---|
| Display is on, motor does not work or works slowly/intermittently | Battery voltage is low Battery is loose in compartment Wire Harness connectors loose |
Charge Battery Re-seat Battery Check that Harness connectors are firmly attached |
| Reduced ride time | Battery is low Battery does not hold a charge Battery at end of life |
Recharge Replace Battery Replace Battery |
| Battery does not fully charge | Charger not connected correctly | Re-check charger connections at battery and wall socket |
| Display does not turn on | Battery not fully seated Wire Harness connectors loose |
Re-seat Battery Check that Harness connectors are firmly attached |
| No Pedal assist | Display bad Power is off Wire Harness connectors loose Motor bad Speed sensor magnet not aligned |
Replace Display Turn Power on Check that Drive Motor Harness connectors are firmly attached Replace Motor Align magnet on wheel with sensor on frame near motor |
Limited Warranty - US
General: Part or model specifications are subject to change without notice.
This Limited Warranty is the only warranty for the product. ALL WARRANTIES OTHER THAN STATED HEREIN ARE DISCLAIMED INCLUDING IMPLIED WARRANTIES OF MERCHANTABILITY AND FITNESS FOR A PARTICULAR PURPOSE, TO THE EXTENT ALLOWABLE BY APPLICABLE LAW. ALL LIABILITY FOR INCIDENTAL, PUNITIVE, SPECIAL, OR CONSEQUENTIAL DAMAGES ARE EXPRESSLY DISCLAIMED, TO THE EXTENT ALLOWABLE BY APPLICABLE LAW.
The only uses for this product are described in this manual.
Warranty registration is not required. The Limited Warranty extends only to the original consumer and is not transferable to anyone else.
What does this Limited Warranty cover?
This Limited Warranty covers defects in workmanship and materials for all parts of the product except those indicated below as not warranted.
What must you do to keep the Limited Warranty in effect?
This Limited Warranty is effective only if:
- Product is completely and correctly assembled.
- Product is used under normal conditions for its intended purpose (see the following section for excluded activities).
- Product receives all necessary maintenance and adjustments.
- Product is used for general transportation and recreational use only.
What is not covered by this Limited Warranty?
This product is designed for recreational use only. This Limited Warranty does not cover normal wear and tear, normal maintenance items, or any damage, failure, or loss that is caused by improper assembly, maintenance, adjustment, storage, or use of the product. This Limited Warranty does not extend to future performance.
This Limited Warranty will be void if the product is ever:
- Used in any competitive sport
- Used for stunt riding, jumping, aerobatics, or similar activity
- Modified in any way
- Modified with the addition of a motor
- Ridden by more than one person at a time
- Rented, sold, or given away
- Used in a manner contrary to the instructions and warnings in this Owner's Manual
What will The Manufacturer do?
Manufacturer's sole and exclusive obligation under this Limited Warranty is to repair and/or replace, at its sole option, any covered defect in workmanship or materials.
How do you get service?
Contact the Customer Service Department. See included list for Customer Contact information.
What rights do you have?
This Limited Warranty gives you specific legal rights. You may also have other rights which vary from State to State.
For how long does this Limited Warranty last?
When used in this Limited Warranty, the phrase "for life" means for as long as the original consumer owns the product.
- The frame is warranted for life except aluminum frames which are warranted for ten (10) years, from the date of purchase.
- The fork is warranted for life except for shock forks which are warranted one (1) year from date of purchase.
- Drive Battery - 90 days
- Electronics - 90 days
- All other Components - 6 months
Customer Service Information
[ USA ]
PLEASE - BEFORE RETURNING TO STORE: Contact Huffy Customer Service. We are glad to assist you with any parts or assembly problems you might have!
For Fast Customer Service and email: www.huffybikes.com/contact
To Order Parts: www.huffybikes.com/parts
OR TEL: 1 800 872 2453 (US)
[ CANADA ]
PLEASE - BEFORE RETURNING TO STORE: Contact Huffy Customer Service. We are glad to assist you with any parts or assembly problems you might have!
AVANT DE RETOURNER AU MAGASIN : Communiquez avec le service à la clientèle de Huffy. Nous vous aiderons volontiers avec tout problème concernant les pièces ou le montage!
For fast customer service in Canada / Pour un service à la clientèle rapide au Canada : Call / Appelez : 1-800-872-2453
Or Email / Ou Courriel: huffycanada@huffy.com
Or visit / Ou visitez :: www.huffybikes.com/global-contacts
[ MÉXICO ]
ANTES DE DEVOLVER EL PRODUCTO A LA TIENDA: Comuníquese Con Servicio Al Cliente De Huffy. Nos Complace Ayudarlo Con Cualquier Parte O Problema De Ensamblado Que Pudiera Tener.
Para obtener Servicio al cliente rápido, visite: www.huffybikes.com.mx
Contáctanos por WhatsApp al 222 422 4955
Visita nuestra página de Facebook HuffyMexico
O LLAME AL TEL: 800 1 HUFFY 1 (800 1 48339 1) (Mexico only)
Para comunicarse por correo electrónico: servicio.mexico@huffy.com
For ASSEMBLY Help: Aide à l'ASSEMBLAGE: Ayuda de la ASAMBLEA:
Please REGISTER your Product: Veuillez ENREGISTRER l'article: Por favor, REGISTRE su producto:
www.huffybikes.com/home/globalcontact/ for current contact information / pour les informations de contact actuelles / para obtener la información de contacto actual
