Reef Octopus Regal-S Instruction Manual
Step 4: Setup
Diagram illustrating the final setup of the skimmer in the sump. It shows the 'Skimmer Water Level' relative to the 'Sump Water Level' and indicates the 'Valve' (part D) which should be fully open.
1. Ensure that the Valve (part D) is fully open before starting the pump.
2. Adjust the valve until the Skimmer water level is between the Skimmer's Neck and just below the Collection Cup.
3. New skimmers require a run-in period of 1-2 weeks for stabilization. During this time, monitor the water level to prevent overflowing into the Collection Cup.
Maintenance
- Collection Cup: Clean at least once every 7-10 days, depending on organic waste collected.
- Skimmer Body: Clean every 3-6 months. Rinse with fresh water only.
- Silencer: Clean every 2-3 months to prevent blocking.
- Pump: Clean every 3-6 months. Check and clean the Impeller. Soak the Pump and Impeller in White Vinegar to dissolve stubborn calcium deposits if necessary.
Safety Tips
- Check that the pump's voltage corresponds to the voltage of the main supply.
- Never allow the pump to run dry.
- Do not touch the socket with wet hands.
- Do not clean the skimmer with any cleaning agents.
HONYA CO., LTD is committed to continuous product development and reserves the right to revise product specifications or designs without prior notice. For inquiries or the latest product updates, please visit www.reefoctopus.com.
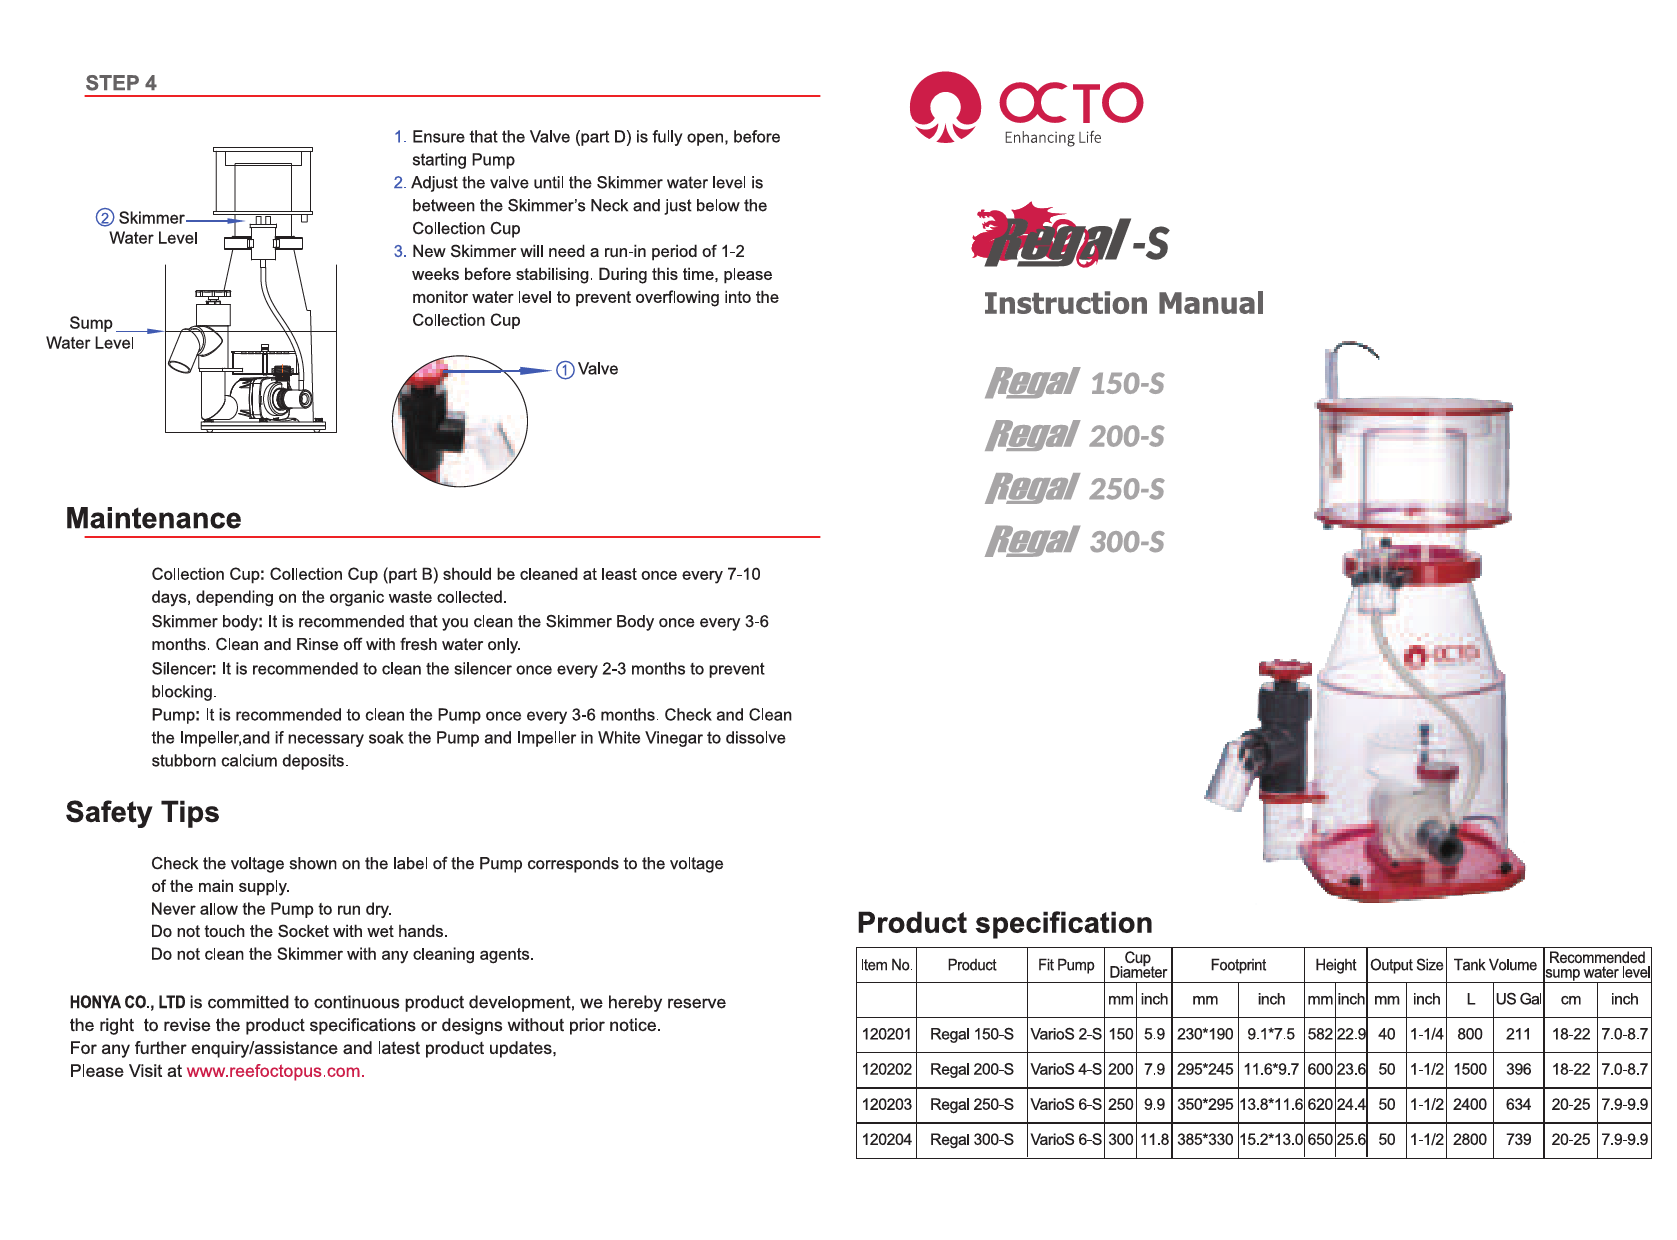
Product Specifications
| Item No. | Product | Height (mm) | Output Size Cup Fit (mm) | Footprint (mm inch) | Pump | Diameter (mm inch) | Tank Volume (L/US Gal) | Sump Water Level (cm inch) |
|---|---|---|---|---|---|---|---|---|
| 120201 | Regal 150-S | 150 (5.9) | VarioS 2-S | 230*190 (9.1*7.5) | 582 (22.9) | 40 (1-1/4) | 800 (211) | 18-22 (7.0-8.7) |
| 120202 | Regal 200-S | 200 (7.9) | VarioS 4-S | 295*245 (11.6*9.7) | 600 (23.6) | 50 (1-1/2) | 1500 (396) | 18-22 (7.0-8.7) |
| 120203 | Regal 250-S | 250 (9.9) | VarioS 6-S | 350*295 (13.8*11.6) | 620 (24.4) | 50 (1-1/2) | 2400 (634) | 20-25 (7.9-9.9) |
| 120204 | Regal 300-S | 300 (11.8) | VarioS 6-S | 385*330 (15.2*13.0) | 650 (25.6) | 50 (1-1/2) | 2800 (739) | 20-25 (7.9-9.9) |
Explosion Chart
The following lists the components of the skimmer:
- A: Cover
- B: Collection Cup
- C: O Ring
- D: Valve
- V1: Plug
- V2, V3, V4: (Part indicators for valve assembly)
- G: Skimmer Body
- H: Plastic Cap
- I: Silencer
- J: Holder
- K: Screw
- L: Venturi
- F: Vent Pipe
- E: O Ring
- M: Plate Screw (M8*50)
- N: Bubble Plate
- O: Round Nut
- P: Bubble Plate Chamber
- Q: O Ring
- R: VarioS Skimmer Pump
- S: Skimmer Base
- T: Skimmer Base Screw (150/200/250-S: 4 Pcs; 300-S: 8 Pcs)
- U: Pump Securing Screw
Assembly Instructions
Step 1
Diagram showing the assembly of the skimmer body, venturi, silencer, air hose, and collection cup.
- Attach the Skimmer Body onto the Skimmer Base and tighten screws.
- Insert the Venturi into the intake of the Pump.
- Attach the Silencer Holder (Part J).
- Slide the Silencer onto the Holder gently.
- Insert the Air Hose.
- Insert the Gate Valve/Vent Pipe (Parts D/F).
- Insert the Collection Cup.
Step 2
Diagram showing the pump being secured to the skimmer base and the bubble plate chamber being aligned.
Use the screw (Part U) to secure the Pump to the skimmer base. Tighten and align the bubble plate chamber using the round nut (Part O) as per the explosion chart.
Step 3
Diagram showing the skimmer placed in the sump with water levels indicated.
- Position the Skimmer into the Sump.
- For optimal performance, the water level in the Sump should be as per the product specification sheet.
- Maintain a consistent water level. Fluctuating water levels will affect the skimmer's performance.