Firewood 11 User Manual
Model: 11
Manufacturer: Firewood Aroma Tech Inc.
Important Safety Instructions
MISUSE CAN CAUSE INJURY AND PROPERTY DAMAGE! Read instructions before use and only use according to instructions.
- Never use a battery that has been damaged.
- Charge using standard USB-C (5V) only.
- Only use with high drain 18650 cell capable of 20A minimum discharge current.
- Remove battery when traveling by air or mailing.
- Do not use near water or if wet.
- The area around the oven can get HOT ? while in use. Please use caution and allow a few minutes to cool before handling.
Battery Management
Changing Battery
Only use High drain 18650 cells with a nominal voltage of 3.6V and rated for at least 20A discharge current. Insert positive end first. Push battery all the way in then down.
Charge Battery
Charge with internal USB charger, using a standard USB-C cable. Using an external charger may result in overcharged cells which will not work with the Firewood (3 sets of 4 buzzes = overcharged > 4.3V). Do not transport loose cells.
A green light indicates charging, which turns off when complete.
Operation
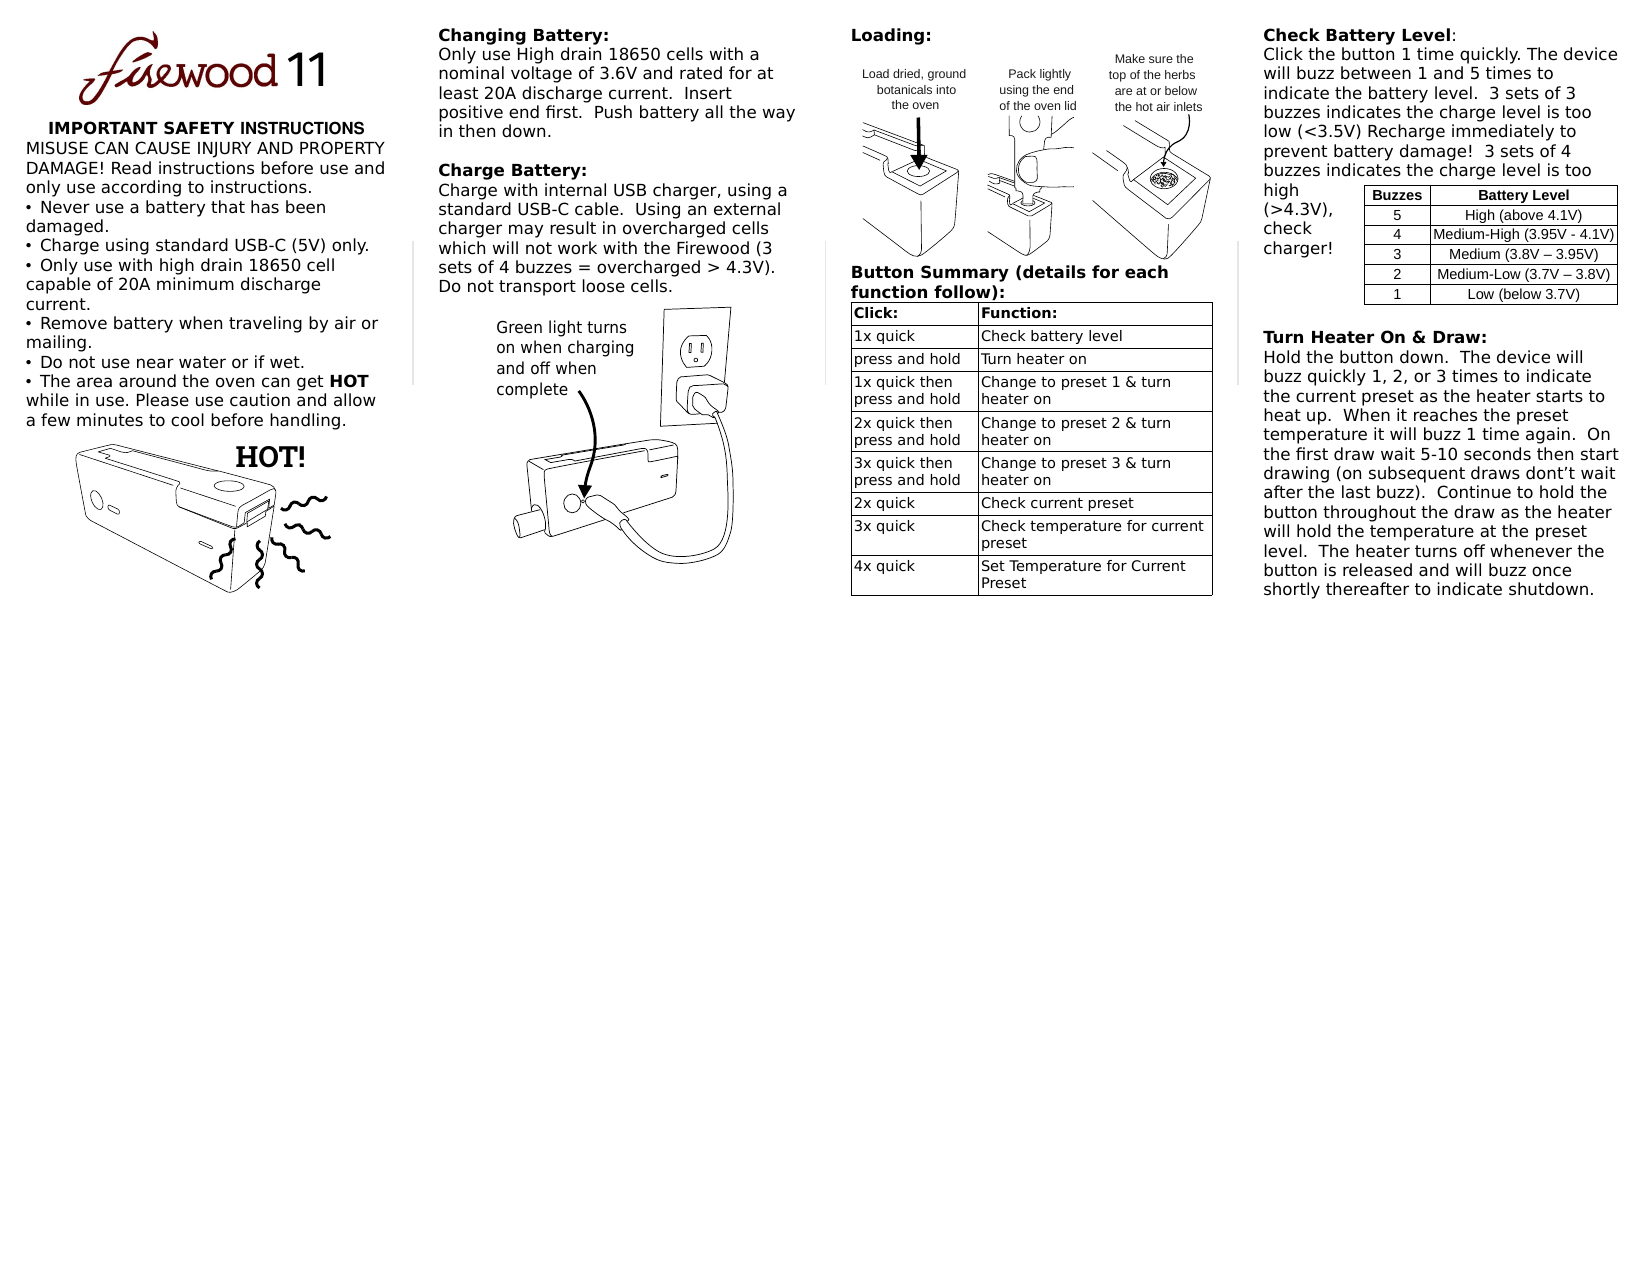
Loading
Load dried, ground botanicals into the oven. Pack lightly using the end of the oven lid. Make sure the top of the herbs are at or below the hot air inlets.
Button Summary
| Click Action | Function |
|---|---|
| 1x quick | Check battery level |
| press and hold | Turn heater on |
| 1x quick then press and hold | Change to preset 1 & turn heater on |
| 2x quick then press and hold | Change to preset 2 & turn heater on |
| 3x quick then press and hold | Change to preset 3 & turn heater on |
| 2x quick | Check current preset |
| 3x quick | Check temperature for current preset |
| 4x quick | Set Temperature for Current Preset |
Check Battery Level
Click the button 1 time quickly. The device will buzz between 1 and 5 times to indicate the battery level. 3 sets of 3 buzzes indicates the charge level is too low (<3.5V) – Recharge immediately to prevent battery damage! 3 sets of 4 buzzes indicates the charge level is too high (>4.3V) – check charger!
| Buzzes | Battery Level |
|---|---|
| 5 | High (above 4.1V) |
| 4 | Medium-High (3.95V - 4.1V) |
| 3 | Medium (3.8V – 3.95V) |
| 2 | Medium-Low (3.7V – 3.8V) |
| 1 | Low (below 3.7V) |
Turn Heater On & Draw
Hold the button down. The device will buzz quickly 1, 2, or 3 times to indicate the current preset as the heater starts to heat up. When it reaches the preset temperature it will buzz 1 time again. On the first draw wait 5-10 seconds then start drawing (on subsequent draws don't wait after the last buzz). Continue to hold the button throughout the draw as the heater will hold the temperature at the preset level. The heater turns off whenever the button is released and will buzz once shortly thereafter to indicate shutdown.
Change to Preset, 2, or 3 and Turn Heater On
Click the button 1, 2 or 3 times quickly to select preset 1, 2, or 3 then hold down the button. The selected preset will be saved and the heater will turn on.
Check Current Preset
Click the button 2 times quickly. The device will buzz quickly 1, 2, or 3 times to indicate the current preset.
Check Temperature for Current Preset
Click the button 3 times quickly. The device will give 2 sets of buzzes. The 1st buzz gives the hundreds place and the 2nd buzz gives the tens place (in degrees F) as shown in the table below.
| Buzzes/Clicks | Temp F (C) |
|---|---|
| 2 then 5 | 250 (121) |
| 2 then 6 | 260 (127) |
| 2 then 7 | 270 (132) |
| 2 then 8 | 280 (138) |
| 2 then 9 | 290 (143) |
| 3 then 0 | 300 (149) |
| 3 then 1 | 310 (154) |
| 3 then 2 | 320 (160) |
| 3 then 3 | 330 (166) |
| 3 then 4 | 340 (171) |
| 3 then 5 | 350 (177) |
| 3 then 6 | 360 (182) |
| 3 then 7 | 370 (188) |
| 3 then 8 | 380 (193) |
| 3 then 9 | 390 (199) |
| 4 then 0 | 400 (204) |
| 4 then 1 | 410 (210) |
| 4 then 2 | 420 (216) |
| 4 then 3 | 430 (221) |
| 4 then 4 | 440 (227) |
Set Temperature for Current Preset
Click the button 4 times quickly. The device will buzz back 4 times quickly. Using the table above, select the temperature by clicking as indicated. For example, to set the temperature to 390, click 4 times to start and wait for 4 buzzes. Then click 3 times and wait for 3 buzzes back. Then click 9 times to finish.
Cleaning and Maintenance
Cleaning the Oven Top and Glass Lid
The top of the oven and the flat glass part of the lid should be cleaned periodically to prevent sticking. Clean when cool using isopropyl alcohol or when hot simply using a bit of folded paper towel (caution these parts get hot ?!). If the lid sticks closed, it can usually be released by pushing up on a corner of the glass part. If it still sticks, heating the oven for a few seconds will release it.
Cleaning the Oven
Remove the top lid then remove the oven screen by pushing down on one side then removing with tweezers. Clean the screen with alcohol or by burning with a torch. Clean the oven interior by gently scraping or with a cotton swab and alcohol.
Cleaning the Mouthpiece and Mouthpiece Attachment
Remove the glass mouthpiece and clean with boiling water and/or alcohol. Slide the bottom door forward to remove. Remove the ceramic mouthpiece adapter and clean with alcohol. Replace the mouthpiece adapter, then the bottom door then the mouthpiece.
Finishing & Maintaining the Wood Surface
Firewood aromatherapy devices come with 100% natural Beeswax and Mineral Oil. Wood can be restored by lightly sanding and reapplying a fresh coat of the original finish.
Warranty Information
Limited Warranty
Firewood Aroma Tech Inc. grants purchasers of the Firewood a warranty against defects in materials and workmanship under normal use of the device for a period of one (1) year from the date of retail purchase by the original purchaser of the unit. If a physical defect arises and a claim is received within the Warranty Period, Firewood Aroma Tech Inc. will either (1) repair the device, (2) exchange the device, or (3) refund the purchase price of the device, at the discretion of the company.
Exclusions and Limitations
The Limited Warranty applies only to devices manufactured by Firewood Aroma Tech Inc. This warranty does not apply to: (a) damage caused by accident, abuse, misuse, or other external causes; (b) damage caused by operating the device outside the permitted or intended uses; (c) a device or part that has been modified to alter functionality or capability; (d) cosmetic damage, including but not limited to scratches, dents, and discolored wood; (e) damage caused by use of unapproved batteries, charger or power supply; (f) damage to ceramic parts after 1 month from the purchase date; (g) damage caused by disassembling the device by removing the screws.
The Warranty does not apply to normal performance degradation of batteries, neglecting to adhere to cleaning instructions, or heat damage due to improper use of the device. Intentionally disassembling or attempting repairs on your device may void the warranty and/or result in a reassembly fee.
For warranty service, please email service@firewoodvapes.com. Please include a description of the problem and the Name and Date of purchase.
