File info: application/pdf · 24 pages · 7.17MB
Using BOSS TONE STUDIO for KATANA Mk II - Roland
MEMO. You can edit livesets and download livesets from BOSS TONE CENTRAL even if the KATANA Mk II is not connected to your computer via a USB.
Full PDF Document

If the inline viewer fails, it will open the original document in compatibility mode automatically. You can also open the file directly.
Extracted Text
Using BOSS TONE STUDIO for KATANA Mk II
This document explains basic operation of BOSS TONE STUDIO for KATANA Mk II (subsequently referred to as "TONE STUDIO").
Getting Ready to Use TONE STUDIO
Installing the USB Driver
Before you use TONE STUDIO, the appropriate USB driver for the product you're using must be installed on your computer.
1. From the product support page, download the KATANA
Driver. To obtain the latest USB driver, access the following URL, and download and install the appropriate driver for the product you're using. http://www.boss.info/support/
2. Double-click the downloaded KATANA Driver.
Installation begins. Proceed with the installation as directed by the installation screens. When the screen indicates "Installation has been completed." click the [Close] button. The KATANA Driver has been installed on your computer.
Installing TONE STUDIO
MEMO Before you install TONE STUDIO, the USB driver must be installed in your computer as described in "Installing the USB Driver" (p. 1).
Windows Users
1. Unpack the Zip file. 2. Double-click "BOSS TONE STUDIO for KATANA Mk II
Installer.exe." Installation begins.
3. Proceed with installation as directed by the install screens. 4. When the screen indicates "Completing the BOSS TONE
STUDIO for KATANA Mk II Setup Wizard," click the [Finish] button.
Mac Users
1. Unpack the Zip file. 2. Double-click "BOSS TONE STUDIO for KATANA Mk II
Installer.pkg." Installation begins.
3. Proceed with installation as directed by the install screens. 4. When the screen indicates "The installation was successful.
The software was installed.," click the [Close] button.
Starting TONE STUDIO
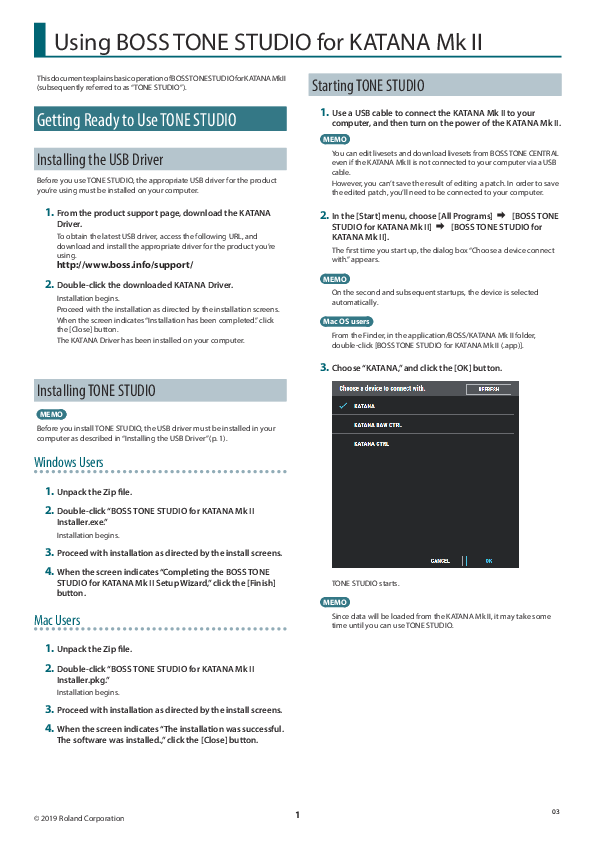
1. Use a USB cable to connect the KATANA Mk II to your
computer, and then turn on the power of the KATANA Mk II. MEMO
You can edit livesets and download livesets from BOSS TONE CENTRAL even if the KATANA Mk II is not connected to your computer via a USB cable. However, you can't save the result of editing a patch. In order to save the edited patch, you'll need to be connected to your computer.
2. In the [Start] menu, choose [All Programs] & [BOSS TONE
STUDIO for KATANA Mk II] & [BOSS TONE STUDIO for KATANA Mk II]. The first time you start up, the dialog box "Choose a device connect with." appears. MEMO On the second and subsequent startups, the device is selected automatically. Mac OS users From the Finder, in the application/BOSS/KATANA Mk II folder, double-click [BOSS TONE STUDIO for KATANA Mk II (.app)].
3. Choose "KATANA," and click the [OK] button.
TONE STUDIO starts. MEMO
Since data will be loaded from the KATANA Mk II, it may take some time until you can use TONE STUDIO.
� 2019 Roland Corporation
1
03
Using BOSS TONE STUDIO for KATANA Mk II
Editor Basic Screen
50/100/100/212/HEAD
2
3
1 4
5
Artist
2
3
1 4
5
1. Tone Setting select area 2. Function select area
3. [CLEAR] / [WRITE] button
If you click the [CLEAR] button, all settings are initialized to the KATANA Mk II's original settings. By clicking the [WRITE] button you can save the edited settings in the tone setting select area (p. 3).
4. Amp setting editing area
5. Effect editing area
Here you can specify the effects that you want to assign to the [BOOSTER], [MOD], [FX], [DELAY], and [REVERB] knobs, and to the expression pedal.
2
Using BOSS TONE STUDIO for KATANA Mk II
Editing a Tone Setting
1. At the top of KATANA Mk II Editor screen, click the [EDITOR]
button.
2. Click the tone setting that you want to edit.
Saving Edited Settings (WRITE)
Here's how to save the edited settings.
1. In the upper right of the KATANA Mk II Editor screen, click
the [WRITE] button.
3. To edit the settings, use the mouse to operate the knobs
and buttons in the screen.
The "WRITE" dialog box appears.
2. If you want to change the name of the tone setting, click
the TONE SETTING NAME field. You can use your computer keyboard to enter a tone setting name.
3. Select the write-destination.
3
Using BOSS TONE STUDIO for KATANA Mk II
NOTE When you save, the tone setting of the selected number is overwritten; the original settings cannot be recovered. Select a tone setting that you don't mind overwriting.
4. Click [WRITE].
The settings of the new tone setting are saved in the specified destination.
MEMO If you want to discard the settings, click the [CLEAR] button located in the upper right of the screen.
4
Using BOSS TONE STUDIO for KATANA Mk II
LIBRARIAN Basic Screen
12
3
4
5
6
1. [CREATE LIVESET] button
Press this button to create a new empty liveset.
2. Liveset name
Shows the name of the liveset and the number of tone settings.
3. Liveset name edit button
Click this to edit the name of the liveset. You can click the trash can symbol to delete the liveset.
4. TONE SETTING name edit button
Click this to edit the name of the tone setting. You can click the trash can symbol to delete the tone setting.
5. [Import] button
This lets you import all of the KATANA Mk II unit's tone settings into the LIBRARIAN, or import a LIBRARIAN file from your computer into the LIBRARIAN.
6. [Export] button
This lets you export a liveset to the KATANA Mk II unit, or export a liveset and save it on your computer.
5
Using BOSS TONE STUDIO for KATANA Mk II
Importing All the Tone Settings into the LIBRARIAN (IMPORT FROM KATANA Mk II)
Here's how to import all of the KATANA Mk II's tone settings into LIBRARIAN. All tone settings are saved as a liveset.
1. In TONE STUDIO screen, click the [LIBRARIAN] button.
5. Click the [OK] button.
The tone settings are saved as a liveset in the LIBRARIAN.
2. At the top of the TONE STUDIO screen, click the [Import]
button.
3. Click the [KATANA Mk II] button.
Exporting a LIBRARIAN Liveset to the KATANA Mk II (EXPORT TO KATANA Mk II)
Here's how a liveset that you saved can be restored to the KATANA Mk II's user patch.
1. At the top of the TONE STUDIO screen, click the [Export]
button.
The CREATE LIVESET screen appears.
2. From SELECT LIVESET, select the liveset that you want to
export.
4. Enter the liveset name, and click the [OK] button.
Import begins. If you decide to cancel during the operation, click the [CANCEL] button. It will take some time to import all of the KATANA Mk II's tone settings. When import is finished, the message "Completed." appears.
3. Click the [KATANA Mk II] button.
Export begins. If you decide to cancel during the operation, click the [CANCEL] button. When export is finished, the message "Completed." appears.
4. Click the [OK] button.
The selected liveset is written back into the KATANA Mk II.
6
Using BOSS TONE STUDIO for KATANA Mk II
Restoring a Tone Setting to the KATANA Mk II
Here's how to select a tone setting from a liveset that you saved, and restore it back to the KATANA Mk II.
1. Drag the tone setting that you want to restore and drop it
onto the desired user patch number of the KATANA Mk II. NOTE
When you drop a tone setting, it overwrites the tone setting of the selected number; the original settings cannot be recovered. Select a user tone setting that you don't mind overwriting.
Saving a Liveset to a Computer (EXPORT TO FILE)
A liveset that you backed up can be exported to your computer (Export).
1. At the top of the TONE STUDIO screen, click the [Export]
button.
2. From SELECT LIVESET, select the liveset that you want to
export.
3. Click the [FILE] button.
The "Save As" dialog box appears.
4. Enter a name and save-destination, and click the [Save]
button. A liveset file (.tsl) is created at the save-destination.
Ways to use an exported liveset
55 Use a USB flash drive to copy the liveset to a different computer. 55 Sent the liveset via email to another KATANA Mk II user.
MEMO
You can also select multiple tone settings as described in "Selecting multiple tone settings" (p. 9).
7
Using BOSS TONE STUDIO for KATANA Mk II
Importing a Liveset from a Computer into the LIBRARIAN (IMPORT FROM FILE)
A liveset that you exported to a computer can be imported into a TONE STUDIO library (Import).
1. At the top of the TONE STUDIO screen, click the [Import]
button.
Creating an Original Liveset
You can collect your favorite tonesettings to create an original liveset.
1. At the top of the TONE STUDIO screen, click the [CREATE
LIVESET] button.
2. Click the [FILE] button.
The "Open" dialog box appears.
3. Select the liveset file (extension: .tsl) that you want to
import into the library, and click the [Open] button. The liveset is imported into the LIBRARIAN.
MEMO
The TONE STUDIO can also import the livesets created by KATANAArtist, KATANA-100/212, KATANA-100, KATANA-50, KATANA-HEAD into the LIBRARIAN.
2. Input a name for the liveset.
3. Click the [OK] button.
An empty liveset containing no tone settings is created.
4. From the tone setting list at the left of the TONE STUDIO
screen, drag and drop your favorite tone settings into the new liveset.
The selected tone settings are registered in the new liveset. MEMO 55 A maximum of 15 tone settings can be registered in one liveset. If
inserting tone settings would cause the liveset to exceed 15 tone settings, the tone settings that exceed 15 are not inserted (a message is displayed). 55 Tone settings that are registered in another liveset can also be dragged and dropped into the new liveset. 55 You can drag and drop the tone settings in the liveset to change their order. 55 TONE STUDIO lets you create up to 50 livesets. If you want to create and save more than 50 livesets, use the EXPORT TO FILE function to save existing livesets on your computer.
8
Using BOSS TONE STUDIO for KATANA Mk II
Copying Tone Settings
Here's how to copy a tone setting to another liveset or to an KATANA Mk II tone setting.
1. Click the tone setting that you want to copy.
MEMO You can also select and copy multiple tone settings as described in "Selecting multiple tone settings" (p. 9).
2. Drag and drop the selected tone settings onto the desired
copy-destination. NOTE
When you drop the tone settings, they are overwritten onto the tone settings of the selected red area, and the original settings cannot be recovered. Select tone settings that you don't mind overwriting.
Selecting multiple tone settings
By using your computer's mouse and keyboard together, you can select multiple tone settings.
Selecting a range of tone settings
Here's how to select a range of consecutive tone settings.
1. Click the first tone setting that you want to select.
2. While holding down your computer keyboard's [Shift] key,
click the last tone setting that you want to select. The first through last tone settings that you click are selected.
Selecting tone settings individually
Here's how to select just the individual tone settings that you click.
1. While holding down your computer keyboard's [Ctrl] key,
click a tone setting that you want to select. The tone setting you click is selected. The selected tone setting is highlighted.
Mac OS users While holding down your computer keyboard's [command] key, click a tone setting that you want to select.
2. If you want to select other tone settings, repeat step 1.
If you hold down the [Ctrl] key and click a selected (highlighted) tone setting once again, the selection is cleared (that tone setting is no longer highlighted).
MEMO
55 If you select non-consecutive tone settings and copy them, they are copied as successive tone settings.
55 A maximum of 50 tone settings can be registered in one liveset. If inserting tone settings would cause the liveset to exceed 50 tone settings, the tone settings that exceed 50 are not inserted (a message is displayed).
55 Tone settings that are registered in a liveset can be copied to your own liveset or to a new liveset.
9
Using BOSS TONE STUDIO for KATANA Mk II
The difference between operations when selecting and copying multiple tone settings
When you drag and drop the selected tone settings, the copy result will differ depending on your mouse operation.
Drag and drop when a red area is shown at the copydestination (overwrite copy)
The tone settings are copied to the area indicated by the red color.
Drag and drop between copy-destination tone settings (insert)
The tone settings are inserted at the position of the red line. Subsequent tone settings are moved backward.
Moving Tone Settings
Here's how to move a tone setting to another liveset or to an KATANA Mk II tone setting. When you move a tone setting, it disappears from its previous location.
1. Click the tone setting that you want to move.
MEMO You can also select and move multiple tone settings as described in "Selecting multiple tone settings" (p. 9).
2. While holding down your computer keyboard's [Alt] key,
drag and drop the selected tone setting to the desired copy-destination.
Mac OS users While holding down your computer keyboard's [option] key, drag and drop.
Deleting Tone Settings
Here's how to delete an unwanted tone setting.
1. Click the tone setting that you want to delete.
MEMO You can also select and delete multiple tone settings as described in "Selecting multiple tone settings" (p. 9).
2. Press your computer keyboard's [Delete] key.
The "DELETE TONE SETTING" message appears.
NOTE Deleted tone settings cannot be recovered. If you decide not to delete, click the [CANCEL] button.
3. Click the [OK] button.
The selected tone settings are deleted.
10
Using BOSS TONE STUDIO for KATANA Mk II
Editing a Liveset Name
1. Click the [ ] button located at the right of the name of the
liveset that you want to edit.
Deleting a Liveset
Here's how to delete a liveset that you no longer need.
1. Click the [ ] button located at the right of the name of the
liveset that you want to delete.
2. Click the [ ] button.
The "Delete liveset" message appears.
Rearranging Livesets
Here's how to rearrange the livesets that are displayed.
1. Click the liveset that you want to rearrange. 2. Drag and drop the liveset name.
The liveset moves to the position indicated by the red line.
NOTE The deleted liveset cannot be recovered. If you decide to cancel without deleting, click the [CANCEL] button.
3. Click the [OK] button.
The selected liveset is deleted.
11
Using BOSS TONE STUDIO for KATANA Mk II
Using the BOSS TONE CENTRAL Library
Downloading Livesets from BOSS TONE CENTRAL
Livesets that have been published on BOSS TONE CENTRAL can be downloaded and used on the KATANA Mk II.
1. At the top of the TONE STUDIO screen, click the [TONE
CENTRAL] button.
4. Click the [OK] button, and click the [LIBRARIAN] button
once again.
The tone settings published on BOSS TONE CENTRAL are listed together with explanations of the tone settings.
2. In LIVESET, select the liveset that you want to download.
In this example, select "Liquid Tones by Liquid Charlie."
3. At the top of the screen, click the [ADD] button.
The liveset you downloaded appears.
5. Drag and drop tone settings from the downloaded liveset
into the desired tone setting numbers of the KATANA Mk II.
NOTE When you drop a tone setting, it overwrites the tone setting of the selected number; the original settings cannot be recovered. Select a tone setting that you don't mind overwriting.
In this example, drag and drop the tone setting "01 LIQUID DRIVE 1" onto "PANEL."
The liveset is downloaded, and the message "Completed." appears.
MEMO Downloads from BOSS TONE STUDIO are done in units of livesets. You can't download individual tone settings, nor add individual tone settings to the library.
12
Using BOSS TONE STUDIO for KATANA Mk II
Selecting the Device Controlled by TONE STUDIO
Here's how to select the device controlled by TONE STUDIO.
1. At the top of the TONE STUDIO screen, click the [SYSTEM]
button. The MENU screen appears.
2. Click the [DEVICE SETTING] button.
The "Device" screen appears.
3. Click SELECT DEVICE, and from the list choose
[KATANA Mk II].
Saving All KATANA Mk II Settings to the Computer (ALL DATA BACKUP)
Here's how all data saved in the KATANA Mk II can be backed-up to the computer.
1. At the top of the TONE STUDIO screen, click the [SYSTEM]
button.
2. Click [ALL DATA BACKUP].
The ALL DATA BACKUP screen appears.
3. Click the [TO FILE] button.
The "Save As" dialog box appears.
4. Input a name and save-destination, and click the [Save]
button. Export begins. It will take some time for all data to be exported. When the operation is finished, the message "Completed." appears.
5. Click the [OK] button.
An all data file (.alb file) is created in the save-destination.
13
Using BOSS TONE STUDIO for KATANA Mk II
Restoring an All Data File from the Computer to the KATANA Mk II (ALL DATA RESTORE)
Here's how an all data file previously saved on the computer can be restored to the KATANA Mk II.
NOTE When you restore, all data is overwritten, and cannot be returned to its previous settings.
1. At the top of the TONE STUDIO screen, click the [SYSTEM]
button.
2. Click [ALL DATA BACKUP].
The ALL DATA BACKUP screen appears.
3. Click the [FROM FILE] button.
Adjusting the Tone of the Entire KATANA Mk II (GLOBAL EQ)
You can place the global equalizer either before (INPUT) or after (OUTPUT) the effect chain.
1. At the top of the TONE STUDIO screen, click the [SYSTEM]
button.
2. Click [GLOBAL EQ].
The GLOBAL EQ screen appears.
50/100/100/212/HEAD
Artist
The "Open" dialog box appears.
4. Select the all data file (extension: .alb) that you want to
restore, and click the [Open] button. Import begins. Since all data is being imported, this will take some time. When the operation is finished, the message "Completed." appears.
5. Click the [OK] button.
All data is restored to the KATANA Mk II.
3. Make settings for the global equalizer.
50/100/100/212/HEAD
You can make one type of equalizer settings.
Artist
You can make three types of equalizer settings (green, red, orange) and switch between them during use.
4. Click the [CLOSE] button.
The settings are completed.
14
KATANA Mk II Effect Parameter List
MEMO � This effect sound is mono. � This effect sound is output with two channels. � These effects take a mono input and output it on two
channels.
BOOSTER
Various boosters and distortion effects can be selected.
BOOSTER Type
Type CLEAN BOOST TREBLE BOOST
MID BOOST
CRUNCH OD
BLUES DRIVE
OVERDRIVE
NATURAL OD WARM OD TURBO OD T-SCREAM DISTORTION FAT DS DST+ GUV DS RAT
METAL ZONE
METAL DS
'60S FUZZ MUFF FUZZ OCT FUZZ
Explanation This not only functions as a booster, but also produces a clean tone that has punch even when used alone. This is a booster that has bright characteristics. This is a booster with unique characteristics in the midrange. Making the connection before the preamp produces sound suitable for solos. A lustrous crunch sound with an added element of amp distortion. This is a crunch sound of the BOSS BD-2. This produces distortion that faithfully reproduces the nuances of picking. This models the sound of the BOSS OD-1. This produces sweet, mild distortion. This is an overdrive sound that provides distortion with a natural feeling. This is a warm overdrive. This is the high-gain overdrive sound of the BOSS OD-2. This models an Ibanez TS-808. This gives a basic, traditional distortion sound. A distortion sound with thick distortion. This models a MXR DISTORTION+. This models a Marshall GUV'NOR. This models a Proco RAT. This models the sound of the BOSS MT-2. It produces a wide range of metal sounds, from old style to slash metal. This is distortion sound that is ideal for performances of heavy riffs. This models a FUZZFACE. It produces a fat fuzz sound. This models an Electro-Harmonix Big Muff . A fuzz sound with rich harmonic content.
BOOSTER Parameters
Parameter TYPE DRIVE TONE
BOTTOM
EFFECT LEVEL SOLO SW SOLO LEVEL DIRECT MIX
Value
Explanation
Refer to BOOSTER Type
0�120
Adjusts the depth of distortion.
-50�+50
Adjusts the tone.
-50�+50
Adjusts the tone for the low frequency range. Turning this to the left (counterclockwise) produces a sound with the low end cut; turning it to the right boosts the low end in the sound.
0�100
Adjusts the volume of the effect sound.
OFF, ON
Switches to a tone that is suitable for solos.
0�100
Adjusts the volume level when the Solo Sw is ON.
0�100
Adjusts the volume of the direct sound.
MOD/FX
With MOD and FX, you can select the effect to be used from the following. You can select the same effect for MOD and FX.
MOD/FX Type
This is a list of the effects that can be selected for MOD/FX.
Effect Name
Explanation
CHORUS
Frequency band division is employed to produce two different choruses, one for low frequencies and one for higher frequencies. This allows you to achieve a more natural chorus sound.
FLANGER
The flanging effect gives a twisting, jet-airplane-like character to the sound.
PHASER
By adding varied-phase portions to the direct sound, the phaser effect gives a whooshing, swirling character to the sound.
UNI-V
This models a Uni-Vibe.
Although this resembles a phaser effect, it also provides a unique undulation that you can't get with a regular phaser.
TREMOLO
Tremolo is an effect that creates a cyclic change in volume.
VIBRATO
This effect creates vibrato by slightly modulating the pitch.
ROTARY
This produces an effect like the sound of a rotary speaker.
RING MOD
(Ring Modulator)
This creates a bell-like sound by ring-modulating the guitar sound with the signal from the internal oscillator. The sound can be unmusical and lack distinctive pitches.
SLOW GEAR
This produces a volume-swell effect ("violin-like" sound).
SLICER
This consecutively interrupts the sound to create the impression that a rhythm backing phrase is being played.
COMP
(Compressor)
This is an effect that produces a long sustain by evening out the volume level of the input signal. You can also use it as a limiter to suppress only the sound peaks and prevent distortion.
LIMITER
The limiter attenuates loud input levels to prevent distortion.
T. WAH
(Touch Wah)
You can produce a wah effect with the filter changing in response to the guitar level.
AUTO WAH
This changes the filtering over a periodic cycle, providing an automatic wah effect.
PEDAL WAH
You can use an expression pedal connected to the FX jack on the rear panel of the GA-FC foot controller (sold separately) to control the wah effect in real time.
GRAPHIC EQ
(Graphic Equalizer)
Adjusts the tone. You can adjust the sound quality in ten bands.
PARAMETRIC EQ Adjusts the tone. You can adjust the sound quality in four bands.
(Parametric Equalizer)
GUITAR SIM
(Guitar Simulator)
Simulation of the characteristics of particular guitar components such as pickups and different guitar bodies allows you to switch among a number of different guitar types all while using a single guitar.
AC.GUITAR SIM
(Acoustic Guitar Simulator)
This transforms the sound of an electric guitar into the sound of an acoustic guitar.
AC. PROCESSOR
(Acoustic Processor)
This processor allows you to change the sound produced by the pickup on an acoustic electric guitar, creating a richer sound similar to that obtained with a microphone placed close to the guitar.
WAVE SYNTH This is a synth sound that processes the guitar input signal.
OCTAVE
This adds a note one octave lower, creating a richer sound.
HEAVY OCTAVE
This adds sound lowered by an octave to the original sound. Since you can play chords even when using this effect, you can use it to fatten the sound of your chordal playing as well.
PITCH SHIFTER
This effect changes the pitch of the original sound (up or down) within a range of two octaves.
HARMONIST
Harmonist is an effect where the amount of shifting is adjusted according to an analysis of the guitar input, allowing you to create harmony based on diatonic scales.
HUMANIZER
This can create human vowel-like sounds.
PHASER 90E
This models an MXR EVH-90 Phase Shifter.
FLANGER117E This models an MXR EVH-117 Flanger.
15
KATANA Mk II Effect Parameter List
Effect Name WAH 95E DC-30
Explanation
This models a Jim Dunlop EVH-95 Wah pedal.You can control the wah effect in real time by adjusting the expression pedal connected to the SEL CH1 CH2/EXP PEDAL jack on the rear panel, or to the rear panel of the GA-FC foot controller (sold separately).
This models a Roland DC-30.
MOD/FX Efffect Parameters
CHORUS
Frequency band division is employed to produce two different choruses, one for low frequencies and one for higher frequencies. This allows you to achieve a more natural chorus sound.
Parameter
Value
Explanation
LOW RATE
0�100,
Adjust the speed of the chorus effect for the low frequency range.
LOW DEPTH
0�100
Adjust the depth of the chorus effect for the low frequency range. If you wish to use this as a doubling effect, use a setting of 0.
LOW PRE DELAY
Adjusts the delay of the effect sound in the
0.0 ms�40.0 ms
low-frequency range. Extending the pre-delay will produce the sensation of multiple sounds
(doubling effect).
LOW LEVEL
0�100
Adjusts the volume of the effect sound in the low-frequency range.
DIRECT MIX
0�100
Adjusts the volume of the direct sound.
HIGH RATE
0�100,
Adjust the speed of the chorus effect for the high frequency range.
HIGH DEPTH
0�100
Adjust the depth of the chorus effect for the high frequency range. If you wish to use this as a doubling effect, use a setting of 0.
Adjusts the delay of the effect sound in the
HIGH PRE DELAY
0.0 ms�40.0 ms
high-frequency range. Extending the pre-delay will produce the sensation of multiple sounds
(doubling effect).
HIGH LEVEL
0�100
Adjusts the volume of the effect sound in the high-frequency range.
CROSSOVER FREQUENCY
100 Hz�4.00 kHz
This sets the frequency dividing the low- and high-frequency ranges.
FLANGER
The flanging effect gives a twisting, jet-airplane-like character to the sound.
Parameter
Value
Explanation
RATE
0�100
This sets the rate of the flanging effect.
DEPTH
0�100
Determines the depth of the flanging effect.
RESONANCE 0�100
Determines the amount of resonance (feedback). Increasing the value will emphasize the effect, creating a more unusual sound.
MANUAL
0�100
Adjusts the center frequency at which to apply the effect.
EFFECT LEVEL 0�100
Adjusts the volume of the flanger.
LOW CUT
FLAT, 55 Hz�800 Hz
This sets the frequency at which the low cut filter begins to take effect. When "Flat" is selected, the low cut filter will have no effect.
DIRECT MIX 0�100
Adjusts the volume of the direct sound.
PHASER
By adding varied-phase portions to the direct sound, the phaser effect gives a whooshing, swirling character to the sound.
Parameter
Value Explanation
Selects the number of stages that the phaser effect will use.
4 STAGE
This is a four-phase effect. A light phaser effect is obtained.
TYPE
8 STAGE This is a eight-phase effect. It is a popular phaser effect.
12 STAGE
This is a twelve-phase effect. A deep phase effect is obtained.
BiPHASE
This is the phaser with two phase shift circuits connected in series.
RATE
0�100 This sets the rate of the phaser effect.
DEPTH
0�100 Determines the depth of the phaser effect.
RESONANCE 0�100
Determines the amount of resonance (feedback). Increasing the value will emphasize the effect, creating a more unusual sound.
MANUAL
0�100 Adjusts the center frequency of the phaser effect.
EFFECT LEVEL 0�100 Adjusts the volume of the phaser.
STEP RATE
OFF, 0�100
This sets the cycle of the step function that changes the rate and depth. When it is set to a higher value, the change will be finer. Set this to "Off" when not using the Step function.
DIRECT MIX 0�100 Adjusts the volume of the direct sound.
UNI-V
This models a Uni-Vibe. Although this resembles a phaser effect, it also provides a unique undulation that you can't get with a regular phaser.
Parameter Value
RATE
0�100
DEPTH
0�100
LEVEL
0�100
Explanation Adjusts the rate of the UNI-V effect. Adjusts the depth of the UNI-V effect. Adjusts the volume.
TREMOLO
Tremolo is an effect that creates a cyclic change in volume.
Parameter Value
WAVE SHAPE 0�100
RATE DEPTH LEVEL
0�100 0�100 0�100
Explanation Adjusts changes in volume level. A higher value will steepen wave's shape. Adjusts the frequency (speed) of the change. Adjusts the depth of the effect. Adjusts the volume.
VIBRATO
This effect creates vibrato by slightly modulating the pitch.
Parameter RATE DEPTH LEVEL
Value 0�100 0�100 0�100
Explanation Adjusts the rate of the vibrato. Adjusts the depth of the vibrato. Adjusts the volume.
16
KATANA Mk II Effect Parameter List
ROTARY
This produces an effect like the sound of a rotary speaker.
Parameter RATE DEPTH LEVEL
Value 0�100 0�100 0�100
Explanation Adjusts the speed of the rotation. Adjusts the amount of depth in the rotary effect. Adjusts the volume.
RING MOD
The sound can be unmusical and lack distinctive pitches.
Parameter Value
Explanation
This selects the mode for the ring modulator.
NORMAL
This is a normal ring modulator.
MODE
INTELLIGENT
By ring-modulating the input signal, a bell like sound is created. The intelligent ring modulator changes the oscillation frequency according to the pitch of the input sound and therefore produces a sound with the sense of pitch, which is quite different from NORMAL. This effect does not give a satisfactory result if the pitch of the guitar sound is not correctly detected. So, you must use single notes, not chords.
FREQUENCY 0�100
Adjusts the frequency of the internal oscillator.
EFFECT LEVEL 0�100
Adjusts the volume of the effect sound.
DIRECT MIX 0�100
Adjusts the volume of the direct sound.
SLOW GEAR
This produces a volume-swell effect ("violin-like" sound).
Parameter Value Explanation
SENS
0�100
Adjusts the sensitivity of the slow gear. When it is set to a lower value, the effect of the slow gear can be obtained only with a stronger picking, while no effect is obtained with a weaker picking. When the value is set higher, the effect is obtained even with a weak picking.
RISE TIME
0�100
Adjusts the time needed for the volume to reach its maximum from the moment you begin picking.
LEVEL
0�100 Adjusts the volume of the effect sound.
SLICER
This consecutively interrupts the sound to create the impression that a rhythm backing phrase is being played.
Parameter PATTERN RATE
Value P1�P20 0�100
TRIGGER SENS 0�100
EFFECT LEVEL 0�100 DIRECT MIX 0�100
Explanation
Select the slice pattern that will be used to cut the sound.
Adjust the rate at which the sound will be cut.
Adjust the sensitivity of triggering.
With low settings of this parameter, softly picked notes will not retrigger the phrase (i.e., the phrase will continue playing), but strongly picked notes will retrigger the phrase so that it will playback from the beginning. With high settings of this parameter, the phrase will be retriggered even by softly picked notes.
Adjusts the volume of the effect sound.
Adjusts the volume of the direct sound.
COMP
This is an effect that produces a long sustain by evening out the volume level of the input signal. You can also use it as a limiter to suppress only the sound peaks and prevent distortion.
Parameter Value
Explanation
BOSS COMP This models a BOSS CS-3.
HI-BAND
This is a compressor that adds an even stronger effect in the high end.
LIGHT
This is a compressor with a light effect.
TYPE
D-COMP ORANGE
This models a MXR DynaComp.
This is modeled on the sound of the Dan Armstrong ORANGE SQUEEZER.
FAT
When applied heavily, this compressor effect provides a fat tone with a boosted midrange.
MILD
When applied heavily, this compressor effect produces a sweet tone with the high end cut.
SUSTAIN 0�100
Adjusts the range (time) over which low-level signals are boosted. Larger values will result in longer sustain.
ATTACK 0�100
Adjusts the strength of the picking attack when the strings are played. Higher values result in s sharper attack, creating a more clearly defined sound.
LEVEL
0�100
Adjusts the volume.
TONE
-50�+50 Adjusts the tone.
LIMITER
The limiter attenuates loud input levels to prevent distortion.
Parameter Value
Explanation
Selects the limiter type.
BOSS LIMITER This selects a stereo limiter.
TYPE
RACK 160D
This models a dbx 160X.
VTG RACK U This models a UREI 1178.
(VINTAGE RACK U)
THRESHOLD 0�100
Adjust this as appropriate for the input signal from your guitar. When the input signal level exceeds this threshold level, limiting will be applied.
RATIO
1:1�INF:1
This selects the compression ratio used with signals in excess of the threshold level.
ATTACK
0�100
Adjusts the strength of the picking attack when the strings are played. Higher values result in s sharper attack, creating a more clearly defined sound.
RELEASE
0�100
Adjusts the release time.
LEVEL
0�100
Adjusts the volume.
17
KATANA Mk II Effect Parameter List
T. WAH
You can produce a wah effect with the filter changing in response to the guitar level.
Parameter MODE
POLAR
Value Explanation
Selects the wah mode.
LPF
Low pass filter. This provides a wah effect over a wide frequency range.
BPF
Band pass filter. This provides a wah effect in a narrow frequency range.
Selects the direction in which the filter will change in response to the input.
DOWN The frequency of the filter will fall.
UP
SENS
0�100
FREQ
0�100
PEAK
0�100
EFFECT LEVEL 0�100 DIRECT MIX 0�100
The frequency of the filter will rise.
Specifies the sensitivity with which the filter changes in the direction specified by the POLAR setting. Higher values will produce a stronger tone which emphasizes the wah effect more. With a setting of 0, the strength of picking will have no effect.
Adjusts the center frequency of the Wah effect.
Adjusts the way in which the wah effect applies to the area around the center frequency. Higher values will produce a stronger tone which emphasizes the wah effect more. With a value of 50 a standard wah sound will be produced.
Adjusts the volume of the effect sound.
Adjusts the volume of the direct sound.
PEDAL WAH
You can control the wah effect in real time by adjusting the expression pedal connected to the SEL CH1 CH2/EXP PEDAL jack on the rear panel, or to the rear panel of the GA-FC foot controller (sold separately).
Parameter
Value
Explanation
Selects the wah mode.
CRY WAH
This models the sound of the CRY BABY wah pedal popular in the '70s.
VO WAH
This models the sound of the VOX V846.
FAT WAH
This is a wah sound featuring a bold tone.
TYPE
LIGHT WAH
This wah has a refined sound with no unusual characteristics.
This expanded wah features a variable range 7STRING WAH compatible with seven-string and baritone
guitars.
RESO WAH
This completely original effect offers enhancements on the characteristic resonances produced by analog synth filters.
PEDAL POS 0�100
(PEDAL POSITION)
Adjusts the position of the wah pedal.
* This parameter is used after it's been assigned to an EXP Pedal or similar controller.
PEDAL MIN
0�100
Selects the tone produced when the heel of the EXP Pedal is depressed.
PEDAL MAX
0�100
Selects the tone produced when the toe of the EXP Pedal is depressed.
EFFECT LEVEL
0�100
Adjusts the volume of the effect sound.
DIRECT MIX
0�100
Adjusts the volume of the direct sound.
AUTO WAH
This changes the filtering over a periodic cycle, providing an automatic wah effect.
Parameter Value
Explanation
Selects the wah mode.
MODE
LPF
Low pass filter. This provides a wah effect over a wide frequency range.
BPF
Band pass filter. This provides a wah effect in a narrow frequency range.
RATE
0�100
Adjusts the frequency (speed) of the change.
DEPTH
0�100
Adjusts the depth of the effect.
FREQ
0�100
Adjusts the center frequency of the Wah effect.
PEAK
0�100
Adjusts the way in which the wah effect applies to the area around the center frequency.
Higher values will produce a stronger tone which emphasizes the wah effect more. With a value of 50 a standard wah sound will be produced.
EFFECT LEVEL 0�100
Adjusts the volume of the effect sound.
DIRECT MIX 0�100
Adjusts the volume of the direct sound.
GRAPHIC EQ
This adjusts the tone. You can adjust the sound quality in ten bands.
Parameter 31 Hz 62 Hz 125 Hz 250 Hz 500 Hz 1 kHz 2 kHz 4 kHz 8 kHz 16 kHz LEVEL
Value -20�+20 dB -20�+20 dB
18
KATANA Mk II Effect Parameter List
PARAMETRIC EQ
This adjusts the tone. You can adjust the sound quality in four bands.
Parameter
Value
Explanation
LOW GAIN
-20�+20 dB
Adjusts the low frequency range tone.
LOW-MID GAIN
-20�+20 dB
Adjusts the low-middle frequency range tone.
HIGH-MID GAIN
-20�+20 dB
Adjusts the high-middle frequency range tone.
HIGH GAIN
-20�+20 dB
Adjusts the high frequency range tone.
LEVEL
-20�+20 dB
Adjusts the overall volume level of the equalizer.
LOW-MID FREQUENCY 20 Hz�10.0 kHz
Specifies the center of the frequency range that will be adjusted by the LOW-MID GAIN.
LOW-MID Q
0.5�16
Adjusts the width of the area affected by the EQ centered at the LOW-MID FREQ. Higher values will narrow the area.
HIGH-MID FREQUENCY 20 Hz�10.0 kHz
Specifies the center of the frequency range that will be adjusted by the HIGH-MID GAIN.
HIGH-MID Q
0.5�16
Adjusts the width of the area affected by the EQ centered at the HIGH-MID FREQ. Higher values will narrow the area.
LOW CUT
FLAT, 20 Hz�800 Hz
This sets the frequency at which the low cut filter begins to take effect. When "Flat" is selected, the low cut filter will have no effect.
HIGH CUT
630 Hz� 12.5 kHz, FLAT
This sets the frequency at which the high cut filter begins to take effect. When "FLAT" is selected, the high cut filter will have no effect.
GUITAR SIM
Simulation of the characteristics of particular guitar components such as pickups and different guitar bodies allows you to switch among a number of different guitar types all while using a single guitar.
Parameter
TYPE
LOW HIGH BODY LEVEL
Value
Explanation
Selects the type of the guitar simulator.
S0H
Changes from a single-coil pickup tone to a humbucking pickup tone.
H0S
Changes from a humbucking pickup tone to a single-coil pickup tone.
H0HF
Changes from a humbucking pickup tone to a
(HALF TONE) single-coil pickup half tone.
S0HOLLOW
Changes a single-coil pickup tone to a hollow body tone with the body resonance added.
H0HOLLOW
Changes a humbucking pickup tone to a hollow body tone with the body resonance added.
S0AC (ACOUSTIC)
Changes a single-coil pickup tone to an acoustic guitar tone.
H0AC (ACOUSTIC)
Changes a humbucking pickup tone to an acoustic guitar tone.
P0AC (PIEZO 0ACOUSTIC)
Changes a piezo pickup tone to an acoustic guitar tone.
-50�+50
Adjusts the low frequency range tone.
-50�+50
Adjusts the high frequency range tone.
0�100
Adjusts the way the body sounds when TYPE is set to S0HOLLOW, H0HOLLOW, S0AC, H0AC or P0AC.
The body sound increases as the value is raised; reducing the value produces a tone similar to that from a piezo pickup.
0�100
Adjusts the volume of the effect sound.
AC. GUITAR SIM
This effect simulates the tonal character of an acoustic guitar.
Parameter Value Explanation
BODY
0�100 Adjusts the body resonance.
LOW
-50�+50 Specifies the sense of volume for the low-frequency range.
HIGH
-50�+50 Specifies the sense of volume for the high-frequency range.
LEVEL
0�100 Specifies the volume of the effect.
19
KATANA Mk II Effect Parameter List
AC. PROCESSOR
OCTAVE
This processor allows you to change the sound produced by the pickup on an acoustic electric guitar, creating a richer sound similar to that obtained with a microphone placed close to the guitar.
Parameter
TYPE
BASS MIDDLE TREBLE PRESENCE LEVEL MIDDLE FREQ
Value
Explanation
Selects the modeling type.
SMALL
This is the sound of a small-bodied acoustic guitar.
MEDIUM
This is a standard, unadorned acoustic guitar sound.
BRIGHT
This is a bright acoustic guitar sound.
POWER
This is a powerful acoustic guitar sound.
-50�+50
Adjusts the tone for the low frequency range.
-50�+50
Adjusts the midrange balance.
-50�+50
Adjusts the tone for the high frequency range.
-50�+50
Adjusts the balance in the extended upper range.
0�100
Adjusts the volume.
20.0 Hz�10.0 Specifies the frequency range to be adjusted with
kHz
Middle.
This adds a note one octave lower, creating a richer sound.
Parameter Value
Explanation
This selects the register to which the effect is applied.
B1 (corresponds to the sound of an open 7th RANGE 1 (B1�E6) string) to E6 (corresponds to the 1st string
played at the 24th fret)
RANGE
B1 (corresponds to the sound of an open 7th RANGE 2 (B1�E5) string) to E5 (corresponds to the 1st string
played at the 12th fret)
B1 (corresponds to the sound of an open 7th RANGE 3 (B1�E4) string) to E4 (corresponds to the sound of an
open 1st string)
B1 (corresponds to the sound of an open 7th RANGE 4 (B1�E3) string) to E3 (corresponds to the 4th string
played at the 2nd fret)
EFFECT LEVEL 0�100
Adjusts the volume of the sound one octave below.
DIRECT MIX 0�100
Adjusts the volume of the direct sound.
HEAVY OCTAVE
WAVE SYNTH
This adds sound lowered by an octave to the original sound. Since you can play chords even when using this effect, you can use it to fatten the sound of your chordal playing as well.
This is a synth sound that processes the guitar input signal.
* When you use a wave synthesizer, observe the following points.
� Because of the need to analyze the pitch, chords (two or more sounds played simultaneously) cannot be played. Be sure to mute all the other strings and play only one note at a time.
� If the unit cannot detect the attack, it may not sound correctly. If the unit cannot detect the attack, it may not sound correctly.
Parameter 1OCT LEVEL 2OCT LEVEL DIRECT MIX
Value 0�100 0�100 0�100
Explanation
Adjusts the volume of the sound one octave below.
Adjusts the volume of the sound two octaves below.
Adjusts the volume of the direct sound.
� The sensitivity may vary according to the guitar's TONE knob and pickup type.
Parameter Value Explanation
Selects a wave type which the synth sound is based.
WAVE
SAW
Creates a synth sound with a saw waveform (
).
SQUARE
Creates a synth sound with the
square waveform (
).
CUTOFF
0�100
Adjusts the frequency where the harmonics contents of the sound are cut off.
RESONANCE 0�100
Adjusts the amount of resonance (and the tone coloration) in the synth sound. The higher the value, the more the synth tone coloration is emphasized.
SYNTH LEVEL 0�100 Adjusts the volume of the synth sound.
FILTER SENS 0�100
Adjusts the amount of filtering applied in response to the input.
FILTER DECAY 0�100
This sets the time needed for the filter to finish its sweep.
PITCH SHIFTER
This effect changes the pitch of the original sound (up or down) within a range of two octaves.
Parameter
VOICE
PS1:PITCH PS2:PITCH 1:LEVEL 2:LEVEL
Value
Explanation
Selects the number of voices for the pitch shift sound.
1VOICE
One-voice pitch-shifted sound output in monaural.
2VOICE
Two-voice pitch-shifted sound (PS1, PS2) output in monaural.
-24�+24
Adjusts the amount of pitch shift (the amount of interval) in semitone steps.
0�100
Adjusts the volume of the pitch shifter.
FILTER DEPTH 0�100 DIRECT MIX 0�100
Adjusts the depth of the filter. When the value is higher, the filter will change more drastically.
Adjusts the volume of the direct sound.
DIRECT MIX
PS1:MODE PS2:MODE
0�100
Adjusts the volume of the direct sound.
Selection for the pitch shifter mode.
FAST, MEDIUM, SLOW
The response is slower in the order of FAST, MEDIUM and SLOW, but the modulation is lessened in the same order.
MONO is used for inputting single notes.
MONO
* You may be unable to produce the intended effect when playing chords (two or more notes played simultaneously).
PS1:FINE PS2:FINE
-50�+50
Make fine adjustments to the interval. The amount of the change in the Fine 100 is equivalent to that of the Pitch 1.
PS1:PRE DELAY
Adjusts the time from when the direct sound is
0 ms�300 ms heard until the pitch shifted sounds are heard.
PS2:PRE DELAY
Normally you can leave this set at 0 ms.
PS1:FEEDBACK 0�100
Adjusts the feedback amount of the pitch shift sound.
20
KATANA Mk II Effect Parameter List
HARMONIST
Harmonist is an effect where the amount of shifting is adjusted according to an analysis of the guitar input, allowing you to create harmony based on diatonic scales.
* Because of the need to analyze the pitch, chords (two or more sounds played simultaneously) cannot be played. Be sure to mute all the other strings and play only one note at a time.
* If the unit cannot detect the attack, it may not sound correctly. If the unit cannot detect the attack, it may not sound correctly.
* The sensitivity may vary according to the guitar's TONE knob and pickup type.
Parameter
Value
Explanation
Selects the number of voices for the pitch shift sound.
VOICE
1VOICE
One pitch-shifted voice is output in monaural.
2VOICE
Two pitch-shifted voices are output in monaural.
HR1:HARMONY -2 oct�+2 HR2:HARMONY oct, USER
This determines the pitch of the sound added to the input sound, when you are making a harmony.
It allows you to set it by up to 2 octaves higher or lower than the input sound. When the scale is set to USER, this parameter sets the user scale number to be used.
The key setting corresponds to the key of the song (#, b) as follows.
Major
MASTER KEY
C (Am)�B (G#m)
Minor Major
DIR.MIX (DIRECT MIX)
0�100
HR1:PRE DELAY 0 ms�300 HR2:PRE DELAY ms,
HR1:FEEDBACK 0�100
HR1:LEVEL HR2:LEVEL
0�100
Minor
Adjusts the volume of the direct sound.
Adjusts the time from when the direct sound is heard until the harmonist sounds are heard. Normally you can leave this set at 0 ms. Adjusts the feedback amount of the harmonist sound.
Adjusts the volume of the harmony sound.
Parameter
Value
Explanation
C -24 C�+24 C
Db -24 D��+24 D�
D -24 D�+24 D
Eb -24 E��+24 E�
E
USER SCALE F
*1 *2
F#
-24 E�+24 E -24 F�+24 F -24 F��+24 F�
You can specify a pitch in the range two octaves above or below the direct sound.
G -24 G�+24 G
Ab -24 A��+24 A�
A -24 A�+24 A
Bb -24 B��+24� B�
B -24 B�+24 B
*1 This can be specified if HR1:HARMONY or HR2:HARMONY is "USER."
*2 The correspondence between the note names and the knobs differs depending on the specified KEY. Knob [1] of the first page is the tonic (root note) of the specified KEY. The table shows the example of when KEY is set to C (Am).
HUMANIZER
This can create human vowel-like sounds.
Parameter
MODE
VOWEL 1 VOWEL 2 RATE DEPTH LEVEL
SENS *1
MANUAL *2
Value
Explanation
This sets the mode that switches the vowels.
PICKING
It changes from VOWEL 1 to VOWEL 2 along with the picking. The time spent for the change is adjusted with the rate.
AUTO
By adjusting the rate and depth, two vowels (VOWEL 1 and VOWEL 2) can be switched automatically.
a, e, i, o, u Selects the first vowel.
a, e, i, o, u Selects the second vowel.
0�100
Adjusts the cycle for changing the two vowels.
0�100
Adjusts the depth of the effect.
0�100
Adjusts the volume.
0�100
Adjusts the sensitivity of the humanizer. When it is set to a lower value, no effect of the humanizer is obtained with weaker picking, while stronger picking produces the effect. When it is set to a higher value, the effect of the humanizer can be obtained whether the picking is weak or strong.
0�100
Adjusts the cycle for changing the two vowels. When it is set to lower than 50, the time for VOWEL 1 is shorter. When it is set to higher than 50, the time for VOWEL 1 is longer.
*1 Setting available when MODE is set to PICKING. *2 Setting available when MODE is set to AUTO.
PHASER 90E
This models an MXR EVH-90 Phase Shifter.
Parameter
Value
SCRIPT
OFF, ON
SPEED
0�100
Explanation Switches the character of the phaser. OFF: Modern ON: Vintage Sets the rate and the depth of the phaser effect.
FLANGER117E
This models an MXR EVH-117 Flanger.
Parameter MANUAL WIDTH SPEED
REGEN.
Value 0�100 0�100 0�100
0�100
Explanation
Adjusts the center frequency at which to apply the effect.
Determines the depth of the flanging effect.
This sets the rate of the flanging effect.
Determines the amount of feedback. Increasing the value will emphasize the effect, creating a more unusual sound.
21
KATANA Mk II Effect Parameter List
WAH 95E
This models a Jim Dunlop EVH-95 Wah pedal.You can control the wah effect in real time by adjusting the expression pedal connected to the SEL CH1 CH2/EXP PEDAL jack on the rear panel, or to the rear panel of the GAFC foot controller (sold separately).
Parameter
Value
PEDAL POS 0�100
(PEDAL POSITION)
PEDAL MIN
0�100
PEDAL MAX
EFFECT LEVEL DIRECT MIX
0�100
0�100 0�100
Explanation Adjusts the position of the wah pedal.
* This parameter is used after it's been assigned to an EXP Pedal or similar controller.
Selects the tone produced when the heel of the EXP Pedal is depressed. Selects the tone produced when the toe of the EXP Pedal is depressed. Adjusts the volume of the effect sound. Adjusts the volume of the direct sound.
DC-30
This models a Roland DC-30.
Parameter TYPE
Value CHORUS ECHO
CHORUS INTENSITY 0�100
ECHO REPEAT RATE 40ms�600ms
EHO INTENSITY
0�100
ECHO LEVEL INPUT VOLUME TONE
OUTPUT
0�100 0�100 -50�+50 D/E
D+E
Explanation Chorus effect Echo effect Adjust the depth of the chorus effect. * Only when TYPE is CHORUS. Adjusts the delay time. * Only when TYPE is ECHO. Adjusts the volume that is returned to the input. A higher value will increase the number of the delay repeats. * Only when TYPE is ECHO. Adjusts the volume of the delay sound. * Only when TYPE is ECHO. Adjusts the input level. Adjusts the tone. Direct sound and effect sound are output respectively. Direct sound and effect sound are mixed and output.
DELAY/DELAY 2
This effect adds delayed sound to the direct sound, giving more body to the sound or creating special effects.
DELAY Type
TYPE DIGITAL
PAN
STEREO ANALOG
TAPE ECHO
REVERSE MODULATE SDE-3000
Explanation This is a simple monaural delay. This allows you to obtain the tap delay effect that divides the delay time, then deliver them to L and R channels. This is a stereo-in/out delay. This gives a mild analog delay sound. This setting provides the characteristic wavering sound of the tape echo. This produces an effect where the sound is played back in reverse. This delay adds a pleasant wavering effect to the sound. This models the sound of the Roland SDE-3000.
DELAY Parameters
Parameter
Value
Explanation
TYPE
Refer to DELAY Type
DELAY TIME 1 ms�2000 ms Adjusts the delay time.
FEEDBACK 0�100
Adjusts the volume that is returned to the input. A higher value will increase the number of the delay repeats.
HIGH CUT
630 Hz� 12.5 kHz, FLAT
This sets the frequency at which the high cut filter begins to take effect. When "FLAT" is selected, the high cut filter will have no effect.
TAP TIME
0�100%
Adjusts the delay time of the right channel delay. This setting adjusts the R channel delay time relative to the L channel delay time (considered as 100%).
* Only when TYPE is PAN.
EFFECT LEVEL 0�120
Adjusts the volume of the delay sound.
DIRECT MIX 0�100
Adjusts the volume of the direct sound.
MOD RATE (MODULATION 0�100 RATE)
Adjusts the modulation rate of the delay sound. * Only when TYPE is MODULATE or SDE-3000.
MOD DEPTH (MODULATION 0�100 DEPTH)
Adjusts the modulation depth of the delay sound * Only when TYPE is MODULATE or SDE-3000.
MOD SW (MODULATION OFF, ON SW)
Turns the modulation on/off. * Only when TYPE is SDE-3000.
Turns the filter on/off.
FILTER
OFF, ON
* If this is on, a natural-sounding effect is obtained when you're using the delay as an echo.
* Only when TYPE is SDE-3000.
RANGE
8kHz, 17kHz
* Models the way in which the SDE-3000's frequency response is affected by the delay range.
* Only when TYPE is SDE-3000.
DELAY PHASE
NORMAL, INVERSE
Specifies the phase of the delay sound. Selecting INV inverts the phase.
* Only when TYPE is SDE-3000.
FEEDBACK PHASE
NORMAL, INVERSE
Specifies the phase of the delay sound feedback. Selecting INV inverts the phase.
* Only when TYPE is SDE-3000.
22
KATANA Mk II Effect Parameter List
REVERB
This effect adds reverberation to the sound.
REVERB Type
TYPE PLATE
ROOM HALL 1 SPRING MODULATE
Explanation
Simulates plate reverberation (a reverb unit that uses the vibration of a metallic plate). Provides a metallic sound with a distinct upper range.
Simulates the reverberation in a small room. Provides warm reverberations.
Simulates the reverberation in a concert hall. Provides clear and spacious reverberations.
This simulates the sound of a guitar amp's built-in spring reverb.
This reverb adds the wavering sound found in hall reverb to provide an extremely pleasant reverb sound.
REVERB Parameters
Parameter TYPE REVERB TIME PRE DELAY EFFECT LEVEL DIRECT MIX
LOW CUT
HIGH CUT
DENSITY COLOR (TYPE = SPRING only)
Value
Explanation
Refer to REVERB Type
0.1 s�10.0 s Adjusts the length (time) of reverberation.
0 ms�500 ms Adjusts the time until the reverb sound appears.
0�100
Adjusts the volume of the reverb sound.
0�100
Adjusts the volume of the direct sound.
FLAT, 20 Hz�800 Hz
This sets the frequency at which the low cut filter begins to take effect. When "Flat" is selected, the low cut filter will have no effect.
630 Hz� 12.5 kHz, FLAT
This sets the frequency at which the high cut filter begins to take effect. When "FLAT" is selected, the high cut filter will have no effect.
0�10
Adjusts the density of the reverb sound.
0�100
Adjust the unique tone of the spring reverb.
EQ
This adjusts the tone.
PARAMETRIC EQ
You can adjust the sound quality in four bands.
Parameter
Value
Explanation
ON/OFF
OFF, ON
Turns this effect on/off.
LOW GAIN
-20�+20 dB
Adjusts the low frequency range tone.
LOW-MID GAIN
-20�+20 dB
Adjusts the low-middle frequency range tone.
HIGH-MID GAIN
-20�+20 dB
Adjusts the high-middle frequency range tone.
HIGH GAIN
-20�+20 dB
Adjusts the high frequency range tone.
LEVEL
-20�+20 dB
Adjusts the overall volume level of the equalizer.
LOW-MID FREQUENCY 20 Hz�10.0 kHz
Specifies the center of the frequency range that will be adjusted by the LOW-MID GAIN.
LOW-MID Q
0.5�16
Adjusts the width of the area affected by the EQ centered at the LOW-MID FREQ. Higher values will narrow the area.
HIGH-MID FREQUENCY 20 Hz�10.0 kHz
Specifies the center of the frequency range that will be adjusted by the HIGH-MID GAIN.
HIGH-MID Q
0.5�16
Adjusts the width of the area affected by the EQ centered at the HIGH-MID FREQ. Higher values will narrow the area.
LOW CUT
FLAT, 20 Hz�800 Hz
This sets the frequency at which the low cut filter begins to take effect. When "Flat" is selected, the low cut filter will have no effect.
HIGH CUT
630 Hz� 12.5 kHz, FLAT
This sets the frequency at which the high cut filter begins to take effect. When "FLAT" is selected, the high cut filter will have no effect.
POSITION
AMP IN AMP OUT
Positions the EQ in front of the amplifier unit within the KATANA's effect chain.
Positions the EQ behind the amplifier unit within the KATANA's effect chain.
GE-10
This models a BOSS GE-10 graphic equalizer. You can adjust the sound quality in ten bands.
Parameter 31 Hz 62 Hz 125 Hz 250 Hz 500 Hz 1 kHz 2 kHz 4 kHz 8 kHz 16 kHz LEVEL
POSITION
23
Value
-12�+12 dB
-12�+12 dB
AMP IN
Positions the EQ in front of the amplifier unit within the KATANA's effect chain.
AMP OUT
Positions the EQ behind the amplifier unit within the KATANA's effect chain.
KATANA Mk II Effect Parameter List
NS (NOISE SUPPRESSOR)
This effect reduces the noise and hum picked up by guitar pickups. Since it suppresses the noise in synchronization with the envelope of the guitar sound (the way in which the guitar sound decays over time), it has very little effect on the guitar sound, and does not harm the natural character of the sound.
NS Parameters
Parameter ON/OFF
THRESHOLD
RELEASE
Value Explanation
OFF, ON Turns this effect on/off.
0�100
Adjust this parameter as appropriate for the volume of the noise. If the noise level is high, a higher setting is appropriate. If the noise level is low, a lower setting is appropriate.
* High settings for the threshold parameter may result in there being no sound when you play with your guitar volume turned down.
0�100
Adjusts the time from when the noise suppressor begins to function until the noise level reaches "0."
SEND/RETURN
These are settings for the EFFECT LOOP (SEND/RETURN) jacks.
Parameter ON/OFF POSITION
MODE SEND LEVEL RETURN LEVEL
Value OFF, ON POST AMP, POST REV
SERIES, PARALLEL
0�100
0�100
Explanation
Turns this effect on/off.
Specifies the position at which the external effect unit is connected within the KATANA's effect chain.
Specifies whether the external effect unit is connected in series or in parallel.
Adjusts the volume of the output to the external effects device.
Adjusts the volume of the input from the external effects device.
* The S/R setting is valid if a plug is connected to the RETURN jack.
24