File info: application/pdf · 60 pages · 1.79MB
Accessories - eaton.com
Radiated Immunity IEC 61000-4-3:2010 Class A: 80MHz to 2.7 GHz: 10V/m Conducted Emissions CISPR 11:2015 Class A: 150KHz to 30MHz immunity DC Port: 3Vrms Signal Port: 3Vrms Class A: 150kHz to 80 MHz Electric fast Transie…
Full PDF Document

If the inline viewer fails, it will open the original document in compatibility mode automatically. You can also open the file directly.
Extracted Text
Accessories
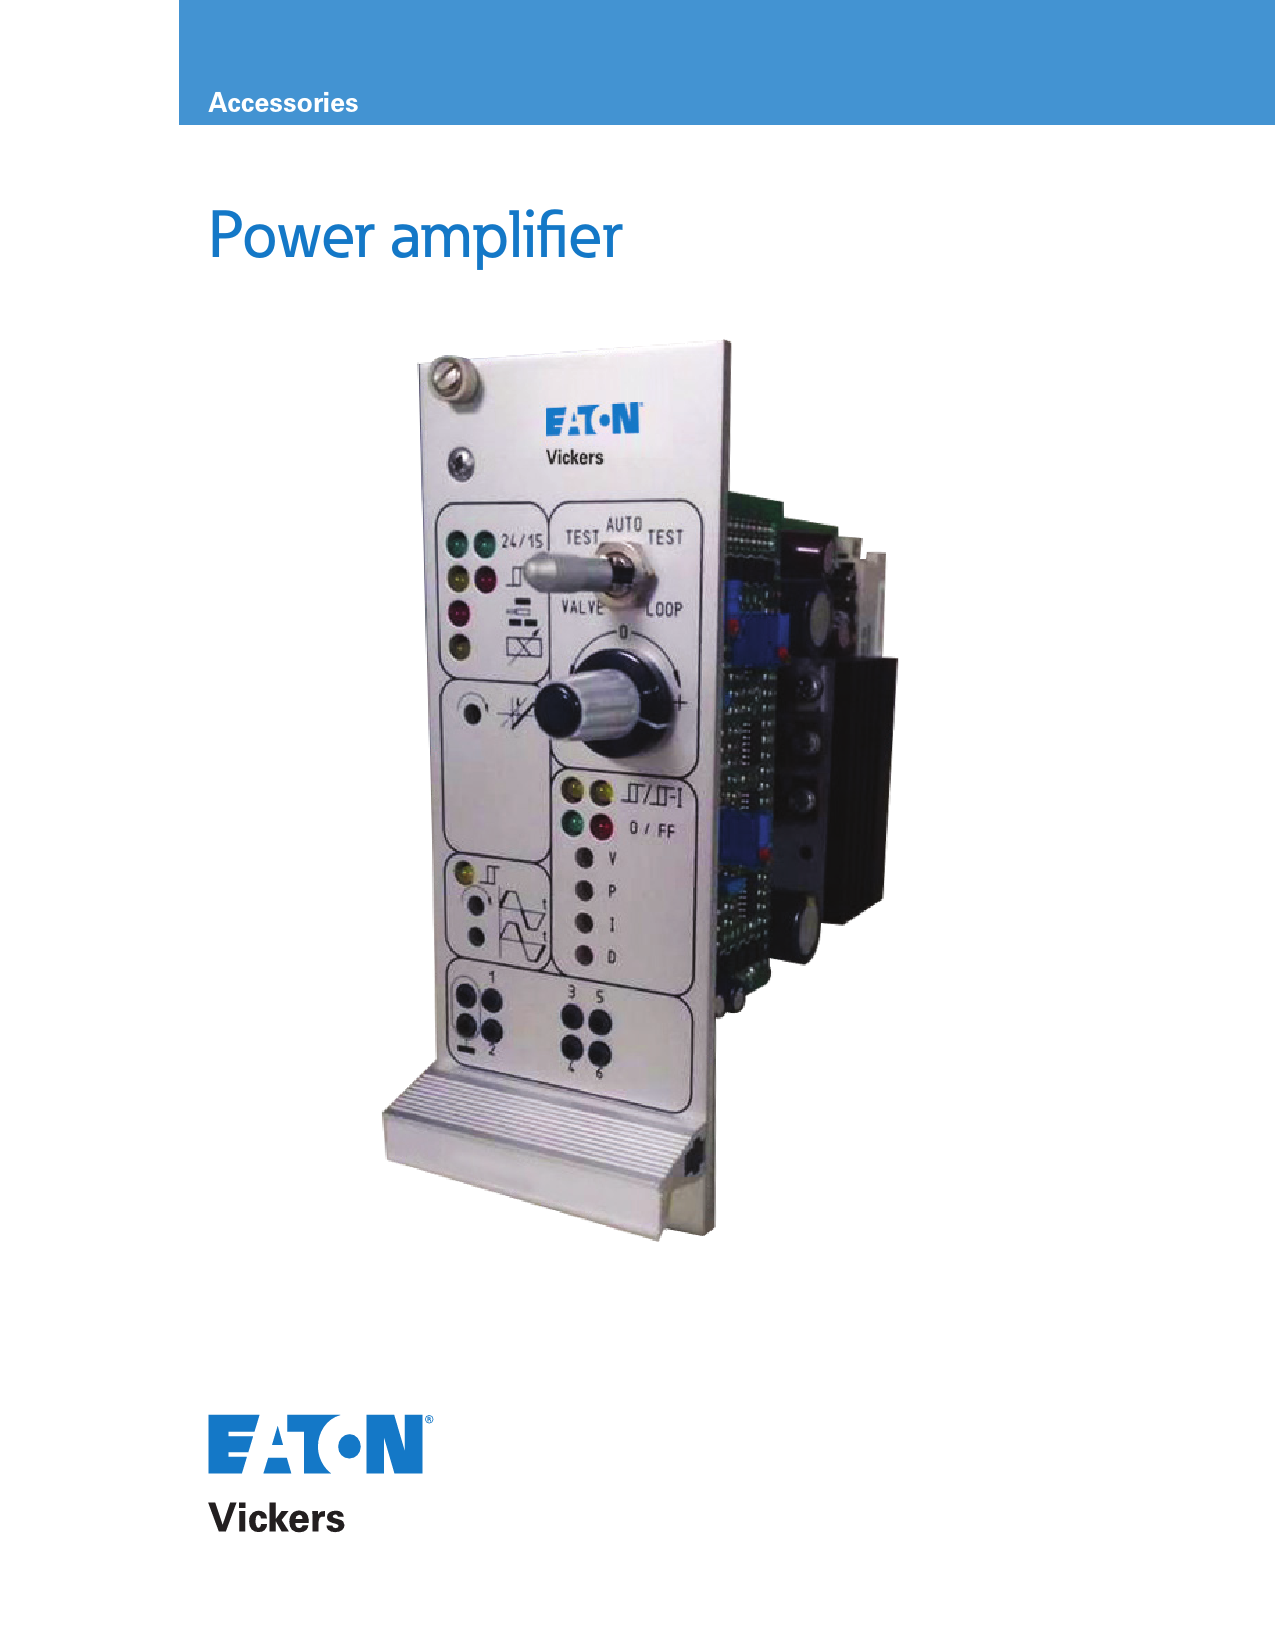
Power amplifier
DISCLAIMER OF WARRANTIES AND LIMITATION OF LIABILITY
The information, recommendations, descriptions and safety notations in this document are based on Eaton Corporation's ("Eaton") experience and judgment and may not cover all contingencies. If further information is required, an Eaton sales office should be consulted. Sale of the product shown in this literature is subject to the terms and conditions outlined in appropriate Eaton selling policies or other contractual agreement between Eaton and the purchaser.
THERE ARE NO UNDERSTANDINGS, AGREEMENTS, WARRANTIES, EXPRESSED OR IMPLIED, INCLUDING WARRANTIES OF FITNESS FOR A PARTICULAR PURPOSE OR MERCHANTABILITY, OTHER THAN THOSE SPECIFICALLY SET OUT IN ANY EXISTING CONTRACT BETWEEN THE PARTIES. ANY SUCH CONTRACT STATES THE ENTIRE OBLIGATION OF EATON. THE CONTENTS OF THIS DOCUMENT SHALL NOT BECOME PART OF OR MODIFY ANY CONTRACT BETWEEN THE PARTIES.
In no event will Eaton be responsible to the purchaser or user in contract, in tort (including negligence), strict liability or otherwise for any special, indirect, incidental or consequential damage or loss whatsoever, including but not limited to damage or loss of use of equipment, plant or power system, cost of capital, loss of power, additional expenses in the use of existing power facilities, or claims against the purchaser or user by its customers resulting from the use of the information, recommendations and descriptions contained herein. The information contained in this manual is subject to change without notice.
Contents
Index
1
General installation recommendation......................................................................... 4
1
General description....................................................................................................... 5
1
Features.......................................................................................................................... 5
1
Type A Amplifer for proportaional control valves....................................................... 6
1
Type B Amplifer with command logic....................................................................... 16
1
Type C Amplifer with command logic module and 4 ramps................................... 22
Module and 2 ramps
1
Type D Power amplifiers with PID modules............................................................. 31
1
Type E power amplifiers with strip guidance controller modules......................... 40
1
Type F Power amplifiers with CNC adaptation modules........................................ 49
1
EURO PAM card offerings........................................................................................... 58
1
1
1
1
1
1
1
1
1
1
1
1
1
1
1
1
1
1
1
1
3
EURO PAM 33 CATALOG E-VLVI-CC004-E1--December 2019 www.eaton.com
General installation recommendation
1
The amplifier is ready for use as supplied, but it must be properly installed by a qualified person
3. Installation requirements according to European EMC regulations
1 using the machine designer's wiring diagram
1. Use screened cables for the wires between amplifier and
solenoid. The screen must be connected to protective
1 1. Safety notes
ground at the amplifier end. 2. The amplifier board must be mounted in a metal housing
1
1. The amplifiers described in these installation and start-up guidelines are designed exclusively for electrical control of
which is connected to an efficient ground point. 3. The wiring for the LVDT(if fitted) must be screened and
1
the corresponding Eaton proportional valves specified. 2. Start-up, maintenance and repair operations may only
1
be performed by qualified personnel with knowledge of electrics/electronics.
grounded at both ends to efficient ground points.
Alternatively, double screened cable can be used for the LVDT with the two screens grounded at opposite ends.
3. The 24V DC supply voltage must meet the
1
guidelines for safe low voltages according to
VDE 0551/EN 607242/IEC 742.
1 2. Pre-installation checks
Table 1.
EMC
Radiated Emission CISPR 11:2015
Class A: 30MHz to 1 GHz
1
1. Check for any damage received in transit.
Radiated Immunity IEC 61000-4-3:2010 Class A: 80MHz to 2.7 GHz: 10V/m
2. Ensure that the model code on this amplifier is the
1
correct one for the application.
Conducted Emissions
CISPR 11:2015
Class A: 150KHz to 30MHz
3. Check that the 24V DC power supply is within the
Conducted
IEC 61000-4-6:2008 Class A: 150kHz to 80 MHz
1
specification.
immunity
DC Port: 3Vrms Signal Port: 3Vrms
4. Ensure that no adjustments are made before the amplifier
1
is installed and powered up.
Electric fast
IEC61000-4-4:2012 Class B
Transient immunity DC Port: �2kV
5. Ensure that the power is switched OFF before installing
Signal Port: �1kV
1
it into its edge connector. (Never insert or remove the
amplifier while the electronic system is live.)
Surge Immunity Test
IEC 61000-4-5:2014 Class B DC Port: �1kV
1
Signal Port: �0.5kV
Electrostatic
IEC 61000-4-2:2008 Class B
1
discharge (ESD)
Air: �8kV Contact: �4kV
1
1
1
1
1
1
1
1
1
1
1
1
WARNING
1
Electromagnetic Compatibility (EMC)
1
It is necessary to ensure that the unit is wired up in accordance with the connection arrangements shown in this catalog. For effective protection, the user's electrical cabinet, the valve subplate or manifold and the cable screens should be connected to efficient earth (ground)
points. In all cases, both valve and cable should be kept as far away as possible from any source of electromagnetic radiation such as cables
1
carrying heavy current, relays and certain kinds of portable radio transmitters, etc. Difficult environments could mean that extra screening
may be necessary to avoid the interference.
4
EURO PAM 33 CATALOG E-VLVI-CC004-E1--December 2019 www.eaton.com
Type A Amplifer for proportaional control valves
General description
Features
1
The power amplifier has five voltage inputs (one inverting)
� User-friendly front panel with all the necessary
and a current input 0-20 mA. Adjustments for set zero point
adjustments, LEDs and monitor points
1
or deadband compensation and for gain allow the amplifier to be easily tuned to the proportional control valve. The ramp
�
Electronic overload protection with automatic reset
1
function generator can be switched on and off using the
� Pulse width modulation for high efficiency
"ramp enable" control.
� Can be equipped with plug-in modules for
1
Monitor points on the front panel allow measurement of the
special functions
conditioned command signal, and either of spool position
� Switchable ramp function generator for controlling rates of
1
LVDT signal or (for valves without LVDT) of solenoid current. ("Conditioned command signal" is the input signal modified
increase and decrease of output
1
according to settings of set zero point or deadband
� 24V DC power supply
compensation, gain and ramp functions.)
� Either current or voltage input signals
1
� Standard input and output signals
1
� CE Electromagnetic compatibility.- 2014/30/EU
� RoHS Compatibility-DIRECTIVE 2011/65/EU
1
1
1
1
1
1
1
1
1
1
1
1
1
1
1
1
1
1
1
This product has been designed and tested to meet specific standards outlined in the European Electromagnetic
1
Compatibility Directive (EMC) 2014/30/EU which repealed Directive 89/336/EEC, amended by Directives 91/263/EEC, 92/31/EEC, 93/68/EEC and 93/97/EEC. For instructions on installation requirements to achieve effective protection levels,
1
see the Installation Wiring Practices for Vickers Electronic Products leaflet 2468. Wiring practices relevant to this Directive are indicated by Electromagnetic Compatibility (EMC).
1
EURO PAM 33 CATALOG E-VLVI-CC004-E1--December 2019 www.eaton.com
5
Type A Amplifer for proportaional control valves
1
The following power amplifier models are covered in this catalog
1
Table 2.
1
Power amplifier
1
EEA-PAM-513-A-33
1
For proportional valve
KCG-3, 1* series KCG-6/8, 1* series KX(C)G-6/8, 1* series
EEA-PAM-523-A-33
1
1
EEA-PAM-525-A-33
1
EEA-PAM-533-A-33
1
EEA-PAM-535-A-33
1
EEA-PAM-541-A-33
1
EEA-PAM-553-A-33
EEA-PAM-561-A-33
1
EEA-PAM-568-A-33
1
EEA-PAM-571-A-33
KTG4V-3...H*, 6* series KDG4V-3...H*, 6* series KDG5V-5/7/8, 1* series
KTG4V-5...H*, 3* series KDG4V-5...H*, 3* series
KFTG4V-3, 2* series KFDG4V-3, 2* series
KFTG4V-5, 2* series KFDG4V-5, 2* series
KHDG5V-5/7/8, 3* series With zero-lapped main spool
KSDG4V-3, 1* series
KFDG5V-5, 3* series KFDG5V-7, 1* series
KFDG5V-8, 1* series
CVU-**-EFP1-3*
1
EEA-PAM-581-A-33
KHDG5V-5/7/8, 3* series
1
1
1
1
1
1
1
1
1
1
1
1
1
1
1
1
6
EURO PAM 33 CATALOG E-VLVI-CC004-E1--December 2019 www.eaton.com
Type A Amplifer for proportaional control valves
Front panel
Model 523, 525, 533, 535, 561, 568 and 581
LEDs [1] 24V supply voltage, green [2] 15V control voltage, green [3] Solenoid output enabled, yellow [4] Solenoid output overload, red [5] LVDT failure, red [6] Drive to solenoid, yellow Potentiometers [7] Deadband compensation, flow from P to B [8] Deadband compensation, flow from P to A [9] Gain, flow from P to B [10] Gain, flow from P to A LED [11] Ramps enabled, yellow Potentiometers [12] Acceleration ramp [13] D eceleration ramp Monitor points [14] C onditioned command signal MP1 [15] Common ground 0V [16] Spool position MP2
(except for 523/525: solenoid current)
541, 553
Potentiometer [20] Adjust valve zero
� 2 mm (0.0787 dia.) sockets
513
24V 15V
Potentiometers [17] Zero adjust [18] Gain
t
t
Monitor point
[19] Sol enoid current MP2
24V 15V
571
Potentiometers [21] Deadband
compensation
[22] Gain
t t
1
1
1
1
24V 15V
1
1
1
1
1
1
1
t
1
t
1
1
1
1
24V 15V
1
1
1
1
1
1
1
t t
1
1
1
1
1
1
1
EURO PAM 33 CATALOG E-VLVI-CC004-E1--December 2019 www.eaton.com
7
Type A Amplifer for proportaional control valves
1 Electrical block diagram
1
EEA-PAM-523/525-A-33
533/535
1
561/568
571
1
581
1
EEA-PAM-513-A-33
1
z22 +15V; 50 mA
z2 +10V; 5 mA
1
b2 � 10V; 5 mA
b22 � 15V; 50 mA
1
z12
Alarm output
15V 24V
b32 +
24V
z32
b30
24V DC
z30
Ramps
Gain
z24
24V
1
b20
Drive zero signal indicator
1
b12
Ramp active indicator
Overload Enabled
Close to enable drive
Enable ramps
Zero point
1
z6
100
Gain
b6 47k
1
b8
Ramps Acc. Dec.
AB
z28
b10
1
z8
1
z10
z26
AB
Controller
b28
b26
EEA-PAM-541-A-33 553
1
b4
z4
1
Enable ramps
Deadband compensation
1
b24
MP 1
1
b18
Command signal monitor point
1
z18
Output monitor point
1
MP 2
Solenoid current
z22 +15V
z14
LVDT
z16
pilot
b14
LVDT
b16
main
Zero point
1
NNote: This is a typical diagram and all the features depicted may not be applicable to all amplifiers, (e.g. LVDTs and dither)
1 Table 3.
1 Command signals and outputs
All models except 553 and 571
553
1
Non-inverting voltage b6/8/10 or z8
Non-inverting current z6
Inverting voltage z10
Secondary pins
Output
1
�
1 �
bz4
�
bz4
P to A
+
bz4
+
N/A
P to B
1
+
1
bz4
+
bz4
P to B
�
bz4
P to A
+
1
�
N/A
571
Valve closed A to B and B to A
1
8
EURO PAM 33 CATALOG E-VLVI-CC004-E1--December 2019 www.eaton.com
Type A Amplifer for proportaional control valves
Operating data
Table 3. continued
Power supply: Nominal
Vmin. - Vmax. Amplifier shut-down Protection
Signal sources:
z22 & b22 z2 & b2 Temperature drift
Command inputs
Voltage:
Direct-V
Inverting-V
Umin. - Umax.
Input
z
Current
z6:
Range, I
Input
z
Power drive Max. solenoid current Current at zero (0V command signal on MP1) Dither Deadband compensation Gain Ramp-time adjustment: Factory setting
min. - max.
min. - max.
Overload detection
Drive:
Enabled
z24
Disabled
z24
Input
z
Ramps:
Enabled
b24
Disabled
b24
Input
z
Command signal monitor point:
Front-panel MP1 &
b18
Output
z
Output Monitor Point (Main) :
Front-panel MP2 &
z18
Output
z
1
1
1
24V DC x 50W
20 - 40V (incl. pk.-to-pk. ripple 10% max.)
1
<18V DC
Reverse-polarity
1
� 15V x 50 mA max. (pk.-to-pk. ripple 50 mV)
1
� 10V (1%) x 5 mA max. (pk.-to-pk. ripple 20 mV) < 1 mV/�C (<0,5 mV/ �F) 0-50�C (32 - 122�F)
1
All outputs short-circuit protected
1
1
b8, b6, z8 & b10
z10
1
0 � 10V
47 k
1
0 � 20 mA
1
100
1
= PWM short-circuit protected See table on next page
1
See table on next page
1
Factory-set
See table on next page
1
See table on next page
1
Min. 50 ms 50 ms - 5s
1
50 ms - 5s
1
Automatic reset
1
>9.8 - <40V
1
Open circuit or 4.5V
22 k
1
>9.8 - <40V
1
Open circuit or 4.5V
1
22 k
1
Monitor signal after deadband compensation (minimum setting), gain and ramps: 0 - 10V (10V ^= Imax.)
1
10 k short-circuit protected
1
513/523/525 (without LVDT): 1 V/A
1
Other types (with LVDT): � 10V at full stroke 10 k short-circuit protected
1
1
EURO PAM 33 CATALOG E-VLVI-CC004-E1--December 2019 www.eaton.com
9
Type A Amplifer for proportaional control valves
1
Table 3. continued
1
Output monitor point (Pilot) :
1
z20
Output
z
1
Ramp-active indicator
b12
1
1
Output
z
1
Drive signal zero indicator
b20
1
Drive signal at null (within deadband limits) Drive active
1
Output resistance
z
Alarm output
z20
1
Set alarm
Signal
1
1 Reset after failure
1
Ambient temperature range
Edge connectors DIN 41612
1
1
1
Cardholder
1
541/581 (with LVDT): � 10V at full stroke 10 k short-circuit protected
Output > + 10V Output < � 10V Output = 0V (� 2V ripple) 10 k
Output = Supply minus 1.5V; I = 50 mA max. Output = 0 � 2V 50
Enable amplifier (on pin z24) when switching power on HIGH when alarm is activated: Output = Supply volts minus 2 volts; l = 50 mA max. LOW when solenoid overload has occurred (maintained until reset): Output = 0 to +/�2 volts; Output impedance = 50
Disable and re-enable on pin z24 0 - 50 �C (32 - 122 �F) full specification On board F48 Male Mating connector F32 Female (rows b and z only) for Type-A only Mating connector F48 Female compatible with all card Types A through F 330g (0.15 lb) F32 02-104807 compatible with card Type-A only F48 02-104808 compatible with all card Types A through F
1 Table 4.
1
Model
523
513
525
533
535
541
553
561 568
571
581
1
Max. solenoid current
Amplifier input current at 0V
1
command signal (MP1) Deadband compensation
1.6A
1.6A
2.7A
2.7A
3.2A 3.2A 1.8A
2.9A
3.2A
0.3A
0.3A
0.3A
0.3A
1.7A 1.7A 1.4A
1.1A
1.7A
1
Factory setting (% of max. spool stroke) �
Adjustment per direction (% of max. spool �
1
stroke from centered position) Gain
25%
15%
10%
�
�
10%
10%
10%
0 - 50%
0 - 50% 0 - 50% �
�
0 - 50% 0 - 50%
0 - 50%
1
Factory setting
Adjustment per direction
10%/ V
10%/ V
10%/ V
10%/ V
10%/V 10%/V 10%/V
10%/ V
10%/ V
2.5 - 10%/V 2.5 - 10%/V 2.5 - 10%/V 2.5 - 10%/V �
�
2.5 - 10%/V 2.5 - 10%/V 2.5 - 10%/V
1
Zero adjustment (% of max. spool stroke) 0 - 50%
�
�
�
+/� 25% +/� 25% �
�
�
1
1
1
1
1
10
EURO PAM 33 CATALOG E-VLVI-CC004-E1--December 2019 www.eaton.com
Type A Amplifer for proportaional control valves
Wiring connections
Amplifier models to Typical Valve Type
Amplifier modelse: 513, 523, 525
z28 z26 b28 b26
+15V z22 z14 z16
b14 b16
Amplifier modele: 553 z28 z26 b28 b26
+15V z22 z14 z16
b14 b16
Amplifier modelse: 541, 581
z28 z26 b28 b26
+15V z22 z14 z16
b14 b16
Amplifier modelse: 533, 535
z28 z26 b28 b26
+15V z22 z14 z16
b14 b16
Amplifier modelse: 561, 568 z28 z26 b28 b26
+15V z22 z14 z16
b14 b16
Amplifier modele: 571 z28 z26
z22 +15V
b14 b16
Customer 's protective ground connection. NNote: If valves are fitted with the "B" type LVDT, the screen will be grounded at the valve end by the shell of the connector.
EURO PAM 33 CATALOG E-VLVI-CC004-E1--December 2019 www.eaton.com
1 1 1 1 1 1 1 1 1 1 1 1 1 1 1 1 1 1 1 1 1 1 1 1 1 1 1 1 1 1
11
Type A Amplifer for proportaional control valves
1 Typical input connection circuitry
1
1
z2 b2
1
1
1
z6
1
b6
b8
1
b10
EEA-PAM- 513 -A-33
z8
523/525
1
533/535
z10
561/568
571
1
b4
581
z4
1
1
Customer 's protective ground connection.
1
Valve solenoid connections LVDT connections
1
z26/28 (b26/28)
M & E type
1
Pin 3
1
1
z28/26 (b28/26)
Pin 2
Pin 1
Pin 4
Pilot stage
LVDT plug pin
1
1
Protective ground: Connection not
1
required if power supply conforms to VDE 0551/EN 60742/IEC 742
B type (EMC)
Pin 1
2 3 4 Main stage +CVU-EFP1 1
1
Pin 2
Pin 4
2
3
1
Pin 3
4
Amplifier pin
z14 z22 z16 Not connected b14 z22 b16 Not connected
1 1
Electromagnetic Compatibility (EMC)
WARNING
1
1.Screened cables should be used for the command signals, the solenoid connections and the LVDT connections.
1
2.Particular attention should be paid to the grounding of the screens as shown in the diagrams.
3.The screen on the LVDT cable needs to be grounded at both ends. An alternative method to prevent creating earth loops is to use double
1
screened cable with each screen grounded at opposite ends.
4.The amplifiers should be mounted in a metal enclosure which is connected to an efficient ground point.
1
1
1
1
12
EURO PAM 33 CATALOG E-VLVI-CC004-E1--December 2019 www.eaton.com
Type A Amplifer for proportaional control valves
Installation dimensions in mm (inches)
1
Plug-in Unit of 3U Height (IEC 297)
1
1
DIN 41612 F48 male connector.
1
7.92
(0.31)
1
M2.5 x 11 (0.43) long collar screws supplied with panel for fixing
z - pin row
1
b - pin row
d - pin row
1
Components envelope
1
2.5
(0.1)
1
1
122.4 (4.82)
Model designation
128.4 (5.06)
8(0.31)
1
1
100
(3.94)
1
1
3(0.12)
1
14.2(0.56)
7.45
1
3(0.12)
(0.29)
7.2
14
40.3
(0.28) (0.55)
175.24(6.9)
1
(1.59)
1
1
1
1
1
1
1
1
1
1
1
1
1
EURO PAM 33 CATALOG E-VLVI-CC004-E1--December 2019 www.eaton.com
13
Type A Amplifer for proportaional control valves
1
Dedicated installation requirement for Type A card
1
5. Front panel indicator lights (LEDs)
Amplifiers may have some, or all, of the following LEDs, depending on amplifier type:
1 Wiring sizes
1
Use 3-core screened cable 0.5 mm2 (20 AWG) per wire for signal and LVDT wiring.
1
For wiring runs between amplifier and solenoid up to 50 meters (164 ft): EEA-PAM-523 and EEA-PAM-525 must
have a wire cross-section of 1.5 mm2 (15 AWG); for all other
1
models use wire of 1 mm2 (18 AWG) cross-section.
1 Front panel controls
1
Any of the following controls may be on the front panel
(depending on the amplifier type) and can be adjusted
1
as described.
1 1. Set zero:
1
On amplifier types 513, 541 and 553, this sets the electrical null of the valve.
Table 5.
Panel symbol
24V 15V
Function indicated
Power supply ON Internal supply ON Output enabled Overload detection
LVDT failure
Ramps enabled
Current to solenoid (Light intensity varies with solenoid current)
6. Fault diagnosis
Color
Green Green Yellow Red
Red
Yellow
Yellow
Normal working state
ON ON ON OFF
OFF
ON
ON
1 2. Deadband compensation:
If the amplifier fails to work the following checks should
1
The two potentiometers are factory set at 10% (20% for 523 models) of valve maximum spool stroke. The setting may be
be made: 1. Check that all wiring is correct to the machine
1
optimized for your application as follows: Apply a small command signal (e.g. 250 mV) and check for
designer's instructions. 2. Check that there is a 24V supply and that the
1 1
hydraulic response from the valve. (For 2-stage valves the correct pilot pressure must be available to obtain response from the main-stage spool.) If this does not occur then adjust the applicable potentiometer clockwise until it does. Alternatively, to reduce valve hydraulic response turn the potentiometer
24V LED is ON.
3. Check that the 15V internaI voltage LED is ON (if 24V LED is ON and this 15V LED is OFF then the amplifier should be replaced.)
1
counter-clockwise.
4. Check that the amplifier is enabled and the LED is ON.
1 3. Gain
5. Check that the LVDT failure LED is OFF. (If ON check the LVDT wiring and connections.)
The gain potentiometers are factory set for 100% output at 10V
1
command signal. Turning the gain potentiometers clockwise
increases the gain; turning counter-clockwise reduces gain.
1
4. Ramps
To check correct function of the amplifier, disconnect all valve connections and link z22 ( +15V) with a 1.2 kQ resistor to b14. (To check the double feedback amplifiers EEAPAM-581/541, make an additional link between z22 (+15V) and z14 with a 1.2 kQ resistor.)
1
Factory setting of ramp potentiometers: all amplifiers are set to
minimum ramp time.
1
Turning the controls clockwise increases ramp time; turning
After installation of resistor link(s), the LVDT failure LED should be OFF. If not, replace the amplifier (caution: a link without resistor damages the amplifier).
counter-clockwise decreases ramp time. There are separate
1
controls for accelerating and for decelerating ramps.
6. Check that the overload LED is OFF. (If ON, check the wiring to the solenoids and the solenoid resistance by
an ohmmeter. Compare the measured value with the
1
catalog data.)
1
7. Check that an appropriate valve driving signal is available (monitor point at the front panel).
� � 10V at monitor point represents � 100% output
1
8. The solenoid current (non-feedback valves) or the
LVDT signal (feedback valves) can be measured at the
1
front panel monitor point.
� Solenoid current can be measured as a voltage signal
1
(1 volt per amp)
1
� � 10V LVDT signal at monitor point represents � 100% spool stroke
1
14
EURO PAM 33 CATALOG E-VLVI-CC004-E1--December 2019 www.eaton.com
Type A Amplifer for proportaional control valves
Valve connection table
1
This table shows how the different valves have to be connected to the associated amplifier.
1
Table 6.
1
Value type
Amplifier type
Solenoid with LVDT or hydraulic A
Solenoid without LVDT or hydraulic B
KCG-3/6/8 and KX(C)G-6/8
EEA-PAM-513-A-33
b26/b28
-
1
K*G4V-3 and KDG5V-5/7/8 K*G4V-5 KF*G4V-3 KF*G4V-5 KHDG5V-5/7/8 zero lapped KSDG4V-3 KFDG5V-5/7 KFDG5V-8 CVU-**-EFP1 KHDG5V-5/7/8
Table 7.
Valve type
KCG-3/6/8 and KX(C)G-6/8 K*G4V-3 and KDG5V-5/7/8 K*G4V-5 KF*G4V-3 KF*G4V-5 KHDG5V-5/7/8 zero lapped KSDG4V-3 KFDG5V-5/7 KFDG5V-8 CVU-**-EFP1 KHDG5V-5/7/8
EEA-PAM-523-A-33 EEA-PAM-525-A-33 EEA-PAM-533-A-33 EEA-PAM-535-A-33 EEA-PAM-541-A-33
EEA-PAM-553-A-33 EEA-PAM-561-A-33 EEA-PAM-568-A-33 EEA-PAM-571-A-33 EEA-PAM-581-A-33
b26/b28
z26/z28
1
b26/b28
z26/z28
b26/b28
z26/z28
1
b26/b28 -
z26/z28 z26/z28
1
-
z26/z28
1
-
z26/z28
1
-
z26/z28
-
z26/z28
1
-
z26/z28
1
1
Pilot stage LVDT
Main stage LVDT
Pin 1 2
3
4
Pin 1 2
3
4
1
�
�
�
�
�
�
�
�
�
�
�
�
1
�
�
�
�
�
�
�
�
�
b14
z22
b16
1
�
�
�
b14
z22
b16
z14
z22
z16
Not connected b14
z22
b16
Not connected
1
�
�
�
b14
z22
b16
1
�
�
�
b14
z22
b16
�
�
�
b14
z22
b16
1
�
�
�
b14
z22
b16
z14
z22
z16
b14
z22
b16
1
1
1
1
1
1
1
1
1
1
1
1
EURO PAM 33 CATALOG E-VLVI-CC004-E1--December 2019 www.eaton.com
15
Type B Amplifer with command logic module and 2 ramps
1 General description
Features and benefits
The EEA-PAM-5**-B-33 Eurocards are power amplifiers with a � Includes all features of "A" amplifiers
1
four-input (demand signal) module and ramp function generator � 2 ramp times set by front-panel potentiometers;
with quadrant detection for separate adjustment of acceleration
can be varied by external voltage signals
1
and deceleration.
� 4 adjustable command pre-sets selectable by
The type of EEA-PAM-5**-B-33 amplifier used
1
depends on the type of proportional valve, see
"Model Codes".
24V logic signal
� Polarity of 10V reference voltage selectable by 24V logic signal
1
� CE electromagnetic compatibility.- 2014/30/EU
1
Front panel
1
� RoHS Compatibility-DIRECTIVE 2011/65/EU
1
LEDs
[1] 24V supply voltage, green
1
[2] 15V control voltage, green
[3] Drive (solenoid) enabled, yellow
1
[4] Overload, red
[5] LVDT failure, red
1
[6] Drive to solenoid, yellow
1
Potentiometers
1
[7] Deadband compensation, flow from P to B [8] Deadband compensation, flow from P to A
1
LED
[9] Ramps enabled, yellow
1
Potentiometers
1
[10] Spool acceleration, flow from port P to B or A
[11] Spool acceleration, flow from port P to B or A
1
Monitor points
1
[12] Conditioned command signal [13] Common ground 0V
1
[14]
24/15
+
_
1
P
2
B
A
3
4
t t
LEDs [15] Positive input polarity ON, yellow [16] Negative input polarity ON, yellow [17] Input 1 ON, yellow
Potentiometers [18] Input 1 adjustment
LED [19] Input 2 ON, yellow
Potentiometers [20] Input 2 adjustment
LED [21] Input 3 ON, yellow
Potentiometers [22] Input 3 adjustment LED [23] Input 4 ON, yellow
Potentiometers [24] Input 4 adjustment
1
LED and symbol not on EEA-PAM-513/523/525 amplifiers.
Main-stage spool in the case of K*DG5V valves.
1
In the case of EEA-PAM-523/525 amplifiers, one of these relationships may not apply if two single solenoid valves are connected.
1 1 Model codes
1 Table 8.
Of solenoid current in the case of EEA-PAM-513/523/525 models, of spool position for others. �2,0 mm (0.0787'' dia.) sockets.
1
Amplifier model
EEA-PAM-513-B-33
1
EEA-PAM-523-B-33
1
EEA-PAM-525-B-33
EEA-PAM-533-B-33
1
EEA-PAM-535-B-33
1
EEA-PAM-561-B-33 EEA-PAM-568-B-33
1
EEA-PAM-571-B-33
EEA-PAM-581-B-33
For valves
KCG-3; KCG-6/8 KX(C)G-6/8 K*G4V-3; KDG5V-5/7/8 K*G4V-5 KF*G4V-3 KF*G4V-5 KFDG5V-5/7 KFDG5V-8 CVU-**-EFP1 KHDG5V-5/7/8
With type "H" coils only
16
EURO PAM 33 CATALOG E-VLVI-CC004-E1--December 2019 www.eaton.com
Type B Amplifer with command logic module and 2 ramps
Operating data
1
Table 9.
1
Power requirements:
See appropriate base amplifier, e.g. for EEA-PAM-535-B-33 see EEA-PAM-535-A-33
1
Control (output) supplies: Output voltages for control:
z22 +15V for LVDTs only
1
At pin z2 At pin b2
+ 10V ( � 1 %) x 5 mA - 10V ( � 1 % ) x 5 mA
1
At pins z2 and b2
Ripple <20 mV pk.-to-pk. Temperature drift <1 mV/� C (<0.5 mV/� F) thru' 0-50� C (32-122� F) range
1
All outputs short-circuit protected
1
Command signal inputs:
Direct-voltage pins
b8, b6,z8, b10
1
Inverting-voltage pin
z10
Voltage range
�10V
1
Input impedance (voltage)
47k
Current pin
z6
1
Current range Input impedance (current)
�20mA 100
1
Command voltage source: Command voltage polarity selection:
d20 � 1OV x 10mA
1
For flow from (main) port P to A
Pin d2 at 0 to +5V
1
For flow from (main) port P to B
Pin d2 at +10 to +40V
Input impedance
47k
1
Warning: Loss of signal at pin d2 causes polarity reversal and possible erratic motion.
In the case of EEA-PAM-523/525 amplifiers, one of these relationships may not apply if two single-solenoid valves are connected.
1
Logic inputs:
1
Switch-on voltage
+10 to +40V
Switch-off voltage
<+5V
1
Input current
d10, d12, d14 or d18 10 mA
Command voltage inputs: d22, d24, d26 and d28
1
Voltage and source Input impedance
+ 10V gives valve flow from port P to B, or -10V gives flow from P to Au
Four 50k pots
1
External command potentiometer
5k; 0.25W minimum Part no. 714127; see catalog 2460
1
Voltage-controlled ramp generator:
u Not applicable when using EEA-PAM-523/525 amplifiers to drive two single-solenoid valves.
1
Acceleration pin Deceleration pin
Input impedance
d6 � 10V
1
d8 � 10V
Note: At any ramp pot. setting, positive voltages increase ramp times and negative voltages decrease
1
them. With pot. set at zero, 0 to + 10V equates to a ramp time range of 50ms to 5s. With pot. set at
max., O to -10V equates to a ramp time of 5s to 50 ms. d6 or dB 10k
1
Drive enabled (power available to solenoid) z24 Apply >9.8V to <40V (22k)
1
Drive disabled (no power to solenoid)
z24 Apply open circuit or up to 4.5V
Alarm output:
z12 Enable amplifier (on pin z24) when switching power on
1
Set alarm
HIGH when alarm is activated
Signal
Output = Supply minus 2V
1
I = 50 mA max.
LOW when solenoid overload has occurred. (Maintained until reset.)
1
Output = 0 to � 2 volts Output resistance = 50 ohms
1
Reset after failure
Disable and re-enable on pin z24
1
EURO PAM 33 CATALOG E-VLVI-CC004-E1--December 2019 www.eaton.com
17
Type B Amplifer with command logic module and 2 ramps
1
Table 9. continued
1
Ramps enabled (valve switching rate limited by ramp potentiometers)
b24 Apply >9.8V to <40V (22 k)
1
Ramps disabled (fastest valve switching; ramp circuit bypassed)
b24 Apply open circuit or up to 4.5V
1
Ramp active indicator:
Drive ramping up
b12 Output >10V
1
Drive ramping down
Drive not ramping
Output <-10V Output 0V ( � 2V ripple)
1
Output resistance
Drive signal zero indicator:
1
Drive signal at null (within deadband limits)
10k b20
Output = Supply minus 1.5V
1
Drive active
I = 50 mA max. Output = 0 � 2V
1
Output resistance
Ambient temperature range
50 0 to 50� C (32 to 122� F)
1
Storage temperature range
Edge connectors
-25 to +85� C (-12 to +185� F) DIN 41612 F48 male type on board. Mating connector must be an F48 female type
1 Installation dimensions and panel display
Dimensions are the same as for the corresponding base amplifier but the panel display is different; see first page
1
Mass
Other characteristics
1
Cardholder
0.40 kg (0.88 lb) approx. See the relevant base amplifier EEA-PAM-5**-A-33. F48 02-104808
1
1
1
WARNING
1
Electromagnetic Compatibility (EMC)
This product has been designed and tested to meet specific standards outlined in the European Electromagnetic Compatibility Directive
1
(EMC) 2014/30/EU which repealed Directive 89/336/EEC, amended by Directives 91/263/EEC, 92/31/EEC, 93/68/EEC and 93/97/EEC. For
instructions on installation requirements to achieve effective protection levels, see this leaflet and the Installation Wiring Practices for Vickers
1
Electronic Products leaflet 2468. Wiring practices relevant to this Directive are indicated by Electromagnetic Compatibility (EMC).
1
1
1
1
1
1
1
1
1
1
1
18
EURO PAM 33 CATALOG E-VLVI-CC004-E1--December 2019 www.eaton.com
Type B Amplifer with command logic module and 2 ramps
Circuit and Connections
EEA-PAM-5**-B-33
Shown with command logic module. Individual ramp adjustments of spool acceleration and deceleration, independent of direction of movement, are on the base amplifier. Additionally, acceleration and deceleration can
be controlled by variable voltage inputs to pins d6 and d8 respectively. The circuit here includes the essential
1
characteristics of all amplifiers listed in the "Model Codes"
section, two pages back; actual amplifiers omit certain
1
sub-circuits to those connection pins not needed for
the valves concerned.
1
1
NNote: Read circuit in conjunction with that for relevant base amplifier EEA-PAM-5**-A
1
z2
+10V x 5mA
+15V +10V
b2 -10V x 5mA
�10V
�15V
z6
�15V
+24V
Power 0V
b6
b8 b10 z8 z10 inverting command input
Signal 0V bz4
Dither Acc. Dec. A B
1
bdz32
bdz30
24V DC Power
1
supply
b12 Ramps active indicator
1
b20 Drive signal zero indicator
1
Close to enable
b24
+24V Drive
1
Enabled
enabled
Overload
1
z12 Drive output status z28
1
Ramps enable +24V
Close to enable
Voltage-controlled ramp generation
Acceleration
b24
Ramps enabled Command logic module d6
Deadband compensation
z26
PWM
b28
b26
Solenoid current
b18
To solenoid To solenoid Command signal
1 1 1 1
Deceleration
d8
monitor points
z18
Monitor points
1
Command voltage
polarity selection d2 1 d10
+15V z22
1
2 d12
1
z16
1
3 d14 4 d18
2
Pilot stage
z14
LVDT
3
+10V - 10V
1
+24V
Logic inputs see table on next page
4 1
2 3
Polarity switch
LVDT failure
Main stage
+15V z22 b16
b14
1 1
4 bz4
+
-
LVDT
1
d28 d26 d24 d22 d20
1
External command potentiometer. R = 5k : 0.25W minimum
Command signal inputs
On-board command voltage source
1
Valve actual connections
see tabel on next page
1
1
Customer's protective earth connection.
Solenoid current for 523/525-B models; LVDT position for all others.
1
On front panel.
See under this heading in "Operating Data" table.
1
1
EURO PAM 33 CATALOG E-VLVI-CC004-E1--December 2019 www.eaton.com
19
Type B Amplifer with command logic module and 2 ramps
1
Table 10. Logic selection inputs
1
Logic input pin
d10
1
d12
1
d14
1 d18
1
Command pot.
1 2 3 4
Secondary pin
bdz30 bdz30 bdz30 bdz30
Voltage to pin d2
0 +24V
0 +24V
0 +24V
0 +24V
Valve flow
P-A P-B
P-A P-B
P-A P-B
P-A P-B
1
In the case of EEA-PAM-523/525-B models, one of these relationships may not apply if two single-solenoid
valves are connected.
1
1 Solenoid and LVDT connections for proportional valves
1 Table 11.
1
Solenoid with
Pilot-stage LVDT, (black plug):
Main-stage LVDT, (gray plug):
LVDT and/or for Solenoid without LVDT,
1
Amplifier type
flow P to B
EEA-PAM-513-B-33 b26/b28
or on pilot valve
-
Pin 1 Pin 2 Pin 3 Pin 4
Pin 1
-
-
-
Not connected -
Pin 2
-
Pin 3
-
Pin 4
Not connected
1
EEA-PAM-523-B-33 b26/b28
EEA-PAM-525-B-33 b26/b28
z26/z28 z26/z28
-
-
-
Not connected -
-
-
-
Not connected -
-
-
-
-
Not connected Not connected
1
EEA-PAM-533-B-33 b26/b28
EEA-PAM-535-B-33 b26/b28
1
EEA-PAM-561-B-33 -
EEA-PAM-568-B-33 -
1
EEA-PAM-571-B-33 -
z26/z28 z26/z28 z26/z28 z26/z28 z26/z28
-
-
-
Not connected b14
-
-
-
Not connected b14
-
-
-
Not connected b14
-
-
-
Not connected b14
-
-
-
Not connected b14
z22
b16
z22
b16
z22
b16
z22
b16
z22
b16
Not connected Not connected Not connected Not connected Not connected
1
EEA-PAM-581-B-33 -
z26/z28
z14 z22 z16 Not connected b14
z22
b16
Not connected
1
1
1
1
1
1
1
1
1
1
1
1
1
20
EURO PAM 33 CATALOG E-VLVI-CC004-E1--December 2019 www.eaton.com
Type B Amplifer with command logic module and 2 ramps
Installation dimentions in mm (inches)
Plug-in Unit of 3U Height, to IEC 297
M2.5 x 11(0.43) long collar screws supplied with panel for fixing
3rd angle projection
DIN 41612 F48 male connector. Mating connector must be an F48 female type.
z - pin row b - pin row
d - pin row Components envelope
7.92 (0.31)
2.5 (0.1)
122.4 (4.82)
Model designation
3(0.12)
3(0.12)
7.45 (0.29)
40.3 (1.59)
128.4 (5.06)
8(0.31)
14.2(0.56)
7.2 (0.28)
14 (0.55)
175.24(6.9)
100 (3.94)
EURO PAM 33 CATALOG E-VLVI-CC004-E1--December 2019 www.eaton.com
1 1 1 1 1 1 1 1 1 1 1 1 1 1 1 1 1 1 1 1 1 1 1 1 1 1 1 1 1 1
21
Type C Amplifer with command logic module and 4 ramps
1 General description
Features and benefits
The EEA-PAM-5**-C-33 Eurocards are power amplifiers
� All features of "A" amplifiers
1
with a 4-input (demand signal) module and 4-ramp function
� 4 adjustable ramp times, 4-quadrant acceleration/
generator with quadrant detection. The ramp generator allows
deceleration
1
acceleration and deceleration to be set separately for both directions of movement.
� 4 adjustable command pre-sets selectable by 24V logic signal
1
The type of EEA-PAM-5**-C-33 amplifier used depends on the � Polarity of the 10V reference voltage selectable by
type of proportional valve, see "Model Codes" on next page.
24V logic signal
1
� CE electromagnetic compatibility.- 2014/30/EU
� RoHS Compatibility-DIRECTIVE 2011/65/EU
1
1 Front panel
1
1
LEDs [1] 24V supply voltage, green
1
[2] 15V control voltage, green [3] Drive (solenoid) enabled, yellow
1
[4] Overload, red [5] LVDT failure, red
1
[6] Drive to solenoid, yellow
Potentiometers
1
[7] Deadband compensation, flow from P to B
[8] Deadband compensation, flow from P to A
1
[9] Gain flow from port P to B
[10] Gain flow from port P to A
1
LED
[11] Ramps enabled, yellow
1 Potentiometers
1
[12] Spool acceleration, flow from port P to B [13] Spool acceleration, flow from port P to B
1
Monitor points
[14] Conditioned command signal
1
[15] Common ground 0V
[16]
1
24/15
+
_
P B A B A
P
1
2
3
4 P
t t t t
LEDs [17] Positive input polarity ON, yellow [18] Negative input polarity ON, yellow [19] Input 1 ON, yellow
Potentiometers [20] Input 1 adjustment
LED [21] Input 2 ON, yellow
Potentiometers [22] Input 2 adjustment
LED [23] Input 3 ON, yellow
Potentiometers [24] Input 3 adjustment
LED [25] Input 4 ON, yellow
Potentiometers [26] Input 4 adjustment [27] Spool acceleration, flow from port P to A [28] Spool deceleration, flow from port P to A
LED and symbol not on EEA-PAM-513/523/525 amplifiers.
1
Main-stage spool in the case of K*DG5V valves.
Of solenoid current in the case of EEA-PAM-523/525 models, of spool position for others.
In the case of EEA-PAM-523/525 amplifiers, one of these relationships
�2,0 mm (0.0787'' dia.) sockets.
1
may not apply if two single solenoid valves are connected.
Indicates drive to whichever solenoid is energized
1
1
1
WARNING
1
Electromagnetic Compatibility (EMC)
1
It is necessary to ensure that the valve is wired up in accordance with the connection arrangements shown in this leaflet. For effective protection, the user's electrical cabinet, the valve subplate or manifold and the cable screens should be connected to efficient earth
1
(ground) points. In all cases, both valve and cable should be kept as far away as possible from any source of electromagnetic radiation such as cables carrying heavy current, relays and certain kinds of portable radio transmitters, etc. Difficult environments could mean that extra
screening may be necessary to avoid the interference.
1
1
22
EURO PAM 33 CATALOG E-VLVI-CC004-E1--December 2019 www.eaton.com
Type C Amplifer with command logic module and 4 ramps
Model codes
1
Table 12.
1
Amplifier model
For valves
EEA-PAM-523-C-33
K*G4V-3; KDG5V-5/7/8
With type "H"
1
EEA-PAM-525-C-33 EEA-PAM-533-C-33
K*G4V-5 KF*G4V-3
coils only
1
EEA-PAM-535-C-33
KF*G4V-5
1
EEA-PAM-561-C-33
KFDG5V-5/7
EEA-PAM-568-C-33
KFDG5V-8
1
1
Operating data
1
Table 13.
1
Power requirements:
See appropriate base amplifier, e.g. for EEA-PAM-535-C-33 see EEA-PAM-535-A-33
1
Control (output) supplies:
z22 +15V for LVDTs only
Output voltages for control:
1
At pin z2
+ 10V ( � 1 %) x 5 mA
At pin b2
-10V ( � 1 % ) x 5 mA
1
At pins z2 and b2
Ripple <20 mV pk.-to-pk. Temperature drift <1 mV/� C (<0.5 mV/� F) thru' 0-50� C (32-122� F) range
1
All outputs short-circuit protected
Command signal inputs:
1
Direct-voltage pins Inverting-voltage pin
b8, b6,z8, b10 z10
1
Voltage range
�10V
1
Input impedance (voltage)
47k
Current pin
z6
1
Current range
�20mA
Input impedance (current)
100
1
Command voltage source:
d20 � 10V x 10mA
Command voltage polarity selection:
1
For flow from (main) port P to A For flow from (main) port P to B
Pin d2 at 0 to +5V Pin d2 at +10 to +40V
1
Input impedance
47k
1
Warning: Loss of signal at pin d2 causes polarity reversal and possible erratic motion.
In the case of EEA-PAM-523/525 amplifiers, one of these relationships may not apply if two single-solenoid valves are connected.
1
Logic inputs:
Switch-on voltage
+10 to +40V
1
Switch-off voltage Input current
<+5V d10, d12, d14 or d18 10 mA
1
Command voltage inputs:
d22, d24, d26 and d28
1
Voltage and source
+ 10V gives valve flow from port P to B, or -10V gives flow from P to Au
Input impedance
Four 50k pots
1
External command potentiometer
5k; 0.25W minimum
Part no. 714127; see catalog 2460
1
u Not applicable when using EEA-PAM-523/525 amplifiers to drive two single-solenoid valves.
1
1
1
EURO PAM 33 CATALOG E-VLVI-CC004-E1--December 2019 www.eaton.com
23
Type C Amplifer with command logic module and 4 ramps
1
Table 13. continued
1
Drive enabled (power available to solenoid) z24 Apply >9.8V to <40V (22 k)
1
Drive disabled (no power to solenoid) Alarm output:
z24 Apply open circuit or up to 4.5V z12 Enable amplifier (on pin z24) when switching power on
1
Set alarm Signal
HIGH when alarm is activated Output = Supply minus 2V
1
I=50 mA max.
LOW when solenoid overload has occurred.
1
(Maintained until reset.) Output = 0 to � 2 volts
1 Reset after failure
1
Ramps enabled (valve switching rate limited by
ramp potentiometers)
Output resistance = 50 ohms Disable and re-enable on pin z24 b24 Apply >9.8V to <40V (22 k)
1
Ramps disabled (fastest valve switching; ramp circuit bypassed)
b24 Apply open circuit or up to 4.5V
1
Ramp active indicator:
Drive ramping up
b12 Output >10V
1
Drive ramping down
Drive not ramping
1
Output resistance
Output <-10V Output 0V ( � 2V ripple) 10k
Drive signal zero indicator:
1
Drive signal at null (within deadband limits)
b20 Output = Supply minus 1.5V
1
Drive active
1 = 50 mA max. Output = 0 � 2V
1
Output resistance
Ambient temperature range
50 0 to 50� C (32 to 122� F)
1
Storage temperature range
Edge connectors
1 Installation dimensions and panel display
-25 to +85� C (-12 to +185� F)
DIN 41612 F48 male type on board. Mating connector must be an F48 female type
Dimensions are the same as for the corresponding base amplifier but the panel display is different
1
Mass
0.40 kg (0.88 lb) approx.
Other characteristics
1
Cardholder
See the relevant base amplifier EEA-PAM-5**-A-33. F48 02-104808
1
1
1
1
1
1
1
1
1
1
1
24
EURO PAM 33 CATALOG E-VLVI-CC004-E1--December 2019 www.eaton.com
Type C Amplifer with command logic module and 4 ramps
Circuit and connections
EEA-PAM-5**-C-33
Shown with command logic module. Individual ramp adjustments of spool acceleration and deceleration, independent of direction of movement, are on the base
amplifier. The circuit here includes the essential characteristics of all amplifiers listed in the "Model Codes" section,
1
actual amplifiers omit certain sub-circuits to those connection
pins not needed for the valves concerned.
1
1
NNote: Read circuit in conjunction with that for relevant base amplifier
1
EEA-PAM-5**-A
1
1
z2 +10V x 5mA
b2 -10V x 5mA
+15V
+10V �10V
�15V
+24V
Power 0V
bdz32 bdz30
24V DC
1
Power
supply
1
z6
b6 b8 b10 z8 z10 inverting command input
bz4 Signal 0V
�15V Gain AB
PA Acc. Dec. A B
Dither
b12 Ramps active indicator
b20 Drive signal zero indicator
1
Close to enable
b24
+24V Drive
1
Enabled
enabled
Overload
1
z12 Drive output status z28
1
Ramps enable +24V
Close to enable
b24
Ramps enabled
z26
To solenoid
1
PWM
b28
Deadband
b26
To solenoid
1
compensation
Solenoid current
1
Command logic module
b18
Command voltage
Acc. Dec. PB
Command signal monitor points
1
z18
Monitor points
1
polarity selection d2
1 d10
2 d12 3 d14
1
z22
1
+15V z16
z14
1
4 d18
2 3
+10V - 10V
Pilot stage LVDT
1
+24V Logic inputs
4 1
2
Polarity switch
LVDT failure
z22 +15V
b16
1
see table on next page
3 4
Main stage
b14
+
-
LVDT
1
d28 d26 d24 d22 d20
bz4
1
1
External command potentiometer. R = 5k : 0.25W minimum
Command signal inputs
Customer's protective earth connection. SCoulsetnoomiderc'usrpreronttefcotriv5e2e3a/5r2th5-cComnnoedcetilos;nL. VDT position for all others. OSnolfernoonitdpcaunrerle.nt for 523/525-B models; LVDT position for all others. SOenefuronndtepr athniesl.heading in "Operating Data" table See under this heading in "Operating Data" table, on previous two pages.
On-board command voltage source
Valve actual connections see tabel on next page
1
1
1
1
1
1
EURO PAM 33 CATALOG E-VLVI-CC004-E1--December 2019 www.eaton.com
25
Type C Amplifer with command logic module and 4 ramps
1
Table 14. Logic Selection Inputs
1
Logic input pin
d10
1
d12
1
d14
1
d18
1
Command pot.
1 2 3 4
Secondary pin
bdz30 bdz30 bdz30 bdz30
Voltage to pin d2
0 +24V
0 +24V
0 +24V
0 +24V
Valve flow
P-A P-B
P-A P-B
P-A P-B
P-A P-B
1
In the case of EEA-PAM-523/525-C models, one of these relationships may not apply if two single-solenoid
valves are connected.
1
1 Solenoid and LVDT connections for proportional valves
1 Table 15.
1
Solenoid with
Pilot-stage LVDT, (black plug):
Main-stage LVDT, (gray plug):
LVDT and/or for Solenoid without LVDT,
1
Amplifier type
flow P to B
EEA-PAM-523-C-33 b26/b28
or on pilot valve
z26/z28
Pin 1 Pin 2 Pin 3 Pin 4
Pin 1
-
-
-
Not connected -
Pin 2
-
Pin 3
-
Pin 4
Not connected
1
EEA-PAM-525-C-33 b26/b28
EEA-PAM-533-C-33 b26/b28
1
EEA-PAM-535-C-33 b26/b28
EEA-PAM-561-C-33
1
EEA-PAM-568-C-33
z26/z28 z26/z28 z26/z28 z26/z28 z26/z28
-
-
-
Not connected -
Not connected
-
-
-
Not connected b14
z22
b16
Not connected
-
-
-
Not connected b14
z22
b16
Not connected
-
-
-
Not connected b14
z22
b16
Not connected
-
-
-
Not connected b14
z22
b16
Not connected
1
1
1
1
1
1
1
1
1
1
1
1
1
1
1
26
EURO PAM 33 CATALOG E-VLVI-CC004-E1--December 2019 www.eaton.com
Type C Amplifer with command logic module and 4 ramps
Installation dimentions in mm (inches) Plug-in Unit of 3U Height, to IEC 297
M2.5 x 11(0.43) long collar screws supplied with panel for fixing
3rd angle projection
DIN 41612 F48 male connector. Mating connector must be an F48 female type.
z - pin row b - pin row
d - pin row Components envelope
7.92 (0.31)
2.5 (0.1)
122.4 (4.82)
Model designation
3(0.12)
3(0.12)
7.45 (0.29)
40.3 (1.59)
128.4 (5.06)
8(0.31)
14.2(0.56)
7.2 (0.28)
14 (0.55)
175.24(6.9)
100 (3.94)
EURO PAM 33 CATALOG E-VLVI-CC004-E1--December 2019 www.eaton.com
1 1 1 1 1 1 1 1 1 1 1 1 1 1 1 1 1 1 1 1 1 1 1 1 1 1 1 1 1 1
27
Type C Amplifer with command logic module and 4 ramps
1
Dedicated installation recommendation for Type B & C card
3. Command Signals 1 to 4 Turning the input 1,2,3,4 adjustment potentiometers
1
The operation of this amplifier has been factory-checked before
clockwise increases output, turning counter-clockwise reduces output. Use the four input adjustment
dispatch as meeting the specification shown in this catalog.
1
The amplifier is ready for use as supplied, but it must be
1
properly installed by a qualified person using the machine designer's wiring diagram.
potentiometers to set four independent command signals. 4. Gain (only available with type C)
The gain potentiometers are factory set for 100% output
at 10V command signal. Turning the gain potentiometers
1 1. Wiring sizes
clockwise increases the gain, turning counter-clockwise reduces gain.
1
1. Use 3-core screened cable 0.5 mm2 (20 AWG) per wire for
signal and LVDT wiring.
5. Ramps
1
2. For wiring runs between amplifier and solenoid up to 50 metres (164 ft): EEA-PAM-523 and EEA-PAM-525 must have
a screened cable with a cross-section of 1.5 mm2 (15 AWG)
1
3. For all other models use screened cable of 1 mm2
(18 AWG) cross-section.
1
2. Front panel controls
The factory settings of ramp potentiometers are minimum ramp time. Turning the controls clockwise increases ramp time, turning counter-clockwise decreases ramp time. On type B there are two separate controls for accelerating and for decelerating ramps, valid for both directions of movement.
On type C there are four separate controls for both
1
Any of the following controls may be on the front panel
(depending on the amplifier type) and can be adjusted
1
as described.
accelerating and for decelerating ramps, independently adjustable for both directions.
1
1. Set zero: On amplifier types 513-B this sets the electrical null
1
of the valve
2. Deadband compensation:
1
The two potentiometers are factory set at 10% (20% for
type 523) of valve maximum spool stroke. The setting
1
may be optimized for your application as follows:
1
Apply a small command signal (e.g. 250 mV) and check for hydraulic response from the valve. (For 2-stage valves the
1
correct pilot pressure must be available to obtain response from the main-stage spool.) If this does not occur then
adjust the applicable potentiometer clockwise until it does.
1
Alternatively, to reduce valve hydraulic response turn the
potentiometer counter-clockwise.
1
A 250 mV command signal can be achieved by turning a
1
selected command signal potentiometer counter-clockwise to the endstop.
1
1
1
1
1
1
1
1
1
1
28
EURO PAM 33 CATALOG E-VLVI-CC004-E1--December 2019 www.eaton.com
Type C Amplifer with command logic module and 4 ramps
3. Front panel indicator lights (LEDs)
1
Amplifiers may have some, or all, of the following LEDs, depending on amplifier type:
1
Table 16.
1
Panel symbol
Function indicated
Color
Normal working state
24V
Power supply ON
Green
ON
1
15V
Internal supply ON
Green
ON
Output enabled
Yellow
ON
1
Overload detection
Red
OFF
1
LVDT failure
Red
OFF
1
Ramps enabled
Yellow
ON
Current to solenoid (Light intensity
Yellow
ON
1
varies with solenoid current)
1
4. Valves connection table
1
1
Table 17.
Solenoid
Pilot-stage LVDT
Main-stage LVDT
1
Solenoid with LVDT without LVDT or
Value type Amplifier type
or hydraulic A
hydraulic B
Pin 1 Pin 2 Pin 3 Pin 4
Pin 1 Pin 2 Pin 3 Pin 4
1
KCG-3/6/8 and EEA-PAM-513-B-33 b26/b28
-
-
-
-
-
-
-
KX(C)G-6/8
1
K*G4V-3 and EEA-PAM-523-B/C-33 b26/b28
z26/z28
-
-
-
-
-
-
KDG5V-5/7/8
K*G4V-5
EEA-PAM-525-B/C-33 b26/b28
z26/z28
-
-
-
-
-
-
1
KF*G4V-3 KF*G4V-5 KFDG5V-5/7 KFDG5V-8 CVU-**-EFP1
EEA-PAM-533-B/C-33 b26/b28 EEA-PAM-535-B/C-33 b26/b28 EEA-PAM-561-B/C-33 EEA-PAM-568-B/C-33 EEA-PAM-571-B-33 -
z26/z28 z26/z28 z26/z28 z26/z28 z26/z28
-
-
-
Not
b14 z22 b16 Not
-
-
-
connected b14 z22 b16 connected
1
-
-
-
b14 z22 b16
1
-
-
-
b14 z22 b16
-
-
-
b14 z22 b16
1
KHDG5V-5/7/8 EEA-PAM-581-B-33 -
z26/z28
z14 z22 z16
b14 z22 b16
1
NNote: If valves are fitted with the "E" type LVDT, the screen will be grounded at the valve end by the shell of the connector.
1
1
1
1
1
1
1
1
1
1
1
EURO PAM 33 CATALOG E-VLVI-CC004-E1--December 2019 www.eaton.com
29
Type C Amplifer with command logic module and 4 ramps
1 5. Fault diagnosis
If the amplifier fails to work the following checks
1
should be made:
6. Check that the overload LED is OFF. (If ON, check the wiring to the solenoids and the solenoid resistance by an ohmmeter. Compare the measured value with the catalog data.)
1. Check that all wiring is correct to the machine designer's
1
instructions.
7. Check that an appropriate command signal is applied (monitor point at the front panel)
2. Check that there is a 24V supply and that the
1
24V LED is ON.
� �10V at monitor point represents �100% output 8. The solenoid current (non-feedback valves) or the
3. Check that the 15V internal voltage LED is ON
1
(if 24V LED is ON and this 15V LED is OFF then the
amplifier should be replaced.)
LVDT signal (feedback valves) can be measured at the front panel monitor point.
� Solenoid current can be measured as a voltage
1
4. Check that the amplifier is enabled and the LED is ON.
5. Check that the LVDT failure LED is OFF. (If ON check the
1
LVDT wiring and connections.)
signal (1 volt per amp)
� �10V LVDT signal at monitor point represents �100% stroke.
To check correct function of the amplifier, disconnect all
1
valve connections and link z22 (+15V) with a 1.2 k resistor
to b14. (To check the double feedback amplifiers
1
EEA-PAM-581, make an additional link between z22 (+15V) and z14 with a 1.2 k resistor.) After installation
1
of resistor link(s), the LVDT failure LED should be OFF. If not, replace the amplifier (caution: a link without resistor
damages the amplifier).
1
1
1
1
1
1
1
1
1
1
1
1
1
1
1
1
1
1
1
1
30
EURO PAM 33 CATALOG E-VLVI-CC004-E1--December 2019 www.eaton.com
Type D Power amplifiers with PID modules
General description
� The design reduces the amount of external wiring, saves space in the rack enclosure and requires only
1
The EEA-PAM-5**-D-33 Eurocards are power amplifiers with
one 24V supply
integrated PID modules. Each of these cards replaces two
� The general purpose, integrated module can be configured
1
conventional electronic cards.
using DIL switches (D1-D9) and potentiometers for the
following applications:
1
Features and benefits
� Closed-loop pressure control using either proportional
pressure valves or servo-performance proportional valves
1
� Includes all features of "A" amplifiers (except gain)
� Closed-loop velocity control
� User configurable PID feed-forward, closed-loop operation
� Closed-loop position control
1
� Command input ramps � Analog feedback sensor interface
� p/Q control with internal or external switch-over
from Q to p
1
� Automatic switch-over p/Q function � Built-in test feature
� The DIL-switch and potentiometer settings can easily be
reconfigured on different cards
1
� CE electromagnetic compatibility.- 2014/30/EU
� RoHS Compatibility-DIRECTIVE 2011/65/EU
1
Front panel FFront Ppaanneel l
LEDs [1] 24V power supply input, green [2] 15V control supply output, green [3] Drive (solenoid) enabled, yellow [4] Overload, red [5] LVDT failure, red
1
1
[15] Mode switch
24/15
AUTO
� TEST VALVE setting � AUTO function setting
1
TEST TEST VALVE LOOP
� TEST LOOP setting [16] Test potentiometer
1
0
LEDs
1
[6] Drive level to solenoid, yellow
Potentiometers [7] Deadband compensation, ow P to B [8] Deadband compensation, ow P to A
LED [9] Ramps enabled, yellow
Potentiometers [10] Command ramp up [11] Command ramp down
Monitor points [12] MP1: Conditioned command signal [13] Common ground (0V) [14] MP2: LVDT (spool) position
�
+
P
B
A
V
P
t
I
t
D
1
35
2
46
[17] PID-controller enabled, yellow [18] Integrator enabled, yellow
1
[19] Feedback = command signal, green
1
[20] Sensor failure, red
Potentiometers
1
[21] Feed-forward signal scaling [22] P-gain
1
[23] I-gain
1
[24] D-gain
Monitor points
1
[25] MP3: Command signal
[26] MP5: PID-controller output
1
[27] MP6: Integrator output [28] MP4: Feedback signal
1
Number and function of potentiometers [7], [8], [7.2] vary according to model type as follows:
For models -513/541/553-
[7.2] Offset
1
LED and symbol not on EEA-PAM-513/523/525 ampli ers.
1
Solenoid current for EEA-PAM-523/525-D models.
�2,0 mm (0.0787 "dia.) sockets. In the case of EEA-PAM-523/525-D models one of these
1
relationships may not apply if two single solenoid valves are connected.
1
1
WARNING
1
Electromagnetic Compatibility (EMC)
1
It is necessary to ensure that the valve is wired up in accordance with the connection arrangements shown in this leaflet. For effective
protection, the user's electrical cabinet, the valve subplate or manifold and the cable screens should be connected to efficient earth
1
(ground) points. In all cases, both valve and cable should be kept as far away as possible from any source of electromagnetic radiation such
as cables carrying heavy current, relays and certain kinds of portable radio transmitters, etc. Difficult environments could mean that extra screening may be necessary to avoid the interference.
1
EURO PAM 33 CATALOG E-VLVI-CC004-E1--December 2019 www.eaton.com
31
Type D Power amplifiers with PID modules
1 Model codes
1 Table 18.
1
Amplifier model
EEA-PAM-513-D-33
1
1
EEA-PAM-523-D-33 EEA-PAM-525-D-33
1
EEA-PAM-533-D-33
EEA-PAM-535-D-33
1
EEA-PAM-541-D-33
EEA-PAM-553-D-33
1
EEA-PAM-561-D-33
EEA-PAM-568-D-33
1
EEA-PAM-571-D-33
1
EEA-PAM-581-D-33
For valves
KCG-3, KCG-6/8 KX(C)G-6/8 K*G4V-3, KDG5V-5/7/8 K*G4V-5 KF*G4V-3 KF*G4V-5 KHDG5V-5/7/8 with zerolapped mainspool KSDG4V-3 KFDG5V-5/7 KFDG5V-8 CVU-**-EFP1 KHDG5V-5/7/8
With type "H" coils only
1 Operating data
1 Table 19.
1 Power (input) supply
See appropriate base amplifier, e.g. for EEA-PAM-535-D-33 see EEA-PAM-535-A-33
1
Control (output) supplies:
Reference voltages
1
Analog inputs:
1
Command signal inputs
Direct-voltage pins
z22 +15V for LVDTs only z2 +10V x 5 mA b2 �10V x 5 mA
b6, b8, b10, z8
1
Inverting-voltage input
Voltage range
1
Input impedance (voltage)
z10 � 10V 47 k
Current input
1
Current range
z6 � 20 mA
1
Input impedance (current)
Feed-forward input
100 d8
1
Input impedance
Voltage range
6 k � 10V
1
Input to ramp generator
Input impedance
1
Voltage range
Inputs from sensors
1
Voltage input
d28 10 k � 10V
d2
Input impedance
1
Voltage range
1 M 0 to 10V, or � 10V
1
Current input Input impedance
d2 100
1
Current range (See "DIL Switches" five pages on) Monitoring of sensor failure for sensors with a current outout only
4-20 mA or 0-20 mA
1
The demand signal should have the same voltage range as the sensor feedback,i.e. 0 to 10V, or � 10V.
Digital inputs:
1
Drive enable (power available to solenoid)
Ramps enable
1
Integrator enable
z24
b24
d14 Warning: In a power-up sequence, the integrator should not be enabled until all hydraulic, electric and control power and signals are applied and stable. Abrupt or unpredictable motion may occur if integrator is enabled during this transition time.
32
EURO PAM 33 CATALOG E-VLVI-CC004-E1--December 2019 www.eaton.com
Type D Power amplifiers with PID modules
Operating data
Table 19. continued
PID-controller enable
Enabled Disabled Load current
Digital outputs: Sensor failure
Sensor failure Sensor o.k. Load current (withstands a continuous short-circuit condition) This output may be used only in conjunction with sensors providing a current output (4-20 mA) Feedback = command signal Feedback matches demand Feedback does not match demand Load current (withstands a continuous short-circuit condition) The load at pin d18 and pin d10 has to be connected to ground
Analog outputs:
PID-controller output Error signal
Feedback signal
Load impedance Voltage range
Output from ramp generator
Load resistance Voltage range
Alarm output (drive output status):
Set alarm Signal
Reset after failure
Ramp active indicator:
Drive ramping up Drive ramping down Drive not ramping Output resistance
Drive signal zero indicator:
Drive signal at null (within deadband limits) Drive active Output resistance
Potentiometers:
Feed-forward P-gain (depends on DIL switch D2): I-gain range D-gain range Sensor signal gain range Sensor signal offset range
Located on PID module.
d12 17 to 40V 0 to 3.5V 10 mA
d18 Vcc �2V <3V 100 mA
d10 Vcc �2V <3V 100 mA
d4 d22 d24
10 k; short-circuit proof � 10V d26 5 k; short-circuit proof � 10V z12 Enable amplifier (on pin z24) >500 ms after switching power on. HIGH when alarm is activated. Output = Supply volts minus 2 volts. I = 50 mA max. LOW when solenoid overload has occurred. (Maintained until reset). Output = 0 to +/�2 volts. Output resistance = 50 ohms. Disable and re-enable on pin z24. b12 Output > 10V Output < � 10V Output 0 � 10V 10 k b20 Output = Supply minus 1.5V; I = 50 mA max. Output = 0 � 2V 50
V = 20% to 100% P = 0.1 to 50V/V Ki = 0.5 to 100 V/s/V Kd = 0 to 0.05 V/V/s 90% to 120% � 10%
EURO PAM 33 CATALOG E-VLVI-CC004-E1--December 2019 www.eaton.com
1 1 1 1 1 1 1 1 1 1 1 1 1 1 1 1 1 1 1 1 1 1 1 1 1 1 1 1 1 1
33
Type D Power amplifiers with PID modules
1 Operating data
1 Table 19. continued
1
Monitor points:
1
Conditioned command signal LVDT (spool) position
MP1 MP2
1
Command signal
MP3
Feedback signal
MP4
1
PID-controller output
Integrator output (100%, independent of D3, D4, D5)
1
Voltage range
Monitor point impedance
1
Ambient conditions:
MP5 MP6
� 10V 10 k
Storage temperature range
1
Operating temperature range
�25 to +85 �C (�13 to +185�F) 0 to 50 �C (32 to 122 �F)
1
Mass
Installation wiring requirements for Vickers electronic products
0.4 kg (0.88 lb) approx. 2468
1
Cardholder
F48 02-104808
All amplifiers except EEA-PAM-523/525 models, in which solenoid current is monitored.
1
1
1
1
1
1
1
1
1
1
1
1
1
1
1
1
1
1
1
34
EURO PAM 33 CATALOG E-VLVI-CC004-E1--December 2019 www.eaton.com
Type D Power amplifiers with PID modules
Circuit and Connections
1
ECEirAcu-iPtAanMd -C5o*n*n-eDct-i3o3ns
1
NENoEtAe: R-PeAadMc-ir5c*u*it-iDn -c3o3njunction with that for relevant base amplifier
EEA-PAM-5**-A
Read circuit in conjunction with that for
1
relevant base ampli er EEA-PAM-5**-A
1
z2 +10V 5 mA b2 �10V 5 mA
15V 24V Power supply
bz32
24V DC
1
+24V
z24
Close to enable Current command signal
z6
Output enable
+24V
Power zero
Enable
bz30 z12
Drive output
Power supply
1
Dither
Overload
status
1
b6
Deadband compensation
b8
z28
1
Voltage
b10
command
z8
signals
z10
Control zero
bz4
Gain
+ �
z26
To solenoid
Power
1
ampli er
PWM
b28
1
b26
To solenoid
Non-invert
D9
Ramp
Solenoid current
+15V z22
1
Connect to +10V (z2) for p/Q control with automatic switch-over only
Inverter + �
b12 Ramp active
b18 MP1
Pilot stage LVDT
LVDT failure
z16 z14
z22 +15V
b16
1 1 1
b20
Main stage
b14
+24V
b24 Ramp enable
LVDT
z18
1
Close to enable
MP2
Power ampli er
1
d28
d26
Feed forward
d8
Test loop
Feed forward
V
PID control module
1
Valve. Actual connections see table on next page.
1
+24V Close to enable PID- controller
+10V Conditioned feedback signal
Sensor 0 to +10V X or sensor 10V
U Sensor 0 to 20 mA or sensor 4 to 20 mA
Sensor failure
Feedback = command signal
d12
d16
d24 Gain
d2 d6
1-10% error d18 d10 Sensor
Offset +
� MP4
MP3
P P-gain
P
D-gain
D
D
D7
Polarity
+ �
1
Test valve
1
1
d4 PID-controller output
1
1
PIDcontroller enabled
MP5
1
1
failure Feedback =
D6
I
MP6
1
command signal
Error signal
d22
I-gain
+
I
1
�
+24V
d14
Close to enable
integrator
Integrator enabled
D3
D5
6% D4 50%
35%
1 1
Customer 's protective ground connection.
1
EURO PAM 33 CATALOG E-VLVI-CC004-E1--December 2019 www.eaton.com
35
Type D Power amplifiers with PID modules
1 Solenoid and LVDT connections for proportional valves
1 Table 20.
1
Solenoid with
Pilot-stage LVDT, (black plug):
Main-stage LVDT, (gray plug):
LVDT and/or for Solenoid without LVDT,
1
Amplifier type
flow P to B
EEA-PAM-513-D-33 b26/b28
or on pilot valve
-
Pin 1 Pin 2 Pin 3 Pin 4
Pin 1
-
-
-
Not connected -
Pin 2
-
Pin 3
-
Pin 4
Not connected
1
EEA-PAM-523-D-33 b26/b28
EEA-PAM-525-D-33 b26/b28
1
EEA-PAM-533-D-33 b26/b28
EEA-PAM-535-D-33 b26/b28
1
EEA-PAM-541-D-33 -
z26/z28 z26/z28 z26/z28 z26/z28 z26/z28
-
-
-
Not connected -
-
-
-
Not connected -
-
-
-
Not connected b14
-
-
-
Not connected b14
z14 z22 z16 Not connected b14
-
-
-
-
z22
b16
z22
b16
z22
b16
Not connected Not connected Not connected Not connected Not connected
EEA-PAM-553-D-33 -
1
EEA-PAM-561-D-33 -
z26/z28 z26/z28
-
-
-
Not connected b14
-
-
-
Not connected b14
z22
b16
z22
b16
Not connected Not connected
1
EEA-PAM-568-D-33 EEA-PAM-571-D-33 -
z26/z28 z26/z28
-
-
-
Not connected b14
-
-
-
Not connected b14
z22
b16
z22
b16
Not connected Not connected
1
EEA-PAM-581-D-33 -
z26/z28
z14 z22 z16 Not connected b14
z22
b16
Not connected
1
Installation dimentions in mm (inches)
1
Installation Dimensions in mm (inches)
1
Plug-in Unit of 3U height, to IEC 297
1
1
1
1
1
1
M2.5 x 11 (0.43) long collar
screws supplied with panel for fixing
1
1
3rd angle projection
DIN 41612 F48 male connector. Mating connector must be an F48 female type.
z - pin row b - pin row d - pin row
Components envelope
7.92 (0.31)
2.5 (0.1)
1
1 122.4
1
(4.82)
128.4 (5.06)
Model
1
designation
1
3 (0.12)
8 (0.31)
14.2 (0.56)
1
1
3 (0.12)
7.45 (0.29)
7.2
14
(0.28) (0.55)
50.3
175.24 (6.9)
1
(1.98)
100 (3.94)
1
36
EURO PAM 33 CATALOG E-VLVI-CC004-E1--December 2019 www.eaton.com
Type D Power amplifiers with PID modules
Application notes
1
DIL Switches
1 2 3 4 5 6 7 8 9 10 ON OFF
Factory setting
The controller is configured for the application using DIL switches, located on the board.
The DIL switch operates as follows:
Table 21.
Switch
D1: D2: D6:
D7: D8: D9: D10:
On
For sensors with 4 to 20 mA output
P-gain 2 to 50
One-sided limitation of the integrator output. (Only useful for proportional pressure and proportional throttle valves.)
Inverts the controller output signal
For sensors with 4 to 20 mA output
Ramp signal not inverted
Not used
Off
For sensors with � 10V or 20 mA outputs P-gain 0,1 to 2 No limitations of integrator output
Non-inverted signal
For sensors with � 10V or 20 mA outputs Ramp signal inverted -
Operation of the integrated test mode
1
The basic operation of the hydraulic actuator can be tested by using the 3-position mode switch mounted on the front panel.
1
To select different modes the toggle switch must be lifted slightly before turning it to a new position.
1
1
CAUTION
1
Before setting the mode switch to either "Test valve" or "Test
1
loop" make sure the test potentiometer is set to "0". Otherwise
sudden movements of the actuator may occur. The mode switch has three positions:
1
Auto
1
The controller operates in closed-loop mode, using the external
command signal. The test potentiometer is disconnected.
1
Test valve
An open-loop command signal for the valve comes directly from
1
the potentiometer. The external input signal is disconnected.
The hydraulic part of the system may be tested in this
1
configuration.
Test loop
1
The closed-loop command signal for the PID-controller comes directly from the potentiometer. The external signal input is
1
disconnected. This configuration allows for verification of the
valve polarity and the control parameters.
1
1
For p/Q control with automatic switch-over, connect d16 to z2 (+10V). The flow command signal (Q) is applied to the feed-forward input, d8, and the desired pressure setpoint voltage applied to a command signal input (b6/8/10 or z6/8/10). The pressure feedback sensor is connected to the sensor input d2, or d6 as required. The pressure control loop will override the flow command to limit the pressure to the level determined by the pressure setpoint voltage. Adjust P, I and D gains for best performance.
The switches D3, D4 and D5 belong together. They limit the I-gain between 5% and 100% as follows:
D3
D4
D5
l-limit
ON
ON
ON
100%
ON
ON
OFF
50%
ON
OFF
ON
35%
ON
OFF
OFF
25%
OFF
ON
ON
5.9%
OFF
ON
OFF
5.8%
OFF
OFF
ON
5.3%
OFF
OFF
OFF
5.0%
External command signal
Test potentiometer on front panel
1
1
Controller
TEST LOOP
AUTO
TEST VALVE
Mode switch on front panel
To power
1
amplifier
1
1
1
1
1
1
1
1
1
1
1
EURO PAM 33 CATALOG E-VLVI-CC004-E1--December 2019 www.eaton.com
37
Type D Power amplifiers with PID modules
1
Dedicated installation recommendation for Card Type D
5. Integrated Test Unit The basic operation of the valve, the hydraulic actuator and
1
1. Pre-installation checks:
the whole closed loop system can be tested by using the integrated test facilities on the front panel.
1
1. The controller has to be configured for the application by the
Caution: Before setting the mode switch to either "Test valve" or "Test loop", make sure the test potentiometer is
1
DIL switches. When replacing an existing amplifier, set the DIL switches in the same position as the old amplifier
set to "0". Otherwise sudden movements of the actuator may occur.
1
1 2 3 4 5 6 7 8 9 10
ON
1
OFF
5. Reconfiguration of controller parameters
Once the controller parameters have been optimized and set, they can be measured by means of an ohmmeter. This allows
1 2. Wiring sizes
an easy reconfiguration of the controller on different cards for use as spare parts or on standard machine series. Four test points are located on the PID module for this purpose, see
1
1. Use 3-core screened cable 0.5 mm2 (20 AWG) per wire for diagram for locations. The resistance between the appropriate
signal and LVDT wiring.
test point and ground (at the front panel monitor point)
1
2. For wiring runs between amplifier and solenoid up to 25
determines the controller parameters:
metres (82 ft), use wire of 1 mm2 (18 AWG) cross-section. P = P-gain
1 3. Installation requirements according to European
I = I-gain
1
EMC regulations
1. The screen for LVDT wiring has to be connected to
D = D-gain V = Feed-forward gain
1 1
protective earth at both ends. PIN 4 on the LVDT plug is connected to LVDT housing. Alternatively, double screened cable can be used with two screens grounded at opposite ends.
Location of User Features on PID Module
Offset
Gain
1 4. Front panel controls
potentiometer (sensor signal)
potentiometer (sensor signal)
1
Any of the following controls may be on the front panel (depending on the amplifier type) and can be adjusted
as described.
1
1. Set zero:
1
On amplifier types 513, 541 and 553 this sets the electrical null of the valve
1
2. Deadband compensation:
1
(not available on types 513, 541 and 553) The two potentiometers are factory set at 10% (20% for
1
types 523 and 533) of valve maximum spool stroke. The
setting may be optimized for your application as follows:
DIL
switches
1
Apply a small command signal (e.g. 250 mV) and check for hydraulic response from the valve. (For 2-stage valves the
1
correct pilot pressure must be available to obtain response from the main-stage spool.) If this does not occur then
adjust the applicable potentiometer clockwise until it does.
1
Alternatively, to reduce valve hydraulic response turn the
potentiometer counter-clockwise.
Potentiometer In position 1%-10% V P I D
Test point "P" P-gain
1 3. Ramps
Test point "D" D-gain
1
The ramp generator is available as a separate unit and
can be used to ramp the command signal. The factory
1
settings of ramp potentiometers are minimum ramp time. Turning the controls clockwise increases ramp time, turning
1
counter-clockwise decreases ramp time.
4. PID controller
Test point "I" I-gain
Test point "V" Feed-forward gain
1
The adjustment of the PID controller must be done
1
by a qualified person with knowledge of closed loop systems. Adjust the controls V, P, I, D to achieve optimum
performance of the closed loop system.
1
38
EURO PAM 33 CATALOG E-VLVI-CC004-E1--December 2019 www.eaton.com
Type D Power amplifiers with PID modules
6. Front panel indicator lights (LEDs)
Amplifiers may have some, or all, of the following LEDs, depending on amplifier type:
Table 22.
5. Check that the LVDT failure LED is OFF. (If ON check the LVDT wiring and connections.)
1
To check correct function of the amplifier, disconnect
all valve connections and link z22 (+15V) with a 1.2 k
1
resistor to b14. (To check the double feedback amplifiers
EEA-PAM-581/541, make an additional link between
1
z22 (+15V) and z14 with a 1.2 k resistor.)
Panel symbol
Function indicated
Normal Color working state
After installation of resistor link(s), the LVDT failure LED
1
should be OFF. If not, replace the amplifier (caution: a link
24V
Power supply ON
Green ON
without resistor damages the amplifier).
1
15V
Internal supply ON
Green ON
6. Check that the overload LED is OFF. (If ON, check
Output enabled Overload detection
LVDT failure Ramps enabled
Yellow ON
Red
OFF
Red
OFF
Yellow ON
the wiring to the solenoids and the solenoid resistance by an ohmmeter. Compare the measured value
1
with the catalog data.) 7. Check that an appropriate valve driving signal is available
1
(monitor point MP1 at the front panel). � �10V at monitor point represents �100% output
1
Current to solenoid (Light intensity Yellow ON varies with solenoid current)
of the valve
1
8. The solenoid current (non-feedback valves) or the LVDT
signal (feedback valves) can be measured at the front panel monitor point MP2.
1
7. Fault diagnosis:
If the amplifier fails to work the following checks should be made
1. Check that all wiring is correct to the machine designer's instructions
2. Check that there is a 24V supply and that the 24V LED is ON
3. Check that the 15V internal voltage LED is ON (if 24V LED is ON and this 15V LED is OFF then the amplifier should be replaced.)
4. Check that the amplifier is enabled and the LED is ON
� Solenoid current can be measured as a voltage signal (1 volt per amp)
1
� �10V LVDT signal at monitor point represents
1
�100% stroke
9. Check that the DIL switches are set correctly, corresponding
1
to the application.
10. Check the PID controller operation by using the monitor
1
points MP3, 4,5,6 at the front panel. The integrated test
facility is a support to check the operation.
1
1
8. Valve connection table
1
This table shows how the different valves have to be connected to the associated amplifier.
1
Table 23.
1
Pilot-stage LVDT
Main-stage LVDT
1
Solenoid
Solenoid
with LVDT or without LVDT
Value type
Amplifier type
hydraulic A or hydraulic B Pin 1 2
3
4
Pin 1 2
3
4
1
KCG-3/6/8 and EEA-PAM-513-D-33 b26/b28
-
KX(C)G-6/8
�
�
�
�
�
�
1
K*G4V-3 and KDG5V-5/7/8
EEA-PAM-523-D-33 b26/b28
z26/z28
�
�
�
�
�
�
1
K*G4V-5 KF*G4V-3
EEA-PAM-525-D-33 b26/b28 EEA-PAM-533-D-33 b26/b28
z26/z28 z26/z28
�
�
�
�
�
�
�
�
�
b14
z22
b16
1
KF*G4V-5
KHDG5V-5/7/8 zero lapped
KSDG4V-3
EEA-PAM-535-D-33 b26/b28 EEA-PAM-541-D-33 -
EEA-PAM-553-D-33 -
z26/z28 z26/z28
z26/z28
�
�
�
b14
z22
b16
z14
z22
z16
Screen b14
z22
b16
Screen
1
�
�
�
b14
z22
b16
1
KFDG5V-5/7
EEA-PAM-561-D-33 -
z26/z28
�
�
�
b14
z22
b16
1
KFDG5V-8
EEA-PAM-568-D-33 -
z26/z28
�
�
�
b14
z22
b16
CVU-**-EFP1 EEA-PAM-571-D-33 -
z26/z28
�
�
�
b14
z22
b16
1
KHDG5V-5/7/8 EEA-PAM-581-D-33 -
z26/z28
z14
z22
z16
b14
z22
b16
1
1
EURO PAM 33 CATALOG E-VLVI-CC004-E1--December 2019 www.eaton.com
39
Type E Power amplifiers with strip guidance controller modules
1 EEA-PAM-5**-E-33 Series
Features and benefits
1 General description
� Includes all features of "A" amplifiers (except gain) � Input offset compensation
1
A strip guidance controller serves to control the position of an electrohydraulic actuator, using optical sensors.
� Strip guidance control � Voltage or current input sensor interface
The controller can be used for strip-edge or
1
strip-center guidance or stack height control.
� Built-in test feature � CE electromagnetic compatibility.- 2014/30/EU
It consists of a power amplifier for roportional valves, and an
1
integrated module for strip guidance control.
� RoHS Compatibility-DIRECTIVE 2011/65/EU
1
1
Front panel FrroonnttPpaannelel
1
LEDs
[1] 24V power supply input, green
1
[2] 15V control supply output, green
1
[3] Drive (solenoid) enabled, yellow
[4] Overload, red
1
[5] LVDT failure, red
[6] Drive level to solenoid, yellow
1 Potentiometers
1
[7] Deadband compensation, flow P to B
[8] Deadband compensation, flow P to A
1 LED
1
[9] Ramps enabled, yellow
1
Potentiometers
[10] Acceleration ramp
1
[11] Deceleration ramp
1
Monitor points
[12] MP1: Conditioned input signal
1
[13] Common ground (0V)
1
[14] MP2: LVDT (spool) position
1
Solenoid current for EEA-PAM-523/525-E models.
1
�2,0 mm (0.0787 "dia.) sockets.
24/15
AUTO
TEST
TEST
VALVE LOOP
0
�
+
P
B
A AUTO
+/�
t
V+
t V�
1
35
2
46
[15] Mode switch � TEST VALVE setting � AUTO function setting � TEST LOOP setting
[16] Test potentiometer
LEDs [17] Controller active, yellow [18] Sensor out of range, red Potentiometers [19] Maximum closed-loop velocity + [20] Maximum closed-loop velocity �
LEDs [21] Open-loop command (+) active [22] Open-loop command (�) active Potentiometers [23] Open-loop command + [24] Open-loop command � Monitor points [25] MP3: Output signal of sensor with
current output, non-inverting
[26] MP5: Conditioned sensor signal, 10V full scale
[27] MP6: Controller output [28] MP4: Output signal of sensor with
current output, inverting
1
1
1
WARNING
1
Electromagnetic Compatibility (EMC)
1
It is necessary to ensure that the valve is wired up in accordance with the connection arrangements shown in this leaflet. For effective protection, the user's electrical cabinet, the valve subplate or manifold and the cable screens should be connected to efficient earth
(ground) points. In all cases, both valve and cable should be kept as far away as possible from any source of electromagnetic radiation such
1
as cables carrying heavy current, relays and certain kinds of portable radio transmitters, etc. Difficult environments could mean that extra
screening may be necessary to avoid the interference.
1
1
40
EURO PAM 33 CATALOG E-VLVI-CC004-E1--December 2019 www.eaton.com
Type E Power amplifiers with strip guidance controller modules
Operation
A built-in test function together with front panel monitor points, considerably simplify start-up and fault diagnosis.
1
Non-contact optical sensors measure the position of the strip edge. The output from a sensor is an electrical signal, which
Model codes
1
is fed to the strip guidance controller (signal ranges 0 to 20
mA, 4 to 20 mA, 0 to +10V, or 0 to +24V). When activated, the Table 24. strip guidance controller maintains the strip edge exactly in the
1
center of the measuring range. If the position of the strip edge deviates from the center of the
Amplifier model
For valves
1
measuring range, the controller causes the actuator to move the strip edge back into position.
EEA-PAM-523-E-33 EEA-PAM-525-E-33
KDG4V-3 and KDG5V-5/7/8 KDG4V-5
With type "H"coils only
1
When closed-loop control is activated by the digital input signal "Automatic", the strip edge is moved from its current position
EEA-PAM-533-E-33 EEA-PAM-535-E-33
KFDG4V-3 KFDG4V-5
1
into the measuring range of the sensor. The maximum actuator velocity (forwards and reverse) can be set on the front panel.
EEA-PAM-541-E-33
KHDG5V-5/7/8 zero-lap
1
Whenever the strip edge leaves the measuring range of the sensor, the controller generates a digital output signal which
EEA-PAM-553-E-33 EEA-PAM-561-E-33
KSDG4V-3 KFDG5V-5/7
1
can be processed by the machine controller. If closed-loop control is not activated, the controller can be
EEA-PAM-568-E-33 EEA-PAM-581-E-33
KFDG5V-8 KHDG5V-5/7/8
1
operated open-loop. In this case the actuator travels at the
velocity set by potentiometer "V+" when digital input "set
1
+" is activated. "V �" and digital input "set �" are used for
movements in the reverse direction.
1
Operating data
1
Table 25.
1
Power supply Control (output) supplies:
1
zbd32 See appropriate base amplifier, e.g. for EEA-PAM-535-E-33 see EEA-PAM-535-A-33
z22 +15V for LVDTs only
1
Differential inputs for sensor:
Voltage input, non-inverting Voltage input, inverting Current input, non-inverting Current input, inverting
Digital inputs (opto-isolated):
Set + Set � Automatic Drive enable
Ramp enable
Digital output (opto-isolated):
Out of range
Potentiometers:
Deadband compensation
d2 +24V max., Ri = 100 k
1
d6 24V max., Ri = 100 k d8 20 mA max., Ri = 100
1
d12 20 mA max., Ri = 100
1
d22 24V DC nom., 20 to 40V DC max., Ri = 2.7 k
1
d20 24V DC nom., 20 to 40V DC max., Ri = 2.7 k d18 24V DC nom., 20 to 40V DC max., Ri = 2.7 k
1
z24 Enable = 9.8 to 40V
Disable = 0 to 4.8V or open, Ri = 47 k
1
b24 Enable = 9.8 to 40V
Disable = 0 to 4.8V or open, Ri = 47 k
1
d24 24V DC nom. Short-circuit proof. Imax. = 100 mA
1
Separate controls for each direction from spool-centered position 0 to 50% of max. current
1
Ramp time adjustment Closed-loop velocities
Separate controls for acceleration and deceleration 50 ms to 5 sec Separate controls for forward and reverse 5 to 100%
1
Open-loop command
Monitor points
Separate controls for forward and reverse 0 to 100%
1
(Numbers corresponding to the numbering on the front panel and in the circuit diagram)
MP1: Conditioned input signal, � 10V MP2: LVDT (spool) position, � 10V
1
MP3: Output signal of sensor with current output, non-inverting 0 to 2V = 0 to 20 mA MP4: Output signal of sensor with current output, inverting 0 to 2V = 0 to 20 mA
1
MP5: Conditioned sensor signal, � 10V MP6: Controller output, � 10V
1
All monitor points are short-circuit proof. In all cases: R(out) = 10 k
Solenoid current for EEA-PAM-523/525-E models.
1
EURO PAM 33 CATALOG E-VLVI-CC004-E1--December 2019 www.eaton.com
41
Type E Power amplifiers with strip guidance controller modules
1 Table 25. continued
1
Alarm output:
Set alarm
1
Signal
1
1
1
Reset after failure
Test facilities
1
1
1
Operating temperature
Storage temperature
1
Mass
Installation wiring requirements for Vickers
1
electronic products
Cardholder
1
1
1
1
1
1
1
1
1
1
1
1
1
1
1
1
1
1
1
z12
Enable amplifier (on pin z24) when switching power on HIGH when alarm is activated Output = Supply volts minus 2 volts I = 50 mA max. LOW when solenoid overload has occurred. (Maintained until reset) Output = 0 to +/�2 volts Output resistance = 50 ohms
Disable and re-enable on pin z24
3-position switch for: � Valve test mode � Controller test mode � Automatic operation mode Caution: Before setting the mode switch to either "Test valve" or "Test loop"ensure that the test potentiometer is set to "0", otherwise sudden movements of the actuator may occur.
0 to 50 �C (32 to 122 �F)
�25 to +85 �C (�13 to +185 �F)
0.4 kg (0.88 lb) approx.
2468
F48 02-104808
42
EURO PAM 33 CATALOG E-VLVI-CC004-E1--December 2019 www.eaton.com
Type E Power amplifiers with strip guidance controller modules
EEA-PAM-533/535-E example
Circuit and Connections
1
EEA-PAM-533/535-E-33 example
Read circuit in conjunction with that for relevant base ampli er EEA-PAM-5**-A
1
NNote: Read circuit in conjunction with that for relevant base amplifier EEA-PAM-5**-A
1
1
+15V
+10V � 10V
� 15V
24V
Power zero
bdz32
24V DC
1
bdz30
Power supply
1
15V Set + d22
b24
Ramp enable
1
Ramp
Set � d20 d18
Automatic
d28 Logic Gnd
Non-
d2
inverting
S�
Test
+
�
A
V +
Open loop command +
MP1
Conditioned input signal
Controller
enabled
z24 Drive enable
1
Enabled
1
Overload
z12 Drive output status
1
1
Deadband compensation B
Voltage inputs
d4 d6 Inverting
MP4
Gain Offset
output MP6 A
b26
b28
Sol. A
1
1
Current inputs
Non-
d8
inverting
Auto
z26
1
Deadband compensation A
Gain 70%
d10
+�
Acc. Dec.
z28
Sol. B
1
Invert Bipolar
Inverting d12
Closed-loop velocity
Ramp
Solenoid
z22
current
b16
1
MP3
MP5 Conditioned
Automatic
S� V�
b14
LVDT
�
1
sensor signal
Loop
Valve
3-position
Open loop command �
MP2 LVDT (spool) position
LVDT failure
1
switch
d26 +24V
1
"MPx" designates the serial number x of the monitor point on the front panel.
Out of range
d24 Out of range
1
d28 Gnd
1
Valve. Actual
connections
1
see table on
next page.
1
Customer's protective ground connection.
1
See footnote at bottom of "Application Examples" Solenoid current for EEA-PAM-523/525-E models.
1
1
1
1
1
1
EURO PAM 33 CATALOG E-VLVI-CC004-E1--December 2019 www.eaton.com
43
Type E Power amplifiers with strip guidance controller modules
1 Solenoid and LVDT connections for proportional valves
1 Table 26.
1
Solenoid with
Pilot-stage LVDT, (black plug):
Main-stage LVDT, (gray plug):
LVDT and/or for Solenoid without LVDT,
1
Amplifier type
flow P to B
or on pilot valve
Pin 1 Pin 2 Pin 3 Pin 4
Pin 1
Pin 2 Pin 3
Pin 4
EEA-PAM-523-E-33 b26/b28
z26/z28
�
�
�
Not connected �
�
�
Not connected
1
EEA-PAM-525-E-33 b26/b28
EEA-PAM-533-E-33 b26/b28
1
EEA-PAM-535-E-33 b26/b28
z26/z28 z26/z28 z26/z28
�
�
�
Not connected �
�
�
�
Not connected b14
�
�
�
Not connected b14
�
�
z22
b16
z22
b16
Not connected Not connected Not connected
EEA-PAM-541-E-33 -
1
EEA-PAM-553-E-33 -
z26/z28 z26/z28
z14 z22 z16 Not connected b14
�
�
�
Not connected b14
z22
b16
z22
b16
Not connected Not connected
1
EEA-PAM-561-E-33 EEA-PAM-568-E-33 -
z26/z28 z26/z28
�
�
�
Not connected b14
�
�
�
Not connected b14
z22
b16
z22
b16
Not connected Not connected
1
EEA-PAM-581-E-33 -
z26/z28
z14 z22 z16
b14
z22
b16
Not connected
1 Installation dimentions in mm (inches)
1 Installation Dimensions in mm (inches)
1
Plug-in Unit of 3U Height, to IEC 297
3rd angle projection
1
1
DIN 41612 F48 male connector.
Mating connector must be an
1
F48 female type.
7.92 (0.31)
1
z - pin row
b - pin row
1
d - pin row
1
M2.5 x 11 (0.43) long collar
1
screws supplied with panel for fixing
1
2.5 (0.1)
Components envelope
1
1
1
122.4 (4.82)
1
Model
designation
1
3
(0.12)
1
128.4 (5.06)
8 (0.31) 14.2 (0.56)
100 (3.94)
1
3
7.45 (0.29)
7.2
14
1
(0.12)
50.3 (1.98)
(0.28) (0.55)
175.24 (6.9)
1
1
44
EURO PAM 33 CATALOG E-VLVI-CC004-E1--December 2019 www.eaton.com
Type E Power amplifiers with strip guidance controller modules
Application examples
1
EEA-PAM-533/535-E ampli ers with KFDG4V-3/5 valves
Strip guidance control, stack height control
Position sensor with current output
+24V
d26 bdz32 +24V
Set +
d22
Set �
d20
Automatic
d18
bdz30 Power Gnd Drive
z24 enable
24V
Out of
range
d24
Ramp b24 enable
z26
Logic Gnd d28
z28
Power supply
24V
1 2 Solenoid
UB
b26
b28
0...20 mA S
I Sensor Gnd
d12 d10
b16 z22 b14
Position
sensor
KFDG4V-3/5
1 2 Solenoid 3 2 LVDT 1
Position sensor with voltage output
+24V
d26 bdz32 +24V
Set +
d22
Set �
d20
Automatic
d18
bdz30 Power Gnd Drive
z24 enable
24V
Out of
range
d24
Ramp b24 enable
z26
Logic Gnd d28
z28
UB
b26
b28
0...10V S
d2
U Sensor Gnd
d4
b16 z22 b14
Position
sensor
1
1
1
Power supply
1
24V
1
1
1
1
1
2 Solenoid
1
KFDG4V-3/5
1
1 2 Solenoid
1
3 2 LVDT
1
1
1
1
Strip-center guidance control Position sensor with current output
+24V
d26
Set +
d22
Set �
d20
Automatic
d18
Out of
24V
range
d24
Logic Gnd d28 UB
S
0...20 mA
d12
I Sensor Gnd
d10
UB
S
0...20 mA
d8
I Sensor Gnd
d4
Position sensor
bdz32 +24V
bdz30 Power Gnd
z24
Drive enable
Ramp b24 enable
z26 z28
b26 b28 b16 z22 b14
Power supply
24V
1 2 Solenoid
KFDG4V-3/5 1 2 Solenoid 3 2 LVDT 1
1
Position sensor with voltage output
1
Power
1
supply
+24V Set + Set �
d26
+24V bdz32
d22 bdz30 Power
d20
Gnd
24V
1 1
Automatic d18
z24
Drive enable
1
24V
Out of range d24
Ramp b24 enable
1
Logic Gnd d28
z26
UB
z28
0...10V S
d2
U Sensor Gnd
d4
b26
UB
b28
0...10V S
b16 d6
z22
U Sensor Gnd
d10
b14
Position sensor
1 2 Solenoid
1
1
KFDG4V-3/5
1
1
2 Solenoid
1
3
2 LVDT
1
1
1
1
Other ampli er/valve combinations differ in respect to the LVDT and solenoid connections; see catalog 2464 for the relevant base ampli er EEA-PAM-5**-A-33.
Customer's protective ground connection.
1
EURO PAM 33 CATALOG E-VLVI-CC004-E1--December 2019 www.eaton.com
45
Type E Power amplifiers with strip guidance controller modules
1
Dedicated installation recommendation for Type E card
1
The operation of this amplifier has been factory-checked
before dispatch as meeting the specification shown in
1
in this catalog
2. Wiring sizes
Use 3-core screened cable 0.5 mm2 (20 AWG) per wire for signal and LVDT wiring.
For wiring runs between amplifier and solenoid up to 25 metres (82 ft), use wire of 1 mm2 (18 AWG) cross-section.
1 1. Configuration
3. Sensor calibration
1
The controller has to be configured for the application by the DIL switches. When replacing an existing amplifier, set the DIL
The amplifier is factory-set to suit a sensor with a 0-20 mA output.
switches in the same positions as the old amplifier.
1
Set the sensor signal to minimum (by covering) and adjust the "offset" potentiometer to read -10V �1% at monitor
Offset potentiometer
Gain potentiometer
1
(sensor signal)
(sensor signal)
point 5 (MP5). Set the sensor signal to maximum (fully illuminated) and
1
adjust the "gain" potentiometer to read +10V �1% at MP5 on the front panel.
1
Re-check offset and repeat above as necessary.
1
4. Front panel controls
ON
Any of the following controls may be on the front panel
1
1
(depending on the amplifier type) and can be adjusted
2
as described.
3
1
4
1. Set zero:
On amplifier types 541 and 553 this sets the electrical
1
null of the valve
2. Deadband compensation:
1
(not available on types 541 and 553)
1
1
1
DIL switches
1
1
1
On 0-10V or 0-20 mA sensor signal Off � 5V or � 10V or 2 sensors
The two potentiometers are factory set at 10% (20% for types 523 and 533) of valve maximum spool stroke. The setting may be optimized for your application as follows:
Apply a small command signal (e.g. 250 mV) and check for hydraulic response from the valve. (For 2-stage valves the correct pilot pressure must be available to obtain response from the main-stage spool.) If this does not occur then adjust the applicable potentiometer clockwise until it does. Alternatively, to reduce valve hydraulic response turn the potentiometer counter-clockwise.
1
2
On Non-inverted sensor signal Off Inverted sensor signal
1
3
On KDG4V-3/5 or KFDG4V-3/5 valves Off KSDG4V-3 or KFDG5V or KHDG5V valves
4
1
Not connected
1
1
1
1
1
1
1
1
46
EURO PAM 33 CATALOG E-VLVI-CC004-E1--December 2019 www.eaton.com
Type E Power amplifiers with strip guidance controller modules
3. Ramps The ramp generator is available as a separate unit and
6. Fault diagnosis
1
If the amplifier fails to work the following checks should
can be used to ramp the command signal. The factory
be made:
1
settings of ramp potentiometers are minimum ramp time.
� Check that all wiring is correct to the machine designer's
Turning the controls clockwise increases ramp time, turning
instructions.
counter-clockwise decreases ramp time.
� Check that there is a 24V supply and that the
1
4. Integrated test unit
24V LED is ON.
1
The basic operation of the valve, the hydraulic actuator and � Check that the 15V internal voltage LED is ON (if 24V LED
the whole closed loop system can be tested by using the
is ON and this 15V LED is OFF then the amplifier should
1
integrated test facilities on the front panel.
be replaced.)
Note: to select different modes, the toggle switch must be � Check that the amplifier is enabled and the LED is ON.
1
lifted slightly before moving to a new position.
� Check that the LVDT failure LED is OFF. (If ON check the
Caution: Before setting the mode switch to either "Test valve" or "Test loop", make sure the test potentiometer is set to "0". Otherwise sudden movements of the actuator
LVDT wiring and connections.)
1
� To check correct function of the amplifier, disconnect
all valve connections and link z22 (+15V) with a 1.2 k resistor to b14. (To check the double feedback amplifiers
1
may occur. 5. Test valve
EEA-PAM-581/541, make an additional link between z22 (+15V) and z14 with a 1.2 k resistor.) After
1
installation of resistor link(s), the LVDT failure LED should
With the 3-position switch set to "Test valve", ensure that
be OFF. If not, replace the amplifier (caution: a link
1
the front panel test potentiometer controls the actuator
without resistor damages the amplifier).
speeds in both directions. 6. Auto
� Check that the overload LED is OFF. (If ON, check the
1
wiring to the solenoids and the solenoid resistance by
In this mode, the controller operates in closed loop using the external sensor signal. The test potentiometer is
an ohmmeter. Compare the measured value with the catalog data.)
1
disconnected.
� Check that the "automatic" signal is applied to pin d18.
1
� The solenoid current (non-feedback valves) or the
7. Test Loop The test potentiometer can be used to simulate the sensor
LVDT signal (feedback valves) can be measured at the front panel monitor point MP2.
1
signal. The external sensor signal is disconnected.
8. Open loop command potentiometers These are used to set the velocity when pin 20 or pin 22 are used by the machine controller to move the ctuator.
9. Max. Closed loop velocity potentiometers
� Solenoid current can be measured as a voltage signal (1 volt per amp)
1
� �10V LVDT signal at monitor point represents � 100% stroke.
1
Note: Due to the effect of spool overlap, the working range is typically 3 to 9 volts for the flows from zero to
1
There are used to set the maximum velocity when in "Auto" mode.
maximum. � Check the DIL switches are set correctly, corresponding to
1
the application. � Check the sensor output signals on MP3, MP4 or MP5
1
5. Front panel indicator lights (LEDs)
as appropriate.
1
Amplifiers may have some, or all, of the following LEDs,
depending on amplifier type:
1
Table 27.
1
Panel
Normal
1
symbol Function indicated
Color working state
24V
Power supply ON
Green ON
1
15V
Internal supply ON
Output enabled
Green ON Yellow ON
1
Overload detection
Red
OFF
1
LVDT failure
Red
OFF
1
Ramps enabled
Yellow ON
Current to solenoid (Light intensity Yellow ON
1
varies with solenoid current)
1
1
EURO PAM 33 CATALOG E-VLVI-CC004-E1--December 2019 www.eaton.com
47
Type E Power amplifiers with strip guidance controller modules
1 7. Valve connection table This table shows how the different valves have to be connected to the associated amplifier.
1 Table 28.
1
Solenoid
Solenoid
with LVDT without
Pilot stage LVDT
or hydraulic LVDT or
1
Value type
Amplifier type
A
hydraulic B Pin 1 2
3
4
K*G4V-3 and KDG5V-5/7/8 EEA-PAM-523-E-33 b26/b28
z26/z28
-
--
1 K*G4V-5
EEA-PAM-525-E-33 b26/b28
z26/z28
-
--
Main stage LVDT
Pin 1 2
3
4
-
--
-
--
1
KF*G4V-3
EEA-PAM-533-E-33 b26/b28
KF*G4V�5
EEA-PAM-535-E-33 b26/b28
1
KHDG5V-5/7/8 zero lapped EEA-PAM-541-E-33 -
z26/z28 z26/z28 z26/z28
-
--
b14 z22 b16
-
-
-
Not
b14 z22 b16 Not
z14
z22 z16 connected
b14 z22 b16 connected
1
KSDG4V-3 KFDG5V-5/7
EEA-PAM-553-E-33 EEA-PAM-561-E-33 -
z26/z28
-
--
z26/z28
-
--
b14 z22 b16 b14 z22 b16
1
KFDG5V-8
KHDG5V-5/7/8
EEA-PAM-568-E-33 EEA-PAM-581-E-33 -
z26/z28 z26/z28
-
--
z14 z22 z16
b14 z22 b16 b14 z22 b16
1
Note: If valves are fitted with the "B" type LVDT, the screen will be grounded at the valve end by the shell of the connector.
1
1
1
1
1
1
1
1
1
1
1
1
1
1
1
1
1
1
1
1
48
EURO PAM 33 CATALOG E-VLVI-CC004-E1--December 2019 www.eaton.com
Type F Power Amplifiers with CNC Adaptation Modules
EEA-PAM-5**-F-33 Series
Features and benefits
1
General description
� Includes all features of "A" amplifiers
� Hysteresis compensation for valves with/without feedback
1
The EEA-PAM-5**-F-33 Eurocards are power amplifiers with integrated CNC adaptation modules. Each card replaces two conventional electronic cards. These power amplifiers are
� Enhanced deadband adjustment for closed-loop position control using valves with overlap
1
used for high accuracy positioning systems with inexpensive standard proportional valves and CNC axis or PLC
� This particular configuration reduces the amount of external wiring, saves space in the rack enclosure and requires only
1
position controls.
one 24V power supply
� Smooth transition between the overlap region and
1
working region
� Low cost, high accuracy positioning systems with
1
overlapped proportional valves. Non-linearities and
inconsistencies (friction) in the overlap region are compensated by the electronic linearization
1
� Simple set-up procedure
1
� A built-in test function significantly simplifies commissioning
(start-up) and fault-diagnosis � CE electromagnetic compatibility.- 2014/30/EU
1
� RoHS Compatibility-DIRECTIVE 2011/65/EU
1
FFrroonntt Ppaanneell
1
LEDs [1] 24V power supply input, green [2] 15V control supply output, green [3] Drive (solenoid) enabled, yellow [4] Overload, red [5] LVDT failure, red [6] Drive level to solenoid, yellow
Potentiometer [7] Offset
LED [8] Ramps enabled, yellow
Potentiometers [9] Acceleration ramp [10] Deceleration ramp Monitor points [11] MP1: Conditioned command signal [12] Common ground (0V) [13] MP2: LVDT (spool) position
�2,0 mm (0.0787 "dia.) sockets. Solenoid current for EEA-PAM-523/525-F models.
24/15
AUTO
TEST TEST
VALVE LOOP
0
�
+
� +
� +
t
PO
t
PEXT
t t
[14] Mode switch
1
� TEST VALVE setting
� AUTO function setting � TEST LOOP setting
1
[15] Test potentiometer
1
1
1
Potentiometers
1
[16] Deadband compensation
[17] Deadband compensation
1
1
[18] Gain
[19] Gain
1
1
[20] Deadband gain
[21] P-gain controller
1
1
1
1
1
WARNING
1
Electromagnetic Compatibility (EMC)
1
It is necessary to ensure that the valve is wired up in accordance with the connection arrangements shown in this leaflet. For effective
protection, the user's electrical cabinet, the valve subplate or manifold and the cable screens should be connected to efficient earth
1
(ground) points. In all cases, both valve and cable should be kept as far away as possible from any source of electromagnetic radiation such
as cables carrying heavy current, relays and certain kinds of portable radio transmitters, etc. Difficult environments could mean that extra screening may be necessary to avoid the interference.
1
EURO PAM 33 CATALOG E-VLVI-CC004-E1--December 2019 www.eaton.com
49
Type F Power amplifiers with CNC adaptation modules
1 Model codes
1 Table 29.
1
Amplifier model
EEA-PAM-523-F-33
1
EEA-PAM-525-F-33
EEA-PAM-533-F-33
1
EEA-PAM-535-F-33
EEA-PAM-561-F-33
1
EEA-PAM-568-F-33
EEA-PAM-581-F-33
1
For valves
} KDG4V-3 and KDG5V-5/7/8
KDG4V-5
With type "H" coils only
KFDG4V-3
KFDG4V-5
KFDG5V-5/7
KFDG5V-8
KHDG5V-5/7/8
1 Operating data
1 Table 30.
1
Power (input) supply
Control (output) supplies:
1
Reference voltages
1
Analog inputs
Command inputs
1
Direct-voltage inputs
Inverting-voltage input
1
Voltage range
bdz32 See appropriate base amplifier, e.g. for EEA-PAM-535-F-33 see EEA-PAM-535-A-33 z22 +15V for LVDTs only z2 +10V x 5 mA b2 �10V x 5 mA
b6, b8, b10, z8 z10 � 10V
1
Input impedance (voltage) Current input
47 k d28
1
Current range
Input impedance (current)
� 20 mA 100
1
Input ramp
Voltage range
1
Input impedance
Velocity demand signal
1
Voltage range
Can be inverted using jumper on plug X30 on circuit board. � 10V 10 k d10, d16 � 10V
1
Input impedance
Digital inputs:
15 k
1
Drive enable (power available to solenoid)
z24
Ramps enable
b24
1
Enabled
Disabled
1
Load current
17 to 40V 0 to 3.5V 10 mA
Analog outputs:
1
P-controller output
1
Voltage range Load impedance
d12 � 10V 10 k; short-circuit proof
1
Output ramp generator
Voltage range
d26 � 10V
1
Load impedance
10 k; short-circuit proof
1
1
1
50
EURO PAM 33 CATALOG E-VLVI-CC004-E1--December 2019 www.eaton.com
Type F Power amplifiers with CNC adaptation modules
Operating data
1
Table 30. continued
1
Alarm output:
Set alarm
z12 Enable amplifier (on pin z24) when switching power on.
1
Signal
HIGH when alarm is activated.
1
Output = Supply volts minus 2 volts.
I = 50 mA max.
1
LOW when solenoid overload has occurred.
(Maintained until reset).
1
Output = 0 to +/�2 volts.
Output resistance = 50 ohms.
1
Reset after failure
Potentiometers:
Disable and re-enable on pin z24.
1
Deadband compensation, separate control
1
for each solenoid
0 to 50%
Gain, separate control for each solenoid
40 to 90%
1
P0-Deadband gain
15 to 43 times
PEXT-Gain controller:
1
Without link
0,1 to 5 times
Link
d18 to d20 2 to 100 times
1
Integrated P-controller
The input circuit of the power amplifier card is used as a differential amplifier between the demand and feedback signals. The ramp signal generator can be used as profile generator.
1
Caution: When using "TEST LOOP" the command signal has to be connected to d8, and d14 has to be connected to the command signal input of the input stage.
1
Hysteresis compensation:
Link
d2 to d6 For KDG4V-* valves only
1
Monitor points:
1
Conditioned command signal power
amplifier
MP1
1
LVDT (spool) position
MP2
Voltage range
� 10V
1
Monitor point impedance
10 k
Ambient conditions:
1
Storage temperature range Operating temperature range
�25 to +85C (�13 to +185F) 0 to 50C (32 to 122F)
1
Mass
0.4 kg (0.88 lb) approx.
1
Installation wiring requirements for Vickers
2468
electronic products Cardholder
F48 02-104808
1
Integrated test modes
See Test Mode details below
1
Solenoid current for EEA-PAM-523/525-F models.
1
1
1
1
1
1
1
EURO PAM 33 CATALOG E-VLVI-CC004-E1--December 2019 www.eaton.com
51
Type F Power amplifiers with CNC adaptation modules
1 Circuit and Connections
1 EEA-PAM-5**-F-33
1
NEEENEAoAt--PeP: ARAMeMa--d55**c**ir--cAFu-3it3in
conjunction
with
that
for
relevant
base amplifier Read circuit in
conjunction
with
that
for
relevant base ampli er EEA-PAM-5**-A
1
1
+10V 5 mA
z2
� 10V 5 mA
b2
1 1
+24V
z24
Close to enable Current command signal
z6
b6
1
b8
Voltage command
b10
1
signals
z8
+
z10
�
1
Control Gnd
bz4
15V 24V Power supply
Output enable
+24V
Dither
Power zero Enable
Overload
bdz32 bdz30
z12
Drive output status
24V DC Power supply
Gain
Offset
PWM
z28 z26
Power ampli er
b28
b26
To solenoid To solenoid
1
1
1
1
Close to
enable ramp
1
+24V
b24
Ramp
+ �
Ramp enabled
b18 MP1
Solenoid current
Pilot stage LVDT
LVDT failure
Main stage
LVDT
z18
z22 +15V
z16
z14
z22 +15V
b16 b14
1
* Jumper for ramp inversion (see note)
Inverter
1
Ramp input
d28
Ramp output
d26
1
P-controller output
d12
1
MP2
Power ampli er CNC adaptation module
Valve. Actual connections see table on next page.
*Jumper position for inverted ramps
R037 R036 V20
1
PO
1
d18 Alternative
gain range
d20
P EXT
QA O
QB O
1
Demand signal
d10 +
Test valve
1
input 10V
d16 �
1
Test loop d14
+10V
Hysteresis
1
d8
Connect for
d2
� 10V
QA maxQB max
compensation
1
hysteresis compensation
d6
1 Customer's protective ground connection.
1
R037 R036 V20
X30 V15 V22
X29 X4
Circuit board
* Jumper position for non-inverted ramps
X30 V15 V22
X29 X4
Circuit board
1
1
52
EURO PAM 33 CATALOG E-VLVI-CC004-E1--December 2019 www.eaton.com
Type F Power amplifiers with CNC adaptation modules
Solenoid and LVDT connections for proportional valves
1
Table 31.
1
Solenoid with
Pilot-stage LVDT, (black plug):
LVDT and/or for Solenoid without LVDT,
Main-stage LVDT, (gray plug):
1
Amplifier type
flow P to B
or on pilot valve
Pin 1 Pin 2 Pin 3 Pin 4
Pin 1 Pin 2 Pin 3 Pin 4
EEA-PAM-523-F-33 b26/b28
z26/z28
�
�
�
Not connected �
�
�
Not connected
1
EEA-PAM-525-F-33 b26/b28 EEA-PAM-533-F-33 b26/b28
z26/z28 z26/z28
�
�
�
Not connected �
�
�
Not connected
�
�
�
Not connected b14 z22 b16 Not connected
1
EEA-PAM-535-F-33 b26/b28 EEA-PAM-561-F-33 �
z26/z28 z26/z28
�
�
�
Not connected b14 z22 b16 Not connected
�
�
�
Not connected b14 z22 b16 Not connected
1
EEA-PAM-568-F-33 � EEA-PAM-581-F-33 �
z26/z28 z26/z28
�
�
�
Not connected b14 z22 b16 Not connected
z14 z22 z16 Not connected b14 z22 b16 Not connected
1
1
Installation Dimensions in mm (inches)
Plug-in Unit of 3U Height, to IEC 297
3rd angle
1
projection
1
1
M2.5 x 11 (0.43) long collar screws supplied with panel for fixing
1
DIN 41612 F48 male connector.
Mating connector must be an F48 female type.
7.92 (0.31)
1
1
z - pin row b - pin row
1
d - pin row
1
Components envelope
1
1
2.5
(0.1)
1
1
1
122.4 (4.82)
Model designation
3 (0.12)
3 (0.12)
7.45 (0.29)
50.3 (1.98)
128.4 (5.06)
8 (0.31)
14.2 (0.56)
7.2
14
(0.28) (0.55)
175.24 (6.9)
1
100
(3.94)
1
1
1
1
1
1
1
1
EURO PAM 33 CATALOG E-VLVI-CC004-E1--December 2019 www.eaton.com
53
Type F Power amplifiers with CNC adaptation modules
1 1 1
Operation of the integrated test mode
The basic operation of the hydraulic actuator can be tested by using the 3-position mode switch mounted on the front panel. To select different modes the toggle switch must be lifted slightly before moving to a new position.
Test valve
An open-loop command signal for the valve comes directly from the potentiometer. The external input signal is disconnected. The hydraulic part of the system may be tested in this configuration.
Test loop
1
CAUTION
The test potentiometer can be used to drive the separate
P-controller, if "Test loop" (closed spool) is selected. The
1
Before setting the mode switch to either "Test valve" or "Test external input signal is disconnected. See wiring example. loop" make sure the test potentiometer is set to "0". Otherwise "Test loop" is usable only if the separate P-controller is used.
sudden movements of the actuator may occur.
1
The mode switch has three positions:
1 Auto The controller operates in closed-loop mode, using the external
CAUTION
1
command signal. The test potentiometer is disconnected.
When using "TEST LOOP" the command signal has to be connected to d8, and d14 to be connected to the command
1
signal input of the input stage.
1
1
1
Command signal
for separate
1
P-controller
d8
1
1
1 Wiring
1
example
1
d14
z8 Gain
1
P-controller
output
1
d12 P-controller
Test potentiometer on front panel
+
�
d10
Demand signal from CNC
d16
TEST LOOP
AUTO
To linearization circuit of ampli er
TEST VALVE
Mode switch on front panel
1
1
1
1
1
1
1
1
1
1
54
EURO PAM 33 CATALOG E-VLVI-CC004-E1--December 2019 www.eaton.com
Type F Power amplifiers with CNC adaptation modules
Application example
1
Positioning module with CNC axis controller To incremental LVDT
1
1
EEA-PAM-533/535-F
Power
1
supply
+24V bdz32
1
bdz30 Power
24V
1
Gnd
Enable z24
1
1
Demand velocity
CNC axis controller or positioning controller (PLC)
z26 z28
d10
d16 b26 b28 b16 z22 b14
1
1
2 Solenoid
1
1
KFDG4V-3/5
1
1
1
2 Solenoid
3
1
2
LVDT
1
1
1
1
1
Customer's protective ground connection.
1
1
1
1
1
1
1
1
1
1
1
1
EURO PAM 33 CATALOG E-VLVI-CC004-E1--December 2019 www.eaton.com
55
Type F Power amplifiers with CNC adaptation modules
1
Dedicated installation recommendation for Type F card
3. Ramps The ramp generation is used to ramp the command signal.
1
The operation of this amplifier has been factory-checked before
The factory setting of ramp potentiometers are minimum ramp time. Turning the controls clockwise increases ramp
despatch as meeting the specification shown in this catalog.
1
time, turning counter-clockwise decreases ramp time. The ramp signal may be inverted by changing a jumper on the
1. Wiring sizes
circuit board.
1
Use screened cable 0.5 mm2 (20 AWG) per wire for signal
4. Offset
1
and LVDT wiring. For wiring runs between amplifier and solenoid up to 25 metres
This potentiometer is used to set the value to null
1
(82 ft), use wire of 1 mm2 (18 AWG) cross-section
5. Deadband gain Potentiometer PO is used to set the electrical gain
1
2. Installation requirements according to European EMC regulations
within the deadband region. The gain factor is very high (30 to 90). This increased gain in the deadband has
the effect of linearizing the valve characteristic. This
1
The wiring to the machine controller should be screened. The
screen should be connected to an efficient ground point at the
potentiometer is normally set to maximum gain. In the event of stability problems in the deadband region,
1
amplifier end.
the gain factor must be reduced.
1 3. Front panel indicator lights (LEDs) Amplifiers may have some, or all, of the following LEDs,
6. P-Gain controller
The PEXT potentiometer adjusts the gain of the P position controller.
1
depending on amplifier type:
5. Fault diagnosis
1 Table 32.
If the amplifier fails to work the following checks
1
Normal
Panel symbol Function indicated
Color working state
1 24V 15V
1
Power supply ON Internal supply ON Output enabled
Green ON Green ON Yellow ON
should be made:
� Check that all wiring is correct to the machine designer's instructions.
� Check that there is a 24V supply and that the 24V LED is ON.
� Check that the 15V internal voltage LED is ON (if 24V LED is
Overload detection
Red OFF
1
ON and this15V LED is OFF then the amplifier should be replaced.)
LVDT failure
Red OFF
� Check that the amplifier is enabled and the LED is ON.
1
Ramps enabled
Yellow ON
� Check that the LVDT failure LED is OFF. (If ON check the
LVDT wiring and connections.)
1
Current to solenoid (Light Yellow ON intensity varies with
1
solenoid current)
To check correct function of the amplifier for a feedback valve, disconnect all valve connections and link z22 ( +15V) with a 1.2 k resistor to b14. (To check the double
feedback amplifiers EEA-PAM-581, make an additional link
1 4. Front panel controls
between z22 (+15V) and z14 with a 1.2 k resistor.)
1. Gain
After installation of resistor link(s), the LVDT failure LED
1 1
The two gain potentiometers are factory set to maximum, and operate separately on positive and negative demand signals
should be OFF. If not, replace the amplifier Caution: a link without resistor damages the amplifier � Check that the overload LED is OFF. (If ON, check the
wiring to the solenoids and the solenoid resistance by
1
2. Deadband compensation:
The two potentiometers are factory set at 10% (20% for
an ohmmeter. Compare the measured value with the catalog data.)
1
type 523 and 533) of valve maximum spool stroke. The setting may be optimized for your application as follows:
� Check that an appropriate valve driving signal is available (monitor point MP1 at the front panel).
1
Apply a small command signal (e.g. 250 mV) and check for hydraulic response from the valve. (For 2-stage valves the correct pilot pressure must be available to obtain response
� �10V at monitor point represents � 100% output of the valve.
1
from the main-stage spool.) If this does not occur then
� The solenoid current (non-feedback valves) or the LVDT
adjust the applicable potentiometer clockwise until it does.
signal (feedback valves) can be measured at the front panel
1
Alternatively, to reduce valve hydraulic response turn the
monitor point MP2.
potentiometer counter-clockwise.
� Solenoid current can be measured as a voltage signal
1
(1 volt per amp)
1
� �10V LVDT signal at monitor point represents �100% stroke.
1
Note: Due to the effect of spool overlap, the working range is typically 3 to 9 volts for the flows from zero to maximum.
56
EURO PAM 33 CATALOG E-VLVI-CC004-E1--December 2019 www.eaton.com
Type F Power amplifiers with CNC adaptation modules
6. Valve connection table
1
This table shows how the different valves have to be connected to the associated amplifier.
1
Table 33.
1
Solenoid
Solenoid
with LVDT without
or hydraulic LVDT or
Pilot stage LVDT
Main stage LVDT
1
Value type
Amplifier type
A
hydraulic B Pin 1 2
3
4
Pin 1 2
3
4
K*G4V-3 and KDG5V-5/7/8 EEA-PAM-523-F-33 b26/b28
z26/z28
-
--
-
--
1
K*G4V-5
EEA-PAM-525-F-33 b26/b28
z26/z28
-
--
-
--
1
KF*G4V-3 KF*G4V�5
EEA-PAM-533-F-33 b26/b28
z26/z28
-
-
-
Not
b14 z22 b16 Not
EEA-PAM-535-F-33 b26/b28
z26/z28
-
-
-
connected
b14 z22 b16 connected
1
KFDG5V-5/7 KFDG5V-8
EEA-PAM-561-F-33 EEA-PAM-568-F-33 -
z26/z28
-
--
z26/z28
-
--
b14 z22 b16 b14 z22 b16
1
KHDG5V-5/7/8
EEA-PAM-581-F-33 -
z26/z28
z14 z22 z16
b14 z22 b16
1
Note: If valves are fitted with the "B" type LVDT, the screen will be grounded at the valve end by the shell of the connector.
1
1
1
1
1
1
1
1
1
1
1
1
1
1
1
1
1
1
1
1
1
EURO PAM 33 CATALOG E-VLVI-CC004-E1--December 2019 www.eaton.com
57
EURO PAM card offerings
1
Table 34.
1
Model No
EEA-EDC-436-A1-33
1
EEA-EDC-436-A2-33
EEA-EDC-436-A3-33
1
EEA-EDC-436-D1-33
1
EEA-EDC-436-D3-33 EEA-PAM-511-A-33
1
EEA-PAM-511-A-33-EN8
EEA-PAM-511-B-33
1
EEA-PAM-511-D-33
EEA-PAM-513-A-33
1
EEA-PAM-513-A-33-EN49
1
EEA-PAM-513-A-33-EN53 EEA-PAM-513-B-33
1
EEA-PAM-513-D-33
EEA-PAM-523-A-33
1
EEA-PAM-523-A-33-EN18
EEA-PAM-523-B-33
1
EEA-PAM-523-C-33
1
EEA-PAM-523-D-33 EEA-PAM-523-E-33
1
EEA-PAM-523-F-33
EEA-PAM-525-A-33
1
EEA-PAM-525-B-33
EEA-PAM-525-C-33
1
EEA-PAM-525-D-33
1
EEA-PAM-525-E-33 EEA-PAM-525-F-33
1
EEA-PAM-533-A-33
EEA-PAM-533-B-33
1
EEA-PAM-533-C-33
EEA-PAM-533-D-33
1
EEA-PAM-533-E-33
1
EEA-PAM-533-F-33 EEA-PAM-535-A2-33
1
EEA-PAM-535-A-33
EEA-PAM-535-A-33-EN3
1
EEA-PAM-535-B-33
EEA-PAM-535-B-33-EN9
1
EEA-PAM-535-C-33
1
EEA-PAM-535-D2-33 EEA-PAM-535-D-33
1
EEA-PAM-535-D-33-EN57
EEA-PAM-535-D-33-EN53
1
EEA-PAM-535-E-33
EEA-PAM-535-F-33
1
EEA-PAM-541-A-33
EEA-PAM-541-D-33
1
EEA-PAM-541-E-33
1
EEA-PAM-553-A-33
33- Series Assembly Number
105EC00004 105EC00005 105EC00006 105EC00007 105EC00008 105EC00009 105EC00010 105EC00011 105EC00012 105EC00013 105EC00014 105EC00015 105EC00016 105EC00017 105EC00018 105EC00019 105EC00020 105EC00021 105EC00022 105EC00023 105EC00024 105EC00025 105EC00026 105EC00027 105EC00028 105EC00029 105EC00030 105EC00031 105EC00032 105EC00033 105EC00034 105EC00035 105EC00036 105EC00037 105EC00038 105EC00039 105EC00040 105EC00041 105EC00042 105EC00043 105EC00044 105EC00045 105EC00046 105EC00047 105EC00048 105EC00049 105EC00050 105EC00051 105EC00052
32 -Series Assembly Number
02-326120 02-326132 02-326133 02-326129 02-326131 02-326000 02-326095 02-326019 02-326036 02-326016 3041111 6025852-001 02-326020 02-326037 02-326001 02-326116 02-326021 02-326029 02-326038 02-326048 02-326057 02-326017 02-326022 02-326030 02-326039 02-326049 02-326058 02-326002 02-326023 02-326031 02-326040 02-326050 02-326059 02-326104 02-326003 02-326172 02-326024 02-326101 02-326032 02-326105 02-326041 6038729-001 3041191 02-326051 02-326060 02-326008 02-326042 02-326052 02-326004
58
EURO PAM 33 CATALOG E-VLVI-CC004-E1--December 2019 www.eaton.com
EURO PAM card offerings
Table 34. Continued
1
Model No
EEA-PAM-553-A-33-EN14 EEA-PAM-553-D-33
33- Series Assembly Number
32 -Series Assembly Number
1
105EC00053
02-326109
105EC00054
02-326043
1
EEA-PAM-553-D-33-EN27
105EC00055
02-326166
EEA-PAM-553-E-33
105EC00056
02-326053
1
EEA-PAM-561-A-33 EEA-PAM-561-B-33
105EC00057 105EC00058
02-326005 02-326025
1
EEA-PAM-561-C-33
105EC00059
02-326033
1
EEA-PAM-561-D-33
105EC00060
02-326044
EEA-PAM-561-E-33
105EC00061
02-326054
1
EEA-PAM-561-F-33
105EC00062
02-326061
EEA-PAM-568-A-33
105EC00063
02-326006
1
EEA-PAM-568-B-33 EEA-PAM-568-C-33
105EC00064 105EC00065
02-326026 02-326034
1
EEA-PAM-568-D-33
105EC00066
02-326045
1
EEA-PAM-568-E-33
105EC00067
02-326055
EEA-PAM-568-F-33
105EC00068
02-326062
1
EEA-PAM-571-A-33
105EC00069
02-326007
EEA-PAM-571-A-33-EN26
105EC00070
02-326165
1
EEA-PAM-571-A-33-EN55 EEA-PAM-571-B-33
105EC00071 105EC00072
3041197 02-326027
1
EEA-PAM-571-D-33
105EC00073
02-326046
1
EEA-PAM-581-A-33
105EC00074
02-326018
EEA-PAM-581-B-33
105EC00075
02-326028
1
EEA-PAM-581-C-33
105EC00076
02-326035
EEA-PAM-581-D-33
105EC00077
02-326047
1
EEA-PAM-581-D-33-EN3 EEA-PAM-581-D-33-EN53
105EC00078 105EC00079
02-326148 3041192
1
EEA-PAM-581-E-33
105EC00080
02-326056
1
EEA-PAM-581-F-33
105EC00081
02-326063
EEA-PAM-535-D-33 EN3
105EC00082
02-104849
1
EEA-EDC-436-D2-33
105EC00083
02-326130
1
Special versions ( )
1
Table 35.
1
EN version
EN 3
Details
SPECIAL VERSION OF EEA-PAM-535-A-33,EEA- PAM-535-D-33, EEA-PAM-581-D-33 WITH COMPATABILITY TO SWEDISH EMC STANDARDS
1
EN 8
SPECIAL VERSION OF EEA-PAM-511-A-33 WITH 30 SECOND RAMP TIME
1
EN9
SPECIAL VERSION OF EEA-PAM-535-B-33 WITH MODIFIED RAMP TIME
EN14
SPECIAL VERSION OF EEA-PAM-553-A-33 WITH MODIFIED DITHER FOR BETTER SMALL STEP RESPONSE
1
EN18
SPECIAL VERSION OF EEA-PAM-523-A-33 WITH DIFFERENT DITHER SETTING FOR KTG PLUS VALVISTOR-SLIP-IN LOWER HYSTERESIS
EN26
SPECIAL VERSION OF EEA-PAM- 571- A-33WITH HIGHER DITHER
1
EN27 EN49
SPECIAL VERSION OF EEA-PAM-553-D-33 FOR ABB SWEDEN SPECIAL VERSION OF EEA-PAM-513-A-33 WITH 24 HOUR RUN IN TEST CONFORMAL COATED PCB
1
EN53 EN55
SPECIAL VERSION OF EEA-PAM-535-D-33, EEA-PAM-581-D-33,EEA-PAM-513-A-33 WITH ONLY CURRENT COMMAND INPUT OF 4 MA..20 MA
1
SPECIAL VERSION OF EEA-PAM-571-A-33 WITH 10 SECONDS RAMP TIME
EN57
SPECIAL VERSION OF EEA-PAM-535-D-33 WITH ONLY CURRENT COMMAND INPUT OF 4 MA..20 MA
1
1
EURO PAM 33 CATALOG E-VLVI-CC004-E1--December 2019 www.eaton.com
59
Eaton Hydraulics Group USA 14615 Loan Oak Road Eden prairie, MN 55344 USA Tel: 952-937-9800 Fax: 952-294-7722 www.eaton.com/hydraulics
� 2019 Eaton All Rights Reserved Printed in USA Document No. E-VLVI-CC004-E1 December 2019
Eaton Hydraulics Group Europe Route de la Longeraie 7 1110 Morges Switzerland Tel: +41 (0) 21 811 4600 Fax: +41 (0) 21 811 4601
Eaton is a registered trademark.
All other trademarks are property of their respective owners.
Eaton Hydraulics Group Asia Pacific Eaton Building 4th Floor, No. 3. Lane 280 Linhong Rd. Changing District, Shanghai 200335 China Tel: (+86 21) 5200 0099 Fax: (+86 21) 5200 0400