File info: application/pdf · 2 pages · 1.05MB
Instructions for the DEFENDER Sectional Flagpole
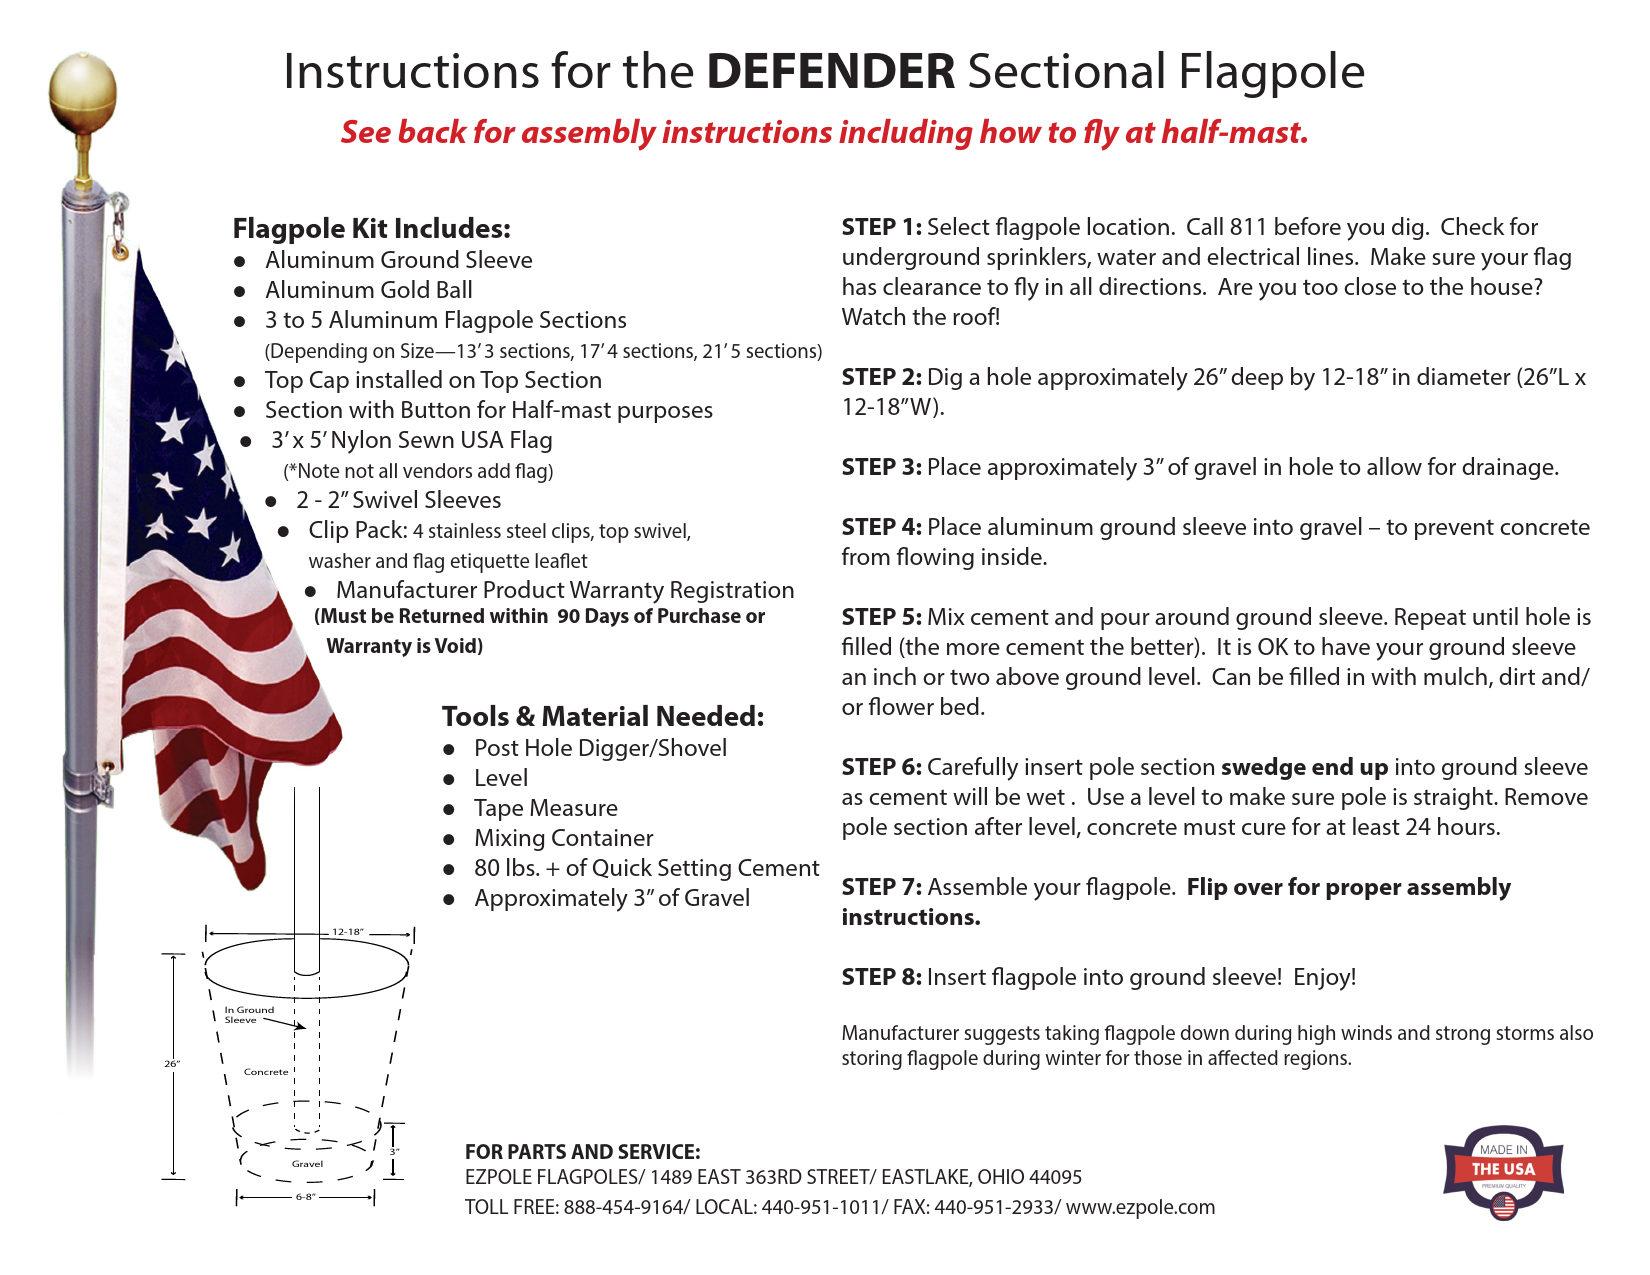
Instructions for the DEFENDER Sectional Flagpole Tools & Material Needed: l Post Hole Digger/Shovel l Level l Tape Measure l Mixing Container l 80 lbs. of Quick Setting Cement l Approximately 3" of Gravel Flagpole K…
Defender 21 ft. Sectional Flagpole Kit with Swivels Instructions / Assembly
EZPole EZD21 855880004422 0855880004422 1004266114
Full PDF Document

If the inline viewer fails, it will open the original document in compatibility mode automatically. You can also open the file directly.
Extracted Text
Instructions for the DEFENDER Sectional Flagpole
See back for assembly instructions including how to fly at half-mast.

Flagpole Kit Includes:
l Aluminum Ground Sleeve l Aluminum Gold Ball l 3 to 5 Aluminum Flagpole Sections

STEP 1: Select flagpole location. Call 811 before you dig. Check for underground sprinklers, water and electrical lines. Make sure your flag has clearance to fly in all directions. Are you too close to the house? Watch the roof!

(Depending on Size--13' 3 sections, 17' 4 sections, 21' 5 sections)

l Top Cap installed on Top Section

STEP 2: Dig a hole approximately 26" deep by 12-18" in diameter (26"L x

l Section with Button for Half-mast purposes

12-18"W).

l 3' x 5' Nylon Sewn USA Flag
(*Note not all vendors add flag)

STEP 3: Place approximately 3" of gravel in hole to allow for drainage.

l 2 - 2" Swivel Sleeves l Clip Pack: 4 stainless steel clips, top swivel,
washer and flag etiquette leaflet

STEP 4: Place aluminum ground sleeve into gravel � to prevent concrete from flowing inside.

l Manufacturer Product Warranty Registration

(Must be Returned within 90 Days of Purchase or

STEP 5: Mix cement and pour around ground sleeve. Repeat until hole is

Warranty is Void)

filled (the more cement the better). It is OK to have your ground sleeve

an inch or two above ground level. Can be filled in with mulch, dirt and/

Tools & Material Needed:

or flower bed.

l Post Hole Digger/Shovel l Level l Tape Measure l Mixing Container

STEP 6: Carefully insert pole section swedge end up into ground sleeve as cement will be wet . Use a level to make sure pole is straight. Remove pole section after level, concrete must cure for at least 24 hours.

l 80 lbs. + of Quick Setting Cement

l Approximately 3" of Gravel

STEP 7: Assemble your flagpole. Flip over for proper assembly

instructions.

12-18"

In Ground Sleeve
26" Concrete

STEP 8: Insert flagpole into ground sleeve! Enjoy!
Manufacturer suggests taking flagpole down during high winds and strong storms also storing flagpole during winter for those in affected regions.

3"

FOR PARTS AND SERVICE:

Gravel

EZPOLE FLAGPOLES/ 1489 EAST 363RD STREET/ EASTLAKE, OHIO 44095

6-8"
TOLL FREE: 888-454-9164/ LOCAL: 440-951-1011/ FAX: 440-951-2933/ www.ezpole.com

Assembly Instructions Defender Sectional Flagpole
Once Ground Sleeve has been installed and had proper time to cure, you can assemble and insert your flagpole.
The Top Section with Top Cap installed will go at the very top of the flagpole.
l If you have the 13' or 17' model, the top section will have a button installed.
l If you have the 21' model, the section with the button should be placed beneath the top section (second from the top).
The button will be used for half-mast purposes, and the first 2" bottom swivel sleeve will rest on the button.
Remaining plain sections to go underneath top section and section with button.

Assembly Instructions Defender Sectional Flagpole
The top of the flag attaches to top swivel with stainless steel clip.
The bottom of the flag attaches to the top hole of 2"Swivel
Sleeve with stainless steel clip.

D-21 image shown. (*Note not all vendors include flag)

The second 2" Swivel Sleeve is used when flying
a second flag.
Flying Your Defender Flag at Half-Mast
*To fly your flag at half-mast on your Defender Sectional flagpole you will want to unclip your flag from the top swivel and first 2" bottom swivel sleeve.
*Clip the top clip of the flag to the first 2" bottom swivel sleeve which will rest on the button. The bottom clip of the flag will clip on to the second
2" bottom swivel sleeve.