File info: application/pdf · 2 pages · 1.75MB
Pedestal Installation Instructions / Instrucciones de ...
Samsung 27" Champagne Washer Or Dryer Pedestal Installation Instructions
Samsung WE402NC WE402NC/A3 887276310121
Extracted Text
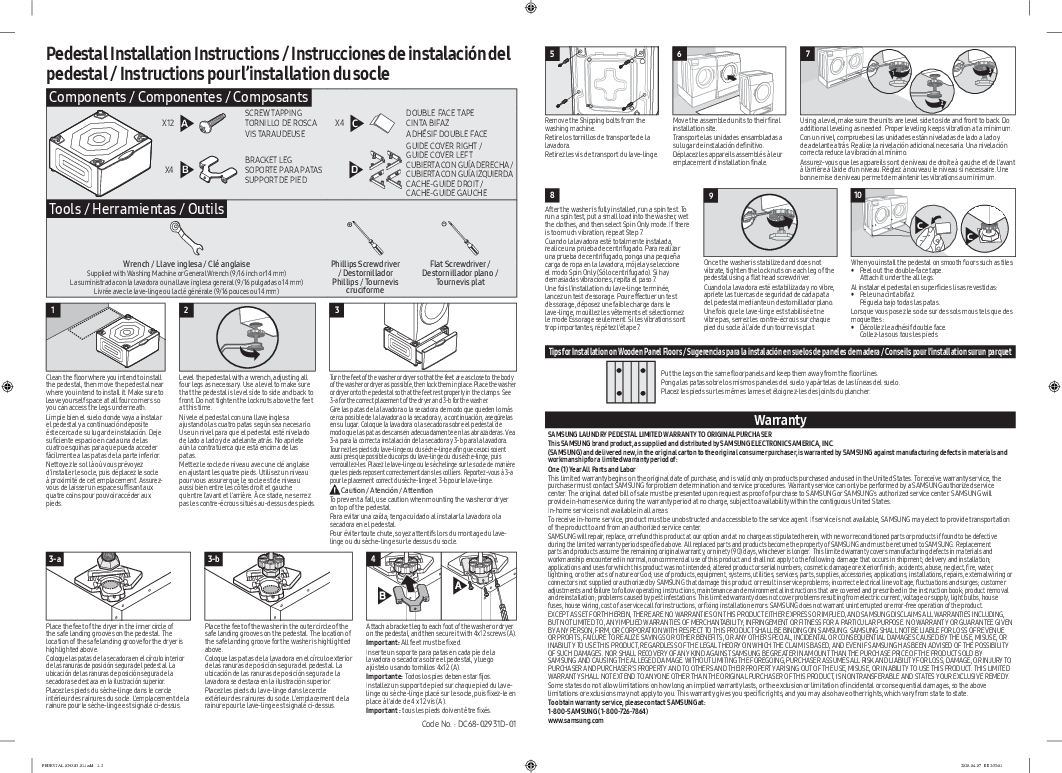
Pedestal Installation Instructions / Instrucciones de instalaci�n del pedestal / Instructions pour l'installation du socle

Components / Componentes / Composants

X12 A

SCREW TAPPING TORNILLO DE ROSCA VIS TARAUDEUSE

X4 C

X4 B

BRACKET LEG

SOPORTE PARA PATAS

D

SUPPORT DE PIED

Tools / Herramientas / Outils

DOUBLE FACE TAPE CINTA BIFAZ ADH�SIF DOUBLE FACE
GUIDE COVER RIGHT / GUIDE COVER LEFT CUBIERTA CON GU�A DERECHA / CUBIERTA CON GU�A IZQUIERDA CACHE-GUIDE DROIT / CACHE-GUIDE GAUCHE

Wrench / Llave inglesa / Cl� anglaise Supplied with Washing Machine or General Wrench (9/16 inch or14 mm) La suministrada con la lavadora o una llave inglesa general (9/16 pulgadas o 14 mm)
Livr�e avec le lave-linge ou la cl� g�n�rale (9/16 pouces ou 14 mm)

1

2

Phillips Screwdriver / Destornillador
Phillips / Tournevis cruciforme
3

Flat Screwdriver / Destornillador plano /
Tournevis plat

Clean the floor where you intend to install the pedestal, then move the pedestal near where you intend to install it. Make sure to leave yourself space at all four corners so you can access the legs underneath. Limpie bien el suelo donde vaya a instalar el pedestal y a continuaci�n deposite �ste cerca de su lugar de instalaci�n. Deje suficiente espacio en cada una de las cuatro esquinas para que pueda acceder f�cilmente a las patas de la parte inferior. Nettoyez le sol l� o� vous pr�voyez d'installer le socle, puis d�placez le socle � proximit� de cet emplacement. Assurezvous de laisser un espace suffisant aux quatre coins pour pouvoir acc�der aux pieds.
3-a

Level the pedestal with a wrench, adjusting all four legs as necessary. Use a level to make sure that the pedestal is level side to side and back to front. Do not tighten the locknuts above the feet at this time. Nivele el pedestal con una llave inglesa ajustando las cuatro patas seg�n sea necesario. Use un nivel para que el pedestal est� nivelado de lado a lado y de adelante atr�s. No apriete a�n la contratuerca que est� encima de las patas. Mettez le socle de niveau avec une cl� anglaise en ajustant les quatre pieds. Utilisez un niveau pour vous assurer que le socle est de niveau aussi bien entre les c�t�s droit et gauche qu'entre l'avant et l'arri�re. � ce stade, ne serrez pas les contre-�crous situ�s au-dessus des pieds.
3-b

Turn the feet of the washer or dryer so that the feet are as close to the body of the washer or dryer as possible, then lock them in place. Place the washer or dryer onto the pedestal so that the feet rest properly in the clamps. See 3-a for the correct placement of the dryer and 3-b for the washer.
Gire las patas de la lavadora o la secadora de modo que queden lo m�s cerca posible de la lavadora o la secadora y, a continuaci�n, aseg�relas en su lugar. Coloque la lavadora o la secadora sobre el pedestal de modo que las patas descansen adecuadamente en las abrazaderas. Vea 3-a para la correcta instalaci�n de la secadora y 3-b para la lavadora.
Tournez les pieds du lave-linge ou du s�che-linge afin que ceuxci soient aussi pr�s que possible du corps du lave-linge ou du s�che-linge, puis verrouillez-les. Placez le lave-linge ou le s�chelinge sur le socle de mani�re que les pieds reposent correctement dans les colliers. Reportez-vous � 3-a pour le placement correct du s�che-linge et 3-b pour le lave-linge.
Caution / Atenci�n / Attention
To prevent a fall, use caution when mounting the washer or dryer on top of the pedestal.
Para evitar una ca�da, tenga cuidado al instalar la lavadora o la secadora en el pedestal.
Pour �viter toute chute, soyez attentifs lors du montage du lavelinge ou du s�che-linge sur le dessus du socle.
4

Place the feet of the dryer in the inner circle of the safe landing grooves on the pedestal. The location of the safe landing groove for the dryer is highlighted above.
Coloque las patas de la secadora en el c�rculo interior de las ranuras de posici�n segura del pedestal. La ubicaci�n de las ranuras de posici�n segura de la secadora se destaca en la ilustraci�n superior.
Placez les pieds du s�che-linge dans le cercle int�rieur des rainures du socle. L'emplacement de la rainure pour le s�che-linge est signal� ci-dessus.

Place the feet of the washer in the outer circle of the safe landing grooves on the pedestal. The location of the safe landing groove for the washer is highlighted above.
Coloque las patas de la lavadora en el c�rculo exterior de las ranuras de posici�n segura del pedestal. La ubicaci�n de las ranuras de posici�n segura de la lavadora se destaca en la ilustraci�n superior.
Placez les pieds du lave-linge dans le cercle ext�rieur des rainures du socle. L'emplacement de la rainure pour le lave-linge est signal� ci-dessus.

Attach a bracket leg to each foot of the washer or dryer on the pedestal, and then secure it with 4x12 screws (A). Important: All feet must be fixed. Inserte un soporte para patas en cada pie de la lavadora o secadora sobre el pedestal, y luego aj�stelo usando tornillos 4x12 (A). Importante: Todos los pies deben estar fijos. Installez un support de pied sur chaque pied du lavelinge ou s�che-linge plac� sur le socle, puis fixez-le en place � l'aide de 4 x 12 vis (A). Important : tous les pieds doivent �tre fix�s.
Code No. : DC68-02931D-01

5

6

7

1

3

2

Remove the Shipping bolts from the washing machine. G Retire los tornillos de transporte de la lavadora.
Retirez les vis de transport du lave-linge.

Move the assembled units to their final installation site.
Transporte las unidades ensambladas a su lugar de instalaci�n definitivo.
D�placez les appareils assembl�s � leur emplacement d'installation finale.

Using a level, make sure the units are level side to side and front to back. Do additional leveling as needed. Proper leveling keeps vibration at a minimum.
Con un nivel, compruebe si las unidades est�n niveladas de lado a lado y de adelante atr�s. Realice la nivelaci�n adicional necesaria. Una nivelaci�n correcta reduce la vibraci�n al m�nimo.
Assurez-vous que les appareils sont de niveau de droite � gauche et de l'avant � l'arri�re � l'aide d'un niveau. R�glez � nouveau le niveau si n�cessaire. Une bonne mise de niveau permet de maintenir les vibrations au minimum.

8
After the washer is fully installed, run a spin test. To run a spin test, put a small load into the washer, wet the clothes, and then select Spin Only mode. If there is too much vibration, repeat Step 7.
Cuando la lavadora est� totalmente instalada, realice una prueba de centrifugado. Para realizar una prueba de centrifugado, ponga una peque�a carga de ropa en la lavadora, m�jela y seleccione el modo Spin Only (S�lo centrifugado). Si hay demasiadas vibraciones, repita el paso 7.
Une fois l'installation du lave-linge termin�e, lancez un test d'essorage. Pour effectuer un test d'essorage, d�posez une faible charge dans le lave-linge, mouillez les v�tements et s�lectionnez le mode Essorage seulement. Si les vibrations sont trop importantes, r�p�tez l'�tape 7.

9
Once the washer is stabilized and does not vibrate, tighten the lock nuts on each leg of the pedestal using a flat head screwdriver. Cuando la lavadora est� estabilizada y no vibre, apriete las tuercas de seguridad de cada pata del pedestal mediante un destornillador plano. Une fois que le lave-linge est stabilis� et ne vibre pas, serrez les contre-�crous sur chaque pied du socle � l'aide d'un tournevis plat.

10
C C
When you install the pedestal on smooth floors such as tiles: � Peel out the double-face tape.
Attach it under the all legs. Al instalar el pedestal en superficies lisas revestidas: � Pele una cinta bifaz.
P�guela bajo todas las patas. Lorsque vous posez le socle sur des sols mous tels que des moquettes : � D�collez le adh�sif double face.
Collez-la sous tous les pieds.

Tips for Installation on Wooden Panel Floors / Sugerencias para la instalaci�n en suelos de paneles de madera / Conseils pour l'installation sur un parquet

Put the legs on the same floor panels and keep them away from the floor lines. Ponga las patas sobre los mismos paneles del suelo y ap�rtelas de las l�neas del suelo. Placez les pieds sur les m�mes lames et �loignez-les des joints du plancher.

Warranty
SAMSUNG LAUNDRY PEDESTAL LIMITED WARRANTY TO ORIGINAL PURCHASER
This SAMSUNG brand product, as supplied and distributed by SAMSUNG ELECTRONICS AMERICA, INC.
(SAMSUNG) and delivered new, in the original carton to the original consumer purchaser, is warranted by SAMSUNG against manufacturing defects in materials and workmanship for a limited warranty period of:
One (1) Year All Parts and Labor
This limited warranty begins on the original date of purchase, and is valid only on products purchased and used in the United States. To receive warranty service, the purchaser must contact SAMSUNG for problem determination and service procedures. Warranty service can only be performed by a SAMSUNG authorized service center. The original dated bill of sale must be presented upon request as proof of purchase to SAMSUNG or SAMSUNG's authorized service center. SAMSUNG will provide in-home service during the warranty period at no charge, subject to availability within the contiguous United States.
In-home service is not available in all areas.
To receive in-home service, product must be unobstructed and accessible to the service agent. If service is not available, SAMSUNG may elect to provide transportation of the product to and from an authorized service center.
SAMSUNG will repair, replace, or refund this product at our option and at no charge as stipulated herein, with new or reconditioned parts or products if found to be defective during the limited warranty period specified above. All replaced parts and products become the property of SAMSUNG and must be returned to SAMSUNG. Replacement parts and products assume the remaining original warranty, or ninety (90) days, whichever is longer. This limited warranty covers manufacturing defects in materials and workmanship encountered in normal, noncommercial use of this product and shall not apply to the following: damage that occurs in shipment; delivery and installation; applications and uses for which this product was not intended; altered product or serial numbers; cosmetic damage or exterior finish; accidents, abuse, neglect, fire, water, lightning, or other acts of nature or God; use of products, equipment, systems, utilities, services, parts, supplies, accessories, applications, installations, repairs, external wiring or connectors not supplied or authorized by SAMSUNG that damage this product or result in service problems; incorrect electrical line voltage, fluctuations and surges; customer adjustments and failure to follow operating instructions, maintenance and environmental instructions that are covered and prescribed in the instruction book; product removal and reinstallation; problems caused by pest infestations. This limited warranty does not cover problems resulting from electric current, voltage or supply, light bulbs, house fuses, house wiring, cost of a service call for instructions, or fixing installation errors. SAMSUNG does not warrant uninterrupted or error-free operation of the product.
EXCEPT AS SET FORTH HEREIN, THERE ARE NO WARRANTIES ON THIS PRODUCT EITHER EXPRESS OR IMPLIED, AND SAMSUNG DISCLAIMS ALL WARRANTIES INCLUDING, BUT NOT LIMITED TO, ANY IMPLIED WARRANTIES OF MERCHANTABILITY, INFRINGEMENT OR FITNESS FOR A PARTICULAR PURPOSE. NO WARRANTY OR GUARANTEE GIVEN BY ANY PERSON, FIRM, OR CORPORATION WITH RESPECT TO THIS PRODUCT SHALL BE BINDING ON SAMSUNG. SAMSUNG SHALL NOT BE LIABLE FOR LOSS OF REVENUE OR PROFITS, FAILURE TO REALIZE SAVINGS OR OTHER BENEFITS, OR ANY OTHER SPECIAL, INCIDENTAL OR CONSEQUENTIAL DAMAGES CAUSED BY THE USE, MISUSE, OR INABILITY TO USE THIS PRODUCT, REGARDLESS OF THE LEGAL THEORY ON WHICH THE CLAIM IS BASED, AND EVEN IF SAMSUNG HAS BEEN ADVISED OF THE POSSIBILITY OF SUCH DAMAGES. NOR SHALL RECOVERY OF ANY KIND AGAINST SAMSUNG BE GREATER IN AMOUNT THAN THE PURCHASE PRICE OF THE PRODUCT SOLD BY SAMSUNG AND CAUSING THE ALLEGED DAMAGE. WITHOUT LIMITING THE FOREGOING, PURCHASER ASSUMES ALL RISK AND LIABILITY FOR LOSS, DAMAGE, OR INJURY TO PURCHASER AND PURCHASER'S PROPERTY AND TO OTHERS AND THEIR PROPERTY ARISING OUT OF THE USE, MISUSE, OR INABILITY TO USE THIS PRODUCT. THIS LIMITED WARRANTY SHALL NOT EXTEND TO ANYONE OTHER THAN THE ORIGINAL PURCHASER OF THIS PRODUCT, IS NONTRANSFERABLE AND STATES YOUR EXCLUSIVE REMEDY.
Some states do not allow limitations on how long an implied warranty lasts, or the exclusion or limitation of incidental or consequential damages, so the above limitations or exclusions may not apply to you. This warranty gives you specific rights, and you may also have other rights, which vary from state to state.
To obtain warranty service, please contact SAMSUNG at:
1-800-SAMSUNG (1-800-726-7864)
www.samsung.com

PEDESTAL-02931D-01.indd 1-2

2020-04-07 2:55:01

Installation tips
Sugerencias de instalaci�n / Conseils d'installation
WE402N(C,P,V,W)/A3

Installation tips/Sugerencias de instalaci�n/Conseils d'installation
There are A-type (clamp-type) and B-type (bracket-type) of Samsung pedestals. If you have both types of the pedestal, we recommend that you install the dryer on A-type (clamp) of pedestal and the washer on B-type (bracket) of pedestal.
Hay dos tipos de pedestales Samsung: tipo A (con abrazadera) y tipo B (con m�nsula). Si posee los dos tipos de pedestales, le recomendamos que instale la secadora con el pedestal tipo A (con abrazadera) y la lavadora con el pedestal tipo B (con m�nsula).
Il existe des socles Samsung de type A (� brides) et de type B (� support). Si vous avez les deux types de socle, nous vous recommandons d'installer le s�che-linge sur le socle de type A (� brides) et le lave-linge sur le socle de type B (� support).
Once you install the washer and dryer as recommended, the dryer will be shorter than the washer, and you can adjust the dryer's leveling feet so the two are the same height.
Cuando haya instalado la secadora y la lavadora seg�n lo recomendado, la secadora quedar� a menor altura que la lavadora, por lo que podr� regular las patas niveladoras de la secadora para emparejar la altura.
Une fois le s�che-linge et le lave-linge install�s comme recommand�, la hauteur du s�chelinge sera inf�rieure � celle du lave-linge. Vous pouvez ajuster les pieds r�glables du s�chelinge pour modifier la hauteur en cons�quence.

A-type (Clamp-type) / Tipo A (Con abrazadera) / Type A (� brides)
B-Type (Bracket-type) / Tipo B (Con m�nsula) / Type B (� support)

Adjusting the height of the dryer/Regular la altura de la secadora/Ajustement de la hauteur du s�che-linge

1

2

3

Step 1. Loosen the 4 locking clamps of the clamp-type pedestal
1. Open the clamp-type pedestal drawer. 2. Unscrew the screws fastening the locking clamps.
(1 per clamp)
Paso 1. Afloje las 4 abrazaderas de fijaci�n del pedestal con abrazadera
1. Abra el caj�n del pedestal con abrazadera. 2. Afloje el tornillo que ajusta la abrazadera de
fijaci�n. (1 por abrazadera)
�tape 1. Desserrer les 4 brides de fixation du socle � brides
1. Ouvrez le tiroir du socle � brides. 2. D�vissez la vis qui maintient la bride de fixation
en place. (1 par bride)
4 Step 4. Do a final check
� Use a bubble level to make sure the dryer is level.
� Make sure the water connections, gas connections, electrical connections, and venting are secured.
� Run a test cycle to ensure proper operation.

[No Turns]
[Ninguna vuelta]
[Aucun tour]

[4 Turns] [4 vueltas] [4 tours]

Step 2. Raise the height of the dryer
Fully retract the dryer's leveling feet and then turn them counterclockwise 4 turns so that the dryer is the same height as the washer.
Paso 2. Subir la altura de la secadora
Retraiga completamente las patas niveladoras de la secadora y luego g�relas hacia la izquierda 4 vueltas para que la secadora quede a la misma altura que la lavadora.
�tape 2. Relever le s�che-linge
R�tractez compl�tement les pieds r�glables du s�che-linge, puis tournez-les sur 4 tours dans le sens antihoraire afin que la hauteur du s�che-linge soit identique � celle du lave-linge.

Paso 4. Verificaci�n final
� Use un nivel de burbuja de aire para asegurarse de que la secadora est� nivelada.
� Aseg�rese de que las conexiones de agua, las conexiones de gas, las conexiones el�ctricas y ventilaciones est�n fijas.
� Ejecute un ciclo de prueba para garantizar un funcionamiento seguro.

Step 3. Tighten the 4 locking clamps of the clamp-type pedestal Close the locking clamps and then fasten each clamp with a screw.
Paso 3. Ajuste las 4 abrazaderas de fijaci�n del pedestal con abrazadera Cierre las abrazaderas de fijaci�n y luego ajuste cada abrazadera con un tornillo.
�tape 3. Serrer les 4 brides de fixation du socle � brides Fermez les brides de fixation, puis serrez chaque bride � l'aide de la vis.
�tape 4. Derni�re v�rification � Utilisez un niveau � bulle pour v�rifier que le
s�che-linge est bien de niveau. � Assurez-vous que les raccordements d'eau,
de gaz, �lectriques et de ventilation sont bien effectu�s. � Lancez un cycle de test pour v�rifier le bon fonctionnement.

Assembling the Guide Cover/Instalaci�n de las cubiertas con gu�a/Installation du cache-guide

RR

R

R

L

F

LF

A-type (Clamp-type) / Tipo A (Con abrazadera) / Type A (� brides)
B-Type (Bracket-type) / Tipo B (Con m�nsula) / Type B (� support) 1. Unscrew. Quite el tornillo. Retirez la vis.

Attach a guide cover to each corner of the pedestal. Each guide cover is labeled (RF for front right, FL or LF for front left, RR for rear right, and LR for rear left) so you can identify the correct corner to attach it to.
Coloque una cubierta con gu�a en cada esquina del pedestal. Cada cubierta con gu�a est� rotulada (RF para frontal derecha, FL o LF para frontal izquierda, RR para posterior derecha y LR para posterior izquierda) de forma que pueda identificar en qu� esquina debe colocarlas.
Installez un cache-guide � chaque coin du socle. Chaque cache-guide porte une �tiquette (RF pour l'avant droit, FL ou LF pour l'avant gauche, RR pour l'arri�re droit et LR pour l'arri�re gauche), afin que vous puissiez identifier le coin sur lequel vous devez l'installer.

R

L

R

L

L L

D

Attach a guide cover to each corner of the pedestal. Each guide cover is labeled (R for right, L for left) so you can identify the correct corner to attach it to.
Coloque una cubierta con gu�a en cada esquina del pedestal. Cada cubierta con gu�a est� rotulada (R para derecha, L para izquierda) de forma que pueda identificar en qu� esquina debe colocarlas.
Installez un cache-guide � chaque coin du socle. Chaque cache-guide porte une �tiquette (R pour le coin droit, L pour le coin gauche). Vous pouvez ainsi identifier le coin sur lequel vous devez l'installer.

2. Attach the guide cover.

L

Coloque la cubierta con gu�a.

Installez le cache-guide.
L

3. Screw in the M4 screw. Ajuste el tornillo M4. Vissez la vis M4.

PEDESTAL-02931D-01.indd 3-4

2020-04-07 2:55:03