Motherboard Orange Pi 3 User Manual
File info: application/pdf · 37 pages · 1.95MB
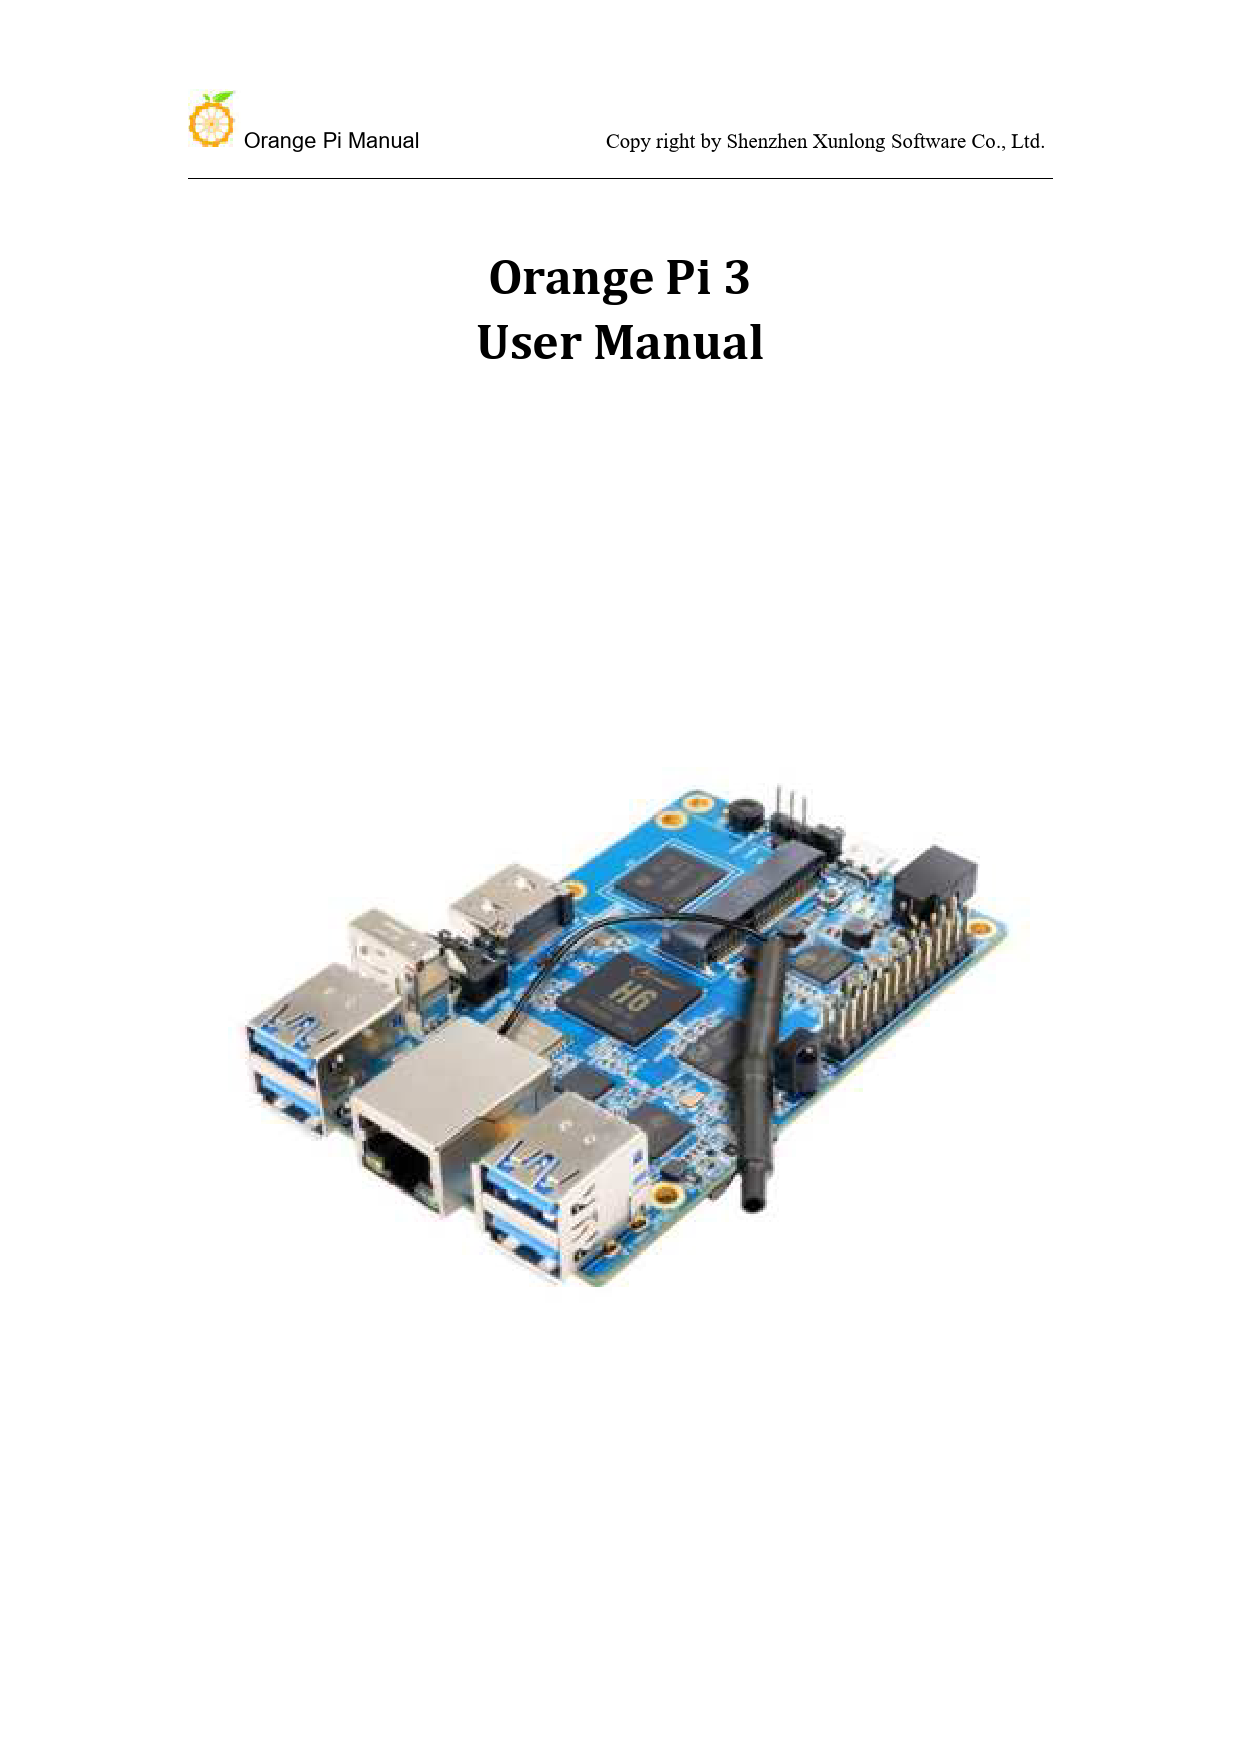
Orange Pi 3 User Manual
Orange Pi Manual. Copy right by Shenzhen Xunlong Software Co., Ltd. Contents. I. Basic Features of Orange Pi 3.
User Manual
Orange Pi Manual. Copy right by Shenzhen Xunlong Software Co., Ltd. $ sudo apt-get install git gnupg flex bison gperf build-essential \ zip curl zlib1g-dev gcc-multilib g ...
Extracted Text
Orange Pi Manual

Copy right by Shenzhen Xunlong Software Co., Ltd.

Orange Pi 3 User Manual

Orange Pi Manual

Copy right by Shenzhen Xunlong Software Co., Ltd.

Contents
I. Basic Features of Orange Pi 3...................................................................................................1 1. What is Orange Pi 3................................................................................................................. 1 2. Use of Orange Pi 3................................................................................................................... 1 3. Who is the Orange Pi 3 designed for?.....................................................................................1 4. Orange Pi 3 hardware parameters.......................................................................................... 2 5. GPIO specifications..................................................................................................................5 II. Development board instructions............................................................................................ 6 1. Prepare hardware and software tools.................................................................................... 6 2. Power supply mode of development board........................................................................... 6 III. Android compilation environment.........................................................................................7 1. Get SDK source code zip..........................................................................................................7 2. Build a compilation environment............................................................................................7 3. Compile SDK source code........................................................................................................8 IV. Setting up a Linux compilation environment.......................................................................11 1. Get the Linux SDK source code from Github........................................................................ 11 2. Get the source code of Linux SDK from Baidu Cloud Disk....................................................12 3. Set up a compilation environment........................................................................................13 4. Compile Linux and U-boot source code................................................................................13 5. Linux SDK usage example...................................................................................................... 14 V. Android firmware burning.....................................................................................................18 1. Android firmware burning steps (TF card start up).............................................................. 18 2. Android firmware programming steps (programming to EMMC via TF card)......................20 VI. Linux firmware burning........................................................................................................23 1. Etcher installation method....................................................................................................23 2. How to flash Linux firmware through Etcher........................................................................23 3. Program Linux system into EMMC Flash chip through script...............................................24 VII. Instructions for use of Linux system................................................................................... 26 1. Linux boot light description.................................................................................................. 26 2. Login account and password.................................................................................................26 3. extend rootfs partition.......................................................................................................... 26 4. Recording playback test method...........................................................................................27 5. WIFI configuration method................................................................................................... 27 6. Test method of PCIE interface...............................................................................................28 VIII. Introduction to serial debugging tools.............................................................................. 30 1. Use on Windows platform.................................................................................................... 31 2. Use on Linux platform........................................................................................................... 33

Orange Pi Manual

Copy right by Shenzhen Xunlong Software Co., Ltd.

History

Ver

Data

Author

Brief

1.0

2019-01-24 Leeboby

Create document

1.1

2019-7-10

Leeboby

Update audio instructions

1.2

2019-12-16 Leeboby

Publish

Memo

Orange Pi Manual

Copy right by Shenzhen Xunlong Software Co., Ltd.

I. Basic Features of Orange Pi 3

1. What is Orange Pi 3
Orange Pi is an open source single board card computer, a new generation of arm64 development board, which can run Android 7.0, Ubuntu and Debian operating systems. The Orange Pi single board computer uses Allwinner H6 system-on-chip and has 1GB or 2GB LPDDR3 memory.
2. Use of Orange Pi 3
We can use it to build:  A computer  A web server  Game console  HD video player  Speaker  Android  ......
3. Who is the Orange Pi 3 designed for?
Orange Pi 3 is not just a consumer product, it is also designed for anyone who wants to use technology for creative creation. It is a very simple, fun and practical tool that you can use to build the world around you.

www.orangepi.cn

1

www.xunlong.tv

Orange Pi Manual

Copy right by Shenzhen Xunlong Software Co., Ltd.

4. Orange Pi 3 hardware parameters

www.orangepi.cn

2

www.xunlong.tv

Orange Pi Manual

Copy right by Shenzhen Xunlong Software Co., Ltd.

www.orangepi.cn

3

www.xunlong.tv

Orange Pi Manual

Copy right by Shenzhen Xunlong Software Co., Ltd.

www.orangepi.cn

4

www.xunlong.tv

Orange Pi Manual

Copy right by Shenzhen Xunlong Software Co., Ltd.

5. GPIO specifications

The following figure is the GPIO pin function diagram of Orange Pi 3:

CON12-P01 CON12-P02 CON12-P03 CON12-P04 CON12-P05 CON12-P06 CON12-P07 CON12-P08 CON12-P09 CON12-P10 CON12-P11 CON12-P12 CON12-P13 CON12-P14 CON12-P15 CON12-P16 CON12-P17 CON12-P18 CON12-P19 CON12-P20 CON12-P21 CON12-P22 CON12-P23 CON12-P24 CON12-P25 CON12-P26

Orange Pi 3 pin correspondence table VCC-3.3V VCC-5V TWI0-SDA VCC-5V TWI0-SCK GND PWM0 S-UART-TX GND S-UART-RX UART3-RX PD18 UART3-TX GND PL10 PD15 VCC-3.3V PD16 SPI1_MOSI GND SPI1_MISO PD21 SPI1_CLK SPI1_CS GND PL08

VCC-IO DCIN PD26 DCIN PD25 GND PD22 PL02 GND PL03 PD24 PD18 PD23 GND PL10 PD15 VCC-IO PD16 PH05 GND PH06 PD21 PH04 PH03 GND PL08

www.orangepi.cn

5

www.xunlong.tv

Orange Pi Manual

Copy right by Shenzhen Xunlong Software Co., Ltd.

II. Development board instructions

1. Prepare hardware and software tools
Hardware requirements:
 Orange Pi 3 development board  TF card, minimum 8GB capacity, class 10, it is recommended to use brand TF
card, such as SanDisk 16G TF card  For a compiling host, the configuration should preferably meet the following
conditions: 64bit CPU 8 GB and above 100GB of free disk space The operating system is preferably
Ubuntu14.04 (for compiling Android source code) Ubuntu18.04 (for compiling Linux source code)
Software Requirements:
 Orange Pi 3 SDK  Orange Pi 3 firmware  Android and Linux programming tools
The above software can be obtained through Github, Google Web Disk and Baidu Cloud Disk.
http://www.orangepi.org/downloadresources/ http://www.orangepi.cn/downloadresourcescn/
2. Power supply mode of development board
There are two ways to power the development board:  DC (5V 2A) power supply: Power on after inserting the DC adapter  Micro USB (5V 2A) OTG power supply:Plug in the Micro USB adapter to power
on.

www.orangepi.cn

6

www.xunlong.tv

Orange Pi Manual

Copy right by Shenzhen Xunlong Software Co., Ltd.

III. Android compilation environment
The following operations are performed on a PC with Ubuntu 14.04 installed. Other versions of Ubuntu systems or Linux distributions may have some differences.
1. Get SDK source code zip
After downloading the Android source package, first you need to combine multiple compressed files into one and then decompress them. $ mkdir OrangePi_3 $ cat H6-2018-1-2.tar.gza* > OrangePi_3.tar $ tar xf OrangePi_3.tar -C OrangePi_3

2. Build a compilation environment

 Install JDK Android 7.0 development can only use the version of openjdk8, higher or lower than this version and Oracle's JDK will cause the compilation to fail. Openjdk-8 installation command is as follows:

$ sudo add-apt-repository ppa:openjdk-r/ppa $ sudo apt-get update $ sudo apt-get install openjdk-8-jdk

 Configure JAVA environment variables For example, the installation path is / usr / lib / jvm / java-8-openjdk-amd64. You can run the following command in the terminal to configure the environment variables:

$ export JAVA_HOME=/usr/lib/jvm/java-8-openjdk-amd64 $ export PATH=$JAVA_HOME/bin:$PATH $ export CLASSPATH=.:$JAVA_HOME/lib:$JAVA_HOME/lib/tools.jar

 Install platform support software For Ubuntu 14.04:

$ sudo apt-get update

www.orangepi.cn

7

www.xunlong.tv

Orange Pi Manual

Copy right by Shenzhen Xunlong Software Co., Ltd.

$ sudo apt-get install git gnupg flex bison gperf build-essential \ zip curl zlib1g-dev gcc-multilib g++-multilib libc6-dev-i386 \ lib32ncurses5-dev x11proto-core-dev libx11-dev lib32z1-dev ccache \ libgl1-mesa-dev libxml2-utils xsltproc unzip

$ sudo apt-get install u-boot-tools

3. Compile SDK source code

After the SDK is decompressed, there will be two subdirectories andorid and lichee under the decompressed directory. The main contents of the lichee directory are as follows:

lichee/brandy/u-boot-2014.07

#uboot Code directory

lichee/bootloader/uboot_2014_sunxi_spl #boot0 Code directory

lichee/linux-3.10

#Kernel code

lichee/tools

#Solution hardware configuration, packaging tools, etc.

 Kernel compilation process
Enter the following command in the lichee directory: $ cd OrangePi_3/lichee $ ./build.sh config

Welcome to mkscript setup progress All available chips:
0. sun50iw1p1 1. sun50iw2p1 2. sun50iw6p1 3. sun8iw11p1 4. sun8iw12p1 5. sun8iw6p1 6. sun8iw7p1 7. sun8iw8p1 8. sun9iw1p1 Choice: 2 All available platforms: 0. android 1. dragonboard 2. linux 3. eyeseelinux Choice: 0 All available business:

www.orangepi.cn

8

www.xunlong.tv

Orange Pi Manual
0. 5.1 1. 4.4 2. 7.x Choice: 2

Copy right by Shenzhen Xunlong Software Co., Ltd.

The output after compilation is as follows:
regenerate rootfs cpio 15757 blocks 17099 blocks build_ramfs Copy boot.img to output directory ... Copy modules to target ...
sun50iw6p1 compile Kernel successful
INFO: build kernel OK.
INFO: build rootfs ... INFO: skip make rootfs for android INFO: build rootfs OK. ---------------------------------------build sun50iw6p1 android 7.x lichee OK ----------------------------------------

The kernel code is in the lichee / linux-3.10 directory. Executing the above commands will automatically copy the configuration file from lichee / linux-3.10 / arch / arm64 / configs / sun50iw6p1smp_android_7.x_defconfig to lichee / linux-3.10 / .config as the default configuration before compiling , You can run ./build.sh directly in the lichee directory for the next compilation, and will continue to use the previous .config configuration.
 uboot / boot0 compilation process (optional)
Normally, you do not need to recompile uboot, but if you have custom modifications to uboot, you can compile. The compilation method is as follows:
cd lichee/brandy/u-boot-2014.07 make distclean && make sun50iw6p1_config && make -j5 # compile uboot
cd lichee/brandy/u-boot-2014.07 make distclean && make sun50iw6p1_config && make spl # compile boot0

www.orangepi.cn

9

www.xunlong.tv

Orange Pi Manual

Copy right by Shenzhen Xunlong Software Co., Ltd.

If uboot / boot0 is not compiled, the default is to use the pre-compiled results of lichee / tools / pack / chips / sun50iw6p1 / bin. After recompiling with the above command, the above files will be replaced automatically.

 Android code compilation process
$ cd android $ source ./build/envsetup.sh $ lunch petrel_fvd_p1-eng $ extract-bsp $ make -j8 && pack

The pack command is used to generate the firmware. If the compilation and packaging process passes successfully, the following message will be prompted:
Dragon execute image.cfg SUCCESS ! ----------image is at----------
OrangePi_3/lichee/tools/pack/sun50iw6p1_android_petrel-p1_uart0.img
pack finish

According to the prompt, you can see the generated Android firmware sun50iw6p1_android_petrel-p1_uart0.img in the OrangePi_3 / lichee / tools / pack / directory. Below, please refer to the "Android Firmware Burning" section to complete the Android firmware burning.

www.orangepi.cn

10

www.xunlong.tv

Orange Pi Manual

Copy right by Shenzhen Xunlong Software Co., Ltd.

IV. Setting up a Linux compilation environment

1. Get the Linux SDK source code from Github
 Orange Pi Linux source downloader Orange Pi 3's Linux source code has been uploaded to GitHub. The currently
supported kernel version is Linux 4.9 and the mainline kernel (some drivers are still under development). We can use the Orange Pi Linux source-specific downloader to download and obtain the downloader source code. Here's the way:
$ sudo apt-get install git $ git clone https://github.com/orangepi-xunlong/OrangePi_Build.git $ cd OrangePi_Build $ ls Build_OrangePi.sh lib README.md
 Run the downloader
$ ./Build_OrangePi.sh
Enter the root password and press enter

Select 0 Build system with uboot / kernel / rootfs / image to enter the interface of development board model selection.

www.orangepi.cn

11

www.xunlong.tv

Orange Pi Manual

Copy right by Shenzhen Xunlong Software Co., Ltd.

Select orange pi 3, enter the kernel version selection interface after entering

At present, the orangepi 3 development board supports the kernel code of Linux 4.9 and mainline. Select one of them and press Enter to start downloading the corresponding SDK source code.

The downloaded source code will be stored in the same directory of OrangePi_Build
$ ls ../OrangePi_Build -l OrangePi_Build OrangePiH6_Linux4.9 (Where the kernel version is Linux4.9) OrangePiH6_mainline (The current kernel version is Linux5.3.5)

2. Get the source code of Linux SDK from Baidu Cloud
Disk
If GitHub fails to download the code, you can download the source code compression package of Linux SDK directly from Baidu Cloud Disk. Download link is:
https://pan.baidu.com/s/15NOF_eAwbN9ah3dfWx0ArQ

www.orangepi.cn

12

www.xunlong.tv

Orange Pi Manual

Copy right by Shenzhen Xunlong Software Co., Ltd.

3. Set up a compilation environment

Orange Pi H6 Linux SDK has only been tested on PCs with Ubuntu 18.04. Please prepare the host environment of ubuntu 18.04 before use. The Linux source directory structure for Orange Pi H6 is shown below:

$ cd OrangePiH6_Linux4.9

$ tree -L 1

.

 build.sh -> scripts/build.s Compile startup script

 external

Store additional configuration files

 kernel

Linux kernel source

 output

Store output files, only generated after compiling source code

 scripts

Script files used during compilation

 toolchain

Cross-compilation toolchain used by the kernel and u-boot

 uboot

Store boot0 and u-boot source code6

directories, 1 file

4. Compile Linux and U-boot source code
 execute the compilation start up script
$ cd OrangePiH6_Linux4.9 $ sudo ./build.sh
Select OrangePi 3 and press Enter

The functions of each option are as follows:
 0 Build Release Image ---- Compile ubuntu or debian distribution images  1 Build Rootfs ---- Compile rootfs for ubuntu or debian  2 Build Uboot ---- Compile boot0 and u-boot source code  3 Build Linux ---- Compile Linux kernel source code

www.orangepi.cn

13

www.xunlong.tv

Orange Pi Manual

Copy right by Shenzhen Xunlong Software Co., Ltd.

 4 Build Module only ---- Compile Linux kernel modules  5 Update kernel Image ---- Update kernel in SD card Linux system  6 Update Module ---- Update the kernel module in SD card Linux system  7 Update Uboot -- -- Update boot0 and u-boot and dtb configuration of SD card Linux
system

The final file generated by the compilation will be saved in the output directory

$ cd output

$ tree -L 2

.

 images

//Generated image file

  OrangePi_3_ubuntu_xenial_server_linux4.9.118_v2.0.2.img

 kernel

//Compile the generated kernel

  uImage_3

 rootfs

//Compile the generated rootfs

 uboot

//Compile the generated uboot image

  boot0_sdcard_sun50iw6p1.bin

  H6.dtb

  u-boot-sun50iw6p1.bin

 xenial_arm64_server_rootfs.tar.gz

5. Linux SDK usage example
The following will fully demonstrate the use of the Linux SDK by adding a

www.orangepi.cn

14

www.xunlong.tv

Orange Pi Manual

Copy right by Shenzhen Xunlong Software Co., Ltd.

rtl8812AU USB WIFI kernel module to the kernel source.

 Get the source code of rtl8812AU from github

$ cd OrangePiH6_Linux4.9/kernel/drivers/net/wireless $ git clone https://github.com/diederikdehaas/rtl8812AU.git Cloning into 'rtl8812AU'... remote: Counting objects: 2347, done. Receiving objects: 100% (2347/2347), 7.87 MiB | 22.00 KiB/s, done. Resolving deltas: 100% (1292/1292), done. Checking connectivity... done.

 Add the configuration of rtl8812AU

$ cd OrangePiH6_Linux4.9/kernel/drivers/net/wireless $ git diff . diff --git a/drivers/net/wireless/Kconfig b/drivers/net/wireless/Kconfig index 373666b..b7ebd5c 100755 --- a/drivers/net/wireless/Kconfig +++ b/drivers/net/wireless/Kconfig @@ -294,4 +294,5 @@ source "drivers/net/wireless/rtl8192eu/Kconfig" +source "drivers/net/wireless/rtl8812AU/Kconfig" endif # WLAN

diff --git a/drivers/net/wireless/Makefile

b/drivers/net/wireless/Makefile

index fd8a466..3aef800 100755

--- a/drivers/net/wireless/Makefile

+++ b/drivers/net/wireless/Makefile

@@ -66,3 +66,4 @@ obj-$(CONFIG_XR_WLAN) += xradio/

+obj-$(CONFIG_RTL8812AU)

+= rtl8812AU/

 Select Realtek 8812A USB WiFi in the kernel configuration and compile it into a kernel module

www.orangepi.cn

15

www.xunlong.tv

Orange Pi Manual

Copy right by Shenzhen Xunlong Software Co., Ltd.

 Recompile the kernel according to the method of `` Compiling Linux and U-boot Source ''

Partially compiled log looks like this:
Start Compile..... Start Compile Module CC [M] drivers/net/wireless/rtl8812AU/core/rtw_cmd.o CC [M] drivers/net/wireless/rtl8812AU/core/rtw_security.o CC [M] drivers/net/wireless/rtl8812AU/core/rtw_debug.o CC [M] drivers/net/wireless/rtl8812AU/core/rtw_io.o CC [M] drivers/net/wireless/rtl8812AU/core/rtw_ioctl_query.o CC [M] drivers/net/wireless/rtl8812AU/core/rtw_ioctl_set.o
After compiling, you can find the compiled kernel module in output / lib / modules / 4.9.118 + / kernel / drivers / net / wireless / rtl8812AU
$ cd output/lib/modules/4.9.118+/kernel/drivers/net/wireless/rtl8812AU $ ls 8812au.ko

 Update kernel module First, insert the SD card that has been burned with Linux firmware into a PC used

www.orangepi.cn

16

www.xunlong.tv

Orange Pi Manual

Copy right by Shenzhen Xunlong Software Co., Ltd.

to compile Linux source code (physical or virtual machine with Ubuntu 18.04 installed). After the system recognizes and successfully mounts the inserted SD card, we can / media / $ LOGNAME see the name of the corresponding partition.

$ cd /media/$LOGNAME

$ ls

BOOT

Store the kernel

rootfs Root file system

Then choose 6 Update Module to update the kernel module according to the instructions in the section `` Compiling Linux and U-boot Source ''

Next, you can start the system through the SD card and use the new 8812au.ko kernel module to drive the USB WIFI network card.

www.orangepi.cn

17

www.xunlong.tv

Orange Pi Manual

Copy right by Shenzhen Xunlong Software Co., Ltd.

V. Android firmware burning

Android firmware cannot be written to the TF card via the dd command in Linux or the Win32 Diskimager tool in Windows. Need to use the tool PhoenixCard to write, PhoenixCard current latest version is PhoenixCard V4.1.2, can be downloaded from the official tool on the official website download page.

1. Android firmware burning steps (TF card start up)

 Format TF card Check whether the inserted TF card is consistent with the selected drive letter, click
the "Restore Card" button to start formatting the TF

 Then select the firmware, select the boot card Please note the red mark in the picture below:

www.orangepi.cn

18

www.xunlong.tv

Orange Pi Manual

Copy right by Shenzhen Xunlong Software Co., Ltd.

 Click "Burn Card" to start writing to the TF card, and wait for the completion of burning.

After the Android firmware is successfully programmed, click the "Close" button, and then you can insert the TF card into the development board to start the system

www.orangepi.cn

19

www.xunlong.tv

Orange Pi Manual

Copy right by Shenzhen Xunlong Software Co., Ltd.

2. Android firmware programming steps (programming to EMMC via TF card)

If you purchased the Orange Pi 3 development board with EMMC Flash chip, you can also burn the Android image to EMMC through TF card, and then use the development board through the system in EMMC. If you purchased the development board of Orange Pi 3 without EMMC Flash, you can only start the system through TF card.
As shown in the figure below, the left side is the Orange Pi 3 development board with EMMC Flash chip attached, and the right side is not attached.

The steps to burn the system to EMMC Flash through TF card are as follows:
 Format TF card Check if the inserted TF card is consistent with the selected drive letter, click the "Recover Card" button to start formatting the TF card.

 Then select the Android firmware of Orange Pi 3, choose the production card among the types of business cards
Please note the red mark in the picture below

www.orangepi.cn

20

www.xunlong.tv

Orange Pi Manual

Copy right by Shenzhen Xunlong Software Co., Ltd.

 Click "Burn Card" to start writing to the TF card, and wait for the completion of burning.

After the Android firmware is successfully programmed, click the "Close" button, and then you can insert the TF card into the development board. After powering on, the system in the TF card will be automatically burned into the EMMC. During the burning process, the red light on the development board will start to flash, and the red light will stop flashing after the burning is completed. You can also see the following programming interface through the HDMI display.

www.orangepi.cn

21

www.xunlong.tv

Orange Pi Manual

Copy right by Shenzhen Xunlong Software Co., Ltd.

Screens displayed during burning

Screen displayed after burning is completed
After programming, you can turn off the power, pull out the TF card, and then power on to start the system in EMMC Flash.

www.orangepi.cn

22

www.xunlong.tv

Orange Pi Manual

Copy right by Shenzhen Xunlong Software Co., Ltd.

VI. Linux firmware burning

We can burn the Orange Pi 3's Linux firmware to the TF card through Etcher. If you
purchased the Orange Pi 3 development board without the EMMC Flash chip, you can
only start the system through the TF card. Etcher supports the following operating
systems.  Linux (most distributions, such as Ubuntu)  MacOS 10.9 and later  Windows 7 and later
The Etcher software installation package can be downloaded from its official
website https://etcher.io/, or it can be downloaded from the official tool of the Orange
Pi 3 official website download page

1. Etcher installation method

 The installation method of Etcher in Windows is the same as that of ordinary software, so I won't go into details here.
 Etcher is installed on Ubuntu and Debian systems as follows 1. Add Etcher Debian repository $ echo "deb https://dl.bintray.com/resin-io/debian stable etcher" | sudo tee /etc/apt/sources.list.d/etcher.list
2. Download the key $ sudo apt-key adv --keyserver hkp://pgp.mit.edu:80 --recv-keys 379CE192D401AB61
3. Update and install $ sudo apt-get update && sudo apt-get install etcher-electron
4.Uninstallation method $ sudo apt-get remove etcher-electron $ sudo rm /etc/apt/sources.list.d/etcher.list && sudo apt-get update

2. How to flash Linux firmware through Etcher
 First open Etcher, its interface is shown below

www.orangepi.cn

23

www.xunlong.tv

Orange Pi Manual

Copy right by Shenzhen Xunlong Software Co., Ltd.

 Then use "Select image" to select the Linux firmware to be burned  Then insert the TF card, Etcher will automatically identify the corresponding
drive  Finally, click "Flash!" To start burning. After burning, you can insert the
development board to start the system.

3. Program Linux system into EMMC Flash chip through
script
If you purchased the Orange Pi 3 development board with EMMC Flash chip, after booting the Linux system through the TF card, you can also burn the Linux system into EMMC Flash through the install_to_emmc script.
Enter the install_to_emmc command in the Linux terminal, and then enter y as prompted, and the Linux system will automatically be burned into EMMC Flash. After the programming is complete, turn off the power, remove the TF card, and then power on the Linux system in EMMC Flash automatically.

www.orangepi.cn

24

www.xunlong.tv

Orange Pi Manual

Copy right by Shenzhen Xunlong Software Co., Ltd.

root@OrangePi:~# install_to_emmc

WARNING: EMMC WILL BE ERASED !, Continue (y/N)? y Erasing EMMC ... Creating new filesystem on EMMC ...
New filesystem created on /dev/mmcblk0. Partitioning EMMC ...
Creating boot & linux partitions OK. Formating fat partition ... fat partition formated. Formating linux partition (ext4), please wait ... linux partition formated.

Instaling u-boot to EMMC ...

Mounting EMMC partitions... FAT partitions mounted to /tmp/_fatdir linux partition mounted to /tmp/_extdir

Copying file system to EMMC ...

Creating "fstab"

******************************* Linux system installed to EMMC. *******************************

www.orangepi.cn

25

www.xunlong.tv

Orange Pi Manual

Copy right by Shenzhen Xunlong Software Co., Ltd.

VII. Instructions for use of Linux system

1. Linux boot light description

 After booting, the on board LED light will first light up red, then the red light will turn off, and the yellow light will stay on.

2. Login account and password

 Username root, password: orangepi  Username orangepi, password: orangepi

3. extend rootfs partition

After the system running card is prepared, the file system rootfs partition should be expanded immediately. This will greatly improve the system performance and avoid various tedious problems caused by insufficient space.
We can use the built-in script resize_rootfs.sh to expand the capacity after entering the system.

The amount of free space in the system before expansion

root@OrangePi:~# df -h

Filesystem

Size Used Avail Use% Mounted on

/dev/mmcblk1p2 1.1G 981M 28M 98% /

devtmpfs

985M 0 985M 0% /dev

tmpfs

994M 0 994M 0% /dev/shm

tmpfs

994M 8.9M 985M 1% /run

tmpfs

5.0M 4.0K 5.0M 1% /run/lock

tmpfs

994M 0 994M 0% /sys/fs/cgroup

/dev/mmcblk1p1 50M 15M 36M 30% /boot

tmpfs

199M 0 199M 0% /run/user/0

root@OrangePi:~#

Run the built-in expansion script root@OrangePi:~# resize_rootfs.sh

www.orangepi.cn

26

www.xunlong.tv

Orange Pi Manual

Copy right by Shenzhen Xunlong Software Co., Ltd.

The amount of space available in the system after the expansion

root@OrangePi:~# df -h

Filesystem

Size Used Avail Use% Mounted on

/dev/mmcblk1p2 15G 982M 13G 7% /

devtmpfs

985M 0 985M 0% /dev

tmpfs

994M 0 994M 0% /dev/shm

tmpfs

994M 8.9M 985M 1% /run

tmpfs

5.0M 4.0K 5.0M 1% /run/lock

tmpfs

994M 0 994M 0% /sys/fs/cgroup

/dev/mmcblk1p1 50M 15M 36M 30% /boot

tmpfs

199M 0 199M 0% /run/user/0

4. Recording playback test method
Note: The Audio Codec audio driver for the mainline kernel is not yet available
 Test recording function root@orangepi3:~# arecord -d 10 -f cd -D hw:1,0 -t wav Test.wav Recording WAVE 'Test.wav' : Signed 16 bit Little Endian, Rate 44100 Hz,
Stereo root@orangepi3:~#
 Test the HDMI playback function, just use the aplay command to play root@orangepi3:~# aplay Test.wav
 Test headset playback root@orangepi3:~# aplay -D hw:1,0 Test.wav

5. WIFI configuration method

Add the following configuration to / etc / network / interface and restart

auto wlan0 iface wlan0 inet dhcp wpa-ssid orangepi wpa-psk orangepi

//Fill in the WIFI account hereorangepi //Fill in the WIFI password hereorangepi

www.orangepi.cn

27

www.xunlong.tv

Orange Pi Manual

Copy right by Shenzhen Xunlong Software Co., Ltd.

6. Test method of PCIE interface

When using the PCIE interface, it should be noted that if the PCIE interface is used, the USB2.0 interface cannot be used. If used at the same time, it will cause a system error. Currently, only the rtl8822be PCIE driver is integrated in the linux3.10 kernel. The drivers for other PCIE devices have not been adapted for the time being, and other versions of the kernel cannot currently use the PCIE function. If you need to test the function of the PCIE interface, please use the Linux 3.10 image or the Android image.

Insert the RTL8822BE wireless network card module according to the method shown in the figure below and start the system. The system will automatically identify and load the 88x2be.ko kernel module.

The lsmod command can be used to check whether the driver is successfully loaded. The ifconfig command can be used to check the network node corresponding to the PCIE wireless network card.

www.orangepi.cn

28

www.xunlong.tv

Orange Pi Manual

Copy right by Shenzhen Xunlong Software Co., Ltd.

root@OrangePi:~# lsmod

Module

Size Used by

88x2be

2116402 0

root@OrangePi:~# ifconfig wlp1s0 wlp1s0 Link encap:Ethernet HWaddr f8:da:0c:5a:00:6f
UP BROADCAST MULTICAST MTU:1500 Metric:1 RX packets:0 errors:0 dropped:6 overruns:0 frame:0 TX packets:0 errors:0 dropped:0 overruns:0 carrier:0 collisions:0 txqueuelen:1000 RX bytes:0 (0.0 B) TX bytes:0 (0.0 B)

www.orangepi.cn

29

www.xunlong.tv

Orange Pi Manual

Copy right by Shenzhen Xunlong Software Co., Ltd.

VIII. Introduction to serial debugging tools

First you need to prepare a USB to TTL serial cable similar to the picture below:

Connect the serial cable as shown in the figure below. The functions of the cables of
different colors are as follows:  Black----GND  Green-RX  White-TX

www.orangepi.cn

30

www.xunlong.tv

Orange Pi Manual

Copy right by Shenzhen Xunlong Software Co., Ltd.

1. Use on Windows platform

In the process of using OrangePi for project development, in order to obtain more debugging information, OrangePi supports serial port information debugging by default. For developers, they only need to prepare the materials mentioned above to get serial debugging information. The serial debugging tools used by different host computers are similar. Basically, you can refer to the methods below to deploy. There are many tools for serial debugging on the Windows platform. The commonly used tool is putty. This section uses putty as an example to explain deployment.
 Install USB driver Download the latest driver PL2303_Prolific_DriverInstaller_v130.zip, download and unzip.

Select application installation as administrator

Wait for the installation to complete

 Download and install Putty Putty can be downloaded from the following address, please choose the version suitable for your development environment.
https://www.chiark.greenend.org.uk/~sgtatham/putty/latest.html
Double-click the downloaded putty.exe directly to open putty. The software interface is shown in the figure below.

www.orangepi.cn

31

www.xunlong.tv

Orange Pi Manual

Copy right by Shenzhen Xunlong Software Co., Ltd.

 Acquisition of equipment information
In Windows 7, we can check whether the serial port connection is normal and the device number of the serial port through the device manager. If the device is not recognized properly, please check if the driver is successfully installed. If there is a problem with the driver installation, you can try to scan and install the driver using 360 Driver Master.

 Putty configuration
Set the serial port to the corresponding port number (COM4), disable flow control, and set the speed to 115200

www.orangepi.cn

32

www.xunlong.tv

Orange Pi Manual

Copy right by Shenzhen Xunlong Software Co., Ltd.

 Start debugging serial output OrangePi is powered on and putty will automatically print serial port log information

2. Use on Linux platform

There is not much difference between using putty on the Linux platform and the Windows platform. The following mainly describes the operation steps where there are differences. All operations are based on Ubuntu 14.04 system.
 Install and start Putty $ sudo apt-get install putty $ sudo putty

 Configure Putty The serial number can be viewed through ls / dev / ttyUSB * Baud rate needs to be set to 115200 And turn off flow control

www.orangepi.cn

33

www.xunlong.tv

Orange Pi Manual

Copy right by Shenzhen Xunlong Software Co., Ltd.

www.orangepi.cn

34

www.xunlong.tv
References
-
 build.sh
-
 MIT PGP Key Server
-
 Exclusive Software Deals for Developers and Startups - Dealsbe
-
 香橙派(Orange Pi)-Orange Pi官网-香橙派开发板,开源硬件,开源软件,开源芯片,电脑键盘
-
 深圳市迅龙软件有限公司
-
 balenaEtcher - Flash OS images to SD cards & USB drives
-
 GitHub - diederikdehaas/rtl8812AU: Realtek 8812AU USB WiFi driver
-
GitHub - orangepi-xunlong/OrangePi_Build: The official build system for Orange Pi, support A64, RDA, RK3399
-
 百度网盘-链接不存在
-
 Download PuTTY: latest release (0.83)