Alcatel-Lucent ALE-30h OXO Connect Essential DeskPhone User Manual
File info: application/pdf · 73 pages · 2.23MB
OXO Connect - ALE-30h & ALE-20h & ALE-20 Essential DeskPhone - User Manual
This document describes the services offered by the following desk phones conneted to an OXO Connect or OXO Connect Evolution system : ALE-30h, ALE-20h & ALE-20
8AL91432ENAA;Set;Desk, Phone;8000, Family;User Manual
OXO Connect - ALE-30h & ALE-20h & ALE-20 Essential ...
User Manual 8AL91432ENAAed01 3 /73 1 Getting to know your telephone 7 1.1 ALE-30h Essential DeskPhone 7 1.1.1 Phone description 7 1.2 ALE-20h Essential DeskPhone / ALE-20 Essential DeskPhone 8
OXO Connect - ALE-30h & ALE-20h & ALE-20 Essential DeskPhone ...
PDF OXO Connect - ALE-30h & ALE-20h & ALE-20 Essential ...
Full PDF Document

If the inline viewer fails, it will open the original document in compatibility mode automatically. You can also open the file directly.
Extracted Text
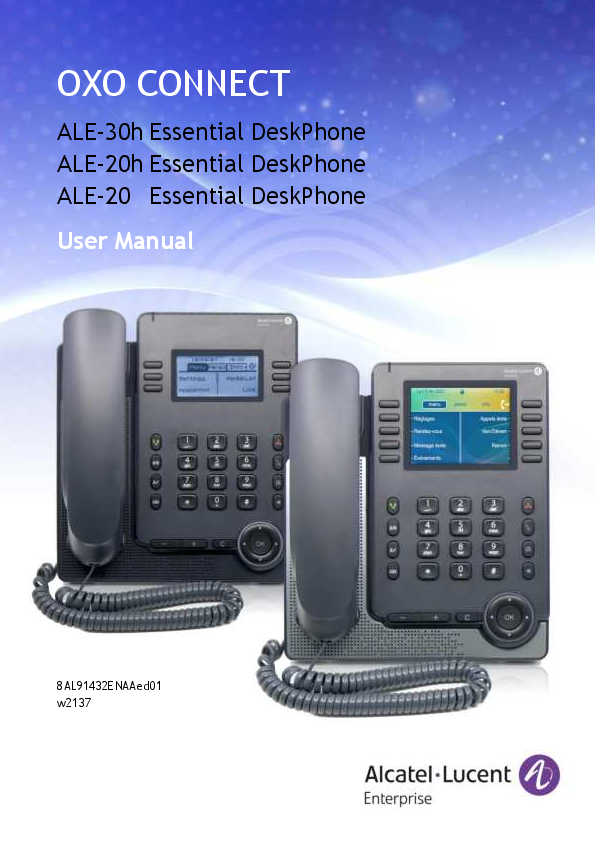
OXO CONNECT
ALE-30h Essential DeskPhone ALE-20h Essential DeskPhone ALE-20 Essential DeskPhone User Manual
8AL91432ENAAed01 w2137

User Manual
Introduction
Thank you for choosing an Alcatel-Lucent Enterprise desk phone.
This document describes the services offered by the following desk phones connected to an OXO Connect or OXO Connect Evolution system.
� ALE-30h Essential DeskPhone (ALE-30h). � ALE-20h Essential DeskPhone (ALE-20h). � ALE-20 Essential DeskPhone (ALE-20).
These desk phones are part of the Essential DeskPhone range.
The Essential DeskPhone range provides a rich communication experience with Alcatel-Lucent Enterprise (ALE) solutions, thanks to a compact design and an intuitive navigation. These models offer enhanced ergonomic features for more effective communication.
Enjoy wideband audio quality in IP mode from the handset or speakerphone (narrow band in Digital mode). This technology allows outstanding communication quality. Programmable keys and intuitive navigation simplify the user experience.
These phones can be deployed in any business environment, from on-premises PBX, to cloud deployment on Alcatel-Lucent Enterprise servers, at home or in the office.
The ALE-20h and ALE-30h are hybrid phones. They offer digital and IP mode on the same network interface via a single Digital or Fast Ethernet port, and allow you to leverage your existing infrastructure. Hybrid Phone can migrate seamlessly from Digital to IP network thus protecting your investment in ALE Deskphone. They can be powered by Power Over Digital Line or Power Over Ethernet or by connecting an external power supply sold separately.
The ALE-20 is an IP phone including 2 RJ-45 Gigabit Ethernet ports. It can be powered by Power Over Ethernet or by connecting an external power supply sold separately.
The labels and icons displayed depend on the model of your desk phone. The label is not displayed if the corresponding feature is not configured on your telephone system. Depending on the size of the display, some labels may be truncated. All labels are displayed in color and are italicized. This icon describes a succession of actions or labels you have to do or select: . This icon describes the consequence of an action: .

8AL91432ENAAed01

2 /73

User Manual

1

Getting to know your telephone

7

1.1 ALE-30h Essential DeskPhone

7

1.1.1 Phone description

7

1.2 ALE-20h Essential DeskPhone / ALE-20 Essential DeskPhone

8

1.2.1 Phone description

8

1.3 Unboxing

9

1.4 Install your desk phone

9

1.4.1 Install the foot

9

1.4.2 Install a comfort wired handset

10

1.4.3 Connect the device

10

1.4.4 First start-up

10

1.5 Description of the connectors

11

1.6 Main screens and navigation keys

12

1.6.1 Welcome screens

12

1.6.2 Call management screen

14

1.7 User local menu

15

1.8 Status icons / Call icons

16

1.9 Permanent features keys

17

1.10 Alphanumeric keyboard

18

2

Using your telephone

19

2.1 2.2 2.3 2.4 2.5 2.6 2.7 2.8 2.9 2.9.1 2.9.2 2.10 2.11 2.11.1 2.11.2 2.12 2.13 2.13.1 2.14 2.15 2.16 2.16.1 2.16.2 2.17 2.18 2.19 2.19.1 2.19.2 2.19.3 2.20 2.21 2.21.1 2.21.2 2.21.3 2.22 2.23 2.24 2.25

Identify the terminal you are on

19

Messaging portal

19

Consulting the call log

20

Making a call

22

Receiving a call

22

Ignore the call

22

Switching between audio modes

23

Activating the loudspeaker during a conversation (handset lifted) - Group listening feature 24

Making calls by name (company directory)

24

Calling a contact using the unified directory

25

Calling a contact using the internal directory (predictive search)

25

Make calls via your programmed call keys (Perso page/F1 and F2 keys/Add-on module) 26

Filtering calls using the voice mailbox

26

Activating call screening

26

When you receive a call

26

Redialing

26

Requesting automatic callback if internal number is busy

27

Cancelling an automatic callback

27

Receiving interphony calls

27

Sending DTMF signals

27

Mute, so that your contact cannot hear you

28

From the set

28

From the headset

28

Forwarding calls to your voice message service

28

Consulting your voice mailbox

28

Sending an instant message to a contact

29

Sending an instant message using the search by name feature

29

Sending an instant message using the phone number

29

Status of the instant messages

30

Consulting instant messages

30

Answering with an instant message

31

Answering an Instant message

31

Answering a voice message

31

Answering from the call log

32

Lock / unlock your telephone

32

Placing a call on hold (hold)

32

Placing an external call on hold (parking)

33

Making a second call during a conversation

33

8AL91432ENAAed01

3 /73

User Manual

2.25.1 Retrieve the call on hold 2.26 Answering a second call during a conversation 2.27 Switching between calls (Broker call) 2.28 Transferring a call 2.29 Transfer a call to a voice mail 2.30 Three-way conference with internal and/or external contacts (conference) 2.30.1 Cancel the conference and recover the last active call before the conference (the other
is on hold) (If conference is active) 2.30.2 End the conference with all participants (If conference is active) 2.30.3 After the conference, to leave your two contacts talking together 2.31 'Meet me' conference 2.31.1 Initiate a 'Meet me' conference 2.31.2 Join a 'Meet me' conference 2.32 Intrusion into an internal conversation (barge-in) 2.32.1 Protection against intrusion 2.33 Save a number into your personal directory 2.34 Selecting calls to be forwarded 2.35 Forwarding calls to another number (immediate forward) 2.36 Forwarding calls when your line is busy (forward if busy) 2.37 Personal assistant: reaching you with one number only 2.38 Activate/disable the personal assistant 2.39 Do not disturb 2.40 Forwarding your calls from the receiving terminal ('Follow me') 2.41 Forwarding all group calls 2.42 Forwarding calls to your pager 2.43 Cancelling all forwards 2.44 Cancelling a specific forward 2.45 Leaving a text message for internal callers 2.45.1 Sending predefined message 2.45.2 Sending a new message 2.46 Send a voice message copy 2.47 Sending a recorded message to a number or a distribution list 2.48 Receiving supervised call ringing 2.49 Answering the general bell 2.50 Manager/Assistant filtering 2.50.1 From the manager or assistant telephone 2.51 Call pick-up 2.52 Answering briefly in place of the operator 2.53 Hunting groups 2.53.1 Hunting group call 2.53.2 Temporary exit from your hunting group/Return into your group 2.54 Calling an internal contact on his/her pager 2.55 Answering a call on your pager 2.56 Calling a contact on his/her loudspeaker 2.57 Broadcasting a message on the loudspeakers of a station group 2.58 ACD: Agent set/ Supervisor station 2.58.1 Agent set 2.58.2 Open an agent session (login) � Agent set 2.58.3 ACD application welcome screen � Agent set 2.58.4 The four operating statuses of the agent set 2.58.5 Changing the operating status of the set � Agent set 2.58.6 Modifying your personal code � Agent set 2.58.7 Integrating another group/leaving a group � Agent set 2.58.8 Close the agent session (logout) � Agent set 2.58.9 Supervisor station 2.58.10 Supervising group mailboxes � Supervisor station 2.59 Configure your phone for remote working 2.59.1 First connection as remote working 2.59.2 Change the configuration
8AL91432ENAAed01

33 34 34 34 35 35
35 35 35 36 36 36 37 37 37 37 37 38 38 38 38 39 39 39 39 39 40 40 40 41 41 41 41 42 42 42 42 42 42 42 43 43 43 43 43 43 43 44 44 44 44 44 45 45 45 45 46 47
4 /73

User Manual

2.59.3 PIN code

47

2.59.4 Reset your PIN code

47

2.59.5 Reconnect your desk phone in your business place

48

2.59.6 Reconnect your desk phone in remote place

48

3

Programming your telephone

49

3.1 Initializing your voice mailbox

49

3.2 Customizing your voice greeting

49

3.2.1 Record your personal message

49

3.3 Modifying your personal code

49

3.4 Adjusting the audio functions

50

3.4.1 Choose the tune

50

3.4.2 Adjusting the ringer volume

50

3.4.3 Activate/deactivate silent mode

50

3.4.4 Activate/deactivate meeting mode (progressive ringing)

50

3.4.5 Activate/deactivate discreet ring mode

51

3.4.6 Adjust ringer volume while a call arrives

51

3.5 Hearing Aid

51

3.6 Adjusting the brightness of the desk phone

51

3.6.1 Adjust the brightness when the phone is in use

51

3.6.2 Adjust the dimmed brightness when the phone is not in use - Only available on ALE-30h 51

3.6.3 Set the delay before the brightness is dimmed when the phone is not in use (screensaver)

- Only available on ALE-30h

52

3.7 Adjust contrast (ALE-20/ALE-20h)

52

3.8 Selecting the welcome page

52

3.9 Selecting language

52

3.10 Programming direct call keys (Perso page/F1 and F2 keys/Add-on module)

53

3.11 Customize the color and the style of programmable softkeys (ALE-30h in IP mode)

54

3.12 Modifying direct call keys

54

3.13 Modify the name of a system programmed key

54

3.14 Deleting direct call keys

55

3.15 Programming an appointment reminder

55

3.16 Install a USB accessory (Headset, Handsfree, Loudspeaker)

55

3.17 Install a RJ9 headset

55

3.18 Activating/Deactivating 'Forced headset' mode

56

3.19 Manage connected devices

56

3.19.1 List of connected devices

56

3.19.2 Default device

56

3.20 Contacting your administrator (Technical support)

57

3.20.1 Date code / Technical code

57

3.20.2 Software version

57

3.20.3 Hardware model

57

3.20.4 Access to administrator configuration (only available in IP mode)

58

3.20.5 Auto update the desk phone via USB key

58

4

Accessories

59

4.1 List of accessories

59

4.1.1 USB accessories

59

4.1.2 RJ9 accessory

59

4.1.3 Power supply

59

4.1.4 Other headsets

59

4.1.5 Other accessories

59

4.2 Magnetic alphabetic keyboard: ALE-10 keyboard

60

4.2.1 Description

60

4.2.2 Unboxing

60

4.2.3 Installation

60

4.2.4 How to use the keyboard

61

4.3 2 x 10 key expansion module: EM200 Smart Expansion Module

62

4.3.1 Unboxing

62

8AL91432ENAAed01

5 /73

User Manual

4.3.2 Description / Connectors

62

4.3.3 install the add-on to the desk phone

63

4.3.4 Icon description

63

4.3.5 Install more than one add-on module

64

4.4 Wall mounting kit

64

4.5 USB external ringing interface module (USB Interface module 2 relays 3GV28184AA)

65

4.5.1 Installation

65

4.5.2 Connect the device

65

4.6 Third parties headset certified in Developer and Solution Partner Program (DSPP)

66

5

Technical specifications

67

6

Ordering information

68

7

Guarantee and clauses

69

7.1 Safety Instructions

69

7.2 Regulatory Statements

70

Quick guide

72

8AL91432ENAAed01

6 /73

User Manual
1 Getting to know your telephone
1.1 ALE-30h Essential DeskPhone
This phone is part of hybrid models and offers digital or IP mode on the same network interface via a single Digital or Fast Ethernet port. With its large color display associated to 2x5 dedicated softkeys, and intuitive navigation keys, your desk phone provides high audio quality for telephone calls either in full duplex hands-free mode or when using the ergonomic handset (wideband in IP mode, narrow band in Digital mode). You can enhance your experience by connecting a new alphabetic keyboard or a color 2x10 keys expansion module. ALE-30h can be used in your company at your office either in IP or Digital mode or at home for remote working in IP mode.
1.1.1 Phone description

1 3.5 inch color display. 2 2 x 5 context sensitive configurable software keys. 3 Permanent feature keys: quick access to the phone's main features. 4 Programmable keys or predefined keys(1). 5 Alphanumeric key.
Status Led indicator / Ambiant light sensor Flashing blue: default incoming calls. 6 Flashing orange (manager/assistant): as assistant, manager's incoming call. Flashing purple (supervisor): as supervisor, supervisee's incoming call.
7 Navigation. 8 Wired handset (wideband in IP mode, narrow band in Digital mode). 9 loudspeaker. 10 Microphone. 11 USB-A connector. 12 2-degree adjustable foot (55�,40�). (1) these predefined keys depend on the system and the countries, contact your installer for more information about your system (configuration for United States for example).

8AL91432ENAAed01

7 /73

User Manual
1.2 ALE-20h Essential DeskPhone / ALE-20 Essential DeskPhone
The ALE-20h Essential DeskPhone is part of hybrid models and offers digital or IP mode on the same network interface via a single Digital or Fast Ethernet port. It is a cost-effective version of the ALE-30h. The ALE-20 Essential DeskPhone is part of IP models and provides a dual Gigabit Ethernet port. In addition to a clear monochrome display associated to 2x3 dedicated softkeys and intuitive navigation keys, these desk phones provide high audio quality for telephone calls either in full duplex hands-free mode or when using the ergonomic handset (wideband in IP mode, narrow band in Digital mode). ALE20h and ALE-20 can be used in your company at your office or at home for remote working in IP mode. ALE-20h can also be used at your office in Digital mode.
1.2.1 Phone description

1 2.8 inch monochrome backlit display. 2 2 x 3 context sensitive configurable software keys. 3 Permanent feature keys: quick access to the phone's main features. 4 Programmable keys or predefined keys(1). 5 Alphanumeric key.
Status Led indicator / Ambiant light sensor Flashing blue:default incoming calls. 6 Flashing orange (manager/assistant): as assistant, manager's incoming call. Flashing purple (supervisor): as supervisor, supervisee's incoming call.
7 Navigation. 8 Wired handset (wideband in IP mode, narrow band in Digital mode). 9 loudspeaker. 10 Microphone. 11 USB-A connector. 12 2-degree adjustable foot (55�,40�). (1) these predefined keys depend on the system and the countries, contact your installer for more information about your system (configuration for United States for example).

8AL91432ENAAed01

8 /73

User Manual
1.3 Unboxing

Deskphone

Handset

2-degree adjustable foot

Handset cord

Safety and regulatory instructions

1.4 Install your desk phone

1.4.1 Install the foot

Clip the foot into its compartment behind the phone. Your desk phone provides a 2-degree foot. Depending on the way you insert the foot into the phone, your desk phone will have a different angle: 55� or 40�. The angle noted on the top of the foot (face up) corresponds to the angle that the phone will have after having inserted the foot.

A

B

40�/55�

To unclip the foot, pull it straight back until it separates from the phone.

8AL91432ENAAed01

9 /73

User Manual
1.4.2 Install a comfort wired handset Your phone is provided with a connected handset. If you have to replace it:
� Plug-in the wired handset to the appropriate connector (see chapter: Description of the connectors.).
� Make sure you position the cable correctly in the compartment intended for that purpose.
1.4.3 Connect the device Please read safety instructions first.
Connect the handset if it is not connected (your phone is usually provided with the handset connected). Connect the keyboard to the RJ9 connector of the phone (ALE-10 Keyboard - optional - sold separately). The magnetic alphabetic keyboard is only available for ALE-30h Essential DeskPhone. The ALE-30h and ALE-20h Essential DeskPhone can be connected to an IP network or a Digital network. Connect the keyboard to the RJ9 connector of the phone the desk phone to the IP line or Digital line (UA) thru RJ45 connector. The desk phone starts automatically in IP mode or Digital (UA) mode regarding the connected network. If your desk phone is not powered by PoE (Power over Ethernet) or PoDL (Power over Digital Line), you have to plug the USB-C power adapter (sold separately). In Digital mode, the local USB-C Power Adapter is mandatory when plugging an expansion module. The power adapter is sold separately. For more information, contact your installer or administrator.
For more details, please consult the section: Description of the connectors.
1.4.4 First start-up The desk phone starts in IP mode (IP network) or Digital mode (UA) according to the connected network. If your desk phone detects a UA line, it stays in low power mode (the top LED is purple blinking) until boot is granted by the system. If the phone stays in low power mode, you have to plug a power adapter.

8AL91432ENAAed01

10 /73

User Manual

1.5 Description of the connectors

Various connections to allow phone extensions. The type of connectors you have depends on your phone.

ALE-30h Essential DeskPhone ALE-20h Essential DeskPhone

ALE-20 Essential DeskPhone

Universal Serial Bus (USB-C) connector This connector is used for:

1

� Connect the USB-C power adapter.

ALE-30h ALE-20h ALE-20

� Connect a USB-C headset.

(1)

(1)

(1)

Digital line (RJ45) 10/100 Fast Ethernet connector (LAN).

(2)

(2)

2

10/100/1000 Mbps Ethernet connectors to the enterprise

network (LAN - RJ45) -

10/100/1000 Mbps Ethernet connectors to a PC (RJ45).

3

RJ9 wired handset or headset connector.

4

magnetic alphanumerical keyboard connector (RJ 9): ALE- (3)

(3)

(3)

10 Keyboard.

Universal Serial Bus (USB-a) connector.

This connector is used for:

5

� A USB-A headset. � An add-on module.

(4)

(4)

� A USB-A key for maintenance (manual software

upgrade via USB key for example).

(1)You can connect a headset if the port is not used to power the phone. (2)Your phone is equipped with only one RJ45 port, to connect it to the IP network or an Digital line. (3)This connector is used for debugging (the keyboard has to be unpluged for ALE-30h). (4)In Digital mode, the local USB-C Power
Adapter is mandatory when plugging an expansion module. Please ensure using a RJ45 connector for the network cable in IP or Digital mode (not RJ11), otherwise
you risk to damage the connector.

8AL91432ENAAed01

11 /73

User Manual

1.6 Main screens and navigation keys

1.6.1 Welcome screens
You can access all of your phone's features from these screens. The default display has three pages that you can access by selecting the corresponding tab at the top of the screen with the navigation keys. The selected page is highlighted. The default pages can be augmented with other applications (ACD for example) installed and/or configured on your system.
� Menu page Menu Contains all features and applications accessible by selecting the softkey of the desired feature or application. From this page, it is possible to adjust the ringer volume, program the time of an appointment, lock the terminal, define the default page displayed, configure voice mail, and access telephone functions such as calling back one of the last numbers or intercepting calls.
� Perso page Perso Contains call line keys (allowing supervision of calls) and programmable call keys.
� Info page Info Contains information on the telephone and the status of its functions: name, telephone number, number of messages (including call log events, text messages and voice messages), transfer status, appointment reminder, etc.

�

/ Forward icon (the icon depends on the model of the phone)

Press the key next to this icon allows you to program or change the transfer function.

� Press the key in front of the label to select the corresponding feature.
� Press the programmed key in front of the softkey to activate it (call a contact, forward to a number, ...).

1.6.1.1 Choose the page displayed by default on the telephone This feature depends on the system configuration. If necessary, contact your administrator.

� Reach the 'Menu' page. � Settings Options Homepage � Select the default page (Menu, Perso, Info, last visited page ...).
�

8AL91432ENAAed01

12 /73

User Manual 1.6.1.2 Description

1

Top bar (date, time, status icons, user dynamic status)

2

Display the page by selecting the corresponding tab.

Forward icon.

3

Manage your call forwarding by pressing the key associated with the forward icon.

� / Stationary arrow: no forwarding activated.

�

/ Blinking or rotating arrow according to the skin: forwarding

activated.

4

Softkeys: menus and actions available depending on the selected page.

OK key: Use this key to validate your choices and options while programming or configuring. In idle state, press the ok key to switch on/off the backlight. Left-right navigator: In idle state, use this key to move from one page to another. In conversation, use this key to move between tabs of current calls (call in progress, calls on hold, incoming call). In the text edition, use this key to navigate into the text box.
Up-down navigator: Used to scroll through the content of a page.
Back/Exit key: Use this key to go back to the previous step. Use this key to go back to the homepage (long press).

8AL91432ENAAed01

13 /73

User Manual
1.6.2 Call management screen Call management screen displays all information about current calls and lets you access to available features during conversation. 1.6.2.1 Description

1

Tabs: incoming call icon, call in progress, call on hold, ...

2

notification (popup) of incoming call

3

softkeys: actions available depending on the call status (when presentation screen is not displayed)

Left-right navigator: Each tab corresponds to a call, the status of which is symbolized by its icon (in progress, call on hold, arrival of new call). When a call is in progress, use the left-right navigator to look at calls on hold or incoming calls. Up-down navigator: All features are accessible while the call is displayed on the screen. Use the Up and Down arrows to move up or down a page. These functions (transfer, conference, etc.) are directly related to the status of the call consulted. For example, the transfer function will not be available between a call in progress or on hold and an incoming call. Back/Exit key: Use to switch to the main screen during conversation to access some functions, for example, searching by name.
Press the key in front of the label to select the corresponding feature.
Calls can also be managed from the Perso page. While the call is in progress, press the Back/Exit key and display the Perso page. Calls in progress or waiting calls are displayed on the different line keys. It is then possible to converse with the contact of your choice by pressing the key associated to the contact.

8AL91432ENAAed01

14 /73

User Manual

1.7 User local menu

Open the user local menu: reach the 'Menu' page Settings Phone Local Menu The user local menu depends on the running mode of the desk phone, IP or Digital (UA) mode.

Display - Use this menu to adjust the display of your set:

� Brightness

Adjust the brightness of the display of the desk phone, the connected add-on, and the LEDs of the

desk phone (

successive presses).

� Screensaver(1)

Set the delay before the brightness is dimmed when the phone is not in use.

� Advanced Low brightness(1)

When the phone is not in use, the brightness is dimmed. Adjust dimmed brightness.

(1) Only available on ALE-30h

Audio - Use this menu to adjust the audio convenience according to your environment, the type of device connected and your audio preferences:
� Devices List all audio devices connected or integrated to the desk phone. Select the preferred audio device (connected or integrated).
� Hearing Aid Check this option if you are using a hearing aid.

About - Use this menu to find information about the software and hardware releases of your desk phone. Use this menu to obtain the link to the user manual of your desk phone or the link to the RainbowTM home page.
� Software Display all information about your desk phone's software.
� Hardware Display all information about your desk phone's hardware (model, PCMS Number, serial number, mac address, Bluetooth� address if available).
� Documentation Display a QR code to directly access documentation for your desk phone. Scan the QR code and open the URL in your favorite web browser.
� Rainbow Display a QR code to directly access the RainbowTM homepage. Rainbow is the cloud-based collaboration application that connects you with your business community. Scan the QR code and open the URL in your favorite web browser.

Config. MMI (only available in IP mode) Access to administrator configuration (depending on the system configuration, an administrator password is requested to access this menu):
� IP address information: IP Parameters IP Status � IP address and DHCP configuration: IP Parameters IP Config � Phone memory: IP Parameters Memories � Used network (wired or wireless): Network � VPN configuration: VPN � Security: Security � Software information (version, run mode): Software infos � Hardware information (MAC, CPU): Hardware infos � Software update mode: Software infos Upgrade
o Enable software upgrade: upgrade via network (system). o Upgrade from USB now: use a USB drive to upgrade the software when you restart the
desk phone. � Factory configuration: Set Default Reset to Defaults

8AL91432ENAAed01

15 /73

User Manual
1.8 Status icons / Call icons
Icons giving information about some specific configurations of the phone or about call status are displayed in the top bar of the screen.
Status icons Depending on the size of the display, all status icons may not be displayed simultaneously. Which icons are displayed depend on their priority. The following icons are listed according to their priority, from the highest to the lowest.
Silent mode. Telephone locked(1). Headset connected. Handsfree connected Appointment programmed. Encrypted signal icon. Wi-Fi (future use) (1) or operator 'restricted mode' according to the system. Call icons

Incoming call icon. Call in progress icon. Call holding icon. Your contact ended the conversation.
8AL91432ENAAed01

16 /73

User Manual

1.9 Permanent features keys

This chapter displays all permanent features keys available on your desk phone. They are located around the keypad.

� Take the call key - in idle state - short press during incoming call (ringing).

� Redial key: to access the 'Redial' feature (short/long press in idle state).

� Silent ringing when receiving an incoming call.

� End the call (Hang up).

� Return to the main page.

� Mute key During a call, press this key to stop your contact from hearing you. When activated the key

blinks blue.

� Interphony key When idle, press this key to switch the phone to interphony mode. When you receive a

call, the phone hooks off automatically and you go straight into hands-free mode. When

activated, this key is lit blue.

This feature can be deactivated by the administrator.

� Messaging key to access the messaging portal (call log, voice messages and text messages). This key flashes blue when there is a new event such as a new voice message, a new

instant message or a new event in the call log and remains lit until all events are

acknowledged or deleted. The key remains lit until all events are acknowledged or

deleted.

� Pressing this key answers an incoming call in hands-free mode (when activated, the key is lit blue). When a call is in progress, pressing this key switches from hands-free mode to headset or handset mode. A long press activates the loudspeaker when a call is in progress

via the handset or headset.

� Turn up the volume (ringing or call state).

successive presses

�

Increase the brightness (idle state)(1).

� Turn down the volume (ringing or call state).

successive presses

�

Decrease the brightness (idle state) (1).

The following keys depend on the system configuration. The 'abc' key is either a key that switches

between alphabetic and numeric keyboards (alphanumeric key) or a programmable key if an optional keyboard is already connected to the phone (ALE-30h). F1 and F2 keys are programmable keys.

Hold, transfer keys depend on the system and the countries, contact your installer for more

information about your system (configuration for United States for example). In this case F1 and F2 are

no longer programmable.

� Programmable key (F1). Lit when the function associated with the key is activated (blue). A service or a direct call can be associated to these keys.

� Placing a call on hold / Retrieve the call on hold. This feature depends on the system configuration. If necessary, contact your administrator.

� Programmable key (F2). Lit in blue when the function associated with the key is activated. A service or a direct call can be associated to these keys.

� Transfer: transfer the call to another number. This feature depends on the system configuration. If necessary, contact your administrator.

� Alphanumeric key Switch between the alphabetic and numeric keyboards. When activated, the key is lit

blue. An optional keyboard can be used on the ALE-30h. In this case, the key can be

programmed as programmable F1 or F2 keys. � Programmable key(1) (If the optional keyboard is connected to the desk phone). Lit when
the function associated with the key is activated (blue). A service or a direct call can be

associated to these keys.

� Access the dial by name feature (long press) (1) Available for ALE-30h Essential DeskPhone. (2) Available for ALE-20h Essential DeskPhone. (3) Available for ALE-20 Essential DeskPhone.

8AL91432ENAAed01

17 /73

User Manual
1.10 Alphanumeric keyboard
Your phone is equipped with alphanumeric keyboard. You can switch between numeric keyboard to dial number, and alphabetic keyboard to enter text by pressing the alphanumeric key. When you are in a text zone, you can switch to the alphabetic keyboard by selecting this key. When activated, the key is lit blue. Select the same key which is lit in blue to switch to the numeric keyboard (the key switches off).
ALE-30h DeskPhone can also be equipped with a magnetic alphabetic keypad: ALE-10 keypad (sold separately). In this case, the alphanumeric key is disabled. The dedicated key can therefore be programmed.
� Enter alphabetic characters. The number pad keys have letters that you can display by successive presses. The number is the last character in the series. Some special characters can be displayed by successively pressing the key:
% $ / ~ & ( )[ ] = *
@ #
space | - _ 1
+ . , ;:\ ? ! < > 0

�

Press and hold the '*' key to switch from lowercase to uppercase mode, and vice versa.

� Use navigation keys to move the cursor into the text (except in dial by name feature).

�

Use this key to delete the last entered character. The alphabetic mode remains

activated.

Use cases:

: '1' is displayed.

+

: 'space' is displayed.

+

3 successive presses: f' is displayed.

+

Long press +

3 successive presses: 'F' is displayed.

+

5 successive presses: ':' is displayed.

8AL91432ENAAed01

18 /73

User Manual
2 Using your telephone
2.1 Identify the terminal you are on
The number of your telephone is displayed on the 'Info' page.
2.2 Messaging portal
The messaging portal allows you to access and manage features such as the call log, instant messaging and voice messages. When there is a new event (new log, new instant message or new voice message) the message key blinks red. Accessing the messaging portal

�

Press the message key to access the messaging portal.

Configure access to the messaging portal The system default setting requires you to enter your personal password to access the messaging portal features. The password information is retained for a few seconds so that if you quit the messaging portal you can access it again after a few seconds without having to re-enter your password. The length of this time-out depends on your system configuration. For more information, contact your installer or administrator. You can change the setting so that you don't have to enter a password each time you want to access the messaging portal features.

�

Access the messaging portal.

� Configure

� Authentification

� Enter your personal password.

� Set authentication to on or off.

On: password is always required.

Off: password is never required.

�

Press to confirm.

Accessing the features of the messaging portal To access the available features (call log, instant messages IM, voice messages, sending an instant message), press the associated softkey.
Acknowledging When you consult a new event (call log, instant message or voice message), the event is automatically acknowledged. However, you can choose to acknowledge all events without consulting them.

�

Access the messaging portal.

�

Press the associated softkey.

� Enter your password (if required) and apply.

�

Press the softkey associated with the type of event you want to acknowledge. If you press

the key associated with the 'all' option, all new events are acknowledged. You can also

acknowledge all events if you press the softkey associated with the check icon in the top right

corner of the screen.

�

Press to confirm.

8AL91432ENAAed01

19 /73

User Manual
Deleting When consulting an event (call log, instant message or voice message), you can delete the event once you have consulted it. However, you can choose to delete all events in one go.

�

Access the messaging portal.

�

Press the associated softkey.

� Enter your password (if required) and apply.

�

Press the softkey associated with the type of event you want to delete.

�

Press to confirm.

2.3 Consulting the call log
At any time, you can consult all answered and unanswered incoming and outgoing calls To do this, go to the call log feature on the messaging portal

�

Access the messaging portal.

� Calls: Press the softkey associated with the call log feature.

� Enter your password (if required) and apply.

You can choose between consulting missed calls only ('Missed' tab) and consulting all call logs

including unanswered/answered, incoming and/or outgoing calls ('All' tab).

Consult missed calls

� Select the 'Missed' tab. Unacknowledged calls are in bold characters.
� Select the log to consult.

�

Display the log details.

Information such as the name, phone number, date and time are displayed on the screen.

You can choose to call the contact, send an instant message to the contact, save the contact in the personal phonebook, or clear the log.

Delete a log

� Select the log to delete.

�

Display the log details.

�

Press the associated softkey. Note that no confirmation is requested.

Acknowledge all missed calls
Once a new log is consulted, it is automatically acknowledged. However, you can acknowledge all new missed calls without consulting them.

�

Press the associated softkey.

�

Press the associated softkey: Missed calls.

�

Press to confirm.

All missed calls are acknowledged.

8AL91432ENAAed01

20 /73

User Manual

Delete all missed calls.

�

Press the associated softkey.

�

Press the associated softkey.

�

Press to confirm.

All missed calls are deleted.

Consulting all calls

� Select the 'All' tab. All calls are displayed with an icon giving information on the type of call.

Answered outgoing calls. Unanswered outgoing calls. Answered incoming calls. Unanswered incoming calls.

� Scroll through the list by using the navigation keys (if more than one page).

�

Display the contact information by selecting it in the list. Information such as the name,

phone number, date and time are displayed on the screen.

You can choose to call the contact, send an instant message to the contact, save the contact in the personal phonebook, or clear the log.
Acknowledge all missed calls

�

Press the associated softkey.

�

Press the associated softkey: Missed calls.

�

Press to confirm.

All missed calls are acknowledged.

Delete all call logs

�

Press the associated softkey.

�

Press the associated softkey.

�

Press to confirm.

All call logs are deleted.

8AL91432ENAAed01

21 /73

User Manual

2.4 Making a call
Use one of the following:
� Dial the destination number. The hands-free mode is activated automatically. � Unhook the handset Dial the destination number. � Press the Off-hook key of the headset Dial the destination number. If your headset has no Off-

hook/On-hook key, use the phone keys and switch on the audio on the headset ( ).

�

Hands-free Dial the destination number.

� Programmed line key.

�

other advanced settings if requested.

�

Redialing from the call log.

�

Redial last number (short press) / Call back one of the last numbers dialed (long press).

To make an external call, dial the outside line access code before dialing your contact number.

The duration of your external call may be limited in time by the administrator. In this case, a beep rings and/or a message will be displayed on the screen 20 seconds before the end of the communication.
If the internal or outside number does not reply: � Interphony: broadcast a message on the loudspeaker of the free terminal. � �Callback: request callback to a busy terminal. � Text: send a written message.
2.5 Receiving a call
Answer the call depends on audio devices connected to your phone: handset, headset, hands-free, external hands-free or loudspeaker. Use one of the following:
� Lift the handset to take the call. � Press the On-Hook/Off-Hook key on the headset to take the call (only available on compatible
headsets).

�

or

Press the 'loudspeaker' key to take the call in hands-free mode.

�

Select the incoming call icon Take the call with the headset if connected, or in hands-

free mode.

� Press dedicated line key on external handsfree to take the call in hands-free mode on this device.

2.6 Ignore the call
A call is received:

�

Press the on-hook key.

Your phone no longer rings but your caller still hears the ringing tone.

You can still answer the call after you have ignored it.

8AL91432ENAAed01

22 /73

User Manual
2.7 Switching between audio modes
During conversation, you can switch between different audio modes (handset, loudspeaker, hands-free or headset, if connected) by pressing the loudspeaker/hands-free key until the desired audio mode is
displayed: . This feature depends on connected devices and the default device selected in the phone configuration. If you have connected the same type of accessory via different connection methods (for example, a USB hands-free device), the default device is used for audio switching. The key is lit when the loudspeaker or hands-free mode is selected. You are in conversation with the handset, you can switch between following audio modes by short pressing on the loudspeaker/hands-free key:

Handset

Short press

Handsfree

Short press

Handset

You are in conversation with the headset (headset or headset+loudspeaker), you can switch between following audio modes by short pressing on the loudspeaker/hands-free key:

Headset Headset

Short press Take the handset off the hook

Handsfree Handset

Short press Short press

Headset Handsfree

You are in conversation with the headset and the handset is not hang-up, you can switch between following audio modes by short pressing on the loudspeaker/hands-free key:

Headset

Short press

Handsfree

Short press

Handset

Press the line key of the headset to switch the audio to the headset.

You are in conversation, you can switch to the loudspeaker by long pressing on the loudspeaker/handsfree key (Group listening feature):

In conversation

Long press

Loudspeaker

Long press

Deactivate loudspeaker

If a USB headset is connected, the loudspeaker (group listening) is deactivated and a pop-up window is displayed on the screen to inform you (to avoid over-consumption of energy).

For each audio mode, during the conversation, you can adjust the volume by pressing the volume keys. The number of levels depends on the audio mode (8 for handset and headset 10 for hands-free and loudspeaker). The selected volume, for each audio mode, will be saved for future conversations.

� During a conversation.

�

Adjust volume by pressing the volume keys.

8AL91432ENAAed01

23 /73

User Manual
2.8 Activating the loudspeaker during a conversation (handset lifted) - Group listening feature
Activate or deactivate the loudspeaker when you are in conversation using the handset or the headset.

�

Activate loudspeaker (long press)

The key is blinking blue ( ).

�

Adjust volume by pressing the volume keys (number of levels: 10).

�

Deactivate loudspeaker (long press)

The key is no longer lit ( ).

If a USB headset is connected, the loudspeaker (group listening) is deactivated and a pop-up window is displayed on the screen to inform you (to avoid over-consumption of energy).
Press and release the loudspeaker key to switch to hands-free mode (light steady).

Switch to the hands-free mode (short press)

The key lights up ( ).

2.9 Making calls by name (company directory)

: If your set is not equipped with a magnetic keyboard, use the alphanumeric keyboard to enter letters. You have to switch the keyboard to the alphabetic mode by selecting the alphanumeric key. When activated, the LED corresponding to the key remains lit up.
You can call your contact using the search by name feature. The search by name feature provides two modes:
� Internal: predictive search of the corporate directory. � Unified: classic search of the corporate directory.
Please be aware that predictive searching means that you won't have access to the contact card, and therefore will only be able to call the contact on his/her company phone.
Switching between the two modes:
� Use one of the following:

o

Long press.

Enter the first letter of your contact's surname.

o If your desk phone is equiped with the magnetic keyboard, enter directly the first

letter of your contact's surname (ALE-30h).

� Options

� The current mode is displayed.

� Select the new mode:

o Internal: the internal directory mode is enabled.

o Unified: the unified directory mode is enabled.

o OK: stay in the current mode.

8AL91432ENAAed01

24 /73

User Manual

2.9.1 Calling a contact using the unified directory � Use one of the following:

o

Long press.

Enter the first letter of your contact's surname.

o If your desk phone is equiped with the magnetic keyboard, enter directly the first letter of

your contact's surname (ALE-30h).

� When entering the name you can extend the search by adding the first letters of the first name

after entering the '#' symbol or pressing: 1stname

�

Start the search.

� A list of matching names is displayed on the screen. Each contact is displayed with their name

and company phone number.

� Use one of the following:

o Scroll and select your contact in the list of matching names.

o

Modify the search.

Call your contact using the company phone number

� Press the softkey associated with the company phone number.

Call your contact using another phone number (via contact card):

� Press the softkey associated with the contact name: The contact card opens and displays information about the contact: last name and first name, several phone numbers (Office, mobile, home), email address, instant message address and the company name. The contain of the contact card depends on the company directory.
� Scroll through the screen with the up and down navigation keys and position the cursor on the contact phone number you wish to call.

�

Start the call.

From the contact card you can also send an instant message.

You can change the search by name function to predictive search mode by setting the unified directory to 'Off' in the settings menu (available once a search by name is started). Please be aware that predictive searching means that you won't access the contact card and therefore can only call the contact on their company phone and connot send instant messages.

2.9.2 Calling a contact using the internal directory (predictive search)

� Use one of the following:

o

Long press.

Enter the first letter of your contact's surname.

o If your desk phone is equiped with the magnetic keyboard, enter directly the first letter of

your contact's surname (ALE-30h).

� If your set is not equipped with a magnetic keyboard, use the alphanumeric keyboard to enter

letters. If you are using the alphanumeric keyboard, enter each letter of the name by pressing

only once on the key with this letter.

� The search runs as soon as you enter a character (predictive search). The matching names are

displayed.

� Use one of the following:

o Use the navigation keys to display the previous and next names.

o

Press the OK key to start the call with the displayed contact (company phone number).

o

Modify the search.

o readmore: display other information about the selected contact.

8AL91432ENAAed01

25 /73

User Manual

o list: display the result as a list. Use the navigation keys to select the contact and press the OK key to start the call.
You can switch to the other search mode by enabling it in the options menu (available once a search by name is started). This feature depends on the system configuration. If necessary, contact your administrator...
2.10 Make calls via your programmed call keys (Perso page/F1 and F2 keys/Add-on module)
If you have programmed a direct call key, select it to make the call.
F1 and F2 keys depend on the system configuration.
2.11 Filtering calls using the voice mailbox
This service lets you filter incoming calls to your voice mailbox. When your caller leaves his message you can choose to communicate with him. This feature depends on the system configuration. If necessary, contact your administrator.
2.11.1 Activating call screening
� Voice mail filtering programmed key. The programmed key has to be configured by the system. � Enter your personal password. � Same key to stop listening and deactivate the screening. 2.11.2 When you receive a call You hear the message left by your caller. Use one of the following:

�

Hands-free to take the call.

� Unhook the handset.

�

To stop listening only.

2.12 Redialing
� Use one of the following:

o

(short press)

Redialing the last number dialed

o

(long press).

Select the number to redial from the last 10 dialed numbers.

�

or Start the call.

You can also access this feature through the menu:
� Reach the 'Menu' page. � Redial list � Select the number to redial from the last 10 dialed numbers.

8AL91432ENAAed01

26 /73

User Manual

2.13 Requesting automatic callback if internal number is busy
This feature lets you to be automatically called back when your internal contact is free.
� The telephone of the internal caller you are trying to contact is busy, and you want the person to call you back as soon as they are free.
� Call back Callback request acknowledged.

�

To return to the home page.

Automatic callback is not available if the set of your contact is free or if you are put on hold when the set is busy. This feature depends on the configuration of the system.

2.13.1 Cancelling an automatic callback
� When the system calls you back, your phone is ringing. � Call back Cancellation of callback request acknowledged.

Canceling the callback request is only possible when the contact you tried to reach released the line.

2.14 Receiving interphony calls
You can answer a call without lifting the handset. When you receive a call, you are automatically connected in hands-free mode. The identity of the caller is displayed on the screen. This feature depends on the system configuration. If necessary, contact your administrator.
To activate

�

(in idle state) When activated, the key is lit blue.

When your caller hangs up, interphony mode remains active.

To deactivate

�

(in idle state) The key switches off.

Interphony can be disabled by the administrator.

2.15 Sending DTMF signals
During a conversation you sometimes have to send DTMF signals, such as with a voice server, an automated attendant or a remotely consulted answering machine.
� During a conversation. � �MFcode � Enter DTMF code. � �MFcode To deactivate the feature.

The function is automatically cancelled when you hang up.

Depending on the system configuration, the DTMF can be activated by default. In this case, you can send DTMF code directly by dialing it during the conversation. But if you want to make a second call during the conversation, you have to deactivate DTMF code before dialing the number.

8AL91432ENAAed01

27 /73

User Manual

2.16 Mute, so that your contact cannot hear you
You can hear your contact but he/she cannot hear you: 2.16.1 From the set
� During a conversation.

�

Disable microphone The key is blinking blue

.

�

Enable microphone The mute key no longer blinks

.

2.16.2 From the headset
� Use the mute key of the headset, if there is one, to disable headset microphone or to resume the conversation (only available on compatible headsets).

2.17 Forwarding calls to your voice message service

� Select the forward icon (the icon depends on your phone: / ). � Immediate>VM Forward is acknowledged (The forward icon becomes animated:

/ ).

�

Go back to the Homepage

2.18 Consulting your voice mailbox
You are notified of a new event when the message key is flashing. New events are also displayed in the 'Info' page.

�

Access the messaging portal.

� Select the voice message feature.

� Enter your password (if required) and apply.

� Select the new voice messages tab by using the left and right navigation keys.

� Select the message you want to listen to by using the up and down navigation keys.

�

Validate your choice.

Display name of sender, with date, time and ranking of message.

� Play Listen to message.

� Clear Erase message.

� Call Call back sender of message.

� Sendcopy Copy message.

� Send IM Send an instant message.

Acknowledge all new voice messages
Once you start listening to a voice message, the message is automatically acknowledged.However, you can acknowledge voice messages without listening to them.

�

Press the associated softkey.

�

Press the associated softkey: Voice msg

�

8AL91432ENAAed01

28 /73

User Manual

Delete all messages

�

Press the associated softkey.

�

Press the associated softkey: Voice msg

�

2.19 Sending an instant message to a contact
You can only send an instant message to a colleague connected to the same telephone system (generally, a colleague in your enterprise).
You can send an instant message to a contact by entering either their phone number or their name.

: If your set is not equipped with a magnetic keyboard, use the alphanumeric keyboard to enter letters. Use the alphanumeric keyboard key to switch between the numeric and alphabetic keyboard. When in alphabetic mode, the LED corresponding to the key remains lit up.
2.19.1 Sending an instant message using the search by name feature

�

Access the messaging portal.

� Send IM

� Enter the first letters of the name.

When entering the name you can extend the search by adding the first letters of the first name after entering the '#' symbol or pressing: 1stname.

�

Start the search.

� A list of matching names is displayed on the screen. Each contact is displayed with their name

and company phone number.

� Select the contact name.

The contact card opens and displays information about the contact: last name and first name,

several phone numbers (Office, mobile, home), email address, instant message address and the

company name. The contain of the contact card depends on the company directory.

� Scroll through the screen with the up and down navigation keys and select instant message

address if exists in the contact card.

�

Access instant message writing mode.

� Write the instant message to send.

�

Send the instant message.

2.19.2 Sending an instant message using the phone number
You can only send an instant message to a colleague connected to the same telephone system (generally, a colleague in your enterprise).

�

Access the messaging portal.

� Send IM

� Enter your contact's phone number.

�

Access instant message writing mode.

� Write the instant message to send.

�

Send the instant message.

8AL91432ENAAed01

29 /73

User Manual
2.19.3 Status of the instant messages Once the instant message has been sent, the message is stored in the 'Sent' tab of the instant message feature in the messaging portal. The status of the message is as follows:

�

Access the messaging portal.

� Select the instant message feature (IM).

� Enter your password if required.

� Use left,or right navigation keys to select the tab: Sent.

Instant message has been sent but not yet delivered. Instant message has been delivered. Instant message has been read.

2.20 Consulting instant messages
You are notified of a new event when the message key is flashing.

�

Access the messaging portal.

� Select the instant message feature (IM).

� Enter your password if required.

� Select one of the following tabs: new messages, received messages, sent messages or all

messages. Select the tab by using the left and right navigation keys.

� Select the message to read by using the up and down navigation keys.

�

Validate your choice.

� Once the instant message is read, you can:

Answer the instant message by pressing the associated softkey.

Delete the instant message by pressing the associated key.
Press OK to call the sender of the instant message. When a message is read, the status of the message changes from unread to read on both sides (on the recipient side and the sender side).
You can use the filter key to consult messages sent by or to a particular contact. For example, when you are on a message sent by a contact, pressing the filter key shows only messages sent to or by that contact.
Acknowledge new instant messages
Once a new instant message is read, it is automatically acknowledged. However, you can acknowledge all new instant messages without reading them.

�

Press the associated softkey.

�

Press the associated softkey: New IM

�

All new instant messages are acknowledged.

8AL91432ENAAed01

30 /73

User Manual

Delete instant messages

When consulting the instant messages, you can choose to delete the messages stored in the following tabs: new, sent, received or all messages.

�

Press the associated softkey.

�

Press the associated with the list you want to delete.

�

2.21 Answering with an instant message
You can send instant messages to your contacts when you have received an instant message or a voicemail or you can send instant messages when consulting the call log. You can only send an instant message to a colleague connected to the same telephone system (generally, a colleague in your enterprise).

: If your set is not equipped with a magnetic keyboard, use the alphanumeric keyboard to enter letters. Use the alphanumeric keyboard key to switch between the numeric and alphabetic keyboard. When in alphabetic mode, the LED corresponding to the key remains lit up.
2.21.1 Answering an Instant message

�

Access the messaging portal.

� Select the instant message feature (IM).

� Enter your password if required.

� Select the tab by using the left and right navigation keys New messages.

� Select the message to answer by using the up and down navigation keys.

�

Validate your choice.

� IM

� Write the instant message to send.

�

Send the instant message.

2.21.2 Answering a voice message

�

Access the messaging portal.

� Select the voice message feature (voice mails).

� Enter your password if required.

� Select one of the following tabs: new voice messages or all voice messages. Select the tab by

using the left and right navigation keys.

� Select the message to answer by using the up and down navigation keys.

� When details of the voice message are displayed on the screen, press the softkey associated with

the instant message.

� Write the instant message to send.

�

Send the instant message.

8AL91432ENAAed01

31 /73

User Manual 2.21.3 Answering from the call log

�

Access the messaging portal.

� Select the call log feature (Calls).

� Enter your password if required.

� Select one of the following tabs: missed calls or all calls. Select the tab by using the left and right

navigation keys.

� Select the call log to consult by using the up and down navigation keys.

�

Validate your choice.

� When details of the call log are displayed on the screen, press the softkey associated with the

instant message feature.

� Write the instant message to send.

�

Send the instant message.

2.22 Lock / unlock your telephone
An icon is displayed on the status bar to indicate that the phone is locked ( / ).
Lock your phone � Reach the 'Menu' page. � Lock � Enter your password (Apply) Your phone is locked.

�

To return to the home page.

Unlock your phone
� Reach the 'Menu' page. � Lock � Enter your password (Apply)
Your phone is unlocked.

�

To return to the home page.

2.23 Placing a call on hold (hold)
During a conversation, you wish to place the call on hold and recover it later, on the same telephone.
� During a conversation. � Use one of the following:
o Select the call in progress icon (the icon depends on your phone: / ) o Hold

o

(this key depends on the system configuration and countries as United States).

Your call is placed on hold (the icon depends on your phone: / ).

8AL91432ENAAed01

32 /73

User Manual

Recover the call on hold Use one of the following:
� Select the call on hold icon from the conversation screen (the icon depends on your phone: / ).

�

(this key depends on the system configuration and countries as United States).

� Hang up, your phone is ringing, then answer the call.

� Press the Back/Exit key to display the Perso page. Select the call on hold.

2.24 Placing an external call on hold (parking)
You can place an external call on hold and retrieve the call on another telephone. This feature depends on the system configuration. If necessary, contact your administrator.
� During a conversation. � Park call � Enter the number of the parking destination phone.
Retrieve the call from the parking destination phone: � Reach the 'Menu' page. � Pickup Unparkcall
If the parked call is not recovered within a preset time (default value 1 min 30), it is transferred to the operator.

2.25 Making a second call during a conversation
Use one of the following: � Dial directly the number for your call (if DTMF mode is not activated). � Name of second contact. � New call Number of second contact. � New call Redial list Select the N� in the last ten issued. � New call Indiv.rep. Select the programmed key.

�

(long press) Or

Menu page Redial list Select the N� in the last ten issued.

�

Perso page Programmed line key.

� The first call is on hold.

2.25.1 Retrieve the call on hold
� You are in conversation with the second contact and the first one is on hold. � Use one of the following:
o Enquiry off o Select the tab of the call to retrieve by using left and right navigation keys. o Hang up, your phone is ringing, then answer the call. You are in conversation with your first caller again.

If you make an error, hang up: your telephone will ring and you will recover your first call.

8AL91432ENAAed01

33 /73

User Manual

2.26 Answering a second call during a conversation
� During a conversation, another person is trying to call you. The name or number of the caller is displayed for a few seconds.
� Select the incoming call icon (the icon depends on your phone: / ). � The first call is on hold.
Other method: � If there are two or more simultaneous incoming calls, select the incoming call icon and press the
following softkey: Answer. � Queue oR Waitqueue Answer
To return to your first contact and end the conversation in progress:
� Hang up, your phone is ringing, then answer the call. You are in conversation with your first caller again.

If you make an error, hang up: your telephone will ring and you will recover your first call.

2.27 Switching between calls (Broker call)
Depending on the system configuration you can manage several calls at the same time.
Use one of the following to switch between calls: During a conversation, a second call is on hold.

� Select the call on hold icon from the conversation screen (the icon depends on your phone: /

).

� Answer

�

Press the Back/Exit key to display the Perso page. Select the call on hold.

You are in conversation with the second contact and the first one is on hold.

2.28 Transferring a call
During a conversation, to transfer the call to another number:
You are in communication with a first caller
Depending on the system configuration, transferring a call can be done in two ways.
1. Using the softkey � Calling a second person during a conversation The first call is on hold. � You can transfer the call immediately or wait for your contact to answer before transferring the call. Transfer � The two callers are connected.
2. Using predefined keys These predefined keys depend on the system and are reserved for specific countries as United States.

�

The first call is on hold.

� Calling a second person during a conversation.

� You can transfer the call immediately or wait for your contact to answer before transferring

the call.

8AL91432ENAAed01

34 /73

User Manual

� � The two callers are connected.
You are in communication with a first caller. A second caller is on hold.
� You want to connect the first caller with the second. � Use one of the following:
o Transfer

o

(this key depends on the system configuration and countries as United States).

� The two callers are connected.

Transfer between two outside calls is not generally possible (depends on country concerned and

system configuration).

2.29 Transfer a call to a voice mail
During the call, you want to transfer your caller to the voice mailbox of another caller � TransferVMU � Number of second contact.

2.30 Three-way conference with internal and/or external contacts (conference)
� During a conversation, a second call is on hold. � �Conference
You are in conference mode.
2.30.1 Cancel the conference and recover the last active call before the conference (the other is on hold) (If conference is active)
� �Conference

2.30.2 End the conference with all participants (If conference is active) Use one of the following:

�

Hang up.

� On hook the handset.

2.30.3 After the conference, to leave your two contacts talking together
� �Conference � Use one of the following:
o Transfer

o

(this key depends on the system configuration and has to be programmed).

8AL91432ENAAed01

35 /73

User Manual
2.31 'Meet me' conference
The 'Meet me' function is used to set up a conference with a maximum of 6 persons: the 'master ' of the conference (who has the rights for initiating the conference) and the participants (maximum of 5) who meet for the conference.
2.31.1 Initiate a 'Meet me' conference
In order for the participants to join the conference, you must first decide on a meeting time for the conference and send them the access code.
� Lift the handset. � Enter the 'Meet me' conference activation code. This code is defined by the administrator during
system configuration. If necessary you may need to contact your administrator. � Enter your telephone number (internal). � Enter your personal password. � Enter the conference access code.
The conference is set-up. Participants must enter this access code to join the conference call. Send the conference call access code to the participants.
When the system prompts you to enter a code or password, you are allowed 3 attempts before the system rejects your request. Call number for activating the 'Meet me' conference: this call number is used by the conference master when he wishes to initiate a conference from an external set. This number must have been defined previously by the system administrator.
2.31.2 Join a 'Meet me' conference
Once set-up by the conference master, the participants can join the 'Meet me' conference (5 participants maximum).
� Lift the handset. � Enter the joining code for the 'Meet me' conference. This code is defined by the administrator
during system configuration. If necessary you may need to contact your administrator. � Enter the conference access code.
Conference access code: 4 digit code defined by the conference master and communicated to the participants so that they can join the conference.
You are in conference mode.
When the conference master on-hooks, all the communications will be cut-off.
Call number for joining the 'Meet me' conference: this call number allows the participants to join a conference from an external set.
An audible beep rings when a participant joins the conference. 2 audible beeps sound when a participant leaves the conference.
You cannot join a conference if there are already the maximum number of participants.
If the conference has not yet been set up by the conference master you are put on hold until the conference is initiated (5 minutes maximum).
If you cannot directly reach the conference, you have to call first an internal user or an automatic operator. This one dials the call number for joining the 'Meet-me ' conference and then transfers your call (10 seconds).

8AL91432ENAAed01

36 /73

User Manual

2.32 Intrusion into an internal conversation (barge-in)
Your contact's line is busy. If the number is not 'protected' and if authorised, you can intrude into the call:
� �Intrusion � Same key to exit (�Intrusion).
2.32.1 Protection against intrusion � Press programmed key. The programmed key has to be configured by the system. � Enter contact's number.
Protection is cancelled when you hang up.

2.33 Save a number into your personal directory
During a call, to save the number onto a call key:
During a conversation.
� Save to rep � Press a call key on the Perso page. � Enter the name of your contact. � Apply.

2.34 Selecting calls to be forwarded
When a forward is applied, you can select the types of call to be forwarded: outside, internal, all.

� Select the forward icon (the icon depends on your phone: / ). � Ext/Int Select the type of Out/Int call Type of call forwarded is displayed.
o All calls Forward internal and outside calls. o External Forward outside calls. o Internal Forward internal calls.

2.35 Forwarding calls to another number (immediate forward)
The number can be your home, mobile, voice mailbox or an internal extension (operator, etc.).

� Select the forward icon (the icon depends on your phone: � Immediate

/ ).

� Number to be called Forward is acknowledged (The forward icon becomes animated:

/ ).

�

Go back to the Homepage.

You can also select the destination number of the forward through the redial feature or the individual repertory.

You can make calls, but only the destination number can call you.

8AL91432ENAAed01

37 /73

User Manual

2.36 Forwarding calls when your line is busy (forward if busy)
Callers can be forwarded to another telephone if you are already on the line.

� Select the forward icon (the icon depends on your phone: / ). � Onbusy � Enter the destination number Forward is acknowledged (The forward icon becomes animated:
/ ).

�

Go back to the Homepage.

2.37 Personal assistant: reaching you with one number only
As well as leaving a message in the voice mailbox, the personal assistant directs the caller to an internal number, an outside number, a mobile or the switchboard.
� reach the 'Menu' page. � settings assistant menu � you can then choose where to route the calls:
o internal Nr dial number of a colleague or your assistant. o externalNr dial an outside line number. o mobile Nr dial number of your mobile or DECT. o operator activate / deactivate transfer to operator.
�

�

Go back to the Homepage.

2.38 Activate/disable the personal assistant
Personal assistant: reaching you with one number only. The personal assistant allows you, when you are away from your desk to give your callers up to 5 destination options, via a profesional voice guide: voicemail, internal number or operator.
� Reach the 'Menu' page. � Settings Assistant � On Or Off Activate or deactivate the assistant.
�

�

Go back to the Homepage.

2.39 Do not disturb
Callers wishing to contact you will see the 'Do Not Disturb' message displayed on their sets when they try to call. You can make your terminal temporarily unavailable for all calls.
� Select the forward icon (the icon depends on your phone: / ).
� DoNotDisturb Forward is acknowledged (The forward icon becomes animated: / ).

8AL91432ENAAed01

38 /73

User Manual

2.40 Forwarding your calls from the receiving terminal ('Follow me')
You wish to receive your calls in your present location: use the 'Follow me' function.
� Select the forward icon (the icon depends on your phone: / ) � Follow-me � Enter the number of the phone you want to forward calls Forward is acknowledged (the forward
icon becomes animated: / ).

�

Go back to the Homepage.

If you have a key programmed with this feature, you can access the feature directly.
� Press programmed key. � Enter the number of the phone you want to forward calls Forward is acknowledged.

�

Go back to the Homepage.

2.41 Forwarding all group calls
You can forward all your group calls to another internal number:
� Group calls forwarding programmed key. The programmed key has to be configured by the system.
� Enter the number of the phone you want to forward calls. � Forward is acknowledged.

�

Go back to the Homepage.

2.42 Forwarding calls to your pager
Callers will thus be able to contact you while you are moving around the company.

� Select the forward icon (the icon depends on your phone: � Topaging Forward is acknowledged.

/ ).

2.43 Cancelling all forwards

� Select the forward icon (The forward icon becomes animated: � Cancel fwd.

/ ).

�

Go back to the Homepage.

To cancel all forwards, you can programme another type of forward too.

2.44 Cancelling a specific forward
� Programmed key corresponding to type of forward (group or selective). The programmed key has to be configured by the system.

8AL91432ENAAed01

39 /73

User Manual
2.45 Leaving a text message for internal callers
You can leave a text message on your terminal which will be displayed on the screen of the terminal calling you. The caller is informed of the message, and can read it by selecting the following softkey: Read message.

: If your set is not equipped with a magnetic keyboard, use the alphanumeric keyboard to enter letters. You have to switch the keyboard to the alphabetic mode by selecting the alphanumeric key. When activated, the LED corresponding to the key remains lit up.

� Select the forward icon (the icon depends on your phone: � Text answer � Choose the type of message.

/ ).

2.45.1 Sending predefined message
� Fixed Msg. � Select the message to be sent.
�
Select the language of the message that will be displayed: Language. Notice that you can select the message to send by its number by selecting the option: Gotomessage. The 27 standard messages are shown below:

1 Call me back 2 Call me back tomorrow 3 Call me back at _:_ (*) 4 Call back _____ (*) 5 Call the attendant 6 Call the secretary 7 I will call back at _:_ (*) 8 Use paging 9 Please fetch your fax 10 Please fetch your mail 11 Please cancel your forwarding 12 Visitors are waiting 13 You are expected at reception 14 Meeting at _:_ (*)
2.45.2 Sending a new message
� New Msg. � Write your message.
�

15 Meeting on ___ (*) 16 Meeting on ___ at _:_ (*) 17 Out for a while 18 Absent for the rest of the day 19 Absent, back at _:_ (*) 20 Absent, back on ___ at _:_ (*) 21 On vacation, back on ___ (*) 22 External meeting 23 External meeting, back on ___ (*) 24 I am in room nr __ (*) 25 In a meeting - do not disturb 26 At lunch 27 Indisposed (*) Messages to be completed using numeric
keypad

8AL91432ENAAed01

40 /73

User Manual
2.46 Send a voice message copy

�

Access the messaging portal.

� Press the softkey associated with the voice message feature: Voice msg.

� Enter your password (if required) and apply.

� Select the tab to consult.

� Using the up and down navigation keys, select the voice message you want to send.

�

Select the message to send.

� Sendcopy

� Enter the destination number.

� � Sendmessage

When sending a copy of the message, you can also record a comment to join to the copy.
� Record � Start recording the comment. � Stop
�

2.47 Sending a recorded message to a number or a distribution list

�

Access the messaging portal.

� Press the softkey associated with the voice message feature: Voice msg.

� Enter your password (if required) and apply.

�

Press the associated softkey.

� Use one of the following:

o Enter the number of the recipient or select a destination list.

o Enter the name of the recipient using the alphapad.

� � Record � Start recording the comment.
� Stop

�

Send the message.

2.48 Receiving supervised call ringing
To receive the special ringing for calls to another number:
� Supervised call ringing programmed key. The programmed key has to be configured by the system.
� Same key to cancel.

2.49 Answering the general bell
When the operator is absent, outside calls to the operator are indicated by a general bell. To answer:
� Reach the 'Menu' page. � Pickup Generalbell

8AL91432ENAAed01

41 /73

User Manual

2.50 Manager/Assistant filtering
System configuration allows 'Manager/Assistant' groups to be formed, so that the manager's calls can be directed to one or more assistants.
2.50.1 From the manager or assistant telephone � Filter programmed key Incoming calls are filtered by a chosen person (assistant, etc.). � Same key to cancel.
Filtering is indicated on the manager's telephone by the icon corresponding to the 'screening/unscreening' programmed key.

2.51 Call pick-up
You hear a telephone ringing in an office where no-one can answer. If authorised, you can answer the call on your own telephone.
If the telephone ringing is in your own pick-up group � Group call pick-up programmed key. The programmed key has to be configured by the system.
If the telephone ringing is not in your pick-up group � Reach the 'Menu' page. � Pickup Set � Enter the number of the ringing telephone.
The system can be configured to prevent call pick-up on some telephones.

2.52 Answering briefly in place of the operator
Outside calls to the operator will ring on your telephone and you can answer the call:

� 'Operator help' programmed key. The programmed key has to be configured by the system. � Your telephone will ring at the same time as the switchboard. � Same key to cancel.

Calls to the switchboard:

Calls to the switchboard will ring on your telephone.

� Lift the handset.

�

Press the Back/Exit key to display the Perso page.

� 'Operator help' programmed key.

2.53 Hunting groups
2.53.1 Hunting group call Certain numbers can form a hunting group and can be called by dialing the group number.
� Lift the handset. � Number of group to be called.
2.53.2 Temporary exit from your hunting group/Return into your group � Leave group programmed key. The programmed key has to be configured by the system. � Enter your group number.

8AL91432ENAAed01

42 /73

User Manual

Belonging to a group does not affect the management of direct calls. A specific telephone within a group can always be called by using its own number.
2.54 Calling an internal contact on his/her pager
The number called does not answer and you know that the person called has a pager: � Paging programmed key. The programmed key has to be configured by the system. � Paging in progress is displayed.
Your contact can answer from any telephone in the system.
2.55 Answering a call on your pager
A call on your pager can be answered from any telephone within the system. Your pager beeps. � Answer paging programmed key. The programmed key has to be configured by the system. � Enter your group number.
2.56 Calling a contact on his/her loudspeaker
Your internal contact does not answer. If authorised, you can remotely activate her/his phone: � Your contact does not reply. � Interphony
You are connected to the loudspeaker on your contact's phone (if he/she has the hands-free function).
2.57 Broadcasting a message on the loudspeakers of a station group
A message not requiring an answer can be broadcasted on the loudspeakers within your broadcast group: � Off hook. � Number of broadcast group Speak, you have 20 seconds.

�

or Hang up.

The message will only be broadcast on terminals not in use and which have a loudspeaker.

2.58 ACD: Agent set/ Supervisor station
2.58.1 Agent set A call center solution allows optimum distribution of calls to agents according to their availability and skills. 2.58.2 Open an agent session (login) � Agent set
� Select the ACD application. � Login � Select the agent and validate.
� � Depending the displayed information, enter your password or confirm.
ACD application welcome screen is displayed.

8AL91432ENAAed01

43 /73

User Manual 2.58.3 ACD application welcome screen � Agent set

1 Name of the agent set. 2 Number of the agent set. 3 Operating status of the agent set. 4 Status of the queues.

4.02 means: group number 4 / 2 calls waiting / the + sign indicates that the queue capacity has been reached.
2.58.4 The four operating statuses of the agent set
An agent's availability is determined by the operating status (of which there are 4), that the agent can change at any time. These statuses are:
� Onduty In service, the agent is ready to receive calls. � Offduty Withdrawn, the agent has withdrawn from the ACD application. � C.Work Additional task, the agent is performing a task concerning a call and is not taking
other calls. � T.Absence Temporarily absent, the agent has taken a break and is not taking calls.

The agent can change the operating status directly by entering codes, pressing the function keys, or using the Agent Assistant agent software on PC (if available).
2.58.5 Changing the operating status of the set � Agent set
2.58.5.1 Changing using codes (all sets) The operating status change codes are defined when the system is configured. Contact the system administrator to obtain these codes.
� Enter the feature code to activate.

2.58.5.2 Change using function keys � Press the function key of the status to be activated. Information relative to the selected status is displayed on the screen. If a refusal message is displayed, contact the system administrator.

2.58.6 Modifying your personal code � Agent set

� Password � New code (6 digits).

2.58.7 Integrating another group/leaving a group � Agent set

� Groups � Press the key of the group (1 to 8) to integrate (box empty) and/or press the key of the group to
leave (box full).

8AL91432ENAAed01

44 /73

User Manual
2.58.8 Close the agent session (logout) � Agent set
� Logout
2.58.9 Supervisor station
� A supervisor can consult the messages left in the voicemail inboxes of the call center groups (maximum 8 groups) using the function keys.
A supervisor can also perform the agent function from the same set.
2.58.10 Supervising group mailboxes � Supervisor station 2.58.10.1 Consulting the messages When a message is left in a group mailbox, the voice mail present indicator associated with the supervision key flashes.
� Press the supervision key. � Follow the instructions of the voice guide.
When a mailbox is consulted by a supervisor, the other supervisors cannot access it.
2.58.10.2 Supervision keys for group mailboxes and positioning on the sets � Access the Perso page to display the positioning of the supervision keys on the sets.
2.59 Configure your phone for remote working
This feature is only available on IP phone (connected to an IP network).
Your IP phone is compatible with remote working (VPN) via a secure connection (encrypted). Your phone supports the IKEv1 and IKEv2 protocol to send data securely. In this mode, all features available at your office will be ready for use remotely. If the telephone system of your enterprise is configured to accept remote workers (system and infrastructure), you have to configure your desk phone to be ready for remote working. The configuration of the phone depends on the infrastructure of your telephony network. For information, please consult the following guide: "IPsec VPN Deployment Guide for Remote Workers for DeskPhones and Premium DeskPhones Serie " 8AL90345ENAA.
Effortless deployment In this section we describe how to manually configure your desk phone for remote use. Alcatel-Lucent Enterprise also offers remote desk phones deployment solutions: Alcatel-Lucent Enterprise Easy Deployment Server (EDS). EDS offers a cloud server allowing easy deployment of devices in remote worker situation for Alcatel-Lucent Enterprise (ALE) systems and third-party SIP servers. For more information, contact your installer or administrator.
In this section, we describe the complete configuration of your phone for remote working. Your installer has to give you all information to configure your desk phone. You have to:
� Enable VPN. � Enter the remote VPN server information. � Enter the TFTP server information (Optional). � Enter authentication. � Setup the VPN start preferences.

8AL91432ENAAed01

45 /73

User Manual
2.59.1 First connection as remote working When you connect your desk phone for the first time remotely, you are prompted to set a PIN code. The PIN code is requested when you enter in the VPN configuration (submenus) or when you boot your desk phone (depending on the VPN configuration).
The PIN code is retained during the session so that you can access the VPN configuration without having to re-enter your PIN code until you exit the VPN configuration.
Before configuring your phone for remote working, check if you have all the information from your administrator.

If your set is not equipped with a magnetic keyboard, use the alphanumeric keyboard to enter letters. Use the alphanumeric keyboard key to switch between the numeric and alphabetic keyboard. When in alphabetic mode, the LED corresponding to the key remains lit up.

To configure your desk phone:

� Use one of the following: o Open the user local menu: reach the 'Menu' page Settings Phone Local Menu Config. MMI o Connect your desk phone to the network (and plug in the power jack if you are using an external power adapter). When the desk phone displays the 'Step 2' during the boot, repeatedly press the '*' and '#' keys in succession until a menu is displayed.
� VPN (scroll down the menu). o VPN Config  Enter the new PIN Code.


Validate.

 Enable VPN: you have to activate this option to use your desk phone for remote

working.

 VPN Server: enter the address of the VPN server.

 VPN PSK: enter the pre-shared key to establish a secure connection with the VPN

server. The PSK can be unique for all remote workers on a same installation or can

be specific to each remote worker. In the first case, the VPN authentication has to

be enabled.

 IKE version: Enter the IKV version (IKEv1/IKEv2).

Other advanced settings if requested: IKEv1 aggressive mode (when IKEv1 enabled), IKE

force encapsulation, Static Virtual IP (VIP Addr).

o VPN Tftp Use TFTP servers, tftp1, tftp2,port: if the TFTP servers are required, activate

this option and enter the addresses and port of the TFTP servers.

o VPN Authent Use Authentification, User, Password: activate this option if a logon to the

VPN server (username and password) is required. The VPN authentication can be disabled

in case a specific PSK is used for each remote worker.

o VPN Pincod Request Pincode on Boot: if this option is activated, the PIN code is required

when you boot your desk phone. We recommend you activate this option.

o

Select this icon to return to the main menu.

o

Select this icon to save parameters.

� The VPN configuration is saved and the main menu is displayed.

�

Select this icon to exit the configuration menu. The desk phone restarts.

� Enter the PIN code if you have selected the option (Request Pincode on Boot).

�

Validate.

� Your desk phone is ready for remote working.

8AL91432ENAAed01

46 /73

User Manual

If you leave the PIN code request menu when the phone is starting, the phone will start without VPN activated.

If an error occurs when your phone is running in remote mode, a popup is displayed with an error message. Please note this message to send to your administrator.

2.59.2 Change the configuration You have to change a parameter of the VPN configuration.

� Open the user local menu: reach the 'Menu' page Settings Phone Local Menu Config. MMI � VPN (scroll down the menu). � Select a submenu to change the configuration (VPN Config, VPN Tftp, VPN Authent, VPN Pincod). � Enter your PIN code (If an administrator password is defined by the system, you can use it to
access to the VPN configuration by selecting: Use Password).

�

Validate.

� Change parameters.

�

Select this icon to save parameters.

� The VPN configuration is saved and the main menu is displayed.

�

Select this icon to exit the configuration menu. The desk phone restarts.

� Enter the PIN code if you have selected the option (Request Pincode on Boot).

�

Validate.

� Your desk phone is ready for remote working.

If an error occurs when your phone is running in remote mode, a popup is displayed with an error message. Please note this message to send to your administrator.

2.59.3 PIN code

The PIN code is composed of 4 digits. You can access the VPN configuration by entering the PIN code or the administrator password if defined by the system. Depending on the VPN configuration, the PIN code is requested when you boot your desk phone. We recommend you enable this option for security reasons and if you need your phone in remote and in business place (See Reconnect your desk phone in your business place). If the PIN code is incorrect 5 times in succession, the PIN code and VPN parameters will be erased. If no administrator password is defined by the system, the PIN code is required to access VPN configuration. Once the PIN code and the administrator password have been set, you can switch between the PIN code and the administrator password by selecting the following softkeys in the login window: User password, Use PIN code.

2.59.4 Reset your PIN code

� Open the user local menu: reach the 'Menu' page Settings Phone Local Menu Config. MMI � VPN (scroll down the menu). � VPN Pincod � Enter your PIN code.

�

Validate.

� Set new Pincode: enter the new PIN Code.

�

Select this icon to save parameters.

� The VPN configuration is saved and the main menu is displayed.

�

Select this icon to exit the configuration menu. The desk phone restarts.

� Enter the PIN code if you have selected the option (Request Pincode on Boot).

8AL91432ENAAed01

47 /73

User Manual

2.59.5 Reconnect your desk phone in your business place Your phone is already configured for remote working.

If you connect your desk phone to the digital network:
If you desk phone is already declared on digital network, you just have to connact and start it (you desk phone is declared twice: on IP network for remote and digital network).

If you connect your phone to the IP network:

� Connect your desk phone to the network (and plug in the power jack if you are using an external power adapter).

� If the option to enter PIN code when you boot your desk phone is enabled in the VPN configuration (Request Pincode on Boot): o The PIN code is requested.

o

Select this icon to go back.

o The phone restarts in normal mode. The VPN is temporary disabled until the next reboot.

� If the option is not enabled:

o When the desk phone displays the 'Step 2' during the boot, repeatedly press the '*' and '#'

keys in succession until a menu is displayed.

o VPN VPN Config

o Enter your PIN code.

o

Validate.

o Enable VPN: disable the remote worker.

o

Select this icon to save parameters.

o The VPN configuration is saved and the main menu is displayed.

o

Select this icon to exit the configuration menu.

o The phone restarts in normal mode.

2.59.6 Reconnect your desk phone in remote place
Your phone is already configured for remote working but it was connected in your place of business. You need to reconnect it in a remote place.

� Connect your desk phone to the network (and plug in the power jack if you are using an external power adapter).

� If the option to enter PIN code when you boot your desk phone is enabled in the VPN configuration (Request Pincode on Boot): o The PIN code is requested. o Enter PIN code.

o

Validate.

o The phone starts as teleworker.

� If the option is not enabled (Request Pincode on Boot).

o When the desk phone displays the 'Step 2' during the boot, repeatedly press the '*' and '#'

keys in succession until a menu is displayed.

o VPN VPN Config o Enter your PIN code.

o

Validate.

o Enable VPN: enable the teleworker.

o

Select this icon to save parameters.

o The VPN configuration is saved and the main menu is displayed.

o

Select this icon to exit the configuration menu.

o The phone starts as teleworker.

If an error occurs when your phone is running in remote mode, a popup is displayed with an error message. Please note this message to send to your administrator.

8AL91432ENAAed01

48 /73

User Manual
3 Programming your telephone

3.1 Initializing your voice mailbox

�

Light flashes.

� Enter your personal code then record your name according to voice guide instructions.

Your personal code is used to access your voice mailbox and to lock your telephone.

Your password has 6 digits. A weak personal code with 6 identical digits (000000, 111111, etc.) or a simple sequence of 6 digits (012345, 123456, etc.) will be rejected by the system. After a system upgrade, the password may still have only 4 digits. For security reasons, we recommend you use a password with 6 digits. Contact your installer for more information. The list of weak passwords provided does not contain all the possibilities.

3.2 Customizing your voice greeting
You can replace the greeting message by a personal message.
� Reach the 'Menu' page. � Settings Mailbox � You can listen to the greeting, customize the greeting and set the default greeting (Listen,
Record name). � You can replace the greeting message by a personal message (Pers message). You can pause,
resume or stop the recording at any time (). � You can choose between two modes: the automated attendant or recorded greeting (Mode
Record mode/Simple mode). Recording of personal message is only possible in the record mode (Record mode).

3.2.1 Record your personal message Your are in record mode (Record mode).

� Pers message Record � Record your message. � Stop: end the recording
o Listen: listen to your recorded message. o Record: record a new message.

o

: Save the recorded message. The recorded message is used for your voice greeting.

To set the default message: Settings Mailbox Default.

3.3 Modifying your personal code
� Reach the 'Menu' page. � Settings Options Password � Old code (6 digits). � New code (6 digits).
�
Until your voice mailbox is activated, the default password is defined by the administrator.

8AL91432ENAAed01

49 /73

User Manual

Your password has 6 digits. A weak personal code with 6 identical digits (000000, 111111, etc.) or a simple sequence of 6 digits (012345, 123456, etc.) will be rejected by the system. After a system upgrade, the password may still have only 4 digits. For security reasons, we recommend you use a password with 6 digits. Contact your installer for more information. The list of weak passwords provided does not contain all the possibilities.
3.4 Adjusting the audio functions
� Reach the 'Menu' page. � Settings Phone Ringing � Enter your password (if required) and apply.
3.4.1 Choose the tune
� Int. Melody/Ext. Melody The melody must be chosen for external and internal calls.
� Select the melody of your choice (32 tunes).
�

�

End. /

To adjust other audio features.

One ringing is louder than the others and can be used in noisy environments.

3.4.2 Adjusting the ringer volume

� Level (Volume)

�

Select the volume you want (10 levels). Use the volume keys on the desk phone or

displayed on the screen.

�

�

End /

To adjust other audio features.

One ringing is louder than the others and can be used in noisy environments.

3.4.3 Activate/deactivate silent mode � Silent � ON/OFF Activate/deactivate.
�

�

End /

To adjust other audio features.

3.4.4 Activate/deactivate meeting mode (progressive ringing) � Progressive � ON/OFF Activate/deactivate.
�

�

End /

To adjust other audio features.

8AL91432ENAAed01

50 /73

User Manual

3.4.5 Activate/deactivate discreet ring mode
� Beeps � 3 Beeps + Ringing � ON/OFF Activate/deactivate.
�

�

End /

To adjust other audio features.

3.4.6 Adjust ringer volume while a call arrives

� Your telephone rings.

�

Adjusting the ringer volume.

3.5 Hearing Aid
If you are using your phone with a hearing device, you must install and activate the hearing aid device (HAC) to avoid hearing discomfort.
� Open the user local menu: reach the 'Menu' page Settings Phone Local Menu Audio Hearing Aid
� Check this option if you are using a hearing aid.

3.6 Adjusting the brightness of the desk phone

Adjust the brightness of the display of the desk phone, the connected add-on, and the LEDs of the desk phone.

3.6.1 Adjust the brightness when the phone is in use

� Open the user local menu: reach the 'Menu' page Settings Phone Local Menu Display Brightness

�

Increase or decrease the brightness (successive presses).

�

�

To return to the home page.

3.6.2 Adjust the dimmed brightness when the phone is not in use - Only available on ALE30h

� Open the user local menu: reach the 'Menu' page Settings Phone Local Menu Display

Advanced Low brightness

�

Increase or decrease the brightness (successive presses).

�

�

To return to the home page.

8AL91432ENAAed01

51 /73

User Manual

3.6.3 Set the delay before the brightness is dimmed when the phone is not in use (screensaver) - Only available on ALE-30h

� Open the user local menu: reach the 'Menu' page Settings Phone Local Menu Display

Screensaver

�

Set the time delay (default 4 hours).

�

�

To return to the home page.

3.7 Adjust contrast (ALE-20/ALE-20h)

� Reach the 'Menu' page Settings Phone Local Menu Contrast

�

Decrease or increase the contrast of the display (successive presses).

�

�

To return to the home page.

3.8 Selecting the welcome page
This function is used to choose the page displayed by default on the telephone.
This feature depends on the system configuration. If necessary, contact your administrator.
� Reach the 'Menu' page. � Settings Options Homepage � Select the default page (Menu, Perso, Info, Last page seen ...).
�

�

Go back to the Homepage.

3.9 Selecting language
� Reach the 'Menu' page. � Settings Options Language � Select the language of your choice.

�

Go back to the Homepage.

8AL91432ENAAed01

52 /73

User Manual
3.10 Programming direct call keys (Perso page/F1 and F2 keys/Add-on module)

: If your set is not equipped with a magnetic keyboard, use the alphanumeric keyboard to enter letters. Use the alphanumeric keyboard key to switch between the numeric and alphabetic keyboard. When in alphabetic mode, the LED corresponding to the key remains lit up.
Depending on your desk phone, you can program:
� Softkeys of the Perso page. � Keys/softkeys of the add-on module. � F1 and F2 keys. � Abc' key in case a magnetic keyboard is connected (ALE-30h).
In case these keys are used for hold and transfer features, F1 and F2 are not programmable (configuration for United States for example).
If the key is not programmed yet:
� Select the key to program. � Name: enter the name of the key.
� � Number: enter the number to associate with the key.
�

�

Go back to the Homepage.

If the key is already programmed:

� Reach the 'Menu' page. � Settings Keys � Select the key to program. � Name: enter the name of the key.

� � Number: enter the number to associate with the key.

�

�

Go back to the Homepage.

� You can customize the name color and style of the key by entering a prefix. See chapter below.

8AL91432ENAAed01

53 /73

User Manual

3.11 Customize the color and the style of programmable softkeys (ALE-30h in IP mode)

You can customize the color and style of the softkeys of the perso page and the add-on modules by inserting a prefix in front of the label of the softkey.

When you program a softkey, add the prefix to the name of the softkey to customize it.

The prefix depends on the software version and are defined as follow:
� \C: color The prefix is followed by a number between 1 and 10 which defines the color.
� \B: bold.

The numbers for each color are as follows:

Use the color number 0 to go back to the default color.

Use cases:
� SOS (Orange): \C2SOS. � SOS (Red, bold): \C3\BSOS.
3.12 Modifying direct call keys
� Reach the 'Menu' page. � Settings Keys � Select the key to modify. � Name: enter the name of the key.
� � Number: enter the number to associate with the key.
�

�

Go back to the Homepage.

3.13 Modify the name of a system programmed key
� Reach the 'Menu' page. � Settings Keys � Select the key to modify. � Name: enter the name of the key.
�

�

Go back to the Homepage.

8AL91432ENAAed01

54 /73

User Manual

3.14 Deleting direct call keys
� Reach the 'Menu' page. � Settings Keys � Select the key to delete. � Clear
�

�

Go back to the Homepage.

3.15 Programming an appointment reminder
You can set the time of a temporary reminder (one within 24 hours) or a permanent reminder (every day at the same time).
� Reach the 'Menu' page. � Appointment � Enter time of appointment. � Temporary/ Permanent Select the type of appointment (temporary or permanent).
�
The 'Appointment programmed' icon is displayed on the welcome page.
3.15.1.1 At the programmed time, your phone rings
�
If your calls are forwarded to another terminal, the forward is not applied to the reminder call.
3.15.1.2 To cancel your reminder request � Reach the 'Menu' page. � Appointment � Temporary/ Permanent Select the type of appointment (temporary or permanent). � Clear
�
The 'Appointment programmed' icon disappears from the welcome page.
3.16 Install a USB accessory (Headset, Handsfree, Loudspeaker)
� Connect the accessory to the USB connector (USB-A, USB-C). � When you plug the accessory in the USB port, the USB accessory is automatically detected. If an
another accessory is already connected with the same function, a popup asks you to select your preferred accessory to use for this function

3.17 Install a RJ9 headset
It is possible to connect a compatible RJ9 headset to the desk phone instead of the handset. In this configuration menu, use this icon to go back

8AL91432ENAAed01

55 /73

User Manual
3.18 Activating/Deactivating 'Forced headset' mode
Forced headset mode must be activated as soon as a headset is installed instead of the handset. � Reach the 'Menu' page. � Settings Phone ForcedHead � ON/OFF Activating/deactivating forced headset.
3.19 Manage connected devices
3.19.1 List of connected devices � Open the user local menu: reach the 'Menu' page Settings Phone Local Menu Audio � Devices � The list of connected devices is displayed. You can find information about the connector:
USB.
Hands-free. Handset.
If two devices are connected to the desk phone and have the same function, two icons are displayed in the same line. The dark icon is the default device. 3.19.2 Default device

If you have connected the same type of accessory onto different connectors (for example, a USB external hands-free module), the list of used connectors is displayed for each type of accessory. You can select your preferred accessory to be used as the default accessory.
� Open the user local menu: reach the 'Menu' page Settings Phone Local Menu Audio � Devices � The list of connected devices is displayed. � Select the device with more than one connector icons. � Select your preferred accessory
�

8AL91432ENAAed01

56 /73

User Manual
3.20 Contacting your administrator (Technical support)
If necessary you may need to contact your administrator. Before contacting your administrator, make sure you have information such as your phone's codes and software version to hand. 3.20.1 Date code / Technical code
The codes are located on the back of the phone, next to the connectors. This label is an example and does not represent the one placed on your phone.
� PN: Technical code. � SN: Date code.
3.20.2 Software version Two versions of software can be installed in the desk phone: NOE IP and NOE TDM softwares. The software version can be viewed on the phone by following this path:
� Use one of the following: o Open the user local menu: reach the 'Menu' page Settings Phone Local Menu About Software o Reach the 'Menu' page Settings Options Version (this feature depends on your system).
This information is available in the QR code which can be scanned with any mobile phone. 3.20.3 Hardware model The hardware model can be viewed on the phone:
� Open the user local menu: reach the 'Menu' page Settings Phone Local Menu About Hardware (If available on your phone).

8AL91432ENAAed01

57 /73

User Manual
3.20.4 Access to administrator configuration (only available in IP mode)
Your administrator can access to the phone configuration. Depending on the system configuration, an administrator password is requested to access this menu.
This menu is only available when the desk phone is running in IP mode.
In this configuration menu, use this icon to go back.
� Use one of the following: o Open the user local menu: reach the 'Menu' page Settings Phone Local Menu Config. MMI. o Connect your desk phone to the network (and plug in the power jack if you are using an external power adapter). When the desk phone displays the 'Step 2' during the boot, repeatedly press the '*' and '#' keys in succession until a menu is displayed.
� This section allows the administrator to set or consult: o IP parameters: IP Parameters IP Status o DHCP option: IP Parameters IP Config o Phone memory: IP Parameters Memories o Used network (wired or wireless): Network o Wired network configuration: Network Wired network o Wireless network configuration: Network Wireless network o VPN configuration: VPN o Security: Security o Software information (version, run mode): Software infos o Hardware information (MAC, CPU): Hardware infos o Software update mode: Software infos Upgrade  Enable software upgrade: upgrade via network (system).  Upgrade from USB now: use a USB drive to upgrade the software when you restart the desk phone. o Factory configuration: Reset to Defaults
3.20.5 Auto update the desk phone via USB key
You can use a USB-A or USB-C key. The key has to be formated in FAT32 mode.
� Create an empty text file on the USB key: upgrade.auto Please check that the file does not have the.txt extension (especially when the file extension is hidden in system preferences).
� Create a directory on the USB key: upgrade � Copy binary files into the new directory:
o IP mode:  bin84x9P  noe84x9P
o Digital mode:  bin84x9T  noe84x9T
� Insert the USB key in the corresponding USB slot (A or C). � Reboot the phone (the led is blinking during upgrade).

8AL91432ENAAed01

58 /73

User Manual
4 Accessories
4.1 List of accessories
For more details about references, consult chapter: Ordering information.
4.1.1 USB accessories � AH 21 U II Premium headset monaural USB-A � AH 22 U II Premium headset binaural USB-A � AH 21 M II Premium headset monaural USB-A � AH 22 M II Premium headset binaural USB-A � EM200 Smart Expansion Module (ALE-30h). � USB external ringing interface module (USB Interface module 2 relays).
4.1.2 RJ9 accessory � ALE-10 Keyboard (ALE-30h). � AH 11 G Headset monaural � AH 11 GA Headset monaural � AH 12 G Headset binaural � AH 12 GA Headset binaural
4.1.3 Power supply � USB-C Power supply (EU, US, UK, AU).
4.1.4 Other headsets Compatible headsets are validated by the Developer and Solution Partner Program (DSPP) (See chapter: Third parties headset certified in Developer and Solution Partner Program (DSPP).
4.1.5 Other accessories � Wall mounting kit: Mx/ALE-20/20h/30 Wall Mounting Kit.

8AL91432ENAAed01

59 /73

User Manual
4.2 Magnetic alphabetic keyboard: ALE-10 keyboard
The magnetic alphabetic keyboard is only available for ALE-30h Essential DeskPhone. 4.2.1 Description The keyboard depends on your country and languages. The magnetic keyboard is automatically fixed on the base of the set. It is connected to the corresponding connector behind the phone. Country variants:
� QWERTY- QWERTZ (International keyboard).
� AZERTY (French keyboard)
4.2.2 Unboxing � ALE-10 keyboard. � Safety and regulatory instructions.
4.2.3 Installation The keyboard automatically magnetizes under the phone. Connect the keyboard to the RJ9 connector of the phone: .

8AL91432ENAAed01

60 /73

User Manual

4.2.4 How to use the keyboard

Use the keyboard to enter text while configuring the phone. Access directly the dial by name feature by entering the name of your contact on the keyboard.

Below is a list of the function keys that allow you to access all the symbols.

Caps lock: to write text in capital letters. Maintain this key and press the letter to display in capital.

Alt key: to access specific and punctuation characters highlighted in blue on the keyboard.

Alt key: To access specific and punctuation characters highlighted in blue on the keyboard. Cursor moving key (left, right). Allows you to navigate edited boxes.

�

: Move the cursor to the right.

�

+ : Move the cursor to the left.

Enter key: to validate edited text.

Backspace key: to delete one character in an edit box.

Use cases:

: F' is displayed.

+

: 'F' is displayed.

+

: ':' is displayed.

+

: '6' is displayed.

Use the international keyboard in QWERTZ mode

� Use one of the following: o Use the alt key:


+

: 'z' is displayed.


+

: 'y' is displayed.

o Configure the desk phone to default to QWERTZ layout on the international keyboard. This

means that the 'z' and 'y' are displayed without using the alt key by pressing the 'y' and 'z'

keys on the keypad respectively.

 Open the user local menu: reach the 'Menu' page Settings Phone Local Menu

Display  German kbd: Check this option to use the keyboard in QWERTZ layout (blue letters

for some keys).


8AL91432ENAAed01

61 /73

User Manual
4.3 2 x 10 key expansion module: EM200 Smart Expansion Module
EM200 Smart Expansion Module is only available for ALE-30h.
Phone capabilities can be extended with Add-ons. The EM200 add-on offers up to 60 additional keys with LED: 2 x 10 programmable keys with LED for each virtual pages. The number of virtual pages depends on the system capabilities. Note that all supervised numbers have to be placed on the first virtual page. 4.3.1 Unboxing
� EM200 Smart Expansion Module. � 2-degree adjustable foot. � 2xM3 screw. � Safety and regulatory instructions. � Quick guide. 4.3.2 Description / Connectors

8AL91432ENAAed01

62 /73

User Manual

Color LCD screen. Programmable keys. Page navigation keys.

Connector to connect the device to the desk phone or already connected add-on (USB-A). The module is equipped with a support to fix it to the desk phone or another add-on.

Universal Serial Bus (USB-a) connector. This connector is used for:

�

Connect a USB headset.

�

Connect an add-on module.

�

To connect a conference module.

A USB-C connector is dedicated to connect a power adapter. The power adapter is sold separately.
4.3.3 install the add-on to the desk phone In digital mode, the desk phone has to be powered by an external USB-C power adapter (sold separately).

1- Insert the add-on USB-A connector into the USB-A socket of the desk phone. 2- Use the add-on support to fix it to the desk phone using the provided screw. 3- Plug the network cable. If necessary, plug the USB-C power adapter (sold separately). In digital
mode, the desk phone has to be powered by an external USB-C power adapter. 4- Restart the desk phone.
If you are using a USB-A headset, you can connect it to the last add-on module.
4.3.4 Icon description
Call icons Incoming call from the monitored contact. In conversation with the monitored contact. The monitored contact is on hold. The monitored contact doesn't exist.
The following icons are displayed when you define a service on a programmable key. Forward feature is activated. Do not disturb feature. Lock/unlock feature. DTMF feature.

8AL91432ENAAed01

63 /73

User Manual

4.3.5 Install more than one add-on module
You can connect to the ALE-30h up to three modules depending on the way it is powered. An additional power adapter can be connected to the third add-on module. Contact your installer to know how many add-ons can be connected to the phone and if necessary to add a power supply.
To attach another add-on, affix and connect the new add-on to the one that is already connected:
� The first add-on is connected to the desk phone. � Insert the new add-on USB-A connector into the USB socket of the installed add-on. � Use the add-on support to fix it to the add-on using the screw provided. � Connect the power supply to the desk phone. You need to use a second power supply, connect it
to the 3rd add-on module. � Restart the desk phone.
4.4 Wall mounting kit
To mount your phone on the wall, you need to install a standard wall plate that you can easily find on the market. Follow the manufacturer's instructions to install the wall plate on the wall. When the wall plate is fixed, you can prepare your phone and mount it on the wall. The wall mount kit is sold separately (refer to the following chapter for the reference: Ordering information).

Fix the support with the phone by using the 2 screws provided (the size of screw is M3x8mm).

Hang the assembled phone with wall mounted kit on the wall plate.

8AL91432ENAAed01

64 /73

User Manual

4.5 USB external ringing interface module (USB Interface module 2 relays 3GV28184AA)

The USB external ringing interface module allows driving an external system (like a ring or a lamp), following the ring tone cadence or the communication state of the phone connected on the telephone line. No system configuration is requested to install the module.

USB Interface module 2 relays lets to connect directly one or 2 external ringings on the USB connector of your desk phone:

Relay 2 Relay 1

The phone is in audio communication. The relay is active as long as the phone is in communication.
The phone is ringing. The relay follows exactly the ring signal.

List of supplies
� USB external ringing interface module. � 1 USB cable 1,5 m (4,9 feet) USB type A - USB type B.

4.5.1 Installation

WARNING: The module must be closed before use. No settings require the module to be open.

In idle state:

Ringing or during communication:

N: Common. NC: Active signal. NO: Non-active signal.

Typical usage diagram: Phase

Neutral

The lamp lights up when the phone is in communication.

The breaking capacity is 12V/24V DC 15A or 120V/220V AC at 10A. 4.5.2 Connect the device
� Plug the provided cord USB type B on the USB connector of the module.
Plug the provided cord USB type A on the USB connector of the desk phone. See description of the connectors of your phone.

8AL91432ENAAed01

65 /73

User Manual
4.6 Third parties headset certified in Developer and Solution Partner Program (DSPP)
The mission of the DSPP is to support a broad ecosystem of developers and partners throughout the desk phone lifecycle. In this context, certification tests are performed between partner applications or devices and Alcatel-Lucent Enterprise's platforms. It certifies proper inter-working with partner applications or devices.
Consult the list of available headsets: "List of certified 3rd parties Headsets for Hard phones and Soft phones.".

8AL91432ENAAed01

66 /73

User Manual
5 Technical specifications
Consult the datasheet of your desk phone for more information.

Height Width Depth Weight (handset and foot) Adjustable foot stand range Color
Display
Power over Ethernet (IEEE 802.3af) Power consumption (PoE) Idle � Active(w/o Add-on, w/o USB) Power consumption (digital line power) idle/active (without USB) Operating conditions
Storage temperature USB-C USB-A
USB power delivery

ALE-30h
183 mm (7.2 in) 207 mm (8.2 in) 35 mm (1.4 in) 806 g (1.78 lbs) 40� - 55� Gray
3.5 inch color, 320 x 240 pixels
Class 1
< 3.5 W
0.8W/1.2W
-5�C - +45�C (23�F - 113�F) -25�C - +70�C (-13�F - 158�F) USB 2.0 USB 2.0
1 x USB-A (5V, 500mA), expandable to support 4.5W (5V, 900mA)

ALE-20h
183 mm (7.2 in) 207 mm (8.2 in) 35 mm (1.4 in) 806 g (1.78 lbs) 40� - 55� Gray 2.8 inch monochrome with backlight, 128 x 64 pixels
Class 1

ALE-20
183 mm (7.2 in) 207 mm (8.2 in) 35 mm (1.4 in) 806 g (1.78 lbs) 40� - 55� Gray 2.8 inch monochrome with backlight, 128 x 64 pixels
Class 1

< 3.5 W

< 3.5 W

0.8W/1W

1.W/1.6W

-5�C - +45�C (23�F - 113�F) -25�C - +70�C (-13�F - 158�F) USB 2.0 USB 2.0
1 x USB-A (5V, 500mA), expandable to support 4.5W (5V, 900mA)

-5�C - +45�C (23�F - 113�F) -25�C - +70�C (-13�F - 158�F) USB 2.0 USB 2.0 1 x USB-A (5V, 500mA), expandable to support 4.5W (5V, 900mA)

8AL91432ENAAed01

67 /73

User Manual
6 Ordering information
This list is not exhaustive and may change at any moment.
ALE-20h Essential DeskPhone ALE-20 Essential DeskPhone ALE-30h Essential DeskPhone EM200 Smart Expansion Module Mx/ALE-20/20h/30 Wall Mounting Kit ALE-10 Keyboard AZERTY ALE-10 Keyboard QWERTY - QWERTZ USB-C 5V/2A Power Adapter (EU) USB-C 5V/2A Power Adapter (US) USB-C 5V/2A Power Adapter (RW) USB external ringing interface module 3m Cat3 Telephone cable-RJ45/RJ11 (x10) AH 21 U II Premium headset monaural USB-A AH 22 U II Premium headset binaural USB-A AH 21 M II Premium headset monaural USB-A AH 22 M II Premium headset binaural USB-A AH 11 G Headset monaural AH 11 GA Headset monaural AH 12 G Headset binaural AH 12 GA Headset binaural

3ML37020AA 3ML37020AB 3ML37030AA 3MK27007AA 3MK27008AA 3ML37010FR 3ML37010DW 3MK08005EU 3MK08005US 3MK08005RW 3GV28184AA 3ML37001AA 3MK08011AB 3MK08012AB 3MK08018AA 3MK08014AB 3MK08007AA 3MK08007AB 3MK08008AA 3MK08008AB

8AL91432ENAAed01

68 /73

User Manual

7 Guarantee and clauses

Safety and Regulatory Instructions relates to the following products: ALE-20 Essential DeskPhone (ALE-20), ALE20h Essential DeskPhone (ALE-20h), ALE-30h Essential DeskPhone (ALE-30h), ALE-20/20h/30h WB Corded Handset, ALE-10 Keyboard (ALE-10).
Read carefully before use of these equipments.

7.1 Safety Instructions

 Changes or modifications to the equipment not expressly approved by the party responsible for

compliance could void the user's authority to operate the equipment.  Magnets could affect the

functioning of pacemakers and implanted heart defibrillators. Keep a safe distance between your

pacemaker or implant defibrillator and the handset which includes magnetic elements: 4 centimeters (1.6

inches) at least.  To limit the risk of interference, people with pacemakers must keep the wireless telephone

away from their equipment (minimum distance of 15 cm/6 inches).  It is recommended to follow the

staTnhdearhdanadccseetptiannccluedpersomceadgunreetsicbeefloermeeunstisngthtahtismeqauyipamtterancttinshhaurmp amnestaaflelitcy

critical areas (hospitals...). objects. To prevent injury,

before each use ensure sharp metallic objects are not stuck to the earpiece and microphone. Avoid using

phones (other than cordless type) during an electrical storm. There may be a remote risk of electric shock

from lightning.  Do not use this device in environments where there is a danger of explosion.  Do not

plug this phone into an Integrated Services Digital Network (ISDN) connection or into a regular Public

Switched Telephone Network (PSTN) connection. allow your telephone to come into contact with

wThaitsecr.an

result When

in severe damage to the external power supply is

phone. used, it

 Never shall be

(c2o3n�nFecttoed11t3o�aFn).easTilhyeascecepsrsoidbluectssocakreet

outlet.  intended

Use this product in temperatures for use in an indoor environment

obneltyw. eenTh-e5�PCoEto(P+o4w5�eCr

oinvdeoroErst.hernDeot)nodtevuisceehsetahdastetssupapt lhyigohr

receive volumes

power for an

and their connected cables must extended period of time, this may

all be completely cause hearing loss.

Always listen at moderate levels.

Cleaning and disinfecting
Refer to document: "How to clean and disinfect Alcatel-Lucent Enterprise terminals".
Wear gloves when cleaning products. Do not use harsh chemicals such as bleach, peroxide, acetone, ethyl acid, methyl chloride, ammonia, or multi-purpose cleaners to clean plastic, metal, rubber, or screen surfaces. Wipe products with a clean, dry, microfiber non-abrasive cloth. Spray cleaning solution on the cloth before cleaning the product. Use pre-moistened wipes or dampen (but do not wet) a soft sterile cloth with the approved agent. Never spray or pour chemical agents directly onto the device as the liquid may stain the product or seep inside and damage the hardware. Do not allow liquid to pool. ALE recommends using a 70% ethanol solution for all wired and wireless ALE terminals. Daily disinfection: Up to 5 disinfections per day. Extensive wiping during cleaning or disinfection may cause surface damage to the device. ALE recommends assigning a dedicated wireless terminal to each employee rather than sharing shifts on terminals, as well as replacing the handset on wired terminals for each employee.

other advanced settings if requested
ALE-20, ALE-20h, ALE-30h: these products can be supplied by PBX through proprietary Digital link (excluding ALE-20) or by Power over Ethernet (POE) compliant with IEEE 802.3af class 1 minimum, or by an USB Type C External Power Supply (EPS) with rating 5V DC, 2A minimun.

8AL91432ENAAed01

69 /73

User Manual

7.2 Regulatory Statements
Declaration of Conformity may be obtained from: ALE International 32 avenue Kl�ber � 92700 Colombes, France ebg_global_supportcenter@al-enterprise.com.
other advanced settings if requested. Use one of the following:

�

 Legal (or reach the 'Menu' page  Settings  Phone  Local Menu  Legal).

� Select the settings icon displayed at the bottom left of the screen during the boot (after a few seconds) Legal.

EU Countries This equipment complies with the essential requirements of following directives:
� 2009/125/EC (ErP), 2011/65/EU (RoHS) and its amendment 2015/863 (EU), � Non-Radio equipment: 2014/30/EU (EMC), 2014/35/EU (LVD), � Radio equipment: 2014/53/EU (RED),
UK This equipment is in compliance with the essential requirements of following regulations: Radio Equipment Regulations 2017, Electromagnetic Compatibility Regulations 2016, Electrical Equipment (Safety) Regulations 2016, The Ecodesign for Energy-Related Products and Energy Information (Amendment) (EU Exit) Regulations 2020, The Restriction of the Use of Certain Hazardous Substances in Electrical and Electronic Equipment Regulations 2012
The 5150 to 5350 MHz frequency range is restricted to indoor use.
Canada Equipments with RF part comply with Industry Canada's license-exempt RSSs. Operation is subject to the following two conditions: (1) this device may not cause harmful interference, and (2) this device must accept any interference received, including interference that may cause undesired operation. These products meet the applicable Innovation, Science and Economic Development Canada technical specifications.
The devices for the band 5150�5350 MHz are only for indoor usage to reduce potential for harmful interference to co-channel Mobile Satellite systems.
USA Equipment without RF part has been tested and found to comply with the limits for a class B digital device, pursuant to Part 15 of the FCC Rules. These limits are designed to provide reasonable protection against harmful interference in a residential installation. This equipment generates, uses and can radiate radio frequency energy and, if not installed and used in accordance with the instructions, may cause harmful interference to radio communications. However, there is no guarantee that interference will not occur in a particular installation. If this equipment does cause harmful interference to radio or television reception, which can be determined by turning the equipment off and on, the user is encouraged to try correcting the interference by consulting the dealer.
Privacy of communications may not be ensured when using any Bluetooth� device.
California - Warning: this product can expose you to chemicals including Antimony trioxide, which is known to the State of California to cause cancer, and Di-isodecyl Phthalate (DIDP), which is known to the State of California to cause birth defects or other reproductive harm. For more information go to www.P65Warnings.ca.gov.
Disposal information
This symbol means that the equipment must be returned to a collection point for electronic equipment waste disposal. Defective batteries must be returned to a collection point for chemical waste disposal.
Related Documentation
Other languages for these Safety and Regulatory Instructions and User Documentation are available at the following Web site: https://www.al-enterprise.com/products. The Alcatel-Lucent name and logo are trademarks of Nokia used under license by ALE.

8AL91432ENAAed01

70 /73

User Manual

www.al-enterprise.com The Alcatel-Lucent name and logo are trademarks of Nokia used under license by ALE. To view other trademarks used by affiliated companies of ALE Holding, visit: www.al-enterprise.com/en/legal/trademarks-copyright. All other trademarks are the property of their respective owners. The information presented is subject to change without notice. Neither ALE Holding nor any of its affiliates assumes any responsibility for inaccuracies contained herein. � Copyright 2021 ALE International, ALE USA Inc. All rights reserved in all countries.

8AL91432ENAAed01

71 /73

Alcatel-Lucent Enterprise ALE-30h / ALE-20h / ALE-20 Essential DeskPhone - Quick guide OXO Connect

Quick g uide Quick guide
Keys

� Take the call key - in idle state - short press during incoming call (ringing).
� Redial key: to access the 'Redial' feature (short/long press in idle state).
� Silent ringing when receiving an incoming call. � End the call (Hang up). � Return to the main page.
� Mute key During a call, press this key to stop your contact from hearing you. When activated the key blinks blue.
� Interphony key When idle, press this key to switch the phone to interphony mode. When you receive a call, the phone hooks off automatically and you go straight into hands-free mode. When activated, this key is lit blue.
� This feature can be deactivated by the administrator.
� Messaging key to access the messaging portal (call log, voice messages and text messages). This key flashes blue when there is a new event such as a new voice message, a new instant message or a new event in the call log and remains lit until all events are acknowledged or deleted. The key remains lit until all events are acknowledged or deleted.
� Pressing this key answers an incoming call in handsfree mode (when activated, the key is lit blue). When a call is in progress, pressing this key switches from hands-free mode to headset or handset mode. A long press activates the loudspeaker when a call is in progress via the handset or headset.

� Turn up the volume (ringing or call state).

successive presses

�

Increase the brightness (idle state)(1).

� Turn down the volume (ringing or call state). successive � Decrease the brightness (idle state) (1).
presses
The following keys depend on the system configuration. The 'abc' key is either a key that switches between alphabetic and numeric keyboards (alphanumeric key) or a programmable key if an optional keyboard is already connected to the phone (ALE-30h). F1 and F2 keys are programmable keys. Hold, transfer keys depend on the system and the countries, contact your installer for more information about your system (configuration for United States for example). In this case F1 and F2 are no longer programmable.
� Programmable key (F1). Lit when the function associated with the key is activated (blue). A service or a direct call can be associated to these keys.
� Placing a call on hold / Retrieve the call on hold. This feature depends on the system configuration. If necessary, contact your administrator.
� Programmable key (F2). Lit in blue when the function associated with the key is activated. A service or a direct call can be associated to these keys.
� Transfer: transfer the call to another number. This feature depends on the system configuration. If necessary, contact your administrator.
� Alphanumeric key Switch between the alphabetic and numeric keyboards. When activated, the key is lit blue. An optional keyboard can be used on the ALE-30h. In this case, the key can be programmed as programmable F1 or F2 keys.
� Programmable key(1) (If the optional keyboard is connected to the desk phone). Lit when the function associated with the key is activated (blue). A service or a direct call can be associated to these keys.
� Access the dial by name feature (long press) (1) Available for ALE-30h Essential DeskPhone. (2) Available for ALE-20h Essential DeskPhone. (3) Available for ALE-20 Essential DeskPhone.

Status icons

Silent mode.

Telephone locked.

Headset connected.

Handsfree connected

Appointment programmed.

Encrypted signal icon.

Wi-Fi (future use)

Call icons

Incoming call icon.

Call in progress icon.

Call holding icon.

Your contact ended the conversation.

Alphanumeric keyboard

Your phone is equipped with alphanumeric keyboard. You can switch between numeric keyboard to dial number, and alphabetic keyboard to enter text by pressing the alphanumeric key. When you are in a text zone, you can switch to the alphabetic keyboard by selecting this key. When activated, the key is lit blue. Select the same key which is lit in blue to switch to the numeric keyboard (the key switches off). ALE-30h DeskPhone can also be equipped with a magnetic alphabetic keypad: ALE-10 keypad (sold separately). In this case, the alphanumeric key is disabled. The dedicated key can therefore be programmed.

% $/ ~

& ( )[ ] = *

@ #

space | - _ 1

+ . , ;:\ ? ! < > 0
Press and hold the '*' key to switch from lowercase to uppercase mode, and vice versa. Use navigation keys to move the cursor into the text (except in dial by name feature). Use this key to delete the last entered character. The alphabetic mode remains activated.

Related Documentation - Other languages for Safety and Regulatory Instructions and User Documentations are available at the following Web site: https://www.al-enterprise.com/products. 8AL91432ENAAed01 - The Alcatel-Lucent name and logo are trademarks of Nokia used under license by ALE. ALE International copyright � 2021

Alcatel-Lucent Enterprise ALE-30h / ALE-20h / ALE-20 Essential DeskPhone - Quick guide OXO Connect

Call Dial the number directly or dial the number after pressing a line key (an off-hook key phone or Bluetooth� handset, hands-free key).
Call by name (Company directory) Enter the name, contact's surname/name or initials and follow the on-screen instructions.
Answer a call Take the handset off the hook, use an off-hook key (phone or Bluetooth� handset), use the hands-free key, or press the incoming call icon.

Ignore the call / End the call.

Redial Long press to access the list of the last 8 dialed numbers.
Make a call-back request to a busy number Callback

Placing a call on hold (hold)

Hold

(1)

Sending DTMF signals MF code Send numbers.

Mute

Interphony The phone automatically answers the call. Before the line is taken, you hear a succession of specific beeps.
Switching between audio modes
Making a second call during a conversation New call
Answering a second call during a conversation Select the incoming call icon.
Switching between calls (Broker call) Select the call on hold icon from the conversation screen.
To cancel your second call and recover the first You automatically recover the first call.
Transferring a call You are in conversation with one contact. Call a second contact. Transfer.
Conference Call the first contact. Call the second contact. Conference.
Make calls via your programmed call keys Press the desired programmed call key.
Programming direct call keys Select an empty programmable key or Settings Keys Select the key to program. Enter the name and number to associate to the key.

Long press
(1)
Perso Menu

Modify the programmed key Settings lbl_softkey_long_348 Press the programmed key to be modified. Follow the on-screen instructions.
Erase a programmed key Settings Keys Select the key to be erased. Follow the on-screen instructions.
Customizing your voice greeting Settings Mailbox You can listen to the greeting, customize the greeting and set the default greeting.

Menu Menu Menu

Consulting your voice mailbox

Diverting calls to your voice mailbox Select the forward icon. Immediate>VM Select the type of call forwarding required.
Cancel forward Select the forward icon. Cancel fwd.
Do not disturb Select the forward icon. DoNotDisturb (DND)

Consulting instant messages Select the instant message feature (IM)

Sending an instant message to a contact Send IM Enter the destination number / Enter the first letters of the name.

Information about the phone

Info

Lock/unlock the phone Lock

Menu

Adjust audio volume

Select the language of your choice Settings Options Language

Menu

Choose the tune
Settings Phone Ringing Adjust the ring via the following menus: Melody, Silent, Beeps, Volume, etc.

Menu

Adjust the brightness of the set Settings Phone Local Menu Display Brightness

Adjusting screen contrast(2) (3) (in idle state)

Modify the password for your phone set Settings Options Password

Menu

Homepage Settings Options Homepage Select the default page.

Menu

(1) Depend on system configuration for specific countries as United States. (2) Available for ALE-20h Essential DeskPhone. (3) Available for ALE-20 Essential DeskPhone.

Related Documentation - Other languages for Safety and Regulatory Instructions and User Documentations are available at the following Web site: https://www.al-enterprise.com/products. 8AL91432ENAAed01 - The Alcatel-Lucent name and logo are trademarks of Nokia used under license by ALE. ALE International copyright � 2021