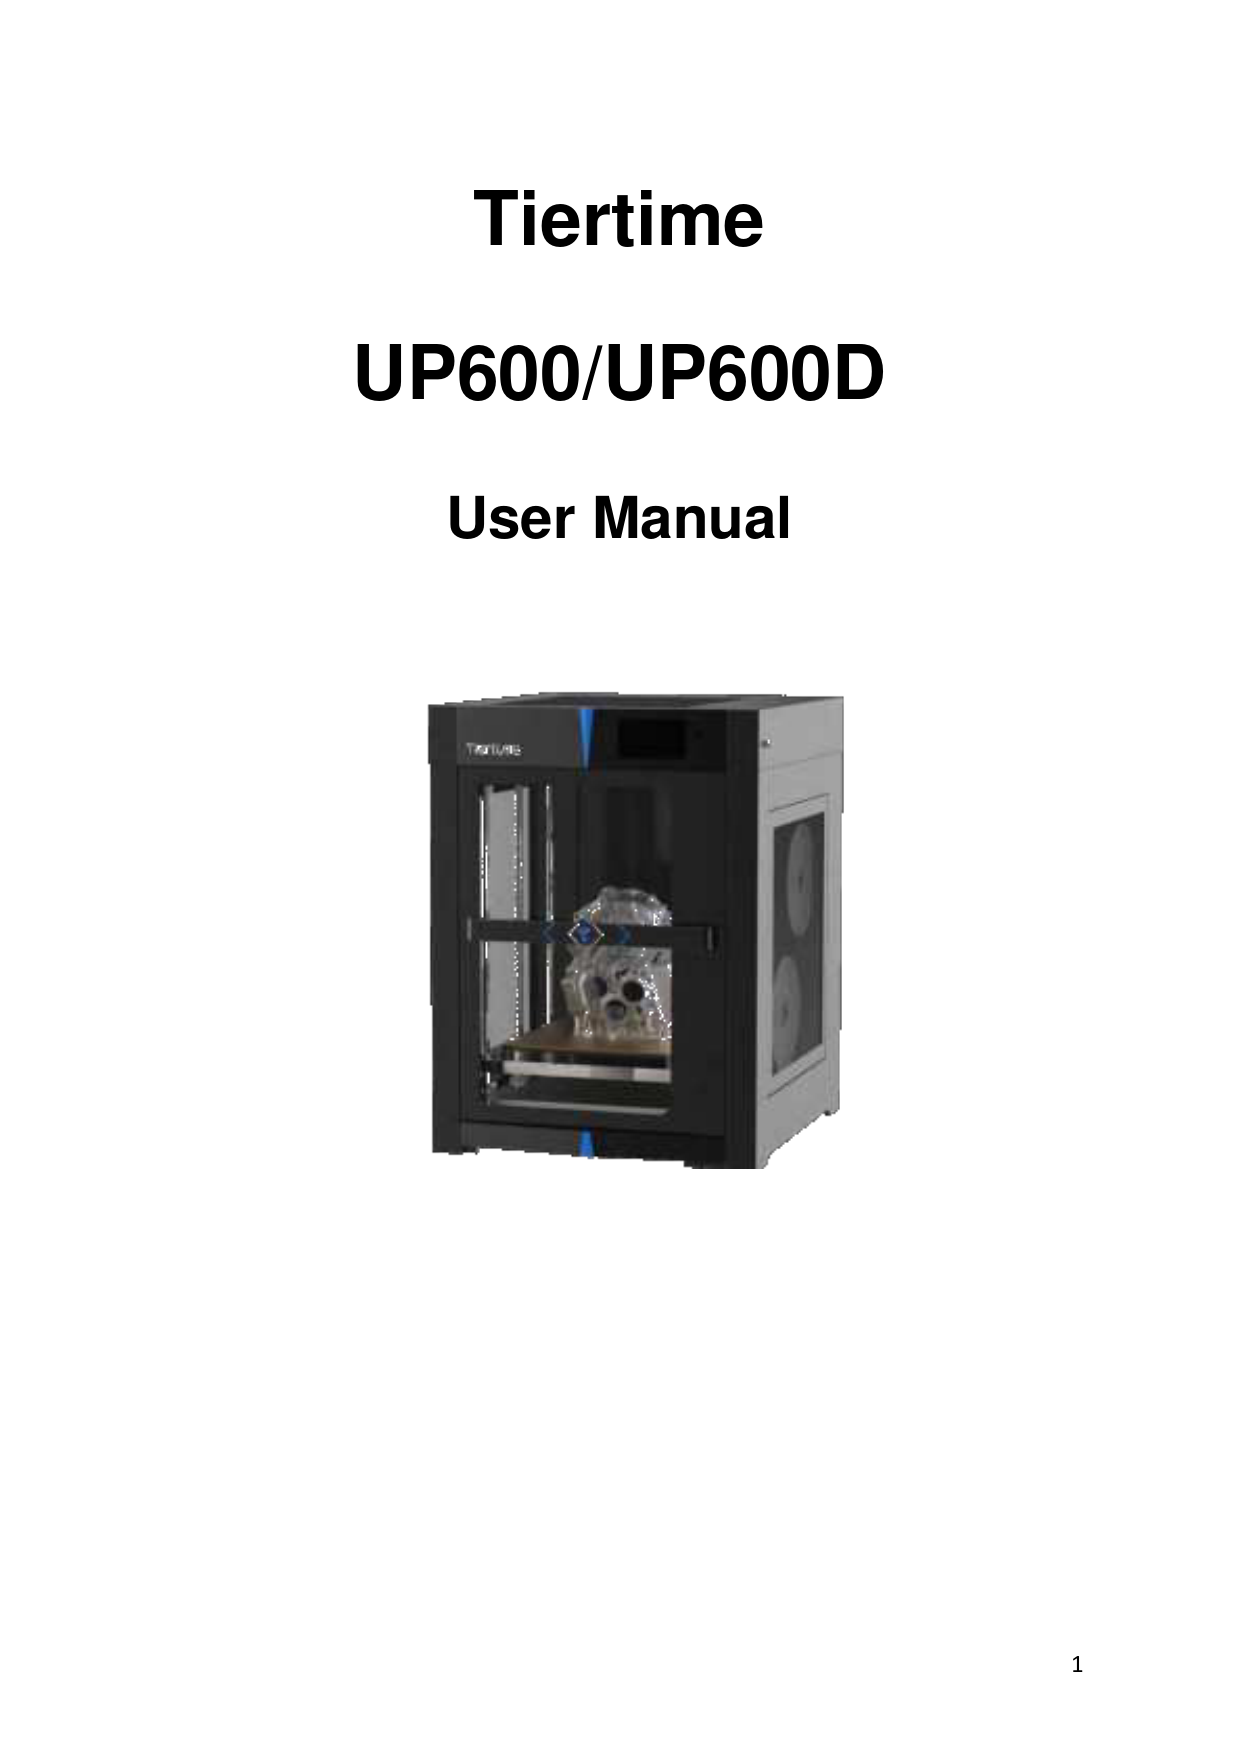
Tiertime UP600D Large Format 3D Printer User Manual
File info: application/pdf · 89 pages · 5.87MB
UP300 User Manual......
User manual
Beijing TierTime Technology Co. Ltd UP600D Tiertime UP600D 2AAHW-UP600D 2AAHWUP600D up600d
Full PDF Document

If the inline viewer fails, it will open the original document in compatibility mode automatically. You can also open the file directly.
Extracted Text
Tiertime UP600/UP600D
User Manual
1

Tiertime .....................................................................................1 UP600/UP600D .......................................................................................................................1 User Manual.............................................................................................................................1 Chaper 1. Safety and Printing Environment ..............................................................................5
1.1 Safety Precautions .......................................................................................................5 1.2 Printing Environment ...................................................................................................6 1.3 One Year Warranty ......................................................................................................6 1.4 Compliance ..................................................................................................................6 Chapter 2. Introduction .............................................................................................................7 2.1 Main Parts of UP600/600D ..........................................................................................7 2.1 Accessories...................................................................................................................9 Chapter 3. Printer Installation .................................................................................................10 3.1 UnBoxing....................................................................................................................10 3.2 Build Plate ..................................................................................................................10 3.3 Connect Power...........................................................................................................10 3.4 Install Software UP Studio 3.0 ...................................................................................10 3.5 Update the Touchscreen Firmware ...........................................................................11 Chapter 4. Prepare UP600/UP600D for Printing .....................................................................12 4.1 Printer Calibration From Touch Screen .....................................................................12 4.2 Load Filaments ...........................................................................................................14 4.3 Update the Touchscreen Firmware ...........................................................................14 5. Prepare UP300D for Printing ...............................................................................................15 5.1Connectivity ................................................................................................................15 5.2 Auto Calibration .........................................................................................................15 5.3 Auto Calibrationfrom Touchscreen ...........................................................................15 5.3 Load the Filaments.....................................................................................................16 Chapter 5. First Print ................................................................................................................21 5.1 Connect and Send Print Job to Printer.......................................................................21 5.2Remove the Printed model.........................................................................................22 Chapter 6. Dual Extrusion ........................................................................................................23 6.1 Switch Print head .......................................................................................................23 6.2 Load Main and Support Material...............................................................................25 6.3. Slicing ........................................................................................................................26 6.3.1 Turn on Extruder 2 for slicing. ................................................................................26 6.3.2 Load a STL file by click the "+" button on the vertical menu..................................27 6.4 Auxiliary Support (A.S.) ..............................................................................................28 Chapter 7. Printer Calibration..................................................................................................30 7.1 Nozzle Height Measurement .....................................................................................30 7.2 Set Nozzle Height through Touchscreen, please refer to page xxx. ..........................31 7.3 Setup Nozzle Height Value through Wand (computer hosted) .................................31 7.3 Matrix Leveling (9-Point Compensation) ...................................................................33 7.3.1 Auto Matrix Leveling through touchscreen, refer to page xxxx. ............................34 7.3.2 Auto Matrix Leveling through Wand (computer hosted). ......................................34 7.4 Manual calibration .....................................................................................................35 Chapter 8. Introduction to UP Studio 3 ...................................................................................37 8.1 Interface.....................................................................................................................37 8.2 Quick Setting Bar........................................................................................................37
2

8.3 Print Layout Tools ......................................................................................................37 8.4 Support Editor............................................................................................................39 Support List ......................................................................................................................41 Support Filter ...................................................................................................................41 8.5 Print Settings..............................................................................................................42 8.5.1 User Modes.............................................................................................................43 8.6 Introduction to print parameters ..............................................................................44 8.6.2 Path .........................................................................................................................48 8.6.3.Special .....................................................................................................................51 8.6.4 Speed ......................................................................................................................52 8.6.5 Temperature ...........................................................................................................52 Chapter 9. Material Library (Mat Lib) and Custom Materials..................................................55 Chapter 10. Part Sub-setting....................................................................................................56 Part Optimization.............................................................................................................56 Chapter 11. "Wand" - the Printer Hosting Software ...............................................................59 11.1 Wand Interface ........................................................................................................59 7.4 Wi-Fi Connection........................................................................................................61 7.5 Ethernet Connection..................................................................................................61 7.6 Editing Network Configuration ..................................................................................61 Chapter 12. Touchscreen Introduction....................................................................................63 12.1 Printer Status Bar.....................................................................................................63 12.2 Main Menu...............................................................................................................64 The printer must be initialize first before printing. .........................................................64 12.3 Material....................................................................................................................65 12.4 Print..........................................................................................................................66 12.5 Calibrate...................................................................................................................67 12.6 Information ..............................................................................................................68 12.7 Config .......................................................................................................................69 12.8 Network Connection ................................................................................................70 Chapter 13. Print Boards..........................................................................................................72 13.1 Perf Glass Boards .....................................................................................................72 13.2 Flex Glass Board .......................................................................................................72 13.3 Glass Surface ............................................................................................................72 Chapter 13. Extruders ..............................................................................................................73 14.1 Single Extrusion Print Heads ....................................................................................73 14.2 Convergence Dual Extruder .....................................................................................74 Chapter 15. Maintenance ........................................................................................................75 15.1 Replacing Nozzle: .....................................................................................................75 15. 2 Change Extruder.....................................................................................................75 15.3 Extruder Maintenace ...............................................................................................76 15.3.2 Convergence Dual ................................................................................................78 Replacing heater module.................................................................................................78 15.3.3 Releasing the heater block....................................................................................79 15.3.4 Remove/Replace Stepper Motor ..........................................................................81 15.3.5 Remove the extrude block...................................................................................82 15.4 Unclogging Extruder.................................................................................................82 15.4.1 Partial Blockage.....................................................................................................83
3

15.4.2 Completely Blockage.............................................................................................83 15.4.3 Remove blockage at heater module.....................................................................83 15.4Dual Filtration System...............................................................................................84 Chapter 16. Specification .........................................................................................................86 Chapter 17. Customer Service and Community ......................................................................87
4

Chaper 1. Safety and Printing Environment
1.1 Safety Precautions
1. The UP600/UP600D 3D printer uses 220V or 110V AC (depends on the geographical location) as power input. Internally the high voltage AC will be converted to 24V DC to power its extrusion and motion control system. The build platform however use 110V or 220V AC directly. For safety, do not try to modify the platform, especially the circuit of the platform's heating system.
2. During printing, the print head and other mechanical parts move at high speed. Due to the size and weight of the motion system, it could easily cause injuries if user reaches to the inside of the machine during printing or other machine operations. User should always stay outside of the machine, and do not reach to the inside when the machine partsare moving!
3. Potential Danger to children: Due to the size of the machine, children could easily go into the machine and close the front door. As long as the front door closed, the printer could start printing at any moment especially it can be controlled wirelessly and remotely. Therefore it could cause extreme danger to small children who wander into the printer. Machine operators need to highly aware about the possibility of any youngsters that may reach the machine. Teachers or technical personnel in education institutes should give adequate safety training to any users that may need to operate the machine. There is an extra USB port in internal space of the printer, that could be used to connecting a web camera for monitoring the machine status.
4. During printing, the temperature of theextruder nozzle could reach 300�C and the temperature of the print platform could be over 100�C. Do not touch these parts with your bare hands when the printer is in the operation mode, not even with the heat resistant gloves included in the accessories, as the temperature could damage the gloves and injure your hands.
5. Wear goggles when removing the supporting material from models or detaching models from the build plates.
6. When printing with plastic filaments, the process couldgenerateslight and, for some people, annoying odor. It is recommended to run the printer in a well ventilated environment. We also suggest to keep the printer in an environment with a stable temperature as unwanted cooling could cause adverse effects to the print quality.
7. When using the "Extrude" function, make sure there is enough space between the print head nozzle and the build platform. 50mm is recommended, otherwise the nozzle could be blocked.
8. Fasten moving parts. Tie back loose hair, secure loose clothing and keep all printer doors closed during operation.
9. Do not leave the printer unattended during operation. Watch the printing of the first a few layers to make sure they adhere correctly.
5

1.2 Printing Environment
As the slight odor could be generated during printing, keep the printer in a well ventilated environment. The UP600/UP600D's ideal working temperature is between 15�C and 30�C with a relative humidity between 20�50%. Printing at temperatures out of this range could cause adverse effects to the printing process and print quality.
1.3 One Year Warranty
Tiertime and its authorized resellers warrant to the original purchaser that this product is free from defects in material and workmanship. Tiertime or its resellers will for one year, at its option, repair or replace at no charge for parts and labor from the date you purchased the product from Tiertime or a reseller. Print heads, Nozzles and Print Boards are warranted for thirty (30) days.
� Tiertime reserves the right to determine the validity of all warranty claims. � Warranty is voided if the product serial number has been altered or removed. � Warranty is voided if the product has been misused or damaged or if evidence is present that the product was altered, modified, or serviced by unauthorized service people.
For the detailed Warranty and Service Level Agreement, please visit our website https://www.tiertime.com.

1.4 Compliance

FCC

RoHS

CE

6

Chapter 2. Introduction
2.1 Main Parts of UP600/600D

1 2

9

7

3 4

8 6

5

1. Top Lid 2. Touchscreen and Front USB port 3. Front Door 4. Platform 5. Door Check Sensor

6. Filament Spool Racks 7. Filament Entrance 8. Side Door 9. USB and Ethernet

7

4

1

2 3

5

1. Power Input Socket 2. Circuit Breaker 3. Power Switch 4. Back Cover (Air Filtration Unit inside) 5. Caster (FOOTMASTER Type)
6
9
8

6. Y-Axis (Left/Right) 7. X-Axis (Back/Forth) 8. Z-Axis (UP/Down)
9. Print Head
7

8

2.1 Accessories

MPN
1 130052 2 130038 3 130037 4 130036 5 27115
6 291010 7 18126 8 130105 9 040037 10 23105 11 BC1044 12 BC1301 13 18068 14 130040 15 CB0054 16 CB0065 17 18 130035 19 20 21 22 23

QTY Part Name

1 Gloves

1 M3 Hex Wrench

1 M2.5 Hex Wrench

1 M2 Hex Wrench

1 Nozzle Wrench for Dual Extruder

1

Nozzle for Dual Extrusion 0.6mm nozzle diameter

1 Micro SD card reader

1 Micro SD card

8 M3 screws

1 Calibration Card

1 Nozzle Detector

1 UP600 Autocalibration Probe

1 Pliers

1 Scraper

1 Tiertime PLA filament 2KG Spool

1 Tiertime PVA filament 500G Spool

1 FFC Ribbon Cable for extruder head.

1 USB Cable

1 Power Cord

1 User Manual

1 Packing List

1 Power Supply 300W

2 Push Pin

The LT SingleExtruder is installed on the UP600 / The Convergence Due Extruder is installed on the UP600D
Notice: All accessories may subject to change without prior notice. If anything is missing, please contactyour local distributor, or Tiertime's global technical support center, which can be reached via support@tiertime.com.

9

Chapter 3. Printer Installation
3.1 UnBoxing.
Please refer to the UP600 unboxing guide attached on the wood packaging.
3.2 Build Plate
The spring steel build plate should be already installed inside the build chamber. Open the front door and make sure the platform is flat and stick well on the magnetic base.
3.3 Connect Power
Plug in the power on the back of the machine. Plug the other end of the cable into a wall outlet. Turn on the power switch.
3.4 Install Software UP Studio 3.0
To operate the UP600/UP600D, you need to install the UP Studio 3.0 software on your computer. Although UP Studio 2.X can also work with UP600, it does not support dual extrusion function and will be obsoleted once UP Studio 3.0 is functionally ready to take the place. You can download the installation files of UP studio software from the following url: https://www.tiertime.com/software System Requirements:
Supported Operating Systems:
10

Windows 7 (SP1) or higher (64 bit only) Mac OS 10.10 or higher Hardware requirements: Open GL 2.0 At least 4GB of RAM Installation Make sure you download the correct version of software based on your computer's configuration and follow the instructions of the installation program.
3.5 Update the Touchscreen Firmware
We regularly update the Tiertime 3D printer's touchscreen program. It is important to make sure your UP600's touchscreen system is up-to-date before the first use and pay attention to the upgrade announcement for touchscreen system in the future. 1. Download the UP600 Touchscreen Upgrade Program from https://www.tiertime.com/touchscreen-upgrade-program/ 2. Save the file to the root directory of the USBdrive which comes with the UP600, and make sure the file is named as "UP600_x.x.x_update.tt" (Case sensitive), x.x.x being the version number. 3. Insert the USB drive to the USB socket under the touch screen, and turn on the printer. Wait until the printer is fully ready, go to Information Page, and press the "Upgrade" button. Follow the instructions on the touchscreen afterwards. 4. Keep the USB drive handy for the future use.
11

Chapter 4. Prepare UP600/UP600D for Printing
UP600/UP600D supports USB and various networking communications protocols.
4.1 Printer Calibration From Touch Screen
1. Switch on printer then go to touchscreen, press "Initialize" button to initialize the printer.
2.Install the auto-leveling probe, a magnetic gadget which can hold itself on the metal extruder mount. Plug the cable of the probe into the probe socket above the extruder.
12

3.Initiate Auto-leveling. 2. Press "Calibrate" on touchscreen.

3. Press "AUTO" The printer will start the process of calibration.

Make sure the nozzle is clean, plastic debris will add errors to the Nozzle Height.
4. Touch the probe's sensor against the nozzle, which will inform the machine that the probe is installed properly and it is ready for the calibration process. Then the printer will start the auto calibration process.
5. Remove the auto-leveling probe from the extruder head after the auto-level process finishes.

13

4.2 Load Filaments
You will find one spool of500g Tiertime PLA for UP600 In order to archive good consistency and print quality, we recommend use Tiertime filaments. The default print settings of UP Studio are optimized using Tiertime materials, so you can start printing confidently without adjusting any parameters. and follow the instructions of the installation program.
4.3 Update the Touchscreen Firmware
We regularly update the Tiertime 3D printer's touchscreen program. It is important to make sure your UP600/UP600D's touchscreen system is up-to-date before the first use and pay attention to the upgrade announcement for touchscreen system in the future. 1. Download the UP600/UP600D Touchscreen Upgrade Program from https://www.tiertime.com/touchscreen-upgrade-program/ 2. Save the file to the root directory of the USBdrive which comes with the UP300D, and make sure the file is named as "UP300D_x.x.x_update.tt" (Case sensitive), x.x.x being the version number. 3. Turn on the printer and go to the Information Page of the touch screen. Insert the USB drive to the USB port under the touchscreenand press the "Update" button. Follow the instructions on the touchscreen to finish the update process. Remove the USB drive once the update process finishes.
14

5. Prepare UP300D for Printing

5.1Connectivity
UP300D supports USB and other networking communications. For Wi-Fi, and Ethernet connection please refer to page 53-54, 66-68.
5.2 Auto Calibration
Auto Calibration can be triggered from the touchscreen, or from Wand software when the printer is connected to a computer (refer to page 64). The calibration process consists of leveling of the build plate,and measurement of nozzle height. For more info please refer to page 25-30.
5.3 Auto Calibrationfrom Touchscreen
1. When the machine is switched on, user needs to first run the initialization in order to operate the printer. Go to touchscreen press the initialize button. 2. Click Calibration. 3. AUTO. The printer will start the process of auto calibration.

1. Initialize Printer

2. Press "Calibrate"

3. Press "Auto"

4.When Leveling procedure finishes, the touchscreen will ask the user to confirm nozzle height value.

5. Put the nozzle height detector under the nozzle.Adjust the + and button to make the nozzle just touching the sensor pad.

6. When the nozzle touch the sensor it will emit a buzz sound, press OK button to save the value.

OK
Make sure the nozzle is clean, plastic debris will add error to Nozzle Height. 15

5.3 Load the Filaments
You will find two spools of filaments in the package. 1. 500g Tiertime PLA 2. 500g TiertimePVA In order to achieve good consistency and print quality, we recommend use Tiertime filaments. The default print settings of UP Studio are optimized using Tiertime materials, so you can start printing confidently without adjusting any parameters.
Heated Filament Chamber
The filament chamber of UP300D has two heating elements, designed to keep the chamber at 55. The heaters will generate warm air current to keep filaments dry. By default, the chamber will start heating as soon as the machine is powered on. If user is printing water soluble support, it is highly recommended to keep the heaters on, as moisture could have adverse effect on such materials. If the heaters are not needed, they can be turned off by a physical switch on the heater (marked on right).
5.3.1 Load Main Material (1) To install the filament, please following the instruction below: 1. Remove the vacuumed bag. 2. Find the end of the filament, and use pliers to make a clean cut of the end. 3. Open the door of the filament bay, feed it into the guiding tube. You should be able to feel the filament triggering the mechanical switch (the filament sensor) at the opening. 4. Keep feeding the filament until the end of the filament sticks out from the other end of the guiding tube (You can open the top lid, and make sure the filament sticks out).
Insert the filament into the guiding tube.It must go through the filament sensor.

Filament 2 Support Material Green Colored

Filament 1 Main Material Blue Colored

16

5. Go to touchscreen
1. Press Material

2. Press "Filament 1"Material Button until it shows "PLA", then press "+" button to increase material weight to 500g.

3. Press " " to extrude material. The machine will heat up and buzz when start to extrude. It will stop automatically

4. When the extruder starting to extrude (starting with a buzz), push the filament into entry 1 on extruder until the extrusion appears from the nozzle.

5. The filament should be able to be extruded from nozzle and form a clean straight thin thread.

17

5.3.2 Load Support Material (2) Loading of the support material is the same as that of the main material but use the Filament 2 entry from the filament bay and the extruder head. On touchscreen, user should choose the correct support material that matches the main material. For PLA, the matching support material could be Tiertime PVA; for ABS, it should be the Tiertime Breakaway.
Important!!!
For the Convergence Dual Extruder, both main and support materials must be loaded into the extruder.
When loading filament, do not continuously load one extruder while leaving the other
empty. Leaving one side of the hotend empty will inevitably results in hotend clogging.
18

To install the filament, please following the instruction below: 1. Remove the vacuumed bag of PLA filament. 2. Find the end of the filament, and use pliers to make a clean cut of the end. 3. Open the filamentbay,and the BLUE colored (for main material) filament entrance of the feeding tube.Insert PLA filament into the guiding tube, you should able to feel the filament triggered mechanical switch (filament sensor) at the entrance. 4. Keep feeding the filament until the end of the filament sticks out from the other end of the guiding tube (You can open the top lid, and make sure the filament sticks out).

Go to Touchscreen
6. Press Material

Insert PLA filament here. (main material)
7. Press "Filament 1"Material Button until it shows
"PLA" and press "+" button to single the weight of material to 500g

7. Press the " " button to extrude material

8. Hold and gently push the filament into the
extruder entrance marked"1" (Blue Color) until it feed into the extruder by its motor.

19

5. Go to touchscreen
5.1 Press Material
5.2 Press Material Button until it shows
"PLA", then press "+" button to increase material weight to 500g.
5.3 Press " " to extrude material. The machine will heat up and buzz when start to extrude. It will stop automatically
5.4 When the extruder start to extrude, push the filament into entry 1 on extruder until it can be feed by extrusion motor.
5.5 The filament should able to be extruded from nozzle and form a clean straight thin thread.
20

Chapter 5. First Print
This chapter intends to guide new users to print a object with use LT Single Extruder for single material printing. For print a object with the Covergence Dual extruder please refer to page xxx

5.1 Connect and Send Print Job to Printer
U600 supports USB, Wi-Fi, and Ethernet connection. For Connecting with WiFi or Ethernet, please refer to page xxx.
USB Connection Use the USB cable included, connect to one of your computers USB port and UP600's back side USB port (Type-B).
Open UP Studio 3 on the computer, click the
" " button (Print) to bring up the "Wand" printer hosting module.

1. Click connect printer

2. Select the connected, click "Ok"

3. Click "Print" to bring up task list.

4. Click "Print Task" to load the .TSK file that just saved.

21

Once selected, the task file will be transferred to the printer. When data transfer is finished, it will start to heat up and start printing after reaching adequate temperature. As long as the data transfer is finished, user can disconnect the printer from computer and printer will able to carry out the print job on its own.
5.2Remove the Printed model
To remove the printed model from the print board of the UP600, it is recommended to wear gloves for protection. Take out the print board with its front handle, using the scraper that comes with the machine, scraping the model off the print board from one corner of the model. Clean the print board from plastic residues, put back into the build chamber for the next print.6. Setup for Dual Extrusion UP600 has the ability to use Convergence Dual Extruder to print in dual material mode. The extruder mount for Single extruders and Convergence Dual are different, therefore when changing extruder, the extruder mount must be also changed.
22

Chapter 6. Dual Extrusion

6.1 Switch Print head

1. Remove Single Extruder.

Withdraw filament from the extruder and turn off the machine before removing the

extruder, then remove the single extruder.

1.1. Unplug extruder cable

1.2. Remove M4 screw to remove the extruder from the mount.


:


2.Change Extruder Mount.
2.1 Remove the M3 screws indicated. The metal part will be released from the mount.


2.2 Remove the 8x M3 screws that connecting the rail bolock to belt and the extruder cable transitional PCB.


Release the extruder mount and extruder cable transitional PCB.

23

3. Install the extruder mount for Dual Extruder.
Install the extruder mount for dual extruder, install the 7x M3 screws indicated below.


4. Install the Convergence Dual Extruder.

After swapping the print head, switch on power and printer will able to recognize the Convergence Dual Extruder automatically.
Nozzle height value must be updated after changing the print head


24

6.2 Load Main and Support Material
When switched to dual extruder,the printer will able to recognize the print head and adjust the interface accordingly. The material interface will have two material options. Filament 1 is the main material and filament 2 by default is the support material.

For dual extrusion version of UP600, you will find two spools of filaments in the package. 1. 500g Tiertime PLA 2. 500g TiertimePVA In order to archive good consistency and print quality, we recommend use Tiertime filaments. The default print settings of UP Studio are optimized using Tiertime materials, so you can start printing confidently without adjusting any parameters.

Main material (Filament 1)

Support material (Filament 2)

Support material (Filament 2)

Main material (Filament 1)

Load Main Material (1) To install the filament, please following the instruction below: 1. Remove the vacuumed bag. 2. Find the end of the filament, and use pliers to make a clean cut of the end. 3. Open the door of the filament bay, feed it into the guiding tube, you should able to feel the filament triggered mechanical switch (filament sensor) at the opening.
25

4. Keep feeding the filament until the end of the filament sticks out from the other end of the guiding tube (You can open the top lid, and make sure the filament sticks out). Load Support Material (2) Loading support material the same as loading main. Make sure the material insert into the correct filament entry. On touchscreen user should choose the correct support material that match the main material. For PLA, the matching support could be Tiertime PVA or breakaway. For more info refer to chaper xxx.
---Important!!!--For Convergence Dual Extruder, both main and support materials must be loaded into the extruder. Leaving one side of the hotend empty will inevitably results in hotend clogging.

6.3. Slicing
6.3.1 Turn on Extruder 2 for slicing.
1. At Left column click the "gear" icon to open the print setting menu.

2. Then click "Basic" button to switch to "Advanced" mode.

26

3. Select "Extruder" Tab, Check the "Extruder 2" Option, then select filament "Tiertime PVA" for its filament option. Then click "Apply" => "OK"
4. Go to top menu print settings, select the correct machine type and print settings, eg Layer thick and nozzle diameter, the filament type for both extruders. The left side material is filament 1(main material) select PLA, the right side material (support) select Tiertime PVA.
6.3.2 Load a STL file by click the "+" button on the vertical menu.
27

STL loaded

Auxiliary Support

Please note an Auxiliary support pillar is auto loaded with the file. This is due to the activation of second extruder. On the left object list, two new entries appear, one is the STL model loaded and the other is the Auxiliary support.
6.4 Auxiliary Support (A.S.)
It is a special preset object for material switching during a print. The A.S. is printed as a column and material will be switched within the path of A.S region of the current layer. User should able to observe a gradient of material change in A.S.. The reason for using A.S. for printing dual material, is all the mixture of the two materials during shifting main(1) and support (2) material are dumped into the A.S. and the support and main objects will retain high purity of its own corresponding material. This is important as mixing the two material not only affect the color of print, but also affect the strength of the main object and the solubility of the support.
Auxiliary Support print setting is partially depend on the print parameter of the current print job but its shape and path are not adjustable by users.
Due to the structure of Covergence Dual Extruder, prolonged stagnent material flow in the hotend will casue degradation and backflow material which eventually result in clogging of hotend. 1. Even user is printing an object that does not need any support, the Auxiliary support(A.S) is still required for periodic material purge to prevent clogging. 2. When using the same material for both main (1) and support (2), the A.S. is still required. 3. When printing with dual material both channels of the extruder must have filament to prevent backflow and clogging the hotend.
28

Move the Auxiliary support pillar to a suitable location. 1. First left click on the Auxiliary support to select it, then click the " " move button. 2. Right-click-drag the Axuiliary support to an area not overlapping with the STL model. 3. Alternatively user can adjust the location by using the key pad. For more info on model layout please go page xxxx.
5. Print preview. After adjustment of the model layout, click the " " preview button to slice the model for preview (not saved).
Click " " (save) button of the task file to save it to hard drive or USB drive.
29

Chapter 7. Printer Calibration
Printer calibration in Tiertime system involve of followings: 1. Nozzle Height Measurement 2. Platform Matrix Leveling (9-Point Compensation) 3. Vertical Calibration 4. Dimensional Calibration All the above calibration are made in terms of SOFTWARE. Nozzle Height and Leveling Compensation are routine procedures that are done by users. For Dimensional calibration and Vertical calibration were done through hardware in factory and only need to be re-calibrated in software when user found the corresponding measurements are not satisfactory.
Since all the calibration data are stored in the on-board SD card of the touchscreen mainboard. If user replaced/formatted SD card or replaced touchscreen entirely, the calibration data previously made will be lost and the calibration may need to be redone.
7.1 Nozzle Height Measurement
Nozzle Height Value is the most important measurement of the printer as it determines how close the nozzle to the build platform when printing starts. The optimal distance between nozzle and build surface depends on depends on different situation. If use raft, the optimal distance is about 0.2mm. If print without raft the distance should be less than 1x layer height, eg 0.2mm layer the distance should be about 0.1-0.15mm. The reason for this is, in order to achieve good first layer adhesion, the first layer should be pressed against the build surface, become slightly overspread to obtain a adequate contact with the print surface.
30

7.2 Set Nozzle Height through Touchscreen, please refer to page xxx. 7.3 Setup Nozzle Height Value through Wand (computer hosted)
1. Connect printer to computer, open UP Studio 3.0 and click the "Print" button to open "Wand". Click "Nozzle Height" button, the print head will move the position that is near the platform.
2. Use the height detector included to confirm the nozzle height value.
User need to put the sensor pad of the detector under the nozzle and then use + / - buttons to adjust the nozzle to touch the sensor until the sensor give a buzz sound. When the nozzle height is determined by the sensor, click "Apply Height" to update the nozzle height value.
31

It is recommend to print a small test object after the measurement, check the following for recommended first layer adhesion.
32

7.3 Matrix Leveling (9-Point Compensation)
Tiertime Matrix Leveling can effectively reduce the adverse effects of tilting and uneven surface of build platform. The leveling will not affect the print's dimensional accuracy in contrary to other leveling methods. Its leveling mechanism is to first measure the platform heights at 9 different points and then use the values to generate a compensating raft that provides a flat and leveled build surface. Then the object is print onto the raft for best print quality and platform adhesion. The Leveling process could done automatically or manually on UP600. 1. Platform may be tilted and print surface may be uneven (may not be visible in real situation). Platform height at 9 different points are measured (arrows) by automatic probe or manually with paper.
2. A compensating raft is laid onto the platform to build a flat and leveled surface. The amount of compensation depends on the result of the previous measurement.
3. Object is printed on the raft. Note object's bottom is flat and horizontal in contrary to the platform's tilted and uneven surface.
33

7.3.1 Auto Matrix Leveling through touchscreen, refer to page xxxx. 7.3.2 Auto Matrix Leveling through Wand (computer hosted).
1. Connect printer to computer using USB/Wi-Fi cable. Find a USB cable, and connect one end to the computer and the other end to the UP600 back USB port (type-B). Open the UP Studio on the computer, you will find the connected UP600 listed in the available printer list of Wand.
1. In UP Studio click "Print" button to open "Wand".
2. Click "Connect Printer", the USB connected printer should in the available printer list, click it to connect.
3. Click Initialize, and wait for the initialization process finishes 4. Click Level Calibrate.
34

5. Click Auto Leveling, the print head will then probe the platform in 9 positions. The leveling probe will be lowered and start to probenine positions on the platform. After probing the platform, theleveling data will be updated and stored in the machine. Theleveling probe retracts automatically when the process is done.
7.4 Manual calibration
Although the Auto Calibration is always the easiest way to calibrate the UP600, some advanced users may prefer to level manually to have full control of result. 1. At plate leveling interface, click the Manual Leveling button
2. Red square now move the box on upper left corner representing the measurement point and the current location of nozzle.
35

A pop up message will hint user to adjust the platform level. Use the green up and down arrows (single) to increase or decrease platform height.

Use the nozzle height detector (or a piece paper as feel gauge) to determine the platform height at the measurement point.

Click "Next" button to save the current height reading and move to the next measurement point.

Repeat the measurement for all 9 points then the software will calculate the compensation values for all the 9 points as well as the nozzle height value?

36

Chapter 8. Introduction to UP Studio 3
8.1 Interface

Program Log

Quick Set Bar

Print Setting Model list

Model Layout Buttons Command Field

Print Preview Slider

8.2 Quick Setting Bar

View Switcher

Printer Model
Nozzle Diameter
Extruder 1 Material Main Material (1)

Layer Thickness

Extruder 2 Material Support Material (2)

Print Quality (Speed)

Quick Setting Bar provides a quick way to change essential print settings, also give overview of current print settings.
8.3 Print Layout Tools

Button Add 3D file to build space.

Description

Slice model and save the data (.tsk) to the directory of the original 3D file.

37

Preview Slice Result. The 3D file will be sliced but not saved, the sliced result will appear on file list of right column. The "Print" button. clicking this button will call out the "Wand" hosting module. This button does not initiate printing. Move. Select a 3D model and then click this button. Mouse Right-Click-drag the model to move it along X-Y Plane. Alternatively use the keypad to move move model along selected axis. Select a 3D model and the click this button to rotate. Select the axis and rotation degree on the keypad.
Select surface to be bottom. Click the bottom and select target surface, it will rotate to become the object bottom. Scale object. Use keypad to select preset ratio or input a target scale ratio.
Link all axis when scale, this keep all 3 axis to keep the original proportion of the model.
Mirror object along selected axis.
Autoplace Click this button all the objects in print space will be automatically arranged to become evenly distributed and "onto" the build surface. Views. Quickly switch between preset view perspectives. Display modes. Choose to display Solid, Surface, Wire or make model transparent. Apply to all models in print space. Cross-section view. Choose to a section along specified axis for inspection only. This function cannot be used to cut/modify object. Fix Error. Choose a model and click this button to fix simple simple mesh defects. Cannot handle more severe issue. Merge. Merge selected models into a single model. The raft of the object will be merged as well. Support Editor. Select model and click this button to open support editor for detailed support editing. Reset Model. Remove all previous modification of the model and model return to the state it is just loaded into the software.
38

8.4 Support Editor
The support editor will first calculate all the possible support structure of the model. Then user could enable or disable specific supports base on their preference. The support editing result will be shown on the model at real time.
Support Types: There are three types of supports in Tiertime's support generating algorithm. They treated differently and can be edited separately.

Support Generated

1. Surface Support

The most common support, support of the overhang surface.

2. Edge support

Support the "Edge" of a shape

39

3. Point support

Support the "Tip" features

Support Parameters
Support List

Support Preview

View Options

Support Angle Top Layer
Top Lift Draft Angle

The overhang angle threshold for support, overhangs less than this angle will not have support generated. This determine number of interface layers between the support structure and the surface being supported. Increase the layer may make the support easier to remove but increase print time. Determine the height the support will "wrap" above the layer of the point or edge features. Adding draft angle will make the base of the support to be wider than the top, this increase the stability of the support column.

40

Draft Angle = 0

Draft Angle = 50

Min. Area Min. Length

Area threshold of the support structure, overhang surface with area less then the threshold will not be supported. Length threshold for the edge support. Edges shorter than the threshold will not be supported.

Support List

Enableturn support on or off. View: hide/show support, not affecting its status. Remove: remove support from list, not affecting its status.
Support Filter

Filter allow user to setup conditions to only show a subset of supports in the support list. This conditions could be: 1. Support Type 2. Support Status 3. Supported Surface Area 4. Location on the XYZ plane. The support filter is a quick way to find and selectively edit specific supports.
41

8.5 Print Settings

- Click Gear button to edit current print setting.

- Click the "Profile Name"

to switch to profile management.

The default profile cannot be deleted. User can created new profiles by copying existing

profiles and edit upon the copy.

Saved Print Profiles

Current Print Profile

Export Copy Delete Existing profiles

42

8.5.1 User Modes

Print Setting Mode: Click the button to switch between Basic, Advanced,Expert mode.
For Basic Mode, the print setting is similar to UP Studio 2. The basic mode although limited but the print settings are highly optimized, with quick selection of basic print parameters, users will able to get excellent print quality. If user is looking for a simple and easy printing experience Basic mode is the best choice.
For Advanced and Expert Mode, a lot more print setting are opened up, much more freedom provided on setting up print parameters but also has bigger risk of adding errors that result in print failure or defects.
After finish setting up the profile, click Apply to save and click "OK" to leave current interface.

Parameters that highlighted in red are modified, once click the apply button, the highlight will be removed.
Parameter Subsets User can use the "Quality"(layer thickness) setting as a subset or grouped setting for related print parameters.
For example when choosing from the preset quality settings, a number of values including those of Quality and Path section will changed. The "pulled" parameters are recommend values of the corresponding quality setting.
User could also use this feature to store a group of settings by click the "+" to copy an existing subset and modify to create their own subset of values or use the "" button to delete an subset.
43

8.6 Introduction to print parameters
Entities of a Part: The model when sliced is divided into different regions or Entities, and each these entities' print setting can be adjusted individually.
Perimeter: The wall/shell of the model. The outter most layer is the "Outter Perimeter", all the perimeter inside the Outter perimeter are "Inner Perimeters" Infill: the region inside the perimeter, can be filled with certain patterns and density Top/Bottom: The roof and bottom layers of the print Support: Automatically generated structure that support the overhang structures Raft: Thick layers that are under the print to improve adhesion and also compensate for unevenness of platform surface. Entity IDs: different entity can be represented with a ID number, these IDs then could be assigned to an extruder, so that the entity will be printed by a specific extruder. Please refer to extruder setting for more info on this topic.

For most up-to-date details of print settings, please go to Tiertime knowledge base: https://support.tiertime.com/xxxxxxxxx

Outter Perimeter (Blue)

Infill

Inner Perimeter (Green)

Support Top Layers
Support Raft

44

Top Layers

Outter Perimeter (Blue)

Inner Perimeter (Green)

Infill
Support Top Layers
Bottom Layers

Support

8.6.1. Slicer Settings

Term
Quality
Layer Thickness
Max. Layer Thickness
Adaptive ratio

Unit Description
mm Layer thickness of print, the bigger the thickness the faster the print speed and lower the print quality.
mm Adaptive layers is to automatically adjust layer thickness base on the overhang angle. Set the largest layer thickness for adaptive layers.
N/A The bigger the adaptive ratio, the more discrete shift from thin to thick layers through overhangs. Overall the algorithm will more inclined to use thicker layers when the ratio increases.

Custom

Layer thick = Max (normal thick, min( thick, normal thick*tan(angle) ))*ratio N/A Custom layer thickness. Allow user to define specific layer thickness for
define height range: Syntax: [start height, end height]layer thickness Eg. [0,10]1.0[25,35]1.0

45

Height: 25-35mm Layer: 1.0 mm

Path Width
Outer Perimeter Inner Perimeter Top Bottom Infill Support Support Space

Height: 0-10mm Layer: 1.0 mm
 For regions that are not defined by custom layer thickness, default layer thickness setting will be used.
 Custom layer thickness will override the adaptive layer function.
mm Line width of the outter most Perimeter mm Line width of the inner perimeter mm Line width of top layers mm Line width of bottom layers mm Line width of inner infills mm Line width of supports mm Horizontal distance between path of support and part.

Top and Bottom
Angle

o

Angle for determining top/bottom layers.

Top Layers

Layer Set the number of top layers

46

Bottom Layers

Layer Set the number of bottom layers

Min. Area Expand

mm2 Threshold area for top and bottom mm Expand the area of top and bottom.

Support
Angle

o

Angle Threshold for support, the larger this angle the more support will be

generated

Layer

Layer Number of interface layer (Support Top Layer) between object and support column. Support top layer also added between raft and part bottom surface, so this option will also increase apparent thickness of raft stucture.

Min. Area Min. Length Stretch Angle
Suspend Lift Top Lift

mm Area Threshold of overhang surface, overhang area smaller than this will not

be supported.

mm Length Threshold of overhang edge. Overhang edge shorter than this will

not be supported.

o

The angle to expand the base of support column. Refer to xxx page.

mm Only applied to point or edge features.Top lift represent the height which the support will "wrap" above the actual supporting point or edge. If the

47

part contain pointy features that is facing down, it is recommend to increase top lift options.

Raft
Layer Thick Base Width Expand
Mode

Layer How many layer the raft will consist mm Layer thickness of raft mm Path width of the first 2 layers of raft mm How much to expand from the perimeter of the bottom layer for the raft
layer N/A Raft infill mode, Profile is for Tiertime printer only, the raft is generated
by printer. The pattern is not visible at this stage. The hatch and offset are for non-Tiertime printer, Tiertime machines cannot use these 2 types.

8.6.2 Path
Term
Path Mode
Profile/Perimeter

Unit Description
N/A

Infill Density

%

Density of the infill pattern, 100%=solid infill, 0%=no infill

Support Density

mm Determine line density of the support column, the large the value the more
48

stable to support but also use more material and more difficult to remove.

Full Fill Area
Infill Path
Top/Bottom Fill Inner Fill Support Fill Infill Perimeters
Support Perimeters

mm2 Area threshold that override density to full/solid Infill. Area smaller than this value will be printed 100% infill.
N/A Infill pattern for Top/Bottom
Offset/Zigzag/Line N/A Infill pattern for Inner Fill
Offset/Zigzag/Line N/A Infill pattern for Support Fill
Offset/Zigzag/Line N/A Extra inner perimeter for infill
None: no infill perimeter Always: Always print infill perimeter Alternate: print infill perimeter alternately, this option may increase the contact surface area between perimeter and infill thus increase the bond strength
N/A Add a single perimeter to support column to increase stability of support but may make support more difficult to remove.

Fill Angle

ON

OFF

o

The starting angle of infill pattern

Angle Increase

o

Fill Angle increase after each layer

49

Angle Increase = 30o

Layer 1

Layer 2

Layer 3

Final Pattern

Angle Increase = 45o

Layer 1

Layer 2

Layer 3

Final Pattern

Angle Increase = 90o

Layer 1

Layer 2

Layer 3

Final Pattern

Support Angle 1

o

Angle of support infill

Support Angle 2

o

Angle of sparse support infill

50

Profile/Fill Overlap Bottom Overlap

N/A Overlap ratio between Perimeter and Infill N/A Overlap ratio between Perimeter and infill for the bottom layer

8.6.3.Special
Special Options
Fill Mode

N/A Fill = Perimeter+infill+top/bottom Shell = Perimeter+top/bottom (no infill) Vase = Perimeter only (no infill, no top/bottom)

Perimeter Gap Tolerance
Fuse Gap

mm mm +0.1 = X and Y plane both increase 0.1mm in size
mm Radius for small gap to be fused.

Thin Wall

Features that are not printable due to to small/thin will be retained and

force printed. Dimensional accrucy may be compromised when checked but

all features are preserved.

Hole Shrink

(only applied to vertical holes on a part, expand small holes to counter the hole shrink effect)

51

Max. Radius
Ratio
Max Shrink Entity ID Profile Inner Profile Top Bottom Infill Support Support Hatch Raft

mm Threshold for applying shrink compensation, holes larger than this diameter value will be ignored.
N/A The bigger this value the more compensation for small holes
N/A Set max. Shrink ratio for compensation
different regions of a print, are marked with an entity ID, so that they can be assign to different extruders to print. The entity IDs are used in the Extruder Settings.

8.6.4 Speed
Profile Inner Profiles Bottom and Top Fill Support Support Hatch Jerk Jerk Length Raft Raft Base Jump

mm/s mm/s mm/s mm/s mm/s mm/s ? mm mm/s mm/s mm/s

Print speed of Perimeters Print speed of Inner Perimeters Print speed of Bottom and Top Print speed of Fill Print speed of Support Print speed of Support Fill Print speed of Short path Define Max. Length of short path Print speed of raft layers Print speed of first layer of raft Speed of jumps (non- printing movements of extruder)

8.6.5 Temperature

Temperature Tune

Profile Tune


Infill Tune


Support Tune


Raft Tune


Support Peel

Bond Strength

%

Extrude Scale

Profile

N/A

Inner Profile

N/A

Top

N/A

Bottom

N/A

Support

N/A

Jerk

N/A

Raft

N/A

Raft Base

N/A

Set increase/decrease of nozzle temperature when printing Perimeters Set increase/decrease of nozzle temperature when printing Infill Set increase/decrease of nozzle temperature when printing Support Set increase/decrease of nozzle temperature when printing Raft
Define the bond strength between part and support.
Extrusion scale of perimeter, value larger than 1 means increasing extrusion amount, value smaller than 1 means reducing extrusion. Set extrusion scale of inner profile Set extrusion scale of top layer Set extrusion scale of bottom layers Set extrusion scale of support Set extrusion scale of short paths Set extrusion scale of raft Set extrusion scale of first layer of raft

52

8.6.6 Seams Settings

Start Optimize Layer Start Fixed Start X Fixed Start Y Profile Start Join Size Join Extend Join Cross Infill dog Speed Down
Slowest Speed
Short Profile
Min. Layer Time
Firsts Layer Speed
Other Options
Platform Preheat
Sleep

Preference for layer start point Define start point on X coordinate. Define start point on Y coordinate. Preference of Start base perimeter features % Size of join mm How much the join extend and reach into infill area. Whether make the join to cross-path

mm/ Define slowest speed for short perimeter

s

mm/ Define length of short perimeter for applying speed down

s

s

Define the minimum duration a layer must spend. Ensure enough cooling

time for part.
% Speed down percentage for the 1st layer. Slow down for first

layer could improve layer adhesion to platform, increase print

success rate.

Preheat platform for max.15 minutes before printing starts. Within 15 minutes, printing will start as soon as target temp reach. De-initialize the printer when current print job finishs. When De-initialized, the printer consume less power and produce lower noise.

8.6.6 Printer

Printer Configuration

Manufacturer

Brand/Producer of printer

Model ID

Printer Model

Origin

X

N/A X-coordinate for origin

Y

N/A Y-coordinate for origin

Z

N/A Z-coordinate for origin

Build Size

X

mm X-axis range

Y

mm Y-axis range

Z

mm Z-axis range

Acceleration
Profile Infill Support Jump

mm/s2 mm/s2 mm/s2 mm/s2

Acceleration for Perimeters Acceleration for Infill Acceleration for Support Acceleration for non-printing movements

8.6.7 Extruder

53

Extruder 1 Filament Nozzle Diameter Scale Factor Entity ID X Offset Y Offset Z Offset Switch Code Extruder 2
8.6.8 Script
Print Start Print End Layer Start Layer End Profile Start Profile End Infill Start Infill End Support Start Support End Path Start Path End

Choose material profiles, from Mat Lib Select the nozzle diameter Extrusion Scale for the extruder (Result similar to E steps) Input the entites assigned for this extruder Offset value for X axis, use for nozzle alignment for multiple extruders Offset value for Y axis, use for nozzle alignment for multiple extruders Offset value for Z axis, use for nozzle alignment for multiple extruders Gcode used for switching extruder Switch on/off extruder 2
Script insertion locations. User could insert Gcodes at these location for customized functions. Accepted Gcodes:
G0: linear Move G1: fast linear move G4: Dwell G28: Move to Origin (Home) G90: Set to Absolute Positioning G91: Set to Relative Positioning G92: Set Position, only support A axis reset. M0: Stop or Unconditional stop M1: Sleep or Conditional stop M2: Program End M25: Pause SD print M42: Switch I/O pin;eg.M42 P15 S0 or S1,port 15,s0=off,s1=on M73: Set build percentage M80: ATX Power On M81: ATX Power Off M82: Set extruder to absolute mode M83: Set extruder to relative mode M92: Set axis_steps_per_unit M104: Set Extruder Temperature M109: Set Extruder Temperature and Wait, Example M109 S215 M140: Set Bed Temperature (Fast) M141: Set Chamber Temperature (Fast) M190: Wait for bed temperature to reach target temp M191: Wait for chamber temperature to reach target temp M204: Set default acceleration M206: Offset axes

54

Chapter 9. Material Library (Mat Lib) and Custom Materials

Filament Type Material ID
Manufacturer Fila. Dia. Density Cost/Kg Print Speed Ratio Max Raft Speed
Retract Speed
Max Length Min Travel
Ratio Temperature Print Standby Platform Shrink X Y Z

Select material profile Material Type: can only choose from preset types A unique number for matching materials. E.g..Tsk file's material ID must match printer's material ID in order to print. Name of Material manufacturer mm Filament Diameter, this value will affect the extrusion scale g/cm3 Density of material, use for estimate $/kg User defined for their own reference
N/A A coefficient that apply to all speed values. mm/s Max first layer speed of raft. If faster than this value, will be
override by this value.
mm/s Speed for retraction, the faster the retraction the less likely to have stringing effect during jumping. But it will also put stress on extrusion mechanism and the optimal speed depends on hardware.
mm Max possible length for a single retraction mm The distance threshold for retraction, if movement is smaller
than this value, retraction will not be applied. N/A Actual retraction length = Ratio* Travel.
 Base temperature for printing  Temperature when standby (during dual extrusion)  Platform temperature
% X-axis compensation for material shrinkage after cooling % Y-axis compensation for material shrinkage after cooling % Z-axis compensation for material shrinkage after cooling

55

Chapter 10. Part Sub-setting

Model Print Profile

Save Mesh

Add Child Model Delete Model

Add Child Profile Link to Main Setting

Save Mesh Delete Model Add Child Model Model Print Profile
Add Child Profile
Link to Main Setting

Save the model to .UP3 format Delete the model from the part list Add a child model, please refer to "Part Optimization" Click to edit the print profile for the model, settings changed only apply to this model and will not be affecting other models on the list. Set height range and specify the print profile for the section, please refer to "Part Optimization". Chain icon means, main setting will affect the value of the print profile of this model. Broken chain means

Part Optimization
1. Optimize along Z axis User could add child print profile to customize settings just for a particular height range.

56

End point

Height range

Click the gear button to modify print profile for the height range.

Start point

Use chain button to link or unlink from the part profile. Use cross button to delete the child profile.

Setting child profile is same setting of main profile. However some settings are not available in child profiles, eg. Layer thickenss. Child profile allow user to adjust print speed, temperature, extrusion scale, infill density, and etc for a particular vertical section of the part

2. Optimize on X-Y plane Use child model could allow user to optimize the part on another dimension.

1. Click "+" button add child a cylinder is added as a child model for the cube.
model. 2. Select the type of child model and define the dimensions.

For the child model, user could define the property as union, subtract or select a infill density.

Union: fuse child model into Subtract: child model is

the main model.

subtracted from the main

model.

Infill: modify the infill percentage of at the overlapped region.

57

15%
(main model)
Support and Raft generation do not apply to child models.

100% (child model)

58

Chapter 11. "Wand" - the Printer Hosting Software
UP Studio 3.0 is a package that includes two softwares; UP Studio now become an independent slicer and the printer hosting functions were spin off into a new software called "Wand"
UP Studio 3.0 only handle modeling slicing and all printer communication, operation and maintenance functions are moved to Wand. Therefore when after slicing, user need to save the sliced data (.tsk) to hard drive and then use Wand to send the .tsk file to the printer.
11.1 Wand Interface

1. Printer connection 2. Printer Status

Show serial number (default)/printer name of connected machines. User could select auto connect with the top right button. Click + to connect or click X to disconnect printer
:Printer Status

:nozzle temperature :platform temperature

3. X-Y axes Control

:current axial coordinates. Platform Map, click the squares to move the print head to

59

4. Z-axis Control 5. Extruder Settings 6. Maintenance 7. Printer Info

corresponding X-Y location on the platform. Red square( ) indicate current location Z axis indicator: black dot indicate current Z location of print head.
click to move print head long Z axis for a small distance
click to move the print head long Z axis continuous until reach the end
: current material setting use for the extruder : current material weight left in spool that loaded to the extruder : current nozzle setting for the extruder
: click to initialize printer
: Setup nozzle height value
: Setup leveling of printer platform : load a file to print :Stop printer action immediately.

60

7.4 Wi-Fi Connection
1, Connect your UP300D with a USB cable to your computer, 2. Open Wand module on your computer and connect to printer. 3. Double click the name of the printer on the printer list on top. This will bring up a network setting window.
At the WLAN drop down menu, choose the WiFi network to connect. Then enter the password for the network. You can now unplug the USB cable, and connect your computer to the Wi-Fi network that you set for theUP300D.

7.5 Ethernet Connection
Plug in an ethernet cable into the LAN port on the back ofUP300D, when connection is established,a LAN icon will appear on the touchscreen.

7.6 Editing Network Configuration

When connected to a network, click the edit button

will bring the detail network

setting page. Use may edit the settings here to suit their network requirements.

61

62

Chapter 12. Touchscreen Introduction
Tiertime UP600Touchscreen consists of two sections, the Printer Status Bar and theMain Menu.

12.1 Printer Status Bar
The Printer Status Bar is at the top of the UP600Touchscreen, which is easy for you to monitor the printer's status regularly.

Nozzle1 Nozzle2 Platform Ethernet

WiFi

Private Material

Temp.

Temp.

Temp.

Weight 1/Weight 2

1. Temperature: during printing, nozzle temperature will be displayed in percentage. When print idle the temperature display is in degree Celsius.
2. Ethernet: If It appears, indicates the Ethernet is connected..
3. Wi-Fi: It shows the Wi-Fi network is connected
means network detected but cannot connect to printer.
4. Private: This lock icon indicates whether the printer has been set as private. Private printers connections are password protected. It only works for WiFi, USB connection will override the protection.
5. Material Weight: This icon represents the material's type name and the remaining weight of the current material roll. (It may appear alternatively as Name/ Weight)

63

12.2 Main Menu
There are six buttons in the Main Menu: Material, Print, Calibrate, Information, Config, and Initialize.

The following table lists all the information of icons in the Main Menu and summarizes the actions associated with each icon.

Initialize
Material Print
Calibrate Information
Network

The printer must be initialize first before printing.
The Material, Calibration and Print buttons on the Main menu of the touchscreen will be greyed out before the printer is properly initialized.
1. Change Material Type 2. Withdraw Material 3. Extrude Material 4. Set Material Weight
1. Print Job Current List 2. Print Job History List (Print Task Management) 3. Print Job's Details 3. Pause the ongoing print job, and change the material.
1. Auto Nozzle Height Detection 2. Set Nozzle Height Manually
1. Basic Printer Information: Model Name, Serial Number, Firmware Version, Screen Version, Total Print Time, Total Weight of the Material Consumed, LAN M.A.C., WLAN M.A.C.. 2. Reset Printer Profile. 3. System Language Settings.
Setup Wifi and view network settings

Config

Machine Settings: button sound, wifi, autolevel, auto update, password, email notification

64

12.3 Material
In the material section, there are Extrude, Withdraw, Change Material Type and Set Total Weight buttons functions. To change the material type, click the Material Type button, and then input your filament's weight by press +/- button. Make sure the material settings properly reflect real situations, because wrong setting could result in print failure or compromised print quality. For Dual extrusion the machine will able to recongize the dual extruder and teh material interface will automatically display 2 filament options: Fliament 1 is main material, Filament 2 is for support material.

Withdraw Extrude
Stop

Click the Withdraw icon.The up arrow on the button will start moving upwards, indicating the extruder is heating up. The extruder will start pushing the filament out once the temperature reaches the melting temperature with a beep.

Click the Extrude icon. The down arrow on the button will start moving downwards, indicating the extruder is heating up. Once the extruder temperature reaches the filament's melting point, the machine will start
to extrude filament.

To stop the printer in the middle of an extruding or withdrawing

STO P

process.

Material Type
ABS
Material Weight

A B S 9999gThe button will display the material profile name. Click the Material Type icon button to change the material type/profile.
500g
To change the total weight the material remaining manually. The material weight will be adjusted automatically based on how much the material is consumed by print jobs.

Nozzle Diameter

Press this button to choose between available nozzle diameters.

65

12.4 Print
In the Print section, you can start a print job or manage the print jobs that currently in the print queue or have finished.
H istory
Entering the history list of the print jobs which has previously been printed on the printer, or ended with errors.

The Print Job Current Listdisplaythe print jobs that have been assigned to the printer. Press the print job on the list to open up the print job detail page.

When USB drive is plugged, this button become available. Press this button the browse USB drive content.

Start a Print Print Job Information

Printing

Paused Printing

66

Pause Resume
Stop Extrude Withdraw

Pause the on-going print job. Resume the paused print job. The printer will stop the print job completely. To extrude the inserted filament. To withdraw the inserted filament.

12.5 Calibrate
The nozzle height of a printer is a key parameter that needs properly set before any print jobs. It can be calibrated manually or set automatically.
Click Auto on the touchscreen, the printer will go through a mechanical process to detect the nozzle height. The final nozzle height will appear on the screen after the whole process finishes:

Nozzle Height 6xx.xx mm

Live nozzle Height

20.0 m m

Edit

E dit

Exit

The actual nozzle height value. Indicating the present nozzle height.
Using +/- to adjust the nozzle height manually.
To edit the nozzle height by inputing numbers manually. Exit Calibration section and back to main menu.

67

12.6 Information
In this section, it displays all the information of your printer, which is not editable.

 Model: The ModelName of your printer's model.  S.N.: Your printer's ID, which will be required if you look for customer service.  Firmware Ver.: Stands for firmware version of your printer.  Screen Vers.: Stands for the touchscreen version. You can check whether your
touchscreen is operating using the latest touchscreen system.  Total Time: This represents the total printing time of your printer from the
beginning.  Total Weight: This indicates the total material weight which accumulated from
the first print.  LAN M.A.C: The unique LAN M.A.C address of your printer in Ethernet .  WLAN M.A.C: It's the unique printer's M.A.C address in your Wi-Fi network.

Reset

This reset button will erase the following three setsof values which has been stored in your printer. Calibration -> Nozzle height, to 0mm. Material -> Material type set to ABS, and total weight set to 500g. Config -> Name to its defaulted S.N number.

Language

There are two types of languages available for you to choose, Simplified Chinese and English.

68

12.7 Config
Config section contains five parameters, and the Network Settings .

Name: Sound:

it's the printer's name, you can change it on the Wand moduel. The default name is the printer's S.N number. Toggle the click sound while using touchscreen.

Preheat: Toggle the build plate preheating option. If it is on, the machine will start pre-heating
15 minutes ahead of the start of the print job.

You can read the introduction of Preheating in Maintenance -> Preheat in the Software User Manual.

Private:

Toggle the printer to set a password for private use. Once this option is on, you can set a password for your printer and your printer will not be accessible by other users on the same network without obtaining the password.

Passwor The password for the printer to protect your printer from other people's access. Click

d:

the text field to enter your password.

69

12.8 Network Connection
Wi-Fi Network Connection and Settings:
1. Go to Network Settings Section.

2. Find the desired Wi-Fi Network's name in the list below.

3. Tap the name to connect the Wi-Fi Network. If the WiFi is protected by password, the keypad page will appear to allow password input.
4. The UP600 is connect to the Wi-Fi Network successfully, when the red exclamation mark disappeared, a interlock and Information icon appears.

Wi-Fi Networks
Wi-Fi Name
Connection Status Network
Information Password Required
Refresh

T iertim e- 0 1

Toggle the option to allow the printer connect to Wi-Fi networks. Choose the name of the network to connect to
This icon indicates the printer has been connected to this Wi-Fi network.
Click the Network Information icon to enter network information editing page. The network requiresthe password to connect.
Refresh the Wi-Fi network list.

70

Page

5 /2 0

Click to enter the next page.

Ethernet Network Settings: 1. Plug an Ethernet cable to the LAN socket at the back of UP600.
2. The Ethernet connection Status icon should be appear in the Printer Status Bar. 3. You now can go to Network Settings section.
4. Click Information button to check the printer's Ethernet Settings.

The following descriptions also applies for Wi-Fi network settings.

Static IP

192.168.xx.x.xx

Toggle the static IP option to edit following settings for static IP.
This is printer's IP address in the network. Click the text field to edit, click Return to save and exit editing.

Mask Gateway

255.255.xxx.xxx 192.168.xx.xxx

This is printer's mask in the network. Click the text field to edit, click Return to save and exit editing.
This is where you define the printer's Network gateway. Click the text field to edit, click Return to save and exit editing.

DNS

192.168.xx.xx

Domain Name Server Address. Click the text field to edit, click Return to save and exit editing.

71

Chapter 13. Print Boards
There are two build plates in the UP600 package.

13.1 Perf Glass Boards
The one with many small holes on one side of the board. Perforated surface has the strongest surface adhesion when used with raft setting. It is made for printing material with high shrinkage ratio that tend to warp during printing and frequently used in conjunction with the HT extruder. Use this print board for: ABS, PC, Nylon, PP and etc.

13.2 Flex Glass Board
The Flex board is made by adding a layer of plastic sheet onto the Perforated surface. (Although extra layer of material is added the total thickness of Flex Galss is same as Perf Glass). It is made for materials that has low shrinkage ratio, so that they do not warp as much as material mention above. Use this print board for: PLA, PETG, PET, TPU and etc.

13.3 Glass Surface
Both build plate have glass side that can be used for printing. It is similar to Flex board in terms of suitable material. User can use the Glass side and print with raft turned off to obtain a flat smooth surface. However the machine need to leveled mechanically and the nozzle the height value may need to be adjusted (offset) for optimal result.

Perforate Surface

"Flex" Surface

Glass

Suitable Material

Suitable Materials

ABS, PC, Nylon, PP and etc. PLA, PETG, PET, TPU and etc.

*Flex/ Perf Glass Board: Glass boards could break if dropped. Please handle with care.

72

Chapter 13. Extruders
UP600 has following extruder options: 1. LT* Single Extruder (Included) 2. Convergence Dual Extruder (Optional) 3. HT* Single Extruder (Optional)
*HT=high temperture, LT=low temperature
14.1 Single Extrusion Print Heads
HT Single Extruder

There are 2 types of single extruders available: HT type and LT type. Following is table summarizing the properties of different extruders. For Convergence Dual, only listed material pair are recommend to use on the extruder, unverified material pairs may not be printable using the extruder.

Extruder Type
Convergence Dual Extruder

Filament Diameter

Maximum Temperature
300C

Main Material
ABS PLA

ABS Type TPU Type

1.75mm

300C 280C

PLA ABS, PC, PP, PA, HIPS, ASA, etc PLA, PETG, TPU, TPE, PET, etc

Support Material
Tiertime Breakaway Tiertime PVA (water soluble) Tiertime Breakaway

73

14.2 Convergence Dual Extruder
The extruder although has similar size of a single extrusion extruder but essentially it is two extruders made into one. The Convergence dual uses a direct extrusion design and has 2 gearbox-stepper motors build into it. It has two cooling fans, one for cooling the hotend and the other is a toolpath coupled fan for cooling printed models.

Filament 1

Filament 2

Convergence Dual Extruder

Gearbox Stepper motor

Exruder Circuit Board
Extrusion Block

Part Cooling Fan

Heater Block Nozzle

Convergence Dual is a patented technology by Tiertime. The Convergence hotend has two channels "converge" at one nozzle opening, the two channels can extrude different materials alternately. Since the two extrusions share a single nozzle, there is no need for nozzle alignment calibration. The two material will always be aligned perfectly.

74

Chapter 15. Maintenance
15.1 Replacing Nozzle:
1. Wear heat resistance gloves and use the included nozzle wrench. 2. The nozzle must be removed while the extruder is heated up to near printing temperature. When extruder heated up, use the nozzle wrench to unscrew the nozzle. 3. Put on the new nozzle 4. Heat up the extruder again and tighten the nozzle with wrench.
0.4mm nozzle (with PTFE Cap)
When the nozzle is cool, it will be too tight to be removed and unscrew the nozzle with force will destroy the hotend! Nozzle Height value must be updated after change nozzle!
15. 2 Change Extruder.
Refer to page xxx
75

15.3 Extruder Maintenace
15.3.1 Single Extruder 1. Withdraw any filament currently load into the extruder. 2. Remove the cover for CFC cable. 3. Unplug the extruder CFC cable. 4. Usethe include M4 Allen key to unscrew the screw on the left side of the extruder, remove the extruder, and then position the replacement extruder in the right place, tighten the screw, and plug in the extruder cable.
4. Unplug the fans. Pull out the extruder casing (gently).
Extruder Fan
5. Extruder Internal Structures.
76

Heat Sink

Extrusion Gear

Heater Module

Extruder Motor cable

Heater Module cable

6. Remove heater module and heat sink.

1. Remove the 2xM3 screws holding the heat sink to extruder motor.

2. Remove 2xM2.5 screws, remove the printed PCB mount and release the PCB and unplug the heater cable.

Remove the M2.5 screw to releae the small

77

15.3.2 Convergence Dual
Replacing heater module.
1. Unplug the CFC cable on the extruder. Remove the M4 screw on the right side of the extruder.
2. Unplug the 2 cables of the fans.
3. Pull off the extruder cover.
78

4. Remove 2xM2.5 hex screws to remove the smaller fan.
5. Remove 4xM3 hex screws above the hotend module.
6. Unplug the 2x cables of heater modules and cut the ziptide to separate the heater module.
15.3.3 Releasing the heater block
1 Remove the mounting block from heater module. Unscrew the 2xM3 hex screws.
79

2 Remove the 2xM3 hex screws that press hold the heater block onto the heatsinks.
3 Remove the 4xM2.5 hex screws to release the PEEK filament entrance (brownish part). This will expose the PTFE tube inside the heater block.
4 Remove the 2xM2.5 hex screws from the wind shield so that the heatsink separate into two parts. Then each heatsink can be released from the heater block.
80

15.3.4 Remove/Replace Stepper Motor
The stepper motor's gearbox may worn out over time. The stepper motor can be replaced invdividually. User may also use this method to clean the extrusion gear, as overtime the gear may be covered with debris of plastics. 1. Remove the 2xM3 hex screws and unplug
the correspeonding motor cable from extruder PCB.
2. Pull the motor out from the motor plate (with some force).
81

15.3.5 Remove the extrude block.
The extruder block can be remove without disassembling other parts. This Method could be useful for cleaning or fixing a clog. 1 Remove the 2xM2.5 hex screws.
2 Pull out the extruder block, then turn it for 90o so that is it is vertical and remove it from the extrusion mechanism.
3 The filament and extrusion gear will be expose for maintenance.
15.4 Unclogging Extruder.
When extruder unable to extrude filament, very likely a blockage or partial blockage is formed somewhere in the channel of the hotend.
82

15.4.1 Partial Blockage
A partially blocked extruder will under-extrude and has following symptoms: 1. Spaghetti or spiral like extrusion when use the manual extrude function of Wand. Normally the extrusion should be straight. 2. Extrusion line is thinner and the part produce become very weak and sponge like. 3. Visible uneven layers. Partial blockage are usually take place at nozzle, so change a new nozzle will likely solve the problem. If under extrusion persist after nozzle change, could be the issue of print parameters.
15.4.2 Completely Blockage
A complete blockage prevents filament to be extruded. The symptoms could be filament grinding at extruder wheel or the extruder produce clunky noise. The blockage could be at the nozzle or at the heater module or sometimes at the spool. 1. The first step is to determine where is the blockage, so first check if the unreeling of spool is normal, sometimes the filament become tangled therefore no filament can be extruded. 2. If the spool is normal, then remove the nozzle (remeber to heat up the extruder first) and try extrude filament without the nozzle. If filament can be extrude well then the blockage is at the nozzle, just replace a new nozzle to restore printing. 3. If the extrusion is still blocked with the nozzle taken off, then the blockage is at the heater module. This situation is more difficult to resolve and more likely to happen in Convergence Dual extruder.
15.4.3 Remove blockage at heater module
1. Try heat up the extruder with temperature that is higher than normal, eg. For PLA the melting temp is 210, user may heat up to 280. Then use the push pin (included in accessory kit) to push from top filament entry all the way through the heater block.
83

2. If pushing from top entry is not working, then try push from bottom entry when the nozzle is attached. Becareful not touch the heater block, wear gloves included. 3. If the pushing from both side are not working, user can try to remove the heater module from the extruder, refer to previous pages of this chapter. Remove the PTFE tubes in the heater module and then heat up the heater block on a torch light/bunsen burner/alcohol lamp/stove flame. User may need to use tool to hold the heater block instead hold it by hand and try push out the blockage. 4. If still cannot clean the heater block, the ultimate methods are to submerge the part in acetone to dissolve the blockage or to heat the heater module on flame until the blocking matter burn to ashes.
15.4Dual Filtration System
UP600 hasHEPA Filter and the Activated Carbon Filter. Both of the filters are located inside the build chamber, circulating the air internally to reduce the toxic particles generated during the 3D printing process. We suggest you change the filter every 3 months, or every 300 hours active printing time. You can purchase the new filtersfrom the official Tiertime online store, https://shop.tiertime.com, or from local resellers The filter system is located at the far side of the build chamber and have to be changed from the back of the machine.
84

1. Use a screwdriver to unscrew the 4x screws on the lower panel, remove the cover.
2. Remove the slot cover by loosening 3x screws.
3. The filters casettes will slide down from the filter unit, replace filters and put back the panels.
85

Chapter 16. Specification

Printing technology

MEM (Melted Extrusion Modelling)

Extruder
Nozzle Diameter
Extruder Maximum Temperature Extruder Maximum Travel Speed XYZ Accuracy Connectivity Display
Build Volume
Printed Object Accuracy Layer Resolution

Single/Dual 0.2mm, 0.4mm,0.5mm, 0.6mm Only 0.4mm for Dual Extrusion) 299
200 mm/sec
2, 2, 0.5 micron
USB cable, Wi-Fi, LAN and USB Stick
4.3 Full Colored LCD Touchscreen
205 � 255 � 225mm (8.7 x 10 x 8.8)(XYZ)
�0.1mm/100mm
0.05/0.1/0.15/0.2/0.25/0.3/0.35/0.4mm

Calibration and Leveling

Automatic

Build Plate Maximum Temperature

100

Print Board

Perf Glass Board or Flex Glass Board, Heated

Enclosure

Full

Dual Filtration System

HEPA and Activated carbon filters V2

Supported Materials

UP Fila ABS, ABS+, PLA , TPU and more

Filament Diameter Filament Spool Compatibility Tiertime Print Queue Pause to Change Filament Type

1.75mm 500 - 1000g Yes Yes

Out of Filament Detection

Yes

Compatible with 3rd party Materials Yes

Physical dimensions

Machine Dimensions

500x523x460 mm (19.6 x 20.5 x 18.1)

Net Weight Input

30kg Power requirements
110-240VAC50-60Hz220W

Extra USB Input for Add-on

5V, 1A Software

Software

UP Studio

Supported OS

Windows 7 SP1 or later, Mac OS X, iOS 8.x/9.x

Hardware Requirements
Supported File Formats
Preview Support Structures Editable Support Structures Cloud Print Settings

OpenGL 2.0, At least 4GB of RAM up3, .ups, .tsk .stl, .obj, .3mf, .ply, .off, .3ds, .g code Yes Yes Yes

Ambient Environment Operating Ambient Temperatures 15 - 3020 - 70 RH non

86

Chapter 17. Customer Service and Community

Support Ticket

Email to support@tiertime.com

Knowledge Base: https://support.tiertime.com

User forum:

https://forum.tiertime.com

Facebook Group

https://www.facebook.com/grou ps/205337203341609/

Facebook Page

facebook.com/tiertime

Youtube Channel youtube.com/tiertime

87

Twitter

twitter.com/tiertimecorp

Instagram

instagram.com/tiertime

88

FCC warning statements:
This equipment has been tested and found to comply with the limits for a Class B digital device, pursuant to part 15 of the FCC Rules. These limits are designed to provide reasonable protection against harmful interference in a residential installation. This equipment generates, uses and can radiate radio frequency energy and, if not installed and used in accordance with the instructions, may cause harmful interference to radio communications. However, there is no guarantee that interference will not occur in a particular installation. If this equipment does cause harmful interference to radio or television reception, which can be determined by turning the equipment off and on, the user is encouraged to try to correct the interference by one or more of the following measures: � Reorient or relocate the receiving antenna. � Increase the separation between the equipment and receiver. � Connect the equipment into an outlet on a circuit different from that to which the receiver is connected. � Consult the dealer or an experienced radio/TV technician for help. Caution: Any changes or modifications to this device not explicitly approved by manufacturer could void your authority to operate this equipment. This device complies with part 15 of the FCC Rules. Operation is subject to the following two conditions: (1) This device may not cause harmful interference, and (2) this device must accept any interference received, including interference that may cause undesired operation. The device has been evaluated to meet general RF exposure requirement.
89