AMAX VA-1000 Drone Camera and Video Recorder User Guide
Your complete guide to operating and maintaining the VA-1000 drone.
On-Board Camera and Video Recorder
The VA-1000 is equipped with an onboard digital camera (1280x720 pixel, 25 frames per second) for aerial photography and videos.
Getting Started with Your Camera
- One microSD card (not included)
- One microSD card reader (included)
- A computer with a USB port and a media player compatible with AVI files (not included)
Formatting Your microSD Card
To format your microSD card, insert it into the included USB SD card reader and plug it into your computer's USB port. An icon will appear on your Desktop. Right-click the icon and follow instructions to format.
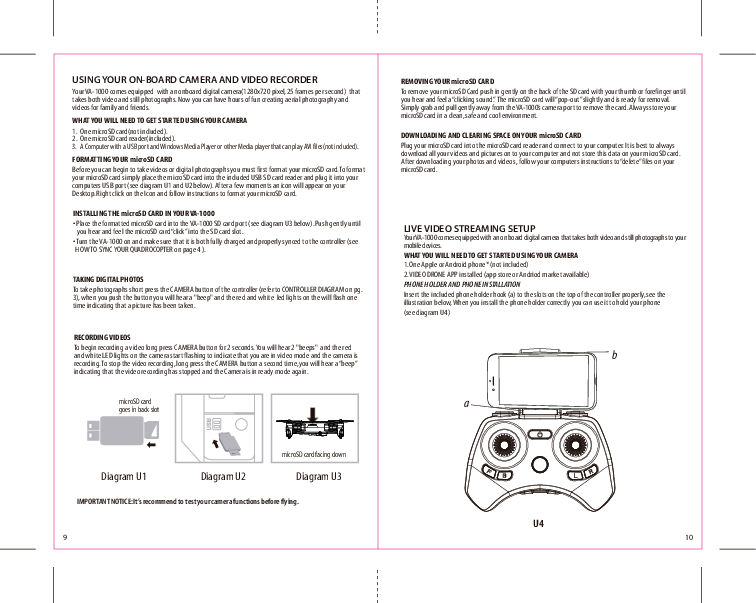
Installing the microSD Card in Your VA-1000
- Place the formatted microSD card into the VA-1000 SD card port. Push gently until you hear and feel a "click".
- Turn the VA-1000 on, ensure it is fully charged, and properly synced to the controller.
Taking Digital Photos
Short press the CAMERA button on the controller. You will hear a "beep" and the red and white LED lights will flash once, indicating a picture has been taken.
Recording Videos
Long press the CAMERA button for 2 seconds. You will hear 2 "beeps" and the red and white LED lights will flash, indicating recording. To stop, long press the CAMERA button again; you will hear a "beep" and the camera will return to ready mode.
Removing Your microSD Card
Push gently on the back of the SD card until you hear a "clicking sound". The microSD card will "pop-out" slightly. Gently pull the card away from the VA-1000's camera port. Store the microSD card in a clean, safe, and cool environment.
Downloading and Clearing Space on Your microSD Card
Plug your microSD card into the microSD card reader and connect to your computer. Download all videos and pictures to your computer. Follow your computer's instructions to "delete" files from your microSD card after downloading.
Important Notice: It's recommended to test your camera functions before flying.
Live Video Streaming Setup
The VA-1000 is equipped with an on-board digital camera that takes both video and still photographs to your mobile devices.
What You Will Need to Get Started Using Your Camera
- One Apple® or Android™ phone (not included)
- VIDEO DRONE APP installed (available in app stores)
Phone Holder and Phone Installation
Insert the included phone holder hook into the slots on the top of the controller. When installed correctly, it can hold your phone.
VA-1000 WiFi App Installation
- Ensure you are using a compatible Android™ or Apple® iOS device with Internet access.
- For Apple® iOS devices, search and select "VIDEO DRONE" in the App Store, then install.
- For Android™ OS devices, search for "VIDEO DRONE" in the Google Play store, then install.
- After installation, click the "VIDEO DRONE" icon to run the App and verify installation.
Note: Apple® devices require iOS 7.0 or higher. Android™ devices require OS 4.2.2 or higher.
Pairing VA-1000 to Your Compatible Device
- After charging the VA-1000 battery, install it into the VA-1000.
- In your device's Settings menu, locate the Wi-Fi option.
- Turn ON the Wi-Fi option.
- Select the "VIDEO DRONE" Wi-Fi network. Enter the 8-digit password attached to the network to activate your account. Return to the Main Menu.
Quick Start (App Usage)
- Open the "VIDEO DRONE" App icon. Tap "START" on the bottom right. You should see real-time video streaming.
- To control the VA-1000 via your mobile device, tap the "ON" button at the top right. Click the motor start icon (a circle with a triangle inside) to start the motors. Control sticks will appear.
- Click the camera icon (a camera symbol) to take still pictures. Pictures are stored on your mobile device.
- To record videos, click the video icon (a circle with a dot inside). A timer will start. Video footage is stored on your mobile device.
- Click the folder icon (a folder symbol) to view pictures and videos.
Troubleshooting Your VA-1000
| Problem | Possible Cause | Possible Solution |
|---|---|---|
| No Power |
|
|
| Aircraft Not Responding |
|
|
| Aircraft Won't Lift Off |
|
|
| Aircraft Spins, cannot be trimmed | Rotor deformation or bad motor | Replace the damaged rotor (consult customer service if needed) |
| Aircraft Tilt to one direction | Aircraft did not calibrate properly | Restart the aircraft and controller, calibrate on a flat level surface |
| Altitude Hold height not stable | Aircraft vibrates too much | Check the propeller deformation |
If you're still encountering difficulties, please contact AMAX Group USA customer service at customercare@amaxbrands.com.
Replacing the Propeller Blades
The VA-1000's propeller system is a precision instrument. Crash landing may cause damage to propellers.
- The VA-1000 has four sets of blades: two sets (A & B) on the front, and two sets (B & A) on the rear.
- When replacing, match the indication markings on the blades.
- Unscrew and take off the damaged blade.
- Replace with new correct blade.
Blade Front Left = A, Blade Front Right = B, Blade Back Left = B, Blade Back Right = A.
Blades Guard Installation
The VA-1000 comes with blade guards for safety. Simply attach the 4 blade guards to each landing gear.
VA-1000 Warnings
The VA-1000 is designed for INDOOR & OUTDOOR use. Blades revolve at high speeds and can cause damage. Stay away from the VA-1000 to reduce risk of injury. Warn spectators. Inspect rotor blades before flight.
General Warnings
- Choking/Cutting Hazard: Small Parts/Sharp Rotor Blades.
- Keep hands, hair, and loose clothing away from the propeller when power is ON.
- Turn off transmitter and VA-1000 when not in use.
- The included charger is specifically for the VA-1000 Li-Poly battery. Do not use it to charge any other battery.
- New alkaline batteries are recommended for maximum performance.
- Parental supervision recommended when flying.
Battery Warnings
Rechargeable Battery (Li-Poly)
Dispose of battery properly according to local disposal requirements if it no longer stays charged.
Controller Batteries (3 "AAA" batteries, not included)
- Do not mix alkaline, standard (carbon-zinc), and rechargeable (Nickel Metal Hydride) batteries.
- Do not mix old and new batteries.
- Non-rechargeable batteries are not to be recharged.
- Rechargeable batteries are to be removed from the item before being charged (if removable).
- Rechargeable batteries are only to be charged under adult supervision.
- Exhausted batteries should be removed immediately and recycled or disposed of properly according to state or local government ordinances and regulations.
- Supply terminals are not to be short-circuited.
- Only batteries of the same or equivalent type as recommended are to be used.
- Batteries are to be inserted with the correct polarity.
- Do not dispose batteries in a fire - batteries may leak or explode.
Care and Maintenance
- Always remove batteries from the wireless remote control when not in use for an extended period.
- To clean, gently wipe the remote control and VA-1000 with a clean damp cloth.
- Keep the toy away from direct heat or sunlight.
- Do not submerge the toy into water; this can damage the unit beyond repair.
- Parental guidance recommended when installing or replacing the batteries.
Limited 90-Day Warranty (North America)
AMAX Group USA warrants to the original consumer that this product is free from any electrical or mechanical defects for 90 DAYS from the date of purchase. If a defect is discovered within the warranty period, AMAX Group USA will repair or replace the unit free of charge upon receipt of the unit, shipped postage prepaid and insured to their warranty center ALONG WITH THE ORIGINAL RECEIPT. The warranty covers normal consumer use and does not cover damage from alterations, accident, misuse, abuse, neglect, wear and tear, inadequate maintenance, commercial use, or unreasonable use. Removal of any parts/components voids all warranties. This warranty does not cover cost of repairs made or attempted by third-party individuals or companies. Any applicable implied warranties are limited to 90 DAYS from the date of purchase. Consequential or incidental damages are excluded.
Repair/Replace Product
If your product malfunctions, contact the AMAX Group USA warranty center. If a return is necessary, their warranty department will issue an RMA number/form and an address for shipping. AMAX Group USA reserves the right to repair, replace, or refund the product.
Important Notice: AMAX Group USA will reject and return to sender returns not accompanied by an AMAX issued RMA form and RMA number. Ensure to contact their warranty center before attempting to return your product.
Preparation for Shipping Your Product
Repack your product in a durable box, preferably the original carton, and send it prepaid and adequately insured. Include the RMA form, your daytime telephone number, and email address inside the shipping carton. For further information, send all inquiries to customercare@amaxbrands.com.
DO NOT ATTEMPT TO SHIP YOUR PRODUCT BACK WITHOUT FIRST CONTACTING OUR WARRANTY DEPARTMENT AT:
Models: VL-6267RN, VL6267RN, 2ASK3VL-6267RN, 2ASK3VL6267RN, VL-6267TN, VL6267TN, 2ASK3VL-6267TN, 2ASK3VL6267TN, VA-1000 HD Streaming Video Drone, HD Streaming Video Drone, Video Drone, Drone