thermaltake Level 20 GT RGB Mechanical Keyboard User Guide
File info: application/pdf · 108 pages · 9.89MB
投影片 1
Level 20 GT RGB - Thermaltake
TT Premium | Level 20 GT RGB User Guide Web Browser Open the default web browser/return to the home page. Email Open the default email box. Keyboard Features Features Overview 06 Restore Factory Settings Press and hold…
Full PDF Document

If the inline viewer fails, it will open the original document in compatibility mode automatically. You can also open the file directly.
Extracted Text
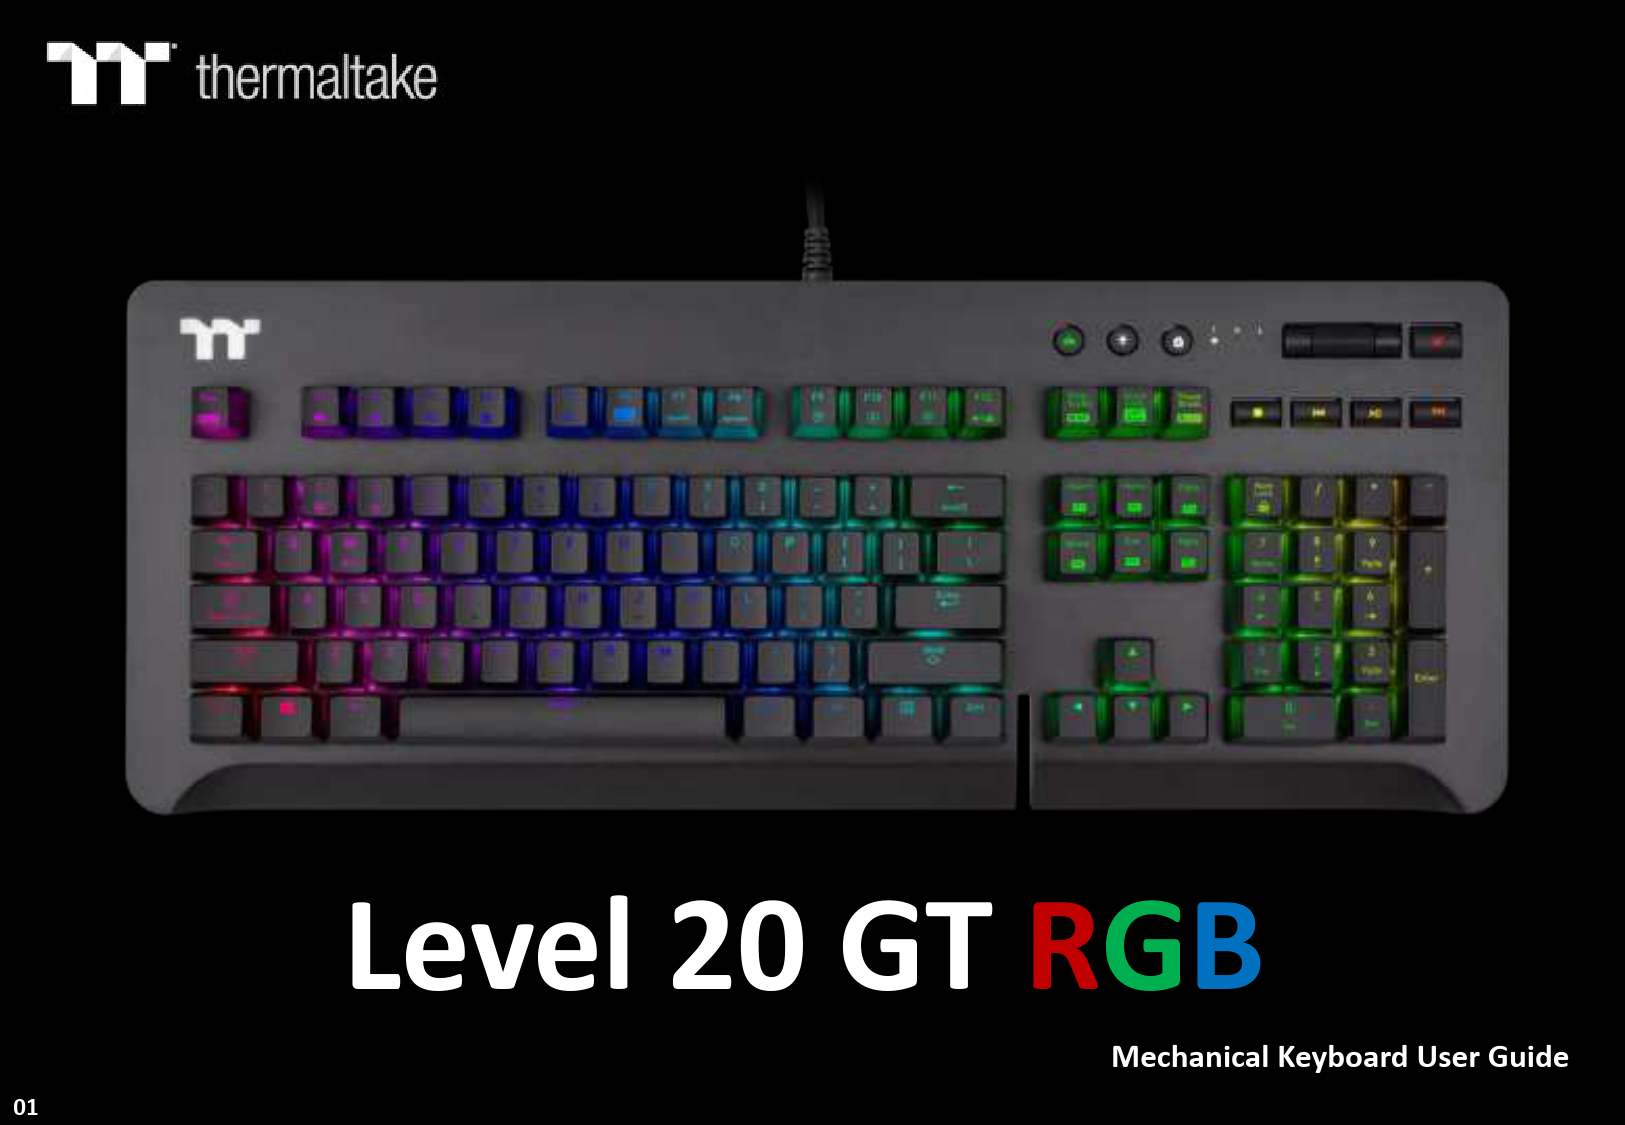
Level 20 GT RGB
Mechanical Keyboard User Guide
01

Table of Contents

PAGE 05

Keyboard Features Overview

PAGE 16

TT iTAKE Installation

PAGE 19

Functions Available on the Home Page

PAGE 21 PAGE 39

Key Configurations
 Default Functions  Single-Key Operations  Macros  Multimedia Features  Hot Keys  Program Execution  Game Profiles  Key Deactivation

--------------------------------------- 22 --------------------------------------- 23 --------------------------------------- 25 --------------------------------------- 27 --------------------------------------- 29 --------------------------------------- 31 --------------------------------------- 36 --------------------------------------- 38

Functions Available on the Macro Page

02

TT Premium | Level 20 GT RGB Mechanical Keyboard User Guide

Table of Contents

PAGE 41

How to Record Macros
 Recording a Macro  Recording a Character Set

--------------------------------------- 42 --------------------------------------- 47

PAGE 49

Functions Available on the Lighting Effects Page

PAGE 51

Lighting Effects Overview
 Static  Pulse  Wave  Spiral Rainbow  Spectrum Cycling  Reactive  Flow  Ripple  Raindrop  Snake Marquee  Music Mode  System Temperature

--------------------------------------- 52 --------------------------------------- 56 --------------------------------------- 60 --------------------------------------- 64 --------------------------------------- 68 --------------------------------------- 69 --------------------------------------- 73 --------------------------------------- 77 --------------------------------------- 81 --------------------------------------- 83 --------------------------------------- 85 --------------------------------------- 87

03

TT Premium | Level 20 GT RGB Mechanical Keyboard User Guide

Table of Contents

PAGE 88

Functions Available on the Settings Page

PAGE 90

TT iTAKE APP Features Overview
 Downloading the App  Connecting the App with Software  Lighting Features  Macros  Virtual Controller  Voice Control  Virtual Keyboard  Voice Control Table

--------------------------------------- 91 --------------------------------------- 92 --------------------------------------- 95 --------------------------------------- 97 --------------------------------------- 100 --------------------------------------- 104 --------------------------------------- 105 --------------------------------------- 106

04

TT Premium | Level 20 GT RGB Mechanical Keyboard User Guide

Chapter 1: Keyboard Features Overview

05

TT Premium | Level 20 GT RGB Mechanical Keyboard User Guide

Keyboard Features Features Overview

TT Premium | Level 20 GT RGB User Guide

Restore Factory Settings
+

Press and hold for five seconds to restore factory settings (including all lighting effects and macros).
 After the settings are restored, a startup animation will run once to indicate that all settings have been restored.

Email
+

Open the default email box.

Web Browser
+

Open the default web browser/return to the home page.

06

Keyboard Features Features Overview

My Computer
+

Open My Computer.

Calculator
+

Open the system's built-in calculator.

Multimedia Player
+

Open the system's built-in multimedia player.

07

TT Premium | Level 20 GT RGB User Guide

Keyboard Features Features Overview

TT Premium | Level 20 GT RGB User Guide

Switching Lighting Effects
+

Static: (1). You can use Fn + F9 (red), F10 (green), and F11 (blue) to change the color of the lighting effect. Pulse: (1). You can use Fn + F7 (slower) and F8 (faster) to adjust the speed of the lighting effect. (2). You can use Fn + F12 to switch between monochrome and random color modes. (3). Under monochrome mode, Fn + F9 (red), F10 (green), and F11 (blue) can be used to adjust the color of the lighting effect. Wave: (1). You can use Fn + F7 (slower) and F8 (faster) to adjust the speed of the lighting effect. (2). You can use Fn + , , , or  to change the direction of running lights. (3). You can use Fn + F9 (red), F10 (green), and F11 (blue) to change the color of the lighting effect. Spiral Rainbow: (1). You can use Fn + F7 (slower) and F8 (faster) to adjust the speed of the lighting effect. (2). You can use Fn +  (counterclockwise) or  (clockwise) to switch the direction of running lights. (3). You can use Fn + F9 (red), F10 (green), and F11 (blue) to change the color of the lighting effect. Spectrum Cycling: (1). You can use Fn + F7 (slower) and F8 (faster) to adjust the speed of the lighting effect. Reactive: (1). You can use Fn + F7 (slower) and F8 (faster) to adjust the speed of the lighting effect. (2). You can use Fn + F12 to switch between monochrome and random color modes. (3). Under monochrome mode, Fn + F9 (red), F10 (green), and F11 (blue) can be used to adjust the color of the lighting effect (F12 will display the blended color). Flow: (1). You can use Fn + F7 (slower) and F8 (faster) to adjust the speed of the lighting effect. (2). You can use Fn + F12 to switch between monochrome and random color modes. (3). Under monochrome mode, Fn + F9 (red), F10 (green), and F11 (blue) can be used to adjust the color of the lighting effect (F12 will display the blended color). Ripple: (1). You can use Fn + F7 (slower) and F8 (faster) to adjust the speed of the lighting effect. (2). You can use Fn + F12 to switch between monochrome and random color modes. (3). Under monochrome mode, Fn + F9 (red), F10 (green), and F11 (blue) can be used to adjust the color of the lighting effect (F12 will display the blended color). Raindrop: (1). You can use Fn + F7 (slower) and F8 (faster) to adjust the speed of the lighting effect. (2). You can use Fn + F12 to switch between monochrome and random color modes. (3). Under monochrome mode, Fn + F9 (red), F10 (green), and F11 (blue) can be used to adjust the color of the lighting effect (F12 will display the blended color). Snake Marquee: (1). You can use Fn + F7 (slower) and F8 (faster) to adjust the speed of the lighting effect. (2). You can use Fn +  or  to change the direction of running lights. (3). You can use Fn + F12 to switch between monochrome and random color modes. (4). Under monochrome mode, Fn + F9 (red), F10 (green), and F11 (blue) can be used to adjust the color of the lighting effect (F12 will display the blended color). Blink: (1). You can use Fn + F7 (slower) and F8 (faster) to adjust the speed of the lighting effect. (2). You can use Fn + F12 to switch between monochrome and random color modes. (3). Under monochrome mode, Fn + F9 (red), F10 (green), and F11 (blue) can be used to adjust the color of the lighting effect (F12 will display the blended color).

08

Keyboard Features Features Overview

TT Premium | Level 20 GT RGB User Guide

Decreasing the Speed of Lighting Effects
+

Five different lighting effect speeds (the slowest setting).

will flash when the speed is set to the

Increasing the Speed of Lighting Effects
+

Five different lighting effect speeds (the fastest setting).

will flash when the speed is set to the

Adjust the brightness of the red light
+

Ten brightness level settings for the red light (the set to the brightest setting).

will flash when the brightness is

Press and hold for three seconds to clear the red value (once cleared, the

will

flash at the same time).

09

Keyboard Features Features Overview

TT Premium | Level 20 GT RGB User Guide

Adjust the brightness of the green light
+

Ten brightness level settings for the green light (the is set to the brightest setting).

will flash when the brightness

 Press and hold for three seconds to clear the green value (once cleared, the

will

flash at the same time).

Adjust the brightness of the blue light
+

Ten brightness level settings for the blue light (the set to the brightest setting).

will flash when the brightness is

 Press and hold for three seconds to clear the blue value (once cleared, the

will

flash at the same time).

Switching Color Modes
+

Can be used to switch between monochrome and random color modes for a specific lighting effect.
 Under monochrome mode, this key serves as the mixed-color indicator.

10

Keyboard Features Features Overview

TT Premium | Level 20 GT RGB User Guide

Changing the Direction of Lighting Effects

+

You can switch the running direction of a specific lighting effect.

Switching Profiles
+

Up to six profiles can be saved. The current active profile is shown by the

color displayed on the

.

P1: Red, P2: Green, P3: Blue, P4: Yellow, P5: Purple, P6: Aquamarine.

 The color statuses described above are only visible under Game Mode.

11

Keyboard Features Features Overview

TT Premium | Level 20 GT RGB User Guide

On-the-Fly Macro Recording
+

Macro Recording (only available under Game Mode): (1). Press Fn + PrtSc to enter recording mode (the entire keyboard will light up and the Record button will begin to flash).
(2). Press Fn + Any Key (excluding the Recording key) to specify a key to save the macro under (a red light will appear after a slight delay; if you press Fn + the same key, a blue light will appear without a delay). Once the key selection is completed, all lights on the keyboard will go out, and the recording key will change from flashing to constantly lit.
(3). Enter the sequence to be recorded (keys recorded will flash in aquamarine).
(4). After the sequence is entered, press Fn + PrtSc to exit recording mode (the light for the Recording key will go off).
 When a key has been designated for macro assignment, before any keystrokes are recorded, the key assignment can be changed by pressing Fn + another key.
Macro Prompt Function: While in recording mode, if the key's backlight is solid white, that means there is currently no macro assigned to this key. If the key is solid green, that means a macro has been assigned to this key (as shown in the following figure: the "A" key has a macro assigned to it).

 Press and hold a key which has been assigned a macro for more than 3 seconds to erase the saved macro.
12

Keyboard Features Features Overview

TT Premium | Level 20 GT RGB User Guide

Area Backlight
+

Supports up to five presets: FPS1FPS2MMOMOBARTS  All five presets listed above can be recorded and modified separately.

Recording Area Backlight
+

Recording procedure (recording can only be activated while in Area Backlight Mode): (1).Press Fn + ScLk to enter Area Backlight mode. (2).Press Fn + Pause to enter Backlight Recording mode (the recording button will flash). (3).Press Fn + F9 (red), F10 (green), and F11 (blue) to produce a desired color by mixing the three colors together (F12 will display the blended color). (4).Press the key in each display area in order (if you wish to change to another color, please return to the previous step). (5).Once completed, press Fn + Pause to exit Recording mode (the recording button will stop flashing).

 When a key's backlight color is identical to the blended color shown by the F12 key, pressing
it will cancel the backlight color. If it is a different color, the color will be overwritten.  Press and hold for five seconds to restore the area's preset light position and color value

(

indicator lights will flash at the same time to indicate that the settings have been

restored).

13

Keyboard Features Features Overview

TT Premium | Level 20 GT RGB User Guide

Switching WASD and the Direction Keys
+

Switches the functions of WASD keys with the arrow keys.

Full Keyboard Lock
+

Lock the entire keyboard ( the current status).

indicator lights will flash at the same time to indicate

Game Mode

When this key is lit up in white, this means it is in non-Game Mode. Once Game Mode is activated, the indicator color will light up in the color specified in the setup profile.
 While not operating under Game Mode, all keys will function according to their preset values.

14

Keyboard Features Features Overview

TT Premium | Level 20 GT RGB User Guide

Full Keyboard Brightness Adjustment

A total of five brightness levels are available for adjusting the brightness of the keyboard's lighting effects.

 The last level completely disables the backlight for all keys.

Locking the Windows Key

The Windows key can be replaced with the function of the Ctrl key.
 Before the key is locked, a white-colored light will turn on. After the key is locked, an aquamarine-colored light will turn on.

Software Requirements:
Compatible with Windows� 7 / Windows� 8 / Windows� 10. An Internet connection is required. And at least 200MB of free hard disk space. Please plug the keyboard into a USB port that is directly connected to the computer's motherboard. Avoid using a USB hub, which may not supply sufficient power for the keyboard to function properly. After the software program is started up, all keyboard functions will be controlled by the program (only the functions of Fn + F1 ~ F6Num will be kept; other switching functions and lighting effects will become temporarily unavailable).
15

Chapter 2: TT iTAKE Installation

16

TT Premium | Level 20 GT RGB Mechanical Keyboard User Guide

Software Installation Setup Instructions

TT Premium | Level 20 GT RGB User Guide

Step 1:
Launch the setup executable file (.EXE) file and click Next.

Step 2:
Click Install to begin the setup process.

17

Software Installation Setup Instructions

TT Premium | Level 20 GT RGB User Guide

Step 3:
Once setup is complete, you will also need to install the Microsoft Visual C++ 2015 Redistributable Package.  Without installing the Redistributable Package, the software will fail to launch.

Step 4:
Click Finish to complete the installation.

18

Chapter 3: Functions Available on the Home Page

19

TT Premium | Level 20 GT RGB Mechanical Keyboard User Guide

Keyboard Page Key Assignment Setting

TT Premium | Level 20 GT RGB User Guide

Switching the Home Page
You can switch the keyboard model.
Switching Profiles
The Level 20 GT RGB can support up to 6 profiles, which can be switched as required.

Other Settings / Shrink Window / Close Window
Other Settings: Software version, firmware version, Amazon Alexa setting and switching the language used for the user interface. Shrink Window: Close the display and minimize the program to the taskbar. Close Window: Close the display and minimize the program to the lower right corner.

Switching Configuration Pages
Switches between the configuration pages singlekey operation, macro recording, lighting effects and sync setting.

Functions for Managing Profiles
Up to 15 profiles can be added for use. The functions of each button from left to right are: Add: Create a new profile. Delete: Delete an existing profile. Copy: Copy a profile. Import: Import a profile. Export: Export a profile.

Correcting the Name of a Profile
The name of a new profile can be modified directly.

PC IP Address
Use the TT iTAKE APP to enter the IP for control.
Assigning Key Functions
Eight different functions can be assigned. 20

Restore Keyboard Settings for All Keys / Apply
Restore Keyboard Settings for All Keys: All key functions saved under the current profile will be restored to factory default values. Apply: Save and apply all settings to the selected key.

Chapter 4: Key Configurations

21

TT Premium | Level 20 GT RGB Mechanical Keyboard User Guide

Default Function Default Key Setting

TT Premium | Level 20 GT RGB User Guide

Step 1:
Select a key, then select a "Default" function from the drop-down list.

Step 2:
Click Apply to change and save the new function.

22

Single Key Function Single Key Setting

TT Premium | Level 20 GT RGB User Guide

Step 1:
Select a key, then select "Single Key" from the drop-down list.

Step 2:
Enter a new key value into the lower-right box.

23

Single Key Function Single Key Setting

TT Premium | Level 20 GT RGB User Guide

Step 3:
Click Apply to change and save the new function.

Step 4:
Based on the information and color displayed on the screen, you will be able to see if the new key setting is applied properly.

24

Macro Function Macro Key Setting

TT Premium | Level 20 GT RGB User Guide

Step 1:
First, you must designate a key, then select "Macro" in the drop-down list.

Step 2:
Select a macro from the upper-right.

25

Macro Function Macro Key Setting

TT Premium | Level 20 GT RGB User Guide

Step 3:
Select a macro repeat option from the drop-down list located in the lower-right corner.

Step 4:
Click Apply to save the new function. Verify if the new key function is applied properly by looking at the color displayed on the screen.

26

Media Function Media Key Setting

TT Premium | Level 20 GT RGB User Guide

Step 1:
Select a key, then select "Media" from the drop-down list.

Step 2:
Select a multimedia function in the right drop-down list.

27

Media Function Media Key Setting

TT Premium | Level 20 GT RGB User Guide

Step 3:
Click Apply to change and save the new function.

Step 4:
Based on the information and color displayed on the screen, you will be able to see if the new key setting is applied properly.

28

Hot Key Function Hot Key Setting

TT Premium | Level 20 GT RGB User Guide

Step 1:
Select a key, then select "Function Keys" from the drop-down list.

Step 2:
Select a type of hotkey function in the upper-right drop-down list.

29

Hot Key Function Hot Key Setting

TT Premium | Level 20 GT RGB User Guide

Step 3:
Select a keyboard function in the lower-right drop-down list.

Step 4:
Click Apply to save the new function. Verify if the new key function is applied properly by looking at the color displayed on the screen.

30

Launch Application Function Application Setting TT Premium | Level 20 GT RGB User Guide

Step 1:
Select a key, then select "Launch Application" from the drop-down list.

Step 2:
Select "Application" in the upper-right drop-down list.

31

Launch Application Function Application Setting TT Premium | Level 20 GT RGB User Guide

Step 3:
Click on the Open File button located on the bottom-right.

Step 4:
Select the executable file (.EXE) to open.

32

Launch Application Function Application Setting TT Premium | Level 20 GT RGB User Guide

Step 5:
Click Apply to change and save the new function.

Step 6:
Based on the information and color displayed on the screen, you will be able to see if the new key setting is applied properly.

33

Launch Application Function Website Setting

TT Premium | Level 20 GT RGB User Guide

Step 1:
Select a key, then select "Launch Application" from the drop-down list.

Step 2:
Select "Web" in the upper-right drop-down list.

34

Launch Application Function Website Setting

TT Premium | Level 20 GT RGB User Guide

Step 3:
Enter the URL into the textbox located on the bottom-right and press Enter.

Step 4:
Click Apply to save the new function. Verify if the new key function is applied properly by looking at the color displayed on the screen.

35

Gaming Profile Function Gaming Key Setting

TT Premium | Level 20 GT RGB User Guide

Step 1:
Select a key, then select "Gaming Profile" from the drop-down list.

Step 2:
Select a game title in the upper-right drop-down list.

36

Gaming Profile Function Gaming Key Setting

TT Premium | Level 20 GT RGB User Guide

Step 3:
In the lower-right drop-down list, select an in-game action.

Step 4:
Click Apply to save the new function. Verify if the new key function is applied properly by looking at the color displayed on the screen.

37

Disable Function Disable Key Setting

TT Premium | Level 20 GT RGB User Guide

Step 1:
Select a key, then select "Disable" from the drop-down list.

Step 2:
Click Apply to save the new function. Verify if the new key function is applied properly by looking at the color displayed on the screen.

38

Chapter 5: Functions Available on the Macro Page

39

TT Premium | Level 20 GT RGB Mechanical Keyboard User Guide

Macro Page Macro Recording Setting

TT Premium | Level 20 GT RGB User Guide

New Macro / Delete / Copy / New Text / Import / Export
New macro: Create a new macro. Delete: Delete a macro or text. Copy: Copy a macro or text. New text: Create a new text. Import: Import a macro or text. Export: Export a macro or text.
Modifying the Name of a Macro / Text
You can change the name of a new macro or text directly.

Record / Delete / Insert / Pause / Edit
Record: Begin macro recording. Delete: Delete the assigned value of a specific key. Insert: Insert an additional value above or below the existing value of a specific key. Stop: End macro recording. Edit: Edit the delay time of a specific key.

Macro Recording Settings
Record Delay Times: Record a macro based on the time interval between each keystroke. Fixed Delay: Record a macro based on the specified time interval. No Delay: Record a macro without recording the time interval between each keystroke.
Macro Recording Area
You can verify the sequence recorded by the macro and the key assignment.
40

Chapter 6: How to Record Macros

41

TT Premium | Level 20 GT RGB Mechanical Keyboard User Guide

Macro Recording Function Recording Setting

TT Premium | Level 20 GT RGB User Guide

Step 1:
Add a new macro and modify its name.

Step 2:
Select the delay method used to record the macro by using the checkboxes below.

42

Macro Recording Function Recording Setting

TT Premium | Level 20 GT RGB User Guide

Step 3:
Press the Record button.

Step 4:
Enter the sequence to be recorded from the keyboard, then press the Stop button to complete the recording.

43

Macro Recording Function Insert Setting

TT Premium | Level 20 GT RGB User Guide

Step 1:
Select a macro by clicking on the key it is assigned to.

Step 2:
Click the Insert button.

44

Macro Recording Function Insert Setting

TT Premium | Level 20 GT RGB User Guide

Step 3:
Select the position where new content is to be inserted.

Step 4:
Press the Record button.

45

Macro Recording Function Insert Setting

TT Premium | Level 20 GT RGB User Guide

Step 5:
Enter the sequence to be recorded from the keyboard.

Step 6:
Click the Stop button to complete the insertion process.

46

Text Recording Function Recording Setting

TT Premium | Level 20 GT RGB User Guide

Step 1:
Add a new character set and modify its name.

Step 2:
Enter the values for the "Start Key" and "End Key" in the upper right corner.

47

Text Recording Function Recording Setting

TT Premium | Level 20 GT RGB User Guide

Step 3:
Click on the input box located at the bottom-right corner and enter the characters to be recorded from the keyboard.

Step 4:
Click the Save button to complete the recording of the character set.

48

Chapter 7: Functions Available on the Lighting Effects Page

49

TT Premium | Level 20 GT RGB Mechanical Keyboard User Guide

Lighting Page Lighting Function Setting
Switching Lighting Effects
Keyboard light of 12 lighting effects are supported: Static, Pulse, Wave, Spiral Rainbow, RGB Spectrum, Reactive, Flow, Ripple, Raindrops, Snake, Music Mode and System Temperature.

TT Premium | Level 20 GT RGB User Guide

Lighting Effects Configurations
Can be used to adjust the color, direction, speed, and brightness level of the lighting effect within an area; can also be used to switch to random colors.

Apply / Restore Lighting Effect Settings
Apply: Apply the new lighting effect settings to all keys on the keyboard. Restore Lighting Effect Settings: All lighting effect settings saved under the current profile will be restored to factory default values.

Color Pattern Settings
Add Pattern: Add a new pattern with red to black gradient. Delete Pattern: Delete the currently selected color pattern. Insert Color Point: Add a red color point to the color pattern. Delete Color Point: Delete the selected color point from the color pattern.
50

Color Wheel Settings
You can select a color from the color wheel directly or enter RGB color values to adjust the color of the lighting effect.

Chapter 8: Lighting Effects Overview

51

TT Premium | Level 20 GT RGB Mechanical Keyboard User Guide

Static Mode Color Area Setting

TT Premium | Level 20 GT RGB User Guide

Step 1:
Select "Static" in the Lighting Effect drop-down list.

Step 2:
Click on a color inside the color wheel or enter the RGB color values to change the color.

52

Static Mode Color Area Setting

TT Premium | Level 20 GT RGB User Guide

Step 3:
Adjust the brightness level of the keyboard's backlight.

Step 4:
Click Apply to save the new settings.

53

Static Mode Customized Setting

TT Premium | Level 20 GT RGB User Guide

Step 1:
Switch the zones to "Customized."

Step 2:
Click on a color inside the color wheel or enter the RGB color values to change the color.

54

Static Mode Customized Setting

TT Premium | Level 20 GT RGB User Guide

Step 3:
Click on the keyboard image directly with the left mouse button to change the
key color.  Right click to cancel the color.

Step 4:
Click Apply to save the new settings.

55

Pulse Mode Color Area Setting

TT Premium | Level 20 GT RGB User Guide

Step 1:
Select "Pulse" in the Lighting Effect drop-down list.

Step 2:
Click on a color inside the color wheel or enter the RGB color values to change the color.

56

Pulse Mode Color Area Setting

TT Premium | Level 20 GT RGB User Guide

Step 3:
Adjust the backlight speed.

Step 4:
Click Apply to save the new settings.

57

Pulse Mode Customized Setting

TT Premium | Level 20 GT RGB User Guide

Step 1:
Switch the zones to "Customized."

Step 2:
Click on a color inside the color wheel or enter the RGB color values to change the color.

58

Pulse Mode Customized Setting

TT Premium | Level 20 GT RGB User Guide

Step 3:
Click on the keyboard image directly with the left mouse button to change the
key color.  Right click to cancel the color.

Step 4:
Click Apply to save the new settings.

59

Wave Mode Pattern Setting

TT Premium | Level 20 GT RGB User Guide

Step 1:
Select "Wave" in the Lighting Effect drop-down list.

Step 2:
Select a set of color patterns on the upper-right.

60

Wave Mode Pattern Setting

TT Premium | Level 20 GT RGB User Guide

Step 3:
Set the direction, speed, and brightness level of the lighting effect.

Step 4:
Click Apply to save the new settings.

61

Wave Mode Customized Pattern Setting

TT Premium | Level 20 GT RGB User Guide

Step 1:
Add a new set of color patterns.

Step 2:
Add a new color-insertion point and drag it to the desired position.

62

Wave Mode Customized Pattern Setting

TT Premium | Level 20 GT RGB User Guide

Step 3:
Click on each color-insertion point to modify its color.

Step 4:
Click Apply to save the new settings.

63

Spiral Rainbow Mode Pattern Setting

TT Premium | Level 20 GT RGB User Guide

Step 1:
Select "Spiral Rainbow" in the Lighting Effect drop-down list.

Step 2:
Select a set of color patterns on the upper-right.

64

Spiral Rainbow Mode Pattern Setting

TT Premium | Level 20 GT RGB User Guide

Step 3:
Set the direction, speed, and brightness level of the lighting effect.

Step 4:
Click Apply to save the new settings.

65

Spiral Rainbow Mode Customized Pattern Setting TT Premium | Level 20 GT RGB User Guide

Step 1:
Add a new set of color patterns.

Step 2:
Add a new color-insertion point and drag it to the desired position.

66

Spiral Rainbow Mode Customized Pattern Setting TT Premium | Level 20 GT RGB User Guide

Step 3:
Click on each color-insertion point to modify its color.

Step 4:
Click Apply to save the new settings.

67

Spectrum Cycling Mode Area Function Setting

TT Premium | Level 20 GT RGB User Guide

Step 1:
Select "Spectrum Cycling" in the Lighting Effect drop-down list.

Step 2:
Set the speed and brightness level of the backlight and click on Apply to save the new settings.

68

Reactive Mode Color Area Setting

TT Premium | Level 20 GT RGB User Guide

Step 1:
Select "Reactive" in the Lighting Effect drop-down list.

Step 2:
Click on a color inside the color wheel or enter the RGB color values to change the color.

69

Reactive Mode Color Area Setting

TT Premium | Level 20 GT RGB User Guide

Step 3:
Adjust the backlight speed.

Step 4:
Click Apply to save the new settings.

70

Reactive Mode Customized Setting

TT Premium | Level 20 GT RGB User Guide

Step 1:
Switch the area to "Customized."

Step 2:
Click on a color inside the color wheel or enter the RGB color values to change the color.

71

Reactive Mode Customized Setting

TT Premium | Level 20 GT RGB User Guide

Step 3:
Click on the keyboard image directly with the left mouse button to change the
key color.  Right click to cancel the color.

Step 4:
Click Apply to save the new settings.

72

Flow Mode Color Area Setting

TT Premium | Level 20 GT RGB User Guide

Step 1:
Select "Flow" in the Lighting Effect drop-down list.

Step 2:
Click on a color inside the color wheel or enter the RGB color values to change the color.

73

Flow Mode Color Area Setting

TT Premium | Level 20 GT RGB User Guide

Step 3:
Set the speed and brightness level of the backlight.

Step 4:
Click Apply to save the new settings.

74

Flow Mode Customized Setting

TT Premium | Level 20 GT RGB User Guide

Step 1:
Set the area to "Customized", then add a new set of color patterns.

Step 2:
Add a new color-insertion point and drag it to the desired position.

75

Flow Mode Customized Setting

TT Premium | Level 20 GT RGB User Guide

Step 3:
Click on each color-insertion point to modify its color.

Step 4:
Click Apply to save the new settings.

76

Ripple Mode Color Setting

TT Premium | Level 20 GT RGB User Guide

Step 1:
Select "Ripple" in the Lighting Effect drop-down list.

Step 2:
Click on a color inside the color wheel or enter the RGB color values to change the color.

77

Ripple Mode Color Setting

TT Premium | Level 20 GT RGB User Guide

Step 3:
Set the speed and brightness level of the backlight.

Step 4:
Click Apply to save the new settings.

78

Ripple Mode Customized Setting

TT Premium | Level 20 GT RGB User Guide

Step 1:
Set the area to "Customized", then add a new set of color patterns.

Step 2:
Add a new color-insertion point and drag it to the desired position.

79

Ripple Mode Customized Setting

TT Premium | Level 20 GT RGB User Guide

Step 3:
Click on each color-insertion point to modify its color.

Step 4:
Click Apply to save the new settings.

80

Raindrop Mode Color Area Setting

TT Premium | Level 20 GT RGB User Guide

Step 1:
Select "Raindrops" in the Lighting Effect drop-down list.

Step 2:
Click on a color inside the color wheel or enter the RGB color values to change the color.

81

Raindrop Mode Color Area Setting

TT Premium | Level 20 GT RGB User Guide

Step 3:
Set the speed and brightness level of the backlight.

Step 4:
Click Apply to save the new settings.

82

Snake Mode Color Setting

TT Premium | Level 20 GT RGB User Guide

Step 1:
Select "Snake" in the Lighting Effect drop-down list.

Step 2:
Click on a color inside the color wheel or enter the RGB color values to change the color.

83

Snake Mode Color Setting

TT Premium | Level 20 GT RGB User Guide

Step 3:
Set the direction, speed, and brightness level of the lighting effect.

Step 4:
Click Apply to save the new settings.

84

Music Mode Color Setting

TT Premium | Level 20 GT RGB User Guide

Step 1:
Select "Music Mode" in the Lighting Effect drop-down list.

Step 2:
Set the desired mode of lighting effects.

85

Music Mode Color Setting

TT Premium | Level 20 GT RGB User Guide

Step 3:
Click on a color inside the color wheel or enter the RGB color values to change the color of each row.

Step 4:
Click Apply to save the new settings.

86

System Temperature Mode Function Setting

TT Premium | Level 20 GT RGB User Guide

Step 1:
Select "System Temperature" in the Lighting Effect drop-down list.

Step 2:
Click Apply to save the new settings.

87

Chapter 9: Functions Available on the Settings Page

88

TT Premium | Level 20 GT RGB Mechanical Keyboard User Guide

Settings Page Else Function
Language Settings
Sets the language of the program's user Interface and theme.
Razer Chroma On / OFF
Users who have installed both the TT iTAKE Software and Razer Synapse 3 can experience synchronized gaming and RGB lighting effects on their gaming gear.
Amazon Alexa Login
TT iTAKE software support Amazon Alexa voice service, allowing you to control the lights by talking to the Alexa Enabled device.
TT iTAKE APP Password Setting
Enter four number or English alphabet.  Empty is disable function.
Official Website / Social Media
Official Website: Visit the Product official website. Social Media: Visit Thermaltake on Facebook.
Software Version
Software Version: Displays the version number of the installed program.
89

TT Premium | Level 20 GT RGB User Guide

Chapter 10: TT iTAKE App Features Overview

90

TT Premium | Level 20 GT RGB Mechanical Keyboard User Guide

TT iTAKE APP Download Download Step

TT Premium | Level 20 GT RGB User Guide

Step 1
Open the App Store.

Step 2
Enter "TT iTAKE" into the search bar.
Step 3
Tap to download.

91

APP Connecting Connecting Step

TT Premium | Level 20 GT RGB User Guide

Step 1
Launch the TT iTAKE app.

Step 2
Open TT iTAKE Engine Software and setting TT iTAKE App password.

92

APP Connecting Connecting Step
Step 3
Click to scan for devices.
Step 4
In order to establish a connection, click on the IP address of the computer you wish to connect to. If the IP address is not found, please try again to scan for your device. In addition, please verify that the keyboard software is activated. If your device still cannot be found, please use the manual connection method (described on the next page).
93

TT Premium | Level 20 GT RGB User Guide
Step 5
Enter TT iTAKE App password.

APP Connecting Input IP Connecting
Step 1
Enter the computer's IP address.
Step 2
Click on the "Connect" button.

TT Premium | Level 20 GT RGB User Guide
Connection Guide
 Before attempting to establish a connection, please read these instructions carefully to prevent problems when searching for your device.

94

Lighting Function Pulse Setting Step

Pulse

Switching Device
TT iTAKE Engine software support devices.

Pulse

Step 3
Select the color you wish to adjust or switch to random color mode (once activated, color selection is no longer available).

Step 4
Set the desired speed to complete the settings.

Step 1
Click this area.

95

TT Premium | Level 20 GT RGB User Guide
Step 2
Select the lighting effects.

Lighting Function Wave Setting Step

Wave

Switching Device
TT iTAKE Engine software support devices.

Wave

Step 3
Select the direction of running lights.

Step 4
Set the desired speed and brightness level to complete the settings.

Step 1
Click this area.

96

TT Premium | Level 20 GT RGB User Guide
Step 2
Select the lighting effects and preconfigured color patterns available in the program (the number indicates the order).

Macro Function Import Macro Setting Step

TT Premium | Level 20 GT RGB User Guide

Step 1
Click to select the menu in the upper-left corner.
Step 2
Select "Macro".

Step 3
Select the key position for adding a new macro.

97

Macro Function Import Macro Setting Step

TT Premium | Level 20 GT RGB User Guide

Step 4
Select a previously recorded macro from the program.
Step 5
Select the type of game the macro will be used for.
Step 6
Tap OK to complete the settings.

Step 7
Tap on the button to activate the macro.

98

Macro Function Delete Macro Setting Step

TT Premium | Level 20 GT RGB User Guide

Step 1
Tap the icon located in the upper-right corner to enter editing mode.

Step 2
Tap the trash can icon to delete the macro.
Step 3
Tap the confirmation icon located in the upper-right corner to exit editing mode.

99

Virtual Controller Function Setting Step

TT Premium | Level 20 GT RGB User Guide

Step 1
Click to select the menu in the upperleft corner.
Step 2
Select "Virtual Controller".

Default Settings
"L" and "R" keys on the keyboard.

Gaming Profile
A maximum of 10 profiles Can be saved.
Default Settings
"A", "B", "X", and "Y" keys on the keyboard.

Default Settings
Up, Down, Left, and Right keys on the keyboard.

Default Settings
"Enter" key on the keyboard.

100

Virtual Controller Function Setting Step

TT Premium | Level 20 GT RGB User Guide

Step 3
Tap the icon located in the upper-right corner to enter editing mode.

Step 4
Tap the icon located in the lower-right corner to add new keys.

101

Virtual Controller Function Setting Step

TT Premium | Level 20 GT RGB User Guide

Step 5
Select the design of the new key.

Step 6
Once it's added, move the key to the desired position, and modify its value and size. (Resizable by using pinch-to-zoom).

102

Virtual Controller Function Setting Step

TT Premium | Level 20 GT RGB User Guide

Step 7
Select the key settings you want to edit.

Step 8
Once editing is complete, tap the confirmation icon in the upper-right corner to confirm your settings and exit editing mode.

103

Voice Control Function Setting Step
Step 1
Click to select the menu in the upper-left corner.
Step 2
Select "Voice Control".

TT Premium | Level 20 GT RGB User Guide
Step 3
After tapping on the microphone icon, the app will begin to listen for voice commands. Please refer to the next page for a list of voice commands.

104

Virtual Keyboard Function Setting Step

TT Premium | Level 20 GT RGB User Guide

Step 1
Click to select the menu in the upper-left corner.
Step 2
Select "Virtual Keyboard".

Step 3
Once the keyboard pops up, press the keys in order to perform remote control.

105

Voice Control Table TT iTAKE APP Command Table TT Premium | Level 20 GT RGB User Guide

Note Color mode
Light mode
106

Command (Chinese)


     TT

Command (English)
Red Color Orange Color Yellow Color Green Color
Blue Color Indigo Color Purple Color White Color
Rainbow Static Pulse Wave Spiral Flow
Spectrum Cycling
Raindrops Snake Marquee
Reactive Blink
Hello TT

Description
Change all LED color "Red" Change all LED color "Orange" Change all LED color "Yellow" Change all LED color "Green" Change all LED color "Blue" Change all LED color "Indigo" Change all LED color "Purple" Change all LED color "White" Default color
Full Lighted mode
Pulse mode
Wave mode
Spiral Rainbow Wave mode
Flow mode, could not change color
RGB Spectrum mode, could not change color Raindrops mode
Snake Marquee mode
Reactive mode
Blink mode
Special mode

Voice Control Table TT iTAKE APP Command Table TT Premium | Level 20 GT RGB User Guide

Note

Command (Chinese)

Light Speed
Switch Brightness
107


Command (English)
Extreme Fast
Normal Slow
Quickly Slowly Turn Off Turn On
End Glaring Bright
Dim Dark

Description
Light speed "Extreme" Light speed "Fast" Light speed "Normal" Light speed "Slow" Change the light speed quickly Change the light speed slowly Turn off all LED light Turn on all LED light Leave voice input Brightness 100% Brightness 75% Brightness 50% Brightness 25%

Voice Control Table Alexa Command Table

TT Premium | Level 20 GT RGB User Guide

Wake up Alexa

Basic Command Command

Light Mode

Alexa tell / ask / open
Thermaltake

Use / Switch / Change

Static Mode Pulse Mode RGB Spectrum Mode Raindrop Mode Blink Mode

Wave Mode Temperature Mode
Hello TT Mode

Color command Color
in Red color in Orange color in Yellow color in Green color in Blue color in Indigo color in Purple color in White color in Rainbow color
Preset modes with no color options.

108