Electronique Telematique ETELM Canada BSTETRA460 Tetra Base Station User Manual netis B maintenance guide V1 1

Electronique Telematique ETELM Canada Inc Tetra Base Station netis B maintenance guide V1 1

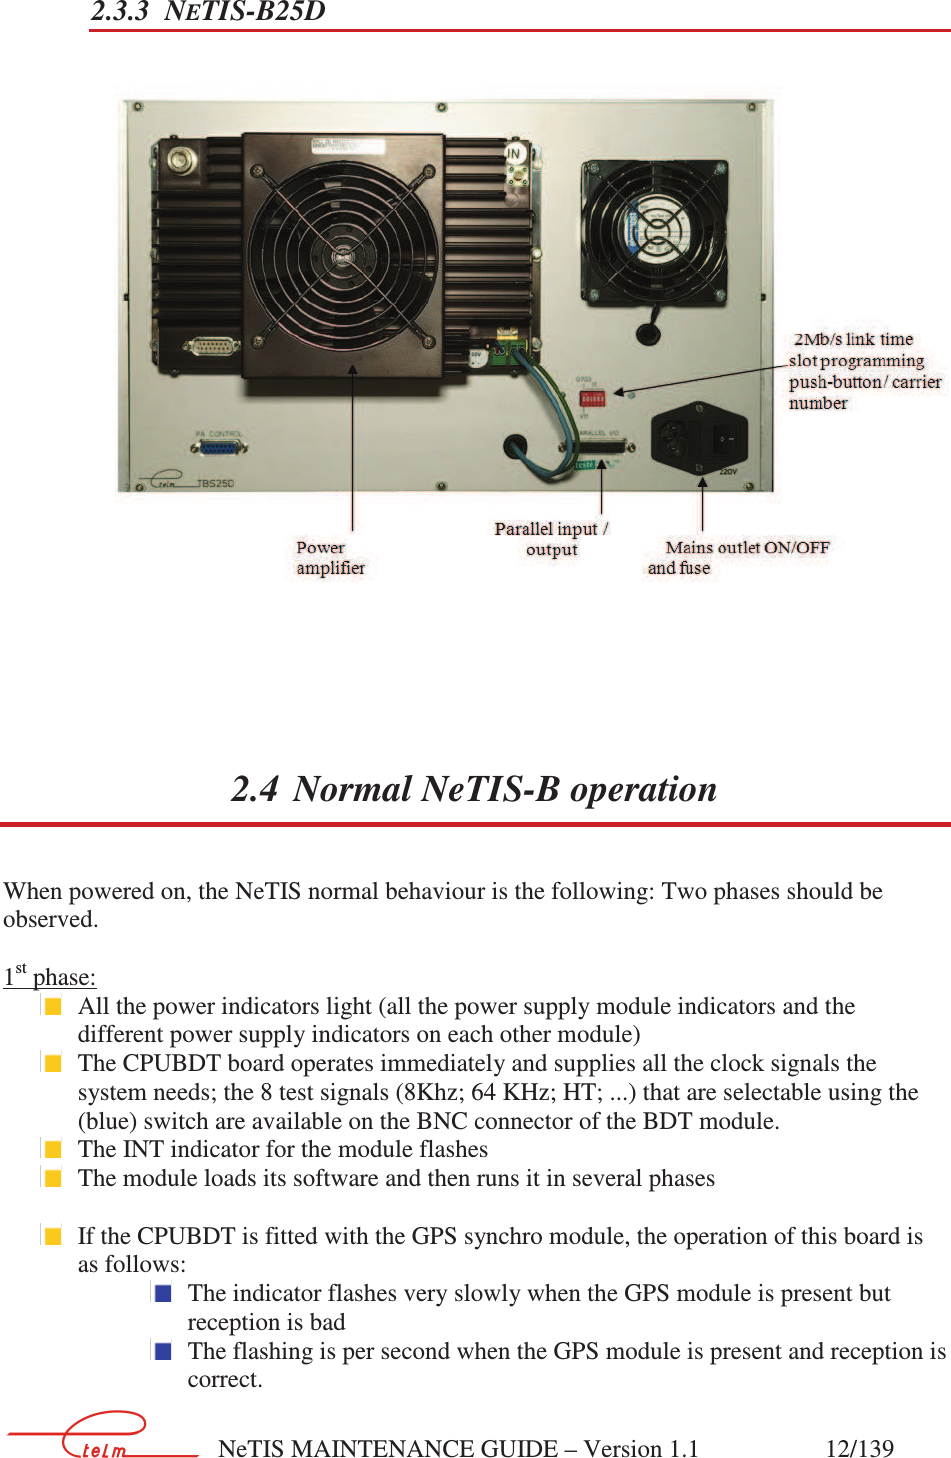
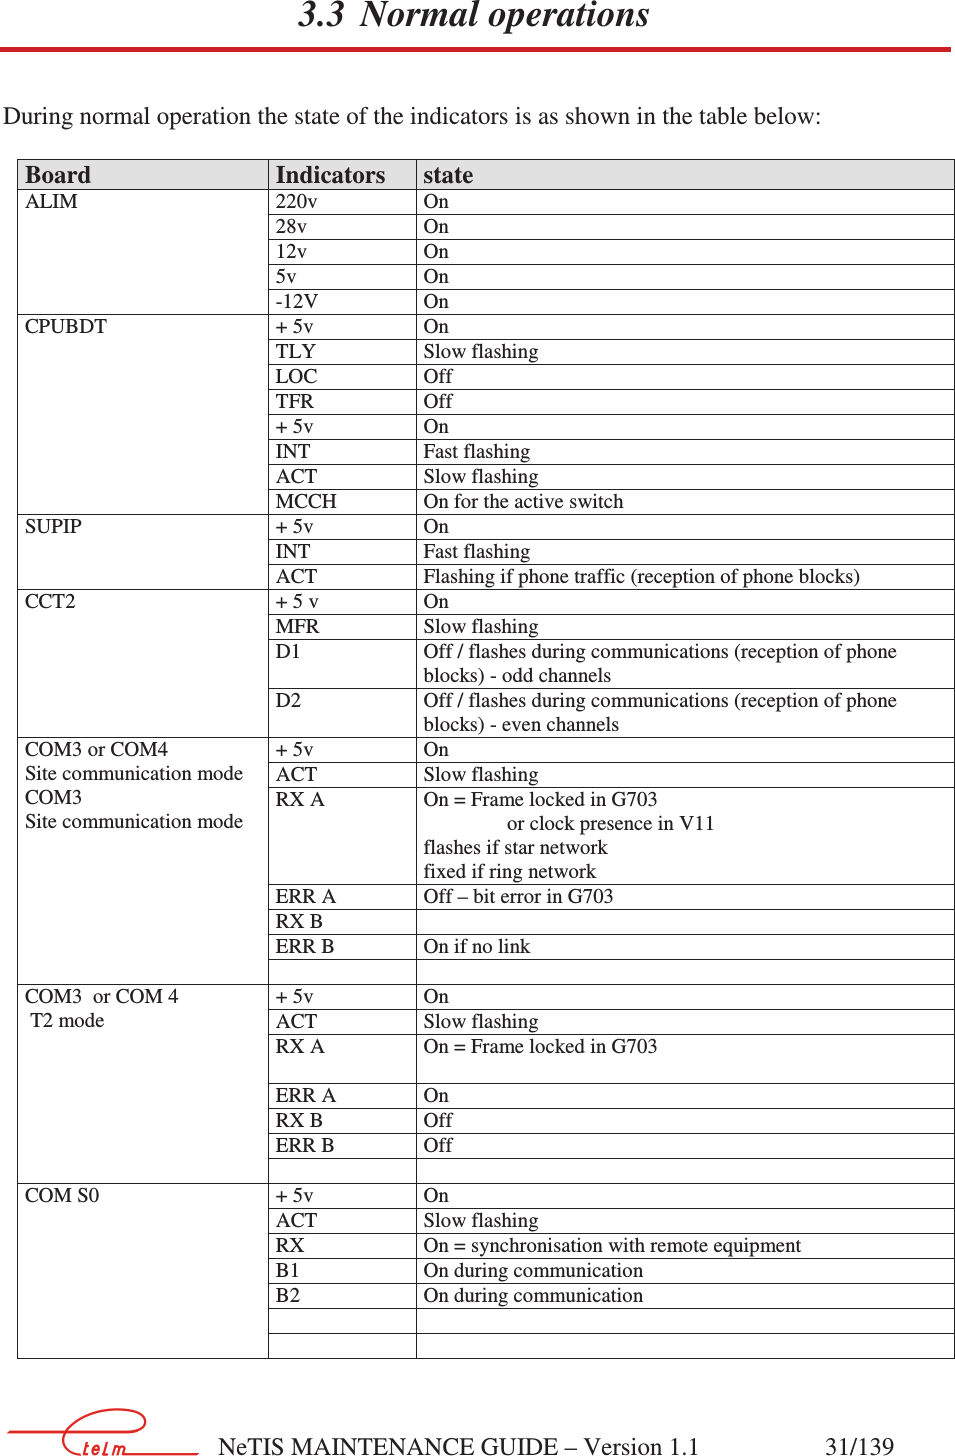
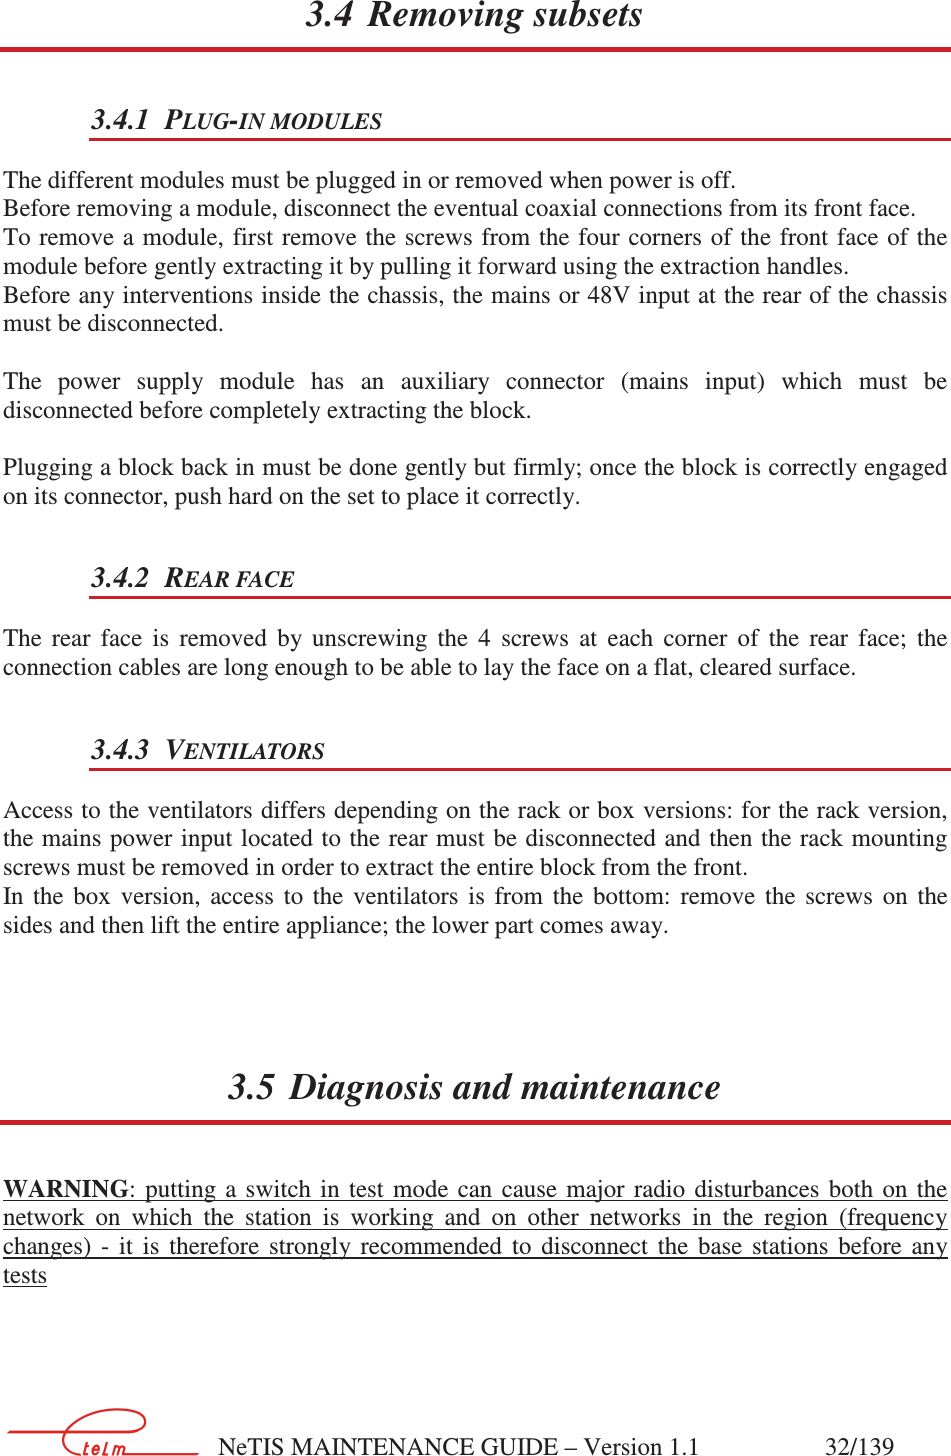
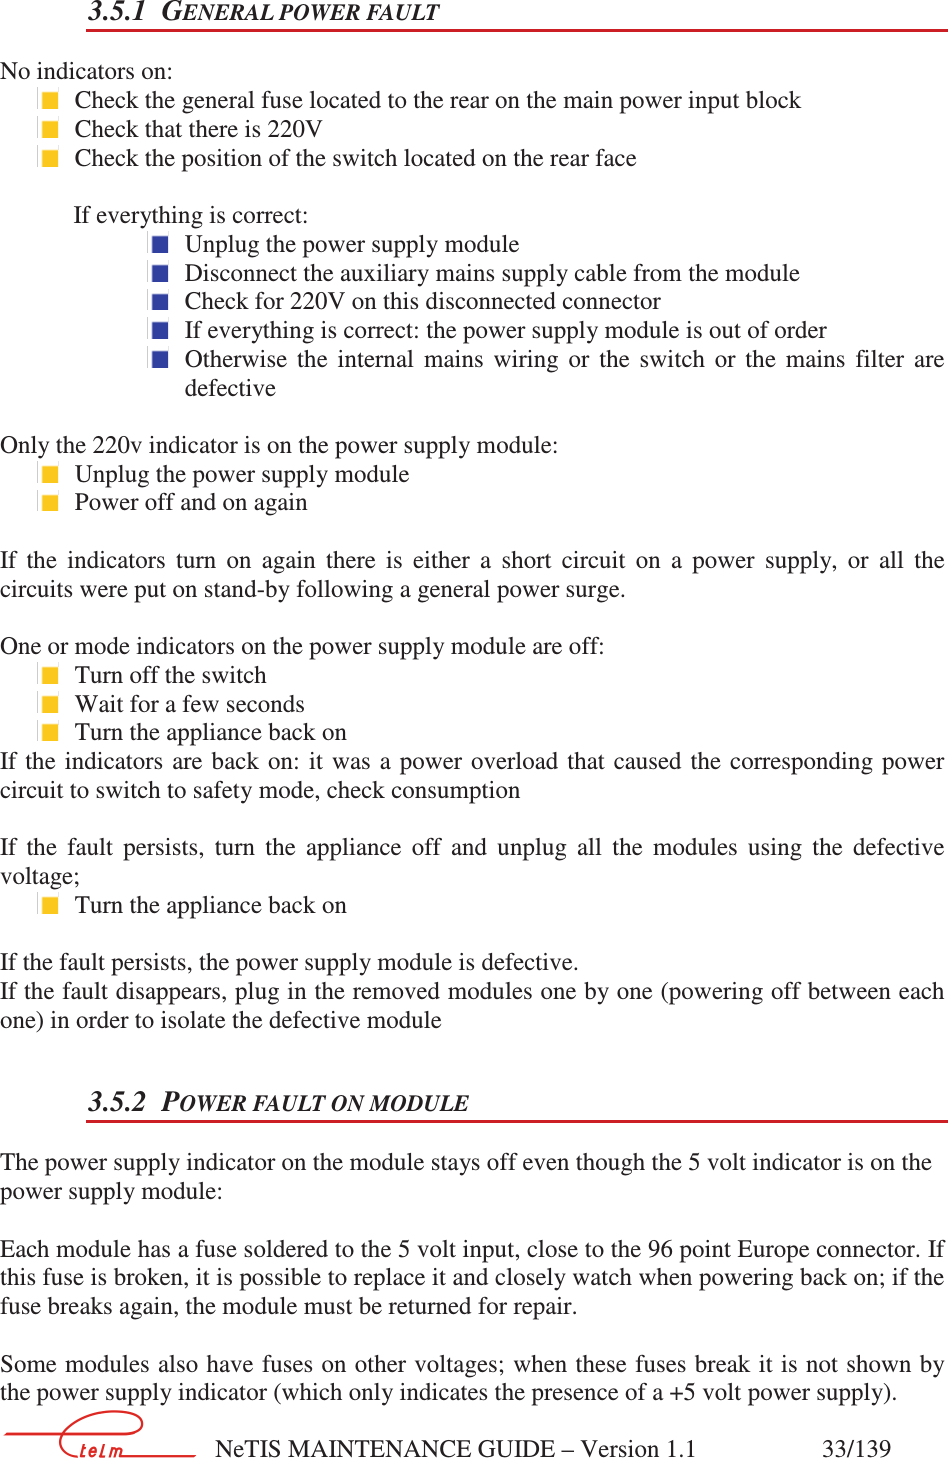
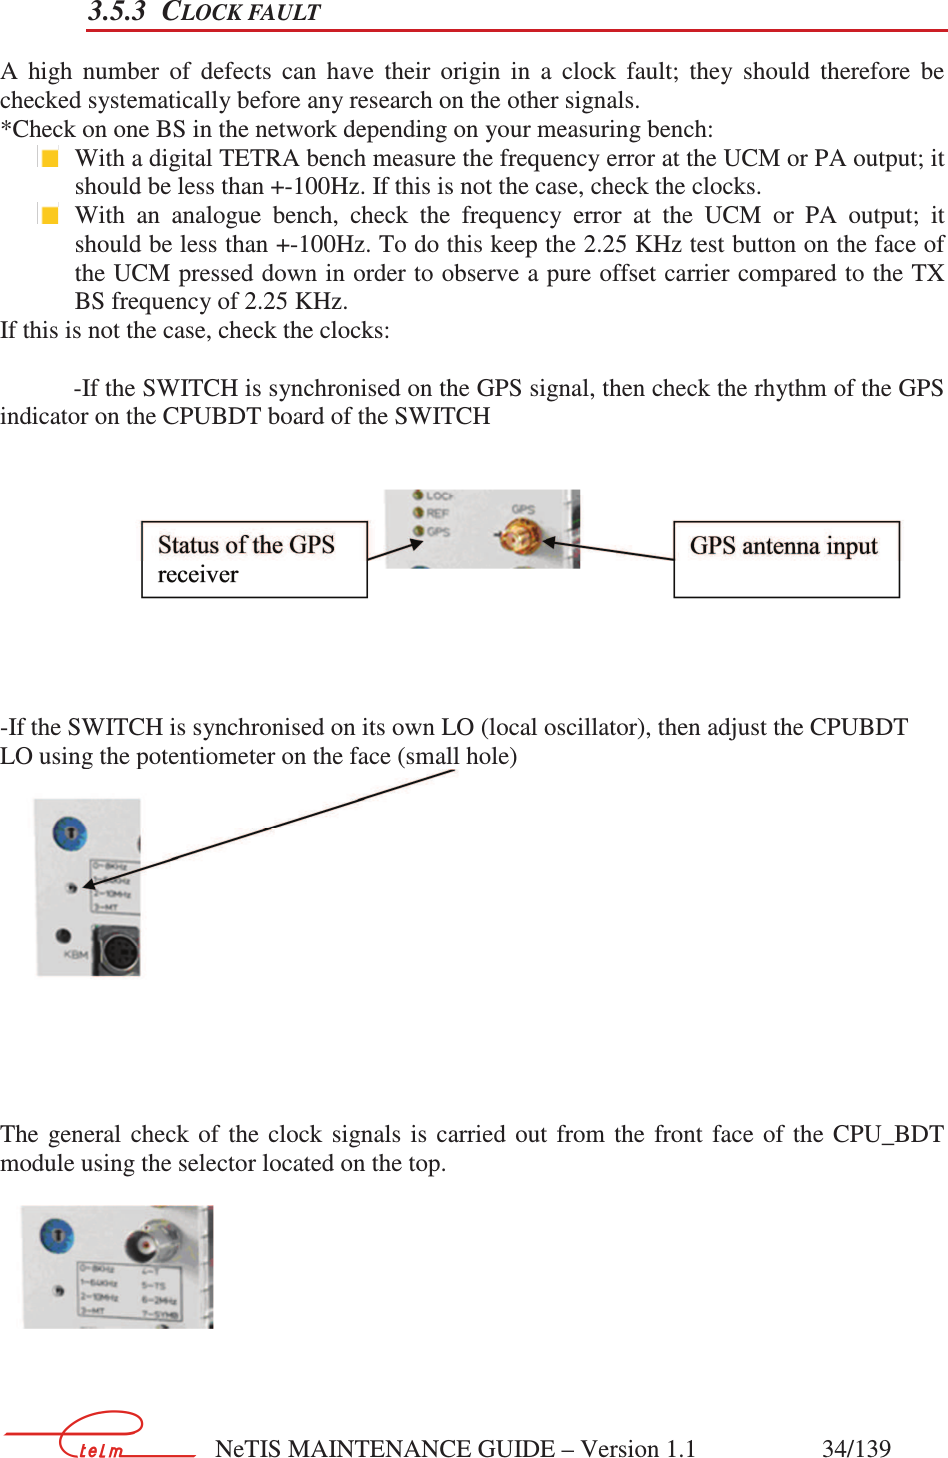
netis B maintenance guide V1.1.part1

       NeTIS MAINTENANCE GUIDE – Version 1.1                    1/139                                         Version  Date  Modifications  Sign. 1.0  20/05/11  CREATION  LM/PM 1.1  25/04/13  Add 2.6.7   PM/LM                               NNeeTTIISS  MMAAIINNTTEENNAANNCCEE  AASSSSIISSTTAANNCCEE  GGUUIIDDEE        ETELM 9, avenue des Deux Lacs  P.A de Villejust 91971 Courtaboeuf – cedex Tel : +33.1.69.31.22.84 Fax : +33.1.69.31.22.61 Web site : www.etelm.fr RC : Evry 320 565 443
       NeTIS MAINTENANCE GUIDE – Version 1.1                    2/139      1.PRESENTATION OF A STANDARD TETRA NETWORK ................................................................. 52.NETIS -B ...................................................................................................................................................... 62.1PRESENTATION OF THE BASE STATION ....................................................................................................... 62.2DIFFERENT VERSIONS ................................................................................................................................ 82.2.1NeTIS Box version ........................................................................................................................... 82.2.2Rackable versions ............................................................................................................................ 92.3REAR FACE .............................................................................................................................................. 112.3.1NeTIS-B25 ..................................................................................................................................... 112.3.2NeTIS –B25C ................................................................................................................................. 112.3.3NeTIS-B25D .................................................................................................................................. 112.4NORMAL NETIS-B OPERATION ............................................................................................................... 122.5HANDLING ............................................................................................................................................... 172.5.1Plug-in modules ............................................................................................................................ 172.5.2Rear face ....................................................................................................................................... 172.6DIAGNOSIS / MAINTENANCE .................................................................................................................... 172.6.1General power faults ..................................................................................................................... 182.6.2Power fault on a module ............................................................................................................... 192.6.3Switch interface fault ..................................................................................................................... 192.6.4Clock fault ..................................................................................................................................... 192.6.5Transmission fault ......................................................................................................................... 222.6.6Correct transmission ..................................................................................................................... 252.6.7Conflicts between NMT alarms and LED of BS ............................................................................ 263.NETIS-N ..................................................................................................................................................... 273.1PRESENTATION OF THE SWITCH ............................................................................................................... 273.1.1Number of COM 3 or 4 boards ..................................................................................................... 273.1.2Number of CODEC board (CCT) .................................................................................................. 283.1.3Number of COMS boards .............................................................................................................. 283.2LAUNCHING ............................................................................................................................................. 303.3NORMAL OPERATIONS ............................................................................................................................. 313.4REMOVING SUBSETS ................................................................................................................................ 323.4.1Plug-in modules ............................................................................................................................ 323.4.2Rear face ....................................................................................................................................... 323.4.3Ventilators ..................................................................................................................................... 323.5DIAGNOSIS AND MAINTENANCE ............................................................................................................... 323.5.1General power fault ...................................................................................................................... 333.5.2Power fault on module .................................................................................................................. 333.5.3Clock fault ..................................................................................................................................... 344.NETWORK FAILURE SCENARIOS ..................................................................................................... 364.1NONE OF THE NETWORK EQUIPMENT IS OPERATIONAL ............................................................................ 364.2THE NETWORK MANAGEMENT TERMINAL (NETIS-M) IS THE ONLY OPERATIONAL EQUIPMENT ON THE NETWORK .......................................................................................................................................................... 374.3NO EQUIPMENT ON THE NETWORK IS OPERATIONAL EXCEPT FOR THE NETWORK MANAGEMENT TERMINAL (NETIS-M) WHICH INDICATES THAT SWITCH IS OPERATIONAL AND ALL THE BSS OUT OF ORDER ..................... 374.4BSS ANSWER CORRECTLY ON THE NMT, BUT MOBILES DO NOT REGISTER ONTO THE NETWORK. ............ 404.5MOBILES REGISTER CORRECTLY TO THE NETWORK BUT ARE UNABLE TO COMMUNICATE ....................... 424.5.1There is no operational phoning between the terminals ............................................................... 434.5.2No communications between terminals ......................................................................................... 444.6THERE IS NORMAL TRAFFIC BETWEEN MOBILES BUT NOT WITH THEIR DISPATCHING (OPERATOR STATIONS)  454.6.1No phones between Dispatching and the terminals....................................................................... 454.6.2No more signalling between Dispatching and the terminals ......................................................... 464.7PABX LINK PROBLEM ............................................................................................................................. 47
       NeTIS MAINTENANCE GUIDE – Version 1.1                    3/139  4.7.1Signalling and phone out of order ................................................................................................. 474.7.2Phone out of order ........................................................................................................................ 485.NETIS-B & NETIS-N SOFTWARE ........................................................................................................ 505.1NETIS-B ................................................................................................................................................. 505.1.1General .......................................................................................................................................... 505.1.2Launching the « Niveau 2.exe » application ................................................................................. 505.1.3NeTIS-B IP configuration .............................................................................................................. 525.2NETIS-N ................................................................................................................................................. 535.2.1General .......................................................................................................................................... 535.2.2Launching the NeTIS –N application ............................................................................................ 535.2.3NeTIS-N IP configuration ............................................................................................................. 566.PUTTY (REMOTE CONNECTION) ...................................................................................................... 587.WINSCP – SOFTWARE UPDATE ......................................................................................................... 618.NETWORKS ............................................................................................................................................. 688.1« STARS » NETWORK ............................................................................................................................... 688.1.1Settings .......................................................................................................................................... 698.2« RING » NETWORK ................................................................................................................................. 718.2.1Operating principles ..................................................................................................................... 728.2.2Fault analyses and diagnosis ........................................................................................................ 738.3ETHERNET LINK (IP) ................................................................................................................................ 848.3.1General presentation ..................................................................................................................... 848.3.2Communications between appliances ........................................................................................... 868.3.3Customers ...................................................................................................................................... 888.3.4Network setting .............................................................................................................................. 898.3.5Declaration of the NeTIS-B addresses on the tetra cs side ........................................................... 948.3.6Switch signalling and phone port .................................................................................................. 968.3.7Secondary network management terminal .................................................................................... 968.4MULTI-SITE AND MULTI NETWORK MANAGEMENT TERMINAL ............................................................... 1008.4.1Presentation ................................................................................................................................ 1008.4.2Network setting ............................................................................................................................ 1019.CPUBDT SOFTWARE AUTHENTICATION (LEVEL 2) ................................................................. 1069.1THE AUTHENTICATION NETWORK MANAGEMENT TERMINAL ................................................................. 1069.2USE........................................................................................................................................................ 1079.3INTEGRATION ........................................................................................................................................ 1089.3.1Equipment ................................................................................................................................... 1089.3.2Software ...................................................................................................................................... 1089.4PRESENTATION ...................................................................................................................................... 1099.4.1Why authenticated? ..................................................................................................................... 1099.4.2What is authenticated? ................................................................................................................ 1099.4.3When to authenticate? ................................................................................................................. 1099.4.4New equipment ............................................................................................................................ 1099.4.5Validity period ............................................................................................................................. 1099.4.6Upgrade ...................................................................................................................................... 1099.5HOW TO AUTHENTICATE? ...................................................................................................................... 1109.5.1Authentication by phone .............................................................................................................. 1109.5.2Internet authentication ................................................................................................................ 1109.6HANDLING ............................................................................................................................................. 1119.6.1General ........................................................................................................................................ 1119.7MANUAL AUTHENTICATION (BY PHONE) ............................................................................................... 1129.7.2Serial equipment connection ....................................................................................................... 1179.8AUTOMATIC AUTHENTICATION (VIA INTERNET) .................................................................................... 1189.8.1Network connection to the equipment ......................................................................................... 1189.8.2Multiple authentications (IP network) ........................................................................................ 1189.8.3Serial equipment connection ....................................................................................................... 1219.8.4No connection to the equipment .................................................................................................. 123
       NeTIS MAINTENANCE GUIDE – Version 1.1                    4/139  9.8.5Diagnosing an authentication problem on a NeTIS-B ................................................................ 12310.PABX GATEWAY .................................................................................................................................. 12510.1INTRODUCTION ................................................................................................................................. 12510.2EQUIPMENT....................................................................................................................................... 12710.3LED SIGNIFICATION ........................................................................................................................... 12710.4CONFIGURATION ............................................................................................................................... 12810.4.1Configuration to the IP PABX Gateway ................................................................................. 12810.4.2Configuration of the service network management terminal .................................................. 12811.MODULE DESCRIPTION .................................................................................................................... 12911.1POWER SUPPLY BOARD: .................................................................................................................... 12911.2CPU-BDT BOARD ............................................................................................................................ 13011.3CCT2 BOARD .................................................................................................................................... 13111.4COM BOARD .................................................................................................................................... 13211.5COM3 BOARD .................................................................................................................................. 13311.6DCTR BOARD ................................................................................................................................... 13411.7SUPIP BOARD ................................................................................................................................... 13511.8UCM BOARD .................................................................................................................................... 13611.9UCM2 BOARD .................................................................................................................................. 13711.10POWER AMPLIFIER (PA) .................................................................................................................... 138
       NeTIS MAINTENANCE GUIDE – Version 1.1                    5/139  1. PRESENTATION OF A STANDARD TETRA NETWORK System composition  A system is composed of:  One or more NeTIS-Ns and one or more sites, each one composed of one or more base BS stations (NeTIS-B).  Of a main NeTIS-M service network management terminal  and eventually one or more secondary NeTIS-M service network management terminal    Standard operator stations supplied by ETELM or supplied by other enterprises which form Dispatching  Portable and mobile terminals  SO, T2 links    Specific applications: for example data transmission.
       NeTIS MAINTENANCE GUIDE – Version 1.1                    6/139  2. NETIS -B 2.1 Presentation of the base station NeTIS-B is a duplex TETRA transmitter receiver connected to the switch using an IP or G703 or V11 link or it can operate autonomously (TETRAG). It manages a TETRA carrier which includes a signal channel and three phone channels.  The base station is composed of the following sub-sets:   A ventilation unit  An electronic unit with a backplane that can receive the following plug-in modules:  Power supply (ALIM)  CPU (CPUBDT)  Demodulator/ Down converter (DCTR) 2 slots for the use of 1 or 2 channel diversities.  Modulator/Up converter (UCM2)  Power amplifier (PA)        The synthetic view below is an example of 4 site architecture.
       NeTIS MAINTENANCE GUIDE – Version 1.1                    7/139          64Kb/s64Kb/sBS2Mb/s2Mb/sBSBS2Mb/sV24SWSWBST2IPT2PSTNPABXDispatchingsSWSWSWSWISIISIISIconsole d'administration
       NeTIS MAINTENANCE GUIDE – Version 1.1                    8/139  2.2 Different versions 2.2.1 NETIS BOX VERSION                     2 handled box NeTIS-B25 base station Locations for accessories (duplexer, hub …)
       NeTIS MAINTENANCE GUIDE – Version 1.1                    9/139  2.2.1.1 NeTIS-Box front view        2.2.2 RACKABLE VERSIONS 2.2.2.1 NeTIS B-25
       NeTIS MAINTENANCE GUIDE – Version 1.1                    10/139   2.2.2.2 NeTIS B25-C   2.2.2.3 NeTIS-B25-D
       NeTIS MAINTENANCE GUIDE – Version 1.1                    11/139   2.3 Rear face 2.3.1 NETIS-B25  2.3.2 NETIS –B25C
       NeTIS MAINTENANCE GUIDE – Version 1.1                    12/139   2.3.3 NETIS-B25D       2.4 Normal NeTIS-B operation When powered on, the NeTIS normal behaviour is the following: Two phases should be observed.  1st phase:  All the power indicators light (all the power supply module indicators and the different power supply indicators on each other module)  The CPUBDT board operates immediately and supplies all the clock signals the system needs; the 8 test signals (8Khz; 64 KHz; HT; ...) that are selectable using the (blue) switch are available on the BNC connector of the BDT module.  The INT indicator for the module flashes   The module loads its software and then runs it in several phases   If the CPUBDT is fitted with the GPS synchro module, the operation of this board is as follows:    The indicator flashes very slowly when the GPS module is present but reception is bad  The flashing is per second when the GPS module is present and reception is correct.
       NeTIS MAINTENANCE GUIDE – Version 1.1                    13/139    The transmission command, lower power and TOS indicators for the UCM board are off. Only the ALC indicator flashes   Verification of the state of the different modules and files - if a problem is detected the remaining operations may be halted.  2nd phase:  The CPUBDT board operates immediately and supplies all the clock signals the system needs; the 8 test signals (8 KHz; 64 KHz; HT; ...) that are selectable using the (blue) switch are available on the BNC connector of the BDT module.  The INT indicator for the module flashes   The ACT indicator on the CPUBDT board starts flashing which means that the programme is running   The EF/ indicator on the UCM board lights (the CPUBDT loads data into the module) and then the ALC and COR indicators light alternately  The MCCH indicator on the CPUBDT board lights if the BS manages the MCCH channel   The PLL and CTX indicators light and the ALC and COR indicators turn off => the BS is transmitting  The programme itself runs   The base station can be in one of the three following situations:  The base station has a correct link with the switch: the switch then uploads the base station configuration and the base station transmits.  The link with the switch is not established (or the switch is stopped) and the base station is not programmed to switch to degraded mode: in this case the base station remains on standby  The link with the switch is not established but the base station is programmed to switch to degraded mode: in this case the base station behaves as an automatic TRA-2M relay and transmits.  It is important to note that TETRA mobiles synchronise on the signal received from the relay transmitter or the base station and that they immediately cease all transmissions if the signal is not correct – it is therefore essential, when faced with a 'dumb' mobile, to start by checking the station transmission before checking anything on the mobile itself.
       NeTIS MAINTENANCE GUIDE – Version 1.1                    14/139    Power indicators - normally all on    CPUBdT board indicators  2a power supply normally on  2b 'IRQ’ normally fast flashing  2c 'ACT’ (Activity):  Static (on or off): the software is not operating correctly  Fast flashing: no reception board (DCTR) detected  Slow flashing (1 second): the base station has received a configuration from a switch  Very slow flashing (2 seconds): the base station has received a configuration from a switch but has switched to degraded mode (link with the switch has been cut)  Very fast flashing: software fault (Authentication or other problem)  2d 'MCCH’ indicates that the base station is carrying the site MCCH  2f  'LOC’ on if the internal time base is in slave mode –  to the GPS or the G703 link or V11 link 1 2
       NeTIS MAINTENANCE GUIDE – Version 1.1                    15/139    2g 'REF’  Presence of a synchronisation by link (communications board)   2f 'GPS’ This indicator has different flashing frequencies,  State 1: On 100ms / Off 100 ms No GPS module or defective GPS module  State 2: On 100ms / Off 900 ms GPS module OK / Satellite acquisition in progress  State 3: On 100ms / Off 5 s Module GPS OK / Antenna fault  State 4: On 1 s / Off 1 s GPS module OK / Satellites OK  State 5: On 2s / Off 2s GPS module OK / Satellites lost, synchronisation maintained for 8 min 30 s before switching to the internal reference The board's synchronisation source can be determined from the indicator states, 'LOC’ off whatever the state of the other indicators means synchronisation on the internal reference 'LOC’ and 'REF’ on mean synchronisation on the link 'LOC’ on and 'REF’ off and 'GPS’ state4 or state5 means synchronisation on the GPS     The clock test connector is controlled by selector 4     Position 0: 8 KHz (used on G703)     Position 1: 64 KHz (used on G703) Position 2: 10 MHz (internal reference clock)     Position 3: TETRA multiframe     Position 4: TETRA frame     Position 5: TETRA time slot     Position 6: 2,048 MHz (G703)     Position 7: TETRA symbols     Clock signal selector on test connector 3    GPS antenna connector  Opening for access to the clock frequency internal reference fine tuning potentiometer for the base station    Keyboard and mouse connector (diagnosis mode only)  Reset push button - this push button is accessible using a pointed object. Launching this command triggers a restart of the software which is indicated by a tone on the restart   COM1 serial connector   RJ45 connector for LAN network  Video connector for local screen connection (diagnosis mode only)    3 4 5 6 7 8 9 10 11
       NeTIS MAINTENANCE GUIDE – Version 1.1                    16/139    Location for board communications (option) or a COM4 board for network mode connection to a switch using a V11 or G703 link, or a COM S board for connection to a PABX in autonomous mode.  Location for an optional DCTR board for a second diversity reception channel.  DCTR operation indicators  14a ALIM  Normally on  14b ACT  Flashes once per second as soon as the software is running correctly  14c MFR  Flashes at high speed (perceivable by the lessening of the brightness of  the indicator) if the board is operating correctly  14d D1  On when a high level radio signal is received  14e D2 On when a block of high power radio data is received (threshold around -70dBm)  14f D3 Indication of the correct decoding of the TETRA block received as input  14g PL    Local oscillator slave mode indicator (normally on) When reception frequency of the board is changing the indicator flashes briefly.     UCM board operation indicators  15a ALIM  Normally on permanently  15b 28V  PA power supply: Normally on permanently  15c CTX  Radio transmission indicator  15d PLL    Transmission oscillator slave mode indicator: Normally on permanently  15e  IO  Reception of messages from the BS software indicator.  15f  ALC  Power slave mode operation indicator: normally permanently on  15g  LINE  PA linearization indicator  15h  LOWPW Low power alarm: normally off  15i  VSWR  Too high reflected power alarm: normally off  15j  TEMP  PA temperature alarm: normally off   '11111' transmission command - this push button can be accessed using a sharp object. When it is activated, the TETRA modulation signal is replaced by a series of 1 symbol which correspond to a pure radio carrier offset from the nominal frequency by +2.25 KHz - this function is used to check the frequency of a base station using an analogue radio bench.  Radio input - level between - 20 dBm and - 130 dBm    COM2 serial connector used to connect a local network management terminal    Radio output to the PA, nominal level - 5 dBm  12 13 14 15 16 17 18 19
       NeTIS MAINTENANCE GUIDE – Version 1.1                    17/139   2.5 Handling  2.5.1 PLUG-IN MODULES  The different modules must be plugged in or removed when power is off. Before removing a module, disconnect the eventual coaxial connections from its front face To remove a module, first remove the screws from the four corners of the front face of the module before gently extracting it by pulling it forward using the extraction handles.  The  power  supply  module  has  an  auxiliary  connector  (mains  input)  which  must  be disconnected before completely extracting the block.  Plugging a block back in must be done gently but firmly; once the block is correctly engaged on its connector, push hard on the set to place it correctly. 2.5.2 REAR FACE Before any interventions inside the chassis, the mains or 48V input at the rear of the chassis must be disconnected. The  rear  face  is  removed  by  unscrewing  the  4  screws  at  each  corner  of  the  rear  face;  the connection cables are long enough to be able to lay the face on a flat, cleared surface. 2.5.2.1 Ventilators Access to  the  ventilators differs depending on whether the NeTIS is  the  rack version  or the box version:   Rack version:  The mains power input located to the rear must be disconnected and then the rack mounting screws must be removed in order to extract the entire block from the front.  Box version:  Access to the ventilators is from the bottom: remove the screws on the sides and then lift the entire appliance; the lower part comes away.  2.6 Diagnosis / Maintenance WARNING: placing a base station in test on a site can cause major radio disruptions both on the  network  on  which  the  station  is  working  and  on  the  other  networks  in  the  region
       NeTIS MAINTENANCE GUIDE – Version 1.1                    18/139   (frequency change) - it is therefore strongly recommended to disconnect the base station from the antenna and to reconnect it to a load before any tests. 2.6.1 GENERAL POWER FAULTS  No indicators on   Check the general fuse located to the rear on the main power input block  Check that there is 220V  Check the position of the switch located on the rear face   If everything is correct:  Unplug the power supply module   Disconnect the auxiliary mains supply cable from the module  Check for 220V on this disconnected connector  If everything is correct: the power supply module is out of order  Otherwise  the  internal  mains  wiring  or  the  switch  or  the  mains  filter  are defective   Only the 220v indicator is on, on the power supply module:   Unplug the power supply module   Power off and on again  If the indicators turn on again there is either a short circuit on a power supply, or all the circuits were put on stand-by following a general power surge   One or mode indicators on the power supply module are off:  Turn off the TBS11  Wait for a few seconds  Turn the appliance back on  If the indicators are back on:   It indicates a power overload which caused the corresponding power supply circuit to go into safety mode   Check consumption  If the fault persists,   Turn the appliance off and unplug all the modules using the defective voltage;   Turn the appliance back on  If the fault persists,   The power supply module is defective  If the fault disappears,   Plug the removed modules back in, one by one (turning power off each time) to isolate the defective module
       NeTIS MAINTENANCE GUIDE – Version 1.1                    19/139   2.6.2 POWER FAULT ON A MODULE The power supply indicator on the module stays off even though the 5 volt indicator is on the power supply module:  Each module has a fuse soldered to the 5 volt input, close to the 96 point Europe connector. If this fuse is broken, it is possible to replace it and closely watch when powering back on; if the fuse breaks again, the module must be returned for repair.  Some modules also have fuses on other voltages; when these fuses break it is not shown by the power supply indicator (which only indicates the presence of a +5 volt power supply). 2.6.3 SWITCH INTERFACE FAULT The defect can come from the CPUBDT board, or from the IP link itself.  WARNING:  the  fault  diagnosis  must  be carried  out  taking into  account  the  settings  of  the degraded mode with the following cases:   A base station not programmed for  degraded mode with an interface  fault ceases all radio transmission  A base station programmed for degraded mode continues to transmit (as a TRA-2M) if there is an interface fault - the MCCH indicator is necessarily on (but the fact that it is on does not necessarily indicate a fault)  The  link  between  the  switch  and  the  BS  is  managed  by  the  CPU  board;  this  board  should always show:  The 5 volts indicator on  The yellow "ACT" indicator flashing slowly  The red "INT" indicator flashing quickly  The yellow "MCCH" indicator on if the BS is carrying the MCCH  Refer to the authentication chapter in the event of an intervention of the CPUBDT in the following cases:  Compact flash replacement  CPUBDT replacement   LEVEL2 software upgrade   When the link is correctly established the base station must synchronise on the link - i.e. the 'synchro signal present' and 'lock' indicators on the module should be on. 2.6.4 CLOCK FAULT  A high number of defects can have their origin in a clock fault; they should therefore be checked systematically before any research on the other signals.
       NeTIS MAINTENANCE GUIDE – Version 1.1                    20/139   *Check according to your measurement bench:  With a digital TETRA bench measure the frequency error at the UCM or PA output; it should be less than +-100Hz. If this is not the case, check the clocks.   With an analogue bench, check the frequency error at the UCM or PA output; it should be less than +-100Hz. To do this keep the 2.25 KHz test button on the face of the UCM pressed down in order to observe a pure offset carrier compared to the TX BS frequency of 2.25 KHz.   If this is not the case, check the clocks:   If the BS is synchronised on the GPS signal, then check the rhythm of the GPS indicator on the CPUBDT board      Or consult the GPS alarms on the network management terminal  by zooming on the NeTIS and then viewing the BDT status by clicking on the resource (See below)
       NeTIS MAINTENANCE GUIDE – Version 1.1                    21/139         If the BS is synchronised on its own LO (local oscillator), then adjust the CPUBDT LO using the potentiometer on the face (small hole)
       NeTIS MAINTENANCE GUIDE – Version 1.1                    22/139      If the BS is synchronised with a G703 link, then:  Adjust the remote SWITCH reference if the CPUBDT is not synchronised with an external clock source    If the SWITCH is synchronised with the GPS, the CPUBDT receives the GPS signal; check the rhythm of the GPS indicator on the CPUBDT     The  general check  of  the clock  signals  is  carried  out  from  the  front  face  of  the  CPU_BDT module using the selector located on the top.     All the clock signals must be perfectly recurrent, stable and exempt from jitter. Check in the following order:  position 7: TETRA clock symbol 18 KHz  position 5: clock time slot 70 Hz  position 4: clock frame 70 / 4 Hz = 17.5  position 3: multiframe 1.02 second (18 frames)  2.6.5 TRANSMISSION FAULT 2.6.5.1 The transmission command indicator, CTX on the UCM stays off Check that the UCM is receiving data from the central processing unit - this traffic is viewed via the IO indicator on the UCM front face which should light. If data is being received, the UCM board is defective. Otherwise check the central processing unit and the settings.
       NeTIS MAINTENANCE GUIDE – Version 1.1                    23/139    The transmission command indicator, CTX on the UCM is on  Measure the RF signal output from the UCM board On a spectrum analyser the signal should have the following form:  Central frequency Fo MHz / 10 KHz / division     Fo: programmed radio frequency   1 KHz bandwidth  10dB/division        If the spectrum only shows rays or if the spectrum overshoots the 25 KHz width, the UCM board is defective When a TETRA radio bench is available, the RF MHz signal will be analysed by the bench programmed on the RF frequency of your BS. The bench is configured as follows:  Base station test  Duplex test, Tx test  RF MHz carrier  Synchronisation acquisition on 'normal and synchro burst'  Constellation measurement  If the bench does not synchronise, check the spectrum as indicated previously. If the bench synchronises, it indicates the signal power and its frequency error; it should be less than +-100Hz. If this is not the case, check the clocks. (See §2.6.4)  The output level of the UCM board: around - 5 dBm. Pay attention to the power regulation from a set point supplied by the PA (Power Amplifier) which can vary this level. A check of the power of the PA output must also be carried out.    If no significant signal is present at this level, check that the UCM frequency band is compatible with the desired value - if so the UCM module is defective.
       NeTIS MAINTENANCE GUIDE – Version 1.1                    24/139    If  the  signal  is  correct  but  has  a  carrier  on  another  channel,  check  the  transmission channel  programming  and  check  the  clocks;  if  these  tests  are  correct,  the  UCM module is defective.   If the signal is correct  but on a  carrier  that is offset compared to  the nominal value, check the clocks or the synchronisation sources.  The complete constellation must comply with the diagram below:        If the constellation presents points that spread radially, check the level.  If the constellation presents points that spread at a tangent, check the clocks. 2.6.5.2 Possible alarms on the transmission chain If the TOS indicator on the UCM board is on, disconnect the antenna and replace it with a 50 Ohms load.  If the TOS indicator switches off, check the antenna connections.  If the 'low power' indicator is on, disconnect the antenna and replace it with a 50 Ohms load.  If the indicator stays on the PA is defective (check its power supply)  If the indicator switches off there is probably an antenna connection problem which caused a fault on the PA  If the 'low power' indicator is off, check the signal power output from the PA.
       NeTIS MAINTENANCE GUIDE – Version 1.1                    25/139   Also check the signal spectrum output from the PA; if the 'shoulders' lift, check the level at the PA input; if this level is correct and the spectrum at this access has no lifting, the PA is defective. 2.6.6 CORRECT TRANSMISSION 2.6.6.1 The mobiles do not attempt to register Check the network and mobile settings, especially:  The compliance of the channel declared on both sides  The mandatory nature or not of the registration  The type of services provided by the BS or the system (phone, data)  The MCC and MNC network numbers  The mobile's authorisation on the system  2.6.6.2 The mobiles attempt to register Place a reference mobile close to the BS receiver antenna on the site concerned in order that the receiver (or receivers for the diversity option) receive a very strong field. If the packet detection LED on the DCTR board briefly lights (each time a packet transmitted by  the  mobile  is  received),  the  receiving  chain  is  apparently  correct  and  the  fault  is  more likely to be found before the BS or the site concerned; otherwise the receiver chain must be checked. Checking a receiver chain Place a reference mobile close to the BS receiver antenna on the site concerned in order that the receiver (or receivers for the diversity option) receive a very strong field. If the packet detection LED on the DCTR board briefly lights (each time a packet transmitted by  the  mobile  is  received),  the  receiving  chain  is  apparently  correct  and  the  fault  is  more likely to be found before the BS or the site concerned; otherwise the receiver chain must be checked. Preliminary checks Connect the network management terminal  in order to monitor the RSSI level (direct access to  this  data  can  also  be  obtained  using  a  screen  and  keyboard  connected  to  the  central processing unit by launching the level measurement test  (RSSI) by pressing the  I key -  this function is terminated by pressing the key again - the field measurements scroll permanently for each installed receiver channel). Make sure that this monitoring is correctly deactivated in order to avoid disrupting the BS.     Disconnect the input to the antenna DCTR module (or to the duplexer).  The indicated RSSI level corresponds to the sound level at the input of the DCTR module; this level is normally between -120 and -126 dBm   If the sound level increases too much when the RF input of the DCTR is reconnected, the  BS  is  probably  correct  and  the  pollution  should  be  looked  for  upstream;  it  can
       NeTIS MAINTENANCE GUIDE – Version 1.1                    26/139   come  from  a  disturbance  or  an  incorrect  adjustment  of  a  duplexer  or  an  incorrect separation of the transmission and receiver antennas; to refine the diagnosis stop the BS transmission by disconnecting the CPU from the PA. Checking a DCTR circuit Connect an RF generator to the DCTR input to be tested, adjusted to the programmed nominal receiver frequency on the BS; the RSSI level indications should correspond within 3 dB to the test generator level within the range of - 20 to - 90 dBm.  Further, the D1 LED of the DCTR module  lights progressively as  the  generator level  exceeds  - 70  dBm. Several faults  can  be detected at this level:  The  viewed  RSSI  level  is  weak  and  almost  constant  whatever  the  generator  level; check the programmed receiver channel, check that the DCTR module is compatible with the frequency band, find out if it is responding on a neighbouring carrier; check the DCTR module  The viewed RSSI level varies correctly either at a weak level (- 90 to - 50 dBm), or at a strong level (- 50 to - 20 dBm) but not over the entire range: the DCTR module is defective  The viewed RSSI level varies correctly at a weak level but varies at levels greater than - 40 dBm and the D1 LED does not light, the DCTR module is defective   The  viewed  RSSI  level  varies  correctly  at  a  strong  level  but  not  at  a  weak  level although  the  noise  levels  are  correct:  the  DCTR  module  is  probably  defective,  it should be checked  2.6.7 CONFLICTS BETWEEN NMT ALARMS AND LED OF BS If there are different alarms on NMT for the same base station concerning VSWR, PA or Tx and the LEDs on the base station do not correspond to this, that’s means that there is an issue with the power alimentation of each board. In this case, the LED (+30v) on the supply board is very weak or off.  1 – switch off the base station 2 – disconnect on the PA board (rear of the rack), supply cable (2 pins, green connector) 3 – disconnect the alarm connector (SubD 15pins) 4 – start the base station If the LED +30v is ok, exchange the PA module If the LED is still not working, exchange the main supply board If both are not ok, check the different wire of supply
       NeTIS MAINTENANCE GUIDE – Version 1.1                    27/139   3. NeTIS-N 3.1 Presentation of the switch Each switch has the following modules:   Power supply (ALIM)  CPU (CPUBDT)  IP phone sequencing board (SUPIP)  one or more communications boards (COM3 or 4) for the connection of the switch to remote sites  one or more communications boards (COM3 or 4) for the connection of the switch to the PABXs  one or more CCT boards (CODEC)  one or more COMS boards for S0 link management  3.1.1 NUMBER OF COM 3 OR 4 BOARDS COM boards used for PABXs  One  Com  board  for  the  same  T2  access  should  support  30  simultaneous communications  COM boards used for radio sites: the number depends on the style of network:   Ring network  Star network  IP network => no need for boards
       NeTIS MAINTENANCE GUIDE – Version 1.1                    28/139   3.1.2 NUMBER OF CODEC BOARD (CCT) There should be as many CODECs as there are simultaneous phone communications exiting the TETRA world.   One CCT board supports up to 16 CODECs.  The phone communications exiting the TETRA world are:  Mobile to telephone and telephone to mobile communications  Mobile group to telephone and telephone to mobile group communications  Dispatching to mobile and mobile to dispatching communications  Mobile group to dispatching and dispatching to mobile group communications  Mobile(s)/Mobile(s) communications listened to by dispatching  On the other hand, communications routed to another switch are not considered as exiting the TETRA world (however they need a CODEC channel if they are to be listened to by a local dispatching or if the telephone is a third party).  The photo on the following page gives the position of the different boards in the chassis and the meaning of the indicators and their statuses during normal operation. 3.1.3 NUMBER OF COMS BOARDS The COMS board gives the possibility of having a S0 or T0 type phone connection. This type of link carries 1 signal channel (D) and 2 phone channels 'B).  This  board  is  therefore  adapted  to  a  small  network  wishing  to  limit  resources  dedicated  to phone communications (max. 2) and the cost of the access to the phone network.  The T0 or S0 access is processed in compliance with the VN4 and VN5 specifications of the EURO-RNIS network
       NeTIS MAINTENANCE GUIDE – Version 1.1                    29/139
       NeTIS MAINTENANCE GUIDE – Version 1.1                    30/139   3.2 Launching When  powering  on,  the  power  supply  indicators  light  and  the  time  base  board  operates immediately with the lighting of the following indicators:    TFB  "synchronisation  signal presence"  if  a  synchronisation  signal  is  configured  and present,    LOC indicating the internal reference oscillator is correctly locked.  The  CPU  board  initialises  and  loads  its  resident  flash  disk  software;  this  software  is  then launched with:  1. The survey of available resources (COM and CCT boards).  2. The loading of the configuration for all the switch boards.  At  this  time  the  link  with the  network management  terminal  is  established  and the  standby screen for the network management terminal displays the representation of the link with the switch in green.  The switch detects the presence of the base stations and uploads their configuration; each base station successfully uploaded is declared available in the resources and the representation of the  link  with them  on  the standby screen  of  the  network management  terminal    changes to green.  The traffic with the base station is established and it starts radio transmission.  If it  is selected  to carry  the site  MCCH, the  'broadcast' data  is  transmitted  and  mobiles can register.  As  soon  as  the  SUPIP  board  is  initialised  it  transmits  synchronisation  packets  on  the  IP network (rhythm of about 30 milliseconds).  When  a  COM  board  is  programmed  as  a  T2  interface  with  a  switchboard,  it  transmits connection data and, as soon as it receives data, the switch declares the resource as available - the link representing this connection  changes to green on the standby screen of the network management terminal  .
       NeTIS MAINTENANCE GUIDE – Version 1.1                    31/139   3.3 Normal operations During normal operation the state of the indicators is as shown in the table below:  Board  Indicators  state ALIM  220v  On 28v  On 12v  On 5v  On -12V  On CPUBDT  + 5v  On TLY  Slow flashing LOC  Off TFR  Off + 5v  On INT  Fast flashing ACT  Slow flashing MCCH  On for the active switch SUPIP  + 5v  On INT  Fast flashing ACT  Flashing if phone traffic (reception of phone blocks) CCT2  + 5 v  On MFR  Slow flashing D1  Off / flashes during communications (reception of phone blocks) - odd channels D2  Off / flashes during communications (reception of phone blocks) - even channels COM3 or COM4 Site communication mode COM3 Site communication mode + 5v  On ACT  Slow flashing RX A  On = Frame locked in G703                  or clock presence in V11 flashes if star network fixed if ring network ERR A  Off – bit error in G703 RX B   ERR B  On if no link    COM3  or COM 4  T2 mode + 5v  On ACT  Slow flashing RX A  On = Frame locked in G703   ERR A  On RX B  Off ERR B  Off    COM S0  + 5v  On ACT  Slow flashing RX   On = synchronisation with remote equipment  B1  On during communication B2  On during communication
       NeTIS MAINTENANCE GUIDE – Version 1.1                    32/139   3.4 Removing subsets 3.4.1 PLUG-IN MODULES  The different modules must be plugged in or removed when power is off. Before removing a module, disconnect the eventual coaxial connections from its front face. To remove a  module,  first remove the screws from the four corners of the front face of the module before gently extracting it by pulling it forward using the extraction handles. Before any interventions inside the chassis, the mains or 48V input at the rear of the chassis must be disconnected.  The  power  supply  module  has  an  auxiliary  connector  (mains  input)  which  must  be disconnected before completely extracting the block.  Plugging a block back in must be done gently but firmly; once the block is correctly engaged on its connector, push hard on the set to place it correctly. 3.4.2 REAR FACE The  rear  face  is  removed  by  unscrewing  the  4  screws  at  each  corner  of  the  rear  face;  the connection cables are long enough to be able to lay the face on a flat, cleared surface. 3.4.3 VENTILATORS Access to the ventilators differs depending on the rack or box versions: for the rack version, the mains power input located to the rear must  be disconnected and then the rack mounting screws must be removed in order to extract the entire block from the front. In  the  box  version,  access  to  the  ventilators  is  from  the  bottom:  remove  the  screws  on  the sides and then lift the entire appliance; the lower part comes away. 3.5 Diagnosis and maintenance WARNING:  putting  a  switch  in  test  mode  can  cause  major  radio disturbances both  on  the network  on  which  the  station  is  working  and  on  other  networks  in  the  region  (frequency changes)  -  it  is  therefore  strongly  recommended  to  disconnect  the  base  stations  before  any tests
       NeTIS MAINTENANCE GUIDE – Version 1.1                    33/139   3.5.1 GENERAL POWER FAULT No indicators on:   Check the general fuse located to the rear on the main power input block  Check that there is 220V  Check the position of the switch located on the rear face    If everything is correct:  Unplug the power supply module   Disconnect the auxiliary mains supply cable from the module  Check for 220V on this disconnected connector  If everything is correct: the power supply module is out of order  Otherwise  the  internal  mains  wiring  or  the  switch  or  the  mains  filter  are defective  Only the 220v indicator is on the power supply module:   Unplug the power supply module   Power off and on again  If  the  indicators  turn  on  again  there  is  either  a  short  circuit  on  a  power  supply,  or  all  the circuits were put on stand-by following a general power surge.  One or mode indicators on the power supply module are off:  Turn off the switch  Wait for a few seconds  Turn the appliance back on If the  indicators  are back  on:  it was  a  power overload  that caused the corresponding power circuit to switch to safety mode, check consumption  If  the  fault  persists,  turn  the  appliance  off  and  unplug  all  the  modules  using  the  defective voltage;   Turn the appliance back on  If the fault persists, the power supply module is defective. If the fault disappears, plug in the removed modules one by one (powering off between each one) in order to isolate the defective module 3.5.2 POWER FAULT ON MODULE The power supply indicator on the module stays off even though the 5 volt indicator is on the power supply module:  Each module has a fuse soldered to the 5 volt input, close to the 96 point Europe connector. If this fuse is broken, it is possible to replace it and closely watch when powering back on; if the fuse breaks again, the module must be returned for repair.  Some modules also have fuses on other voltages; when these fuses break it is not shown by the power supply indicator (which only indicates the presence of a +5 volt power supply).
       NeTIS MAINTENANCE GUIDE – Version 1.1                    34/139   3.5.3 CLOCK FAULT  A  high  number  of  defects  can  have  their  origin  in  a  clock  fault;  they  should  therefore  be checked systematically before any research on the other signals. *Check on one BS in the network depending on your measuring bench:  With a digital TETRA bench measure the frequency error at the UCM or PA output; it should be less than +-100Hz. If this is not the case, check the clocks.  With  an  analogue  bench,  check  the  frequency  error  at  the  UCM  or  PA  output;  it should be less than +-100Hz. To do this keep the 2.25 KHz test button on the face of the UCM pressed down in order to observe a pure offset carrier compared to the TX BS frequency of 2.25 KHz.  If this is not the case, check the clocks:  -If the SWITCH is synchronised on the GPS signal, then check the rhythm of the GPS indicator on the CPUBDT board of the SWITCH     -If the SWITCH is synchronised on its own LO (local oscillator), then adjust the CPUBDT LO using the potentiometer on the face (small hole)         The  general check  of  the clock  signals  is  carried  out  from  the  front  face  of  the  CPU_BDT module using the selector located on the top.
       NeTIS MAINTENANCE GUIDE – Version 1.1                    35/139   All the clock signals must be perfectly recurrent, stable and exempt from jitter. Check in the following order:   Position 7: TETRA clock symbol 18 KHz  Position 5: clock time slot 70 Hz  Position 4: clock frame 70 / 4 Hz = 17.5  Position 3: multiframe 1.02 second (18 frames)
       NeTIS MAINTENANCE GUIDE – Version 1.1                    36/139   4. NETWORK FAILURE SCENARIOS 4.1 None of the network equipment is operational The  standby  screen  on  the  network  management  terminal indicates  that  the  switch  is  no longer connected. The base stations are not transmitting or are in degraded mode. The dispatching stations are no longer operational. Telephone access is no longer operational.  First  check  the  position  of  the  switching  unit  if  the  installation  has  one.  If  everything  is normal the fault probably originates from the CPU board. Reset it by pushing a pointed object into the hole on the front face of the CPU board.   If, after the reset, everything seems to operate correctly, check that the link with the service network  management  terminal  is  correct (view  the  network  management  terminal's  standby screen).  If  the  installation  has  a  switch  unit,  check  its  correct  operation  because  the  switch may have occurred - this test is carried out by cutting the junction on the COM2 port of the active  switch  with  the  switch  unit  (the  other  switch  must,  of  course,  be  operational  for  the test).  If the  installation  does  not  seem to  start  up,  connect  a VGA  screen  to  the  front face  of the CPU  board  and  check  its  indications  after  resetting.  The  software  loading  and  programme launch steps are indicated. After the software is loaded, indications are given of the resources detected  by  the  CPU  board  -  check  that  the  displayed  resources  correspond  to  the  various boards located in the chassis. If the run fails, carry out software reload.  If the problem comes from the non-loading of the OS, change the flash board and reconfigure the network
       NeTIS MAINTENANCE GUIDE – Version 1.1                    37/139   If, after re launch, the service console indicates that the switch connection is correct, refer to the  following  case  where  only  the  network  management  terminal  is  operational  on  the network. Otherwise, after checking the correct operation of the network management terminal and the link, change the CPU board. 4.2 The network management terminal (NeTIS-M) is the only operational equipment on the network The network management terminal’s standby screen shows that the switch is connected and that  no  other  equipment  is  connected  (base  station,  telephone)  or  these  indications  are random. The base stations are not transmitting or are in degraded mode. The dispatching stations are no longer operational. Telephone access is no longer operational.  This is probably a fault in the CPU board, or a problem with the switch internal bus; in order to find out, disconnect the switch extension unit if it has one and reset the CPU board:    If all the resources connected to the main switch unit are operational again, the fault comes from the extension (or the cable connecting it)  Otherwise  remove  all  the  communications  boards,  the  codec  boards  and  the  SUPIP board  from  the  chassis.  Reset  the  CPU  board and  check  that  it  detects  no  resources (except for the time base board); reconnect a communications board and check that it is detected; if it is not detected, the CPU board is defective.  If the resource is detected, continue reconnecting the boards one by one and check each time that they are detected correctly. If a board is not detected or is detected with a wrong location number, that board is defective and may have caused a major disturbance to the entire equipment.      4.3 No equipment on the network is operational except for the network management terminal (NeTIS-M) which
       NeTIS MAINTENANCE GUIDE – Version 1.1                    38/139   indicates that switch is operational and all the BSs out of order  The network management terminal’s standby screen shows that the switch is connected and that  no  other  equipment  is  connected  (base  station,  telephone  ...)  or  these  indications  are random.
       NeTIS MAINTENANCE GUIDE – Version 1.1                    39/139   The resources are correctly detected by the CPU       Check the state of the 'Rx’ and 'ERR’ indicators on the communications boards (COM)      If all the indicators are in a normal state, the problem comes from a resource assignment error  Reload the equipment configuration file from the network management terminal (download).
       NeTIS MAINTENANCE GUIDE – Version 1.1                    40/139          4.4 BSs answer correctly on the NMT, but mobiles do not register onto the network. The base stations  reply normally to  a 'zoom' request from  the service  network management terminal.  Mobiles do not register into the network. In the event file there are no mobile registrations; the messages below cannot be found in the log.    In  this  specific  case  there  is  necessarily  a  problem  on  the  site  due  to  the  absence  of registration.

Navigation menu