Klipsch CS700SUB Subwoofer Part for Audio/Video System User Manual new
Klipsch L.L.C. Subwoofer Part for Audio/Video System new
Klipsch >
Contents
- 1. Part 1
- 2. Part 2
Part 1

CS-700
Owner's Manual
Chapter 1: Connecting Your System
Reading this Manual ......................................................................1
Step-by-Step Connections .............................................................1
Step 1: Unpack the box..................................................................2
Step 2: Put the batteries in the remote control .............................2
Step 3A: Set-top box connection ...................................................3
Step 3B: TV audio connection........................................................4
Step 4: Connect Klipsch System to the TV's Input.........................5
Step 5: Connect the speakers........................................................6
Speaker Setup Considerations................................................6
Step 6: Connect other components (OPTIONAL) ...........................7
Step 7: Connect AM and FM antennas...........................................8
Step 8: Turn on the TV and the Klipsch system ..............................8
Step 9: Complete the on-screen setup ..........................................9
Your Klipsch Controller .................................................................11
Buttons .................................................................................11
Display ..................................................................................11
The basics ................................................................................... 12
Switching between media—
TV, DVD, Radio, CD, etc........................................................ 12
Chapter 2: Remote Control
Buttons........................................................................................ 13
Programming your remote control............................................... 14
Chapter 3: Operation
Compatible discs ........................................................................ 15
Incompatible discs...................................................................... 15
Regional coding........................................................................... 15
Playing a disc .............................................................................. 15
DVD and VCD playback.................................................................16
Transport...............................................................................16
Navigating info banners ...............................................................17
Playing CDs ................................................................................. 18
Playing CDs with mp3 or JPEG files............................................. 19
Playing the radio ......................................................................... 19
Setting up presets ............................................................... 19
On screen info banner ................................................................. 19
Chapter 4: Menu System
On screen menu system .............................................................. 20
Navigating menus........................................................................ 20
On-screen menus .........................................................................21
Audio.....................................................................................21
Setup ....................................................................................21
Languages.............................................................................21
Parental control ................................................................... 22
Remote control .................................................................... 22
Chapter 5: Troubleshooting
General problems................................................................. 23
Video problems .................................................................... 23
Audio problems.................................................................... 23
Remote control problems..................................................... 23
Playback problems............................................................... 23
Radio problems.................................................................... 23
Chapter 6: Care and Maintenance
Klipsch System..................................................................... 24
Cleaning ............................................................................... 24
Handling and Caring for Discs.............................................. 24
Remote Control Codes ......................................................... 25
Warranty............................................................................... 27
FCC Information................................................................... 27
Appendix I
Connection Overview................................................................... 28
Input jacks ........................................................................... 28
Output jacks......................................................................... 28
Audio connection options .................................................... 28
Video connection options .................................................... 28
Table of Contents
WARNING: This product is intended to be operated ONLY from the AC Voltages listed on the
back panel or included power supply of the product. Operation from voltages other than those
indicated may cause irreversible damage to the product and void the product's warranty. The
use of AC Plug Adapters is cautioned because it can allow the product to be plugged into
voltages in which the product was not designed to operate. If the product is equipped with a
detachable power cord, use only the type provided with your product or by your local distributor
and/or retailer. If you are unsure of the correct operational voltage, please contact your local
distributor and/or retailer.
CAUTION: Place the equipment near a main power supply outlet and make sure that you can
easily access the power breaker switch.
NOTE: If the AC mains connection provides a third prong for ground (Class 1 devices), the
device shall be connected to a main socket outlet with a protective earthing connection.
NOTE: If a DVD is present, the following laser safety statement applies:
LASER SAFETY: This unit employs a laser. Due to possible eye injury, only a qualified
service person should remove the cover or attempt to service this device.
CAUTION: Use of controls or adjustments or performance of procedures other than those
specified herein may result in hazardous radiation exposure.
This device is protected by U.S. patent numbers 4,631,603 and 4,577,216 and 4,819,098 and
4,907,093 and other intellectual property rights.
DVD Safety Information
This DVD player is designed and manufactured to respond to the Region Management Information. If the
region number of a DVD disc does not correspond to the region number of this DVD player, this player
cannot play the disc. The region number for this DVD player is Region No 1.
DVD Copy Protection
In accordance with the DVD standard, your DVD player is equipped with a Copy Protection System,
which can be switched on and off by the DVD disc itself, in order to make any recording of the relevant
DVD disc onto a videotape of very poor picture quality, or even impossible. This product incorporates
copyright protection technology that is protected by method claims of certain U.S. patents and other
intellectual property rights owned by Macrovision Corporation and other rights owners. Use of this
copyright protection technology must be authorized by Macrovision Corporation, and is intended
for home use only unless otherwise authorized by Macrovision Corporation. Reverse engineering or
disassembly is prohibited. This DVD player does not play discs that are pirated. The unauthorized use
and recording of copyright and patented material is considered piracy.
INDEX page i/ii
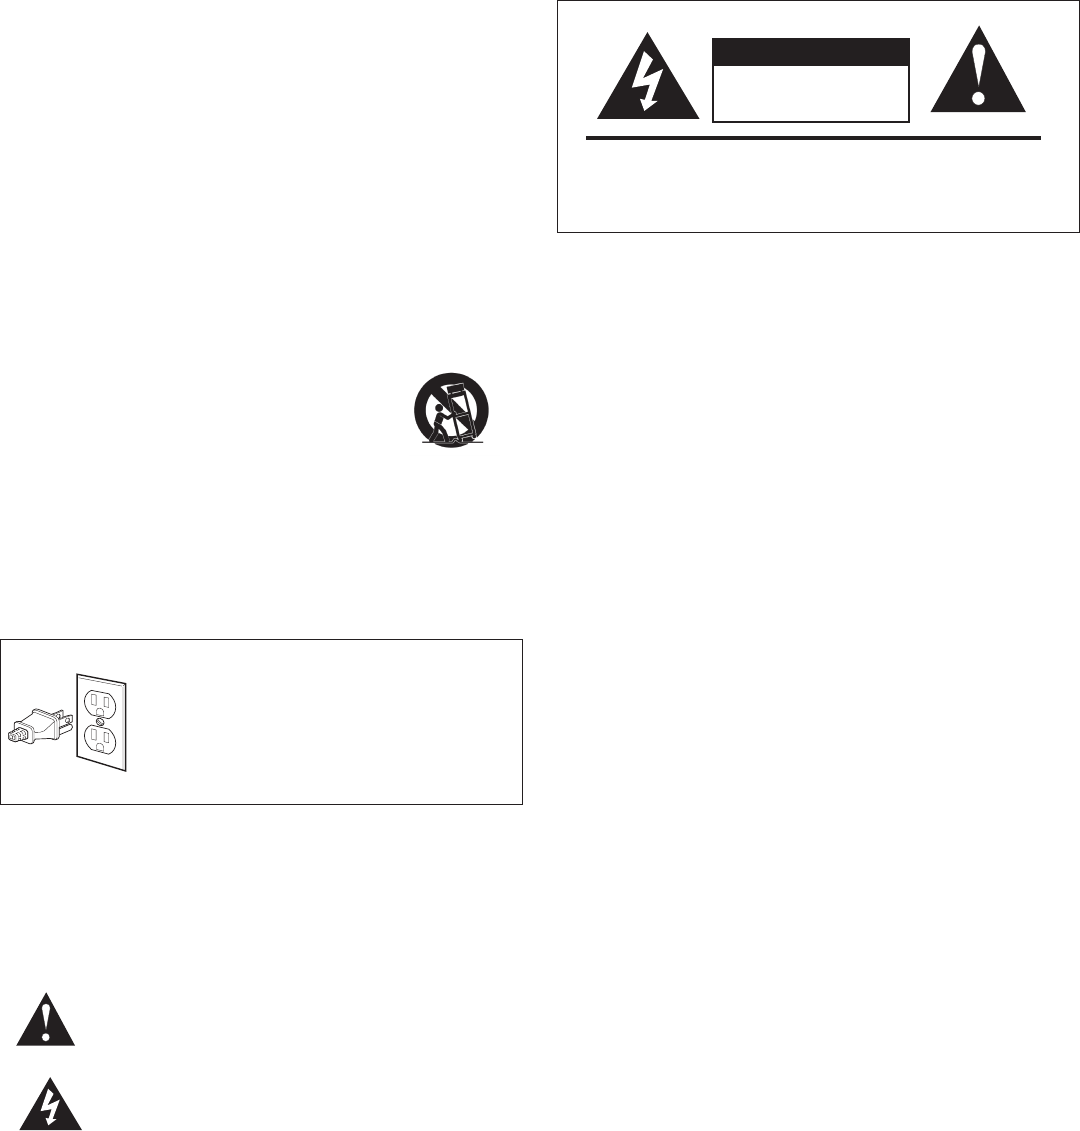
Important Safety Information
For Your Safety: The AC power plug is polarized (one blade is
wider than the other) and only fits into an AC power outlet one
way. If the plug won’t go into the outlet completely, turn the plug
over and try to insert it the other way. If it still won’t fit, contact a
qualified electrician to change the outlet, or use a different one.
Do not attempt to bypass this safety feature.
W A R N I N G
RISK OF ELECTRIC SHOCK.
DO NOT OPEN.
WARNING: Do Not Open! Risk of Electrical Shock. Voltages in this equipment
are hazardous to life. No user-serviceable parts inside. Refer all servicing to
qualified service personnel.
The exclamation point, within an equilateral triangle is intended to alert the
user to the presence of important operating and maintenance (servicing)
instructions in the literature accompanying the product.
The lightning flash with arrowhead symbol within an equilateral triangle,
is intended to alert the user to the presence of uninsulated “dangerous
voltage” within the product’s enclosure that may be of sufficient magnitude to
constitute a risk of electrical shock to persons.
WARNING:
To reduce the risk of fire or electrical shock, do not expose this apparatus to
rain or moisture.
WARNING: Batteries (battery pack or batteries installed) shall not be exposed to
excessive heat such as sunshine, fire or the like.
WARNING: No naked flame sources – such as candles – should be placed on
the product.
READ these instructions.
KEEP these instructions.
HEED all warnings.
FOLLOW all instructions.
DO NOT use this apparatus near water.
CLEAN ONLY with dry cloth.
DO NOT block any ventilation openings. Install in accordance with the
manufacturer’s instructions.
DO NOT install near any heat sources such as radiators, heat registers,
stoves, or other apparatus (including amplifiers) that produce heat.
DO NOT defeat the safety purpose of the polarized or grounding type
plug. A polarized plug has two blades with one wider than the other. A
grounding type plug has two blades and a third grounding prong. The
wider blade or the third prong is provided for your safety. If the provided
plug does not fit into your outlet, consult an electrician for replacement of
the obsolete outlet.
PROTECT the power cord from being walked on or pinched, particularly
at plugs, convenience receptacles, and the point where they exit from
the apparatus.
ONLY USE attachments/accessories specified by the manufacturer.
USE only with a cart, stand, tripod, bracket, or table specified by the
manufacturer, or sold with the apparatus. When a cart
is used, use caution when moving the cart/apparatus
combination to avoid injury from tip-over.
UNPLUG this apparatus during lightning storms or when
unused for long periods of time.
REFER all servicing to qualified service personnel. Servicing is required
when the apparatus has been damaged in any way, such as power-supply
cord or plug is damaged, liquid has been spilled, objects have fallen into
the apparatus, the apparatus has been exposed to rain or moisture, does
not operate normally, or has been dropped.
1.
2.
3.
4.
5.
6.
7.
8.
9.
10.
11.
12.
13.
14.
DO NOT expose this apparatus to dripping or splashing and ensure
that no objects filled with liquids, such as vases, are placed on the
apparatus.
To completely disconnect this apparatus from the AC Mains, disconnect
the power supply cord plug from the AC receptacle.
The mains plug of the power supply cord shall remain readily operable.
15.
16.
17.

Thank you for purchasing the Klipsch CS-700 System. After reading this
manual and connecting your system, you will hear the results of more than 60
years of stringent engineering and class-leading research and development.
Like all Klipsch products, your Klipsch CS-700 features Klipsch Tractrix® Horn-
loaded technology—the guiding design for the first Klipschorn® developed in
1946 and every product that has followed. Horn-loading allows your speakers
Thank You
to deliver high sensitivity, low distortion, flat frequency response and wide
dispersion, which translates to unequaled power, detail, and dynamics: the
hallmark of the “Klipsch Sound.” Please be sure to return the enclosed product
registration card or register your product at www.klipsch.com so we are better
able to serve you. Again, thank you for choosing Klipsch and we hope that your
Klipsch CS-700 brings life to your music and movies for many years.
CHAPTER 1: CONNECTING YOUR SYSTEM
Reading this Manual
This manual uses different style conventions and typefaces to distinguish them from the body text. Throughout the manual, the following conventions are used:
Step-by-Step Connections
This chapter is divided into steps to get you up and running as quickly as possible. Because TVs have so many different options these days, several
connection scenarios are provided. Below is a summary of the steps you will take to get connected.
Example
DISC, AUX 1, SAT/CAB, GUIDE, INFO, DVD MENU
Audio, Setup, Languages, Parental Control
AUX 1 INPUT, VIDEO OUTPUT, COMPONENT
Input and Output Jacks
Text
Button names on the remote and unit appear in
ALL
CAPS, BOLD
.
On-screen menus appear in Bold, Italics.
Input and output jack names appear in
ALL CAPS
.
Black bar sections provide technical information.
Step 1: Unpack the box Page 2
Step 2: Put batteries in the remote control Page 2
Step 3: Connect TV signal output to Klipsch input
3A: Set-top box Connection Page 3
Use this connection if your TV has a cable box, satellite receiver, or HD Receiver set-top box connected to it
3B: TV Audio Connection Page 4
Use this connection if you receive your TV signal via regular cable (no cable box) or an off-air antenna
Step 4: Connect Klipsch system to TV’s VIDEO INPUT Page 5
Step 5: Connect the speakers Page 6
Step 6: Connect other components Page 7
Step 7: Connect AM and FM antennas Page 8
Step 8: Turn on TV and Klipsch system Page 8
Step 9: Complete the on-screen setup Page 9
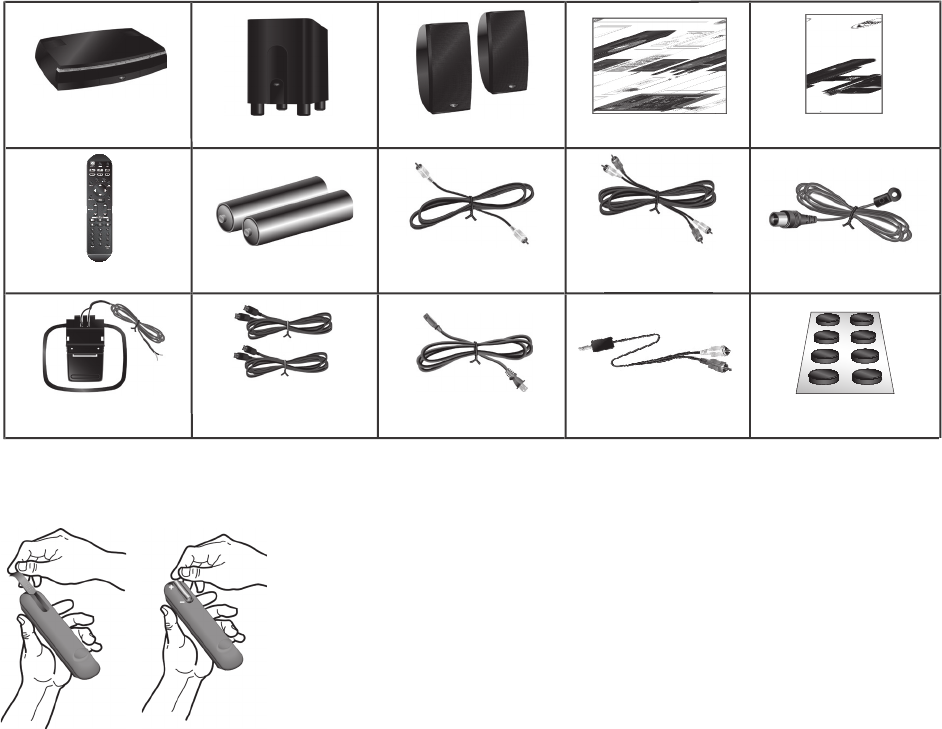
Step 2: Put the batteries in the remote control
Subwoofer Left/Right SpeakersController
Remote Control
2 AA Remote Batteries
Setup Guide
Composite Video
Cable (Yellow)
Left/Right Audio Cable
(Red and White) FM Antenna
AM Antenna
00
0
000 0
0
0
0
0
0
0
SOURCE PRESETS PLAY OPEN/CLOSE
Owner’s Manual
(Red and White)
0
2 20-Ft. Left/Right
Speaker Cables
Subwoofer
Power Cable Rubber Pads
0
VolumeChannel
Input Surround
Mode
DVD
Menu
Seek / Track
Exit
1 2 3
4 5 6
7 8 9
0
ST
E
P 1:
U
npack the box
Make sure you have the following items as you unpack your Klipsch system.
Mini plug to
RCA Adapter
CONNE
C
T
I
ONS
page 1/
2
Locate s
upplied remote control and batteries.
R
emove the battery compartment cover on the back of the remote. Push down on the
tab and lift the cover.
Insert the two (2) “AA” batteries. Make sure the polarities (+ and -) are aligned
correctly with the polarities inside the remote.
Replace the cover.
1.
2.
3.
4.
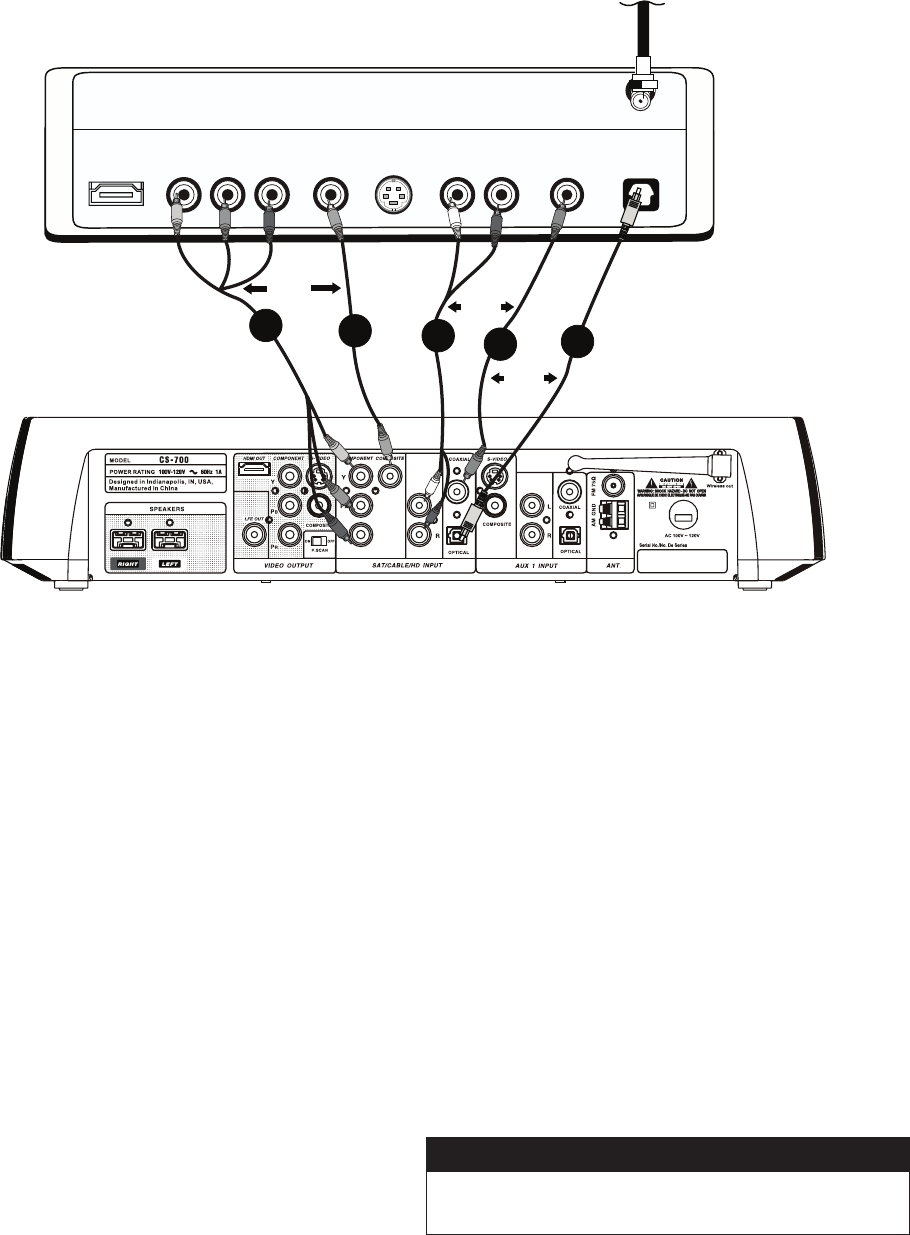
Disconnect the cable on your cable, satellite or HD set-top box that is
connected to your TV (you need to connect 1 video and 1 audio).
Connect the VIDEO—look at the options available on the set-top box
and choose 2A or 2B.
To maintain best picture quality—if the back of the set-top box
has any COMPONENT VIDEO (Y, PB, PR) OUTPUT jacks, plug
corresponding cable(s) into the jack(s) on the set-top box and to
the Klipsch CS700’S SAT/CBL/HD INPUT COMPONENT
jacks (Y to Y; PBto PB, PRto PR). If you use 2A, you must
also connect the corresponding output from the Klipsch controller’s
“VIDEO OUTPUT” section to your TV to ensure that you get a picture.
These cables have not been included with the Klipsch system.
When using the HDMI connection you must turn Progressive Scan
(7:*(5) “On”. If the HDMI connection are used and 7:*(5
is “Off”, you will not see a picture.
If the set-top box has a VIDEO (yellow)
OUTPUT
jack for video, plug
the supplied yellow video cable into that jack and to the Klipsch
system’s
SAT/CABLE/HD INPUT COMPOSITE
(yellow) jack.
1.
2.
*()3,05
6<;7<;:
=0+,6:=0+,6
*64765,5;
@ 7)79
*()3,)6?ZOV^U
+0.0;(3
*6(?0(367;0*(3
(<+06
3 9
*()3,:0.5(3
6969
69
2A 2B 3C
3B
3A
/+406<;
2307:*/*65;9633,9
STEP 3A: Set-Top Box Connection
Connect the AUDIO—look at the options available on the set-top box
and choose 3A, 3B, 3C.
Connect the supplied audio cables to the AUDIO LEFT (white) and
AUDIO R
IGHT
(red) jacks on the back of the set-top box and to the
Klipsch system’s
SAT/CABLE/HD INPUT LEFT
(white) and
RIGHT
(red) jacks.
If the set-top box has Digital AUDIO (
COAXIAL
), connect appropri-
ate cable to the set-top box AUDIO COAXIAL jack and to the
SAT/CABLE/HD INPUT COAXIAL
jack.
If the set-top box has Digital AUDIO (
OPTICAL
), connect appropriate
cable (not supplied) to the Klipsch System’s
SAT/CABLE/HD INPUT
OPTICAL
jack. You will first need to remove the plastic dust plug.
Note: If you connect a high definition Y, PB, PRINPUT, you must also
connect the corresponding Y, PB, PROUTPUT to your TV. If you connect
HDMI, you must also connect the corresponding output from the Klipsch
controller’s “VIDEO OUTPUT” section to your TV to ensure that you get a
picture. These cables have not been included with the Klipsch system.
3.
A.
B.
C.
Use this connection if your TV has a cable box, satellite receiver or HD receiver set-top box connected to it.
See next page (3B) if no set-top box is used.
A.
B.
Please see appendix I (page 28) for the basics on how input
and output jacks work with your Klipsch system.
Input and Output Jacks
2307:*/*65;9633,9
*6476:0;,
05 7< ;
3
9
:=0+,6
=
05 7< ;
3
9
:=0+,6
=
05 7< ;
7
)
@
7
9
05 7< ;
7
)
@
7
9
*64765,5;
6<; 7 <;
7
)
@
7
9
*64765,5; (<+06=0+,6
6<; 7 <;
3
9
=
DIGITAL OPTICAL
OUTPUT
DIGITAL COAXIAL
OUTPUT
ANTENNA B
INPU T
ANTENNA A
INPUT
;=)(*27(5,3
*()3,69
6--(09
(5;,55(
1B 1C 1A
69 69
STEP 3B: TV Audio Connection
If you don't have a set-top box connected to your TV (you either have cable
coming out of the wall or an off-air antenna, such as HD), simply connect
the Audio OUTPUT jacks on the TV to the AUDIO INPUT jacks on the Klipsch
system. If you want the TV sound to come through the Klipsch system, you
need to make this audio connection.
Choose the best TV AUDIO connection available (1A, 1B, or 1C).
If your TV doesn’t have DIGITAL OPTICAL or DIGITAL COAXIAL
for the audio connection, connect standard audio cables (you can
use the supplied cables for this if you have not already used them)
to the AUDIO LEFT (white) and AUDIO RIGHT (red) OUTPUT jacks
on the back of your TV and to the Klipsch system’s
SAT/CAB/HD
INPUT
jacks that are labeled
L
and
R.
1.
A.
If your TV has a DIGITAL AUDIO (
COAXIAL
) OUTPUT jack, connect
appropriate cable (not supplied) to the TV’s AUDIO COAXIAL
OUTPUT jack and to the Klipsch System’s
SAT/CAB/HD INPUT
COAXIAL
jack.
If your TV has a DIGITAL AUDIO (
OPTICAL
) OUTPUT jack, connect
appropriate cable (not supplied) to it and the other end to the
Klipsch System’s
SAT/CAB/HD INPUT OPTICAL jack.
2. Make note of which AUDIO INPUT you used (SAT/CAB, AUX 1, AUX 2),
as you will need to enter the correct AUDIO INPUT setting during the
on-screen setup procedure in Step 9.
B.
C.
Use this connection if you receive your TV signal via regular cable (no cable box) or with an off-air antenna.
CONNECTIONS page 3/4
Please see appendix I (page 28) for the basics on how input
and output jacks work with your Klipsch system.
Input and Output Jacks
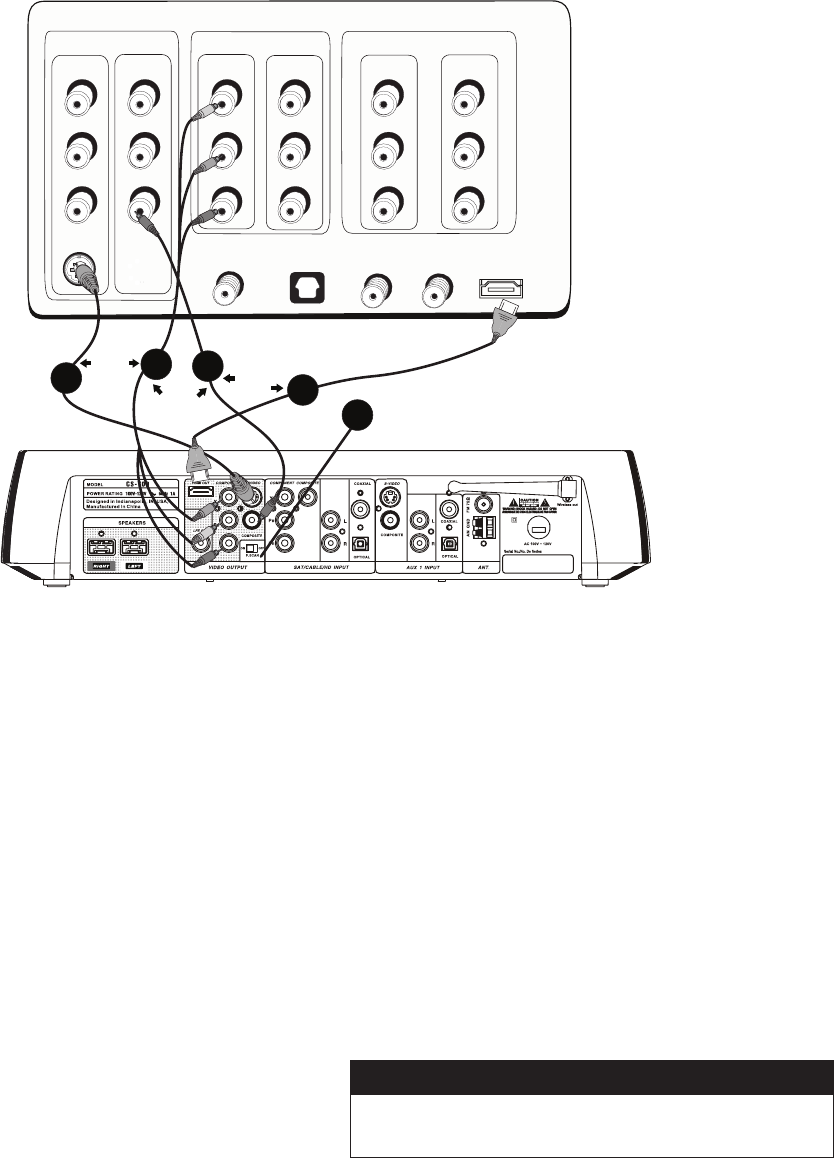
If your TV has an HDMI INPUT, connect the corresponding HDMI cable
(not supplied) from the HDMI OUTPUT of the Klipsch system to the
HDMI INPUT of the TV.
If you’re using COMPONENT jacks or HDMI and your TV supports
progressive scanning technology (see the TV owner’s manual if you
don’t know whether your TV is a progressive scan TV), slide the
7:*(5
switch on the back of your Klipsch system to the
65
position.
If you put the 7:*(5 switch in the 65 position and your TV doesn’t
support progressive scan, you won’t see a picture on the TV screen.
4.
5.
If your TV doesn’t have HDMI or COMPONENT, but has S-VIDEO,
connect S-VIDEO cable (not supplied) to the Klipsch system’s
VIDEO
OUTPUT S-VIDEO
jack and to the corresponding
S-VIDEO
jack on the TV.
If your TV has COMPONENT INPUT jacks (Y, PB, PR) connect the (not
supplied) corresponding cables (either bundled or three separate
video grade cables—yellow) to the Klipsch system’s
VIDEO OUTPUT
COMPONENT Y, P
B
, P
Rjacks and to the corresponding input jacks on
the TV. To use this option, you must also connect the corresponding Y,
PB, PROUTPUT to your TV.
If your TV doesn’t have COMPONENT or S-VIDEO, connect the TV’s
VIDEO INPUT
(yellow) to the Klipsch system’s
COMPOSITE
jack (yellow)
with the supplied cable.
1.
2.
3.
*6476:0;,
05 7<;
3
9
:=0+,6
=
05 7<;
3
9
=
05 7<;
7
)
@
7
9
05 7<;
7
)
@
7
9
*64765,5;
6<; 7< ;
7
)
@
7
9
*64765,5; (<+06=0+,6
6<; 7< ;
3
9
=
DIGITAL OPTICAL
OUTPUT
DIGITAL COAXIAL
OUTPUT
ANTENNA B
INPUT
ANTENNA A
INPUT
;=)(*27(5,3
HDMI
INPUT
69
69
2
1
5
3
2307:*/*65;9633,9
4
69
STEP 4: Connect Klipsch System to the TV's Input
Note: Until recently, TVs only had VIDEO INPUT jacks. Therefore, your TV
might not carry the "IN" or "Input" label even though it is an input.
Note: If an HDMI (digital) input is used to connect a source (such as a
cable or satellite box) to the CS-700, the TV must also be connected with
an HDMI cable to preserve the digital signal. Also, if an analog signal is
connected to the CS-700, the TV must also be connected with an analog
signal. The CS-700 will not up-convert an analog signal to a digital signal.
Please see appendix I (page 28) for the basics on how input
and output jacks work with your Klipsch system.
Input and Output Jacks