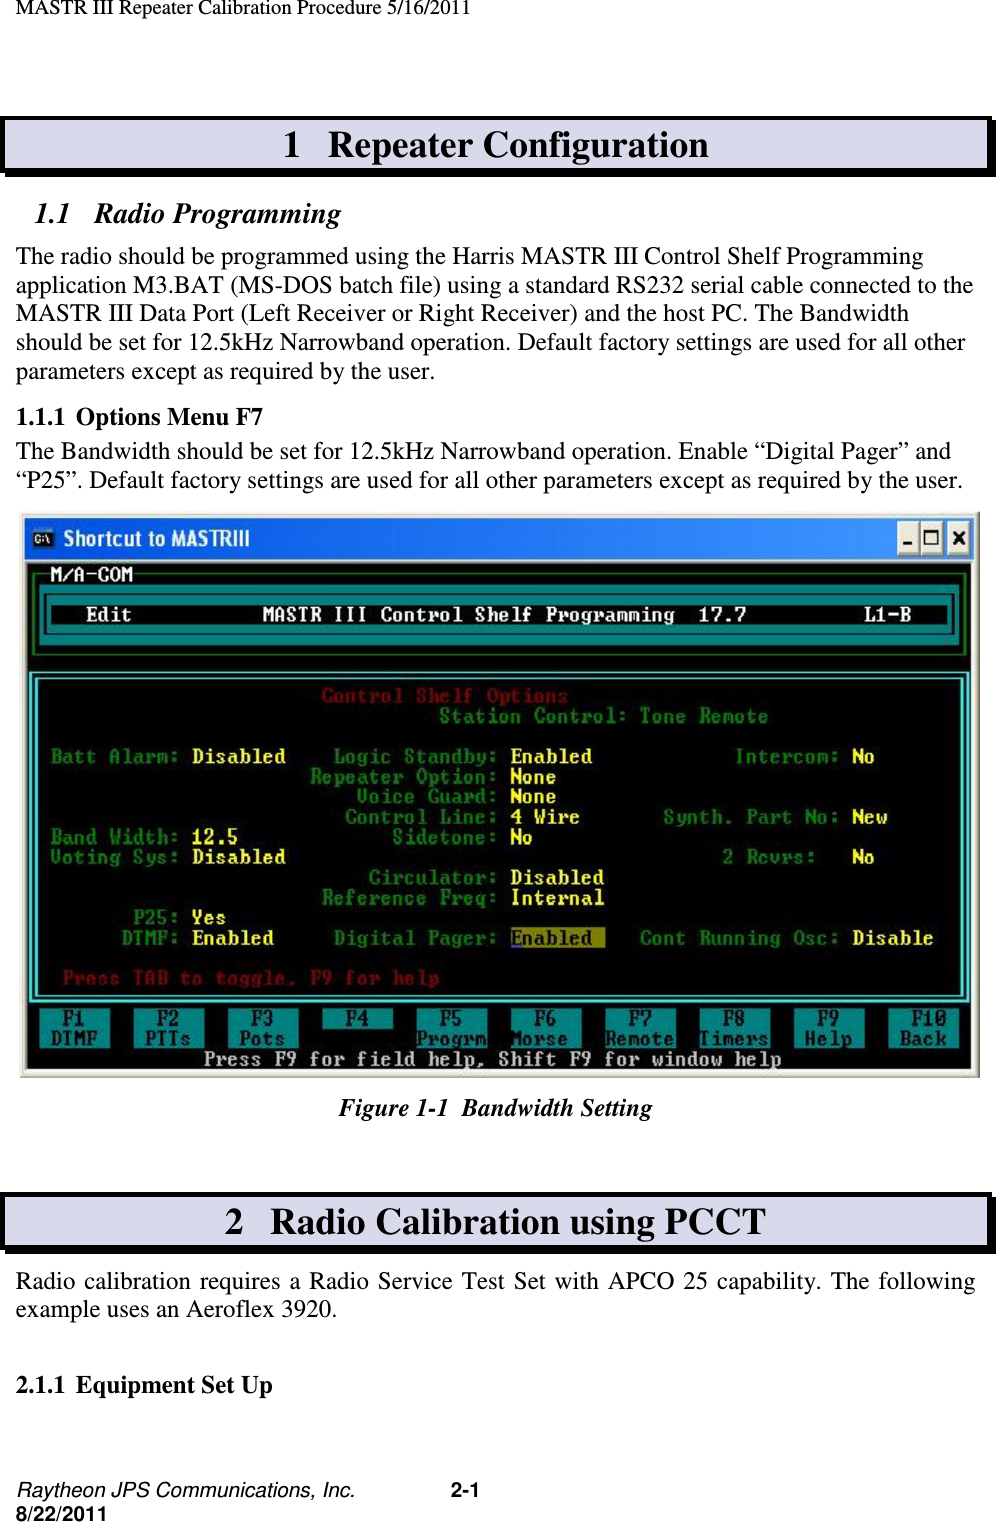
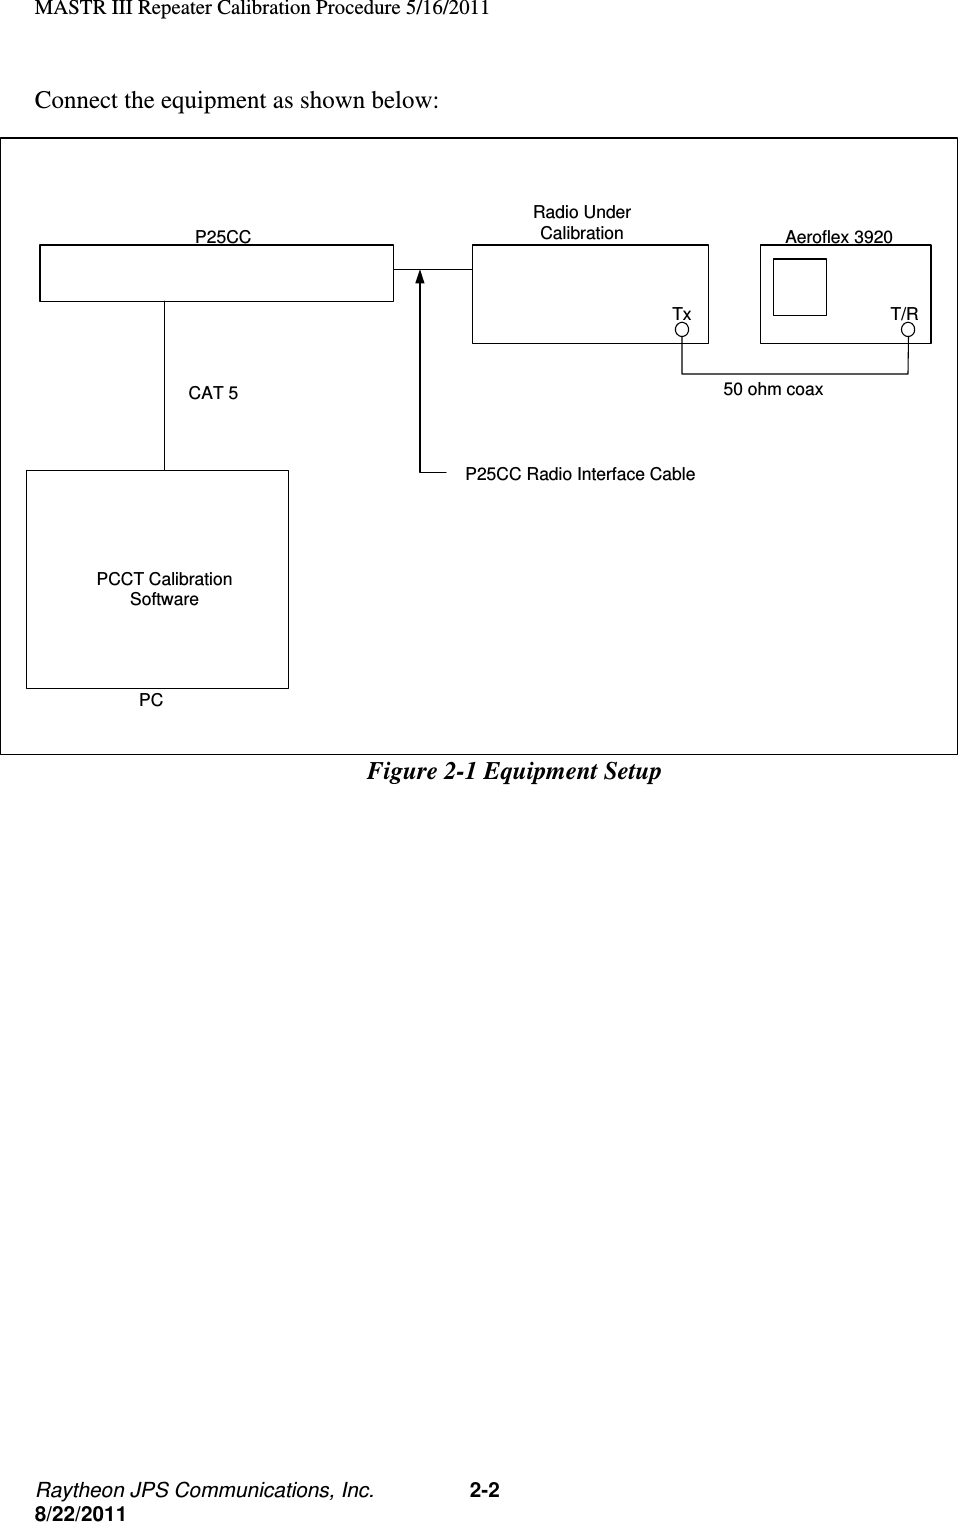
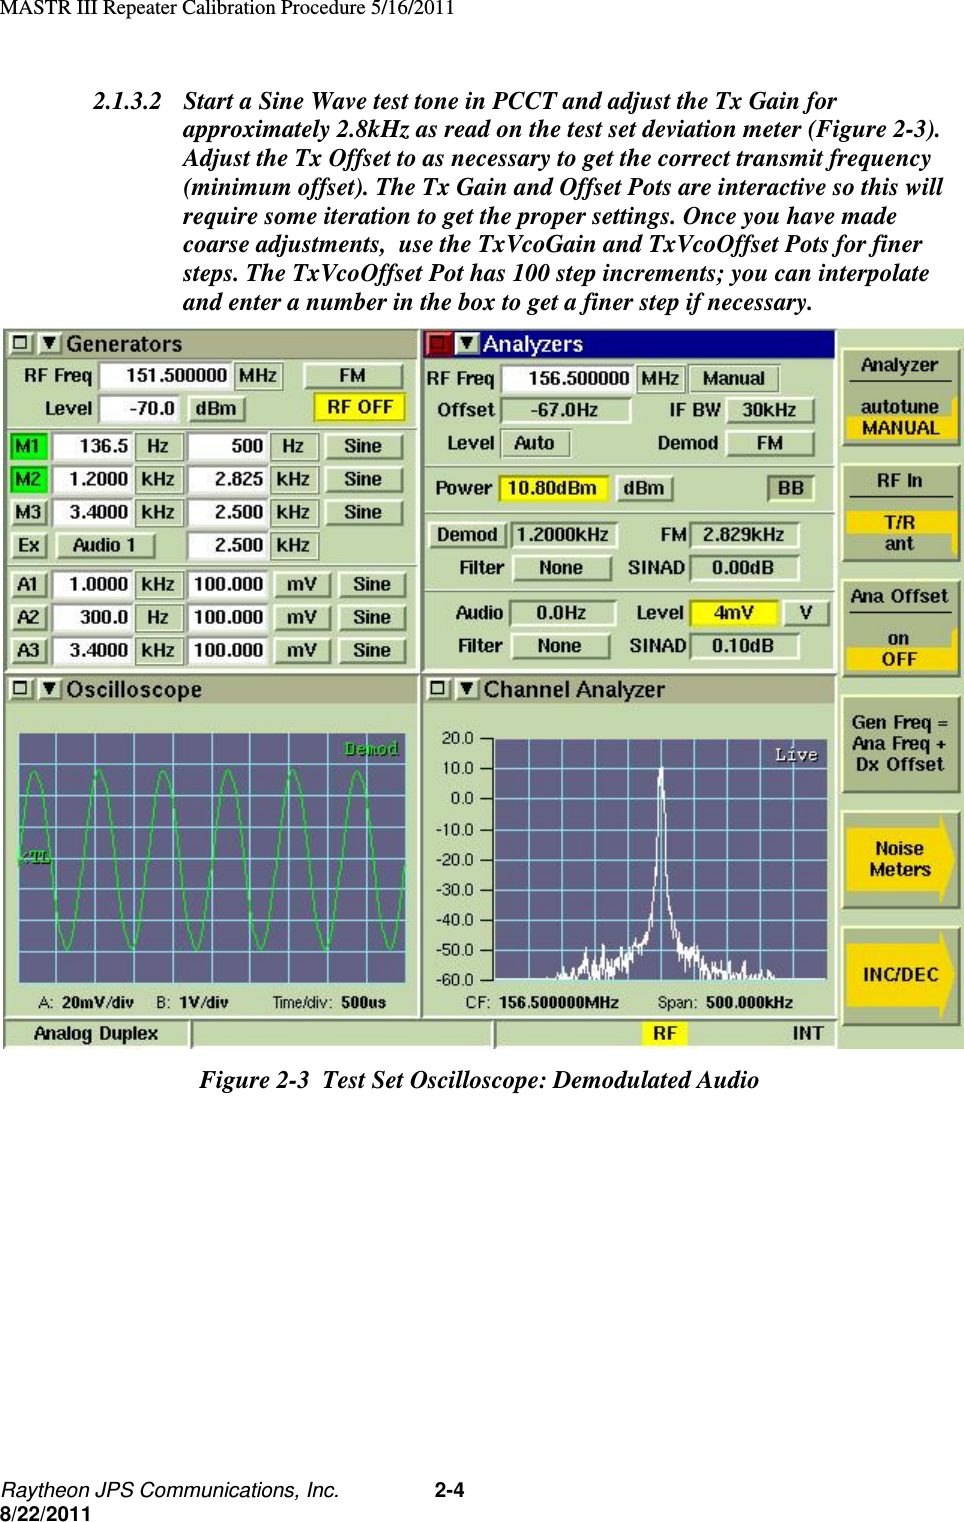
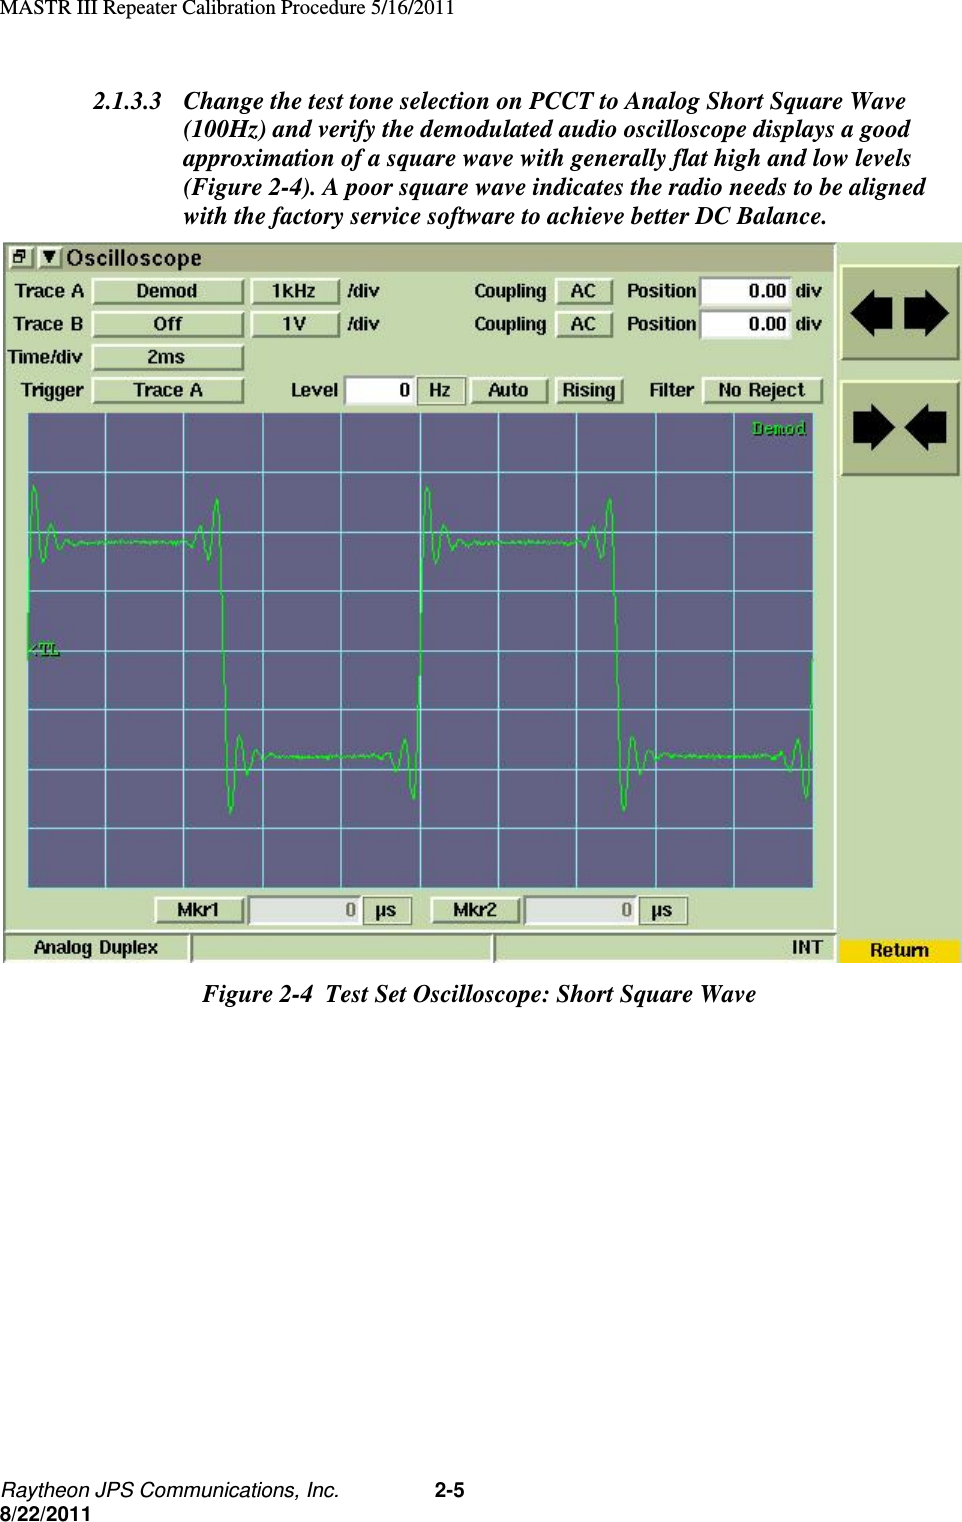
Raytheon IDS M3-VHF-136 110W VHF BASE STATION User Manual REPEATER CALIBRATION

JPS COMMUNICATIONS, INC. 110W VHF BASE STATION REPEATER CALIBRATION

REPEATER CALIBRATION USER MANUAL

MASTR III Repeater Calibration Procedure 5/16/2011 Raytheon JPS Communications, Inc. 2-1 8/22/2011 1 Repeater Configuration 1.1 Radio Programming The radio should be programmed using the Harris MASTR III Control Shelf Programming application M3.BAT (MS-DOS batch file) using a standard RS232 serial cable connected to the MASTR III Data Port (Left Receiver or Right Receiver) and the host PC. The Bandwidth should be set for 12.5kHz Narrowband operation. Default factory settings are used for all other parameters except as required by the user. 1.1.1 Options Menu F7 The Bandwidth should be set for 12.5kHz Narrowband operation. Enable “Digital Pager” and “P25”. Default factory settings are used for all other parameters except as required by the user.  Figure 1-1  Bandwidth Setting  2 Radio Calibration using PCCT Radio calibration requires  a Radio Service Test Set with APCO 25 capability. The  following example uses an Aeroflex 3920.  2.1.1 Equipment Set Up
MASTR III Repeater Calibration Procedure 5/16/2011 Raytheon JPS Communications, Inc. 2-2 8/22/2011 Connect the equipment as shown below: Figure 2-1 Equipment Setup Aeroflex 3920T/RRadio Under CalibrationTxP25CCPCPCCT Calibration SoftwareCAT 5 50 ohm coaxP25CC Radio Interface Cable
MASTR III Repeater Calibration Procedure 5/16/2011 Raytheon JPS Communications, Inc. 2-3 8/22/2011 2.1.2 Initial Steps 2.1.2.1 Set the Radio Test Set to analog duplex mode and program to monitor the frequency of the transmitter. 2.1.2.2 Power up the radio and P25net CC. 2.1.2.3 Launch PCCT and connect to the P25net CC channel. 2.1.3 Radio Tx Calibration 2.1.3.1 In PCCT go to the Configure >Tx window and select Analog Sine Wave per Figure 2-2. Preset the Tx Gain and Offset Pots to the values shown.  Figure 2-2  Configure Tx Window
MASTR III Repeater Calibration Procedure 5/16/2011 Raytheon JPS Communications, Inc. 2-4 8/22/2011 2.1.3.2 Start a Sine Wave test tone in PCCT and adjust the Tx Gain for approximately 2.8kHz as read on the test set deviation meter (Figure 2-3). Adjust the Tx Offset to as necessary to get the correct transmit frequency (minimum offset). The Tx Gain and Offset Pots are interactive so this will require some iteration to get the proper settings. Once you have made coarse adjustments,  use the TxVcoGain and TxVcoOffset Pots for finer steps. The TxVcoOffset Pot has 100 step increments; you can interpolate and enter a number in the box to get a finer step if necessary.  Figure 2-3  Test Set Oscilloscope: Demodulated Audio
MASTR III Repeater Calibration Procedure 5/16/2011 Raytheon JPS Communications, Inc. 2-5 8/22/2011 2.1.3.3 Change the test tone selection on PCCT to Analog Short Square Wave (100Hz) and verify the demodulated audio oscilloscope displays a good approximation of a square wave with generally flat high and low levels (Figure 2-4). A poor square wave indicates the radio needs to be aligned with the factory service software to achieve better DC Balance.  Figure 2-4  Test Set Oscilloscope: Short Square Wave
MASTR III Repeater Calibration Procedure 5/16/2011 Raytheon JPS Communications, Inc. 2-6 8/22/2011 2.1.3.4 Reconfigure the test set for P25 mode. 2.1.3.5 Start an IMBE test tone using PCCT set to Standard Tone Test Pattern.  Figure 2-5  Standard Tone Test Pattern
MASTR III Repeater Calibration Procedure 5/16/2011 Raytheon JPS Communications, Inc. 2-7 8/22/2011 2.1.3.6 Listen for a 1200Hz sine wave in the monitor speaker set for demodulated audio. A P25 Handset may also be used for this step if tuned to the proper frequency in conventional P25 mode. 2.1.3.7 Check the Symbol Deviation to verify that it is 1750Hz +/- 75Hz; adjust the TxVcoGain to increase or decrease the deviation if necessary. Also, you may adjust the Frequency Error by trimming the TxVcoOffset if needed. The Constellation and Eye Diagrams are shown for reference. The Modulation Fidelity should be better than 5% (typically<2%;  SeeFigure 2-6) .  Figure 2-6  Transmitter Performance Screen  This completes Transmitter calibration. Unkey the transmitter and install a dummy load on the Tx output in preparation for Receiver calibration 2.2 Rx Calibration Receive calibration adjusts the P25net CC audio input level to match the radio line audio output level and calibrates the P25net CC for the RSSI signal from the receiver.  • Rx Gain provides adjustment for the receiver line audio output entering the Channel Card.
MASTR III Repeater Calibration Procedure 5/16/2011 Raytheon JPS Communications, Inc. 2-8 8/22/2011 • Rx Offset provides a DC reference level adjustment for the receiver audio. This adjustment allows the output reference DC level from the receiver to be matched by the P25netCC Rx input.   • RSSI Gain provides level adjustment for the RSSI input. • RSSI Offset provides a DC reference level adjustment for the RSSI input signal.  2.2.1 Equipment Setup Connect the equipment as shown in Figure 2-7. Figure 2-7  Rx Calibration Set-up Aeroflex 3920T/RRadio Under CalibrationTxP25CCPCPCCT Calibration SoftwareCAT 5 50 ohm coaxRx50 ohm dummy load50 ohm coaxP25CC Radio Interface Cable
MASTR III Repeater Calibration Procedure 5/16/2011 Raytheon JPS Communications, Inc. 2-9 8/22/2011 2.2.2 Initial Steps 2.2.2.1 Launch PCCT and go to the Configure >Rx and Tx Manual window and set default values for the Rx and RSSI parameters as shown in Figure 2-8. Check the “Enable Editing” boxes for entering parameters.  Figure 2-8  Configure Tx and Rx (Manual) Window
MASTR III Repeater Calibration Procedure 5/16/2011 Raytheon JPS Communications, Inc. 2-10 8/22/2011 2.2.3 Rx Calibration 2.2.3.1 Go to the Configure > Rx (Automatic) screen. 2.2.3.2 Set the generator to Analog Duplex Mode at the Receiver frequency; set the modulation for a 1200Hz Sine with 2.83kHz deviation. With the generator on and set to -70dBm, Check the Rx beam box and start the oscilloscope on PCCT.  2.2.3.3 Adjust the Rx Offset so the mean of the observed sine wave is centered as close as possible about zero. Adjust the Rx Gain so that the signal peaks are slightly less than +17,000 and -17,000 but greater than +14,000 and -14,000 (Figure 2-9).  Figure 2-9  Rx Gain and Offset Adjustment
MASTR III Repeater Calibration Procedure 5/16/2011 Raytheon JPS Communications, Inc. 2-11 8/22/2011 2.2.3.4 Go to the Configure>Rx (Automatic) window and select trigger on RSSI value of 2000. 2.2.3.5 Hit Trigger, Calculate, and Save to calculate and store the coefficients for Rx Scale Factor and Offset  Note: If the Rx gain is too high or low a Calibration Warning will prompt you to change the Rx gain and repeat the operation. 2.2.3.6 Return to the Configure >TX and RX (Manual) screen and place a (-) sign in front of the Rx Scale Factor number. The MASTR III requires a 180 degree inversion for proper synchronization of P25 frames.  2.2.4 RSSI Calibration 2.2.4.1 Sect the Configure>RSSI (Automatic) screen.  Figure 2-10 RSSI (Automatic) Screen
MASTR III Repeater Calibration Procedure 5/16/2011 Raytheon JPS Communications, Inc. 2-12 8/22/2011 2.2.4.2 Set the generator to -120dBm and turn on. 2.2.4.3 With the RSSI Gain set to 10, start the Oscilloscope and adjust the Offset until the trace is around  -30,000 (Figure 2-11).   Figure 2-11  RSSI Low Level
MASTR III Repeater Calibration Procedure 5/16/2011 Raytheon JPS Communications, Inc. 2-13 8/22/2011 2.2.4.4 Select the “Zeroise” button. Then select the “Get value 1” button next to the -120dBm entry. 2.2.4.5 Change the generator level to -60dBm.Adjust the RSSI gain as required to move the trace to above +30,000.  Figure 2-12  RSSI High Level  2.2.4.6 Set the generator back to -120dBm and verify the trace goes back to around -30,000.Adjust RSSI Offset as required. 2.2.4.7 Reset the generator to -60dBm and select the “Get value 2” button next to the -60dBm entry. 2.2.4.8 Select “Calculate”, then “Save”. A warning message will prompt you to repeat the procedure if the limits are not satisfied. See Figure 2-13 RSSI Calculate & Save Screen. Note that RSSI values are displayed for the 2 generator levels and RSSI Scale Factor and Offset and were calculated.
MASTR III Repeater Calibration Procedure 5/16/2011 Raytheon JPS Communications, Inc. 2-14 8/22/2011  Figure 2-13 RSSI Calculate & Save Screen
MASTR III Repeater Calibration Procedure 5/16/2011 Raytheon JPS Communications, Inc. 2-15 8/22/2011 2.2.5 Rx Verification  2.2.5.1 Turn off test set generator. 2.2.5.2 Reconfigure the test set to generate a STD 1011 test pattern at -70dBm level. 2.2.5.3 Verify the Rx LED on the P25netCC channel is lit. 2.2.5.4 Turn off the generator. 2.3 Bit Error Rate Test 2.3.1.1 On PCCT toolbar select Controller Card\Bit Error rate test. 2.3.1.2 Start the generator with a STD 1011 test pattern at -114dBm.( Be certain to include the insertion loss of the RF cable at the test frequency). 2.3.1.3 Press the Purge Data button and allow the Total Rx Blocks to reach 200 for each generator setting as you decrease the level in 0.5dB increments. 2.3.1.4 The Average Bit Error Rate should be 5% or less for -116dBm (typically -118dBm .  Figure 2-14 BER Test data This completes Radio calibration. 2.4 Load/Save Transceiver Configuration PCCT has a feature that allows saving the calibration settings for a radio as well as recalling them. This provides a short-cut around the full calibration procedure in most cases. Sometimes variation between radios and Channel Cards will require some fine adjustment of the calibration. 2.4.1 Load/Save Config Window Open the Configure>Load/Save Config screen and select the transceiver to be loaded (See Figure 2-15  Load/Save Config Screen).
MASTR III Repeater Calibration Procedure 5/16/2011 Raytheon JPS Communications, Inc. 2-16 8/22/2011  Figure 2-15  Load/Save Config Screen 2.4.2 Default Radio Settings Loaded After loading a notification of the action will be displayed (see Figure 2-16  Default Settings Applied Screen).  Figure 2-16  Default Settings Applied Screen

Navigation menu