2VE ENERGY PLC CMR130A OWL Micro Wireless Electricity Monitor (433.92MHz Tx) User Manual CM130A UM R2 indd
2 SAVE ENERGY PLC OWL Micro Wireless Electricity Monitor (433.92MHz Tx) CM130A UM R2 indd
UserManual.wiki
>
2VE ENERGY PLC
>
CMR130A User Manual
Users Manual
Navigation menu
Upload a User Manual
Namespaces
Wiki Guide
HTML
PDF
Info
Views
User Manual
Discussion / Help
Navigation

![DISPLAY FEATURES 1. Indicates which Display Mode the Monitor is in: COST / ENERGY 2. Currency Units for Cost Display Mode 124356 7 8 910113. Battery low indicator: Display (Monitor) / Remote4. Display current COST / ENERGY5. Measurement units for Display Modes6. Acummulative/Historical Data Display7. [ ] key8. [ ] key9. SET key10. RESET Key11. Battery compartmentDisplay Key FunctionsKEY MODE ACTION OPERATION[SET] Non SET mode ≥ 2s Place Display into SET mode Adjust COSTSET mode Pressed Selects adjusted COST value[ ] Non SET mode Pressed Change to next display modes: COST ENERGY COST≥ 2s Enable sensor searching. Typical search time is ~30secsSET mode Pressed Adjusts the COST Increment[ ] Non SET mode Pressed Change to next display modes: COST ENERGY COST≥ 2s Enable/Disable Power Save SET mode Pressed Adjusts the COST Decrement[ ] + [ ] Non SET mode ≥ 2s Clear TOTAL COST and TOTAL ENERGY to 045USUKUSUSUK](https://usermanual.wiki/2VE-ENERGY-PLC/CMR130A/User-Guide-1214676-Page-6.png)
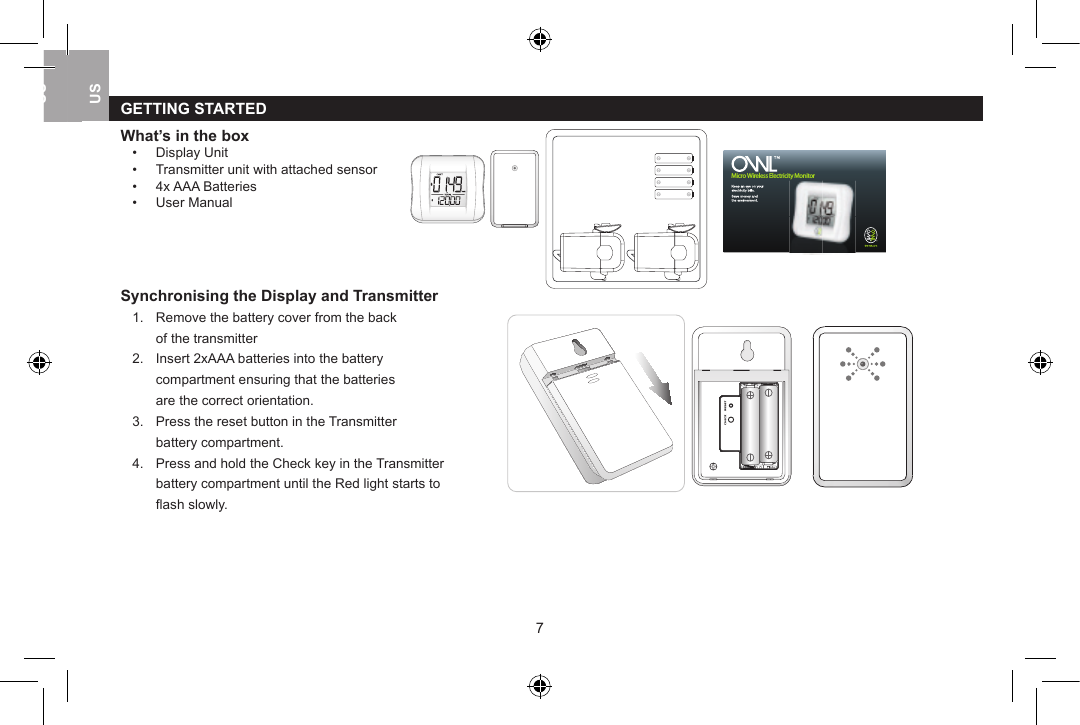
![TRANSMITTER FEATURES12 3456 1. Flashes to indicate data transmitted from Sender Box 2. Sockets for sensors 3. Wall mount hole 4. RESET key: Resets the Sender Box and clears all data held in memory 5. CHECK key: Forces transmission every 2 seconds (for 30 Seconds) 6. Battery CompartmentTransmitter Key FunctionsKEY KEY PRESS OPERATION[CHECK] Press and Hold until Red Light flashesPlaces transmitter into increased transmit rate to help speed up synchronisation with Display[RESET] Press <2s Resets the transmitter and allocates new synchronising address67USUKUSUSUK](https://usermanual.wiki/2VE-ENERGY-PLC/CMR130A/User-Guide-1214676-Page-7.png)
![SWITCHING BETWEEN DISPLAY MODESElectricity use can be viewed in a Cost or Energy Display. Press [ ] or [ ] to switch between the Display Modes. In the Energy display view current kW in upper screen and accumulated Energy (kWh) since last reset in the lower screen. In the Cost display view current cost of electricity per hour in the upper screen and accumulated cost since last reset in the lower screen.SETTING THE COST The cost of electricity per hour can be set from 00.00 to 99.99 cents. Press and hold the [SET] key to enable the SET Mode to adjust the cost of electricity per hour (Default 10.00). The “Main Units” will flash slowly (“10”). Press [ ] and/or [ ] to adjust the cost of electricity per hour “Main Units”. Press [SET] to confirm Main Units value. The “Sub Units” will flash slowly (“00”). Press [ ] and/or [ ] to adjust the cost of electricity per hour “Sub Units”. Press [SET] to confirm Sub Units value. The cost of electricity per hour has been set and returns back to display mode.89USUKUSUSUK](https://usermanual.wiki/2VE-ENERGY-PLC/CMR130A/User-Guide-1214676-Page-10.png)
![PLACE DISPLAY INTO POWER SAVE MODEThe display unit has a power save mode to extend the life of the batteries, by changing the receive rate from every 12 seconds to every 60 seconds.Note that the Transmitter has an auto power save as it transmits every 6 seconds only if there is a change in the electricity usage otherwise transmits every 60 seconds. Press and hold [ ] key to place Display into or to take Display out from Power Save Mode. RESET ACCUMULATED VALUESPress and hold [ ] + [ ] keys simultaneously for greater than 2 seconds to reset the accumulated cost & energy values to 0. 1011USUKUSUSUK](https://usermanual.wiki/2VE-ENERGY-PLC/CMR130A/User-Guide-1214676-Page-11.png)
![LOW BATTERY WARNINGA low battery warning icon will appear in top right hand corner of the display when in either the COST or ENERGY display modes. This indicates that the batteries in the Display or Transmitter are coming close to the end of their usable life and should be replaced soon. Replace batteries in the Display unit • Remove the battery cover from the base of the Display• Replace the 2x AAA batteries in the battery compartment with new/ fresh batteries ensuring that the batteries are inserted in the correct orientation.• Replace the battery cover of the Display• Press and hold [ ] key for greater than 2 seconds to place the display into Search mode to resynchronise with the transmitter unit.Replace batteries in the Transmitter unit • Remove the battery cover from the back of the Transmitter• Replace the 2x AAA batteries in the battery compartment with new/ fresh batteries ensuring that the batteries are inserted in the correct orientation.• Press and hold the Check key in the Transmitter battery compartment until the Red light starts to flash slowly.• Replace the battery cover of the Transmitter• Press and hold [ ] key for greater than 2 seconds to place the display into Search mode to resynchronise with the transmitter unit.1011USUKUSUSUK](https://usermanual.wiki/2VE-ENERGY-PLC/CMR130A/User-Guide-1214676-Page-12.png)
![Accuracy <1A 1A to 3A 3A to 71A >71ACurrent RMS Not Specified Better than 10% Better Than 5% Not SpecifiedWireless Link 433MHz Radio FrequencyWireless Range 30 metres in open area[walls, partitions and electrical appliances may affect reception range]Display Power Supply 2 x AAA / LR03 / UM-4 1.5V batteriesSender Box Power Supply 2 x AAA / LR03 / UM-4 1.5V batteriesOperating Temperature 5°C ~ 45°C (41°F ~ 113°F) at 85% relative humidityStorage Temperature -5°C ~ 60°C (23°F ~ 140°F) at 85% relative humidityCOMPLIANCEManufactured to ISO-9001 Quality Assurance Standards & tested for compliance relative to configuration for intended market. Product tested by Intertek Testing Services HK Ltd:- European CE, FCC, UL (USA), IC (Canada), C-tick Aus & NZ.Declaration of ConformityHereby, 2 Save Energy Ltd, declares that the OWL Micro Wireless Monitor (CM130A) is in conformity with Part 15 of the FCC Rules.FCC StatementThis device complies with Part 15 of the FCC Rules. Operation is subject to the following two conditions: (1) This device may not cause harmful interference, and (2) This device must accept any interference received, including interference that may cause undesired operation.WARNING: Changes or modifications to this unit not expressly approved by the party responsible for compliance could void the user’s authority to operate the equipment.NOTE: This equipment has been tested and found to comply with the limits for a Class B digital device, pursuant to Part 15 of the FCC Rules. These limits are designed to provide reasonable protection against harmful interference in a residential installation. This equipment generates, uses and can radiate radio frequency energy and, if not installed and used in accordance with the instructions, may cause harmful interference to radio communications.1213USUKUSUSUK](https://usermanual.wiki/2VE-ENERGY-PLC/CMR130A/User-Guide-1214676-Page-14.png)