3B Technology LT2627A01 27 inch LCD Monitor User Manual
3B Technology Co., Ltd. 27 inch LCD Monitor
User manual

TFT LCD Display
USER'S MANUAL
Warnings
Warning:
To reduce the risk of electric shock do not remove cover.
No user serviceable parts inside. Refer servicing to qualified service personnel.
The lightning flash with arrowhead symbol, within an equilateral
triangle, is intended to alert the user to the presence of insinuated
"dangerous voltage" within the product's enclosure that may be of
sufficient magnitude to constitute a risk of electric shock to persons.
The exclamation point within an equilateral triangle is intended to
alert the user to the presence of important operation and
maintenance (servicing) instructions in the literature accompanying
the appliance.
Warning:
"To prevent fire of shock hazard, do not expose the set to rain or moisture". Do not rub
or strike the Active Matrix LCD with "anything hard as this may scratch, mar, or
damage the Active Matrix LCD permanently".
Caution:
Power:
This set operates on a DC supply provided by the AC-DC adaptor, the voltage is as
indicated on the label on the back cover. Use only the AC-DC adaptor supplied with
the set and never apply an AC mains to the set directly. The AC-DC adaptor operates
on an AC mains supply, the voltage is as indicated on the label of the AC-DC adaptor.
a. Connect the DC plug of the AC-DC adaptor to the 15V socket of the set.
b. Connect the AC-DC adaptor and it's power cord.
c. Connect the power cord to an AC mains.
In the event of thunderstorms or power cuts, please pill out the mains plug of the
AC-DC adaptor and the aerial plug. Do not allow anything to rest upon or roll over the
power cord, and do not place the set where the power cord is subject to damage.
Service
other hazards. If the unit does not operate properly, unplug it and call your dealer.
Antenna Connect the antenna cable to the connection marked Ant. (on the rear). For
best reception, use an outdoor antenna.
Location
Position your unit so that no bright light or sunlight will shine directly on the screen.
Do not expose the unit to vibration, moisture, dust or heat. Also ensure that the unit
is placed in a position that allows a free flow of air. Do not cover the ventilation
openings on the back cover. You can install the unit on a wall or place it on a table-
top or similar flat surface. Mounted the unit securely to eliminate the risk of injury from
the unit falling. Contact your dealers to purchase the optional ceiling mount.
Cleaning
Unplug the unit before cleaning the face or the LCD Screen. Dust the unit by wiping
the screen and cabinet with a soft, clean cloth. If the screen requires additional cleaning
use a clean, damp cloth. Do not use liquid or aerosol cleaners.
Non-active pixels
Occasionally, a few non-active pixels may appear on the screen as a fixed point of blue, green or red.
Please note that this does not affect the performance of your product.
RISK OF ELECTRIC SHOCK
DO NOT OPEN
WARNING
Contents
7. Safety
5. Troubleshooting
6. Dimensional Drawings
3.2.4 Control of OSD menu while in use of VIDEO or TV Input
3.2.5. Using TELETEXT with Remote Control
4. Product Specification
Warnings
1. Supplied Accessories
2. Installation
2.1. Wall Installation
2.2. Desktop Installation
2.3. Installation Procedure
2.4. Installation Reference
3. Operation
3.1 OSD (On Screen Display) buttons on the casing
3.2 Use of OSD (On Screen Display) menu
3.2.1 Basic Instruction of OSD Menu
3.2.2 OSD basic form
3.2.3 Control of OSD menu at PC Input mode
Supplied Accessories
Make sure the following accessories are provided with product.
Installation
Install Options
* You can install the unit on a wall or place it on a table-like surface.
* To eliminate any risk of injury from the unit falling, it should be mounted securely.
1. Wall Installation
Caution: Do not install the unit on a weak wall surface, like plaster etc. it is not
needed any bracket or installation accessory with the exception of nails or screws.
Distance of holes of back panel is 305mm,
a. Drive nails or screws on the wall, in the location you want to install the unit.
b. Hang the unit on the nails or screws.
2. Desktop Installation
3. Operation
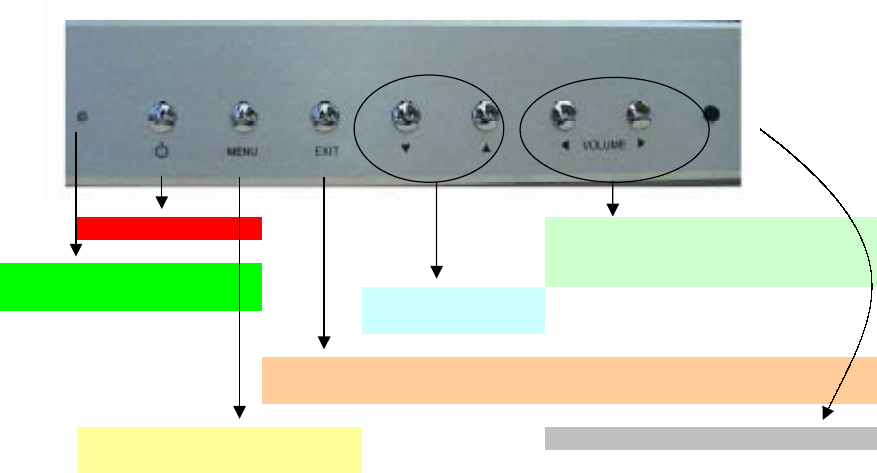
3.1 OSD(On Screen Display) buttons on the casing
You can basically control OSD menu with OSD buttons on front case,
therefore you need to understand overall functions of OSD buttons prior to
entering main contents.
** Front Buttons
Volume buttons
during OSD operation, adjust
certain sub menu or setting
Channel buttons
move a cursor on OSD,
during OSD operation, move to previous menu from a present one
or make the OSD disappear
OSD menu appearance on screen or
move to each sub menu
Sensor for the Remote Control
When power is on, the light is
green(blue).
Power On/Off
3.2 Use of OSD(On Screen Display) menu
3.2.1 Basic Instruction of OSD Menu
- Order of OSD Menu
If you want to adjust the displaying, please follow the following procedure.
1. Press the [MENU] button, then OSD Menu will appear on screen.
2. Press [UP/DOWN] button to make a curser move to the item you want to adjust
3. Press [MENU] button while an icon is selected.
4. Sub ITEM or adjusting Menu will appear. If Sub item shows up,
repeat two or three times until you can see an adjusting Menu.
5. At the state of adjusting Menu, adjust the condition with [RIGHT/LEFT] buttons
6. Press [EXIT] button, then OSD menu or the present menu disappears from screen.
** If you want to move from low to high category, press [MENU] button.
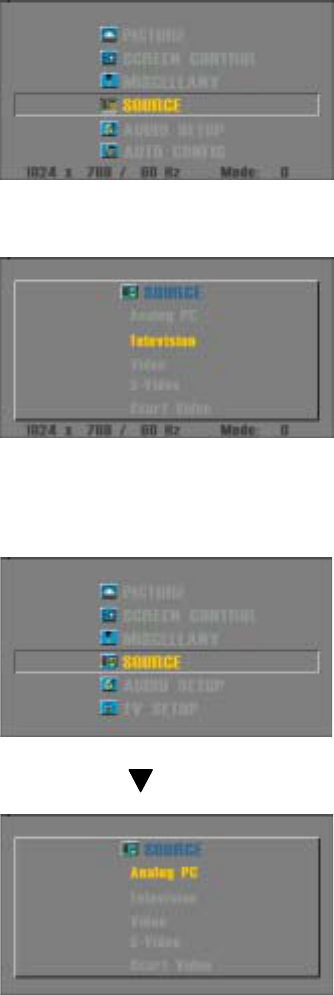
- Select the Input Mode
- Conversion of source inputs ;
You can select one of source inputs using [MENU] button.
Press [MENU] button, then the following menu will appear.
1. Press [UP/DOWN] and
put the cursor on "SOURCE"
then press [MENU]
2. In order to convert to TV input,
move cursor to [Television], then
press [RIGHT] button.
3. There are also " Analog PC, PC Video,
S-Video & Scart Video,
one of which you can select to fit a input source
- Conversion from TV or VIDEO to PC input mode
Press [MENU] button, then the following menu will appear.
1. Press [UP/DOWN] and ,
put the cursor on "SOURCE"
then press [MENU]
2. In order to convert to PC input,
move cursor to [ Analog PC], then
press [RIGHT] button.
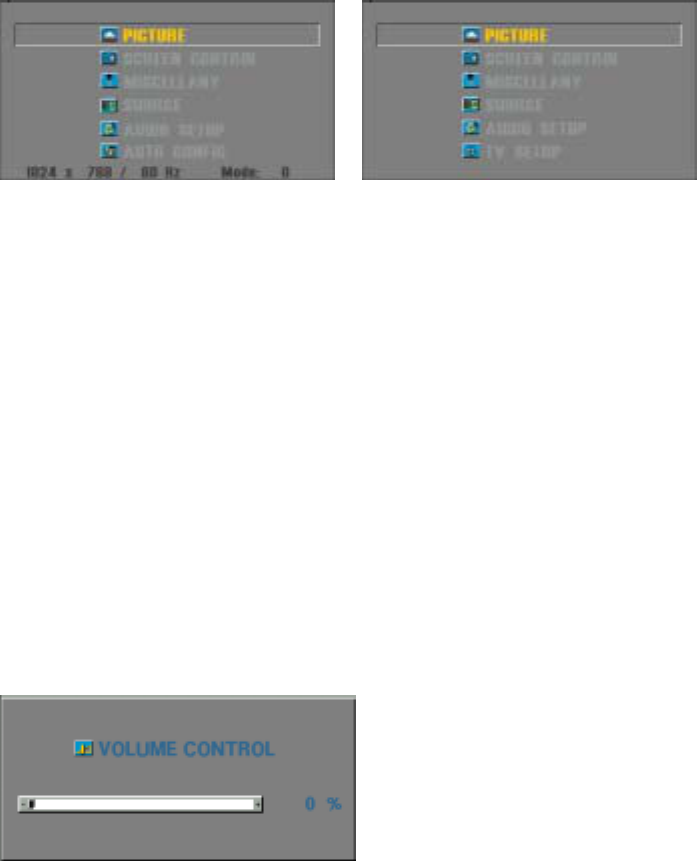
3.2.2 OSD basic form
Two kinds of OSD menu are serviced as OSD structure.
One for TV input, and the other for other source inputs.
(OSD for analog PC input) (OSD for other sauce inputs)
At the beginning, the cursor is fixed at [PICTURE],
and the present resolution of PC Monitor appears at the bottom.
If you press [LEFT/RIGHT] with no menu selected, then volume will be adjusted
Increase VOLUME with [RIGHT]
Decrease VOLUME with [LEFT]
Press [EXIT] button, then menu disappears.
3.2.3 Control of OSD menu at PC input mode
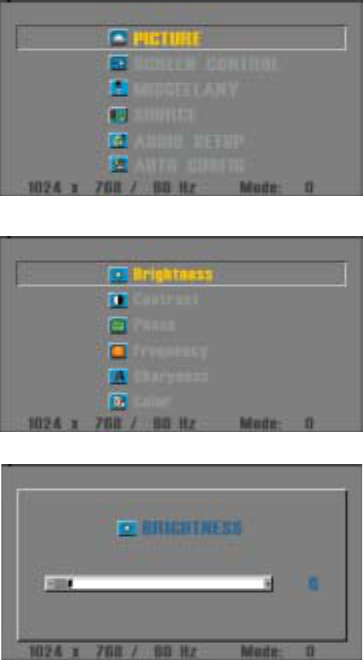
Adjustment of PICTURE
- Control of Brightness
To adjust BRIGHTNESS, take the following procedure.
1. Press [MENU], then OSD MENU appears.
Select "PICTURE", then
press [MENU].
2. Select "Brightness" using [UP]/[DOWN]
then press [MENU]
3. Adjust the desired Brightness
using [RIGHT]/[LEFT]
4. Press [EXIT] to move to previous
MENU
Follow the same procedure to control the CONTRAST, PHASE and FREQUENCY

- Control of SHARPNESS
Use to control the distinction of display
1. Press [MENU], then OSD MENU appears.
Select "PICTURE", then
press [MENU].
2. Select "Sharpness" using [UP]/[DOWN]
then press [MENU]
3. Select the distinction you want
by using [RIGHT]/[LEFT] button.
lower number gets stronger distinction,
higher number gets smoother distinction.
- Control of COLOR
Use to adjust the density of color.
1. Press [MENU], then OSD MENU appears.
Select "PICTURE", then
press [MENU].
2. Select "Color" using [UP]/[DOWN]
then press [MENU]

3. Select "Red" using [UP]/[DOWN]
then press [MENU]
4. Adjust the level with using
[RIGHT]/[LEFT]
5. Press [EXIT] to move to previous
MENU
* To adjust the density of Green, Blue, take the same procedure as above.
Control of the position of entire screen
- Control of H-POSITION
Use to move the position of entire screen.
1. Press [MENU], then OSD MENU appears.
Select "SCREEN CONTROL", then
press [MENU].
2. Select "H-Position" using [UP]/[DOWN]
then press [MENU]
(H-Position for horizontal movement,
V-Position for vertical movement)
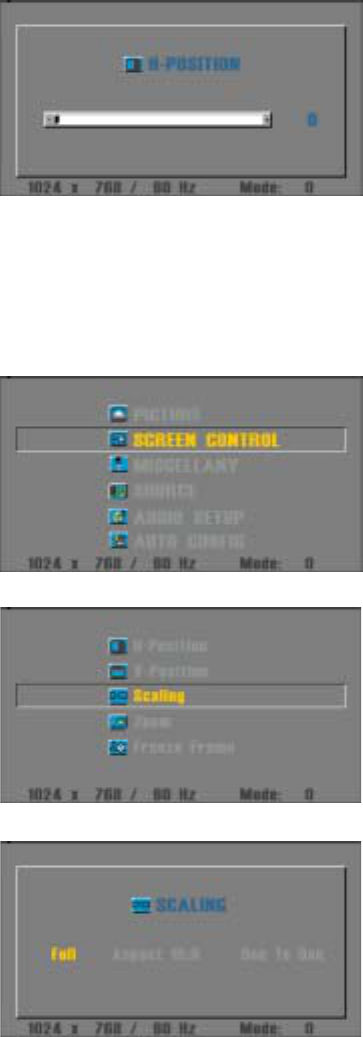
3. Adjust the level by using
[RIGHT]/[LEFT]
4. Press [EXIT] to move to previous
MENU
- SCALING Function
Controlling magnification of the screen.
1. Press [MENU], then OSD MENU appears.
Select "SCREEN CONTROL", then
press [MENU].
2. Select "Scaling" using [UP]/[DOWN]
then press [MENU]
3. Select the function by using
[RIGHT]/[LEFT]
(FULL for entire screen,
Aspect 16:9 for wide vision,
One To One for fitting into a running
program resolution)

- ZOOM Function
Use to zoom in/out on the screen.
1. Press [MENU], then OSD MENU appears.
Select "SCREEN CONTROL", then
press [MENU].
2. Select "Zoom" using [UP]/[DOWN]
then press [MENU]
3. Select the level with using
[RIGHT]/[LEFT]
- FREEZE FRAME Function
Use to pause the favorite shot of pictures.
1. Press [MENU], then OSD MENU appears.
Select "SCREEN CONTROL", then
press [MENU].
2. Select "Freeze Frame" using [UP]/[DOWN]
then press [MENU]
3. Select the On/Off with using
[RIGHT]/[LEFT]
(On : Pause, Off : Relieve)
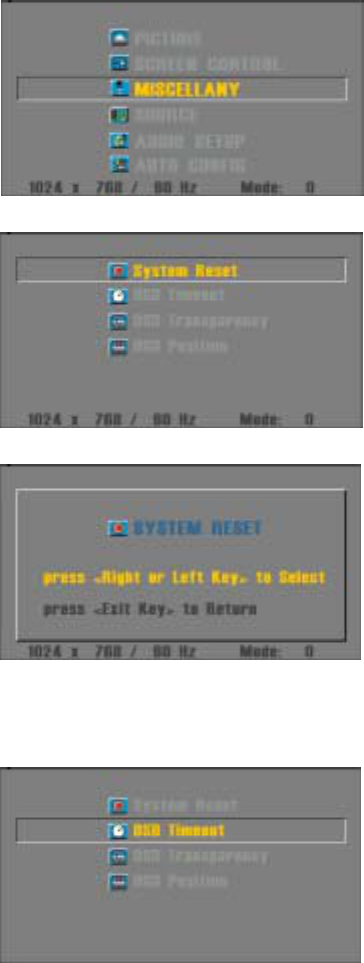
Control of MISCELLANY
- SYSTEM RESET
In case that user makes improper setting, it sets back to factory default
1. Press [MENU], then OSD MENU appears.
2. Select "MISCELLANY"
using [UP]/[DOWN], then
press [MENU].
3. Select "System Reset"
using [UP]/[DOWN],
then press [MENU]
4. Select [RIGHT]/[LEFT], then
factory-defaulting will start .
Select [EXIT] before pressing [RIGHT]/
[LEFT] to return to previous menu
- OSD TIMEOUT Function
Use to adjust the stand-by time of OSD MENU, while no command is conducted by buttons.
1. Press [MENU], then OSD MENU appears.
2. Select "MISCELLANY"
using [UP]/[DOWN], then
press [MENU].
3. Select "OSD Timeout"
using [UP]/[DOWN], then
press [MENU]

4. Select the time as you like
by using [RIGHT]/[LEFT],
You can set up the time 5 to 60 sec.
in a multiple of 5 sec.
- OSD TRANSPARENCY Function
1. Press [MENU], then OSD MENU appears.
2. Select "MISCELLANY"
using [UP]/[DOWN], then
press [MENU].
3. Select "OSD Transparency"
using [UP]/[DOWN], then
press [MENU]
4. Select the level you like
with using [RIGHT]/[LEFT],
On : OSD Background gets
more transparent.
Off : OSD Background gets
less transparent.
- OSD POSITION Function
This function is for adjusting the position of OSD MENU on screen.
1. Press [MENU], then OSD MENU appears.
2. Select "MISCELLANY"
using [UP]/[DOWN], then
press [MENU].
3. Select "OSD Position"
using [UP]/[DOWN], then
press [MENU]
4. Select the position as you like
by using [RIGHT]/[LEFT],
From the far left, left-top, mid-top,
right-top, left-mid, center, mid-right,
left-bottom, mid-bottom, right-bottom
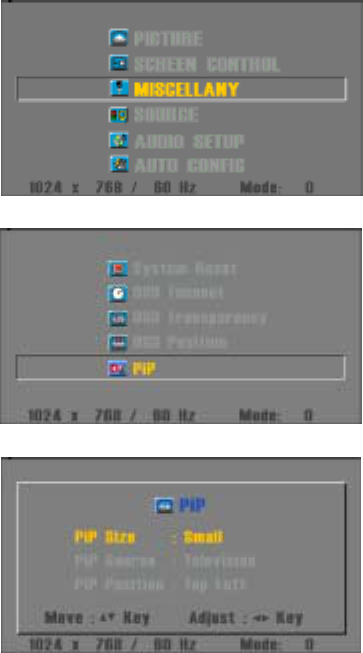
* PiP Adjustment
1. Press [MENU], then OSD MENU appears.
2. Select "MISCELLANY" using [UP]/[DOWN]
then press [MENU]
3. Select "PiP" using [UP]/[DOWN],
then press [MENU]
4. Adjust the desired PiP Size, PiP Source,
PiP Position using [UP]/[DOWN].
then Select the desired Size, Source,
Position using [Left]/[Right]
- Using PIP(Picture in Picture)
This function will work on Video / S-Video / Television / Scart signals as inputs to
sub-screen on main screen PC mode. When watching PIP, the main screen and
the sub-screen menu have differences in the quality of screen color.
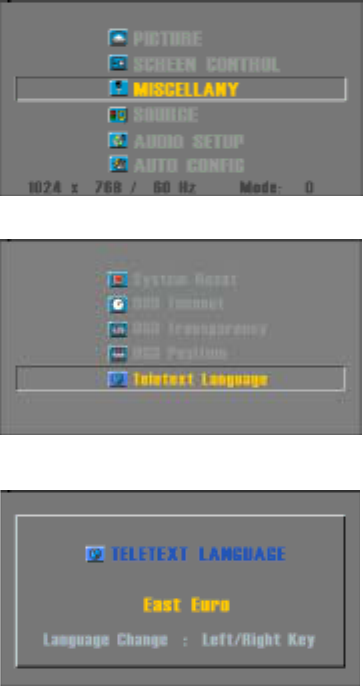
-Teletext Language
4. Select User's area using
** Area
East Euro -> West Euro -> East Cyrillic ->
West Cyrillic -> East Greek -> West Greek
-> East Arabic -> West Arabic -> East Euro
[Left]/[Right]
3. Select "Redetect language"
using[UP/DOWN], the press [menu].
1. Press [MENU], then OSD MENU appears.
2. Select "MISCELLANY" using
[UP]/[DOWN], the press [MENU].
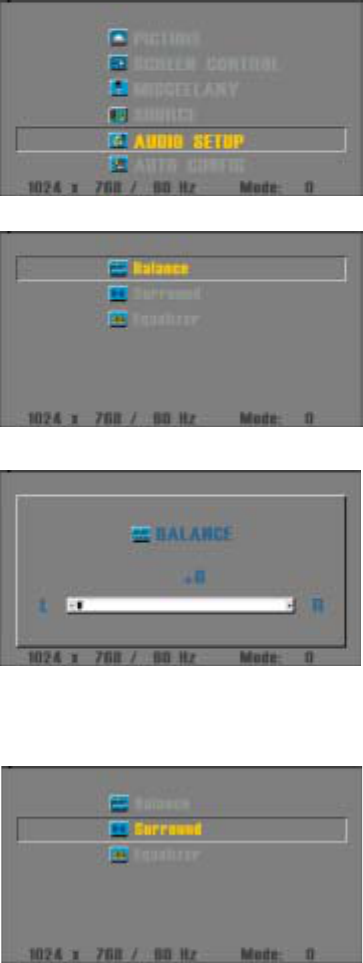
AUDIO SETUP
- Control of BALANCE
Use to adjust right or left balance of VOLUME.
1. Press [MENU], then OSD MENU appears.
2. Select "AUDIO SETUP"
using [UP/DOWN], then
press [MENU].
3. Select "Balance"
using [UP/DOWN]
then press [MENU]
4. Adjust the balance of VOLUME
using [RIGHT/LEFT]
L : left speaker
R : right speaker
- Control of SURROUND
1. Press [MENU], then OSD MENU appears.
2. Select "AUDIO SETUP"
using [UP/DOWN], then
press [MENU].
3. Select "Surround"
using [UP/DOWN]
then press [MENU]
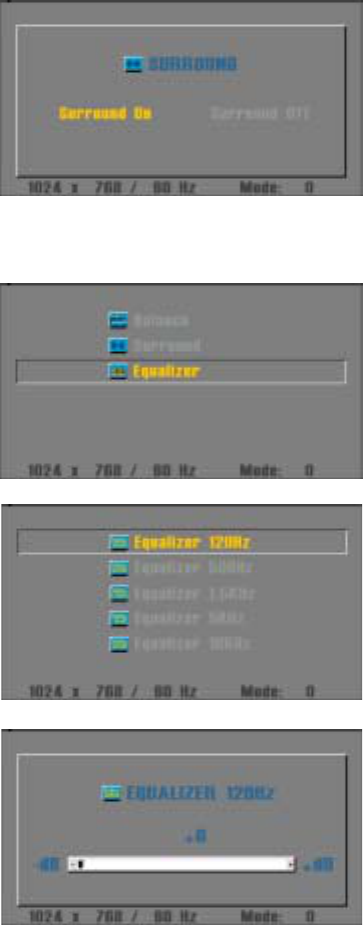
4. Adjust the On/Off of Surround
using [RIGHT/LEFT]
- Control of EQUALIZER
Use to adjust certain frequency to make it fit user's desire
1. Press [MENU], then OSD MENU appears.
2. Select "AUDIO SETUP"
using [UP/DOWN], then
press [MENU].
3. Select "Equalizer"
using [UP/DOWN]
then press [MENU]
4. Adjust to adjust certain frequency
using [UP/DOWN], then press [MENU]
5. Adjust the value
using [RIGHT/LEFT]
** Follow the same procedure to control Equalizer 500Hz, 1.5KHz, 5KHz, 10KHz
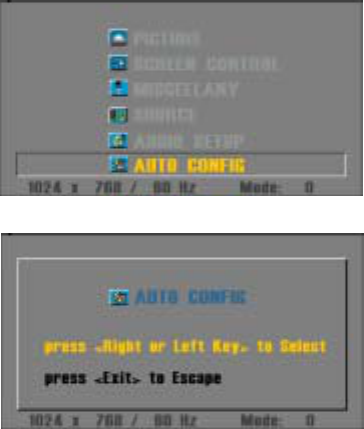
- AUTO CONFIG
Adjust position of display and picture quality automatically.
1. Press [MENU], then OSD MENU appears.
2. Select "AUTO CONFIG"
using [UP/DOWN], then
press [MENU].
3. Select [RIGHT/LEFT], then
Start "AUTO CONFIG".
before pressing [RIGHT/LEFT],
to escape to previous menu,
select [EXIT]
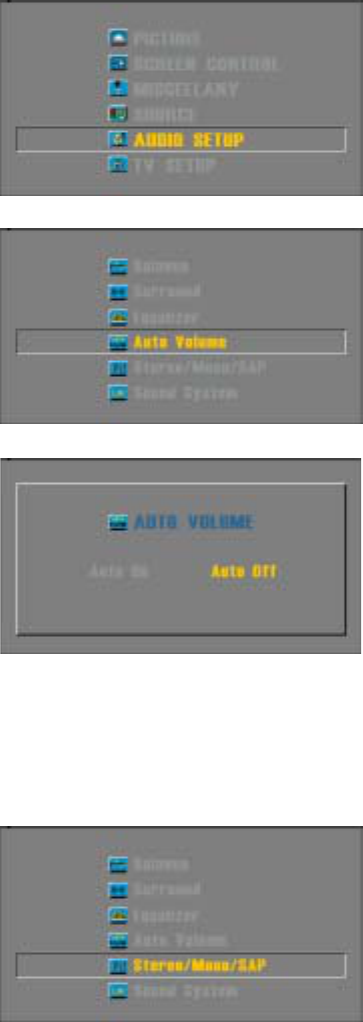
3.2.4 Control of OSD menu while in use of VIDEO or TV Input
AUDIO SETUP
- Auto Volume
Use to put the different level of volumes as per broadcast stations in a similar level
1. Press [MENU], then OSD MENU appears.
2. Select "AUDIO SETUP"
using [UP/DOWN], then
press [MENU].
3. Select "Auto Volume"
using [UP/DOWN]
then press [MENU]
4. Adjust the On/Off of AUTO VOLUME
using [RIGHT/LEFT]
Press [EXIT]
to return to previous menu
- Control of Stereo/Mono/SAP
According to the signal transmitted by broadcast station, select among Stereo/Mono/SAP
(There is a possibility of noise or bad sound at the areas of receiving poor signals,
in that case, select "Mono")
1. Press [MENU], then OSD MENU appears.
2. Select "AUDIO SETUP"
using [UP/DOWN], then
press [MENU].
3. Select "Stereo/Mono/SAP"
using [UP/DOWN]
then press [MENU]
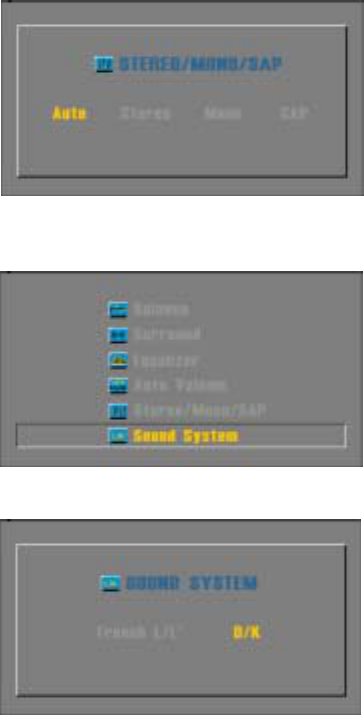
4. Adjust according to channel programs
using [RIGHT/LEFT]
At Auto selection, sound system
automatically adjusted
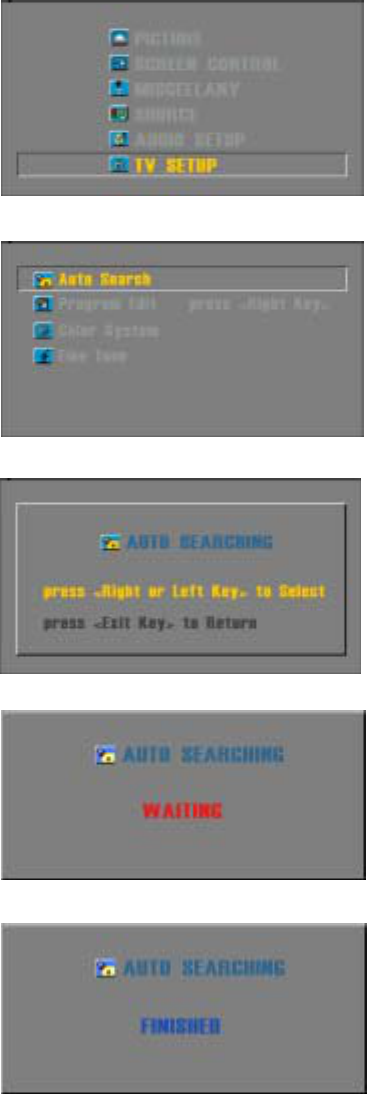
- Control of SOUND SYSTEM
Use to fit each country's stereo system.
1. Press [MENU], then OSD MENU appears.
2. Select "AUDIO SETUP"
using [UP/DOWN], then
press [MENU].
3. Select "Sound System"
using [UP/DOWN]
then press [MENU]
4. Adjust to fit in user country's sound system
using [UP/DOWN]
(French L/L' for France's neighboring
countries, D/K for East European)
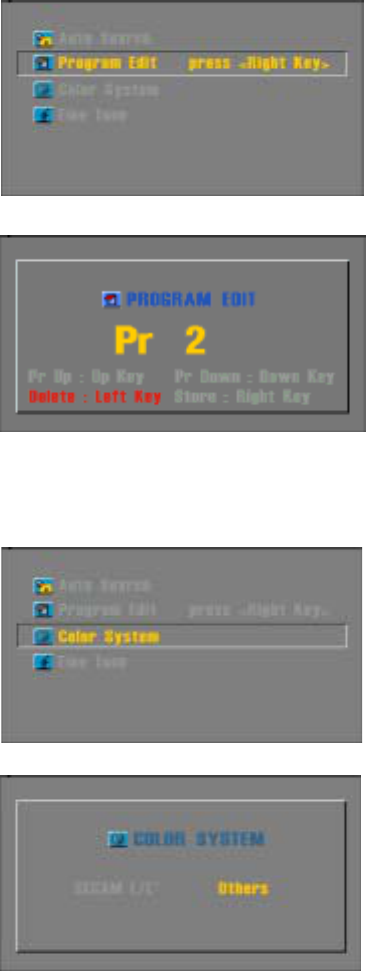
Control of TV SETUP
- Adjusting AUTO SEARCH
Automatically search and store currently broadcasting channels in memory.
1. Press [MENU], then OSD MENU appears.
2. Select "TV SETUP"
using [UP/DOWN], then
press [MENU].
3. Select "Auto Search"
using [UP/DOWN]
then press [MENU]
4. Select "AUTO SEARCHING",
by pressing [RIGHT/LEFT].
Press [EXIT],
to return to previous menu
5. Automatically search/store channels
in memory.
While searching/storing continues,
all buttons do not work
6. Completing the searching, there appears
"FINISHED".
To escape, press [EXIT].
The program stored at CH 1 will appear
on screen
- PROGRAM EDIT
After completing Auto Searching, use to delete the undesired of stored channels
or input your favorite channels manually.
1. Press [MENU], then OSD MENU appears.
2. Select "TV SETUP"
using [UP/DOWN], then
press [MENU].
3. Select "Program Edit",
using [UP/DOWN]
then press [MENU]
4. Use [UP/DOWN] to move to the intended
channel and pressing [RIGHT], then
you can watch by that channel.
Use [LEFT] to delete a channel
To return previous menu,
press [EXIT].
- Control of COLOR SYSTEM
"Auto Searching" allows to adjust to a suitable Color System(PAL/SECAM) for each country,
but exceptionally in case of a wrong adoption, user can select manually.
1. Press [MENU], then OSD MENU appears.
2. Select "TV SETUP"
using [UP/DOWN], then
press [MENU].
3. Select "Color System",
using [UP/DOWN]
then press [MENU]
4. Use [RIGHT/LEFT] to select
"SECAM L/L'" for France,
select "Others" for the other countries.
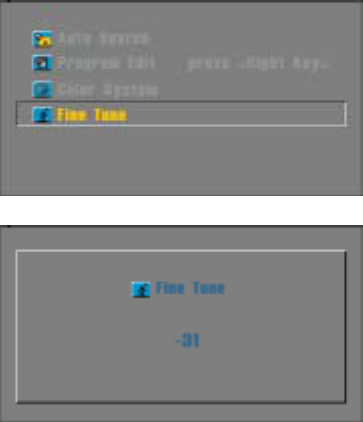
- FINE TUNE
Use to make minute adjustment when unsecured, poor colored display or lined picture appears.
1. Press [MENU], then OSD MENU appears.
2. Select "TV SETUP"
using [UP/DOWN], then
press [MENU].
3. Select "Fine Tune",
using [UP/DOWN]
then press [MENU]
4. Use [RIGHT/LEFT] to adjust -31 ~ 31
to optimize the picture
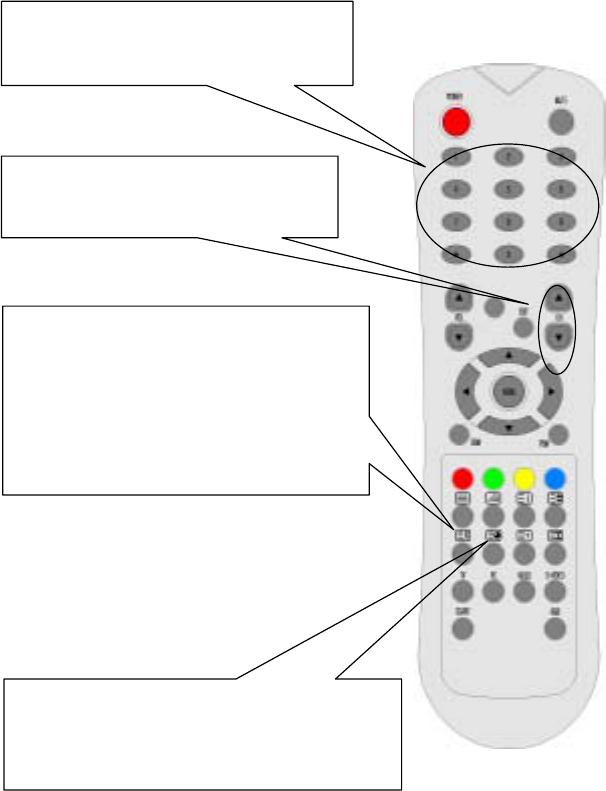
3.2.5 Using TELETEXT with a remote control
- TELETEXT
When the present TV program is broadcasted with text information, it shows TV mode and
Text mode in a toggle form by Text button, recognizing its signal.
* The remote control has not been fixed yet. This is subject to change without notice.
TEXT buttons - In case of channels with
TEXT information, pressing the Text
button will convert TV mode to Text
mode, then Text information will appear.
At this time, Menu buttons shall not
work.
Only Teletext related buttons shall work.
UP/DOWN buttons - In TEXT Mode,
page nbr shall be Up/Down.
DIGIT 0~9 buttons - In TEXT Mode, it is
possible to move to the selected
page directly
MIX button - In TEXT Mode, the background
of TEXT screen converts to TV screen
and so you can see both Text and TV
screen simultaneously.
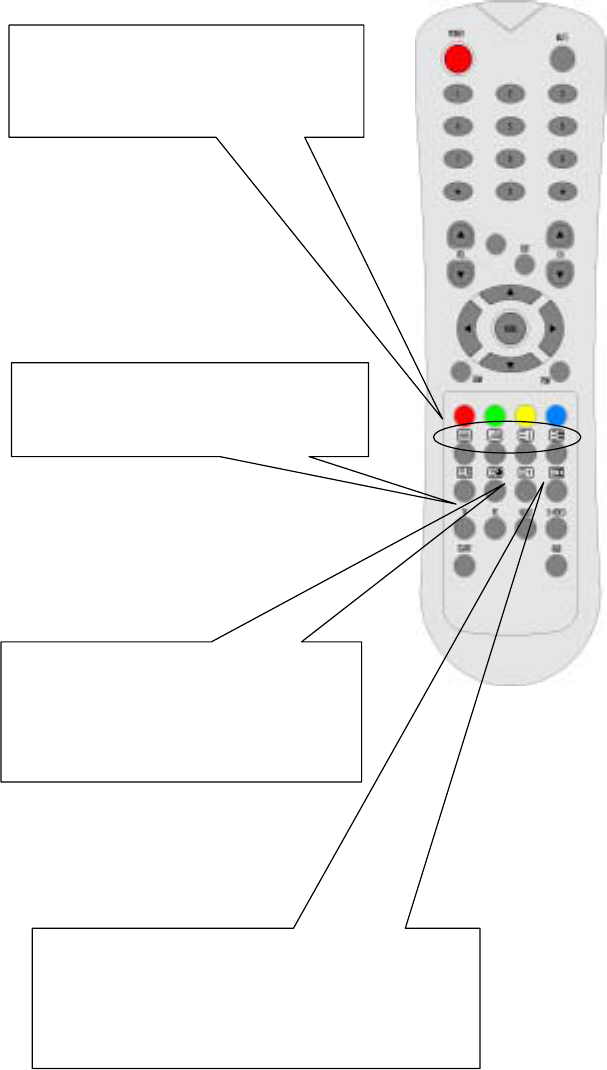
INDEX button - In TEXT Mode, it is used
to
connect directly to the index page of
text screen.
Normally Page No.100 is appointed as
the index page.
CANCEL button - In TEXT Mode, it is
used to cancel the searching of pages
or other working functions.
SIZE button - In TEXT Mode, it is used to enlarge
the size of current page.
Press once : 1/2 upper part enlarged.
Press twice : 1/2 lower part enlarged.
Press three times : ordinary screen converted.
R/G/Y/C COLOR buttons - In TEXT
Mode,
there are four different colors at the
bottom of the screen. One of them
can be chosen with these buttons.
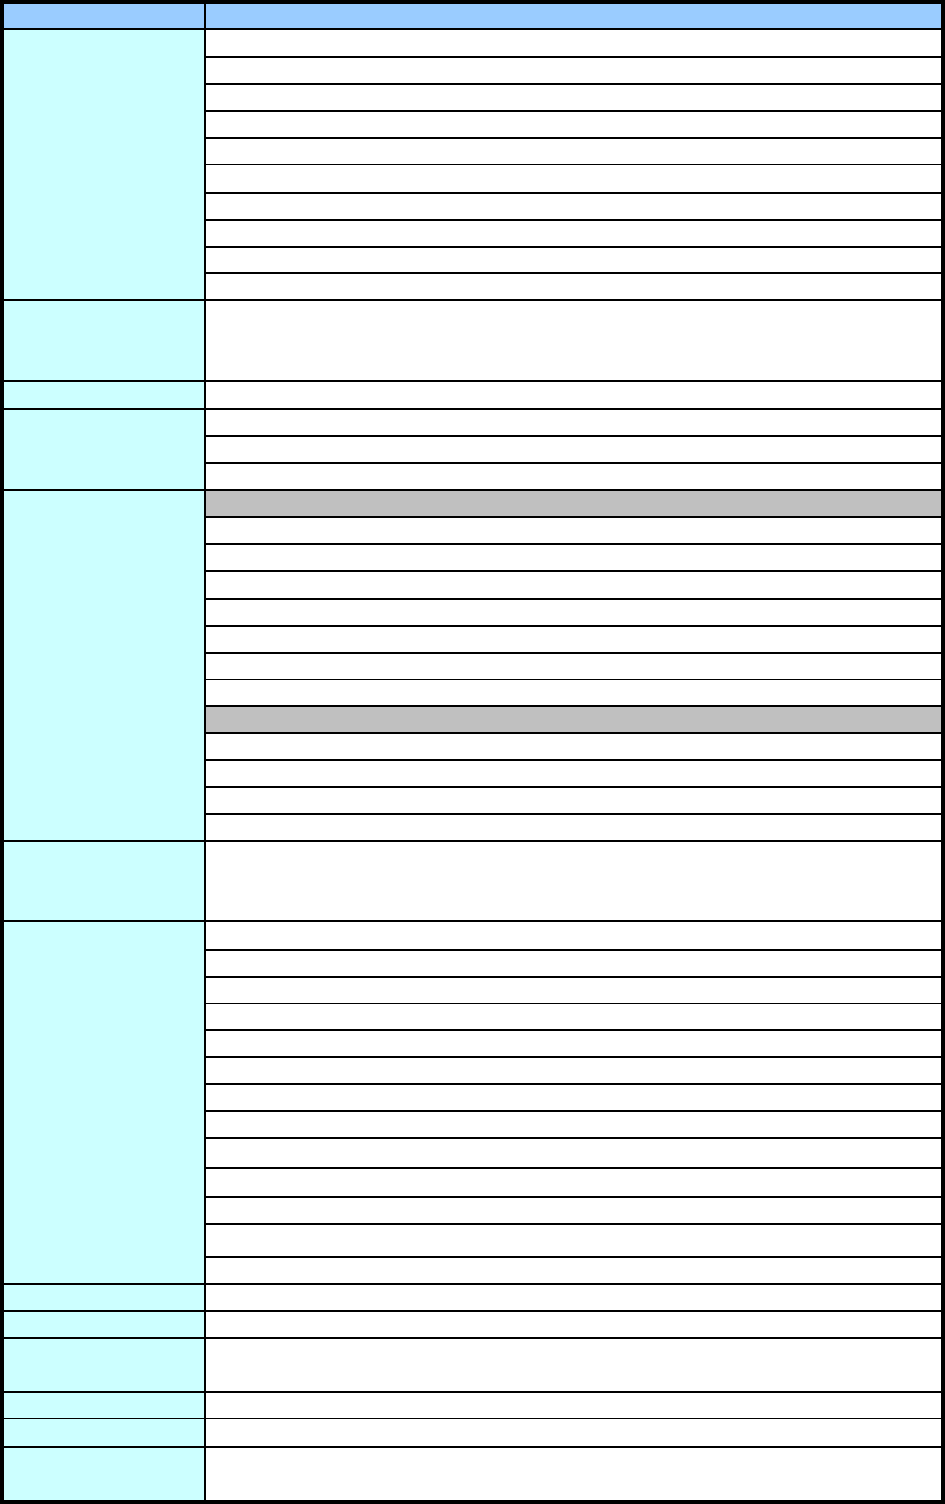
4. Product Spec.
MODEL
Panel:TFT-LCD
Panel Type
Size
Panel Pitch
Maximum Color
Brightness
Contrast Ratio
Viewing Angle
Resolution
Program Channels
Connectors (Rear)
1. Input
S-VHS
Video
Audio
PC Audio(Stereo)
PC(analog RGB)
RGB A/V
TV Antenna
2. Output
A/V
Audio(Stereo)
Headphone(Stereo)
Plug & Play
Wall Mount
Power Consumption
Weight (Net) .kg
Included Items AC Adaptor, Power Cable, 15-Pin D-Sub PC Signal Cable, 3.5mm A/V cable,
PC Audio Cable(option), Remote Controller (45keys), User's Manual
Dimensions (mm):
W x H x D
99Programs(EU).
696*436*82.5
150W
VESA
B/G, D/K, I, L/L
"PAL, SECAM, Multi(PAL/SECAM), Tri-mode (NTSC/PAL)"-option
3.5mm Jack
DDC 1/28
3.5mm Jack
Position & Scaling; H/V Position; Scaling; Zoom; Freeze Frame;
Control; System Reset; OSD Time Out; OSD Background; OSD H-Position; OSD V-Position;
Audio Control: Volume; Balance; Equalizer; Auto Volume; Surround; Auto Config; etc.
NTSC/PAL/SECAM/NT4.43
1.0+/- 0.2Vp-p
RCA
RCA(R/L)
Text(for EU only): Teletext; index; Mix; Size; Hold; Sub-page; Cancel; Reveal; Red; Green; Yellow;
Page Numeric 0~9; etc.
3.5mm Jack
15-Pin D-Sub
21-Pin Euro Scart(for EU only)
IEC-Type(EU)"
21Pin Euro Scart(for EU only)
4-Pin Mini Din
Scanning Frequency:
Horizontal
Vertical
TV:
Color System
Tuner System
OSD/Direct Control
Video Input:
Color System
Level (at 75 ohm)
"TV, Composite & S-VHS Mode-"
Display: Brightness; Contrast; Color; Hue; Sharpness; Scale; Zoom; Freeze Frame; Full Screen/Wide, PIP
Control: System Reset; OSD Time Out; OSD Background; OSD H-Position; OSD V-Position;
Audio Control: Volume; Balance; Equalizer; Auto Volume; Surround; Mono/Stereo/SAP/Auto;
Channel Control: CH Auto Search Program; CH Fine Tune; CH Manual Search Program; CH Manual
CH Manual Color Select; etc
PC Mode-
Display: Brightness; Contrast; Phase; Frequency; Sharpness; R/G/B Color Control;
Specification
LVDS
27 inch
WXGA(1280*720)
@75Hz
30~80.0KHz 55~75Hz
LT27A02
16.7M(8bit)
550cd
600:1
85"
0.1555(H) x 0.4665(V)

5. Troubleshooting
In case a problem occurs with your LCD, please take the following steps first.
If you still have the problem, turn the power off and contact your dealer or an authorized
service center.
TROUBLESHOOTING
Screen is too large
or too small
Execute automatic adjustment by pressing Auto config button. If the screen is
still abnormal after Auto config, perform fine adjustment.
Computer input
Screen is abnormal
It is the noise when the mechanism expands of contracts from to changes to
the environment due to factors such as humidity, temperature, etc. it is not a
failure
LCD makes strange
noise
ㅡIs the unit receiving interference from other devices? Transmission antennas
of radio broadcasting stations and transmission antennas of amateur radios and
cellular ㅡUse the unit as far apart as possible from devices that may
cause possible interference Dimensional Drawings
There are stripes on
the screen or colors
fade
LCD indication lamp
is On. The red means the Stand-by power is ON. It will take a few seconds to turn
off as the main power is off.
The picture is
spotted ㅡThere may be interference from automobiles trains, high voltage lines neon
lights, etc.
Increase the sound by pressing volume adjustment button. Check if voice
terminal of external input is connected properly. Check if speaker cables are
connected properly Select and check the other input. If the sound still does not
work and the other channels are the same after you have done as the above,
contact your dealer or an authorized service center.
Screen appears, but
there is no sound
Check if main power is On. Check that the batteries of the remote control were
loaded properly. Check to see if any obstacle exists between the LCD and the
remote control and remove it, if any. If the batteries have no power, replace them
with two new batteries.
Remote control does
not work
Is the power plug pulled out? Insert the power plug, Turn the main power
button on and then press the power button of the remote control.
The screen does not
appear.
Adjust the screen size.
Stripes appears on
the screen and it
shakes
Troubleshooting
Simultaneous Screen
does not appear
Perform brightness adjustment or contrast adjustment.
Screen is too bright
or too dark.
Check that LCD and external equipment are connected. Check the inputs of
simultaneous screen by pressing sub-screen selection.
Stop using wireless telephones, hair driers, and electrical drills.
Screen appears in
black and white Adjust color temp.
CHECK ITEM
FCC Compliance Statements
Note: This equipment has been tested and found to comply with the limits for a
Class B digital device, pursuant to part 15 of the FCC Rules. These limits are
designed to provide reasonable protection against harmful interference in a
residential installation. This equipment generates, uses and can radiate radio
frequency energy and, if not installed and used in accordance with the
instructions, may cause harmful interference to radio communications.
However, there is no guarantee that interference will not occur in a particular
installation. If this equipment does cause harmful interference to radio or
television reception, which can be determined by turning the equipment off and
on, the user is encouraged to try to correct the interference by one or more of
the following measures:
• Reorient or relocate the receiving antenna
• Increase the separation between the equipment and receiver.
• Connect the equipment into an outlet on a circuit different from that to
which the receiver is connected.
• Consult the dealer or an experienced radio / TV technician for help.
Warning : Your are cautioned that any change or modifications to the equipment not
expressly approved by the party responsible for compliance could void your authority
to operate such equipment.