3B Technology LT3032A01 32 Inch LCD TV User Manual cover1 ai
3B Technology Co., Ltd. 32 Inch LCD TV cover1 ai
Users Manual
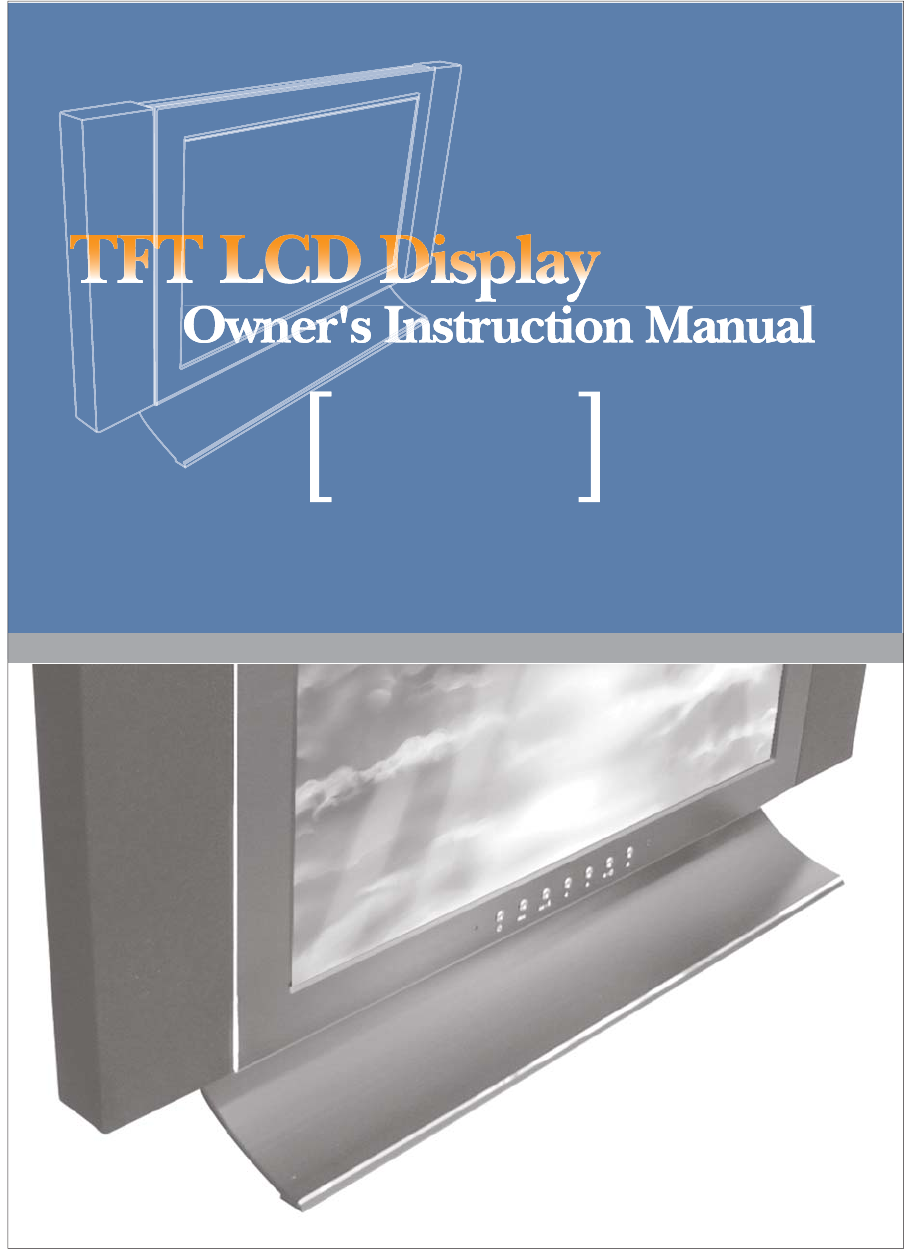
On- Screen Display Menus PC Display Closed Caption ViChip
Before operating the unit,
please read this manual
thotoughtly and retain it
for future reference
In
In
ner's
ner'
wner
wn
n
n
Before operating the unit,
please read this manual
thotoughtly and retain it
for future reference
Owner's Instruction ManualOwner's Instruction Manual

Safety Instruction
WARNING
RISK OF ELECTRIC SHOCK
DO NOT OPEN
Warning:
To reduce the risk of electric shock do not remove cover(or Back)..
No user serviceable parts inside. Refer servicing to qualified service personnel.
The lightning flash with arrowhead symbol, within an equilateral
triangle, is intended to alert the user to the presence of insinuated
"dangerous voltage" within the product's enclosure that may be of
sufficient magnitude to constitute a risk of electric shock to persons.
The exclamation point within an equilateral triangle is intended to
alert the user to the presence of important operation and
maintenance (servicing) instructions in the literature accompanying
the appliance.
Warning:
To prevent fire of shock hazard, do not expose the set to rain or moisture. Do not
rub or strike the Active Matrix LCD with anything hard as this may scratch, mar,
or damage the Active Matrix LCD permanently.
TM/VM-1210, TM/VM-1510, TM/VM-1512 : LT15A01
LT2627(E) LT3032(E)
01
Caution:
Do not attempt to modify this product in any way without written authorization.
Read and keep these Instruction manual
Heed all warnings and follow all instructions.
Do not use this apparatus near water.
Clean only with a dry cloth.
Do not block any ventilation openings. Install in accordance with the manufacturer instructions.
Do not install near any heat sources such as radiators, heat registers, stoves, or other apparatus
(including amplifiers) that produce heats.
This TV is not completely disconnected from a power supply line, as minute current is consumed
even when the POWER switch is turned off.
Do not place hot objects or naked flame sources, such as lighted candles or nightlights on, or close
to the TV. High temperatures can melt plastic and lead to fires.
Do not set on top of the TV. Any object or container that might spill liquids or small objects into the TV.
Protect the power cord from being walked on or pinched, particularly at plugs, convenience receptacles,
and the point where it exits the apparatus.
Only use attachments/accessories specified by the manufacturer.
Use only with the cart, stand, tripod, bracket, or table specified by the manufacturer, or sold with
the apparatus. When a cart is used, use caution when moving the cart/apparatus combination to
avoid injury form tip-over.
Unplug this apparatus during lighting storms or when unused for long periods of time.
Refer all servicing to qualified service personnel., Servicing is required when the apparatus has been
damaged in any way, such as power supply cord or plug is damaged, liquid has been spilled or objects
has fallen into the apparatus, the apparatus has been exposed to rain or moisture, does not operate
normally, or has been dropped.
Safety Instruction
LCD DISPLAY
LCD D ISPL AY
02
Installation
Installation
Warning:
To prevent fire of shock hazard, do not expose the set to rain or moisture. Do not rub
or strike the Active Matrix LCD with anything hard as this may scratch, mar, or
damage the Active Matrix LCD permanently.
Service
Never remove the back cover of the unit, this can expose you to high voltage and other hazards.
If the unit does not operate properly, unplug it and call your dealer.
Antenna connect the antenna cable to the connection marked Ant. (on the rear).
For best reception, use an outdoor antenna.
Location
Position your unit so that no bright light or sunlight will shine directly on the screen.
Do not expose the unit to vibration, moisture, dust or heat. Also ensure that the unit
is placed in a position that allows a free flow of air. Do not cover the ventilation
openings on the back cover. You can install the unit on a wall or place it on a table-top
or similar flat surface. Mounted the unit securely to eliminate the risk of injury from
the unit falling. Contact your dealers to purchase the optional ceiling mount.
Cleaning
Unplug the unit before cleaning the face or the LCD Screen. Dust the unit by wiping
the screen and cabinet with a soft, clean cloth. If the screen requires additional cleaning
use a clean, damp cloth. Do not use liquid or aerosol cleaners.
Power:
This set operates on an AC main supply, the voltage is as indicated on the label on the
back cover.
Never apply any DC power to the set directly. Connect the power cord to an AC mains.
In the event of thunderstorms or power cuts, please pill out the mains and aerial plug of
the set.
Do not allow anything to rest upon or roll over the power cord, and do not place the set
where the power cord is subject to damage.
LCD DISPLAYLCD DISPLAY
Contents
03
Contents
Page
LCD DISPLAY
LCD D ISPL AY
Safety
Bacic
Operation
Power ON/OFF
Info
TV
Picture
Window
Sound
Function
Spec
01
02
04
05-07
08
09
10
11
12
13
14
15
16
17
18
19
20
21-22
23
24
24-26
27-28
28-29
Safety Instruction
Installation
The Front Panel
Viewing the Connection of Back Panel
Viewing the Connection of External equipments
Watching DTV
Remote Control Handset
Inserting the Batteries in the Remote Control
Viewing and Selecting an Input source from External sources
Switching On and Off (LED light: Red & Green)
Displaying Information
Use of OSD(On Screen Display) menu
Storing Channels Automatically
Storing Channels Manually
Storing Channels Fine Tuning
Viewing Closed Captions
Set up Restrictions Using the TV Guidelines
Set up Restrictions Using the MPAA Ratings
Changing the Picture Standard
Setting the Window
Changing the Sound Standard
Function
Features of Product
Overview Specification
Supported Timings(* TBD)
Troubleshooting
The Front Panel
04
The Front Panel
1
2
3
4
5
6
1 2 3 4 5 7
7
6
[Power Key ] Power On/Off your set
[MENU Key] Press the MENU button, the OSD (On Screen Display ) Menu will be displayed
on screen.
[EXIT/Source Key : ] During OSD operation, return to the normal viewing Or return to the
previous menu.
: Use it as the Source Key if there is no menu on the screen
(Ex: TV -> PC -> DVI -> DTV -> DVD -> Video -> S-Video
[Left/Right Key ▶/ ◀ ] Volume Buttons
During OSD operation, adjust certain sub menu or setting value.
When you select ▶/ ◀ , it is "Enter " function
Decrease or Increases the level of audio volume and the volume of the
selected function
[Up/Down Key ▼ , ▲ ] Channel Buttons
Decreases or Increases the channel number.
Or make a curser move to the item you want to adjust during
OSD operation.
: Auto Configulation on PC mode : Hotkey
[Power Indicator ] LED Light (2 Colors : red, green )
Light up when you turn the Power Off
Red Light shows in Stand by mode, Green light shows in Power-On mode.
Remote control Sensor
Viewing the Connection of Back Panel (Over 26 inch)
05
Whenever you connect an audio or video system to your set, ensure that all elements
are swiched off. Refer to the documentation supplied with your equipment
for detailed connection instrctions and associated safety precautions.
Viewing the Connection of Back Panel
2
2
3
4
6
4
DTV/DVD
DVI
S-Video
PC
Composite Video
Component Inputs
PC AMP
AC Power
1
TV ANT.
5
06
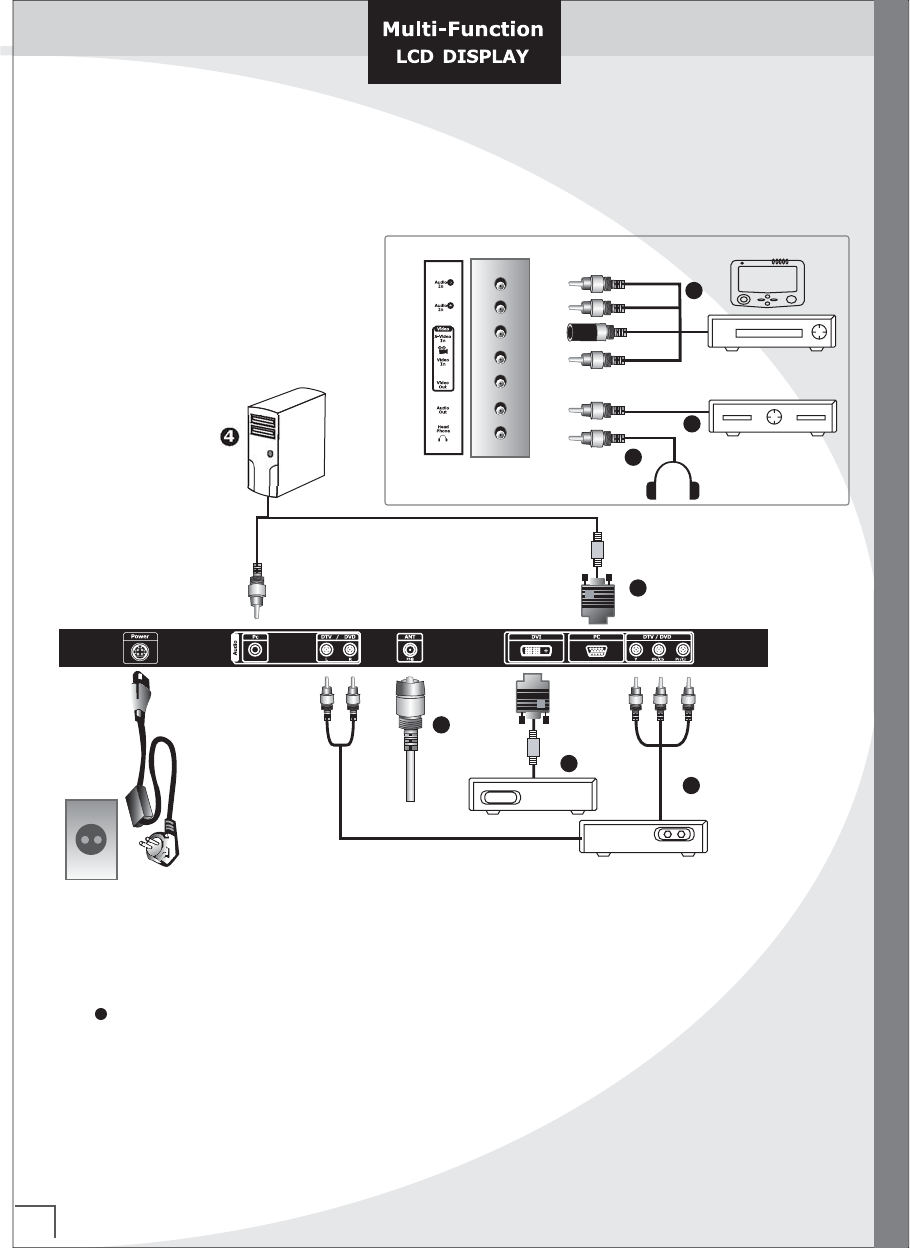
Viewing the Connection of Back Panel
Viewing the Connection of Back Panel (22, 23 inch)
Whenever you connect an audio or video system to your set, ensure that all elements
are swiched off. Refer to the documentation supplied with your equipment
for detailed connection instrctions and associated safety precautions.
2
2
3
4
6
4
DTV/DVD
DVI
S-Video
PC
Composite Video
Component Inputs
PC AMP
1
TV ANT.
5
07
Viewing the Connection of Back Panel
Viewing the Connection of Back Panel (Under 20 inch)
Whenever you connect an audio or video system to your set, ensure that all elements
are swiched off. Refer to the documentation supplied with your equipment
for detailed connection instrctions and associated safety precautions.
2
2
3
4
6
4
DTV/DVD
DVI
S-Video
PC
Video
Component Inputs
PC
1
TV ANT
5
Video/S-Video
DC IN
Headphone VideoAudio
Output
AMP
08
Viewing the Connection to External equipments
Viewing the Connection to External equipments
Connecting an Aerial or Cable Television Network (depending on the model)
Connecting a Set-Top Box, VCR or DVD
To view television channels correctly, a signal must be received by the set from one of
the followngs sources;
- An outdoor aerial
- A cable television network
- A satellite network
Component 1 and 2 : Connect the VCR, or DVD or PVR or DTV component cable
to the comopnent input ports.
* You can get better picture quality if you connect DVD player with component input ports
Connecting External A/V Devices
Connecting a Computer
Connect RCA or S-Video cables to an appropriate external A/V device such as a VCR, DVD,
Camcorder or Game box.
Connect the 15pin D-SUB connector or DVI socket to the PC RGB or DVI connector.
Connect the stereo audio cable from the sound card of PC to the PC Audio Input socket
of the set.
Audio Out (Line Out)
Connecting Headphones
Connect to the External Audio Amplifier.
Plug a set of headphones into the 3.5mm mini-jack socket on the left-side of the set
While the headphones are connected, the sound from the built-in speaker will be disabled.
1
2
3
4
5
6
To watch digitally broadcast Programs, purchase and connect a digital set-top box
Use the set's RGB, Component or DVI jack for video connections, connectors,
depending on your set-top box. Then, make the corresponding audio connections.
Turn on the digital set-top box (Refer to the owner's manual for the digital set-top box)
Use Sources Input Select on the remote control to select Component (DTV), RGB or DVI.
Watching DTV
How to connect
How to use
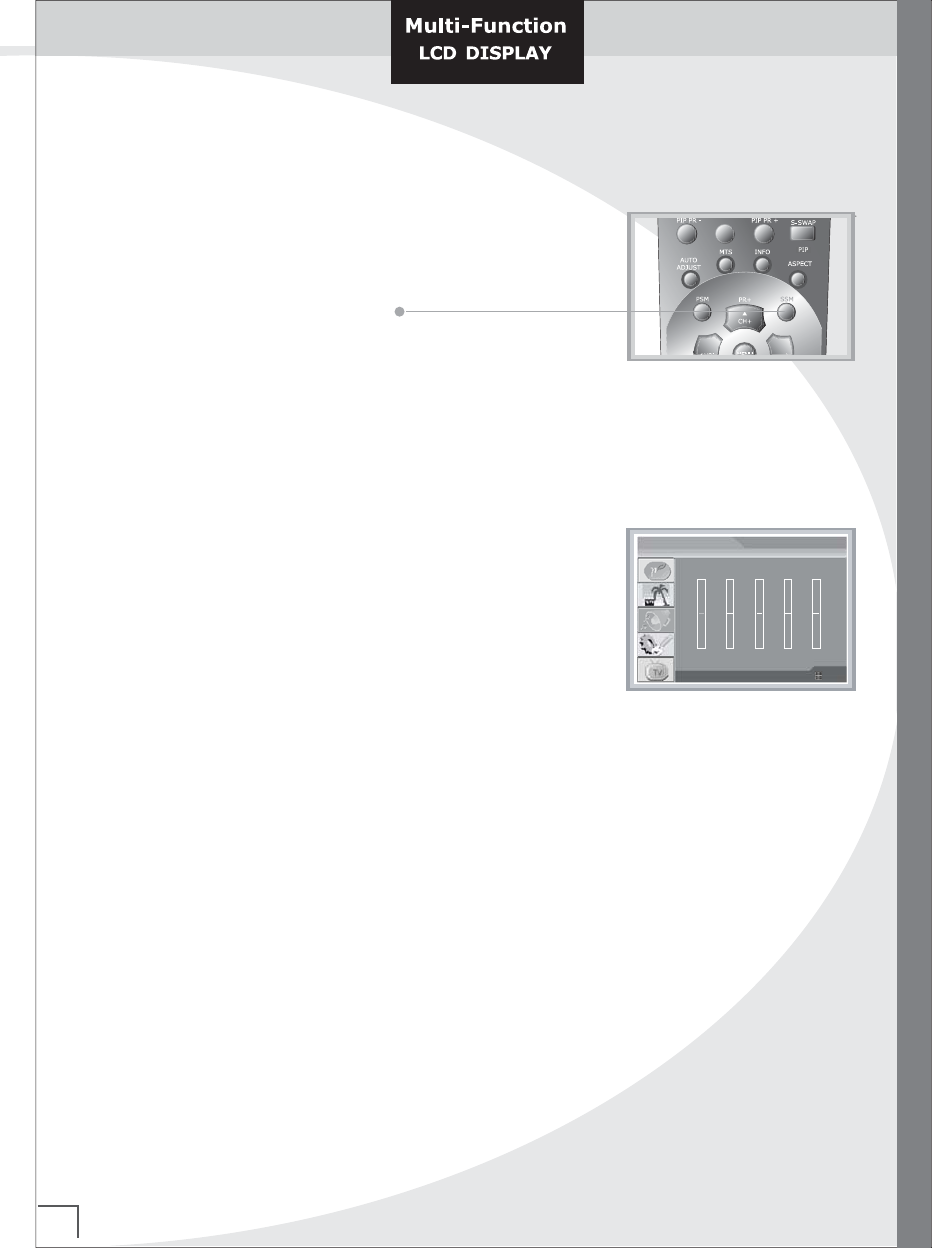
REMOTE CONTROLLER
0
VOL
AUTO MANUAL ADD DEL
CC V-CHIP
FAVIRITE PREV
MENU SELECT ▼▲
HDTV TIME PBP STILL
HDTV
TV PROGRAM
09
Remote Control Handset
Remote Control Handset
Power
Input Source
TV ON/OFF
Mute
Source
Switches the sound on or off
Display all input ources
PIP Size
Adjust the sub picture size
on or off
PIP input
Switches the sub picture
Position
Alternates between
main and sub sound
S-Swap
Select Screen aspect Ratio
Fill, 4:3, 1:1, Zoom1,Zoom2
Aspect
Use to see information
on the current broadcast
Info
To select the sound appropriate
to your viewing program character
Select a Program / Channel or
a menu
Previous menu
SSM
EXIT
CH +/-(PR+/-)
Switches the sub picture to
direction
Select TV,PC/DVI,DTV,
DVD,S/VIDEO
Selects a program
for the sub picture
Numeric buttons for
direct channel access
PIP PR +/-
Auto Program
Channel setting,
Manual setting,
Add, Del, CC,
V-Chip
TV Program
Adjust the factory
preset picture according
to the room
PSM
Adjust automatically
PC mode(Resolution)
Auto Adjust
TV select the language during
dual language & Stereo
broadcast.
MTS/Sound
Menu
Increases / Decreases
sound level
Adjust menu settings
VOLUME +/-
Sets the sleep timer
Sleep
OSD ON
Once you have connected up your various audio and video
systems, you can view the different sources by selecting the
appropriate input.
1. Check that all the necessary connections have been made
2. Press the SOURCES(EXIT/ ) button of Front panel or
Source of Remote Control
The input sources are displayed in the picture.
3. There are also "Video, S-Video, DVD, DTV, DVI and PC"
one of which you can select to fit a input source.
10
Inserting the Batteries in the Remote Control
Inserting the Batteries in the Remote Control & Input sources
Viewing and Selecting an Input source from External sources
You must insert or replace the batteries in the remote control when you ;
Purchase your set
Find that the remote control is no longer
operating correctly
1. Remote the cover on the rear of the remote
control by pressing the symbol downwards
and then pulling firmly to remove it.
2. Install two AAA size batteries.
+ on the battery against + on the remote control
- on the battery against - on the remote control
3. Replace the cover by aligning it with the base of the
remote control and presssing it back into place.
* Do not mix battery types, (Ex), alkaline and manganese.
1.5V
1.5V
1.5V
1.5V
11
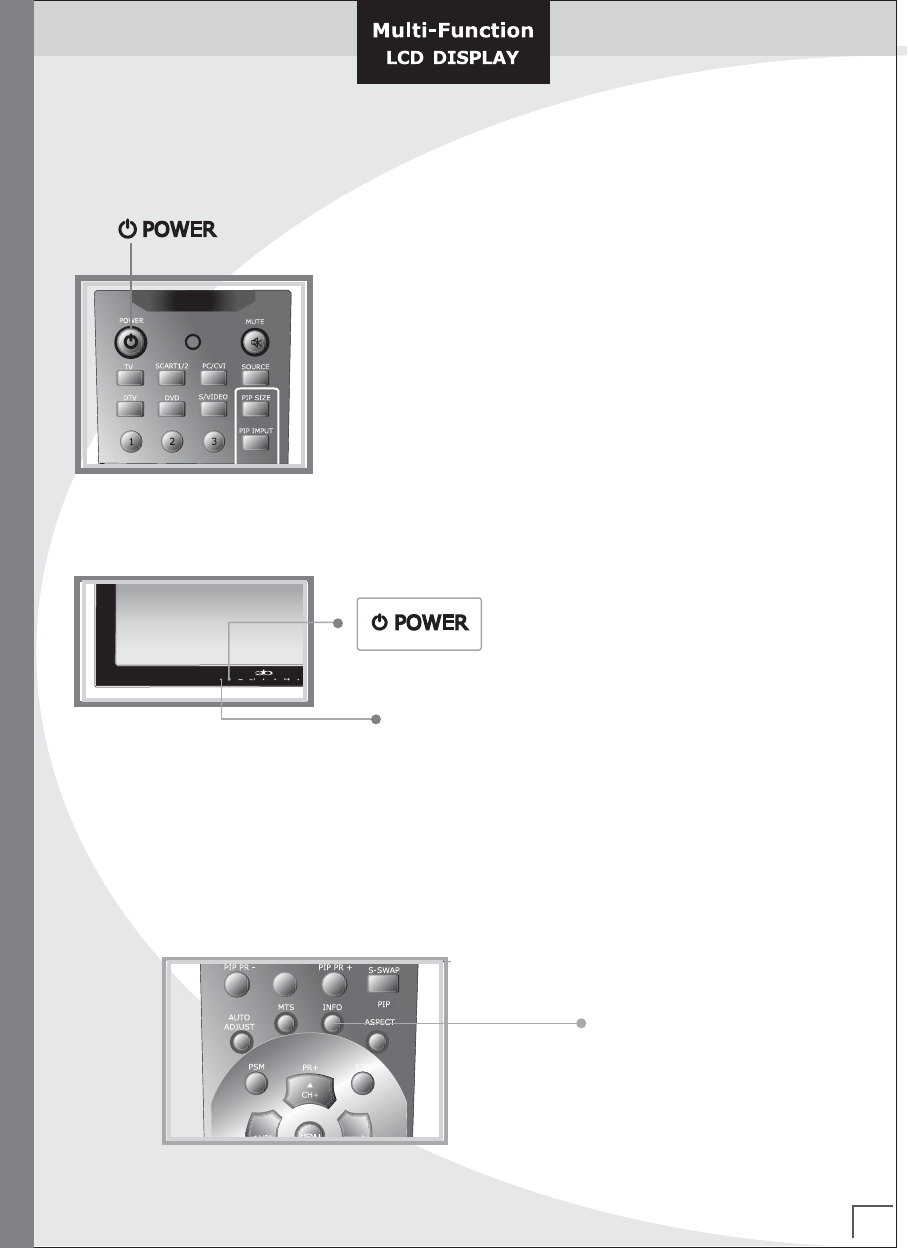
Switching On and Off (LED light : Red & Green)
Switching On and Off (LED light : Red & Green)
1. Plug the mains lead into an appropriate socket.
☞ When the power cord is plugged in, the LED turns red.
2. Press the POWER button to switch on. Then the LED turns green.
3. To switch off, press the POWER button again. Then the LED
turns red.
LED light
Displaying Information
You can see the setting status of selected by pressing the "INFO" button on the remote control.
the information displayed varies according to the selected source.
0
INFO
12
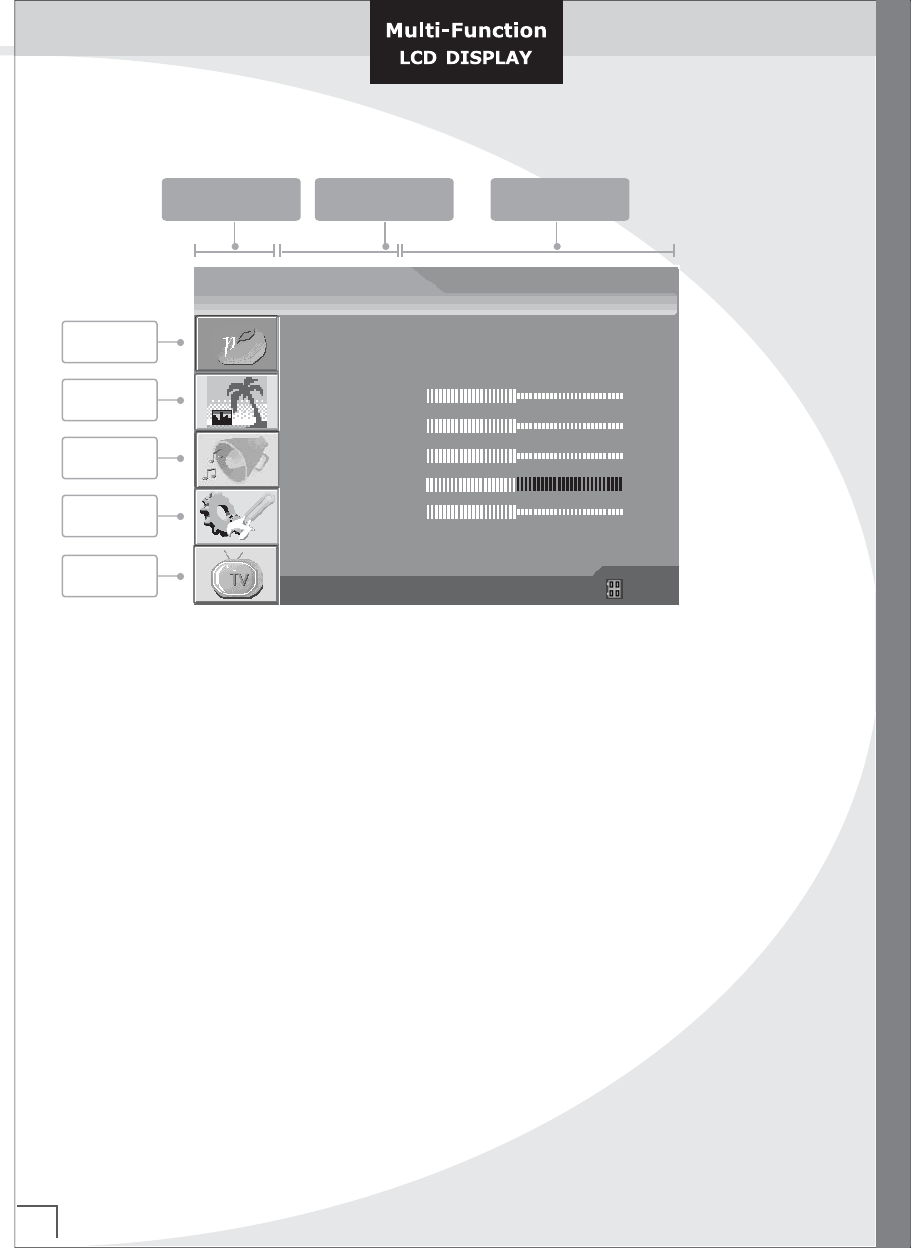
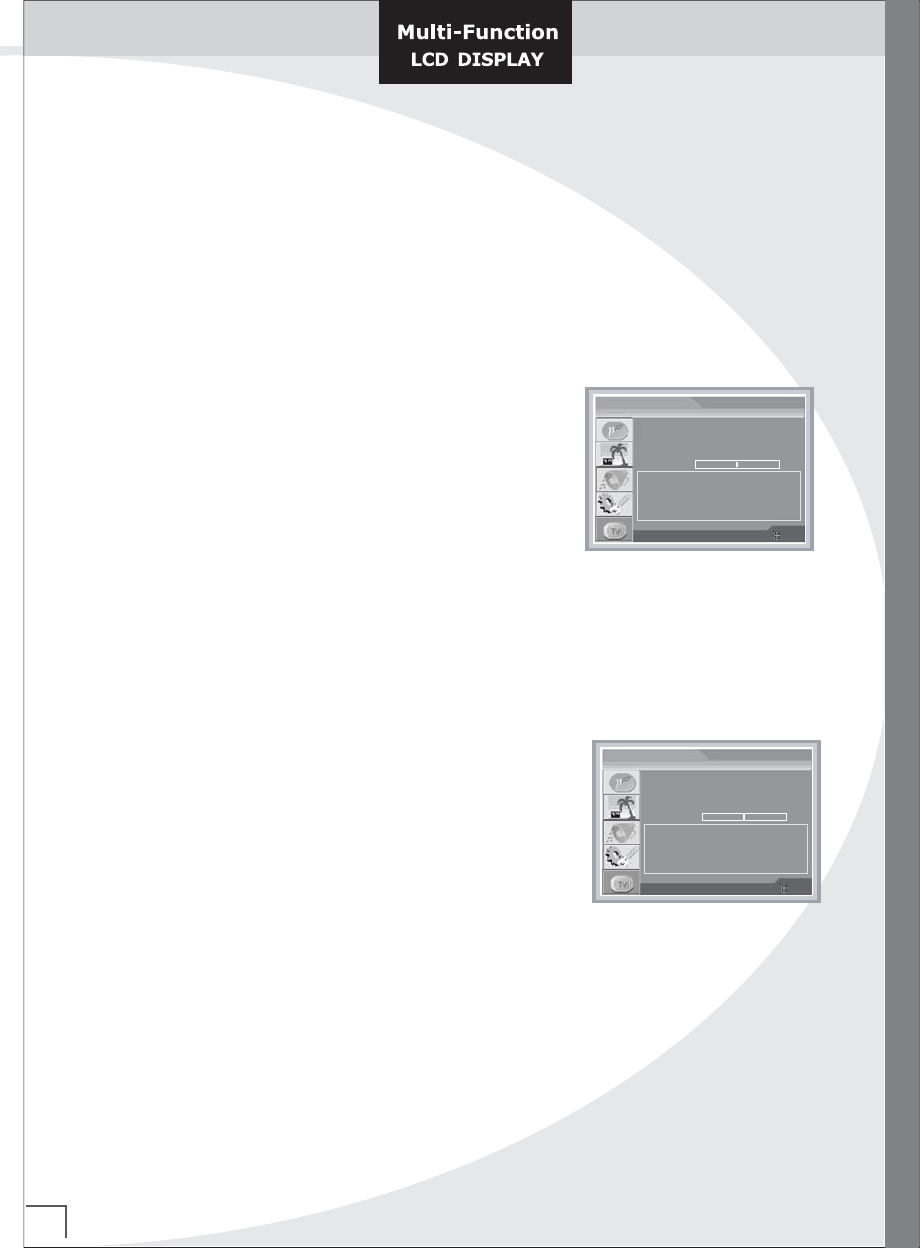
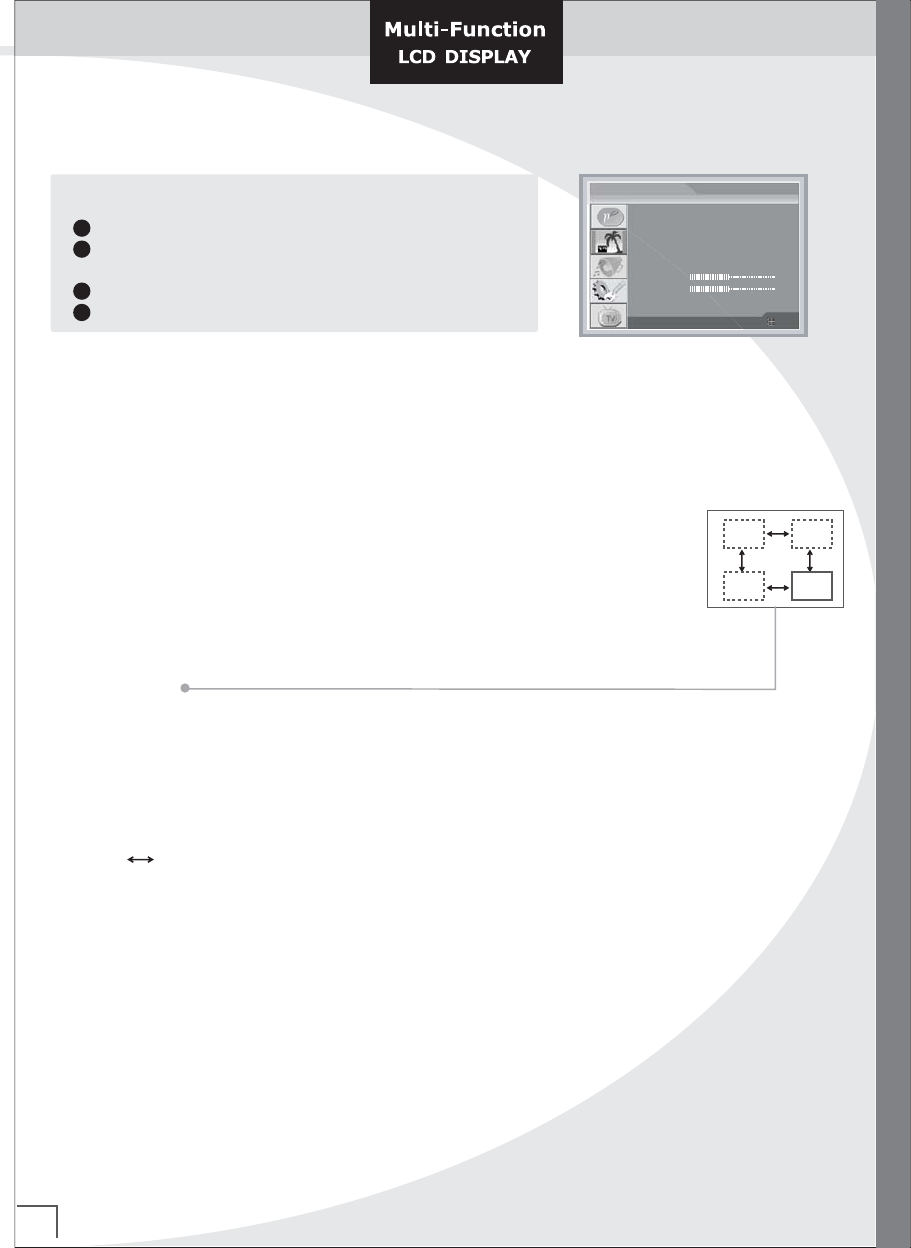
Use of OSD(On Screen Display) menu
If you want to adjust the displaying, please follow the following procedure.
1. Press the MENU button, then main Menu will be displayed.
2. Press ▲/▼ button to select the item Group you want to adjust
3. Press ▶ button to enter. (to select Sub menu)
4. Sub item or adjusting Menu will appear. If Sub item shows up,
repeat two or three times until you can see an adjusting Menu.
5. At the state of adjusting Menu, adjust the condition with ◀/▶ or ▲/▼ buttons
6. press the EXIT button to previous menu.
Picture
Item Group
Window
Sound
Funtion
TV
Sub menu Sub item
OSD MENU
PSM
Color Tone
Brightness
Contrast
Color
Tint
Sharpness
Picture
◀ Custom ▶
▶
50
50
50
50
50
▼▲ : Move ◀▶ : Adjust : Exit
13
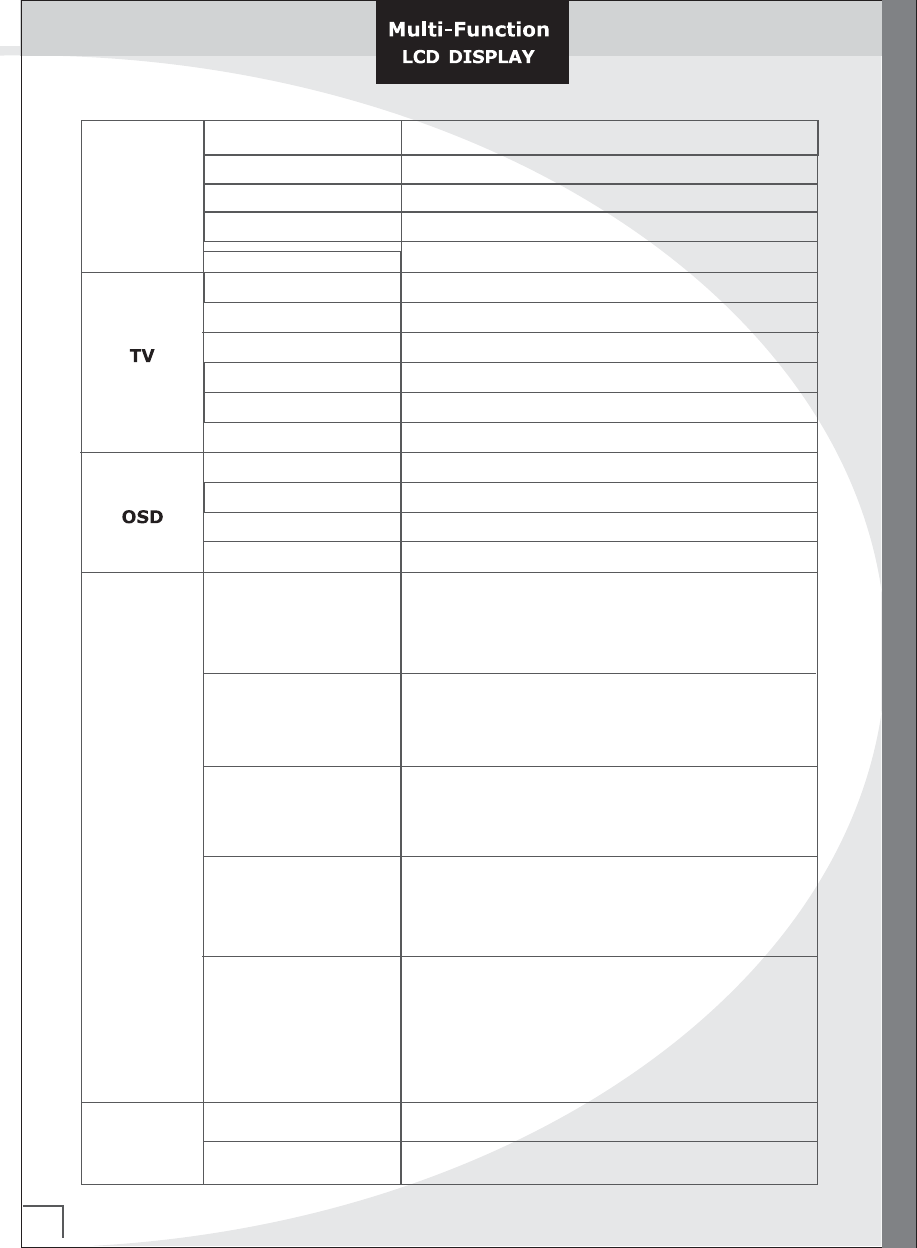
Storing Channels Automatically
You can scan for the frequency ranges available to you (and availability
depends on you country). Automatically allocated programm numbers
may not correspond to actual or desired programm numbers.
However you can sort numbers manually and clear any channels you
do not wish to watch.
1. Press the MENU button.
☞ The main menu is displayed.
2. Press the ▲ or ▼ button to select the TV.
☞ The options available in the TV group are displayed.
3. Press the ▲ or ▼ button to select Auto Search for auto
search.
4. Press the ▶ button to search the channels.
5. To stop the search before it has finished. Press the Exit
button to search the channels.
6. When the channels have been stored, you can;
☞ Stored channel is indicated in orange color, can not be
stored channel is indicated in gray color.
Storing Channels Automatically
Auto Search
Manual Search
Auto Fine Tune
Fine Tune
Closed Caption
Caption Display
TV Parental Guidelines
TV SETUP
▶
▶
▼▲ : Move ◀▶ : Adjust : Exit
ON OFF
CCD / V-Chip Setup
0
◀ CC1 ▶
◀ Box ▶
▶
199.25MHz
11 Cable Channel Searching
Press <Exit> to cancel
1234 5678910
11 12 13 14 15
16 17 18 19 20 22 23 24 25 26 27 28 29 30
31 32 33 34 35 36 37 38 39 40 41 42 43 44 45
46 47 48 49 50 51 52 53 54 55 56 57 58 59 60
61 62 63 64 65 66 67 68 69 70 71 72 73 74 75
76 77 78 79 80 81 82 83 84 85 86 87 88 89 90
91 92 93 94 95 96 97 98 99 100 101102 103 104 105
106 107 108 109 110 111 112 113 114 115 116 117 118 119120
106 107 108 109 110
21
14
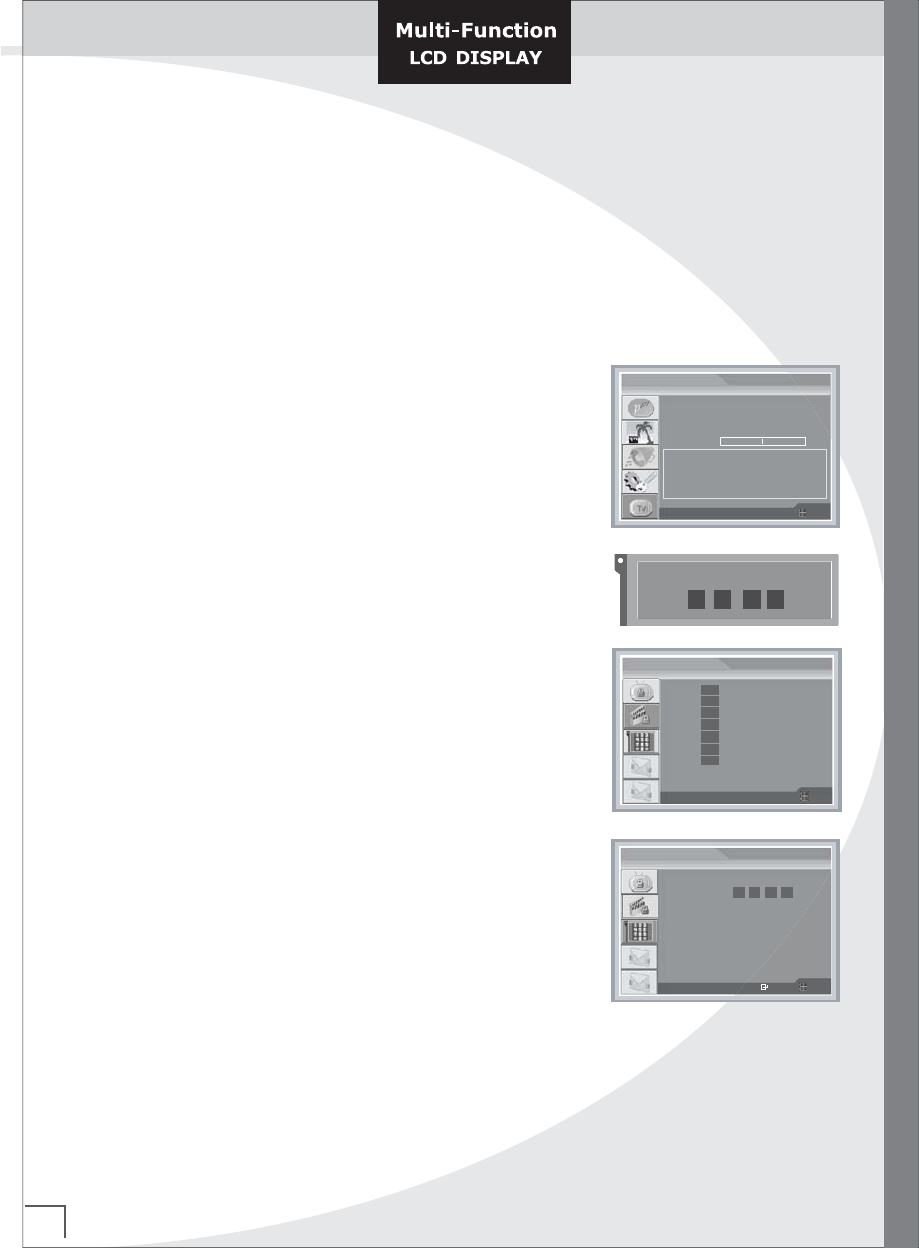
Storing Channels Manually
You can store up to 125 channels(Air : 2~69Ch), including those received via cable networks.
When storing channels manually, you can choose;
+ Whether or not to store each of the channels found.
1. Press the MENU button.
☞ The main menu is displayed.
2. Press the ▲ or ▼ button to select the TV.
☞ The options available in the TV group are displayed.
3. Press the ▲ or ▼ button to select the Manual Tuning.
Press ▶ button to enter
4. Setting list of channel will be displayed.
5. Press ▲, ▼, ◀, ▶ button to select the channel.
6. Press Menu Key to store/Delete the channel.
7. press Exit Key to disappear from setting list of channel
if setting is finished.
☞ Stored channel is indicated in orange color, can not be
stored channel is indicated in gray color.
Storing Channels Manually
Auto Search
Manual Search
Auto Fine Tune
Fine Tune
Closed Caption
Caption Display
TV Parental Guidelines
TV SETUP
▶
▶
▼▲ : Move ◀▶ : Adjust : Exit
ON OFF
CCD / V-Chip Setup
0
◀ CC1 ▶
◀ Box ▶
▶
199.25MHz
11 Air TV Channel Edit
▲▼◀▶ : Channel Add / Del : Menu
1234 5678910 12 13 14 15
16 17 18 19 20 22 23 24 25 26 27 28 29 30
31 32 33 34 35 36 37 38 39 40 41 42 43 44 45
46 47 48 49 50 51 52 53 54 55 56 57 58 59 60
61 62 63 64 65 66 67 68 69 70 71 72 73 74 75
76 77 78 79 80 81 82 83 84 85 86 87 88 89 90
91 92 93 94 95 96 97 98 99 100 101102 103 104 105
106 107 108 109 110 111 112 113 114 115 116 117 118 119120
106 107
21
108 109 110
11

15
1. Press the Menu button.
☞ The main menu is displayed.
2. Press the ▲ or ▼ buton to select the TV.
☞ The options available in the TV group are displayed.
3. Press the ▲ or ▼ button to select the Auto Fine Tune.
4. Select auto fine tune On or Off by pressing the ◀ or ▶
button.
5. Press the Exit button to exit.
☞ On : When change the channel, automatically correct
frequency.
6. If you need to tuner the channel precisly, Press the ▲ or ▼
button to select Fine Tune.
Start the Fine Tune by pressing the ◀ or ▶ button.
☞ When Auto Fine Tune is off.
SStoring Channels Fine Tuning
Storing Channels Fine Tuning
You can set the fine picture, when the received picture is poor.
+ Each channels can be stored after tuning.
Auto Search
Manual Search
Auto Fine Tune
Fine Tune
Closed Caption
Caption Display
TV Parental Guidelines
TV SETUP
▶
▶
▼▲ : Move ◀▶ : Adjust : Exit
ON OFF
CCD / V-Chip Setup
0
◀ CC1 ▶
◀ Box ▶
▶
Auto Search
Manual Search
Auto Fine Tune
Fine Tune
Closed Caption
Caption Display
TV Parental Guidelines
TV SETUP
▶
▶
▼▲ : Move ◀▶ : Adjust : Exit
ON OFF
CCD / V-Chip Setup
0
◀ CC1 ▶
◀ Box ▶
▶
16
Viewing Closed Captions
Viewing Closed Captions
Your TV decodes and displays the closed captions that are broadcast with certain TV shows.
These captions are usually subtitles for the hearing impaired or foreign-language translations.
All VCRs record the closed caption signal from television programs, so home-recorded
video tapes also provide closed captions. Most pre-recorded commercial video tapes provide
closed captions as well.
1. Press the MENU button.
☞ The main menu is displayed.
2. Press the ▲ or ▼ button to select the TV.
☞ The options available in the TV group are displayed.
3. Press the ▲ or ▼ button to select the Closed Caption.
4. Press the ◀ or ▶ button to select the CCD Mode.
☞ Off -> CC1 -> CC2 -> CC3 -> CC4 -> Text1 ->
Text2 -> Text3 -> Text4 -> XDS
☞ XDS : indicated information regard to recent broadcast.
(Broadcasting company / time /limited level / rest of time and so on)
6. Press the EXIT button to exit.
* Set up background of closed caption.
1. Press the MENU button.
☞ The main menu is displayed.
2. Press the ▲ or ▼ button to select the TV.
☞ The options available in the TV group are displayed.
3. Press the ▲ or ▼ button to select the Caption Display.
4. Press the ◀ or ▶ button to select the Box or Shadow.
☞ Box : set up the background of caption as black box - recommend
Shadow : set up background of caption as clarity.
5. Press the EXIT button to previous menu.
Auto Search
Manual Search
Auto Fine Tune
Fine Tune
Closed Caption
Caption Display
TV Parental Guidelines
TV SETUP
▶
▶
▼▲ : Move ◀▶ : Adjust : Exit
ON OFF
CCD / V-Chip Setup
0
◀ CC1 ▶
◀ Box ▶
▶
Auto Search
Manual Search
Auto Fine Tune
Fine Tune
Closed Caption
Caption Display
TV Parental Guidelines
TV SETUP
▶
▶
▼▲ : Move ◀▶ : Adjust : Exit
ON OFF
CCD / V-Chip Setup
0
◀ CC1 ▶
◀ Box ▶
▶
17
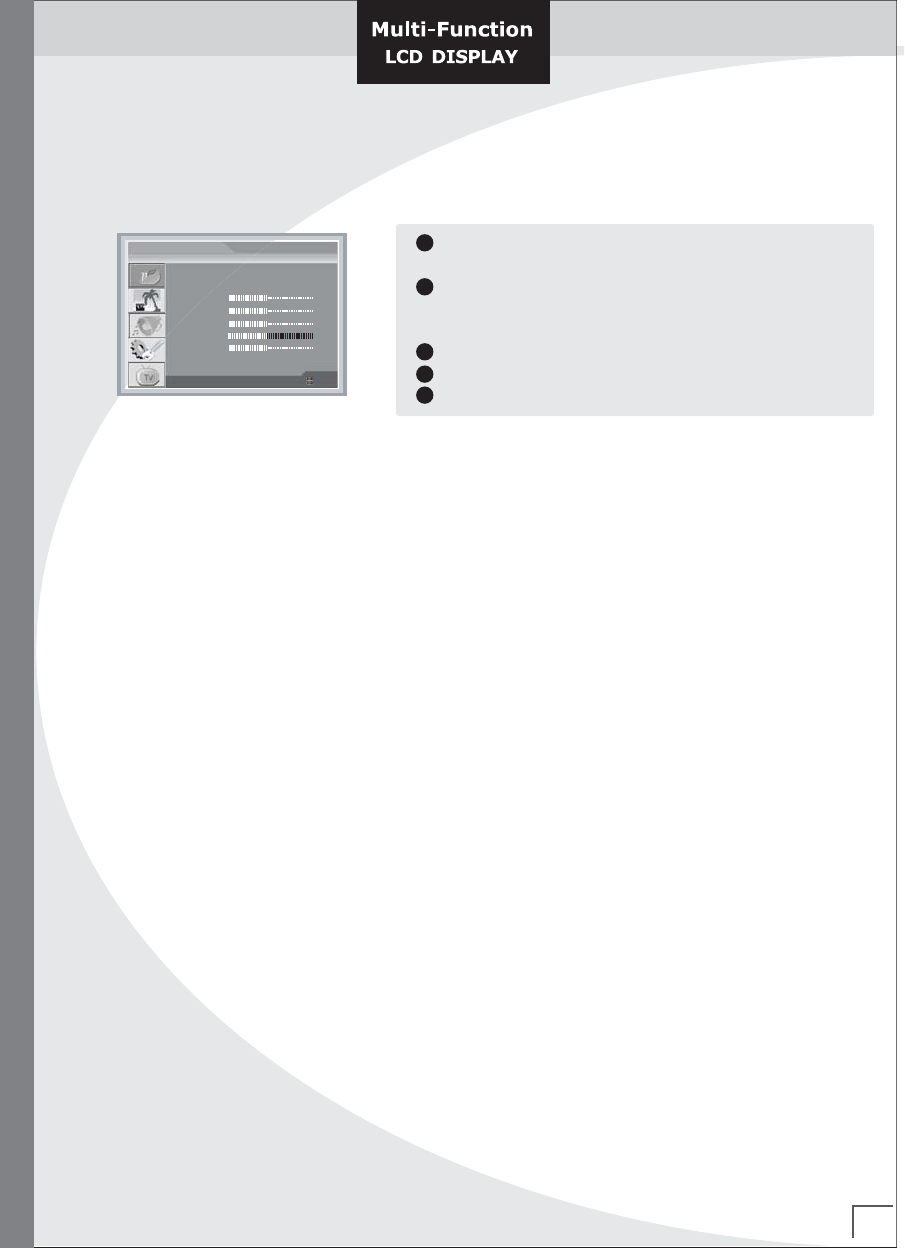
Set up Restrictions Using the TV Guidelines
The V-Chip feature automatically locks out programming that is deemed inappropriate for
children.
First, set up a personal identification number (Password), and enable the V-Chip.
Parental restrictions can be set up using either of two methods:
The TV guidelines.
1. Press the MENU button.
☞ The main menu is displayed.
2. Press the ▲ or ▼ button to select the TV.
☞ The options available in the TV group are displayed.
3. Press the ▲ or ▼ button to select the TV Parental Guidelines.
Press the ▶ button to enter.
4. The "Enter Password" screen will appear.
Enter your 4-digit Password number.
☞ The default Password number for a new TV set is "0-0-0-0".
5. Press the ▲ or ▼ button to select the TV Guidlines.
Press the ▶ button to enter.
6. The TV Guidelines screen will appear.
Press the ▲ or ▼ button to select one of the six age-based
categories:
☞ TV-Y Young children
TV-Y7 Children 7 and over
TV-G General audience
TV-PG Parental guidance
TV-14 Viewers 14 and over
TV-MA Mature audience
7. Press the ◀ or ▶ button to select TV-Rating.
☞ All : For all of age
FV : Fantasy Violence
D : Sexual suggestive Dialog
L : Adult Language
S : Sexual situation
V : Violence
8. Press the EXIT button to previous menu.
Set up Restrictions Using the TV Guidelines
Auto Search
Manual Search
Auto Fine Tune
Fine Tune
Closed Caption
Caption Display
TV Parental Guidelines
TV SETUP
▶
▶
▼▲ : Move ◀▶ : Adjust : Exit
ON OFF
CCD / V-Chip Setup
0
◀ CC1 ▶
◀ Box ▶
▶
FV : Fantasy Violence V : Violence
S : Sexual Situation L : Coarse Language
TV Guidelines
▼▲ : Move ◀▶ : Adjust : Exit
D : Suggestive Dialog
TV - Y7 All TV-Y7 : Young Children
TV - G All TV-G : Young Children
TV - PG All TV-PG : Young Children
TV - MA All TV-MA : Young Children
TV - 14 All TV-14 : Young Children
TV - Y All TV-Y : Young Children
Enter Password
* * - -
18
Set up Restrictions Using the MPAA Ratings
The MPAA rating system uses the Motion Picture Association of America (MPAA) system,
and its main application is for movies.
When the V-Chip lock is on, the TV will automatically block any programs that are coded
with objectionable ratings (either MPAA or TV-Ratings).
The user must first enter a Password (personal ID number) before any of the V-Chip
restrictions can be set up or changed.
1. Take the same step as shown on the page 15 from
No.1 to No.4.
2. Press the ▲ or ▼ button to select the MPAA Rating.
Press the ▶ button to enter.
3. Repeatedly press the ▲ or ▼ button to select a particular
MPAA category.
☞ G : General audience (no restrictions).
PG : Parental guidance suggested.
PG-13 : Parents strongly cautioned.
R : Restricted. Children under 17 should be accompanied
by an adult.
NC-17 : No children under age 17.
X : Adults only.
NR : Not rated.
● Blocking : Enable/Disable the V-Chip
1. Same the previous page step 1 to 4.
2. Press the ▲ or ▼ button to select the Change Password.
Press the ▶ button to enter.
3. Press the ▲ or ▼ button to select the Blocking.
To enable the V-Chip feature, press the ◀ or ▶ buttons
so that the Blocking is set to On.
(Pressing the ◀ or ▶ buttons will alternate between On and Off)
● Setting Up Your Password Number
1. Same the previous page step 1 to 4.
2. Press the ▲ or ▼ button to select the Change Password.
Press the ▶ button to enter.
3. Press the ▲ or ▼ button to select the New Password.
Choose any 4-digits for your Password Number and ▶ button to enter.
☞ Password Number select to the Remote-Control Numeric Button.
4. press the EXIT button to previous menu.
Set up Restrictions Using the MPAA Ratings
Auto Search
Manual Search
Auto Fine Tune
Fine Tune
Closed Caption
Caption Display
TV Parental Guidelines
TV SETUP
▶
▶
▼▲ : Move ◀▶ : Adjust : Exit
ON OFF
CCD / V-Chip Setup
0
◀ CC1 ▶
◀ Box ▶
▶
B : Blocked U : Unblocked
MPAA Rating
▼▲ : Move ◀▶ : Adjust : Exit
PG B PG : Genernal audience
PG-13 B PG-13 : Genernal audience
X B X : Genernal audience
R B R : Genernal audience
NC-17 B NC-17 : Genernal audience
G B G : Genernal audience
NR B NR : Genernal audience
Enter Password
* * - -
Change Password
▼▲ : Move ◀▶ : Adjust : Exit
New Password - - - -
Blocking On
▶
19
Changing the Picture Standard
You can select the type of picture which best corresponds to your viewing requirements.
Changing the Picture Standard
Press the Menu button.
☞ The main menu is displayed.
Press the ▲ or ▼ button to select the Picture.
☞ The options available in the Picture group are
displayed.
Press the ▶ button to select sub-Menu button.
Press the ▲ or ▼ button to select the sub-Menu item.
Press the ▶ button to select to change the value.
1
2
3
4
5
1. PSM(TV / Video / S-Video / DVD)
Press the ▶button to change the sub-item
☞ Dynamic -> Cinema -> Custom -> Standard
If you make any changes to these settings, the picture standard is automatically switched to
Custom.
You can also recall a desired picture (Standard, Cinema, Custom, Dynamic)
with PSM button on the remote control. The Picture Standard, Cinema and Dynamic
are programmed for good picture reproduction at the factory, and cannot be changed.
Select the option (Contrast, Brightness, Color, Sharpness or Tint only) to be adjusted
by pressing the ▲ or ▼ button.
2. Color Tone
☞ You can control the 6 kinds temperature of screen color.
Press the ▶ button to change the sub-item
Cool1 -> Cool2 -> Nomal -> Warm1 -> Warm2-> User
3. Brightness
Adjust screen brightness as bright or darkly. Press ▶ or ◀ , adjust the amount from 0 to 100.
4. Contrast
Adjust contrast gap between the object in screen and background as softly or strongly.
Press ▶ or ◀ , adjust the amount from 0 to 100.
5. Color
Adjust the density of color as mild or deep. Press ▶ or ◀, adjust the amount from 0 to100.
6. Tint (not available for TV mode)
Adjust the shadow of color. Press ▶ or ◀ , adjust the amount from 0 to 100.
7. Sharpness
Adjust the outline of object in screen as clear or misty. Press ▶ or ◀, adjust the amount from 0 to 100.
8. Phase(PC,DTV), Frequency(PC Only)
Press the ▶ or ◀ buttons to adjust the screen quality, vertical stripes may appear or the picture
may be blurry.
PSM
Color Tone
Brightness
Contrast
Color
Tint
Sharpness
Picture
◀ Custom ▶
▶
50
50
50
50
50
▼▲ : Move ◀▶ : Adjust : Exit
20
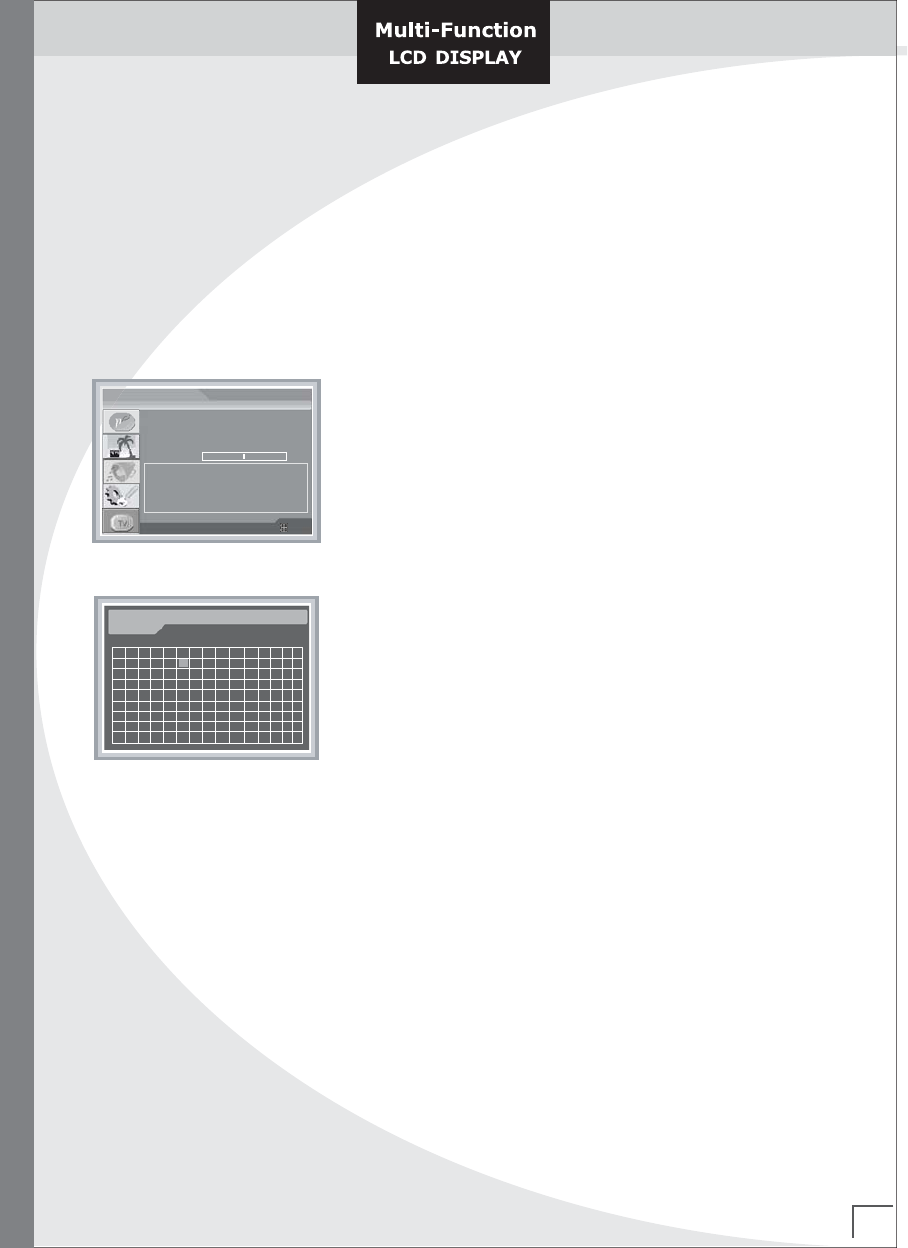
Setting the Window
Setting the Window
1
2
3
4
Press the Menu button.
Press the ▲ or ▼ button to select the Window.
The options available in the Window group are displayed.
Press the ▶ button
Press the ▲ or ▼ button to select the sub-item.
If you want to change the feature.
Aspect Ratio
PIP Size
PIP Source
PIP Position
Sound Swap
H Position
V Position
Window
◀ Fill All ▶
50
50
▼▲ : Move ◀▶ : Adjust : Exit
◀ Off ▶
◀ Television ▶
◀ Upper Left ▶
◀ Main Sound ▶
1. Aspect Ratio (Picture Format)
You can watch TV in various picture formats; Fill All, Zoom2, Zoom1 or One to One
Repeatedly press the Aspect button to select your desired aspect ratio picture format.
☞ Wide LCD : Fill All->Zoom2->Zoom1->4:3(TV, Video, S-Video, DVD), Fill All->4:3(PC, DTV, DVI)
Normal LCD : Fill All->Zoom2->Zoom1->Wide(TV, Video, S-Video, DVD), Fill All->Wide(PC, DTV, DVI)
2. PIP Size(PC, DTV, DVI)
PIP is the picture in picture. Adjust the size of PIP window.
Press The ▶ button Select the sub-item.
☞ Off -> Small -> Large
4. PIP Source
Choose the input source in PIP window. Press The ▶button Select the sub-item.
☞ TV, Video, S-Video
5. PIP Position
Move the position of PIP window Press the ▶button select the sub-item.
Or press the Remote-control POSITION button.
☞ Upper Left -> Upper Right -> Lower Left -> Lower Right
6. Sound Swap
Exchange the main and sub sound.
Press The ▶button to exchange the sub-item.
☞ Main Sub
7. H Position(PC Only)
Press the ◀ or ▶ buttons to adjust the Horizontal Position.
8. V Position(PC Only)
Press the ◀ or ▶ buttons to adjust the Vertical Position.

21
Changing the Sound Standard
You can select the type of special sound effect to be used when watching a given broadcast.
Changing the Sound Standard
1. Balance
Press the ▶ or ◀ button to change the balance level between the left and right sound.
2. Auto Volume
Reduces the differences in volume level between broadcasters.
Press the ▶ or ◀ button to select Off / On.
3. Stereo Effect
Press the ▶ or ◀ button to select Off / On.
4. MTS
Mono/Stereo/SAP reception.
Press the ▶ or ◀ button to select Mono, Stereo or SAP.
Language selection for dual language broadcast
If a programme received in two languages (dual language),
you can switch to Language A, Language B or Language A+B by pressing the Language(A/B)
sub-item.
Language A sends the primary broadcast language to the loudspeakers.
Language B sends the secondary broadcast language to the loudspeakers.
Language A+B sends a separate language to each loudspeakers.
5. Stereo System
Select the stereo system by nation .
Press the ▶ or ◀ button to select BTSC(USA), A2(KOREA) or EIA-J(JAPAN).
1
2
3
4
5
Press the Menu button.
Press the ▲ or ▼ button to select the Sound.
The options available in the Sound group are displayed.
Press the ▶ button to select the sub-menu.
Press the ▼ or ▲ button to select the sub-item.
Press the EXIT button to previous menu.
Balance
Auto Volume
Stereo Effect
MTS
Language(A/B)
Stereo System
SSM
AUDIO
◀ Stand ▶
▼▲ : Move ◀▶ : Adjust : Exit
◀ Off ▶
◀ Off ▶
◀ Mono ▶
◀ Language A ▶
0
Equalizer ▶
◀ BTSC (USA) ▶
LR
22
Change Sound Standard
6. SSM(Sount Status Memory)
Press the ▲ or ▼ button to select SSM.
Press the ◀ or ▶ button to select a sound setting on the
SSM menu.
You can also recall a desired sound (Stand, Music, Movie, Speech or User)
with SSM button on the remote control. The sound Stand, Music, Movie and Speech
are programmed for good sound reproduction at the factory and cannot be changed.
7. Equalizer
Press the ▲ or ▼ button to select the Equalizer.
Press the ◀ or ▶ to select the freguency bands of
0.1 0.5 1.5 5.0 10KHz.
Press the ▲ or ▼ button to adjust the appropriate value
of the selected freguency band.
0
AUDIO
▼▲ : Move ◀▶ : Adjust : Exit
0
500Hz
0
120Hz
0
5KHz
0
1.5KHz
0
10KHz
23
Function
When you start using your set for the first time, you must select the language
which will be used for displaying menu and indicators.
Function
1. LANGUAGE
Press the Menu button.
Press the ▲ or ▼ button to select the Function.
The options available in the Function group are
displayed.
Press the ◀ or ▶ button to select the Language.
2. Auto Adjust (PC only)
Press the MENU button and then use ▲ or ▼ button to select the FUNCTION menu.
Press the ▶ button and then use ▲ or ▼ button to select Auto Adjust.
When Auto adjust has finished, OK will be shown on screen.
If the position of the image is still not correct, try Auto adjustment again.
Although the image is still not correct, your set is functioning properly but needs further
adjustment.
3. Osd Time-Out
Press the MENU button and then use ▲ or ▼ button to select the FUNCTION menu.
Press the ▶ button and then use ▲ or ▼ button to select Osd Time-Out.
The preset time out intervals :
10 -> 15 -> 20 -> 25 -> 30 -> 35 -> 40 -> 45 -> 50 -> 55 -> 60 (Minutes)
4. Sleep Timer
You can select a time period of between off and 240 minutes after which your set
automatically switches off.
Press the MENU button and then use ▲ or ▼ button to select the FUNCTION menu.
Press the ▶ button and then use ▲ or ▼ button to select Sleep Timer.
Select the number of minutes after which your set switch on by pressing the ◀ or ▶
button repeatedly.
The preset time intervals :
Off -> 10 -> 20 -> 30 -> 60 -> 90 -> 120 -> 180 -> 240 (Minutes)
Language
Auto Adjust
Osd Time-Out
Sleep Timer
FUNCTION
▼▲ : Move ◀▶ : Adjust : Exit
▶
◀ 60 Sec ▶
◀ Time Off ▶
◀ English ▶
24
1. Features of Product
NTSC TV(One Tuner)
One Component Jacks(DTV, DVD)
One Composite and S-Video
(option : mounted in left-hand Side of case for user friendly)
DVI-D
PC input
TV Stereo
PIP Window
new & graphic Multi OSD language
(English, French, Spanish, Korean, Chinese, Japane)
Audio Output Power (Over 22inch : 4Watts/Ch, Under 20inch : 2.5Watts/Ch )
Channel Edit/Delete
Closed Caption
V-Chip
Power Board Built-In(Over 26inch)
Remote Control Unit(57keys)
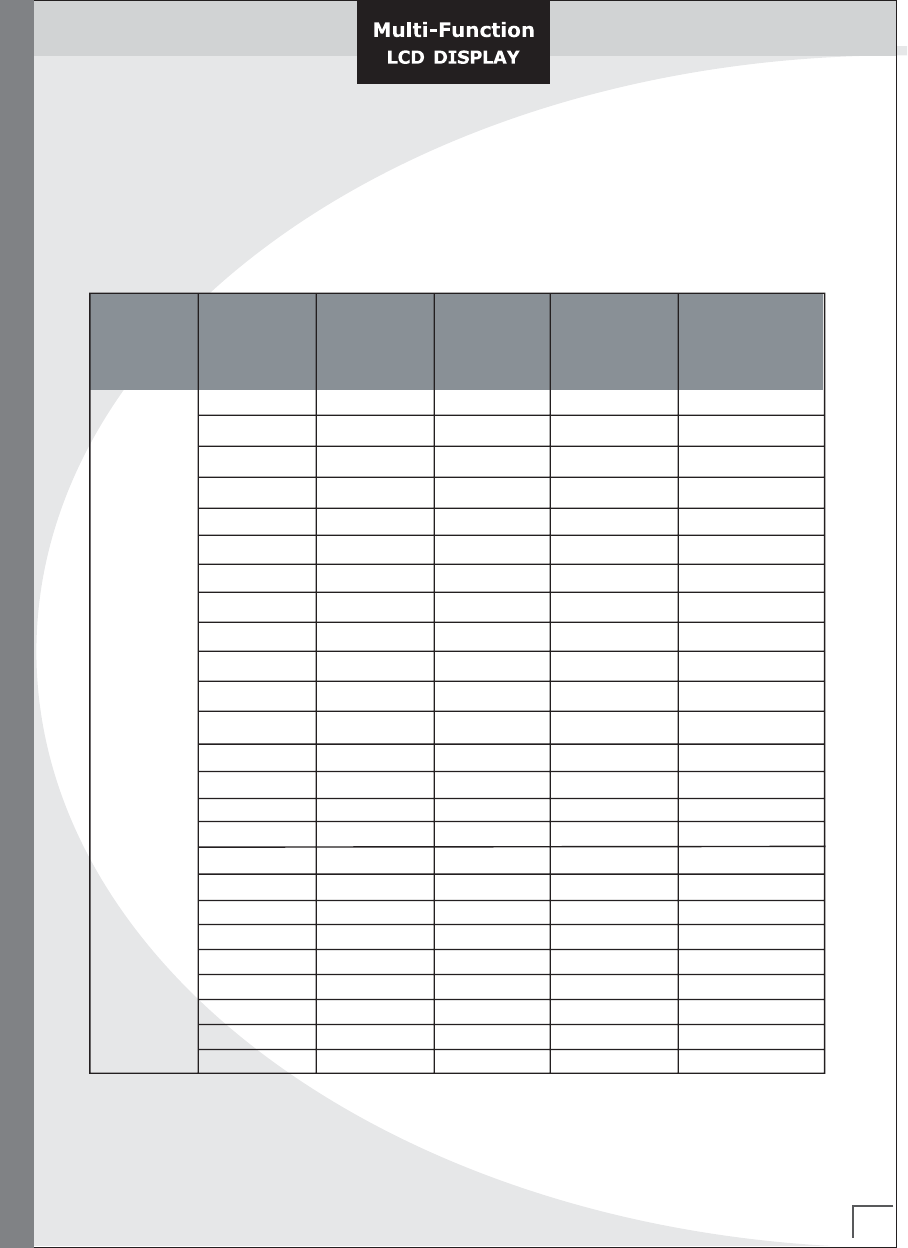
2. Overview Specfication
A. Summary of Specifications
Target Panel Size LCD 17/22/23/26/32 inch
Aspect Ratio 4:3, 16:9 or 15:9
Resolution SXGA(1280x1024), WXGA(1280x768, 1280x720, 1366x768)
Refresh Rate 50Hz, 60Hz
Maximum Pixel Rate
110 MHz
Display
Interface Daul Channel LVDS, Single Channel LVDS
Product Feature
Items Specifications
25
H Frequency Range : 20 ~ 82 kHz
V Frequency Range : 55 ~ 90 Hz
Maximum resolution : 1280x1024 75Hz
Maximum pixel rate : 135 MHz
DTV mode support : 720P, 1080i
Analog PC
Separate / Composite / SOG sync support
H Frequency Range : 20 ~ 82 kHz
V Frequency Range : 55 ~ 75 Hz
Maximum resolution :1280x1024 75Hz
Maximum pixel rate : 135 MHz
Digital PC (DE Mode)
DTV mode support: 720P, 1080i
CVBS, S-Video
NTSC-M
PAL-B/G/H/I
SECAM
DVD Component 480i
DTV Component
1080i
720P
480P
Supported
Signals
TV NTSC M Systems
TV ANT In (75 ohms coaxial cable)
CVBS
S-Video
Component
Composite RCA In (75 ohms 0.7/1.0 Vp-p
Mini Din-4Pin x 1 S-Video In
PC Analog RGB D-Sub 15Pin (75 ohms ±10%, 0.7Vp-p ±5%)
RCA x 3 (75 ohms, 0.7/1.0 Vp-p)
YPbPr : DTV / YCbCr : DVD
Component 2 Y-Pb-Pr DVD RCA In (75 ohms , 0.7/1.0 Vp-p)
PC DVI
Connection
(Video)
Video Out
DVI- D
RCA x 1(75 ohms, 0.7/1.0 Vp-p)
TV Tuner SIF In
Connection
(Audio) PC / DVI
RCA x 2, Stereo Sound In (500mVrms)
Product Specification
26
Product Specification
Video / S-Video
Component
Speaker Out
Headphone Out
Stereo Headphone Jack
Autio Out
Tuning System
Tuning Supports
Tuning Range
Channel Save Capacity
Sound System
MTS Support
Stereo Headphone Jack
2.5W(under 20 inch), 4W(Over 22 inch) x 2
RCA x 2, Stereo Sound In (500mVrms)
RCA x 2, Stereo Sound In (500mVrms)
Connection
(Audio)
NTSC-M
Air / Cable (STD, HRC, IRC)
Air Ch : 2 ~ 69 Ch, Cable Ch : 1 ~ 125 Ch
All Channel for Air and Cable (181 Ch)
BTSC (USA), A2 (KOREA), EIA-J (Japan)
Mono, Stereo, SAP
Color
OSD Type
Language Support
Maximum OSD Size
16 colors
Graphic & Text
English, French, Spanish, Korean, Chinese, Japane
512 (H) x 360 (V)
User
Functions
Picture
Contrast, Brightness, Sharpness, Color, Tint, Color Temp,
PSM(Picture Status Memory)
Phase, Frequency
Window
Aspect Ratio,
PIP Size, PIP Source, PIP Position, Sound Swap,
H Position, V Position
Audio
Balance, Auto Volume, MTS,
Language (A/B), Stereo System, 5 Band Equalizer
SSM(Sound Status memory)
Function
Language,
Auto Adjust,
OSD Time Out, Sleep Timer
TV
Auto Search, Manual Search,
Auto Fine Tune, Fine Tune,
Closed Caption, Caption Display
V-Chip : TV Guidelines, MPAA Rating, Blocking On / Off,
Change the Password
Power
Supply Voltage DC 12V (17 inch), AC 220 / 110V 50~60Hz
Power Consumption -
27
Product Specification
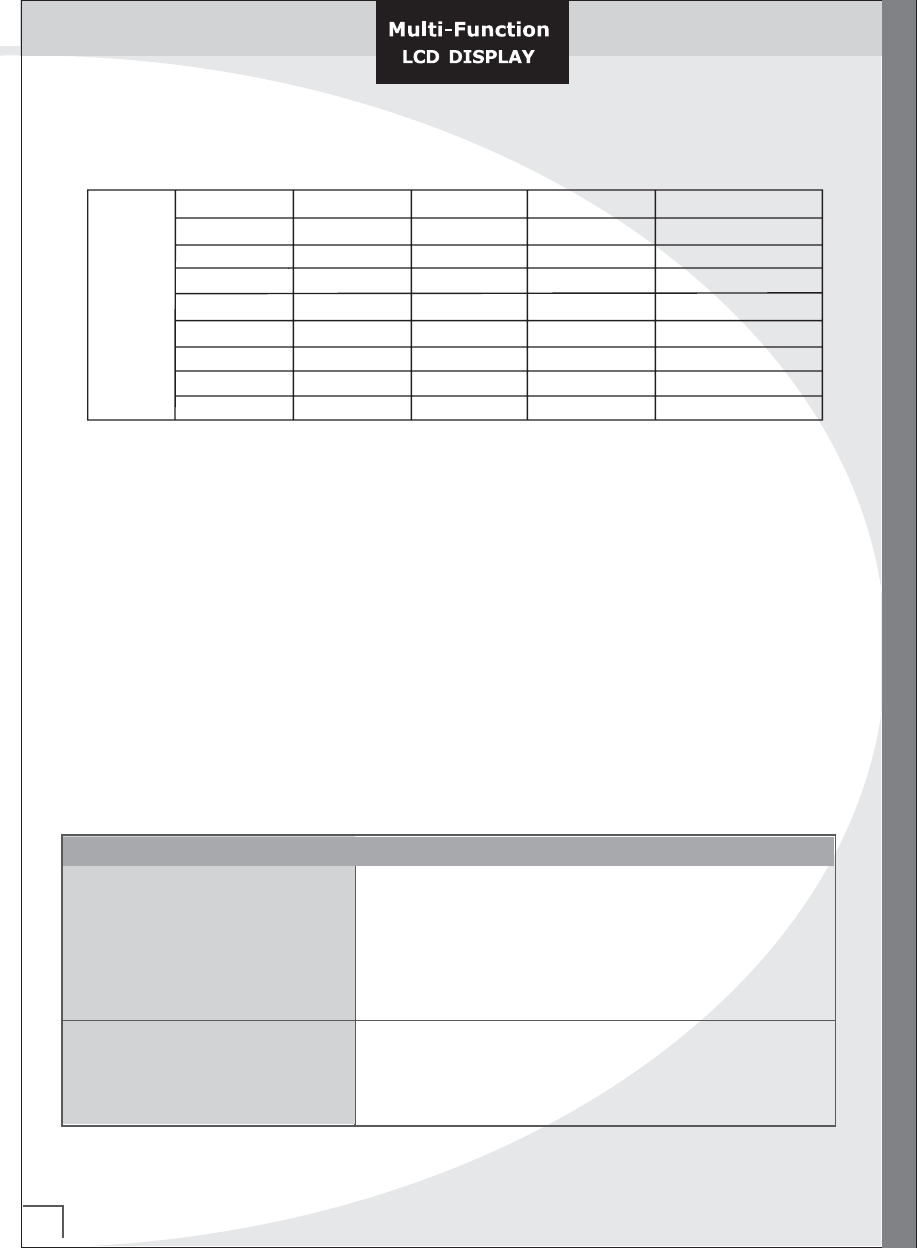
B. Supported Timings(* TBD)
640x400 37.861 85.08
31.5
640x350 31.469 70.087
25.175
640x350 37.861 85.08
31.5
640x480 31.469 59.94
25.175
640x480
640x480
35.000 66.667
30.24
640x480
34.940 69.884
28.513
640x480
37.861 72.809
29.765
640x480
37.500 75.0
31.5
720x400
43.269 85.008
36.0
720x400
PC
800x600
Section Resolution
H
Frequency
( kHz )
V
Frequency
( Hz )
Pixel
Frequency
( MHz )
Comment
31.469 70.087 28.322
37.927 85.039 35.5
35.156 56.25 36.0
800x600 37.879 60.317 40.0
800x600 43.764 70.02 45.513
800x600 48.077 72.188 50.0
800x600 46.875 75.0 49.5
800x600 53.674 85.061 56.25
832x624 49.726 74.551 57.284
1024x768 48.780 60.001 64.11
1024x768 56.476 70.069 75.0
1024x768 57.703 72.039 78.476
1024x768 60.241 74.927 81.724
1024x768 60.030 75.029 78.75
1024x768 68.677 84.997 94.5
1024x768 68.677 84.997 94.5
28
Troubleshooting
1280x1024 79.976 75.025
135.0
1280x1024 64.754 60.06
108.992
1280x1024 78.125 72.005
135.0
1280x1024 63.600 60.0
108.883
1280x1024 74.620 70.0
128.943
1280x1024 76.824 72.0
132.752
720x480
31.469 59.94
25.175
1280x720 44.964 59.94
74.176
1920x1080
33.750 60.0 74.25 Interlace
Please surely note above specifications can be changed as per further improvement
without notice.
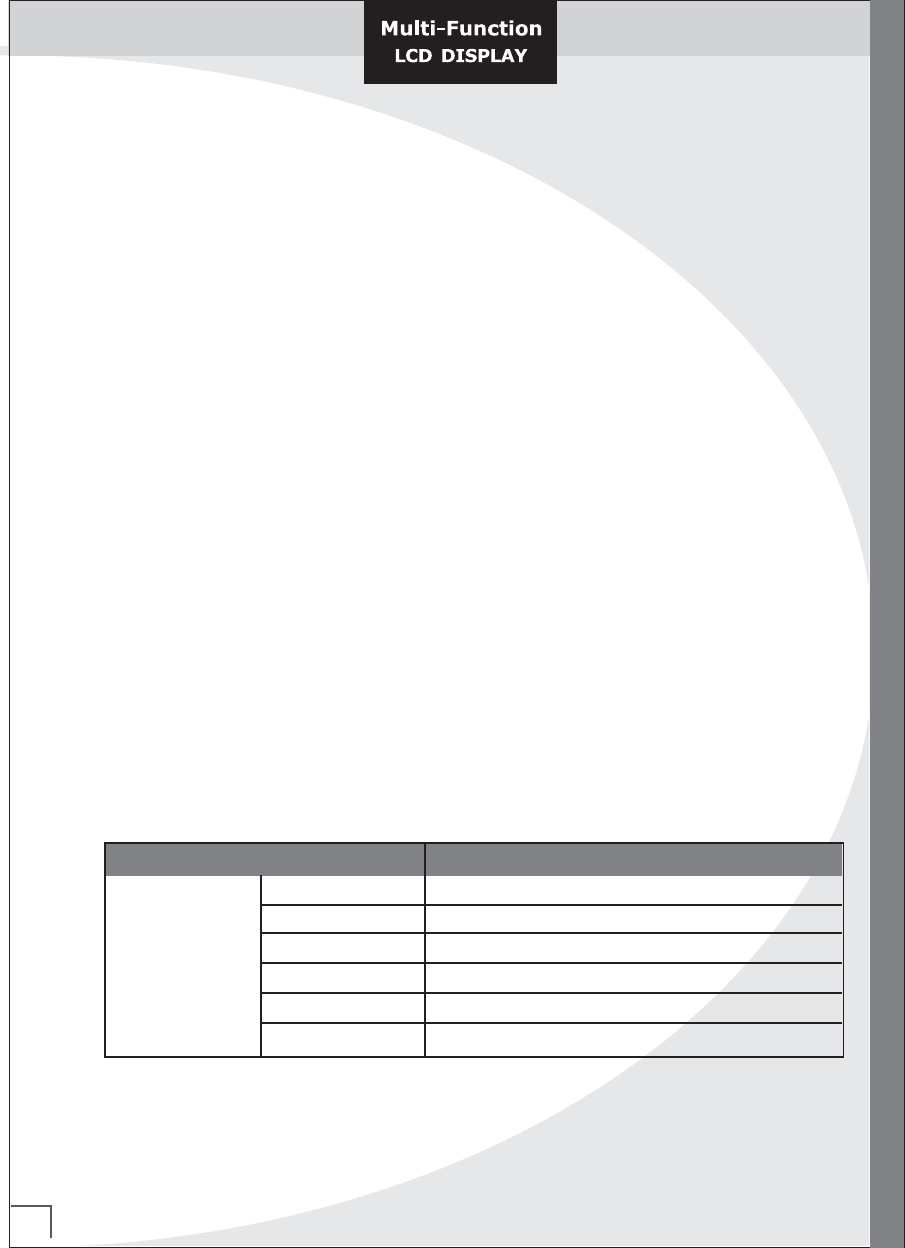
Troubleshooting
If you cannot solve the problem using the instruction below, note the model and serial number of
your set and contact your local dealer.
Problem Check Item
No picture and sound - Make sure the main lead has been connected to a wall
socket.
- Make sure you have pressed the Power button.
LED light of the Power/Standby indicator is in red.
- Make sure picture contrast and brightness settings.
- Check the volume
No pricture/No picture from AV - Check the brightness setting of the display
terminal - Lamp may have malfunction
- Make sure a cable with no Video input signal is
connected to the S-Video Input terminal
29
Troubleshooting
Normal picture, but no sound - Check the volume
- Make sure the sound is not muted. MUTE button has been
pressed on the remote control
- Make sure the connections of the optional speaker
systems are securely inserted
- Make sure the setting of AV Output terminal
Picture is too light - Make sure color and contrast settings
Picture is too dark - Make sure brightness setting is not set too low
- Check to see if brightness setting
- Lamp may have malfunction
Remote control does not work - Change the batteries
- Make sure the infrared transmitter window is not
receiving strong light such as light from fluorescent
lamps
No picture from AV OUT terminal - Make sure AV Input is not set
- Make sure the input source other than AV
The picture is not sharp - The reception may be weak
The picture moves - The state of the broadcast may also be bad
- Make sure the antenna is facing the right direction
- Make sure outside antenna is not disconnected
The picture is doubled or tripled - Make sure the antenna is facing the right direction
- There may be reflected electric waves from mountains
or buildings
The picture is spotted - There may be interference from automobiles, trains,
high voltage lines, neon lights, etc.
There are stripes on the screen - Is the unit receiving interference from other devices?
or colors fade Transmission antennas of radio broadcasting stations
and transmission antennas of amateur radios and
cellular phones may also cause interference
- Use the unit as far apart as possible from devices
that may cause possible interference