3Com DIGITAL MODEM 3ComImpact ISDN External User Guide` Manual To The 1efd9e78 23eb 45f0 B402 8b68570fd99d
User Manual: 3Com DIGITAL MODEM to the manual
Open the PDF directly: View PDF ![]() .
.
Page Count: 62
- 3Com‚ Impact‰ ISDN External Digital Modem User Gui...
- Contents
- Figures
- Tables
- About This Guide
- Introduction
- Installing and Configuring the Digital Modem
- Troubleshooting
- AT Command Set Overview
- AT Commands, Registers, and Result Codes
- Technical Support
- Limited Warranty
- FCC Class B Certification Statement
- Canadian Notice

®
3C
OM
â
I
MPACT
ä
ISDN E
XTERNAL
D
IGITAL
M
ODEM
U
SER
G
UIDE
A member of the 3Com Impact product family
Part No. 09-0699-002
Published August 1995
3Com Corporation
■
5400 Bayfront Plaza
■
Santa Clara, California
■
95052-8145
Ó
3Com Corporation, 1995. All rights reserved. No part of this documentation may be reproduced
in any form or by any means or used to make any derivative work (such as translation,
transformation, or adaptation) without permission from 3Com Corporation.
3Com Corporation reserves the right to revise this documentation and to make changes in
content from time to time without obligation on the part of 3Com Corporation to provide
notification of such revision or change.
3Com Corporation provides this documentation without warranty of any kind, either implied or
expressed, including, but not limited to, the implied warranties of merchantability and fitness for a
particular purpose. 3Com may make improvements or changes in the product(s) and/or the
program(s) described in this documentation at any time.
UNITED STATES GOVERNMENT LEGENDS:
If you are a United States government agency, then this documentation and the software
described herein are provided to you subject to the following restricted rights:
For units of the Department of Defense:
Restricted Rights Legend:
Use, duplication or disclosure by the Government is subject to restrictions
as set forth in subparagraph (c) (1) (ii) for restricted Rights in Technical Data and Computer
Software clause at 48 C.F.R. 52.227-7013. 3Com Corporation, 5400 Bayfront Plaza, Santa Clara,
California 95052-8145.
For civilian agencies:
Restricted Rights Legend:
Use, reproduction or disclosure is subject to restrictions set forth in
subparagraph (a) through (d) of the Commercial Computer Software - Restricted Rights Clause at
48 C.F.R. 52.227-19 and the limitations set forth in 3Com Corporation’s standard commercial
agreement for the software. Unpublished rights reserved under the copyright laws of the United
States.
The software described in this documentation is furnished under a license agreement included
with the product either as a separate document or on the software distribution diskette in a root
directory file named LICENSE.TXT. If you are unable to locate a copy, please contact 3Com and a
copy will be provided to you.
Unless otherwise indicated, registered trademarks are registered in the United States and may or
may not be registered in other countries.
3Com is a registered trademark of 3Com Corporation. Async-PPP, Impact, and QuickSelect are
trademarks of 3Com Corporation. 3ComFacts, Ask3Com, and NetFacts are service marks of 3Com
Corporation.
CompuServe is a registered trademark of CompuServe, Inc.
IBM, AT, and Power PC are trademarks of International Business Machines Corporation. Apple,
Macintosh, and Power Macintosh are trademarks of Apple Computer Corporation. UL is a
trademark of Underwriters Laboratories, Inc. Pentium is a trademark of Intel Corporation.
Microsoft, MS-DOS, and Windows are trademarks of Microsoft Corporation. Siemens is a trademark
of Siemens Artiengesellschaft. Northern Telecom is a trademark of Northern Telecom Limited.
AT&T is a trademark of American Telephone & Telegraph Company. Motorola is a trademark of
Motorola, Inc. TurboCom is a trademark of Bio-Engineering Research Laboratory. AdTran is a
trademark of AdTran, Inc. Delrina, WinComm, and WinFax are trademarks of Delrina Corporation.
Other brand and product names may be registered trademarks or trademarks of their respective
holders.
Guide written by Anne Bailey. Edited by Nancy Kurahashi. Technical illustration by Tim Buckreus.
Production by Yvonne Sartain.

C
ONTENTS
A
BOUT
T
HIS
G
UIDE
Introduction i
How to Use This Guide i
Conventions ii
1
I
NTRODUCTION
3Com Impact Digital Modem Features 1-3
Data Capabilities 1-4
Voice Capabilities 1-4
Simultaneous Data and Voice Capabilities 1-4
Analog Modem Capabilities 1-5
3Com Impact Digital Modem Package Contents 1-5
Standard Package Contents 1-5
Additional Contents 1-5
ISDN Digital Line Configuration Requirements 1-6
Computer System Requirements 1-7
IBM PC or Compatible Requirements 1-8
Apple Macintosh Requirements 1-8
Cabling Requirements 1-9
2
I
NSTALLING
AND
C
ONFIGURING
THE
D
IGITAL
M
ODEM
Installing the 3Com Impact Digital Modem 2-3
Installing the Digital Modem in an IBM-compatible PC 2-3
Installing the Digital Modem in an Apple Macintosh Computer 2-4
Configuring the 3Com Impact Digital Modem 2-6
Configuration for IBM PC or Compatible Computer 2-7
Configuration for Apple Macintosh Computer 2-13
Placing and Receiving Calls 2-15
Placing ISDN Data Calls 2-15
Multilink PPP Calls With Dynamic Bandwidth Allocation 2-15
Placing Analog Modem Calls 2-17
Using Communications Software to Place Calls 2-17
Receiving Data Calls 2-17

Using the Phone Out Port 2-17
Placing Calls Using the Phone Out Port 2-18
Receiving Calls Using the Phone Out Port 2-18
Protocol Support 2-19
Async-Sync PPP Conversion 2-19
QuickSelect 2-19
3
T
ROUBLESHOOTING
Troubleshooting Tips 3-1
Downloading Firmware to Your External Digital Modem 3-5
A
AT C
OMMAND
S
ET
O
VERVIEW
B
AT C
OMMANDS
, R
EGISTERS
,
AND
R
ESULT
C
ODES
AT Command Set for the 3Com Impact
Digital Modem B-1
AT Command Set for Internal Analog Fax Modem B-4
Remote S Registers B-7
Digital Modem Result Codes B-10
C
T
ECHNICAL
S
UPPORT
On-line Technical Services C-1
3Com Bulletin Board Service C-1
World Wide Web Site C-2
Ask3Com on CompuServe C-2
3ComFacts Automated Fax Service C-2
Support from Your Network Supplier C-3
Support from 3Com C-4
Returning Products for Repair C-4
L
IMITED
W
ARRANTY
FCC C
LASS
B C
ERTIFICATION
S
TATEMENT
C
ANADIAN
N
OTICE
T
ABLES
1
Text Conventions ii
2
Notice Icons ii
1-1
ISDN Ordering Information by Switch Type 1-7
1-2
Pin Descriptions 1-9
2-1
Front Panel LED Indicator Definitions 2-2
B-1
AT Command Set Summary B-1
B-2
AT Command Set Summary for the Internal Analog Modem B-4
B-3
Remote S Registers B-7
B-4
3Com Impact Digital Modem Result Codes B-10
A
BOUT
T
HIS
G
UIDE
Introduction
This guide describes how to install, operate, and
troubleshoot the 3Com
â
Impact
ä
ISDN External Digital
Modem, referred to throughout this guide as the 3Com
Impact digital modem.
If the information in the release notes shipped with your
product differs from the information in this guide, follow the
release notes. Be sure to read the README.TXT or Read Me
files on the applicable software utility diskette for the latest
product information.
How to Use This Guide
The following table shows where to find specific information
in this guide.
If you are looking for: Turn to:
General information about the 3Com Impact digital modem Chapter 1
Instructions for installing and operating the digital modem Chapter 2
Simple digital modem troubleshooting tips Chapter 3
Instructions for using the AT command line set Appendix A
Tabular summary of the AT command line set, registers,
and result codes
Appendix B
Information about 3Com’s technical support Appendix C

ii
A
BOUT
T
HIS
G
UIDE
Conventions
Table 1 and Table 2 list text and icon conventions that are
used throughout this guide:
Table 1
Text Conventions
Convention Description
Text represented as
screen
display
This typeface
is used to represent displays that appear
on your terminal screen, for example:
NetLogin:
Text represented as
commands
This typeface
is used to represent commands that you
enter, for example:
SETDefault !0 -IP NETaddr = 0.0.0.0
Keys When specific keys are referred
to in the text, they are called out
by their labels, such as “the Return key” or “the Escape key,” or
they may be shown as [Return] or [Esc].
If two or more keys are to be pressed simultaneously, the keys are
linked with a plus sign (+), for example:
Press [Ctrl]+[Alt]+[Del].
Italics Italics
are used to denote
new terms
or
emphasis
.
Table 2
Notice Icons
Icon Type Description
Information Note Information notes call attention to important features
or instructions.
Caution Cautions contain directions that you must follow to
avoid immediate system damage or loss of data.
Warning Warnings contain directions that you must follow for
your personal safety. Follow all instructions carefully.

1
I
NTRODUCTION
The Integrated Services Digital Network (ISDN) is a digital
communications standard for supporting voice, data, and
video applications through conventional telephone wires.
Specifically, ISDN is a method of connecting to the public
telephone network using digital technology. ISDN uses the
existing copper wire and public telephone network
infrastructure. All existing voice services provided by the
telephone companies are accessible using ISDN, and for the
first time, high-speed dial-up data can be provided
cost-effectively to the mass market.
Two electrical interfaces are defined as part of ISDN. The first
and less expensive is Basic Rate ISDN, or 2B+D. A Basic Rate
Interface (BRI) has two 56 or 64 Kbps (kilobits per second)
B (
B
earer) channels for user data, and one 16 Kbps signaling
D (
D
ata) channel, used for packet communications with the
public network and providing status and control information.
In most regions, the ISDN BRI is priced at 1.5 to 1.8 times the
monthly cost of an analog POTS (plain old telephone service)
telephone line. You may dial voice or data connections on
either or both of the B channels simultaneously. Calls placed
from an ISDN line may connect to remote sites that have
analog POTS, Switched 56, ISDN BRI, or T1 telephone lines.
There is full compatibility with existing services, and no need
for ISDN BRI on both ends.
The other electrical interface, which is somewhat more
expensive, is the ISDN Primary Rate Interface (PRI). PRI is
based on the more expensive and higher-speed T1 networks
that are typically deployed at larger sites. PRI consists of 23
B channels and one 64 Kbps D channel, providing large
businesses with a greater degree of flexibility.
1-2
C
HAPTER
1: I
NTRODUCTION
The 3Com Impact ISDN External Digital Modem (referred to as
the 3Com Impact digital modem throughout this guide) is an
external, stand-alone ISDN Basic Rate digital modem for
connection with digital telephone services from local telephone
companies in North America. It is designed for users who
require high-speed access to the Internet, on-line information
services, or their corporate local area network (LAN). A typical
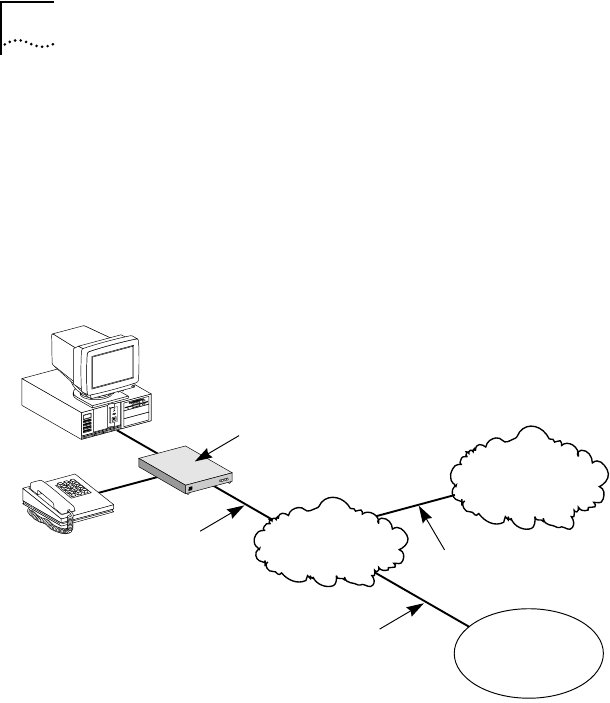
3Com Impact digital modem application is shown in Figure 1-1.
Figure 1-1
Analog and Digital Network Access with the 3Com Impact
Digital Modem
Four models of the 3Com Impact digital modem are sold in
the U.S. and Canada:
■
3C871 is the IBM
â
or IBM-compatible PC external digital
modem product.
■
3C872 is the IBM
or IBM-compatible PC external digital
modem product with an internal 14.4 Kbps analog fax
modem.
■
3C876 is the Apple
â
Macintosh
â
external digital modem
product.
■
3C877 is the Apple Macintosh external digital modem
product with an internal 14.4 Kbps analog fax modem.
®
3
Com
Impact
™
D-Channel
B-1
B-2
Test
Power
3Com Impact
ISDN External
Digital Modem Internet
or
on-line service
Analog or ISDN line
Analog or ISDN line
Public telephone
network
Corporate
LAN
ISDN line

3Com Impact Digital Modem Features
1-3
The 3Com Impact digital modem can be connected to any
compatible UL
â
-listed IBM AT
â
-compatible or Apple Macintosh
personal computer that includes instructions for the installation
of hardware and software options to serial ports.
3Com Impact Digital Modem Features
The 3Com Impact digital modem provides the following:
■
A complete digital network termination (Basic Rate ISDN NT1).
■
Full ISDN signaling support of National ISDN and
pre-National ISDN service offerings.
■
An asynchronous RS-232-C data port for connectivity to IBM
or compatible PC and Apple Macintosh serial ports at rates of
up to 115.2 Kbps.
■
AT command set dialing.
■
Interoperability support through standard protocols like
Point-to-Point Protocol (PPP) and V.120. (V.120 is a rate
adaption scheme to convert transmission rates from a range
of 50 bps to 19.2 Kbps to the B channel 64 Kbps rate.)
■
Multilink PPP support, which allows the two B channels to be
virtually linked, thereby allowing a maximum digital
connection of 128 Kbps.
■
Dynamic bandwidth allocation (DBA), which allows you to
place a voice call while a Multilink PPP call is active.
■
Internal 14.4
Kbps analog fax modem (V.32
bis
compliant) for
connection to non-ISDN fax machines and modems (applies
to 3C872 and 3C877 models only).
■
An analog voice port for attaching analog telephones,
answering devices, and fax machines to the ISDN line.
■
A graphical user interface for digital modem configuration.
■A comprehensive diagnostic test and LED status display.
■One-year limited warranty within the “Other Hardware
Products” category of the 3Com Limited Warranty at the end
of this guide.

1-4 CHAPTER 1: INTRODUCTION
Data Capabilities
The 3Com Impact digital modem allows transmission of
asynchronous data at speeds of up to 115.2 Kbps over digital
ISDN connections with the highest reliability and error-free
performance possible. With Multilink PPP, a digital connection
of up to 128 Kbps can be established by aggregating the two
56 Kbps or 64 Kbps ISDN B channels. Note that the COM port
speed of your PC limits the maximum data transmission rate to
no more than 115.2 Kbps.
ISDN technology reduces call setup times by more than 50%
compared to V. fast/V.34 analog modem setup times,
reducing the time it takes to establish a connection to under
three seconds.
This high-speed performance allows you to do the following:
■Dial up the Internet at high data rates
■Access your office’s LAN
■Access and download graphics, software, and data files more
quickly
Voice Capabilities
The 3Com Impact digital modem’s Phone Out port allows the
use of existing analog telephone equipment (touch-tone
telephones, cordless telephones, and fax and answering
machines) to place and receive calls over the ISDN line. When
you connect to another ISDN line, setup times are reduced,
and voice quality is excellent.
Simultaneous Data and Voice Capabilities
The 3Com Impact digital modem quickly processes data and
voice calls simultaneously. For example, you can send a fax or
place a voice telephone call while maintaining a high-speed
connection to the office LAN; you can also receive a voice
telephone call while you are connected to the Internet.

3Com Impact Digital Modem Package Contents 1-5
Analog Modem Capabilities
The 3Com Impact digital modem (models 3C872 and 3C877)
includes an integrated V.32bis analog modem for data or fax
transmissions of up to 14.4 Kbps over the ISDN line. V.42bis
data compression boosts analog modem throughput to up
to 57.6 Kbps.
3Com Impact Digital Modem Package Contents
3Com Impact digital modems are available in Macintosh and PC
versions, with or without a built-in V.32bis analog fax modem.
Standard Package Contents
The following list describes the package contents common
to models 3C871, 3C872, 3C876, and 3C877. Refer to the
section “Additional Contents” for any additional items that
are specific to a particular model.
■One 3Com Impact ISDN digital modem
■One power cable with an ac wall transformer
■One serial cable
■One RJ -45/RJ -11 ISDN telephone cable
■One 3.5" installation diskette
■3Com Impact ISDN External Digital Modem User Guide
■3Com Impact ISDN External Digital Modem Quick Start
Instructions
Additional Contents
Model 3C871
■One copy of TurboComä Windowsä software
■One DB-9-to-DB-25 serial connection adapter

1-6 CHAPTER 1: INTRODUCTION
Model 3C872
■One copy of TurboCom Windows software
■One copy of Delrinaâ WinCommä Lite and WinFaxâ Lite
communications software
■One DB-9-to-DB-25 serial connection adapter
ISDN Digital Line Configuration Requirements
The 3Com Impact digital modem requires an ISDN digital
telephone line that is properly configured for use with the
digital modem.
3Com has determined the optimal ISDN line configurations
for the 3Com Impact digital modem and has provided that
configuration data to many telephone companies.
To simplify the ordering process for an ISDN digital line, use
the following simplified ISDN ordering code:
3ComA * J6
If your digital modem has an internal analog fax modem
(Models 3C872 and 3C877), then two directory numbers
(telephone numbers) will be required to allow a voice call
and a fax modem call to occur at the same time. When you
tell the telephone company the ISDN ordering code
(3ComA * J6), let the representative know that you will need
two directory numbers.
If your telephone company does not support simplified ISDN
ordering codes, refer to Table 1-1 for ISDN ordering
information.
Present this ordering information to the ISDN line installer or
telephone company service representative in your area. Also,
make sure that your local telephone company installer
provides an RJ-11 or RJ-45 connector for your ISDN line.

Computer System Requirements 1-7
Computer System Requirements
* Two directory numbers are required for Models 3C872 and 3C877. This allows a voice call and a
call using the internal analog fax modem to occur at the same time.
Connect the model 3C871 or 3C872 3Com Impact digital
modem to an IBM-compatible computer. Connect the model
3C876 or 3C877 3Com Impact digital modem to an Apple
Macintosh computer. Connect the digital modem to a
computer that meets UL standards in the United States or is
certified to CSA standards in Canada.
Table 1-1 ISDN Ordering Information by Switch Type
ISDN Switch Type
ISDN Line
Configuration
Parameter
AT&Tâ 5ESS
Custom
AT&T 5ESS
National
ISDN-1
Northern
Telecomâ
DMS100
National
ISDN-1
Siemensâ
EWSD
National
ISDN-1
Line Code 2B1Q (no NT1
required)
2B1Q (no NT1
required)
2B1Q (no NT1
required)
2B1Q (no NT1
required)
Directory
Numbers
1*1*2 1*
Channels 2B alternate
circuit-switched
data and voice
2B alternate
circuit-switched
data and voice
2B alternate
circuit-switched
data and voice
2B alternate
circuit-switched
data and voice
Terminal Type A with
Point-to-Point
A with
Point-to-Point
Functional PVC 2 Functional
TEI Dynamic Dynamic Dynamic Dynamic
Call
Appearances
Idle Idle — —
Supplemental
Voice Features
None None None None
EKTS Features No No No No
D Channel
Packet
No No No No
B Channel
Packet
No No No No

1-8 CHAPTER 1: INTRODUCTION
IBM PC or Compatible Requirements
An IBM-compatible PC must have the following:
■A 386, 486, or Pentiumâ processor
■An available serial communications port
For sustained performance at higher data rates (57.6 Kbps
and 115.2 Kbps), it is recommended that your IBM or IBM-
compatible PC serial COM port be equipped with a 16C550
UART (universal asynchronous receiver/transmitter). To
determine what UART is installed in your PC, run the
Microsoftâ Diagnostic Program (msd) from the DOS prompt.
In addition, for reliable high-speed serial port performance in
the Microsoft Windows environment, a TurboComä driver for
Windows, which replaces the standard Microsoft Windows
COM driver, is included with the 3Com Impact digital modem.
■MS-DOSâ or IBM PC DOS 3.1 or later operating system
■640 Kilobytes of conventional memory
■Microsoft Windows 3.1 or later (optional)
■A hard disk drive with 1 MB of free space
Apple Macintosh Requirements
An Apple Macintosh computer must be a Macintosh Plus or
later model. It must also have the following:
■An available serial communications port
The highest possible serial port data rate with most
Macintosh computers is 57.6 Kbps. Some later Macintosh
models (AV and Power Macintoshä) have data rates of up to
115.2 Kbps. 3Com recommends that you use the 8-pin serial
communications port on your Macintosh.
■System 7 or later operating system
■A hard disk drive with 1 MB of free space

Cabling Requirements 1-9
Cabling Requirements
Cables to connect the 3Com Impact digital modem to your
computer are provided. For IBM or IBM-compatible PCs with
a 25-pin serial port, a DB-9–to–DB-25 connection adapter is
included with the digital modem.
The asynchronous RS-232-C port on the digital modem,
labeled Computer, is a standard DB-9 female connector. The
digital modem asynchronous port pin assignments, shown in
Table 1-2, conform to standard definitions for data
communications equipment (DCE).
Table 1-2 Pin Descriptions
Pin # Pin Name Signal Direction
1Carrier Detect (DCD) From digital modem
2 Receive Data (RD) From digital modem
3 Transmit Data (TD) To digital modem
4 Data Terminal Ready
(DTR)
To digital modem
5 Signal Ground (GND) —
6 Data Set Ready (DSR) From digital modem
7 Request to Send (RTS) To digital modem
8 Clear to Send (CTS) From digital modem
9 Ring Indicator (RI) From digital modem
2INSTALLING AND
CONFIGURING
THE DIGITAL MODEM
This chapter describes installation and configuration of the
3Com Impact digital modem. In combination with the
instructions given in this chapter, follow the instructions
given in the appropriate PC or Macintosh computer user
guide. Refer to Figure 2-1 and Figure 2-2, showing the digital
modem back and front panels, during installation and
configuration. If you encounter difficulties after installation,
refer to Chapter 3, “Troubleshooting.”
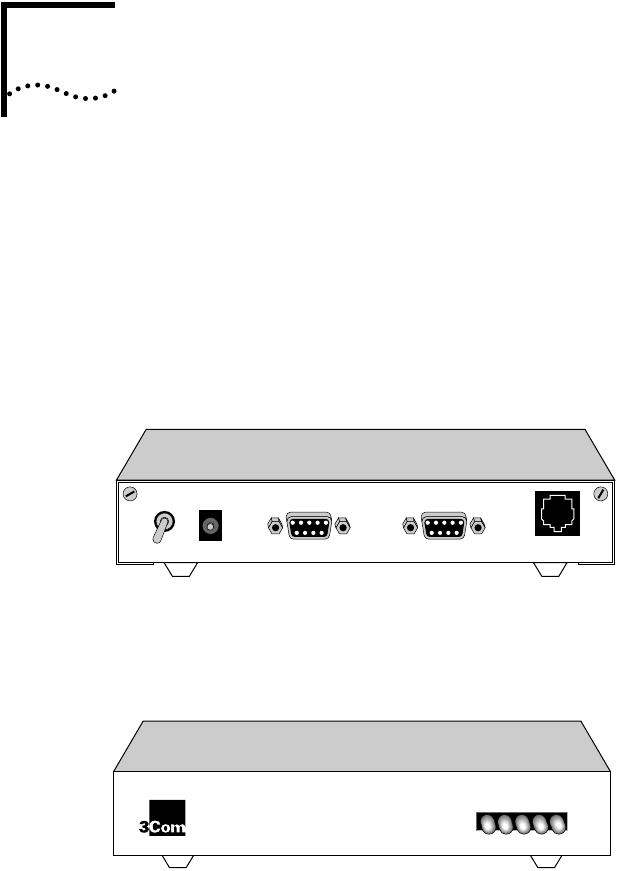
Figure 2-1 Back Panel Power Switch and Connectors
The LED status display, shown in Figure 2-2, consists of five
front panel LEDs that are described in Table 2-1.
Figure 2-2 Front Panel LED Indicators
Power 12V AC RS232D Wall
ISDN BRI-U ONLY
RS232D
D-Channel
B-1
B-2
Test
Power
®3ComImpact™

2-2 CHAPTER 2: INSTALLING AND CONFIGURING THE DIGITAL MODEM
Table 2-1 Front Panel LED Indicator Definitions
LED Color Description
Power Yellow Power Indicator. Lit when power is on and remains lit as long
as power is available from the ac wall transformer plugged into
the electrical outlet.
Test Yellow Self-Test/Status. Flashes when the digital modem is
executing its power-up self-test or a user-initiated reset. If the
results of the self-test or reset are normal, the LED goes off. If
the result of the self-test is abnormal and a fault is detected,
the LED remains lit but does not flash.
D-Channel Yellow D Channel/Status. Provides a quick indication of the ISDN
physical network interface and D channel status. If the physical
ISDN interface is not synchronized or is disconnected, this LED
remains lit.
If the physical interface establishes synchronization and the
ISDN D channel signaling procedures are not properly
established, the LED flashes.
Once the physical and D channel signaling are synchronized,
the LED goes off.
If any physical loss of framing occurs, the LED lights; if there is
a loss of D channel signaling, the LED flashes.
B-1 Yellow
or
green
B-1 Channel Indicator. Indicates the activity state of the B-1
channel of the ISDN interface. Green indicates a
circuit-switched data call. Yellow indicates a circuit-switched
voice call. If a call is in a dialing state, the LED flashes. When a
call enters the active state, the appropriate LED color stays lit.
When the call is disconnected, the LED goes off.
B-2 Yellow
or
green
B-2 Channel Indicator. Indicates the activity state of the B-2
channel of the ISDN interface. Green indicates a
circuit-switched data call. Yellow indicates a circuit-switched
voice call. If a call is in a dialing state, the LED flashes. When a
call enters the active state, the appropriate LED color stays lit.
When the call is disconnected, the LED goes off.

Installing the 3Com Impact Digital Modem 2-3
Installing the 3Com Impact Digital Modem
This installation procedure assumes that you are familiar
with IBM and IBM-compatible or Apple Macintosh
computers. If you are not, refer to the user guide that
accompanied your computer for instructions on hardware
installation and operating system commands.
Installing the Digital Modem in an IBM-compatible PC
To install the 3Com Impact digital modem model 3C870 or
3C872 in an IBM or IBM-compatible computer:
1Turn off the computer.
2Ensure that the 3Com Impact digital modem power switch
is in the Off position.
3Insert the 9-pin male end of the 3Com Impact digital
modem-to-PC serial signal cable into the connector
labeled Computer on the digital modem’s back panel and
tighten the connector screws.
4Connect the other end of the 3Com Impact digital
modem-to-PC serial signal cable to a serial
communications (COM) port on the back of your PC and
tighten the connector screws.
Most COM port connectors are labeled COM, SERIAL, or
RS-232-C. On an IBM AT PC and most laptops or notebooks,
connect the cable to a 9-pin COM port connector.
5Connect the 3Com Impact digital modem power cable to the
connector marked 12V AC on the back panel of the digital
modem.
See Figure 2-1 for the location of the 12V AC connector on
the digital modem’s back panel.
6Plug the transformer end of the power cable into a
standard 117V ac wall outlet.

2-4 CHAPTER 2: INSTALLING AND CONFIGURING THE DIGITAL MODEM
7Connect the RJ-45 (8-pin) connector end of the
RJ-45/RJ-11 ISDN cable to the RJ-45 connector labeled
Wall on the digital modem’s back panel.
See Figure 2-1 for the location of the RJ-45 connector on the
digital modem’s back panel.
8Connect the RJ-11 (6-pin) connector end of the
RJ-45/RJ-11 ISDN cable to the RJ-11 ISDN wall jack.
CAUTION: The 3Com Impact digital modem is designed
to operate with Basic Rate ISDN 2B1Q U Interface network
terminations. An internal Network Termination device
(NT1) is built into the digital modem. Do not connect the
3Com Impact digital modem ISDN port to a standard
analog telephone jack or to an external NT1 device. Make
sure that it is connected to the ISDN jack.
9Turn on the 3Com Impact digital modem by toggling the
power switch on the back panel to the On position.
See Figure 2-1 for the location of the power switch on the
digital modem’s back panel. The indicator LEDs on the front
panel (see Figure 2-2) flash momentarily as the unit
undergoes a power-up self-test diagnostic.
10 Turn on the computer’s power switch.
11 Go to the section “Configuration for IBM PC or
Compatible Computer” later in this chapter to configure
the 3Com Impact digital modem.
Installing the Digital Modem in an Apple Macintosh
Computer
To install the 3Com Impact digital modem model 3C875 or
3C877 in an Apple Macintosh computer:
1Turn off the computer.
2Ensure that the 3Com Impact digital modem power switch
is in the Off position.

Installing the 3Com Impact Digital Modem 2-5
3Insert the 9-pin male end of the 3Com Impact digital
modem-to-Macintosh serial signal cable into the
connector labeled Computer on the digital modem’s back
panel and tighten the connector screws.
4Connect the other end of the 3Com Impact digital
modem-to-Macintosh serial signal cable to the serial
communications port on the back of the Macintosh.
The serial communications port is the mini-DIN, 8-pin serial
port connector, indicated on the Macintosh connector panel
by the telephone handset imprint.
5Connect the 3Com Impact digital modem power cable to
the connector marked 12V AC on the back panel of the
digital modem.
See Figure 2-1 for the location of the 12V AC connector on
the digital modem’s back panel.
6Plug the transformer end of the power cable into a
standard 117V ac wall outlet.
7Connect the RJ-45 (8-pin) connector end of the
RJ-45/RJ-11 ISDN cable to the RJ-45 connector labeled
Wall on the digital modem’s back panel.
See Figure 2-1 for the location of the RJ-45 connector on the
digital modem’s back panel.
8Connect the RJ-11 (6-pin) connector end of the
RJ-45/RJ-11 ISDN cable to the RJ-11 ISDN wall jack.
CAUTION: The 3Com Impact digital modem is designed
to operate with Basic Rate ISDN 2B1Q U Interface network
terminations. An internal Network Termination device
(NT1) is built into the digital modem. Do not connect the
3Com Impact digital modem ISDN port to a standard
analog telephone jack or to an external NT1 device. Make
sure that it is connected to the ISDN jack.

2-6 CHAPTER 2: INSTALLING AND CONFIGURING THE DIGITAL MODEM
9Turn on the 3Com Impact digital modem by toggling the
power switch on the back panel to the On position.
See Figure 2-1 for the location of the power switch on the
digital modem’s back panel. The indicator LEDs on the front
panel (see Figure 2-2) flash momentarily as the unit
undergoes a power-up self-test diagnostic.
10 Turn on the computer’s power switch and restart.
11 Go to the section “Configuration for Apple Macintosh
Computer” later in this chapter to configure the 3Com
Impact digital modem.
Configuring the 3Com Impact Digital Modem
The 3Com Impact digital modem requires the five essential
configuration parameters below before it can operate
properly on an ISDN line. Before configuring the digital
modem, make sure you have this information readily
available. These five parameters are provided to you at the
time of installation of your ISDN line by the telephone
company installer.
■ISDN Switch Type
■Phone #1 (local directory telephone number)
■SPID #1 (Service Profile Identifier)
■Phone #2 (if required by the telephone company)
■SPID #2 (if required by the telephone company)
Each of these items is stored in special S registers within the
digital modem. These S registers are set by issuing ATSxx=
commands to the digital modem. The Impact digital modem
software will automatically issue the AT commands to set the
S registers as part of the configuration process.
The following three sections describe how to configure the
3Com Impact digital modem using the Windows, DOS, or
Macintosh operating systems, respectively.

Configuring the 3Com Impact Digital Modem 2-7
After you configure the digital modem and verify that it is
working properly, you should install the TurboCom software.
Refer to the installation instructions that came with the
TurboCom software. This software is required only for
IBM PC or compatible computers running Windows 3.X.
Configuration for IBM PC or Compatible Computer
You can configure the 3Com Impact external digital modem
for an IBM PC or compatible using either the Windows-based
installation program or the MS-DOSâ–based installation program.
Configuration Using Windows
To configure the digital modem for an IBM PC or compatible
computer using Windows:
1Insert the 3Com Impact DOS & Windows Installation
Diagnostic Utilities diskette into an available diskette drive.
2Select Run from the File menu. In the Run dialog box, type:
a:setup
The check box labeled Run Minimized should be left
unchecked.
3Click OK.
The installation process begins copying the configuration
program to the hard disk. A message box provides the status
of the installation and indicates when it is complete.
4Double-click the 3Com Impact icon to access the 3Com
Impact Configuration dialog box.
COM1 is the default COM port.
■If the digital modem is connected to COM1, the 3Com
Impact Configuration dialog box appears, as shown in
Figure 2-3. Go on to step 5.
■If the digital modem is not connected to COM1, the COM
Port Provisioning dialog box appears. Choose the
COM port to which the digital modem is connected.
2-8 CHAPTER 2: INSTALLING AND CONFIGURING THE DIGITAL MODEM
Click Connect. The 3Com Impact Configuration dialog
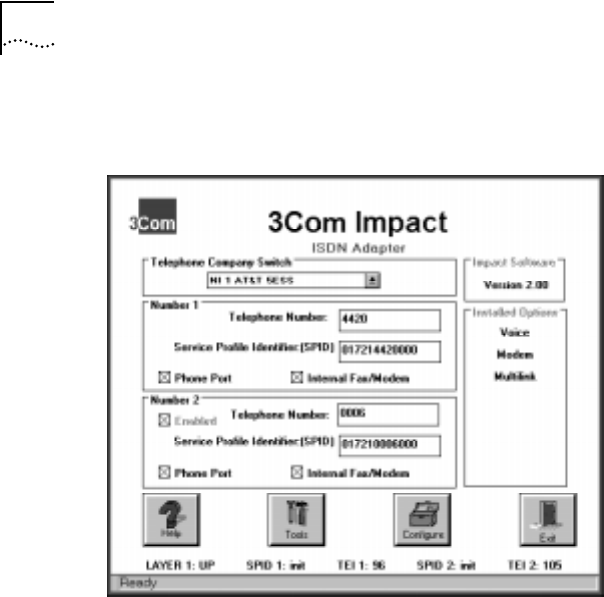
box appears, as shown in Figure 2-3.
Figure 2-3 Configuration Dialog Box
A status bar below the Help, Tools, Configure, and Exit
buttons provides the following ISDN status information:
■Layer 1 status
■Service Profile Identifier (SPID) for telephone numbers 1 and 2
■Terminal Endpoint Identifiers (TEI) 1 and 2 (for information
purposes only)
A message bar at the bottom of the dialog box provides help
for completing the fields. If you click in a field, the message bar
tells you what information to enter in the field. The message bar
also provides status information about the digital modem. If the
digital modem is disconnected from the ISDN telephone line,
for example, a message indicates this condition.
The right side of the dialog box shows the digital modem
software version, along with any installed options (such as
Multilink PPP or internal analog fax modem).

Configuring the 3Com Impact Digital Modem 2-9
5Select the type of switch, as specified by your telephone
company, from the Telephone Company Switch
drop-down list box.
6Click in the Telephone Number field in the Number 1 area
and enter the telephone number to which your digital
modem is connected.
7Click in the Service Profile Identifier (SPID) field and enter
the corresponding SPID for the telephone number you
entered in the previous step.
You should have received this SPID from your telephone
company.
CAUTION: If the ISDN line has been configured with only one
telephone number (Point-to-Point), do not include the SPID.
8Specify which device should receive the calls coming to
Telephone Number 1.
You can select Phone Port or Internal Fax/Modem. If your
model has the internal analog fax modem installed (Models
3C872 and 3C877), you can select both.
If both boxes are checked, the internal analog fax modem
and the phone will both ring, enabling you to answer using
either device.
9If you have a second telephone number associated with
your ISDN telephone line (some telephone companies
require two), enter the number and corresponding SPID in
the appropriate fields in the Number 2 area.
10 Specify which device should receive the calls coming to
Telephone Number 2.
11 Click the Configure button to download the parameters
listed in steps 5 through 10 to your digital modem’s
S registers.

2-10 CHAPTER 2: INSTALLING AND CONFIGURING THE DIGITAL MODEM
12 If you have changed the Telephone Company Switch type,
you must reset the digital modem by turning the power
switch off and then on.
13 Verify the configuration.
Check the status bar (located beneath the Help, Tools,
Configure, and Exit buttons of the Configuration dialog box)
to verify correct configuration. If the parameters were
configured accurately and the digital modem is ready to
send and receive calls, the status bar fields will appear as
shown below. Note that the TEI number(s) are not configured
by the user. The TEI number is provided by the telephone
company for informational purposes only.
■Layer 1: UP
■SPID 1: Init
■TEI 1: Number from 0 to 127
■SPID 2: Init (if required)
■TEI 2: Number from 0 to 127 (if required)
14 Click Exit to leave the utility.
This completes the configuration procedure.
15 Install the TurboCom software.
Refer to the installation instructions that came with the
TurboCom software.
After the TurboCom software is installed, proceed to the
“Placing and Receiving Calls” section.
Configuration Using DOS
To configure the digital modem for an IBM PC or compatible
computer using DOS:
1Create a directory on the hard drive, insert the 3Com
Impact DOS & Windows Installation Diagnostic Utilities
diskette into the PC’s diskette drive, and copy all the files
from the utility diskette to the hard drive.

Configuring the 3Com Impact Digital Modem 2-11
Copy the files to a new DOS directory. For example, to create a
directory dddd on your C drive at the C:\> DOS prompt, type:
md c:\dddd
To copy all files from the diskette to a directory \dddd at the
A:\> DOS prompt, type:
copy a:*.* c:\dddd
2Execute INSTALL from the hard drive.
At the C:\> DOS prompt, type:
INSTALL
The configuration program launches and presents the
Port Settings screen. To move the cursor around the screen,
use the [Up Arrow] and [Down Arrow] keys. To select a
parameter, use the [Space Bar].
3Use the [Space Bar] to select the digital modem’s
COM port and COM port data rate.
This sets the speed of communication between the
3Com Impact digital modem and the computer during
configuration.
When you select the port, the standard interrupt (IRQ)
associated with that port is automatically chosen. Select the
COM port data rate based on the data rate required by the
destination digital modem and the maximum data rate
supported by your computer’s COM port.
The program does not allow you to select a data rate that
exceeds the speed of your COM port.
4Press [F10] to connect to the 3Com Impact digital modem
via the chosen COM port.
The Configuration screen will appear.
5In the Phone #1 field, enter the telephone number to
which your digital modem is connected.

2-12 CHAPTER 2: INSTALLING AND CONFIGURING THE DIGITAL MODEM
6Enter the corresponding Service Profile Identifier (SPID) in
the SPID #1 field for the telephone number you entered in
the previous step.
You should have received this SPID from your telephone
company.
CAUTION: If the ISDN line has been configured with only one
telephone number (Point-to-Point), do not include the SPID.
7Specify which device should receive the calls coming to
Phone #1.
You can select Phone Port or Internal Fax/Modem. If your
model has the internal analog fax modem (Models 3C872
and 3C877), you can select both. The Phone Port and Internal
Fax/Modem check boxes associated with Phone #1 appear
to the right of Phone #1.
If both boxes are checked, the internal analog fax modem
and the phone will both ring, enabling you to answer using
either device.
8If you have a second telephone number associated with
your ISDN telephone line (some telephone companies
require two), enter the number and corresponding SPID in
the Phone #2 and SPID #2 fields.
9Specify which device should receive the calls coming to
Phone #2.
10 Confirm that the parameters listed in steps 5 through 9
are correct.
When these parameters are updated, the information is read
back to the screen. Check to see that the values have been
correctly entered.
11 Press [F10] to update the information in the 3Com Impact
digital modem.

Configuring the 3Com Impact Digital Modem 2-13
12 Reset the digital modem by turning the power switch off
and then on again.
If the parameters match those registered at the telephone
company ISDN switch, the D channel LED lights for a few
minutes, flashes for several seconds, and then turns off. If the
LED continues to flash or remains lit, see Chapter 3,
“Troubleshooting.”
13 Press [Esc] to return to the main menu.
Once in the main menu, exit the program.
14 Go to the section “Placing and Receiving Calls” to place
your first call.
Configuration for Apple Macintosh Computer
To configure the digital modem for an Apple Macintosh
computer:
1Insert the 3Com Impact Installer Diagnostic Utilities
software utility diskette into the diskette drive and copy
the files by selecting them and dragging them to the
hard drive icon.
The Macintosh operating system automatically places the
files in the appropriate folders.
2Open the 3Com Impact Mac folder and double-click the
3Com Impact Installer program icon to launch it.
The utility program presents the Port Settings screen. To
move the cursor around the screen, use the [Tab] key. Select
the Modem port and click OK. The Utility dialog box appears.
3In the Phone Number 1 field, enter the telephone number
to which your digital modem is connected.
4Enter the corresponding Service Profile Identifier (SPID) in
the SPID field for the telephone number you entered in
the previous step.

2-14 CHAPTER 2: INSTALLING AND CONFIGURING THE DIGITAL MODEM
You should have received this SPID from your telephone
company.
CAUTION: If the ISDN line has been configured with only one
telephone number (Point-to-Point), do not include the SPID.
5Specify which device should receive the calls coming to
Phone Number 1.
You can select Phone Port or Internal Fax/Modem. If your model
has the internal analog fax modem (Models 3C872 and 3C877),
you can select both.
If both boxes are checked, the internal analog fax modem
and the phone will both ring, enabling you to answer using
either device.
6If you have a second telephone number associated with
your ISDN telephone line (some telephone companies
require two), enter the number and corresponding SPID in
the Phone Number 2 and SPID Number 2 fields.
7Specify which device should receive the calls coming to
Phone Number 2.
8Confirm that the parameters listed in steps 3 through 7
are correct.
9Click the Update Configuration button to update this
information to the 3Com Impact digital modem.
10 Reset the digital modem by turning the power switch off
and then on again.
If the parameters match those registered at the telephone
company ISDN switch, the D channel LED lights for a few
minutes, flashes for several seconds, and then turns off. If the
LED continues to flash or remains lit, see Chapter 3,
“Troubleshooting.”
11 Go to the section “Placing and Receiving Calls” to place
your first call.

Placing and Receiving Calls 2-15
Placing and Receiving Calls
This section illustrates how to place and receive a variety of
calls with your 3Com Impact digital modem. The digital
modem uses AT commands and S registers for call
management. See Appendix A, “AT Command Set
Overview,” for instructions on use of the AT command set,
and Appendix B, “AT Commands, Registers, and Result
Codes,” for a tabular summary of the AT command lines.
Placing ISDN Data Calls
When you need to place a call from your PC or Macintosh,
the 3Com Impact digital modem recognizes the AT
command ATD to dial a digital ISDN data call. Depending on
the setting of register S60, 56 Kbps (default) or 64 Kbps
B channel transmission speeds are used. Correct examples of
outgoing circuit-switched digital modem commands with
dial strings are:
AT D 1 908 555 7891
ATD19085555555
Multilink PPP Calls With Dynamic Bandwidth Allocation
The 3Com Impact digital modem supports Multilink PPP,
which allows the two B channels to be virtually linked, thereby
allowing a maximum digital connection of 128 Kbps. Note
that both your service and the one that you are dialing into
must support Multilink PPP, or the virtual linking will not
occur. Multilink PPP is enabled by default.
Multilink configuration is facilitated through registers S80,
S81, S82, and S83. Additionally, dynamic bandwidth
allocation (DBA) in multilink mode is configured in
register S70. Register S80 enables (the default) or disables
Multilink PPP operation.

2-16 CHAPTER 2: INSTALLING AND CONFIGURING THE DIGITAL MODEM
By default, the 3Com Impact digital modem dials the same
number for both Multilink PPP channels. If the destination to
which the digital modem is dialing to establish a second
Multilink PPP channel requires a different telephone number,
then this second telephone number is stored in register S81.
By default, this register is empty. It must be configured
before you establish each Multilink PPP call. If the
Multilink PPP destination is a single telephone number for
both channels, then be sure to clear register S81 by sending
the command ATS81=<blank> to the digital modem.
Some Multilink PPP implementations require the use of a
Multilink PPP option called the Multilink Endpoint Identifier.
This option is configured in registers S82 and S83.
Register S82 stores the Multilink Endpoint Identifier Class
value. Valid classes are listed in Appendix B, “AT Commands,
Registers, and Result Codes.” Register S83 stores the actual
Multilink Endpoint Identifier. Note that this option is not
required in most cases, so these registers typically do not
have to be changed. If the Multilink Endpoint Identifier is
required, these values will be provided by your system
administrator or Internet service provider.
When dynamic bandwidth allocation is enabled (by default),
you can place a voice call from a device that is attached to
the Phone Out port while a Multilink PPP call is active. When
you lift the telephone handset to place a voice call, the
digital modem automatically removes one of the Multilink
PPP connections and uses it for the voice call. Once the voice
call ends, the digital modem automatically reestablishes that
channel for Multilink PPP operation.
There may be cost implications due to the use of two
B channels for Multilink PPP. Check with your service
providers, such as the telephone company, Internet access
provider, or on-line service provider.

Using the Phone Out Port 2-17
Placing Analog Modem Calls
To place a call from your PC or Macintosh using the optional
V.32bis 14.4 Kbps internal analog fax modem (included with
models 3C872 and 3C877), use the AT command ATDT (for
connection to an analog modem using touch-tone dialing) or
ATDP (for connection to an analog modem using pulse dialing).
Using Communications Software to Place Calls
If you are using standard communications software, select a
Hayes-compatible modem configuration and dial out
through the 3Com Impact digital modem. Refer to your
communications software documentation for more details.
Receiving Data Calls
Incoming circuit-switched data calls from other
3Com Impact digital modems or from ISDN devices and
Sw56 equipment may be received by the digital modem.
If auto answer is disabled (the default) in register S0, a RING
message is delivered to the Computer port upon reception of
an incoming data call to the digital modem. The command AT
A answers the incoming data call. A CONNECT message is then
delivered to the Computer port upon successful connection.
If auto answer is enabled, the call is automatically answered
and a CONNECT message, indicating the speed of the
connection, is delivered to the Computer port.
Using the Phone Out Port
If you have analog touch-tone telephones, answering
machines, fax machines, external analog modems, or other
analog telephone devices, connect them to the 3Com Impact
digital modem’s RJ-11 modular jack labeled Phone Out on
the digital modem’s back panel (see Figure 2-1).
The 3Com Impact digital modem does not support pulse
dialing (rotary) telephones.

2-18 CHAPTER 2: INSTALLING AND CONFIGURING THE DIGITAL MODEM
CAUTION: The 3Com Impact digital modem is designed to
operate with telephones that are compatible with the original
AT&T 2500 touch-tone telephone standard. 3Com guarantees
proper operation of up to three compatible touch-tone devices
on the Phone Out port. The digital modem is designed to
provide power and ringing for these three devices on up to 100
feet of AWG 26 or heavier AWG wiring. Although the digital
modem may function satisfactorily at longer cable distances
with more than two attached telephones, proper operation at
longer cable distances is not guaranteed in all situations.
Specialized telephone equipment, most notably speaker
phones that draw significantly larger amounts of power, may
not work at all on the digital modem’s Phone Out port. These
devices do not conform to the loop current (power)
specification of the 2500 touch-tone telephone standard, and
their operation is not guaranteed.
Placing Calls Using the Phone Out Port
To place an outgoing call, simply take the telephone
handset or external fax machine off the hook, wait for a dial
tone, and dial the destination telephone number.
Receiving Calls Using the Phone Out Port
lncoming calls to the telephone number assigned to the
Phone Out port ring at the Phone Out port unless you are
busy on another Phone Out port call. If the port is busy, the
incoming call is automatically disconnected.
If you have a digital modem with an internal analog fax
modem (models 3C872 and 3C877) you can have calls routed
to the internal analog fax modem when the Phone Out port
is busy. To do this, the digital modem must be configured to
allow a call to be routed to both the Phone Out port and the
internal analog fax modem, as described in the section
“Configuring the 3Com Impact Digital Modem.”

Protocol Support 2-19
Protocol Support
Async-Sync PPP Conversion
One of the most unique and powerful features of the
3Com Impact digital modem is its ability to convert
asynchronous Point-to-Point Protocol (PPP) into synchronous
(HDLC-based) PPP that can be transported in ISDN
B channels to communications servers and routers that have
integrated ISDN Basic Rate (BRI), Primary Rate (PRI), or
T1 access lines.
A wide variety of software and internetworking products has
been tested for interoperability with the 3Com Impact
digital modem’s Async-Sync PPPä conversion software.
QuickSelect
The 3Com Impact digital modem supports V.120 and
Async-Sync PPP conversion. The digital modem uses a
technique called QuickSelectä so that you do not have to
manually select the proper protocol for each ISDN call. With
QuickSelect enabled (the default), the digital modem
automatically detects and uses the required protocol.

3TROUBLESHOOTING
This chapter explains how to isolate and solve simple
problems encountered with the 3Com Impact digital
modem. Problems may stem from incorrect option settings
or improper installation. Follow the steps outlined in this
chapter.
There are no user-serviceable parts inside your 3Com Impact
digital modem. Unauthorized opening of the unit will void
the warranty.
Troubleshooting Tips
Before you call 3Com’s technical support organization for
assistance, check the following:
1The power supply is connected and the power LED is on.
2Turn the 3Com Impact digital modem power switch off
and then on again several times and observe the Test LED.
During power-up self-test, the Test LED flashes.
■If the Test LED flashes and remains on for more than a few
minutes, there is an internal failure. Notify your reseller that
the 3Com Impact digital modem has failed the self-test, and
order a replacement.
■If the LED goes off after the test has been completed, the
test has been successful.
3Verify that the ISDN cable is connected to the digital
modem, and make sure it is connected to the ISDN wall
jack.

3-2 CHAPTER 3: TROUBLESHOOTING
The 3Com Impact digital modem will not operate if
connected to an analog telephone wall jack. Make sure that
the digital modem is connected directly into the ISDN wall
outlet without connection to any intermediate telephone
equipment (an NT1 device is not required with this digital
modem).
4Make sure that the cables provided by 3Com or a 3Com
authorized reseller are in good condition and show no
evidence of wear or other physical damage.
If damage is apparent after close inspection, contact your
reseller for replacement cables.
5Monitor the status of the D channel LED.
■If you are connected to a live digital ISDN line, the
D channel LED remains lit for up to a few minutes after
the self-test but then begins to flash.
When the D channel LED flashes, it indicates that the
ISDN signal is present.
When the D channel LED goes out, it indicates that a
valid communication channel has been established and
calls may be attempted by the user.
■If the D channel LED remains lit after more than a few
minutes, it is likely that there is a poor physical
connection to the local telephone company.
This fault can be caused by a damaged cable, a broken
wire, a damaged connector, a nonstandard U interface
(proprietary AMI line coding), or a problem within the
telephone company network. If the telephone wires at
your site appear to be satisfactory, call your local
telephone company for repair of telephone company
equipment and troubleshooting assistance.
■If the D channel LED flashes for more than a few minutes
without going out, there is probably a mismatch between
the settings of the ISDN line and the 3Com Impact digital
modem configuration.

Troubleshooting Tips 3-3
Check the Service Profile Identifier (SPID) entry and the
Phone# information in the digital modem software
configuration utility.
If you have verified once again that your SPID and Phone#
parameters are entered properly and the D channel LED
continues to flash without going out, call your telephone
company, verify that you have been given the correct SPID
and Phone# information, and ask whether the ISDN line is
Point-to-Point. If the ISDN line is Point-to-Point, be sure not
to include the SPID in the configuration.
Also verify that the telephone company has configured
the ISDN line properly for the 3Com Impact digital
modem product (see Table 1-1). If the D channel LED
does not go out after these verifications, call your reseller
for line configuration and troubleshooting assistance.
■If the D channel LED goes out, the digital modem is ready
to place and receive calls.
If you have a standard analog telephone attached to the
digital modem’s analog voice port, you can place a voice
call in the normal fashion. You should have the ability to
obtain a dial tone, enter digits, and connect to your
destination. While the voice call is being placed, either
the B-1 or B-2 channel LEDs will flash yellow. Once the
voice call is connected and the other party picks up the
phone, the B-1 or B-2 LEDs that were flashing will now
remain lit until the call is disconnected.
If you do not hear a dial tone or cannot establish a call,
there is most likely a problem with the configuration of
your ISDN line. Call the telephone company and have it
verify that your line is configured for circuit-switched
voice and data service.
6Monitor the B-1 and B-2 LEDs.
Data calls typically involve more interactions than voice calls do.
Your computer, applications software, or the remote destination
can prevent establishment of a data call. If you have been able
to perform all of the above steps, your 3Com Impact digital
modem is most likely functioning correctly.

3-4 CHAPTER 3: TROUBLESHOOTING
■If you are unable to establish a data call, carefully monitor the
B-1 and B-2 LEDs while attempting a data call. The B-1 and
B-2 LEDs flash green during the data call establishment
phase. They then remain continuously green once the data
connection is established.
■If neither of the B-1 or B-2 LEDs flashes green, check to make
sure that your computer is turned on and operational, that
your 3Com Impact digital modem cable is properly
connected and not damaged, and that your application
software has sent an AT dial command in the proper format.
Depending upon the location of the destination call you are
dialing, there may be an incompatible local or toll telephone
company. Though this is less likely, if you suspect a telephone
company problem in dialing local or toll data connections,
contact your local telephone company and have it verify that
you can dial a data call to the destination telephone number.
7If you are able to establish a data call, in which the B-1 or
B-2 green LED remains lit and you receive a CONNECT
message at your application software, but you are unable
to send data, then it is possible that:
■There is a difference in the local and remote B channel
data rates.
■There is a mismatch in the data communications
protocols.
■There is an interoperability mismatch between the local
and remote applications.
■Make sure that the local and remote data applications have
communication capability and are properly configured.
Once you have verified that communication capability
exists, make sure that the B channel call data rate is the
same as the remote destination call data rate. The default B
channel data rate used by the digital modem is 56 Kbps.
Under some circumstances, the data rate may be
increased to 64 Kbps at both ends of the connection.

Downloading Firmware to Your External Digital Modem 3-5
8If problems persist, refer to Appendix C, “Technical Support.”
If you have gone through the troubleshooting tips and still
have not been able to resolve the problem, contact
technical support. Please have the serial number of your
3Com Impact digital modem; a list of symptoms, including
any LED status information; computer display status; and
relevant information about your application software ready
when you call.
Downloading Firmware to Your External Digital
Modem
Data communications is an evolving technology. To keep
pace with this evolution, your digital modem has been
uniquely designed to be user-upgradable. As recommended
by 3Com technical support, you may need to download the
latest firmware to your digital modem. You can use the
following procedure to download the updated firmware to
your digital modem.
For IBM and IBM-Compatible PCs
This section provides instructions on downloading firmware
from your PC to your digital modem.
1Obtain the latest firmware file from the 3Com FTP site
ftp.3Com.com.
2Copy the firmware file to your computer.
3Double-click the 3Com Impact icon to access the
Configuration dialog box, shown in Figure 2-3.
4Click the Tools button.
The Firmware and Tests buttons appear.
Use the Tests tool only under the direction of service
personnel.
5Click the Firmware button.
The Firmware dialog box appears.

3-6 CHAPTER 3: TROUBLESHOOTING
6Select the firmware file that you copied from 3Com’s
FTP site and click OK to start the download to the
3Com Impact digital modem.
The download will take several minutes.
7Click the Exit button to exit the utility.
For Macintosh Computers
This section provides instructions on downloading firmware
from your Macintosh to your digital modem.
1Obtain the latest firmware file from the 3Com FTP site
ftp.3Com.com.
2Copy the firmware file to your computer.
3Double-click the 3Com Impact icon to access the
Utility dialog box.
Use the Diagnostics button only under the direction of service
personnel.
4Click the Update Firmware button.
5Select the firmware file that you copied from 3Com’s
FTP site and click OK to start the download to the
3Com Impact digital modem.
A message box appears and allows you to confirm the
download. The download will take several minutes.
6Click OK.

AAT COMMAND SET
OVERVIEW
Most communications software supports an AT command
line initialization string. The initialization string sets up the
3Com Impact digital modem to negotiate and connect
with a remote modem. Before dialing, the software sends
the initialization string to the 3Com Impact digital modem.
The communications software or server stores the
initialization string and uses it each time it dials. In most
situations, an initialization string is not necessary with the
3Com Impact digital modem. If an initialization string is
required by the communications software or server, use the
Hayes default initialization string.
Software that communicates using AT commands
(ATtention codes) is required to control the 3Com Impact
digital modem. You can enter these codes manually.
However, they are often entered automatically by modem
communications software. For a summary of the AT
command set, see Appendix B, “AT Commands, Registers, and
Result Codes.” Below is a sample AT command line:
AT V1 D 1 800 555 3333 [Enter]
AT gets the attention of your 3Com Impact digital modem.
V1 sets the digital modem to verbose mode so that it sends
its responses in English words instead of numbers.
D tells the digital modem to dial an ISDN digital connection
to the phone number that follows.
[Enter] sends the command line to your 3Com Impact digital
modem.

A-2 APPENDIX A: AT COMMAND SET OVERVIEW
Follow these steps to use AT commands:
1Launch your communications software.
Be sure your communications software is in terminal mode.
2Be sure the digital modem is in command mode
(sometimes called local mode or terminal mode) so that it
interprets your commands.
When your computer is powered on, the digital modem
automatically starts in command mode. If you have recently
used the digital modem to make a call and have not yet
disconnected, type +++ to switch to command mode.
3Type:
AT <commands> [Enter]
An AT command line starts with the characters AT. The
command line can accept up to 40 command characters in
the line (not including the two AT characters, spaces, or
[Enter]).
After completing its tasks, the 3Com Impact digital modem
sends a message to the screen.

BAT COMMANDS,
REGISTERS, AND RESULT
CODES
The 3Com Impact ISDN digital modem commands are
summarized in Table B-1, modem commands for the internal
analog modem in Table B-1, remote S registers in Table B-3,
and digital modem result codes in Table B-4.
AT Command Set for the 3Com Impact
Digital Modem
Table B-1 summarizes the AT command set.
Table B-1 AT Command Set Summary
Command Function (Example) Description
AAnswer incoming circuit-switched
digital modem call (AT A)
Answers an incoming call.
&C Serial port CD control (AT &C2) &C0 forces CD to remain on at all times.
&C1 forces CD to follow the state of
carrier from the remote system. CD turns
on after CONNECT message is sent to
host (default).
&C2 forces CD to remain on except
temporarily after disconnect.
D (ATD5551234) Dials an outgoing 56/64 Kbps
circuit-switched digital connection.
DT (ATDT5551234) Dials an outgoing analog modem call,
using the optional V.32bis modem, at a
maximum modem line speed of
14.4 Kbps using touch-tone dialing.
DP (ATDP5551234) Dials an outgoing analog modem call,
using the optional V.32bis modem, at a
maximum modem line speed of
14.4 Kbps using pulse dialing.
(continued)

B-2 APPENDIX B: AT COMMANDS, REGISTERS, AND RESULT CODES
&D DTR control (AT &D0) &D0 causes digital modem to ignore DTR
from host.
&D1 causes digital modem to enter
command state on detecting on-off
transition of DTR.
&D2 causes digital modem to hang up
current calls upon on-off transition of DTR
and prepares serial port to accept AT
command at any speed (default).
E AT command echo (AT E0) E0 disables the echo of AT commands
back to the host computer.
E1 enables the echo of AT commands to
the host computer (default).
&F Restore factory defaults (AT &F) Restores all factory default settings.
H Hang up (AT H) Hangs up the current connections.
I Identification (AT I0) I0 displays the product and options ID.
I1 displays the flash memory checksum.
I4 displays the modem product code,
precomputed checksum, firmware
revision number, model, interface type,
country code, and data pump model.
O Enter connect state (AT O) Causes the digital modem to go out of
command mode into on-line mode.
Q Result code control (AT Q0) Q0 enables the output of result codes
(default).
Q1 disables the output of result codes.
Q2 disables the output of result codes in
answer mode only.
\Q Serial port flow control (AT \Q1) \Q0 disables flow control.
\Q1 enables bidirectional XON/XOFF
software flow control.
\Q3 enables bidirectional RTS/CTS
hardware flow control (default).
%R Read all S registers (AT %R) Provides an output list of all S registers.
SN? Read configuration register
(AT S60?)
Reads a specific S register setting.
SN= Write configuration register
(AT S60=64)
Writes to a specific S register.
(continued)
Table B-1 AT Command Set Summary (continued)
Command Function (Example) Description

AT Command Set for the 3Com Impact Digital Modem B-3
\S Read on-line status: command
settings (AT \S)
Reads the status of any parameters that
have been modified through AT
commands.
\T Link inactivity timer (AT \T1) \T0 disables inactivity timer (default).
\Tn link inactivity timer in minutes. The
digital modem automatically disconnects
the call if no activity is sensed within n
(n = 0–255) minutes.
V Result code format (AT V0) V0 enables short form result codes.
V1 enables long form result codes
(default).
&W Stores configuration (AT &W) Stores the configuration of all S registers
that are not part of the digital modem
initial configuration set.
Z Reset (AT Z) Disconnects all calls in progress and
performs a complete digital modem
system reset.
+++ Enter command state Causes digital modem to enter the
command state if it is currently in the
on-line state.
$B Set baud rate (AT $B57600) 0 — Autobaud (default). Other settings
are 1200, 2400, 4800, 9600, 19200,
38400, 57600, and 115200.
%V Show version number (AT %V) Displays digital modem firmware version.
Table B-1 AT Command Set Summary (continued)
Command Function (Example) Description

B-4 APPENDIX B: AT COMMANDS, REGISTERS, AND RESULT CODES
AT Command Set for Internal Analog Fax Modem
Table B-1 summarizes the AT command set for the internal
analog modem.
Table B-2 AT Command Set Summary for the Internal Analog Modem
Command Function (Example) Description
BSet 1200 bps (operation= 0) Initiates calls using either ITU-T V.220 or
Bell 212a at 1200 bps.
0 — V.22
1 — Bell 212a (default)
C1 ATC1 Modem responds with OK
F Select modem modulation mode 0 — Auto detect (default)
1 — V.21/Bell 103
3 — V.23
4 — V.22/Bell 212a
5 — V.22bis
6 — V.32bis/V.32 4800 bps
7 — V.32bis/V.32 7200 bps
8 — V.32bis/V.32 9600 bps
9 — V.32bis 12000 bps
10 — V.32bis 14400 bps
L Modem speaker volume control 0,1 — Low
2 — Medium (default)
3 — High
M Modem speaker operation 0 — Off
1 — On during handshaking, off while
receiving carrier (default)
2 — On during handshaking, on while
receiving carrier
3 — Off while receiving carrier, on
during answering
(continued)

AT Command Set for Internal Analog Fax Modem B-5
XSelect the subset of result
messages that will be used by
the modem to inform the PC of
the results of commands
0 — Basic call progress
1 — Basic call progress and connection
rate
2 — Basic call progress and connection
rate
3 — Basic call progress and connection
rate
4 — All call progress and connection rate
%E Line quality monitor control 0 — Disable
1 — Enable and retrain
2 — Enable and fallback/forward
3 — Enable and auto-retrain but hang up
immediately if line quality becomes
insufficient
%L Return received line signal level Returns a value that indicates the
received line signal level
%Q Report line signal quality Reports the line signal quality
&G Generate guard tone 0 — Disable (default)
1 — Select 1800 Hz guard tone
&V Display current configuration
\A Set MNP max block size 0 — 64
1 — 128
2 — 192
3 — 256
\B Transmit break to remote Sends break to remote modem with a
length in multiples of 100 ms (n x 100 ms)
in non-error corrected mode only.
n = 1–9
\G End-to-end, modem-to-modem
flow control
0 — Disable (default)
1 — Enable
\L MNP mode 0 — Stream (default)
1 — Block
(continued)
Table B-2 AT Command Set Summary for the Internal Analog Modem (continued)
Command Function (Example) Description

B-6 APPENDIX B: AT COMMANDS, REGISTERS, AND RESULT CODES
\N Set preferred error-correcting
mode to be negotiated in a
subsequent data connection
0 — Normal speed buffered
1 — Direct
2 — Reliable link
3 — Auto reliable
4 — Force LAPM
5 — Force MNP
-K MNP extended services Enables/disables conversion of a V.42
LAPM connection to an MNP 10
connection.
0 — Disable
1 — Enable
2 — Enable; inhibits MNP extended
services initiation during V.42 LAPM
answer mode detection phase
-Q MNP 10 fallback to 2400 bps
(V.22bis)/1200 (V.22)
Enables or disables fallback from MNP 10
to V.22bis/V.22.
0 — Disable
1 — Enable (default)
*H Link negotiation speed Controls the connection speed for link
negotiations before upshift occurs
between two MNP Class 10 modems.
0 — Highest rate (default)
1 — 1200 bps
2 — 4800 bps
+F All fax commands (AT+fax sub-
command)
All fax commands
Table B-2 AT Command Set Summary for the Internal Analog Modem (continued)
Command Function (Example) Description

Remote S Registers B-7
Remote S Registers
The 3Com Impact digital modem supports the S registers
listed in Table B-3. All S registers except S0 are the 3Com
extended registers.
Table B-3 Remote S Registers
Registers Descriptions
S0 Auto Answer
0 — Disabled (default)
1 — Enabled
S50 ISDN Switch Signaling Type:
1 — AT&T 5ESS Custom
3 — NI-1/AT&T 5ESS (default)
6 — NI-1/NTI DMS 100 or Siemens EWSD
S51 Phone #1
S52 Phone #1 Service Profile ID (SPID)
S53 Phone #2 (if required by your carrier)
S54 Phone #2 Service Profile ID (SPID) (if required by your carrier)
S55 Terminal Endpoint Identifier 1:
Stores the first TEI assigned by the switch if a second
directory number is required by your carrier. A value of 255
indicates no TEI has been assigned. This field is read-only.
S56 Terminal Endpoint Identifier 2:
Stores the second TEI assigned by the switch. A value of 255
indicates no TEI has been assigned. This field is read-only.
S57 Terminal Initialization State:
Indicates the status of the first TEI using SPID 1. This field is
read-only.
0 — 3Com Impact digital modem has not attempted
initialization
1 — 3Com Impact digital modem has initialized successfully
using SPID 1
2 — 3Com Impact digital modem has failed initialization
using SPID 1
(continued)

B-8 APPENDIX B: AT COMMANDS, REGISTERS, AND RESULT CODES
S58 Terminal Initialization State:
Indicates the status of the second TEI using SPID 2. This
information is provided only if your carrier requires a second
directory number. This field is read-only.
0 — 3Com Impact digital modem has not attempted
initialization
1 — 3Com Impact digital modem has initialized successfully
using SPID 2
2 — 3Com Impact digital modem has failed initialization
using SPID 2
S59 U Interface Status:
This field is read-only.
0 — U interface is not synchronized with the switch
1 — U interface is synchronized and ready
S60 B Channel Data Rate:
56 — 56 Kbps (default)
64 — 64 Kbps
S61 Outgoing Call Type:
0 — Follow dial modifiers (default)
2 — ISDN
3 — Internal analog fax modem
S63 (only for models with
an internal fax modem)
Incoming Voice Call Routing (bit map)
Bit Position/Feature:
0 — Phone #1 internal analog fax modem
1 — Phone #1 Phone Out port
2 — Phone #2 internal analog fax modem
3 — Phone #2 Phone Out port
S65 Voice Automatic Number Identification:
Displays the phone number of an incoming voice call. This
field is read-only.
S66 Data Automatic Number Identification:
Displays the phone number of an incoming data call. This
field is read-only.
(continued)
Table B-3 Remote S Registers (continued)
Registers Descriptions

Remote S Registers B-9
S70 Dynamic Bandwidth Allocation:
0 — DBA disabled
1 — DBA enabled (default)
S71 B Channel Protocol:
0 — QuickSelect (default)
1 — Async-Sync PPP conversion
2 — V.120
S73 V.120 Frame Type:
0 — I frame (default)
1 — UI frame
S74 V.120 Maximum Frame Size (range 240–256):
256 — Maximum frame size of 256 is used (default)
248 — Maximum frame size of 248 is used (for AdTranâ
compatibility, use 253)
S80 Multilink PPP:
0 — Disable
1 — Enable (default)
S81 Multilink PPP Directory Number:
If the destination to which you are dialing a Multilink PPP
call requires two separate directory numbers, you must
include the second telephone number of up to 15 digits in
this S register. If left blank, then the number used to dial the
first link is used.
S82 Multilink PPP Endpoint Identifier Class:
If required, this information is provided by your Internet
service provider.
1 — Locally Assigned Address
2 — Internet Protocol (IP) Address
3 — IEEE 802.1 Globally Assigned MAC Address
4 — PPP Magic-Number Block
5 — Public Switched Network Directory Number
S83 Multilink PPP Endpoint Identifier (up to 20 characters)
If required, this information is provided by your Internet
service provider.
Table B-3 Remote S Registers (continued)
Registers Descriptions

B-10 APPENDIX B: AT COMMANDS, REGISTERS, AND RESULT CODES
Digital Modem Result Codes
Table B-4 lists the 3Com Impact digital modem result codes.
Table B-4 3Com Impact Digital Modem Result Codes
Short Form Long Form Meaning
0 OK Indicates that the most recent command or
action was successfully completed.
2 RING Indicates that an incoming call is present
and no AT Answer command is
outstanding.
3 NO CARRIER Indicates that the most recent call attempts
did not establish a call or that the physical
ISDN interface is not operational.
4 ERROR Indicates that the most recent command or
action was not successfully completed.
7 BUSY Indicates that the most recent call attempt
did not connect because the remote
destination was busy.
5 CONNECT 1200 Indicates 1200 bps analog modem
connection.
10 CONNECT 2400 Indicates 2400 bps analog modem
connection.
11 CONNECT 4800 Indicates 4800 bps analog modem
connection.
12 CONNECT 9600 Indicates 9600 bps analog modem
connection.
15 CONNECT 14400 Indicates 14400 bps analog modem
connection.
28 CONNECT 28800 Indicates 28800 bps analog modem
connection.
56 CONNECT 56000 Indicates 56000 bps digital modem
connection.
64 CONNECT 64000 Indicates 64000 bps digital modem
connection.

CTECHNICAL SUPPORT
3Com provides easy access to technical support information
through the variety of services described in this appendix.
On-line Technical Services
3Com offers worldwide support, through the following:
■3Com Bulletin Board Service (3ComBBS)
■World Wide Web Site
■Ask3ComSM on CompuServeâ
■3ComFactsSM Automated Fax Service
3Com Bulletin Board Service
3ComBBS contains patches, software, and drivers for all 3Com
products, as well as technical articles. This service is available
via modem seven days a week, 24 hours a day. To reach the
service, set your modem to 8 data, no parity, and 1 stop bit.
Country Baud Rate Telephone Number
Australia up to 14400 baud (61) (2) 955 2073
France up to 14400 baud (33) (1) 69 86 69 54
Germany up to 9600 baud
up to 9600 baud
(49) (89) 627 32 188
(49) (89) 627 32 189
Hong Kong up to 14400 baud (852) 537 5601
Italy (fee required) up to 9600 baud (39) (2) 273 00680
Japan up to 14400 baud (81) (3) 3345 7266
Singapore up to 14400 baud (65) 534 5693
Taiwan up to 14400 baud (886) (2) 377 5838
(886) (2) 377 5840
U.K. up to 14400 baud (44) (144) 227 8278
U.S. up to 14400 baud
ISDN V.120
(1) (408) 980 8204
(1) (408) 654-2703

C-2 APPENDIX C: TECHNICAL SUPPORT
World Wide Web Site
Access the latest networking information on 3Com’s World
Wide Web site by entering our URL into your Internet
browser:
http://www.3Com.com/
This service features news and information about 3Com
products, customer service and support, 3Com’s latest news
releases, selected articles from 3TECHâ, 3Com’s
award-winning technical journal, and more.
Ask3Com on CompuServe
Ask3Com is a CompuServe-based service containing patches,
software, drivers, and technical articles about all 3Com
products, as well as an interactive forum for technical
questions. To use Ask3Com, you need a CompuServe account.
To use Ask3Com:
1Log on to CompuServe.
2Enter go threecom
3Press [Return] to see the Ask3Com main menu.
3ComFacts Automated Fax Service
3Com Corporation’s interactive fax service, 3ComFacts,
provides data sheets, technical articles, diagrams, and
troubleshooting instructions on 3Com products 24 hours a
day, seven days a week. Within this service, you may choose
to access CardFactsâ for adapter information, or NetFactsâ
for network system product information.
■CardFacts provides adapter installation diagrams,
configuration drawings, troubleshooting instruction, and
technical articles.
Document 9999 provides you with an index of adapter
documents.

Support from Your Network Supplier C-3
■NetFacts provides data sheets and technical articles on
3Com Corporation’s hub, bridge, router, terminal server, and
software products.
Document 8888 provides you with an index of system
product documents.
Call 3ComFacts using your touch-tone telephone.
International access numbers are:
Local access numbers are available within the following
countries:
Support from Your Network Supplier
If additional assistance is required, contact your network
supplier. Many suppliers are authorized 3Com service
partners who are qualified to provide a variety of services,
including network planning, installation, hardware
maintenance, application training, and support services.
When you contact your network supplier for assistance, have
the following information ready:
■Diagnostic error messages
■A list of system hardware and software, including revision levels
■Details about recent configuration changes, if applicable
If you are unable to contact your network supplier, see the
following section on how to contact 3Com.
Country Fax Number
Hong Kong (852) 537 5610
U.K. (44) (144) 227 8279
U.S. (1) (408) 727 7021
Country Fax Number Country Fax Number
Australia 800 123853 Italy 1678 99085
Denmark 800 17319 Netherlands 06 0228049
Finland 98 001 4444 Norway 800 11062
France 05 90 81 58 Sweden 020 792954
Germany 0130 8180 63 U.K. 0800 626403

C-4 APPENDIX C: TECHNICAL SUPPORT
Support from 3Com
If you are unable to receive support from your network
supplier, technical support contracts are available from 3Com.
In the U.S. and Canada, call (800) 876 3266 for customer service.
Returning Products for Repair
A product sent directly to 3Com for repair must first be
assigned a Return Materials Authorization (RMA) number. A
product sent to 3Com without an RMA number will be
returned to the sender unopened, at the sender’s expense.
To obtain an RMA number, call or fax:
Country Telephone Number Fax Number
U.S. and Canada (800) 876 3266 (408) 764 7120
LIMITED WARRANTY
HARDWARE: 3Com warrants its hardware products to be free from defects in workmanship and
materials, under normal use and service, for the following lengths of time from the date of
purchase from 3Com or its Authorized Reseller:
Internetworking products One year
Network adapters Lifetime
Ethernet stackable hubs and unmanaged Ethernet fixed port repeaters Lifetime*
(One year if
not registered)
*Power supply and fans in these stackable hubs and unmanaged repeaters One year
Other hardware products One year
Spare parts and spares kits 90 days
If a product does not operate as warranted during the applicable warranty period, 3Com shall, at
its option and expense, repair the defective product or part, deliver to Customer an equivalent
product or part to replace the defective item, or refund to Customer the purchase price paid for
the defective product. All products that are replaced will become the property of 3Com.
Replacement products may be new or reconditioned. Any replaced or repaired product or part
has a ninety (90) day warranty or the remainder of the initial warranty period, whichever is longer.
3Com shall not be responsible for any software, firmware, information, or memory data of
Customer contained in, stored on, or integrated with any products returned to 3Com pursuant to
any warranty.
SOFTWARE: 3Com warrants that the software programs licensed from it will perform in
substantial conformance to the program specifications therefor for a period of ninety (90) days
from the date of purchase from 3Com or its Authorized Reseller. 3Com warrants the magnetic
media containing software against failure during the warranty period. No updates are provided.
3Com's sole obligation hereunder shall be (at 3Com's discretion) to refund the purchase price
paid by Customer for any defective software products, or to replace any defective media with
software which substantially conforms to 3Com's applicable published specifications. Customer
assumes responsibility for the selection of the appropriate applications program and associated
reference materials. 3Com makes no warranty that its software products will work in combination
with any hardware or applications software products provided by third parties, that the operation
of the software products will be uninterrupted or error free, or that all defects in the software
products will be corrected. For any third party products listed in the 3Com software product
documentation or specifications as being compatible, 3Com will make reasonable efforts to
provide compatibility, except where the non-compatibility is caused by a “bug” or defect in the
third party's product.
STANDARD WARRANTY SERVICE: Standard warranty service for hardware products may be
obtained by delivering the defective product, accompanied by a copy of the dated proof of
purchase, to 3Com's Corporate Service Center or to an Authorized 3Com Service Center during
the applicable warranty period. Standard warranty service for software products may be obtained
by telephoning 3Com's Corporate Service Center or an Authorized 3Com Service Center, within
the warranty period. Products returned to 3Com's Corporate Service Center must be
pre-authorized by 3Com with a Return Material Authorization (RMA) number marked on the
outside of the package, and sent prepaid, insured, and packaged appropriately for safe shipment.
The repaired or replaced item will be shipped to Customer, at 3Com's expense, not later than
thirty (30) days after receipt by 3Com.
WARRANTIES EXCLUSIVE: IF A 3COM PRODUCT DOES NOT OPERATE AS WARRANTED ABOVE,
CUSTOMER’S SOLE REMEDY SHALL BE REPAIR, REPLACEMENT, OR REFUND OF THE PURCHASE
PRICE PAID, AT 3COM’S OPTION. THE FOREGOING WARRANTIES AND REMEDIES ARE EXCLUSIVE
AND ARE IN LIEU OF ALL OTHER WARRANTIES, EXPRESS OR IMPLIED, EITHER IN FACT OR BY
OPERATION OF LAW, STATUTORY OR OTHERWISE, INCLUDING WARRANTIES OF
MERCHANTABILITY AND FITNESS FOR A PARTICULAR PURPOSE. 3COM NEITHER ASSUMES NOR
AUTHORIZES ANY OTHER PERSON TO ASSUME FOR IT ANY OTHER LIABILITY IN CONNECTION
WITH THE SALE, INSTALLATION, MAINTENANCE OR USE OF ITS PRODUCTS.
3COM SHALL NOT BE LIABLE UNDER THIS WARRANTY IF ITS TESTING AND EXAMINATION
DISCLOSE THAT THE ALLEGED DEFECT IN THE PRODUCT DOES NOT EXIST OR WAS CAUSED BY
CUSTOMER'S OR ANY THIRD PERSON'S MISUSE, NEGLECT, IMPROPER INSTALLATION OR TESTING,
UNAUTHORIZED ATTEMPTS TO REPAIR, OR ANY OTHER CAUSE BEYOND THE RANGE OF THE
INTENDED USE, OR BY ACCIDENT, FIRE, LIGHTNING, OR OTHER HAZARD.
LIMITATION OF LIABILITY: IN NO EVENT, WHETHER BASED IN CONTRACT OR TORT (INCLUDING
NEGLIGENCE) SHALL 3COM BE LIABLE FOR INCIDENTAL, CONSEQUENTIAL, INDIRECT, SPECIAL, OR
PUNITIVE DAMAGES OF ANY KIND, OR FOR LOSS OF REVENUE, LOSS OF BUSINESS, OR OTHER
FINANCIAL LOSS ARISING OUT OF OR IN CONNECTION WITH THE SALE, INSTALLATION,
MAINTENANCE, USE, PERFORMANCE, FAILURE, OR INTERRUPTION OF ITS PRODUCTS,EVEN IF
3COM OR ITS AUTHORIZED RESELLER HAS BEEN ADVISED OF THE POSSIBILITY OF SUCH
DAMAGES.
Some states do not allow the exclusion of implied warranties or the limitation of incidental or
consequential damages for consumer products, so the above limitations and exclusions may not
apply to you. This warranty gives you specific legal rights which may vary from state to state.
GOVERNING LAW: This Limited Warranty shall be governed by the laws of the state of California.
3Com Corporation
5400 Bayfront Plaza
Santa Clara, CA 95052-8145
(408) 764-5000
FCC CLASS B CERTIFICATION STATEMENT
3Com Corporation
Model Nos: 3C871, 3C872, 3C876, 3C877
FCC ID: LP2QAREMOTE
Made in U.S.A.
This device complies with Part 15 of the FCC Rules. Operation is subject to the following two
conditions:
1 this device may not cause harmful interference, and
2 this device must accept any interference received, including interference that may cause
undesired operation.
WARNING: This equipment has been tested and found to comply with the limits for a Class B
digital device, pursuant to Part 15 of the FCC Rules, and the Canadian Department of
Communications Equipment Standards entitled, “Digital Apparatus,” ICES-003. These limits are
designed to provide reasonable protection against harmful interference in a residential
installation. This equipment generates, uses and can radiate radio frequency energy and, if not
installed and used in accordance with the instructions, may cause harmful interference to radio
communications. However, there is no guarantee that interference will not occur in a particular
installation. If this equipment does cause harmful interference to radio or television reception,
which can be determined by turning the equipment off and on, the user is encouraged to try to
correct the interference by one or more of the following measures:
■Reorient or relocate the receiving antenna.
■Increase the separation between the equipment and receiver.
■Connect the equipment into an outlet on a circuit different from the one which the receiver is
connected to.
■Consult the dealer or an experienced radio/TV technician for help.
The user may find the following booklet prepared by the Federal Communications Commission
helpful:
The Interference Handbook
This booklet is available from the U.S. Government Printing Office, Washington, D.C. 20402. Stock
No. 004-000-00345-4.
NOTE: In order to maintain compliance with the limits of a Class B digital device, 3Com requires
that you use quality interface cables when connecting to this device. Changes or modifications
not expressly approved by 3Com could void the user’s authority to operate this equipment. Refer
to the manual for specifications on cabling types.

CANADIAN NOTICE
The Industry Canada label identifies certified equipment. This certification means that the
equipment meets certain telecommunications network protective, operation, and safety
requirements. The Department does not guarantee the equipment will operate to the users’
satisfaction.
Before installing this equipment, users should ensure that is permissible to be connected to the
facilities of the local telecommunications company. The equipment must also be installed using
an acceptable method of connection. In some cases, the inside wiring associated with a
single-line individual service may be extended by means of a certified connector assembly. The
customer should be aware that compliance with the above conditions may not prevent
degradation of service in some situations.
Repairs to certified equipment should be made by an authorized Canadian maintenance facility
designated by the supplier. Any repairs or alterations made by the user to this equipment, or
equipment malfunctions, may give the telecommunications company cause to request the user
to disconnect the equipment.
Users should ensure for their own protection that the electrical ground connections of the power
utility, telephone lines, and internal metallic water pipe system, if present, are connected
together. This precaution may be particularly important in rural areas.
CAUTION: Users should not attempt to make electrical ground connections by
themselves, but should contact the appropriate inspection authority or an electrician,
as appropriate.
