3D Connexion Primergy Serverview Suite Tivoii Owners Manual Netview E.buc
TivoII to the manual 3f1b46cf-b2e0-4499-943b-c959d9cf33f0
2015-02-05
: 3D-Connexion 3D-Connexion-Primergy-Serverview-Suite-Tivoii-Owners-Manual-135650 3d-connexion-primergy-serverview-suite-tivoii-owners-manual-135650 3d-connexion pdf
Open the PDF directly: View PDF ![]() .
.
Page Count: 66
- Contents
- Preface
- Introduction
- Installation
- Components of ServerView Integration in NetView
- Configuration and Operation
- Configuring Fujitsu Siemens Servers with the Map Application
- Creating a ServerView Component Symbol for a Fujitsu Siemens Server
- Selection Name
- Changes to the Fujitsu Siemens Server
- Manually Configuring a Fujitsu Siemens Server
- Resetting a Manual Configuration
- Automatic Search and Configuration of all Fujitsu Siemens Servers
- Configuration File of the Poll Application
- Status Indication in the Map
- Starting the Poll Application
- Map Application
- Operation of the Status Display for Fujitsu Siemens Servers
- Resetting Individual Fujitsu Siemens Servers
- Display of ServerView Events in NetView
- Configuring Fujitsu Siemens Servers with the Map Application
- ServerView Application
- Figures
- Index

PRIMERGY ServerView Suite
PRIMERGY ServerView Suite
ServerView Integration 2.0 in Tivoli NetView
A. Matthäus
Fujitsu Siemens Computers GmbH München
81730 Munich
e-mail: email: manuals@fujitsu-siemens.com
Tel.: (089) 61001-158
Fax: (++49) 700 / 372 00000
Integration in Tivoli NetView
Sprachen: En
Edition June 2006

Comments…Suggestions…Corrections…
The User Documentation Department would like to
know your opinion of this manual. Your feedback helps
us optimize our documentation to suit your individual
needs.
Fax forms for sending us your comments are included in
the back of the manual.
There you will also find the addresses of the relevant
User Documentation Department.
Certified documentation
according to DIN EN ISO 9001:2000
To ensure a consistently high quality standard and
user-friendliness, this documentation was created to
meet the regulations of a quality management system
which complies with the requirements of the standard
DIN EN ISO 9001:2000.
cognitas. Gesellschaft für Technik-Dokumentation mbH
www.cognitas.de
Copyright and Trademarks
Copyright © 2006 Fujitsu Siemens Computers GmbH.
All rights reserved.
Delivery subject to availability; right of technical modifications reserved.
All hardware and software names used are trademarks of their respective manufacturers.

Integration in Tivoli NetView
Contents
1 Preface . . . . . . . . . . . . . . . . . . . . . . . . . . . . . . 1
1.1 Summary of Contents . . . . . . . . . . . . . . . . . . . . . . . 1
1.2 Background Information . . . . . . . . . . . . . . . . . . . . . . 2
1.3 Target Groups . . . . . . . . . . . . . . . . . . . . . . . . . . . 3
1.4 Related Publications . . . . . . . . . . . . . . . . . . . . . . . . 3
1.5 Changes From the Previous Version . . . . . . . . . . . . . . . 4
1.6 Notational Conventions . . . . . . . . . . . . . . . . . . . . . . 5
2Introduction. . . . . . . . . . . . . . . . . . . . . . . . . . . . 7
2.1 Overview . . . . . . . . . . . . . . . . . . . . . . . . . . . . . . 7
2.2 Definitions of Terms . . . . . . . . . . . . . . . . . . . . . . . . 8
3 Installation . . . . . . . . . . . . . . . . . . . . . . . . . . . 11
3.1 Hardware Requirements for All Systems . . . . . . . . . . . . 11
3.2 Software Requirements for Windows NT . . . . . . . . . . . . 11
3.3 Installation under Windows . . . . . . . . . . . . . . . . . . . 12
3.3.1 Interactive Installation . . . . . . . . . . . . . . . . . . . . . . 12
3.3.2 Silent Installation . . . . . . . . . . . . . . . . . . . . . . . . . 15
3.4 Deinstallation under Windows . . . . . . . . . . . . . . . . . . 16
3.5 Update Installation of ServerView Integration in NetView . . . . 21
4 Components of ServerView Integration in NetView . . . . . 23
4.1 Objects in Maps . . . . . . . . . . . . . . . . . . . . . . . . . 23
4.1.1 Symbols . . . . . . . . . . . . . . . . . . . . . . . . . . . . . 24
4.1.2 Fields and Capabilities . . . . . . . . . . . . . . . . . . . . . . 26
4.2 Status Display of ServerView Devices . . . . . . . . . . . . . . 27
4.2.1 Data Collection . . . . . . . . . . . . . . . . . . . . . . . . . 27
4.2.2 Threshold and Rearm Events . . . . . . . . . . . . . . . . . . 28
4.2.3 Reaction Script . . . . . . . . . . . . . . . . . . . . . . . . . 29
4.3 ServerView Traps and MIBs . . . . . . . . . . . . . . . . . . . 29
4.4 Applications of ServerView Integration in NetView . . . . . . . 30
4.4.1 Poll Application . . . . . . . . . . . . . . . . . . . . . . . . . 30
4.4.2 Map Application . . . . . . . . . . . . . . . . . . . . . . . . . 30
4.4.3 Reset Function . . . . . . . . . . . . . . . . . . . . . . . . . . 30
4.4.4 Deinstall Function . . . . . . . . . . . . . . . . . . . . . . . . 31
4.4.5 ServerView Application Launch . . . . . . . . . . . . . . . . . 31

Integration in Tivoli NetView
Contents
5 Configuration and Operation . . . . . . . . . . . . . . . . . . 33
5.1 Configuring Fujitsu Siemens Servers with the Map Application . 33
5.1.1 Creating a ServerView Component Symbol for a Fujitsu Siemens
Server . . . . . . . . . . . . . . . . . . . . . . . . . . . . . . 34
5.1.2 Selection Name . . . . . . . . . . . . . . . . . . . . . . . . . . 35
5.1.3 Changes to the Fujitsu Siemens Server . . . . . . . . . . . . . 36
5.1.4 Manually Configuring a Fujitsu Siemens Server . . . . . . . . . 37
5.1.5 Resetting a Manual Configuration . . . . . . . . . . . . . . . . 37
5.1.6 Automatic Search and Configuration of all Fujitsu Siemens
Servers . . . . . . . . . . . . . . . . . . . . . . . . . . . . . . 37
5.1.7 Configuration File of the Poll Application . . . . . . . . . . . . . 38
5.2 Status Indication in the Map . . . . . . . . . . . . . . . . . . . 40
5.2.1 The Status from the Viewpoint of NetView . . . . . . . . . . . . 40
5.2.2 The ServerView Status . . . . . . . . . . . . . . . . . . . . . . 40
5.2.3 Automatic Monitoring of the ServerView Status . . . . . . . . . 41
5.2.4 How Status Monitoring Works . . . . . . . . . . . . . . . . . . 41
5.2.5 Resetting the ServerView Status Manually . . . . . . . . . . . . 42
5.2.6 SNMP Configuration . . . . . . . . . . . . . . . . . . . . . . . 43
5.2.7 Automatic Reactions . . . . . . . . . . . . . . . . . . . . . . . 43
5.3 Starting the Poll Application . . . . . . . . . . . . . . . . . . . . 44
5.4 Map Application . . . . . . . . . . . . . . . . . . . . . . . . . . 44
5.5 Operation of the Status Display for Fujitsu Siemens Servers . . . 45
5.6 Resetting Individual Fujitsu Siemens Servers . . . . . . . . . . 47
5.7 Display of ServerView Events in NetView . . . . . . . . . . . . . 47
6 ServerView Application . . . . . . . . . . . . . . . . . . . . . 49
6.1 Starting ServerView . . . . . . . . . . . . . . . . . . . . . . . . 49
6.2 Installing ServerView . . . . . . . . . . . . . . . . . . . . . . . 52
Figures . . . . . . . . . . . . . . . . . . . . . . . . . . . . . . . . . . . 53
Index . . . . . . . . . . . . . . . . . . . . . . . . . . . . . . . . . . . . 55

Integration in Tivoli NetView 1
1 Preface
Strategies to implement centralized server administration are becoming more
and more important due to the increasingly crucial role played by networks
based on independent servers in information technology today.
This manual describes the functions and procedures for using the ServerView
Integration in IBM Tivoli NetView. This Installation of the ServerView Integration
for NetView enables the system management functions of IBM Tivoli NetView
to be used with PRIMERGY ServerView. Using ServerView Integration for
NetView, Fujitsu Siemens PRIMERGY servers can be managed across a multi-
platform network. The ServerView Integration in NetView V2.0 supports Fujitsu
Siemens ServerView MIBs up to V3.65.00.
1.1 Summary of Contents
This manual describes the installation and operation of the ServerView
Integration in IBM Tivoli NetView.
This manual is part of the PRIMERGY ServerView Suite documentation and is
organized in the following chapters:
– Chapter 2 contains a general description of the “ServerView Integration in
NetView” product.
– Chapter 3 describes the installation of the integration package under
Windows 2000, Windows 2003 and Windows XP.
– Chapter 4 introduces the components integrated in NetView.
– Chapter 5 explains the configuration and operation of the ServerView
Integration.
– Chapter 6 provides a brief overview of the ServerView application.

2 Integration in Tivoli NetView
Background Information Preface
1.2 Background Information
ServerView runs on heterogeneous networks using the network management
protocol SNMP (Simple Network Management Protocol) and can be easily
linked with other management systems (e.g. HP OpenView NNM, IBM Tivoli
NetView, Microsoft SMS, Novell ManageWise) via standardized interfaces.
ServerView enables a trouble-free integration of Fujitsu Siemens PRIMERGY
servers in enterprise-wide network management systems such as Tivoli.
ServerView monitors important server components such as hard drives, fans
and power supplies. If the values specified for these parameters are exceeded
or an error occurs, appropriate messages are issued, and corrective measures
are initiated if required.
All Fujitsu Siemens PRIMERGY servers on a network can be monitored from
any standard PC running Windows 2000, Windows 2003 or Windows XP using
the server management software ServerView.
Server management offers operators of large networks decisive advantages:
– Increased productivity due to more reliable servers
– Reduced costs due to automatic monitoring of the data processing infra-
structure
– Flexible system expansion, since ServerView can be easily adapted to
changing conditions
– Shorter downtimes due to simplified error analysis
– Shorter response times when errors occur
– Lower total operating costs (total cost of ownership) due to efficient utili-
zation of network components and their resources
– Ease of use through software ergonomics: clear presentation of data, intel-
ligent user interfaces and a help system for user support

Integration in Tivoli NetView 3
Preface Target Groups
1.3 Target Groups
This manual is intended for system administrators who use the ServerView
Integration in NetView to manage Fujitsu Siemens Entry servers.
It is therefore assumed that you already have some experience in the following
areas:
– operation and administration of Tivoli NetView,
– operation and administration of ServerView, e.g., the interpretation of
ServerView SNMP traps.
1.4 Related Publications
This manual contains details that complement the information provided in the
IBM Tivoli NetView User Guides. Consequently, in order to use the “ServerView
Integration in NetView” effectively, you will need to be familiar with IBM Tivoli
NetView.
A basic requirement is also the ServerView documentation that consists of the
following components:
– The user guide, which describes the basic method of operation of
ServerView
– The Installation Guide, which describes the installation of ServerView
(Windows- and Web-based) and the Alarm Service on the Management
Server, and the installation of the ServerView agents on the managed
servers.
– The online help system, which offers detailed explanations of the individual
menus and commands
– The online trap and threshold description

4 Integration in Tivoli NetView
Changes From the Previous Version Preface
You will also find additional useful information on the subject of server
administration:
– in the ServerView information files, especially the Readme file, which
contains the latest information that could not be included in the manual.
The ServerView information files can be called from the ServerView program
group by clicking on the corresponding entry.
– in the operating system documentation
– in the technical manual for the system boards
– in the description “BIOS setup”
Further Information
For further information see
http://www.fsc-pc.de
1.5 Changes From the Previous Version
This edition is valid for ServerView Integration 2.0 in Tivoli NetView V1.7 and
replaces the following online manual: “ServerView Integration in NetView
Version 1.3”, edition February 2002.
The documentation has been revised to reflect the current status of the software
in both technical and language terms. New screen copies for installation and
deinstallation have been incorporated and described. Additions habe been
made ot the table of ServerView traps integrated in NetView. Chapters 5 and 6
have been revised.

Integration in Tivoli NetView 5
Preface Notational Conventions
1.6 Notational Conventions
The following notational conventions are used in this manual:
If two keys need to be pressed at the same time, then this is shown by placing
a hyphen between the two key symbols.
References to other text locations or sections in this manual are shown with the
corresponding chapter or section title and the page on which the chapter or
section begins.
IPlease note that the screenshots shown in this manual depend, among
other things, on the system being used and could, in a few cases, be
slightly different from what appears on your screen.
You may also note some system-dependent differences in the menu items
available on PRIMERGY systems.
VWarning This symbol points out hazards that can lead to personal
injury, loss of data or damage to equipment
IThis symbol highlights important information and tips.
ÊThis symbol indicates a step that you must perform in
order to continue the procedure.
italics Commands, menu items, button names, options,
variables, file names and path names are printed in
italics.
fixed font System outputs are indicated using a fixed font.
semi-bold fixed
font
Commands to be entered via the keyboard are indicated
using a semi-bold fixed font.
[Key symbols] Keys are presented according to their representation on
the keyboard. If uppercase letters are to be entered
explicitly, the Shift key is shown, e.g. [SHIFT] - [A] for A.
Table 1: Notational conventions


Integration in Tivoli NetView 7
2 Introduction
ServerView is a software package that monitors all important server functions
such as the hard disk, fans, power supply and temperature and reports the
measured values on a central monitoring console.
You can run ServerView Integration in NetView on Windows 2000, Windows
2003 and Windows XP. ServerView Integration lets you use the functionality of
ServerView and IBM Tivoli NetView at a central administration system.
2.1 Overview
The Fujitsu Siemens PRIMERGY servers are shown in the map of NetView.
Following installation of ServerView Integration in NetView you can administer
the PRIMERGY servers from the central management console:
– They appear as graphic symbols on the NetView map.
– Incoming traps are displayed in the Event Browser.
– Automatic reactions to traps can be configured and triggered.
– Values of MIB variables can be queried, saved, and analyzed periodically.
The integration of ServerView Integration in NetView offers the following
benefits:
– Management investments already made are unaffected.
– All devices on the network are presented in a centrally managed map.
– The overall status of a device, which can be determined in the context of
other managers, is shown.
– The same methods are used to display, monitor, and evaluate all managed
devices in order to support rapid and, if required, automatic response to
failures.
– Network components and their resources are used efficiently.
– Maximum performance and minimum failure times ensure an optimum
cost/benefit ratio.

8 Integration in Tivoli NetView
Definitions of Terms Introduction
2.2 Definitions of Terms
Global directory names of NetView
NetView is installed in the folder \usr\ov on the drive stored in the
environment variable NV_DRIVE.
The “ServerView Integration in NetView” product
The “ServerView Integration in NetView” product consists of an
integration package that you can add on to an existing NetView instal-
lation.
ServerView application
ServerView is a server management software for all devices with
ServerView agents. When integrated in NetView under Windows, it is
used to graphically display the MIB variables of the corresponding MIBs
and to configure the servers. You can install ServerView from the
PRIMERGY ServerView Suite Software CD.
Map application
The Map application is part of the integration package. It is automatically
started whenever the symbol for a PRIMERGY server is assigned to an
object of a map in NetView. Such assignments can occur automatically
via a call to the Poll application for all objects or can be made manually
by the user at the NetView console.
Poll application
The Poll application is part of the integration package. It supports
searching for devices with installed ServerView agents and is called by
the user via the MIsc – Extended Discovery – Discover Fujitsu Siemens
Server menu.
Object
In the context of NetView, an object is the representation of a physical
object in the NetView database. In this database, an object has a defined
set of properties. An object may be displayed in the NetView map by one
or more (possibly different) symbols.

Integration in Tivoli NetView 9
Introduction Definitions of Terms
Symbol
In NetView a symbol represents just one object in the NetView database
in the NetView map. The status of a symbol can be determined from the
following three sources:
– from the status of the associated object,
– from the status of all subordinate symbols
(i.e. symbols in the submap of that symbol)
– from the symbol’s own status
(regardless of the object represented - this enables objects to be
represented by symbols with different statuses, depending on the
object context).
ServerView device
This manual uses the term ServerView device to refer to objects from the
NetView database for which the properties ServerViewObj and Node are
set and which are represented by at least one symbol of the type
Computer:FujitsuSiemens Primergy in the NetView map.
The physical devices corresponding to these objects should be
Fujitsu Siemens PRIMERGY servers with installed ServerView agents.
ServerView is the manager for these devices.
ServerView component object or ServerView component symbol
This manual uses the term ServerView component object to refer to the
component object of a ServerView device. A component object is used
to represent a specific hardware, software or logical component of a
device. The ServerView component objects are managed by the Map
application. They are used to represent the ServerView status of the
associated ServerView device from the viewpoint of ServerView. The
capabilities ServerViewObj and Software are set for these objects.
The ServerView component symbol is the graphic representation of the
ServerView component object in the NetView map. It reflects the current
status of the device from the viewpoint of ServerView and has the symbol
type Software:FujitsuServerView.


Integration in Tivoli NetView 11
3Installation
Before you start installing the “ServerView Integration in NetView” integration
package, please make sure that you read all the installation requirements in this
section.
If you want to install the integration package in a NetView client/server
environment, proceed as follows:
1. ServerView Integration in NetView must be first installed on the NetView
server.
2. If you need the functionality of the integration package on a NetView client,
you can then install the package on that client.
3.1 Hardware Requirements for All Systems
On your system, at least 2 MB of free disk space must be available in the global
directory structure of NetView.
3.2 Software Requirements for Windows NT
The software on the system must meet the following requirements:
– Windows 2000 (with Service Pack 1 or higher), Windows 2003 or Windows
XP must be installed as the operating system.
– NetView V7.1 or higher must be installed in single, client or server mode.
– In NetView, two free contiguous event numbers in the range 1001 to 1999
must be available in the "NetView" enterprise.
INote that the installation of the ServerView V3.x software must occur
before the installation NetView V7.1 if both management programs are
to be run on the same system.
IThe installation and every call to the ServerView application activates the
SNMP Trap Service on the system, which uses port 162. Since port 162
is also used by the NetView daemons, you should stop and disable the
SNMP Trap Service manually (via the Services in the Control Panel)
before starting the NetView daemon.

12 Integration in Tivoli NetView
Installation under Windows Installation
3.3 Installation under Windows
Make the CD with the integration products for Tivoli NetView available on the
system and change to the NetView subdirectory.
Two installation methods can be selected via parameters on calling SETUP.EXE:
– An interactive installation that offers a user interface, dialogs and messages
during the installation process
– A silent installation without the user interface, dialogs and messages
IBoth installation methods produce identical results if the installation
completes successfully.
3.3.1 Interactive Installation
To install the “ServerView Integration in NetView” integration package in inter-
active mode, proceed as follows:
ÊStart the file SETUP.EXE from the installation medium on your system to
display the Setup window of the integration package.
Figure 1: Installation: First Setup window

Integration in Tivoli NetView 13
Installation Installation under Windows
ÊClick Next to display dialog window with the “End User License Agreement”.
Figure 2: Installation: “End User License Agreement” dialog window
ÊClick Next to display the dialog window with general information on the
integration package.
Figure 3: Installation: “General information” in the dialog window

14 Integration in Tivoli NetView
Installation under Windows Installation
ÊClick Next. The displayed dialog window will offer you the option of canceling
the installation process without applying any changes to the system.
Figure 4: Installation: “Ready to install” dialog window
ÊClick Next. The installation process will now copy the files to your system and
configure NetView. Following a successful installation, the dialog window
Installation Completed appears.

Integration in Tivoli NetView 15
Installation Installation under Windows
Figure 5: Installation: “Installation Completed” dialog window
ÊClick Finish to complete the installation process.
ÊStart the NetView console.
3.3.2 Silent Installation
You can start the installation in silent mode by issuing the following call from the
command line of a shell or from the Run dialog box on the Start menu:
<drive-letter>:\SETUP.EXE /S
where <drive-letter> is the letter of the drive associated with the installation
medium.
The installation will now run in the background as a separate process and
complete the entire installation procedure and configuration without any user
interface, dialogs and messages. You can follow the progress of the process
with the Task Manager of Windows.
On completing the installation process, you will need to restart the NetView
console.

16 Integration in Tivoli NetView
Deinstallation under Windows Installation
3.4 Deinstallation under Windows
To fully deinstall the integration package, you must perform the following actions
manually in NetView before calling the deinstallation program:
ÊSelect the menu item Misc – Extended Discover – Reset all Fujitsu Siemens
Server in the NetView console to clear all installed Fujitsu Siemens
PRIMERGY servers from all NetView maps.
Figure 6: Deinstallation: Menu item selection in the NetView console
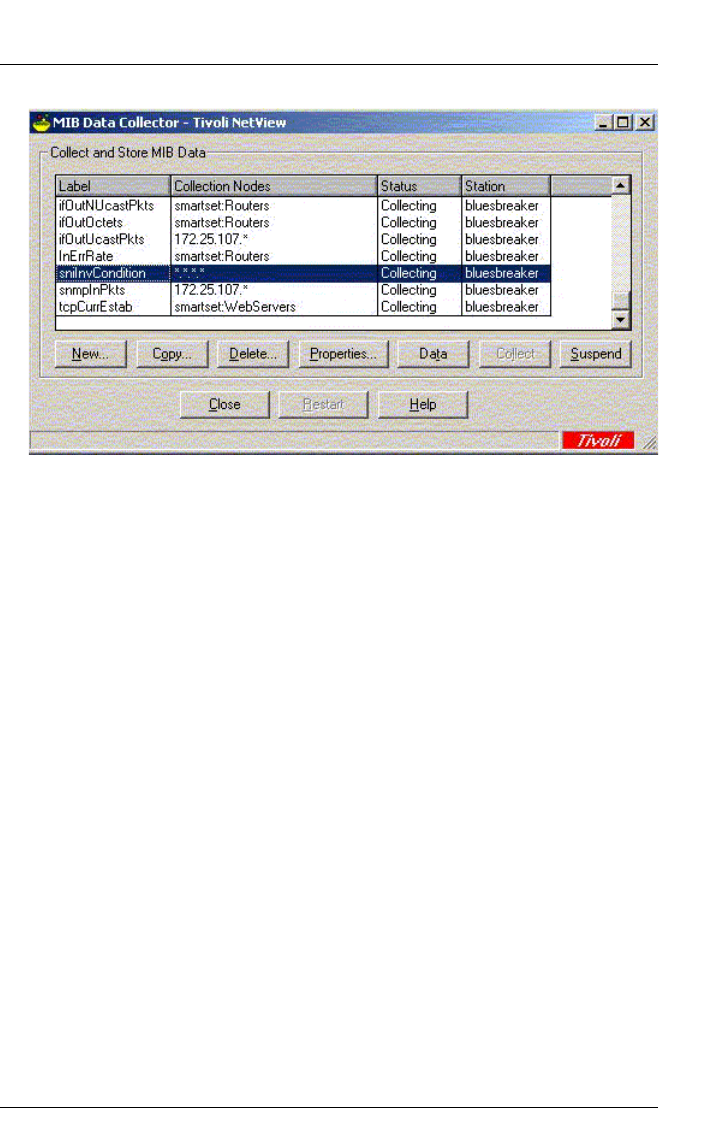
ÊOpen the window MIB Data Collector (menu Tool – MIB – Collect Data). In this
window delete the Data Collection with the label SnilnvCondition by clicking
on Delete.
Integration in Tivoli NetView 17
Installation Deinstallation under Windows
Figure 7: Deinstallation: Delete Data Collection
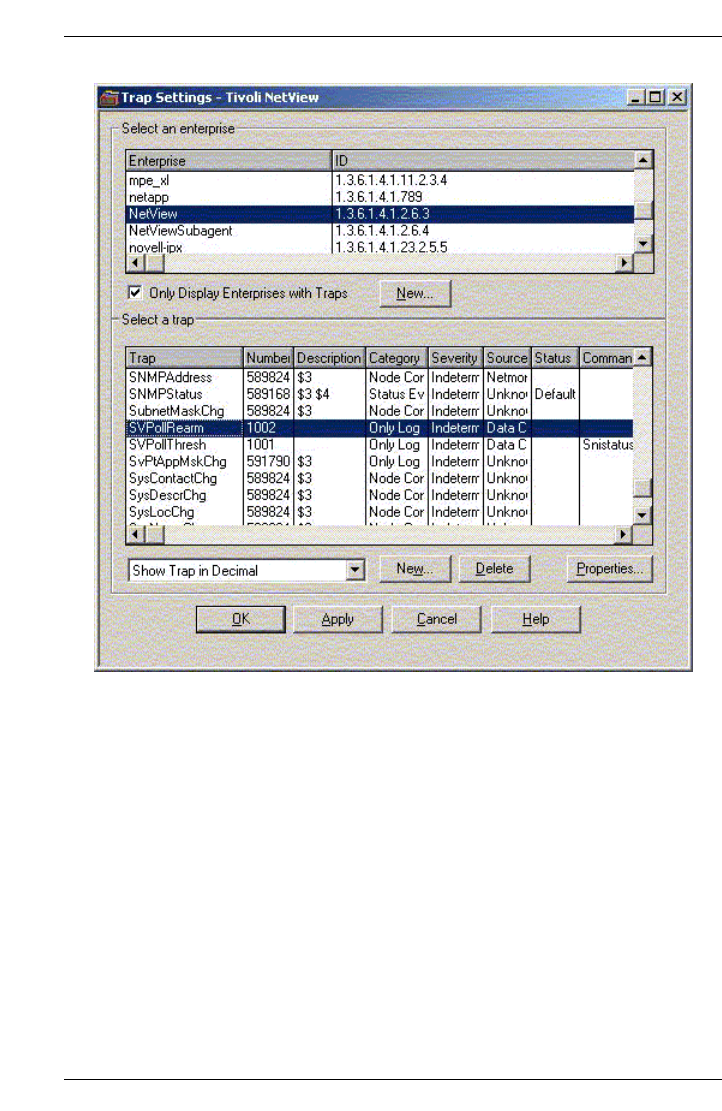
ÊThen open the Trap Settings window (menu Options – Trap Settings). Select
NetView in the Select an enterprise group box. Delete the two traps Polling and
Rearm of the ServerView status display. To do this, select SVPollRearm and
SVPollThresh one after the other, and confirm each by clicking on Delete.
18 Integration in Tivoli NetView
Deinstallation under Windows Installation
Figure 8: Deinstallation: Delete the Polling and Rearm traps
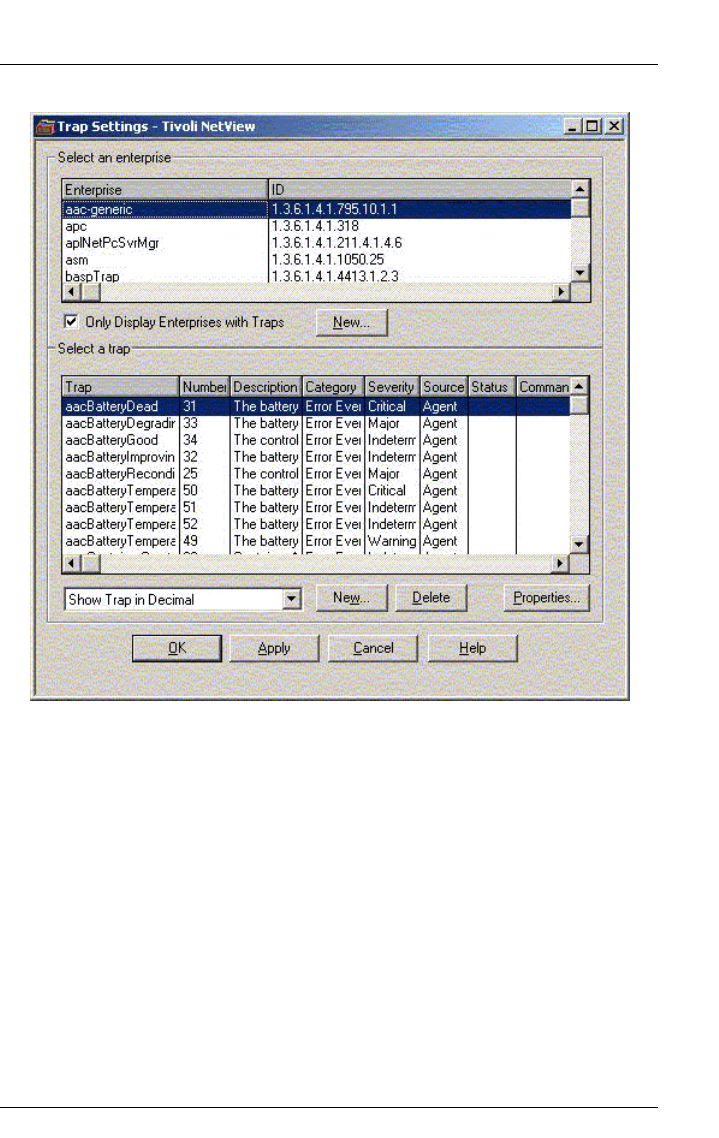
ÊOpen the Trap Settings window (menu Options – Trap Settings). Delete all traps
of the ServerView-specific enterprise systems. You will find a table with the
traps that must be deleted in the chapter “Components of ServerView
Integration in NetView” on page 29.
Integration in Tivoli NetView 19
Installation Deinstallation under Windows
Figure 9: Deinstallation: Delete traps
ÊStart deinstallation in Control Panel/Software by selecting Fujitsu Siemens
ServerView Integration in Tivoli NetView and clicking on Change/Remove button.

20 Integration in Tivoli NetView
Deinstallation under Windows Installation
Figure 10: Deinstallation: Select Control Panel/Software
ÊClick on Next in the display deinstallation window to start deinstallation.
Figure 11: Deinstallation: First dialog window

Integration in Tivoli NetView 21
Installation Update Installation of ServerView Integration in NetView
ÊFollowing successful deinstallation the Deinstallation Completed window
appears. Click on Finish to complete the deinstallation process.
Figure 12: Deinstallation: “Deinstallation Completed” window
3.5 Update Installation of ServerView
Integration in NetView
You can update an existing installation for all systems by first deinstalling and
then reinstalling the integration package as described above.


Integration in Tivoli NetView 23
4 Components of ServerView
Integration in NetView
This chapter describes all the components and configurations added to the
NetView management program on installing the ServerView Integration in
NetView.
You will find details on how to configure, start and run the components of the
ServerView Integration in NetView in the chapter “Configuration and Operation”
on page 33.
4.1 Objects in Maps
Object in maps are components which are graphically represented in NetView
maps and for which specific capabilities and definitions have been stored in the
NetView database.

24 Integration in Tivoli NetView
Objects in maps Components
4.1.1 Symbols
The following symbol subclasses are created:
1. The symbol class Computer includes the symbol subclass FujitsuSiemens to
represent Fujitsu Siemens PRIMERGY servers.
Figure 13: New symbol subclasses in the “Computer” symbol class

Integration in Tivoli NetView 25
Components Objects in maps
2. The new symbol class FujitsuSiemensServerView is added to the Software
symbol class.
Figure 14: New symbol subclasses in the “Software” symbol class
Component symbols of the Software:FujitsuSiemensServerView symbol type
are used in the submap of a Fujitsu Siemens PRIMERGY server to display
the status of all ServerView agents on that server. The Map application can
automatically create these symbols and objects.
The definitions of the symbol classes and symbol subclasses as well as the
associated default capabilities for these symbols can be found in the file
usr\ov\c\ServerView\ServerView.symbols. The corresponding bitmaps are located
in the directory \usr\ov\bitmaps\c.

26 Integration in Tivoli NetView
Objects in maps Components
4.1.2 Fields and Capabilities
The integration package creates fields for internal use by the Map application
and capability fields in the NetView database. The capability fields are special
fields for classifying objects.
The currently set capabilities of an object can be viewed in the Object Properties
of that object.
The ServerViewObj capability is used to classify all devices that are managed via
the ServerView product.
Figure 15: Object Properties with the Capabilities tab
The field and capability definitions can be found in the file
\usr\ov\fields\c\ServerView\ServerView.fields.
The definitions of the default capabilities for the new symbols are located in the
file \usr\ov\symbols\c\ServerView\ServerView.symbols

Integration in Tivoli NetView 27
Components Status Display of ServerView Devices
4.2 Status Display of ServerView Devices
All ServerView devices are identified in the NetView map by the graphical
symbol subclass FujitsuSiemens. The status of a device is shown in the map with
color codes. In the case of Fujitsu Siemens servers that are configured accord-
ingly, this status is determined from the status of all its component symbols.
These component symbols can be found in the submap of the respective server.
Figure 16: Map with ServerView devices in different states
4.2.1 Data Collection
The Data Collection for ServerView is used to set up the periodic polling of the
ServerView agents. The Data Collection is configured with the status variable
SniInvCondition.
The results of the periodic polls are used for the status display of the ServerView
devices.

28 Integration in Tivoli NetView
Status Display of ServerView Devices Components
4.2.2 Threshold and Rearm Events
The two events SVPollThresh and SVPollRearm are created in NetView.
The Threshold event is triggered on polling the status variable SniInvCondition
(Data Collection). This event defines the action (reaction script) that sets the
device status in the NetView map.
Figure 17: Threshold event
The Rearm event is used to limit the threshold range for the Data Collection.
Figure 18: Rearm event
Integration in Tivoli NetView 29
Components ServerView Traps and MIBs
4.2.3 Reaction Script
The Reaction script \usr\ov\snistatustrap.bat is executed at every polling interval
of the Data Collection for each polled node. This script sets the status of the
polled ServerView device in the NetView map, depending on the current value
of the status variable SniInvCondition for that device.
4.3 ServerView Traps and MIBs
On installing the ServerView Integration in NetView, all ServerView traps are
integrated in the trap configuration of NetView. This extends the trap configu-
ration with the following traps:
aac-generic ide rms_cTemperature2
apc ioManager s31MgmtAgent
apINetPcSvrMgr ldcm siemensRFC1157e
asm ldsm siemensRFCL1157e
baspTrap netapp sni
cmc phoenix sniDesktopMgmt
cmcTc ppc sniServerMgmt
dataGeneral promiseTraps sw
bridge raidmanager tapeAlert
dpt raidTraps trapDefinition
duralink rms_cContact traps
elSSMTrapObjects rms_cHumidity1 upsman
em4513MIB rms_cHumidity2 upsTraps
eMylexRaidEventInfor-
mation
rmc_cOutput wfmTrapInfo
evtlogAgntTrap rms_cTemperature1
Table 2: ServerView Traps

30 Integration in Tivoli NetView
Applications Components
The ServerView MIBs are installed in the directory \usr\ov\snmp_mibs\fujitsuSi-
emens. The inventory MIB Invent.mib is loaded during the installation so that the
Data Collection with the status variable SniInvCondition can be installed from this
MIB.
4.4 Applications of ServerView Integration in
NetView
This section describes the applications available on installing the integration
package.
4.4.1 Poll Application
The Poll application searches the network for Fujitsu Siemens PRIMERGY
servers on which ServerView agents have been installed. The Poll application
sets the ServerViewObj capability for all the ServerView servers it finds.
The object IDs, which specify the path when searching the network for
ServerView devices, are defined in the configuration file \usr\ov\bin\Server-
ViewPoll.cfg.
4.4.2 Map Application
The Map application configures a network node that was identified by the Poll
application as a Fujitsu Siemens PRIMERGY server for the status display in the
NetView map.
The following properties are set by the Map application:
– The properties of the network nodes are set to that of a PRIMERGY server.
– Submaps are created on each network node.
– Icons with symbol properties of the ServerView software are created in the
submaps.
4.4.3 Reset Function
The Reset function can be used to undo the configuration of one or all
PRIMERGY servers (i.e., to reset the configuration by the Map application).

Integration in Tivoli NetView 31
Components Applications
4.4.4 Deinstall Function
The Deinstall function deletes the ServerViewObj capability from the NetView
database for all PRIMERGY servers (i.e. for all severs for which the Server-
ViewObj capability was set by the Poll application).
4.4.5 ServerView Application Launch
The ServerView Application Launch function starts the ServerView application
from the NetView map.


Integration in Tivoli NetView 33
5 Configuration and Operation
This chapter describes how you can start up and manage the components
installed with the integration package.
In NetView you can automatically search your network for any network compo-
nents in the “managed objects” (Discovery). With Discovery, NetView accesses
the SNMP agents and assigns corresponding default symbols to the various
device types.
The components found are entered in the submap of the relevant device (e.g.
IP interfaces or network cards).
5.1 Configuring Fujitsu Siemens Servers with
the Map Application
Fujitsu Siemens PRIMERGY servers must be configured for the following
reasons:
– The servers should be visibly distinguishable from other devices in the map.
– The status of the ServerView agents should be mapped to appropriate
component symbols in the map.
IFujitsu Siemens servers can be configured only in a map with read/write
privileges. The Map application makes changes to the objects and
symbols in the NetView map.
34 Integration in Tivoli NetView
Configuring with the Map Application Configuration and Operation
5.1.1 Creating a ServerView Component Symbol for a
Fujitsu Siemens Server
The Map application creates a ServerView component symbol in the submap of
a Fujitsu Siemens server with the following capabilities:
– The symbol type is set to Software:FujitsuSiemensServerView
– The label of the symbol is set to ServerView
– The Status Source attribute of the symbol is set to Propagated, i.e., the status
of the ServerView component symbol is derived from the status of the
related object
– The status of the related object is initially set to Unknown
– The selection name of the server object and the suffix :ServerView form the
selection name of the ServerView component object
– The default capabilities of the ServerView component object are set in
accordance with the corresponding symbol definition file
Figure 19: ServerView component symbol

Integration in Tivoli NetView 35
Configuration and Operation Configuring with the Map Application
5.1.2 Selection Name
The Map application automatically assigns the selection name of the
ServerView component symbol, which depends on the selection name of the
parent server.
INeither the selection name of the server, nor the selection name of the
ServerView component symbol should be changed manually.
If, however, it is absolutely necessary for the selection name of a
Fujitsu Siemens server to be changed, proceed as follows:
ÊSelect the menu item Misc – Extended Discovery – Reset selected Fujitsu
Siemens Server for the relevant Fujitsu Siemens server. This deletes the
ServerView component symbol from the submap of the server and sets the
symbol type to a default value other than FujitsuSiemens.
ÊChange the selection name of the server.
ÊChange the symbol type of at least one of the symbols for this server back
to FujitsuSiemens. This causes the Map application to regenerate the
ServerView component symbol (with a corresponding selection name).

36 Integration in Tivoli NetView
Configuring with the Map Application Configuration and Operation
5.1.3 Changes to the Fujitsu Siemens Server
The Status Source attribute of the symbol is set to Propagated, i.e. the status of
the symbol for the server is derived from the status of all component symbols.
The default capabilities of the server are set in accordance with the corre-
sponding symbol definition file.
Figure 20: Server symbol
Fujitsu Siemens servers and the associated ServerView component symbols
are configured by the Map application when the following events occur:
– when the symbol type of an existing device is changed to
Computer:FujitsuSiemens.
The configuration is then performed for the affected node.
– when a new device with the symbol type Computer:FujitsuSiemens is created.
The configuration is then performed for the affected node.

Integration in Tivoli NetView 37
Configuration and Operation Configuring with the Map Application
5.1.4 Manually Configuring a Fujitsu Siemens Server
Select the symbol of the server in the map. You now have two methods by which
you can configure a single node as a Fujitsu Siemens server:
1. Using the Context menu, change the symbol type to FujitsuSiemens.
2. Create a new server with one of these two symbol types in the map by
selecting the menu item Object – New.
This creates a server as a Fujitsu Siemens server with the appropriate capabil-
ities and a ServerView component symbol in the map (see the section “Config-
uring Fujitsu Siemens Servers with the Map Application” on page 33). The
configuration is performed even if there are several other existing symbols for
the object with different symbol types already present in the current map.
5.1.5 Resetting a Manual Configuration
If you want to reset this configuration, you must first make sure that there is no
further symbol with the symbol type FujitsuSiemens. Resetting a server is
achieved via the menu item Misc – Extended Discovery – Reset selected Fujitsu
Siemens Server. This changes the symbol and some of the capabilities of the
server accordingly. The ServerView component symbol in the related submap
is deleted unless there is at least one other symbol for this device with the
symbol type FujitsuSiemens.
IThe component symbol is deleted only when the server is no longer
represented by any symbol with the symbol type FujitsuSiemens.
5.1.6 Automatic Search and Configuration of all
Fujitsu Siemens Servers
Under the Misc menu item of the NetView main menu, you can start the Poll
application with the option Extended Discovery – Discover Fujitsu Siemens Server.
NetView automatically assigns the symbol type of a node, which depends on
the value of the MIB variable sysObjectID. For each known value of the
sysObjectID MIB variable, an associated symbol type is defined in the
\usr\ov\conf\c\oid_to_sym file.

38 Integration in Tivoli NetView
Configuring with the Map Application Configuration and Operation
The Poll application enables the symbol type to be assigned more precisely. It
can determine the symbol type of a device by checking whether a specific MIB
object is supported by that device.
All Poll application output is sent to the shell in which NetView was started. The
change in symbol type has the following effect in connection with the Map appli-
cation: the Map application configures the related node as a Fujitsu Siemens
server by changing the symbol type to FujitsuSiemens.
INote the effects of the SNMP parameter settings in NetView in this
context:
– If you have defined the wrong Community-String for a device, the request of
the Poll application will be rejected, and the device will not be detected
correctly.
– If you have selected a Timeout value that is too low, the requests may be
aborted before a response can be received. If the Timeout value is too high,
this will lead to delays when polling devices which do not have SNMP agents
or for which the SNMP agent is inactive.
– The reliability of the network connections is determined by the Retry-Count.
If you have selected too high a Retry-Count, this will lead to delays when
polling devices which do not have SNMP agents or for which the SNMP
agent is inactive.
ISet the IPMAP_NO_SYMBOL_CHANGES environment variable in the
runtime environment of NetView to TRUE. This prevents changes to the
symbol types from being reset by NetView as part of the Configuration
Monitoring, which runs continuously.
VWarning
Do not terminate NetView while the Poll application is running.
5.1.7 Configuration File of the Poll Application
In the $OV_BIN/ServerViewPoll.cfg file you will find the definitions of the tests
performed by this application. Each entry in this file has the following format (the
quotes and commas are part of the syntax and must always be specified):
SYSOID="sysObjectID_Value",OBJECT="MIB_ObjectID",
NEWSYMBOL="New_Symbol_Type"

Integration in Tivoli NetView 39
Configuration and Operation Configuring with the Map Application
sysObjectID_Value
This parameter identifies a value for the MIB variable sysObjectID from
the MIB-II in dot notation, beginning with a period, for example:
“.1.3.6.1.4.1.231.1.3.1” - this is the value returned by all SINIX-N
systems as a sysObjectID. All nodes returning this value for sysObject are
to be tested for support of the MIB variables with object identifier
MIB_ObjectID.
In NetView you can use the “Configuration - System Information” menu
item to check if a specific node returns a value for sysObjectID and which
value is returned.
MIB_ObjectID
This parameter identifies a MIB variable that must be supported by each
individual node in order to receive the new symbol type. This variable is
specified with the object instance (always “.0” for scalar objects) without
the period prefix. For example, “1.3.6.1.4.1.231.2.10.2.1.3.0” identifies
the object sniInvCondition from the inventory MIB.
New_Symbol_Type
This parameter identifies the symbol type to be assigned to all symbols
(in the open map) of a node supporting the specified MIB variable. This
symbol type must be a type already known in NetView, and is specified
by entering the symbol class and symbol subclass, separated by a colon,
e.g. Computer:FujitsuSiemens. You can view the symbol types defined in
NetView by selecting the Object – New menu option. If this parameter is
not a symbol type known in NetView, the Poll application terminates
immediately.
Blank lines and comment lines (which must start with “#” in the first column) are
permitted in this configuration file.
The lines of the configuration file are compared against each node in the order
in which they are specified. If there are several lines with the same
sysObjectID_Value, only the first line specified is valid; other lines with the same
sysObjectID_Value are ignored. The node is always tested only for support of the
MIB variables from the first matching line. In this case, “matching” means that
the node returns the specified value for the MIB variable sysObjectID and there
is no symbol representing the node in the open map which has the symbol type
New_Symbol_Type.

40 Integration in Tivoli NetView
Status Indication in Map Configuration and Operation
5.2 Status Indication in the Map
5.2.1 The Status from the Viewpoint of NetView
NetView determines the status of a device in the map by sending ICMP echo
requests to the respective device. The status determined by this method only
indicates the accessibility state of the device. To present the ServerView status
described below, the Map application creates a ServerView component symbol
in the submap of the server.
NetView determines the status of a correctly configured Fujitsu Siemens server
from the status of all its component symbols (attribute Status Source of the
symbol equals Propagated), e.g., from the ServerView status and the status of
all interfaces.
IThe ServerView status can be determined only if the server is accessible
via SNMP. If it is not, the status of the ServerView component symbol is
no longer updated. The server is then monitored by NetView's monitoring
of the other components.
VWarning
If the monitoring for the other components of a server by NetView is
disabled, it is possible that a failure of that server may not be reflected by
a status change of the corresponding symbol in the NetView map. This
could occur, for example, if the submap of the server contains only the
ServerView symbol and a symbol for the interface, and the user deletes
the interface symbol or sets this interface component object to
unmanaged.
5.2.2 The ServerView Status
For Fujitsu Siemens servers with installed ServerView subagents, you can
obtain more detailed information on the status of the device than just its avail-
ability status. For this reason, the sniInvCondition object from the INVENTORY-
MIB depicts the overall status of all ServerView agents on the relevant device.
The status returned is always the most critical state among all the ServerView
agents.
By monitoring these MIB variables, you can therefore determine the status of a
device from the viewpoint of ServerView.

Integration in Tivoli NetView 41
Configuration and Operation Status Indication in Map
5.2.3 Automatic Monitoring of the ServerView Status
The following components automatically monitor this ServerView status:
– Data Collection for the MIB object sniInvCondition from the INVENTORY-MIB
– The Threshold and Rearm events for this Data Collection
– A reaction script for evaluating the values received, which sets the status of
the ServerView component symbol accordingly.
IAll devices for which this status monitoring is enabled must be configured
as Fujitsu Siemens servers, i.e., represented by at least one symbol with
the symbol type FujitsuSiemens in the map. If you do not want any such
status monitoring to be performed, you can undo the configuration of the
nodes.
5.2.4 How Status Monitoring Works
The value of the MIB variable sniInvCondition is periodically polled for each
required Fujitsu Siemens server via the Data Collection.
ITo keep the network load down to a minimum, you should adapt the
“generic” Data Collection created during the installation of the integration
package (with the source definition “*.*.*.*”) before using it.
The related threshold monitoring is defined so that both the Threshold and the
Rearm events are triggered at each successful poll.
As a reaction to the Threshold event, the \usr\ov\bin\setServerViewStatus.bat
reaction script is executed. This script receives the NetView-Object-ID of the
corresponding server and the current value of the MIB variable sniInvCondition
as its parameters. No automatic reaction is involved in the Rearm event. It
simply serves to reactivate the Threshold event.
The \usr\ov\bin\setServerViewStatus.bat script determines a corresponding
NetView status from the ServerView status and the selection name of the
related ServerView component symbol from the NetView-Object-ID of the
server involved. The determined status of this ServerView component symbol
is then set in the submap of the server using the OV_Set_Status_Color event.

42 Integration in Tivoli NetView
Status Indication in Map Configuration and Operation
The Fujitsu Siemens servers are configured by the Map application and the Poll
application so that NetView can determine the status of a server from the status
of all of its component symbols. Consequently, such status changes are passed
up through the map hierarchy and can change the status of the relevant server,
segment, network, etc.
You can influence this procedure by performing various configuration steps:
– When configuring the Data Collection, select a suitable polling interval and
enter all the Fujitsu Siemens servers to be monitored in the Source list. Use
the menu option Tools – MIB – Collect, select snilnfCondition and the click on
Properties and Polling Properties one after the other.
IWhen doing this, do not change the Specific Event Number - it is
automatically assigned during the installation of the integration package,
based on the previously defined Threshold events.
– The events SVPollThresh and SVPollRearm are assigned to the event category
Don´t log or display. Consequently, they do not appear in the event browser
and are not recorded in the log file. If you want to change this behavior, you
can assign a different event category to these events.
– A NetView status is determined in the reaction script from the value of the
MIB variable sniInvCondition.
If necessary, you can modify this script and adapt the assignments to meet
your needs.
– The OV_Set_Status_Color event is generated by the reaction script at each
successful poll. To prevent this event from being recorded in the event
browser and/or the log file, you can change the event category for this event
accordingly (Don´t log or display or Log only).
5.2.5 Resetting the ServerView Status Manually
To reset the status of a Fujitsu Siemens server in the NetView map, proceed as
follows:
ÊFrom the context menu of the node in the map, select the item Unmanage
Object to place the node in the unconfigured state.
ÊSelect the item Manage Object from the context menu of the node in the map
to place the node with the set configuration in the initial state.

Integration in Tivoli NetView 43
Configuration and Operation Status Indication in Map
This is needed, for example, if the server is no longer accessible via SNMP (the
SNMP agent is not running) and you want to prevent the server from being
constantly displayed as a “faulty device” in the map.
5.2.6 SNMP Configuration
The parameters you set here are used by the Poll application.
IPlease make sure that you also read the details on selecting SNMP
parameters in the section “Automatic Search and Configuration of all
Fujitsu Siemens Servers” on page 37.
Figure 21: Configuration of SNMP parameters in NetView
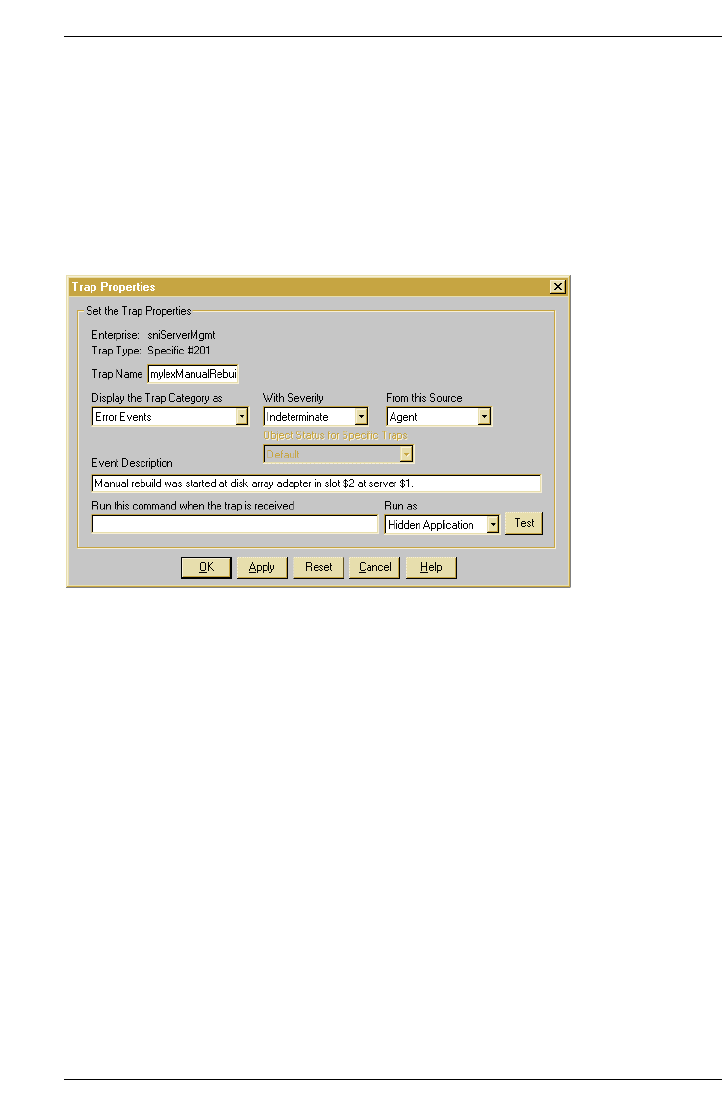
5.2.7 Automatic Reactions
In the NetView event configuration, you can set various automatic reactions to
be triggered when a trap is received from the ServerView MIBs. This includes:
– Logging of the event in the NetView event log file (Event Log Message)
– Forwarding of the event (Forward Event)
– Displaying a pop-up window with information on the trap that was received
(Popup Notification)
– Issuing any shell command (Command for Automatic Action)
44 Integration in Tivoli NetView
Status Indication in Map Configuration and Operation
This reaction can be used to call scripts or any applications, to send e-mails,
and so on. It is also possible to use this reaction to control (or transfer data
to) any external systems with a shell interface, e.g. trouble ticket systems,
paging software, etc. For more details on the shell interface and how to use
it, please refer to the user documentation of the relevant external system.
IDetailed information on configuring automatic reactions can be found in
the NetView user documentation.
Figure 22: Configuring automatic reactions in NetView
5.3 Starting the Poll Application
The Poll application is started via the Misc – Extended Discovery – Discover Fujitsu
Siemens Server menu item.
5.4 Map Application
The Map application is executed automatically when the capability of a network
node changes to ServerViewObj. It is thus executed for every Fujitsu Siemens
server detected by the Poll application.

Integration in Tivoli NetView 45
Configuration and Operation Operation of Status Display
5.5 Operation of the Status Display for
Fujitsu Siemens Servers
The menu item Misc – Extended Discovery – Discover Fujitsu Siemens Server
produces a graphical view of all devices in a hierarchic map. The
Fujitsu Siemens servers are displayed in the map in accordance with their
configuration and can be visibly distinguished from other devices.
Figure 23: Display of devices in the NetView map
The status of a device is indicated in the map using color codes. In the case of
Fujitsu Siemens servers that are configured accordingly, this status is deter-
mined from the status of all its component symbols. These component symbols
can be found in the submap of the respective server.

46 Integration in Tivoli NetView
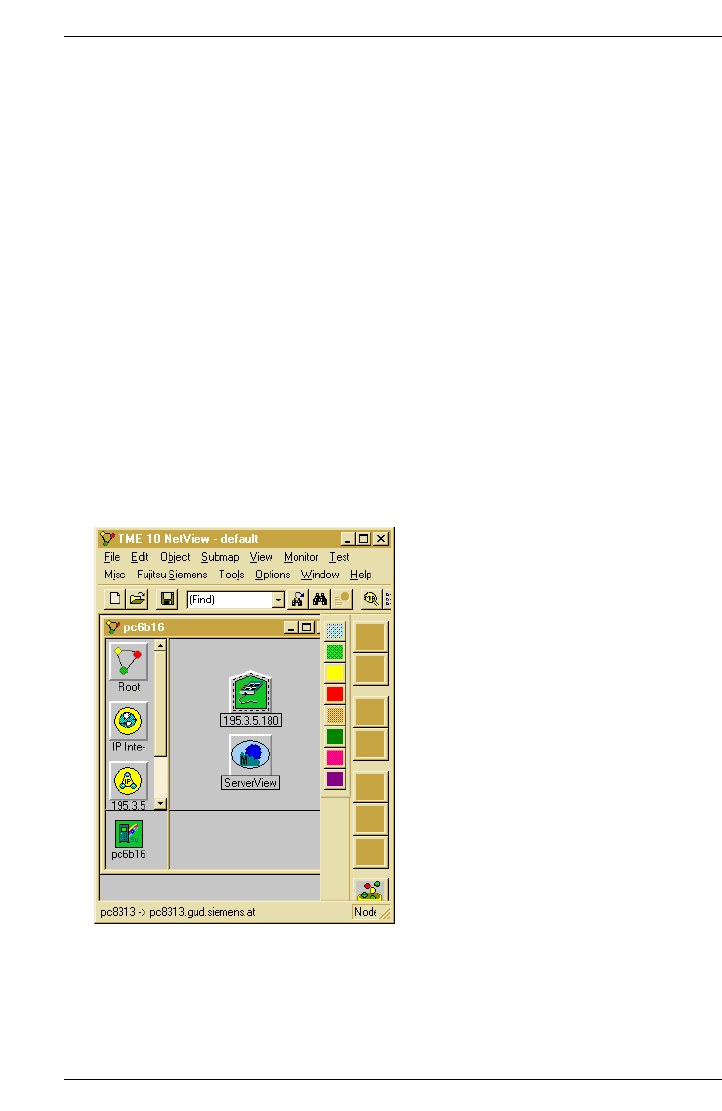
Operation of Status Display Configuration and Operation
Figure 24: Submap of a server with component symbols
Component symbols can be created and managed by NetView itself or by any
other applications such as the Map application, for example.
The overall status of all ServerView agents on a server is determined by a Data
Collection with Threshold monitoring and an associated reaction script and
mapped to the ServerView component symbol in the submap of that server. This
component symbol thus corresponds to the status icon in the server list of
ServerView.
If the status of the ServerView component symbol changes to Major, for example,
the status of the parent server symbol is updated in accordance with the propa-
gation rules and the original status. This mechanism enables a status to be
forwarded up to the highest level in the map hierarchy.
Such status changes inform the network administrator about problems that have
occurred. The administrator can then track these status changes down from a
higher-level map until he or she finally reaches the map that shows the
relevant server. A quick look at the submap of the server immediately indicates
which component of the system is in an alarm state and which manager can be
used to track this state further.

Integration in Tivoli NetView 47
Configuration and Operation Reset Server/Display Events
5.6 Resetting Individual Fujitsu Siemens
Servers
You can use the menu option Misc – Extended Discovery – Reset selected Fujitsu
Siemens Server in the NetView console to reset the configuration of the selected
server, i.e., the server is then no longer shown as a Fujitsu Siemens server in
the NetView map.
The following capabilities are removed on resetting the configuration:
– The capabilities of the network node for PRIMERGY servers are reset to the
default.
– Icons with symbol properties of the ServerView software are removed from
the submaps.
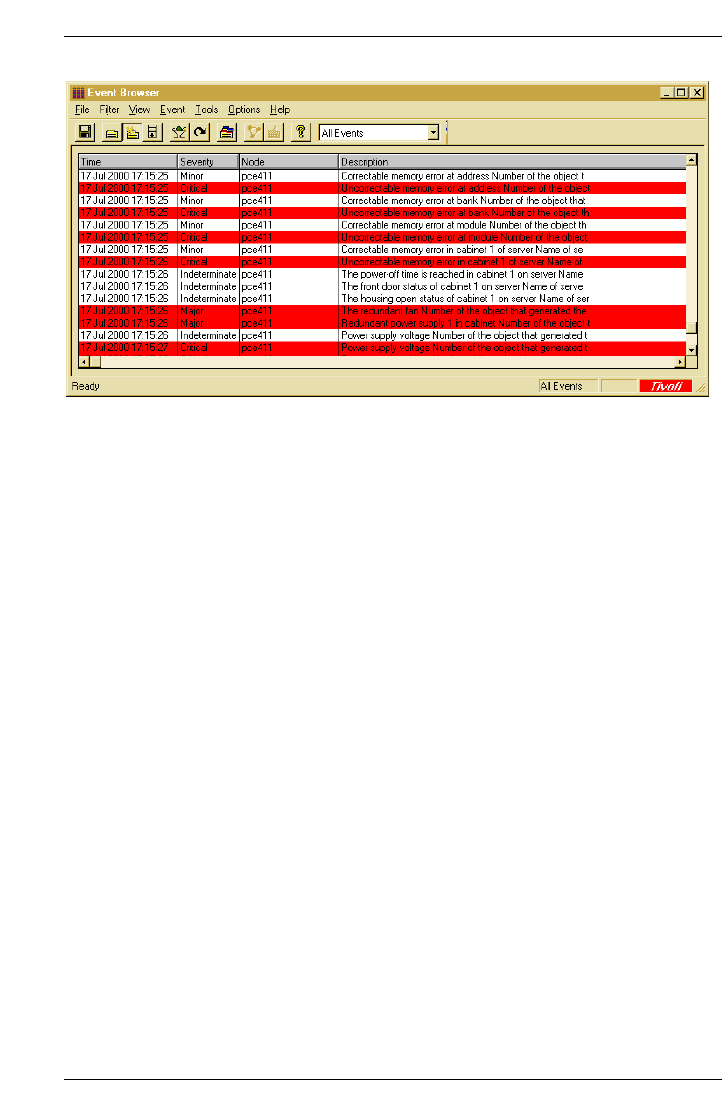
5.7 Display of ServerView Events in NetView
The ServerView application can be used to configure the monitoring of various
events by the agents. When such an event occurs on the server, a trap is sent
to the manager.
NetView displays the received traps from the ServerView MIBs in list form in the
event category ServerView Events. The output occurs in the format defined in the
ServerView MIBs of the integration package. NetView associates the trap with
the appropriate device, but the traps have no effect on the color-coded status
indicator of a device or component symbol in the map.
48 Integration in Tivoli NetView
Reset Server/Display Events Configuration and Operation
Figure 25: Event Browser window

Integration in Tivoli NetView 49
6 ServerView Application
The ServerView application is a manager for all devices with ServerView
agents. It is used in the integration in NetView under Windows to graphically
represent the MIB variables from the corresponding MIBs and to configure the
server.
6.1 Starting ServerView
You start ServerView with the Application Launch function. This causes the
network parameters of the selected Fujitsu Siemens PRIMERGY server to be
passed from the NetView map to ServerView.
IThe properties of the Fujitsu Siemens PRIMERGY servers involved must
be configured with type Computer and subtype FujitsuSiemens.
There are two ways of starting ServerView from the NetView console:
50 Integration in Tivoli NetView
Starting ServerView ServerView Application
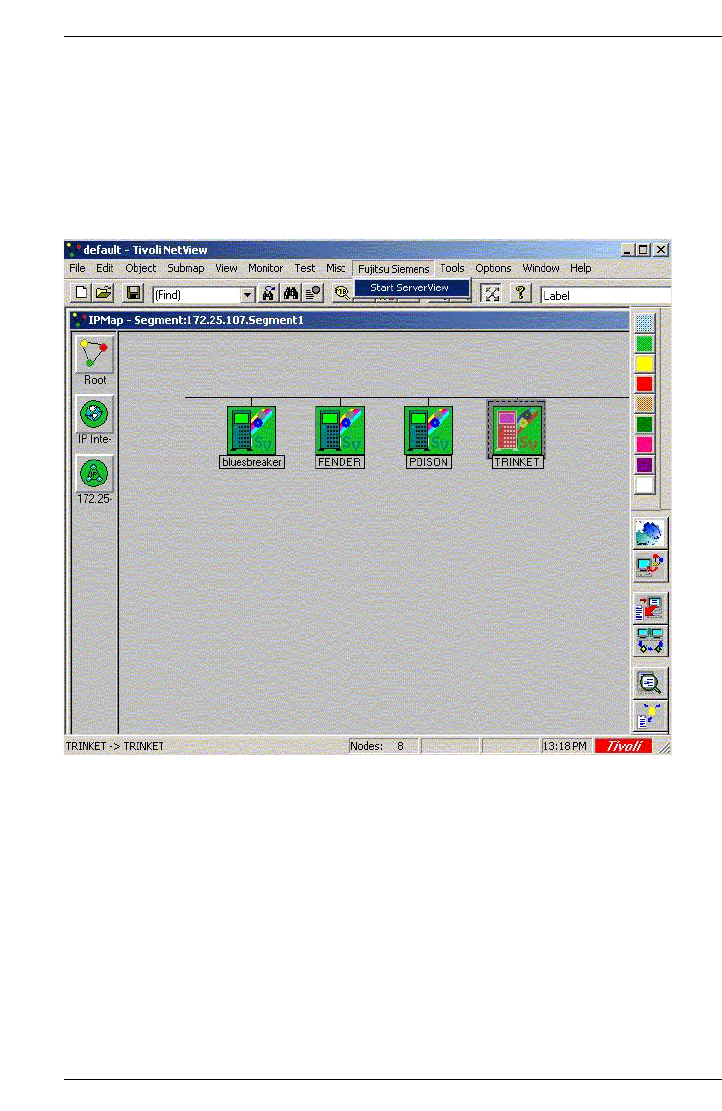
Variant 1
In the NetView map first select the Fujitsu Siemens server (TRINKET in this
example) for which the Application Launch function is to be executed.
Start the Application Launch function via the menu Fujitsu Siemens – Start
ServerView (at the top edge of the NetView window).
Figure 26: Start ServerView via menu

Integration in Tivoli NetView 51
ServerView Application Starting ServerView
Variant 2
In the NetView map first select the Fujitsu Siemens server (TRINKET in this
example) for which the Application Launch function is to be executed.
Start the Application Launch function by clicking on the Start Fujitsu ServerView
icon (at the right edge of the NetView window).
Figure 27: Starting ServerView with the ServerView icon
52 Integration in Tivoli NetView
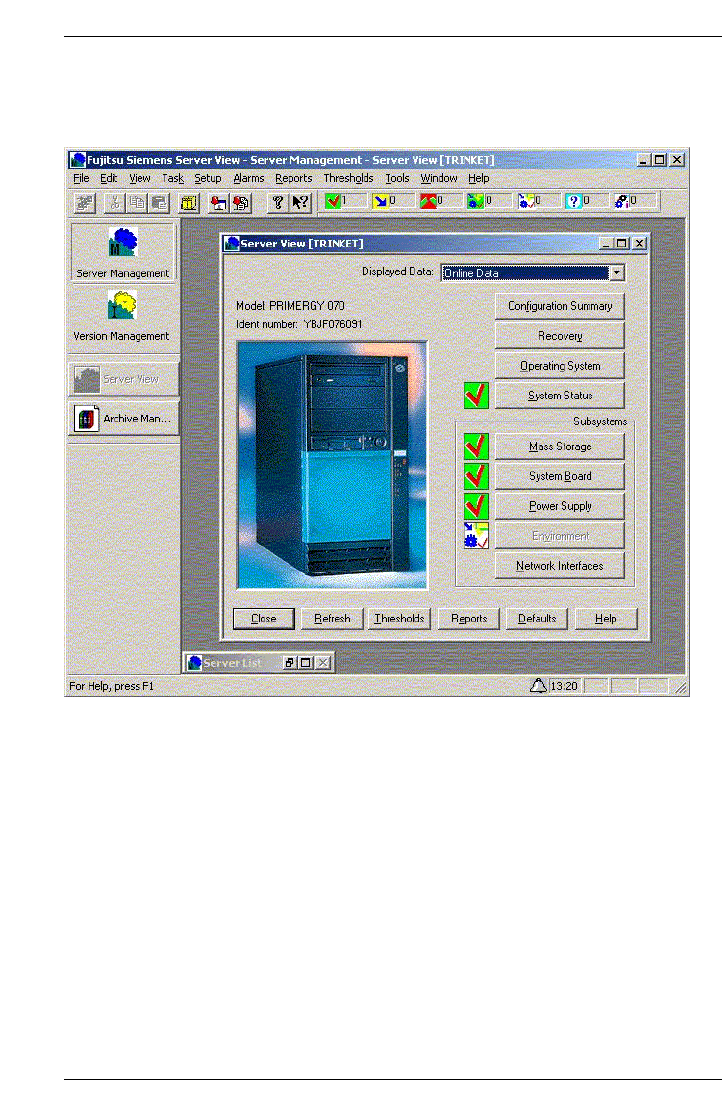
Installing ServerView ServerView Application
In both cases the ServerView window is opened and the selected
Fujitsu Siemens server (TRINKET in this example) is shown in the server list.
Figure 28: ServerView window showing the selected server
6.2 Installing ServerView
If ServerView and NetView are to be installed on the same system, ServerView
V3.x or higher must be installed first.

Integration in Tivoli NetView 53
Figures
Figure 1: Installation: First Setup window . . . . . . . . . . . . . . 12
Figure 2: Installation: “End User License Agreement” dialog window 13
Figure 3: Installation: “General information” in the dialog window . 13
Figure 4: Installation: “Ready to install” dialog window . . . . . . . 14
Figure 5: Installation: “Installation Completed” dialog window . . . 15
Figure 6: Deinstallation: Menu item selection in the NetView console 16
Figure 7: Deinstallation: Delete Data Collection . . . . . . . . . . 17
Figure 8: Deinstallation: Delete the Polling and Rearm traps . . . . 18
Figure 9: Deinstallation: Delete traps . . . . . . . . . . . . . . . . 19
Figure 10: Deinstallation: Select Control Panel/Software . . . . . . 20
Figure 11: Deinstallation: First dialog window . . . . . . . . . . . . 20
Figure 12: Deinstallation: “Deinstallation Completed” window . . . . 21
Figure 13: New symbol subclasses in the “Computer” symbol class . 24
Figure 14: New symbol subclasses in the “Software” symbol class . 25
Figure 15: Object Properties with the Capabilities tab . . . . . . . . 26
Figure 16: Map with ServerView devices in different states . . . . . 27
Figure 17: Threshold event . . . . . . . . . . . . . . . . . . . . . . 28
Figure 18: Rearm event . . . . . . . . . . . . . . . . . . . . . . . 28
Figure 19: ServerView component symbol . . . . . . . . . . . . . . 34
Figure 20: Server symbol . . . . . . . . . . . . . . . . . . . . . . 36
Figure 21: Configuration of SNMP parameters in NetView . . . . . 43
Figure 22: Configuring automatic reactions in NetView . . . . . . . 44
Figure 23: Display of devices in the NetView map . . . . . . . . . . 45
Figure 24: Submap of a server with component symbols . . . . . . 46

54 Integration in Tivoli NetView
Figures
Figure 25: Event Browser window . . . . . . . . . . . . . . . . . . 48
Figure 26: Start ServerView via menu . . . . . . . . . . . . . . . . 50
Figure 27: Starting ServerView with the ServerView icon . . . . . . 51
Figure 28: ServerView window showing the selected server . . . . 52

Integration in Tivoli NetView 55
Index
A
Application Launch function 49
automatic monitoring
of ServerView status 41
C
Capability
ServerViewObj 9
Software 9
capability
delete 31
ServerViewObj 26
component symbol 27
create for Siemens server 34
ServerView 46
type and label 34
configure
Siemens server 33
contents of the manual 1
D
Data Collection 27, 41
threshold range 28
Deinstall function 31
deinstallation
under Windows 16
determine ServerView status 40
E
element manager 46
environment variable
NV_DRIVE 8
event
logging 43
OV_Set_Status_Color 41, 42
ServerViewPollRearm 42
ServerViewPollThres 42
Event Browser 7
event category 42
event configuration 43
event log file 43
event number 11
F
Fujitsu Siemens server
reset configuration 47
G
global directory names
of NetView 8
H
hardware requirements 11
I
IBM Tivoli NetView 1
ICMP echo requests 40
installation
interactive 12
silent 15
update 21
integration package 8
deinstall (Windows) 16
install 11
interactive installation 12
inventory MIB 30
M
manual
contents 1
target group 3
map
objects 23
Map application 8, 30
automatic execution 44
map, of NetView 7
MIB variable
display 8
graphical representation 49
querying 7
sniInvCondition 41
sysObjectID 39

56 Integration in Tivoli NetView
Index
N
NetView
client 11
global directory name 8
map 7
object 8
status of a device in the map 40
symbol 9
NetView console 47
start ServerView 49
NetView database 8
NetView map
reset server status 42
NetView status
determine 41
NetView trap configuration
integration of ServerView traps 29
network management system,
integration 2
network node
configure 30
Notational conventions 5
notational conventions 5
NV_DRIVE (environment variable) 8
O
object 8
properties 26
objects 23
operating costs, reduce 2
P
Poll application 8, 30
start 44
Popup Notification 43
port 162 11
productivity, increase 2
propagation rules 46
R
Reaction script 29
Rearm event 28, 41
requirements
hardware 11
software (Windows NT) 11
Reset function 30
S
server management 2
ServerView 2
agents 40
Application Launch function 31
Data Collection 27
frontend application 49
reset server configuration 30
start from NetView console 49
ServerView component object 9
ServerView component symbol 9
ServerView device 9
ServerView frontend
software 11
ServerView Integration for NetView 7
ServerView MIB
install 30
ServerView status
automatic monitoring 41
reset manually 42
ServerView traps
integration in NetView 29
Siemens server
configure 33
create component symbol 34
determine status 40
map 7
silent installation 15
SNMP configuration 43
software ergonomics 2
software requirements
Windows NT 11
status changes in map hierarchy 42

Integration in Tivoli NetView 57
Index
status variable
SniInvCondition 28
symbol 9
symbol class 39
Computer 24
Software 25
symbol subclass 24
symbol type 39
symbol type Software:ServerView 9
T
target group of this manual 3
Threshold event 28
threshold monitoring 41
threshold range, for Data Collection
28
trap
display 47
trap configuration 29
U
update installation 21
W
Windows
deinstall integration package 16


Comments on PRIMERGY ServerView Suite
ServerView Integration 2.0 in Tivoli NetView
Integration in Tivoli NetView
Comments
Suggestions
Corrections
✁
Submitted by
Fujitsu Siemens Computers GmbH
User Documentation
81730 Munich
Germany
Fax: (++49) 700 / 372 00000
email: manuals@fujitsu-siemens.com
http://manuals.fujitsu-siemens.com

