3M Scott Technologies 200673 Pak Link Data Logger to be used with Pak Alert User Manual 595123 01 A
Scott Safety-Division of Scott Technologies, Inc. Pak Link Data Logger to be used with Pak Alert 595123 01 A
Users Manual
Page 1 of 12 P/N 595123-01 Rev A 9/07
INSTALLATION AND USE INSTRUCTIONS
INSTALLATION AND USE INSTRUCTIONS FOR THE
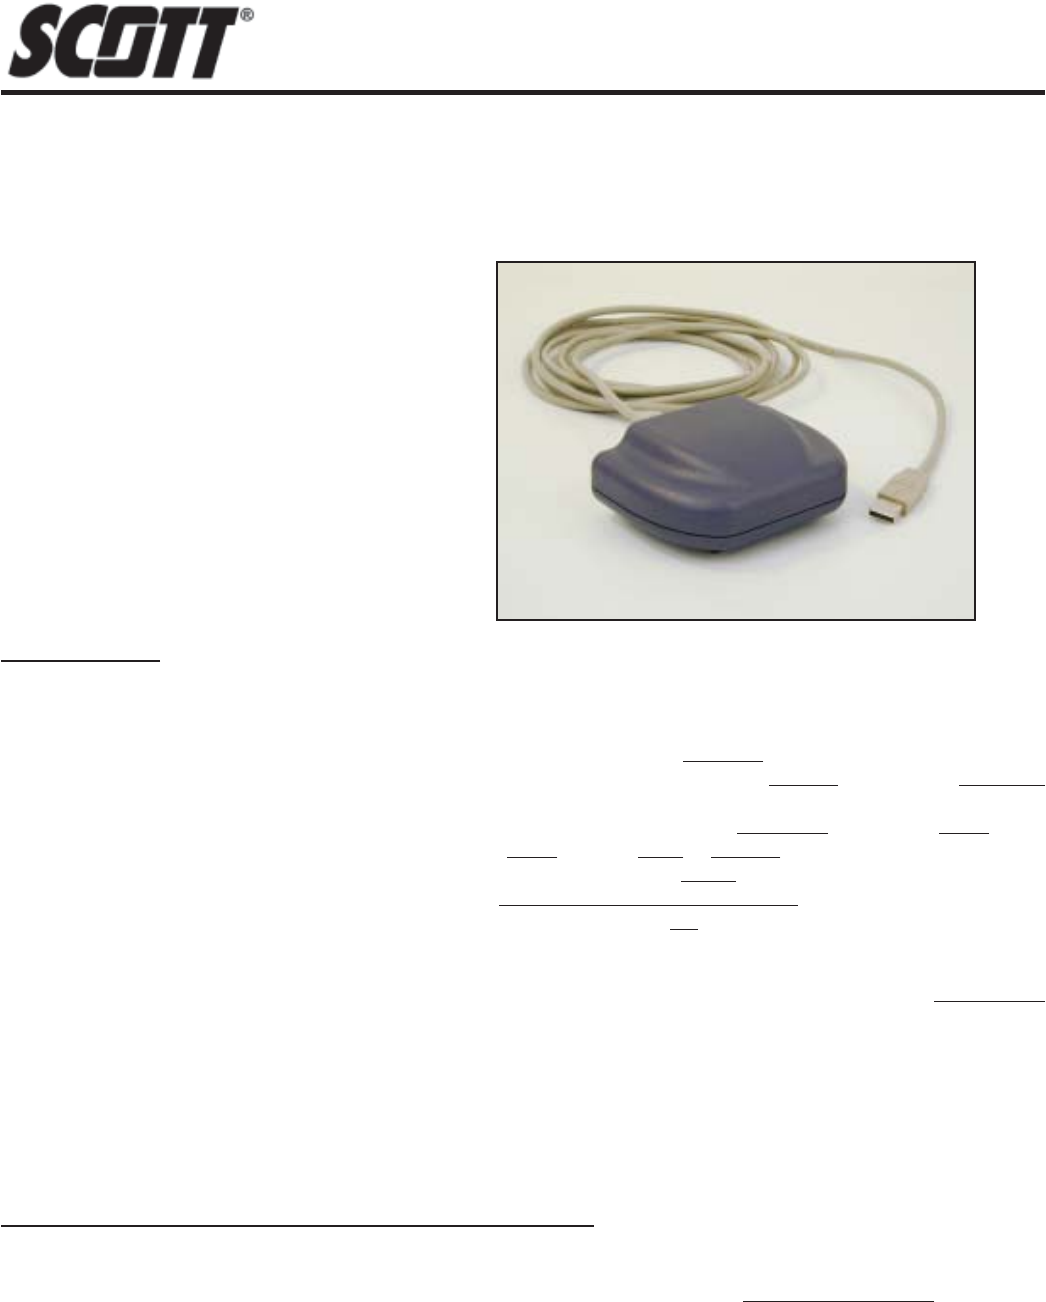
SCOTT PAK-LINK™ COMPUTER INTERFACE
TO USE THE DATA LOGGER AND ID UPDATER FEATURES WITH PROPERLY EQUIPPED
SCOTT AIR-PAK® SELF-CONTAINED BREATHING APPARATUS
DATA LOGGER
Software within the PAK-ALERT SE 7 distress alarm maintains a Data Log in a nonvolatile memory of a select set of
events of PASS operation in the course of normal use of the respirator. The memory has a capacity of over 2000 events.
When the capacity is met, new events will be written over the oldest events in the log. The events of primary use include:
Off To Sensing – Date and time stamp when the PASS sensing mode is activated
Sensing to Pre-Alarm – Date and time stamp when the PASS switches from the sensing mode to the pre-alarm
mode
Pre-Alarm To Alarm – Date and time stamp when the PASS switches from the pre-alarm mode to the alarm mode
Alarm Reset – Date and time stamp when the PASS alarm mode is reset to sensing mode
Manual Alarm – Date and time stamp when the PASS is manually put in alarm mode
Low Battery – Date and time stamp when the PASS low power supply warning signal activates
Sensing To Off – Date and time stamp when the PASS is turned to the off mode
The Data Log also records certain information including Clock Reset Pending, Clock Reset, and Power On Reset.
The data logging information can be downloaded by the emergency services organizations’ personnel using the PAK-
LINK Computer Interface connected to a personal computer USB connection equipped with the SCOTT Data Logger
Software and Microsoft® Excel®.
The date and time in the PAK-ALERT SE 7 distress alarm Data Logger software are set initially at the factory. An internal
back-up battery will maintain the date and time setting when the PASS batteries are removed or changed. However,
each time the data is downloaded, the date and time on the distress alarm are automatically reset (Clock Reset) to the
date and time as they appear on the personal computer. SCOTT strongly recommends that each new respirator be run
through the Data Logger downloading procedure in this instruction to set the date and time to your local time zone before
the unit is put into service. This procedure should also be followed if the respirator is left unused for more than six weeks.
DESCRIPTION
These instructions cover the following TWO software
programs on SCOTT software disk P/N 31001371.
PAK-LINK ID UPDATER FOR SCOTT DISTRESS ALARMS
The PAK-ALERT SE 7 distress alarm comes factory programmed with an identification number unique to that unit. This
is the “Device” number that appears when downloading the Data Log. This identification number can be reprogrammed
to a combination of up to eight characters (letters and/or numbers) using the SCOTT PAK-LINK ID Updater Software on
a personal computer with the same PAK-LINK computer interface. The SCOTT PAK-TRACKER Locator System integrated
into a SCOTT PAK-ALERT Distress Alarm also uses the same ID number, so this software can be used to reprogram the
ID for respirators equipped with that function as well.
WINDOWS®, Microsoft®, and Excel® are registered copyrights of Microsoft, Inc.
Page 2 of 12P/N 595123-01 Rev A 9/07
INSTALL THE PAK-LINK COMPUTER INTERFACE USB DRIVER
Before the PAK-LINK Computer Interface can be used with your computer, the USB Driver must be
2. Insert the CD disk in you computer.
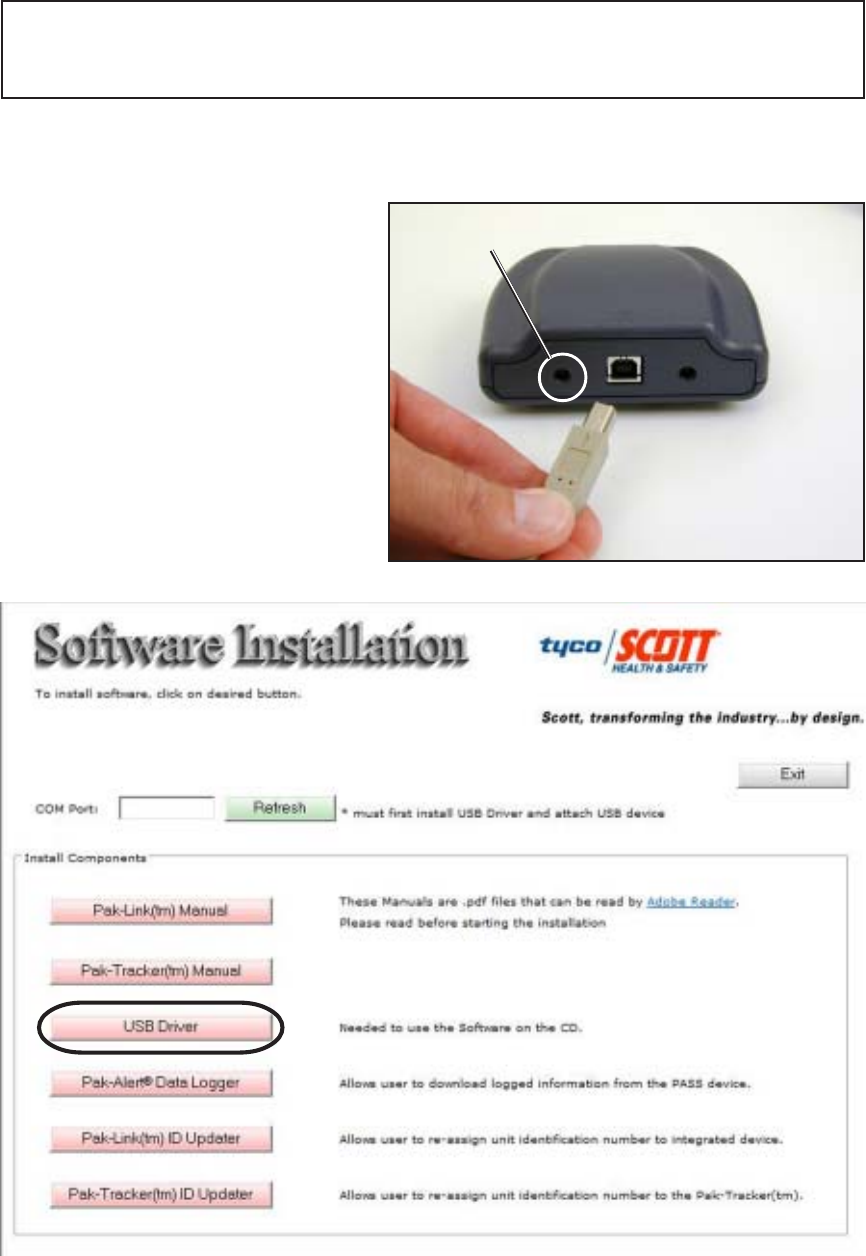
Installer screen will appear. See
FIGURE 2.
COMPUTER REQUIREMENTS
The SCOTT Data Logger software is PC based and requires a minimum of WINDOWS® 2000 or
higher and a 486 or faster processor with approximately ten (10) megabytes of free disc space. The
data log can be viewed within the Data Logger Software, but the computer must have Microsoft®
Excel® installed in order to output and save a file of the data log. The Interface Unit plugs into a USB
2.0 port on the computer from which it gets its power.
installed. Install the USB Driver according
to the following steps:
1. Connect the PAK-LINK Computer
Interface to your computer using a USB
2.0 cable. Use of a peripheral powered
USB multi-port is not recommended.
The GREEN Light on the PAK-LINK
Computer Interface will turn on. If the
GREEN light does not turn on, there is
a problem with the interface. Remove
the interface from service and tag for
repair or replacement.
FIGURE 1
GREEN LIGHT WILL TURN
ON WHEN CONNECTED
FIGURE 2
CAUTION
THE INTERFACE UNIT GETS ITS POWER FROM THE USB PORT ON THE COMPUTER. WHEN USED
WITH A BATTERY POWERED LAP TOP COMPUTER, ALWAYS UNPLUG THE USB CABLE AFTER
USE TO PREVENT DRAINING THE POWER FROM THE BATTERY.
Page 3 of 12 P/N 595123-01 Rev A 9/07
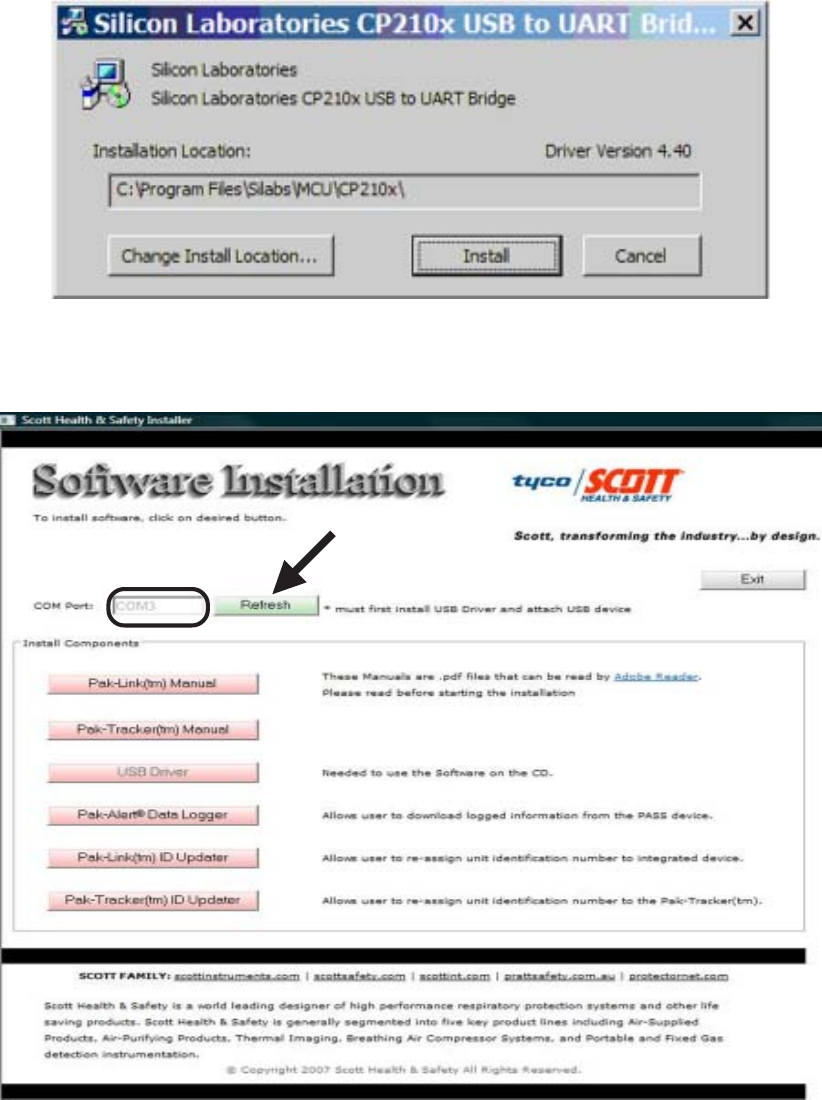
3. Select “USB Driver” to install the USB driver on you computer needed to operate the PAK-LINK
Computer Interface. Follow the instructions on the screen. See FIGURE 3.
6. Make a note of the number of the COM Port that appears. See FIGURE 4.
NOTE
WRITE DOWN THE COM PORT NUMBER THAT APPEARS ON YOUR SCREEN. YOU WILL
NEED IT TO COMPLETE THE SETUP WHEN YOU RUN EITHER OF THE PROGRAMS
7. When your Computer displays “Found new Hardware” select OK.
4. When the USB Driver has been installed successfully, return to the Installer main screen.
5. Next to “COM Port,” click the “Refresh” button to display the COM Port that has been assigned
to the USB Connection. See FIGURE 4.
FIGURE 3
FIGURE 4
Page 4 of 12P/N 595123-01 Rev A 9/07
TO INSTALL DATA LOGGER SOFTWARE
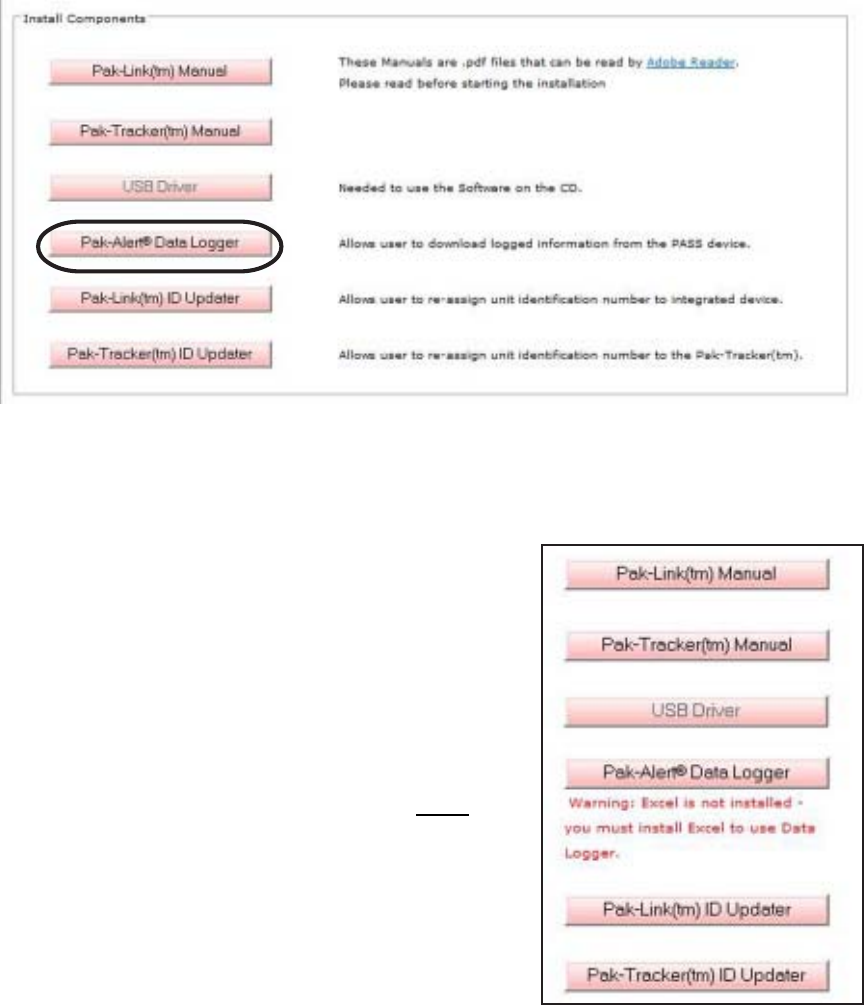
1. Select “Pak-Alert Data Logger” to install the Data Logger program to download the log of events
from compatible PAK-ALERT Distress Alarm PASS Device. Follow the instructions on the screen.
You may need to close all other applications. See FIGURE 5.
2. When the installer creates a folder called “Scott Health & Safety” for the files, select “Continue.”
3. When the set up is completed successfully, select “OK.” You will return to the Installer screen.
4. When finished installing, close the Installer.
USING THE DATA LOGGER
DATE AND TIME
The date and time in the PAK-ALERT SE 7 distress alarm Data Logger software are set initially at
the factory. An internal back-up battery will maintain the date and time setting when the PASS
batteries are removed or changed. However, the date and time are automatically reset (Clock Re-
set) on the distress alarm after each time the data is downloaded. SCOTT strongly recommends
that each new respirator be run through the data log downloading procedure in this instruction to set
the date and time to your local time zone before the unit is put into service. This procedure should
also be followed if the respirator is left unused for more than six weeks.
FIGURE 5
NOTE
IF MICROSOFT EXCEL IS NOT INSTALLED ON YOUR
COMPUTER, THE MESSAGE SHOWN IN FIGURE 6 WILL
APPEAR. YOU WILL STILL BE ABLE TO INSTALL THE
SCOTT DATA LOGGER SOFTWARE AND VIEW THE
DATA LOG, BUT YOU WILL NOT BE ABLE TO OUTPUT
AND SAVE A FILE OF THE DATA LOG WITHOUT EXCEL
INSTALLED ON THE COMPUTER.
FIGURE 6
Page 5 of 12 P/N 595123-01 Rev A 9/07
TO VIEW AND DOWNLOAD THE DATA LOG
1. Make sure the Date and Time on the computer are set correctly for your time zone.
2. To start the Data Logger software, go to the WINDOWS START Menu and select “All Programs.”
Look in the “Scott Health & Safety” program folder to find the shortcut to the “Pak Link Data
Logger” program.
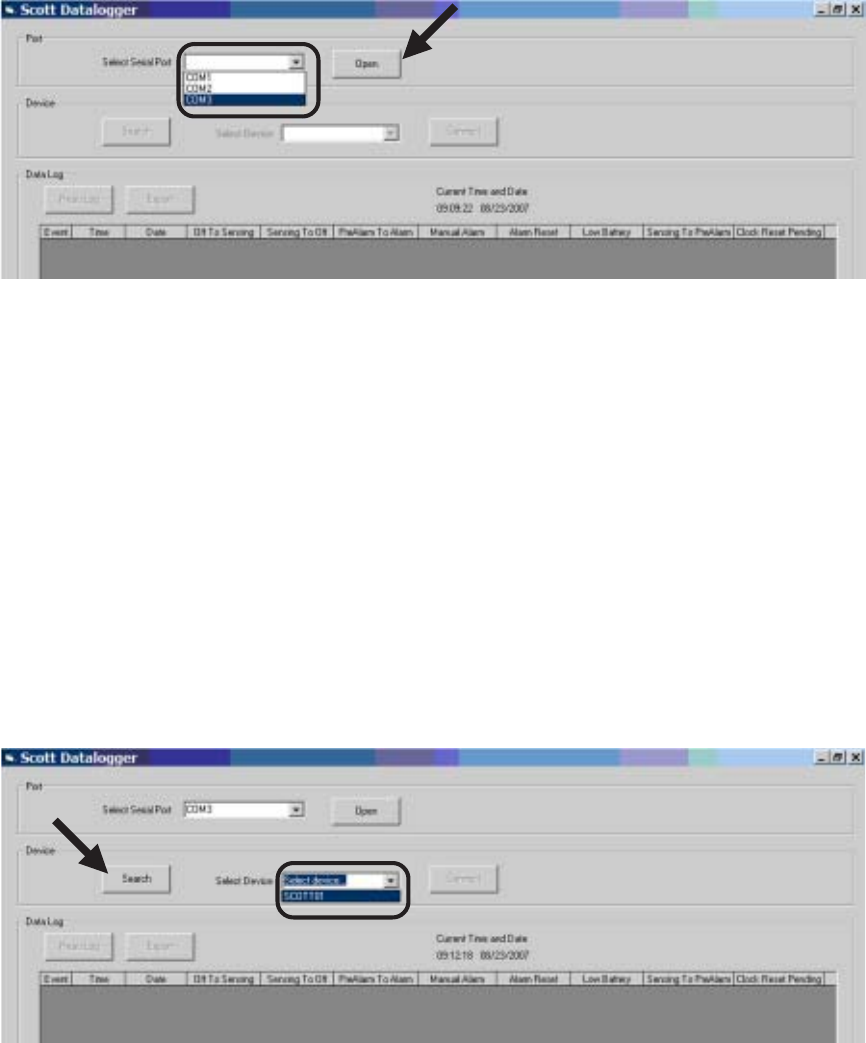
3. Under Port, place your cursor on the pull-down arrow in the box next to “Select Serial Port.”
Select the COM Port that was set in Installation. See FIGURE 7. Click “OPEN.”
To download the Data Log from the PASS Device, proceed as follows:
1. Position the SCOTT respirator and the PAK-LINK Computer Interface conveniently close to you
and access to the computer. The PAK-LINK Computer Interface can communicate with an
activated PASS device as far as twenty feet away, so make sure no other units are being
activated in the immediate area.
2. Make sure the SCOTT respirator is OFF and that there is no residual air pressure in the system.
3. Verify that the batteries in the PASS device are good according to the instructions for the PASS
device.
4. On the Control Console on the respirator, press and hold the RESET button for approximately
eight (8) seconds. The lights on the Control Console will flash GREEN and then RED. When the
RED lights begin flashing alternately, the PASS Device is in Transmit Mode. You have
approximately thirty (30) seconds to complete the connection with the PAK-LINK Computer
Interface before the PASS Device times-out.
5. Under Device, click “Search.” In the “Select Device” window, it will say “Please wait…”
6. When the PAK-LINK Computer Interface finds any activated devices, the window will change to
“Select device…” Place your cursor on the pull-down arrow in the box next to “Select Device.”
Select the ID of the active unit you wish to download the data log. See FIGURE 8.
TO VIEW AND DOWNLOAD THE DATA LOG
CONTINUED ON NEXT PAGE...
FIGURE 7
FIGURE 8
Page 6 of 12P/N 595123-01 Rev A 9/07
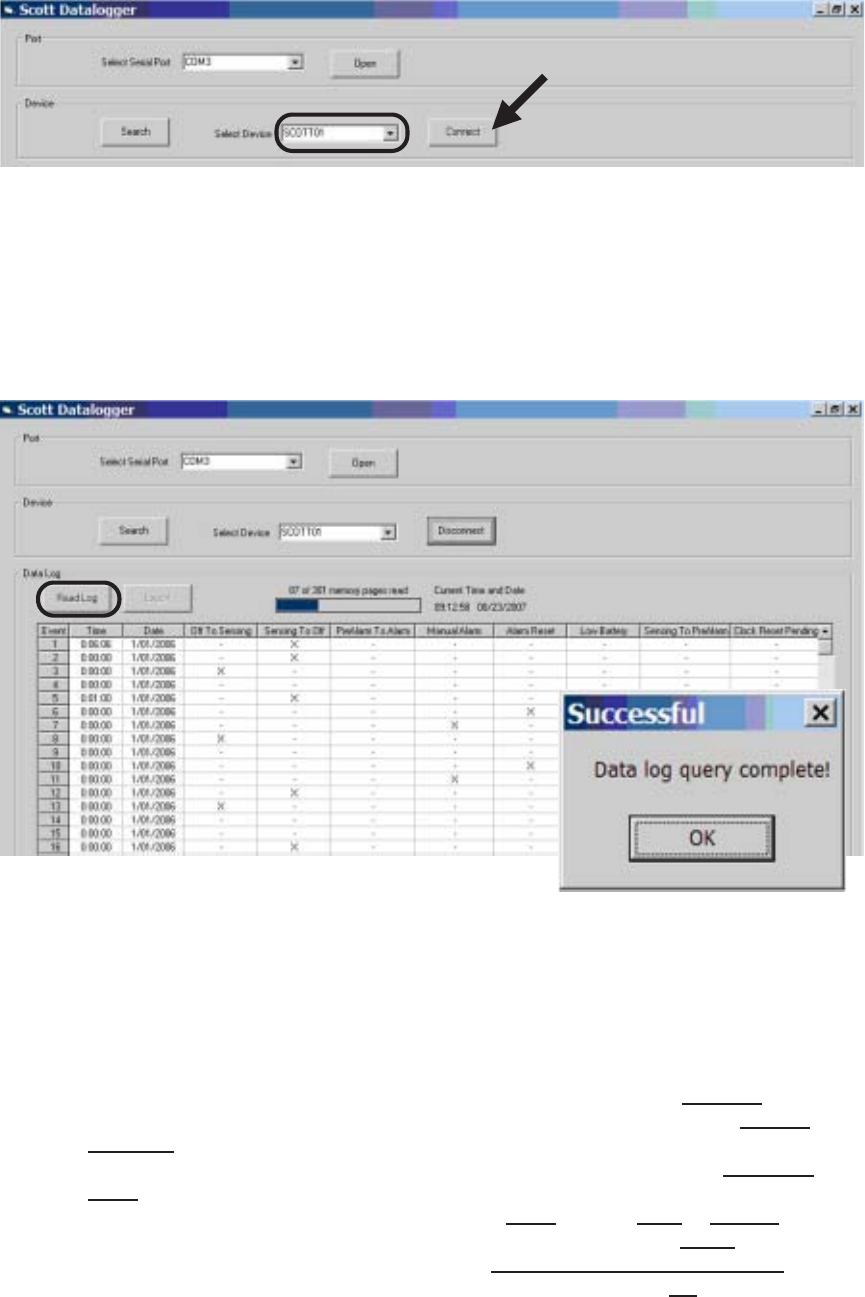
7. When the ID of the active unit appears in the Select Device, click on “Connect” to establish the
connection. See FIGURE 9.
8. Under Data Log, select “Read Log.” The data log from the active unit will begin to download as
in FIGURE 10. A status bar will appear showing the progress of the number of memory pages
read. This may take a couple minutes depending on how many events are stored. When complete,
a message will appear that says, “Successful – Data log query complete!”
NOTE
THE NUMBER OF “MEMORY PAGES” READ DOES NOT DIRECTLY RELATE TO THE NUMBER
OF EVENTS LOGGED.
TO VIEW AND DOWNLOAD THE DATA LOG CONTINUED...
FIGURE 9
NOTE
AS SOON AS THE DATA LOG HAS BEEN READ, THE DATE AND TIME ON THE PASS DEVICE
WILL BE RESET TO THE DATE AND TIME ON THE COMPUTER.
NOTE
IF, AT ANY TIME, YOU RECEIVE AN ERROR MESSAGE, RETURN TO STEP 4 AND VERIFY
THAT THE PASS DEVICE IS IN TRANSMIT MODE.
FIGURE 10
The events of primary use include:
Off To Sensing – Date and time stamp when the PASS sensing mode is activated
Sensing to Pre-Alarm – Date and time stamp when the PASS switches from the sensing mode
to the pre-alarm mode
Pre-Alarm To Alarm – Date and time stamp when the PASS switches from the pre-alarm mode
to the alarm mode
Alarm Reset – Date and time stamp when the PASS alarm mode is reset to sensing mode
Manual Alarm – Date and time stamp when the PASS is manually put in alarm mode
Low Battery – Date and time stamp when the PASS low power supply warning signal activates
Sensing To Off – Date and time stamp when the PASS is turned to the off mode
The Data Log also records certain information including Clock Reset Pending, Clock Reset, and
Power On Reset.
Page 7 of 12 P/N 595123-01 Rev A 9/07
TESTING THE EQUIPMENT
Perform a REGULAR OPERATIONAL INSPECTION of the respirator before returning the SCOTT
AIR-PAK SCBA to service.
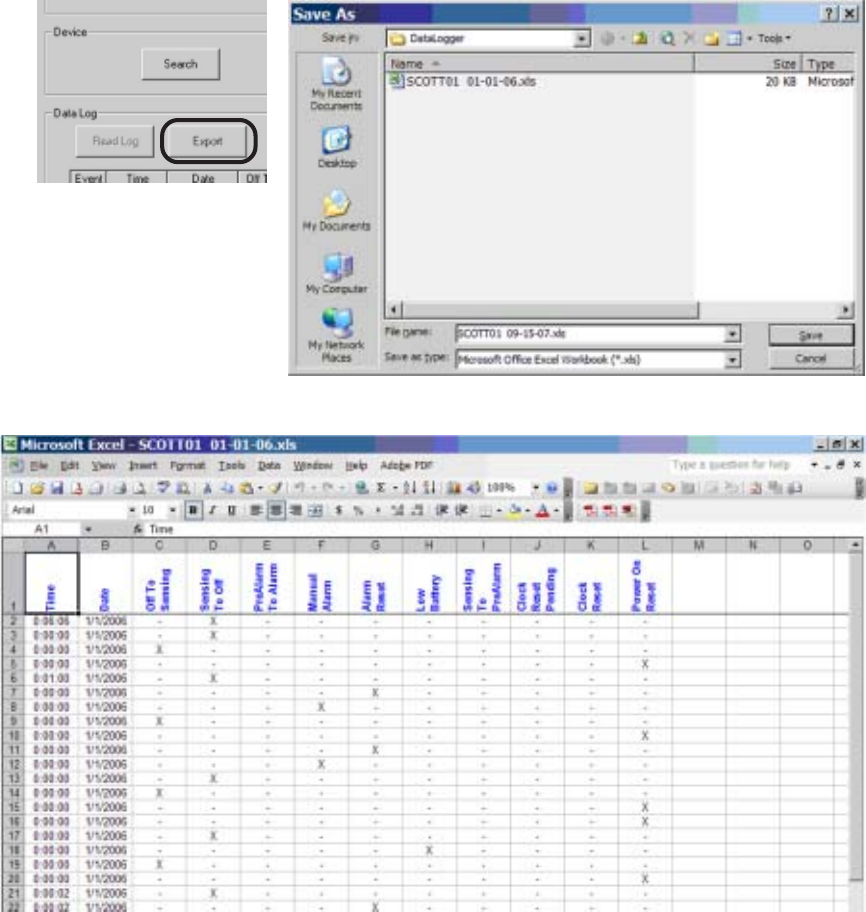
FIGURE 11
TO SAVE THE DATA LOG AND CLOSE THE DATA LOGGER SOFTWARE
1. To save a copy of the downloaded Data Log, you must have Microsoft Excel on your computer.
Click “Export” to create an Excel spreadsheet file (.xls extension) on your computer.
2. Name and save the file to a folder where you will be able to find it. See FIGURE 11.
NOTE
THE DEFAULT NAME FOR THE FILE WILL BE THE UNIT ID PLUS THE MOST RECENT DATE
IN THE DATA LOG (THE CURRENT DATE).
3. As soon as you save the file, Excel will open displaying the file. See FIGURE 12.
4. To disconnect the Data Logger Interface from the selected device, click “Disconnect.” You may
activate and select another device for downloading the data log as described above.
5. If the RED lights are still flashing on the Control Console, double-click the RESET button to
deactivate the transmitter. NOTE
IF NO ACTION IS TAKEN FOR THIRTY SECONDS AFTER THE DOWNLOAD IS COMPLETE,
THE PAK-ALERT SE 7 DISTRESS ALARM WILL TIME OUT AND DEACTIVATE ITSELF.
6. To close down the SCOTT Data Logger software, click the “X” in the upper right hand corner of
the Data Logger window.
FIGURE 12
Page 8 of 12P/N 595123-01 Rev A 9/07
TO INSTALL PAK-LINK ID UPDATER SOFTWARE
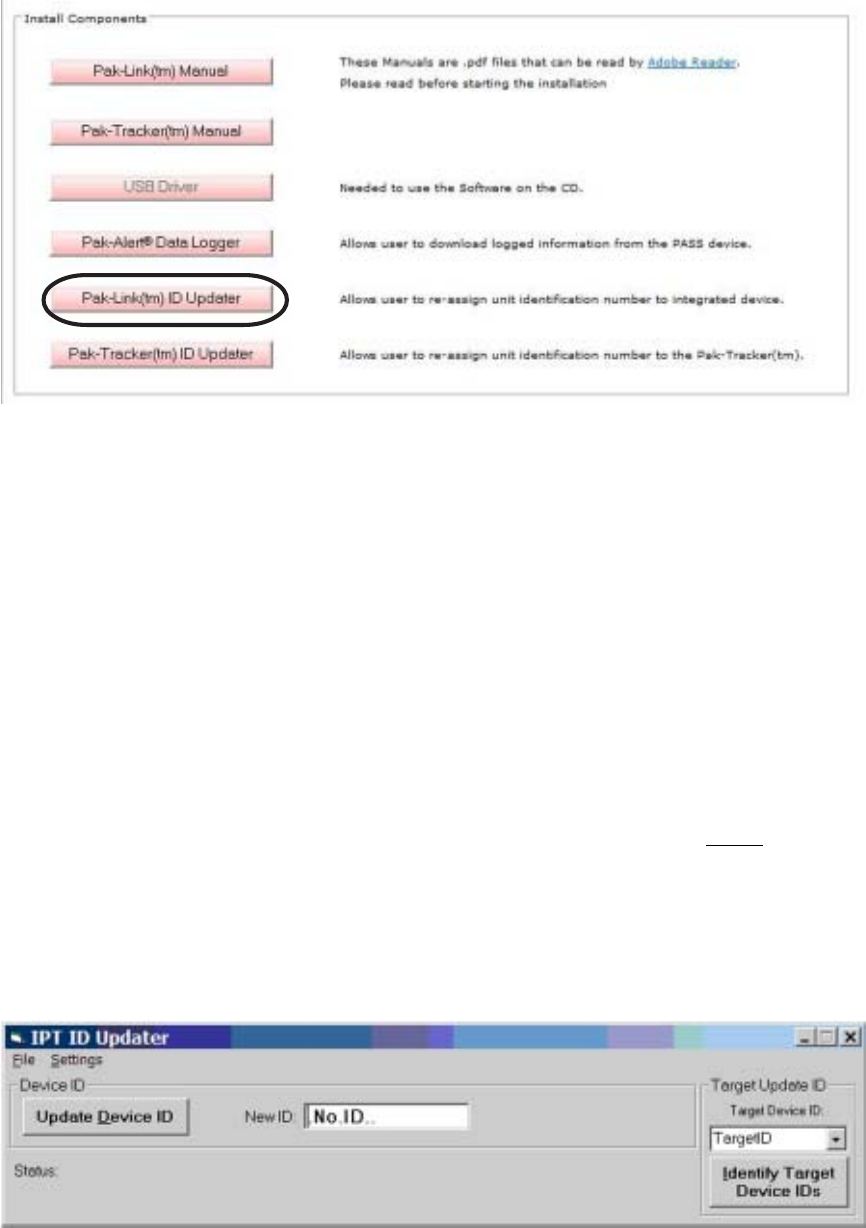
1. Select “Pak-Link ID Updater” to install the ID Updater for the PAK-ALERT Distress Alarm (either
a PAK-ALERT SE 7 Distress Alarm, or a SCOTT PAK-ALERT Distress Alarm equipped with the
PAK-TRACKER Locator System). Follow the instructions on the screen. You may need to close
all other applications to install this program. See FIGURE 13.
USING THE PAK-LINK ID UPDATER
TO UPDATE THE RESPIRATOR ID
1. To start the Pak-Link ID Updater software, go to the WINDOWS START Menu and select “All
Programs.” Look in the “Scott Health & Safety” program folder to find the shortcut to the “Pak-
Link ID Updater” program. See FIGURE 14.
FIGURE 14
FIGURE 13
2. When the installer creates a folder called “Scott Health & Safety” for the files, select “Continue.”
3. When the set up is completed successfully, select “OK.” You will return to the Installer screen.
4. When finished installing, close the Installer.
CREATING YOUR IDENTIFICATION PLAN
Each organization using this equipment must determine how to identify the respirators used by its
members. Every PASS device must have a distinct identification. Never give two different PASS
devices the same identification number. If two or more units have the same identification:
– When searching with a PAK-TRACKER Hand Held Unit, it will be difficult to distinguish which
unit is in alarm mode;
– If two units equipped with the data logging function have the same identification, it will be difficult
to distinguish which unit is in question when conducting an investigation.
For units equipped with the data logging function, SCOTT recommends that you perform a Data
Log download before you change the identification so that you have a record of the data log points
that occurred under the old identification.
Your organization must choose an identification plan that will give you the most information with the
least confusion. Establish the identification plan and train everyone involved before use of the
equipment in an actual event. Also consider coordinating with other organizations in your area for
mutual aid situations especially when using the PAK-TRACKER equipment.
Page 9 of 12 P/N 595123-01 Rev A 9/07
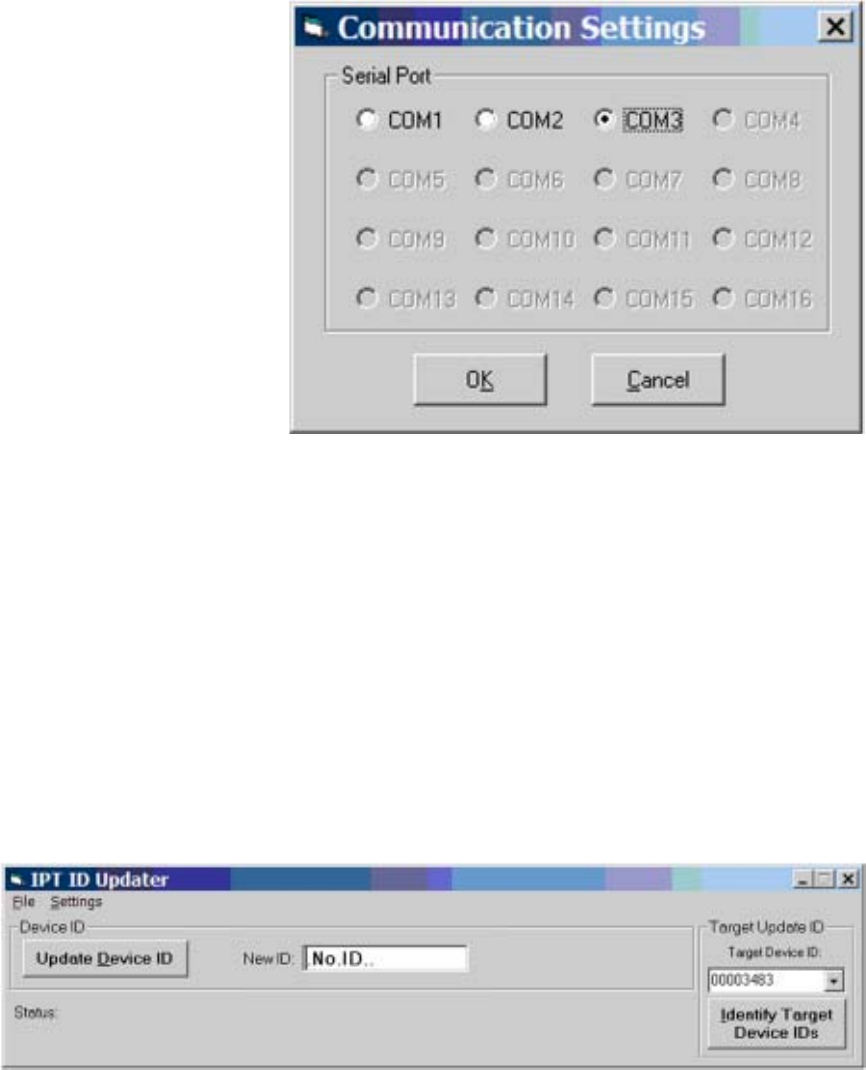
2. Select “Settings” and “COM Port Selection.” This will open a “Communications Settings” window.
Select the COM Port that was set in Installation. See FIGURE 15.
TO UPDATE THE ID OF A PROPERLY EQUIPPED SCOTT RESPIRATOR
1. Position the SCOTT respirator and the PAK-LINK Computer Interface conveniently close to you
and access to the computer. The PAK-LINK Computer Interface can communicate with an
activated PASS device as far as twenty feet away, so make sure no other units are being
activated in the immediate area.
2. Make sure the SCOTT respirator is OFF and that there is no residual air pressure in the system.
3. Verify that the batteries in the PASS device are good according to the instructions for the PASS
device.
4. On the Control Console on the respirator, press and hold the RESET button for approximately
eight (8) seconds. The lights on the Control Console will flash GREEN and then RED. When the
RED lights begin flashing alternately, the PASS Device is in Transmit Mode. You have
approximately thirty (30) seconds to complete the Update before the PASS Device times-out.
5. Select “Identify Target Device.” After a few seconds, the screen will display a list of the ID
numbers for all units that are in Transmit Mode in the immediate area. Select the ID number for
the unit you wish to Update. See FIGURE 16.
FIGURE 15
TO UPDATE THE RESPIRATOR ID
CONTINUED ON NEXT PAGE...
FIGURE 16
Page 10 of 12P/N 595123-01 Rev A 9/07
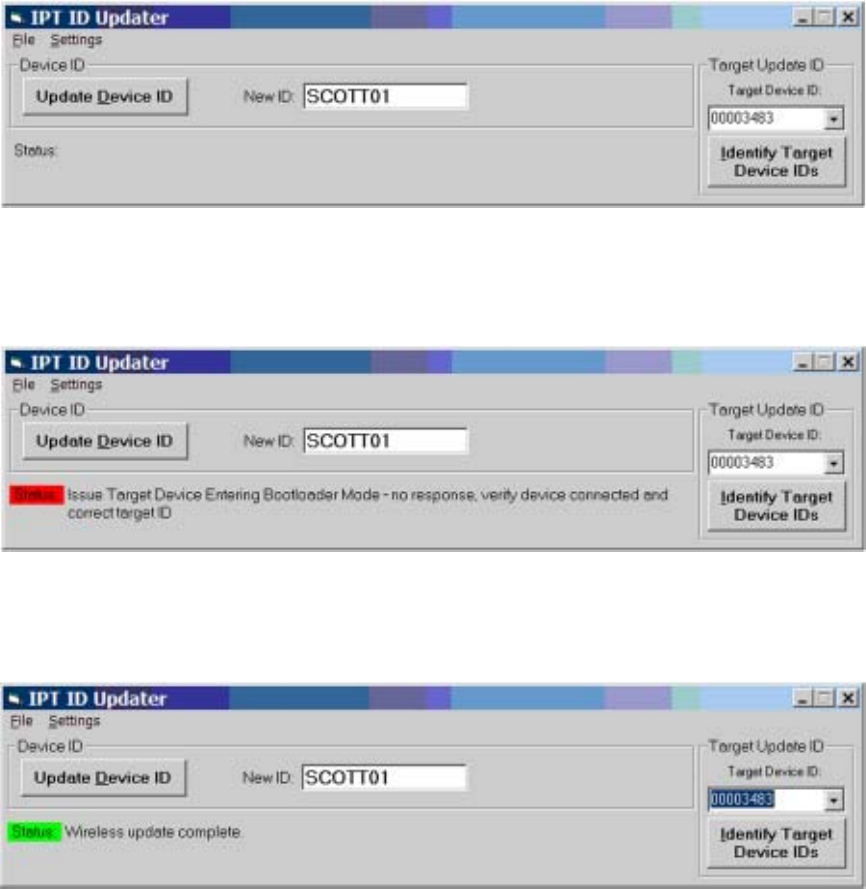
6. Type in the new ID. User any combination of numbers and letters (upper and lower case) up to
a maximum of eight (8) characters long. Click “Update Device ID.” See FIGURE 17. If you type
in too many characters, a RED Status screen will appear.
TO UPDATE THE RESPIRATOR ID CONTINUED...
7. If the PASS Device times-out, you will see the screen shown in FIGURE 18. Return to Step 3 to
reactivate the Transmit Mode and proceed as above.
8. When the Update is successful, you will see the screen shown in FIGURE 19.
9. After completing the ID update, double-click the RESET button on the Control Console to
deactivate the transmitter. NOTE
IF NO ACTION IS TAKEN FOR THIRTY SECONDS AFTER THE DOWNLOAD IS COMPLETE,
THE PAK-ALERT DISTRESS ALARM WILL TIME OUT AND DEACTIVATE ITSELF.
10. Mark the new ID number on a label somewhere on the SCOTT respirator in some indelible
manner.
11. To program another ID, you may activate and select another device for updating the ID as
described above.
12. To close down the SCOTT Pak-Link ID Updater software, click the “X” in the upper right hand
corner of the window.
FIGURE 19
FIGURE 17
FIGURE 18

Page 11 of 12 P/N 595123-01 Rev A 9/07
TESTING THE EQUIPMENT
Perform a REGULAR OPERATIONAL INSPECTION of the respirator before returning the SCOTT
SCBA to service.
If the SCBA is equipped with the SCOTT PAK-TRACKER Locator System, also test the operation of
the equipment according to the REGULAR OPERATIONAL INSPECTION section of the PAK-
TRACKER Locator System User Instructions, SCOTT P/N 595102-01.
CAUTION
THE INTERFACE UNIT GETS ITS POWER FROM THE USB PORT ON THE COMPUTER. WHEN USED
WITH A BATTERY POWERED LAP TOP COMPUTER, ALWAYS UNPLUG THE USB CABLE AFTER
USE TO PREVENT DRAINING THE POWER FROM THE BATTERY.

Page 12 of 12P/N 595123-01 Rev A 9/07
Health & Safety Products
Monroe Corporate Center
PO Box 569
Monroe, NC 28111
Telephone 1-800-247-7257
FAX (704) 291-8330
www.scotthealthsafety.com Printed in USA
Copyright © 2007, SCOTT, All Rights Reserved
SAFETY LISTINGS
FCC COMPLIANCE
FCC Compliance Statement (Part 15.19)
This device complies with Part 15 of the FCC Rules. Operation is subject to the following two
conditions:
1. This device may not cause harmful interference, and
2. This device must accept any interference received,
including interference that may cause undesired operation.
FCC Warning (Part 15.21)
Changes or modifications not expressly approved by the party responsible for compliance could
void the user’s authority to operate the equipment.
This portable transmitter with its antenna complies with FCC’s RF exposure limits for general popu-
lation / uncontrolled exposure.
The Locator Integrated Transmitter has been assigned FCC ID # T5E200673.
CLASS B DIGITAL DEVICE
Note: This equipment has been tested and found to comply with the limits for a Class B digital
device, pursuant to Part 15 of the FCC Rules. These limits are designed to provide reasonable
protection against harmful interference in a residential installation. This equipment generates, uses
and can radiate radio frequency energy and, if not installed and used in accordance with the instruc-
tions, may cause harmful interference to radio communications. However, there is no guarantee
that interference will not occur in a particular installation. If this equipment does cause harmful
interference to radio or television reception, which can be determined by turning the equipment off
and on, the user is encouraged to try to correct the interference by one or more of the following
measures:
– Reorient or relocate the receiving antenna
– Increase the separation between the equipment and receiver.
– Connect the equipment into an outlet on a circuit different from that to which the receiver is
connected.
– Consult the dealer or an experienced radio/TV technician for help.
QUESTIONS OR CONCERNS
If you have any questions or concerns regarding use of this equipment, contact your authorized
SCOTT dealer or distributor, or contact SCOTT at 1-800-247-7257 (or 704-291-8300 outside the
continental United States) or visit our web site at www.scotthealthsafety.com.
INDUSTRY CANADA COMPLIANCE
Industry Canada Statement
The term “IC” before the certification / registration number only signifies that the Industry Canada
technical specifications were met.
Section 14 of RSS-210
The installer of this radio equipment must ensure that the antenna is located or pointed such that it
does not emit RF field in excess of Health Canada limits for the general population. Consult Safety
Code 6, obtainable from Health Canada’s web site: www.hc-sc.gc.ca/rpb.
Operation is subject to the following two conditions:
1) this device may not cause interference, and
2) this device must accept any interference, including interference that may cause un-
desired operation of the device.