5LINX GM100N Dual-mode GSM/WiFi cellular phone User Manual
5LINX Enterprises, Inc. Dual-mode GSM/WiFi cellular phone
5LINX >
Contents
- 1. User Manual
- 2. user manual
user manual

GM100N
FCC RF Exposure Information and Statement
The SAR limit of USA (FCC) is 1.6 W/kg averaged over one gram of tissue.
Device types TV9 (FCC ID: YKMGM100N) has also been tested against this
SAR limit. The highest SAR value reported under this standard during product
certification for use at the ear is 0.859W/kg and when properly worn on the body
is 0.485W/kg. This device was tested for typical body-worn operations with the
back of the handset kept 1.5cm from the body. To maintain compliance with FCC
RF exposure requirements, use accessories that maintain a 1.5cm separation
distance between the user's body and the back of the handset. The use of belt
clips, holsters and similar accessories should not contain metallic components
in its assembly. The use of accessories that do not satisfy these requirements
may not comply with FCC RF exposure requirements, and should be avoided.
This device complies with part 15 of the FCC rules. Operation is subject to the
following two conditions: (1) this device may not cause harmful interference,
and (2) this device must accept any interference received, including
interference that may cause undesired operation.
NOTE: The manufacturer is not responsible for any radio or TV interference
caused by unauthorized modifications to this equipment. Such modifications
could void the user’s authority to operate the equipment.
NOTE: This equipment has been tested and found to comply with the limits for
a Class B digital device, pursuant to part 15 of the FCC Rules. These limits
are designed to provide reasonable protection against harmful interference in
a residential installation. This equipment generates uses and can radiate
radio frequency energy and, if not installed and used in accordance with the
instructions, may cause harmful interference to radio communications.
However, there is no guarantee that interference will not occur in a particular
installation.
If this equipment does cause harmful interference to radio or television
reception, which can be determined by turning the equipment off and on, the
user is encouraged to try to correct the interference by one or more of the
following measures:
- Reorient or relocate the receiving antenna.
- Increase the separation between the equipment and receiver.
-Connect the equipment into an outlet on a circuit different from that to which
the receiver is connected.
-Consult the dealer or an experienced radio/TV technician for help.

Chapter
Chapter
Chapter
Chapter 1
1
1
1
Getting
Getting
Getting
Getting Started
Started
Started
Started
1.1
1.1
1.1
1.1 Getting
Getting
Getting
Getting to
to
to
to Know
Know
Know
Know Your
Your
Your
Your Touch
Touch
Touch
Touch Phone
Phone
Phone
Phone and
and
and
and Accessories
Accessories
Accessories
Accessories
1.2
1.2
1.2
1.2 Installing
Installing
Installing
Installing the
the
the
the SIM
SIM
SIM
SIM Card,
Card,
Card,
Card, Battery,
Battery,
Battery,
Battery, and
and
and
and Storage
Storage
Storage
Storage Card
Card
Card
Card
1.3
1.3
1.3
1.3 Charging
Charging
Charging
Charging the
the
the
the battery
battery
battery
battery
1.4
1.4
1.4
1.4 Using
Using
Using
Using the
the
the
the Strap
Strap
Strap
Strap Holder
Holder
Holder
Holder
1.5
1.5
1.5
1.5 Starting
Starting
Starting
Starting Up
Up
Up
Up
1.6
1.6
1.6
1.6 Navigating
Navigating
Navigating
Navigating On
On
On
On Your
Your
Your
Your Device
Device
Device
Device
1.7
1.7
1.7
1.7 Home
Home
Home
Home Screen
Screen
Screen
Screen
1.8
1.8
1.8
1.8 Status
Status
Status
Status Icons
Icons
Icons
Icons
1.9
1.9
1.9
1.9 Start
Start
Start
Start Menu
Menu
Menu
Menu
1.1
1.1
1.1
1.1 0
0
0
0 When
When
When
When Connecting
Connecting
Connecting
Connecting Your
Your
Your
Your Device
Device
Device
Device to
to
to
to a
a
a
a Computer
Computer
Computer
Computer
1.1
1.1
1.1
1.1 Getting
Getting
Getting
Getting to
to
to
to Know
Know
Know
Know Your
Your
Your
Your Touch
Touch
Touch
Touch Phone
Phone
Phone
Phone and
and
and
and Accessories
Accessories
Accessories
Accessories
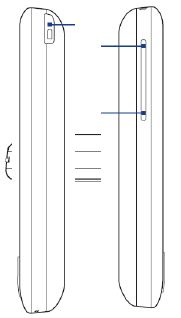
Top
Top
Top
Top panel
panel
panel
panel
POWER
POWER
POWER
POWER
Press to turn off the display temporarily. To turn off the power, press and hold
for about 5 seconds. For more information, see"Starting Up"in this chapter.
Left
Left
Left
Left panel
panel
panel
panel
VOLUME
VOLUME
VOLUME
VOLUME UP
UP
UP
UP
During a call or
when playing
music, press here to
increase the volume.
VOLUME
VOLUME
VOLUME
VOLUME DOWN
DOWN
DOWN
DOWN
During a call or when
playing music, press
here to lower the
volume.
Right
Right
Right
Right panel
panel
panel
panel
Stylus
Stylus
Stylus
Stylus
(See"Stylus"in this
chapter for details.)
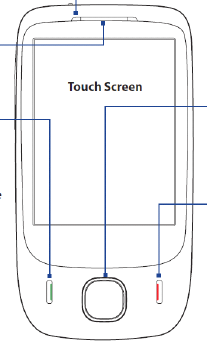
Front
Front
Front
Front panel
panel
panel
panel
Notification
Notification
Notification
Notification LED
LED
LED
LED
* See description below.
Earpiece
Earpiece
Earpiece
Earpiece
Listen to a phone call from
here.
TALK/SEND
TALK/SEND
TALK/SEND
TALK/SEND
•
•
•
•
Press to answer an
incoming call or dial a
number.
•
•
•
•
During a call, press
and hold to toggle the
speakerphone on and off.
•
•
•
•
Press and hold to use Voice
Commander. (See Chapter
12 for details.)
Touch
Touch
Touch
Touch Screen
Screen
Screen
Screen
4-WAY
4-WAY
4-WAY
4-WAY NAVIGATION
NAVIGATION
NAVIGATION
NAVIGATION
CONTROL
CONTROL
CONTROL
CONTROL with
with
with
with ENTER
ENTER
ENTER
ENTER
button
button
button
button
Press this multi-directional
control up, down, left, or
right to move through
menus and program
instructions; carry out the
selection by pressing the
center button.
END
END
END
END
•
•
•
•
Press to end a call or
return to the Home
screen.
•
•
•
•
Press and hold to lock
the device.
(To customize the
End key, tap Start
Start
Start
Start >
>
>
>
Settings
Settings
Settings
Settings >
>
>
> Personal
Personal
Personal
Personal
tab >
>
>
> Buttons
Buttons
Buttons
Buttons >
>
>
> End
End
End
End
Key
Key
Key
Key tab.
* Left LED shows:
•
Flashing green light when there are new SMS, MMS or e-mail messages, missed calls, or
reminders.
•
Solid green light when the device is connected to the power adapter or a computer and the
battery is fully charged.
•
Solid amber light when the battery is being charged.
•
Flashing amber light when the remaining battery level reaches below 10%.
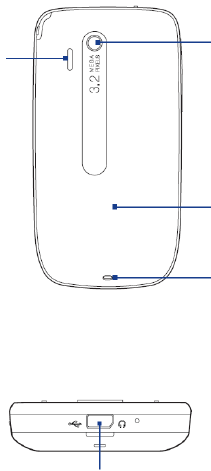
Back
Back
Back
Back panel
panel
panel
panel
Speaker
Speaker
Speaker
Speaker
3.2
3.2
3.2
3.2 Megapixel
Megapixel
Megapixel
Megapixel Camera
Camera
Camera
Camera
See "Taking Photos and
Videos"in Chapter 11
for details.
Back
Back
Back
Back Cover
Cover
Cover
Cover
Strap
Strap
Strap
Strap Holder
Holder
Holder
Holder
See"Using the Strap Holder"
in this chapter for details.
Bottom
Bottom
Bottom
Bottom panel
panel
panel
panel
Sync
Sync
Sync
Sync Connector/Earphone
Connector/Earphone
Connector/Earphone
Connector/Earphone Jack
Jack
Jack
Jack
•
•
•
•
Connect the supplied USB cable to synchronize information
or plug in the power adapter to recharge the battery.
•
•
•
•
Connect the supplied USB stereo headset for hands-free
conversation or for listening to audio media.
Accessories
Accessories
Accessories
Accessories
The product package includes the following items and accessories:
•
•
•
•
•
•
•
•
•
•
•
•
•
•
•
•
•
•
•
•
•
•
•
•
•
•
•
•
Battery
Power adapter
Screen protector
Stereo headset
USB sync cable
Quick Start Guide
1.2
1.2
1.2
1.2 Installing
Installing
Installing
Installing the
the
the
the SIM
SIM
SIM
SIM Card,
Card,
Card,
Card, Battery,
Battery,
Battery,
Battery, and
and
and
and Storage
Storage
Storage
Storage Card
Card
Card
Card
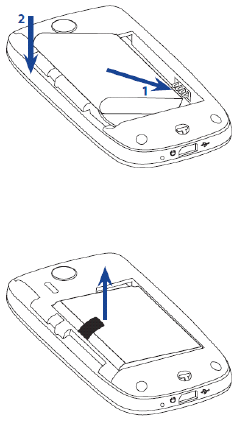
You need to remove the back cover before you can install the SIM card, battery and
storage card on your device. Also, make sure to always turn off the power before
installing or replacing the SIM card and battery.
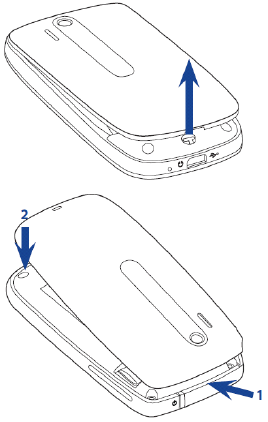
To
To
To
To remove
remove
remove
remove the
the
the
the back
back
back
back cover
cover
cover
cover
1.
1.
1.
1. Make sure your device is turned off.
2.
2.
2.
2. Hold the device securely with the
front facing down.
3.
3.
3.
3. With your thumb or finger, lift up
the bottom of the back cover.
To
To
To
To replace
replace
replace
replace the
the
the
the back
back
back
back cover
cover
cover
cover
1.
1.
1.
1. Secure the top part of the back
cover first by aligning into the two
openings located on the topmost
part of the back of the device.
2.
2.
2.
2. Press the bottom part of the back
cover down to lock the cover into
place. You will hear a click when the
back cover is locked in place.
2
2
2
2
1
1
1
1

SIM
SIM
SIM
SIM card
card
card
card
The SIM card contains your phone number, service details, and phonebook/
message memory. Your device supports both 1.8V and 3V SIM cards.
Note
Note
Note
Note
Some legacy SIM cards may not function with your device. You should consult with
your service provider for a replacement SIM card. There may be fees for this service.
Cut-off corner
To
To
To
To install
install
install
install the
the
the
the SIM
SIM
SIM
SIM card
card
card
card
1.
1.
1.
1. Make sure your device is turned off.
2.
2.
2.
2. Locate the SIM card slot, then
insert the SIM card with its gold
contacts facing down and its cut-
off corner facing in the card slot.
3.
3.
3.
3. Slide the SIM card completely into
the slot.
To
To
To
To remove
remove
remove
remove the
the
the
the SIM
SIM
SIM
SIM card
card
card
card
1.
1.
1.
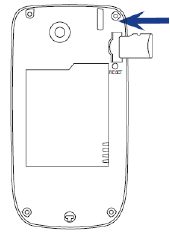
1. Remove the battery if it is installed.
2.
2.
2.
2. From the opening near the top
of the device, push the SIM card
partially out with the stylus.
3.
3.
3.
3. Slide the SIM card out the rest of
the way from the SIM card slot with
your thumb or finger.
Battery
Battery
Battery
Battery
Your device comes with a rechargeable Lithium-ion battery and is designed to use
only manufacturer-specified original batteries and accessories. Battery performance
depends on many factors, including network configuration, signal strength, the
features or settings used, the temperature of the environment and the way in which
you operate your device, and more.
Battery life estimates (approximations):
•
•
•
•
•
•
•
•
Note
Note
Note
Note
Standby time: Up to 365
365
365
365 hours for GSM
Talk time: Up to 400
400
400
400 minutes for GSM
Battery life is subject to network and phone usage.
Warning!
Warning!
Warning!
Warning!
To reduce risk of fire or burns:
•Do not attempt to open, disassemble, or service the battery pack.
•
Do not crush, puncture, short external contacts, or dispose of in fire or
water.
•
Do not expose to temperatures above 60
o
C (140
o
F).
•Replace only with the battery pack designated for this product.
•
Recycle or dispose of used battery as stipulated by local regulations.
To
To
To
To install
install
install
install the
the
the
the battery
battery
battery
battery
1.
1.
1.
1. Align the battery's exposed
copper contacts with the battery
connectors inside the battery
compartment.
2.
2.
2.
2. Insert the contacts side of the
battery first and then gently push
the battery into place.
3.
3.
3.
3. Replace the back cover.
2
2
2
2
1
1
1
1
To
To
To
To remove
remove
remove
remove the
the
the
the battery
battery
battery
battery
1.
1.
1.
1. Make sure your device is turned
off.
2.
2.
2.
2. Remove the back cover.
3.
3.
3.
3. Pull the ribbon strip upward to
release the battery.
Storage
Storage
Storage
Storage card
card
card
card
To have additional storage for your images, videos, music, and files, you can
purchase a microSD
™
card and install it into the your device.
To
To
To
To install
install
install
install a
a
a
a microSD
microSD
microSD
microSD card
card
card
card
1.
1.
1.
1. Remove the back cover,
2.
2.
2.
2. Insert the microSD card into the slot with its gold contacts facing down until
it clicks into place.
Note
Note
Note
Note
To remove the microSD card, press it to eject it from the slot.
1.3
1.3
1.3
1.3 Charging
Charging
Charging
Charging the
the
the
the battery
battery
battery
battery
New batteries are shipped partially charged. Before you start using your device, it is
recommended that you install and charge the battery. Some batteries perform best
after several full charge/discharge cycles.
To
To
To
To charge
charge
charge
charge the
the
the
the battery
battery
battery
battery
1.
1.
1.
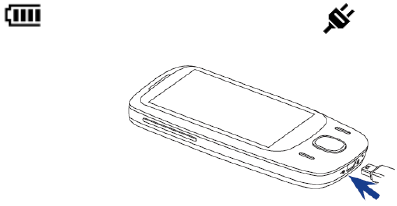
1. Connect the USB connector of the
AC adapter to the sync connector
on your device.
2.
2.
2.
2. Plug in the AC adapter to an
electrical outlet to start charging
the battery.
Note
Note
Note
Note
Only the AC adapter and USB sync cable provided with your device must be used to
charge the device.
As the battery is being charged while the power is on, a charging icon appears
in the title bar of the Home screen. After the battery has been fully charged, a full
battery icon appears in the title bar of the Home screen.
Depending on the battery charging status, a green or amber light also illuminates
on the LED above the touch screen. See"Front panel"earlier in this chapter for
details.
Warning!
Warning!
Warning!
Warning!
•
•
•
•
Do not remove the battery from the device while you are charging it using
the AC or car adapter.
•
•
•
•
As a safety precaution, the battery stops charging when it overheats.
1.5
1.5
1.5
1.5 Starting
Starting
Starting
Starting Up
Up
Up
Up
After installing your SIM card and battery and charging the battery, you can now
power on and start using your device.
Switch
Switch
Switch
Switch to
to
to
to Sleep
Sleep
Sleep
Sleep mode
mode
mode
mode when
when
when
when not
not
not
not in
in
in
in use
use
use
use
Press and immediately release the POWER button to turn off the display temporarily
and switch your device to Sleep
Sleep
Sleep
Sleep mode
mode
mode
mode . Sleep mode suspends your device to a low
power state while the display is off in order to save battery power.
Your device automatically goes into Sleep mode when you leave the device idle
after a certain period of time. You will still be able to receive messages and calls
while your device is in Sleep mode. Pressing the POWER button again or incoming
calls/messages will wake up your device.
Navigation Control
On the home screen and in many programs on your device, you can use the Navigation
Control to move through menus and instructions. Press the control up, down, left, and right
to move around the screen. When an item has been selected on the screen, press the ENTER
button (the center button) to confirm your selection.
1.7
1.7
1.7
1.7 Home
Home
Home
Home Screen
Screen
Screen
Screen
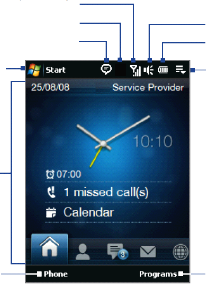
The main screen of the device which allows finger- touch access to program, calendar,
contacts, phone, Windows Media, setting, e-mail, Internet, and more.
Signal strength
Connection status
Notification
Start menu
Adjust volume
Battery status
Quick menu
TouchFLO
Home screen
Open the Phone screen
(See Chapter 2 for details)
Go to the Programs
Programs
Programs
Programs tab to
access favorite programs
1.8
1.8
1.8
1.8 Status
Status
Status
Status Icons
Icons
Icons
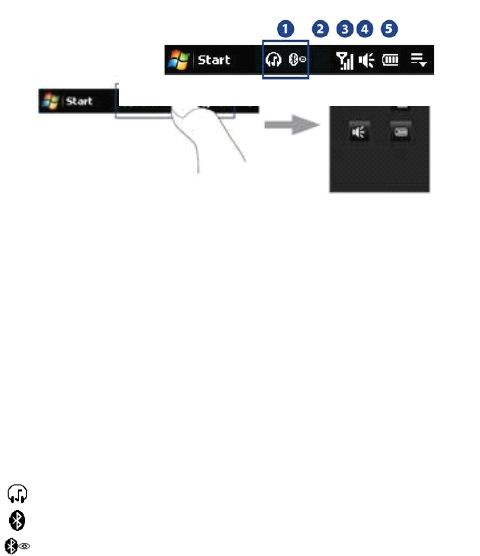
Icons
When you touch or tap the icon area of the title bar, the System Status screen opens
and displays larger status icons so you can touch them with your finger more easily
and accurately.
Tip
Tip
Tip
Tip
The System Status screen can be disabled in TouchFLO settings. See"Settings on your
Device"in Chapter 13 for details.
The following are some of the status icons that you may see on the device.
1
1
1
1 2
2
2
2 3
3
3
3 4
4
4
4 5
5
5
5
1
1
1
1
Icon
Icon
Icon
Icon Description
Description
Description
Description
Bluetooth stereo headset connected
Bluetooth on
Bluetooth visible mode on

Icon
Icon
Icon
Icon Description
Description
Description
Description
Connection Setup
Multiple notifications; tap the icon to view all
New text messages; SMS notification of voice mail
Sending MMS
Receiving MMS
MMS sent
Cannot send MMS
New incoming MMS
New Windows Live
™
message
Missed call
Speakerphone on
Roaming
Alarm
Other wireless network(s) detected
Wired headset connected

Description
Description
Description
Description
GPRS available
EDGE available
Icon
Icon
Icon
Icon Description
Description
Description
Description
Connected to a
wireless network
Connection is active
Connection is not
active
Synchronization in
progress
3
3
3
3
Icon
Icon
Icon
Icon Description
Description
Description
Description
GPRS connecting
GPRS in use
EDGE connecting
EDGE in use
Maximum signal strength
No signal

Icon
Icon
Icon
Icon Description
Description
Description
Description
Phone is turned off
No phone service
Searching for phone service
Voice call in progress
Call on hold
Calls are forwarded
Dialing while no SIM card is inserted
No SIM card inserted
4
4
4
4
Icon
Icon
Icon
Icon Description
Description
Description
Description
Vibrate mode
Sound on
Sound off
5
5
5
5
Icon
Icon
Icon
Icon Description
Description
Description
Description
Battery charging
Battery full
Battery low
Q uick men
1.9
1.9
1.9
1.9 Start
Start
Start
Start Menu
Menu
Menu
Menu
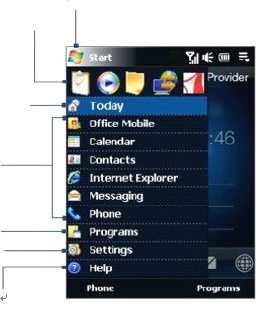
The Start menu, which can be opened from the top left corner of the screen, gives
you access to all the programs and settings of your Windows Mobile-powered
device. Touch or tap to select an item on the Start menu.
Open the Start menu.
Open a recently-used program.
View Help information for the
current screen.
Access more programs.
View and change settings.
1.1
1.1
1.1
1.1 0
0
0
0 When
When
When
When Connecting
Connecting
Connecting
Connecting Your
Your
Your
Your Device
Device
Device
Device to
to
to
to a
a
a
a Computer
Computer
Computer
Computer
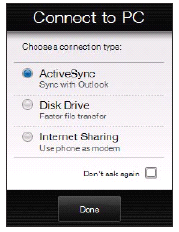
Whenever you connect your device to the computer with the USB cable, the
Connect to PC screen will be displayed and will prompt you to choose the type of
USB connection:
ActiveSync
ActiveSync
ActiveSync
ActiveSync
Select this mode when you need to do the following:
•
•
Synchronize Outlook e-mail messages, contacts, calendar appointments,
files, and other data between your device and your computer.
Have read and write access to the whole device.
Chapter
Chapter
Chapter
Chapter 2
2
2
2
Synchronizing
Synchronizing
Synchronizing
Synchronizing Information
Information
Information
Information
With
With
With
With Your
Your
Your
Your Computer
Computer
Computer
Computer
2
2
2
2 .1
.1
.1
.1 About
About
About
About Synchronization
Synchronization
Synchronization
Synchronization
2
2
2
2 .2
.2
.2
.2 Setting
Setting
Setting
Setting Up
Up
Up
Up Windows
Windows
Windows
Windows Mobile
Mobile
Mobile
Mobile ®
®
®
® Device
Device
Device
Device Center
Center
Center
Center
on
on
on
on Windows
Windows
Windows
Windows Vista
Vista
Vista
Vista ®
®
®
®
2
2
2
2 .3
.3
.3
.3 Setting
Setting
Setting
Setting Up
Up
Up
Up ActiveSync
ActiveSync
ActiveSync
ActiveSync ®
®
®
® on
on
on
on Windows
Windows
Windows
Windows XP
XP
XP
XP ®
®
®
®
2
2
2
2 .4
.4
.4
.4 Synchronizing
Synchronizing
Synchronizing
Synchronizing With
With
With
With Your
Your
Your
Your Computer
Computer
Computer
Computer
2
2
2
2 .5
.5
.5
.5 Synchronizing
Synchronizing
Synchronizing
Synchronizing via
via
via
via Bluetooth
Bluetooth
Bluetooth
Bluetooth
2
2
2
2 .6
.6
.6
.6 Synchronizing
Synchronizing
Synchronizing
Synchronizing Music
Music
Music
Music and
and
and
and Video
Video
Video
Video

2
2
2
2 .1
.1
.1
.1 About
About
About
About Synchronization
Synchronization
Synchronization
Synchronization
You can take information from your computer wherever you go by synchronizing
them to your device. The following types of information can be synchronized
between your computer and your device:
•
•
•
•
•
•
•
•
•
•
•
•
•
•
•
•
•
•
•
•
Microsoft
Microsoft
Microsoft
Microsoft ®Office
Office
Office
Office Outlook
Outlook
Outlook
Outlook ®information
information
information
information , which include Office Outlook e-
mail, contacts, calendar, tasks, and notes
Notes
Notes
Notes
Notes , which are created using Microsoft
Microsoft
Microsoft
Microsoft ®
®
®
® Office
Office
Office
Office OneNote
OneNote
OneNote
OneNote ®
®
®
® 2007
2007
2007
2007
Media
Media
Media
Media , such as pictures, music, and video
Favorites
Favorites
Favorites
Favorites , which are the bookmarked links to your favorite web sites
Files
Files
Files
Files , such as documents and other files
Before you can synchronize, you need to install and set up first the synchronization
software on your computer. For more information, see"Setting Up Windows Mobile
Device Center on Windows Vista ® "and"Setting Up ActiveSync ® on Windows XP ® "in
this chapter.
Note
Note
Note
Note
ActiveSync or Windows Mobile Device Center only synchronises data on your
computer and device. If you have installed a storage card and you want to back up
files from the storage card, use Windows Explorer on your computer to copy files from
the storage card to your computer.
Ways
Ways
Ways
Ways to
to
to
to synchronize
synchronize
synchronize
synchronize
After you have installed the synchronization software on your computer, connect
and synchronize your device with your computer by:
•
•
•
•
•
•
•
•
Using the supplied USB sync cable.
Upon connecting the sync cable to your device and your computer, the
synchronization process automatically starts.
Using Bluetooth.
You must first set up a Bluetooth partnership between your device and your
computer before you can synchronize information between them using

Bluetooth. For more information about setting up a Bluetooth partnership,
see Chapter 9. For information about synchronizing through Bluetooth, see
"Synchronizing via Bluetooth"later in this chapter.
Try to synchronize regularly in order to keep information up-to-date in both your
device and your computer.
Notes
Notes
Notes
Notes
•
•
•
•You can also synchronize Outlook e-mail, contacts, calendar, and tasks on your
device with the Exchange Server at your work. For more information about setting
up your device to synchronize with the Exchange Server, see Chapter 7.
•
•
•
•
If you are sending your device for repair or performing a hard reset, data from your
device will be lost. It is recommended that you sync your device to your computer
to back up your files. To back up files from the storage card to your computer, use
Windows Explorer to copy files from the storage card to the computer.
2
2
2
2 .2
.2
.2
.2 Setting
Setting
Setting
Setting Up
Up
Up
Up Windows
Windows
Windows
Windows Mobile
Mobile
Mobile
Mobile ®
®
®
® Device
Device
Device
Device Center
Center
Center
Center on
on
on
on
Windows
Windows
Windows
Windows Vista
Vista
Vista
Vista ®
®
®
®
Microsoft
Microsoft
Microsoft
Microsoft Windows
Windows
Windows
Windows Mobile
Mobile
Mobile
Mobile ®Device
Device
Device
Device Center
Center
Center
Center is the replacement for Microsoft ®
ActiveSync ® on Windows Vista ® .
Note
Note
Note
Note
Some versions of Windows Vista ® come with Windows Mobile Device Center already
installed. If Windows Mobile Device Center is not available on your Windows Vista ® ,
you can install it from the Getting Started Disc that came with your device.
Set
Set
Set
Set up
up
up
up synchronization
synchronization
synchronization
synchronization in
in
in
in Windows
Windows
Windows
Windows Mobile
Mobile
Mobile
Mobile Device
Device
Device
Device Center
Center
Center
Center
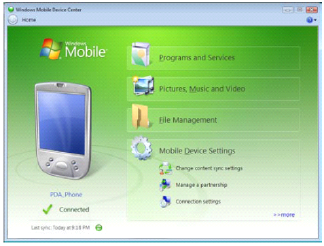
When you connect your device to your computer and start Windows Mobile Device
Center for the first time, you are asked to create a Windows Mobile partnership with
your device. To create a partnership:
1.
1.
1.
1. Connect your device to your computer. Windows Mobile Device Center
configures itself, then opens.
2.
2.
2.
2. On the license agreement screen, click Accept
Accept
Accept
Accept .
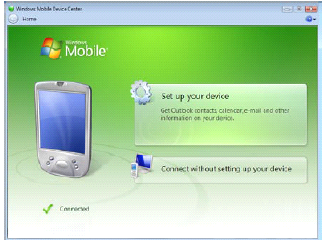
3.
3.
3.
3. On the Windows Mobile Device Center's Home screen, click Set
Set
Set
Set up
up
up
up your
your
your
your
device
device
device
device .
Note
Note
Note
Note Choose Connect
Connect
Connect
Connect without
without
without
without setting
setting
setting
setting up
up
up
up your
your
your
your device
device
device
device if you only want to transfer
media files, check for updates, and explore your device but not synchronize
Outlook information.
4.
4.
4.
4. Select the items you want to synchronize, then click Next
Next
Next
Next .
5.
5.
5.
5. Enter a device name, then click Set
Set
Set
Set Up
Up
Up
Up .
When you finish the setup wizard, Windows Mobile Device Center synchronizes
your device automatically. Notice that Outlook e-mails and other information
appear on your device after synchronization.
Use
Use
Use
Use Windows
Windows
Windows
Windows Mobile
Mobile
Mobile
Mobile Device
Device
Device
Device Center
Center
Center
Center
To open Windows Mobile Device Center, click Start
Start
Start
Start >
>
>
> All
All
All
All Programs
Programs
Programs
Programs >
>
>
> Windows
Windows
Windows
Windows
Mobile
Mobile
Mobile
Mobile Device
Device
Device
Device Center
Center
Center
Center on your Windows Vista computer.
On Windows Mobile Device Center, you can do the following:
•
•
•
•
•
•
•
•
•
•
•
•
•
•
•
•
Note
Note
Note
Note
Click Mobile
Mobile
Mobile
Mobile Device
Device
Device
Device Settings
Settings
Settings
Settings to change synchronization settings.
When you click Pictures,
Pictures,
Pictures,
Pictures, Music
Music
Music
Music and
and
and
and Video
Video
Video
Video >
>
>
> XX
XX
XX
XX new
new
new
new pictures/video
pictures/video
pictures/video
pictures/video clips
clips
clips
clips
are
are
are
are available
available
available
available for
for
for
for import
import
import
import , a wizard guides you to tag and transfer photos
from your device to the Photo Gallery on your computer.
Click Pictures,
Pictures,
Pictures,
Pictures, Music
Music
Music
Music and
and
and
and Video
Video
Video
Video >
>
>
> Add
Add
Add
Add media
media
media
media to
to
to
to your
your
your
your device
device
device
device from
from
from
from
Windows
Windows
Windows
Windows Media
Media
Media
Media Player
Player
Player
Player to synchronize music and video files using Windows
Media ® Player. For more information, see"Using Windows Media ® Player
Mobile"in Chapter 11.
Click File
File
File
File Management
Management
Management
Management >
>
>
> Browse
Browse
Browse
Browse the
the
the
the contents
contents
contents
contents of
of
of
of your
your
your
your device
device
device
device to view
documents and files on your device.
See Windows Mobile Device Center Help for more information.

2
2
2
2 .3
.3
.3
.3 Setting
Setting
Setting
Setting Up
Up
Up
Up ActiveSync
ActiveSync
ActiveSync
ActiveSync ®
®
®
® on
on
on
on Windows
Windows
Windows
Windows XP
XP
XP
XP ®
®
®
®
The Getting Started disc that comes with your device contains Microsoft ActiveSync
4.5 or later. Follow the steps in this section to install and set up ActiveSync on
Windows XP or other compatible Windows systems.
Note
Note
Note
Note
For a list of compatible Windows systems, go to
http://www.microsoft.com/windowsmobile/activesync/activesync45.mspx.
Install
Install
Install
Install ActiveSync
ActiveSync
ActiveSync
ActiveSync
1.
1.
1.
1. Place the Getting Started disc to the disc drive of your computer.
2.
2.
2.
2. Click Setup
Setup
Setup
Setup and
and
and
and Installation
Installation
Installation
Installation .
3.
3.
3.
3. Select the ActiveSync
ActiveSync
ActiveSync
ActiveSync check box, then click Install
Install
Install
Install .
4.
4.
4.
4. Read the license terms, then click Accept
Accept
Accept
Accept .
5.
5.
5.
5. When installation is completed, click Done
Done
Done
Done .
6.
6.
6.
6. On the Getting Started with Windows Mobile screen, click Close
Close
Close
Close .
Set
Set
Set
Set up
up
up
up synchronization
synchronization
synchronization
synchronization in
in
in
in ActiveSync
ActiveSync
ActiveSync
ActiveSync
1.
1.
1.
1. Connect your device to your computer. The Synchronization Setup Wizard
automatically starts and guides you to create a synchronization partnership.
Click Next
Next
Next
Next to proceed.
2.
2.
2.
2. To synchronize your device with your computer, clear the Synchronize
Synchronize
Synchronize
Synchronize
directly
directly
directly
directly with
with
with
with a
a
a
a server
server
server
server running
running
running
running Microsoft
Microsoft
Microsoft
Microsoft Exchange
Exchange
Exchange
Exchange check box, then click
Next
Next
Next
Next .
3.
3.
3.
3. Select the information types that you want to synchronize, then click Next
Next
Next
Next .
4.
4.
4.
4. Select or clear the Allow
Allow
Allow
Allow wireless
wireless
wireless
wireless data
data
data
data connections
connections
connections
connections check box according to
your preference.
5.
5.
5.
5. Click Finish
Finish
Finish
Finish .

When you finish the wizard, ActiveSync synchronizes your device automatically.
Notice that Outlook e-mails and other information appear on your device after
synchronization.
2
2
2
2 .4
.4
.4
.4 Synchronizing
Synchronizing
Synchronizing
Synchronizing With
With
With
With Your
Your
Your
Your Computer
Computer
Computer
Computer
Connect and synchronize your device with your computer using the USB cable or
Bluetooth connection.
Start
Start
Start
Start and
and
and
and stop
stop
stop
stop synchronization
synchronization
synchronization
synchronization
You can manually synchronize either from your device or computer.
From
From
From
From your
your
your
your device
device
device
device
•
•
•
•
•
•
•
•
Tip
Tip
Tip
Tip
On the TouchFLO Home screen, slide to the Settings
Settings
Settings
Settings tab and then touch Sync
Sync
Sync
Sync
Data
Data
Data
Data ; or
Tap Start
Start
Start
Start >
>
>
> Programs
Programs
Programs
Programs >
>
>
> ActiveSync
ActiveSync
ActiveSync
ActiveSync , then tap Sync
Sync
Sync
Sync . To end synchronization
before it completes, tap Stop
Stop
Stop
Stop .
To delete a partnership with one computer completely, disconnect your device
from that computer first. In ActiveSync on your device, tap Menu
Menu
Menu
Menu >
>
>
> Options
Options
Options
Options , tap the
computer name, then tap Delete
Delete
Delete
Delete .
From
From
From
From Windows
Windows
Windows
Windows Mobile
Mobile
Mobile
Mobile Device
Device
Device
Device Center
Center
Center
Center
1.
1.
1.
1. Click Start
Start
Start
Start >
>
>
> All
All
All
All Programs
Programs
Programs
Programs >
>
>
> Windows
Windows
Windows
Windows Mobile
Mobile
Mobile
Mobile Device
Device
Device
Device Center
Center
Center
Center .
2.
2.
2.
2. Click at the lower left of the Windows Mobile Device Center.
To end synchronization before it completes, click
From
From
From
From ActiveSync
ActiveSync
ActiveSync
ActiveSync on
on
on
on your
your
your
your computer
computer
computer
computer
.
When you connect your device to your computer, ActiveSync automatically opens
on your computer and synchronizes.
•
•
•
•
•
•
•
•
To manually start synchronization, click .
To end synchronization before it completes, click .

Change
Change
Change
Change which
which
which
which information
information
information
information is
is
is
is synchronized
synchronized
synchronized
synchronized
You can change the information types and the amount of information to
synchronize for each type either on your device or your computer. Follow the steps
below to change synchronization settings on your device.
Note
Note
Note
Note
Before changing synchronization settings on your device, disconnect it from your
computer.
1.
1.
1.
1. In ActiveSync on your device, tap Menu
Menu
Menu
Menu >
>
>
> Options
Options
Options
Options .
2.
2.
2.
2. Select the check box for any items you want to synchronize. If you cannot
select a check box, you might have to clear the check box for the same
information type elsewhere in the list.
3.
3.
3.
3. To change synchronization settings for an information type, for instance, E-
E-
E-
E-
mail
mail
mail
mail , select it and tap Settings
Settings
Settings
Settings .
You can then set the download size limit, specify the time period of
information to download, and more.
Notes
Notes
Notes
Notes
•
•
•
•
Some information types such as Favorites, Files and Media cannot be selected in
ActiveSync Options on your device. You can only select or clear these items from
your computer's Windows Mobile Device Center or ActiveSync.
•
•
•
•
A computer can have sync partnerships with many different Windows Mobile
powered devices, but a device can have sync partnerships with at most two
computers. To ensure that your device will synchronize properly with both
computers, set up the second computer using the same synchronization settings
you used on the first computer.
•
•
•
•
Outlook e-mail can be synchronized with only one computer.

Troubleshoot
Troubleshoot
Troubleshoot
Troubleshoot sync
sync
sync
sync connection
connection
connection
connection problem
problem
problem
problem
In some cases, when the computer connects to the Internet or a local network, it
may disconnect the connection with your device in favor of the Internet or network
connection.
If this happens, tap Start
Start
Start
Start >
>
>
> Settings
Settings
Settings
Settings >
>
>
> Connections
Connections
Connections
Connections tab >
>
>
> USB
USB
USB
USB to
to
to
to PC
PC
PC
PC , then clear the
Enable
Enable
Enable
Enable advanced
advanced
advanced
advanced network
network
network
network functionality
functionality
functionality
functionality check box. This makes your computer
utilize a serial USB connection with your device.
2
2
2
2 .5
.5
.5
.5 Synchronizing
Synchronizing
Synchronizing
Synchronizing via
via
via
via Bluetooth
Bluetooth
Bluetooth
Bluetooth
You can connect and synchronize your device with the computer using Bluetooth.
Note
Note
Note
Note
To connect and synchronize your device with a computer via Bluetooth, your
computer must have a built-in Bluetooth or installed with a Bluetooth adapter or
dongle.
To
To
To
To synchronize
synchronize
synchronize
synchronize with
with
with
with a
a
a
a computer
computer
computer
computer via
via
via
via Bluetooth
Bluetooth
Bluetooth
Bluetooth
1.
1.
1.
1. Set up Windows Mobile Device Center or ActiveSync on your computer to
synchronize through Bluetooth. See the program's Help for instructions.
2.
2.
2.
2. Make sure that Bluetooth on both your device and the computer are turned
on and set to visible mode. See"Bluetooth Modes"in Chapter 9 for details.
If this is the first time you have connected to this computer via Bluetooth,
you must first complete the Bluetooth wizard on your device and set
up a Bluetooth partnership between your device and the computer. For
more information about creating a Bluetooth partnership, see"Bluetooth
Partnerships"in Chapter 9.
3.
3.
3.
3. On your device, tap Start
Start
Start
Start >
>
>
> Programs
Programs
Programs
Programs >
>
>
> ActiveSync
ActiveSync
ActiveSync
ActiveSync .
4.
4.
4.
4. Tap Menu
Menu
Menu
Menu >
>
>
> Connect
Connect
Connect
Connect via
via
via
via Bluetooth
Bluetooth
Bluetooth
Bluetooth .
Note
Note
Note
Note To conserve battery power, turn off Bluetooth when not in use.

2
2
2
2 .6
.6
.6
.6 Synchronizing
Synchronizing
Synchronizing
Synchronizing Music
Music
Music
Music and
and
and
and Video
Video
Video
Video
If you want to carry your music or other digital media along with you while you
travel, set up Windows Media ® Player on your computer to synchronize music and
video with your device.
Other than selecting the Media
Media
Media
Media information type to be synchronized, all media
synchronization settings must be set in Windows Media ® Player. Before media can
be synchronized, you must do the following:
•
•
•
•
•
•
•
•
•
•
•
•
Install Windows Media ® Player Version 11 on your computer. (Windows
Media ® Player 11 works only in Windows XP or later versions).
Connect your device to the computer with a USB cable. If your device is
currently connected using Bluetooth, you must end that connection before
media can be synchronized.
Set up a sync partnership between your device and your computer's Windows
Media ® Player.
For more information about using Windows Media ® Player Mobile, see Chapter 11.
Chapter
Chapter
Chapter
Chapter 3
3
3
3
Exchanging
Exchanging
Exchanging
Exchanging Messages
Messages
Messages
Messages
3
3
3
3 .1
.1
.1
.1 Messaging
Messaging
Messaging
Messaging
3
3
3
3 .2
.2
.2
.2 Text
Text
Text
Text Messages
Messages
Messages
Messages
3
3
3
3 .3
.3
.3
.3 MMS
MMS
MMS
MMS
3
3
3
3 .4
.4
.4
.4 Types
Types
Types
Types of
of
of
of E-mail
E-mail
E-mail
E-mail Accounts
Accounts
Accounts
Accounts
3
3
3
3 .
.
.
. 5
5
5
5 Using
Using
Using
Using E-mail
E-mail
E-mail
E-mail
3
3
3
3 .1
.1
.1
.1 Messaging
Messaging
Messaging
Messaging
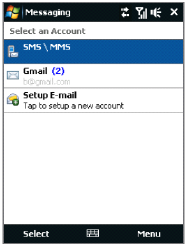
Messaging
Messaging
Messaging
Messaging is a central location where you will find all types of messaging accounts,
which include text messages (SMS), multimedia messages (MMS), and e-mail
accounts.
To
To
To
To select
select
select
select a
a
a
a messaging
messaging
messaging
messaging account
account
account
account
Do one of the following:
•
•
•
•
On the Home screen, slide to the
Mail
Mail
Mail
Mail tab and then touch Menu
Menu
Menu
Menu >
>
>
> Accounts
Accounts
Accounts
Accounts >
>
>
>
Accounts
Accounts
Accounts
Accounts . The Account Picker screen then opens
where you can select an account.
Tip
Tip
Tip
Tip You can also tap Start
Start
Start
Start >
>
>
> Messaging
Messaging
Messaging
Messaging to access
the Account Picker screen.
•
•
•
•
While you are in a message list of a certain
account, for example SMS \ MMS, tap Menu
Menu
Menu
Menu >
>
>
>
Go
Go
Go
Go To
To
To
To to switch to other types of messaging
accounts.
Account Picker screen
To
To
To
To configure
configure
configure
configure message
message
message
message account
account
account
account settings
settings
settings
settings
•
•
•
•
•
•
•
•
Tap Menu
Menu
Menu
Menu >
>
>
> Options
Options
Options
Options on the Account Picker screen; or
Tap Menu
Menu
Menu
Menu >
>
>
> Tools
Tools
Tools
Tools >
>
>
> Options
Options
Options
Options while you're in a message list.
To
To
To
To automatically
automatically
automatically
automatically add
add
add
add a
a
a
a signature
signature
signature
signature in
in
in
in outgoing
outgoing
outgoing
outgoing messages
messages
messages
messages
You can automatically add your name and other information as your signature in
outgoing SMS, MMS, and e-mail messages:
Note
Note
Note
Note You need to specify your signature for each type of messaging account.
1.
1.
1.
1. Tap Start
Start
Start
Start >
>
>
> Messaging
Messaging
Messaging
Messaging , then tap Menu
Menu
Menu
Menu >
>
>
> Options
Options
Options
Options .
2.
2.
2.
2. Tap Signatures
Signatures
Signatures
Signatures .
3.
3.
3.
3. Select a messaging account in which to add a signature.

4.
4.
4.
4. Select the Use
Use
Use
Use signature
signature
signature
signature with
with
with
with this
this
this
this account
account
account
account check box.
5.
5.
5.
5. In the provided text box, enter the information that will be displayed as your
signature.
6.
6.
6.
6. If you want the signature to be added whenever you reply or forward
messages, select the Use
Use
Use
Use when
when
when
when replying
replying
replying
replying and
and
and
and forwarding
forwarding
forwarding
forwarding check box, then
tap OK
OK
OK
OK .
7.
7.
7.
7. Repeat the steps to add a signature to other messaging accounts.
3
3
3
3 .2
.2
.2
.2 Text
Text
Text
Text Messages
Messages
Messages
Messages
Send short text messages (SMS) to other mobile phones. SMS messages have a
160-character limit. If you continue to enter text after the limit is reached, the text
message will be delivered to your recipients in two or more separate messages.
These are called concatenated SMS messages. If your recipient's mobile phone
supports concatenated messages, they will receive your complete SMS message at
one time.
Create
Create
Create
Create a
a
a
a new
new
new
new text
text
text
text message
message
message
message
Depending on your preference, there are a number of alternative ways you can
create a new text message.
From
From
From
From the
the
the
the TouchFLO
TouchFLO
TouchFLO
TouchFLO Home
Home
Home
Home screen
screen
screen
screen
1.
1.
1.
1. On the Home screen, slide to the Messages
Messages
Messages
Messages tab.
2.
2.
2.
2. Touch the New
New
New
New icon ( ) on the upper right side of the screen.
Tip
Tip
Tip
Tip
To send a text message to a favorite contact, first select the photo of the desired
contact in the People
People
People
People tab to open his or her contact card and then touch Send
Send
Send
Send text
text
text
text
message
message
message
message . For more information about working with favorite contacts, see"People"in
Chapter 3.

From
From
From
From the
the
the
the Account
Account
Account
Account Picker
Picker
Picker
Picker screen
screen
screen
screen
1.
1.
1.
1. Tap Start
Start
Start
Start >
>
>
> Messaging
Messaging
Messaging
Messaging >
>
>
> SMS
SMS
SMS
SMS \
\
\
\ MMS
MMS
MMS
MMS .
2.
2.
2.
2. Tap Menu
Menu
Menu
Menu >
>
>
> New
New
New
New >
>
>
> SMS
SMS
SMS
SMS .
From
From
From
From the
the
the
the Contacts
Contacts
Contacts
Contacts screen
screen
screen
screen
1.
1.
1.
1. Tap Start
Start
Start
Start >
>
>
> Contacts
Contacts
Contacts
Contacts .
2.
2.
2.
2. Tap the contact's name to open his or her contact card.
3.
3.
3.
3. Touch Send
Send
Send
Send text
text
text
text message
message
message
message .
Compose
Compose
Compose
Compose and
and
and
and send
send
send
send a
a
a
a text
text
text
text message
message
message
message
After creating a new text message, follow the steps below to enter your message
and then send it.
1.
1.
1.
1. To add recipients, enter their mobile phone numbers in the To
To
To
To field, separating
them with a semicolon. You can also tap To
To
To
To or tap Menu
Menu
Menu
Menu >
>
>
> Add
Add
Add
Add Recipient
Recipient
Recipient
Recipient to
add mobile phone numbers from Contacts.
2.
2.
2.
2. Enter your message.
Tip
Tip
Tip
Tip To choose from preset messages, tap Menu
Menu
Menu
Menu >
>
>
> My
My
My
My Text
Text
Text
Text and tap a desired
message. To check the spelling, tap Menu
Menu
Menu
Menu >
>
>
> Spell
Spell
Spell
Spell Check
Check
Check
Check .
3.
3.
3.
3. Tap Send
Send
Send
Send .

Text messages that are sent to and received from a contact (or number) are
Manage
Manage
Manage
Manage text
text
text
text messages
messages
messages
messages
grouped as a single thread in your inbox. Threaded SMS lets you see exchanged
messages (similar to a chat program) with a contact on the screen.
To
To
To
To reply
reply
reply
reply to
to
to
to a
a
a
a text
text
text
text message
message
message
message
1.
1.
1.
1. In the SMS \ MMS inbox, tap a message thread to open it.
2.
2.
2.
2. At the bottom of the screen, type your reply message and then tap Send
Send
Send
Send .
Enter your reply
message here

To
To
To
To copy
copy
copy
copy a
a
a
a message
message
message
message in
in
in
in the
the
the
the thread
thread
thread
thread to
to
to
to the
the
the
the SIM
SIM
SIM
SIM card
card
card
card
1.
1.
1.
1. In the SMS \ MMS inbox, tap the message to open it.
2.
2.
2.
2. Use the Navigation Up or Down control to select a message in the thread that
you want to copy to the SIM card.
Note
Note
Note
Note You cannot copy a sent message from the thread to the SIM card.
3.
3.
3.
3. Tap Menu
Menu
Menu
Menu >
>
>
> Copy
Copy
Copy
Copy to
to
to
to SIM
SIM
SIM
SIM .
To
To
To
To copy
copy
copy
copy a
a
a
a text
text
text
text message
message
message
message from
from
from
from the
the
the
the SIM
SIM
SIM
SIM card
card
card
card to
to
to
to the
the
the
the device
device
device
device
1.
1.
1.
1. In the SMS \ MMS inbox, select the SIM message you want to copy.
2.
2.
2.
2. Tap Menu
Menu
Menu
Menu >
>
>
> Copy
Copy
Copy
Copy to
to
to
to Phone
Phone
Phone
Phone .
Note
Note
Note
Note
Copying SIM text messages to your device results in duplicate messages in the Inbox
folder when your SIM card is in use.
To
To
To
To delete
delete
delete
delete a
a
a
a message
message
message
message in
in
in
in the
the
the
the thread
thread
thread
thread
1.
1.
1.
1. In the SMS \ MMS inbox, tap a message thread to open it.
2.
2.
2.
2. Use the Navigation Up or Down control to select a message in the thread that
you want to delete.
3.
3.
3.
3. Tap Menu
Menu
Menu
Menu >
>
>
> Delete
Delete
Delete
Delete .
To
To
To
To delete
delete
delete
delete all
all
all
all messages
messages
messages
messages in
in
in
in a
a
a
a thread
thread
thread
thread
1.
1.
1.
1. In the SMS \ MMS inbox, select a message thread using the Navigation Up or
Down control.
2.
2.
2.
2. Tap Delete
Delete
Delete
Delete .
To
To
To
To reply
reply
reply
reply to
to
to
to a
a
a
a text
text
text
text message
message
message
message with
with
with
with an
an
an
an MMS
MMS
MMS
MMS message
message
message
message
You can reply to a text message in a thread or to a SIM text message using an MMS
message.
1.
1.
1.
1. In the SMS \ MMS inbox, tap a message thread to open it.
2.
2.
2.
2. Tap Menu
Menu
Menu
Menu >
>
>
> Insert
Insert
Insert
Insert , and then in the menu, select the item you want to insert:
Picture/Video
Picture/Video
Picture/Video
Picture/Video ,Audio
Audio
Audio
Audio or Attachment
Attachment
Attachment
Attachment .

Tip
Tip
Tip
Tip
Tap Menu
Menu
Menu
Menu >
>
>
> Advanced
Advanced
Advanced
Advanced Composer
Composer
Composer
Composer after adding a picture/video, audio, or
attachment to compose an MMS message complete with text, emoticons, media
and attachments.
3.
3.
3.
3. Tap Send
Send
Send
Send .
Tip
Tip
Tip
Tip You can also insert a vCard or vCalendar in your MMS message.
3
3
3
3 .3
.3
.3
.3 MMS
MMS
MMS
MMS
Sending multimedia messages (MMS) to your friends and family is fun and easy. You
can include pictures, videos, and audio clips in a multimedia message.
Notes
Notes
Notes
Notes
•
•
•
•
Multimedia messaging is a charged service and has to be provisioned on your
mobile phone account. Contact your wireless service provider to have MMS
provisioned as part of your calling plan.
•
•
•
•Make sure the size of MMS messages that you send is within the limits allowed by
your wireless service provider.
Change
Change
Change
Change MMS
MMS
MMS
MMS settings
settings
settings
settings
Check your device to see if it is preconfigured with your wireless service provider's
MMS settings. Add the MMS settings of your wireless service provider if there are no
preset MMS settings found on your device.
To
To
To
To configure
configure
configure
configure MMS
MMS
MMS
MMS message
message
message
message settings
settings
settings
settings
1.
1.
1.
1. Tap Start
Start
Start
Start >
>
>
> Messaging
Messaging
Messaging
Messaging >
>
>
> SMS
SMS
SMS
SMS \
\
\
\ MMS
MMS
MMS
MMS .
2.
2.
2.
2. Tap Menu
Menu
Menu
Menu >
>
>
> MMS
MMS
MMS
MMS Options
Options
Options
Options . The Settings screen then appears.
3.
3.
3.
3. In the Preferences
Preferences
Preferences
Preferences tab, choose from the available options according to your
needs.
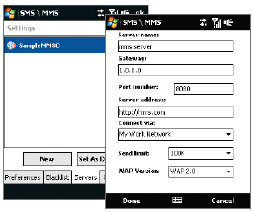
4.
4.
4.
4. Tap the Servers
Servers
Servers
Servers tab and check if
your device is preset with MMS
server settings.
If there are no preset settings,
tap New
New
New
New and enter the following
information, which you obtained
from your wireless service
provider:
•
•
•
•
•
•
•
•
•
•
•
•
•
•
•
•
•
•
•
•
•
•
•
•
Gateway
Gateway
Gateway
Gateway . Location of the MMS server, which is usually in the form of an IP
address.
Port
Port
Port
Port number
number
number
number . HTTP port number used for connecting to the MMS server
and for file transfer.
Server
Server
Server
Server address
address
address
address . URL address of the server where MMS messages are
stored.
Connect
Connect
Connect
Connect via
via
via
via . Select the connection that your device uses for MMS
messages.
Send
Send
Send
Send limit
limit
limit
limit . Select the maximum MMS message size allowed by your
wireless service provider.
WAP
WAP
WAP
WAP version
version
version
version . Select either WAP
WAP
WAP
WAP 1.2
1.2
1.2
1.2 or WAP
WAP
WAP
WAP 2.0
2.0
2.0
2.0 , depending on which
one is being used by your wireless service provider.
5.
5.
5.
5. Tap Done
Done
Done
Done .
Notes
Notes
Notes
Notes
•
•
•
•
If your device already has preset MMS settings, it is recommended that you do not
change these settings. If you change the preset settings, your device may not be
able to send and receive MMS messages.
•If you add several MMS message service providers to the Settings screen, you can
choose one as your default provider. Select the provider's name in the list, then tap
Set
Set
Set
Set As
As
As
As Default
Default
Default
Default .
Create
Create
Create
Create and
and
and
and send
send
send
send MMS
MMS
MMS
MMS messages
messages
messages
messages
You can compose MMS messages in a combination of slides, where each slide can
consist of a photo, video or audio clip, and/or text.
To
To
To
To compose
compose
compose
compose an
an
an
an MMS
MMS
MMS
MMS message
message
message
message
1.
1.
1.
1. Tap Start
Start
Start
Start >
>
>
> Messaging
Messaging
Messaging
Messaging >
>
>
> SMS
SMS
SMS
SMS \
\
\
\ MMS
MMS
MMS
MMS , then tap Menu
Menu
Menu
Menu >
>
>
> New
New
New
New >
>
>
> MMS
MMS
MMS
MMS .
2.
2.
2.
2. When you see the Choose a MMS screen, tap a preset template, or tap
Custom
Custom
Custom
Custom to open a blank MMS message.
Note
Note
Note
Note
If you prefer to start composing from a blank MMS message every time, select
the Always
Always
Always
Always choose
choose
choose
choose custom
custom
custom
custom check box.
3.
3.
3.
3. In To
To
To
To , enter the recipient's phone number or e-mail address directly, or tap To
To
To
To ,
Cc
Cc
Cc
Cc , or Bcc
Bcc
Bcc
Bcc to choose a phone number or an e-mail address from Contacts.
Note
Note
Note
Note You may need to scroll up to see Cc and Bcc.
4.
4.
4.
4. Enter a subject for your message.
5.
5.
5.
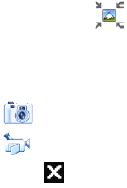
5. Tap the Insert
Insert
Insert
Insert icon ( )to select and insert a photo or video clip. When
selecting a photo or video clip, you can:
•
•
•
•
•
•
•
•
•
•
•
•
•
•
•
•
Tap Select
Select
Select
Select to insert the selected photo or video clip into the MMS
message you are composing.
Tap
Tap
to take a photo and insert it into the MMS message.
to record MMS video and insert it into the MMS message.
Tap Exit
Exit
Exit
Exit (
) to quit selection and return to the MMS message.
6.
6.
6.
6. Enter text and insert audio clips by tapping the respective areas. See"To add
text to an MMS message"and"To add an audio clip to an MMS message"for
details.
7.
7.
7.
7. To add more slides, tap
or tap Menu
Menu
Menu
Menu >
>
>
> Slides
Slides
Slides
Slides >
>
>
> Insert
Insert
Insert
Insert Slide
Slide
Slide
Slide . Repeat steps
5 and 6 to insert photos/videos, text, and audio onto your slides.
8.
8.
8.
8. Tap Send
Send
Send
Send to send the MMS message.
Tip
Tip
Tip
Tip
You can also send an MMS message from Pictures & Videos, Album, or the Camera
program.
To
To
To
To add
add
add
add text
text
text
text to
to
to
to an
an
an
an MMS
MMS
MMS
MMS message
message
message
message
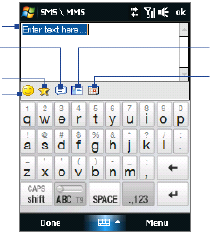
When you tap Insert
Insert
Insert
Insert text
text
text
text here
here
here
here on your MMS message, an empty screen appears
where you can enter your text. You can insert the following types of information:
Enter your own text
Choose from common words
or phrases from the My Text list
Include a Favorites link
Add an emoticon
Insert contact
information
Insert calendar
appointment
Tip
Tip
Tip
Tip To edit or delete a phrase on the My Text list, tap and hold a string, then tap Edit
Edit
Edit
Edit or
Delete
Delete
Delete
Delete from the shortcut menu. To add a new phrase, tap New
New
New
New .
To
To
To
To add
add
add
add an
an
an
an audio
audio
audio
audio clip
clip
clip
clip to
to
to
to an
an
an
an MMS
MMS
MMS
MMS message
message
message
message
You can add one audio clip per slide in your MMS message.
1.
1.
1.
1. Tap Insert
Insert
Insert
Insert audio
audio
audio
audio on your MMS message.
By default, My Documents will be shown. Tap My Music or another folder that
contains audio files. When navigating folders, tap the down arrow (
return to the upper folder.
) to

2.
2.
2.
2. Select an audio file. When selected, you can:
•
•
•
•
•
•
•
•
•
•
•
•
Tap to play the audio clip, to pause, or to stop playback.
Tap Select
Select
Select
Select to insert it into your MMS message.
Tap Exit
Exit
Exit
Exit ( ) to quit selection and return to your MMS message.
To record a new audio clip and add it to your MMS message, tap . The Record pop-
up window then opens. Tap Record
Record
Record
Record to start recording, and Stop
Stop
Stop
Stop to end the recording.
Tap Play
Play
Play
Play to listen to the recorded audio clip, then tap Add
Add
Add
Add . The new audio clip is then
inserted into your MMS message.
Note
Note
Note
Note
View
View
View
View and
and
and
and reply
reply
reply
reply to
to
to
to MMS
MMS
MMS
MMS messages
messages
messages
messages
To
To
To
To view
view
view
view an
an
an
an MMS
MMS
MMS
MMS message
message
message
message
•
•
•
•
•
•
•
•
Use the playback controls , , and
Tap Contents
Contents
Contents
Contents to see a list of files included in the message. On the Message
Contents screen, you can do the following:
•
•
•
•
•
•
•
•
•
•
•
•
To save a file, select it, and tap Menu
Menu
Menu
Menu >
>
>
> Save
Save
Save
Save .
To save the contents of a text file to the My Text list, tap Menu
Menu
Menu
Menu >
>
>
> Save
Save
Save
Save into
into
into
into
My
My
My
My Text
Text
Text
Text .
To associate a photo to one of your contacts, tap Menu
Menu
Menu
Menu >
>
>
> Assign
Assign
Assign
Assign to
to
to
to
Contact
Contact
Contact
Contact .
.
To
To
To
To reply
reply
reply
reply to
to
to
to an
an
an
an MMS
MMS
MMS
MMS message
message
message
message
1.
1.
1.
1. In the SMS \ MMS inbox, press Navigation Up or Down to select the mobile
phone number or name of the contact who sent you the MMS message.
2.
2.
2.
2. In the threaded message, MMS messages will have the
to open and view an MMS message.
icon. Tap this icon
3.
3.
3.
3. After viewing the MMS message, tap Menu
Menu
Menu
Menu >
>
>
> Reply
Reply
Reply
Reply >
>
>
> via
via
via
via MMS
MMS
MMS
MMS to reply
with an MMS message or tap Menu
Menu
Menu
Menu >
>
>
> Reply
Reply
Reply
Reply >
>
>
> via
via
via
via SMS
SMS
SMS
SMS to reply with a text
message.

To
To
To
To block
block
block
block a
a
a
a phone
phone
phone
phone number
number
number
number from
from
from
from sending
sending
sending
sending you
you
you
you MMS
MMS
MMS
MMS messages
messages
messages
messages
If you do not want to receive MMS messages from a particular sender, you can add
the sender's phone number to the MMS Blacklist.
1.
1.
1.
1. When you receive a new MMS message, open and view the message.
2.
2.
2.
2. To avoid receiving MMS messages from this sender next time, tap Menu
Menu
Menu
Menu >
>
>
>
Show
Show
Show
Show >
>
>
> Message
Message
Message
Message Detail
Detail
Detail
Detail .
3.
3.
3.
3. On the Message Detail screen, tap Menu
Menu
Menu
Menu >Show
Show
Show
Show Contact
Contact
Contact
Contact Details
Details
Details
Details .
4.
4.
4.
4. Tap Menu
Menu
Menu
Menu >
>
>
> Save
Save
Save
Save to
to
to
to Blacklist
Blacklist
Blacklist
Blacklist .
5.
5.
5.
5. Tap Done
Done
Done
Done .
Tip
Tip
Tip
Tip
To unblock a phone number and allow the sender to send you MMS messages,
remove the number from the Blacklist. Go to the SMS \ MMS inbox, tap Menu
Menu
Menu
Menu >
>
>
> MMS
MMS
MMS
MMS
Options
Options
Options
Options >
>
>
> Blacklist
Blacklist
Blacklist
Blacklist tab, tap and hold the phone number in the Blacklist, and then
tap Delete
Delete
Delete
Delete .
3
3
3
3 .4
.4
.4
.4 Types
Types
Types
Types of
of
of
of E-mail
E-mail
E-mail
E-mail Accounts
Accounts
Accounts
Accounts
You can set up the following types of e-mail accounts on your device:
•
•
•
•
•
•
•
•
•
•
•
•
•
•
•
•
Outlook e-mail that you sync with your computer or the Exchange Server.
E-mail account that you have from an Internet Service Provider (ISP) or other
e-mail provider.
Web-based e-mail accounts such as Gmail ® , Yahoo! ® Mail Plus, AOL ® , and
others.
Work account that you access using a VPN connection.

Set
Set
Set
Set up
up
up
up your
your
your
your device
device
device
device to
to
to
to synchronize
synchronize
synchronize
synchronize Outlook
Outlook
Outlook
Outlook e-mail
e-mail
e-mail
e-mail with
with
with
with the
the
the
the
computer
computer
computer
computer
If you have installed the synchronization software on your computer and created a
partnership with your device, then your device is ready to send and receive Outlook
e-mail.
Add
Add
Add
Add an
an
an
an e-mail
e-mail
e-mail
e-mail account
account
account
account
To add a new e-mail account, you can do one of the following:
•
•
•
•
•
•
•
•
On the Home screen, slide to the Mail
Mail
Mail
Mail tab and then touch New
New
New
New
Account
Account
Account
Account if you are adding an e-mail account for the first time or tap Menu
Menu
Menu
Menu >
>
>
>
Accounts
Accounts
Accounts
Accounts >
>
>
> Setup
Setup
Setup
Setup E-mail
E-mail
E-mail
E-mail ; or
Tap Start
Start
Start
Start >
>
>
> Messaging
Messaging
Messaging
Messaging >
>
>
> Setup
Setup
Setup
Setup E-mail
E-mail
E-mail
E-mail .
The E-mail Setup wizard then opens and lets you enter your e-mail account
settings. See"E-mail Setup Wizard"in this chapter for details.

3
3
3
3 .
.
.
. 5
5
5
5 Using
Using
Using
Using E-mail
E-mail
E-mail
E-mail
After setting up e-mail accounts on your device, you can start sending and
receiving e-mail messages.
Create
Create
Create
Create a
a
a
a new
new
new
new e-mail
e-mail
e-mail
e-mail message
message
message
message
Depending on your preference, there are two ways you can create a new e-mail
message.
To
To
To
To start
start
start
start from
from
from
from an
an
an
an empty
empty
empty
empty message
message
message
message
1.
1.
1.
1. On the TouchFLO Home screen, slide to the Mail
Mail
Mail
Mail tab.
2.
2.
2.
2. Select the e-mail account you want to use on the right side of the screen.
3.
3.
3.
3. Touch the New
New
New
New Mail
Mail
Mail
Mail icon ( ) to create a new e-mail.
To
To
To
To send
send
send
send an
an
an
an e-mail
e-mail
e-mail
e-mail to
to
to
to a
a
a
a favorite
favorite
favorite
favorite contact
contact
contact
contact
1.
1.
1.
1. On the TouchFLO Home screen, slide to the People
People
People
People tab.
2.
2.
2.
2. Swipe your finger on the screen to scroll through the photos of your favorite
contacts.
3.
3.
3.
3. Touch the photo of the desired contact and then touch Send
Send
Send
Send e-mail
e-mail
e-mail
e-mail .
For more information about working with favorite contacts, see"People"in
Chapter 3.
Tip
Tip
Tip
Tip You can also touch Start
Start
Start
Start >
>
>
> Contacts
Contacts
Contacts
Contacts , select a contact name, and then touch Send
Send
Send
Send
e-mail
e-mail
e-mail
e-mail .
Chapter
Chapter
Chapter
Chapter 4
4
4
4
Internet
Internet
Internet
Internet
4
4
4
4 .1
.1
.1
.1 Ways
Ways
Ways
Ways of
of
of
of Connecting
Connecting
Connecting
Connecting to
to
to
to the
the
the
the Internet
Internet
Internet
Internet
4
4
4
4 .2
.2
.2
.2 Starting
Starting
Starting
Starting a
a
a
a Data
Data
Data
Data Connection
Connection
Connection
Connection
4
4
4
4 .
.
.
. 3
3
3
3 Using
Using
Using
Using Your
Your
Your
Your Device
Device
Device
Device as
as
as
as a
a
a
a Modem
Modem
Modem
Modem
(Internet
(Internet
(Internet
(Internet Sharing)
Sharing)
Sharing)
Sharing)

4
4
4
4 .1
.1
.1
.1 Ways
Ways
Ways
Ways of
of
of
of Connecting
Connecting
Connecting
Connecting to
to
to
to the
the
the
the Internet
Internet
Internet
Internet
Your device's networking capabilities allow you to access the Internet or your
corporate network at work through one of the following connections:
•
•
•
•
•
•
•
•
•
•
•
•
Note
Note
Note
Note
Wi-Fi
2G, GPRS, or EDGE
Dial-up
You can also add and set up the following connections:
•
VPN:
VPN:
VPN:
VPN: A VPN connection is used to access your corporate network by using an
existing Internet connection.
•Proxy:
Proxy:
Proxy:
Proxy: A Proxy connection is used to access the Internet using an existing
connection to your corporate or WAP network.
Wi-Fi
Wi-Fi
Wi-Fi
Wi-Fi
Wi-Fi provides wireless Internet access over distances of up to 100 meters (300 feet).
To use Wi-Fi on your device, you need access to a wireless access point or"hotspot".
Note
Note
Note
Note
The availability and range of your device's Wi-Fi signal depends on the number,
infrastructure, and other objects through which the signal passes.
To
To
To
To turn
turn
turn
turn Wi-Fi
Wi-Fi
Wi-Fi
Wi-Fi on
on
on
on and
and
and
and off
off
off
off
1.
1.
1.
1. On the Home screen, slide to the Settings
Settings
Settings
Settings tab.
2.
2.
2.
2. On the Settings screen, tap Communications
Communications
Communications
Communications >Wi-Fi
Wi-Fi
Wi-Fi
Wi-Fi to enable/disable the
wireless function.
When enabled, the On
On
On
On indicator is activated and available wireless networks
will be detected.
To
To
To
To connect
connect
connect
connect to
to
to
to a
a
a
a wireless
wireless
wireless
wireless network
network
network
network
After Wi-Fi is turned on, your device scans for available wireless networks in your
area.
1.
1.
1.
1. The network names of the detected wireless
networks are displayed on a pop-up message
window. Tap the desired wireless network,
then tap OK
OK
OK
OK .
Note
Note
Note
Note When you select an open (unsecured)
network, you will be automatically connected
to the network after tapping OK
OK
OK
OK . You do not
need to do steps 2 and 3.
2.
2.
2.
2. On the next pop-up message window, do one
of the following:
•
•
•
•
•
•
•
•
Tap The
The
The
The Internet
Internet
Internet
Internet if the wireless network
connects your device to the Internet.
Tap Work
Work
Work
Work if the wireless network connects
your device to a private network.
3.
3.
3.
3. Enter the key and then tap Connect
Connect
Connect
Connect .
Next time you use your device to detect wireless networks, you will not see the
pop-up message windows again, and you will not be prompted to enter the
network key of the previously accessed wireless network (unless you perform a
hard reset which will erase custom settings on your device).
Note
Note
Note
Note
Wi-Fi networks are self-discoverable, which means no additional steps are required for
your device to connect to a Wi-Fi network. It may be necessary to provide a username
and password for certain closed wireless networks.
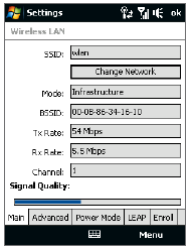
To
To
To
To check
check
check
check wireless
wireless
wireless
wireless network
network
network
network status
status
status
status
You can check the current wireless connection status from any of the following
screens of your device:
•
•
•
•
Title
Title
Title
Title bar
bar
bar
bar .
When you enable Wi-Fi on your device, the Wi-Fi ON icon
title bar.
appears on the
After Wi-Fi is turned on, your device scans for available wireless networks and
the wireless signal icon appears on the title bar. The arrows in this icon
move back and forth while your device is scanning for a wireless network
signal. Once your device successfully connects to a wireless network, the
arrows stop moving.
Wireless
Wireless
Wireless
Wireless LAN
LAN
LAN
LAN screen
screen
screen
screen .
On the Home screen, slide to the Settings
Settings
Settings
Settings tab
and then tap Menu
Menu
Menu
Menu >
>
>
> Wireless
Wireless
Wireless
Wireless Network
Network
Network
Network . On
the Main
Main
Main
Main tab, you will see the wireless network
that your device is currently connected to.
The configuration and signal quality of the
wireless network are also shown.
•
•
•
•
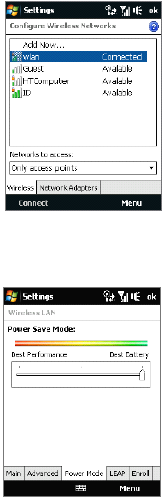
Internet 1 1 3
•
•
•
•
Configure
Configure
Configure
Configure Wireless
Wireless
Wireless
Wireless Networks
Networks
Networks
Networks screen
screen
screen
screen .
On the Home screen, slide to the Settings
Settings
Settings
Settings tab
and then tap All
All
All
All Settings
Settings
Settings
Settings . In the Connections
Connections
Connections
Connections
tab, tap Wi-Fi
Wi-Fi
Wi-Fi
Wi-Fi . This screen displays the wireless
networks currently available.
To connect to a wireless network in the list,
tap and hold on the desired network, then tap
Connect
Connect
Connect
Connect . Tap a wireless network in the list to
view or change its connection settings.
You can also add new wireless networks, if
available, by tapping Add
Add
Add
Add New
New
New
New .
To
To
To
To save
save
save
save battery
battery
battery
battery power
power
power
power while
while
while
while connected
connected
connected
connected to
to
to
to a
a
a
a wireless
wireless
wireless
wireless network
network
network
network
Using Wi-Fi quickly consumes battery power. Turn off Wi-Fi when not in use. You can
also enable power saving settings.
1.
1.
1.
1. On the Home screen, slide to the Settings
Settings
Settings
Settings tab.
2.
2.
2.
2. On the Settings screen, tap Menu
Menu
Menu
Menu >
>
>
> Wireless
Wireless
Wireless
Wireless
Network
Network
Network
Network >
>
>
> Power
Power
Power
Power Mode
Mode
Mode
Mode tab.
3.
3.
3.
3. On the Power
Power
Power
Power Mode
Mode
Mode
Mode tab, move the Power
Power
Power
Power
Save
Save
Save
Save Mode
Mode
Mode
Mode slider to a position that optimizes
performance with the least power consumption.
For example, move the slider to the left (Best
Performance) to have the optimal wireless
network performance; move to the right (Best
Battery) to obtain the maximum battery usage.
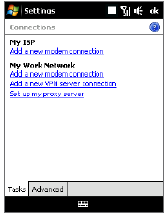
GPRS
GPRS
GPRS
GPRS
Use GPRS
GPRS
GPRS
GPRS (or EDGE
EDGE
EDGE
EDGE , if available) to connect to the Internet and to send and
receive e-mail and picture messages on your device. You will need a data plan to
use your wireless service provider's GPRS network. Check with your wireless
service provider to find out about GPRS rates.
If you completed the Connection Setup process for auto-configuring the data
connection the first time you turned on your device, your device is then ready
to use your wireless service provider's GPRS services. Do not change the
connection settings as this may cause services to stop working.
Note
Note
Note
Note
If you did not complete the auto-configuration process before, follow the instructions
in"To manually select the network operator to use for data connections"in Chapter
13 to configure the data connection for your device.
To
To
To
To add
add
add
add a
a
a
a new
new
new
new GPRS
GPRS
GPRS
GPRS connection
connection
connection
connection
When you need to add another GPRS connection on your device, obtain the
Access
Access
Access
Access point
point
point
point name
name
name
name from your wireless service provider. Also, check if the GPRS
network requires a user name and password.
1.
1.
1.
1. On the Home screen, slide to the Settings
Settings
Settings
Settings tab and then tap All
All
All
All Settings
Settings
Settings
Settings .
2.
2.
2.
2. On the Connections
Connections
Connections
Connections tab, tap Connections
Connections
Connections
Connections .
3.
3.
3.
3. In My
My
My
My ISP
ISP
ISP
ISP , tap Add
Add
Add
Add a
a
a
a new
new
new
new modem
modem
modem
modem connection
connection
connection
connection .
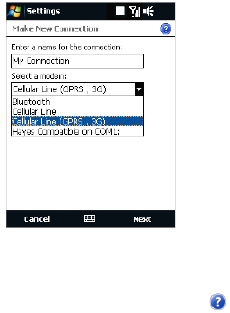
4.
4.
4.
4. On the Make New Connection screen, enter a name for the connection.
5.
5.
5.
5. In the Select
Select
Select
Select a
a
a
a modem
modem
modem
modem list, select Cellular
Cellular
Cellular
Cellular Line
Line
Line
Line (GPRS
(GPRS
(GPRS
(GPRS ,
,
,
, 2G)
2G)
2G)
2G) , then tap Next
Next
Next
Next .
6.
6.
6.
6. Enter the Access point name, then tap Next
Next
Next
Next .
7.
7.
7.
7. Enter the user name and password, if required, then tap Finish
Finish
Finish
Finish .
Notes
Notes
Notes
Notes
•
•
•
•
To view help information for any screen, tap the help icon ( ).
•
•
•
•
To modify your connection settings, tap Manage
Manage
Manage
Manage existing
existing
existing
existing connections
connections
connections
connections and then
tap Edit
Edit
Edit
Edit .
Dial-up
Dial-up
Dial-up
Dial-up
To set up a dial-up connection to your Internet Service Provider (ISP) on your
device, you need the same settings that you normally use when you dial up from
your computer. This includes the ISP server phone number, your user name and
password.
1.
1.
1.
1. On the Home screen, slide to the Settings
Settings
Settings
Settings tab and then tap All
All
All
All Settings
Settings
Settings
Settings .
2.
2.
2.
2. On the Connections
Connections
Connections
Connections tab, tap Connections
Connections
Connections
Connections .
3.
3.
3.
3. In My
My
My
My ISP
ISP
ISP
ISP , tap Add
Add
Add
Add a
a
a
a new
new
new
new modem
modem
modem
modem connection
connection
connection
connection .
4.
4.
4.
4. In the Select
Select
Select
Select a
a
a
a modem
modem
modem
modem list, select Cellular
Cellular
Cellular
Cellular Line
Line
Line
Line , then tap Next
Next
Next
Next .

5.
5.
5.
5. Enter the ISP server phone number, then tap Next
Next
Next
Next .
6.
6.
6.
6. Enter your user name, password, and any other information required by your
ISP, then tap Finish
Finish
Finish
Finish .
4
4
4
4 .2
.2
.2
.2 Starting
Starting
Starting
Starting a
a
a
a Data
Data
Data
Data Connection
Connection
Connection
Connection
After setting up a data connection such as GPRS or ISP dial-up on your device,
you can now connect your device to the Internet. The connection is started
automatically when you begin using a program that accesses the Internet such as
Opera Mobile.
To
To
To
To manually
manually
manually
manually connect
connect
connect
connect or
or
or
or disconnect
disconnect
disconnect
disconnect a
a
a
a data
data
data
data connection
connection
connection
connection
1.
1.
1.
1. On the Home screen, slide to the Settings
Settings
Settings
Settings tab and then tap
Communications
Communications
Communications
Communications to open the Comm Manager.
2.
2.
2.
2. Tap Data
Data
Data
Data Connection
Connection
Connection
Connection to connect or disconnect the data connection. When
your device successfully establishes the data connection, the ON indicator is
activated.
To
To
To
To choose
choose
choose
choose from
from
from
from multiple
multiple
multiple
multiple types
types
types
types of
of
of
of data
data
data
data connections
connections
connections
connections
If you have set up multiple types of data connections on your device, you can
choose and manually start a desired connection.
1.
1.
1.
1. On the Home screen, slide to the Settings
Settings
Settings
Settings tab and then tap All
All
All
All Settings
Settings
Settings
Settings .
2.
2.
2.
2. On the Connections
Connections
Connections
Connections tab, tap Connections
Connections
Connections
Connections .
3.
3.
3.
3. Tap Manage
Manage
Manage
Manage existing
existing
existing
existing connections
connections
connections
connections .
4.
4.
4.
4. Tap and hold the name of the desired connection, then tap Connect
Connect
Connect
Connect .
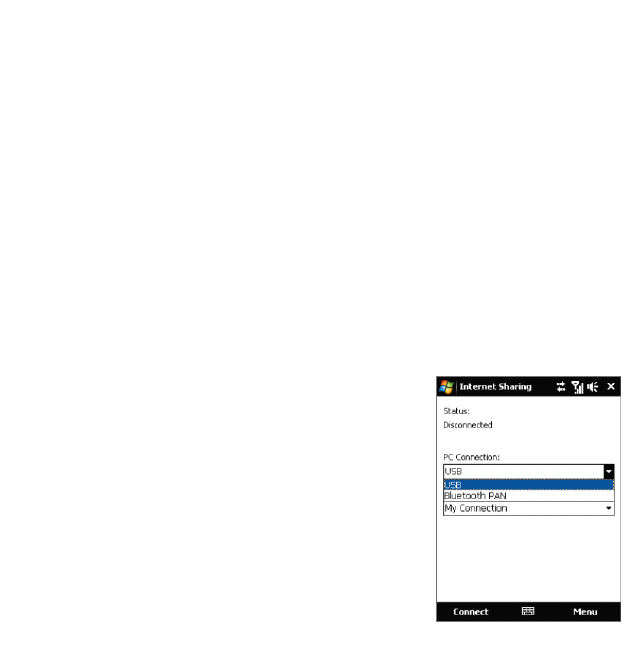
4.3
4.3
4.3
4.3 Using
Using
Using
Using Your
Your
Your
Your Device
Device
Device
Device as
as
as
as a
a
a
a Modem
Modem
Modem
Modem (Internet
(Internet
(Internet
(Internet Sharing)
Sharing)
Sharing)
Sharing)
Internet
Internet
Internet
Internet Sharing
Sharing
Sharing
Sharing connects your desktop or notebook computer to the Internet by
using your device's data connection (GPRS or EDGE, for instance). You can choose
to
connect via USB or Bluetooth.
Notes:
Notes:
Notes:
Notes: •
•
•
•Make sure your device has a SIM card installed, and your device has a GPRS/3G or
phone dial-up modem connection. If your device has not been set up with a data
connection yet, tap Menu
Menu
Menu
Menu >
>
>
> Connection
Connection
Connection
Connection Settings
Settings
Settings
Settings on the Internet Sharing screen.
For more information about setting up these connections, see "GPRS/3G" and
"Dial-up" in this chapter.
•
•
•
•
If you want to use a USB cable connection, you must first install Windows Mobile
Device Center or Microsoft ActiveSync version 4.5 or later on the computer.
•
•
•
•
If you want to use a Bluetooth connection, make sure your computer has built-in
Bluetooth capability. If your computer does not have Bluetooth, you can connect
and use a Bluetooth adapter or dongle.
•
•
•
•
Before using Internet Sharing, disconnect from Windows Mobile Device Center or
ActivSync on your computer.
To
To
To
To set
set
set
set up
up
up
up your
your
your
your device
device
device
device as
as
as
as a
a
a
a USB
USB
USB
USB modem
modem
modem
modem
1.
1.
1.
1. On your device, tap Start
Start
Start
Start >
>
>
> Programs
Programs
Programs
Programs >
>
>
>
Internet
Internet
Internet
Internet Sharing
Sharing
Sharing
Sharing .
2.
2.
2.
2. In the PC
PC
PC
PC Connection
Connection
Connection
Connection list, select USB
USB
USB
USB .
3.
3.
3.
3. In the Network
Network
Network
Network Connection
Connection
Connection
Connection list, select the
name of the connection that your device
uses to
connect to the Internet.
4.
4.
4.
4. Connect your device to the computer using
the
5.
5.
5.
5. Tap Connect
Connect
Connect
Connect .

To
To
To
To use
use
use
use your
your
your
your device
device
device
device as
as
as
as a
a
a
a Bluetooth
Bluetooth
Bluetooth
Bluetooth modem
modem
modem
modem
For the computer to use the Internet connection of your device, activate Internet
Sharing on your device, then set up a Bluetooth Personal Area Network (PAN)
between the computer and your device.
1.
1.
1.
1. On your device, turn on Bluetooth and set it to visible mode by following
the steps in"To turn Bluetooth on and make your device visible"section in
Chapter 9.
2.
2.
2.
2. Initiate a Bluetooth partnership from your device by following the steps in"To
create a Bluetooth partnership"
3.
3.
3.
3. Tap Start
Start
Start
Start >
>
>
> Programs
Programs
Programs
Programs >
>
>
> Internet
Internet
Internet
Internet Sharing
Sharing
Sharing
Sharing .
4.
4.
4.
4. Select Bluetooth
Bluetooth
Bluetooth
Bluetooth PAN
PAN
PAN
PAN as the PC
PC
PC
PC Connection
Connection
Connection
Connection .
5.
5.
5.
5. From the Network
Network
Network
Network Connection
Connection
Connection
Connection list, select the name of the connection that
your device uses to connect to the Internet.
6.
6.
6.
6. Tap Connect
Connect
Connect
Connect .
7.
7.
7.
7. On your computer, set up a Bluetooth Personal Area Network (PAN) with your
device:
For
For
For
For Windows
Windows
Windows
Windows Vista:
Vista:
Vista:
Vista:
a.
a.
a.
a. Click Start
Start
Start
Start >
>
>
> Control
Control
Control
Control Panel
Panel
Panel
Panel >
>
>
> Network
Network
Network
Network and
and
and
and Internet
Internet
Internet
Internet >
>
>
> Network
Network
Network
Network and
and
and
and
Sharing
Sharing
Sharing
Sharing Center
Center
Center
Center .
b.
b.
b.
b. Click Manage
Manage
Manage
Manage network
network
network
network connections
connections
connections
connections and then under Personal
Personal
Personal
Personal Area
Area
Area
Area
Network
Network
Network
Network , double-click Bluetooth
Bluetooth
Bluetooth
Bluetooth Network
Network
Network
Network Connection
Connection
Connection
Connection .
c.
c.
c.
c. In the Bluetooth Personal Area Network Devices dialog box, select your
device, then click Connect
Connect
Connect
Connect .
For
For
For
For Windows
Windows
Windows
Windows XP:
XP:
XP:
XP:
a.
a.
a.
a. Tap Start
Start
Start
Start >
>
>
> Control
Control
Control
Control Panel
Panel
Panel
Panel >
>
>
> Network
Network
Network
Network Connections
Connections
Connections
Connections .
b.
b.
b.
b. Under Personal
Personal
Personal
Personal Area
Area
Area
Area Network
Network
Network
Network , click the Bluetooth
Bluetooth
Bluetooth
Bluetooth Network
Network
Network
Network
Connection
Connection
Connection
Connection icon.

c
c
c
c .
.
.
.Under Network
Network
Network
Network Tasks
Tasks
Tasks
Tasks , click View
View
View
View Bluetooth
Bluetooth
Bluetooth
Bluetooth network
network
network
network devices
devices
devices
devices .
d.
d.
d.
d. In the Bluetooth Personal Area Network Devices dialog box, select
your device, then click Connect
Connect
Connect
Connect
Note:
If the Bluetooth adapter or dongle on your computer was installed using a
third- party provided driver, open the Bluetooth software that came with the
Bluetooth
adapter/dongle to connect your computer and device via Bluetooth. Refer to
the
Bluetooth adapter/dongle documentation for more information.
8.
8.
8.
8. On the Internet Sharing screen on your device, check if a connected
status message is displayed, which indicates that your computer has been
successfully connected to the Internet using your device as a Bluetooth
modem.
To
To
To
To end
end
end
end the
the
the
the Internet
Internet
Internet
Internet connection
connection
connection
connection
On the Internet Sharing screen, tap Disconnect
Disconnect
Disconnect
Disconnect .
Chapter
Chapter
Chapter
Chapter 5
5
5
5
Bluetooth
Bluetooth
Bluetooth
Bluetooth
5
5
5
5 .1
.1
.1
.1 Bluetooth
Bluetooth
Bluetooth
Bluetooth Modes
Modes
Modes
Modes
5
5
5
5 .2
.2
.2
.2 Bluetooth
Bluetooth
Bluetooth
Bluetooth Partnerships
Partnerships
Partnerships
Partnerships
5
5
5
5 .3
.3
.3
.3 Connecting
Connecting
Connecting
Connecting a
a
a
a Bluetooth
Bluetooth
Bluetooth
Bluetooth Hands-free
Hands-free
Hands-free
Hands-free or
or
or
or
Stereo
Stereo
Stereo
Stereo Headset
Headset
Headset
Headset

5
5
5
5 .1
.1
.1
.1 Bluetooth
Bluetooth
Bluetooth
Bluetooth Modes
Modes
Modes
Modes
Bluetooth is a short-range wireless communications technology. Devices with
Bluetooth capabilities can exchange information over a distance of about eight
meters (26 feet) without requiring a physical connection.
Bluetooth on your device operates in three different modes:
•
•
•
•
•
•
•
•
•
•
•
•
Notes
Notes
Notes
Notes
On
On
On
On . Bluetooth is turned on. Your device can detect other Bluetooth-enabled
devices, but not vice versa.
Visible
Visible
Visible
Visible . Bluetooth is turned on, and all other Bluetooth-enabled devices can
detect your device.
Off
Off
Off
Off . Bluetooth is turned off. In this mode, you can neither send nor receive
information using Bluetooth.
•
•
•
•
By default, Bluetooth is turned off. If you turn it on, then turn off your device,
Bluetooth also turns off. When you turn on your device again, Bluetooth
automatically turns on.
•
•
•
•
Turn off Bluetooth when not in use to conserve battery power, or in places where
using a wireless device is prohibited, such as on board an aircraft and in hospitals.
To
To
To
To turn
turn
turn
turn Bluetooth
Bluetooth
Bluetooth
Bluetooth on
on
on
on and
and
and
and make
make
make
make your
your
your
your device
device
device
device visible
visible
visible
visible
1.
1.
1.
1. On the Home screen, slide to the Settings
Settings
Settings
Settings tab and then tap Menu
Menu
Menu
Menu >
>
>
>
Bluetooth
Bluetooth
Bluetooth
Bluetooth Devices
Devices
Devices
Devices >
>
>
> Mode
Mode
Mode
Mode tab.
2.
2.
2.
2. Select the Turn
Turn
Turn
Turn on
on
on
on Bluetooth
Bluetooth
Bluetooth
Bluetooth and Make
Make
Make
Make this
this
this
this device
device
device
device visible
visible
visible
visible to
to
to
to other
other
other
other devices
devices
devices
devices
check boxes.
3.
3.
3.
3. Tap OK
OK
OK
OK . The Title bar will show
mode.
to indicate that the device is in Visible
To
To
To
To turn
turn
turn
turn off
off
off
off Bluetooth
Bluetooth
Bluetooth
Bluetooth visibility
visibility
visibility
visibility after
after
after
after a
a
a
a certain
certain
certain
certain period
period
period
period of
of
of
of time
time
time
time
You can automatically turn off Bluetooth visibility after a specified period of time.
1.
1.
1.
1. On the Home screen, slide to the Settings
Settings
Settings
Settings tab and then tap Menu
Menu
Menu
Menu >
>
>
>
Bluetooth
Bluetooth
Bluetooth
Bluetooth Devices
Devices
Devices
Devices >
>
>
> Timeout
Timeout
Timeout
Timeout tab.
2.
2.
2.
2. In Turn
Turn
Turn
Turn off
off
off
off Visible
Visible
Visible
Visible mode
mode
mode
mode , select the time before your device's Bluetooth
visibility turns off. Tap OK
OK
OK
OK .

5
5
5
5 .2
.2
.2
.2 Bluetooth
Bluetooth
Bluetooth
Bluetooth Partnerships
Partnerships
Partnerships
Partnerships
A Bluetooth partnership is a relationship that you create between your device and
another Bluetooth-enabled device in order to exchange information in a secure
manner.
To
To
To
To create
create
create
create a
a
a
a Bluetooth
Bluetooth
Bluetooth
Bluetooth partnership
partnership
partnership
partnership
1.
1.
1.
1. On the Home screen, slide to the Settings
Settings
Settings
Settings tab and then tap Menu
Menu
Menu
Menu >
>
>
>
Bluetooth
Bluetooth
Bluetooth
Bluetooth Devices
Devices
Devices
Devices >
>
>
> Devices
Devices
Devices
Devices tab.
2.
2.
2.
2. Tap Add
Add
Add
Add new
new
new
new device
device
device
device . Your device displays the names of other Bluetooth
devices within range.
3.
3.
3.
3. Tap the device name in the box, then tap Next
Next
Next
Next .
4.
4.
4.
4. Specify a passcode to establish a secure connection. The passcode can be 1
up to 16 characters.
5.
5.
5.
5. Tap Next
Next
Next
Next .
6.
6.
6.
6. Wait for the paired device to accept the partnership. The receiving party
needs to enter the same passcode that you specified.
7.
7.
7.
7. After the receiving party enters the passcode, a message box appears on your
device confirming the partnership.
Tip
Tip
Tip
Tip Tap Advanced
Advanced
Advanced
Advanced to change the paired device name and to set the services you
want to use for the paired device. After setting the name and options, tap Save
Save
Save
Save .
8.
8.
8.
8. Tap Done
Done
Done
Done .
Note
Note
Note
Note
Creating a Bluetooth partnership between two devices is a one-time process. Once
a partnership is created, the devices can recognize the partnership and exchange
information without entering a passcode again.

To
To
To
To accept
accept
accept
accept a
a
a
a Bluetooth
Bluetooth
Bluetooth
Bluetooth partnership
partnership
partnership
partnership
1.
1.
1.
1. Ensure that Bluetooth is turned on and in visible mode.
2.
2.
2.
2. Tap Yes
Yes
Yes
Yes when prompted to establish a partnership with the other device.
3.
3.
3.
3. Enter a passcode (the same passcode that is entered on the device requesting
the partnership) to establish a secure connection. The passcode must be
between 1 and 16 characters.
4.
4.
4.
4. Tap Next
Next
Next
Next .
5.
5.
5.
5. Tap Done
Done
Done
Done . You can now exchange information with the paired device.
Tips
Tips
Tips
Tips
•
•
•
•
To rename a Bluetooth partnership, tap and hold the partnership's name on the
Devices
Devices
Devices
Devices tab of the Bluetooth screen, then tap Edit
Edit
Edit
Edit .
•
•
•
•
To delete a Bluetooth partnership, tap and hold the partnership's name on the
Devices
Devices
Devices
Devices tab, then tap Delete
Delete
Delete
Delete .
5
5
5
5 .3
.3
.3
.3 Connecting
Connecting
Connecting
Connecting a
a
a
a Bluetooth
Bluetooth
Bluetooth
Bluetooth Hands-free
Hands-free
Hands-free
Hands-free or
or
or
or Stereo
Stereo
Stereo
Stereo
Headset
Headset
Headset
Headset
For hands-free phone conversations, you can use a Bluetooth hands-free headset
such as a car kit with your device. Your device also supports A2DP (Advanced Audio
Distribution Profile) which allows you to use a Bluetooth stereo headset for hands-
free phone conversations and for listening to stereo music.
To
To
To
To connect
connect
connect
connect a
a
a
a Bluetooth
Bluetooth
Bluetooth
Bluetooth hands-free
hands-free
hands-free
hands-free or
or
or
or stereo
stereo
stereo
stereo headset
headset
headset
headset
1.
1.
1.
1. Make sure that both your device and the Bluetooth headset are turned
on and within close range, and that the headset is visible. Refer to the
manufacturer's documentation to find out how to set the headset in visible
mode.
2.
2.
2.
2. On the Home screen, slide to the Settings
Settings
Settings
Settings tab and then tap Menu
Menu
Menu
Menu >
>
>
>
Bluetooth
Bluetooth
Bluetooth
Bluetooth Devices
Devices
Devices
Devices >
>
>
> Devices
Devices
Devices
Devices tab >
>
>
> Add
Add
Add
Add new
new
new
new device
device
device
device .

3.
3.
3.
3. Tap the name of the Bluetooth headset, then tap Next
Next
Next
Next . The device will
automatically pair the device with the Bluetooth headset.
Windows Mobile will automatically try one of the preconfigured passcodes (0000,
1111, 8888, 1234) to pair the Bluetooth headset with the device. If this fails, you
have to enter the passcode delivered with your headset manually.
Note
Note
Note
Note
If the Bluetooth stereo headset becomes disconnected, turn the headset on and
repeat step 1 to 2 above. Tap and hold the name of the Bluetooth stereo headset and
tap Set
Set
Set
Set as
as
as
as Wireless
Wireless
Wireless
Wireless Stereo
Stereo
Stereo
Stereo .
Chapter
Chapter
Chapter
Chapter 6
6
6
6
Navigating
Navigating
Navigating
Navigating on
on
on
on the
the
the
the Road
Road
Road
Road
6
6
6
6 .1
.1
.1
.1 Google
Google
Google
Google ™
™
™
™Maps
Maps
Maps
Maps (Available
(Available
(Available
(Available by
by
by
by Country)
Country)
Country)
Country)
6
6
6
6 .2
.2
.2
.2 Guidelines
Guidelines
Guidelines
Guidelines and
and
and
and Preparation
Preparation
Preparation
Preparation for
for
for
for Using
Using
Using
Using GPS
GPS
GPS
GPS
6
6
6
6 .3
.3
.3
.3 Downloading
Downloading
Downloading
Downloading Satellite
Satellite
Satellite
Satellite Data
Data
Data
Data via
via
via
via QuickGPS
QuickGPS
QuickGPS
QuickGPS
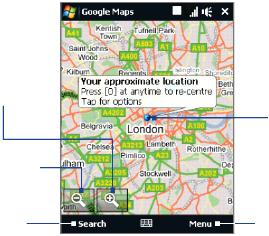
6
6
6
6 .1
.1
.1
.1 Google
Google
Google
Google ™
™
™
™Maps
Maps
Maps
Maps (Available
(Available
(Available
(Available by
by
by
by Country)
Country)
Country)
Country)
Google
™
Maps lets you track your current location, view real-time traffic situations,
and receive detailed directions to your destination. It also allows you to search and
locate places of interest or even a contact address.
Note
Note
Note
Note You need an active data connection or Wi-Fi connection to use Google Maps.
To
To
To
To launch
launch
launch
launch Google
Google
Google
Google Maps
Maps
Maps
Maps
Tap Start
Start
Start
Start >
>
>
> Programs
Programs
Programs
Programs >
>
>
> Google
Google
Google
Google Maps
Maps
Maps
Maps .
Note
Note
Note
Note
The first time you launch Google Maps, you will be asked to accept terms and
conditions when using Google Maps. You must agree to the terms and conditions for
you to be able to launch and use Google Maps.
The
The
The
The Google
Google
Google
Google Maps
Maps
Maps
Maps screen
screen
screen
screen
Tap to zoom in
on the map.
Tap to zoom
out on the map.
Tap to search for places of
interest and addresses.
Your current location.
Tap to open a menu where you
can set Google Maps to find and
display your current location,
get directions, see traffic
information, look up a contact
address, and more.
Notes
Notes
Notes
Notes
•
•
•
•
Currently, traffic information is only available for the U.S.
•
•
•
•
Tap Menu
Menu
Menu
Menu >
>
>
> Options
Options
Options
Options >
>
>
> Reset
Reset
Reset
Reset Google
Google
Google
Google Maps
Maps
Maps
Maps to reset the Google Map cookies,
history of search terms, preferences, and image cache.
•
•
•
•Tap Menu
Menu
Menu
Menu >
>
>
> Help
Help
Help
Help >
>
>
> Tips
Tips
Tips
Tips to learn more about the program and its many features.
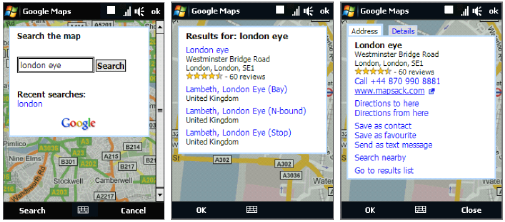
You can easily search and locate a place of interest such as hotels, restaurants, and
Search
Search
Search
Search for
for
for
for a
a
a
a place
place
place
place of
of
of
of interest
interest
interest
interest
other places using Google Maps. Google Maps can also show details on how to
contact and reach the place of interest from your current location.
Note
Note
Note
Note
You can also enter keywords, street addresses, or postal codes when searching places
using Google Maps.
1.
1.
1.
1. On the Google Maps screen, tap Search
Search
Search
Search .
2.
2.
2.
2. Enter the place of interest you want to find, and then tap Search
Search
Search
Search :
3.
3.
3.
3. Search results will then be listed. Tap the desired place from the list to view its
address, phone number, and other details.
4.
4.
4.
4. On the Address
Address
Address
Address tab, you can:
•
•
•
•Tap the web address to go to the web site of the place of interest.
Note
Note
Note
Note
This information only appears when the web site of the place of interest is
available.
•
•
•
•
Tap the [phone
[phone
[phone
[phone number]
number]
number]
number] to call the place of interest that you have
selected.

•
•
•
•
•
•
•
•
•
•
•
•
Tap Directions
Directions
Directions
Directions to
to
to
to here
here
here
here or Directions
Directions
Directions
Directions from
from
from
from here
here
here
here to get directions on how
to get to the place of interest from your current location or vice versa.
Tap Search
Search
Search
Search nearby
nearby
nearby
nearby to search for other places of interest near your current
location.
Tap Send
Send
Send
Send as
as
as
as text
text
text
text message
message
message
message to send the contact information of the place of
interest via SMS.
For more information about Google Maps, you can visit the following web site:
http://www.google.com/gmm/index.html.
6
6
6
6 .2
.2
.2
.2 Guidelines
Guidelines
Guidelines
Guidelines and
and
and
and Preparation
Preparation
Preparation
Preparation for
for
for
for Using
Using
Using
Using GPS
GPS
GPS
GPS
If you install a GPS software on your device, please follow these guidelines before
and when using your device as a GPS device.
•
•
•
•
•
•
•
•
•
•
•
•
Do not operate the GPS system while driving. The plotted GPS route is only
for driving reference. It should not interfere with actual driving behavior.
Do not leave your device in a vehicle or expose the device to direct sunlight
to avoid overheating the battery, which could pose damage to the device or
risk to the vehicle.
When using the device inside a vehicle, use the car holder to mount the
device securely in place. Avoid placing the device in the areas shown in the
following diagram:
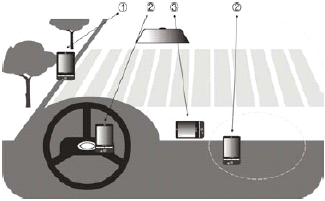
•
•
•
•
•
•
•
•
•
•
•
•
•
•
•
•
1
1
1
1Do not place where it will block the driver's vision.
2
2
2
2Do not place where air bags could deploy.
3
3
3
3Do not place anywhere in the vehicle without securing the device in the
holder.
Please use the GPS system cautiously. Users shall be liable for any damages
resulting from negligent operation of the system.
The GPS signal cannot pass through solid non-transparent objects. Signal
reception may be affected by obstructions such as high-rise buildings,
tunnels, bridges, forests, weather (rainy or cloudy days), etc. If the vehicle's
visor contains metal, it will be difficult for the GPS signal to pass through.
Wireless communication products (such as mobile phones or radar-detecting
devices) may interfere with the satellite signal, resulting in unstable signal
reception.
The Global Positioning System (GPS) is built and operated by the US
Defense Department. The Department is responsible for the accuracy and
maintenance of the system. Any changes that the Department makes may
affect the accuracy and function of the GPS system.
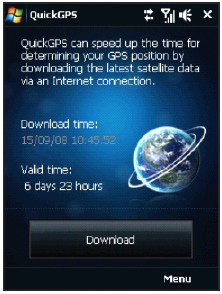
6
6
6
6 .3
.3
.3
.3 Downloading
Downloading
Downloading
Downloading Satellite
Satellite
Satellite
Satellite Data
Data
Data
Data via
via
via
via QuickGPS
QuickGPS
QuickGPS
QuickGPS
Before you start using your device for GPS navigation, open the QuickGPS
QuickGPS
QuickGPS
QuickGPS program
first to download ephemeris data (current satellite position and timing information)
onto your device. This data is needed to determine the GPS position of your current
location.
QuickGPS downloads ephemeris data from a web server, instead of from the
satellites, using the Internet connection on your device, which can be via Wi-Fi,
ActiveSync or GPRS/ 2 G. This significantly speeds up the time for determining your
GPS position.
To
To
To
To open
open
open
open QuickGPS
QuickGPS
QuickGPS
QuickGPS
Tap Start
Start
Start
Start >
>
>
> Programs
Programs
Programs
Programs >
>
>
> QuickGPS
QuickGPS
QuickGPS
QuickGPS .
To
To
To
To download
download
download
download data
data
data
data
Tap Download
Download
Download
Download on the QuickGPS screen.
On the screen, initially, you will see the Valid
Valid
Valid
Valid
time
time
time
time of the downloaded data. As time passes,
the remaining days and hours of validity will be
shown.
To speed up GPS positioning, download the
latest ephemeris data when the validity of the
data expires.

To configure download times, tap Menu
Menu
Menu
Menu >
>
>
> Options
Options
Options
Options and choose from the available
Download
Download
Download
Download options
options
options
options
options:
•
•
•
•
•
•
•
•
•
•
•
•
Remind
Remind
Remind
Remind me
me
me
me when
when
when
when data
data
data
data expires
expires
expires
expires .
Enables your device to display a reminder message when the validity of the
ephemeris data has expired.
When you see the reminder message, tap Menu
Menu
Menu
Menu to dismiss the reminder or to
set the snooze time so that you will be reminded again. Tap OK
OK
OK
OK to open the
QuickGPS program and download the latest data.
Auto
Auto
Auto
Auto download
download
download
download when
when
when
when data
data
data
data expires
expires
expires
expires .
Allows ephemeris data to be automatically updated onto your device when
the data has expired.
Auto
Auto
Auto
Auto download
download
download
download when
when
when
when connected
connected
connected
connected to
to
to
to PC
PC
PC
PC via
via
via
via ActiveSync
ActiveSync
ActiveSync
ActiveSync .
Allows ephemeris data to be automatically downloaded via ActiveSync to
your device when your device is connected to your computer. Your computer
must be connected to the Internet in order to download data.
Chapter
Chapter
Chapter
Chapter 7
7
7
7
Programs
Programs
Programs
Programs
7
7
7
7 .1
.1
.1
.1 Accessing
Accessing
Accessing
Accessing Programs
Programs
Programs
Programs on
on
on
on Your
Your
Your
Your Device
Device
Device
Device
7
7
7
7 .2
.2
.2
.2 Adding
Adding
Adding
Adding and
and
and
and Removing
Removing
Removing
Removing Programs
Programs
Programs
Programs

7
7
7
7 .1
.1
.1
.1 Accessing
Accessing
Accessing
Accessing Programs
Programs
Programs
Programs on
on
on
on Your
Your
Your
Your Device
Device
Device
Device
You will find preinstalled programs in the Start menu and on the Programs screen
of your device.
To
To
To
To launch
launch
launch
launch and
and
and
and use
use
use
use a
a
a
a program
program
program
program
Do one of the following:
•
•
•
•
•
•
•
•
Tap Start
Start
Start
Start to open the Start menu and then tap a desired program.
To access more programs, tap Start
Start
Start
Start >
>
>
> Programs
Programs
Programs
Programs , or slide to the Programs
Programs
Programs
Programs tab
on the Home screen and then tap All
All
All
All Programs
Programs
Programs
Programs .
7
7
7
7 .2
.2
.2
.2 Adding
Adding
Adding
Adding and
and
and
and Removing
Removing
Removing
Removing Programs
Programs
Programs
Programs
Additional programs, such as the programs in the Application disc or other
programs that you purchase, can be installed and uninstalled on your device. Your
device does not allow you to uninstall most of the preinstalled programs.
Note
Note
Note
Note
Before you purchase additional programs for your device, make sure that they are
compatible with your device.
To
To
To
To install
install
install
install a
a
a
a program
program
program
program
1.
1.
1.
1. Download the program to your computer (or insert the CD or disk that
contains the program into your computer).
You may see a single *.exe
*.exe
*.exe
*.exe file, a *.zip
*.zip
*.zip
*.zip file, a Setup.exe
Setup.exe
Setup.exe
Setup.exe file, or several versions
of files for different device types and processors. Be sure to select only the
programs designed for your device.
2.
2.
2.
2. Read any installation instructions or documentation that comes with the
program. Many programs provide special installation instructions.
3.
3.
3.
3. Connect your device to the computer.
4.
4.
4.
4. Double-click the installation setup file.
To
To
To
To uninstall
uninstall
uninstall
uninstall a
a
a
a program
program
program
program
1.
1.
1.
1. Tap Start
Start
Start
Start >
>
>
> Settings
Settings
Settings
Settings >
>
>
> System
System
System
System tab >
>
>
> Remove
Remove
Remove
Remove Programs
Programs
Programs
Programs .
2.
2.
2.
2. In the Programs
Programs
Programs
Programs in
in
in
in storage
storage
storage
storage memory
memory
memory
memory list, select the program you want to
remove, then tap Remove
Remove
Remove
Remove .
Chapter
Chapter
Chapter
Chapter 8
8
8
8
Managing
Managing
Managing
Managing Your
Your
Your
Your Device
Device
Device
Device
8
8
8
8 .1
.1
.1
.1 Copying
Copying
Copying
Copying and
and
and
and Managing
Managing
Managing
Managing Files
Files
Files
Files
8
8
8
8 .2
.2
.2
.2 Settings
Settings
Settings
Settings On
On
On
On Your
Your
Your
Your Device
Device
Device
Device
8
8
8
8 .3
.3
.3
.3 Changing
Changing
Changing
Changing Basic
Basic
Basic
Basic Settings
Settings
Settings
Settings
8
8
8
8 .4
.4
.4
.4 Using
Using
Using
Using Connection
Connection
Connection
Connection Setup
Setup
Setup
Setup
8
8
8
8 .5
.5
.5
.5 Using
Using
Using
Using Task
Task
Task
Task Manager
Manager
Manager
Manager
8
8
8
8 .6
.6
.6
.6 Protecting
Protecting
Protecting
Protecting Your
Your
Your
Your Device
Device
Device
Device
8
8
8
8 .7
.7
.7
.7 Managing
Managing
Managing
Managing Memory
Memory
Memory
Memory
8
8
8
8 .8
.8
.8
.8 Resetting
Resetting
Resetting
Resetting Your
Your
Your
Your Device
Device
Device
Device
8
8
8
8 .9
.9
.9
.9 Windows
Windows
Windows
Windows Update
Update
Update
Update
8
8
8
8 .10
.10
.10
.10 Battery
Battery
Battery
Battery Saving
Saving
Saving
Saving Tips
Tips
Tips
Tips

8
8
8
8 .1
.1
.1
.1 Copying
Copying
Copying
Copying and
and
and
and Managing
Managing
Managing
Managing Files
Files
Files
Files
You can copy files between your device and computer, or copy files to a storage
card installed on your device. You can also efficiently manage your files and folders
using File Explorer.
To
To
To
To copy
copy
copy
copy files
files
files
files using
using
using
using Windows
Windows
Windows
Windows Mobile
Mobile
Mobile
Mobile Device
Device
Device
Device Center
Center
Center
Center or
or
or
or ActiveSync
ActiveSync
ActiveSync
ActiveSync
1.
1.
1.
1. Connect your device to the computer.
2.
2.
2.
2. Click File
File
File
File Management
Management
Management
Management >
>
>
> Browse
Browse
Browse
Browse the
the
the
the contents
contents
contents
contents of
of
of
of your
your
your
your device
device
device
device in Windows
Mobile Device Center on your computer, or click Explore
Explore
Explore
Explore in ActiveSync on
your computer. This opens Windows Explorer on your computer and displays
the contents of your device.
3.
3.
3.
3. To copy a file from your device to your computer:
a. Browse the contents of your device, right-click the file you want to copy,
then click Copy
Copy
Copy
Copy .
b. Right-click a folder on your computer, then click Paste
Paste
Paste
Paste .
4.
4.
4.
4. To copy a file from your computer to your device:
a. Browse the folders on your computer, right-click the file you want to copy,
then click Copy
Copy
Copy
Copy .
b. Right-click a folder on your device, then click Paste
Paste
Paste
Paste .
To
To
To
To manage
manage
manage
manage files
files
files
files on
on
on
on your
your
your
your device
device
device
device using
using
using
using File
File
File
File Explorer
Explorer
Explorer
Explorer
File
File
File
File Explorer
Explorer
Explorer
Explorer lets you browse and manage the contents of your device. The root
folder on the device is named My
My
My
My Device
Device
Device
Device , and contains the following folders: My
Documents, Program Files, Windows, and more.
1.
1.
1.
1. Tap Start
Start
Start
Start >
>
>
> Programs
Programs
Programs
Programs >
>
>
> File
File
File
File Explorer
Explorer
Explorer
Explorer .
2.
2.
2.
2. Tap a folder or file to open it.
3.
3.
3.
3. To return to an upper level folder, tap Up
Up
Up
Up and select the folder.
4.
4.
4.
4. To quickly delete, rename, or copy a file, tap and hold the file, then choose

the desired operation on the shortcut menu. To copy or delete multiple files,
tap and drag over the desired files to select, tap and hold the selection, then
choose the desired operation on the shortcut menu.
To
To
To
To copy
copy
copy
copy files
files
files
files to
to
to
to a
a
a
a storage
storage
storage
storage card
card
card
card
1.
1.
1.
1. Make sure that the storage card is properly installed on your device.
2.
2.
2.
2. Tap Start
Start
Start
Start >
>
>
> Programs
Programs
Programs
Programs >
>
>
> File
File
File
File Explorer
Explorer
Explorer
Explorer and navigate to the appropriate folder.
3.
3.
3.
3. Tap and hold the file you want to copy, then tap Copy
Copy
Copy
Copy .
4.
4.
4.
4. Tap the down arrow ( ), then tap Storage
Storage
Storage
Storage Card
Card
Card
Card in the list.
5.
5.
5.
5. Tap and hold an empty area on the screen and then select Paste
Paste
Paste
Paste on the
menu.
Tip
Tip
Tip
Tip
You can configure programs such as Word Mobile and Excel Mobile to directly save
edited files onto a storage card. In the program's file list, tap Menu
Menu
Menu
Menu >
>
>
> Options
Options
Options
Options , then
select the Storage
Storage
Storage
Storage Card
Card
Card
Card in the Save
Save
Save
Save to
to
to
to box.
8
8
8
8 .2
.2
.2
.2 Settings
Settings
Settings
Settings On
On
On
On Your
Your
Your
Your Device
Device
Device
Device
You can adjust the device settings to suit the way you work. To see all available
settings, slide to the Settings
Settings
Settings
Settings tab on the Home screen and tap All
All
All
All Settings
Settings
Settings
Settings .
Personal
Personal
Personal
Personal tab
tab
tab
tab
Icon
Icon
Icon
Icon Description
Description
Description
Description
Buttons
Buttons
Buttons
Buttons Assign a program or function to a hardware button. You can also set the
behavior when you press and hold the END key.
Input
Input
Input
Input Set options for each of the input methods.
Lock
Lock
Lock
Lock Set a password for your device.
Icon
Icon
Icon
Icon Description
Description
Description
Description
Menus
Menus
Menus
Menus Set which programs will appear in the Start menu.
Owner
Owner
Owner
Owner Information
Information
Information
Information Enter your personal information on your device.
Phone
Phone
Phone
Phone Customize phone settings such as ring tone, set a PIN number for your
SIM card, and more.
Sounds
Sounds
Sounds
Sounds &
&
&
& Notifications
Notifications
Notifications
Notifications Enable sounds for events, notifications, and more, and
set the type of notification for different events.
Today
Today
Today
Today Customize the appearance and the information to be displayed on the
Today screen.
Note
Note
Note
Note
You will not see the Today screen when the TouchFLO Home screen
is enabled. To display the Today screen, you can disable TouchFLO by
tapping Start
Start
Start
Start >
>
>
> Settings
Settings
Settings
Settings >
>
>
> Personal
Personal
Personal
Personal tab >
>
>
> Today
Today
Today
Today >
>
>
> Items
Items
Items
Items tab and then
clearing the TouchFLO
TouchFLO
TouchFLO
TouchFLO check box. However, you will not be able to use
the TouchFLO Home screen if you disable it.
Voice
Voice
Voice
Voice Commander
Commander
Commander
Commander Settings
Settings
Settings
Settings Customize Voice Commander features. You can
create personalized voice tags for contact names, program names, and music
names to make it easier for Voice Commander to recognize them.
System
System
System
System tab
tab
tab
tab
Icon
Icon
Icon
Icon Description
Description
Description
Description
About
About
About
About This is where you can see basic information such as the Windows Mobile ®
version and type of processor used on your device. You can also specify a name
for your device.
Certificates
Certificates
Certificates
Certificates See information about certificates that are installed on your device.

Description
Description
Description
Description
Clear
Clear
Clear
Clear Storage
Storage
Storage
Storage Reset your device to factory default settings.
Clock
Clock
Clock
Clock &
&
&
& Alarms
Alarms
Alarms
Alarms Set the device clock to the date and time of your locale or to a
visiting time zone when you're traveling. Alarms can also be set at specified days
and times of a week.
Customer
Customer
Customer
Customer Feedback
Feedback
Feedback
Feedback Set your device to automatically send information about
how you use Windows Mobile. By default, this option is disabled.
Device
Device
Device
Device Information
Information
Information
Information See information about the firmware version, hardware,
identity, and the duration of calls made on your device.
Encryption
Encryption
Encryption
Encryption Encrypt files on your storage card. Encrypted files will only be
readable on your device.
Error
Error
Error
Error Reporting
Reporting
Reporting
Reporting Enable or disable the device's error reporting function. When
this function is enabled and a program error occurs, technical data about the state
of the program and your computer will be logged in a text file and delivered to
Microsoft's technical support if you choose to send it.
External
External
External
External GPS
GPS
GPS
GPS Set the appropriate GPS communication ports, if required. You may
need to do this when there are programs on your device that access GPS data or
you have connected a GPS receiver to your device. See Help for details.
Key
Key
Key
Key Lock
Lock
Lock
Lock Lock the buttons on your device except for the POWER button when
the device is in Sleep mode. This ensures you will not switch the device on by
accident and consume unnecessary power.
Managed
Managed
Managed
Managed Programs
Programs
Programs
Programs Displays the programs that were installed on your device
using System Center Mobile Device Manager.
Memory
Memory
Memory
Memory Check the device memory allocation status and storage card
information.
Icon
Icon
Icon
Icon

Icon
Icon
Icon
Icon Description
Description
Description
Description
Microphone
Microphone
Microphone
Microphone AGC
AGC
AGC
AGC Adjust the volume of your voice automatically when you are
recording.
Power
Power
Power
Power Check the remaining battery power. You can also set the brightness of
the backlight and timeout for turning off the display (switching device to Sleep
mode) to conserve battery power.
Regional
Regional
Regional
Regional Settings
Settings
Settings
Settings Set the regional configuration to use, including the format for
displaying numbers, currency, date, and time on your device.
Remove
Remove
Remove
Remove Programs
Programs
Programs
Programs Remove programs that you installed on your device.
Screen
Screen
Screen
Screen Recalibrate the screen, apply ClearType, and change the screen text size.
Task
Task
Task
Task Manager
Manager
Manager
Manager Stop running programs and set the ( ) button to end programs
immediately when you tap the button. For more information, see "Using Task
Manager" in this chapter.
TouchFLO
TouchFLO
TouchFLO
TouchFLO You can enable or mute the finger scrolling and panning sound. You
can also enable or disable the large Start menu, and choose to show or hide the
System Status screen when title bar icons are tapped.
Windows
Windows
Windows
Windows Update
Update
Update
Update Link to Microsoft's web site and update Windows Mobile ® on
your device with the latest security patches or fixes, if they are available.

Connections
Connections
Connections
Connections tab
tab
tab
tab
Icon
Icon
Icon
Icon Description
Description
Description
Description
Advanced
Advanced
Advanced
Advanced Network
Network
Network
Network Turn on/off HSDPA, set the line type to use when making
circuit switch data (CSD) connection, and set the GPRS authentication method.
HSDPA is a 3.5G digital data service that provides high-speed downstream data
rates. In order for your device to attain the high connection speed of HSDPA, your
wireless service provider must support this feature and you must be within the
coverage area of your service provider's HSDPA network. Your device supports up
to 7.2 Mbps download speeds.
Beam
Beam
Beam
Beam Set your device to receive incoming Bluetooth beams.
Bluetooth
Bluetooth
Bluetooth
Bluetooth Turn Bluetooth on, set your device to visible mode, and scan for other
Bluetooth devices.
Comm
Comm
Comm
Comm Manager
Manager
Manager
Manager Manage your device's connections (including GPRS, Wi-Fi,
and Bluetooth), turn the phone on or off, and enable or disable the Direct Push
function.
Connection
Connection
Connection
Connection Setup
Setup
Setup
Setup Configure your device's data connections, such as 3G/GPRS,
WAP, and MMS, based on the detected or selected network operator. See"Using
Connection Setup"in this chapter for details.
Connections
Connections
Connections
Connections Set up one or more types of modem connections for your device,
such as phone dial-up, 3G/GPRS, and more, so that your device can connect to the
Internet or a private local network.
Domain
Domain
Domain
Domain Enroll
Enroll
Enroll
Enroll Enroll your device in your company's domain to let System
Center Mobile Device Manager to manage the device. Please ask your Server
Administrator for more details.
USB
USB
USB
USB to
to
to
to PC
PC
PC
PC Set the type of USB connection to your computer. Select the
ActiveSync option for synchronizing data, or use Disk Drive mode to quickly
transfer files to the storage card on your device. See"When Connecting Your
Device to a Computer"in Chapter 1 for details.

Icon
Icon
Icon
Icon Description
Description
Description
Description
Wi-Fi
Wi-Fi
Wi-Fi
Wi-Fi Scan for available wireless networks.
Wireless
Wireless
Wireless
Wireless LAN
LAN
LAN
LAN See information about the active wireless network, and customize
Wi-Fi settings.
8
8
8
8 .3
.3
.3
.3 Changing
Changing
Changing
Changing Basic
Basic
Basic
Basic Settings
Settings
Settings
Settings
Date
Date
Date
Date and
and
and
and time
time
time
time
To
To
To
To set
set
set
set the
the
the
the date
date
date
date and
and
and
and time
time
time
time
1.
1.
1.
1. On the Home screen Home
Home
Home
Home tab, tap the time display and then tap the Time
Time
Time
Time
tab.
Tip
Tip
Tip
Tip Tap the More
More
More
More tab and select the Display
Display
Display
Display the
the
the
the clock
clock
clock
clock on
on
on
on the
the
the
the title
title
title
title bar
bar
bar
bar in
in
in
in all
all
all
all
programs
programs
programs
programs option to show the clock on all screens.
2.
2.
2.
2. Select the correct time zone and change the date or time.
Note
Note
Note
Note
During synchronization, the time on your device is updated with the time on your
computer.
To
To
To
To set
set
set
set the
the
the
the date
date
date
date and
and
and
and time
time
time
time for
for
for
for a
a
a
a different
different
different
different location
location
location
location
If you visit or communicate with someone in a particular time zone often, you can
select it as your visiting time zone.
1.
1.
1.
1. On the Home screen Home
Home
Home
Home tab, tap the time display and then tap the Time
Time
Time
Time
tab.
2.
2.
2.
2. Tap Visiting
Visiting
Visiting
Visiting .
3.
3.
3.
3. Select the correct time zone and change the date or time.

The style in which numbers, currency, dates, and times are displayed is specified in
Regional
Regional
Regional
Regional settings
settings
settings
settings
regional settings.
1.
1.
1.
1. On the Home screen, slide to the Settings
Settings
Settings
Settings tab and then tap All
All
All
All Settings
Settings
Settings
Settings .
2.
2.
2.
2. On the System
System
System
System tab, tap Regional
Regional
Regional
Regional Settings
Settings
Settings
Settings >
>
>
> Region
Region
Region
Region tab and then select your
region from the list.
Note
Note
Note
Note This does not change the language of your device's operating system.
The region you select determines which options will be available on the other
tabs.
3.
3.
3.
3. To customize regional settings further, tap the appropriate tabs and set the
desired options.
Display
Display
Display
Display settings
settings
settings
settings
To
To
To
To adjust
adjust
adjust
adjust the
the
the
the screen
screen
screen
screen brightness
brightness
brightness
brightness
1.
1.
1.
1. On the Home screen, slide to the Settings
Settings
Settings
Settings tab and then tap All
All
All
All Settings
Settings
Settings
Settings .
2.
2.
2.
2. On the System
System
System
System tab, tap Power
Power
Power
Power >
>
>
> Backlight
Backlight
Backlight
Backlight tab.
3.
3.
3.
3. Clear the Auto
Auto
Auto
Auto adjust
adjust
adjust
adjust backlight
backlight
backlight
backlight check box to display the sliders for adjusting
brightness.
4.
4.
4.
4. Adjust the brightness by dragging the slider under On
On
On
On battery
battery
battery
battery power
power
power
power and
On
On
On
On external
external
external
external power
power
power
power .
To
To
To
To set
set
set
set the
the
the
the backlight
backlight
backlight
backlight to
to
to
to dim
dim
dim
dim after
after
after
after a
a
a
a time
time
time
time delay
delay
delay
delay
1.
1.
1.
1. On the Home screen, slide to the Settings
Settings
Settings
Settings tab and then tap All
All
All
All Settings
Settings
Settings
Settings .
2.
2.
2.
2. On the System
System
System
System tab, tap Power
Power
Power
Power >
>
>
> Advanced
Advanced
Advanced
Advanced tab.
3.
3.
3.
3. In On
On
On
On battery
battery
battery
battery power
power
power
power and On
On
On
On external
external
external
external power
power
power
power , select the Turn
Turn
Turn
Turn off
off
off
off backlight
backlight
backlight
backlight
if
if
if
if device
device
device
device is
is
is
is not
not
not
not used
used
used
used for
for
for
for check box, then specify the time delay.

To
To
To
To increase
increase
increase
increase or
or
or
or decrease
decrease
decrease
decrease the
the
the
the size
size
size
size of
of
of
of text
text
text
text on
on
on
on the
the
the
the screen
screen
screen
screen
1.
1.
1.
1. On the Home screen, slide to the Settings
Settings
Settings
Settings tab and then tap All
All
All
All Settings
Settings
Settings
Settings .
2.
2.
2.
2. On the System
System
System
System tab, tap Screen
Screen
Screen
Screen >
>
>
> Text
Text
Text
Text Size
Size
Size
Size tab.
3.
3.
3.
3. Move the slider to increase or decrease the text size.
Device
Device
Device
Device name
name
name
name
The device name is used to identify your device in the following situations:
•
•
•
•
•
•
•
•
•
•
•
•
Note
Note
Note
Note
Synchronizing with a computer
Connecting to a network
Restoring information from a backup
If you synchronize multiple devices with the same computer, each device must have a
unique name.
To
To
To
To change
change
change
change the
the
the
the device
device
device
device name
name
name
name
1.
1.
1.
1. On the Home screen, slide to the Settings
Settings
Settings
Settings tab and then tap All
All
All
All Settings
Settings
Settings
Settings .
2.
2.
2.
2. On the System
System
System
System tab, tap About
About
About
About >
>
>
> Device
Device
Device
Device ID
ID
ID
ID tab.
3.
3.
3.
3. Enter the device name.
Notes
Notes
Notes
Notes
•
•
•
•The device name must begin with a letter, consist of letters from A
A
A
Ato Z
Z
Z
Z, numbers
from 0
0
0
0to 9
9
9
9, and cannot contain spaces. Use the underscore character to separate
words.
•
•
•
•
If you enroll your device to your company's domain, the device name will be
changed to be the same as the one used to enroll the device.
Ringer
Ringer
Ringer
Ringer settings
settings
settings
settings
To
To
To
To change
change
change
change the
the
the
the ring
ring
ring
ring type
type
type
type and
and
and
and ring
ring
ring
ring tone
tone
tone
tone
1.
1.
1.
1. Press the TALK/SEND button to open the Phone screen and then tap Menu
Menu
Menu
Menu >
>
>
>
Options
Options
Options
Options .
2.
2.
2.
2. On the Phone
Phone
Phone
Phone tab, select the desired Ring
Ring
Ring
Ring type
type
type
type and Ring
Ring
Ring
Ring tone
tone
tone
tone from the
provided lists and then tap OK
OK
OK
OK .

Tips
Tips
Tips
Tips
•You can use *.wav
*.wav
*.wav
*.wav ,*.mid
*.mid
*.mid
*.mid ,*.mp3
*.mp3
*.mp3
*.mp3 ,*.wma
*.wma
*.wma
*.wma , or other types of sound files that you
downloaded from the Internet or copied from your computer as ring tones. To
quickly set the music file as a ring tone, tap and hold the music file and then select
Set
Set
Set
Set As
As
As
As Ringtone
Ringtone
Ringtone
Ringtone . For a complete list of supported audio file formats for ring tones,
see "Specifications" in the Appendix.
•
To use your sound files as ring tones, copy them first to the /My
/My
/My
/My Documents/My
Documents/My
Documents/My
Documents/My
Ringtones
Ringtones
Ringtones
Ringtones folder on your device, then select the sound from the Ring
Ring
Ring
Ring tone
tone
tone
tone list of
your device. For more information about copying files, see"Copying and Managing
Files"in this chapter.
Alarms
Alarms
Alarms
Alarms and
and
and
and notifications
notifications
notifications
notifications
To
To
To
To set
set
set
set an
an
an
an alarm
alarm
alarm
alarm
1.
1.
1.
1. On the Home screen Home
Home
Home
Home tab, tap the time display and then tap the Alarms
Alarms
Alarms
Alarms
tab.
2.
2.
2.
2. Tap <Description>
<Description>
<Description>
<Description> and enter a name for the alarm.
3.
3.
3.
3. Tap the day of the week for the alarm. Select multiple days by tapping each
desired day. Tap again to deselect the day.
4.
4.
4.
4. Tap the time to open a clock and set the time for the alarm.
Tip
Tip
Tip
Tip You can drag the hour and minute hands of the clock to set the time.
5.
5.
5.
5. Tap the alarm icon ( ) to specify the type of alarm you want. You can
choose a flashing light, a single sound, a repeating sound, or vibration.
6.
6.
6.
6. If you choose to play a sound, tap the list next to the Play
Play
Play
Play sound
sound
sound
sound check box
and tap the sound you want.
To
To
To
To choose
choose
choose
choose how
how
how
how to
to
to
to be
be
be
be notified
notified
notified
notified about
about
about
about events
events
events
events or
or
or
or actions
actions
actions
actions
1.
1.
1.
1. On the Home screen, slide to the Settings
Settings
Settings
Settings tab and then tap Sounds
Sounds
Sounds
Sounds >
>
>
>
Advanced
Advanced
Advanced
Advanced .
2.
2.
2.
2. On the Sounds
Sounds
Sounds
Sounds tab, choose how you want to be notified by selecting the
appropriate check boxes.

3.
3.
3.
3. On the Notifications
Notifications
Notifications
Notifications tab, in Event
Event
Event
Event , tap an event name and choose how you
want to be notified by selecting the appropriate check boxes. You can choose
from several options, such as a special sound, a message, a flashing light, or
vibrate.
Tips
Tips
Tips
Tips
•
•
•
•
Turning off sounds and flashing light notifications helps conserve battery
power.
•
•
•
•
The types of notifications that can be enabled depend on the event. For
instance, only Play
Play
Play
Play sound
sound
sound
sound and Vibrate
Vibrate
Vibrate
Vibrate notifications can be enabled if it is an
ActiveSync event.
Phone
Phone
Phone
Phone services
services
services
services
Your device can directly link to the mobile phone network, and enable you to
access and change the settings of various phone services for your device. Phone
services may include Call Forwarding, Call Waiting, Voicemail, and more. Contact
your wireless service provider to find out about the availability of phone services for
your device.
To
To
To
To access
access
access
access and
and
and
and change
change
change
change settings
settings
settings
settings of
of
of
of phone
phone
phone
phone services
services
services
services
1.
1.
1.
1. On the Home screen, slide to the Settings
Settings
Settings
Settings tab and then tap All
All
All
All Settings
Settings
Settings
Settings .
2.
2.
2.
2. On the Personal
Personal
Personal
Personal tab, tap Phone
Phone
Phone
Phone >
>
>
> Services
Services
Services
Services tab.
3.
3.
3.
3. Select the service you want to use, then tap Get
Get
Get
Get Settings
Settings
Settings
Settings .
4.
4.
4.
4. Choose your desired options, then tap OK
OK
OK
OK .
For more information about customizing settings of phone services, see Help on
your device.
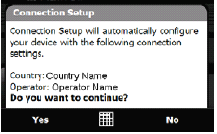
8
8
8
8 .4
.4
.4
.4 Using
Using
Using
Using Connection
Connection
Connection
Connection Setup
Setup
Setup
Setup
Connection
Connection
Connection
Connection Setup
Setup
Setup
Setup configures your device's data connections, such as GPRS, WAP,
and MMS, for you so that you do not need to enter the settings manually onto your
device. All you need to do is to select your network operator, then Connection
Setup does all the configuration for you.
To
To
To
To automatically
automatically
automatically
automatically configure
configure
configure
configure the
the
the
the device's
device's
device's
device's data
data
data
data connections
connections
connections
connections
The first time you power on your device, or when you insert a new SIM card and
then power on your device, Connection Setup will display a notification message to
inform you that it will automatically configure your device's connection settings.
1.
1.
1.
1. Tap Yes
Yes
Yes
Yes on the notification message.
Note
Note
Note
Note
If your SIM card supports multiple network operator profiles, the next message
that appears will display network profile choices. Select the profile you want to
use and tap OK
OK
OK
OK .
2.
2.
2.
2. When prompted to automatically configure your device to the proper
network settings, tap Yes
Yes
Yes
Yes .
Connection Setup configures your device's data connection settings.
3.
3.
3.
3. After the Connection Setup completes the configuration, tap Restart
Restart
Restart
Restart .
To
To
To
To manually
manually
manually
manually select
select
select
select the
the
the
the network
network
network
network operator
operator
operator
operator to
to
to
to use
use
use
use for
for
for
for data
data
data
data connections
connections
connections
connections
You can also manually select your network operator from Connection Setup's
settings screen. Connection Setup will then reconfigure your device's data
connections settings based on the operator that you selected.

1.
1.
1.
1. On the Home screen, slide to the Settings
Settings
Settings
Settings tab and then tap All
All
All
All Settings
Settings
Settings
Settings .
2.
2.
2.
2. On the Connections
Connections
Connections
Connections tab, tap Connection
Connection
Connection
Connection Setup
Setup
Setup
Setup .
3.
3.
3.
3. Select the network Country
Country
Country
Country and Operator
Operator
Operator
Operator you want to use, then tap OK
OK
OK
OK .
Note
Note
Note
Note If you choose a Country
Country
Country
Country and/or Operator
Operator
Operator
Operator that is different from the installed SIM
card network operator, you may not be able to access network services.
4.
4.
4.
4. When prompted to confirm whether you want to configure the data
connection settings based on the selected network, tap Yes
Yes
Yes
Yes .
Connection Setup configures the data connection settings.
5.
5.
5.
5. After the Connection Setup completes the configuration, tap Restart
Restart
Restart
Restart .
8
8
8
8 .5
.5
.5
.5 Using
Using
Using
Using Task
Task
Task
Task Manager
Manager
Manager
Manager
Task
Task
Task
Task Manager
Manager
Manager
Manager lets you view and stop running programs, configure the
and enable the Quick Menu on the Home screen.
To
To
To
To open
open
open
open Task
Task
Task
Task Manager
Manager
Manager
Manager
•
•
•
•
•
•
•
•
button,
Tap the Quick
Quick
Quick
Quick Menu
Menu
Menu
Menu button on the top right corner of the Home screen to
open the Quick Menu, then tap ; or
On the Home screen, slide to the Settings
Settings
Settings
Settings tab and then tap All
All
All
All Settings
Settings
Settings
Settings . On
the System
System
System
System tab, tap Task
Task
Task
Task Manager
Manager
Manager
Manager .
To
To
To
To switch
switch
switch
switch back
back
back
back to
to
to
to a
a
a
a running
running
running
running program
program
program
program
•
•
•
•
•
•
•
•
Tap the program name in the Quick Menu; or
On the Task Manager screen, tap and hold the program name on the
Running
Running
Running
Running tab, then tap Activate
Activate
Activate
Activate .
To
To
To
To configure
configure
configure
configure the
the
the
the Exit
Exit
Exit
Exit (
(
(
( )
)
)
) button
button
button
button
You can configure the Exit
Exit
Exit
Exit button to shut down running programs when the
button is tapped, or to just temporarily close the program screen but keep the
program running.

1.
1.
1.
1. On the Task Manager screen, tap the Button
Button
Button
Button tab.
Note
Note
Note
Note When the Enable
Enable
Enable
Enable the"X"button
the"X"button
the"X"button
the"X"button to
to
to
to end
end
end
end running
running
running
running programs
programs
programs
programs check box is not
selected, tapping the Exit
Exit
Exit
Exit button will only close a program screen. The program
is not ended and continues to run in the background.
2.
2.
2.
2. Select the Enable
Enable
Enable
Enable the"X"
the"X"
the"X"
the"X" button
button
button
button to
to
to
to end
end
end
end running
running
running
running programs
programs
programs
programs check box.
3.
3.
3.
3. Choose the action for shutting down programs (by tapping the
by tapping and holding the
4.
4.
4.
4. Tap OK
OK
OK
OK .
button).
button, or
To
To
To
To close
close
close
close running
running
running
running programs
programs
programs
programs from
from
from
from the
the
the
the Task
Task
Task
Task Manager
Manager
Manager
Manager
1.
1.
1.
1. On the Task Manager screen, tap the Running
Running
Running
Running tab.
2.
2.
2.
2. Do one of the following:
•
•
•
•
•
•
•
•
•
•
•
•
Tip
Tip
Tip
Tip
Select the check box of the programs that you want to close, then tap
Stop
Stop
Stop
Stop Selected
Selected
Selected
Selected .
Tap Stop
Stop
Stop
Stop All
All
All
All to close all programs in the list.
Tap Menu
Menu
Menu
Menu >
>
>
> Stop
Stop
Stop
Stop All
All
All
All but
but
but
but Selected
Selected
Selected
Selected to close all programs except those
which check boxes are selected.
You can also close running programs from the Quick Menu on the Home screen. See
"Quick Menu"in Chapter 1 for details.
To
To
To
To add
add
add
add a
a
a
a running
running
running
running program
program
program
program to
to
to
to the
the
the
the exclusive
exclusive
exclusive
exclusive list
list
list
list
If you add a running program to the Exclusive
Exclusive
Exclusive
Exclusive Programs
Programs
Programs
Programs List
List
List
List , it will not be closed
when you tap Stop
Stop
Stop
Stop Selected
Selected
Selected
Selected or Stop
Stop
Stop
Stop All
All
All
All and will not be listed in the Quick Menu
on the Home Screen.
1.
1.
1.
1. On the Task Manager screen, tap the Running
Running
Running
Running tab.
2.
2.
2.
2. Tap and hold the program name, then tap Add
Add
Add
Add Exclusive
Exclusive
Exclusive
Exclusive .
Tip
Tip
Tip
Tip To remove a program from the exclusive list, tap the Exclusive
Exclusive
Exclusive
Exclusive tab, select the check
box of the program, then tap Remove
Remove
Remove
Remove .

To
To
To
To set
set
set
set the
the
the
the sorting
sorting
sorting
sorting preference
preference
preference
preference and
and
and
and program
program
program
program icon
icon
icon
icon size
size
size
size in
in
in
in the
the
the
the Quick
Quick
Quick
Quick Menu
Menu
Menu
Menu
1.
1.
1.
1. On the Task Manager screen, tap the Others
Others
Others
Others tab.
2.
2.
2.
2. In Sort
Sort
Sort
Sort programs
programs
programs
programs in
in
in
in Quick
Quick
Quick
Quick Menu
Menu
Menu
Menu by
by
by
by , choose whether to sort according to
Program
Program
Program
Program name
name
name
name or Memory
Memory
Memory
Memory usage
usage
usage
usage . The list will be sorted in ascending order.
3.
3.
3.
3. In Program
Program
Program
Program icon
icon
icon
icon size
size
size
size in
in
in
in Quick
Quick
Quick
Quick Menu
Menu
Menu
Menu , choose whether to use Small
Small
Small
Small size
size
size
size or
Large
Large
Large
Large size
size
size
size .
8
8
8
8 .6
.6
.6
.6 Protecting
Protecting
Protecting
Protecting Your
Your
Your
Your Device
Device
Device
Device
Protect
Protect
Protect
Protect your
your
your
your SIM
SIM
SIM
SIM card
card
card
card with
with
with
with a
a
a
a PIN
PIN
PIN
PIN
You can protect your SIM card from unauthorized use by assigning a PIN (personal
identification number). The default SIM card PIN is provided by your wireless service
provider.
To
To
To
To enable
enable
enable
enable the
the
the
the SIM
SIM
SIM
SIM card
card
card
card PIN
PIN
PIN
PIN
1.
1.
1.
1. On the Home screen, slide to the Settings
Settings
Settings
Settings tab and then tap All
All
All
All Settings
Settings
Settings
Settings .
2.
2.
2.
2. On the Personal
Personal
Personal
Personal tab, tap Phone
Phone
Phone
Phone >
>
>
> PIN/PIN2
PIN/PIN2
PIN/PIN2
PIN/PIN2 tab.
3.
3.
3.
3. Select the Require
Require
Require
Require PIN
PIN
PIN
PIN when
when
when
when phone
phone
phone
phone is
is
is
is used
used
used
used check box.
4.
4.
4.
4. Enter the PIN number and then tap OK
OK
OK
OK . To change the PIN at any time, tap
Change
Change
Change
Change PIN
PIN
PIN
PIN .
Tip
Tip
Tip
Tip Emergency calls can be placed at any time, without requiring a PIN.
Protect
Protect
Protect
Protect your
your
your
your device
device
device
device with
with
with
with a
a
a
a password
password
password
password
You can help keep your data more secure by requiring a password every time the
device is turned on.
To
To
To
To set
set
set
set a
a
a
a device
device
device
device password
password
password
password
1.
1.
1.
1. On the Home screen, slide to the Settings
Settings
Settings
Settings tab and then tap All
All
All
All Settings
Settings
Settings
Settings .
2.
2.
2.
2. On the Personal
Personal
Personal
Personal tab, tap Lock
Lock
Lock
Lock .

3.
3.
3.
3. Select the Prompt
Prompt
Prompt
Prompt if
if
if
if device
device
device
device unused
unused
unused
unused for
for
for
for check box, then specify the idle time
before the device requires a password.
4.
4.
4.
4. In the Password
Password
Password
Password type
type
type
type box, select the type of password you would like to use.
Tip
Tip
Tip
Tip
If your device is configured to connect to a network, use an alphanumeric
password for increased security.
5.
5.
5.
5. Enter the password in both the Password
Password
Password
Password and Confirm
Confirm
Confirm
Confirm boxes.
6.
6.
6.
6. Tap OK
OK
OK
OK . The next time the device is turned on, you will be prompted to enter
your password.
Notes
Notes
Notes
Notes
•
•
•
•
To ensure that you can always make emergency calls, do not begin your password
with the digits of your local emergency number.
•
•
•
•
If you entered a hint, the hint will be displayed after the wrong password is entered
five times.
•
•
•
•Each time a wrong password is entered, the device response time gets longer until
the device appears to be not responding.
•
•
•
•
If you forget your password, you can hard reset or clear the device memory. Before
you do this, make sure you back up your data and files so that you can restore
them back to your device. For more information about hard resetting the device
and clearing the memory, see"Resetting Your Device"in this chapter.
Encrypt
Encrypt
Encrypt
Encrypt files
files
files
files on
on
on
on your
your
your
your storage
storage
storage
storage card
card
card
card
You can set your device to encrypt files as they are saved on the storage card.
1.
1.
1.
1. On the Home screen, slide to the Settings
Settings
Settings
Settings tab and then tap All
All
All
All Settings
Settings
Settings
Settings .
2.
2.
2.
2. On the System
System
System
System tab, tap Encryption
Encryption
Encryption
Encryption .
3.
3.
3.
3. Select Encrypt
Encrypt
Encrypt
Encrypt files
files
files
files when
when
when
when placed
placed
placed
placed on
on
on
on a
a
a
a storage
storage
storage
storage card
card
card
card .
Notes
Notes
Notes
Notes
•
•
•
•
Encrypted files can only be read on the device that encrypted them.
•
•
•
•
Encrypted files are opened just like other files, provided you are using the device
that encrypted them. There is no separate step for you to take to read these files.

Important
Important
Important
Important If Encrypt
Encrypt
Encrypt
Encrypt files
files
files
files when
when
when
when placed
placed
placed
placed on
on
on
on a
a
a
a storage
storage
storage
storage card
card
card
card is enabled, backup all files from
the storage card before
before
before
before using Clear Storage, hard reset, or updating the ROM
system software. Otherwise you will no longer be able to access the encrypted files
on the storage card. Use ActiveSync or Windows Mobile Device Center to transfer
files between your storage card and computer. After the procedure, copy your files
back to the storage card.
8
8
8
8 .7
.7
.7
.7 Managing
Managing
Managing
Managing Memory
Memory
Memory
Memory
To
To
To
To see
see
see
see how
how
how
how much
much
much
much memory
memory
memory
memory is
is
is
is available
available
available
available for
for
for
for use
use
use
use
1.
1.
1.
1. On the Home screen, slide to the Settings
Settings
Settings
Settings tab and then tap All
All
All
All Settings
Settings
Settings
Settings .
2.
2.
2.
2. On the System
System
System
System tab, tap Memory
Memory
Memory
Memory >Main
Main
Main
Main tab. The amount of memory
allocated to data storage versus program storage is displayed, as well as the
amount of memory in use versus the available memory.
To
To
To
To see
see
see
see the
the
the
the available
available
available
available space
space
space
space of
of
of
of the
the
the
the storage
storage
storage
storage card
card
card
card
1.
1.
1.
1. On the Home screen, slide to the Settings
Settings
Settings
Settings tab and then tap All
All
All
All Settings
Settings
Settings
Settings .
2.
2.
2.
2. On the System
System
System
System tab, tap Memory
Memory
Memory
Memory >
>
>
> Storage
Storage
Storage
Storage Card
Card
Card
Card tab.
If your device is running low on memory, try the following to free memory on your
device:
•
•
•
•
•
•
•
•
•
•
•
•
•
•
•
•
•
•
•
•
Close programs which are not in use.
Install a storage card and then move files and e-mail attachments to the
storage card.
Delete unnecessary files. Tap Start
Start
Start
Start >
>
>
> Programs
Programs
Programs
Programs >
>
>
> File
File
File
File Explorer
Explorer
Explorer
Explorer . Tap and hold
the file, and tap Delete
Delete
Delete
Delete .
Delete large files. To find large files on your device, tap Start
Start
Start
Start >
>
>
> Programs
Programs
Programs
Programs >
>
>
>
Search
Search
Search
Search . In the Type
Type
Type
Type list, tap Larger
Larger
Larger
Larger than
than
than
than 64
64
64
64 KB
KB
KB
KB , and tap Search
Search
Search
Search .
In Opera Mobile or Internet Explorer Mobile, delete temporary Internet files
and clear history information.

•
•
•
•
•
•
•
•
Remove programs you no longer use.
Reset your device.
8
8
8
8 .8
.8
.8
.8 Resetting
Resetting
Resetting
Resetting Your
Your
Your
Your Device
Device
Device
Device
Soft
Soft
Soft
Soft reset
reset
reset
reset
Occasionally, you may need to reset your device. A soft (or normal) reset of your
device clears all active program memory and shuts down all active programs. This
can be useful when your device is running slower than normal, or a program is not
performing properly. A soft reset is also necessary after the installation of some
programs. If a soft reset is performed when programs are running, unsaved work
will be lost.
To
To
To
To perform
perform
perform
perform a
a
a
a soft
soft
soft
soft reset
reset
reset
reset
1.
1.
1.
1. Remove the back cover.
(See"To remove the back cover"in
Chapter 1 for instructions.)
2.
2.
2.
2. Pull out the stylus, and use the
stylus tip to press the RESET
button located near the battery
compartment.
Your device then restarts and displays the
Home screen.
Hard
Hard
Hard
Hard reset
reset
reset
reset
You can also perform a hard reset (also known as a full reset). A hard reset should
only be performed if a normal reset does not solve a system problem. After a
hard reset, the device is restored to its default settings
—
the way it was when you
first purchased it and turned it on. Any programs you installed, data you entered,

and settings you customized on your device will be lost. Only Windows Mobile ®
software and other pre-installed programs will remain.
Warning!
Warning!
Warning!
Warning!
Your device will be set back to factory default settings. Make sure that any
additional installed programs and/or user data have been backed up before you
perform a hard reset.
Important
Important
Important
Important If Encrypt
Encrypt
Encrypt
Encrypt files
files
files
files when
when
when
when placed
placed
placed
placed on
on
on
on a
a
a
a storage
storage
storage
storage card
card
card
card is enabled, backup all files from
the storage card before
before
before
before using Clear Storage, hard reset, or updating the ROM
system software. Otherwise you will no longer be able to access the encrypted files
on the storage card. Use ActiveSync or Windows Mobile Device Center to transfer
files between your storage card and computer. After the procedure, copy your files
back to the storage card.
To
To
To
To perform
perform
perform
perform a
a
a
a hard
hard
hard
hard reset
reset
reset
reset
1.
1.
1.
1. Power off your device.
2.
2.
2.
2. Press and hold the VOLUME DOWN and ENTER buttons, and then press the
POWER button.
The following message then appears on the screen:
This
This
This
This operation
operation
operation
operation will
will
will
will delete
delete
delete
delete
all
all
all
all your
your
your
your personal
personal
personal
personal data,
data,
data,
data,
and
and
and
and reset
reset
reset
reset all
all
all
all settings
settings
settings
settings
to
to
to
to manufacturer
manufacturer
manufacturer
manufacturer default.
default.
default.
default.
Press
Press
Press
Press Volume
Volume
Volume
Volume Up
Up
Up
Up to
to
to
to restore
restore
restore
restore
manufacturer
manufacturer
manufacturer
manufacturer default,
default,
default,
default, or
or
or
or
press
press
press
press other
other
other
other keys
keys
keys
keys to
to
to
to cancel.
cancel.
cancel.
cancel.
3.
3.
3.
3. Press the VOLUME UP button to perform the hard reset, or press any other
button to cancel the reset.

Clear
Clear
Clear
Clear Storage
Storage
Storage
Storage
1.
1.
1.
1. On the Home screen, slide to the Settings
Settings
Settings
Settings tab and then tap All
All
All
All Settings
Settings
Settings
Settings .
2.
2.
2.
2. On the System
System
System
System tab, tap Clear
Clear
Clear
Clear Storage
Storage
Storage
Storage .
3.
3.
3.
3. Enter" 1234
1234
1234
1234 "and then tap Yes
Yes
Yes
Yes .
13.9
13.9
13.9
13.9 Windows
Windows
Windows
Windows Update
Update
Update
Update
You can update Windows Mobile ® on your device with the latest updates, security
patches or fixes, if these are available.
To
To
To
To set
set
set
set up
up
up
up Windows
Windows
Windows
Windows Update
Update
Update
Update
The first time you run Windows Update, you need to set up how you want Windows
Update to check for patches on the Microsoft web site.
1.
1.
1.
1. On the Home screen, slide to the Settings
Settings
Settings
Settings tab and then tap All
All
All
All Settings
Settings
Settings
Settings .
2.
2.
2.
2. On the System
System
System
System tab, tap Windows
Windows
Windows
Windows Update
Update
Update
Update .
3.
3.
3.
3. On the Update Setup screen, tap Next
Next
Next
Next .
4.
4.
4.
4. Choose how you want to check for updates, Manual
Manual
Manual
Manual or Automatic
Automatic
Automatic
Automatic , then tap
Next
Next
Next
Next .
Note
Note
Note
Note If you select Automatic
Automatic
Automatic
Automatic , you will be asked if you want to use your current data
plan to check for updates. Select or clear the Use
Use
Use
Use my
my
my
my data
data
data
data plan
plan
plan
plan to
to
to
to check
check
check
check for
for
for
for and
and
and
and
download
download
download
download updates
updates
updates
updates check box and tap Next
Next
Next
Next .
You can also use Clear Storage to reset your device back to factory default settings.
5.
5.
5.
5. Tap Finish
Finish
Finish
Finish .
To
To
To
To check
check
check
check for
for
for
for updates
updates
updates
updates
1.
1.
1.
1. On the Home screen, slide to the Settings
Settings
Settings
Settings tab and then tap All
All
All
All Settings
Settings
Settings
Settings .
2.
2.
2.
2. On the System
System
System
System tab, tap Windows
Windows
Windows
Windows Update
Update
Update
Update .
3.
3.
3.
3. Tap Check
Check
Check
Check Now
Now
Now
Now .
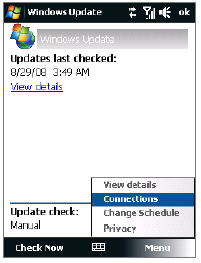
Note
Note
Note
Note
Windows Mobile ® updates may not be available at all times. Check the Windows
Mobile ® web site for update information.
To
To
To
To change
change
change
change Windows
Windows
Windows
Windows Update
Update
Update
Update options
options
options
options
1.
1.
1.
1. On the Home screen, slide to the Settings
Settings
Settings
Settings tab and then tap All
All
All
All Settings
Settings
Settings
Settings .
2.
2.
2.
2. On the System
System
System
System tab, tap Windows
Windows
Windows
Windows Update
Update
Update
Update .
3.
3.
3.
3. Tap Menu
Menu
Menu
Menu and select the option you want to
change.
•
•
•
•
•
•
•
•
Tap Connections
Connections
Connections
Connections to change how the
device connects to the Internet when
checking for updates.
Tap Change
Change
Change
Change Schedule
Schedule
Schedule
Schedule to change how
Windows Update checks for Windows
Mobile ® updates .
.
.
.

8
8
8
8 .10
.10
.10
.10 Battery
Battery
Battery
Battery Saving
Saving
Saving
Saving Tips
Tips
Tips
Tips
How long your battery power lasts depends on the battery type and how you use
your device. Try the following to help conserve battery life:
•
•
•
•
•
•
•
•
•
•
•
•
•
•
•
•
•
•
•
•
•
•
•
•
•
•
•
•
When the device is not in use, press POWER to switch off the display.
On the Home screen, slide to the Settings
Settings
Settings
Settings tab and then tap All
All
All
All Settings
Settings
Settings
Settings . On
the System
System
System
System tab, tap Power
Power
Power
Power >
>
>
> Advanced
Advanced
Advanced
Advanced tab of the Power settings screen.
Here, you can specify the time before your device automatically turns off the
display and backlight to conserve battery power. For optimum conservation,
specify 3 minutes or less.
On the Home screen, slide to the Settings
Settings
Settings
Settings tab and then tap All
All
All
All Settings
Settings
Settings
Settings . On
the System
System
System
System tab, tap Power
Power
Power
Power >
>
>
> Backlight
Backlight
Backlight
Backlight tab. Clear the Auto
Auto
Auto
Auto adjust
adjust
adjust
adjust backlight
backlight
backlight
backlight
check box to be able to adjust the backlight brightness settings.
Use the AC adapter to plug your device into an external power outlet
whenever possible, especially when using a storage card or when using a
modem or other peripherals.
Turn Bluetooth off when you are not using it. Make your device visible to
other devices only when you are trying to establish a Bluetooth partnership.
For more information about Bluetooth, see Chapter 9.
On the Home screen, slide to the Settings
Settings
Settings
Settings tab and then tap
Communications
Communications
Communications
Communications . On the Comm Manager screen, turn off Wi-Fi or your
active data connection when not in use.
Tap Start
Start
Start
Start >
>
>
> Settings
Settings
Settings
Settings >
>
>
> Connections
Connections
Connections
Connections tab >
>
>
> Wi-Fi
Wi-Fi
Wi-Fi
Wi-Fi and then tap Menu
Menu
Menu
Menu >
>
>
>
Advanced
Advanced
Advanced
Advanced . From the Turn
Turn
Turn
Turn off
off
off
off Wi-Fi
Wi-Fi
Wi-Fi
Wi-Fi if
if
if
if not
not
not
not connected
connected
connected
connected in
in
in
in list, select a timeout
period so that Wi-Fi can be automatically turned off when your device is not
connected to any wireless network for some time.

•
•
•
•
•
•
•
•
Lower the volume.
Close battery-intensive programs, such as the Camera, when you are done
using them. Make sure the programs are ended and are not continuously
running in the background. Refer to"Using Task Manager"in this chapter for
information on closing programs.

Chapter
Chapter
Chapter
Chapter 9
9
9
9
Sip
Sip
Sip
Sip Settings
Settings
Settings
Settings
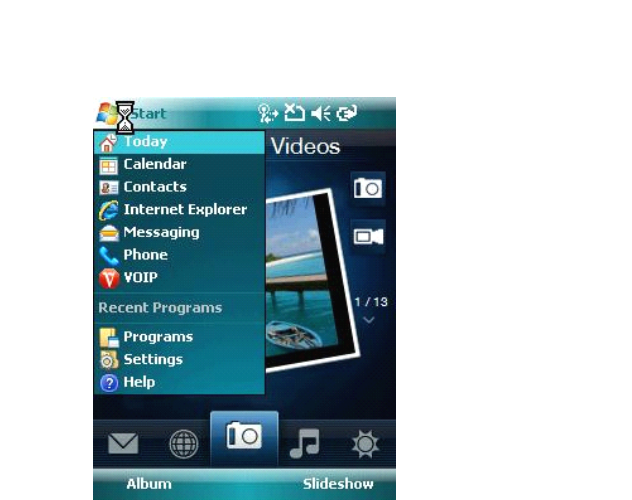
9.1
9.1
9.1
9.1 Press
Press
Press
Press Start
Start
Start
Start Menu
Menu
Menu
Menu and
and
and
and Click
Click
Click
Click Menu
Menu
Menu
Menu of
of
of
of Programs
Programs
Programs
Programs
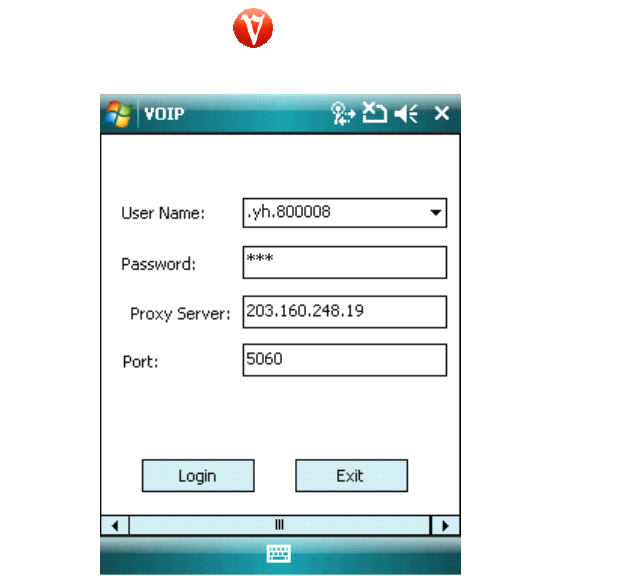
9.2
9.2
9.2
9.2 Find
Find
Find
Find the
the
the
the icon
icon
icon
icon of
of
of
of and
and
and
and Click
Click
Click
Click in
in
in
in
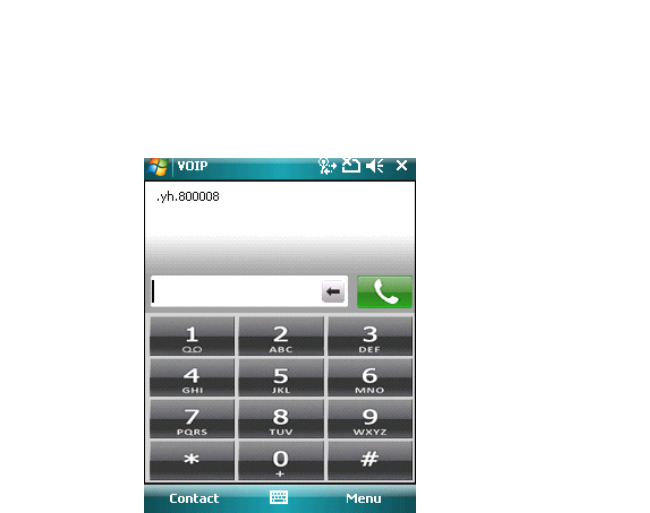
9.3
9.3
9.3
9.3 Log
Log
Log
Log in
in
in
in
Enter dialling platform. If you register successfully, it will show your sip account name, at this time to
make voip callings according to different sip server dialing method.
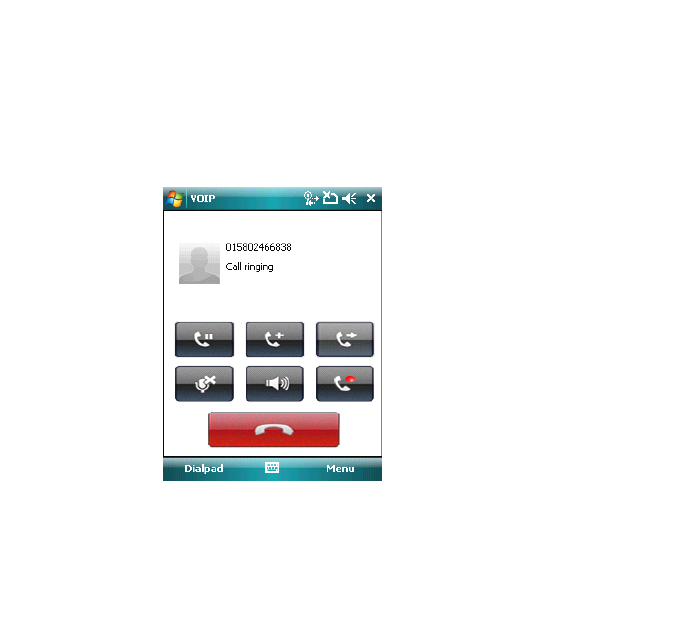
9.4
9.4
9.4
9.4 Dialing
Dialing
Dialing
Dialing Platform
Platform
Platform
Platform Menus
Menus
Menus
Menus
Contact menu in the left,Menu is for configuration
R e-register :update your sip registering C onfig:
Sip config: Add sip settings
C all history
Exit: Exit the whole sip config
14.4
14.4
14.4
14.4 Some
Some
Some
Some notes
notes
notes
notes on
on
on
on this
this
this
this sip
sip
sip
sip software
software
software
software
This Sip software speech codec with G.711/G.729a/b/G.723.1/GSM, WIFI Seamless
roaming, support voip sip callings under EDGE/GPRS (depends on network speed )and
wifi ,support In-bound DTMF