7signal ABGN-EYE-APU3 7Signal Sapphire User Manual Deployment Guide
7signal 7Signal Sapphire Deployment Guide
7signal >
Contents
- 1. user manual 1
- 2. user manual 2
- 3. user manual 3
- 4. user manaul 1
user manual 2

7signal Ltd, Panuntie 6, FI-00620 HELSINKI, FINLAND, +358 40 777 7611, info@7signal.com, www.7signal.com
7signal Sapphire
Deployment Guide
Release 3.1
Preface i
7signal Ltd, Panuntie 6, FI-00620 HELSINKI, FINLAND, +358 40 777 7611, info@7signal.com, www.7signal.com
7signal Sapphire Deployment Guide Release 3.1
PREFACE
Document scope
This document is aimed for people familiarizing themselves with 7signal Sapphire before
deployment and to aid the actual deployment. After completion of this document 7signal
Sapphire is installed, up and running ready for Wireless Quality Advancement.
This document does not describe how the software operates, how to configure testing or how
to read the measurements. The actual use of 7signal Sapphire applications is explained in
documents 7signal Sapphire Carat User Guide and 7signal Sapphire Loupe User Guide.
FCC Warning
The radiated output power of the 7signal Sapphire Eye complies with the FCC RF exposure
limits. To avoid the possibility of exceeding the FCC radio frequency exposure limits, a distance
of at least 20 cm should be kept with the user and the device while operating.
The FCC ID for 7signal Sapphire Eye is YLF-2010-08-APU2 for
IEEE802.11a/b/g.
FCC APPROVAL PENDING ON RELEASE DATE
The FCC ID for 7signal Sapphire Eye is YLF-EYE-ABGN-APU3 for
IEEE802.11a/b/g/n.
This device is restricted to indoor-only use in 5150.0-5250.0 MHz and
5470.0 -5725.0 MHz bands
Note to the user
Any uninstructed modification to the 7signal products may result in violation of FCC
requirements.

Preface ii
7signal Ltd, Panuntie 6, FI-00620 HELSINKI, FINLAND, +358 40 777 7611, info@7signal.com, www.7signal.com
7signal Sapphire Deployment Guide Release 3.1
Contact information
Contact us at 7signal
by mail: Panuntie 6, FI-00620 Helsinki, Finland
by email: info@7signal.com
by phone: +358 40 777 7611 (exchange)
report defects by email: defect-report@7signal.com
any other request: support@7signal.com

Table of Contents iii
7signal Ltd, Panuntie 6, FI-00620 HELSINKI, FINLAND, +358 40 777 7611, info@7signal.com, www.7signal.com
7signal Sapphire Deployment Guide Release 3.1
TABLE OF CONTENTS
1 7signal WQA solution ........................................................................................................1
1.1 Solution Overview ........................................................................................................... 2
1.2 Hardware......................................................................................................................... 2
1.2.1 802.11a/b/g ......................................................................................................... 2
1.2.2 802.11a/b/g/n ...................................................................................................... 3
2 Requirements ...................................................................................................................4
2.1 Carat server requirements .............................................................................................. 4
2.2 Sonar server requirements ............................................................................................. 4
2.3 Firewall settings .............................................................................................................. 5
3 7signal Sapphire Connectivity ............................................................................................6
3.1 Communication security ................................................................................................. 6
3.2 Supportive connections .................................................................................................. 6
3.2.1 SSH for Eye ........................................................................................................... 6
4 Installing 7signal Sapphire .................................................................................................7
4.1 Operating System installation tips .................................................................................. 7
4.1.1 Hard disk partitioning .......................................................................................... 7
4.2 Setting up Eyes ................................................................................................................ 8
4.3 Mounting Eyes ................................................................................................................ 9
4.3.1 Roof Install ......................................................................................................... 10
4.3.2 Wall Install (optional) ......................................................................................... 10
4.3.3 Pole Install (optional) ......................................................................................... 11
4.3.4 Eye installation examples .................................................................................. 12
4.4 Installing 7signal Sapphire software ............................................................................. 13
4.4.1 Carat server install (Linux) ................................................................................. 13
4.4.2 DBMS install (Linux) ........................................................................................... 17
4.4.3 Loupe server install (Linux) ................................................................................ 20
4.4.4 Sonar install (Linux) ............................................................................................ 22
4.4.5 Sonar install (Windows) ..................................................................................... 24
4.4.6 Carat GUI install (Linux) ..................................................................................... 28
4.4.7 Carat GUI install (Windows) ............................................................................... 30
5 Upgrading Sapphire ........................................................................................................ 34
5.1 Copy the latest Sapphire release to the hard disk (Linux) ............................................ 34

Table of Contents iv
7signal Ltd, Panuntie 6, FI-00620 HELSINKI, FINLAND, +358 40 777 7611, info@7signal.com, www.7signal.com
7signal Sapphire Deployment Guide Release 3.1
5.2 Eye upgrade .................................................................................................................. 34
5.2.1 Eye upgrade (GUI) .............................................................................................. 34
5.2.2 Eye upgrade (command line) ............................................................................. 36
5.3 Stop Sapphire solution (Linux) ...................................................................................... 37
5.4 Carat server upgrade (Linux) ......................................................................................... 38
5.5 DBMS upgrade (Linux)................................................................................................... 39
5.6 Carat GUI upgrade (Linux) ............................................................................................. 40
5.7 Loupe server upgrade (Linux) ....................................................................................... 41
5.8 Sonar upgrade (Linux) ................................................................................................... 42
5.9 Carat GUI upgrade (Windows) ...................................................................................... 43
5.10 Start Sapphire solution (Linux) .................................................................................... 47
5.11 Start Automated Testing ............................................................................................. 47
6 Uninstalling Sapphire ...................................................................................................... 48
6.1 Uninstall Loupe server (Linux) ....................................................................................... 48
6.2 Uninstall Carat server (Linux) ........................................................................................ 48
6.3 Uninstall DBMS (Linux) .................................................................................................. 49
6.4 Uninstall Carat GUI (Linux) ............................................................................................ 50
6.5 Uninstall Carat GUI (Windows) ..................................................................................... 50
6.6 Uninstall Sonar (Linux) .................................................................................................. 51
7 Log Settings .................................................................................................................... 52
7.1 Carat server log ............................................................................................................. 52
7.2 Carat GUI log ................................................................................................................. 52
7.3 Eye log ........................................................................................................................... 53
7.4 Loupe log ....................................................................................................................... 53
7.5 Sonar log (Linux) ............................................................................................................ 54
8 Sapphire Process Management ....................................................................................... 55
8.1 Carat .............................................................................................................................. 55
8.2 Loupe ............................................................................................................................. 55
8.3 Sonar ............................................................................................................................. 55
8.4 Eye ................................................................................................................................. 55
9 Troubleshoot .................................................................................................................. 56
9.1 GUI client cannot connect to Carat server .................................................................... 56
9.2 Cannot add Eye unit ...................................................................................................... 56
9.3 No access to Sonar server, active test failed ................................................................ 56

Table of Contents v
7signal Ltd, Panuntie 6, FI-00620 HELSINKI, FINLAND, +358 40 777 7611, info@7signal.com, www.7signal.com
7signal Sapphire Deployment Guide Release 3.1
9.4 Loupe client cannot connect to Carat server ................................................................ 57
9.5 Eye IP address forgotten ............................................................................................... 57
10 Command-line utility for Eye ......................................................................................... 58
10.1 Overview ..................................................................................................................... 58
10.2 IP command group ...................................................................................................... 58
10.3 Keys command group ................................................................................................. 59
10.4 AP command group..................................................................................................... 59
10.5 Conn command group ................................................................................................ 59
10.6 Run command group ................................................................................................... 60
10.7 Txp command group ................................................................................................... 61
10.8 Log command group ................................................................................................... 62
11 Command-line tool for database management .............................................................. 64
11.1 Dump command group ............................................................................................... 64
11.2 Logsetup command ..................................................................................................... 64
11.3 Backup command group ............................................................................................. 65
11.4 Show command group ................................................................................................ 66
11.5 Delete command group .............................................................................................. 67
11.6 Reinit command group................................................................................................ 67
Appendix A. Logical connections ........................................................................................ 69
Appendix B. Bandwidth requirements ................................................................................ 75
11.6.1 Eye – Sonar ...................................................................................................... 75
11.6.2 Eye – Carat ....................................................................................................... 75
11.6.3 Carat server – Carat GUI client ........................................................................ 76
11.6.4 Loupe server – Loupe client (browser) ............................................................ 76
11.6.5 DB2 and Loupe server, DB2 and Carat server .................................................. 76

1 7signal WQA solution 1
7signal Ltd, Panuntie 6, FI-00620 HELSINKI, FINLAND, +358 40 777 7611, info@7signal.com, www.7signal.com
7signal Sapphire Deployment Guide Release 3.1
1 7signal WQA solution
Welcome to learn about 7signal Sapphire that provides you a new way to continuously and
automatically measure the health and quality of a wireless network from the user's
perspective. A commonly used term here is wireless quality assurance, or WQA. Companies
and their business processes are becoming increasingly dependent on the performance and
service quality of their wireless networks. Thanks to the Sapphire WQA solution, companies
can integrate the quality management of wireless networks with their existing IT and
communications technology services.
7signal Sapphire uses monitoring stations (Sapphire Eye) to monitor performance and quality
in WLAN cells and to monitor the surrounding radio frequency environment. The performance
of the customer’s network is tested against a test server (Sonar). Interactive tests, monitoring
stations, and parameters for automatic measurement are managed with a centralized
management tool (Sapphire Carat). The measurement results are reported via a reporting
application (Sapphire Loupe).
The monitoring station, Sapphire Eye, continuously monitors the selected WLAN channels via
passive listening, which does not have an impact on network performance. It can also emulate
a client device in the target network and then use the network and the services provided
through it. By analyzing the measurement results, the solution can detect network
performance and quality-of-service (QoS).The solution can also produce proactive statistics on
the predicted user experience of network performance, which enables the company to
increase network capacity before the users notice loss of performance.
In user emulation tests, also known as active tests, Eye connects to the test server (Sonar) over
the wireless network and uses it like an ordinary production service. The use may include mass
file transfers, browser downloads, wireless VoIP calls, or connections to another production
server. Sapphire tests the end-user experience by examining the entire data chain from the
client to the production service. Active tests can monitor the network even when there are no
users in the network. This makes it possible to forecast performance problems and to take
corrective actions even before the service level suffers. Active tests show the availability and
quality of services offered over the network, and they help administrators to see why some
applications with their various demands for network performance do not work as expected in
the network or some of its areas. When problems occur, active tests can also aid to locate of
the problem area in the network topology, which often includes WLAN, LAN, and WAN
elements.
The key differentiators of 7signal Sapphire are user emulation, superb coverage, continuous
monitoring, and visibility of network health. Competing solutions are often based on
monitoring the access point settings. As a result, they do not give any indication of the service
quality experienced by the end user. In such limited solutions, the service quality parameters
measured are the same as in wired networks. Sapphire, by contrast, produces a
comprehensive picture of the radio connection quality, where delay, number of
retransmissions, and packet loss are taken into account, in addition to the commonly
measured parameters.
1 7signal WQA solution 2
7signal Ltd, Panuntie 6, FI-00620 HELSINKI, FINLAND, +358 40 777 7611, info@7signal.com, www.7signal.com
7signal Sapphire Deployment Guide Release 3.1
1.1 Solution Overview
The 7signal Sapphire quality monitoring solution consists of Sapphire Eye monitoring stations,
Sonar test servers, the Sapphire Carat management software, and Sapphire Loupe for viewing
and reporting on results.
1.2 Hardware
7signal Sapphire Eye is a wireless probe or a monitoring station that is installed in a central
position within the WLAN network. Currently there are two versions of the Eye: version
supporting 802.11a/b/g standards and version supporting 802.11a/b/g/n standards. .
1.2.1 802.11a/b/g
802.11a/b/g version of Eye has the following main features (partly optional):
Mechanical parts injection molded polycarbonate plastic
Linux computer, 1GB Flash memory
WLAN radio module, 802.11 a/b/g support (2.4 GHz, 4.9 GHz-5.8 GHz)
Spectrum Analyzer component
6 sectored high gain antennas covering 360 degrees in horizontal direction, 1 sectored
high gain antenna in vertical direction
RF board with antenna beam selection capability and low noise amplifiers in receiver
chain
Battery
Heating element
1 7signal WQA solution 3
7signal Ltd, Panuntie 6, FI-00620 HELSINKI, FINLAND, +358 40 777 7611, info@7signal.com, www.7signal.com
7signal Sapphire Deployment Guide Release 3.1
Electrical compass
GPS receiver
1
2
1.2.2 802.11a/b/g/n
802.11a/b/g/n version of Eye has the following main features (partly optional):
Mechanical parts injection molded polycarbonate plastic
Linux computer, 1GB Flash memory
WLAN radio module, 802.11 a/b/g/n support (2.4 GHz, 4.9 GHz-5.8 GHz)
Expansion card slots inside the unit: One Mini-PCI and one PCI Express for future use
Micro SD card slot inside the unit
Spectrum Analyzer component
6 sectored high gain antennas covering 360 degrees in horizontal direction, 1 sectored
high gain antenna in vertical direction
RF board with antenna beam selection capability and low noise amplifiers in receiver
chain
Battery
Heating element
Electrical compass
GPS receiver1 2
Reset button1
Power LED
1
Software support will be available in future releases-
2
GPS receiver may be augmented with an external antenna that is not provided by 7signal.

2 Requirements 4
7signal Ltd, Panuntie 6, FI-00620 HELSINKI, FINLAND, +358 40 777 7611, info@7signal.com, www.7signal.com
7signal Sapphire Deployment Guide Release 3.1
2 REQUIREMENTS
2.1 Carat server requirements
Carat server controls Eye units and collects measurement results to the database. Carat server
runs on Linux operating system and can be installed to dedicated server or virtual
environment.
The Carat server minimum requirements are below:
• Dual core x86 32-bit Intel and AMD processors
• minimum 2 GB RAM
• installation minimum 10GB hard disk space required
• recommended minimum database space 100GB
o depending on target network size, (for reference, typical data volume =
uncompressed raw measurement data /AP/month = circa 50MB)
• Network connection
• CentOS 5.4 or Red Hat Enterprise Linux 5.4
2.2 Sonar server requirements
Sonar is an end-point software for Sapphire active tests. Sonar server runs on Linux operating
system and can be installed to dedicated server or virtual environment.
The Sonar server minimum requirements are below:
• Dual core x86 32-bit Intel and AMD processors
• Network connection
• CentOS 5.4 or Red Hat Enterprise Linux 5.4
• Minimum 2GB RAM
To best reflect the business-application behavior, Sonar server would benefit from similar
characteristics than the server running the business application. For example, the Windows
TCP/IP stack implementation may limit performance by default.
2 Requirements 5
7signal Ltd, Panuntie 6, FI-00620 HELSINKI, FINLAND, +358 40 777 7611, info@7signal.com, www.7signal.com
7signal Sapphire Deployment Guide Release 3.1
2.3 Firewall settings
The following ports should be opened in firewalls:
Source IP/Mask
Destination IP/Mask
Protocol/Port
Comments
Carat server connections to Eye
Carat server IP/32
Eye Ethernet IP/32
TCP/77993
Eye management
Carat server IP/32
Eye Ethernet IP/32
TCP/22
Eye (SSH)
Carat GUI connections to Carat server
Carat GUI IP/32
Carat server IP/32
TCP/477773
Carat GUI
Carat GUI IP/32
Carat server IP/32
TCP/1099
Carat GUI RMI
Loupe client (web browsers) connections to Carat server
Browser host IP/32
Carat server IP/32
TCP/803
Loupe (HTTP)
Browser host IP/32
Carat server IP/32
TCP/4433
Loupe (HTTPS)
Eye connections to Sonar server
Eye WLAN IP/32
Sonar server IP/32
TCP/803
Sonar tests
Eye WLAN IP/32
Sonar server IP/32
ICMP
Sonar RTT
Eye WLAN IP/32
Sonar server IP/32
UDP/50000-500093
Sonar VoIP
Sonar server connection to Eye
Sonar server IP/32
Eye WLAN IP/32
UDP/99993
Sonar VoIP
3
This is the default port number. All TCP/UDP ports in Sapphire are configurable.

3 7signal Sapphire Connectivity 6
7signal Ltd, Panuntie 6, FI-00620 HELSINKI, FINLAND, +358 40 777 7611, info@7signal.com, www.7signal.com
7signal Sapphire Deployment Guide Release 3.1
3 7SIGNAL SAPPHIRE CONNECTIVITY
3.1 Communication security
All connections containing meaningful traffic are being encrypted. The used encryption
methods are TLS and SSL. The PKI infrastructure (certificates) is being used throughout the
solution.
Every customer has individual set of certificates, delivered within containers called certificate
packages. It is not possible to use the delivered certificates to decrypt traffic of other 7signal
Sapphire systems.
Q: Where can I find my certificates? All the customer certificates and certificate
packages are located in the Certificates CD.
It is neither necessary nor encouraged to handle the certificate container files. Install and
upgrade processes of 7signal Sapphire take care of all the typical cases. In untypical cases the
7signal staff shall be involved with all the help necessary.
3.2 Supportive connections
3.2.1 SSH for Eye
SSH connection is required in deployment phase: IP address configuration and management
traffic encryption certificate setup are done with 7config command line utility. Eye firmware
can be also managed with SSH.

4 Installing 7signal Sapphire 7
7signal Ltd, Panuntie 6, FI-00620 HELSINKI, FINLAND, +358 40 777 7611, info@7signal.com, www.7signal.com
7signal Sapphire Deployment Guide Release 3.1
4 INSTALLING 7SIGNAL SAPPHIRE
4.1 Operating System installation tips
It is recommended to install the operating system by using the graphical installer.
4.1.1 Hard disk partitioning
This chapter gives some guidelines for hard disk partitioning. It is assumed that readers have
comprehensive knowledge about Linux file systems, RAID, LVM and disk partitioning. This
chapter does not cover basic partitioning requirements, e.g. configuring boot and swap
partitions are not covered.
Laptop installations
Default partitioning suggested by the OS installer is suitable for most of the cases. As laptops
are rarely equipped with multiple hard drives, RAID configurations are not possible.
Server installations
It is recommended to configure at least one RAID array: 7signal databases and database log
files should reside on a file system on top of RAIDed disks (RAID level 1 or higher, LVM on top
of RAID). Multiple RAIDed file systems are also suitable, for example, OS installation could be
on file system on RAID1, and databases on file system on top of RAID5.
It is suggested that LVM is used on top of RAIDs: this makes possible to easily add a new RAID
array as a LVM physical volume, if the existing ones run out of disk space.
Example #1
Two physical disks
Boot and swap partitions
RAID1 on top of disks, formatted as LVM physical volume
Physical volume split into two logical volumes
o 20% of space for OS installation, mount point “/” (LV1)
o 80% of space for databases and database log files, mount point
/opt/7signal/databases (LV2)
Sapphire installation
o Sapphire components are installed to /opt/7signal (on LV1)
o Sapphire databases are installed to /opt/7signal/databases (on LV2)
(7signal DBMS installer asks for location of databases and database log files)
Example #2
Five physical disks
Boot and swap partitions
RAID1 on top of two disk, RAID5 on top of tree disks, all formatted as LVM physical
volume
Physical volume on RAID1 has one logical volume

4 Installing 7signal Sapphire 8
7signal Ltd, Panuntie 6, FI-00620 HELSINKI, FINLAND, +358 40 777 7611, info@7signal.com, www.7signal.com
7signal Sapphire Deployment Guide Release 3.1
o 100% of space for OS installation, mount point “/” (LV1)
Physical volume on RAID5 has two logical volumes
o 80% of space for databases, mount point /opt/7signal/databases (LV2)
o 20% of space for database log files, mount point /opt/7signal/database-
logs (LV3)
Sapphire installation
o Sapphire components are installed to /opt/7signal (on LV1)
o Sapphire databases are installed to /opt/7signal/databases (on LV2) and
database logs are directed to /opt/7signal/database-logs (on LV3)
(7signal DBMS installer asks for location of databases and database log files).
4.2 Setting up Eyes
Step 1: Connect to Eye unit:
By default Eye units have IP address 192.168.0.1 with net mask 255.255.255.0.
Connect to address 192.168.0.1 as root by using a SSH client.
# ssh root@<Eye IP address>
The root default password is ‘7signal’. It is strongly advised to change this password as it is
factory default for every single Eye unit.
Step 2: Configure IP settings:
Setting IP address of the management interface:
# 7config ip set addr <IP address>
Setting network mask of the management interface:
# 7config ip set mask <dot-format-mask>
Setting port of the management interface (optional):
# 7config ip set port <port>
Verify the settings with the ‘show’ command:
# 7config ip show
Step 3: Reboot Eye unit:
Reboot the Eye unit to make the changes effective:
# reboot
4 Installing 7signal Sapphire 9
7signal Ltd, Panuntie 6, FI-00620 HELSINKI, FINLAND, +358 40 777 7611, info@7signal.com, www.7signal.com
7signal Sapphire Deployment Guide Release 3.1
4.3 Mounting Eyes
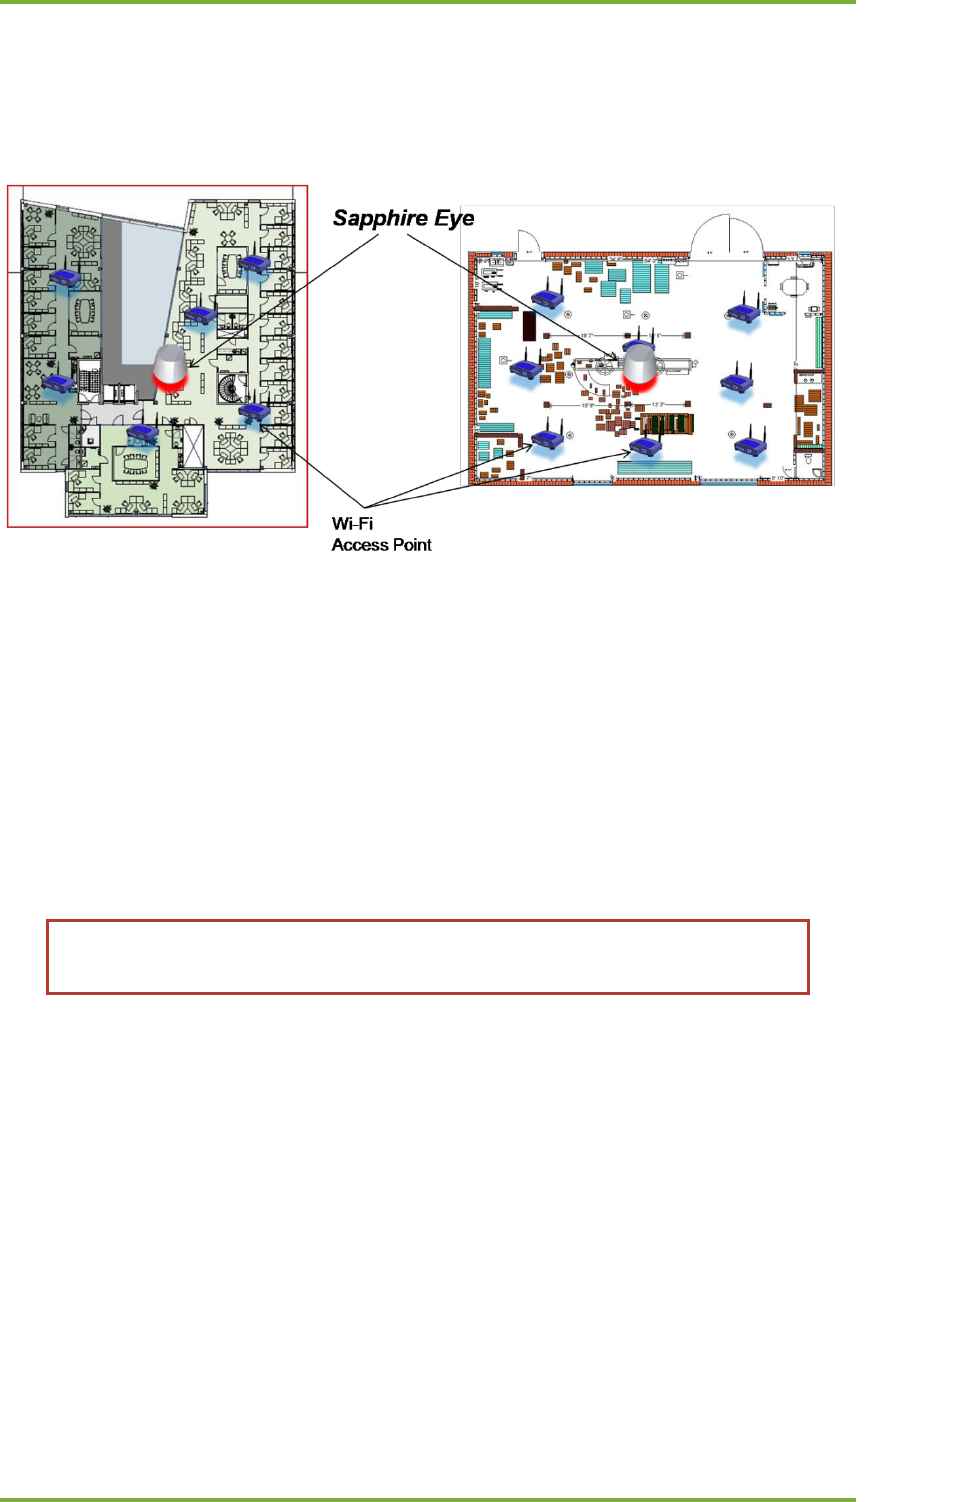
Mount Sapphire Eye in the most centralized location of the WLAN area. Eye can be installed on
the ceiling, wall or mast.
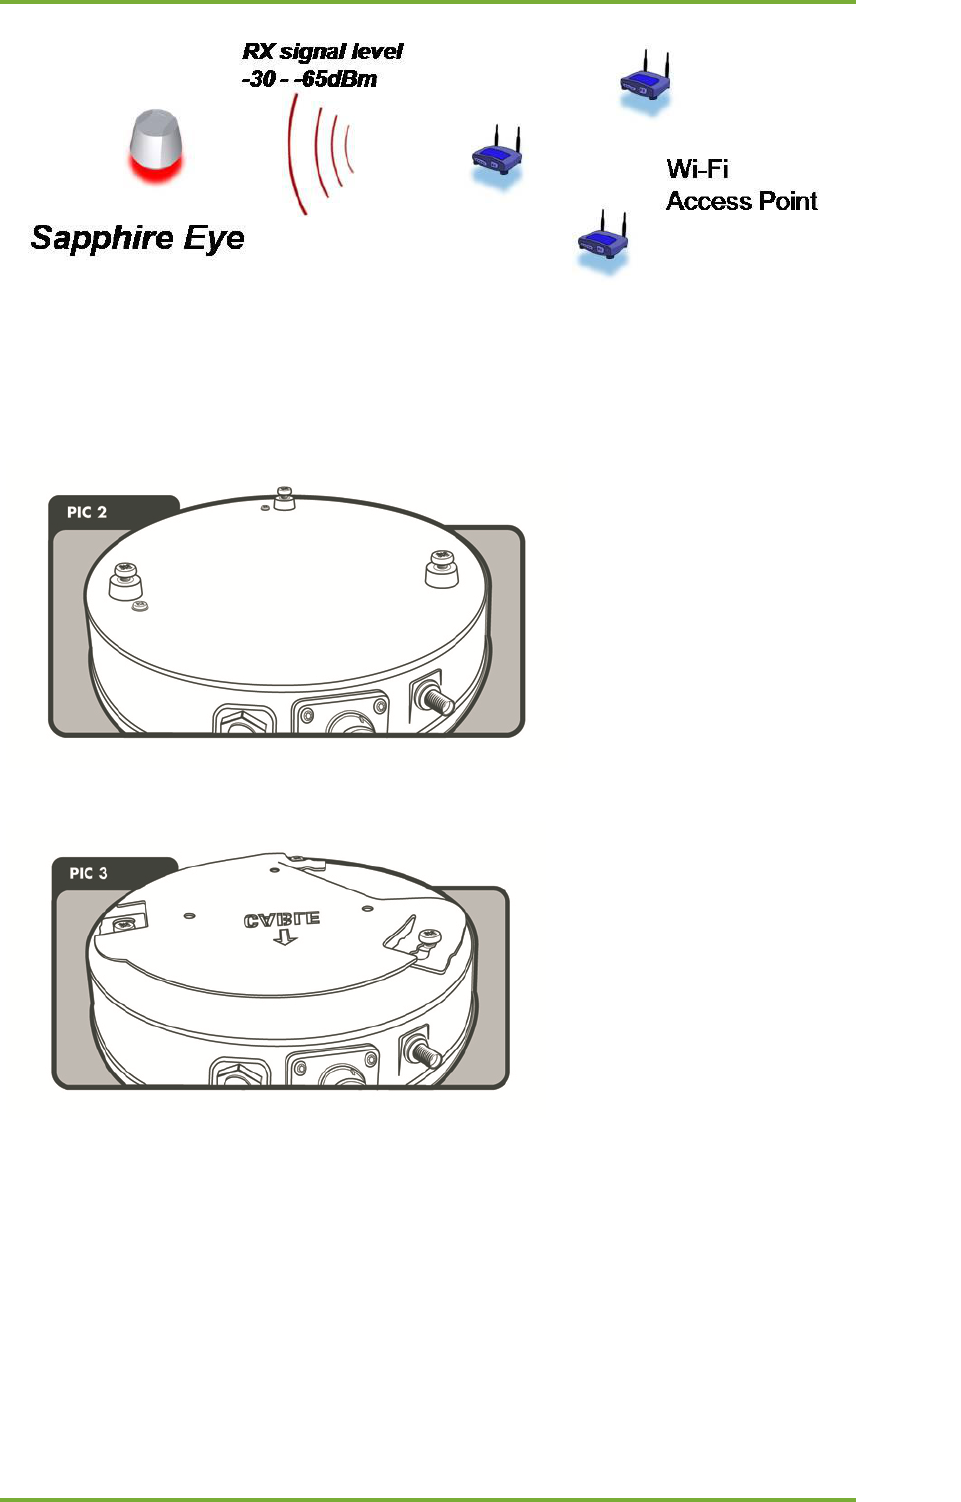
Sapphire Eye has extremely sensitive radio technology inside
The receiving signal is 10-20dB stronger than the basic WLAN end-user
The transmitted signal is 5-6dB stronger at the access point side than with the basic
WLAN end-user
For best accuracy of the WLAN performance, the Sapphire Eye location should be selected so
that:
The average signal level for the managed WLAN access points are between -65dBm
and -30dBm
NOTE: Eyes must not be located too close to any metal objects and places
surrounded by concrete walls.
The best installation location is easily verified with:
Site Miner: The Site Miner kit includes a Carat laptop and an Eye unit (with battery).
Site Survey signal level results
4 Installing 7signal Sapphire 10
7signal Ltd, Panuntie 6, FI-00620 HELSINKI, FINLAND, +358 40 777 7611, info@7signal.com, www.7signal.com
7signal Sapphire Deployment Guide Release 3.1
4.3.1 Roof Install
On top of Eye unit there are three slots for screws. Insert screws (Pan Head Stainless Screw,
DIN 7985 M5x12) on top of the Eye unit. The head of the screw is supposed to have few
millimeters of space between the inserts on the unit top.
Mount the install plate on the ceiling (pictured right below).
Mount the Eye unit in the roof mounting plate by inserting the screw tops into the plate holes.
Make sure that the marking ‘CABLE’ is pointed towards connectors. Turn the unit and feel it
snatching into the plate.
4.3.2 Wall Install (optional)
On top of Eye unit there are three slots for screws. Insert screw thread taps (Socket Set Screw
Cone Point, DIN 914, M5x20) on top of the Eye unit. In wall-mounting the screw does not have
any head.

4 Installing 7signal Sapphire 11
7signal Ltd, Panuntie 6, FI-00620 HELSINKI, FINLAND, +358 40 777 7611, info@7signal.com, www.7signal.com
7signal Sapphire Deployment Guide Release 3.1
Mount the install mechanics on the wall on the rectangular side. The longest side of the
triangle should face towards the ground.
There are three elliptical holes in the wall-mount mechanics. Mount the Eye unit by pushing
the screws on top of the unit through the wall-mount mechanics. From the top-side of the
mechanics use the nuts to attach the unit to the mechanics.
4.3.3 Pole Install (optional)
In pole install, the wall-mount is attached to any pole by using mechanics. Screw the provided
back plate to the wall-mount mechanics. Push the U bar through the back plate. Follow the
wall-mount instructions from here on.
4 Installing 7signal Sapphire 12
7signal Ltd, Panuntie 6, FI-00620 HELSINKI, FINLAND, +358 40 777 7611, info@7signal.com, www.7signal.com
7signal Sapphire Deployment Guide Release 3.1
4.3.4 Eye installation examples
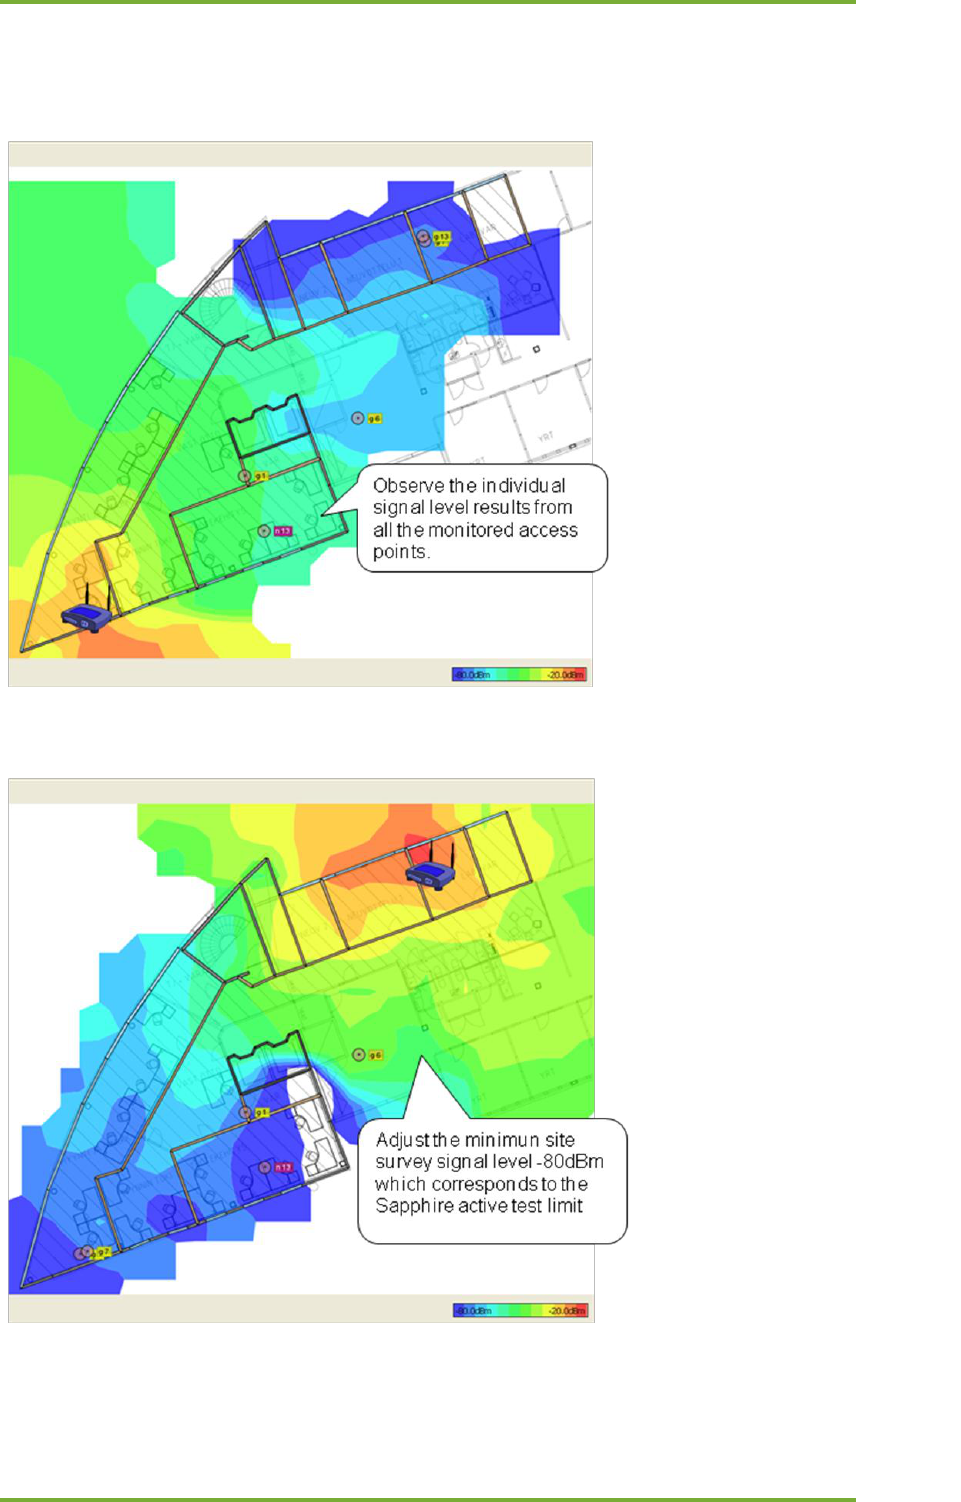
The Site Survey results are valuable for Eye location estimation. The Eye location is good if the
Site Survey heat map shows >-80dBm signal level from all the access points.
The Site Survey results are valuable for Eye location selection
Verify the signal levels also from the far end access points
4 Installing 7signal Sapphire 13
7signal Ltd, Panuntie 6, FI-00620 HELSINKI, FINLAND, +358 40 777 7611, info@7signal.com, www.7signal.com
7signal Sapphire Deployment Guide Release 3.1
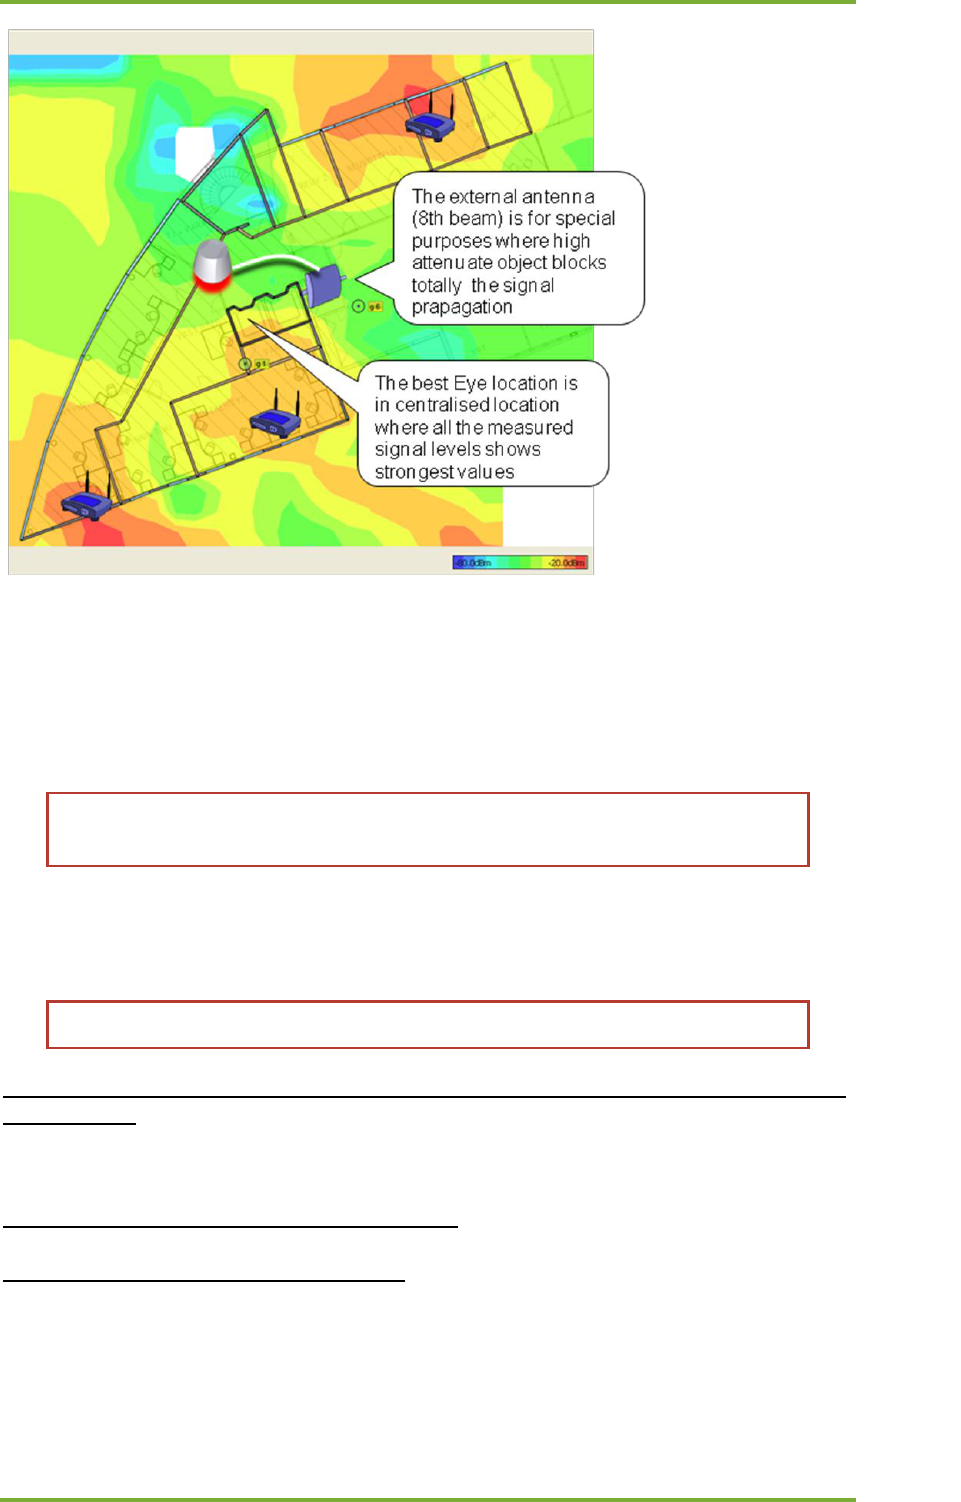
The external antenna is useful in the environment where shafts or thick walls are attenuating
radio too much.
4.4 Installing 7signal Sapphire software
The 7signal Sapphire software can be found from 7signal Sapphire Installation CD.
Root privileges are needed for installation of Sapphire components, except for
Carat GUI.
4.4.1 Carat server install (Linux)
Copy the installer file from the delivery medium to for example /home directory.
NOTE! Do not use /tmp directory.
Step 1: Change to the directory where installer was copied and install Carat server by issuing
the command:
# ./7signal-Carat-x.x-x.x-installer.bin
Step 2: Define the database essential parameters:
Alternative 1: Carat DBMS is not installed yet
As the DBMS will be running in the same host, it is recommended to use the defaults.
Extracting installer, please wait ...
Launching installer.
Checking previous installations...

4 Installing 7signal Sapphire 14
7signal Ltd, Panuntie 6, FI-00620 HELSINKI, FINLAND, +358 40 777 7611, info@7signal.com, www.7signal.com
7signal Sapphire Deployment Guide Release 3.1
Installations were not found
Enter location to which 7signal Sapphire Carat server will be
installed [/opt/7signal]: <enter>
Trying to locate 7signal DBMS installation. Please wait ...
DBMS installation was not found. Do you want to specify DB properties
manually
(defaults: database host localhost, username 'db7sign', TCP port 7722)
[y/N]? <enter>
Alternative 2: Carat DBMS is already installed
Since the DBMS is already installed, the Carat installer can determine DB configuration
automatically. Defaults values should be applied.
…
Extracting installer, please wait ...
Verifying installer, please wait ...
…
Unpacking data files ...
Launching installer.
…
Checking previous installations...
Installations were not found
Enter location to which 7signal Sapphire Carat server will be
installed [/opt/7signal]: <enter>
Trying to locate 7signal DBMS installation. Please wait ...
DBMS installation found at /opt/7signal/dbms.
Do you want to use DB user configuration found from this location
[Y/n]? <enter>
Configured DB user is db7sign
Configured DB port number is 7722
Step 3: Setup host address for RMI server:
Localhost or 127.0.0.1 for the IP address should not be used, as this information shall be used
by RMI server and it needs to know the external address in order to serve the remotely
connecting clients:
Please enter host name or IP address to which the Carat clients will
be connecting to [192.168.0.2]: <IP address or DNS name> <enter>
Step 4: Install certificate package (and passwords):
The certificate packages and related password are in separate delivery medium.
When the installer asks whether the certificate package will be used or not, answer “y”:
Encryption certificates from certificate package [Y/n]? <enter>
Alternative 1: Install certificates and passwords from separate packages
Typically, certificate packages and password packages are delivered separately. Press enter
when the installer asks location of 7signal-all.tar.gz certificate package:

4 Installing 7signal Sapphire 15
7signal Ltd, Panuntie 6, FI-00620 HELSINKI, FINLAND, +358 40 777 7611, info@7signal.com, www.7signal.com
7signal Sapphire Deployment Guide Release 3.1
Please enter location of archive file (<prefix>-7signal-all.tar.gz):
<enter>
Next, the installer asks for location of the certificate package 7signal-certs.tar.gz. Enter
the name of the directory in which the certificate package resides:
Please enter location of certificate archive file (<prefix>-7signal-
certs.tar.gz): <directory path>
Found file /<directory path>/<customer name>-7signal-certs.tar.gz. Do
wish to use it [Y/n]? <enter>
The installer extracts and verifies required certificates from the certificate package:
Validating archive..
Archive valid.
Next, the installer asks for location of the password package 7signal-pwds.tar.gz. Enter
the name of the directory in which the password package resides:
Please enter location of certificate archive file (<prefix>-7signal-
pwds.tar.gz): <directory path>
Found file /<directory path>/<customer name>-7signal-pwds.tar.gz. Do
wish to use it [Y/n]? <enter>
The installer extracts and installs required certificates and passwords from the certificate and
password packages:
Validating archive..
Archive valid.
Extracting files..
Extracting passwords..
Alternative 2: Install certificates and passwords from single package
Certificates and passwords are delivered in a single package. The installer asks for location of
the package 7signal-all.tar.gz. Enter the name of the directory in which the package
resides:
Please enter location of archive file (<prefix>-7signal-all.tar.gz):
<directory path> <enter>
Found file /<directory path>/<customer name> -7signal-all.tar.gz. Do
wish to use it [Y/n]? <enter>
The installer extracts, verifies and installs required certificates and passwords from the
package:
Validating archive..
Archive valid.
Extracting files..
Extracting passwords..

4 Installing 7signal Sapphire 16
7signal Ltd, Panuntie 6, FI-00620 HELSINKI, FINLAND, +358 40 777 7611, info@7signal.com, www.7signal.com
7signal Sapphire Deployment Guide Release 3.1
Step 5: The license file location:
The license file is created for each customer individually. It is in the same delivery medium
with the certificate packages.
The installer asks for location of the license file. Enter path and file name of the license file and
press enter:
Please enter location and name of Carat license file
(/<path>/<license>.lic): <path and name of the license file> <enter>
It is also possible to not install license file at this point. This can be done by pressing enter
without any input.
Alternatives:
a) Enter location and name of the license (.lic) file
b) Proceed installation without installing license. You must
install license by using '7carat install set' command before
starting the Carat server.
c) Cancel installation
If b) is selected, user can install license later with command ‘7carat license set
<license_file>’
Step 6: Finish installation:
After the license file has been installed, the installation finishes automatically:
Copying init script..
Installing init script..
Extracting Carat package...
Copying Carat to /opt/7signal...
Extracting jre...
JRE already installed, checking if it is up to date
Installed version: 1.6.0_17-b04
New version : 1.6.0_17-b04
JRE does not need to be updated.
Installing configuration file.
Installing license file...
Installing 7carat tool...
Installing 7edp tool...
Modifying file permissions...
Creating uninstaller...
Saving configuration.
Done.
The installation is now finished.

4 Installing 7signal Sapphire 17
7signal Ltd, Panuntie 6, FI-00620 HELSINKI, FINLAND, +358 40 777 7611, info@7signal.com, www.7signal.com
7signal Sapphire Deployment Guide Release 3.1
4.4.2 DBMS install (Linux)
Prerequisities
The operating system installation may not have all the necessary components for DBMS
installation. Please check the following items:
C++ library
o Check that the library is installed:
# rpm –q compat-libstdc++-33
o If not installed:
Internet connection available:
install the library (as root user) by issuing the command:
yum install compat-libstdc++-33
Internet connection not available:
An RPM package is contained in Sonar medium in folder named ‘Non-
7signal Software’ in case there is no network connectivity. Install the
rpm with command:
# rpm –i compat-libstdc++-33-3.2.3-47.3-i386.rpm
IP address of the server must be resolvable to DNS name. This can be achieved by
following procedures:
o Server has been added to DNS
o Hosts file contain the DNS name.
more /etc/hosts
edit the hosts file if needed
Installation
The DBMS for Linux comes as a file of type bin that contains both the script and 3rd party
install package for DB2 database. There is another version of the DBMS installer that does not
contain the actual DB2 package, which is suitable for upgrades.
Copy 7signal-DBMS-installer from delivery medium to for example /root directory.
NOTE! Do not use /tmp directory.
Alternative 1: Install DBMS database uninterrupted with the default settings by issuing the
command:
# ./7signal-DBMS-with-DB2-x.x-x.x-installer.bin –s
The silent install does not require input as all the options shall use default settings. After the
installation is finished, the DB2 has been installed and databases have been created.

4 Installing 7signal Sapphire 18
7signal Ltd, Panuntie 6, FI-00620 HELSINKI, FINLAND, +358 40 777 7611, info@7signal.com, www.7signal.com
7signal Sapphire Deployment Guide Release 3.1
Alternative 2: Install DBMS database interactively by issuing the command:
# ./7signal-DBMS-with-DB2-x.x-x.x-installer.bin
The installer starts to install 7signal DBMS:
…
Extracting installer, please wait ...
Launching installer.
…
Using <DB2 installer name> installer.
Checking host <hostname> reachability.. OK.
Trying to locate existing installation...
Locating 7signal Sapphire Carat installation. Please wait ...
Carat installation found at /opt/7signal/Carat.
DB tools directory will be /opt/7signal/dbms
Do you want to use DB configuration found from this location [Y/n]?
<enter>
The question above is asked if there is a 7signal Carat installation on the host
4
.
DBMS directory : /opt/7signal/dbms
DB2 installation package location :
installer/db2exc_950_LNX_x86.tar.gz
Target directory : /opt/ibm/db2
untarring DB2...
Creating DB user..
Configured DB user is db7sign
Configured DB port number is 7722
Do you want to specify DB admin manually [y/N]? <enter>
The installer allows defining the database user and the communication port. As supposedly the
host is dedicated to 7signal Sapphire, the defaults should work fine and are encouraged to be
used.
The installer continues by installing DB2:
Preparing response file...
Running response file...
DBI1191I db2setup is installing and configuring DB2 according to the
response file provided. Please wait.
The execution completed successfully.
For more information see the DB2 installation log at
"/tmp/db2setup.log".
IBM DB2 installed.
Creating uninstaller...
Creating DB schema generator...
Copying aggregation view template generator and templates to
/home/db7sign/.
Installing 7db tool..
Installing 7signal DB backup & restore tool..
Installing 7signal DB2 library..
Installing 7signal DB2 utilities..
4
If the Carat server is not installed yet, the installer asks some configuration parameters for the
database. Default values for these parameters are preferred.
4 Installing 7signal Sapphire 19
7signal Ltd, Panuntie 6, FI-00620 HELSINKI, FINLAND, +358 40 777 7611, info@7signal.com, www.7signal.com
7signal Sapphire Deployment Guide Release 3.1
Enter location for databases [/home/db7sign]: <enter>
The database location defaults to the /home file system just like the database logs that are
configured below.
This default database location is not recommended, if the /home file system is not
backed up or otherwise replicated, or does not have enough disk space. The logs
and the actual database should always reside in separate file systems, preferably
on RAIDed, separate physical devices.
Next, the installer confirms creation of databases:
Do you want to create databases now [Y/n]? <enter>
The installer continues and the database creation takes several minutes:
7SIGNAL creating management database...
7SIGNAL creating measurement database...
7SIGNAL creating security database...
Do you want to change the default database logging method (circular
logging) to infinite archival logging [y/N]? <enter>
It is encouraged to make the install with circular logging. The infinite archival logging requires
design and practically endless storage device. The instructions for moving to infinite archival
logging are in the Carat User Manual among other detailed backup process design issues.
The next step is to specify location for database log files. Log file location defaults to the
/home file system just like the actual database.
Enter location for Management DB log files
[/home/db7sign/db7sign/NODE0000/SQL00001/SQLOGDIR/]: <enter>
OK. Using default.
Enter location for Measurement DB log files
[/home/db7sign/db7sign/NODE0000/SQL00002/SQLOGDIR/]: <enter>
OK. Using default.
Enter location for Security DB log files
[/home/db7sign/db7sign/NODE0000/SQL00003/SQLOGDIR/]: <enter>
OK. Using default.
The installer is now finished. The DB2 is now installed, up and running.
4 Installing 7signal Sapphire 20
7signal Ltd, Panuntie 6, FI-00620 HELSINKI, FINLAND, +358 40 777 7611, info@7signal.com, www.7signal.com
7signal Sapphire Deployment Guide Release 3.1
4.4.3 Loupe server install (Linux)
Copy 7signal-Loupe-installer from the delivery medium to e.g. /home directory.
NOTE! Do not use /tmp directory.
Step 1: Change to the directory where installer was copied and install Loupe server by
issuing the command:
# ./7signal-Loupe-x.x-x.x-installer.bin
Step 2: The installation directory:
Give the location in the file system to install the Loupe server:
Extracting installer, please wait ...
Launching installer.
Checking previous installations ...
No previous installation found.
Enter location to which 7signal Sapphire Loupe will be installed,
installer will create a '/Loupe/' directory under the given path
[/opt/7signal]: <enter>
Step 3: Carat server IP address:
The Loupe server should run in the same host than the Carat server and therefore localhost IP
address is suitable:
Configuration for:
* /opt/7signal/Loupe/apache-tomcat-
5.5.26/conf/Catalina/localhost/7signal.xml
* /opt/7signal/Loupe/webapps/WEB-INF/web.xml
Enter the DB2 username [db7sign]:
Enter the DB2 password [xxxxxxx]:
Enter the location of Carat server [127.0.0.1]: <enter>
Step 4: Ports for Loupe service:
As the host is expected to be dedicated for 7signal Sapphire, the default ports for HTTP and
HTTPS should work fine. However, the ports are freely configurable.
Configuration for:/opt/7signal/Loupe/apache-tomcat-
5.5.26/conf/server.xml
Enter the port for Loupe HTTP server, most commonly 80 or 8080 [80]:
When the non-SSL port is 80, then the preferred SSL port is 443.
Enter the SSL port for Loupe HTTPS server [443]: <enter>
Step 5: Install certificate package (and passwords):
The certificate packages and related password are in separate delivery medium.
When the installer asks whether the certificate package will be used or not, answer “y”:

4 Installing 7signal Sapphire 21
7signal Ltd, Panuntie 6, FI-00620 HELSINKI, FINLAND, +358 40 777 7611, info@7signal.com, www.7signal.com
7signal Sapphire Deployment Guide Release 3.1
Extracting Loupe package ...
Loupe requires two certificates to run properly. They are delivered
separately.
Get certificates from certificate package [Y/n]? <enter>
Alternative 1: Install certificates and passwords from separate packages
Typically, certificate packages and password packages are delivered separately. Press enter
when the installer asks location of 7signal-all.tar.gz certificate package:
Please enter location of archive file (<prefix>-7signal-all.tar.gz):
<enter>
Next, the installer asks for location of the certificate package 7signal-certs.tar.gz. Enter
the name of the directory in which the certificate package resides:
Please enter location of certificate archive file (<prefix>-7signal-
certs.tar.gz): <directory path>
Found file /<directory path>/<customer name>-7signal-certs.tar.gz. Do
wish to use it [Y/n]? <enter>
The installer extracts and verifies required certificates from the certificate package:
Validating archive..
Archive valid.
Next, the installer asks for location of the password package 7signal-pwds.tar.gz. Enter
the name of the directory in which the password package resides:
Please enter location of certificate archive file (<prefix>-7signal-
pwds.tar.gz): <directory path>
Found file /<directory path>/<customer name>-7signal-pwds.tar.gz. Do
wish to use it [Y/n]? <enter>
The installer extracts and installs required certificates and passwords from the certificate and
password packages:
Validating archive..
Archive valid.
Extracting files..
Extracting passwords..
Alternative 2: Install certificates and passwords from single package
Certificates and passwords are delivered in a single package. The installer asks for location of
the package 7signal-all.tar.gz. Enter the name of the directory in which the package
resides:
Please enter location of archive file (<prefix>-7signal-all.tar.gz):
<directory path> <enter>
Found file /<directory path>/<customer name> -7signal-all.tar.gz. Do
wish to use it [Y/n]? <enter>
4 Installing 7signal Sapphire 22
7signal Ltd, Panuntie 6, FI-00620 HELSINKI, FINLAND, +358 40 777 7611, info@7signal.com, www.7signal.com
7signal Sapphire Deployment Guide Release 3.1
The installer extracts, verifies and installs required certificates and passwords from the
package:
Validating archive..
Archive valid.
Extracting files..
Extracting passwords..
Step 6: Starting of Loupe server:
It is possible to start the server immediately. The requirement is that the database is up and
running at the Loupe start-up:
Updating files according to configuration ...
Finding JRE ... found at /opt/7signal/jre
Copying init script ...
Installing init script ...
Installing 7loupe tool ...
Creating uninstaller ...
Loupe install process finished.
HTTP server configured to URL: http://localhost:80/
Do you want to start Loupe server now? [Y/n] <enter>
Installation is finished.
4.4.4 Sonar install (Linux)
Copy 7signal-Sonar-installer from the delivery medium e.g. to /home directory.
NOTE! Do not use /tmp directory.
Step 1: Change to the directory where installer was copied and install Loupe server by
issuing the command:
# ./7signal-Sonar-x.x-x.x-installer.bin
Step 2: Specify installation directory:
The installer extracts installation files and asks location for the installation:
…
Extracting installer, please wait ...
Verifying installer, please wait ...
…
Enter location to which 7signal Sonar server will be installed
[/opt/7signal]: <enter>
Step 3: Specify configuration parameters:
The installer asks some configuration parameters for Sonar installation. In general, default
values can be used:
Enter name for the Sonar server [Sonar]: <enter>

4 Installing 7signal Sapphire 23
7signal Ltd, Panuntie 6, FI-00620 HELSINKI, FINLAND, +358 40 777 7611, info@7signal.com, www.7signal.com
7signal Sapphire Deployment Guide Release 3.1
Enter port number for the server [80]: <enter>
Checking that TCP port 80 is not in use.. Port 80 free.
Number of simultaneous clients reflects to the number of Eyes running tests against this Sonar
installation:
Enter number of maximum simultaneous clients (1..50) [10]: <number of
Eyes> <enter>
VoIP tests require individual UDP port for each simultaneously running VoIP test. Ports are
reserved as a port range, starting from a port number specified by the user (default: 50000):
Enter first UDP port of UDP port pool [50000]: <starting port> <enter>
Next, enter the size of the port range. The default is 10, which means that 10 simultaneous
VoIP tests can be run against this Sonar:
Enter size of port pool (1..20) [10]: <enter>
Last, specify the default logging level. By default, only errors are logged:
Enter log level (DEBUG,INFO,WARN,ERROR) [ERROR]: <enter>
Step 4: Verify configuration:
The installer outputs the specified configuration. Verify the configuration and accept it:
Sonar configuration:
--------------------------------------------------
Server name : Sonar
Server port : 80
Max. clients : 10
MOS port pool start: 50000
MOS port pool size : 10
Log level : ERROR
Is this configuration OK [Y/n] <enter>
Step 5: Finish installation:
The installer finishes installation automatically:
Copying Sonar to /opt/7signal...
Configuring Sonar...
Extracting jre...
JRE already installed, checking if it is up to date
Installed version: 1.6.0_17-b04
New version : 1.6.0_17-b04
JRE does not need to be updated.
Updating files according to configuration...
Copying init script..
Installing init script..
Creating uninstaller...
Done.
4 Installing 7signal Sapphire 24
7signal Ltd, Panuntie 6, FI-00620 HELSINKI, FINLAND, +358 40 777 7611, info@7signal.com, www.7signal.com
7signal Sapphire Deployment Guide Release 3.1
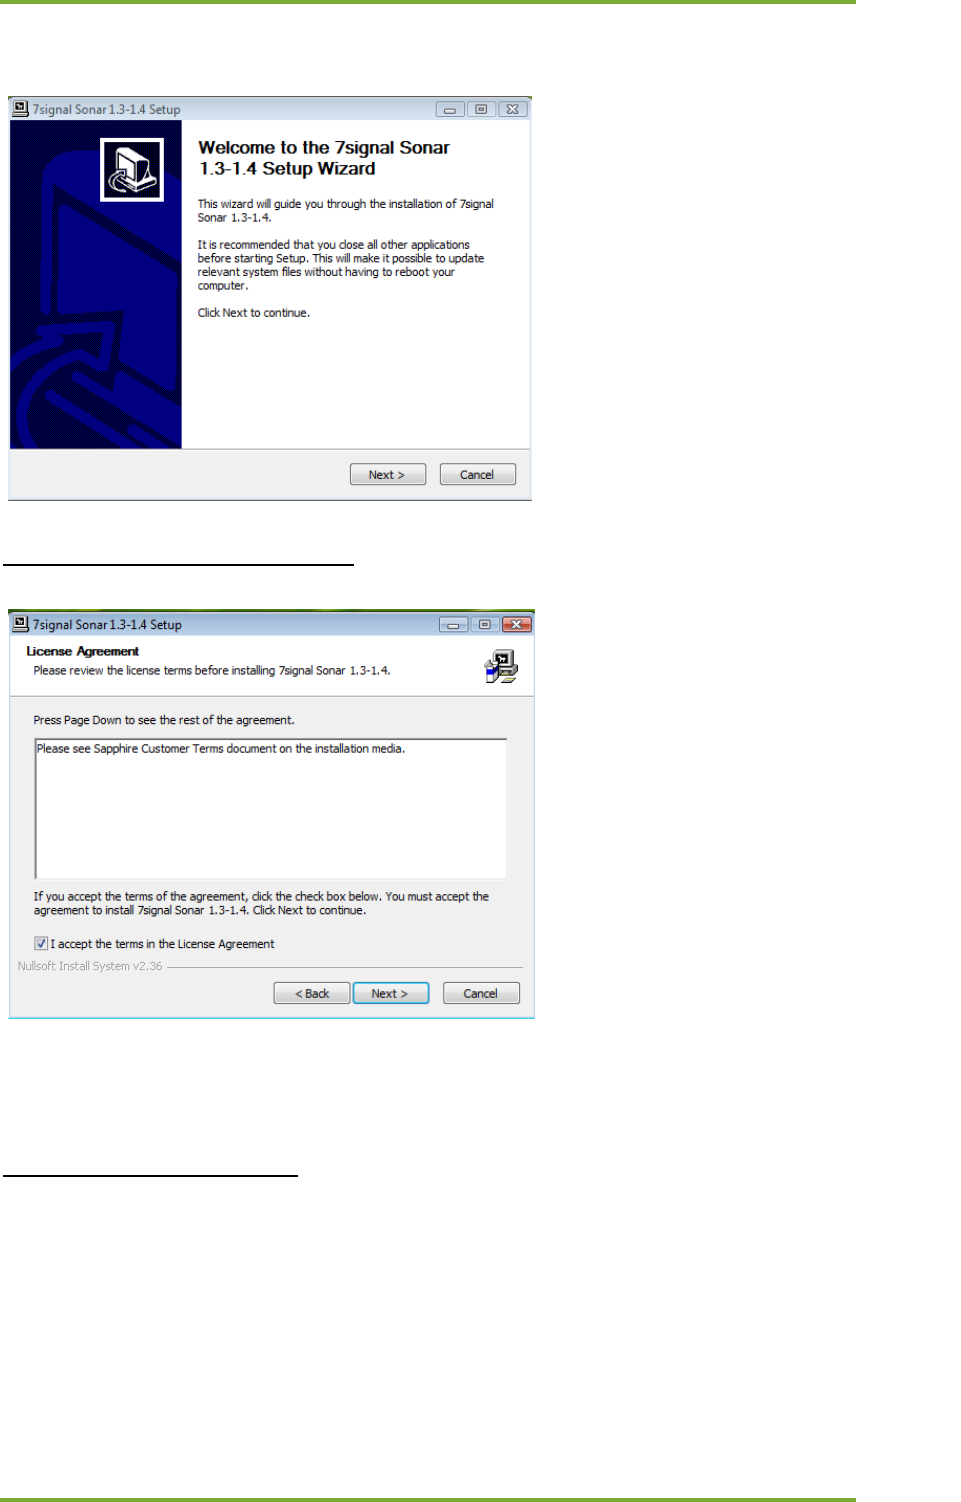
4.4.5 Sonar install (Windows)
Installing Sonar on Windows platform is possible. However, performance of the Sonar server
might not be optimal on Windows platform, due to implementation of Windows TCP/IP stack.
Note: Version number of Sonar used in these instructions may not be the one that
is going to be installed. However, the instructions are applicable to all Sonar
versions.
Step 1: Execute Carat GUI installer:
4 Installing 7signal Sapphire 25
7signal Ltd, Panuntie 6, FI-00620 HELSINKI, FINLAND, +358 40 777 7611, info@7signal.com, www.7signal.com
7signal Sapphire Deployment Guide Release 3.1
A double-click on the icon launches the following panel:
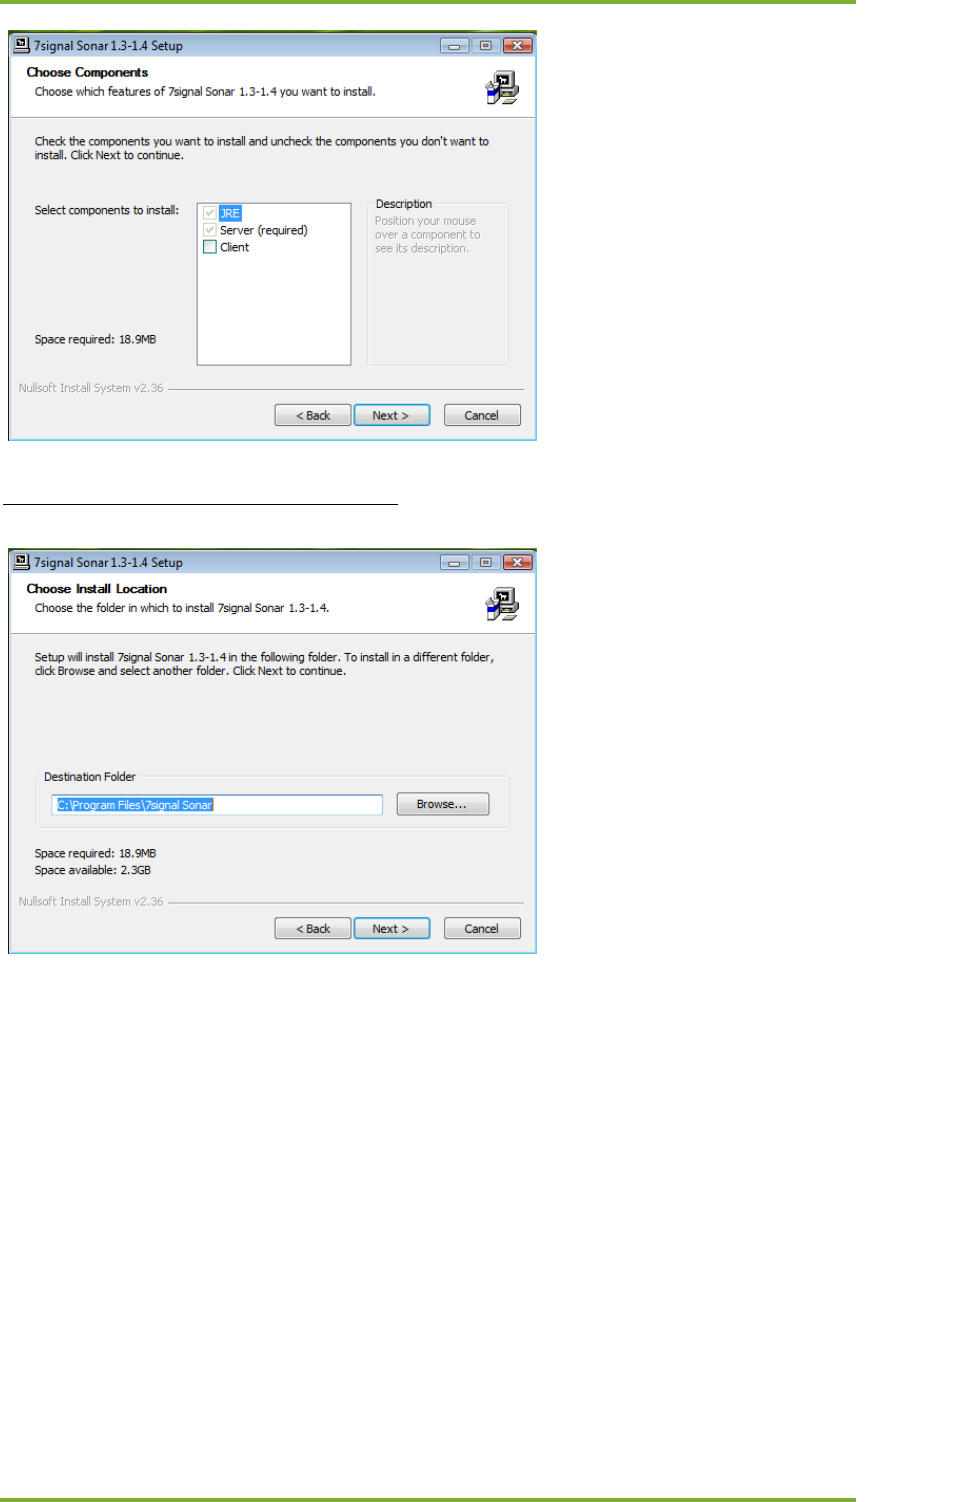
Step 2: Accept the License Agreement:
The distribution medium contains 7signal Sapphire Customer Terms document in the
Documents folder.
Step 3: Choose the components:
This is informative step only: it is mandatory to select both JRE and the Sonar server itself.
The client install should not be selected.
4 Installing 7signal Sapphire 26
7signal Ltd, Panuntie 6, FI-00620 HELSINKI, FINLAND, +358 40 777 7611, info@7signal.com, www.7signal.com
7signal Sapphire Deployment Guide Release 3.1
Step 4: Choose the location for installation:
4 Installing 7signal Sapphire 27
7signal Ltd, Panuntie 6, FI-00620 HELSINKI, FINLAND, +358 40 777 7611, info@7signal.com, www.7signal.com
7signal Sapphire Deployment Guide Release 3.1
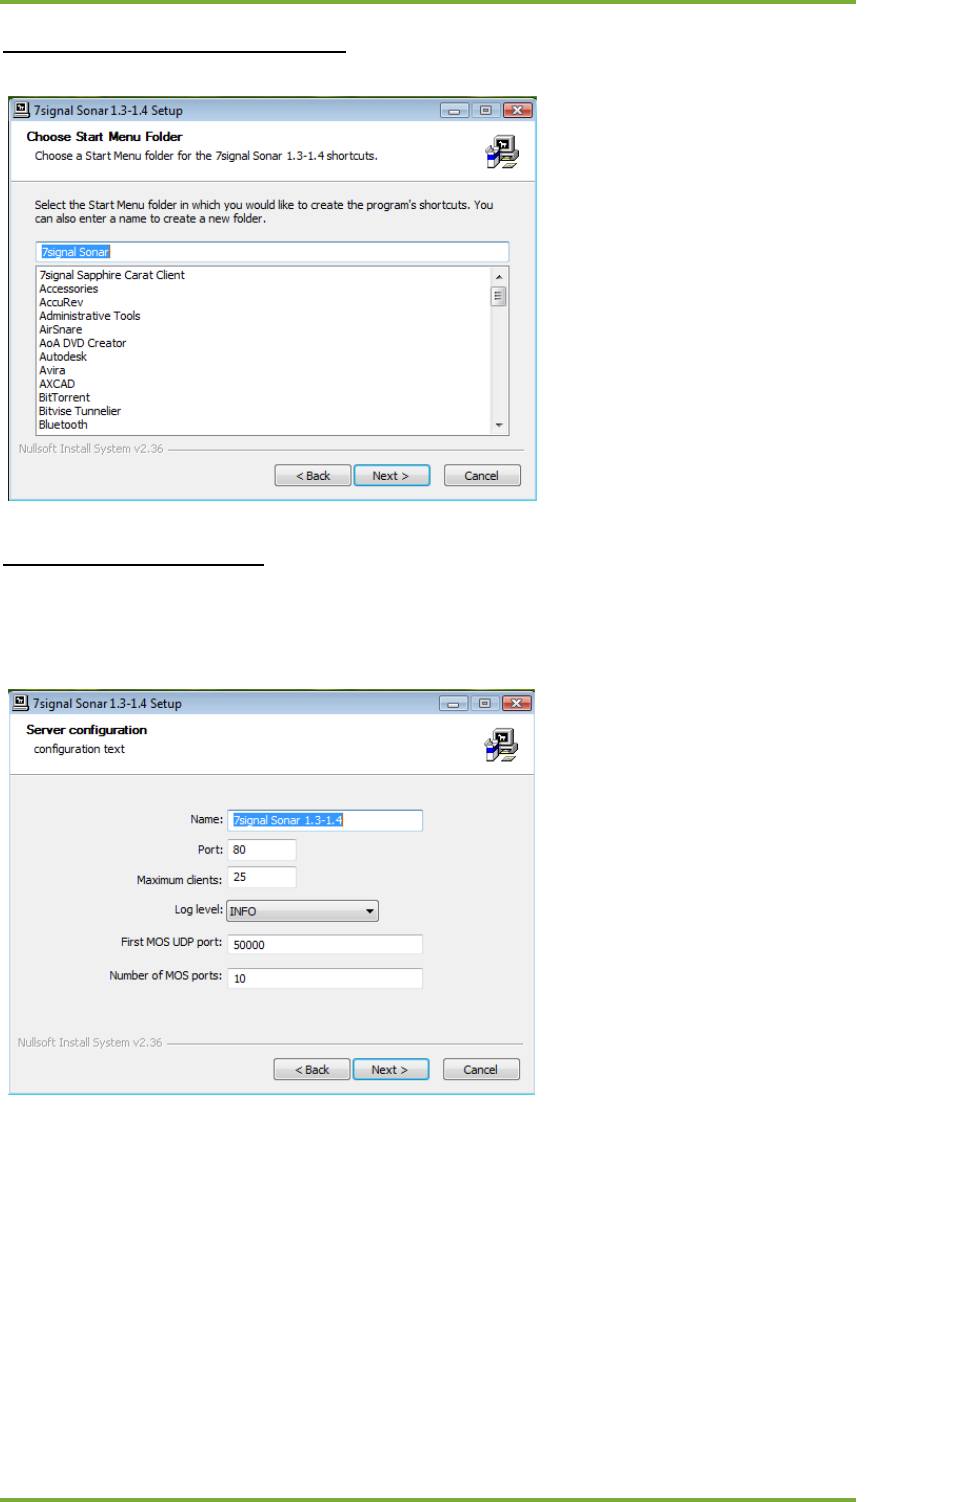
Step 4: Choose the Start menu folder:
Step 5: Server configuration:
One should see the connectivity section above if one needs or wants to change the defaults for
the communication and networking settings.
4 Installing 7signal Sapphire 28
7signal Ltd, Panuntie 6, FI-00620 HELSINKI, FINLAND, +358 40 777 7611, info@7signal.com, www.7signal.com
7signal Sapphire Deployment Guide Release 3.1
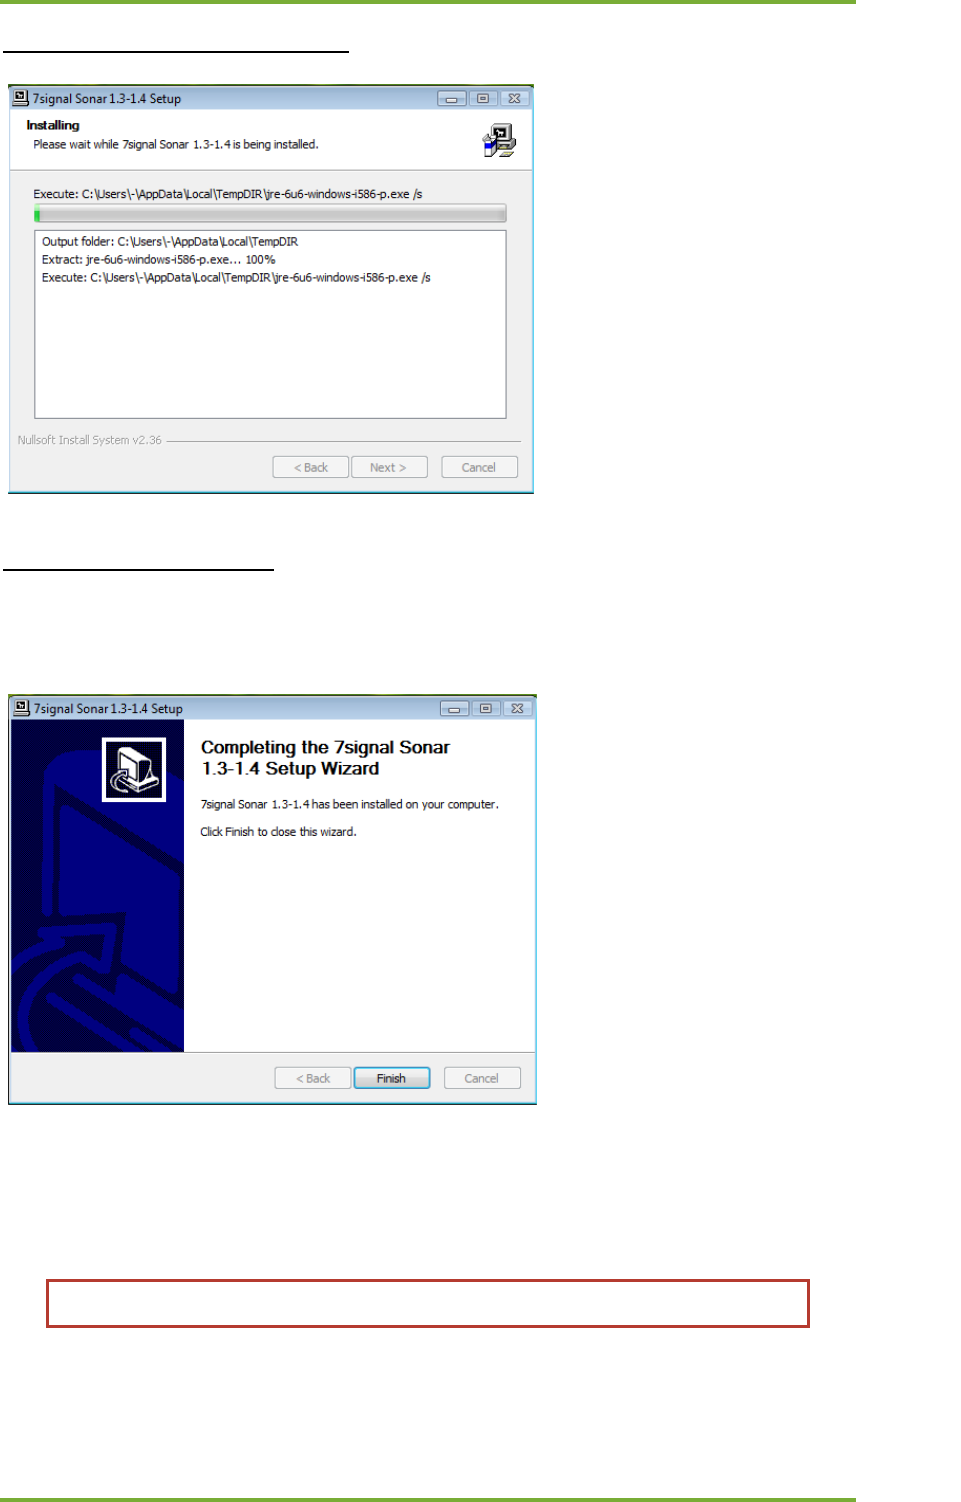
Step 5: The package is being installed:
Step 6: Finish the installation:
Finish the installation. An icon for launching the Sonar server should be available on the
chosen start-folder.
4.4.6 Carat GUI install (Linux)
Copy 7signal-Carat-GUI-installer from the delivery medium e.g. to /home directory.
NOTE! Do not use /tmp directory.

4 Installing 7signal Sapphire 29
7signal Ltd, Panuntie 6, FI-00620 HELSINKI, FINLAND, +358 40 777 7611, info@7signal.com, www.7signal.com
7signal Sapphire Deployment Guide Release 3.1
Step 1: Change to the directory where installer was copied and install Loupe server by
issuing the command:
# ./7signal-Carat-Client-x.x-x.x.installer.bin
The installer starts:
…
Extracting installer, please wait ...
Launching installer.
…
Step 2: Choose destination folder:
Enter the path for the desired destination folder:
Enter location to which 7signal Sapphire Carat client will be
installed [/opt/7signal]: <enter>
Step 3: Install certificate package (and passwords):
The certificate packages and related password are in separate delivery medium.
When the installer asks whether the certificate package will be used or not, answer “y”:
Carat client GUI requires a certificate to run properly. It is
delivered separately.
Get certificates from certificate package [Y/n]? <enter>
Alternative 1: Install certificates and passwords from separate packages
Typically, certificate packages and password packages are delivered separately. Press enter
when the installer asks location of 7signal-all.tar.gz certificate package:
Please enter location of archive file (<prefix>-7signal-all.tar.gz):
<enter>
Next, the installer asks for location of the certificate package 7signal-certs.tar.gz. Enter
the name of the directory in which the certificate package resides:
Please enter location of certificate archive file (<prefix>-7signal-
certs.tar.gz): <directory path>
Found file /<directory path>/<customer name>-7signal-certs.tar.gz. Do
wish to use it [Y/n]? <enter>
The installer extracts and verifies required certificates from the certificate package:
Validating archive..
Archive valid.
4 Installing 7signal Sapphire 30
7signal Ltd, Panuntie 6, FI-00620 HELSINKI, FINLAND, +358 40 777 7611, info@7signal.com, www.7signal.com
7signal Sapphire Deployment Guide Release 3.1
Next, the installer asks for location of the password package 7signal-pwds.tar.gz. Enter
the name of the directory in which the password package resides:
Please enter location of certificate archive file (<prefix>-7signal-
pwds.tar.gz): <directory path>
Found file /<directory path>/<customer name>-7signal-pwds.tar.gz. Do
wish to use it [Y/n]? <enter>
The installer extracts and installs required certificates and passwords from the certificate and
password packages:
Validating archive..
Archive valid.
Extracting files..
Extracting passwords..
Alternative 2: Install certificates and passwords from single package
Certificates and passwords are delivered in a single package. The installer asks for location of
the package 7signal-all.tar.gz. Enter the name of the directory in which the package
resides:
Please enter location of archive file (<prefix>-7signal-all.tar.gz):
<directory path> <enter>
Found file /<directory path>/<customer name> -7signal-all.tar.gz. Do
wish to use it [Y/n]? <enter>
The installer extracts, verifies and installs required certificates and passwords from the
package:
Validating archive..
Archive valid.
Extracting files..
Extracting passwords..
Step 4: Finish installation:
The installer finishes installation automatically:
Finished.
The GUI client may be started from the install directory with the script run_client.sh. A
desktop icon or launcher is not generated automatically by the installer, because of lack of
generic support for desktop icons in Linux distributions.
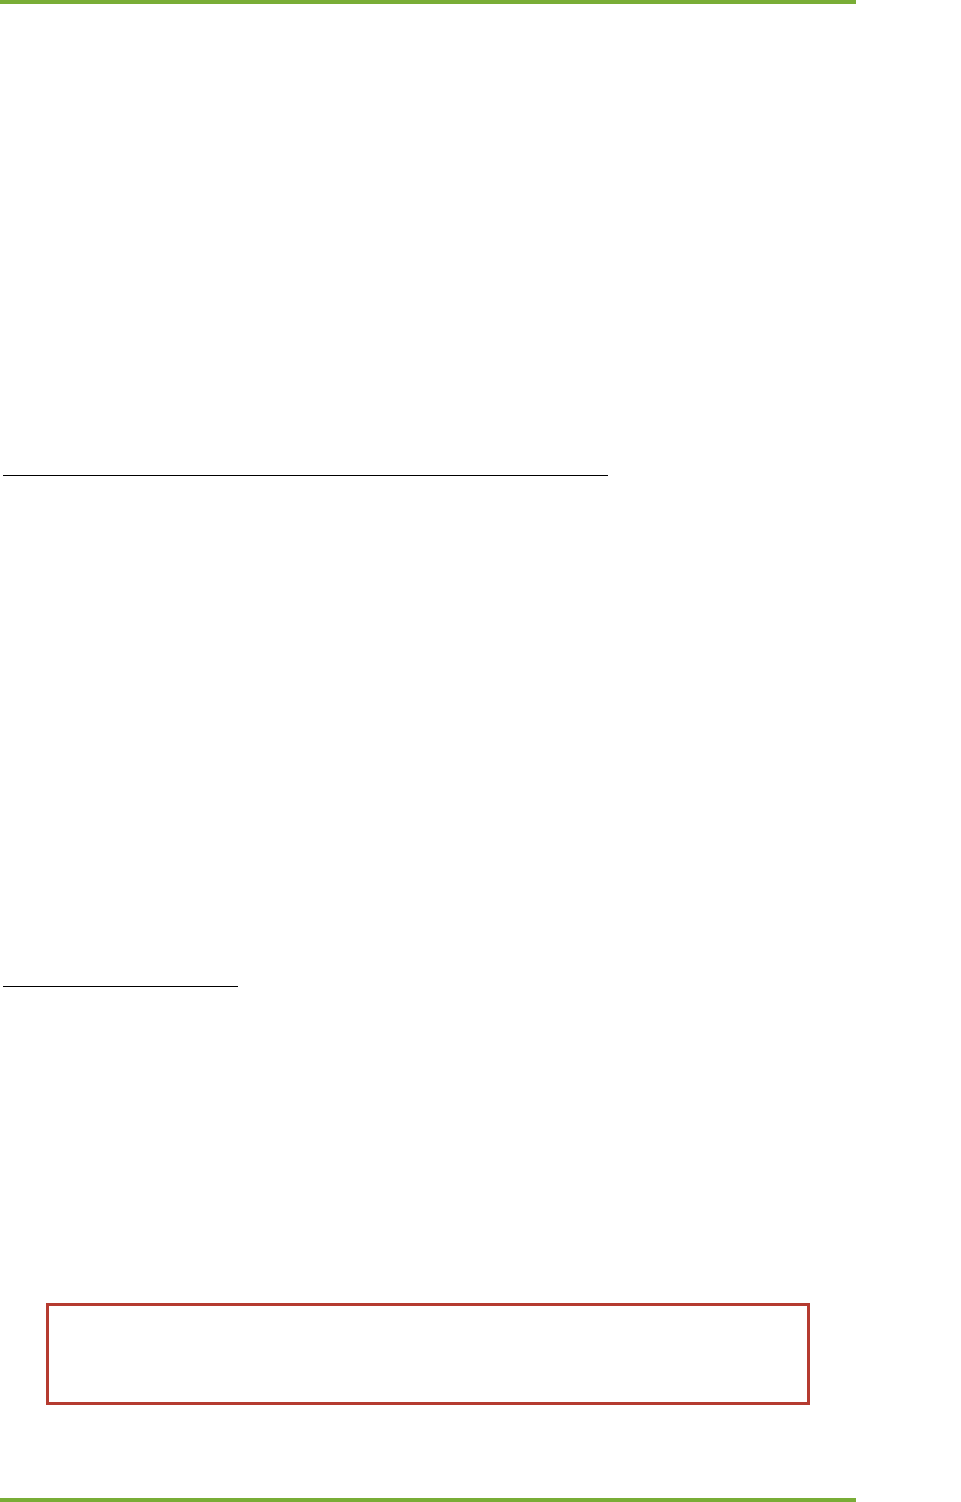
4.4.7 Carat GUI install (Windows)
Note: Version number of Carat GUI used in these instructions may not be the one
that is going to be installed. However, the instructions are applicable to all Carat
GUI versions.
4 Installing 7signal Sapphire 31
7signal Ltd, Panuntie 6, FI-00620 HELSINKI, FINLAND, +358 40 777 7611, info@7signal.com, www.7signal.com
7signal Sapphire Deployment Guide Release 3.1
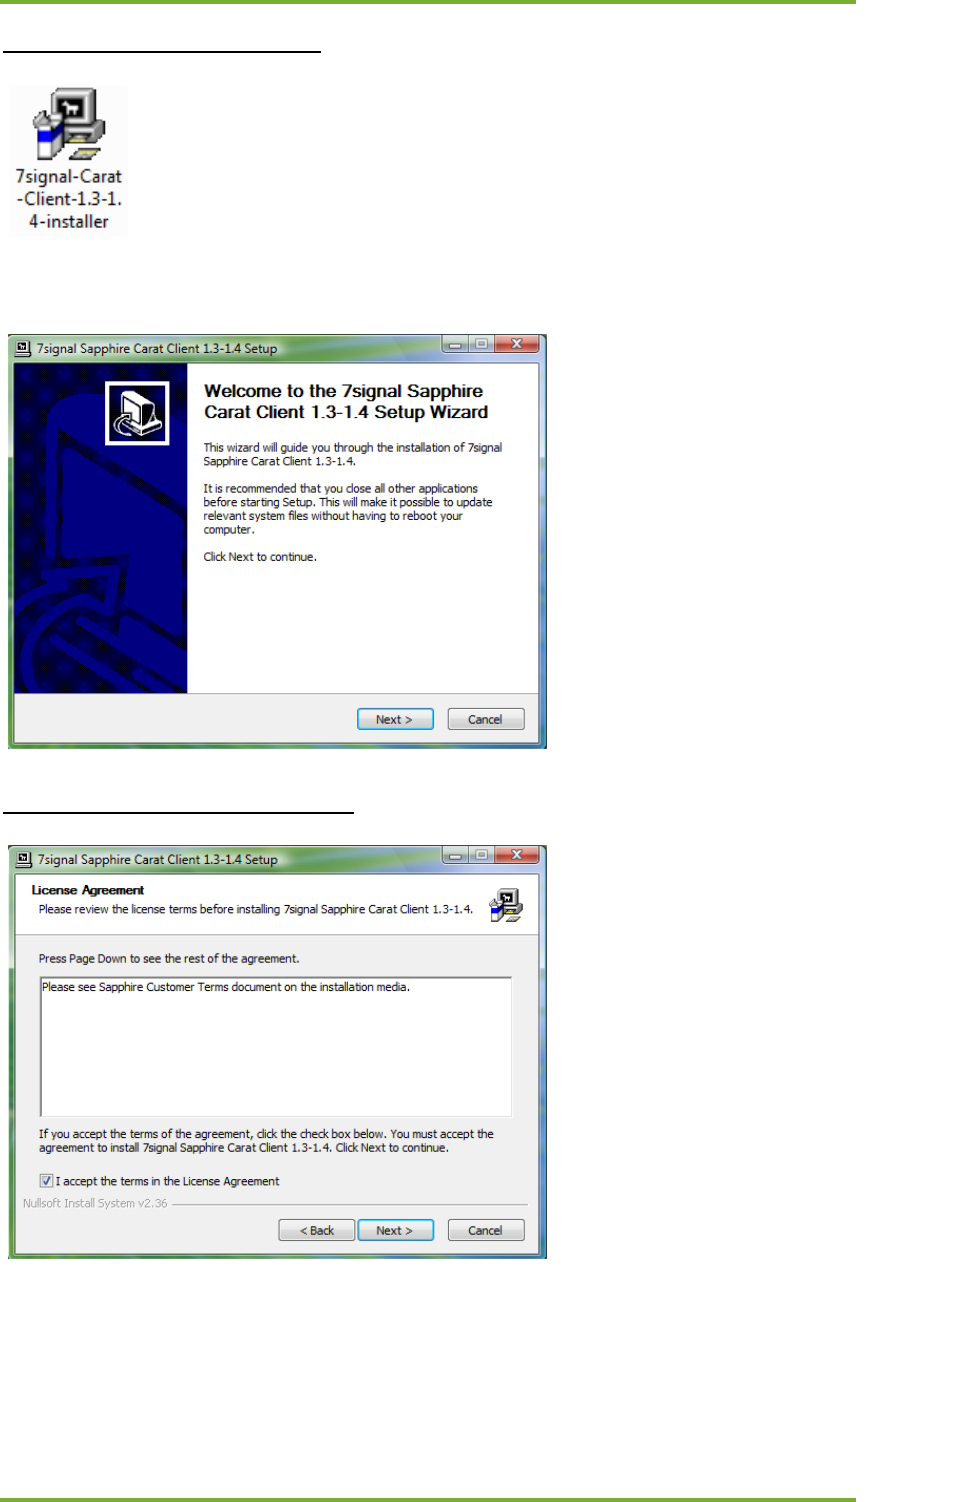
Step 1: Execute Carat GUI installer:
A double-click on the icon launches the following panel:
Step 2: Accept the License Agreement:
The distribution medium contains 7signal Sapphire Customer Terms document in the
Documents folder.
4 Installing 7signal Sapphire 32
7signal Ltd, Panuntie 6, FI-00620 HELSINKI, FINLAND, +358 40 777 7611, info@7signal.com, www.7signal.com
7signal Sapphire Deployment Guide Release 3.1
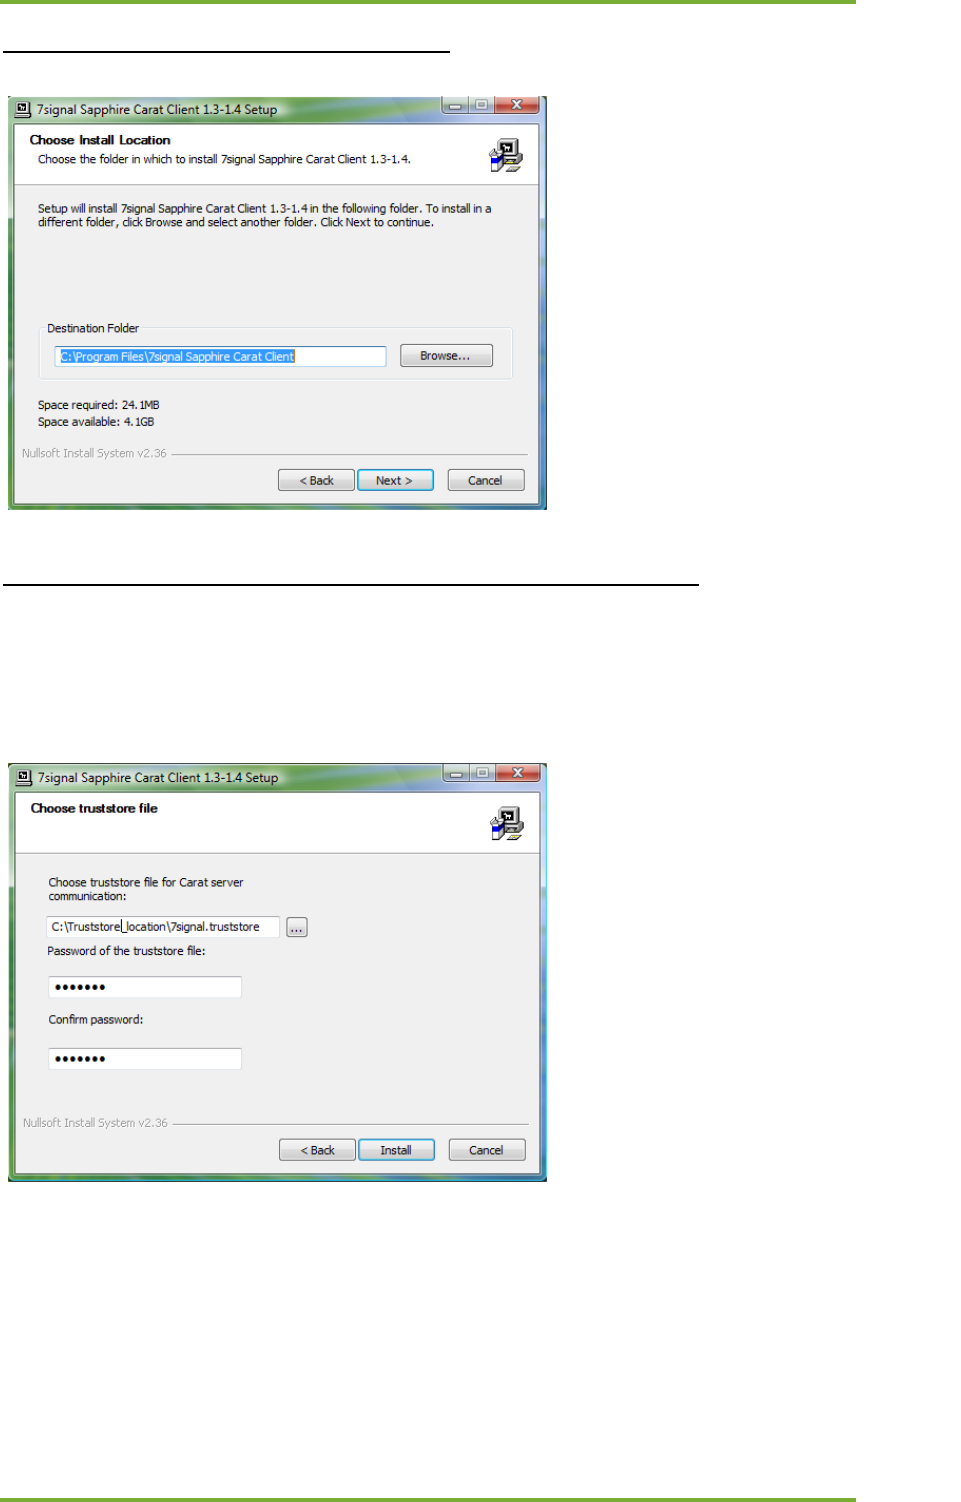
Step 3: Define the installation destination folder:
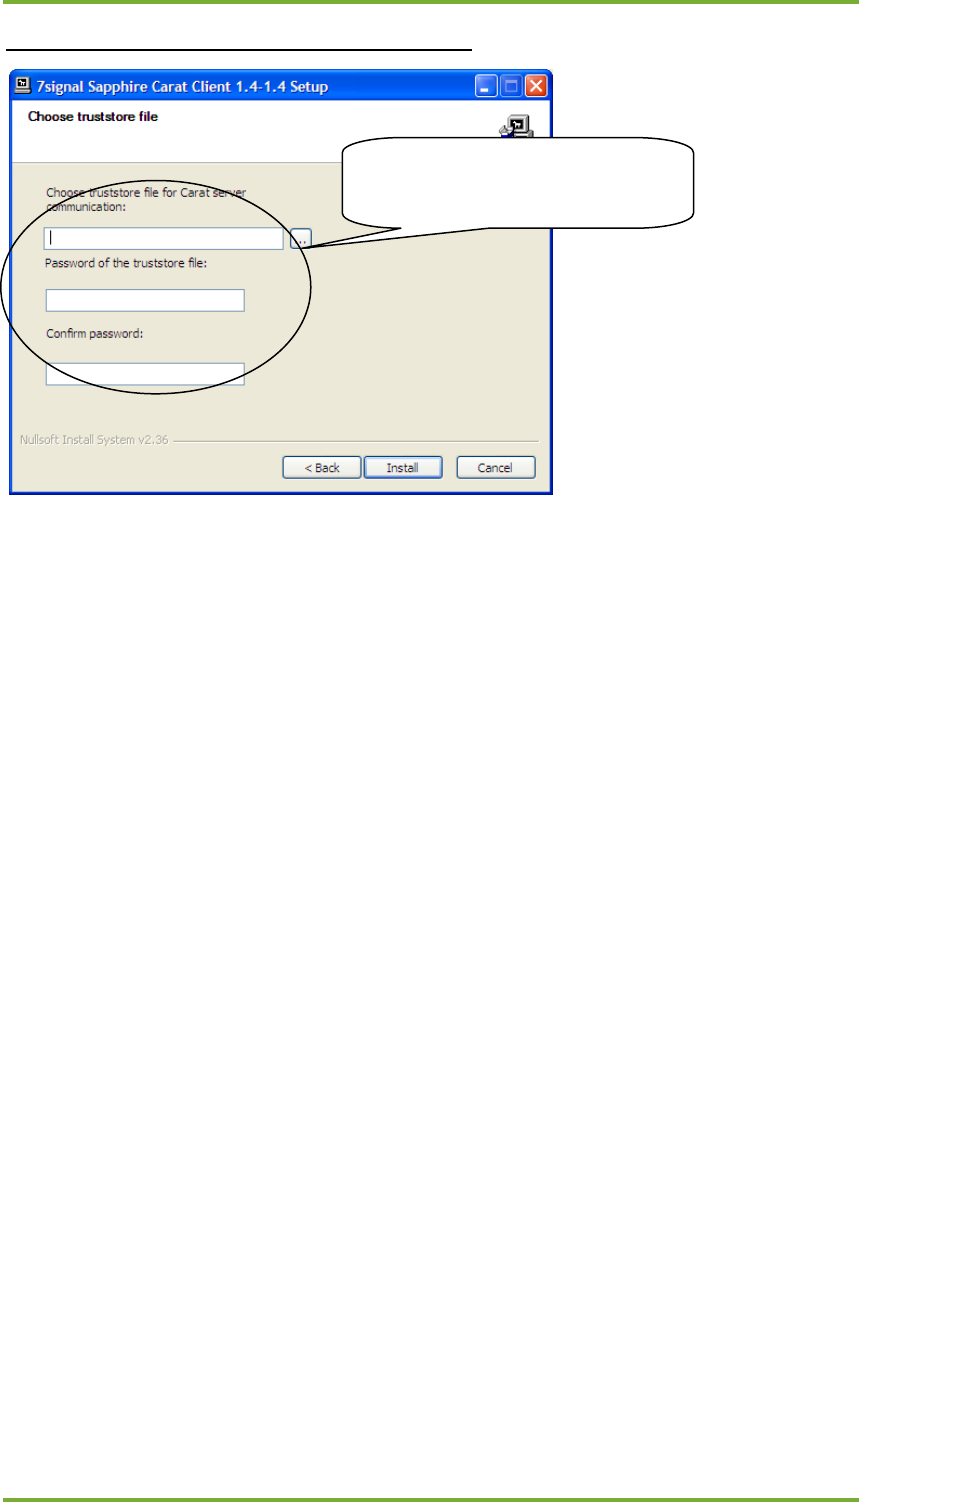
Step 4: Select your 7signal.truststore file and type your truststore password:
The PKI encryption infrastructure requires Carat GUI to provide a certificate. The certificate is
stored in a truststore file. The truststore file and the password are delivered within the product
package.
4 Installing 7signal Sapphire 33
7signal Ltd, Panuntie 6, FI-00620 HELSINKI, FINLAND, +358 40 777 7611, info@7signal.com, www.7signal.com
7signal Sapphire Deployment Guide Release 3.1
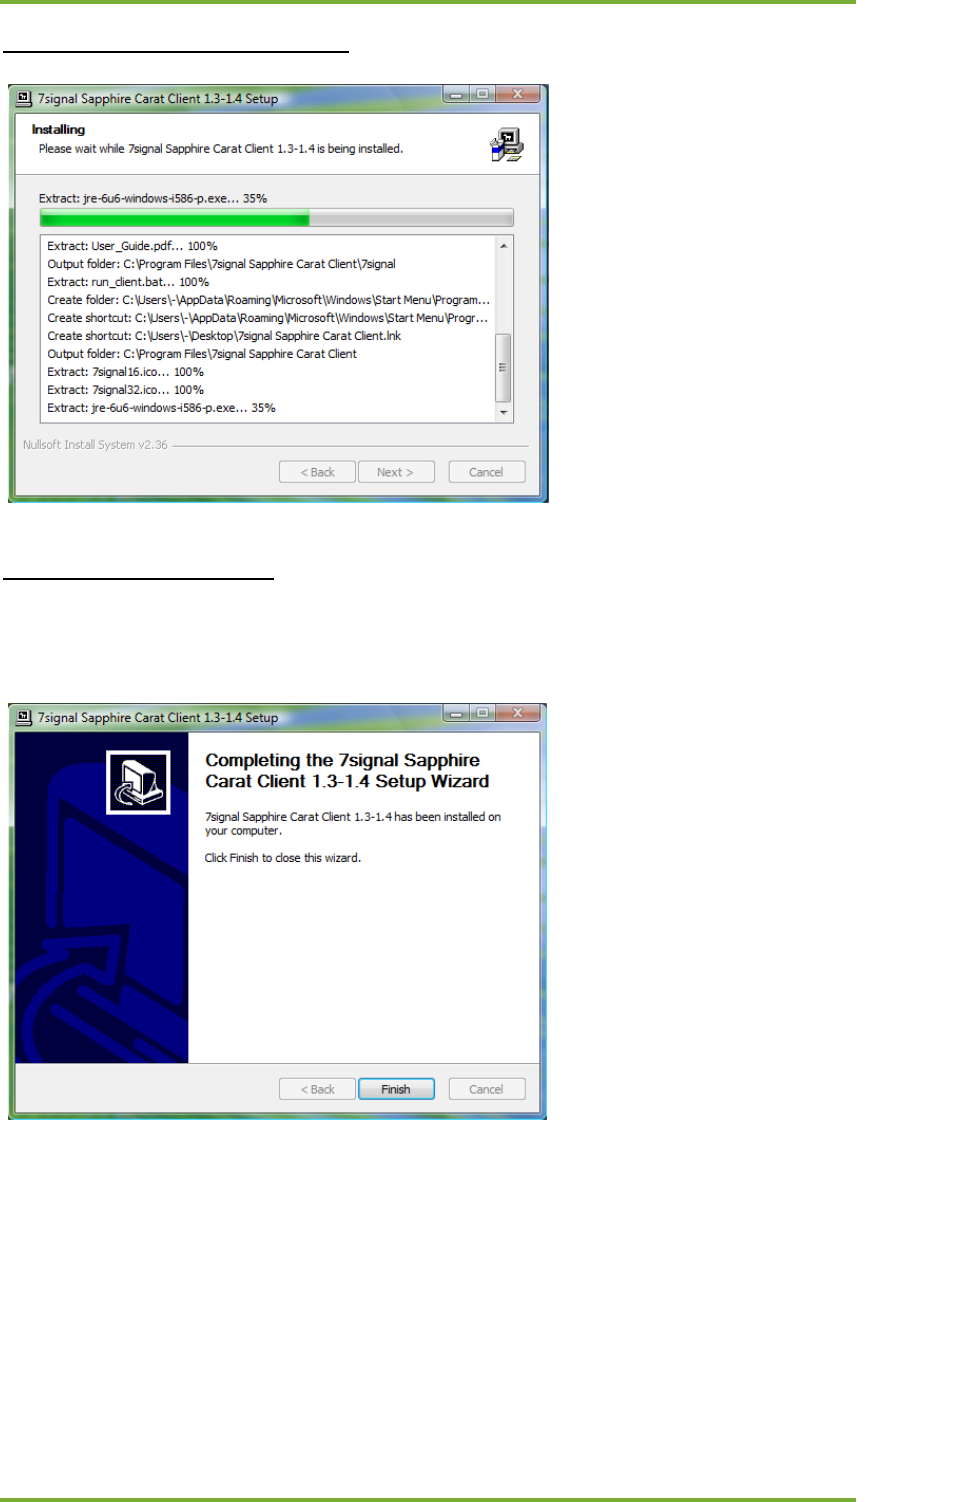
Step 5: The package is being installed:
Step 6: Finish the installation:
Finish the installation. An icon for launching the Carat GUI client should be available on the
desktop.
5 Upgrading Sapphire 34
7signal Ltd, Panuntie 6, FI-00620 HELSINKI, FINLAND, +358 40 777 7611, info@7signal.com, www.7signal.com
7signal Sapphire Deployment Guide Release 3.1
5 UPGRADING SAPPHIRE
5.1 Copy the latest Sapphire release to the hard disk (Linux)
Step 1: Create new directory to the Carat server:
# mkdir /root/SapphireXXYY
Step 2: Change to the installer directory:
# cd /root/SapphireXXYY
Step 3: Copy the Sapphire Carat CD (X.X-Y.Y) to the install directory:
# cp –r /<path to installation media>/* /root/SapphireXXYY/
5.2 Eye upgrade
5.2.1 Eye upgrade (GUI)
NOTE: Eye SW can be upgraded also after the other elements with command line.
Step 1: Start the Carat GUI:
Step 2: Install new software version to Eye:
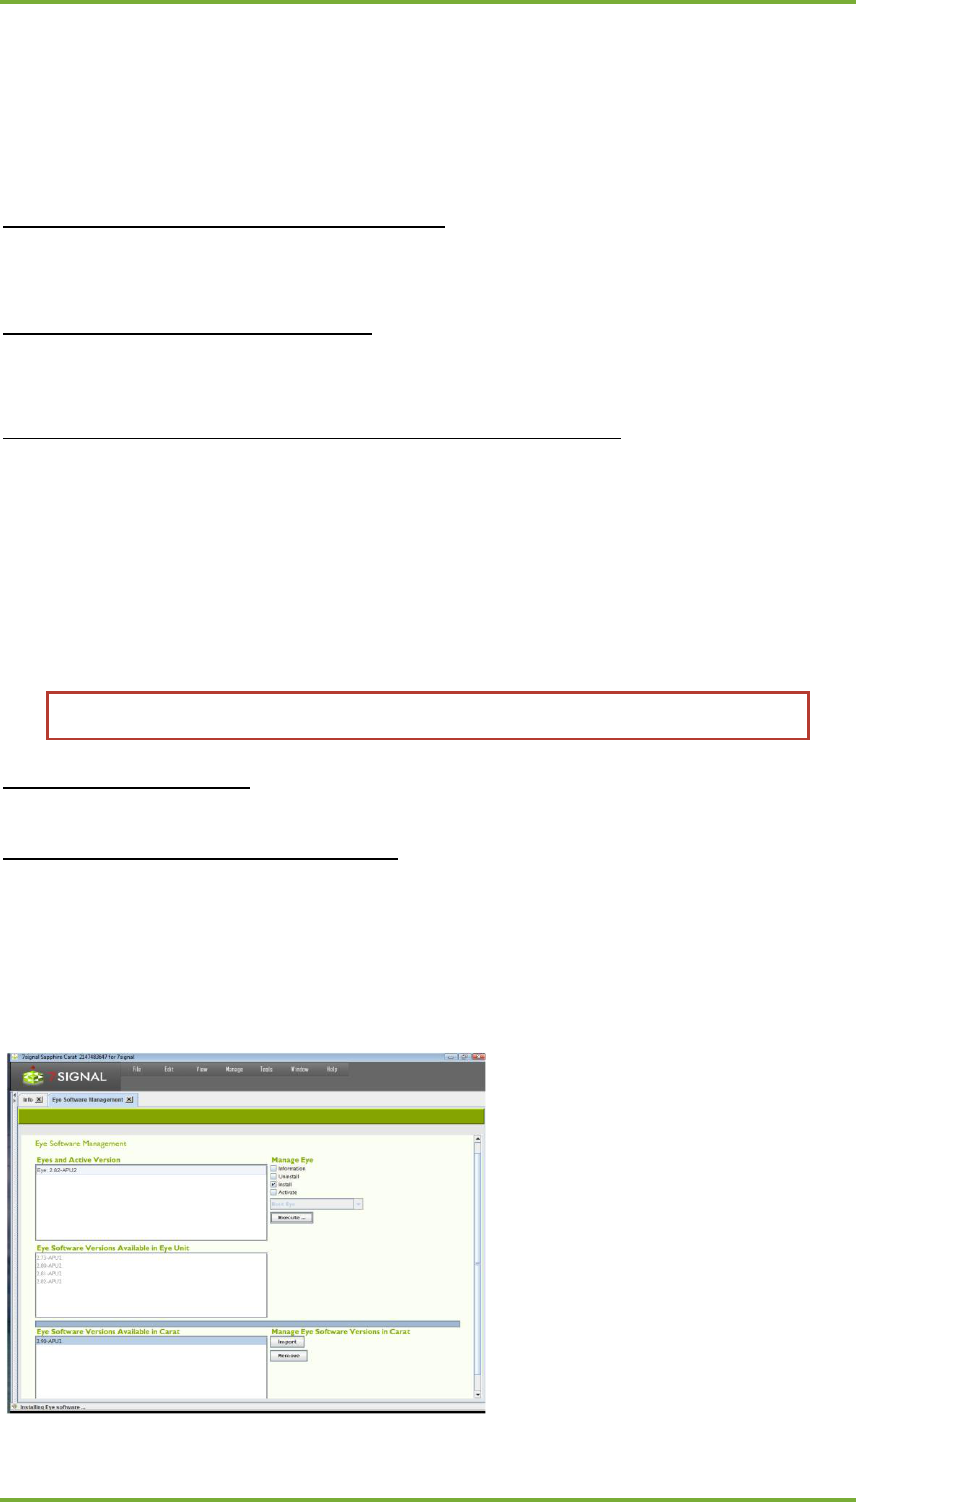
Open the “Manage | Eye Software Management” view
- Select the Eye to be upgraded and new software version from the Carat
- Select “Install” and “Execute …”
- Wait until installation is complete
5 Upgrading Sapphire 35
7signal Ltd, Panuntie 6, FI-00620 HELSINKI, FINLAND, +358 40 777 7611, info@7signal.com, www.7signal.com
7signal Sapphire Deployment Guide Release 3.1
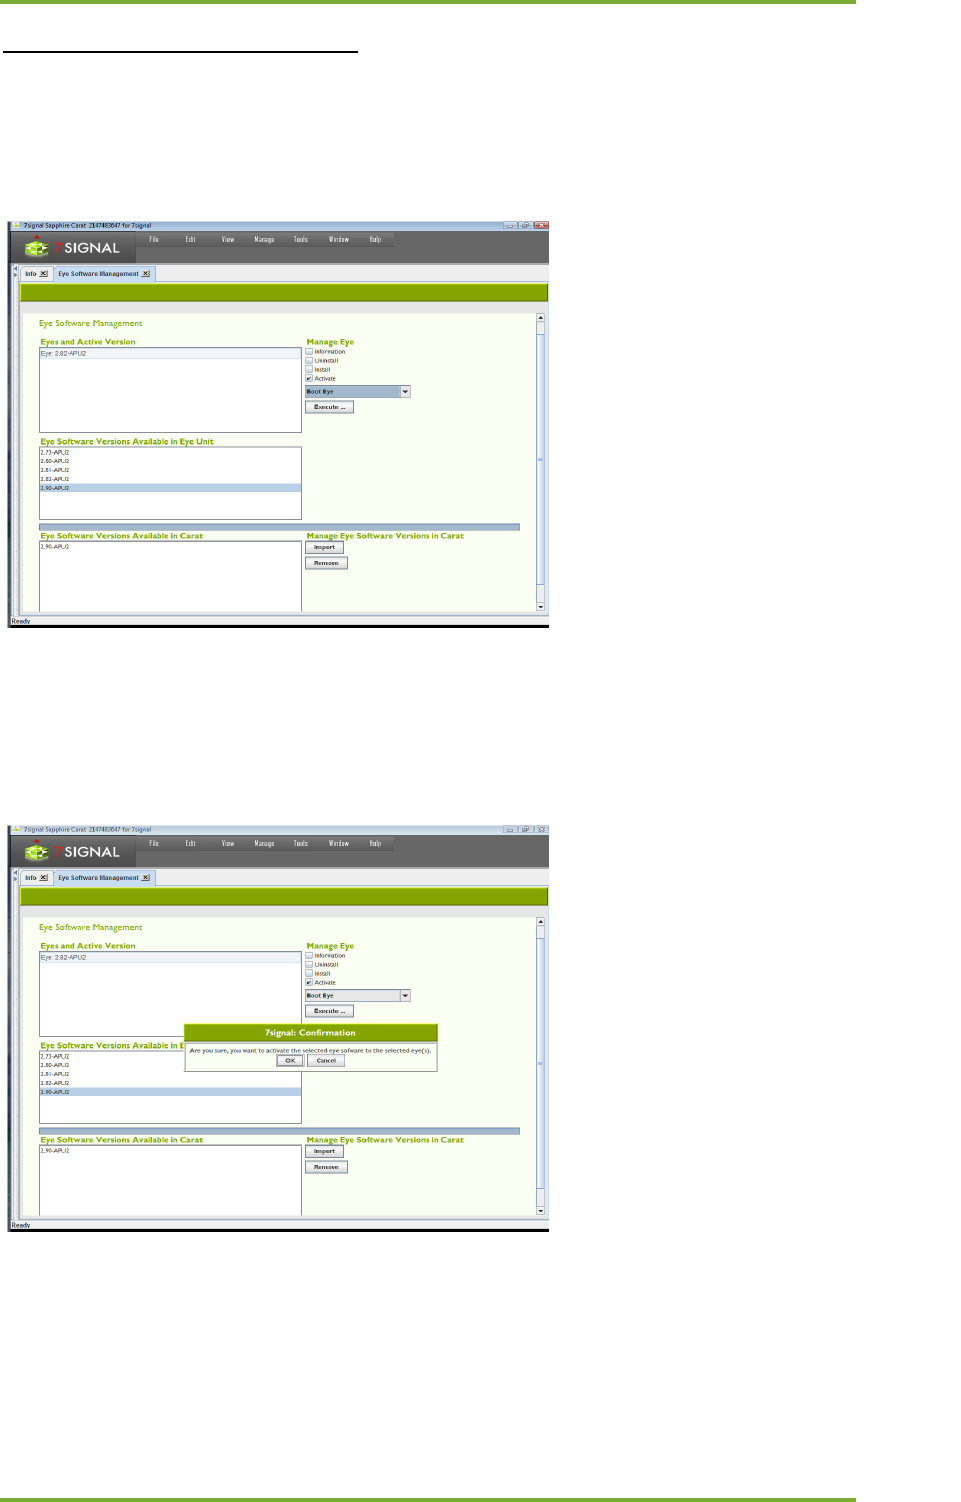
Step 3: Activate the installed software:
- Select the Eye and new software version in the Eye unit
- Select Activate and Execute …
o The new Eye software will be activated and the Eye unit will be rebooted
- Carat GUI confirms software activation: “Are you sure, you want to activate selected
eye software to the selected eye(s).”
- Select OK
5 Upgrading Sapphire 36
7signal Ltd, Panuntie 6, FI-00620 HELSINKI, FINLAND, +358 40 777 7611, info@7signal.com, www.7signal.com
7signal Sapphire Deployment Guide Release 3.1
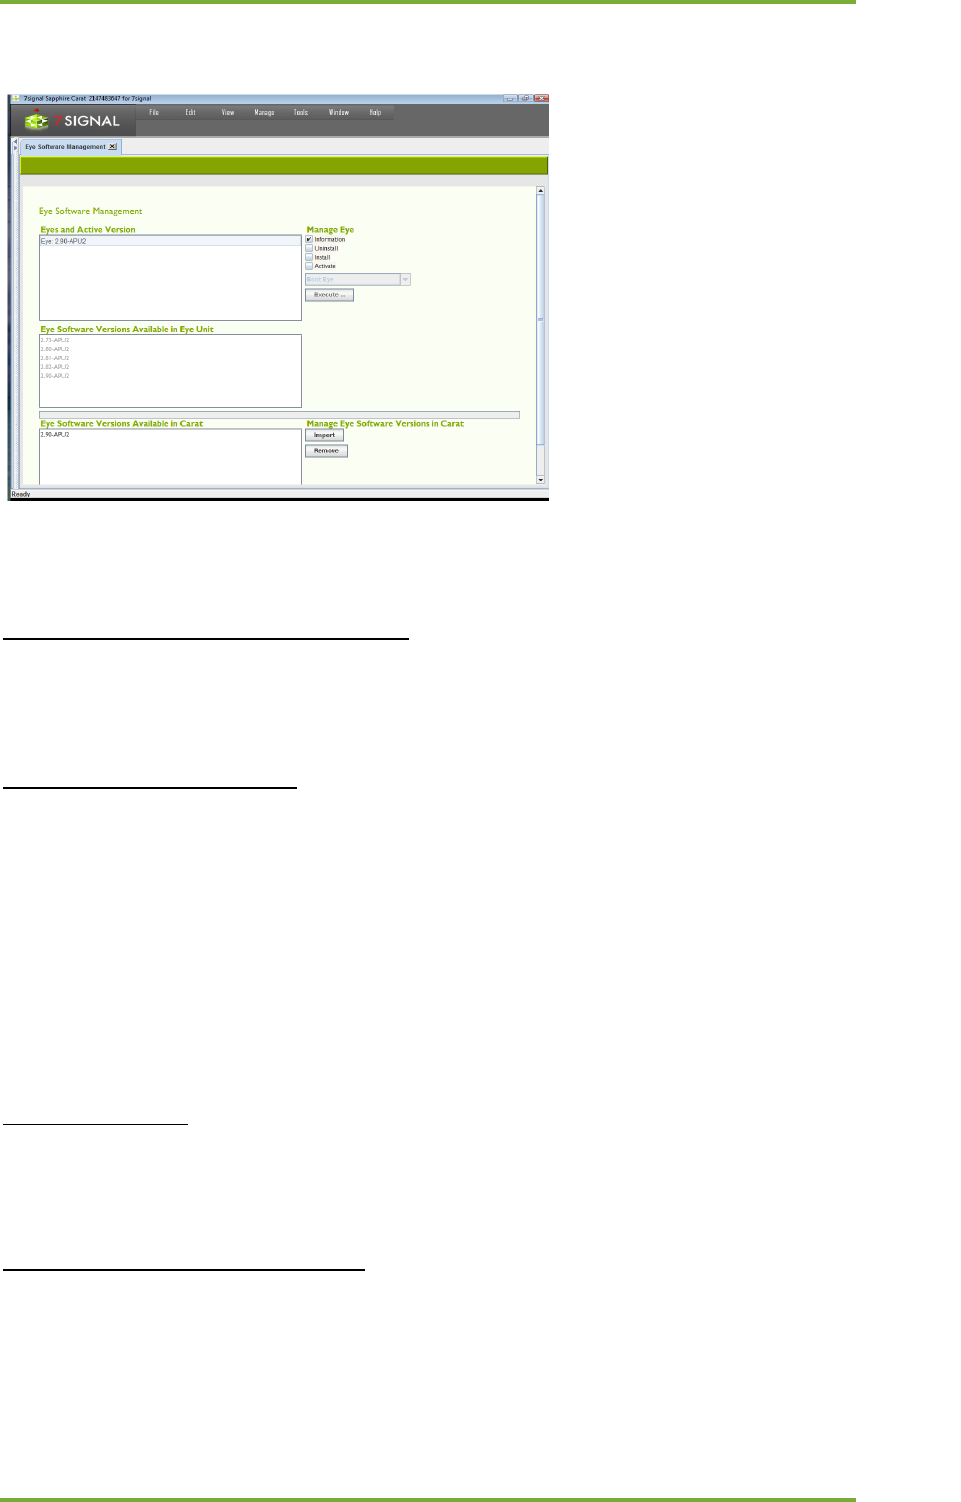
Eye software is now updated to the latest software version:
5.2.2 Eye upgrade (command line)
Step 1: Change to the Eye installer directory:
# cd /root/SapphireXXYY/Carat_CD/Eye
Step 2: Copy the SW to Eye unit:
802.11a/b/g unit:
# scp 7signal-eye-v0X.YY-APU2–installer.bin root@<IP_address>:/nand
802.11a/b/g/n unit:
# scp 7signal-eye-v0X.YY-APU3–installer.bin root@<IP_address>:/nand
Step 3: Login to Eye:
# ssh root@<eye_ip_address>
Step 4: Install the Eye new SW package:
[root@Eye]# cd /nand

5 Upgrading Sapphire 37
7signal Ltd, Panuntie 6, FI-00620 HELSINKI, FINLAND, +358 40 777 7611, info@7signal.com, www.7signal.com
7signal Sapphire Deployment Guide Release 3.1
802.11a/b/g unit:
[root@Eye]# ./7signal-eye-v0X.YY-APU2–installer.bin
802.11a/b/g/n unit:
[root@Eye]# ./7signal-eye-v0X.YY-APU3–installer.bin
Step 5: Reboot the Eye:
[root@Eye]# reboot
5.3 Stop Sapphire solution (Linux)
NOTE: All Sapphire components running on the Carat server must be stopped
before upgrade.
Step 1: Stop the Carat server:
Stop the Carat server by issuing the command:
# 7carat stop
Command output should be the following:
7signal Sapphire Carat is running
Shutting down 7signal Sapphire Carat: OK
7signal Sapphire Carat is not running
Step 2: Stop the Loupe server:
Stop the Loupe server by issuing the command:
# 7loupe stop
Command output should be the following:
Shutting down 7signal Loupe server: JRE_HOME is now set to =
/opt/7signal/jre
in /opt/7signal/Loupe/shutdown_loupe_server.sh
Attempting to shutdown the Apache Tomcat server... finished.
Killing possible Loupe processes.. no processes to kill
7signal Loupe server shutdown complete

5 Upgrading Sapphire 38
7signal Ltd, Panuntie 6, FI-00620 HELSINKI, FINLAND, +358 40 777 7611, info@7signal.com, www.7signal.com
7signal Sapphire Deployment Guide Release 3.1
5.4 Carat server upgrade (Linux)
Step 1: Change to the Carat server installer directory:
# cd /root/SapphireXXYY/Carat_Server/linux
Step 2: Execute Carat server installer:
Start the installer by issuing the command:
# ./7signal-Carat-X.X-Y.Y-installer.bin
The installer starts and finds an existing installation:
Extracting installer, please wait ...
Launching installer.
Checking previous installations...
Installations were found from /opt/7signal
Currently active version in directory /opt/7signal/Carat/vx.x-
x.x/7signal
Active version is x.x
Found existing 7signal Sapphire Carat installations.
Confirm upgrade:
Do you want to upgrade from currently active version x.x to version
X.X-Y.Y [Y/n]? <enter>
Installer starts the upgrade process:
OK. Starting upgrade process.
The following configuration was found:
--------------------------------------
Used JRE : /opt/7signal/jre
DB host : localhost
DB port number : 7722
DB username : db7sign
DB password (MD5) : 105ee7df7fcc92c001b9882e60a33224 -
Copy keystore from : /opt/7signal/Carat/vx.x/
7signal/conf/carat.keystore
Copy GUI truststore from : /opt/7signal/Carat/vx.x-
/7signal/conf/7signal.keystore
Copy license from : /opt/7signal/Carat/vx.x
/7signal/conf/license.xml
Collect clients : false
Eye keystore passwd (MD5) : 236e61626c20c2358626cd6547575ffc -
GUI truststore password (MD5): 236e61626c20c2358626cd6547575ffc -
RMI host address : xxx.yyy.zzz.vvv
Target directory : /opt/7signal
Accept configuration:
Is this configuration OK [Y/n]? <enter>
5 Upgrading Sapphire 39
7signal Ltd, Panuntie 6, FI-00620 HELSINKI, FINLAND, +358 40 777 7611, info@7signal.com, www.7signal.com
7signal Sapphire Deployment Guide Release 3.1
OK. Performing installation by using previous configuration.
Extracting Carat package...
Copying Carat to /opt/7signal...
Extracting jre...
JRE already installed, checking if it is up to date
Installed version: 1.6.0_06-b02
New version : 1.6.0_13-b03
Copying JRE to /opt/7signal/jre
Installing configuration file.
When upgrading to the next major version, the installer asks for location of the new license
file. Enter path and file name of the license file and press enter:
Please enter location and name of Carat license file
(/<path>/<license>.lic): <path and name of the license file> <enter>
Installing license file...
Installing 7carat tool...
Modifying file permissions...
Creating uninstaller...
Saving configuration.
Done.
Upgrade is ready after installer finishes.
5.5 DBMS upgrade (Linux)
NOTE: If your Sapphire version is 2.0 or previous (e.g. 1.4-1.5) please upgrade the
DBMS to 2.1 level before continue.
The Sapphire version can be checked from GUI/Help/About.
Step 1: Change to the Carat database installer directory:
# cd /root/SapphireXXYY/Carat-output/Carat_DBMS/linux
Step 2: Execute DBMS installer in upgrade mode:
# ./7signal-DBMS-X.X-Y.Y-installer.bin upgrade
NOTE: The upgrade command must be used in order to save old measurement
data!
The DBMS installer starts to upgrade the DBMS. When the installer asks some upgrade
parameters, default values provided are applicable in most of the installations. Upgrade
process may take several minutes.
Extracting installer, please wait ...
Launching installer.
Trying to locate existing installation...
Found existing DB installation.
Starting to upgrade.
DBMS location : /opt/7signal/dbms
Configured DB user is db7sign

5 Upgrading Sapphire 40
7signal Ltd, Panuntie 6, FI-00620 HELSINKI, FINLAND, +358 40 777 7611, info@7signal.com, www.7signal.com
7signal Sapphire Deployment Guide Release 3.1
Configured DB port number is 7722
Current version : x.x
Version to which upgrade: X.X-Y.Y
Enter location of JRE [/opt/7signal/jre]: <enter>
JRE location : /opt/7signal/jre
Java location : /opt/7signal/jre/bin/java
Do you wish to backup databases before proceeding [Y/n] <enter>
Enter directory to which the backed up databases are copied
[/var/opt/7signal/dbms/backups]:
Do you wish to start database upgrade now [Y/n] <enter>
Copying aggregation view template generator and templates to
/home/db7sign/
Installing 7db tool..
Installing 7signal DB backup & restore tool..
Updating version information...
Database upgrade done.
DBMS upgrade is ready when the installer finishes.
5.6 Carat GUI upgrade (Linux)
Step 1: Change to the Carat GUI installer directory:
# cd /root/SapphireXXYY/Carat_GUI/linux
Step 2: Execute Carat GUI installer:
Start the installer by issuing the command:
# ./7signal-Carat-Client-X.X-Y.Y-installer.bin
The installer starts to upgrade the GUI. Confirm the upgrade when the installer asks for
confirmation:
Extracting installer, please wait ...
Launching installer.
Enter location to which 7signal Sapphire Carat client will be
installed [/opt/7signal]: <enter>
Extracting Carat client package...
Found existing installation on given location.
Do you want to upgrade [Y/n]? <enter>
Copying Carat to /opt/7signal...
Extracting jre...
JRE already installed, checking if it is up to date
Installed version: 1.6.0_13-b03
New version : 1.6.0_13-b03
JRE does not need to be updated.
Updating files according to configuration...
Restoring configuration files..
Creating uninstaller...
Finished.
The GUI upgrade is ready when the installer finishes.

5 Upgrading Sapphire 41
7signal Ltd, Panuntie 6, FI-00620 HELSINKI, FINLAND, +358 40 777 7611, info@7signal.com, www.7signal.com
7signal Sapphire Deployment Guide Release 3.1
5.7 Loupe server upgrade (Linux)
Step 1: Change to the installer directory:
# cd /root/SapphireXXYY/Loupe/linux
Step 2: Execute Loupe server installer:
Start the installer by issuing the command:
# ./7signal-Loupe-X.X-Y.Y-installer.bin
The installer starts to upgrade the Loupe installation. Confirm the upgrade and apply default
values for questions asked by the installer:
Extracting installer, please wait ...
Launching installer.
Checking previous installations ...
Loupe installation found from /opt/7signal
Do you want to upgrade the previous Loupe installation [Y/n]? <enter>
Loading configuration from previous web.xml ...
Loading configuration from previous server.xml ...
TARGET_DIR : /opt/7signal
RMI_LOCATION : 127.0.0.1
CARAT_TRUSTSTORE_PASSWORD : xxXxx
DB2_USER : db7sign
DB2_PASSWORD : XXxxXXYY
NONSSL_PORT : 80
SSL_PORT : 443
LOUPE_KEYSTORE_PASSWORD : xxWxX
Do you want to continue the upgrade with this configuration [Y/n]?
<enter>
Extracting Loupe package ...
Updating files according to configuration ...
Finding JRE ... found at /opt/7signal/jre
Copying init script ...
Installing init script ...
Installing 7loupe tool ...
Creating uninstaller ...
Do you want to update the Carat-libraries (lib/7signal_common.jar and
lib/7signal_vault.jar) from the previous Carat installation [y/N]?
<enter>
Loupe install process finished.
HTTP server configured to URL: http://localhost:Xx/
Do you want to start Loupe server now? [Y/n] <enter>
7signal Sapphire Loupe service commands:
service 7signalLoupe start : Starts Loupe server
(Shortcut: 7loupe s)
service 7signalLoupe stop : Stops Loupe server
(Shortcut: 7loupe x)

5 Upgrading Sapphire 42
7signal Ltd, Panuntie 6, FI-00620 HELSINKI, FINLAND, +358 40 777 7611, info@7signal.com, www.7signal.com
7signal Sapphire Deployment Guide Release 3.1
service 7signalLoupe restart : Restarts Loupe server
(Shortcut: 7loupe r)
service 7signalLoupe status : Shows if the server is running or not
(Shortcut: 7loupe status)
To learn more about the 7loupe-command, simply type command '7loupe'
without any parameters.
The Loupe server upgrade is ready when the installer finishes.
5.8 Sonar upgrade (Linux)
Step 1: Create install directory to the Sonar server:
# mkdir /root/SapphireXXYY/
Step 3: Copy the Sapphire Sonar CD (X.X-Y.Y) to the install directory:
# cp –r /<path to installation media> /root/SapphireXXYY/
Step 4: Change to the installer directory:
# cd /root/SapphireXXYY/Sonar/linux
Step 5: Execute Sonar server installer:
Start the installer by issuing the command:
# ./7signal-Sonar-X.X-Y.Y-installer.bin
The installer starts to upgrade the Sonar installation. Confirm the upgrade and accept the
current configuration:
Extracting installer, please wait ...
Launching installer.
Sonar installation found from /opt/7signal.
Do you want to upgrade [Y/n]? <enter>
Starting to upgrade.
Stopping Sonar..
Getting current configuration..
Checking that TCP port 80 is not in use.. Port 80 free.
Sonar configuration:
--------------------------------------------------
Server name : Sonar
Server port : 80
Max. clients : 10
MOS port pool start: 50000
MOS port pool size : 10
Log level : ERROR
Is this configuration OK [Y/n] <enter>
Copying Sonar to /opt/7signal...
Configuring Sonar...
Extracting jre...
JRE already installed, checking if it is up to date
Installed version: 1.6.0_06-b02
5 Upgrading Sapphire 43
7signal Ltd, Panuntie 6, FI-00620 HELSINKI, FINLAND, +358 40 777 7611, info@7signal.com, www.7signal.com
7signal Sapphire Deployment Guide Release 3.1
New version : 1.6.0_13-b03
Copying JRE to /opt/7signal/jre
Updating files according to configuration...
Copying init script..
Installing init script..
Creating uninstaller...
Starting Sonar server..
Starting 7signal Sonar: OK
Done.
The Sonar server upgrade is ready when the installer finishes.
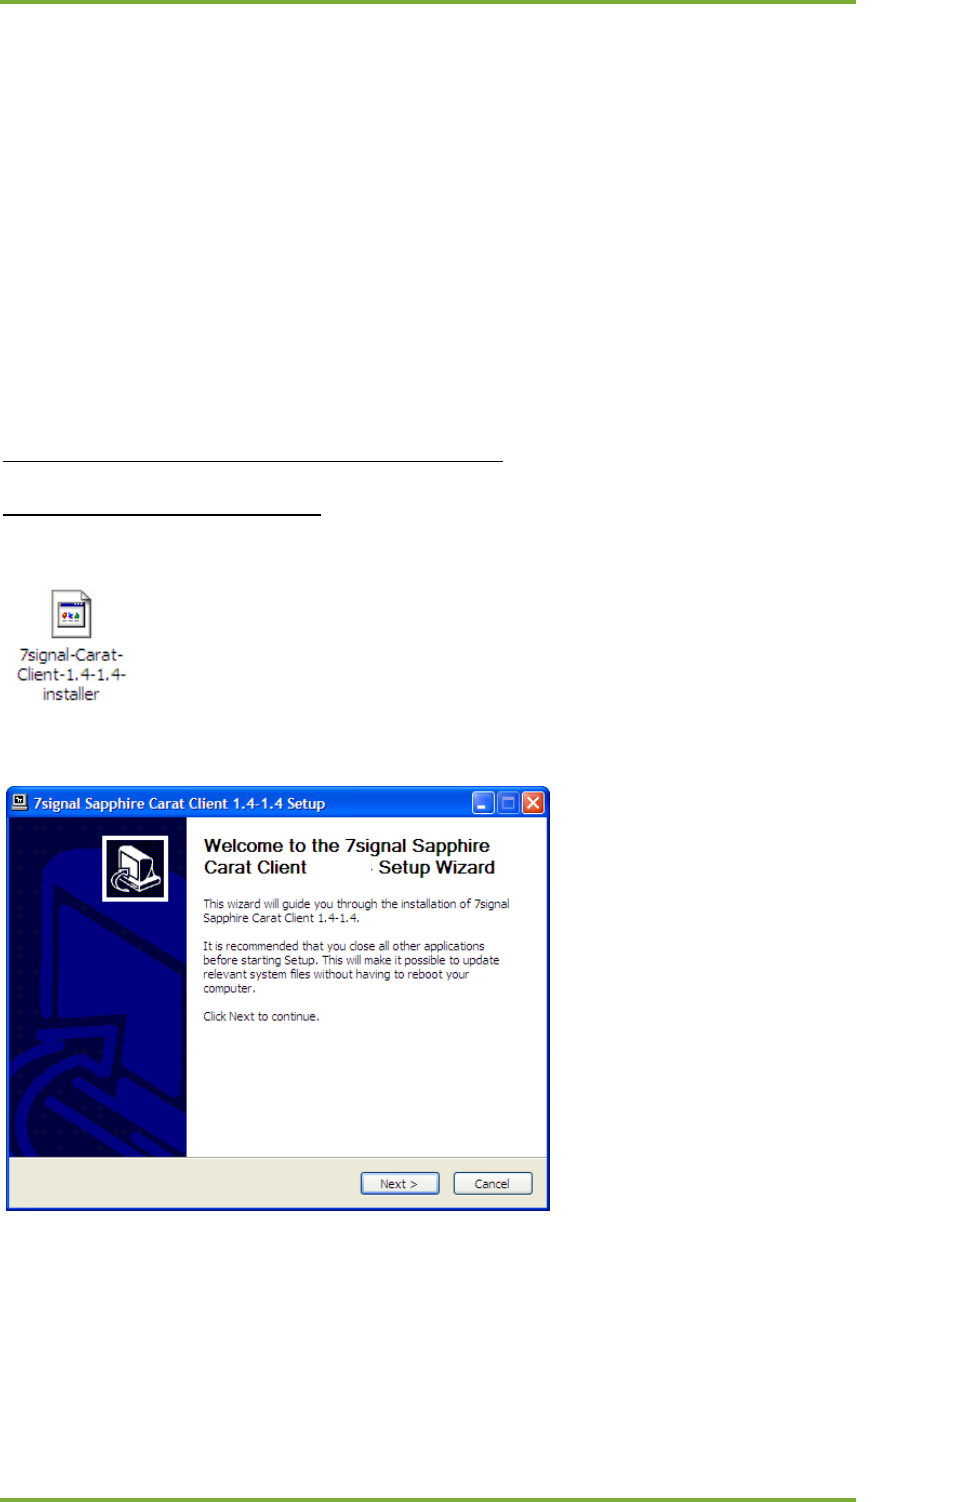
5.9 Carat GUI upgrade (Windows)
Step 1: Install the installation CD to the Windows host:
Step 2: Execute Carat GUI installer:
Execute the windows installer Carat_GUI/win folder:
The installer starts and Welcome dialog is shown:
Click “Next” to proceed.

5 Upgrading Sapphire 44
7signal Ltd, Panuntie 6, FI-00620 HELSINKI, FINLAND, +358 40 777 7611, info@7signal.com, www.7signal.com
7signal Sapphire Deployment Guide Release 3.1
Step 3: Accept the License Agreement:
Click “Next” to proceed.
Step 4: Define the installation destination folder
Browse the folder to which the Carat GUI is currently installed. Click “Next” to proceed.
5 Upgrading Sapphire 45
7signal Ltd, Panuntie 6, FI-00620 HELSINKI, FINLAND, +358 40 777 7611, info@7signal.com, www.7signal.com
7signal Sapphire Deployment Guide Release 3.1
Step 5: Proceed with the current encryption certificates:
Click “Install” button (the original 7signal.truststore file and truststore password will be
selected automatically).
Leave empty if Windows client has
already been installed before
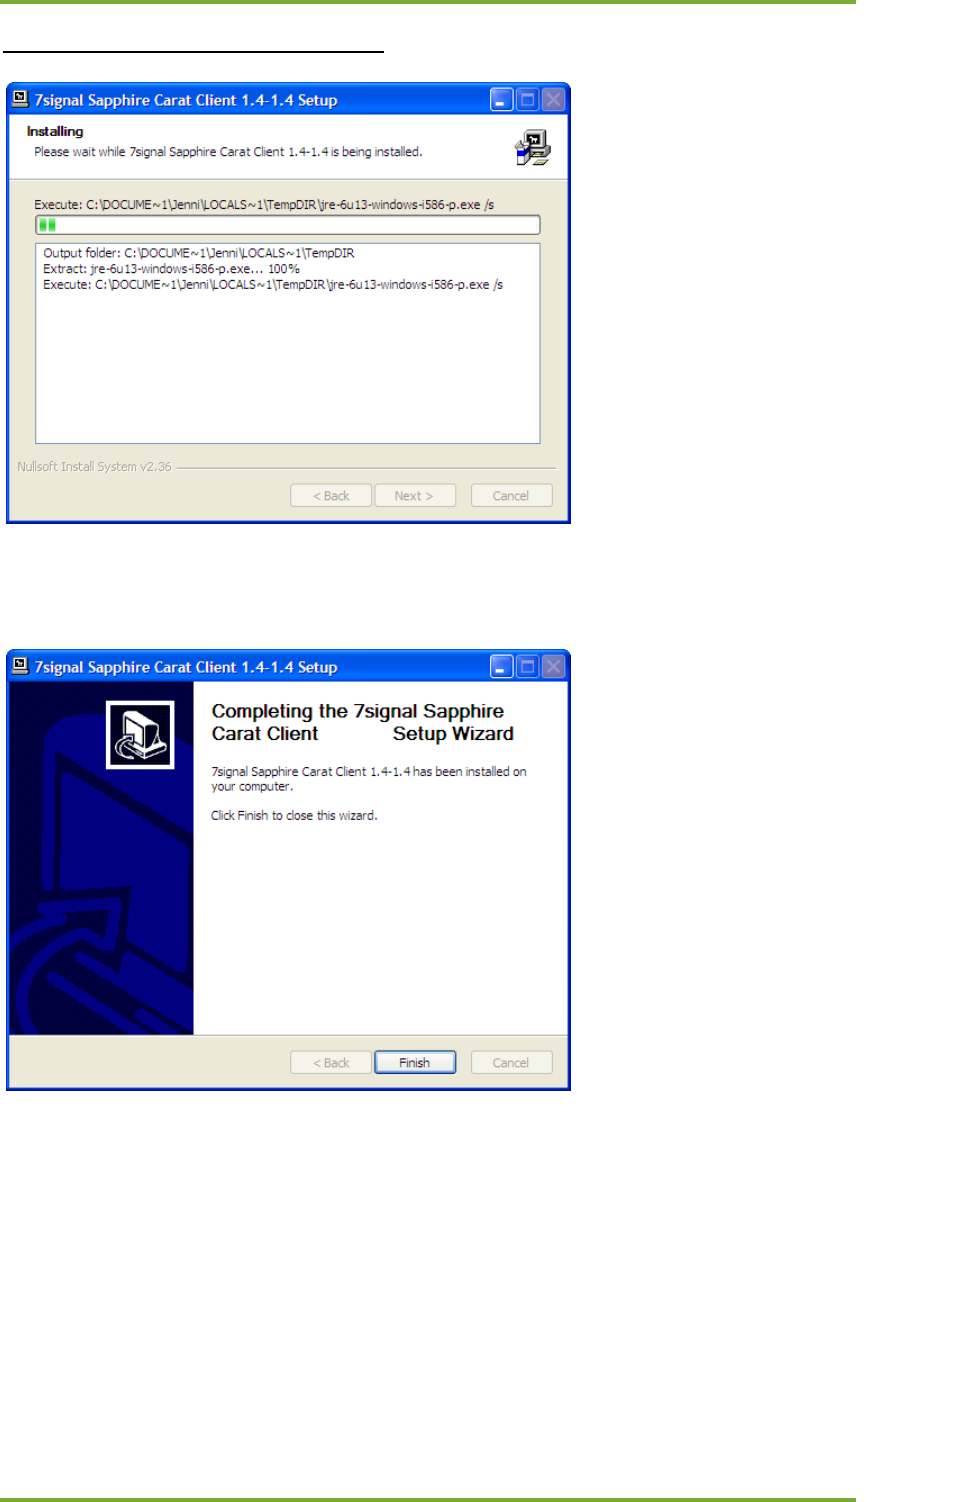
5 Upgrading Sapphire 46
7signal Ltd, Panuntie 6, FI-00620 HELSINKI, FINLAND, +358 40 777 7611, info@7signal.com, www.7signal.com
7signal Sapphire Deployment Guide Release 3.1
Step 6: Wait installation to be completed:
Click “Finish” button after installation is complete:

5 Upgrading Sapphire 47
7signal Ltd, Panuntie 6, FI-00620 HELSINKI, FINLAND, +358 40 777 7611, info@7signal.com, www.7signal.com
7signal Sapphire Deployment Guide Release 3.1
5.10 Start Sapphire solution (Linux)
After all components have been upgraded, start the Carat and Loupe servers.
Step 1: Start the Carat server:
Start the Carat server by issuing the command:
# 7carat start
The Carat server starts in couple of seconds:
7signal Sapphire Carat is not running
Starting 7signal Sapphire Carat: OK
7signal Sapphire Carat is not running
7signal Sapphire Carat is not running
7signal Sapphire Carat is running
Step 2: Start the Loupe server:
Start the Loupe server by issuing the command:
# 7loupe start
The Loupe server starts in couple of seconds:
Starting 7signal Loupe server: 7signal Loupe server start complete
7signal Loupe server is not running
7signal Loupe server is running
5.11 Start Automated Testing
Automated testing is in stopped state after the Sapphire has been upgraded.
Step 1: Start Carat GUI:
Step 2: Start Automated Testing:
Select “Tools | Start Automated Testing”.

6 Uninstalling Sapphire 48
7signal Ltd, Panuntie 6, FI-00620 HELSINKI, FINLAND, +358 40 777 7611, info@7signal.com, www.7signal.com
7signal Sapphire Deployment Guide Release 3.1
6 UNINSTALLING SAPPHIRE
6.1 Uninstall Loupe server (Linux)
Step 1: Stop Loupe server:
Login to Carat host and stop the Loupe server by issuing the command:
# 7Loupe stop
Step 2: Uninstall Loupe server:
Change to Loupe installation directory:
# cd <Loupe installation directory>
Uninstall the Loupe server by issuing the command:
# ./loupe_server_uninstall.sh
The uninstaller script starts. Confirm uninstall by entering “y”:
7signal Sapphire Loupe server will be removed (/opt/7signal/Loupe).
Are you sure [y/N]? y
The uninstaller script starts to uninstall the Loupe server:
Shutting down Loupe server...
Shutting down 7signal Loupe server: Attempting to shutdown the Apache
Tomcat server... finished.
Killing possible Loupe processes.. no processes to kill
7signal Loupe server shutdown complete
Removing files...
Done.
The uninstallation is finished when the script is ready.
6.2 Uninstall Carat server (Linux)
Step 1: Stop Carat server:
Login to Carat host and stop the Carat server by issuing the command:
# 7carat stop
Step 2: Uninstall Carat server:
Change to Carat installation directory:
# cd /<Carat installation directory>/vX.X-Y.Y/
Uninstall the Carat server by issuing the command:
# ./carat_uninstall.sh
6 Uninstalling Sapphire 49
7signal Ltd, Panuntie 6, FI-00620 HELSINKI, FINLAND, +358 40 777 7611, info@7signal.com, www.7signal.com
7signal Sapphire Deployment Guide Release 3.1
The uninstaller script starts. Confirm uninstall by entering “y”:
7signal Sapphire Carat, related user account and home directory will
be removed. Are you sure [y/N]? y
The uninstaller script starts to uninstall the Carat server:
Stopping 7signal Sapphire Carat..
Shutting down 7signal Sapphire Carat: 7signal Sapphire Carat is not
running
Removing init script..
Removing files...
Removing user account and group...
Done.
The uninstallation is finished when the script is ready.
6.3 Uninstall DBMS (Linux)
The Carat and Loupe servers must be uninstalled before DBMS can be uninstalled.
See chapters 6.1 and 6.2.
Login to Carat host and change to DBMS installation directory. It is the parent directory of
former Carat installation
5
:
# cd /<DBMS installation directory>
Uninstall the DBMS by issuing the command:
# ./uninstall-dbms.sh
The uninstaller script starts. Confirm uninstall by entering “y”:
DB2 and related user accounts will be removed. Are you sure [y/N]? y
The uninstaller script starts to uninstall the Carat server:
Resolving log directories...
6
- MGMT7 log directory is /<database location
directory>/NODE0000/SQL00001/SQLOGDIR/
- MEAS7 log directory is /<database location
directory>/NODE0000/SQL00002/SQLOGDIR/
- SECUR7 log directory is /<database location
directory>/NODE0000/SQL00003/SQLOGDIR/
Resolve logging method...
- MGMT7 database uses circular logging.
- MEAS7 database uses circular logging.
- SECUR7 database uses circular logging.
Resolving database directory ...
- Databases on <database location directory>
Stopping DB2...
SQL1064N DB2STOP processing was successful.
Stopping applications...
5
For example, if Carat server was installed to /opt/7signal/Carat, the DBMS installation directory is
/opt/7dignal/dbms.
6
Output will be different if infinite archival logging was in use.
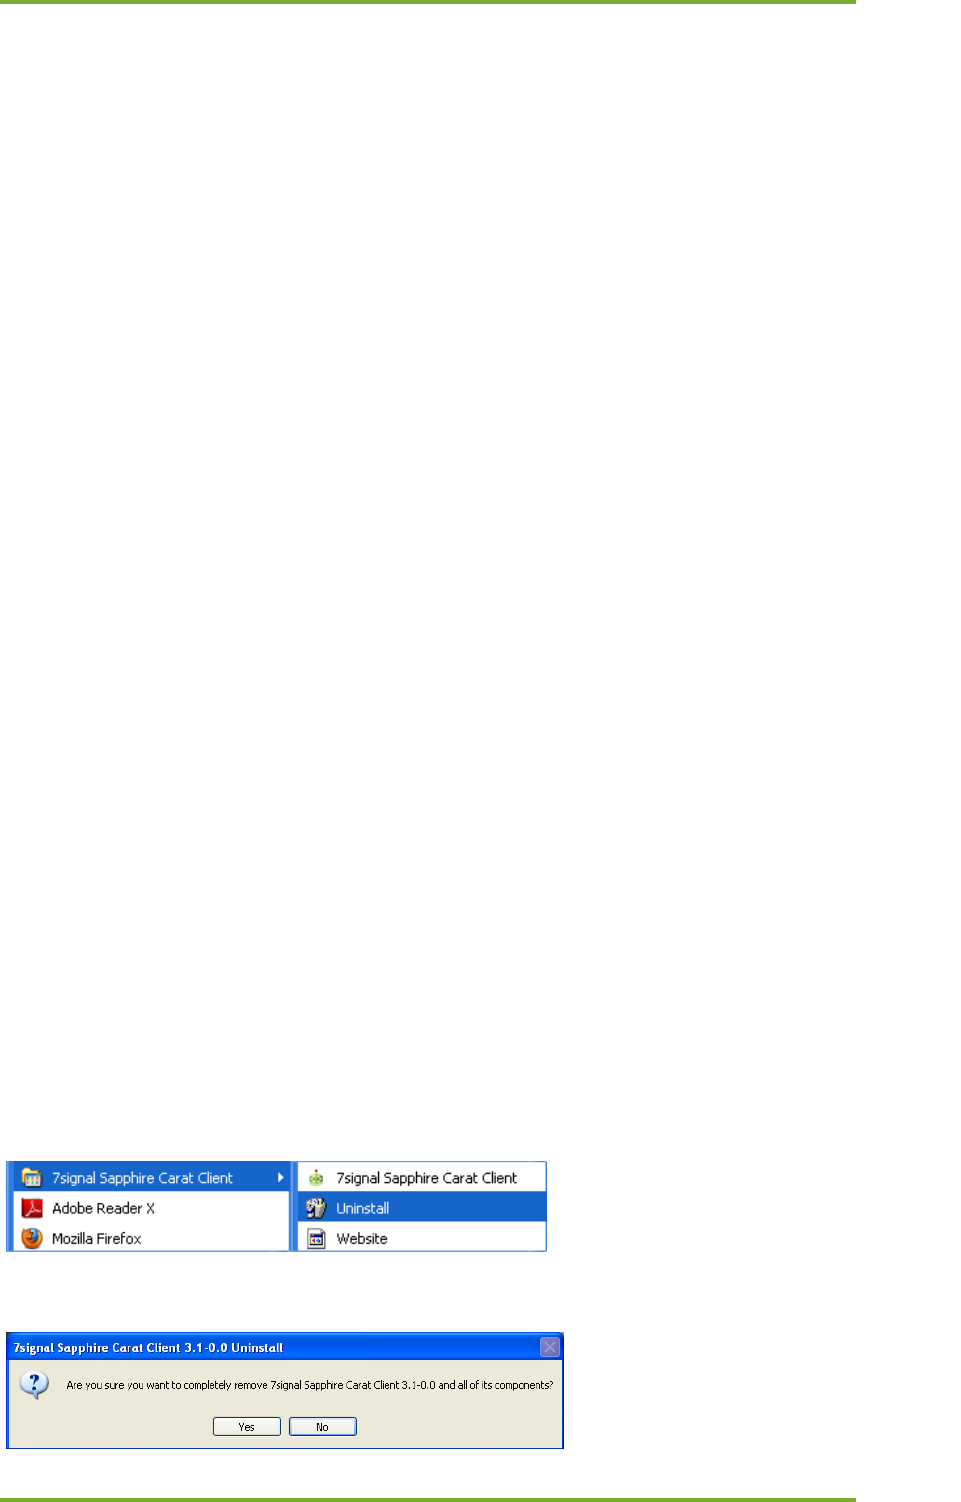
6 Uninstalling Sapphire 50
7signal Ltd, Panuntie 6, FI-00620 HELSINKI, FINLAND, +358 40 777 7611, info@7signal.com, www.7signal.com
7signal Sapphire Deployment Guide Release 3.1
Removing DB instance...
DBI1070I Program db2idrop completed successfully.
Dropping DAS...
SQL4410W The DB2 Administration Server is not active.
DBI1070I Program dasdrop completed successfully.
Running DB2 uninstaller...
Removing files...
Removing service definitions..
DB2 uninstalled. Removing database users..
Removing product information..
Removing remaining directories ..
Done.
The uninstallation is finished when the script is ready.
6.4 Uninstall Carat GUI (Linux)
Login to host and change to Carat GUI installation directory (directory ClientGUICarat on
installation path):
# cd /<Carat GUI installation directory>
Uninstall the DBMS by issuing the command:
# ./carat_client_uninstall.sh
The uninstaller script starts. Confirm uninstall by entering “y”:
7signal Sapphire Carat client will be removed. Are you sure [y/N]? y
The uninstaller script starts to uninstall the Carat server:
Removing files...
Done.
The uninstallation is finished when the script is ready.
6.5 Uninstall Carat GUI (Windows)
Open Start Menu, browse to “7signal Sapphire Carat Client” submenu. Choose “Uninstall”:
The uninstaller starts. Confirm uninstallation by clicking “Yes”:
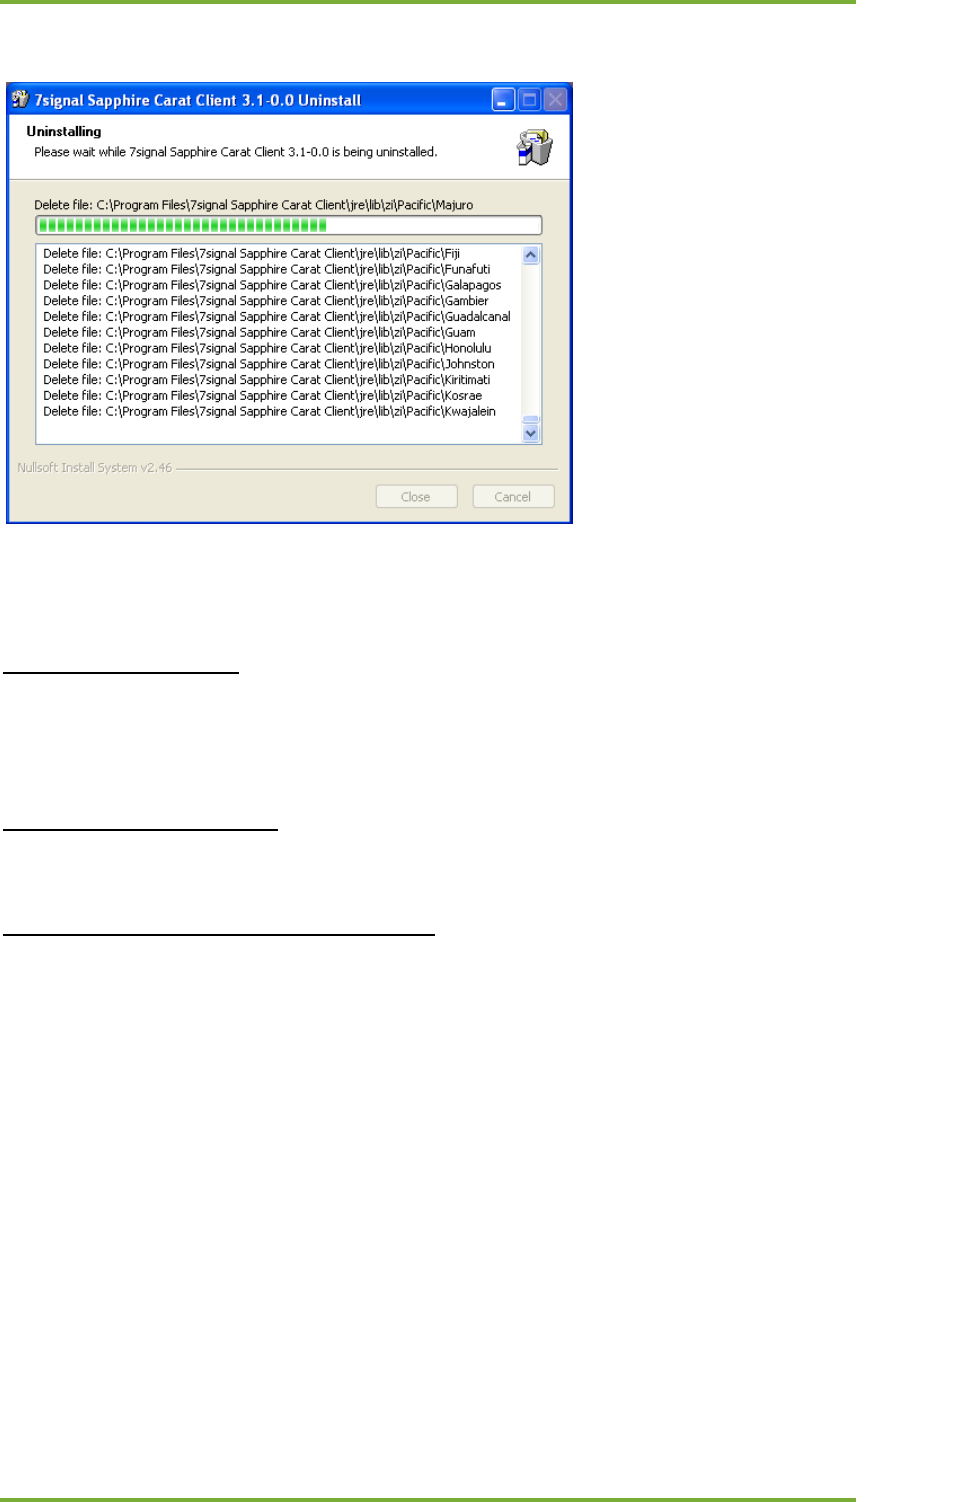
6 Uninstalling Sapphire 51
7signal Ltd, Panuntie 6, FI-00620 HELSINKI, FINLAND, +358 40 777 7611, info@7signal.com, www.7signal.com
7signal Sapphire Deployment Guide Release 3.1
The uninstaller uninstalls the Carat GUI. Click “Ok” when uninstaller has finished.
6.6 Uninstall Sonar (Linux)
Step 1: Stop Sonar server:
Login to Sonar host and stop the Sonar server by issuing the command:
# service 7signalSonar stop
Step 2: Uninstall Sonar server:
Change to Sonar installation directory (e.g. /opt/7signal/Sonar):
# cd /<Sonar installation directory>
Uninstall Sonar by issuing the command:
# ./sonar_uninstall.sh
The uninstaller script starts. Confirm uninstall by entering “y”:
7signal Sonar will be removed. Are you sure [y/N]? y
The uninstaller script starts to uninstall the Sonar server:
Stopping 7signal Sonar..
Shutting down 7signal Sonar: 7signal Sonar is not running
Removing init script..
Removing files...
Done.
The uninstallation is finished when the script is ready.
7 Log Settings 52
7signal Ltd, Panuntie 6, FI-00620 HELSINKI, FINLAND, +358 40 777 7611, info@7signal.com, www.7signal.com
7signal Sapphire Deployment Guide Release 3.1
7 LOG SETTINGS
All 7signal Sapphire elements have logging capability.
7.1 Carat server log
The log file - server.log - is located in /opt/7signal/Carat/7signal. The directory
contains older log files as well named server.log.* where by default the asterisk (*) is in range
of 1..5. Altogether, there is one active log file named server.log and five files for circulating the
files. The oldest logs do get overwritten.
To check the latest logs one should issue the following command:
# 7carat log
For continuous real-time logging:
# 7carat log -f
The Carat log level can be checked or changed by using loglevel command of 7carat tool (for
example, from INFO to DEBUG which produces much more detailed information):
# 7carat loglevel show
# 7carat loglevel set DEBUG
Notice that Carat server has to be restarted in order to take the changed log level
into use.
7.2 Carat GUI log
In Windows by default the log file - client.log - is located in folder
\Program Files\7signal Sapphire Carat Client\7signal
In Linux the log file - client.log - is located in start-up folder (if launched from desktop icon,
user’s home directory).

7 Log Settings 53
7signal Ltd, Panuntie 6, FI-00620 HELSINKI, FINLAND, +358 40 777 7611, info@7signal.com, www.7signal.com
7signal Sapphire Deployment Guide Release 3.1
7.3 Eye log
NOTE: as this is Eye logging, all the commands are to be given in the prompt of
the monitoring station, not in Carat or Sonar server.
The Eye unit has an in-memory circular log that can be followed real-time with the following
command:
# logread -f
Without any arguments the command shows of the whole log and returns immediately:
# logread
The logging can be directed to rotating log files instead of the ring buffer with 7config log –
command. Name and location of the log files depends on Eye hardware version:
Eye for 802.11a/b/g: /nand/syslog
Eye for 802.11a/b/g/n: /var/log/messages
In order to change logging to log files, issue the following command:
# 7config log set target persistent
To change logging back to ring buffer, use the following command:
# 7config log set target buffer
The following command shows the log level and log target information:
# 7config log show
7.4 Loupe log
Loupe is based on Tomcat so the log file is named catalina.out and is by default in directory
/<Loupe installation directory>/apache-tomcat-<version>/logs.
Tool to follow the most recent logging is
# 7loupe log
and for continuous monitoring:
# 7loupe log -f

7 Log Settings 54
7signal Ltd, Panuntie 6, FI-00620 HELSINKI, FINLAND, +358 40 777 7611, info@7signal.com, www.7signal.com
7signal Sapphire Deployment Guide Release 3.1
7.5 Sonar log (Linux)
The log file - sonar-server.log - is located by default in /<Sonar installation
directory>/Sonar/log.

8 Sapphire Process Management 55
7signal Ltd, Panuntie 6, FI-00620 HELSINKI, FINLAND, +358 40 777 7611, info@7signal.com, www.7signal.com
7signal Sapphire Deployment Guide Release 3.1
8 SAPPHIRE PROCESS MANAGEMENT
8.1 Carat
Carat is a service in Linux systems. However, the Carat process is supposed to be used by
7signal tool called 7carat:
# 7carat <parameter-from-the-bullet-list>
o start
o stop
o restart
o status
8.2 Loupe
Loupe is a service in Linux systems. However, the Loupe process is supposed to be used by
7signal tool called 7loupe:
# 7loupe <parameter-from-the-bullet-list>
o start
o stop
o restart
o status
8.3 Sonar
Sonar is a service in Linux systems:
# service 7signalSonar <parameter-from-the-bullet-list>
o start
o stop
o restart
o status
8.4 Eye
NOTE: The following command requires session in the monitoring station.
The utility 7config controls the Eye configuration. See more details on the tool on chapter
10. The process is controlled with command group run.
# 7config run <parameter-from-the-bullet-list>
o start
o stop
o restart
o status

9 Troubleshoot 56
7signal Ltd, Panuntie 6, FI-00620 HELSINKI, FINLAND, +358 40 777 7611, info@7signal.com, www.7signal.com
7signal Sapphire Deployment Guide Release 3.1
9 TROUBLESHOOT
9.1 GUI client cannot connect to Carat server
1. Check that username and password are correct in the GUI
2. Check that Carat server is running
a. run 7carat status
b. read the Carat server log
c. if necessary, issue command 7carat start and go to b)
3. Check that GUI port 47777 (default) is open in the firewall of the GUI host
4. Check that RMI port 1099 (default) is open in the firewall of the GUI host
5. Check that the Carat server RMI address is the right one in the GUI host
a. The script run_7signal_Carat_mgmt_server.sh contains the IP address
as _rmiserver_prop variable.
i. the default location for the script is
/opt/7signal/Carat/7signal/
b. Check that this variable has the right Carat server address
9.2 Cannot add Eye unit
1. Check that license.xml file is located in the Carat server
a. Check the Carat server log for possible license errors
b. Check the existence of the file
i. The default location for the license file is
/opt/7signal/Carat/7signal/conf
c. The file permission should be 744.
d. Check the contents of the file to see any anomalies
2. Run 7config verify command in Eye unit
3. Check that maximum number of Eye’s (license defines) is not exceeded.
4. Check that carat.keystore is located in the Carat server
a. the default folder location is /opt/7signal/Carat/7signal/conf
9.3 No access to Sonar server, active test failed
1. Check that Sonar server is configured correctly to Carat (Manage|Test endpoints)
a. IP address and Sonar port
2. Check the process at the Sonar host with the command
a. service 7signalSonar status
b. Remotely one can telnet <sonar-ip-addr> <port-default-80>
i. Sonar opens the connection and closes it after 1 second of idle time
3. Check Sonar log for error messages
4. Check that Sonar ports are open in the firewall(s)
5. Check that the WLAN encryption key has correct definition
6. Check that the key is bound to the managed network
7. Check connectivity options and requirements for Eye and Sonar
9 Troubleshoot 57
7signal Ltd, Panuntie 6, FI-00620 HELSINKI, FINLAND, +358 40 777 7611, info@7signal.com, www.7signal.com
7signal Sapphire Deployment Guide Release 3.1
9.4 Loupe client cannot connect to Carat server
Loupe and Carat are both run in the Carat host machine.
1. Check that username and password are correct
2. Check Loupe log for error messages
a. Run command 7loupe log
3. Check that loupe server is running
a. Run command 7loupe status
4. Check Carat log for error messages
a. Run command 7carat log
5. Check that carat server is running
a. Run command 7carat status
9.5 Eye IP address forgotten
In order to find out the Eyes IP address, the MAC (Ethernet) address of the Eye
must be known.
1. Connect Eye to a Carat host directly with an Ethernet cable (i.e. Carat and Eye have to
be in the same LAN).
2. Use the 7edp utility (part of the Carat installation) to find out Eye’s IP address. The
syntax of the tool is the following:
7edp <name of the Carat Ethernet interface> <MAC address of the
Eye’s Ethernet interface>
For example:
# 7edp eth0 00:19:F4:EE:01:31
7edp tool resolves the Eye’s IP address:
Sending EDP request
Waiting response..
Received EDP frame from Eye
Eye IP address is 192.168.3.42

10 Command-line utility for Eye 58
7signal Ltd, Panuntie 6, FI-00620 HELSINKI, FINLAND, +358 40 777 7611, info@7signal.com, www.7signal.com
7signal Sapphire Deployment Guide Release 3.1
10 COMMAND-LINE UTILITY FOR EYE
10.1 Overview
7config is a command line utility for configuring various things in Eye unit. Commands are
divided into thematic command groups so that each group contains one or more commands. A
command may also have an argument and a value.
Currently supported command groups are the following:
ip: IP address management.
keys: Key storage management.
ap: Access point configuration storage management.
conn: Connection management.
run: Software run-state management.
txp: External antenna configuration.
log: Log configuration
iface: Global interface management.
verify: System verification.
Command group specific help can be shown with command:
7config <group> help
General help can be shown with command:
7config help
10.2 IP command group
This command group contains commands for configuring IP configuration of Eye Ethernet
interface. Currently, it is possible to show current IP configuration, set IP address, network
mask and default gateway address (or alternatively, use DHCP configuration) of the
management interface. It is also possible to take a backup from current IP configuration, and
restore the configuration from the backup.
7config ip <CMD> <ARG> [VALUE]
'set' command arguments:
addr Set IP address of management interface (eth0)
VALUE = Valid IPv4 address
mask Set netmask of IP address of management address
VALUE = Valid IPv4 netmask in dotted format
(x.x.x.x)
port Set management port
VALUE = TCP port number
gateway Set IP address of default gateway (optional)
VALUE = Valid IPv4 address
or 'remove' to remove configured gateway

10 Command-line utility for Eye 59
7signal Ltd, Panuntie 6, FI-00620 HELSINKI, FINLAND, +358 40 777 7611, info@7signal.com, www.7signal.com
7signal Sapphire Deployment Guide Release 3.1
dhcp Set DHCP on/off
VALUE = on|off
'show' command arguments: none
'backup' command arguments:
create Create backup from existing IP configuration.
restore Restore IP configuration from backup.
Examples:
Setting IP address of the management interface:
# 7config ip set addr <IP_address>
Setting network mask of the management interface:
# 7config ip set mask <mask_in_dotted_format>
Setting port of the management interface:
# 7config ip set port <IP_address>
Create backup from current IP configuration:
# 7config ip backup create
Restore IP configuration from a backup:
# 7config ip backup restore
Show current IP configuration:
# 7config ip show
10.3 Keys command group
This command group contains command for managing WLAN network keys stored to Eye unit.
Currently, the only supported operation is to destroy all WLAN keys from the Eye.
# 7config keys destroy
10.4 AP command group
This command group contains command for managing Access Point information stored to Eye
unit. Currently, the only supported operation is to destroy all Access Point information from
the Eye.
# 7config ap destroy
10.5 Conn command group
This command group contains commands for managing encryption settings of management
traffic between Eye unit and Carat server. Currently supported operations are to show
configured TLS encryption key file name, set TLS encryption key file name, set password of the

10 Command-line utility for Eye 60
7signal Ltd, Panuntie 6, FI-00620 HELSINKI, FINLAND, +358 40 777 7611, info@7signal.com, www.7signal.com
7signal Sapphire Deployment Guide Release 3.1
encryption key file, and install certificates and passwords from certificate and password
packages.
7config conn <CMD> <ARG> [VALUE]
'cert' command arguments:
set Set management connection encryption certificate file.
VALUE = Certificate file name. File must reside
in /nand/etc/certificates directory.
show Show current encryption certificate file name.
install Install certificate from certificate archive.
VALUE = Archive name (<prefix>-7signal-certs.tar.gz)
'pwd' command arguments:
set Set encryption certificate password.
install Install password from password archive.
VALUE = Archive name (<prefix>-7signal-pwds.tar.gz)
'encryption' command arguments:
install Install encryption certificate and password
from combined certificate and password archive.
VALUE = Archive name (<prefix>-7signal-all.tar.gz)
Examples
Install certificate from certificate package:
# 7config conn cert install <certificate package file>
Install password from password package:
# 7config conn pwd install <password package file>
10.6 Run command group
This command group contains commands for managing Eye software run-state. Currently
supported operations are to ask current status of the software, to start, stop and restart the
software, activate software version, show installed version, uninstall a software version, and to
reconfigure Eye unit without restarting it.
7config run <CMD> [ARG]
status Show status of Eye software.
start Start Eye software.
stop Stop Eye software.
restart Restart Eye software.
reconfig Reconfigure unit and restart Eye software.
show Show active software version.
list List installed software versions.
activate Activate software version.
Example: 7config run activate 02.80
Activates version 2.80
remove Uninstall Eye software version.
Example: 7config run remove 02.61
Uninstalls SW version 2.61

10 Command-line utility for Eye 61
7signal Ltd, Panuntie 6, FI-00620 HELSINKI, FINLAND, +358 40 777 7611, info@7signal.com, www.7signal.com
7signal Sapphire Deployment Guide Release 3.1
Examples:
Query status of the Eye software:
# 7config run status
Start the Eye software:
# 7config run start
Stop the Eye software:
# 7config run stop
Restart the Eye software:
# 7config run restart
List installed Eye softwares:
# 7config run list
Reconfigure the Eye:
# 7config run reconfig
10.7 Txp command group
This command group contains commands for showing and setting of TX power related
parameters. Currently supported operations are showing of TX power settings, setting default
TX power, setting gain of an external antenna and setting cable loss of the external antenna.
7config txp [ARG] [VALUE]
'show' command arguments:
default Show default TX power.
ext Show configured gain of external antenna.
cable Show configured cable loss of external antenna.
If no arguments given, all information will be shown.
'set' command arguments:
default Set default TX power.
VALUE = TX power (dBm).
ext Set gain of external antenna.
VALUE = Gain of external antenna (dBi).
cable Set cable loss of external antenna.
VALUE = Cable loss of external antenna cable
(dB).
Examples:
Show all information in TX power configuration:
# 7config txp show

10 Command-line utility for Eye 62
7signal Ltd, Panuntie 6, FI-00620 HELSINKI, FINLAND, +358 40 777 7611, info@7signal.com, www.7signal.com
7signal Sapphire Deployment Guide Release 3.1
Show configured cable loss:
# 7config txp show cable
Set external antenna gain to 10 dBi:
# 7config txp set ext 10
10.8 Log command group
This command group contains commands for configuring log production of the Eye. Logs can
be produced either to a ring buffer on RAM (this is the default, can be read by logread
command), or to persistent storage on NAND flash. In 802.11a/b/g, the persistent log resides
in folder /nand/ as files named syslog*, and in 802.11a/b/g/n in folder /var/log as files
named messages.
Reading of the log files is either from the chosen storage directly or with a command logread.
By default, only the critical messages are logged. Currently, the supported commands are:
show which shows the current log configuration.
set
o level which sets the current level of logging
o default which sets default level of logging at system start-up
o target which sets logging target, ring buffer or NAND.
Log level set by 'set level' command remains active until restart of the system. Default log
level after installation is "ERROR".
Log levels are the following:
CRIT - Critical messages
ERROR - Error messages
WARN - Warning messages.
INFO - Informational messages.
DEBUG - Debug messages.
Log levels are cumulative, i.e. the level CRIT logs only critical messages, WARN logs all levels
including CRITICAL, ERROR and WARN messages. DEBUG logs all possible messages.

10 Command-line utility for Eye 63
7signal Ltd, Panuntie 6, FI-00620 HELSINKI, FINLAND, +358 40 777 7611, info@7signal.com, www.7signal.com
7signal Sapphire Deployment Guide Release 3.1
Log command group arguments:
'show' Show log configuration.
'set' command arguments:
level Set log level.
VALUE = CRIT | ERROR | WARN | INFO | DEBUG
default Set default log level. This log level will be active
when 7signal software starts.
VALUE = CRIT | ERROR | WARN | INFO | DEBUG
target Set logging target.
VALUE = buffer | persistent
Examples:
Set log level to DEBUG:
# 7config log set level DEBUG
Set log level to WARN:
# 7config log set level WARN
Set default log level to ERROR:
# 7config log set default ERROR
Show default log level:
# 7config log show
Set logging target to NAND flash:
# 7config log set target persistent
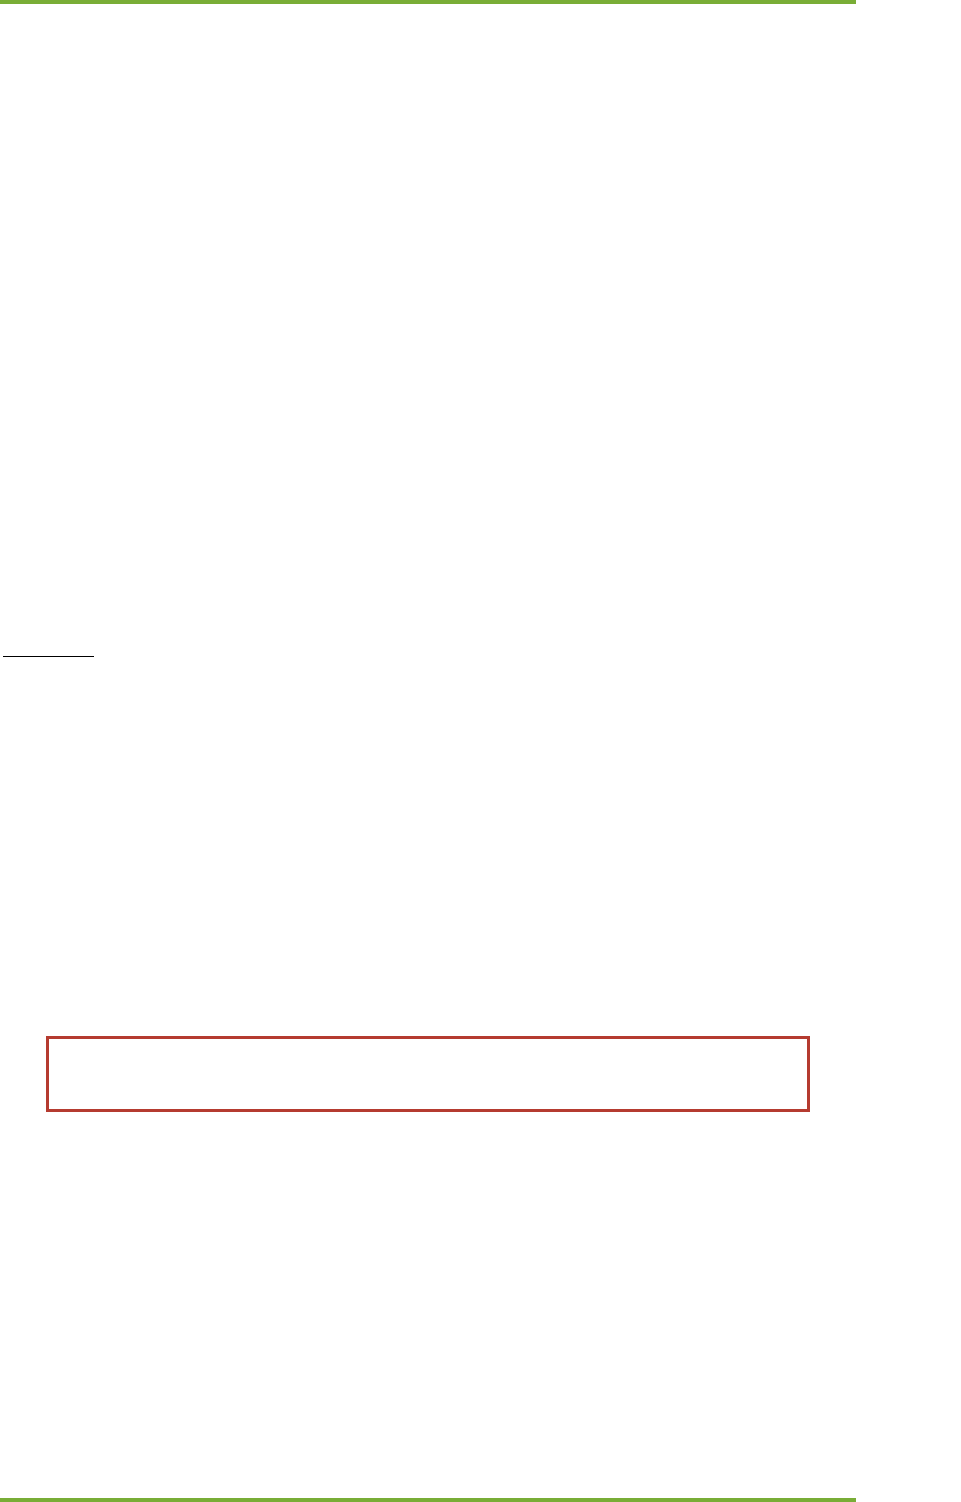
11 Command-line tool for database management 64
7signal Ltd, Panuntie 6, FI-00620 HELSINKI, FINLAND, +358 40 777 7611, info@7signal.com, www.7signal.com
7signal Sapphire Deployment Guide Release 3.1
11 COMMAND-LINE TOOL FOR DATABASE
MANAGEMENT
7db command is a tool for Carat database. It supports limited data retrieval, general
management and database backup administrator for both immediate and automatic backups.
It is recommended that database backups should be taken regularly.
7db command groups:
dump Dump export and import
show Show status and configurations
reinit Re-initialize databases
backup Automatic backup management
logsetup To change the current logging method
db2 Access to database management system command-line tool
11.1 Dump command group
Creates an instant database backup dump or restores previous backups.
Examples:
Make a dump to a gzipped tar file
# 7db dump export
Import a dump
# 7db dump import 7signal-dump.tgz
11.2 Logsetup command
Changes the way the underlying DBMS handles logging.
NOTE: the command is trivial to issue but it’s consequences are highly resource
consuming. Observe awareness when using this command.
There are two different logging modes in 7signal Sapphire. This command switches between
the modes. There is lots of informative output as this command should not be used carelessly
or without proper planning and understanding of the consequences.
The command examines the current state of all three different underlying databases. In case
they differ from each other, the processing shall stop as it is expected that all the databases
are handled similarly. In case the logging method differs, there has been some significant error
in DB administration and system otherwise.
The logsetup command may result in numerous backups for the safety reasons so the overall
process duration is rather long.

11 Command-line tool for database management 65
7signal Ltd, Panuntie 6, FI-00620 HELSINKI, FINLAND, +358 40 777 7611, info@7signal.com, www.7signal.com
7signal Sapphire Deployment Guide Release 3.1
11.3 Backup command group
Creates instant and automatic database backups.
NOTE: the backup policy should be well-planned. Please see the 7signal Sapphire
User Guide for further discussion on backup and the options available.
Backup commands:
show Show automatic backup configuration
remove Remove automatic backup configuration
set Configure automatic backup
o daily <HH:mm> <backup directory>
o weekly <DDD> <HH:mm> <backup directory>
<DDD> = Mon, Tue, Wed, etc.
o directory <backup directory>
Backup directory is optional if a backup
configuration already exists.
now Immediate backup.
o online
o offline
restore Recovery command
workdir Configure working directory used in backup and restore operations.
Examples:
Remove configuration
# 7db backup remove
Backup every Wednesday at 00:30 to /mnt/backups
# 7db backup set weekly Wed 00:30 /mnt/backups
Backup every day at 03:00 to /mnt/backups
# 7db backup set daily 03:00 /mnt/backups
Change backup directory to /mnt/newbackups, do not change time settings
# 7db backup set directory /mnt/newbackups
Backup every Sunday at 00:30, do not change backup directory
# 7db backup set weekly Sun 01:30
Back the system up immediately offline
# 7db backup now /mnt/backups offline

11 Command-line tool for database management 66
7signal Ltd, Panuntie 6, FI-00620 HELSINKI, FINLAND, +358 40 777 7611, info@7signal.com, www.7signal.com
7signal Sapphire Deployment Guide Release 3.1
Back the system up immediately online (requires archival database logging)
# 7db backup now /mnt/backups online
Set working directory for backup and restore (highly recommended for larger databases)
# 7db backup workdir set /opt/largefilesystem
Restore a known-to-be-good system state
# 7db backup restore <backup-file>
11.4 Show command group
Shows the status and configuration of the database
Show commands:
tabstatus Show the status of the tables.
o all
o <database_name>
conf Show configuration of the database.
Examples
Show status of the tables in the MEAS7 and MGMT7 databases
# 7db show tabstatus all
Show status of the tables in the SECUR7 database
# 7db show tabstatus secur7
Show status of the CARAT7.ap_ftp_qos_test table in the MEAS7 database
# 7db show tabstatus meas7 ap_ftp_qos_test
Show configuration of the database
# 7db show conf

11 Command-line tool for database management 67
7signal Ltd, Panuntie 6, FI-00620 HELSINKI, FINLAND, +358 40 777 7611, info@7signal.com, www.7signal.com
7signal Sapphire Deployment Guide Release 3.1
11.5 Delete command group
Delete data from the database tables
# 7db delete
NOTE: use reinit to reset 7signal Sapphire, delete merely does what it says: it
deletes table contents and does not guarantee that Sapphire is usable after the
command. The user must know how to restore some sound and complete state of
the system before issuing this command.
11.6 Reinit command group
Empty the database and resume initial state of the system.
# 7db reinit
Examples:
Re-initialize the MEAS7 and MGMT7 databases
# 7db reinit all
Re-initialize the MEAS7 database
# 7db reinit meas7
Re-initialize CARAT7.ap_ftp_qos_test table in the MEAS7 database
# 7db reinit meas7 ap_ftp_qos_test

11 Command-line tool for database management 68
7signal Ltd, Panuntie 6, FI-00620 HELSINKI, FINLAND, +358 40 777 7611, info@7signal.com, www.7signal.com
7signal Sapphire Deployment Guide Release 3.1
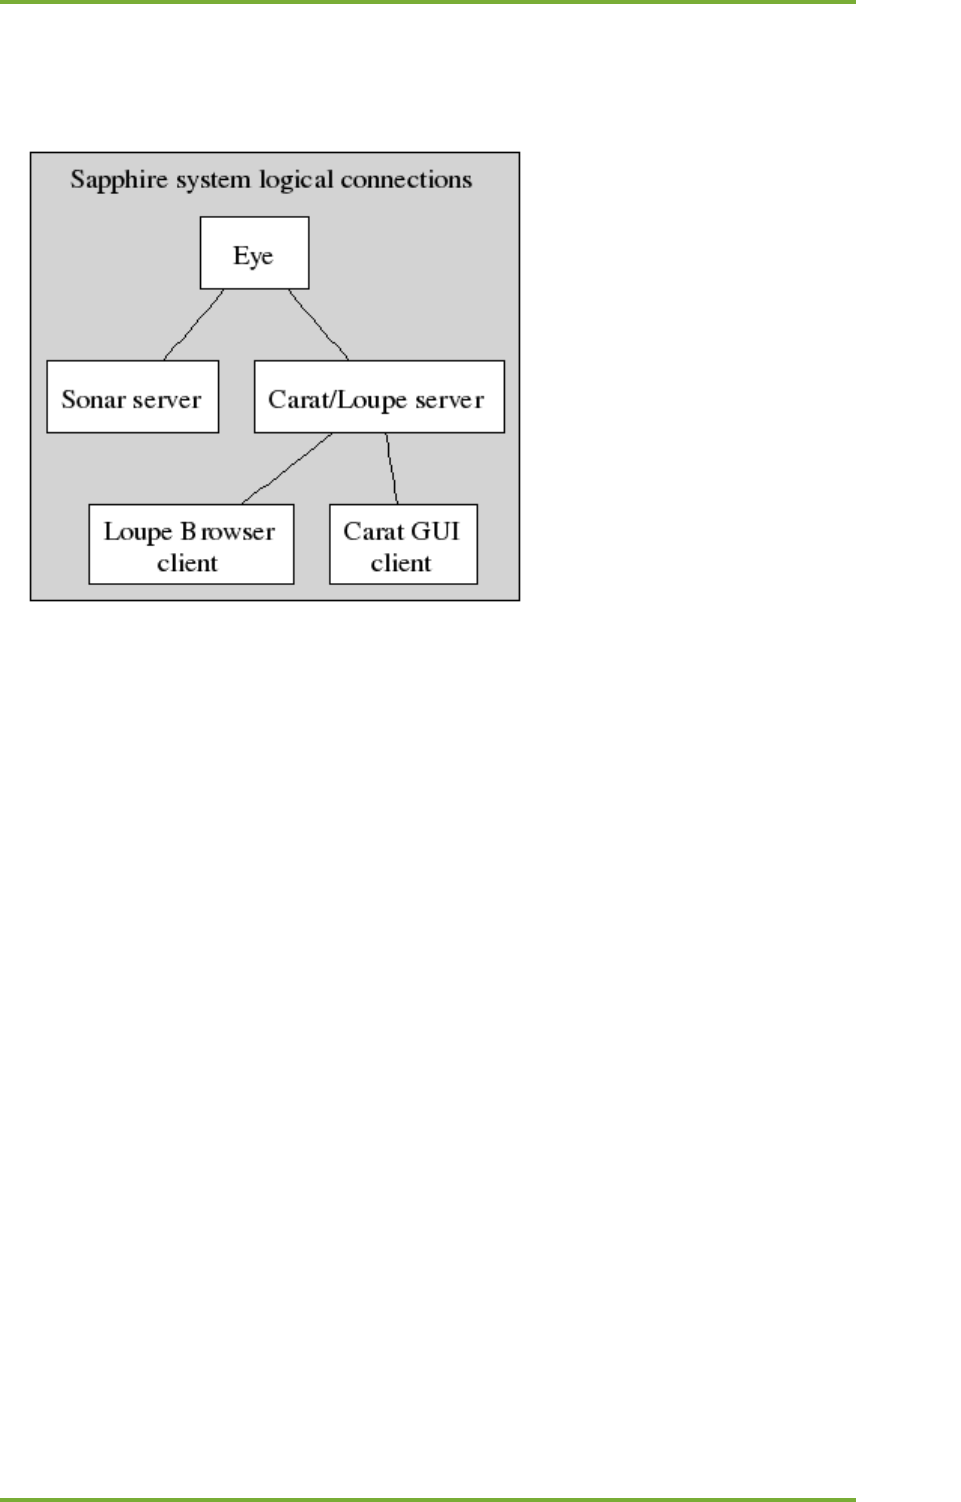
11 Command-line tool for database management 69
7signal Ltd, Panuntie 6, FI-00620 HELSINKI, FINLAND, +358 40 777 7611, info@7signal.com, www.7signal.com
7signal Sapphire Deployment Guide Release 3.1
APPENDIX A. LOGICAL CONNECTIONS
Sapphire elements and their logical connections are in the picture below:
• Eye – a WLAN probe with both WLAN interface (WLAN client and analysis functions)
and Ethernet interface (management functions).
• Sonar – Server software emulating various business services for testing purposes.
Deployment method is two-fold as follows: 7signal Solution: the application is
running in hosts chosen by the customer. 7signal Site Miner: a dedicated mini-laptop
is running the application.
• Carat – centralized management software, a stand-alone application. Deployment
method is two-fold as follows: 7signal Solution: the application running in a host
chosen by the customer. 7signal Site Miner: a dedicated normal laptop running the
application.
• Loupe – A web-application for measurement visualization that is deployed in
conjunction of the Carat server software.
• Internet browsers – Thin-clients for Loupe server. Not provided by 7signal.
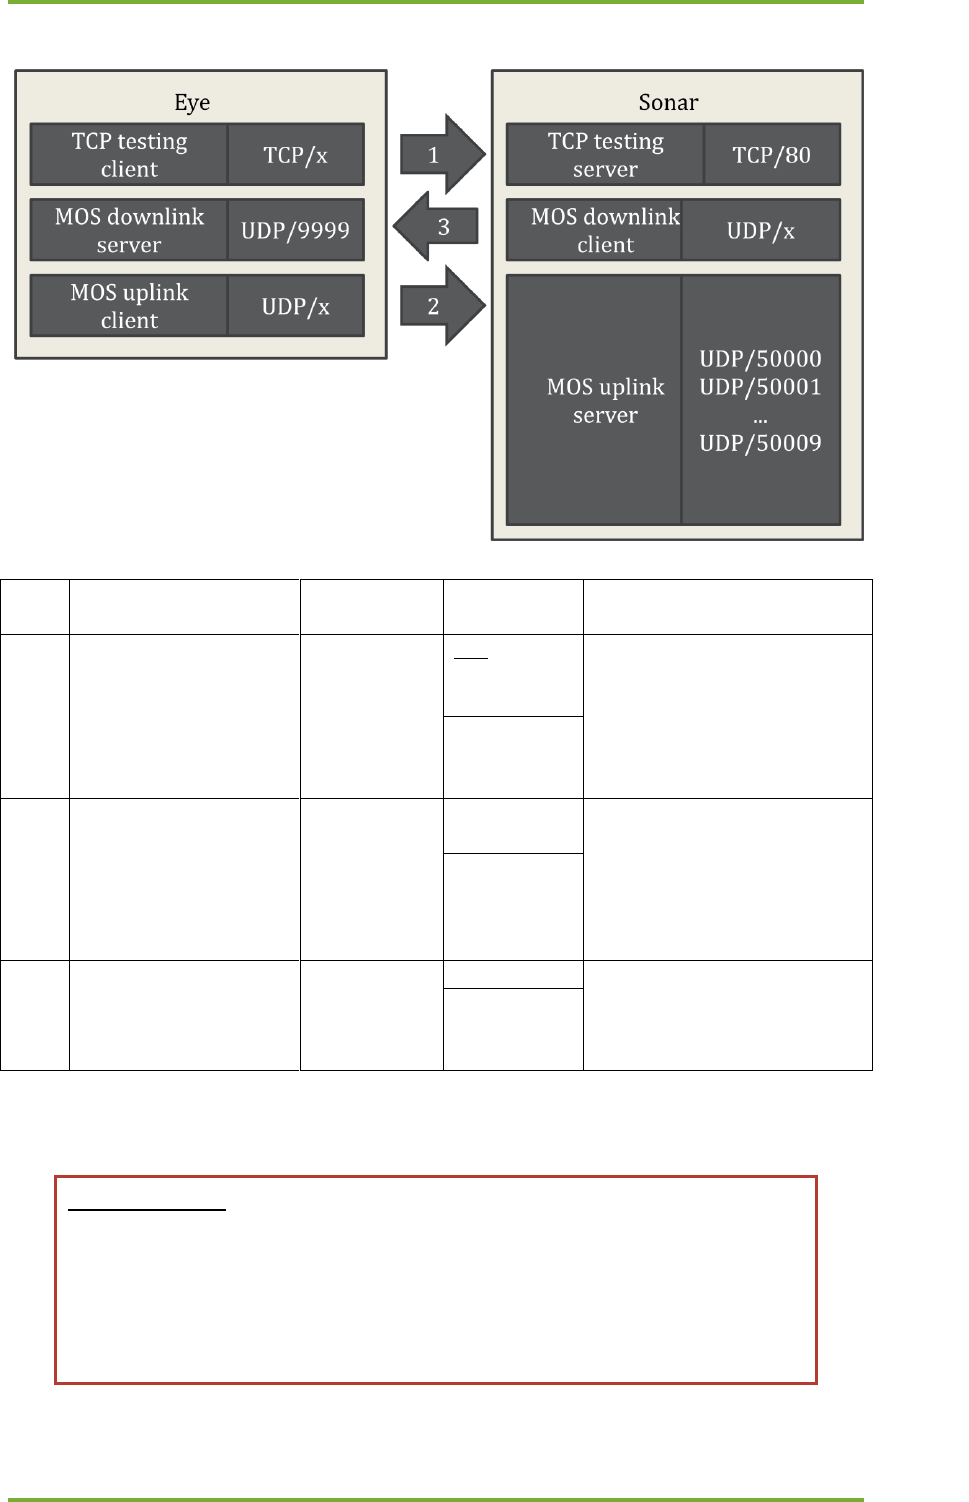
11 Command-line tool for database management 70
7signal Ltd, Panuntie 6, FI-00620 HELSINKI, FINLAND, +358 40 777 7611, info@7signal.com, www.7signal.com
7signal Sapphire Deployment Guide Release 3.1
Eye – Sonar connection
Conn
ID
Description
Data content
Listening
port(s)
Remarks
1
Test management and
typical test connection
Test control
message and
pseudo-data
TCP/80
Traffic is properly
encapsulated HTTP. Uses Eye
WLAN interface.
Configurable
during Sonar
deployment
2
MOS test, uplink
direction
MOS test
specific data
udp/50000 –
50009
Optional. Uses Eye WLAN
interface. The number of port
varies between 0 and 20. The
port numbers are
consecutive. By default 10
ports are opened.
Configurable
during Sonar
installer
3
MOS test, downlink
direction
MOS test
specific data
udp/9999
Optional. Uses Eye WLAN
interface.
Configurable
during Eye
deployment
Main purpose: Eye connects through WLAN interface to the remote server that simulates or
emulates business applications.
Important notice: The Sonar servers may be numerous and the network topology
between Eye and Sonar may vary radically and could contain numerous firewalls.
7signal has no control over the network topology and cannot influence arbitrary
devices and network elements between the endpoints. To ensure fluent
deployment, the user/configurator has to have thorough understanding of the
network between the endpoints and possibility to affect all the elements
necessary.
11 Command-line tool for database management 71
7signal Ltd, Panuntie 6, FI-00620 HELSINKI, FINLAND, +358 40 777 7611, info@7signal.com, www.7signal.com
7signal Sapphire Deployment Guide Release 3.1
To test and use the wireless connection the following variables must be known:
ESSID – test parameter to connect to a particular wireless network.
WLAN encryption
Network keys – pre-shared keys, certificates or similar - are stored in Eye file system by Carat
application.
To be observerd: the target wireless network may be configured to have MAC address
preventions so the MAC address of WLAN interface of the Eye unit must be white-listed as a
network client. Eye does not act as an access point of the wireless network.
MOS test connections
MOS test is a license-controlled feature and not used in every environment. MOS test requires
additional ports to be used. MOS traffic is special-purpose traffic with identical fingerprint than
any VoWLAN call would have.
Sonar may serve numerous Eyes concurrently and therefore it is able to listen numerous UDP
ports for incoming VoIP calls. Ports are listened in per-need basis. One UDP port may serve one
Eye at a time so the number of concurrent MOS tests in single Sonar is dictated by the number
of available ports that is configured during Sonar deployment phase.
Eye has one open UDP port for VoIP calls as it communicates with single Sonar only at a time.
Eye – Carat connection
Conn
ID
Description
Data content
Listening
port(s)
Remarks
1
Eye server
TLS encrypted
binary
protocol for
management
and testing.
TCP/7799
Uses Eye ethernet
interface.
Configurable
in Eye
deployment
In this case the Eye acts as a server and Carat software is a client. Carat does not make any SSH
connections, SSH is optional connection for operators.
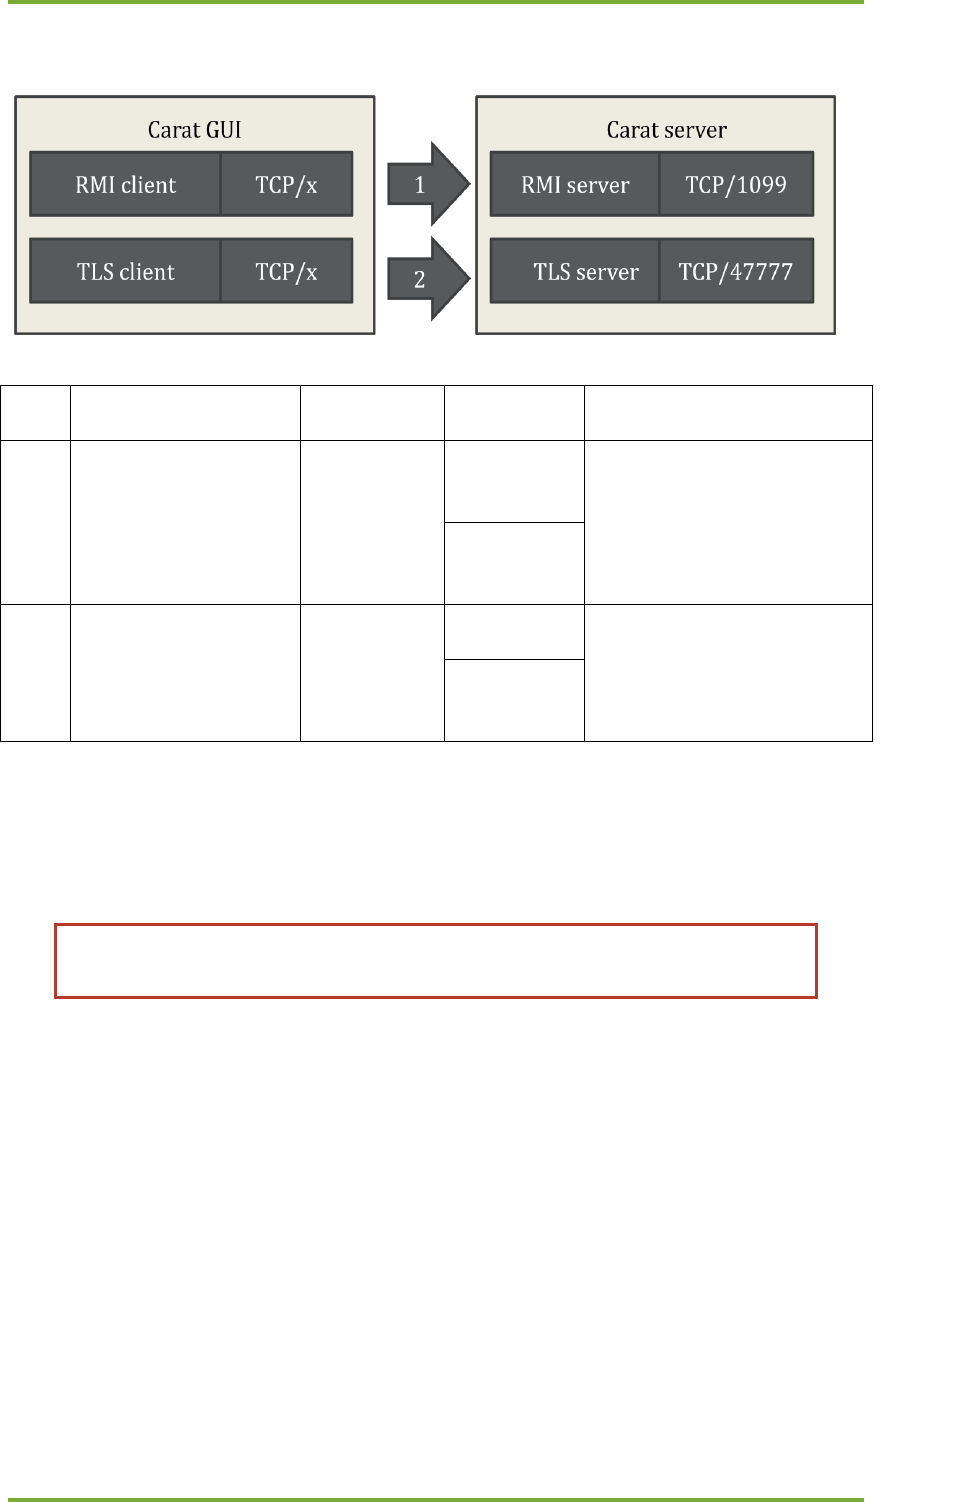
11 Command-line tool for database management 72
7signal Ltd, Panuntie 6, FI-00620 HELSINKI, FINLAND, +358 40 777 7611, info@7signal.com, www.7signal.com
7signal Sapphire Deployment Guide Release 3.1
Carat server – Carat GUI connection
Conn
ID
Description
Data content
Listening
port(s)
Remarks
1
RMI service
RMI service
protocol
TCP/1099
Discovery service for conn
#2.
Typically not
changed.
2
TLS encrypted
connection from GUI
to a Carat server
RMI calls
TCP/47777
Configurable
in Carat GUI
deployment
The Carat graphical user-interface is a stand-alone Java SE application that is a client to Carat
server. It is for managerial actions and interactive WLAN network testing for operators.
Internal connections in Carat server
Note: as the following connections occur inside one host machine only, this part
may be skipped regarding the firewall settings and other networking.
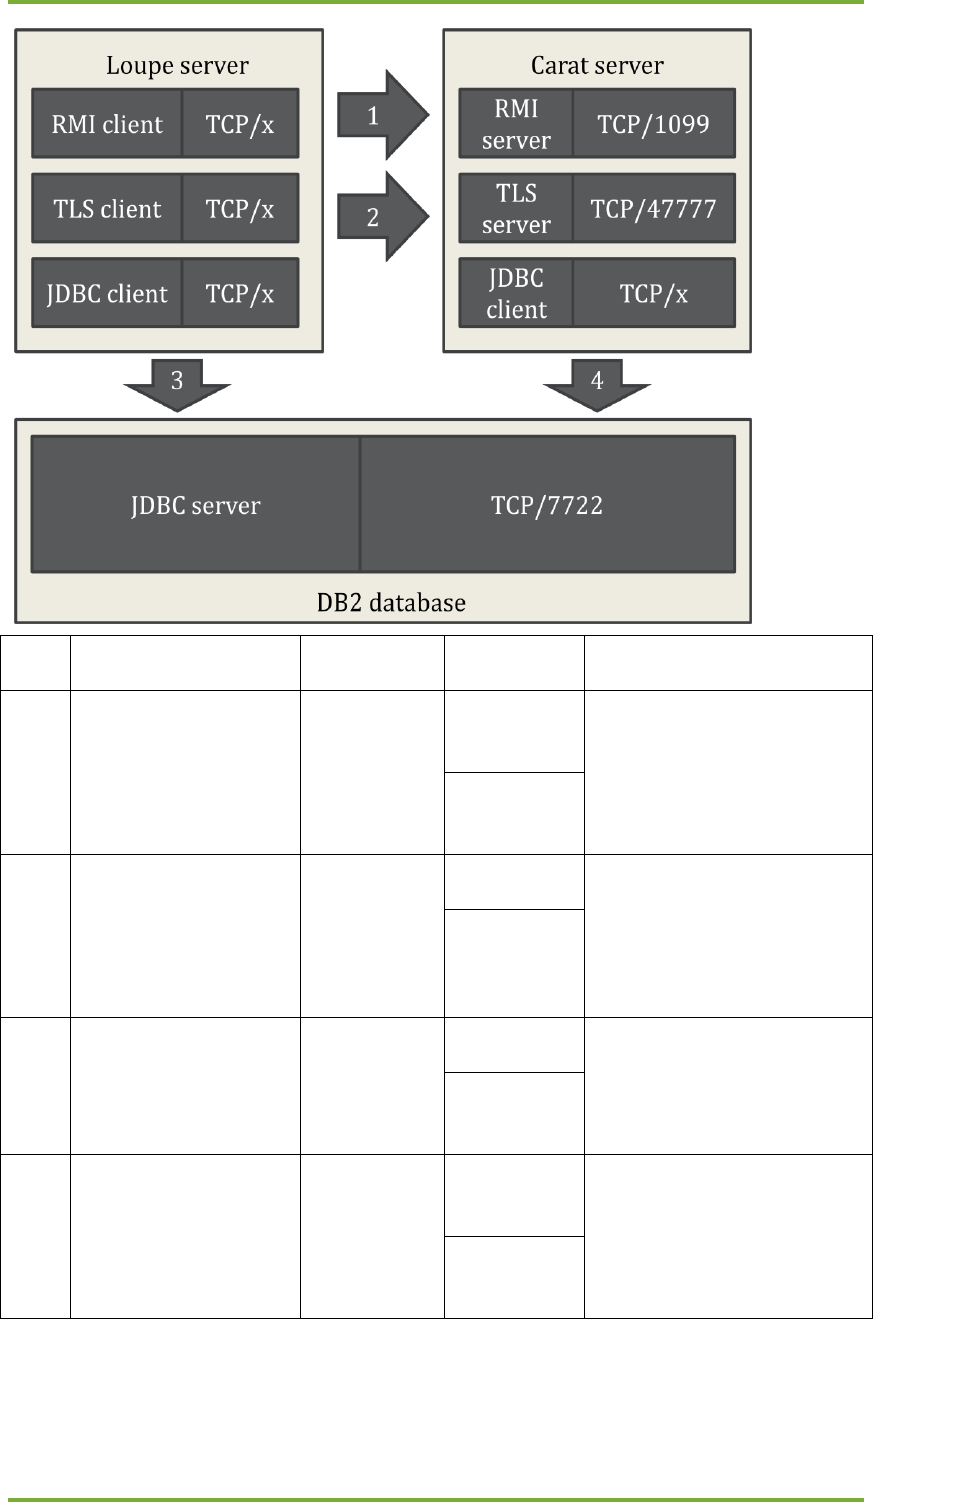
11 Command-line tool for database management 73
7signal Ltd, Panuntie 6, FI-00620 HELSINKI, FINLAND, +358 40 777 7611, info@7signal.com, www.7signal.com
7signal Sapphire Deployment Guide Release 3.1
Conn
ID
Description
Data content
Listening
port(s)
Remarks
1
RMI service.
RMI service
protocol
TCP/1099
Discovery service for conn
#2.
Typically not
changed.
2
Loupe web-app
connecting as a client
to a Carat server.
RMI calls
TCP/47777
Configurable
during Carat
GUI
deployment
3
IBM DB2 database
service for Loupe.
JDBC traffic.
TCP/7722
Configurable
during DBMS
deployment
4
IBM DB2 database
service for Carat.
JDBC traffic.
TCP/7722
Configurable
during DBMS
deployment
Loupe is a web-application that visualizes the measurements and it has a dual-role in the sense
of connectivity: Loupe acts as a client to both the Carat server and DB2 and as a server to the
browser clients. Currently, Carat, Loupe and IBM DB2 applications are inseparable as they run
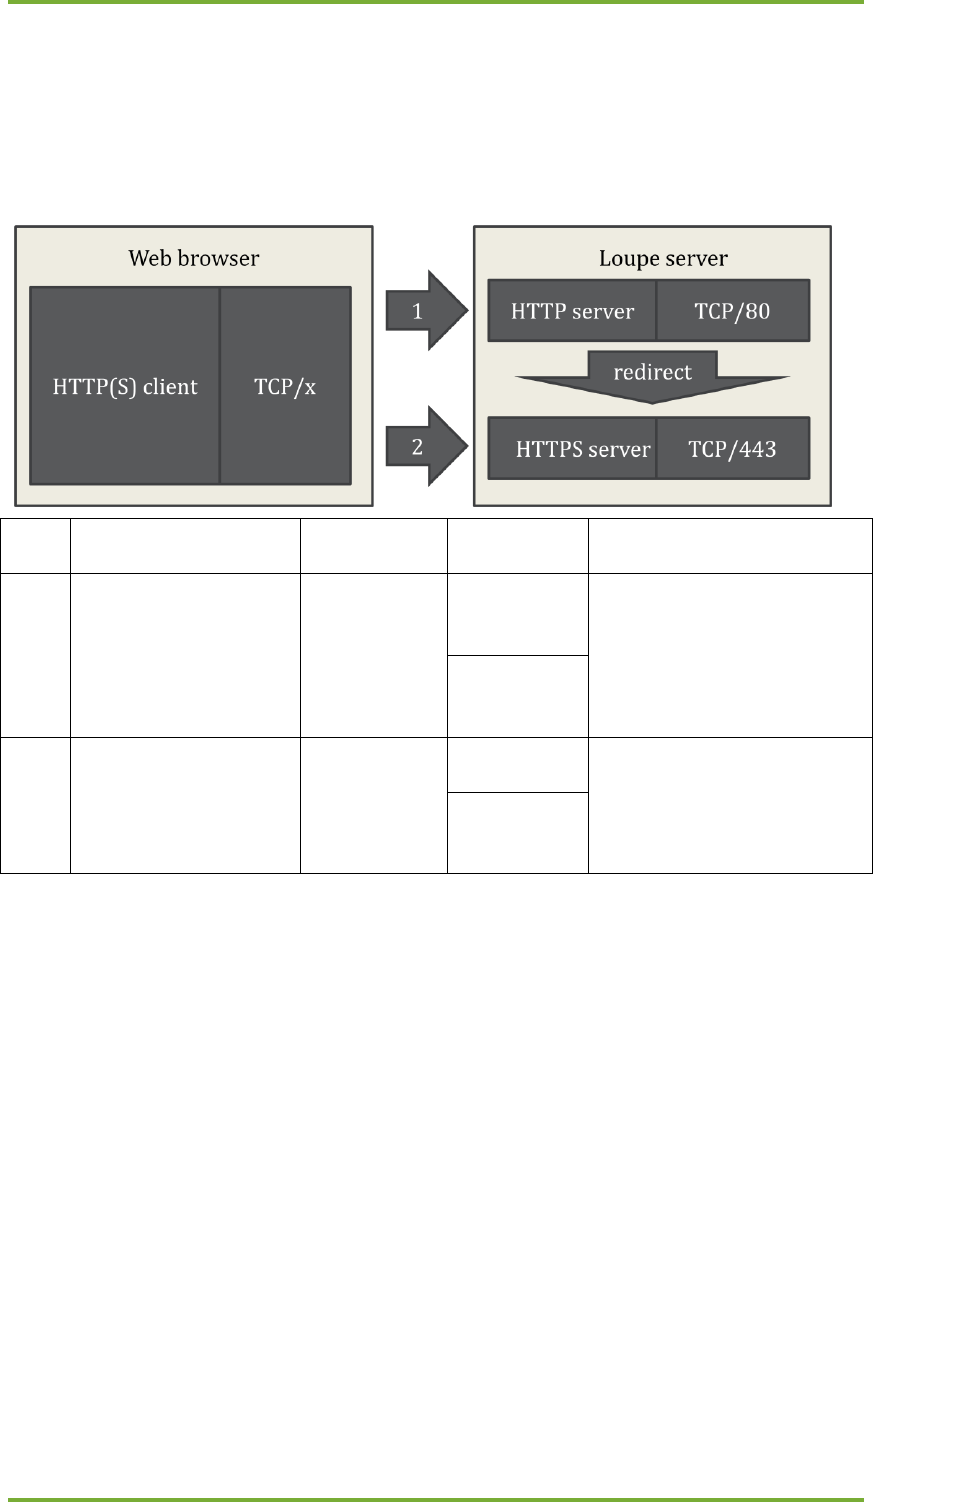
11 Command-line tool for database management 74
7signal Ltd, Panuntie 6, FI-00620 HELSINKI, FINLAND, +358 40 777 7611, info@7signal.com, www.7signal.com
7signal Sapphire Deployment Guide Release 3.1
in the same host in all supported setups. The connection between Carat GUI and DB2 is
secured by medium-level encryption implemented by IBM.
7signal installers contain the installation medium for DB2 and the setup of DB2 is automated
by 7signal DBMS installer. It is possible to change the defaults during installation time.
Loupe – internet browser connection
Conn
ID
Description
Data content
Listening
port(s)
Remarks
1
Standard HTTP
connection.
Standard
HTTP traffic
for creating a
HTTPS
connection.
TCP/80
Redirects to HTTPS port of
Loupe.
Configurable
during Loupe
deployment.
2
Standard HTTPS
connection for
measurement requests
and responses.
Secure HTTP.
Report and
chart
requests and
responses.
TCP/443
Business connection for
Loupe.
Configurable
during Loupe
deployment.
11 Command-line tool for database management 75
7signal Ltd, Panuntie 6, FI-00620 HELSINKI, FINLAND, +358 40 777 7611, info@7signal.com, www.7signal.com
7signal Sapphire Deployment Guide Release 3.1
APPENDIX B. BANDWIDTH REQUIREMENTS
NOTE: the volume estimates are estimates and vary based on the configuration.
11.6.1 Eye – Sonar
From
To
Medium
Traffic
motivator
Volume
estimate
Major factor
Eye
Sonar
WLAN
Automated
test engine
and
interactive
testing by
users.
Low, each
request is a few
hundred bytes.
Eye acts as one
WLAN end-user
would do, one
operation per
minute.
The test profile that the Eye
is running.
In case of MOS test VoFi
traffic is transmitted as long
as requested in the test
parameters, constant traffic
at the rate of 100 kBs/s.
Sonar
Eye
WLAN
Responses to
client.
Typically
pseudo-data
that varies
based on the
test
parameters.
MOS test most probably
contain significant amount of
data.
For example, the FTP download test transfers by default 2 megabytes of data that does not
take long. The amount of data is exceptionally high for data transfer in a logistics environment
but on the other hand in office environment transfer of this size is relatively low. The test
parameter should be adjusted, either to simulate typical transfer or to save the bandwidth
while keeping the transfer size high enough to give measurements out of the network.
11.6.2 Eye – Carat
From
To
Medium
Traffic
motivator
Volume
estimate
Major factor
Carat
Eye
Ethernet
Automated
test engine
and
interactive
testing by
users.
1 kB/minute.
The binary
protocol for
requests is
volume-
efficient.
The chosen test profile and
individual test parameters
dictate whether the Eye
keeps testing a long time or
is there frequent test
management traffic.
Duration of one test varies
from a few seconds to almost
minutes per request
depending on the test type.
Eye
Carat
Ethernet
Responses to
client.
100 kB
/minute.
Spectrum Analysis and MOS
test most probably contain
significant amount of data.
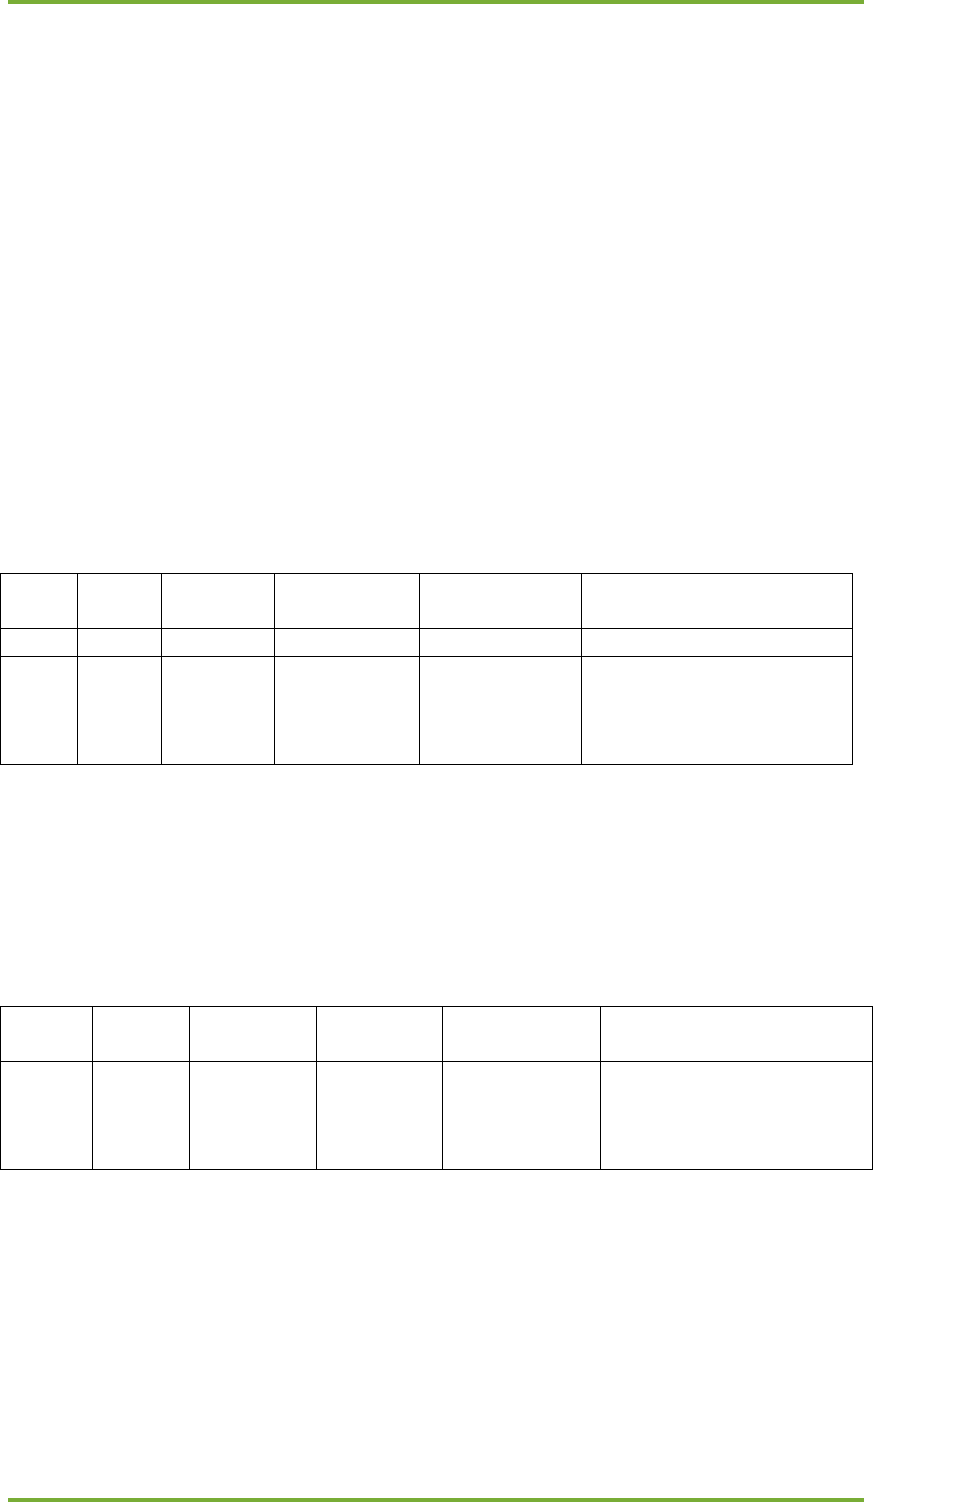
11 Command-line tool for database management 76
7signal Ltd, Panuntie 6, FI-00620 HELSINKI, FINLAND, +358 40 777 7611, info@7signal.com, www.7signal.com
7signal Sapphire Deployment Guide Release 3.1
The data transferred in only test parameters and in most cases results of analysis, sometimes
raw measurements.
Naturally the number of Eyes is directionally proportional the traffic load as each Eye
connection are independent and concurrent. One single Eye typically executes a test in one
minute in the average. However, there are tests that finish in 10 seconds (practical minimum)
and few tests run few minutes.
The communication protocol is both minimal and binary so the traffic from Carat to Eye is very
economic. The measurement result minimum is around 100 bytes in one message and the top
range is the spectrum measurement (not available in all configurations) that returns
approximately 300 times a 50 byte result unit.
In data communications sense the traffic for single Eye is minimal.
Test type and test distribution depend on the test profile used in the Carat server. The test
profile content and test parameters (incl. test duration and size of file transfers) are freely
modifiable by Carat system administrator.
11.6.3 Carat server – Carat GUI
From
To
Medium
Traffic
motivator
Volume
estimate
Major factor
Carat
GUI
Ethernet
User
Very low.
User activity, expected low.
GUI
Carat
Ethernet
Responses to
client.
300 kB/minute
Spectrum Analysis and
MOS test results may
contain significant amount
of data.
There is no continuous interaction, all activities are initiated by the user. The amount of traffic
depends completely on user-decisions. Typically the traffic is binary communication.
In 7signal Solution the IP cloud between the client and the server may be complex and contain
VPNs, wireless links etc. that affect the communications.
11.6.4 Loupe server – Loupe client (browser)
From
To
Medium
Traffic
motivator
Volume
estimate
Major factor
Loupe
host
Clients
in
WWW
Ethernet,
general
networking
User
actions
Volatile. Like
one HTTP
client.
User activity. Per any
request the amount of
requested KPIs is the
driving factor.
There is no continuous machine-to-machine interaction, all activities are initiated by the user.
The amount of traffic depends completely on user-decisions. Server output typically contains
graphics. Medium duty cycle.
11.6.5 DB2 and Loupe server, DB2 and Carat server
In current implementation all three processes are running in the same host so there is no
network burden whatsoever outside the host.

11 Command-line tool for database management 77
7signal Ltd, Panuntie 6, FI-00620 HELSINKI, FINLAND, +358 40 777 7611, info@7signal.com, www.7signal.com
7signal Sapphire Deployment Guide Release 3.1
From
To
Medium
Traffic
motivator
Volume
estimate
Major factor
localhost
localhost
IP stack
Interoperable
server
processes.
N/A
The amount of Eyes in the
network. Data is
transferred in the core
memory of the host.