8BITDO TECHNOLOGY SNES30 GamePad User Manual
8BITDO TECHNOLOGY HK LIMITED GamePad Users Manual
User Manual
8Bitdo SNES30 Bluetooth GamePad Manual
Thank you to buy SNES30 GamePad, It’s the best for fighting, shooting, action and emulator games.SNES30 has Multi-mode, it supports PC, Smart phone, Pad, Notebook, Android,
iOS, Windows. All popular systems and devices support.
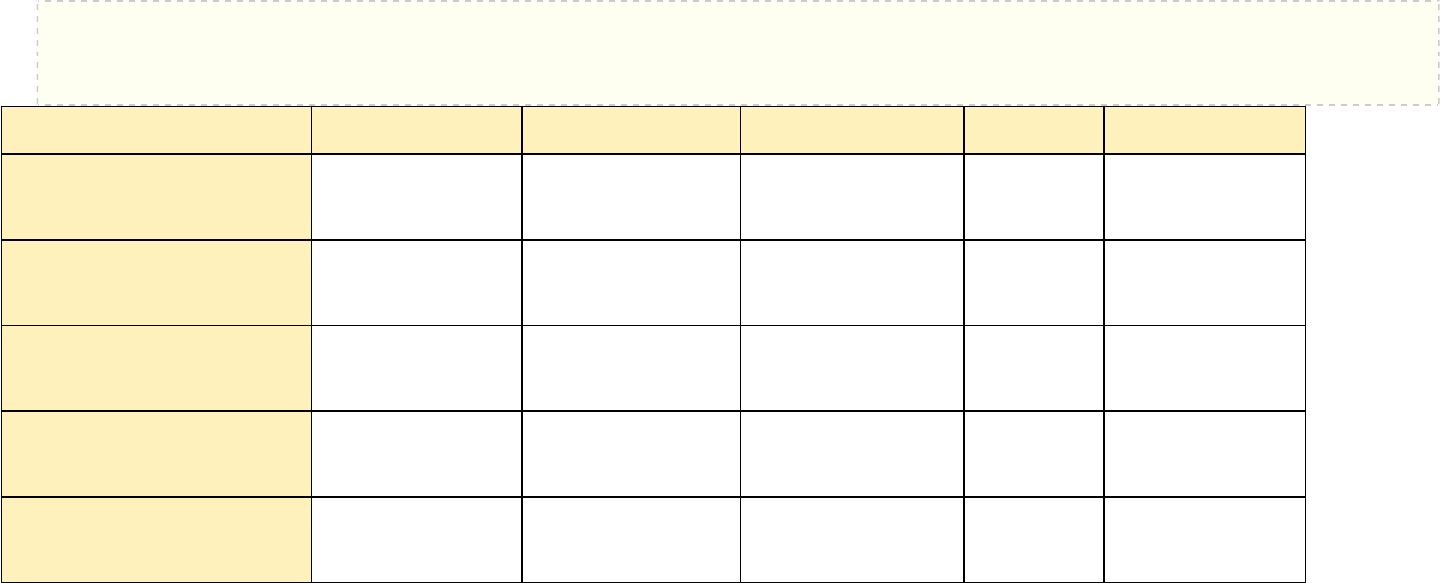
Mode1 Mode2 Mode3 Mode4 Mode5
Joystick Bluetooth Keyboard iCade Emu-Touch
Screen USB Joystick
Power ON (Hold down key for 3
seconds) START START+B START+A START+X Auto connection
Blue LED 1 times per second 2 times per second 3 times per second 4timesper
second Can be ignored
Support system Windows, Android Windows, Mac OS, Android,
iOS Android, iOS Android, iOS Windows
memo PC can use Bluetooth
Adapter.
Exclusive support FOUR
players
Input method should be
English. Need ROOT Also charge SNES30
battery.
Firmware upgradable for function expansion in the future.

Expansion Mode Bluetooth Keyboard(2P)Wiimote Mode Development...
Power ON (Hold down key for 3 seconds) START+B+R START+Y START+L
Blue LED 2 times per second 1 times per second 1 times per second
Support system Windows, Mac OS, Android, iOS Nintendo Wii RETRON5
Memo Multiplayer on iOS with Dual keyboard code system. wiimote Exclusive support FOUR players L+R+A+BastheHome
key of the RETRON5 console.
The most common situations:
1. For Android devices, use Mode 1.
2. For iOS devices, use Mode 2 or 3.
3. For games that only support touchscreen controls, use Mode 4.
To turn Power OFF: Hold down START button for 3 seconds.
To activate the conditions below, you will need to clear the pair information on the SNES30.
Press SELECT button for more than 3 seconds to clear pair information. When both LED lights blink once
you are able to connect other devices to the SNES30 again.
1. Connect the SNES30 GamePad to another device.
2. Change between Mode 1, 2 or 3.
3. Request password (to pair), if not “0000”.
Note: Make sure the battery of the SNES30 GamePad is not empty. Otherwise use the USB-cable to charge the device.
For two players: iOS/Mac OSX/Android/PC
Player 1 press START + B to power on the SNES30 GamePad. (LED light will blink twice.)
Player 2 press START + B + R to power on the SNES30 GamePad. (LED light will blink once, for a longer period of time.)
Both SNES30 GamePads will provide a different key code password to work with Bluetooth. The mapping of the keys can be done in game.
Multiplayer mode(s):
Android/Windows: Connect the SNES30 GamePad with the USB-cable or Bluetooth. Multiplayer support depends on the game itself.
Mode 1, 2 and 3
Manual in Detail:
(Note: Make sure the battery of the SNES30 GamePad is not empty. Otherwise use the USB-cable to charge the device.)
Establishing Bluetooth connection with Mode 1, 2 or 3 activated: Follow instructions on page Fast Startup Figure, to turn on the SNES30 GamePad in mode 1, 2 or 3.
1. Scan for Bluetooth devices on your Android/iOS device.
2. Select “8Bitdo SNES30 GamePad” in the list of available devices.
3. Map the keys in the app or emulator you will be playing.
Mode4 Emu-Touchschreen mode
Note: Android needs ROOT
1. Download the official SNES30 GamePad APP/APK from the official site at www.8Bitdo.com.
2. Follow the instructions on page Fast Startup Figure, to turn on the SNES30 GamePad in mode 4.
3. Run the SNES30 GamePad app and scan for Bluetooth devices. When detected tap “8Bitdo SNES30 GamePad” to pair.
4. If asked for pairing code (password), enter “0000”.
5. In Emu-Touchscreen mode, press SELECT+START to activate SNES30 GamePad app.
6. Finally, drag and drop buttons in order to map the keys to your satisfaction. Press SELECT+START to finish set-up.
Warning:
Android: After using Mode 4 and you wish to use Mode 1, 2 or 3, you will need to clear pairing information at system Bluetooth first and then scan, pair again.
Tip: Double tap DPad or use two fingers can zoom it to fit games.
Mode5 Windows USB Cable Mode
1. Use the enclosed USB-cable to connect the SNES30 GamePad to your PC. Your PC will immediately recognize the device.
2. You will be able to map the keys, in the game options of the game you are playing.
Note: When connecting the SNES30 GamePad to your PC the battery will also charge.
Wiimote Mode
1. When running a game, press the ‘HOME’ button on the Wiimote to access settings.
2. Press START+Y to power ON the SNES30 GamePad
3. To connect the SNES30 GamePad with your Wii console: Press the red button (wireless) next to the SD slot on your Wii console for a few seconds. The player 1 or 2 battery icon
will turn to gray. This means you’ll be able to connect the SNES30 GamePad to your Wii console.

Note: If you wish to connect your SNES30 GamePad in ‘player one mode’, you will have to take the battery out of the original Wiimote.
Redefine Wiimote mode button mapping, SNES30 GamePad - Wiimote
Wiimote Direction keys B One A Two Minus Plus
SNES30 Pro Direction keys X Y A B SELECT START
RETRON5 Mode
START + L mode (support RETRON5 console).
Note:L+R+A+BastheHomekeyoftheRETRON5console.
Redefine RETRON5 mode button mapping, SFC30 GamePad - RETRON5
RETRON5 Direction keys + - < v L R SELECT START
SFC30 Direction keys X B X A L R SELECT START
Upgrade firmware via PC or Mac
1. Press START+L+R on the SNES30 GamePad. Green + Blue LED lights will be blinking.
2. Use the enclosed USB-cable to connect the SNES30 GamePad to your PC.
3. Download the SNES30 GamePad upgrade software from the www.8Bitdo.com website and run the 8Bitdo_update.exe file in Windows folder(for WIN user), or in MacOS folder (for MacOS
user).
4. Select the Bluetooth_firmware.dat firmware file and run the update.
LED Light(s) status
1. Blue light flashing: Bluetooth disconnected.
2. Solid Blue light: Bluetooth connected..
3. Green light flashing: Battery charging..
4. Green light off: Charging completed..
5. Solid Red light: Battery low..
6. No LED lights active: Power off or Sleep mode..
To restore the SNES30 GamePad to factory settings hold down the START button for 8 seconds.
The firmware of the SNES30 GamePad can be upgraded and functions may be changed or added. The final notices and features can be checked on the official website.
Disclosure: Second English version of manual revised by Joshy Scheers, Chief Editor of 3rd-strike.com.
Future versions, may or may not be revised by other translators and thus this data may or may not be accurate.
FCC STATEMENT :
This device complies with Part 15 of the FCC Rules. Operation is subject to the following two conditions:
(1) This device may not cause harmful interference, and
(2) This device must accept any interference received, including interference that may cause undesired operation.
Warning: Changes or modifications not expressly approved by the party responsible for compliance could void the user's authority to operate the equipment.
NOTE: This equipment has been tested and found to comply with the limits for a Class B
digital device, pursuant to Part 15 of the FCC Rules. These limits are designed to provide reasonable protection against harmful interference in a residential
installation.
This equipment generates uses and can radiate radio frequency energy and, if not installed and used in accordance with the instructions, may cause harmful
interference to radio communications. However, there is no guarantee that interference will not occur in a particular installation. If this equipment does cause harmful
interference to radio or television reception, which can be determined by turning the equipment off and on, the user is encouraged to try to correct the interference by
one or more of the following measures:
Reorient or relocate the receiving antenna.
Increase the separation between the equipment and receiver.
Connect the equipment into an outlet on a circuit different from that to which the receiver is connected.
Consult the dealer or an experienced radio/TV technician for help.
RF warning statement:
The device has been evaluated to meet general RF exposure requirement. The device can be used in portable exposure condition without restriction.