8Bitdo USB_RR_PS Classic V1.6 MD RR ENG Manual
User Manual: 8Bitdo
Open the PDF directly: View PDF ![]() .
.
Page Count: 8
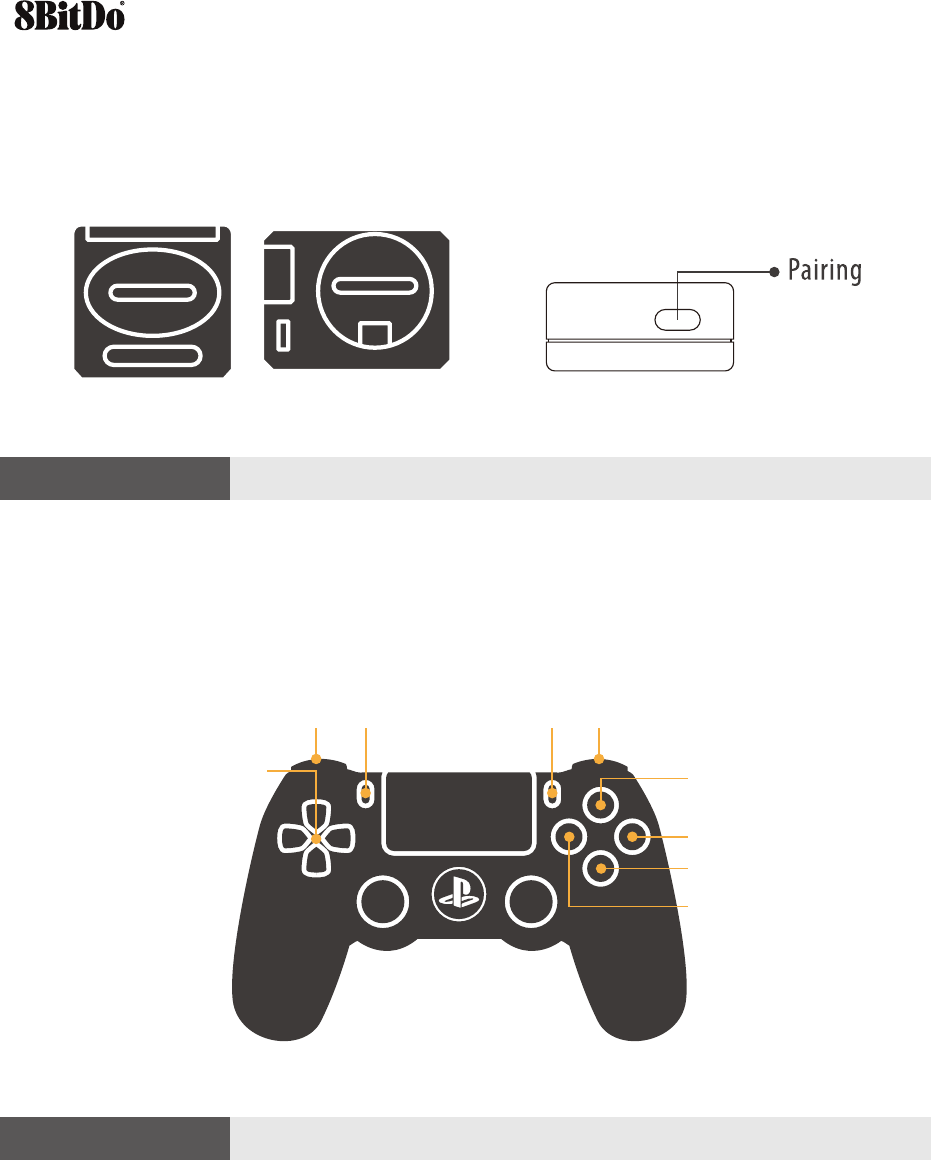
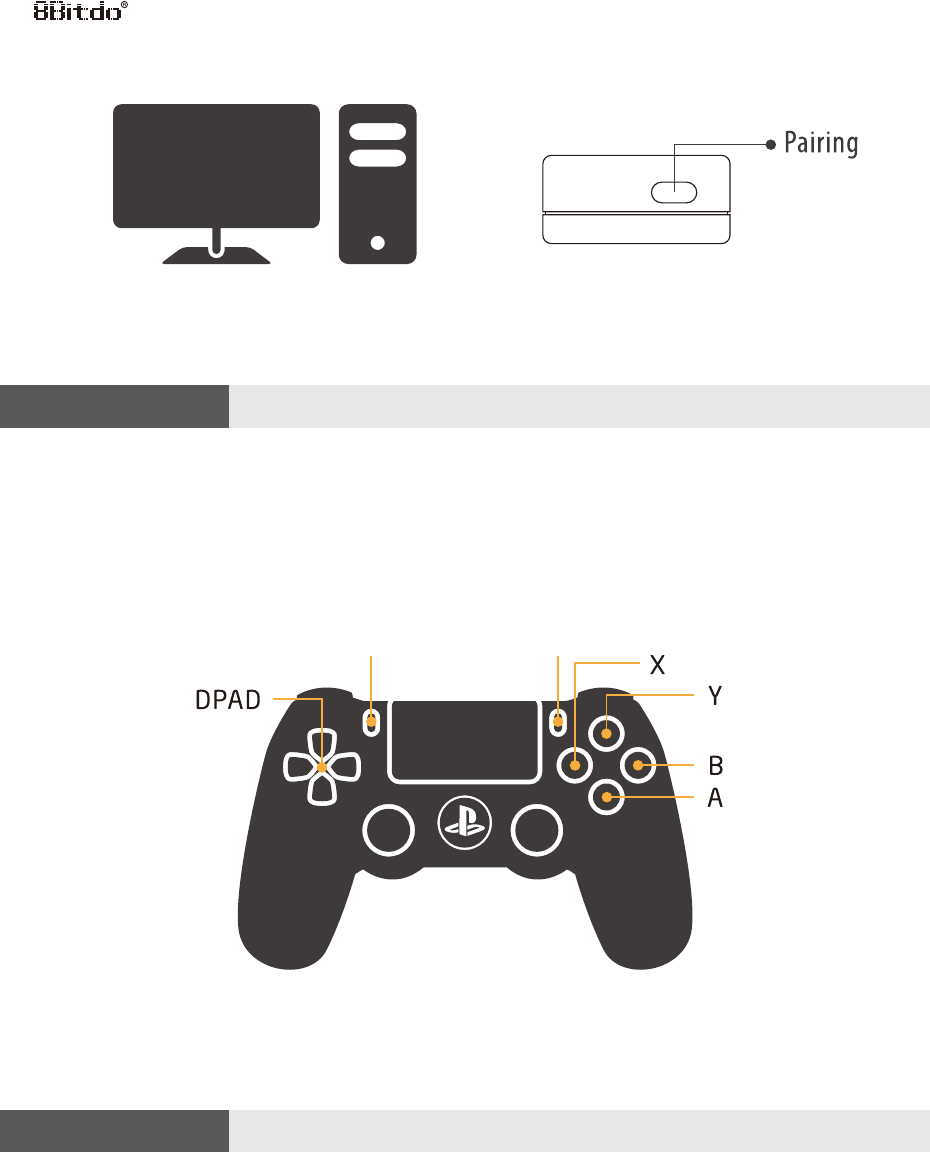
For PS4 controller
1. Insert Retro Receiver into console and then press the pairing button (the LED will rapidly blink)
2. Press and hold the Share and PS buttons until the lightbar begins to strobe quickly in double.
3. Wait until your Retro Receiver's LED is solid blue and the controller's lightbar stay on.
4. For next connection only need to press PS button and wait until receiver's LED is solid blue.
MODE START
DPAD
Z
A
Y
C
B
X
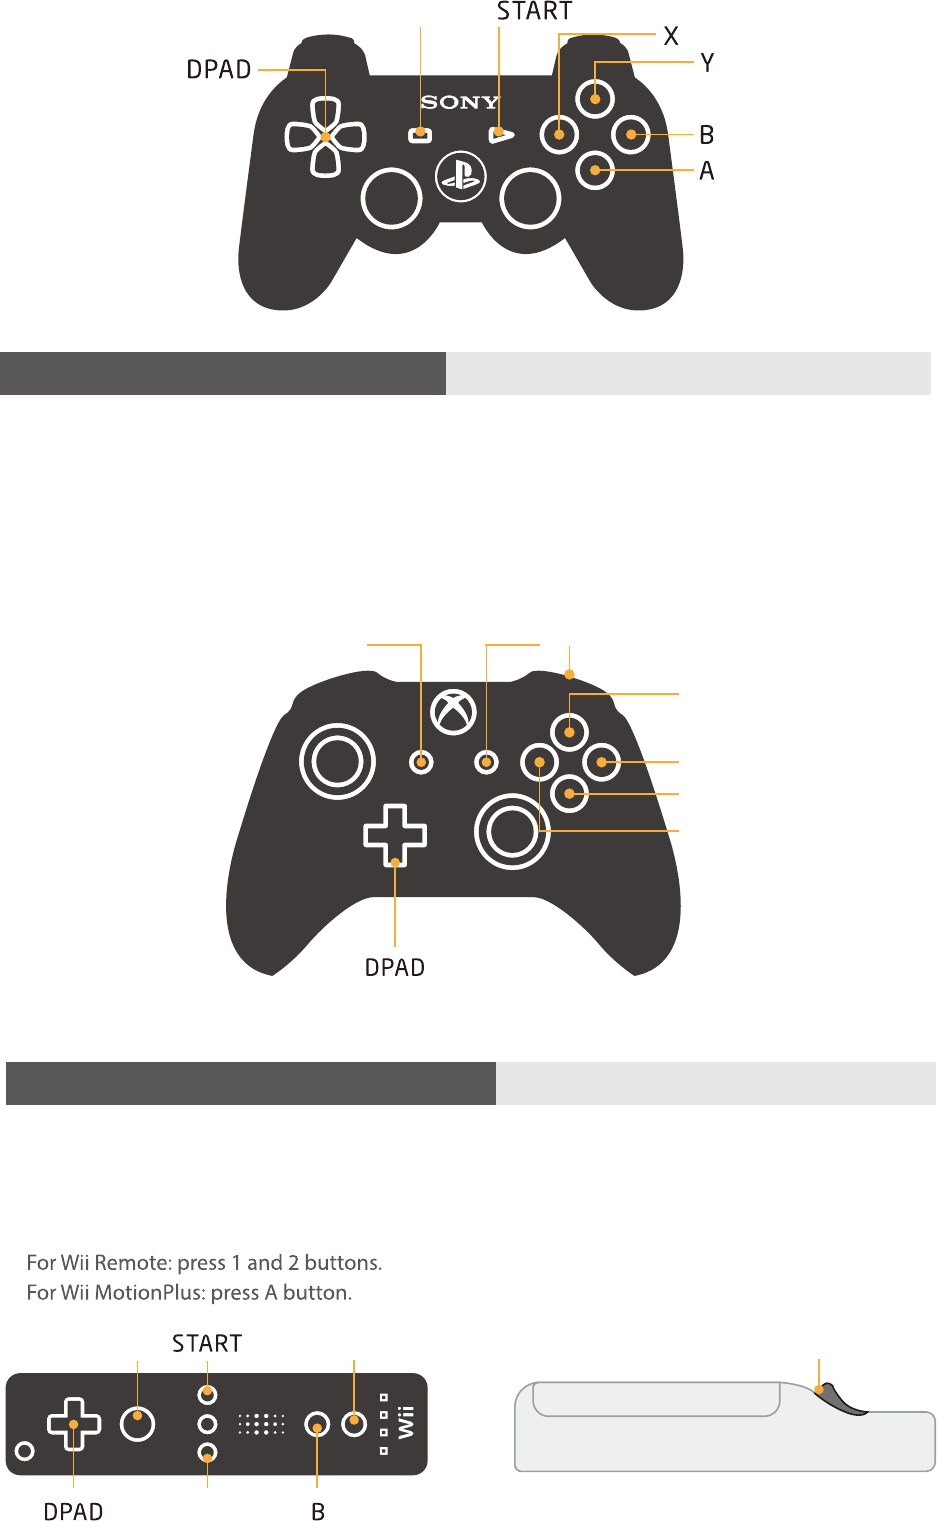
For PS3 controller
1. Download and Run 8BitDo Retro Receiver Tools on your PC available for Mac and PC.
2. On your Retro Receiver, hold down the pairing button and connect it to your MAC/PC via USB.
3. Connect your PS3 controller to MAC/PC via USB.
4. Once your Retro Receiver and PS3 controller are both connected via USB, click the "Pair" button
in the soware.
5. Once pairing is complete, you can insert your Retro Receiver into your console.
6. Now press the PS button on your PS3 controller.
7. Wait until your Retro Receiver's LED is solid blue and the controller's #1 LED stay on.
8. To re-sync aer powering your console down, begin from step 6.
Retro Receiver
for original Genesis & Mega Drive
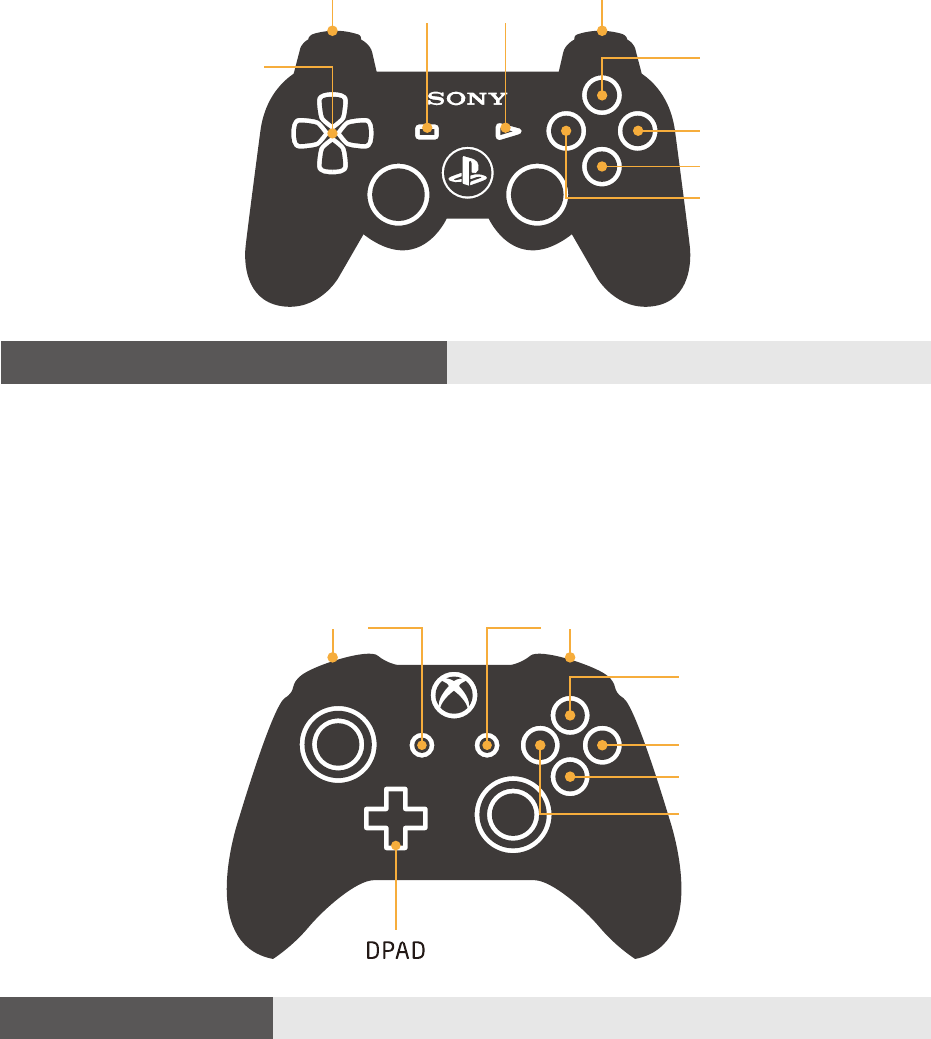
For Xbox One S/X Bluetooth controller
1. Insert Retro Receiver into console and then press the pairing button (the LED will rapidly blink).
2. Press HOME button to turn on your Xbox One S/X Bluetooth controller and then press bind
button.
3. Wait until both LEDs on the Retro Receiver and controller stay solid.
4. Retro Receiver will auto-reconnect to the controller when you turn back on the controller with
the HOME button only.
MODE START
DPAD
Z
X
A
Y
C
B
MODE START ZX
A
Y
C
B
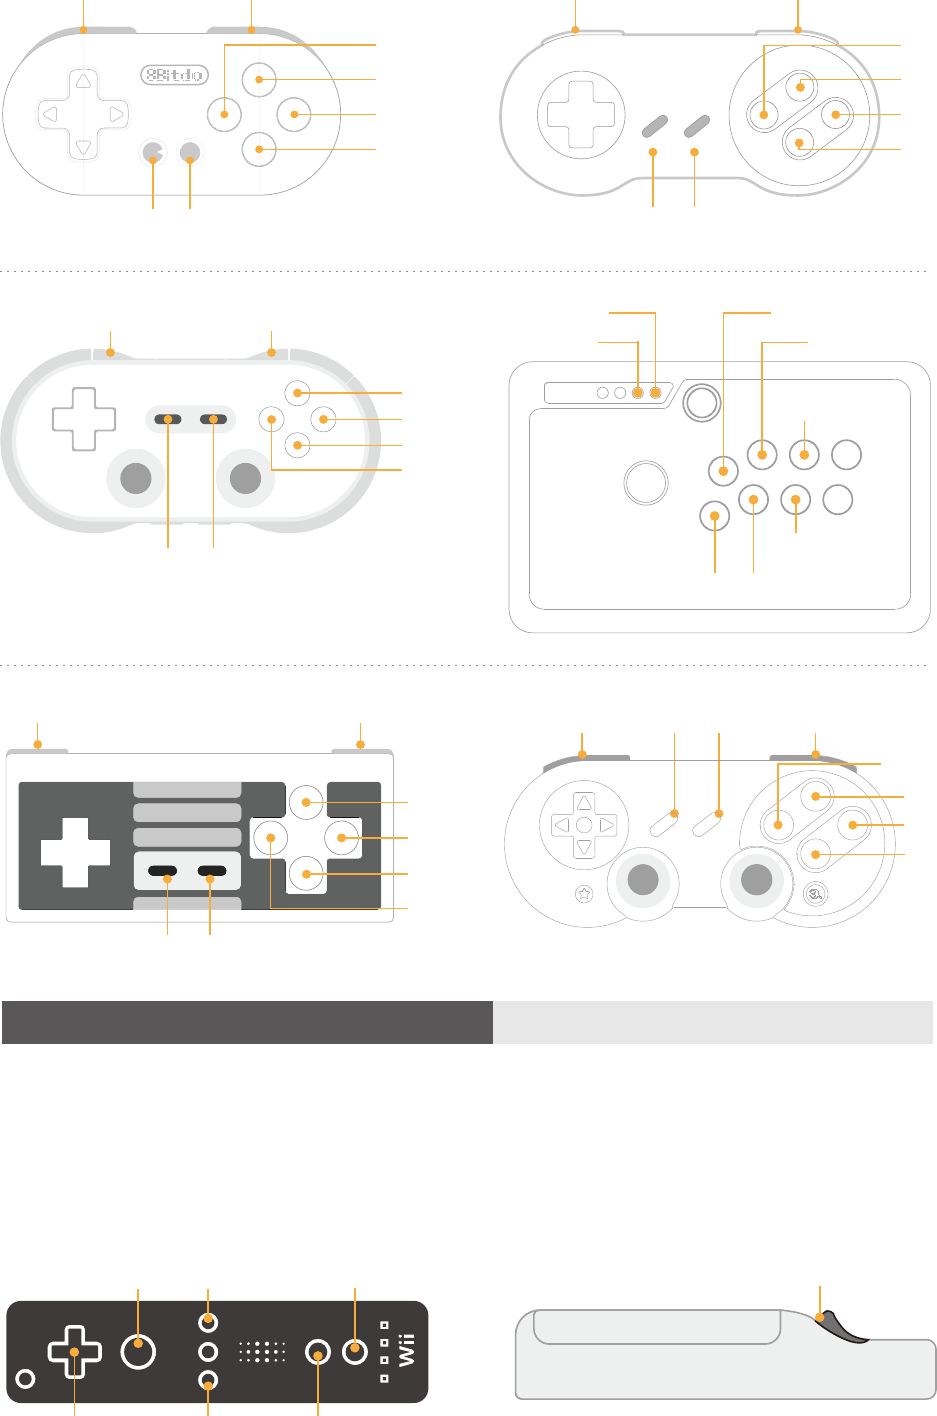
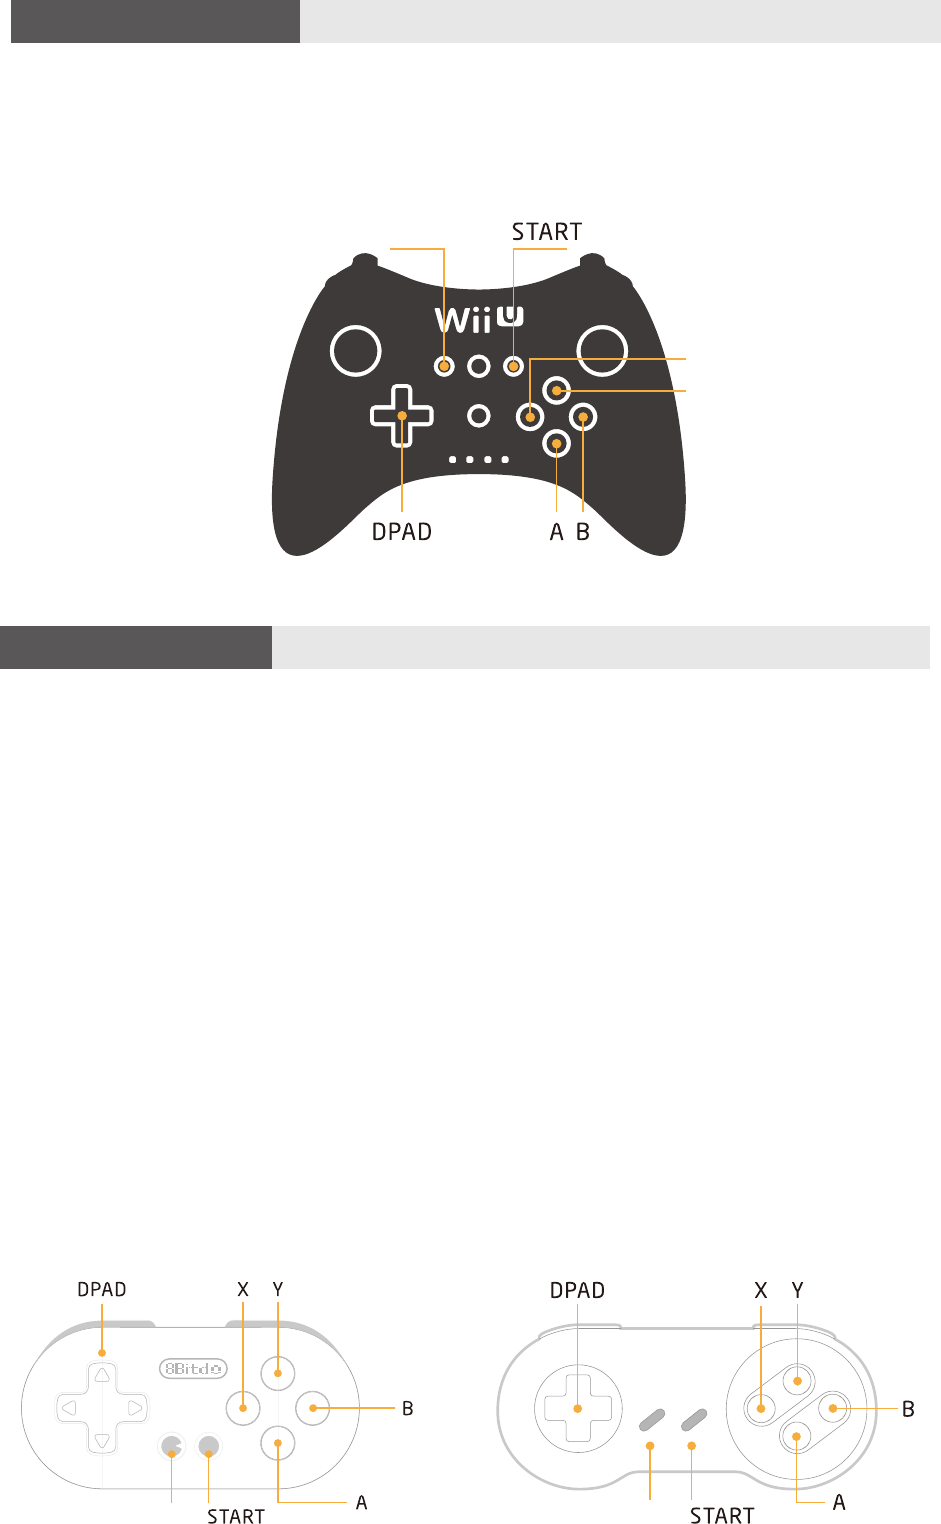
For 8Bitdo controllers
SN30 Pro/N30 Pro2/SN30 v2:
1. Press B + START to turn on your SN30 Pro controller.
2. Press both PAIR buttons on the receiver and controller to sync them.
3. Both LEDs on the receiver and controller will become solid when they are successfully paired.
N30 Pro:
1. Press POWER to turn on your controller.
2. Press both PAIR buttons on the receiver and controller to sync them.
3. Both LEDs on the receiver and controller will become solid when they are successfully paired.
N30/F30/SN30/SF30/Zero:
1. Press START to turn on your controller.
2. Press both PAIR button on the receiver and SELECT on the controller to sync them.
3. Both LEDs on the receiver and controller will become solid when they are successfully paired.
N30 Arcade Stick:
1. Press X + START to turn on your arcade stick.
2. Press both PAIR button on the receiver and arcade stick to sync them.
3. Both LEDs on the receiver and controller will become solid when they are successfully paired.
START
START
MODE START
START START
A
Y
C
B
ZX
MODE MODE
A
Y
C
B
ZX
A
C
B
Y
Z
X
MODE
MODE
A
Y
C
B
ZX
A
Y
C
B
ZX START
A
Y
C
B
MODE ZX
4. To re-sync aer powering your console down.
For Wii Remote/Wii MotionPlus controller
1. Insert Retro Receiver into console and then press the pairing button (the LED will rapidly blink)
2. Press the Wii Remote/Wii MotionPlus controller's sync button.
3. Wait until your Retro Receiver's LED is solid blue and the controller's #1 LED stay on.
* For Wii Remote: press 1 and 2 buttons.
* For Wii MotionPlus: press A button.
START
MODE
DPAD
A
Y
B
X
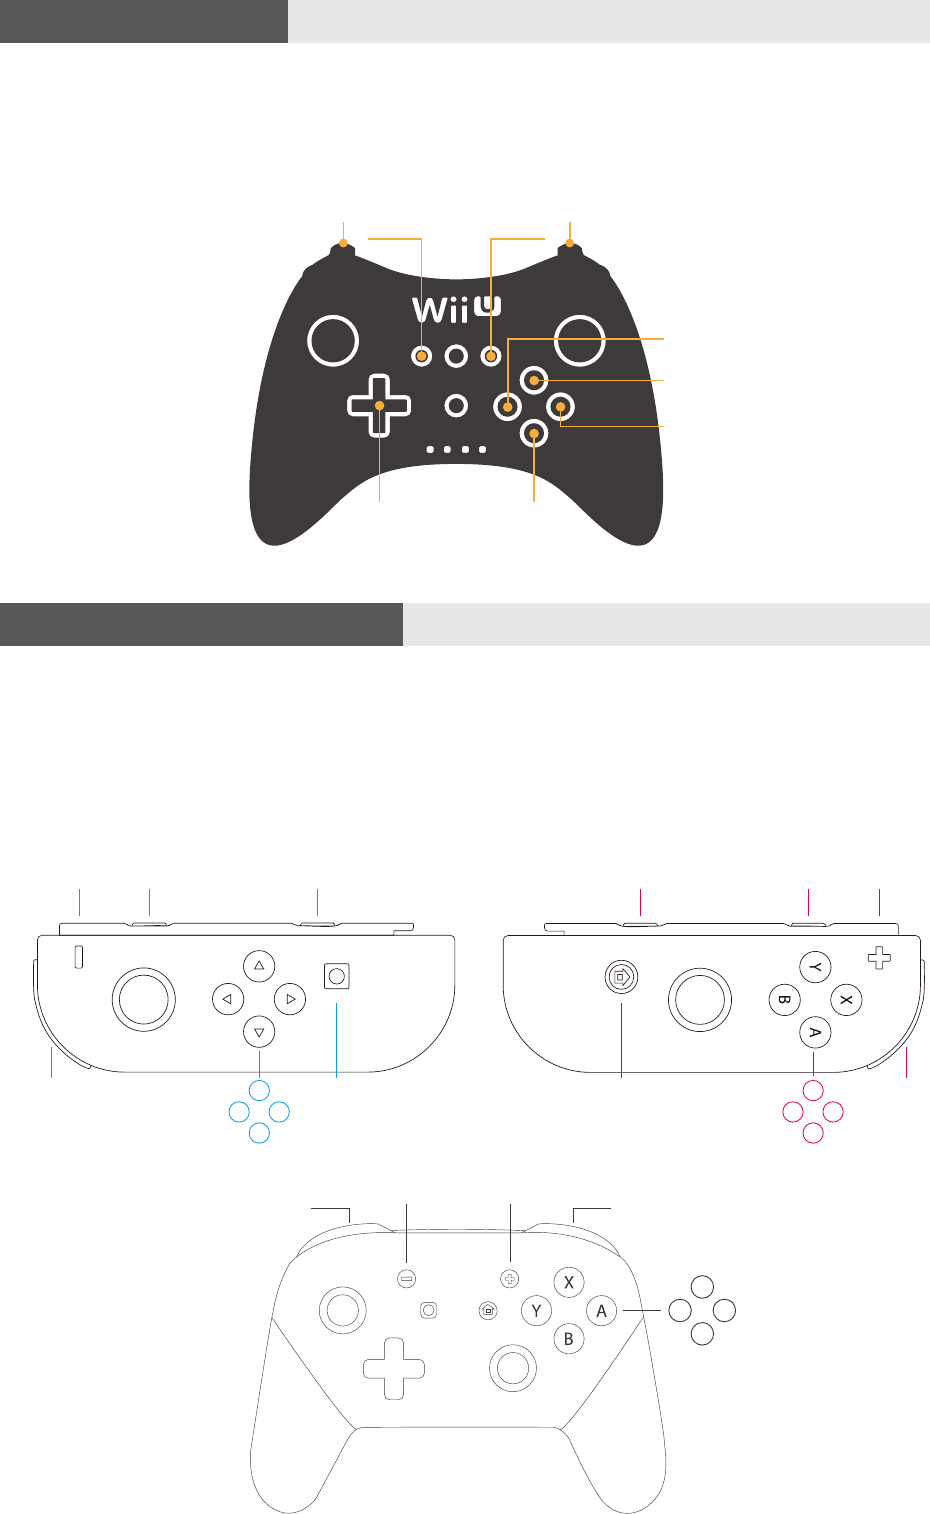
For Wii U Pro controller
1. Insert Retro Receiver into console and then press the pairing button (the LED will rapidly blink).
2. Press your Wii U Pro controller's sync button.
3. Wait until your Retro Receiver's LED is solid blue and the controller's #1 LED stay on.
4. For next connection only need to press A button.
DPAD
MODE START
A
Y
C
B
ZX
For Nintendo Switch Joy-Con/Pro
1. Insert Retro Receiver into console and then press the pairing button (the LED will rapidly blink).
2. Press your Switch Joy-Con/Pro controller's sync button.
3. Wait until your Retro Receiver's LED is solid blue and the controller's #1 LED stay on.
4. For next connection only need to press A button.
X Z
X
MODE
Z
START
Y
A
B
C
X Z
MODE
X
Z
Y
A
B
C
START
X
MODE START
Y
A
B
C
Z
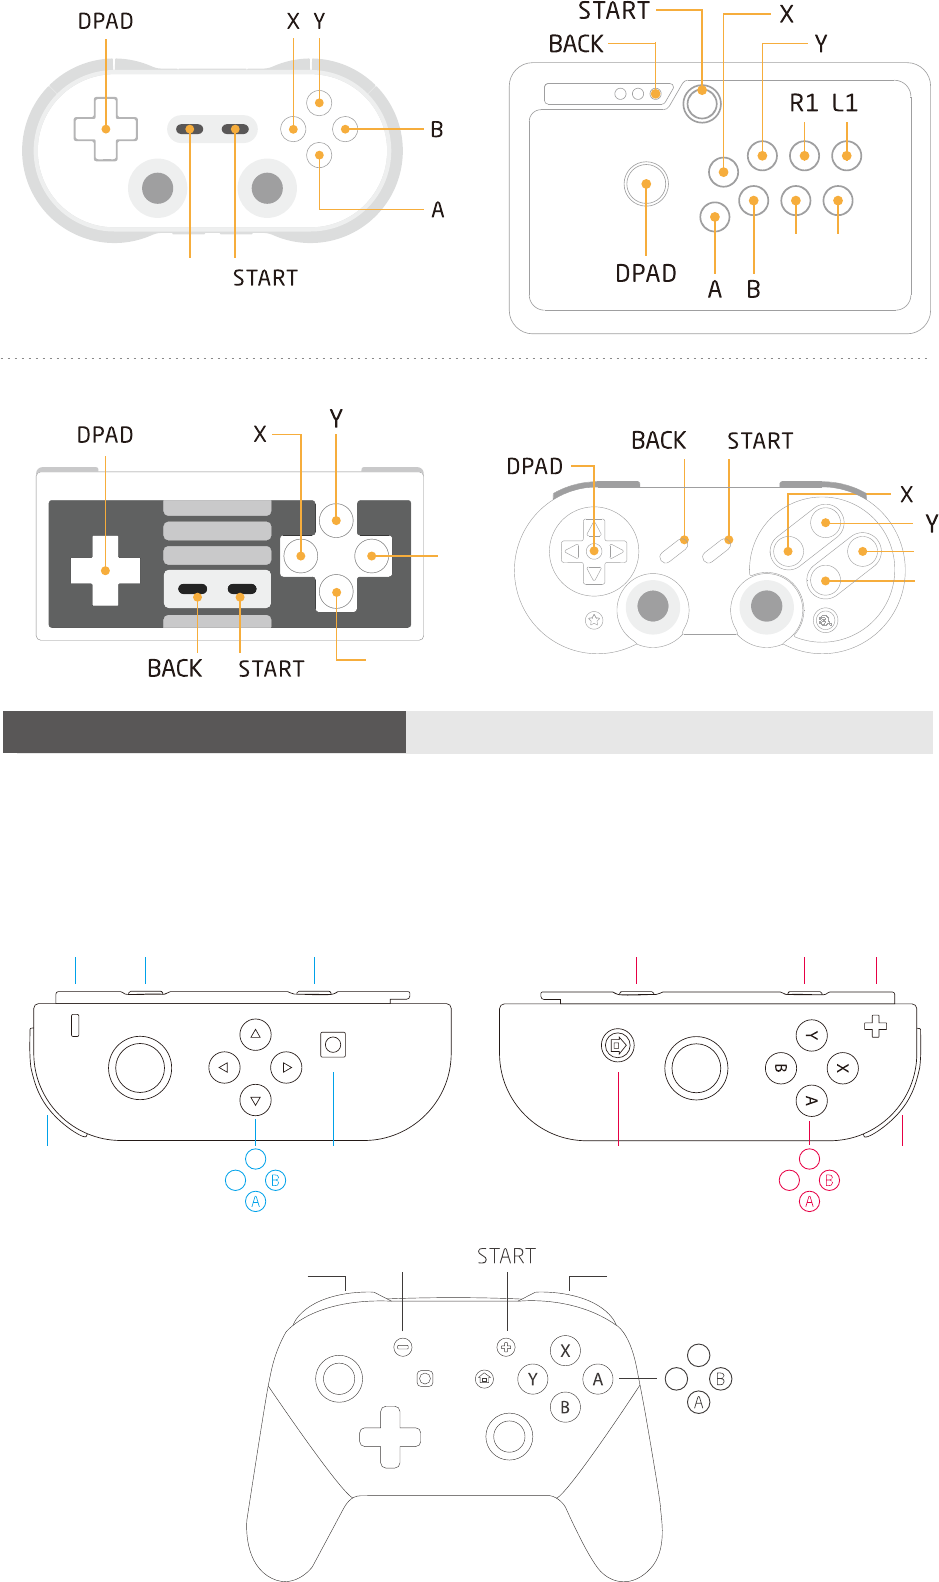
For PS3 controller
For PS4 controller
BACK
1. Insert Retro Receiver into console and then press the pairing button (the LED will rapidly blink)
2. Press and hold the PS and Share buttons until the lightbar begins to strobe quickly in double.
3. Wait until your Retro Receiver's LED is solid blue and the controller's lightbar stay on.
4. For next connection only need to press PS button and wait until receiver's LED is solid blue.
1. Download and Run 8Bitdo Retro Receiver Tools on your PC available for Mac and PC.
2. On your Retro Receiver, hold down the pairing button and connect it to your MAC/PC via USB.
3. Connect your PS3 controller to MAC/PC via USB.
4. Once your Retro Receiver and PS3 controller are both connected via USB, click the "Pair" button
in the soware.
5. Once pairing is complete, you can insert your Retro Receiver into your console.
6.Now press the PS button on your PS3 controller.
7. Wait until your Retro Receiver's LED is solid blue and the controller's #1 LED stay on.
8. To re-sync aer powering your console down, begin from step 6.
Retro Receiver for X- input
* Key command for switching between two levels: L+R+SELECT
START
BACK
For Wii Remote/Wii MotionPlus controller
Y
A
X
BACK
1. Insert Retro Receiver into console and then press the pairing button (the LED will rapidly blink)
2. Press the Wii Remote/Wii MotionPlus controller's sync button.
3. Wait until your Retro Receiver's LED is solid blue and the controller's #1 LED stay on.
4. To re-sync aer powering your console down.
For Xbox One S/X Bluetooth controller
1. Insert Retro Receiver into console and then press the pairing button (the LED will rapidly blink).
2. Press HOME button to turn on your Xbox One S/X Bluetooth controller and then press bind
button.
3. Wait until both LEDs on the Retro Receiver and controller stay solid.
4. Retro Receiver will auto-reconnect to the controller when you turn back on the controller with
the HOME button only.
BACK START
A
X
Y
B
For 8Bitdo controllers
BACK
BACK
SN30 Pro/SF30 Pro:
1. Press START+B to turn on your SN30 Pro/SF30 Pro controller.
2. Press both PAIR buttons on the receiver and controller to sync them.
3. Both LEDs on the receiver and controller will become solid when they are successfully paired.
N30 Pro/F30 Pro:
1. Press POWER to turn on your controller.
2. Press both PAIR buttons on the receiver and controller to sync them.
3. Both LEDs on the receiver and controller will become solid when they are successfully paired.
N30/F30/SN30/SF30/Zero:
1. Press START to turn on your controller.
2. Press both PAIR button on the receiver and SELECT on the controller to sync them.
3. Both LEDs on the receiver and controller will become solid when they are successfully paired.
N30 Arcade Stick:
1. Press HOME to turn on your arcade stick.
2. Press both PAIR button on the receiver and arcade stick to sync them.
3. Both LEDs on the receiver and controller will become solid when they are successfully paired.
For Wii U Pro controller
X
Y
BACK
1. Insert Retro Receiver into console and then press the pairing button (the LED will rapidly blink).
2. Press your Wii U Pro controller's sync button.
3. Wait until your Retro Receiver's LED is solid blue and the controller's #1 LED stay on.
4. For next connection only need to press A button.
B
A
B
A
R2 L2
BACK
For Nintendo Switch Joy-Con/Pro
1. Insert Retro Receiver into console and then press the pairing button (the LED will rapidly blink).
2. Press your Switch Joy-Con/Pro controller's sync button.
3. Wait until your Retro Receiver's LED is solid blue and the controller's #1 LED stay on.
4. For next connection only need to press A button.
LB RBBACK LB RB START
LT
RT X
YSTART BACK LT
RT
X
Y
X
Y
BACK
LB, LT RB, RT
