8devices CM2 Broadband Digital Transmission System User Manual User manual
8devices Broadband Digital Transmission System User manual
8devices >
Contents
- 1. User manual
- 2. Users Manual
User manual

Carambola2manual
TableofContents
Introduction.......................................................................................................................3
Wheretostart....................................................................................................................5
InstallpackagestoyourPC...........................................................................................................................................5
Getlatestsources..............................................................................................................................................................5
Getolderrevision.............................................................................................................................................................5
Stableversion.....................................................................................................................................................................5
Morepackages...................................................................................................................................................................5
Buildimage.........................................................................................................................................................................6
Connectusingserialcable..................................................................................................8
RS‐232level........................................................................................................................................................................8
TTL3.3Vlevel.....................................................................................................................................................................8
Software...............................................................................................................................................................................8
Startterminal.....................................................................................................................9
Connectionsettings.........................................................................................................................................................9
Windows..............................................................................................................................................................................9
Linuxminicom...................................................................................................................................................................9
Linuxpicocom....................................................................................................................................................................9
OtherLinuxuartsettingsandusefulcommands.................................................................................................9
SetupTFTPserver............................................................................................................10
Windows...........................................................................................................................................................................10
Linux...................................................................................................................................................................................11
UploadnewfirmwaretoCarambola2..............................................................................12
sysupgrade.......................................................................................................................................................................12
mtd.......................................................................................................................................................................................12
Serialconnectiononly.................................................................................................................................................12
TFTP....................................................................................................................................................................................12
Upgradingbootloader..................................................................................................................................................12
Webinterface/LUCI....................................................................................................................................................12
TerminalprogramsforvariousOS,settingsandusageexamples............................................................12
Carambola2automatedflashing(linuxversion)..............................................................................................12
Changedefaultconfiguration...........................................................................................13
ChangeNetworkparameters....................................................................................................................................13
Cahngedefaultbanner(welcomescreen)...........................................................................................................13
AppendixACheatsheet...................................................................................................14
Introduction
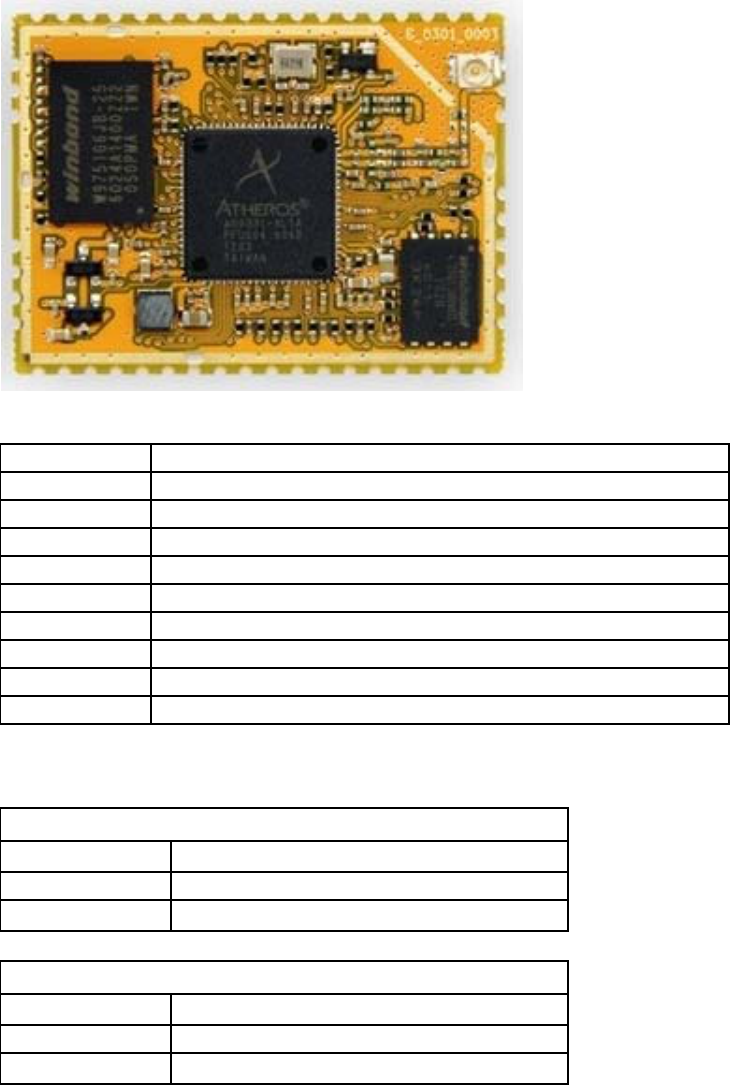
8devicesCarambola2isamemberofCarambolawirelessmodulesfamilyandisbased
onQualcomm/AuthorsAR9331SoC.Carambola2isasurfacemountable,singlesided,
Wi‐FienabledLinuxmodule,featuringthelowestpowerconsumptionintheindustry.
Modulecomesbundledwithanopensourcedevelopmentboardforaquickstartofyour
newInternetofThingseraproject.8devicesisprovidingOpenWRTlinuxdistribution
sourcecodewithnecessarypatchesonGitHubhttps://github.com/8devicesandis
supportedbyourgrowingcommunityonhttp://www.8devices.com/communityforum.
Carambola 2 specification overview
CPU AR9331, 400 MHz
Memory 16 MB SPI Flash with 64 MB DDR2 RAM
Frequency 2.4 GHz
Max output power 21 dBm
Wireless standard 802.11 bgn
Antenna (port) U.FL connector
Power supply 3.3 V, power consumption 0.5 W
Interfaces USB host/slave, serial port, 2 x Ethernet, I2S, SLIC, SPDIF, 23 x GPIO
Size 28 by 38 mm
Software OpenWRT
Antennas:
12dBiomnidirectionalantenna
Model: 2400A-12
Gain-dBi 12
Manufacturer: Anteny24
3dBibuiltinceramicantenna
Model: ACA-5036-A2-CC-S
Gain-dBi 3
Manufacturer: INPAQ TECHNOLOGY CO., LTD.

Wheretostart
InstallpackagestoyourPC
sudo apt-get install subversion g++ ncurses-term zlib1g-dev gawk flex patch
openssh-server minicom picocom tftp tftpd gettext libncurses5 libncurses5-
dev unzip quilt git git-doc git-gui
Getlatestsources
git clone https://github.com/8devices/carambola carambola cd carambola
Getolderrevision
For some reason you might wish to get older source revision. To see available tags execute these commands:
git tag -l
You should see something like this
carambola/v1.0 carambola/v1.1 carambola/v1.1-rc1 carambola/v2.0
carambola/v2.0-rc1 carambola/v2.1 carambola/v2.1-rc1 carambola/v2.1-rc2
carambola/v2.2-rc1 carambola/v2.3-rc1
In order to get older version, type this command (but this should be rare case)
git checkout carambola/v1.0
Stableversion
At this point (2012-11-11) stable version is carambola/v2.3-rc4. To get this version type command:
git checkout carambola/v2.3-rc4
Morepackages
Edit file:
vi feeds.conf.default
src-git packages git://github.com/8devices/packages.git #src-git luci
https://github.com/8devices/luci.git src-git luci src-git
git://nbd.name/luci.git #src-svn packages
svn://svn.openwrt.org/openwrt/packages src-svn xwrt http://x-
wrt.googlecode.com/svn/trunk/package #src-svn luci
http://svn.luci.subsignal.org/luci/trunk/contrib/package #src-svn phone
svn://svn.openwrt.org/openwrt/feeds/phone #src-svn efl
svn://svn.openwrt.org/openwrt/feeds/efl #src-svn xorg
svn://svn.openwrt.org/openwrt/feeds/xorg #src-svn desktop
svn://svn.openwrt.org/openwrt/feeds/desktop #src-svn xfce
svn://svn.openwrt.org/openwrt/feeds/xfce #src-svn lxde
svn://svn.openwrt.org/openwrt/feeds/lxde #src-link custom
/usr/src/openwrt/custom-feed
Type
./scripts/feeds update -a ./scripts/feeds install -a
I suppose you would also like to add luci.
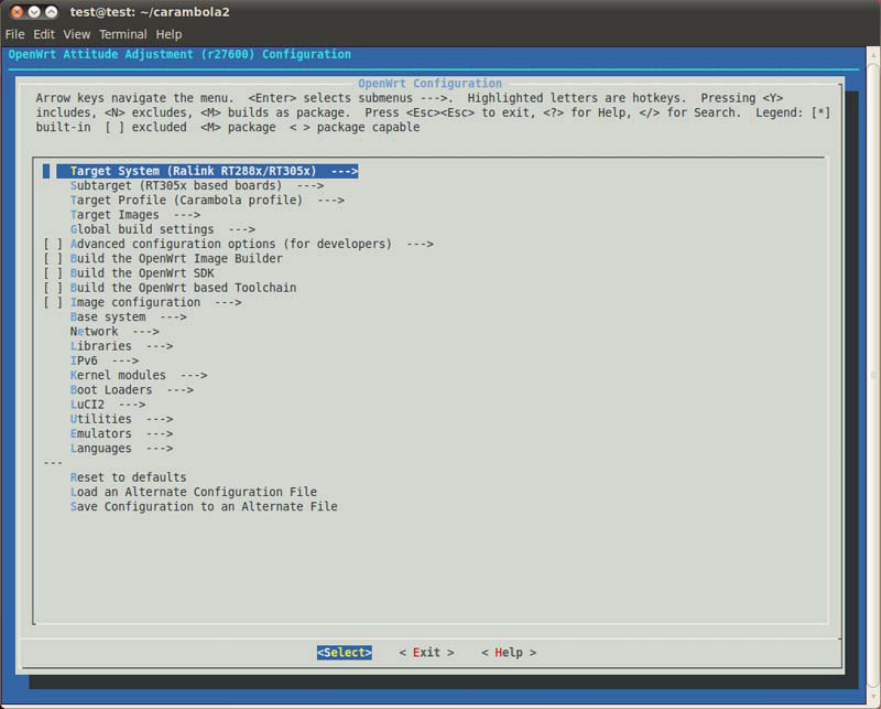
Buildimage
If you wish you can change kernel settings, but at this time skip this step.
make kernel_menuconfig
Type
make menuconfig
You should see configuration window like this:
Let's leave everything untouched for now and and exit.
Type
make
for standard building procedure or
make -j 2
if you want to use more than 1 thread and you have more than 1 CPU core on your system. This process takes
long time (it took ~1 hour on 4 core machine) or
make V=99
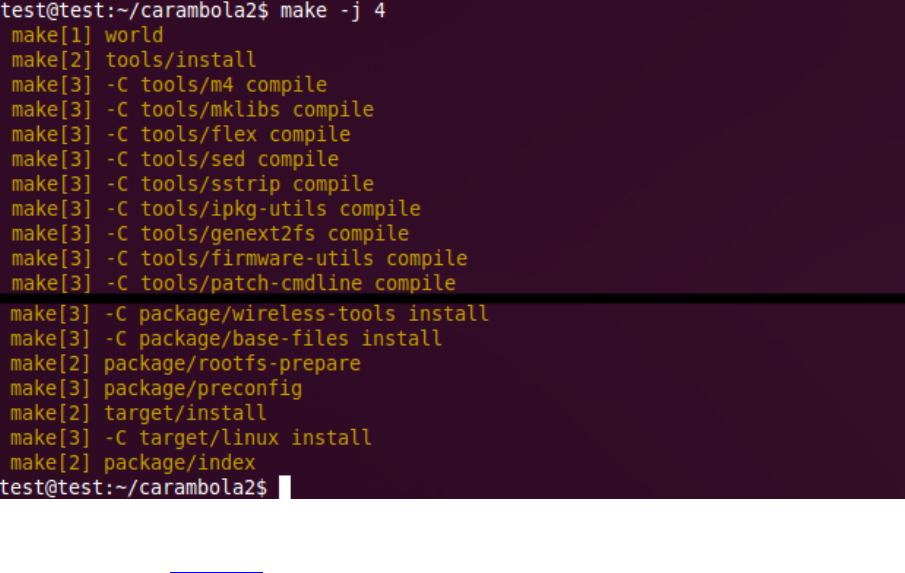
if you need or want to see more details.
You should see build log like this:
Or if you feel really advanced, you can get email notification upon completing build proces. For this you need to
install and configure email client. After you are done, type this long command:
date > /tmp/text.txt; make -j 2 >> /tmp/text.txt; date >> /tmp/text.txt;
mail -s "done" email_where_to_send_report@server.com < /tmp/text.txt
If you wish to observe current progress on computer, type in another console
tail -f /tmp/text.txt
Connectusingserialcable
RS‐232level
It is best to connect to carambola using standard RS-232 male cable. Just plug cable to carambola, set 115200
8N1 settings without hardware flow control and power up your carambola.
TTL3.3Vlevel
However, if you have TTL level USB to serial converter, you should do some soldering.
Remove J9 and J10 jumpers and connect FTDI 3.3V TTL serial to USB cable. J9.1 – RX(input), J10.1 –
TX(output). I used FTDI 3.3V USB to serial converter.
Software
You can use any terminal program you wish to communicate.

Startterminal
Connectionsettings
• 1152008N1,nohardwareflowcontrol.
Windows
I recommend using V-term32 (no need to install just unzip and run) or TeraTerm program.
Linuxminicom
TODO
Linuxpicocom
picocom -f n -p n -b 115200 -i -r -l /dev/ttyUSB0
picocom -b 9600 /dev/ttyUSB0
• Picocomman
• Toexit,pressandholdCTRL,A,Q.
OtherLinuxuartsettingsandusefulcommands
If you do not have installed stty you should get it by typing
opkg install coreutils-stty
To set options:
stty -F /dev/ttyUSB0 cs8 9600 ignbrk -brkint -icrnl -imaxbel -opost -onlcr
-isig -icanon -iexten -echo -echoe -echok -echoctl -echoke noflsh -ixon -
crtscts
To get options:
stty -a -F /dev/ttyUSB0
To read from device
tail -f /dev/ttyUSB0
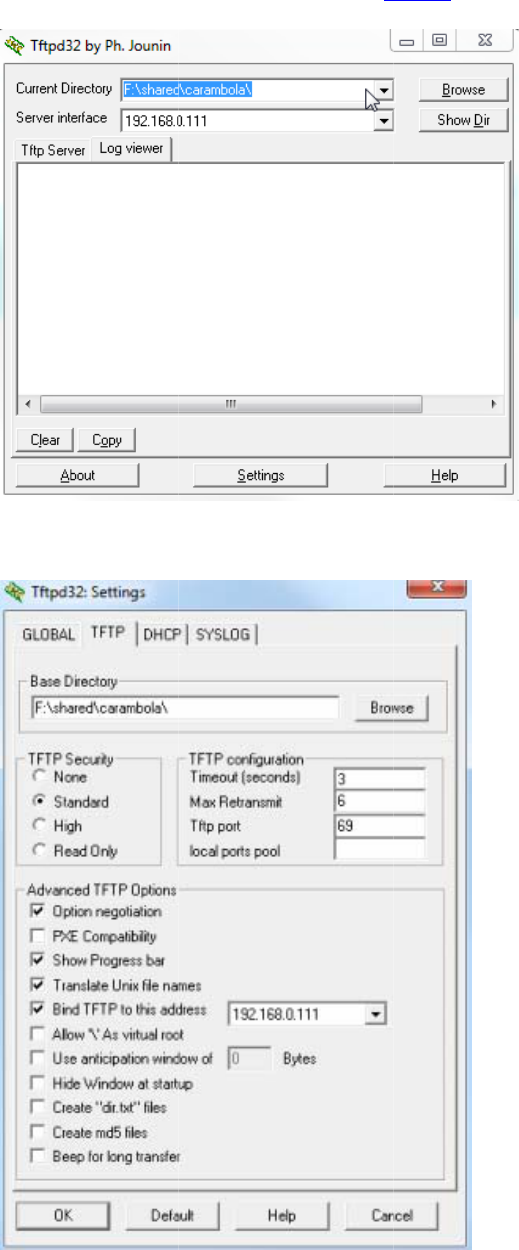
Setu
p
Windo
You can
Enable
T
p
TFTPs
e
ws
set up TFTP
s
T
FTP server.
Y
e
rver
s
erver very q
u
Y
our settings
s
u
ickly using
T
s
hould look li
T
FTP32 sofw
a
ke:
a
re. It is free.
Linux
If you wish, you can use linux machine to do the same task.
sudo apt-get install xinetd tftpd tftp
sudo touch /etc/xinetd.d/tftp
sudo nano /etc/xinetd.d/tftp
Paste this code:
service tftp { protocol = udp port = 69 socket_type = dgram wait = yes
user = nobody server = /usr/sbin/in.tftpd server_args = /home/tftpboot
disable = no }
sudo mkdir /home/tftpboot
sudo chmod -R 777 /home/tftpboot
sudo chown -R nobody /home/tftpboot
sudo service xinetd restart

UploadnewfirmwaretoCarambola2
This topic covers few methods how to upgrade firmware on Carambola. Some methods require only serial
connection, some only LAN, some LAN and Serial. Also you might need to install/setup other software to
perform these tasks.
sysupgrade
sysupgrade is best ever way to upgrade firmware. For this to work you must be connected to Carambola
terminal. It does not matter using Serial, LAN ir Wireless connection.
mtd
mtd method is similar to sysupgrade. Use any one you like.
Serialconnectiononly
Using serial cable is most dangerous one. There many things that can go wrong. Ensure you have good serial
cable (cheaper usb-serial adapters don't work), rock solid power supply and steel nerves :)
TFTP
TFTP method to upgrade firmware requires you serial connection to Carambola and configured TFTP server
over LAN. Wireless connection does not work.
Upgradingbootloader
If for some reason you have older bootloader and wish to upgrade, you must proceed here. It is even more
dangerous than upgrading firmware using serial connection only. If something fails, there are big chances you
render your module useless.
Webinterface/LUCI
This method is recommended for novices. Connect Carambola web interface, browse for firmware upgrade,
select file and press upgrade.
TerminalprogramsforvariousOS,settingsandusageexamples
terminals
Carambola2automatedflashing(linuxversion)
Pyton based flash utility for Carambola2

Changedefaultconfiguration
ChangeNetworkparameters
Edit:
carambola/target/linux/ramips/base-files/etc/config/network
Cahngedefaultbanner(welcomescreen)
Change welcome screen example
Edit:
carambola/package/base-files/files/etc/banner
Appe
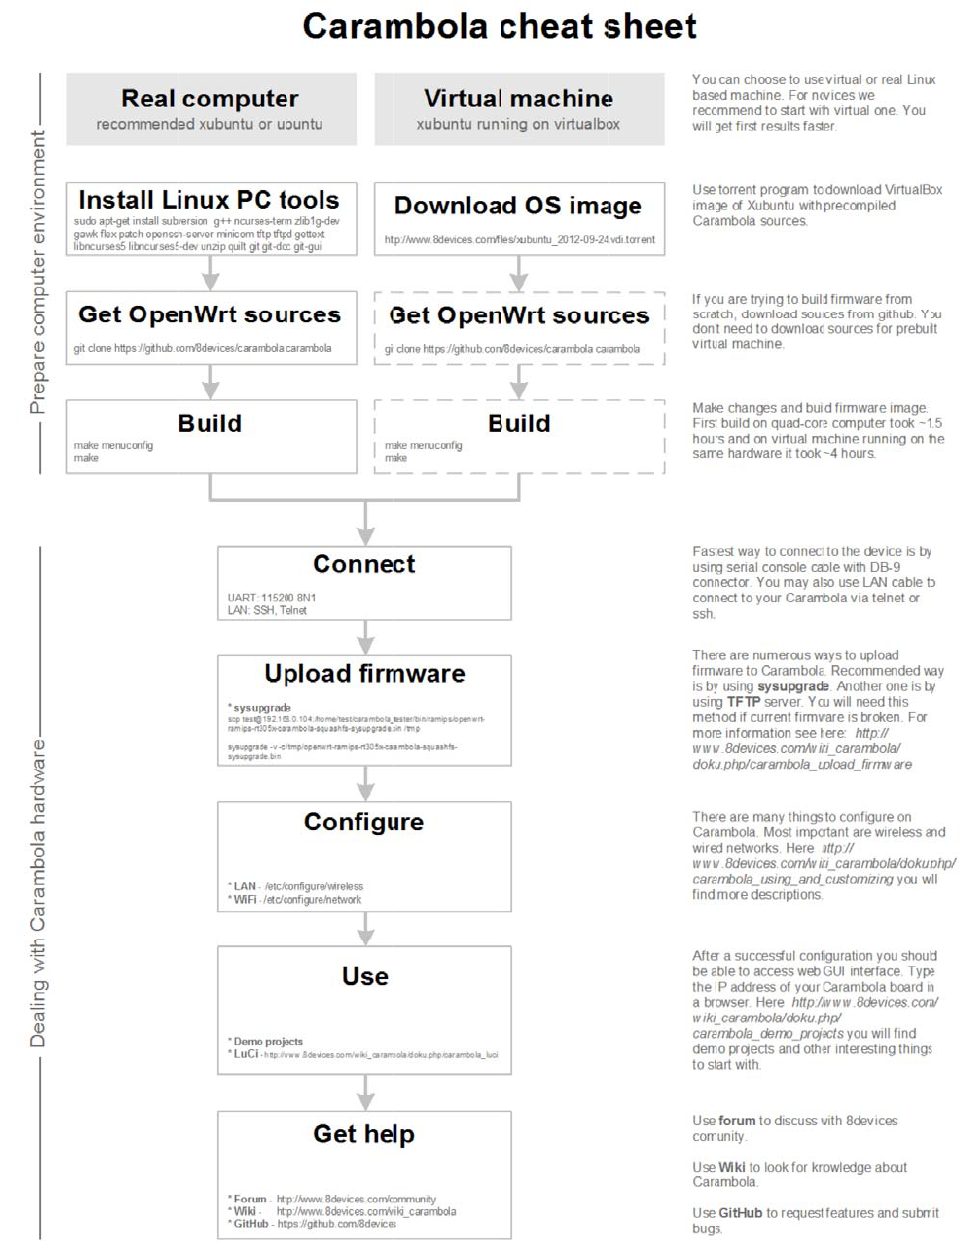
If you are
eet
where to start,, reading this flow chart migght be helpfull.
FCC Warning Statement:
Any Changes or modifications not expressly approved by the party responsible for compliance could
void the user's authority to operate the equipment.
This device complies with part 15 of the FCC Rules. Operation is subject to the following two
conditions:
(1) This device may not cause harmful interference, and (2) this device must accept any interference
received, including interference that may cause undesired operation.
This equipment has been tested and found to comply with the limits for a Class B digital device,
pursuant to Part 15 of the FCC Rules. These limits are designed to provide reasonable protection
against harmful interference in a residential installation. This equipment generates uses and can
radiate radio frequency energy and, if not installed and used in accordance with the instructions, may
cause harmful interference to radio communications. However, there is no guarantee that interference
will not occur in a particular installation. If this equipment does cause harmful interference to radio or
television reception, which can be determined by turning the equipment off and on, the user is
encouraged to try to correct the interference by one or more of the following
measures:
Reorient or relocate the receiving antenna.
Increase the separation between the equipment and receiver.
Connect the equipment into an outlet on a circuit different from that to which the receiver is connected.
Consult the dealer or an experienced radio/TV technician for help.
FCC Radiation Exposure Statement
ThisequipmentcomplieswithFCCradiationexposurelimitssetforthforan
uncontrolledenvironment.Thisequipmentshouldbeinstalledandoperatedwith
minimumdistance20cmbetweentheradiatorinclude antenna andyourbody.
Labelingrequirement
TheHostdeviceofOEMintegratormustbelabeledwith‘ContainsFCCID:Z9W‐CM2’
ICwarning
This device complies with Industry Canada licence-exempt RSS standard(s).
Operation is subject to the following two conditions:
(1) This device may not cause interference and (2) this device must accept any interference,
including interference that may cause undesired operation of the device.
Le présent appareil est conforme aux CNR d'Industrie Canada applicables aux appareils radio exempts de
licence.L'exploitation est autorisée aux deux conditions suivantes :
(1) l'appareil ne doit pas produire de brouillage, et
(2) l'utilisateur de l'appareil doit accepter tout brouillage radioélectrique subi, même si le brouillage est
susceptible d'en compromettre le fonctionnement.
Under Industry Canada regulations, this radio transmitter may only operate using an antenna of a
type and maximum (or lesser) gain approved for the transmitter by Industry Canada. To reduce
potential radio interference to other users, the antenna type and its gain should be so chosen that the
equivalent isotropically radiated power (e.i.r.p.) is not more than that necessary for successful
communication.
This radio transmitter (identify the device by certification number, or model number if Category II) has
been approved by Industry Canada to operate with the antenna types listed below with the maximum
permissible gain and required antenna impedance for each antenna type indicated. Antenna types not
included in this list, having a gain greater than the maximum gain indicated for that type, are strictly
prohibited for use with this device.