A Four Tech Co G3290N 2.4G RF Mouse User Manual G7 16 in One Manual
A Four Tech Co Ltd 2.4G RF Mouse G7 16 in One Manual
Users Manual

User Manual
16-in-One Software
www.a4tech.com
G3-290N
About "16-in-One" software
Consists of value-added functions, such as: Multi-link management, DPI / report rate setting, 4-way
wheel, power-saving management, battery status indication, etc.
Best software for your every need!
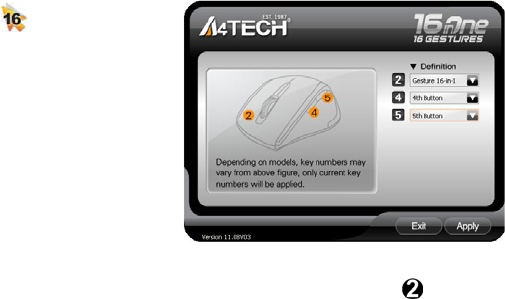
Define the Mouse Buttons
1. Double-click the icon " " at the system tray
to open the “Main Menu”.
2. Select the function you preferred for each
button from the pull-down function list.
3. Store and apply the setting by clicking
"Apply".
4. Click “Exit”.
Gesture 16-in-1
Select “Gesture 16-in-1” from the pull-down function list of the mouse RIGHT button , the setup box
will pop up.
You may set up 16 user-friendly functions/commands to the defined gesture RIGHT button, including
the functions of Keyboard/Mouse simulation, Open a file, Office, Text, Multimedia, Internet, etc.
Press/hold the gesture RIGHT button and draw a line in the direction described to perform the preset
functions/commands.
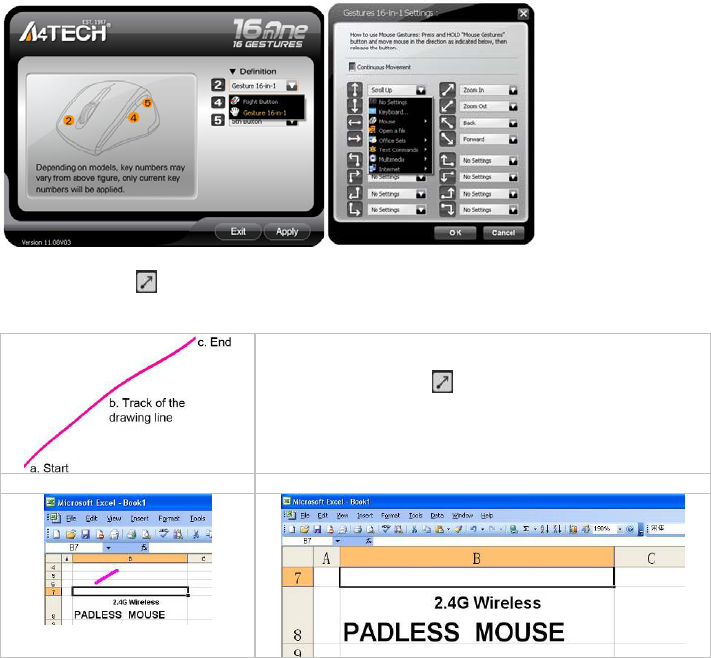
Setup Box
Example: Using as “Zoom In” by default, just press/hold the gesture RIGHT button and draw a
line as shown below, and then release the button, the picture or the document will be zoomed in
immediately.
a. Press/hold the gesture RIGHT button
b. Draw the line as the arrow direction
c. Release gesture RIGHT button
Then the picture has been zoomed in.
Original Zoom In
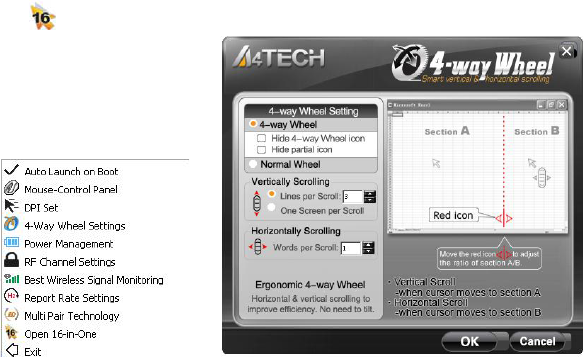
Change the Mouse Wheel to 4-way Wheel
Click the icon at the system tray and select "4-Way Wheel Settings".
a. The 4-way Wheel splits the working screen into 2 areas A and B as shown on the right. When the
cursor locates in area A, the wheel will perform vertical scrolling; when the cursor locates in
area B, the wheel will perform horizontal scrolling
b. You may move the Red split icon to change the ratio of area A and B
(Note: If the "Normal Wheel" is selected, the wheel will perform as a normal mouse wheel, and
“4-way Wheel” function won't be launched.)
Connect New Mice/KBs
The multi-link receiver can link to 3 sets Mice/KBs for specified applications, such as presentation,
meeting or teaching. Please follow the steps to finish the ID pairing of the new mice/KBs.
1) Click the icon " " at the system tray and select "Multi-link Technology".
2) Follow the on-screen instructions to finish the ID pairing and manage the paired devices.
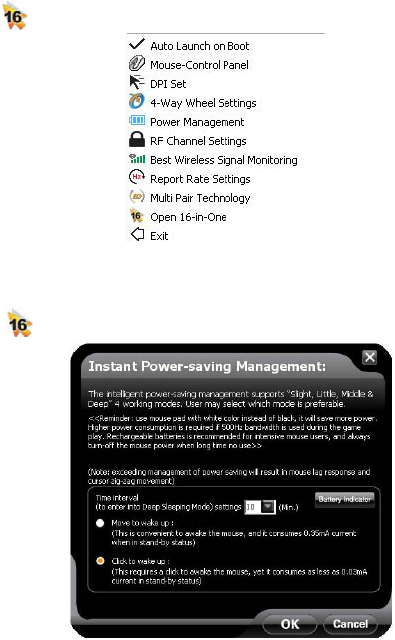
Power-saving Management
1. Click the icon at the system tray and select “Power Management ".
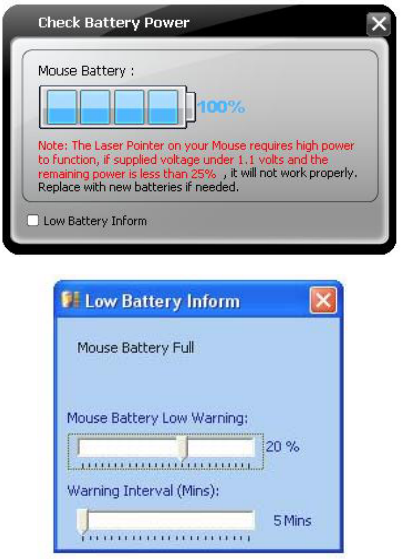
2. Click "Battery Indicator" to see the battery power status.
3. Low battery informs will pop up at the right corner of your screen when battery low.
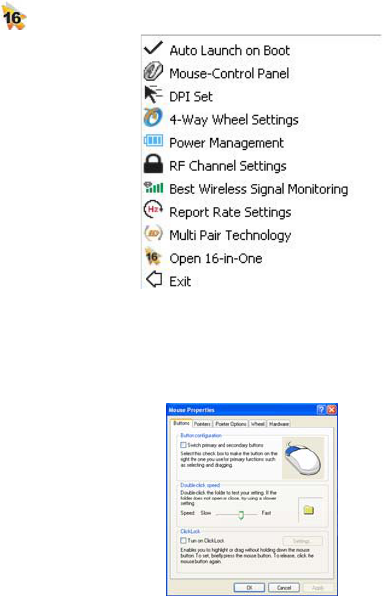
Additional tasks of G7 16-in-One
Click the icon at your system tray, the full task list of 16-in-1 will pop up as shown below:
Auto Launch on Boot
If this task is selected, 16-in-1 will auto-execute when the system boots up.
Mouse-Control Panel
Open "Mouse Properties" of your Windows system, e.g., you may setup mouse pointers and other
often-used mouse settings.
Mouse-Control Panel
Notice:
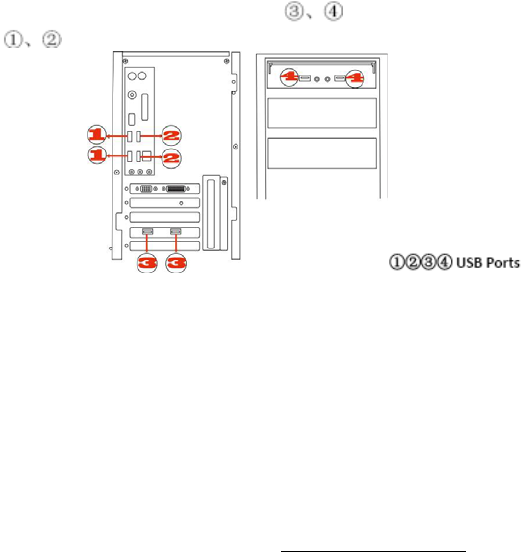
To ensure a good wireless connection, please read below instructions for your reference:
If the wireless mouse is not working smoothly due to wireless conflicts, try below methods to get
improvement.
A) Please plug the Multi-link receiver into to avoid shielding wireless signal instead
of .
B) Use USB extension cable to position the Multi-link receiver at a distance to prevent
electromagnetism interference from devices.
Troubleshooting & FAQ
If the mouse is not working:
1. Make sure the mouse power is on
2. Try another USB port
3. Ensure the Multi-link receiver is inserted
4. Check battery and battery installation
Product Support
Need more technical support? Please go to: http://support.a4tech.com/ and our support team will
respond within 72 hours.
**Features and specifications of all A4TECH products are subject to change without notification.
THIS DEVICE COMPLIES WITH PART 15 OF THE FCC RULES. OPERATION IS SUBJECT TO THE FOLLOWING TWO
CONDITIONS: (1) THIS DEVICE MAY NOT CAUSE HARMFUL INTERFERENCE AND (2) THIS DEVICE MUST ACCEPT
ANY INTERFERENCE RECEIVED, INCLUDING INTERFERENCE THAT MAY CAUSE UNDESIRED OPERATION.
Federal Communications Commission Requirements
The equipment has been tested and found to comply with the limits for Class B Digital Device, pursuant to part 15 of the FCC
Rules. These limits are designed to provide reasonable protection against harmful interference in a residential installation. This
equipment generates uses and can radiate radio frequency energy and, if not installed and used in accordance with the
instruction, may cause harmful interference to radio communication. However, there is no guarantee that interference will not
occur in a particular installation. If this equipment does cause harmful interference to radio or television reception, which can
be determined by turning the equipment off and on, the user is encouraged to try to correct the interference by one or more of
the following measures:
●Reorient of relocate the receiving antenna.
●Increase the separation between the equipment and receiver.
●Connect the equipment into an outlet on a circuit different from that to which the receiver is connected.
●Consult the dealer or an experienced radio/TV technician for help.
THE CHANGES OR MODIFICATIONS NOT EXPRESSLY APPROVED BY THE PARTY RESPONSIBLE FOR COMPLIANCE
COULD VOID THE USER'S AUTHORITY TO OPERATE THE EQUIPMENT.
This device complies with Part 15 of the FCC Rules. Operation is subject to the following two conditions:
(1) This device may not cause harmful interference, and receiver.
(2) This device must accept any interference received, including interference that may cause undesired operation