A Four Tech Co RFKB5 RF Keyboard User Manual start 2
A Four Tech Co Ltd RF Keyboard start 2
users manual
1
Quick Start Guide
Getting Ready
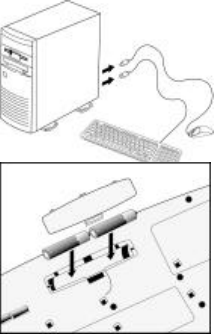
1. Turn off the power of your computer.
2. Remove the existing keyboard (and mouse for the A4Tech® Wireless
Desktop).
3. Install the AA alkaline batteries in the Wireless keyboard. Remove the battery
compartment cover on the bottom of the keyboard by squeezing the cover in
from the tab to release it.
THE MANUFACTURER IS NOT RESPONSIBKE FOR ANY RADIO OR TV INTERFERENCE CAUSED
BY UNAUTHORIZED MODIFICATIONS TO THIS EQUIPMENT.SUCH MODIFICATIONS COULD
VOID THE USER’S AUTHORITY TO OPERATE THE EQUIPMENT.
NOTE: This equipment has been tested and found to comply with the limits for a Class B digital device,
pursuant to part 15 of the FCC Rules. These limits are designed to provide reasonable protection against
harmful interference in a residential installation. This equipment generates. uses and can radiate radio
frequency energy and, if not install and used in accordance with the instructions, may cause harmful
interference to radio communications. However, there is no guarantee that interference will not occur in a
particular installation. If this equipment does cause harmful interference to radio or television reception, which
can be determined by turning the equipment off and on ,the user is encouraged to try to correct the interference
by one or more o the following measures:
-Reorient or relocate the receiving antenna.
-Increase the separation between the equipment and receiver.
-Connect the equipment into an outlet on a circuit different from that to which the receiver is connected.
-Consult the dealer or an experienced radio/TV technician for help.
2
Setting Up the Keyboard or Wireless Desktop
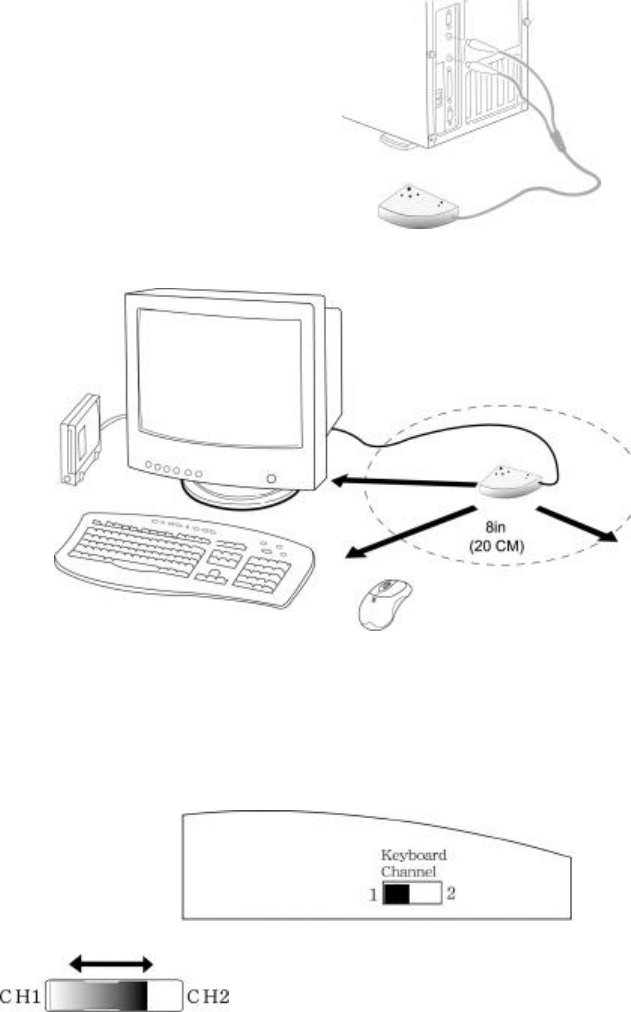
1. Make sure that your computer is turned off.
2. Connecting the Receiver’s Keyboard Cable:
(a) When connecting to an IBM AT keyboard port, use the 5-pin DIN
connector already attached to the keyboard cable.
(b) When connecting to a PS/2-style, 6-pin DIN keyboard port, remove
the AT adapter.
(c) Connect the receiver’s purple keyboard cable to the computer’s keyboard port.
3. Place the receiver eight inches (20
centimeters) from any electromechanical
device.
Installing the Keyboard Software-
iKeyWorksOffice
Before you can take advantage of the many features
your keyboard offers, you must install the driver.
The driver is in the installation diskette that came
packaged with your mouse and keyboard
Windows 95/98/Me/2000/NT4.0 installation
Insert the installation diskette into your floppy disk drive.
Click the Start button and then click Run.
In the Run dialog window, type A:\setup, where “A” is the letter of your floppy disk drive.
Click OK and follow the instructions on your screen to complete the installation.
Selecting the Frequency Channel
The Wireless keyboard operates on two frequency channels..
Refer to the following to change the frequency channel for your
keyboard: Set the frequency channel on the receiver to 1 or 2. Set
the frequency channel on the keyboard to 1 or 2.
The Wireless keyboard ID code
Each keyboard is assigned a unique ID code at manufacture, so the receiver
only picks up the signal from your mouse and prevents other Wireless
keyboard radio signals from operating on your computer. This feature can
also be disabled, allowing other Wireless pointing devices to operate your
computer.

3
Connecting the Wireless Keyboard ID Code
Manually establish communication between the receiver and
keyboard.
(a) Press any key from the keyboard
(b) Press the ID Connect button on the receiver the green LED light
will show you the keyboard ID be connect. If the green LED light is
off then keyboard ID is disconnect.
4
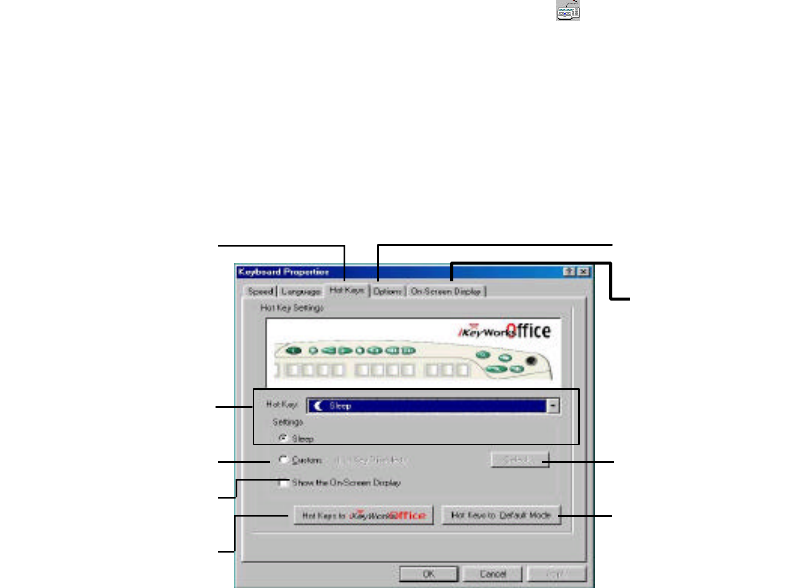
Using the iKeyWorksOffice Software
To launch the iKeyWorksOfficeTM software, double-click the iKeyWorksOffice icon on the Windows
Taskbar.
This iKeyWorksOffice software, brings you closer and keeps you in better touch with your desktop world. Set
up and organize your keyboard in your way. Using the Hotkeys and the iKeyWorksOffice software, customize
your keyboard so you can be at your Internet home page, or favorite chat room, and run your e-mail
application with the push of a button. The Hot Keys are divided into two groups, as defined by their functions.
Access customize function
Hotkeys Setting Options
Setting On-Screen
Hot Keys to default function
Show the On-Screen display
Customize hotkey
System default function
MS Office hotkey group

5
Using the 12 Hot Keys
There are 12 programmable Hot keys, which you must setup the iKeyWorksOffice software before using.
Hot
Keys Default Functions Microsoft Office program functions
My Home key: Accesses your home web page for
favorite internet address Word: Access Microsoft word application
E-mail key: Launches an e-mail application E-mail key: Launches an e-mail application
Favorite key: Starts an application, accesses a web site
and web sites + Font Size: Increase font size.
Search key: Displays a menu of internet search
engines - Font Size: Decrease font size.
Previous Track Key: Plays the previous track. Next Doc.: Open next document
Next Track key: Plays the next track. Previous Doc.: Open Previous Document
Play/Pause key: Plays or pauses the CD/DVD. Excel: Access Microsoft Excel application
Stop key: Stops play. Open document: Access my documents
Volume Up key: Increase sound volume. Zoom In: To magnify the view of a
document.
Volume Down key: Decreases sound volume. Zoom Out: To demagnify the view of a
document.
Mute key: Dramatically reduces the sound volume. My Document: Access the My Document
function
Suspend key: Access the Windows Shut Down dialog
box, where you can put your system on stand-by or
shut down windows.
Office Tools: Show the Office tools
6
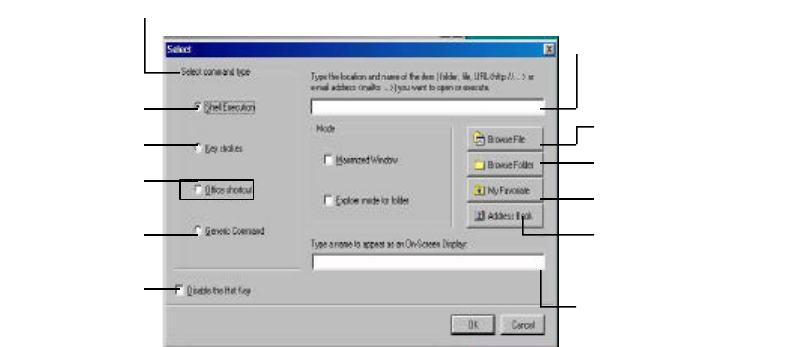
Customize your Hot Keys
You can define the hotkey as Shell Execution, Keystrokes, Office shortcut and Generic Command to meet
your personal needs.
Customize your Hotkeys
Keystrokes
Generic Command
Disable the Hot key Show the name of the hot key
Email address book
Type the name of file, folder …
Browse File
Browse Folder
My favorite
Select command type
Shell execution
Office shortcut