A Four Tech Co RW29 RF Mouse User Manual Manual
A Four Tech Co Ltd RF Mouse Manual
UserManual.wiki
>
A Four Tech Co
>
RW29 User Manual
Manual
Navigation menu
Upload a User Manual
Namespaces
Wiki Guide
HTML
PDF
Info
Views
User Manual
Discussion / Help
Navigation

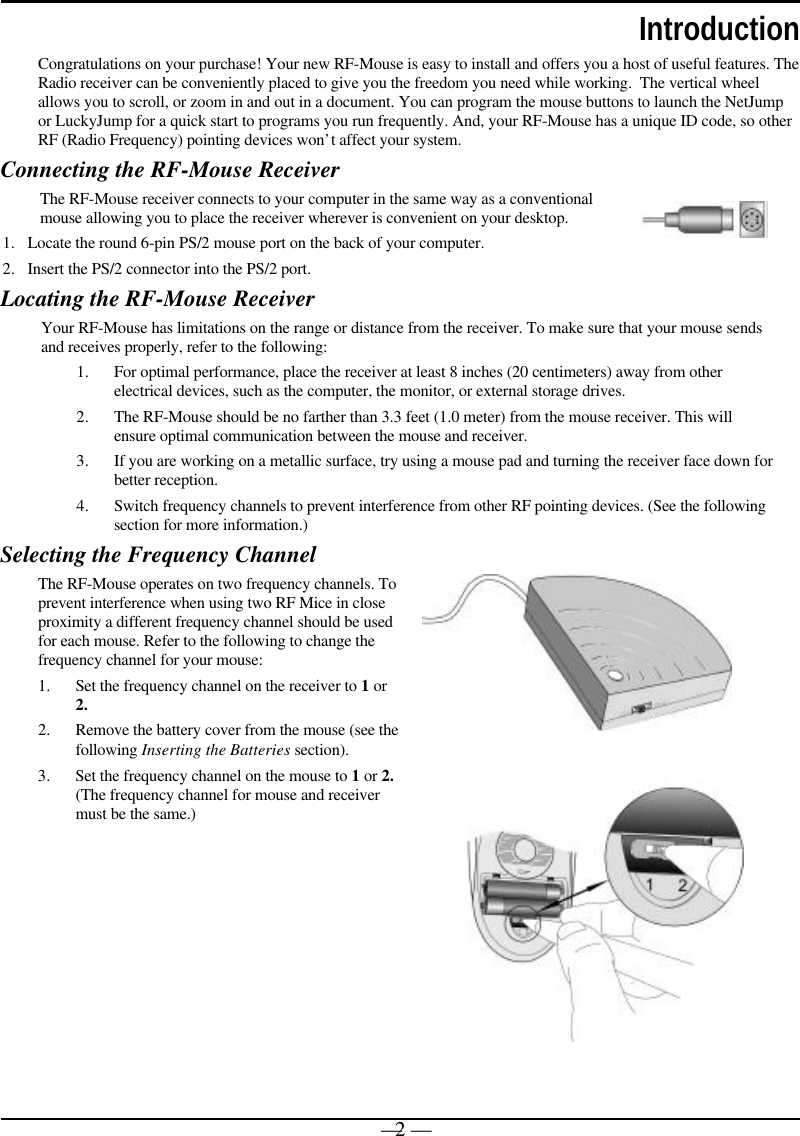
![— 3 —Inserting the BatteriesThe RF-Mouse uses two AAA batteries. For best performance, use onlyalkaline batteries. Refer to the following to insert the batteries:1. Press the tab on the bottom of the mouse cover as shown here andremove the cover.2. Insert the two AAA batteries. (The correct polarity is indicated onthe battery compartment casing.)3. Replace the cover.Checking the Batteries powerTo check the battery power, right-click the mouse icon in the Taskbar.Choose the “Check RF-Mouse Status” option to display the RF-Mouse Statuswindow. The current battery percentage charge is shown.Installing the Mouse SoftwareBefore you can take advantage of the many features your mouse offers, you must install the driver. The driver is onthe installation diskette that came packaged with your mouse.Windows 95/98/2000/NT4.0/Me installation1. Connect the mouse to your computer.2. Insert the installation diskette into your floppy disk drive.3. Click the Start button and then click Run.4. In the Run dialog window, type A:\setup, where “A” is the letter of your floppy disk drive.5. Click OK and follow the instructions on your screen to complete the installation.The RF-Mouse ID codeEach RF-Mouse is assigned a unique ID code at manufacture, so the receiver only picks up the signal from your mouseand prevents other RF-Mouse radio signals from operating on your computer. This feature can also be disabled, allowingother RF-pointing devices to operate your computer.Connecting the RF-Mouse ID CodeWhen the driver installation is finished your computer reboots and the RF-Mouse window (shown on the right) appears.CONNECT ID: Move the RF-Mouse for a few seconds to establish aconnection, then click Connect ID. The unique ID code of your mouse isrecognized and another RF pointing device will not function on your computer.Exit: Click Exit if no other RF pointing devices are within 3 meters range or ifyou want other RF pointing devices to be able to access your computer.Changing the RF-Mouse ID CodeYou can use a new RF-Mouse on your computer without changing the Radio receiver; you just need to change the ID code.Refer to the following:1. Press [Shift + Alt + F11] or [Shift + Alt + F12] to call up the RF-Mouse ID Code window.2. Move the RF-Mouse for a few seconds to establish a connection, then click Connect ID.3. The new ID code is Connected and the RF-Mouse window closes.](https://usermanual.wiki/A-Four-Tech-Co/RW29/User-Guide-115694-Page-4.png)

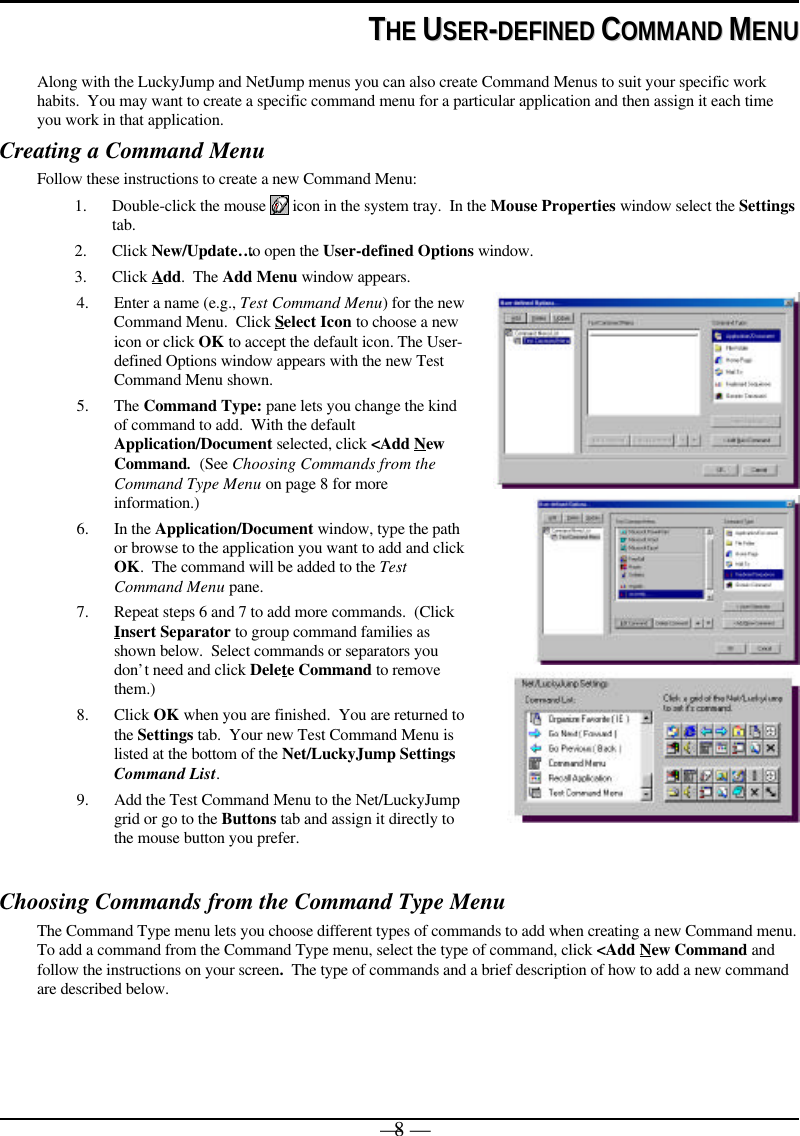
![— 5 —IIWWHHEEEELLWWOORRKKSS DDOOEESS TTHHEE HHEEAAVVYY WWOORRKK!!With iWheelWorks driver/software installed, your Mouse is transformed into much more than just a pointing device.See how easy scrolling through long documents or panning in drawing applications becomes when using the scrollwheels. Office users should love this feature—use the vertical wheel to scroll through your document then just pressthe [Ctrl] key and use the same wheel to zoom in for a close look. It even works in print preview! The third buttoncan be programmed to launch NetJump or LuckyJump—two customizable toolbars that open all those useful programsthat you need so often with just one click. And, in easy-to-follow steps, create your own Command Menu and withone click put all your favorite programs right under the cursor!The following table provides an overview of the mousefunctions.Function Description Here’s how to do itVerticalScrollLets you scroll up ordown in the currentapplication window.To scroll up, move the vertical wheel forward; to scroll down,move the wheel back. See Wheel Tab on page 7 for moreinformation.HorizontalScrollLets you scroll to theleft or right in thecurrent applicationwindow.To scroll left, move the horizontal wheel forward; to scroll right,move the wheel back. See Wheel Tab on page 7 for moreinformation.AutoScroll Use AutoScroll inOffice 97-compatibleapplications to scrollthrough largedocuments.Activate AutoScroll from LuckyJump or NetJump. TheAutoScroll icon appears over the vertical scrollbar. Move themouse in the direction you want to scroll. The farther you movethe AutoScroll icon from the starting point, the faster thescrolling. To stop AutoScroll, press any mouse button.Zoom Lets you zoom in orout when usingapplications thatsupport zoomfunction.In the Mouse Properties window select the Wheel tab andcheck the “Wheel Zoom for Office 97/2000” option (if youdon’t check this option you can hold the [Ctrl] key whilezooming with either scroll wheel). Then use the horizontalwheel to zoom in and out. See Wheel Tab on page 7 for moreinformation.LuckyJump With one click youcan choose from arange of commonlyused commands tolaunch.In the Mouse Properties window select the Buttons tab andthen assign LuckyJump in the drop-down menu for the desiredbutton. See Settings Tab and Executing LuckyJumpCommands on page 7 and Take Your mouse on a Test Run onpage 10 for more information.NetJump Lets you choose fromcommands commonlyused for Webbrowsing.In the Mouse Properties window select the Buttons tab andthen assign NetJump in the drop-down menu for the desiredbutton. See Settings Tab and Executing NetJump Commandson page 7 and Take Your mouse on a Test Run on page 10 formore information.CommandMenuCreate your ownCommand Menu forlaunching all yourfavorite programs.In the Mouse Properties window select the Settings tab andthen click New/Update. Follow the instructions on your screen.See Creating Your Own Command Menu on page 8 for moreinformation.](https://usermanual.wiki/A-Four-Tech-Co/RW29/User-Guide-115694-Page-6.png)
![— 6 —MMOOUUSSEE PPRROOPPEERRTTIIEESS SSEETTTTIINNGGSSFrom the Mouse Properties window you can customize many settings for your mouseincluding button assignments, scroll wheels and cursor movement. To open the MouseProperties window double-click on the mouse icon in the system tray. The MouseProperties window has six tabs that are described below.System TrayButtons TabButton Assignments: Click the down arrow to select the preferredfunction for each button. (See the Settings Tab for more information.)Double Click Speed: Increase the speed for executing a double-click.Button Configuration: Configure your mouse for left- or right-hand use. The default setting for buttons 1 and 2 will be reversed.Ø Note! The particular mouse you purchased may differ somewhat fromthe illustration shown in the Buttons tab. The third button onsome models is positioned under the vertical scroll wheel insteadof at the side as shown here.Pointers TabThe Pointers tab lets you change the way the cursor appears. Click thedown arrow under Scheme and choose the setting you want. Theavailable pointers for each scheme are shown in the pane below. You canbrowse to additional pointers, then create your own scheme using theSave As button.Motion TabPointer Speed: Lets you adjust how fast the cursor moves on thescreen.SnapTo Button: Check this box to automatically have the cursormove to the default button in each new dialog box or window.Sonar: When this box is checked, pressing and releasing the [Ctrl] keywill highlight the cursor.Trails: Check this box when you want your cursor to display pointertrails. This option is useful when using an LCD display that can makethe cursor difficult to see.](https://usermanual.wiki/A-Four-Tech-Co/RW29/User-Guide-115694-Page-7.png)
![— 7 —Wheel TabWheel Mode: Select the Enhanced Dual Wheel 4D Wheel functionmode radio button to enable both vertical and horizontal wheels. When theMS-IntelliMouse Compatible mode radio button is selected only the verticalwheel will function.Swap Vertical and Horizontal Wheel: Check this box to swap thefunctions of the Horizontal and Vertical Wheels.Vertical Wheel/Horizontal Wheel: Check the Reverse scrollingdirection box to change the scrolling direction when you turn the scrollwheel. Select the Scroll or Scroll one “page” per scroll unit radio button toset the scrolling speed to suit your work habits.Wheel Zoom for Office 97/2000: Check this box to use thehorizontal wheel to zoom in and out when using applications that supportthis function. You can still use the wheel to scroll horizontally bypositioning the cursor over the horizontal scroll bar. When this option isunchecked, you must press the [Ctrl] key while turning the horizontal wheelto use the zoom function.Settings TabCommand List: Shows all the available commands (including User-defined Command Menus) that you can assign to either the NetJump orLuckyJump grids.NetJump (top grid): The NetJump grid groups commonly used Web-browsing commands. To change a command, select a new one from theCommand List and click on the icon in the grid that you want to change.LuckyJump (bottom grid): The LuckyJump grid groups all-purposecommands. To change a command, select a new one from the CommandList and click on the icon in the grid that you want to change.User-defined Command Menu: Here you can create your owncommand menu to suit your specific needs. Click on New/Update… andfollow the onscreen instructions.Apply Net/LuckyJump or the User-defined Command Menu you define herefrom the Buttons tab.Executing NetJump CommandsNetJump combines commonly used tasks for Web browsing into one convenient grid and puts them right under thecursor. To use NetJump, open the Mouse Properties window and select the Buttons tab. Assign NetJump in thedrop-down menu of the button you want. Click OK to close the Mouse Properties window. Now click the assignedbutton to open the NetJump grid and execute your command. (See the Settings Tab section above for instructions oncustomizing NetJump.)Executing LuckyJump CommandsLuckyJump combines commonly used tasks for Windows environments into one convenient grid and puts them rightunder the cursor. To use LuckyJump, open the Mouse Properties window and select the Buttons tab. AssignLuckyJump in the drop-down menu of the button you want. Click OK to close the Mouse Properties window.Now click the assigned button to open the LuckyJump grid and execute your command. (See the Settings Tabsection above for instructions on customizing LuckyJump.)](https://usermanual.wiki/A-Four-Tech-Co/RW29/User-Guide-115694-Page-8.png)

![— 10 —Adding a Keyboard Sequence Shortcut CommandIn Office applications many users are accustomed to using keyboard commands such as the copy command, [Ctrl] +[C] or the paste command [Ctrl] + [V] directly from the keyboard. However, to spare you from having to rememberall these keyboard shortcuts you can add them to your Test Command Menu. Refer to the following to add aKeyboard Sequence command.1. Double-click the mouse icon in the system tray. In the MouseProperties window select the Settings tab.2. Click New/Update… to open the User-defined Options window.3. Select Keyboard Sequence in the Command Type pane and click <AddNew Command.4. In the Keyboard Sequence window type a name for the command. ClickRecord and then type in the keyboard sequence. To apply the “Underline”command as shown below, type: [Ctrl] + [Shift] + [W].5. Click Stop when you are finished and then click OK.6. Repeat steps 3 to 5 to add more Keyboard Sequence commands to your TestCommand Menu.7. When you have finished adding commands, close the User-defined Optionswindow and the Mouse Properties window.8. Open your Office application and select some text. Select the UnderlineKeyboard Sequence command from your Test Command Menu.9. The text you selected is now underlined.TTAAKKEE YYOOUURR MMOOUUSSEE OONN AA TTEESSTT RRUUNNFor this “Test Run” the LuckyJump grid will be customized to demonstrate how much easier working with themouse can be. Refer to the following to customize either the LuckyJump or NetJump grid:1. Double-click the mouse icon in the system tray. In the Mouse Propertieswindow select the Settings tab.2. You will see the default settings for LuckyJump. Scroll to Help in theCommand List and select it.3. Move the cursor to the LuckyJump grid and click the bottom-left Documentsitem. Notice the cursor changes to a “Pointing finger” and the Documentsicon is replaced with the Help icon.4. Now scroll to the end of the Command List and assign the Test CommandMenu to the LuckyJump grid in the same way. (See Creating Your OwnCommand Menu on page 8 if you have not already created a Test CommandMenu.)5. Continue customizing the LuckyJump menu by assigning commands from theCommand List to the LuckyJump grid.6. After you have added all the commands you want, click on the Buttons taband assign LuckyJump to the button you want. (In most cases you will assignLuckyJump to the third button. Most users prefer to leave the default ContextSensitive Help setting on the second button.)7. Click OK to close the Mouse Properties window.8. Now, just press the mouse button assigned to LuckyJump and the LuckyJumpgrid opens right under the mouse cursor. (Move the mouse over each item inthe grid for a description.)Some of the commands in LuckyJump are described in more detail below.](https://usermanual.wiki/A-Four-Tech-Co/RW29/User-Guide-115694-Page-11.png)