AAPICO ELECTRONICS A1NIGHT Dash cam User Manual
AAPICO ELECTRONICS CO., LTD Dash cam
User Manual
User Manual for GoTrec A1 Nite
High-Definition MINI Car Dashcam
Product Features:
The car dashcam of our company is convenient for use in various scenarios for the
purpose of taking photographs, video recording, voice recording and taking high-
definition snapshots at anytime, anywhere.
Seamless transition between files without missing any instant
SOS emergency data protection functionality
G-sensor recording clip locking functionality upon collision detection
1.5 inch LTPS TFT LCD
High-definition wide-angle camera lens
4x digital zoom
Video format: MOV
Built-in microphone (speaker)
Supports video recording while charging
Supports high-capacity TF micro SD memory card
Supports motion detection recording functionality
Supports parking surveillance functionality
Supports surge protection functionality during start up of the car
Supports night vision (high-definition, black-and-white night vision, colour night
vision, configurable)
Built-in WIFI connectivity
Product Description
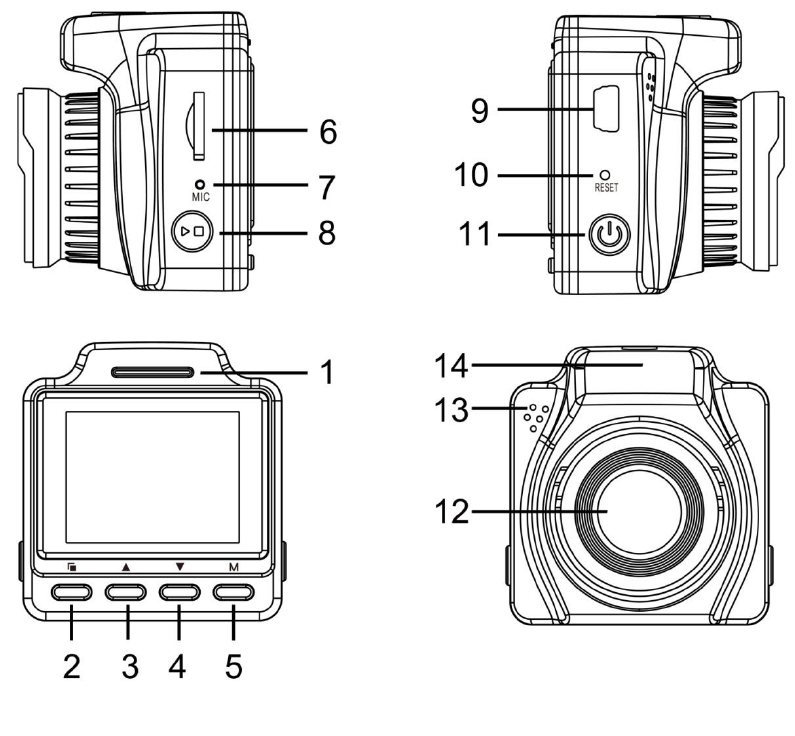
Product Structure
1) Indicator light 2) Menu button
3) UP button 4) DOWN button
5) Mode selection button 6) TF card slot
7) MIC voice recording receiver 8) OK confirmation button
9) USB data port 10) Reset button
11) Power switch 12) High-definition lens
13) Speaker
Buttons and Functional Descriptions:
1) Status indicator
The blue indicator on the left will illuminate when the unit is turned on, and the
blue light flashes during recording;
The red indicator on the right is illuminated when the unit is being charged, with
the red light going off once the battery is fully charged;
2) Menu button
Press this button to bring up the menu for function settings;
Press this button repeatedly to switch between the settings;
During the process of recording, pressing this button will encrypt the current
video file;
3) UP selection button
On the menu selection, use this button to move up the list;
On standby mode, this allows for digital zoom in
4) DOWN selection button
On the menu selection, use this button to move down the list;
On standby mode, this allows for digital zoom out;
Press this button during video recording to turn on or turn off voice recording;
5) Mode selection button
Press this button to switch between video recording/taking photo/playback
6) TF card slot
Memory card slot
7) MIC
Voice recording receiver
8) OK confirmation button
Confirmation button for recording and taking photograph. Under the video
recording mode, press this button to start recording and press again to stop
recording; under the photography mode, press this button to take pictures; this
is used as the confirmation button under menu mode;

9) USB data port
The USB data port is used for (1) connecting with PC for data transfer; (2)
connecting the external power source for battery charging or equipment
operation;
10) Reset button
Button to reset the equipment if it is frozen.
Power switch button
Press to turn the equipment on or off; in standby mode, press and hold (for
more than 5 seconds) to turn on or off WIFI connectivity.
Description of Special Functions:
G-sensor functionality
When gravitational acceleration (1g = 9.80 m/s2) is experienced, the equipment
will automatically lock the recording clip and save the video captured during the
incident into a file that cannot be deleted;
The option for G-sensor can be selected in the menu and this equipment
provides the following settings: 4 levels of sensitivity for selection with Off, Low,
Medium or High as options. Default factory setting is Medium;
SOS function
When the button is pressed during the process of video recording, the
equipment will encrypt the current video and save it as a file that cannot be
deleted. The screen will show the icon when this happens;
Turning on/off automatically
Enabling automatic power on of the equipment to start video recording once the
ignition is on. Once the ignition has been switched off, video recording will be
extended for a further 5 seconds before it is saved automatically and then the
equipment turns off by itself;
WIFI functionality
1. In the standby mode, press the function button to go into the menu
selection. Then select WIFI functionality and press to confirm to go into the WIFI
mode. The following will be displayed:

Through a dedicated APP on mobile phone, connectivity with this equipment can be
established to allow for operations via the mobile phone.
Under the WIFI mode, press to select WIFI-OFF and then press the confirmation
button to exit the WIFI mode.
2. In the standby mode, press and hold the power switch for more than 5 seconds to
go into the WIFI mode.
Under the WIFI mode, press and hold the power switch for more than 5 seconds to
exit the WIFI mode.
Night Vision
Adding night vision option in the function menu
1. OFF to turn off the night vision functionality to enter the normal high-
definition recording mode. Once the night vision functionality has been turned
off, the icon will be illuminated on the screen.
2. Colour night vision functionality: When the ambient brightness has become
lower than a certain level and remain for more than 5 seconds, the equipment
will automatically switch the IR CUT, and go into colour night vision mode. When
the ambient brightness exceeds a certain level for more than 5 seconds, the
equipment will automatically switch the IR CUT, and return into the normal high-
definition colour mode. Once the colour night vision mode has been turned on,
the icon will be illuminated on the screen.
3. Black-and-white night vision functionality:
When the ambient brightness has become lower than a certain level and remain
for more than 5 seconds, the equipment will automatically switch the IR CUT,
and go into black-and-white night vision mode. When the ambient brightness
exceeds a certain level for more than 5 seconds, the equipment will
automatically switch the IR CUT, and return into the normal high-definition
colour mode. Once the black-and-white night vision mode has been turned on,
the icon will be illuminated on the screen.
Parking Surveillance Functionality
Press the button and set the Parking Surveillance function in the menu. Select
On and press button to confirm. The icon is illuminated once the Parking
Surveillance functionality is activated. When the car is left on its own, upon
sensing minor vibration, the equipment will automatically turn on and start
video recording for 20 seconds before it switches off automatically (when the
Parking Surveillance has been activated, the screen will not be illuminated while
the equipment is turned on, but only the blue indicator is lit up).
Basic Operating Instructions for Video/Photography:
Turning on and turning off the equipment
Press the power switch to turn the equipment on. The blue indicator will
illuminate when it is turned on;
While the equipment is turned on, press the power switch (recording must be
paused if it is being used). The blue indicator will then go off;
Video recording mode
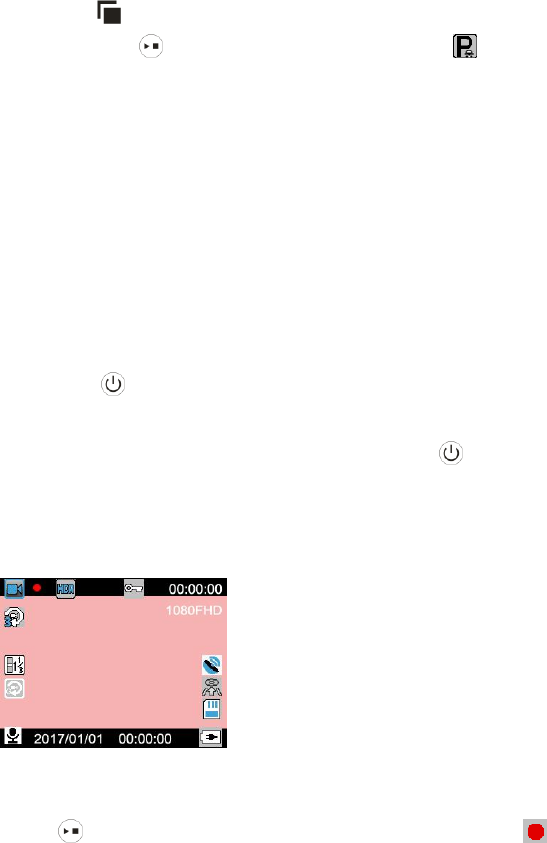
Press the M button to switch to the video mode, as shown in the diagram above.
Press to start video recording, the recording icon will start flashing and at
the same time, the blue indicator will start blinking to go into the recording mode.
Photography mode
Press the M button to switch to the photography mode, as shown in the diagram
below:

Press to take pictures. Every time the screen blinks once, a picture has been
taken.
Video/Photograph Playback
Press the M button to switch to the playback mode. The playback icon will
appear on the top left corner of the screen;
Press the button to scroll to the files above;
Press the button to scroll to the files below;
Press the button to playback the selected video file;
Menu settings
Press the button to bring up the settings menu;
By pressing or button, selections can be done within the settings;
Select the setting item to be updated, press the button to go into that
selection to make changes;
Exiting the settings munu
Press the button, to exit the settings status;
Time setting
By repeatedly pressing the button to go into the settings option, press
button to select date setting and then press to enter into the selection. Press the
button to switch between year/month/day/hour/minute/second. Adjust the number as
required using , press to confirm the changes.
USB Mode
Connect the USB cable to the computer and press the power on button. The car
dashcam will automatically bring out the USB menu with the following options:
USB-Disk: Video or photograph files can be retrieved and saved using this mode.

Description for Battery Use
Refer to illustrations below for battery status indicator:
Full battery power Battery power is slightly lower
Battery power is low Battery is out of power
There are three ways to charge the battery. The red charging indicator will
illuminate throughout the process of charging. The entire charging duration
takes approximately 120 minutes. The red charging indicator will go off
automatically once charging is completed.
1: Charging using power adapter
2: Charging using PC-USB
3: Charging using car power source
Remark: When the equipment shuts down due to improper operations of the
product, it can be returned to normal operation by removing the battery or
pressing the reset button, and then power on again.
Product Specifications
Product special characteristics
High-definition camera lens, high-definition
video recording
G-sensor
Built-in (Emergency saving of data in the
event of accidents, without the data being
deleted)
Dimensions of LCD display
1.5 LTPS 4:3
Lens
Wide angle lens of 145 degree, 6g, aperture
F1.8
Language
Supporting languages of many countries
File format
MOV
Recording resolution
Built-in lens with 2 megapixels
Video recording format
H.264, Audio: AAC
Colour effect
Standard
Seamless loop recording
Seamless loop recording without missing any
instant
Synchronised power on and off
with car
Power on when car engine is ignited, delayed
power off when car engine is switched off

Motion detection function
Supported
Time indication in
year/month/day/minute/second
Supported
Memory card
TF (Maximum supported capacity 32GB)
Photography mode
12 megapixels
Photograph format
JPEG
Microphone
Supported
WIFI functionality
Connectivity with mobile phone enabled
(optional)
High-definition night vision
Black-and-white night vision, colour night
vision, configurable
Parking surveillance
Supported
Light source frequency
50Hz/60Hz
USB functionality
USB-Disk
Power source connection
5V 1A
Battery
Built-in 170mAh
Trouble Shooting:
If the following problems occur under normal operating conditions, please refer
to the solutions below:
Unable to take photographs or record videos
Check if the capacity of the TF card is sufficient or whether it is locked.
Stopping automatically in the middle of recording
Due to the large data size of high-definition videos, use high-speed TF card that is
compatible with SDHC. High-speed TF cards carry the C4 or C6 mark.
While replaying images and videos, “file error” is indicated
Error in the process of saving materials on TF card, thus causing incomplete
saving of file. Use the “formatting” functionality in the video camera to re-format
the TF card.
Blurry images produced
Check if there is dirt or fingerprint on the lens; wipe the lens with paper before
taking pictures or videos.
Images look dark while taking pictures of the sky, water surface and in other
settings
Environments with significant contrast will affect the automatic exposure
functionality of the camera. This is be rectified by adjusting the “EV” value in the
settings menu of the equipment.
Colour output is somewhat lacking in cloudy environment and under interior
lightings
Check the “white balance” function of the equipment and set it as automatic.
Images with interference that appears as horizontal lines
This is due to wrong setting for “light source frequency”. Modify the setting as
“50Hz” or “60Hz” in accordance with the frequency of local power supply.
Equipment shutdown
Press the reset button to reboot the equipment.
Parts Included Within the Packaging:
1. Multi-function high-definition car dashcam
2. MINI support
3. 5V, 1.5A high-capacity car charger
4. User manual for the car dashcam
5. USB data cable

FCCCaution
Thisdevicecomplieswithpart15oftheFCCRules.Operationissubjecttothe
followingtwoconditions:(1)Thisdevicemaynotcauseharmfulinterference,and(2)
thisdevicemustacceptanyinterferencereceived,includinginterferencethatmay
causeundesiredoperation.
AnyChangesormodificationsnotexpresslyapprovedbythepartyresponsiblefor
compliancecouldvoidtheuser'sauthoritytooperatetheequipment.
Note: ThisequipmenthasbeentestedandfoundtocomplywiththelimitsforaClass
Bdigitaldevice,pursuanttopart15oftheFCCRules.Theselimitsaredesignedto
providereasonableprotectionagainstharmfulinterferenceinaresidentialinstallation.
Thisequipmentgeneratesusesandcanradiateradiofrequencyenergyand,ifnot
installedandusedinaccordancewiththeinstructions,maycauseharmfulinterference
toradiocommunications.However,thereisnoguaranteethatinterferencewillnot
occurinaparticularinstallation.Ifthisequipmentdoescauseharmfulinterferenceto
radioortelevisionreception,whichcanbedeterminedbyturningtheequipmentoff
andon,theuserisencouragedtotrytocorrecttheinterferencebyoneormoreofthe
followingmeasures:
-Reorientorrelocatethereceivingantenna.
-Increasetheseparationbetweentheequipmentandreceiver.
-Connecttheequipmentintoanoutletonacircuitdifferentfromthattowhichthe
receiverisconnected.
-Consultthedealeroranexperiencedradio/TVtechnicianforhelp.
ThisequipmentcomplieswithFCCradiationexposurelimitssetforthforan
uncontrolledenvironment.Thisequipmentshouldbeinstalledandoperatedwith
minimumdistance20cmbetweentheradiator&yourbody.