ACE BAYOU 51XXX X ROCKER/V ROCKER GAME CHAIR/AUDIO RECLINER User Manual XVM51XXX
ACE BAYOU CORP. X ROCKER/V ROCKER GAME CHAIR/AUDIO RECLINER XVM51XXX
XVM51XXX User manual

06109
Need Help? Email: service@acebayou.com Web: www.thexrocker.com Phone: 866.969.2603
Need Help? Email: service@acebayou.com Web: www.thexrocker.com Phone: 866.969.2603
FEATURES
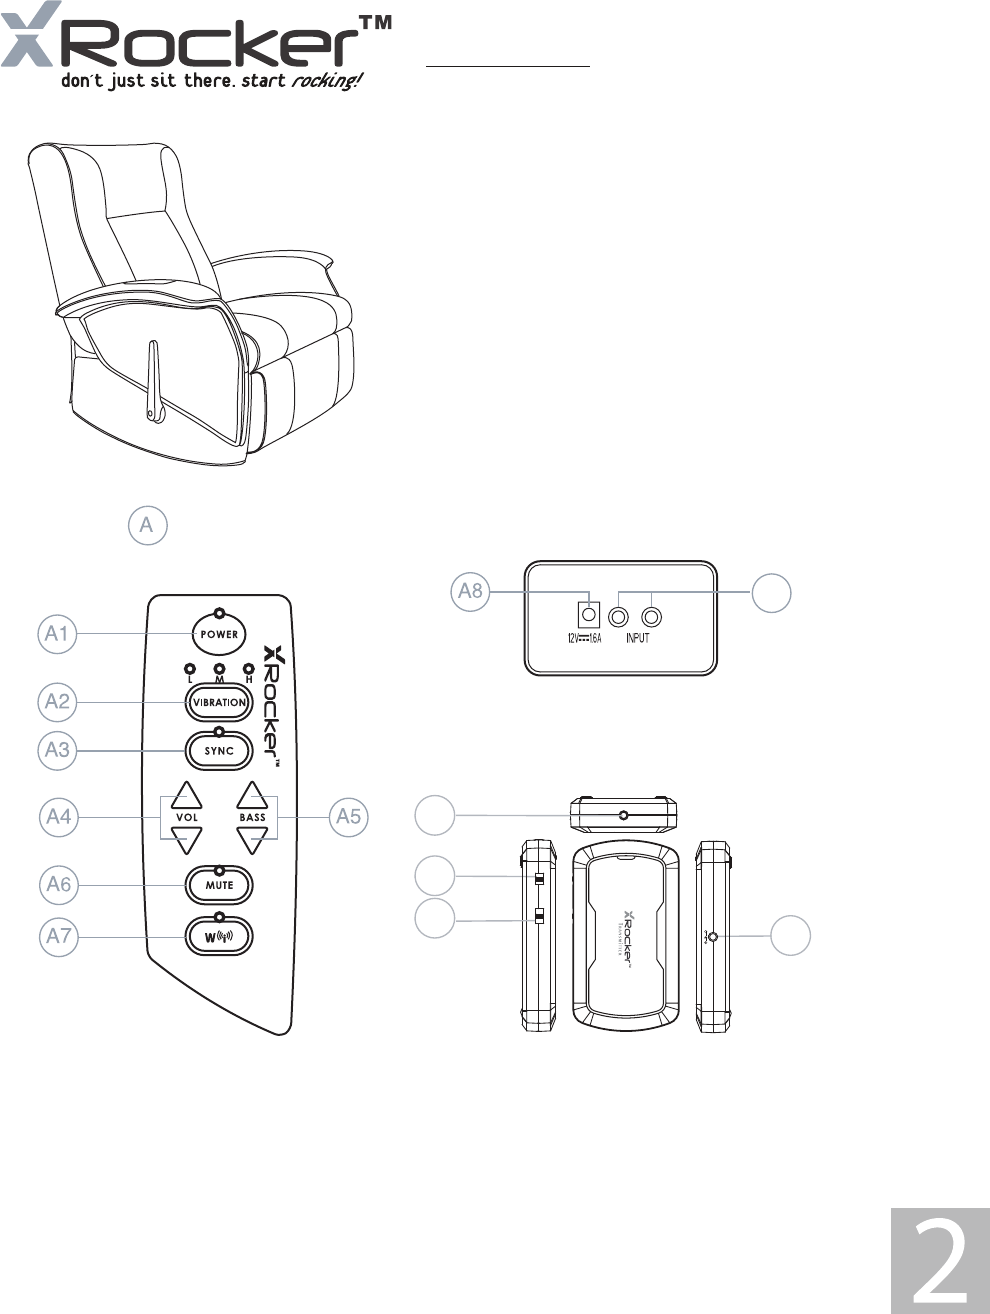
A-Control Panel
A1-Power On/Off
A2-Vibration Mode
A3-Vibration & Music SYNC Mode
A4-Volume Adjustment
A5-Bass Volume Adjustment
A6-Mute Mode
A7-Wireless Mode
A8-12V DC Power Input Jack
A9-Audio Input Jack
A10-DC 3V/200mA Power Input Jack of Transmitter
A11-Audio Input Jack of Transmitter
A12-Power On/Off Switch of Transmitter
A13-Wireless Band Switch of Transmitter
A9
A12
A11
A10
A13
AUDI O IN
OFF/ ON
BAND
1 2 3
…… ……
DC IN DC 3V
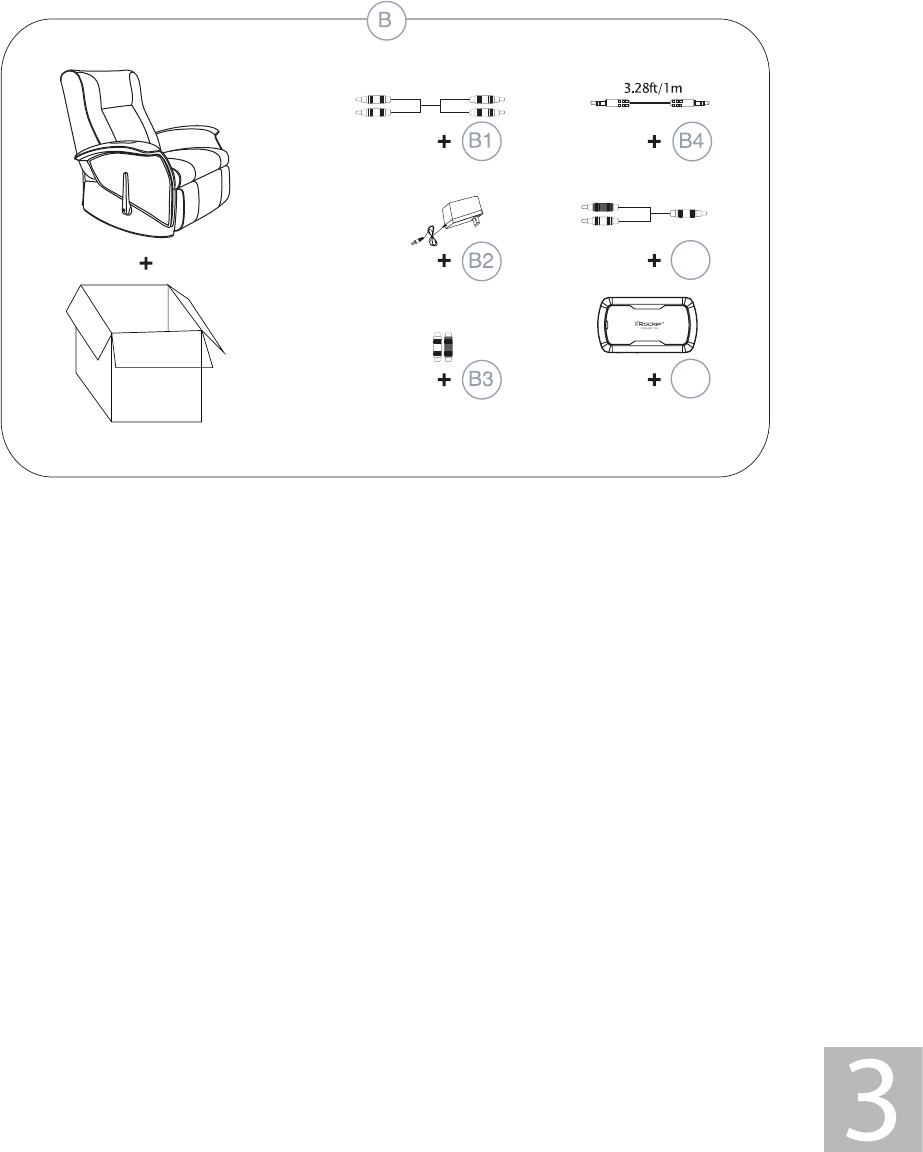
B1-3m RCA Stereo Male to RCA Stereo Male Plug Cable(1 PC)
B2-INPUT:120V AC 60Hz
OUTPUT:12V DC 1.6A Main POWER Adapter.
B3-RCA Female-to-Female Plug Adapter(2 PCS)
B4-1m 3.5mm Stereo Male to Male Cable
B5-0.15m RCA stereo Male to 3.5mm Stereo Male Cable(1PC)
B6-Transmitter Box
B-Accessories Supplied
The Unit Specification
Signal-to-Noise Rate(Amplifier): Subwoofer :>50dB
Satellite :>60dB
Frequency Response: 60Hz~15kHz
Distortion: Subwoofer: <4%(F=90Hz)
Satellite: <1%(F=1kHz)
Input: DC 12V/1.6A
TX/RX Specification
1) TX Power Supply 3V DC / 200mA
2 X AAA Batteries(BATTERIES ARE NOT INCLUDED)
7;&XUUHQWP$
5;&XUUHQWP$
4) TX Transmission distance:<65ft/20 meters (No buildings or other barriers)
(QYLURQPHQWDOWHPSHUDWXUHеaеЯaЯ
6) Modulation mode: FSK
7;:RUNIUHTXHQF\0+]
5;:RUNIUHTXHQF\0+]
9) TX Power:<10dBM
10) RX Sensitivity:-95dBM
11) RX frequency range: 50Hz~12KHz
12) Second Harmonic Suppression: -40dB
13) Band Quantity: 3 channels
C-Audio Specification
IWm
0.492ft/0.15m
Some parts may vary slightly
B5
B6

Need Help? Email: service@acebayou.com Web: www.thexrocker.com Phone: 866.969.2603
SET UP
FUNCTIONS:
6LGHFRQWUROSDQHOZLWKYROXPHEDVVFRQWUROLQSXWMDFNDQGFKDQQHOFKRLFH
%DFNFRQWUROSDQHOZLWKLQSXWDQGSRZHUMDFNV
+DUGZRRGIUDPHFRQVWUXFWLRQZLWKGXDOOD\HUIRDPFRYHUIRUH[WUDFRPIRUW
(DV\WRFOHDQKHDY\GXW\XSKROVWHU\JUDGHYLQ\OFRYHU
:LUHOHVVDXGLRWUDQVPLVVLRQ
READ BEFORE USAGE:
āAOZD\VPDNHVXUHWKHEDFNUHVWLVORFkHGEHIRUHVLWWLQJLQWKHFKDLU
āE[FHVViYHXVHRIDXGLRHTXLSPeQWFRXOGOHDGWRKHDULQJORVV
ā&KLOGUHQXQGHUWKHDJHRIVKRXOGQRWXVHWKiVSURGXFWZLWKRXWDGXOWVXSHUYiVLRQ
āSWULFWO\IRULQGRRUXVe-GRQRWH[SRVHWRGLUHFWVXQOLJKWPRLVWXUHRUH[WUHPHWHPSHUDWXUHV
ā,IFRYHUEHFRPeVZHWGLVFRQQHFWSRZHULPPHGLDWHO\DQGGRQ'WXVHXQWLOFRPSOHWHO\GU\
ā'RQRWDWWHPSWWRUHPRYHWKHFRYHURUDQ\FRPSRQHQWV5HPRYDORIWKHFRYHURUWDPSHULQJZLWKFRPSRQeQWVSXWV\RXDWULVk
IRULQMXU\RUGHDWKIURPHOHFWULFDOVKRFN
ā:KeQXViQJLQZLUHOHVVPRGHFRQQHFWWKHDXGLRFDEOHWRWKH5X'RNO7FRQQHFWWKHDXGLRLQSXWGLUHFWO\WRWKH5HFOLQHURUWKe
GHYLFHZLOOEH'AMAGE'
ā'RQRWPL[DONDOLQHVWDQGDUGFDUERQ]LQFRUUHFKDUJHDEOHQLFNHO-FDGPLXPEDWWHULHV
ā'RQRWPL[ROGDQGQHZEDWWHULHV
/LIWX5RFNHURXWRIER[
PRVLWLRQWKHFKDLURQWKHIORRU
)ROORZWKHGLDJUDPVEHORZWRDVVePEOHWKHFKDLU
5HYLHZWKHVHWXSGLDJUDPVWRIDPLOLDUL]H\RXUVHOIZLWKWKHX5RFNHUVFRPSRQeQWVDFFHVVRULHVDQGVHWXS
/RFDWHWKHLQSXWSDQHORQWKHEDFNERWWRPFRUQHURIWKHFKDLU:KeQXVHGLQZLUHGPRGHPDNHVXUHWKDWWKHFRQWUROSDQHOLV
QRWPRUHWKDQIWPHWHUVDZD\IURPWKHDXGLRVRXUFHDQGIWPHWHUVDZD\IURPSRZHUVRXUFH
8QSDFNWKHSRZHUDGDSWHU'CVADQGFRQQHFWLWLQWRWKHSRZHURXWOHWWKeQWRWKHSRZHUMDFNRQWKHEDFNSDQHOA
PUHVVWKHSRZHUEXWWRQADQGFRQILUPWKDWWKHSRZHULQGLFDWRUOLJKWALVRQ,QZLUHOHVVPRGHWXUQRQWKeSRZHUA
WRWKH7XER[FRQILUPWKDWLWVLQGLFDWRUOLJKWLVRQWXUQWKHVZLWFKWRDGMXVWWKHFKDQQHO
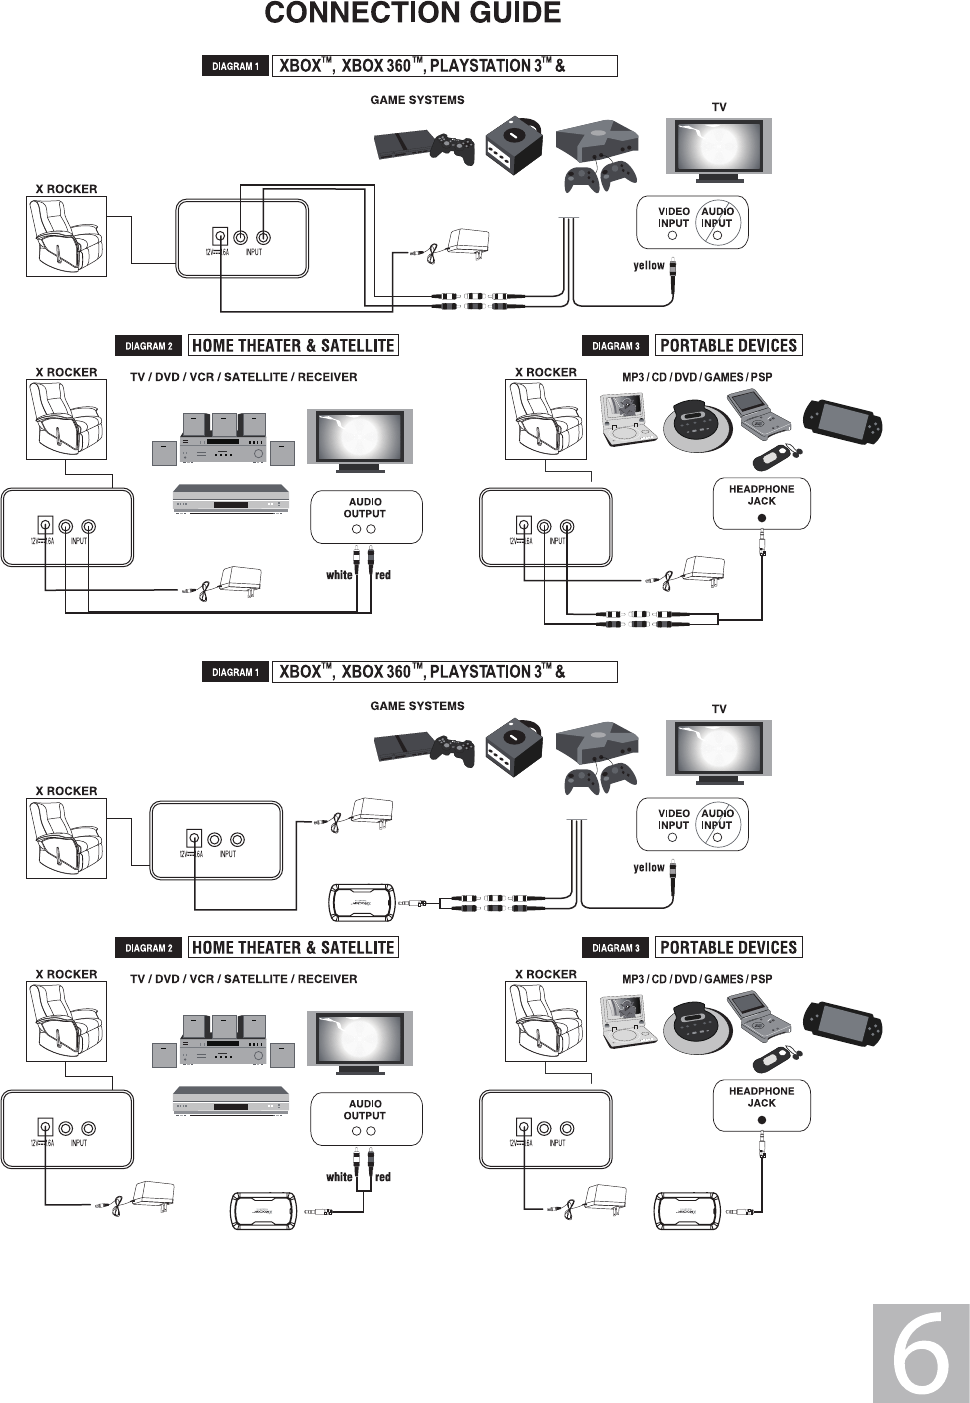
)ROORZWKHGLDJUDPVWRFRQQHFWWKHX5RFNHUWRWKHDXGLRVRXUFHRI\RXUFKRLFHLQZLUHGRUZLUHOHVVPRGH
AGMXVWWKHEDVVDQGYROXPHWR\RXUSUHIHUHQFH
1
A
1
E
1
F
7
G
6
H
1
I
1
B
1
C
1
D
ā&KDQJHVRUPRGLILFDWLRQVQRWH[SUHVVO\DSSURYHGE\WKHSDUW\UHVSRQVLEOHIRUFRPSOLDQFHFRXOGYRLGWKHXVHU·VDXWKRULW\WR
RSHUDWHWKHHTXLSPHQW
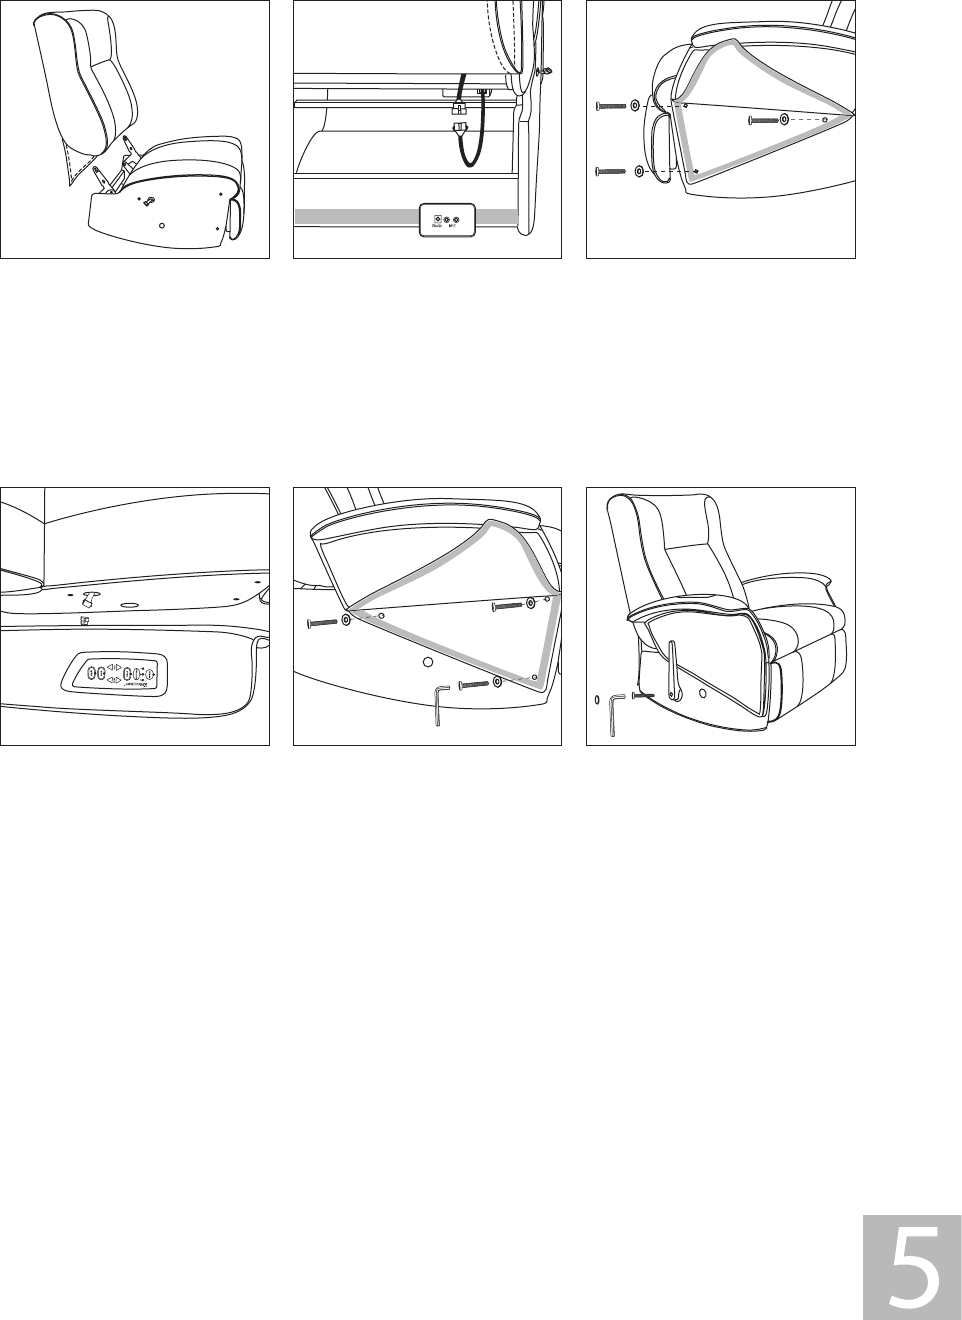
Step 1:
Lift the backrest(B) up, the lower
the backrest into the seat
brackets. Securely lock the flat
head bolts into both sides of the
seat(A).
Step 2:
Connect the cable between the
seat(A) and backrest(B). Make
sure the terminal is fully
inserted. Then attach the Velcro
flap.
Step 3:
Open the Velcro flap of left
armrest(C). Attach the left
armrest to the seat using the
parts shown in the illustration.
Tighten the bolts with Allen
wrench(I) provided.
Step 4:
Connect the cable between the
seat(A) and right armrest(D).
Make sure the terminal is fully
inserted.
Step 5:
Open the Velcro flap of right
armrest(C). Attach the right
armrest to the seat using the
parts shown in the illustration.
Tighten the bolts with Allen
wrench(I) provided.
Step 6:
Attach the handle, please pay
careful attention to the drawing
to be sure you position it
correctly. Insert the bolt and
tighten it with the Allen wrench
provided. Push the plastic cap (F)
into the bolt hole to finish the
assembly.
Need Help? Email: service@acebayou.com Web: www.thexrocker.com Phone: 866.969.2603
white
red
Wii
white
red
white
red
Wii
Need Help? Email: service@acebayou.com Web: www.thexrocker.com Phone: 866.969.2603
Need Help? Email: service@acebayou.com Web: www.thexrocker.com Phone: 866.969.2603
This warranty covers all defects in material and workmanship in this product, but DOES NOT COVER the following:
1. Damage, deterioration or malfunction resulting from:
a. Acts of God, accident, misuse, abuse, negligence, improper installation, maintenance or operation, or
failure to follow the instructions contained in this Owners Manual.
b. Any damage in the shipment of the products. (Claims must be presented to the carrier)
c. Repair, attempted repair, or modifications by anyone other than the Ace Bayou Service Center.
2. Any unit which has been modified of attempted to be modified or altered in anyway whatsoever.
3. Normal wear and periodic maintenance.
4. Any unit used for industrial or commercial purposes (including rental).
5. Products sold AS IS or WITH ALL FAULTS, or consumables (such as fuses, batteries, etc).
6. Customer instruction installation, set up adjustments or signal reception problems
WARRANTY PAGE
REPAIR OR REPLACEMENT AS PROVIDED UNDER THIS WARRANTY IS THE EXCLUSIVE REMEDY OF THE CONSUMER. ACE BAYOU
SHALL NOT BE LIABLE FOR ANY INCIDENTAL OR CONSEQUENTIAL DAMAGES FOR BREACH OF ANY EXPRESSED OR IMPLIED
WARRANTY ON THIS PRODUCT. EXCEPT TO THE EXTENT PROHIBITED BY APPLICABLE LAW, ANY IMPLIED WARRANTIES,
INCLUDING WARRANTIES OF MERCHANTABILITY AND FITNESS FOR A PARTICULAR PURPOSE, ARE LIMITED IN DURATION TO
THE LENGTH OF THIS WARRANTY.
Ace Bayou will repair or replace (at its discretion) units covered by this warranty, without charge to the consumer for labor
or materials. YOU ARE RESPONSIBLE FOR INITIAL SHIPPING CHARGES. However, we will pay the return shipping charges to
any destination within USA if repairs are covered by the warranty.
Limited Warranty:
Ace Bayou warrants this product (including any accessories) against defects in material and workmanship for a period of
90 days from the date of first consumer purchase. This warranty is enforceable only by the original purchaser.
ALL DAMAGED OR MISSING PARTS MUST BE REPORTED WITHIN 14 DAYS OF PURCHASE.
IMPORTANT: You must keep your original retail receipt as proof of purchase.
NOTE: This equipment has been tested and found to comply with the limits for a Class B digital device, pursuant to Part 15
of the FCC Rules. These limits are designed to provide reasonable protection against harmful interference in a residential
installation. This equipment generates, uses and can radiate radio frequency energy and, if not installed and used in
accordance with the instructions, may cause harmful interference to radio communications. However, there is no guarantee
that interference will not occur in a particular installation.
If this equipment does cause harmful interference to radio or television reception, which can be determined by turning the
equipment off and on, the user is encouraged to try to correct the interference by one or more of the following measures:
-- Reorient or relocate the receiving antenna.
-- Increase the separation between the equipment and receiver.
-- Connect the equipment into an outlet on a circuit different from that to which the receiver is connected.
-- Consult the dealer or an experienced radio/TV technician for help.