ACE BAYOU BABT20 GAMING CHAIR User Manual Print
ACE BAYOU CORP. GAMING CHAIR Print
UserManual.wiki
>
ACE BAYOU
>
BABT20 User Manual
User manual-FCC-revised
Navigation menu
Upload a User Manual
Namespaces
Wiki Guide
HTML
PDF
Info
Views
User Manual
Discussion / Help
Navigation


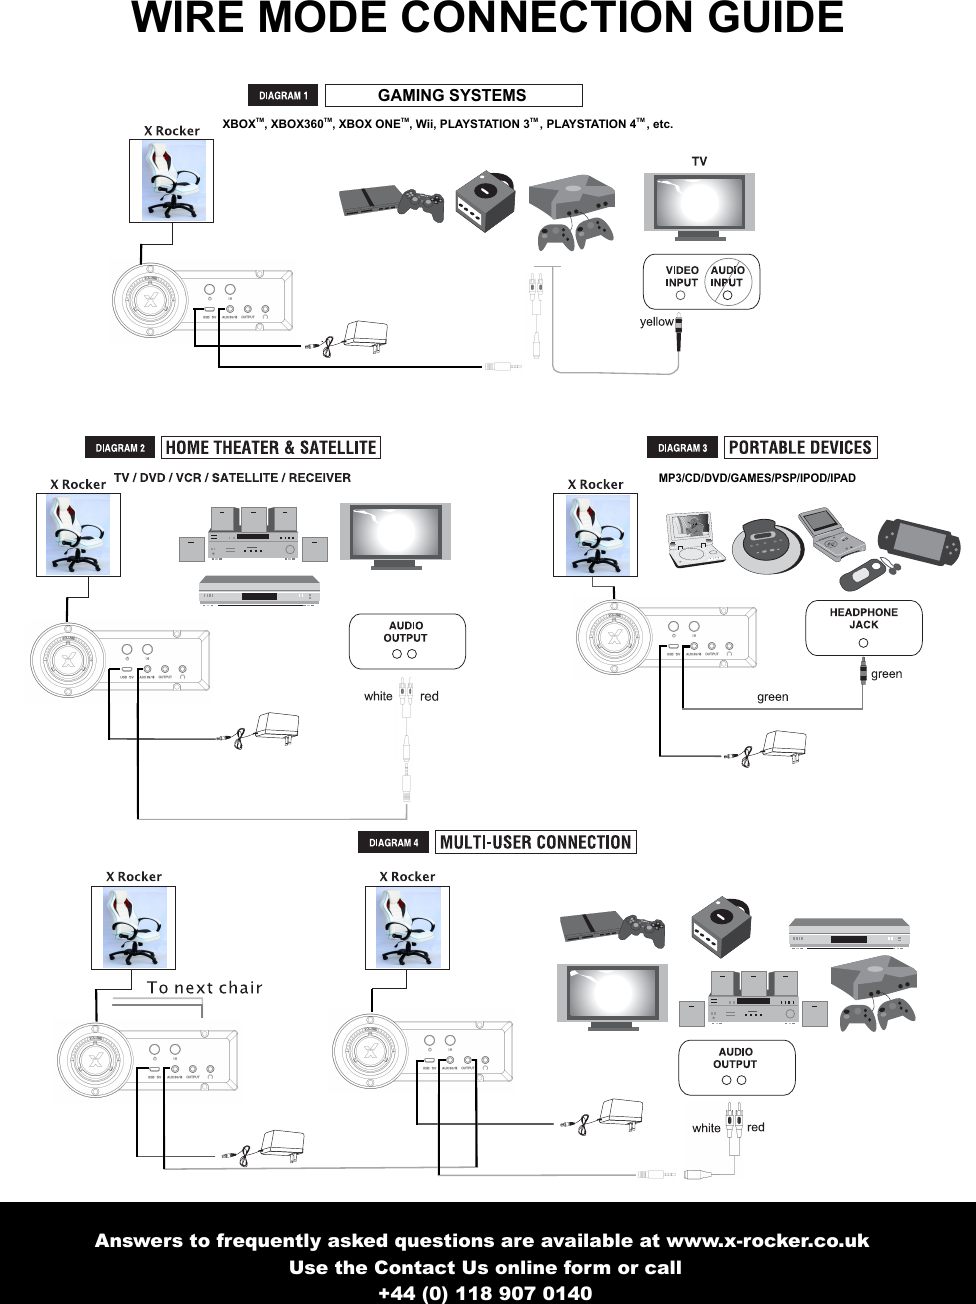
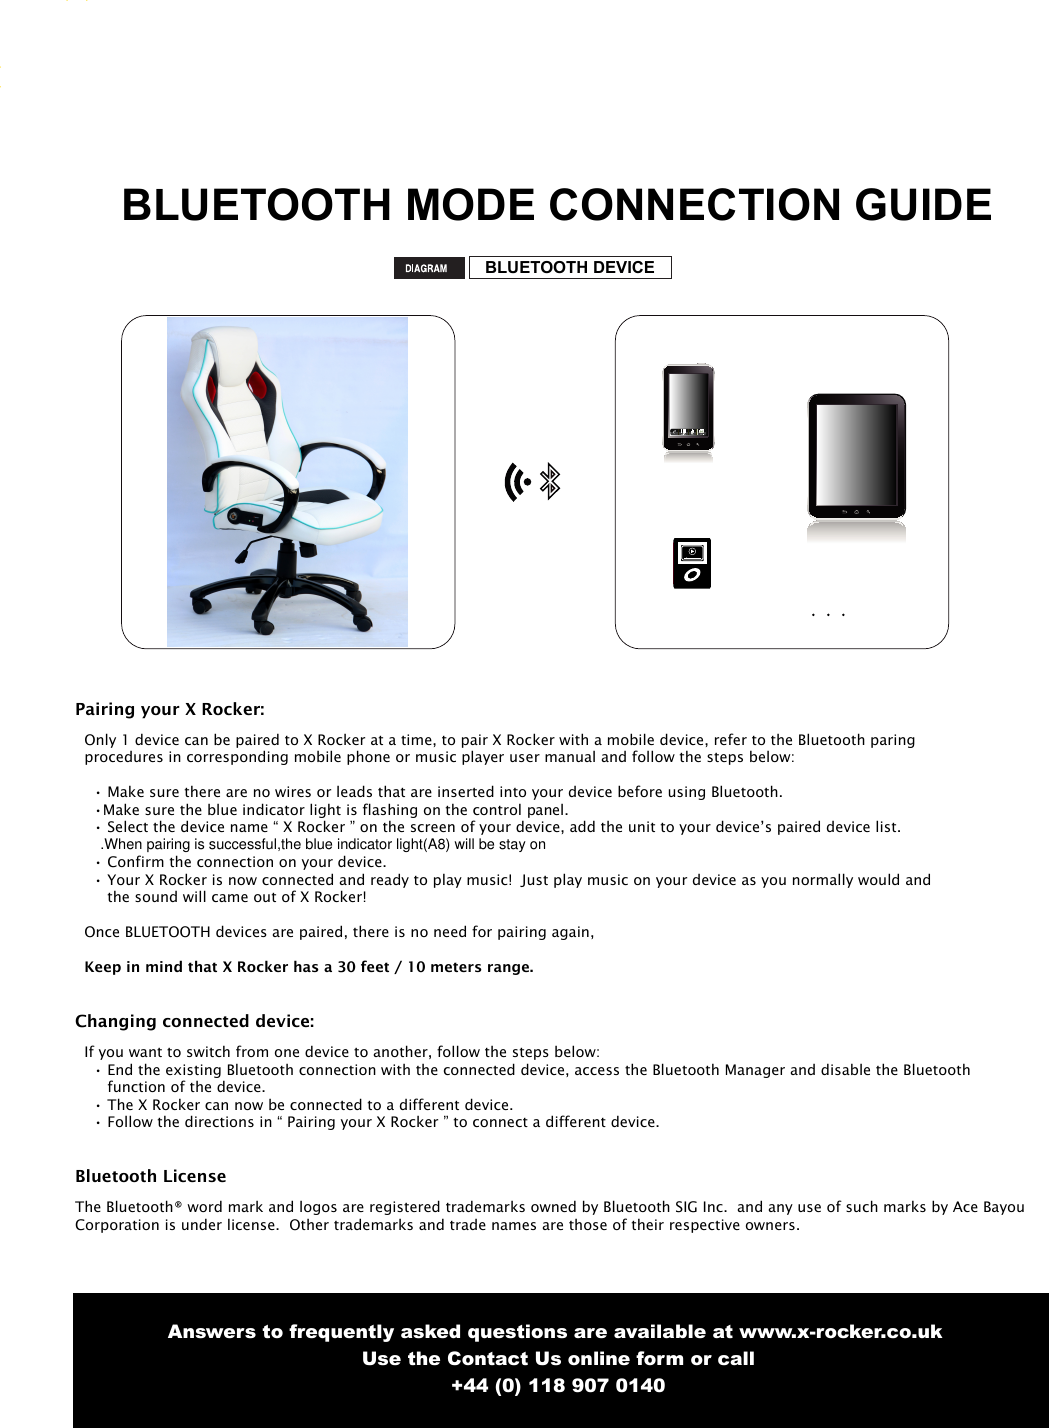
![7Answers to frequently asked questions are available at www.x-rocker.co.uk Use the Contact Us online form or call+44 (0) 118 907 0140If you use component or AV cable to connect console to TV:•Fit the B3 connectors to the ends of the B1cable•Unplug the Red and White plugs of the console’s AV cable from the TV, leaving the Yellow (video)plug in place.•Plug the Red and White plugs of the console’s AV cable into the B3 connectors on the Rocker’s B1cable.Component or AV cables are supplied with new models of PlayStation 3, X Box Elite and Wii, as well as earlier generation consoles. If you use HDMI cable to connect to TVConnect Rocker to one of TV’s Audio Out connections, Most HD-ready TV sets have some combination of RCA, mini-plug or optical audio interfaces enabling audio connection to accessories. Many have all three.•RCA connection is direct to the RCA plug terminations of the Rocker’s B1 cable, but makesure you are connecting to an Audio Out pair. If your TV has only two RCA sockets and they are not marked Audio Out, they are probably input sockets and cannot send audio Information to the Rocker.•Mini Plug connection. Mini Plug sockets are often found on the front or side of the TVset, marked with the headset icon². Fit the RCA-to-Mini Plug adapter[B4 on instructions] to the RCA ends of your three-meter cable[B1 on the instructions], converting your three-meter cable to a mini plug-to-mini plug connector. Plug one end into TV’s headset socket and the other into Rocker’s mini Plug input socket.(This is same configuration as for MP3 and other portable/handheld devices.) NOTE:Audio out volume through this outlet is usually separately adjustable from speaker volume, Please consult TV’s user guide for how to regulate output.•Optical Audio Out: A few models of TV only have optical audio out. if you have one of these sets,you will need anoptical to cable or optical to RCA coaxial adapter, sometimes called a Toslink to RCA adapter, and some connecting cables. There are several models of adapter available at reasonable prices from general electronic retailers and HD specialist shops and web sites.•If you use the console’s Component or AV cable: For direct connection to a game console, fit the mini-plug end ofthe B4 Mini Plug-RCA adapter to the Rocker’s transmitter. Fit the RCA socket ends to the the red and white audio plugsof the component or AV cable.If they are plugged into the TV, remove them, leaving the yellow video cable in place.•If you use HDMI connection to the TV: Fit the rocker’s transmitter to an available audio-out on the TV, using theappropriate connector mini-plug to mini-plug for the headset audio-out, or mini plug -to-RCA for RCA audio-out.•Other sound sources: Connect transmitter to MP3 players or handheld games using mini plug-to-mini plugconnector. For other devices such as stereo amplifiers, locate the most suitable audio output. Connectors compatiblewith most sound sources are included with your X Rocker.IMPORTANT: Refer to TV Manual for the audio outputs your TV has. You will require:-Headphone socket-Red and White RCA (not next to a yellow socket)If you have a scart socket, you will need a scart to an audio output adapter.Wired ConnectionDirect connection to game consoleWireless Connection](https://usermanual.wiki/ACE-BAYOU/BABT20/User-Guide-2963867-Page-7.png)
