ACE ELECTRONICS TA-7850 Alarm Clock With Dual USB User Manual 1
ACE INTERNATIONAL ELECTRONICS LTD Alarm Clock With Dual USB 1
User manual

USER GUIDE
MODEL: TA-7850
ATTENTION: POUR ÉVITER LES CHOC ÉLECTRIQUES, INTRODUIRE LA LAME LA PLUS LARGE DE LA FICHE DANS
LA BORNE CORRESPONDANTE DE LA PRISES ET POUSSER JUSQU'AU FOND.
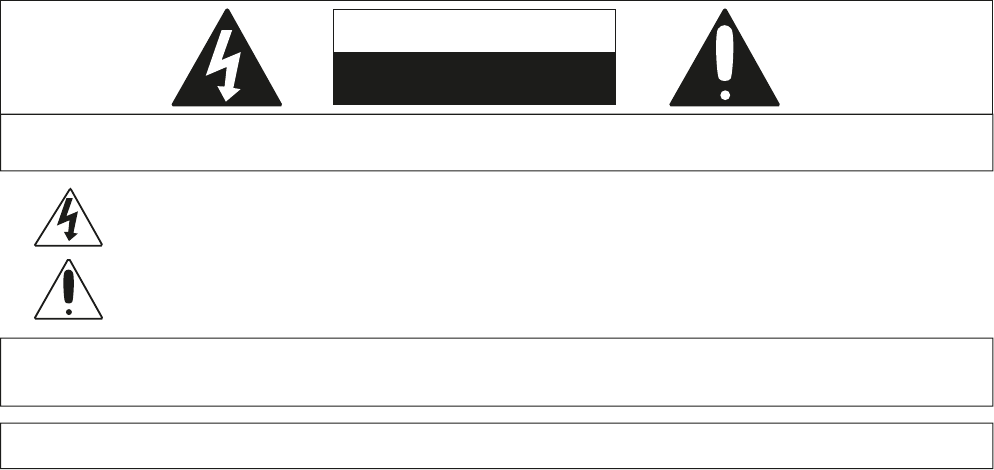
DANGEROUS VOLTAGE: The lightning flash with arrowhead symbol, within an equilateral triangle is
intended to alert the user to the presence of uninsulated dangerous voltage within the product's
enclosure that may be of sufficient magnitude to constitute a risk of electric shock to persons.
ATTENTION: The exclamation point within an equilateral triangle is intended to alert the user to the
presence of important operating and maintenance (servicing) instructions in the literature accompanying
the appliance.
FCC WARNING: This equipment may generate or use radio frequency energy. Changes or modifications to this
equipment may cause harmful interference unless the modifications are expressly approved in the instruction manual.
The user could lose the authority to operate this equipment if an unauthorized change or modification is made.
CAUTION: TO REDUCE THE RISK OF ELECTRIC SHOCK, DO NOT REMOVE COVER (OR BACK).
NO USER-SERVICEABLE PARTS INSIDE. REFER SERVICING TO QUALIFIED SERVICE PERSONNEL.
CAUTION
RISK OF ELECTRIC SHOCK
DO NOT OPEN
NOTE: This equipment has been tested and found to comply with the limits for a Class B digital device, pursuant to part
15 of the FCC Rules. These limits are designed to provide reasonable protection against harmful interference in a
residential installation. This equipment generates, uses and can radiate radio frequency energy and, if not installed and
used in accordance with the instructions, may cause harmful interference to radio communications. However, there is no
guarantee that interference will not occur in a particular installation. If this equipment does cause harmful interference
to radio or television reception, which can be determined by turning the equipment off and on, the user is encouraged to
try to correct the interference by one or more of the following measures:
. Reorient or relocate the receiving antenna.
. Increase the separation between the equipment and receiver.
. Connect the equipment into an outlet on a circuit different from that to which the receiver is connected
. Consult the dealer or an experienced radio/TV technician for help.
Compliance information: This device complies with Part 15 0f the FCC Rules. Operation is subject to the following two
conditions: (1) this device may not cause harmful interference, and (2) this device must accept any interference received,
including interference that may cause undesired operation.
SURGE PROTECTORS: It is recommended to use a surge protector for AC connection. Lightning and power surges ARE
NOT covered under warranty for this product.
WARNING: TO PREVENT FIRE OR SHOCK HAZARD, DO NOT EXPOSE THIS UNIT TO RAIN OR MOISTURE.
CAUTION:
Danger of explosion if battery is incorrectly replaced. Replace only with the same or equivalent type.
The batteries shall not be exposed to excessive heat such as sunshine, fire or the like.
Dispose of batteries properly according to environmental regulations.
Packaging
The product has been packaged to protect it from damage in transit. Packaging materials are raw materials
and can therefore be reused or recycled.
FCC RF Radiation Exposure Statement
This equipment complies with FCC RF radiation exposure limits set forth for an uncontrolled environment. This
equipment should be installed and operated with a minimum distance of 20 centimeters between the radiator
and your body.

This symbol on a product means that the product is covered by European Directive 2012/19/EU. Inform yourself
about the local separate collection system for electrical and electronic products. Follow local rules and never
dispose of the product with normal household waste. Correct disposal of old products helps prevent negative
consequences for the environment and human health.
Batteries
Do not dispose of used batteries in the household rubbish. Every consumer is obliged by law to take old batteries
to a collection point for used batteries in a recycling centre or retailer that sells batteries.
Unplug this apparatus during lightning storms or when unused for long periods of time.
Do not block any ventilation openings. The minimum distance around the product for sufficient ventilation is 10 cm.
The product shall not be exposed to dripping or splashing.
The product can be used in both moderate and tropical climate.
Do not place any sources of danger on the product (e.g. liquid filled objects, lighted candles).
Where the plug of the Direct Plug-in Adapter is used as the disconnect device, the disconnect device shall remain readily
operable.
EMC Directive 2004/108/EC
Low Voltage Directive 2014/35/EU
Ecodesign Directive 2009/125/EC
RoHS Directive 2011/65/EU
Declaration of conformity :

1. Read these Instructions.
2. Keep these Instructions.
3. Heed all Warnings.
4. Follow all instructions.
5. Do not use this apparatus near water.
6. Clean only with a dry cloth.
7. Do not block any ventilation openings. Install in accordance with the manufacturer’s instructions.
8. Do not install near any heat sources such as radiators, heat registers, stoves, or other apparatus (including ampliers)
that produce heat.
9. Do not defeat the safety purpose of the polarized or grounding - type plug. A polarized plug has two blades with one
wider than the other. A grounding type plug has two blades and a third grounding prong. The wide blade or the third
prong are provided for your safety. When the provided plug does not fit into your outlet, consult an electrician for
replacement of the obsolete outlet.
10. Protect the power cord from being walked on or pinched particularly at plugs, convenience receptacles, and the point
where they exit from the apparatus.
11. Only use attachments/accessories specied by the manufacturer.
12. Use only with a cart, stand, tripod, bracket, or table specied by the manufacturer, or sold with the apparatus.
When a cart is used, use caution when moving the cart/apparatus combination to avoid injury from tip-over.
13. Unplug this apparatus during lightning storms or when unused for long periods of time.
14. Refer all servicing to qualied service personnel. Servicing is required when the apparatus has been damaged in any way,
such as power-supply cord or plug is damaged, liquid has been spilled or objects have fallen into the apparatus, the
apparatus has been exposed to rain or moisture, does not operate normally, or has been dropped.
15. Power Sources - This product should be connected to a power supply only of the type described in these operating
instructions, or as marked on the unit.
IMPORTANT SAFETY INSTRUCTIONS
16. Water and Moisture - This product should be kept away from direct contact with liquids. The apparatus shall not be
exposed to dripping or splashing and that no objects filled with liquids, such as vases, shall be placed on the apparatus.
17. CAUTION – Danger of explosion if battery is incorrectly replaced. Replace only with the same or equivalent type.
Batteries (a battery pack or an installed battery) shall not be exposes to excessive heat such as sunshine, re, etc.
18. Where the mains plug or an appliance coupler is used as the disconnect device, the disconnect device shall remain
readily operable.
19. Do not install this equipment in a conned or "boxed-in" space such as a bookcase or similar unit, and maintain good
ventilation conditions. The ventilation should not be impeded by covering the ventilation openings with items such as
newspaper, tablecloths, curtains, etc.
20. This apparatus is for professional use only.
21. When moving or not using the appliance, secure the power cord (e.g., wrap it with a cable tie). Be careful not to damage
the power cord. Before using it again, make sure the power cord has not been damaged. If the power cord has been
damaged at all, bring the unit and cord to a qualied service technician for repair or replacement as specified by the
manufacturer.
22. WARNING: Please refer to any important information (e.g., electrical, safety, etc.) printed on the exterior bottom
enclosure or rear panel before installing or operating the product.
23. WARNING: Do not ingest the battery, Chemical Burn Hazard. This product contains a coin/button cell battery. If the
coin/button cell battery is swallowed, it can cause severe internal burns in just 2 hours and can lead to death.
Keep new and used batteries away from children. If the battery compartment does not close securely, stop using the
product and keep it away from children. If you think batteries might have been swallowed or placed inside any part of
the body, seek immediate medical attention.
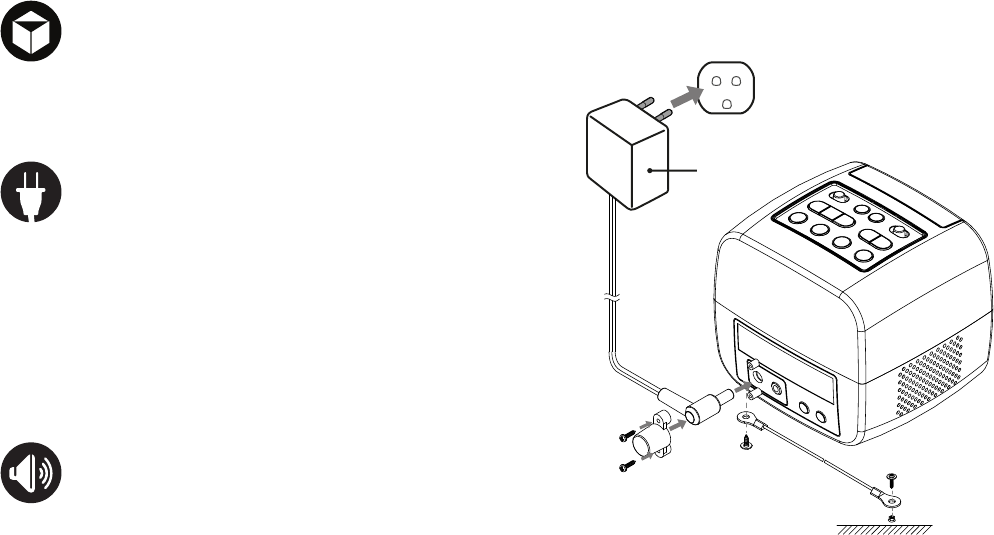
AC POWER SOURCE
Insert the small end of the AC adaptor into the DC In
Jack(located on the rear of the unit). Connect the other
end to a wall outlet providing 100-240V AC, 50/60 Hz.
The output of the provided AC/DC Adaptor is DC 5V 5A.
note: Disconnect both ends of the power cord when not
in use. Use only the supplied AC adaptor with the
following specs: AC In - 100-240V AC, 50/60Hz/DC
Out - 5V 5A
Press the VOL + or VOL - button repeatedly to increase
or decrease the volume to a safe listening level.
ADJUSTING THE VOLUME
AC outlet
AC/DC
adapter plug
TA-7850 Alarm Clock, AC power adaptor, plastic wall plug.
tapping screws(4 pcs), steel rope, DC head plastic holder,
rubber plug.
INSIDE THE BOX
1
14
89
2
10
3
11
4
12
5
13
6 7
1
14
9
2
10
3
11
4
12
5
13
6
7
8
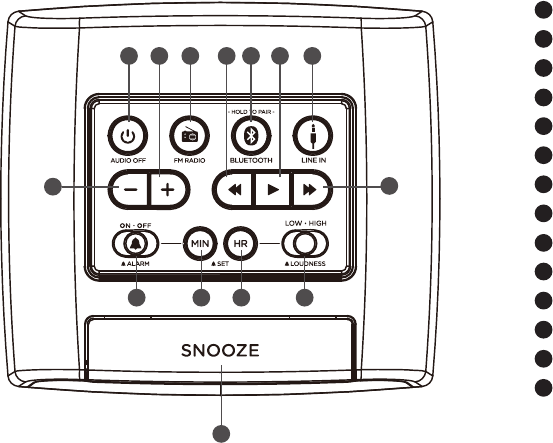
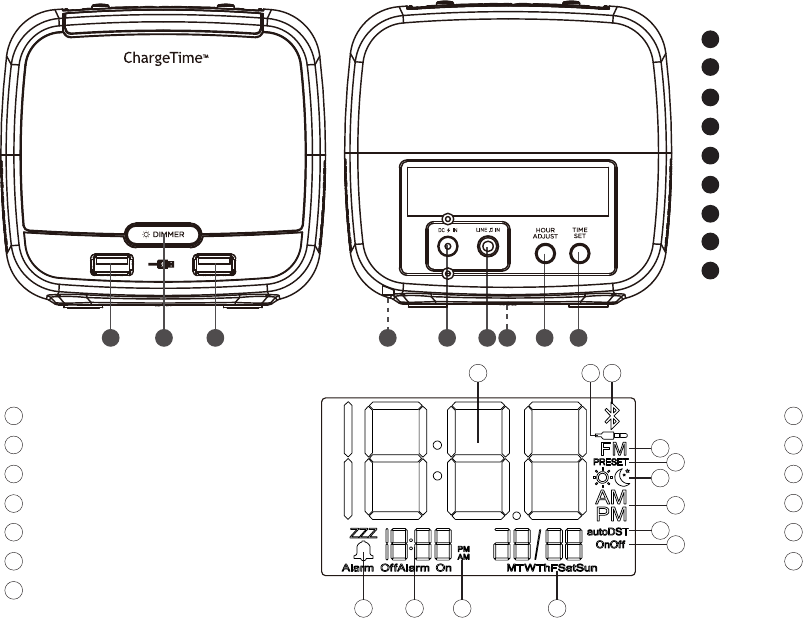
LOCATION OF CONTROLS
AUDIO OFF button
Volume + button
FM RADIO button
TUNE/SKIP - button
BLUETOOTH button
PLAY button
LINE IN button
Volume - button
TUNE/SKIP + button
ALARM ON-OFF switch
ALARM SET MINUTE button
ALARM SET HOUR button
ALARM LOUDNESS switch
SNOOZE button
9
10
11
12
13
8
23
22
21
20
19
18
17
16
15 USB Charging port
Dimmer button
USB Charging port
Screw jack
DC In jack
Line-In jack
Backup battery compartment
HOUR ADJUST button
TIME SET button
LCD Display indicators
DST
DIMMER ON/OFF
Day of the week
AM/PM (ALARM )
ALARM Set Time
ALARM
9
10
11
12
13
8
15 16 17 18 19 20 21 22 23
Time display
Line-In/AUX
Bluetooth
FM Radio
Radio PRESET
Day/Night
AM/PM Time
1
2
3
4
5
6
7
123
4
5
6
7

Charge Time Plus with a built-in backup battery, which is for prevention from data lost due to power disconnection
and saves the date and time to make setup simpler. The date and time are saved for PST(Pacific Standard Time)
There's also an internal capacitor that is used for backup to save time and alarm settings during a power failure
or if the AC adapter is unplugged. Since this is built-in there is no need to replace any batteries to maintain the
power backup feature.
Simply press "Hour Adjust" on the back of ChargeTime plus to adjust the hour. The date and time is initially set
to PST (Pacific Standard Time).
QUICK TIME SETUP
BACKUP BATTERY

1. Plug in the ChargeTime-plus, but leave the power "OFF".
2. Press and hold the TIME SET button until the display flashes "12" then press the TUNE/SKIP - or TUNE/SKIP +
button repeatedly to advance to the correct hour.
3. Press the TIME SET button to confirm and now the digits "00" will begin flashing. Pressing the TUNE/SKIP - or
TUNE/SKIP + button repeatedly to adjust the minutes.
4. When you reach the correct current minute, press the TIME SET button again to confirm.
5. Four digits which display the year will now begin flashing below the time. Press the TUNE/SKIP - or TUNE/
SKIP + button repeatedly to advance to the correct current year, then press the TIME SET button to confirm.
6. With the display will begin flashing "1/1 ", press the TUNE/SKIP - or TUNE/SKIP + button repeatedly to
advance the correct current month, then press TIME SET button to confirm.
7. Now set the day by pressing the TUNE/SKIP - or TUNE/SKIP + button repeatedly to advance the current day,
then press TIME SET again to confirm.
1. Press the "ALARM SET HOUR" button, to change alarm hours digit. Press the "ALARM SET MINUTE" button
to change alarm minute digit.
2. Slide the ALARM switch to the "ON" position, then the Alarm On will appear the display.
3. The alarm source use BUZZER to wake you up only, FM radio can not.
4. Top slide on the right: Hi/Low alarm buzzer sound volume setting.
notes: Before setting the alarm, make sure that the clock time is set correctly (see "Setting the clock")
SETTING THE CLOCK AND DATE
SETTING THE ALARM TIME

1. When the alarm sounds, press the AUDIO OFF button to silence the alarm.
2. The Alarm On will appear on the display, indicating that the alarm is reset and will sound again in 24 hours.
1. If the alarm is not needed the next day, slide the ALARM switch to the "OFF" position and the Alarm Off will
display, indiacting that the alarm is off and will not sound.
2. To reactivate the alarm next time it is needed, slide the ALARM switch to the "ON" position and the Alarm
On will appear on the display, then check to make sure the alarm time is correct.
When the alarm sounds, pressing the SNOOZE button will temporarily silence the alarm. The alarm will sound
again after 9 minutes pass.
SILENCING THE ALARM
DISABLING THE ALARM
SNOOZE

1. When the unit is in "NIGHT MODE" , the night mode icon " " will flash 3
times, and then the display will go blank. When any button is pressed, the
display brightness will turn on to medium brightness for 7 seconds .
2. Press the "DIMMER" button on front under the LCD. Repeatedly to cycle
through the brightness levels of the LCD display and choose from: high,
medium, low and night mode. The default setting is medium.
AUTO DST:
1. Auto-DST by default will ship as "on".
2. To toggle auto-DST on/off, press both "time set" and "hour adjust" together.
3. The icons for DST will show in these cases:
(1) when the time is being set, show the icon for either "DST on" or "DST off".
(2) when the auto DST is turned on or off, flash either "DST on" or "DST off"
three times .
(3) when the clock is first turned on: display either "DST on" or "DST off" for
one minute only.
EASY DST:
1. This is simply the "hour adjust" button on the back next to time set.
2. User simply presses or press and hold to change the current hour only... the
hour does not need to flash, user doesn't have to press "set"... they just tap
"hour adjust" and the time will advance one hour.... it will cycle through 24
hours AM and PM
NIGHT MODE

PLAYING THE RADIO
1. With the ChargeTime-plus plugged in, press the RADIO button to enter the RADIO mode and the FM frequency
will appear on the display.
2. Repeatedly press the TUNE/SKIP - or TUNE/SKIP + button to manually adjust the tuning on the display until
the desired station appears.
3. For auto tuning, press and hold the TUNE/SKIP - or TUNE/SKIP + button until the display starts to scan then
release the button and the tuner will search and stop on the next strongest station it finds. Repeat this process
until the desired station appears on the display.
notes: Fully extend the FM wire antenna to increase reception sensitivity.
Keep digital music players or mobile phones away from the FM antenna as this may cause interference.
Do not place the FM antenna near the AC power adaptor as this may lead to reception interference.
SETTING RADIO PRESETS
1. To preset a radio station to memory, first follow the steps above to tune in the desired station.
2. Press the RADIO button once to enter save mode.
3. Repeatedly press the PLAY/PAUSE button until the desired preset number you wish to assign to that station
appears in the display and the unit tunes to the station.
4. Press the RADIO button again to save.
5. Repeat the steps to save up to 20 preset stations if desired.
6. To automatically save presets, press and hold the RADIO button for two seconds and the ChargeTime-plus will
scan and save the strongest station signals in ascending order.
note: Setting a new station preset in the same position as a previously saved station will replace the previously
stored station for that preset number.

1. With the ChargeTime-plus plugged in, press the BLUETOOTH button into the Bluetooth mode and the BT
icon will appear on the display.
2. Power on your Bluetooth compatible device and search for the ChargeTime-plus under the Bluetooth settings
of your audio streaming device. After a few seconds it should detect the ChargeTime-plus, at which time you
can select the ChargeTime-plus and establish a wireless Bluetooth connection.
3. Press TUNE/SKIP - or TUNE/SKIP + button to select previous or next track.
4. Press PLAY/PAUSE button to play or pause music.
5. When Bluetooth is disconnected for 15 minutes or music is paused for 15 minutes on connection, device will
automatically go into standby mode.
6. To force into pairing mode,Press and hold "bluetooth" button.
note: When in pairing mode, it will only last for 90 seconds, then it will stop being available to pair.
1. To listen to music from an external audio device (e.g. iPad, iPod shuffle, mobile phone, MP3 player, digital
media player, etc), turn on your ChargeTime-plus and power on the external audio device.
2. Insert one end of a 3.5mm audio cable (sold separately) into the Line-Out/ Headphone jack of your external
audio device and the other end into the Line-In jack on the ChargeTime-plus.
3. Press the SOURCE button to switch the input source to AUX.
4. Select the music you wish to listen to on your external audio device then press play and sound will be
projected through the ChargeTime-plus speakers.
STREAMING BLUETOOTH AUDIO
AUX-IN CONNECTION

general:
Power Source........................................................................................................................................................................................................... DC 5V/5A
AC Power Supply............................................................................................................................................................... 1 00 - 240V - 50/60Hz A1.3
Battery Backup.................................................................................................................................................................. 2 x 1.5V "AAA" size batteries
Speaker................................................................................................................................................................................................................... 2pcs 3w 4
Output Power................................................................................................................................................................................................................. 2W x 2
USB Output.................................................................................................................................................................................................................... 5V 2.1A
radio:
Frequency Range (FM) ............................................................................................................................................................................. 87.5 - 1 08 MHz
Bluetooth:
Bluetooth specification......................................................................................................................................................................................... v2.1 +EDR
Supported Profile..................................................................................................................................................................................................... AD2Pvl.2
Range ............................................................................................................................................................................................ 10m/33 feet line of sight
Specifications are subject to change without notice.
The ChargeTime-plus features dual USB charging ports on the front of the unit which are designed to charge
most USB compatible devices. Simply plug in a USB cable (sold separately) into the ChargeTime-plus USB port
then connect your device to begin charging.
AUDIO OFF
DUAL USB CHARGING PORTS
Press AUDIO OFF to turn off all audio.
SPECIFICATIONS

Q: Why is the USB port not charging my devices?
A: Make sure that the USB plug is firmly connected into both ports of the ChargeTime-plus and your USB
compatible device and that the ChargeTime-plus is plugged in to a power source as the USB charging ports
will not operate from the backup batteries.
Q: Why will my Nook/netbook device not charge when I connect it to the USB charger?
A: Even though it may be USB compatible, some devices, including the Nook and some larger tablets or
netbooks require a higher output to charge them than the 5V/2.1A USB port on the ChargeTime-plus. Please
check your device manufacturer's charging specifications as you may be required to only use the charger
supplier with your device at time of purchase.
Q: How do I turn the alarm off?
A: Pressing the AUDIO OFF button will silence the alarm and reset it to sound again in 24 hours.
Q: What if I don't want the alarm to go off on the weekends?
A: You can disable the alarm on days you do not need it by sliding the ALARM switch to the "OFF" position. The
changed to Alarm Off will display, indiacting that the alarm is turned off and will not sound until
you reactivate the alarm.
Q: Why do I not hear any music when I play the radio?
A: Make sure that a 3.5mm Line-In cable is not plugged into the Line-In jack of the ChargeTime-plus as this will
switch the input source to AUX even if there is no external audio device connected.
Q: The display is flashing "12:00"?
A: This appears during the initial setup or could be a result of an extended power output or if the Charge
Time-plus was unplugged for an extended period. Simply follow the steps in the 'setting the clock' section of
this user guide to reset the current time.
FAQS
Europe
TeleAdapt Limited
Axis 5
Rhodes Way
Watford
WD24 4YW
United Kingdom
Tel: +44 (0)1923 810200
CONTACT DETAILS
Americas
TeleAdapt Inc
1315 Greg Street
Suite 110
Sparks
NV 89431
USA
Tel: +1 775 355 8585
Middle East
TeleAdapt Limited
Dubai Media City
Thuraya Tower 1
Office 1008
PO Box 500344
Dubai
UAE
Tel: +971 367 8283
Asia
TeleAdapt HK, Ltd
Unit G, 15/F, Block 2
Leader Industrial Center
No. 188-202 Texaco Road
Tseun Wan
Hong Kong
Tel: +852 2780 90 20
Website
For information on other
TeleAdapt products
designed for the hospitality
industry, including
specification and cut sheet
downloads, please visit our
website at:
www.teleadapt.com