ACR Electronics ACR-RLB30 Hand Held Radio User Manual Product Manual
ACR Electronics, Inc. Hand Held Radio Product Manual
Product Manual
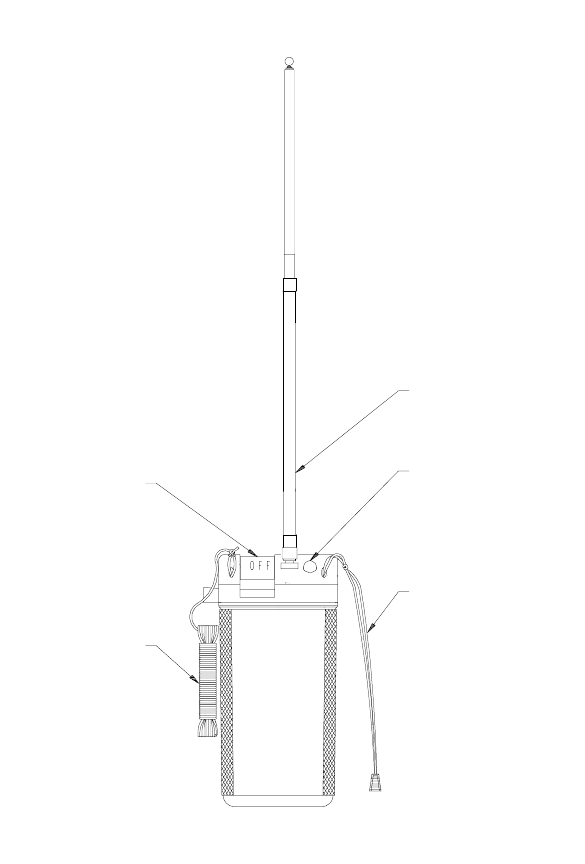
Waterproof
ON-OFF Switch
Hanked Lanyard
Wrist Lanyard
Transmitting
Indicator Light (LED)
Flexible Antenna
(Factory Replaceable)
Figure 1: ACR MINI B300™ EPIRB
- 1 -
SECTION 1 — INTRODUCTION
1.1 General
This manual provides installation, operation and maintenance
instructions for the ACR/MINI B300TM Emergency Position Indicating
Radio Beacon (EPIRB), hereinafter referred to as the Beacon. This
section describes the characteristics and details of the Beacon (See
Figure 1). A Cognizant Authority Station License may be required to
carry this unit. The Beacon comes with a user replaceable
6 volt Lithium, Duracell DL223A, (or equivalent) battery. See
installation instructions page 5.
1.2 Purpose
The Beacon is an item of survival equipment and is designed to be
carried on a person or aboard vessels at sea and in port, so as to be
readily available in any emergency. It may be used on the deck of
vessels, on survival craft, or may be attached to the latter with the
provided lanyard, as well as attached to survival suits, etc. When turned
“ON”, it transmits tone modulated signals (VHF) so that rescue aircraft
or vessels equipped with suitable direction finding receiving equipment
can “home” to the transmitting unit. This Beacon meets FCC Rules for
improved satellite detection.
1.3 Satellite Detection
EPIRB use is directly affected by the COSPAS-SARSAT System.
SARSAT is an acronym for Search and Rescue Satellite-Aided
Tracking. This international system has proven that satellites can be
used to detect distress alerts and to determine position from 121.5 MHz
and 406 MHz EPIRBs.
COSPAS-SARSAT frequently plays a key role in many operational
Search and Rescue decisions. Since the first recorded rescue in 1982,
over 3,000 persons have been rescued as a direct result of SARSAT.
These successes have brought more public awareness and an expanding
growth in the use of EPIRBs.
- 2 -
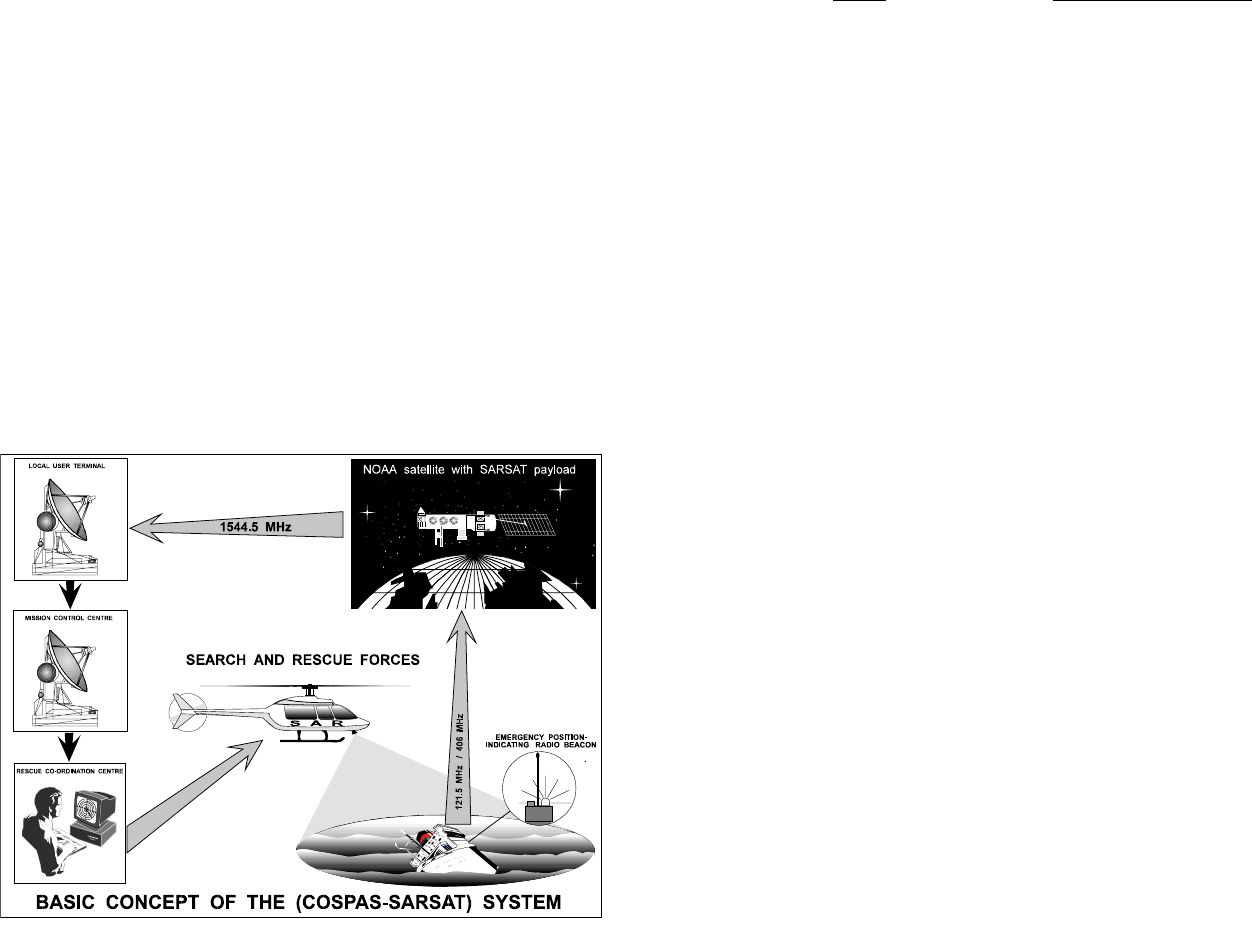
Figure 2: Satellite Detection
1.4 Authorizations
The ACR/MINI B300TM Emergency Position Indicating Radio Beacon
meets the requirements of the European Telecommunications Standards
Institute, ETS 300 152, for Marine use.
1.5 Characteristics
The ACR/MINI B300TM Beacon is an o-ring sealed battery operated
unit. The Beacon case, with its external antenna is waterproof. The
semiconductor circuits are mounted within the case assembly, which
also contains the battery power supply. An “ON-OFF” switch is
installed on top of the Beacon, along with a light emitting diode (LED)
operation indicator. The Beacon may be carried on a person, stowed in
any convenient place, mounted in a special bracket aboard a vessel, or
tied with its lanyard inside survival craft. The unit floats and is
completely waterproof.
- 3 -
1.6 Technical Data
Pertinent technical data is listed below:
ITEM CHARACTERISTICS
Frequency 121.5 MHz
Power Output Minimum 75 mW during 24 hours
operation
Operating Life 24 hours minimum at -10°C, (-14°F)
longer in temperate climates
Battery Lithium, 6 volt Duracell DL223A,
(or equivalent). Sold with Beacon.
Rated replacement life: 10 years.
Emission Type A3X
Modulation Downward sweeping tone between
1600 and 300 Hz at 2 to 4 sweeps per
second
Frequency ± 3.5 kHz (Crystal controlled)
Stability
Operating -20°C to +55°C (-14°F to +131°F)
Temperatures
Activation Manual “ON-OFF” switch
Size 127mm x 66mm x 41mm (5.0"H x
2.6"W x 1.6"D) excluding antenna
Weight 215 g (7.6 ounces)
Attachments Lanyards, Hanked and Wrist
- 4 -
SECTION 2 — INSTALLATION
2.1 General
The ACR/MINI B300M Beacon has been designed for multi-purpose
installation for survival use, personnel, rafts, floats and survival craft. It
should be carried with you or stowed where it will be readily available
in an emergency.
2.2 Battery Installation
1. Remove four (4) screws holding the top cap of the Beacon to the
case. Use a no. 2 Phillips screwdriver. Remove top cap and PC
board from bottom case being careful not to disturb any electronic
components on the PC board.
2. Remove old battery and place new battery in battery clip with
groove side of battery down and flat side of battery up. Caution:
Make sure flat side of battery is up. Otherwise, the polarity of the
battery would be reversed and damage to the battery will occur.
The battery also poses a possible fire, explosion, or burn hazard
when placed in the battery clip upside down. A semiconductor
diode protects the electronics from damage due to battery reversal.
3. Put the battery expiration date on the flat side of the battery and on
the EPIRB case with ACR part no. A1-20-0857 or equivalent
permanent shield label.
4. Grease the top cap o-ring with Dow Corning number 4 Silicone
Grease, ACR Part no. A2-09-0069.
5. Replace the four (4) screws holding the top cap to the bottom case
of the Beacon. Make sure screws are tight but do not use excessive
torque which could strip the threads in the top cap.
2.3 Battery Date Code
A typical Duracell DL223A battery has a date code of 6J1313. The first
alphanumeric character of the code is always a number representing the
last digit of the year of manufacture. The second alphanumeric
character of the code is always a letter, the position of which in the
alphabet represents the number of the month of manufacture. That is: A
represents January, B represents February, C represents March, etc.
- 5 -
The next two alphanumeric characters of the code represent the day of
the month of manufacture. Therefore, the date of manufacture for the
date code 6J1313 is October 13, 1996.
2.4 Battery Expiry Date
The battery Expiry Date is obtained by adding the battery
manufacturers rated replacement life of 10 years to the date of
manufacture. For example, a date code of 6J1313 would have a Battery
Expiry Date of October 13, 2006.
SECTION 3 — OPERATION
3.1 General
The EPIRB is designed to operate best when placed on a flat non-
conductive surface or while over water at sea. It should be operated in
an area free of obstructions which could absorb RF energy and limit
radiation patterns.
Position the antenna straight up (perpendicular to ground) and not
pointing toward the receiving station. Note that the radiation field null
occurs directly off the end of the antenna.
Maintain a visual path where possible between the Beacon and the
receiver, since beacons characteristically transmit “line of sight”.
The Beacon transmits on 121.5 MHz.
3.2 Manual Deployment
Remove the Beacon from its storage position and ensure that the
antenna telescoping section is fully extended and that the antenna is in
an upright position. Break and remove the flip switch seal. Flip the
switch to the “ON” position. Red LED indicator will illuminate. The
LED indicator will remain on for 5 seconds indicating that the batteries
are functional. After 5 seconds, the LED indicator will begin flashing,
indicating that the transmitter is functioning properly. If operated from
the deck of the vessel, choose the most advantageous position free of
surrounding obstacles. If deployed in water, make sure that the antenna
is positioned vertically and the antenna itself is out of the water. It is
preferable to hold the unit above the water, as immersion reduces
effectiveness.
- 6 -

SECTION 4 — MAINTENANCE
4.1 General
The Beacon has been designed for use with a minimum of maintenance
required. A check list is given in this section, and when accomplished
periodically, should help to assure emergency operation and extended
life use.
4.2 Battery Check
1. The battery expiry date should always be placed on the battery and
the outside of the Beacon case. See 2.2 Battery Installation.
Replace the battery immediately after extended use or emergency
and always on or before the battery expiry date. Use only a 6 volt
Lithium Duracell DL223A (or equivalent) battery.
2. Safety Precautions:
Warning: To avoid possible fire, explosion, leakage or burn
hazard, do not open, recharge, disassemble, heat above 71°C
(160°F) or incinerate.
4.3 Inspection Check
The following checks should be made during the periodic servicing:
1. Check the antenna tip and telescoping sections for any signs of
damage or corrosion.
2. Check the plastic covered portion of the antenna for any signs of
chafing, wear, cracks, or other damage, and signs of resultant
corrosion beneath the covering.
3. Check the antenna socket at the cap surface for any sign of
looseness or corrosion.
4. Check the Beacon housing for signs of damage or mishandling.
Dents, or damage to the top end could result in an operational
malfunction during an emergency.
5. Check the lanyards for chafing, fraying or any damage. Check the
lanyard anchor points for chafing. Resecure the lanyards and check
the knots for tightness.
6. Rinse the outside of the unit with fresh water frequently to remove
any salt build-up on case or exposed parts.
- 7-
TABLE OF CONTENTS
SECTION 1 — INTRODUCTION 2-4
1.1 General............................................................................................2
1.2 Purpose ...........................................................................................2
1.3 Satellite Detection...........................................................................2-4
1.4 Authorizations.................................................................................3
1.5 Characteristics.................................................................................3
1.6 Technical Data................................................................................4
SECTION 2 — INSTALLATION 5
2.1 General............................................................................................5
2.2 Battery Installation..........................................................................5
2.3 Battery Date Code...........................................................................5
2.4 Battery Expiry Date ........................................................................6
SECTION 3 — OPERATION 6
3.1 General............................................................................................6
3.2 Manual Deployment........................................................................6
SECTION 4 — MAINTENANCE 7
4.1 General............................................................................................7
4.2 Battery Check .................................................................................7
4.3 Inspection Check.............................................................................7
- i -
Foreword:

Congratulations and thank you! You have just purchased the
finest personal locator EPIRB available on the market. Other
brands merely attempt to meet the requirements established by
government regulatory agencies. ACR designed its Mini B300 to
work in real life situations and to save lives. It, therefore, exceeds
many of the requirements established by authorities. By
purchasing this EPIRB you have distinguished yourself as one of
the safest persons in boating.
To be a responsible EPIRB owner:
• Read this manual.
• Activate your EPIRB ONLY in an emergency.
• Mount your EPIRB in an easily accessible spot or store it in
your ditch/emergency kit.
• Prepare an emergency evacuation plan and rehearse it.
• In a grave and imminent situation, where you have exhausted
all other means of rescue, activate your EPIRB and leave it
“On” until Search And Rescue forces arrive. Do not turn it off
and on in the misguided belief that you are saving battery
power.
• NEVER set off a false alarm.
Search And Rescue forces will respond to all known emergencies.
This EPIRB will alert the authorities to an emergency if activated
in most coastal waters, (excluding parts of Africa and Antarctica).
SAR reports indicate that 99% of all class A & B EPIRB
activations are false. The high number of false activation events
places an unnecessary burden on the search and rescue system.
Don’t be guilty of causing a false or accidental activation. Help
educate others that irresponsible handling of EPIRBs risks lives by
slowing the response to real emergencies and wastes tax payer
dollars. Please call or write for answers to questions or for
information on other safety products manufactured by ACR
Electronics, Inc.
Use this page for recording personal notes and comments: