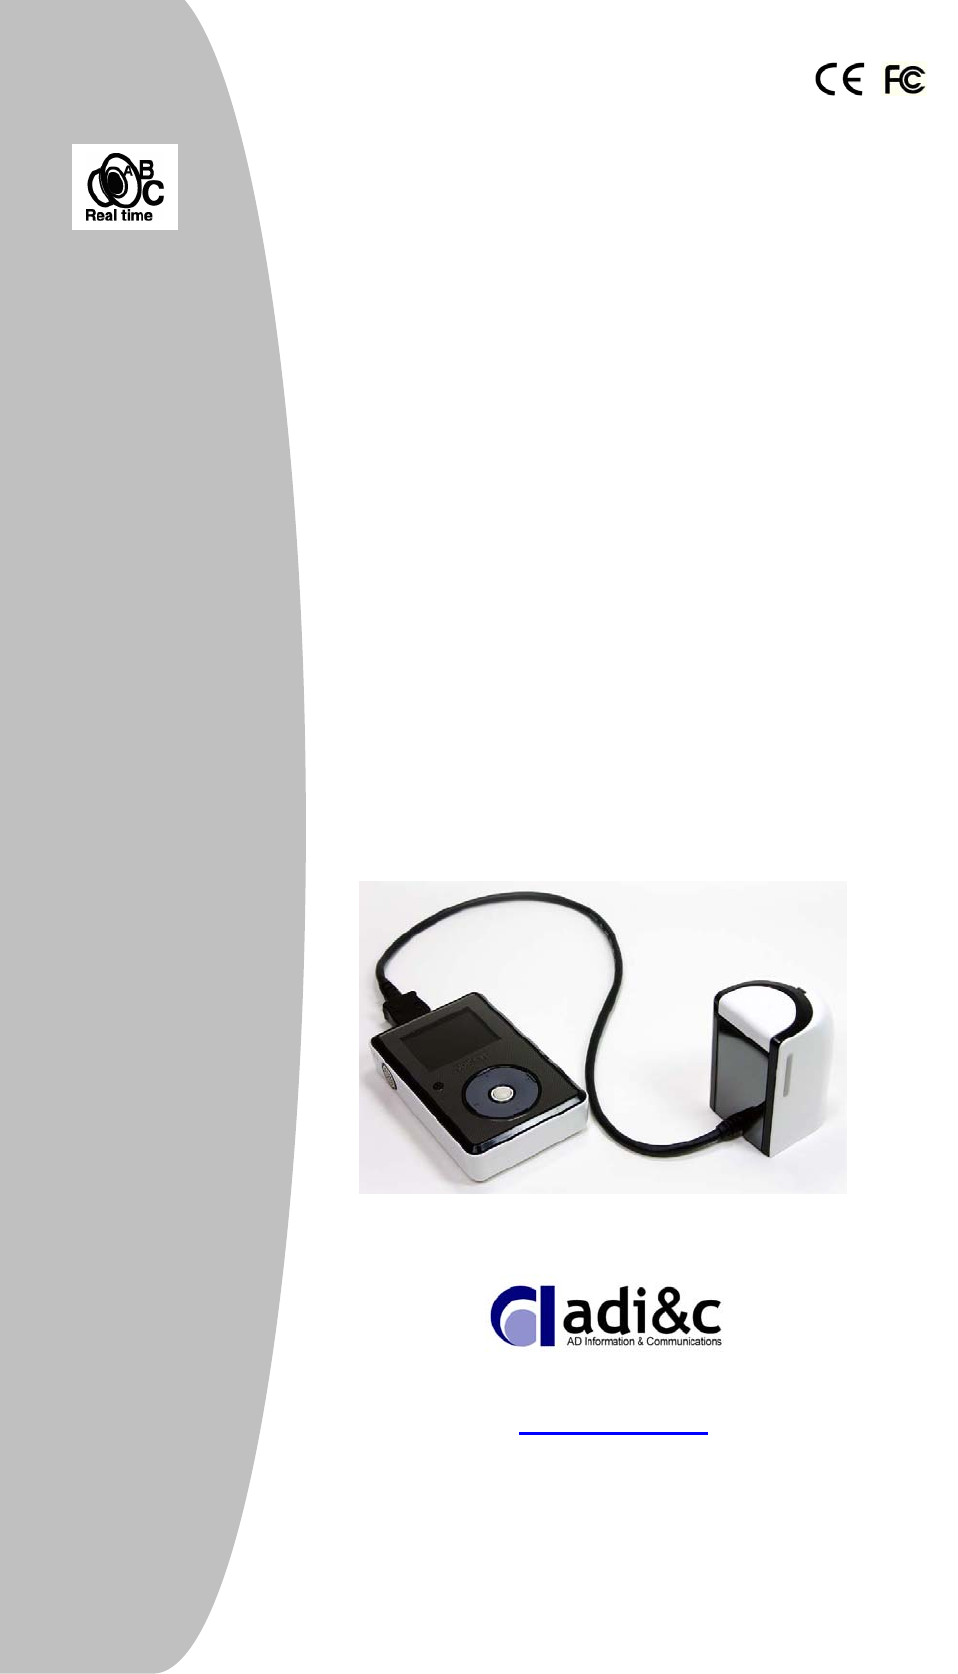
AD Information and Communications VMP-200 VOICEYE MATE User Manual VOICEYE Mate manual Eng
AD Information & Communications Co., Ltd. VOICEYE MATE VOICEYE Mate manual Eng
Users Manual
User’s Manual
KP[
KP[
thisdf
www.voiceye.com
Table of Contents
This user manual is not the final version for End-users.
It may not show some functions added.

2
Chapter 1. Before you start
1. Safety Precautions ····································································· 4
2. Important features of VOICEYE Player ···················································· 5
3. VOICEYE Mate product specifications ····················································· 6
4. Package Lists ···································································· 7
5. Items sold separately ······················································ 7
6. Description of each part in VOICEYE Mate ················································ 8
7. Description of LCD display and Icons ······················································ 9
8. Recharging the battery and operation time ··················································· 10
Chapter 2. The features of VOICEYE Mate
1. Getting started ········································································· 11
2. Power on, off, and reset ································································ 12
3. Setting lock ··········································································· 12
4. Capturing and reading VOICEYE ············································· 12
5. Adjusting speech rate and volume ······················································· 14
6. Saving and playing a file ···························································· 14
7. Managing folders and files ·························································· 16
8. Using Bookmark folder ······························································· 17
9. Setting play methods ·································································· 17
10. Information about the available memory space ······································· 18
11. Setting speech announcement on/off ················································ 18
12. FM radio ·················································································· 19
13. Recording ·········································································· 19
14. Talking clock ······································································ 20

3
Chapter 3. Detailed description of each mode in VOICEYE Player
1. Play mode ·············································································· 20
2. VOICEYE mode ············································································· 22
3. FM radio mode ·············································································· 23
4. Record mode ·········································································· 24
5. Setup mode ····················································································· 25
Chapter 4. VOICEYE Browser
1. Installing VOICEYE Browser ································································· 27
2. System requirements ··········································································· 29
3. Installing the VOICEYE Player driver and connecting to the player ···· 29
4. Features of VOICEYE Browser ···························································· 31
5. Detailed description of each feature ························································ 33
(1) Upgrading the VOICEYE Player ····················································· 33
(2) Managing TTS language packs ·························································· 34
(3) Downloading files to the VOICEYE Player ···································· 37
(4) Uploading files to My Computer ···················································· 37
(5) Managing folders and files ···························································· 37
6. Menu Index ·······································································································
3 9
Chapter 5. Appendix
1. How to use VOICEYE template ······························································ 41
2. Troubleshooting ····················································································· 42
3. A/S (after-service) ··················································································· 43
4. Consumer damage compensation guide ······························································ 43
5. Product Warranty ····························································································· 44
4
Chapter 1. Before you start
▶ Before you start using this product, please be aware of the cautions listed below.
▶ We, the manufacturer of VOICEYE, are not responsible for the failure or damage of the
product (or its parts or connecting wires), data loss, injury, handicap, and any other damages
resulting from ignoring the cautions below.
(1) Don’t use this product for any purpose other than described in this user’s manual.
(2) Be careful when you touching the sharp edges of the box, contents inside the box
including this user’s manual and all other parts included.
(3) Avoid any strong direct impact or vibration on the product. It can cause damage and/or
structural failure.
(4) Don’t use or leave your VOICEYE Player in very hot and humid place or where strong
vibration or magnetic field is present and avoid drastic changes in temperature,
(5) Be careful not to spill any liquid (i.e. water, beverage, etc) on the VOICEYE Player.
(6) Be aware that if you disassemble or rebuild your VOICEYE Player, you will not be
eligible for free repair service, and may be excluded from any other services.
(7) We are not responsible for the data loss or damage while transmitting data between
your VOICEYE Player and a computer.
(8) Back up your data frequently if you choose to keep important data in your VOICEYE
Player. The data stored in your VOICEYE Player may be lost due to failure or damage,
or other external causes (i.e. an impact from outside, electric failure, etc). In such cases,
we do not take any responsibility for the data loss.
(9) Be aware that the continuous use of an earphone for long hours may cause hearing
impairment.
(10) Properly hold the plug when you connect or disconnect your ear phone or cable.
If you pull the ear phone or cable cord, the wire inside may be broken.
(11) Make sure that you are inserting the end of a cable correctly when you connect
the USB cable or the cable for the VOICEYE scanner to your VOICEYE Player
or to a computer. If the end of the cable is not correctly aligned to the
corresponding hole and inserted by force, it can cause failure or
damage of your VOICEYE Player or a computer.
(12) Don’t leave the USB cable connected to a computer while you are not using it.
(13) Avoid giving a strong impact on the cable or shaking it hard while it is
connected to your VOICEYE Player.
(14) Don’t leave your VOICEYE Player connected to a computer through a USB
Safety Precautions
1
5
cable for a prolonged time.
(15) Always keep the USB port on your VOICEYE Player clean.
(16) Wipe the player surface a soft cloth or towel when dirty. Please avoid using any
chemical solution.
○ Output real time speech – the VOICEYE Player Outputs the content of a
VOICEYE captured by the VOICEYE scanner, or a text file stored in the VOICEYE Player
in synthesized voice in real time.
○ Store text data –You can save the content of a VOICEYE you are currently
listening to, or a text file kept in a computer to a folder in the VOICEYE Player.
○ Adjust speech output rate –You can adjust the speed of speech output.
○ Output voice messages for menus – The VOICEYE Player Guides you through menus
and all the other functions with voice messages. You can turn off set this feature too.
○ Support LCD display – the VOICEYE Player Displays the content being spoken on the
LCD display. You can turn off this feature for your convenience.
○ FM radio – You can listen to your favorite FM radio station at any time at any place with
the VOICEYE Player.
○ Record – The VOICEYE Player provides recoding function. The VOICEYE Player has a
built-in microphone on the front side.
○ Announce time by voice –Tells you the current time.
○ Transmit data between the VOICEYE Player and a computer – You can transmit text data
using the VOICEYE Browser after you connect your VOICEYE Player to the computer
through a USB cable.
○ Download a VOICEYE – You can play the content of the VOICEYE downloaded from a
web site via the VOICEYE Browser.
Please refer to the relevant section in the manual for more information about other
functions of the VOICEYE Player and related software.
By default, the VOICEYE Player guides you through all menus and functions with voice
messages. If you do not press any button during speech outputs, you will not put too much
stress on the system and will be able to use the player more safely.
We provide a separate user’s manual for the VOICEYE Maker used to create a VOICEYE .
Please refer to the VOICEYE Maker user’s manual for MS Word.
Important features of the VOICEYE
2

6
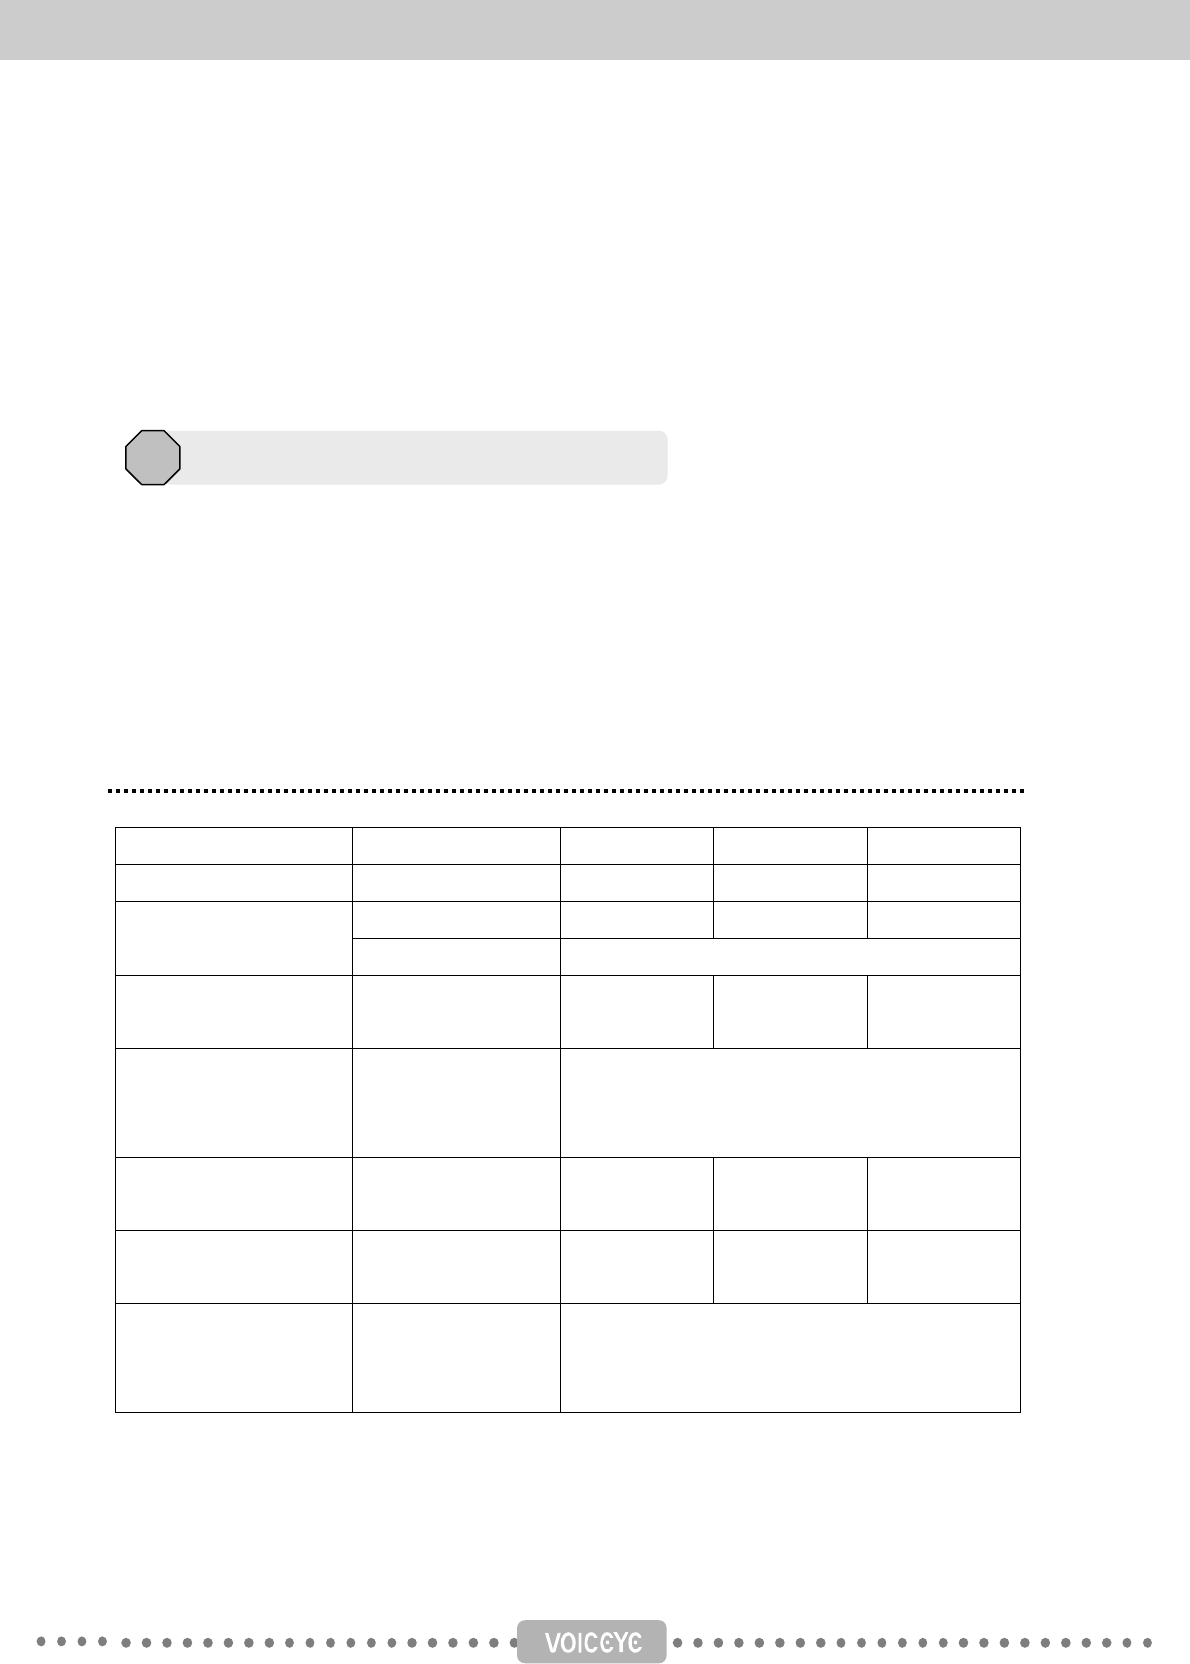
※ VOICEYE Player
The number of channels Stereo (left and right side)
Output frequency range 20Hz~20KHz
Ear phone output (L)15mW + (R)15mW, 16Ω
Audio
Speaker output (L)250mW + (R)250mW, 8Ω
FM tuner FM frequency range 87.5MHz ~ 108MHz
File File type Text (*.txt)
Adapter USB or power adapter
(5V/0.5A)
Battery Lithium ion
Power supply
Charging time 2 hours
Dimension 102 x 65 x 23 mm
Weight 125g (including battery)
LCD size 1.89″
LCD resolution 160 x 128 STN/4096 color
Operating temperature 0 ~ 40℃
Memory 512MB internal memory
(TTS DB 200MB)
USB USB 2.0
Maximum operation time 3 hour playing in speech
General
Recording Sampling frequency 16KHz,
16 bit mono
※ VOICEYE scanner
Dimension 43 x 48 x 67 mm
Weight 80g
Image sensor 1/2 inch CMOS Color SXGA sensor
Color 24 bit RGB Color
Pixel array size 1280 x 1024 Pixel
Exposure Automatic & manual control
Signal to noise ratio 54 dB
Maximum image transfer rate 15 FPS (Frame Per Sec)
Interface 24 pin port
Cable length 45cm
VOICEYE Mate product specifications
3

7
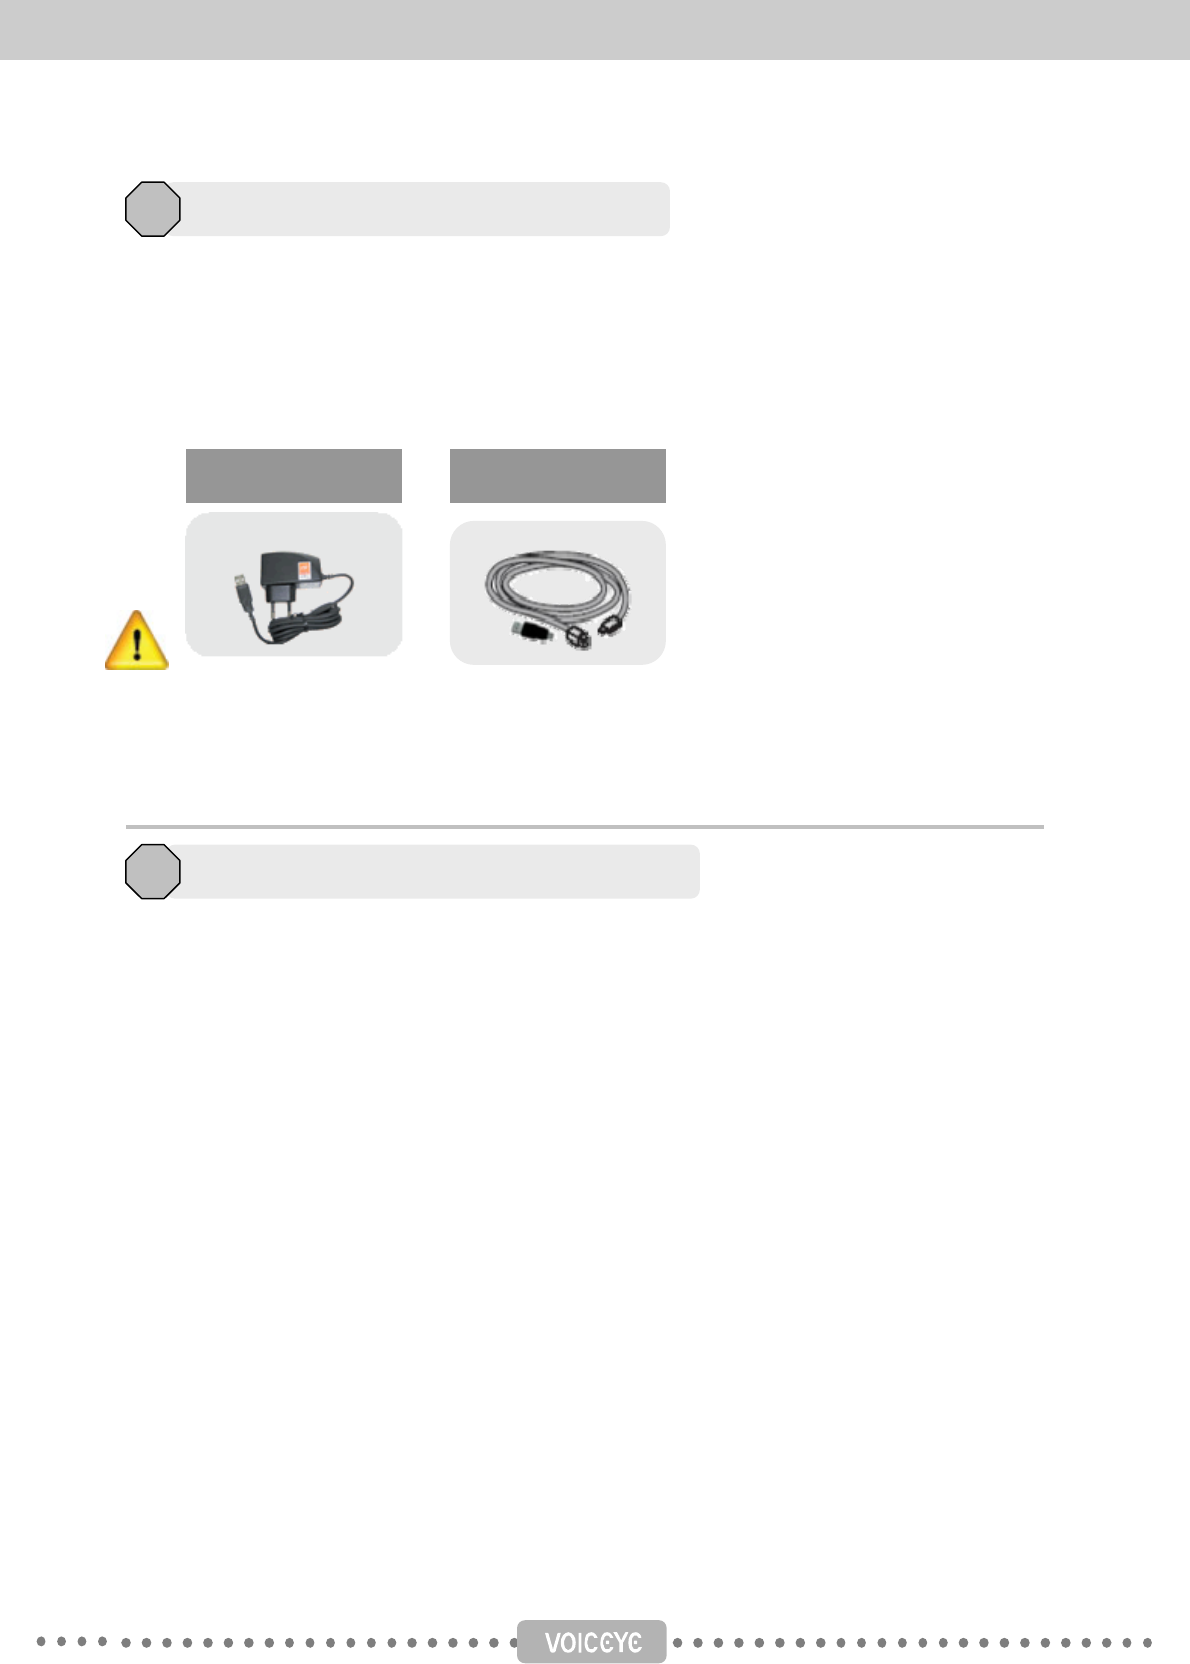
Please make sure that all the items listed in this manual are included in your package.
When you purchase this product, English TTS (Text to Speech) engine will
be provided in a CD. If you need other languages such as Korean or
Japanese, you have to purchase a separate language pack CD.
When you purchase this product, the VOICEYE Maker for MS Word will
be included in the CD. You can also purchase the VOICEYE Maker for
HWP (Hangul Word Processor).
Package List
4
VOICEYE Scanner VOICEYE Player USB cable
Recharging adaptor Manual Template
Install CD
Options (items sold separately)
5
TTS Language pack
Earphone Hand strap
VOICEYE Maker
8
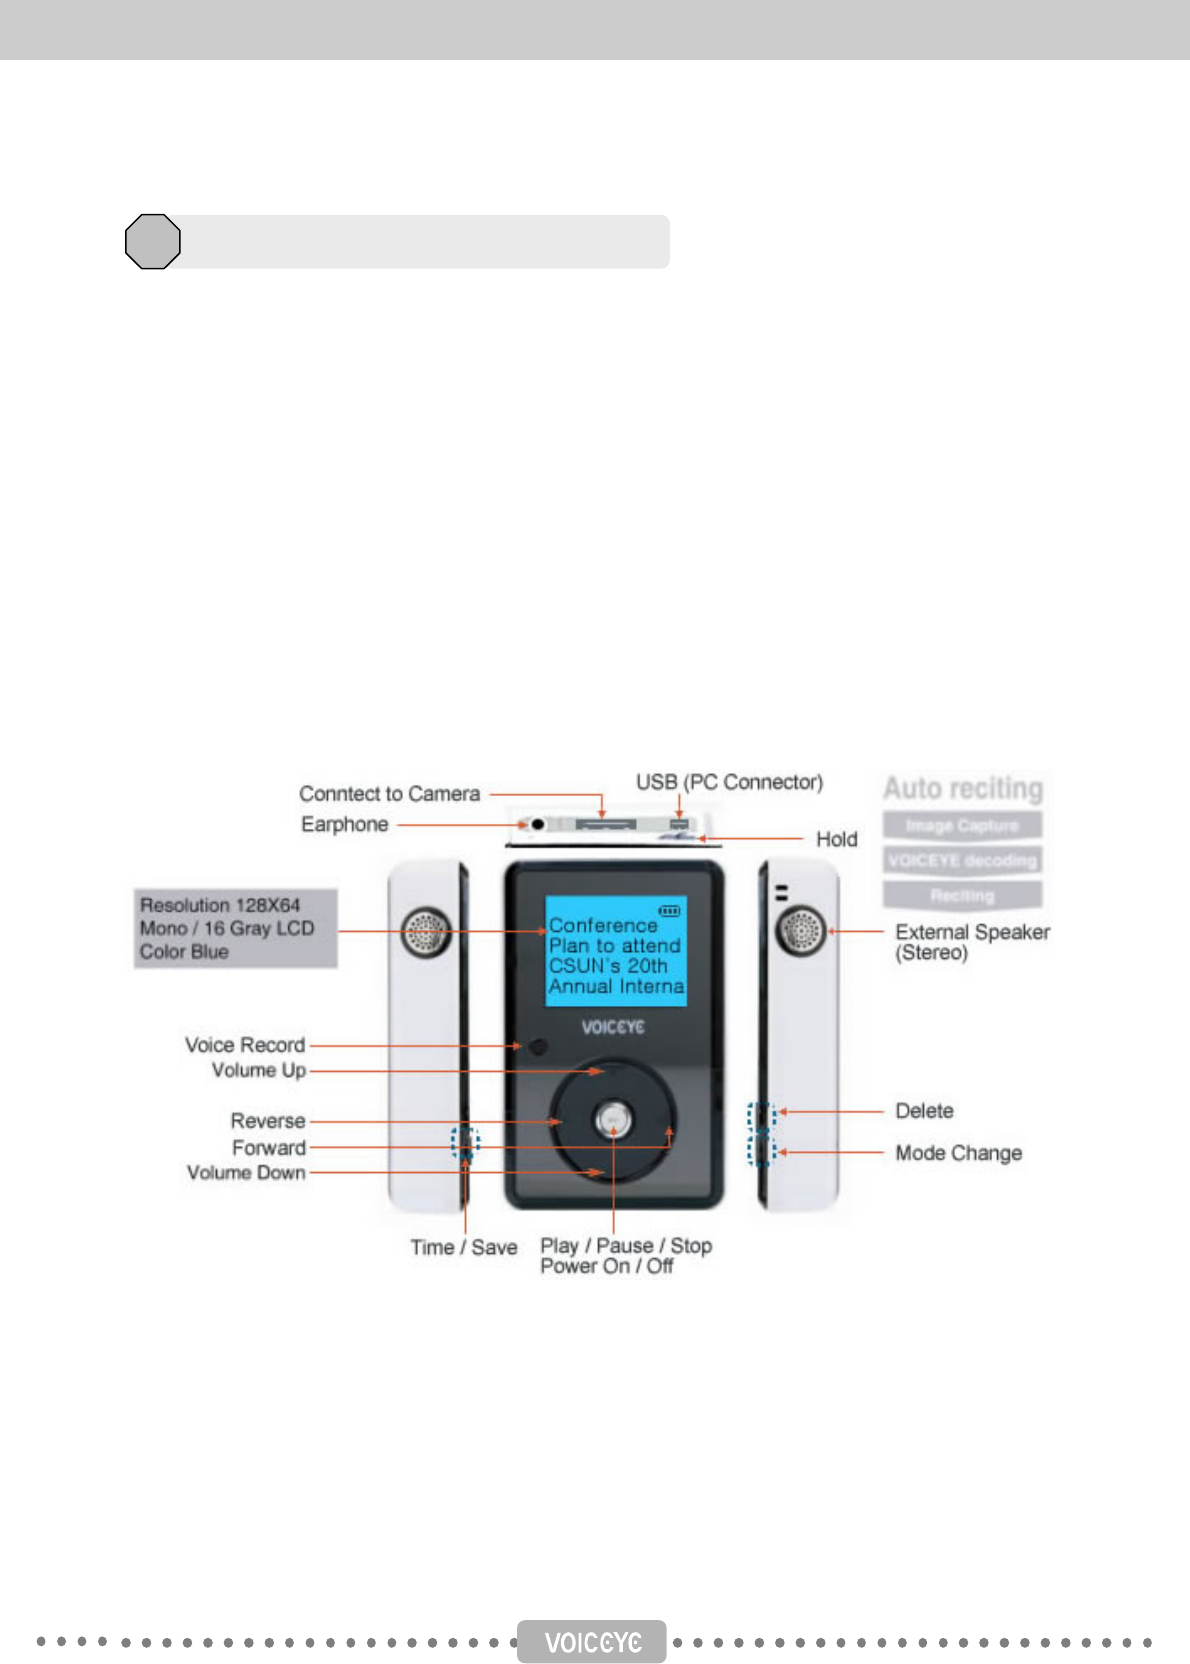
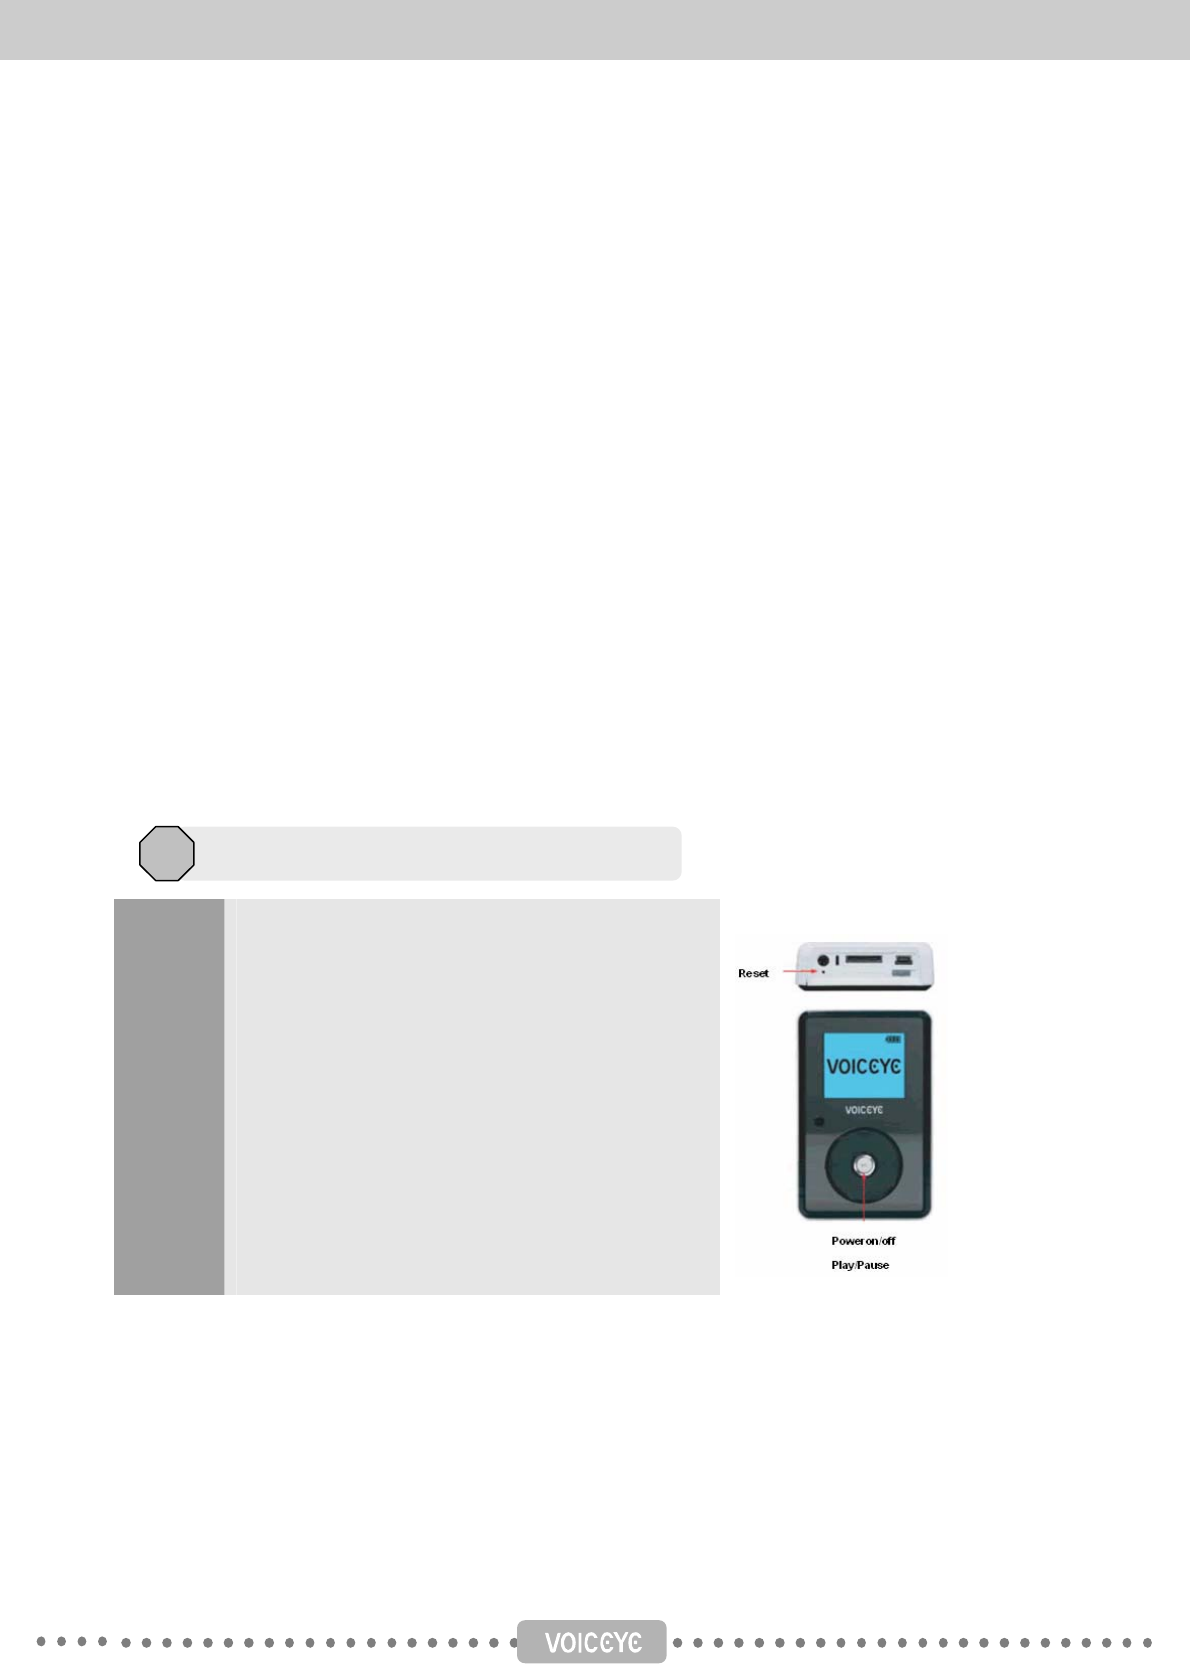
VOICEYE Player
The VOICEYE Player is vertical rectangular box shape. Place the player with the buttons facing
up. This is the front. On the upper part of this side is a LCD display and below it, a set of
buttons laid out in a circular fashion. The button at the center of the circle is the Play button.
You can find the Left, Right, Up and Down button in its corresponding direction. On the front left
edge of the player, there is the Time button for a Talking Clock and remaining battery level.
There are two buttons on the front right edge. The top button of the two is the Delete button. It
is used for saving and deleting files. The lower one is the Mode button and is used to change
modes and bookmarking. On the top side of the player, there are various ports for connecting a
VOICEYE scanner, a USB cable and an earphone.
Description of each part in VOICEYE Mate
6
9
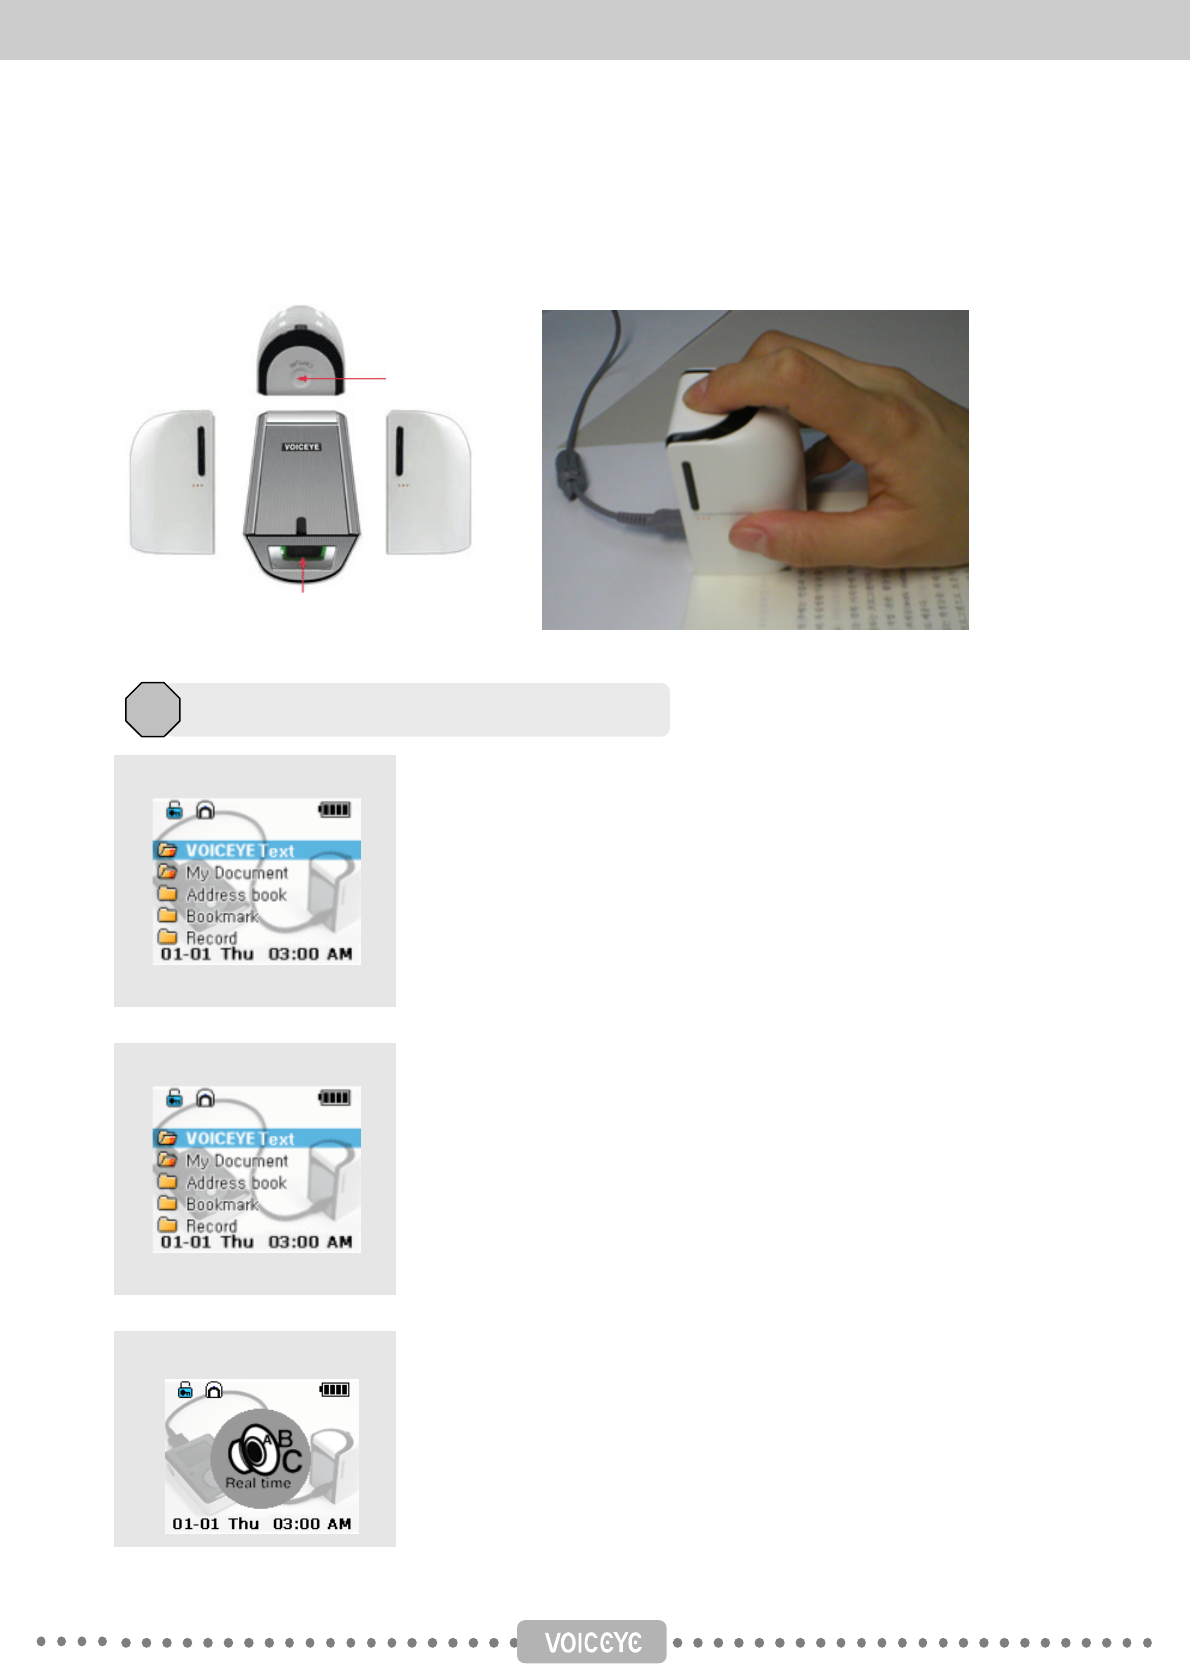
VOICEYE scanner
The VOICEYE scanner has the Capture button at the top, the lens at the bottom that captures a
VOICEYE , and a cord for connecting it to the VOICEYE Player.
1. Play mode
The icons for lock status, scanner connection status, and remaining
battery indication are displayed in the top. In the middle, a list of folders
and files are displayed. On the bottom, the current date, the day of the
week and the current time are displayed. If you press the Right button after
selecting a folder, the list of files and folders within the folder are
displayed. If you press the Play button, the content of the selected file is
shown on the display.
2. Play mode
The icons for lock status, scanner connection status, and remaining
battery indication are displayed in the top. In the middle, a list of folders
and files are displayed. On the bottom, the current date, the day of the
week and the current time are displayed. If you press the Right button after
selecting a folder, the list of files and folders within the folder are
displayed. If you press the Play button, the content of the selected file is
shown on the display.
3. VOICEYE mode
The icons for lock status, scanner connection status, and remaining
battery indication are displayed on top. In the middle, a list of folders and
files is displayed. On the bottom, the current date, the day of the week,
and the current time are displayed. In “VOICEYE mode,” the scanner
connection status icon appears on top. If the scanner is not connected, a
red X is shown on the icon.
Description of LCD display and Icons
7
Capture button
VOICEYE scan lens

10
4. FM Radio mode
The icons for lock status, scanner connection status, and the remaining
battery indication are displayed on top. In the upper left, the current
frequency is displayed. In the middle, an image of an FM radio is
displayed. On the bottom, the current date, the day of the week and the
current time are displayed.
5. Recording mode
The icons for lock status, scanner connection status and remaining battery
indication are displayed on top. In the middle, the VOICEYE record image
is displayed. At the bottom part, the current date, the day of the week, and
the current time are displayed.
6. Setup mode
The icons for lock status, scanner connection status and remaining battery
indication are displayed on top. In the middle, the information about
memory capacity, TTS settings, LCD settings and others are displayed.
You can move up and down. On the bottom, the current date, the day of
the week, and the current time are displayed.
7. Icons displayed on top
of LCD screen
Locked Unlocked
Scanner is connected Scanner is not connected
Battery display External power is connected
11
The VOICEYE Player battery is placed inside the unit and you can recharge using the ac adapter.
The player can also be charge while it is connected to a computer through a USB cable. The battery
will recharge automatically. We recommend connecting the cable to the USB port at the back of the
computer, because the power supply through the USB port at the front or an extended USB hub may
not be strong enough to recharge the battery.
It takes about 2 hours to recharge the battery completely.
When the battery is fully charged, the player’s output speech is approximately 3 continuous hours.
When you use it in “VOICEYE mode,” capturing VOICEYE, the operation time can be shorter
because the LED in the VOICEYE scanner consumes some battery power.
Chapter 2. The features of VOICEYE Mate
Reading the content of a VOICEYE printed on a publication.
1. Press and hold the Play button to power on. You will hear the message, such as, “Successful
booting. Play mode. VOICEYE text folder. The battery is fully charged.”
2. Connect the VOICEYE scanner to the player.
3. Place the scanner on a VOICEYE so that the lens at the bottom can capture the symbol.
Locate the capture button on top of the scanner. The flat side with the connecting cord should be
faced away from you. Align the edge of the scanner to the upper right corner edge of the page you
are reading.
4. Press the mode button or the capture button to enter VOICEYE mode. A continuous beep
indicated that it is searching for a valid VOICEYE. Once it captures, a chime-like sound “di-ri-ring”
will indicate successful completion and the content within the symbol will be played instantaneously.
If you have tried several times but hear only beeping sound, see page 13 of this manual. If the
scanner fails to capture any VOICEYE it is indicated by a loud “ding” sound, much like the one you
hear in windows operating system applications.
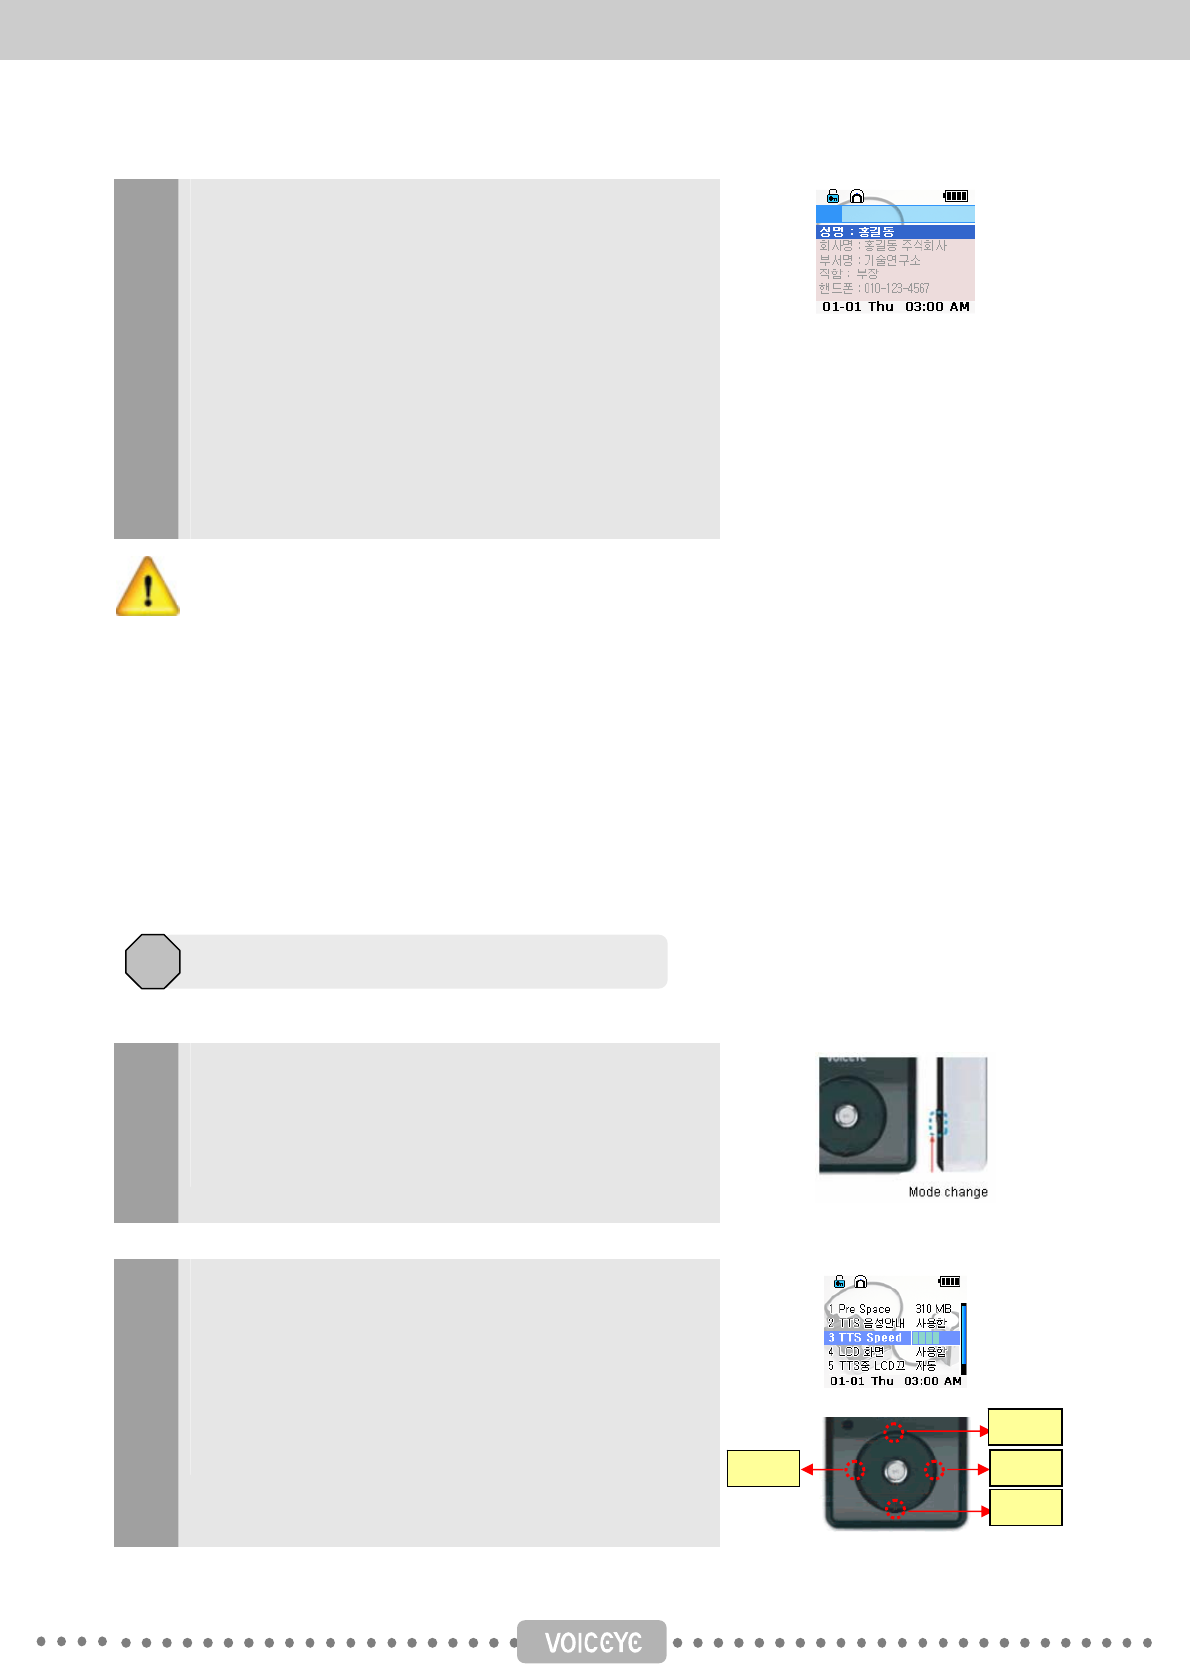
5. If you want to save the content while it is being played, press the Delete button on the front right
edge, and you will be asked whether you want to save it. Press the Play button to confirm, or press
any other button to cancel.
Recharging the battery and operation time
8
Getting started (Help folder in “Play mode”)
1
USB cable Recharging adaptor
12
6. The content captured and played the last time is stored in memory, so you don’t have to capture
it again. You can play it immediately by pressing the Play button and you can stop playing by
pressing the Time button.
Reading the content stored in the player (speech playback in “Play mode”).
1. Press and hold the Play button on the front side to power on. You will hear a message, such as,
“Successful booting. Play mode. VOICEYE text folder. The battery is fully charged.”
2. The player will start in “Play mode,” and the selection bar will be placed on the VOICEYE text
folder.
3. You can press the Up and Down button on the front side to move the selection bar to the folder
you want to select.
4. Press the Right button to enter the selected folder. The files in the folder will be displayed.
Press the Left button to return to the previous screen or use the Up and Down button to move the
selection bar to locate the file you want to play.
5. As you move through the files, the name of the selected file will be announced.
6. Press the Play button on the desired file, and the content of the file will be played in speech.
7. Press the Play button to pause. Press the Play button again to resume.
8. If you press the Time button, the playback will stop and return to the previous screen.
1 / On
2 / Off
3/Reset
Press and hold the Play button on the front side to
power on. You will hear a message, such as,
“Successful booting.” Then the player will place the
selection bar on the VOICEYE text folder in Play
mode.
Press and hold the Play button to power down.
There is a little hole for the Reset button next to the
earphone jack hole. Press the button with a pin or
the tip of a pencil to reset and reboot the player.
Power on, off, and reset
2
13
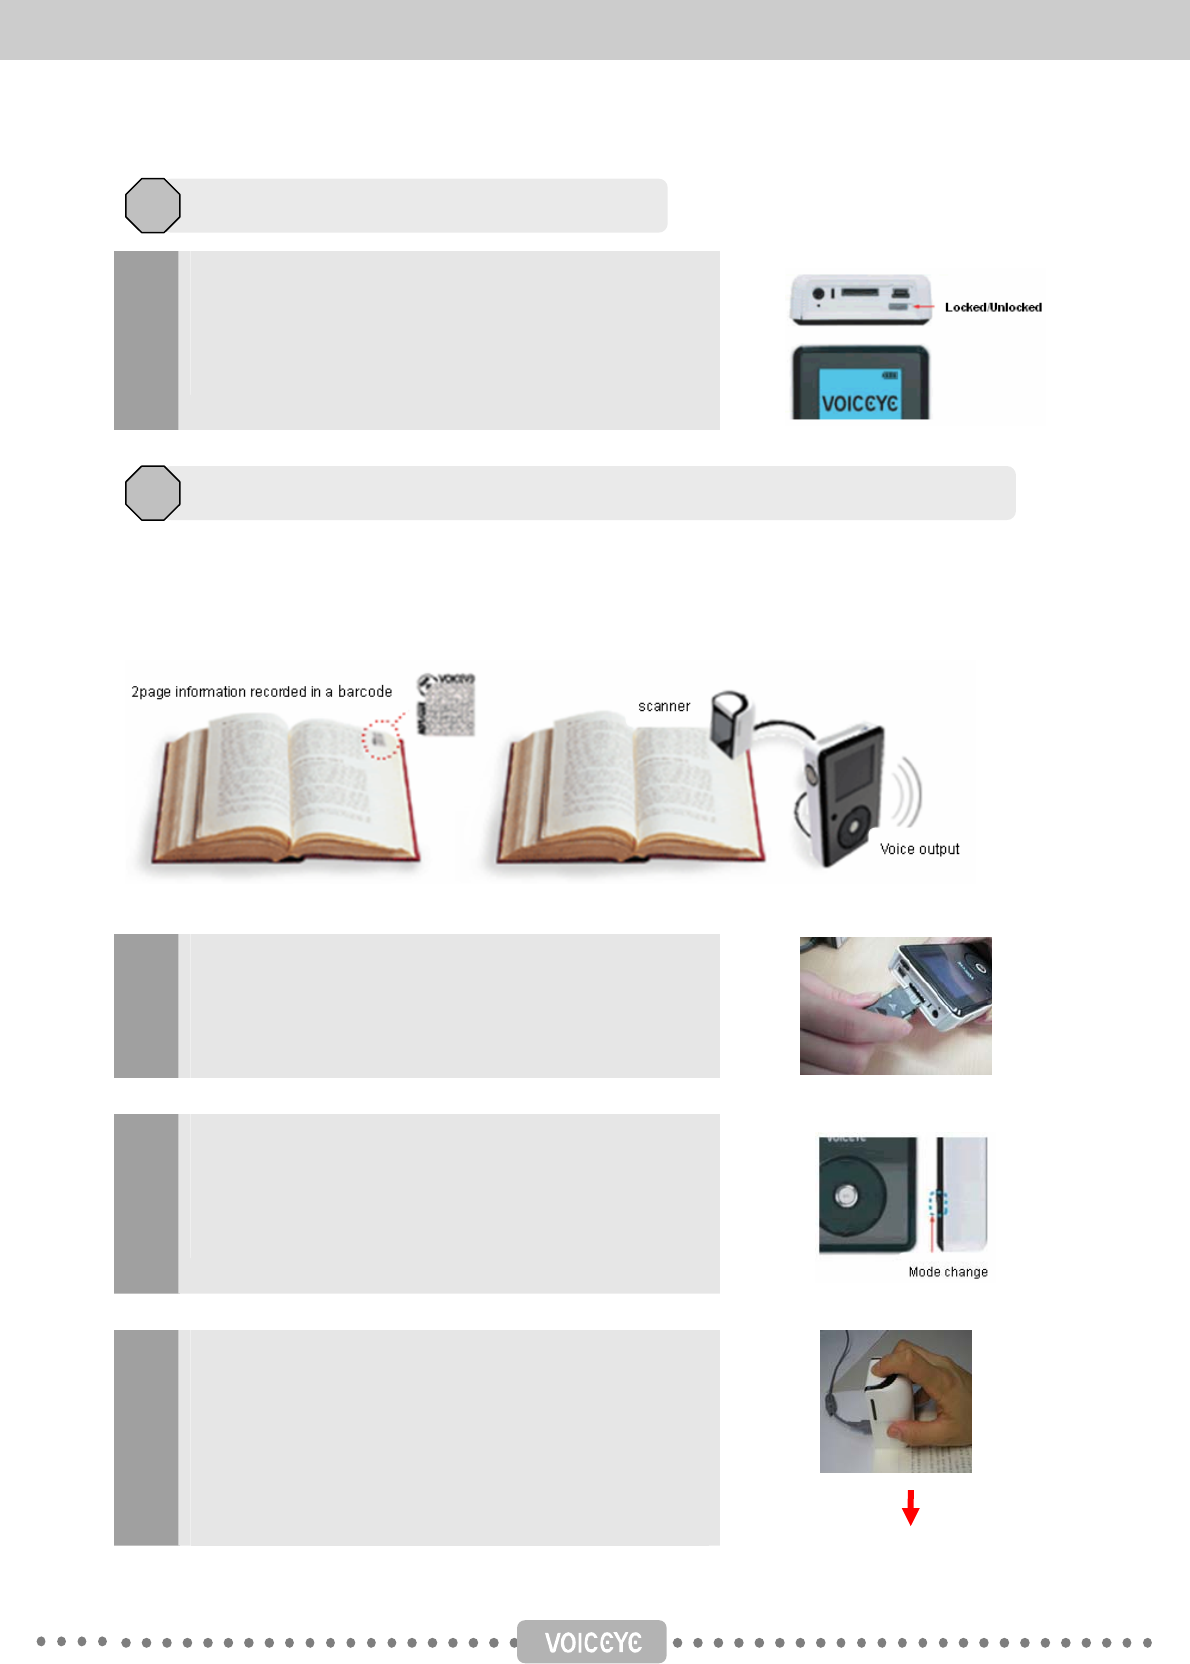
1
On the top side of the player, there is a Lock switch next to
the USB port. If you slide the switch to the left (you will
find a tiny bump on the left of the switch), the player will be
locked, and if switched to the right, it will be unlocked.
Place the scanner on a VOICEYE located at the top right corner of a printed page. The player will
automatically recognize the image, restore the content of the original document, and produce the
speech output of the content. The player should be set to “VOICEYE mode.”
1
Check the connection between the VOICEYE Player and
the VOICEYE scanner first. When you connect the
VOICEYE scanner to the VOICEYE Player, you will hear a
message “The scanner is connected.”
2
If you press the Mode button repeatedly or press the
Capture button on the top of the scanner, the player will be
set to the “VOICEYE mode.” The Mode button is the lower
of the two buttons on the front right edge.
3
If you press the Capture button in “VOICEYE mode,” the
player will start capturing a VOICEYE . You will hear a
continuous beep indicating the progress while it is trying to
located a valid symbol. The data encoded in the symbol
will be automatically decoded and played using text-to-
speech. The content will also be shown on the LCD
Setting lock
3
Capturing a VOICEYE and playing its content in speech
4
14
display. The data obtained from the last capture is stored
in memory, so you can play it again by pressing the Play
button without capturing the VOICEYE again. Pressing the
Play button will start playing the content, and pressing the
Time button will stop. A VOICEYE will be easily captured
automatically if you place the scanner like in the figure on
the right, with the side from which the cord connecting to
the player comes out facing to the top of the page, and
with the back right bottom of the scanner aligned with the
top right corner of the page.
Things to remember when capturing a VOICEYE
1) Make sure that the back right bottom corner of the scanner is at the top right corner
of the printed page.
2) Make sure if you have pressed the Capture button in the “VOICEYE mode.”
3) You will hear beeps continually while capturing a . If capturing is not completed for
a long time, make sure that you have placed the scanner where the VOICEYE is.
Once
the is successfully captured, a chime-like “di-ri-ring” sound will be played and the
text-to-speech will begin to speak the text data in the VOICEYE.
※ Adjusting speech rate.
1
Change to “setup mode,” by pressing the Mode button
repeatedly. In “Play mode,” pressing the Left button will
take you directly to the “Setup mode.”
2
Locate “TTS speed” by pressing the Up or Down button in
“setup mode.” Once “TTS speed” is selected, change the
setting by pressing the Left or Right button. By default, it is
set to normal speed. There are 7 options: slowest, slower,
slowest, normal, faster, faster, and fastest.
Adjusting speech rate and volume
5
Right
Up
Down
Left
15
※ Adjusting volume
In “Play mode,” “VOICEYE mode,” and “FM radio mode,”
you can adjust the volume by pressing the Up or Down
button. You can adjust the volume while speech output is
being produced.
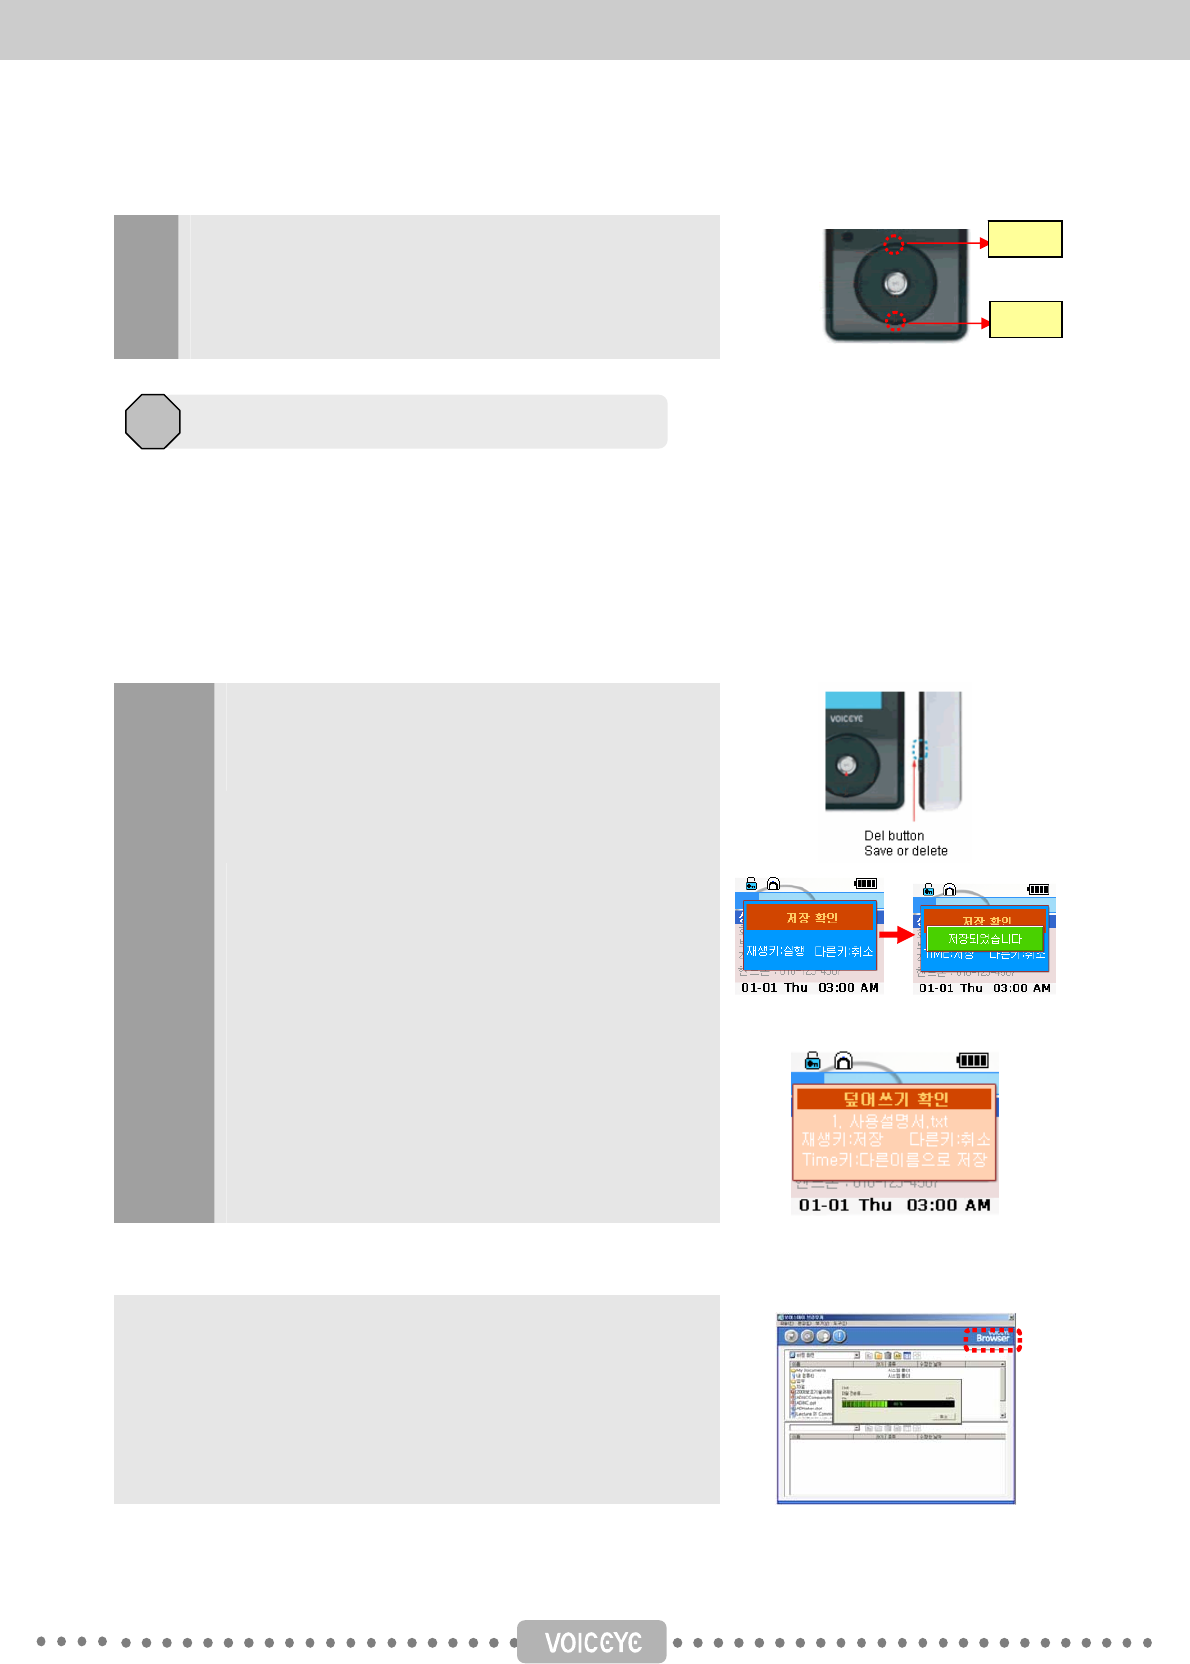
While the content of a VOICEYE is being played in speech, you can save it by pressing the Del button.
You can access the saved file in “Play mode” by pressing the Up or Down button repeatedly. When you
move the selection bar through a list of files and folders, the selected item will be announced. Also, you
can transfer text files on your PC to the VOICEYE Player, using VOICEYE Browser.
※ Saving to a file in “VOICEYE mode”
1
If you want to save the content of a VOICEYE to a file
while it is being played, press the Del button.
2
You will hear the message “Press the Play button to
confirm, or press any other button to cancel.”
Pressing the Play button will save the content to a file,
and pressing any other button will cancel saving.
3
When you have confirmed saving by pressing the Play
button, if there is a file with the same name, you can
press the Play button to overwrite the file, Time button
to save it with a different name, or any other button to
cancel.
※ Transmitting text files on your PC to the VOICEYE Player, using VOICEYE Browser
In the VOICEYE browser, select the files you want to download to
the VOICEYE Player, and then click the download button at the
top right corner of the browser. When you use copy and paste,
please make sure whether you are in My Computer Explorer
window, or in the VOICEYE Player Explorer window.
Saving and playing a file
6
Up
Down
16
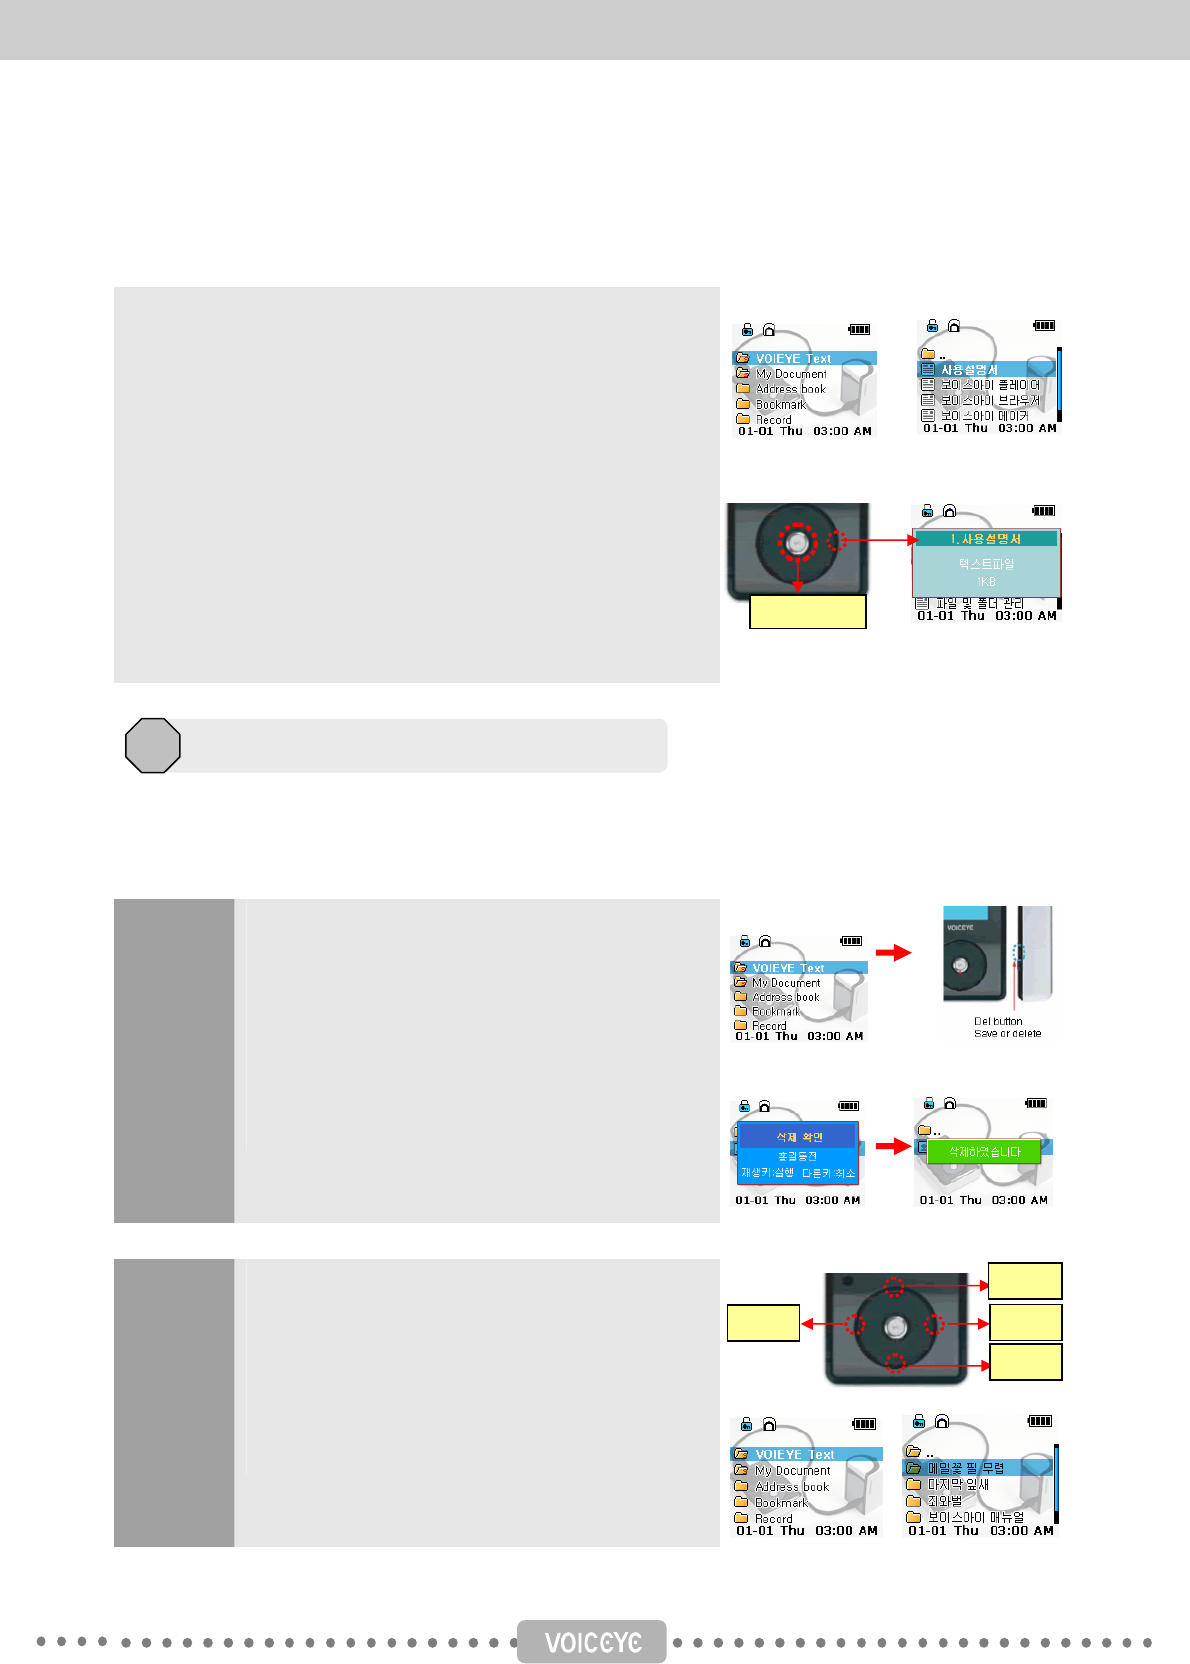
※ Playing stored files
If you press the Up or Down button in “Play mode,” you can move
among folders and files and the current selection will be
announced in speech whenever you change the selection. To
enter the selected folder, press the Right button. Again, press the
Up or Down button to move to the file you want to play, and press
the Play button. You will hear the content of the file. While it is
being played, if you press the Time button, the speech will stop
and the player will be in “Play mode” again. Within a folder, if you
press the Right button, you will hear the type and size of the file.
If you press the Left button, you will move to the higher level
folder. Folder list, File list.
Folder list File list
Playing file File index
The VOICEYE Player contains system folders by default. These folders cannot be deleted. However,
you can delete the folders and files you created if you want to. You can also use the VOICEYE browser
to manage your files and folders.
1
Deleting
files
If you press the Up or Down button in “Play mode,”
a file or folder will be selected and its name will be
announced. If you press the Delete button, the file
or folder will be deleted. Then, press the Play button
to confirm, or any other button to cancel. System
folders will not be deleted.
2
Moving
to a
folder
Once you select a folder, press the Right button to
enter it. Then, you will hear a message, “Current
folder: text.” Press the Down or Up button to select
a file or folder. If you press the Left button, you will
move back to the higher level folder.
Managing folders and files
7
Right
UP
Down
Left
Play button
17
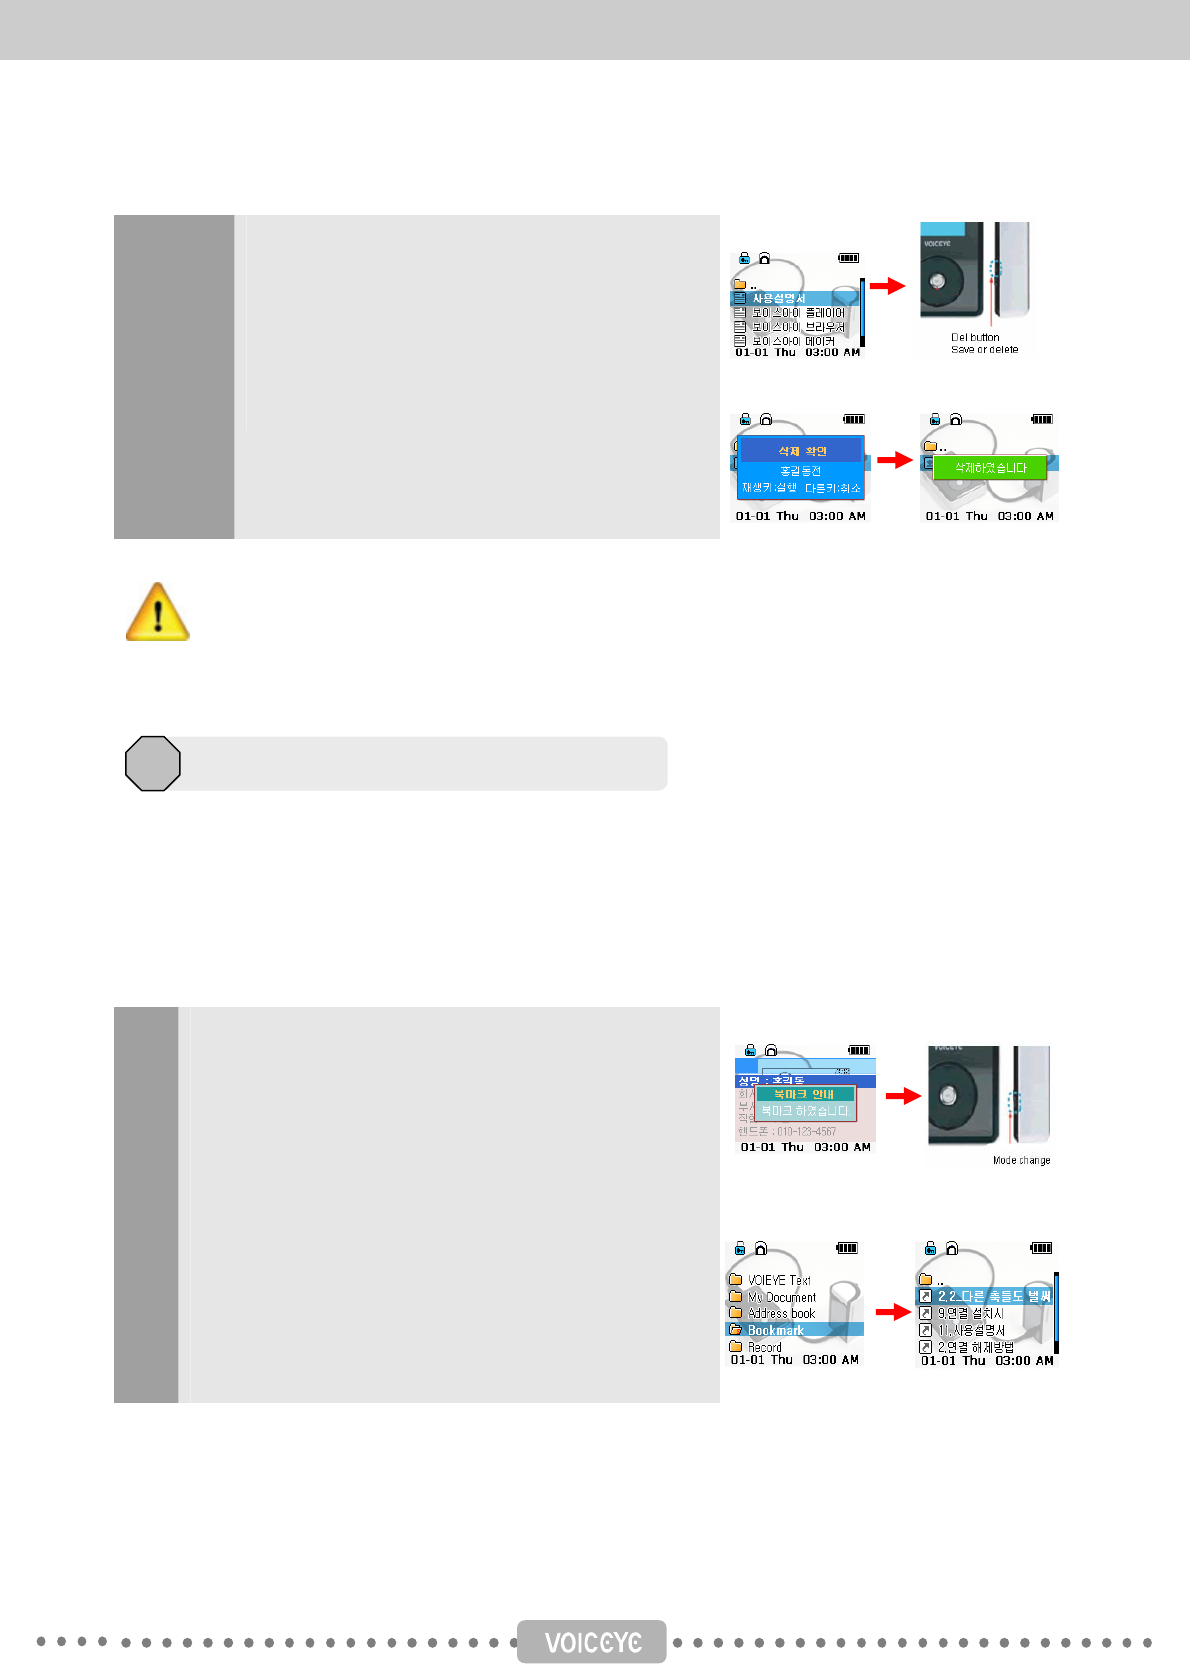
3
Deleting
files
You can delete the selected file by pressing the
Delete button. Then, press the Play button to
confirm, or any other button to cancel.
You can easily manage folders and files in the player, using the VOICEYE Browser program. For
more information about how to manage folders and files, refer to “Managing folders and files
using VOICEYE Browser.”
While you are listening to the content of a VOICEYE in “VOICEYE mode” or a stored file in “Play mode,”
you can set bookmarks so that you can easily move back to a certain position in the file. If you press the
Mode button and hold it for two seconds while the content is being played, the location of the file
containing the content will be saved in the Bookmark folder. If there is a file with the same name, the file
location information in the folder will be deleted and rewritten. When you delete a file, the file location
information stored in the Bookmark folder will also be deleted.
1
2
Press the Mode button and hold for about two seconds
while playing the content. You will hear the message,
“Bookmarked.”
After saving the bookmark, the player will resume playing
the content.
You can find the saved bookmark file in the bookmark
folder. You can store up to 20 bookmark files in the
bookmark folder. If it contains 20 bookmark files in the
bookmark folder, you should delete some bookmark files
and then set another bookmark.
Using the Bookmark folder 8
18
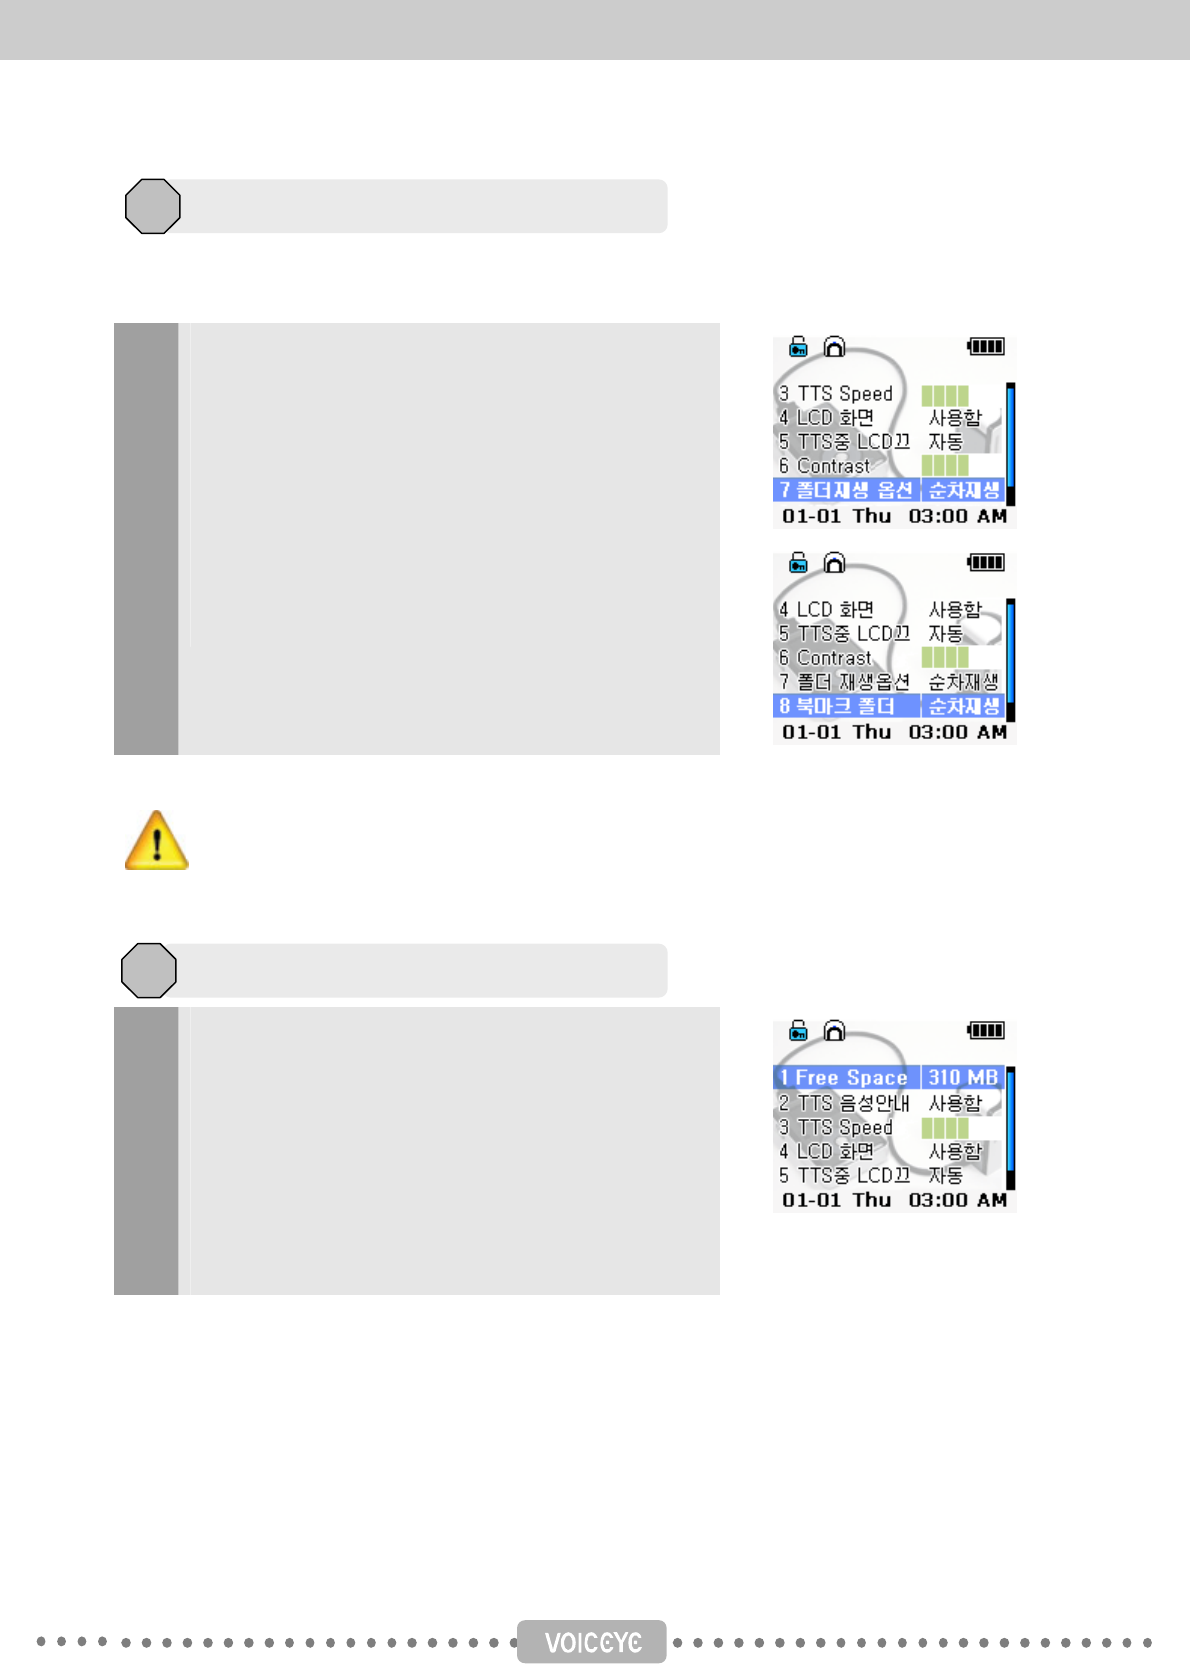
There are two play methods: one time and sequence. The play method applies to all files in all
folders, but the play method for the bookmark folder can be set separately.
1
2
3
Press the Mode button repeatedly until you reach “setup
mode.”
Press the Up or Down button to move to “folder play”
option.
One time: plays the selected file and stops. (It is the
default value.)
Sequence: Plays the selected file, selects the next file and
plays it automatically until there is no more file.
You can set the play method for the Bookmark folder in the same way. After selecting
the “Bookmark folder” item in “Setup mode,” you can set it to one time or sequence.
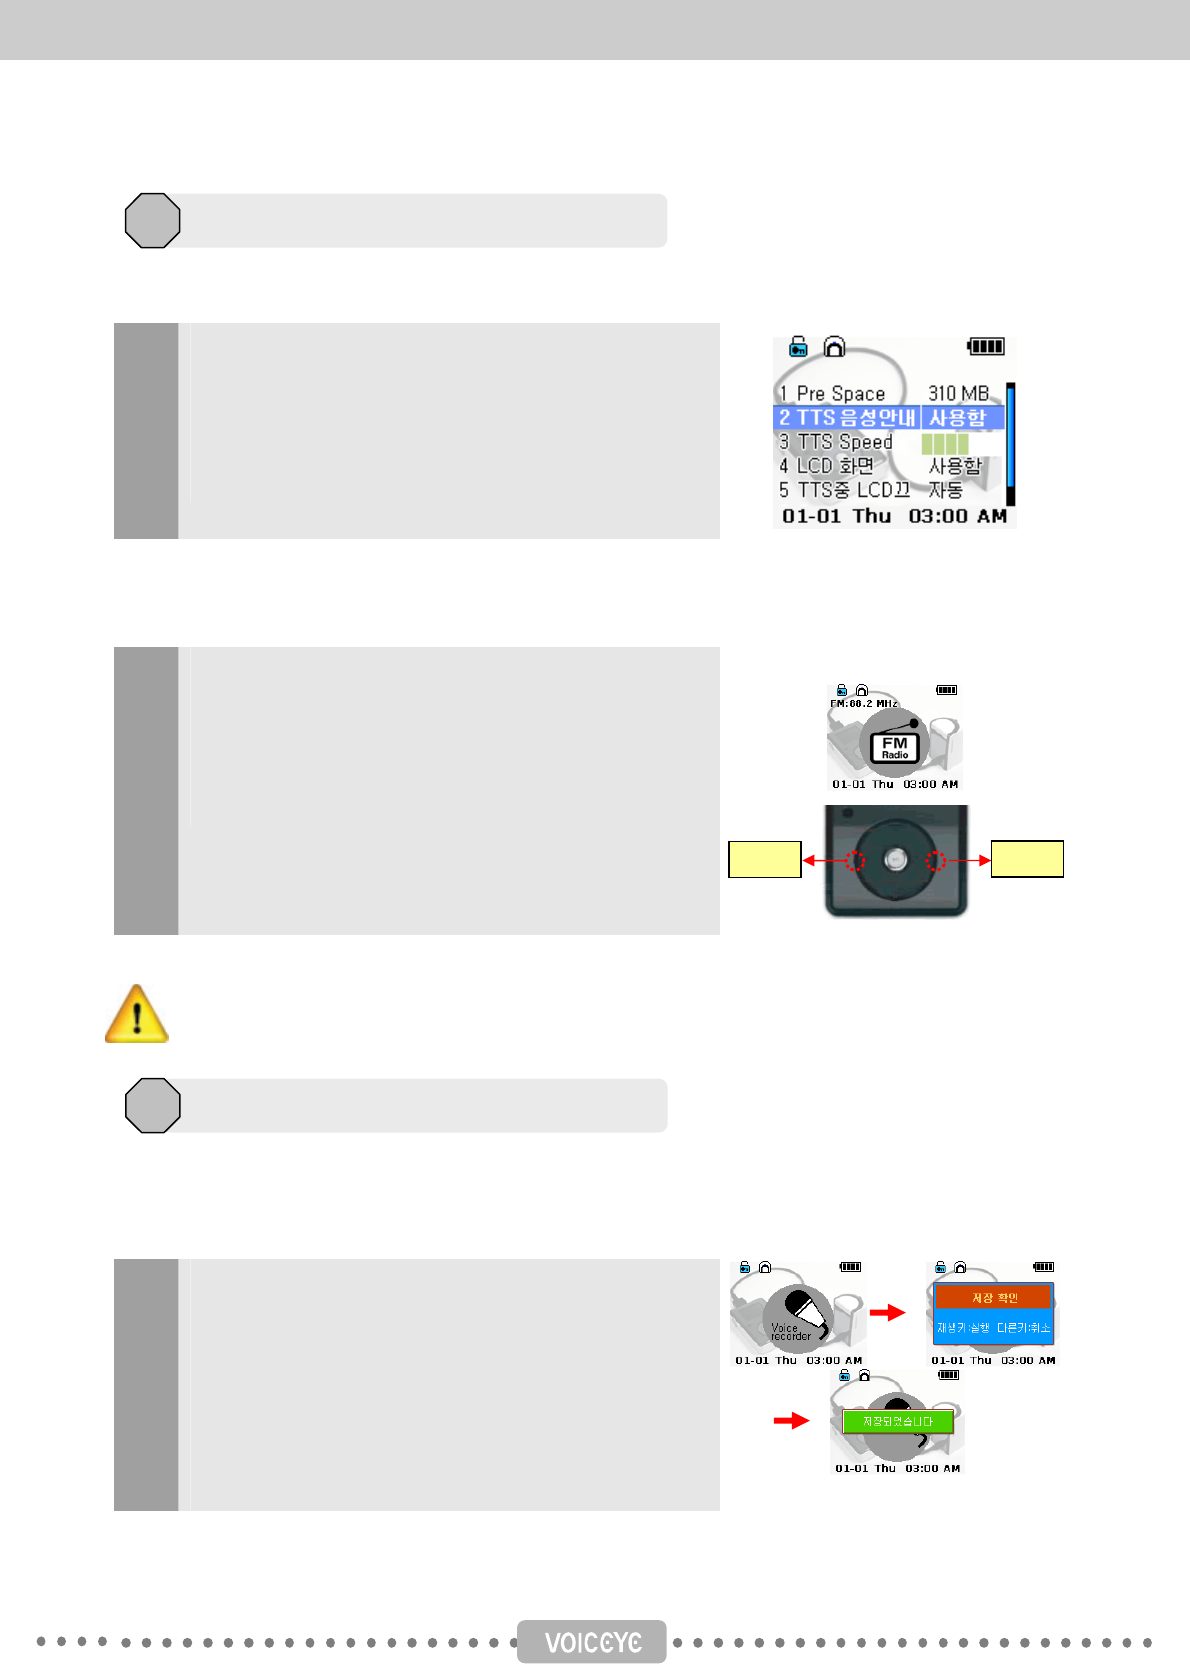
1
2
Press the Mode button repeatedly to change to the “Setup
mode.”
At the first item in the “Setup mode,” it will announce the
currently available memory space.
The VOICEYE Player has 512MB memory capacity. Some
of it is used for storing the files of the TTS engine and the
operating system, and about 300 MB memory space is
available at first.
Setting play methods
9
Information about the available memory space
10
19
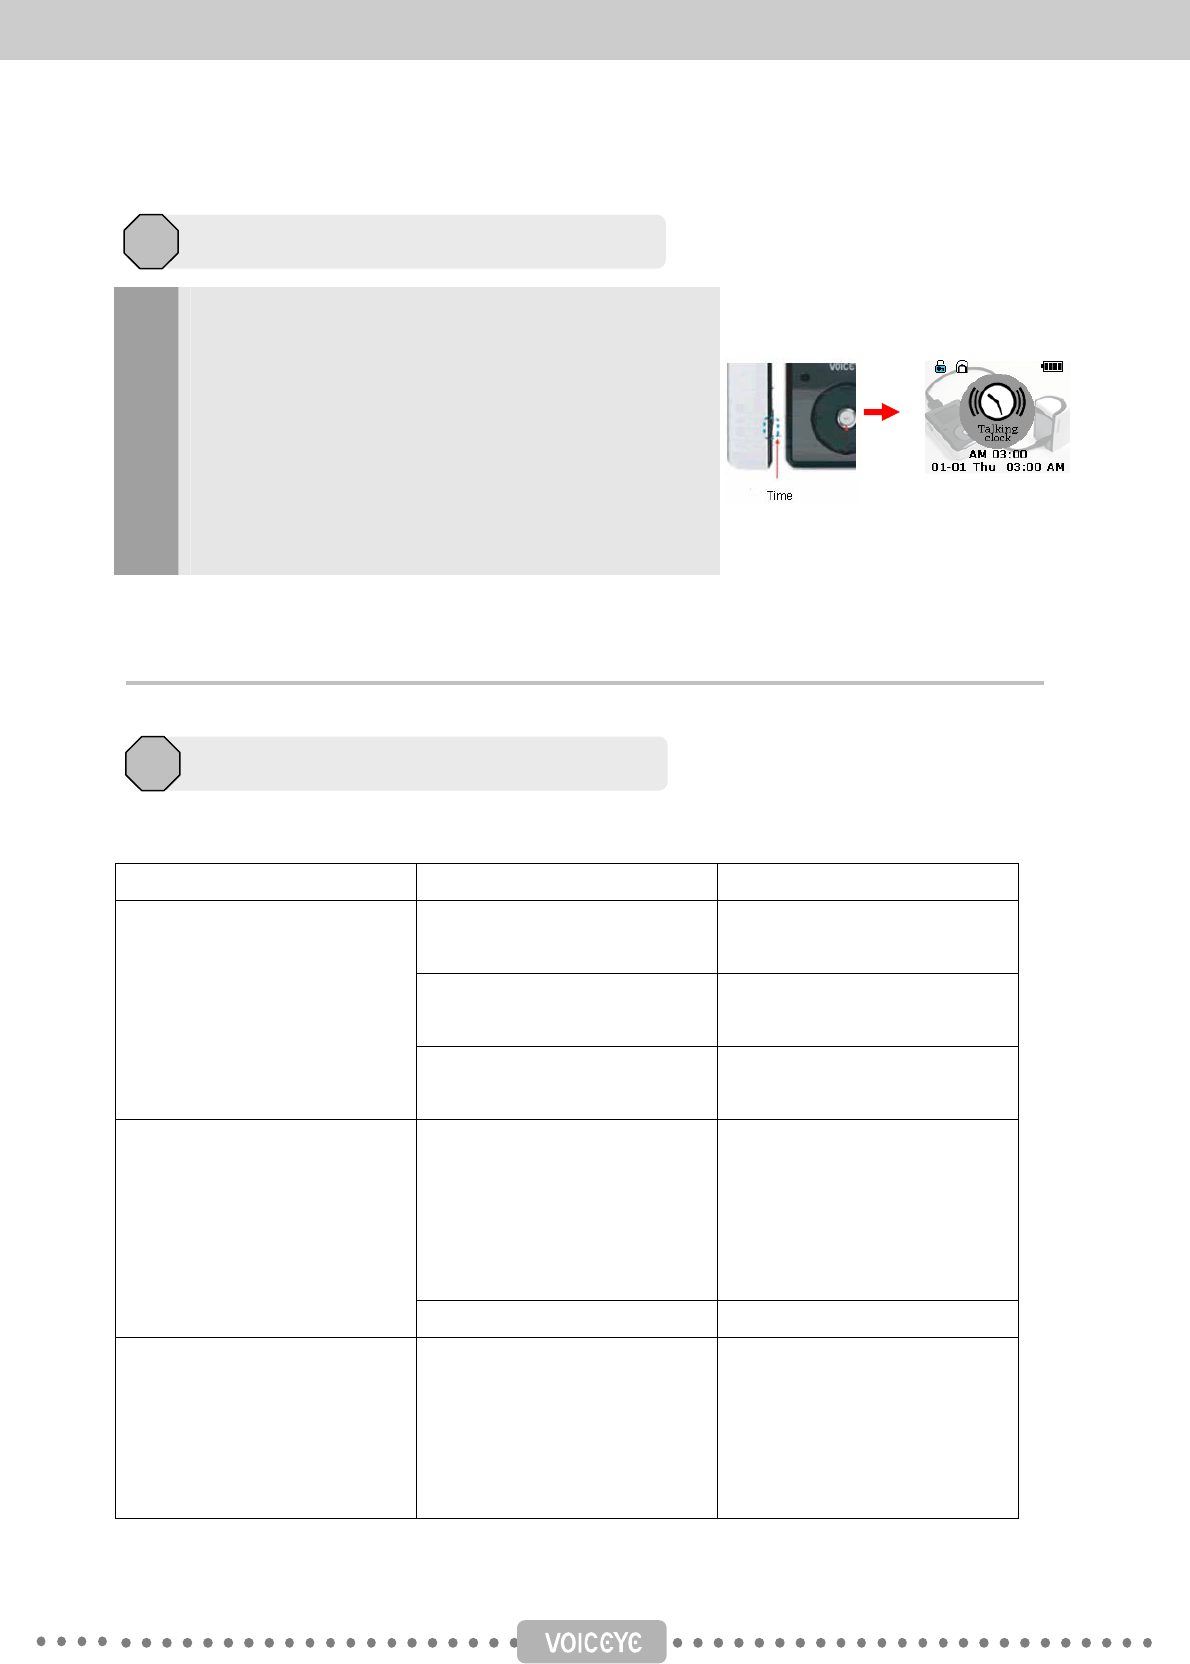
Basically, when you move to a menu item, the VOICEYE Player announces the item in speech. If you feel
you know the interface so well that you don’t need the announcement, you can set the announcement off.
1
2
Press the Mode button repeatedly to change to the “Setup
mode.”
Press the Down button to move to the second item, “TTS
engine,” and press the Left or Right button to set it to On
or Off.
The VOICEYE Player has a built-in FM radio tuner, so you can listen to your favorite FM radio station
using your VOICEYE Player.
1
2
Press the Mode button repeatedly to change to the “FM
radio mode.”
Press the Left or Right button to change the radio
frequency.
FM radio mode
The functions of each button in the “FM radio mode” will be described later in the section
“FM radio mode.” An earphone plays a role as an antenna to receive the signal better.
Thus, you must use an earphone to listen to the radio.
The VOICEYE Player has a small round built-in microphone on the front, and you can record short voice
messages.
1
2
3
4
Press the Mode button repeatedly to change to “Record
mode.”
Press the Delete button while recording. Then you will
hear a message asking if you want to save.
Press the Play button to save the recorded message, or
press any other button to cancel. The saved file will be
found in the “Record” folder in the “Play mode.”
Setting speech announcement on/off
11
Recording
13
Right
Left
20
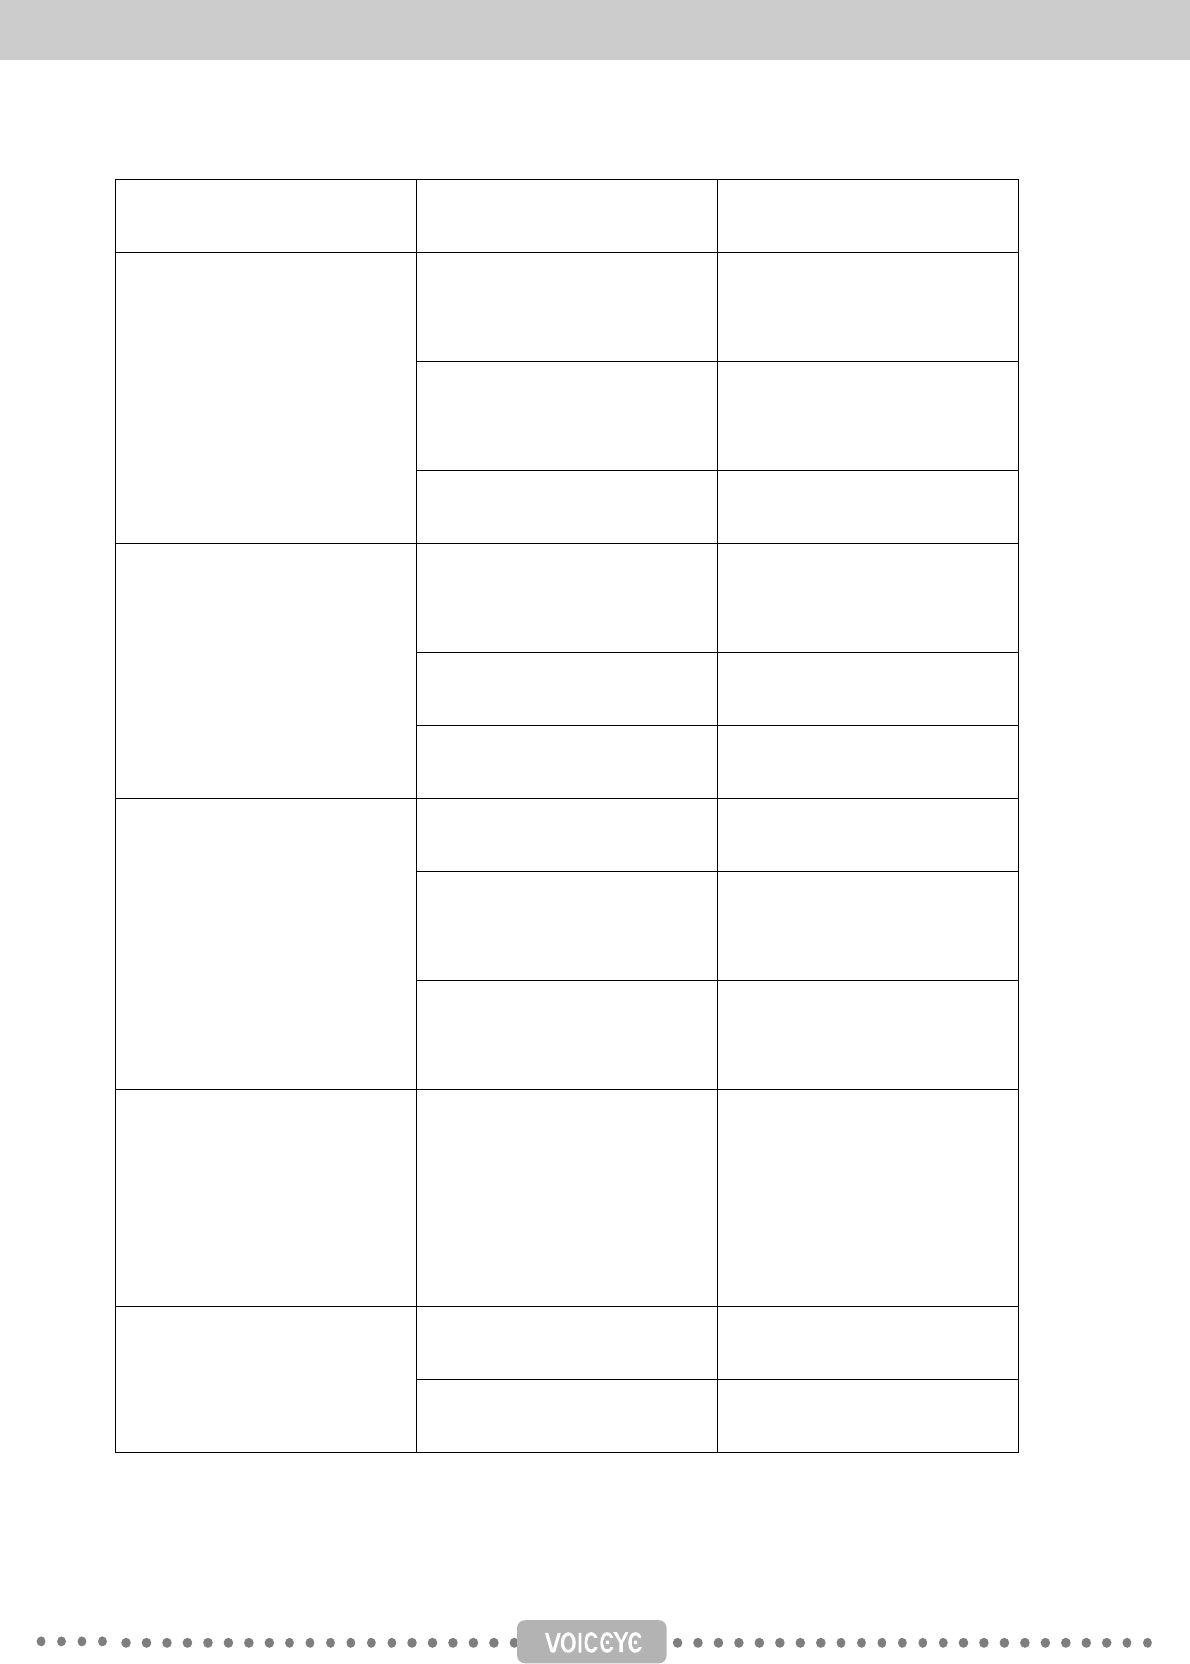
If you press the Time button on the left front edge, the
player announces the current time. When you are listening
to the content of a file or a VOICEYE in the “Play mode”
or “VOICEYE mode,” when you are in “FM radio mode,” or
when you are recording, this function will not work.
Ex. You will hear a message like “ten twenty five AM.”
Chapter 3. Detailed description of each mode of the VOICEYE Player
In “Play mode,” you can move to or search the folders and files stored in the VOICEYE Player, and play
the selected file. You can also delete folders and files, and manage bookmarks.
Button Function Messages and comments
Plays the selected file or
pauses playing
Toggle
Turns off the power by pressing
and holding for 3 seconds
Closing sound
Play
Confirms to delete a folder or
a file
“Successful delete”
Moves to and select the
previous item in the list of
folders and files
Announces the name of the
folder or the file. If the selection
bar is at the top of the list, you
will hear the message, “The
first position.”
Up
Increases volume while playing
Down
Moves to and select the next
folder or file in the list
Announces the name of the
folder or the file. If the selection
bar is at the bottom, you will
hear the message,
“The last position.”
Time announcement in speech
14
Play mode
1
21
Decreases volume while
playing
Moves to the higher level folder
Announces the name of the
folder after moving to the
higher level folder
Changes to the “Setup mode”
when you are in the top level
folder.
Announces the first item in the
“Setup mode”
Left (Rewind)
Moves 5 seconds backwards
while playing
Resumes playing at the
position
Moves to the lower level folder
Announces the name of the
folder after moving to the lower
level folder
Announces information about
the selected file
“Text file, 755 bytes”
Right (Fast Forward)
Moves 5 seconds forwards Resumes playing at the
position
Announces the current time Announces the current time in
speech
Stops playing a file and goes
back to the “Play mode” while
playing
Time
Announces the remaining
battery if you press and hold
for 2 seconds
“Battery is fully charged.”
Delete
Deletes a folder or a file.
Cannot delete the system
folder. If you delete a file, also
deletes the bookmarks
associated with the file.
“Press the Play button to
delete,” “Successfully deleted”
or “Delete canceled”
Changes to the
“VOICEYE mode”
“VOICEYE mode.”
Mode
While playing, stops playing
and changes the mode.
“VOICEYE mode”
22
Bookmarks the file if you press
and hold for 2 seconds
while playing
“Successful bookmark,”
“Bookmark cancelled.” You can
use up to 20 bookmarks.
Capture Changes to the
“VOICEYE mode”
“VOICEYE mode”
In “Voice mode,” you can capture a VOICEYE, restore the text contained the captured image, and play
the content using speech.
Button Function Messages and comments
Plays the content captured the
last time
Pauses or resumes playing
while playing
Toggle
Turns the power off if you press
and hold for 3 seconds.
Closing sound
Play
Confirms to save to a file
Up Increases volume
Down Decreases volume
Moves 5 seconds backwards
while playing
Resumes playing at the
changed position
Left (Rewind) Changes to the “Play mode”
while not playing
“Play mode.” Says the
message, “VOICEYE text
folder.”
Right (Fast Forward)
Moves 5 seconds forwards
while playing
Resumes playing the content at
the changed position.
Stops playing while playing.
Time Announces the remaining
battery if you press and hold for
2 seconds.
“The battery is fully charged.”
Delete
Saves to a file while playing. If
there exists a file with the same
name, press the Play button to
overwrite, Time button to save
Press the Play button to save.”
“Successfully saved” or “Save
cancelled.”
VOICEYE mode
2
23
as another name, or any other
button to cancel.
Changes to the
“FM radio mode”
“FM radio mode”
Does nothing while playing
Mode
Bookmarks the file if you press
and hold for 2 seconds
while playing
“Successfully bookmarked”
You can use up to 20
bookmarks.
Capture Stops playing while playing
Captures a VOICEYE
while not playing
Things to remember when capturing a VOICEYE
1) Make sure that the top right corner of a page and the back right bottom corner of the VOICEYE
scanner are properly aligned.
2) After you hear the message, “VOICEYE mode,” press the Capture button on the scanner to start
capturing.
3) You will hear a continuous beep while capturing. If it continues to beep for too long, make sure
that you have placed the scanner at the top right corner of a page. If the VOICEYE is successfully
captured, its content will be played after a chime-like “di-ri-ring” sound.
You can listen to your favorite FM radio station, using the built-in FM tuner. When you enter the “FM
radio mode,” be aware that you cannot use any button for about 2 seconds while the FM tuner is being
initialized.
Button Function Message and comments
Mutes the FM radio temporarily Toggle
Play Turns the power off if you press
and hold for 3 seconds
Closing sound
Up Increases volume
Down Decreases volume
Left (Rewind)
Decreases the FM radio
frequency. If you press and
hold for 2 seconds, it will
automatically scan for the
Decreases 0.1 at a time.
FM radio mode
3
24
previous channel. If you press
and release while scanning,
stops scanning.
Right (Fast Forward)
Increases the FM radio
frequency. If you press and
hold for 2 seconds, it will
automatically scan for the next
channel. If you press and
release while scanning, stops
scanning.
Increases 0.1 at a time
Announces the current time Message announcing the
current time.
Time
Announces the remaining
battery if you press and hold for
2 seconds.
“The battery is fully charged.”
Delete Does nothing
Mode Changes to the “record mode.” “Record mode”
Capture Changes to the “VOICEYE
mode”
“VOICEYE mode”
An earphone plays a role as an antenna to receive the radio signal. Therefore, you
must listen to the radio using an earphone.
Button Function Messages and comments
Play Starts recording Starting sound “ding-dong”
Pauses and resumes recording
while recording
“ding-dong,” toggle
Turns the power off if you press and
hold for 3 seconds
Closing sound
Up Does nothing
Down Does nothing
Left
(Rewind)
Changes to the “Play mode” while
not recording
“Play mode”
Right
(Fast Forward)
Does nothing
Record mode
4
25
Time Announces the current time while
not recording
Message announcing the current time
Does nothing while recording
Del Stops recording and saves the
recorded content to a file while
recording
“Press the Play button to save, or any
other button to cancel”
Does nothing while not recording
Mode Changes to the “setup mode” “Setup mode”
Capture Changes to the “VOICEYE mode” “VOICEYE mode”
Does nothing while recording
You can change the current settings of various options such as LCD display on/off, TTS speed, play
methods, and so on.
(1) Functions of each button
Button Function Messages and Comments
Play Announces the information about
the currently selected menu item
Turns the power off if you press and
hold for 3 seconds
Closing sound
Up Moves to the previous item in the
menu
Announces the information about the
menu item
Down Moves to the next item in the menu Announces the information about the
menu item
Left
(Rewind)
Changes the value of the selected
menu item
Announces the changed setting
Right
(Fast Forward)
Changes the value of the currently
selected menu item
Announces the changed value
Time Announces the current time
Announces the remaining battery if
you press and hold for 2 seconds
“The battery is fully charged”
Delete Does nothing
Mode Changes to the “Play mode” “Play mode”
Capture Changes to the “VOICEYE mode” “VOICEYE mode”
Setup mode
5
26
(2) The values for the menu items in the “Setup mode”
Item Value Description
Free Space Remaining memory space Announces the currently available memory
space
TTS information Enable Outputs speech messages for menu items or
actions
Disable Do not output speech messages for menu
items and actions
TTS speed Slowest
More slower
Slower
Normal
Faster
More faster
Fastest
Sets the speech output speed The default is
“Normal.”
LCD display Enable Uses LCD display
Disable Does not use LCD display. The messages
will not be shown on the LCD display. This
saves some battery consumption
LCD display off
while TTS play
Always on
The LCD display is always on while playing
Auto Turns off the LCD display automatically after
playing for a certain period of time
Contrast Darkest
More darker
Darker
Normal
Brighter
More brighter
Brightest
Adjusts the LCD contrast. The default is
“Normal.”
Folder play One time Plays the selected file and then stops. This is
the default.
Sequence Plays the selected file and continues to play
the next file in the list.
Bookmark folder One time Plays the selected file and then stops. This is

27
the default.
Sequence Plays the selected file and continues to play
the next file in the list.
Chapter 4. VOICEYE Browser
If you insert the CD, a screen for installation will be automatically displayed. Click “VOICEYE Browser
1.0.” Or you can also install the program by running the setup.exe file in the “VOICEYE Browser” folder.
1
Click “VOICEYE Browser 1.0”
2
Click “Next” to start the
installation.
*Please connect your VOICEYE
Player to your computer before
installing*
Installing VOICEYE Browser
1

28
3
Read the text about the copyright
agreement carefully and if you
agree to it, select “Agree” and
click “Next.”
4
Enter the user name, the
company name and
click “Next.”
5
Click “Install” to begin the
installation
29
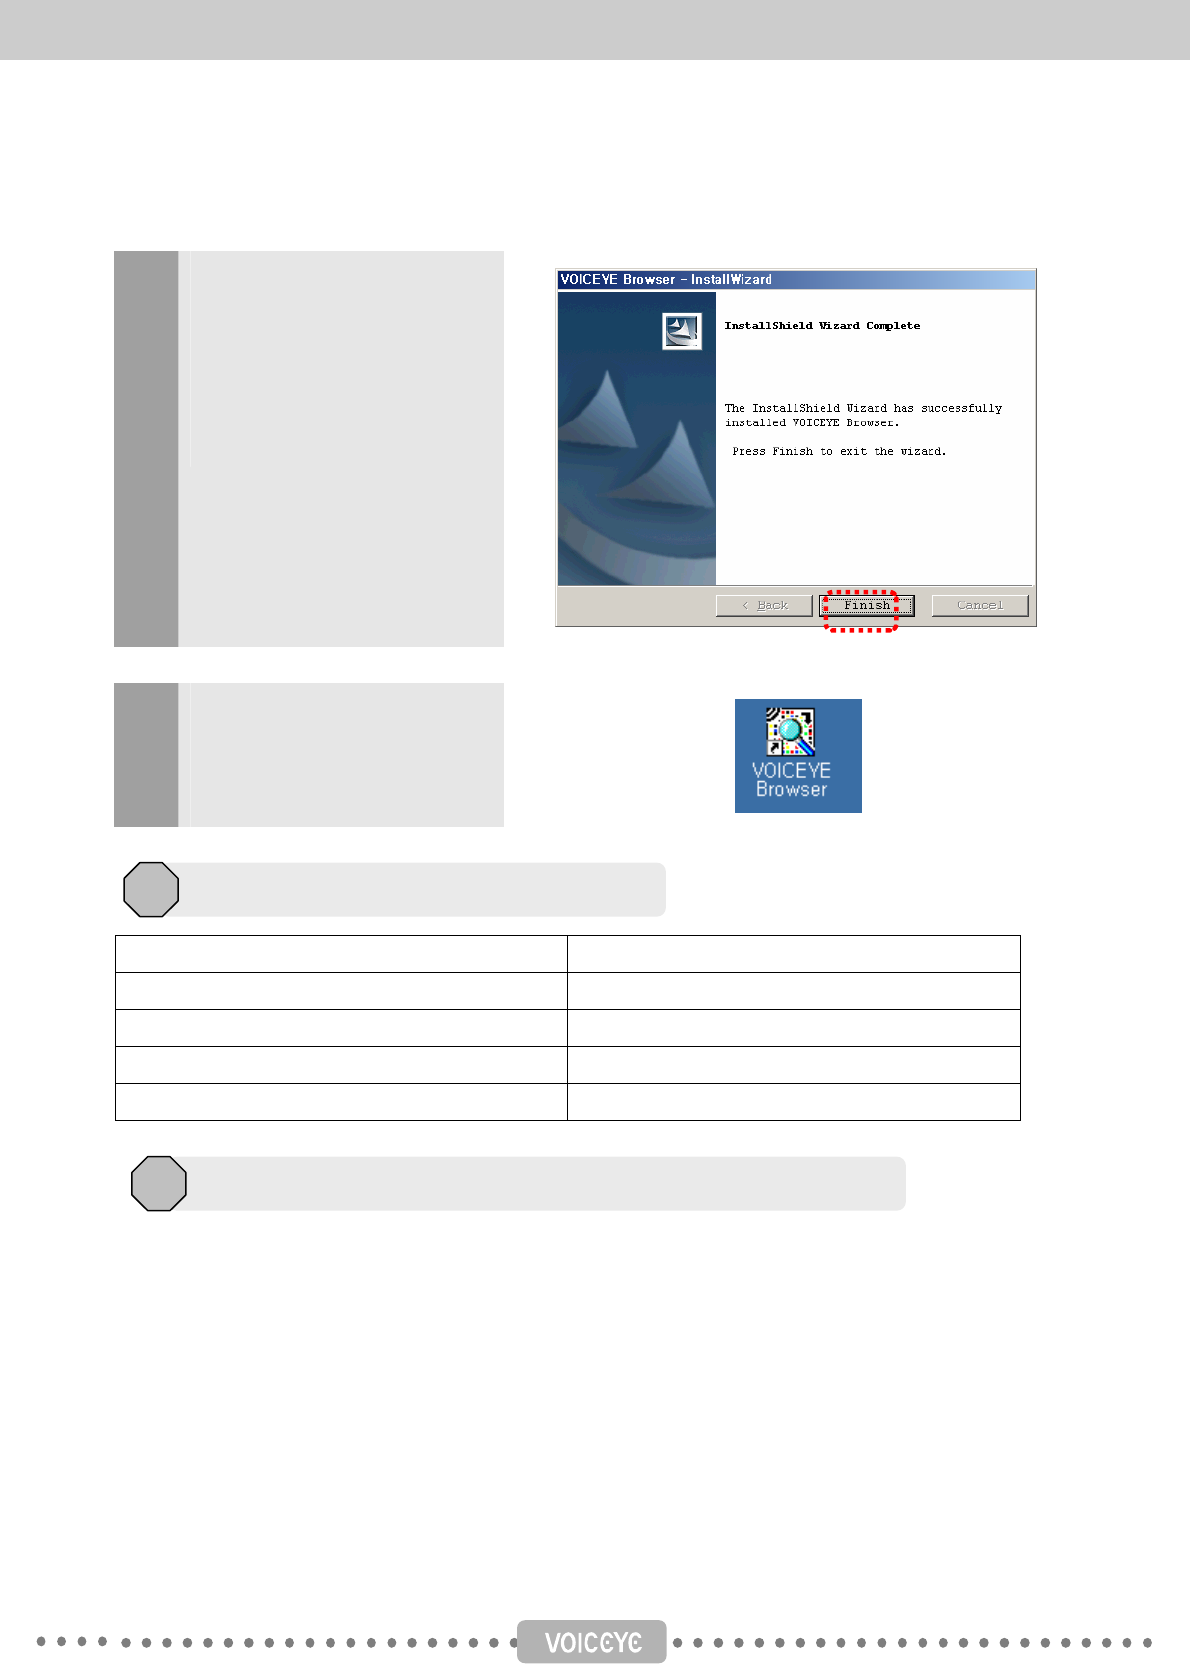
6
Installation is finished.
7 If you find the VOICEYE reader
icon in the desktop, the software
has been successfully installed.
Operating system Windows 2000/2003/XP
Processor Pentium IV
Main memory Larger than 128 MB
Hard disk space Larger than 500MB
Connection port Higher than USB 1.1; USB 2.0 recommended
If you install the VOICEYE Browser while the VOICEYE Player is connected to the computer, the
VOICEYE driver will be installed automatically. However, if the driver is not installed properly, you can
install it by running setup_driver.exe program in the “Tools” folder on the CD. Before you install the driver,
please, make sure that the player is connected to the computer.
System requirements
2
Installing the VOICEYE Player driver and connecting to the player
3
30
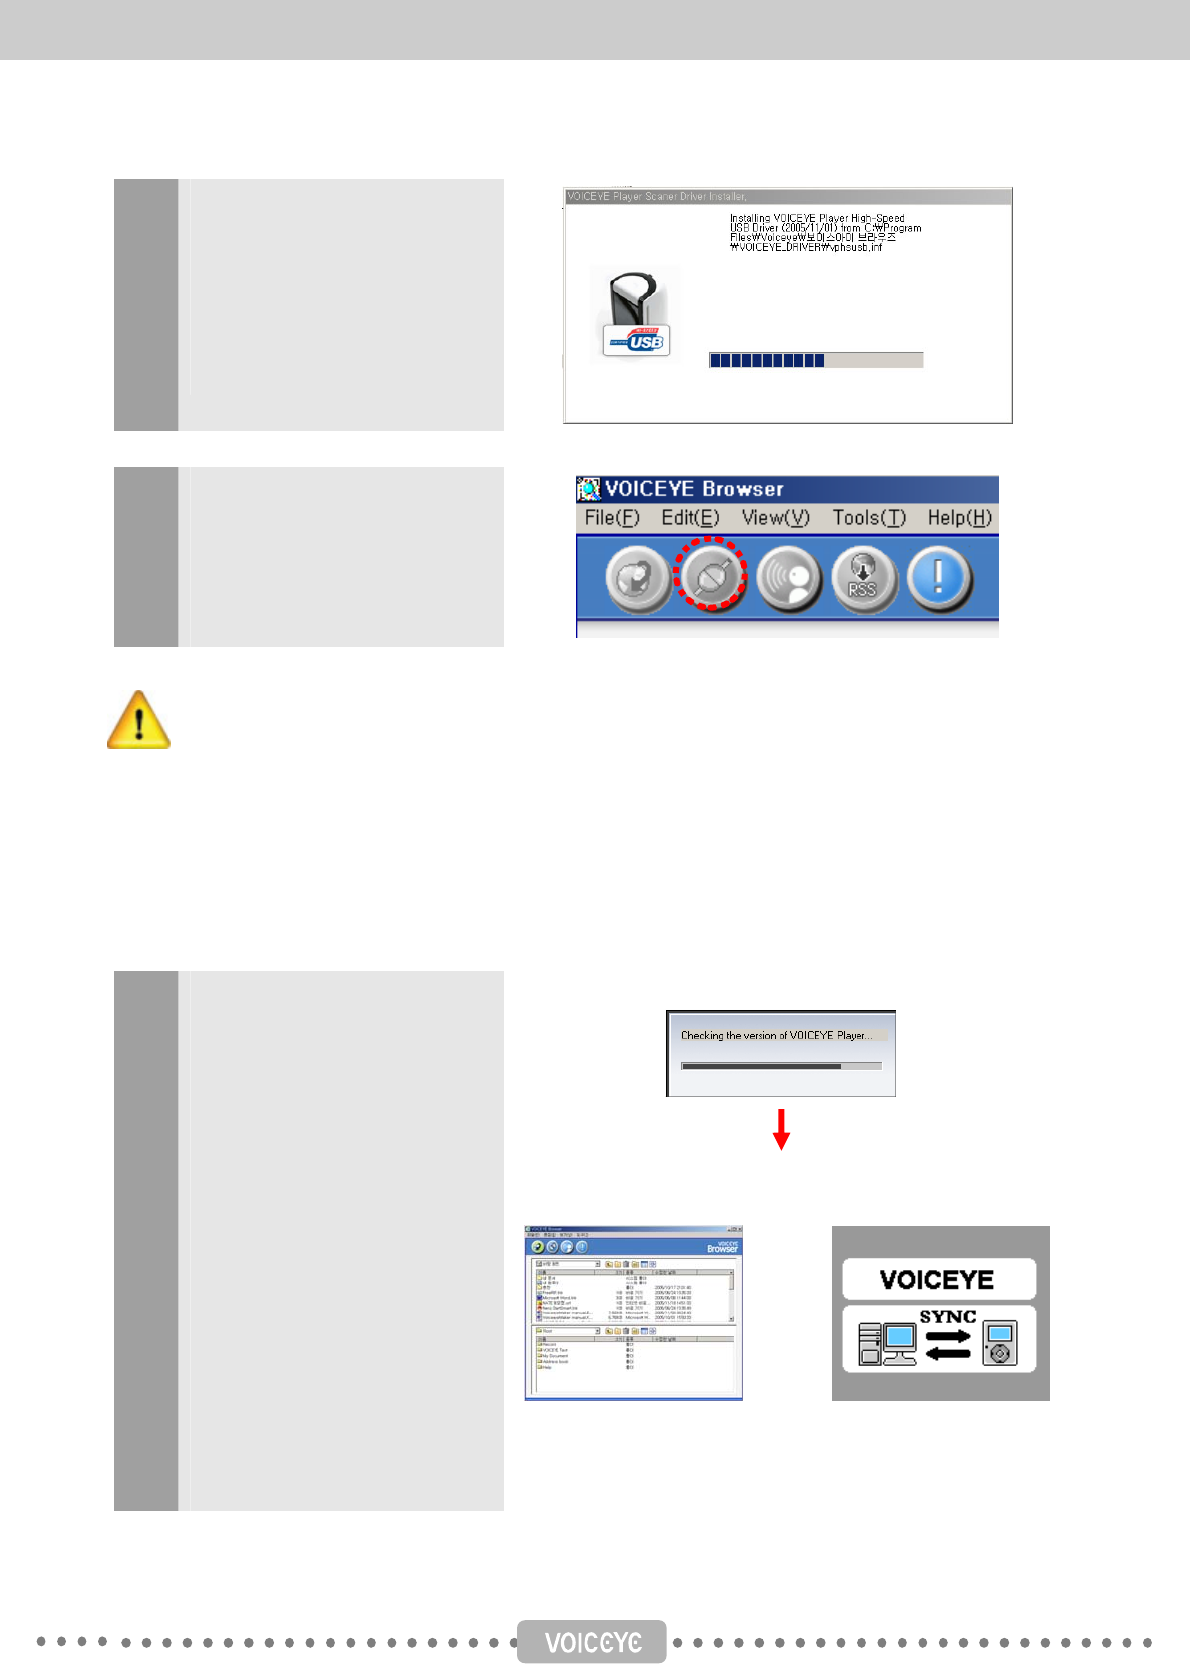
1 If you run the setup_driver.exe
program, the driver will be
installed automatically. While
installing, it proceeds like shown
in the figure on the right.
2 Start the VOICEYE Browser on
the desktop, or in Start menu ->
all programs -> VOICEYE ->
VOICEYE Browser.
Click the Connect button located in the top left of the screen or select “Connect to the
player” in the Tools menu. While the player is connected with VOICEYE Browser, you
cannot use any function of the player. This is to prevent errors that may occur when using
TTS output or the VOICEYE scanner on the player while transmitting files between the
player and the Browser. Therefore, if you want to listen to the content of a file on the
player while it is connected with the VOICEYE Browser, you should disconnect the player
from the Browser.
3
The VOICEYE Player displays the
connecting process on its LCD
display. If the VOICEYE Player is
successfully connected, the
VOICEYE Player folder will
appear in the lower part of the
VOICEYE Browser screen. The
VOICEYE Player will also display
the image indicating its connected
status. If you cannot find these,
you should retry to connect after
unplugging and reconnecting the
USB cable.
Connection completed
VOICEYE browser VOICEYE Player
31
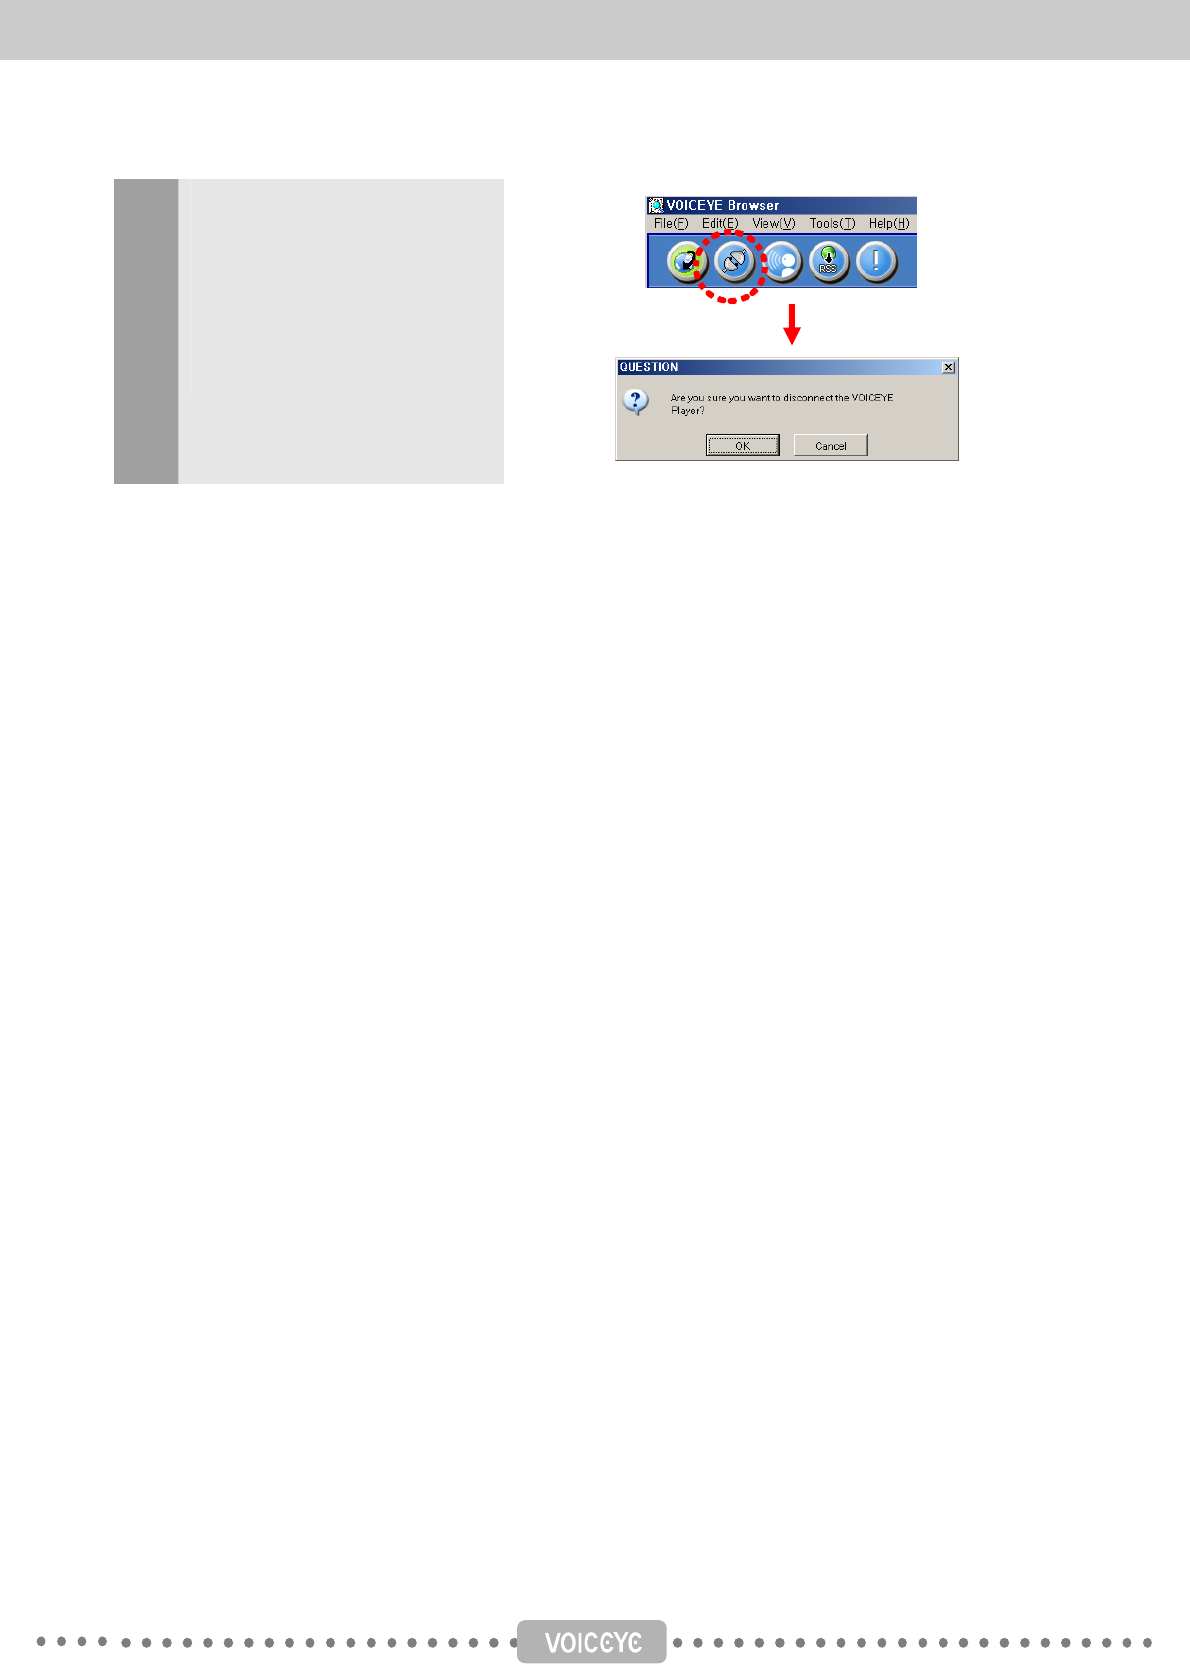
4
If you click Disconnect icon, a
screen that asks whether to
disconnect or not will appear. If
you click “OK,” the player will be
disconnected.
※ If you connect your VOICEYE Player with the VOICEYE Browser on a computer, the time in the player
will be set to the time on the computer automatically.
32
The VOICEYE Browser is a program developed to enable users to transfer files between the VOICEYE
Player and a PC, manage folders and files more easily. Through this program, you can manage the
data stored in the player with much more convenience.
(1) Important features of the VOICEYE Browser
• Supports printing the list of folder s and files in the VOICEYE Player.
• Transfers data between the player and the computer, and manages them
(transferring the VOICEYE s downloaded from the Internet, renaming
• “My computer,” files, and folders in the player, copy, cut, paste, etc.)
• Upgrades the VOICEYE Player’s operating system to a new version
• Shows information about the VOICEYE Player.
• Changes the TTS installed in the VOICEYE Player.
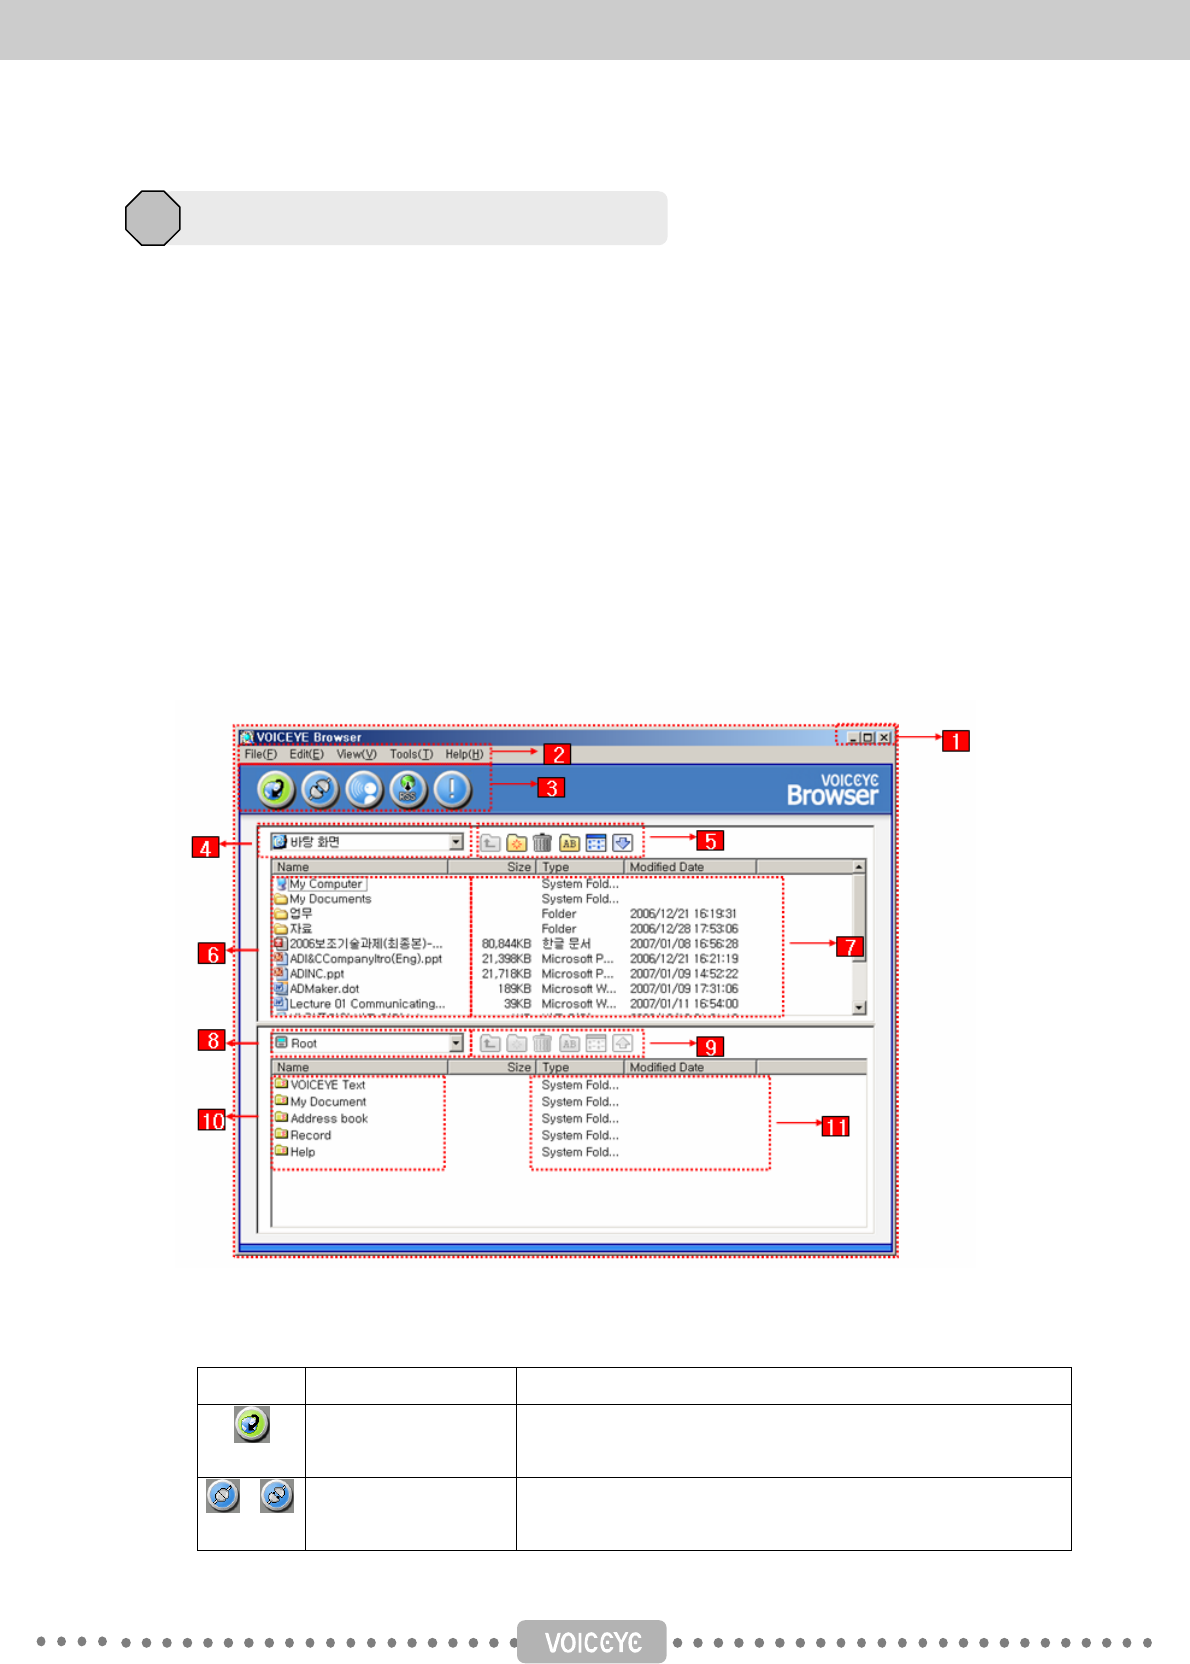
(2) The name of each part in the VOICEYE Browser
① Window size adjustment, Maximize, minimize, restore, close
② The main menu: the menu for all functionality of the VOICEYE Browser
③ Area for managing the VOICEYE Player
Icon Function Description
Update Updates the VOICEYE Player’s operating system to the
latest version.
/ Connect/Disconnect Make or break the connection between the player and the
Browser.
Features of the VOICEYE Browser
4
33
Manage language
packs
Changes the language of the TTS installed in the VOICEYE
Player.
Internet News
downloading
Download news files from internet by “Click”
Browser information Shows the information about the VOICEYE Browser.
④ My computer directory - Shows the list of files and folders in the top level directory
⑤ My computer Toolbar – a collection of My computer Toolbar buttons
⑥ My computer Explorer Window – Shows the folder list and file list in My Computer
⑦ My Computer Property window – Shows the properties of the selected folder or file
⑧ VOICEYE Player directory list – Shows the list of folders and files in the top level
directory of the VOICEYE Player
⑨ VOICEYE Player Toolbar – a collection of the VOICEYE Player My Computer Toolbar
buttons
⑩ VOICEYE Player explorer Window – Shows the folders and files in the VOICEYE Player
⑪ VOICEYE Player Property Window – Shows the property window of the folder or file
selected in the VOICEYE Player Explorer Window
The VOICEYE Browser provides such functions as folder and file management just like in the Windows
Explorer, file uploading and downloading between the VOICEYE Player and the computer, upgrading
VOICEYE Player version, and changing language pack.
(1) Upgrading the VOICEYE Player
When you connect the VOICEYE Player with the VOICEYE Browser, it automatically checks the
version of the player and upgrades it to the latest version if available. At this point, the computer must
be connected to the Internet. If the latest version is already installed in the player, a window
containing the message “The player has the latest version already” will appear.
You can also upgrade the player manually. If the VOICEYE Player is not connected to the
computer, the upgrade icon is not activated.
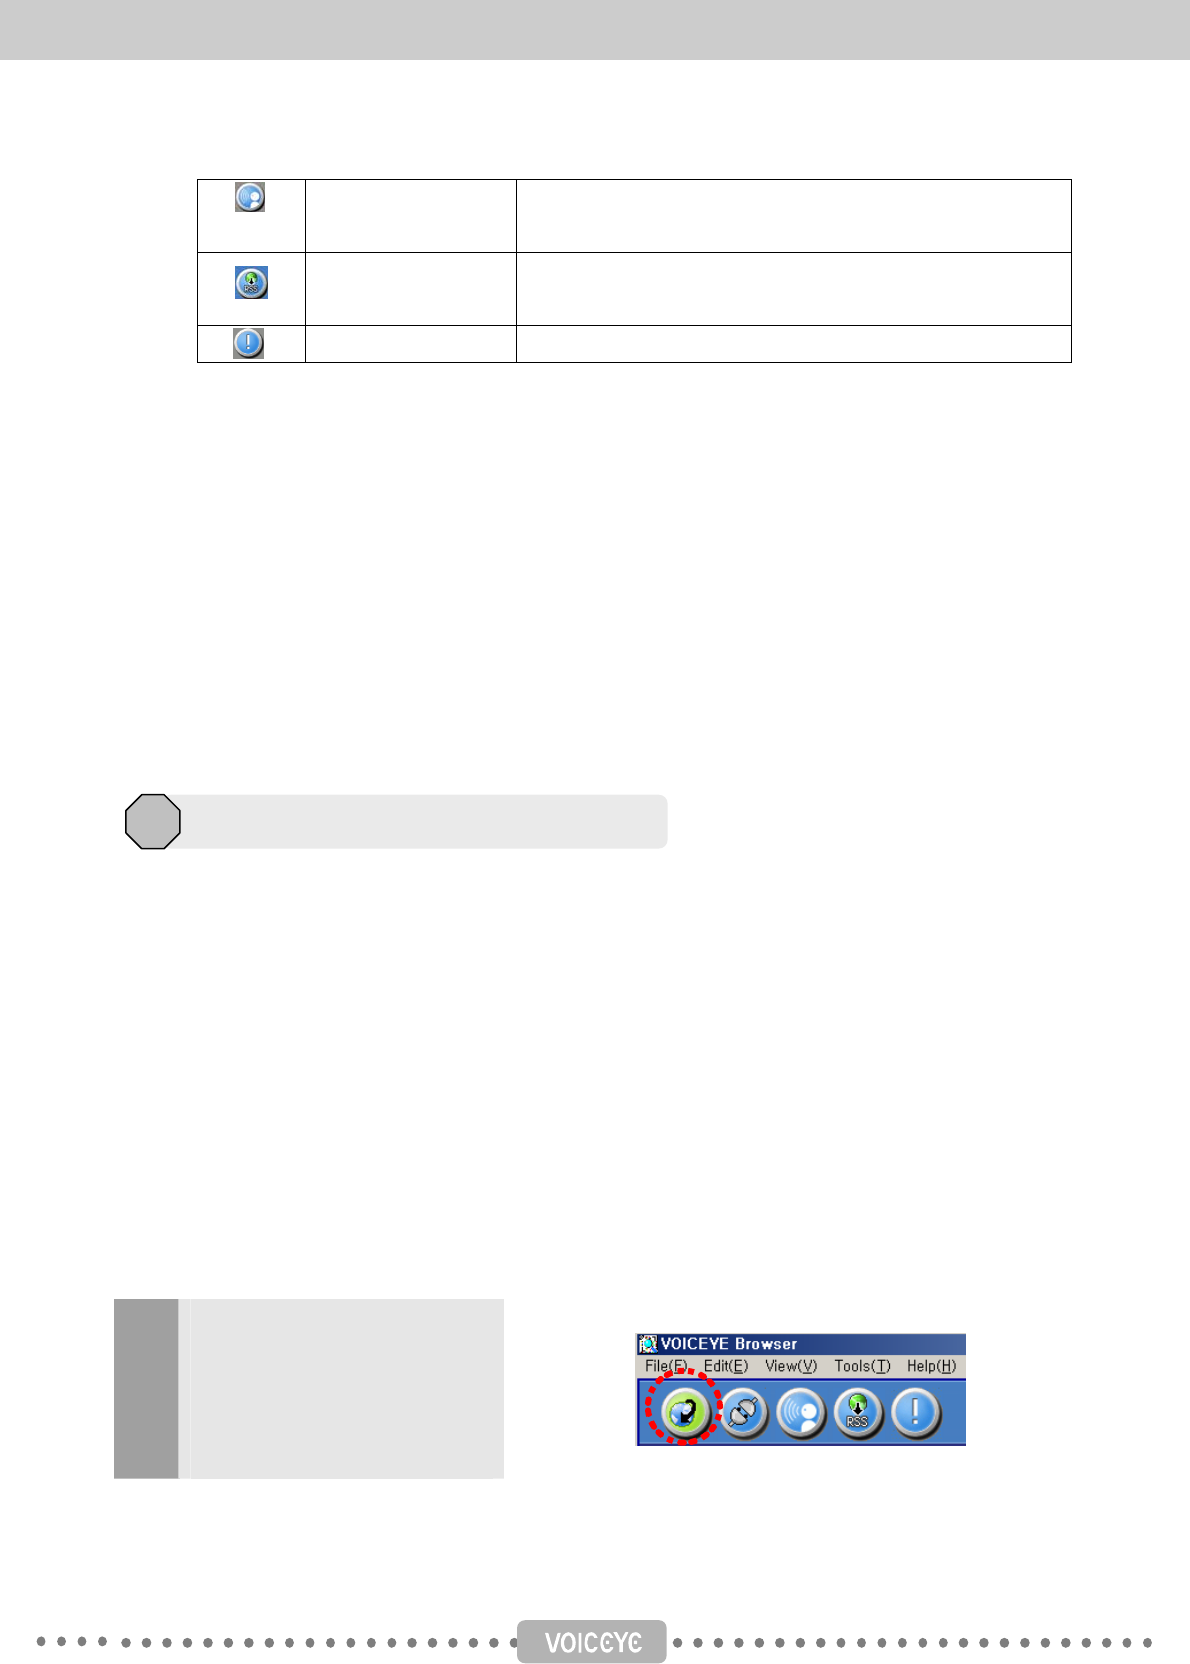
1
Select the upgrade icon at the top
left of the screen, or “Player
upgrade” in the Tool menu.
Detailed description of each feature
5
34
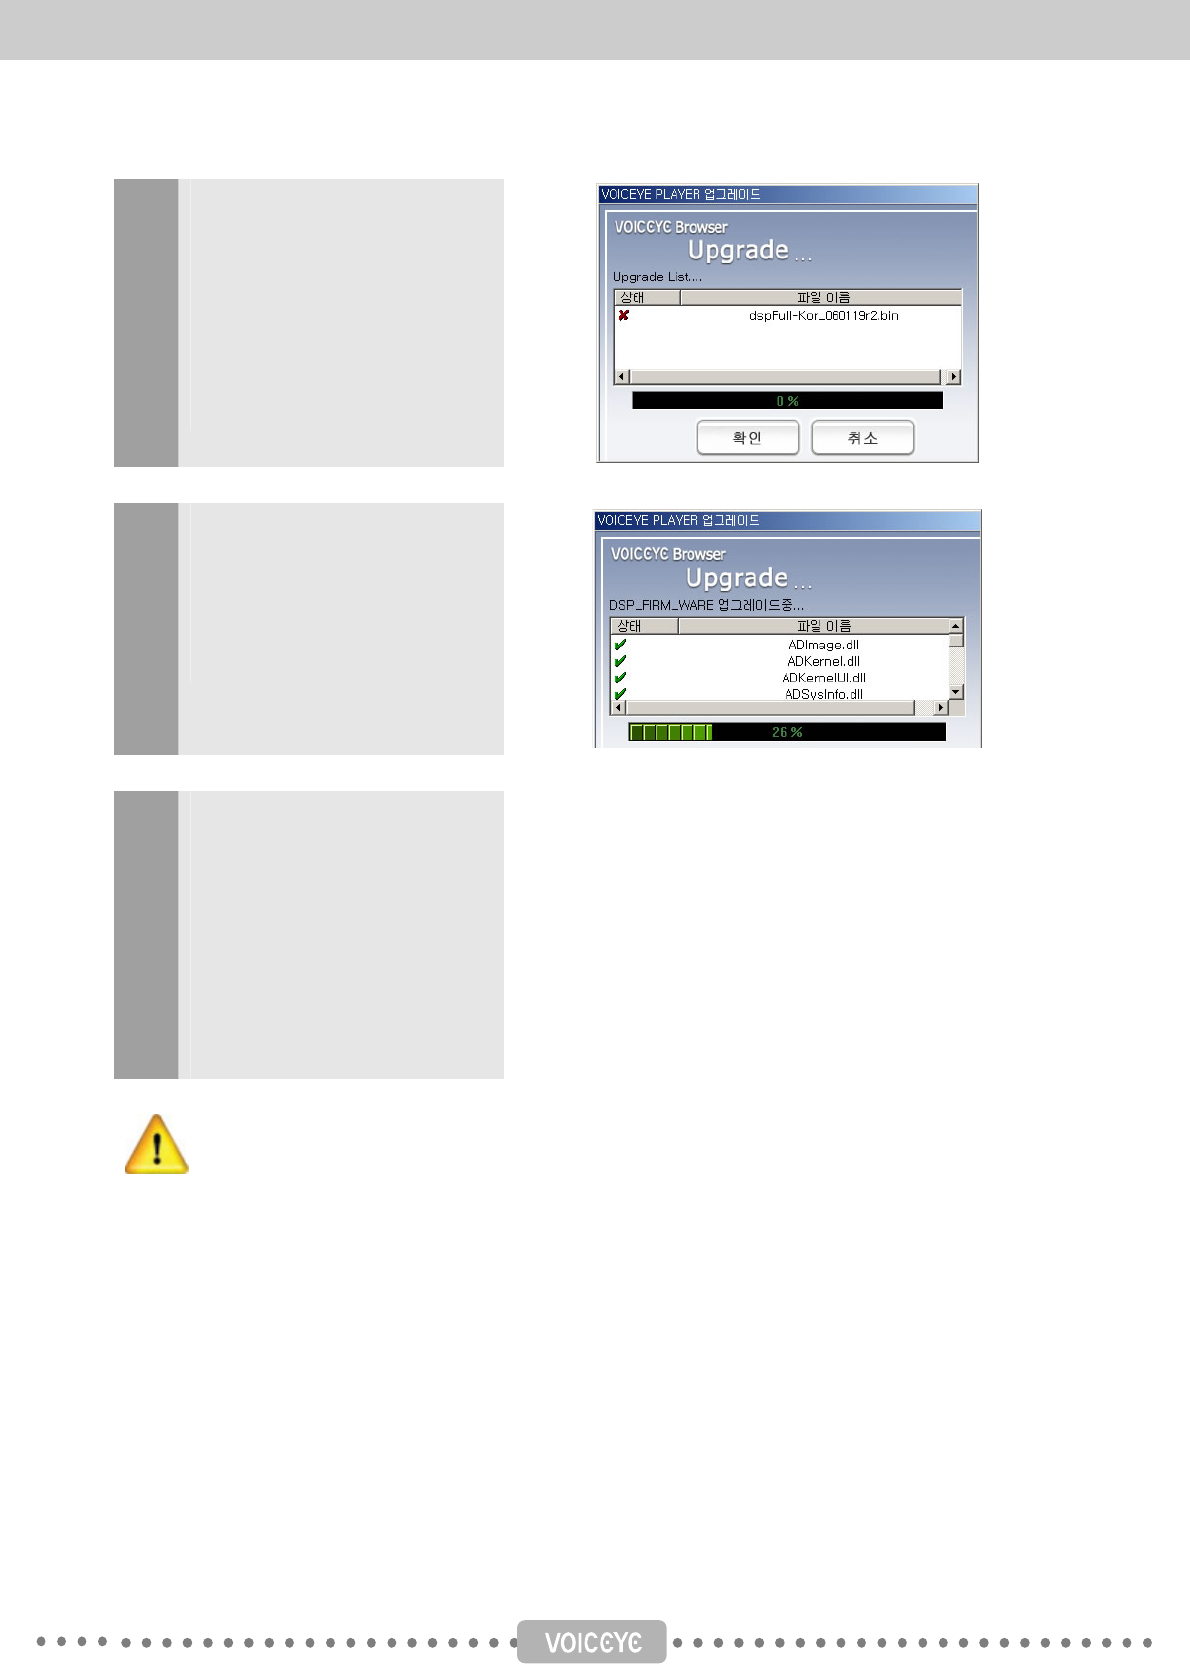
2
It analyzes the system installed in
the VOICEYE Player. If the latest
version is installed in the player, a
window saying “the latest version”
will appear and disappear
automatically.
3
If not, upgrade the system files in
the player to the newest version.
4
If the player is upgraded
successfully to the newest
version, a message window
saying “Successfully upgraded”
will appear. You can complete
upgrading by clicking “OK.”
Once upgrading is completed, you should reboot the VOICEYE Player in order to use the new
version of the VOICEYE Player.
(2) Managing TTS language packs
In the VOICEYE Player, only one language is installed. Those who purchased the English version of the
VOICEYE Player, want to listen to Japanese text files, they have to purchase the Japanese language
pack separately. After installing the language pack contained in the CD, if you click the language change
icon in the VOICEYE Browser, you can change the TTS engine installed in the VOICEYE Player.
Further explanation will be shown later on using an example changing from English to Japanese.
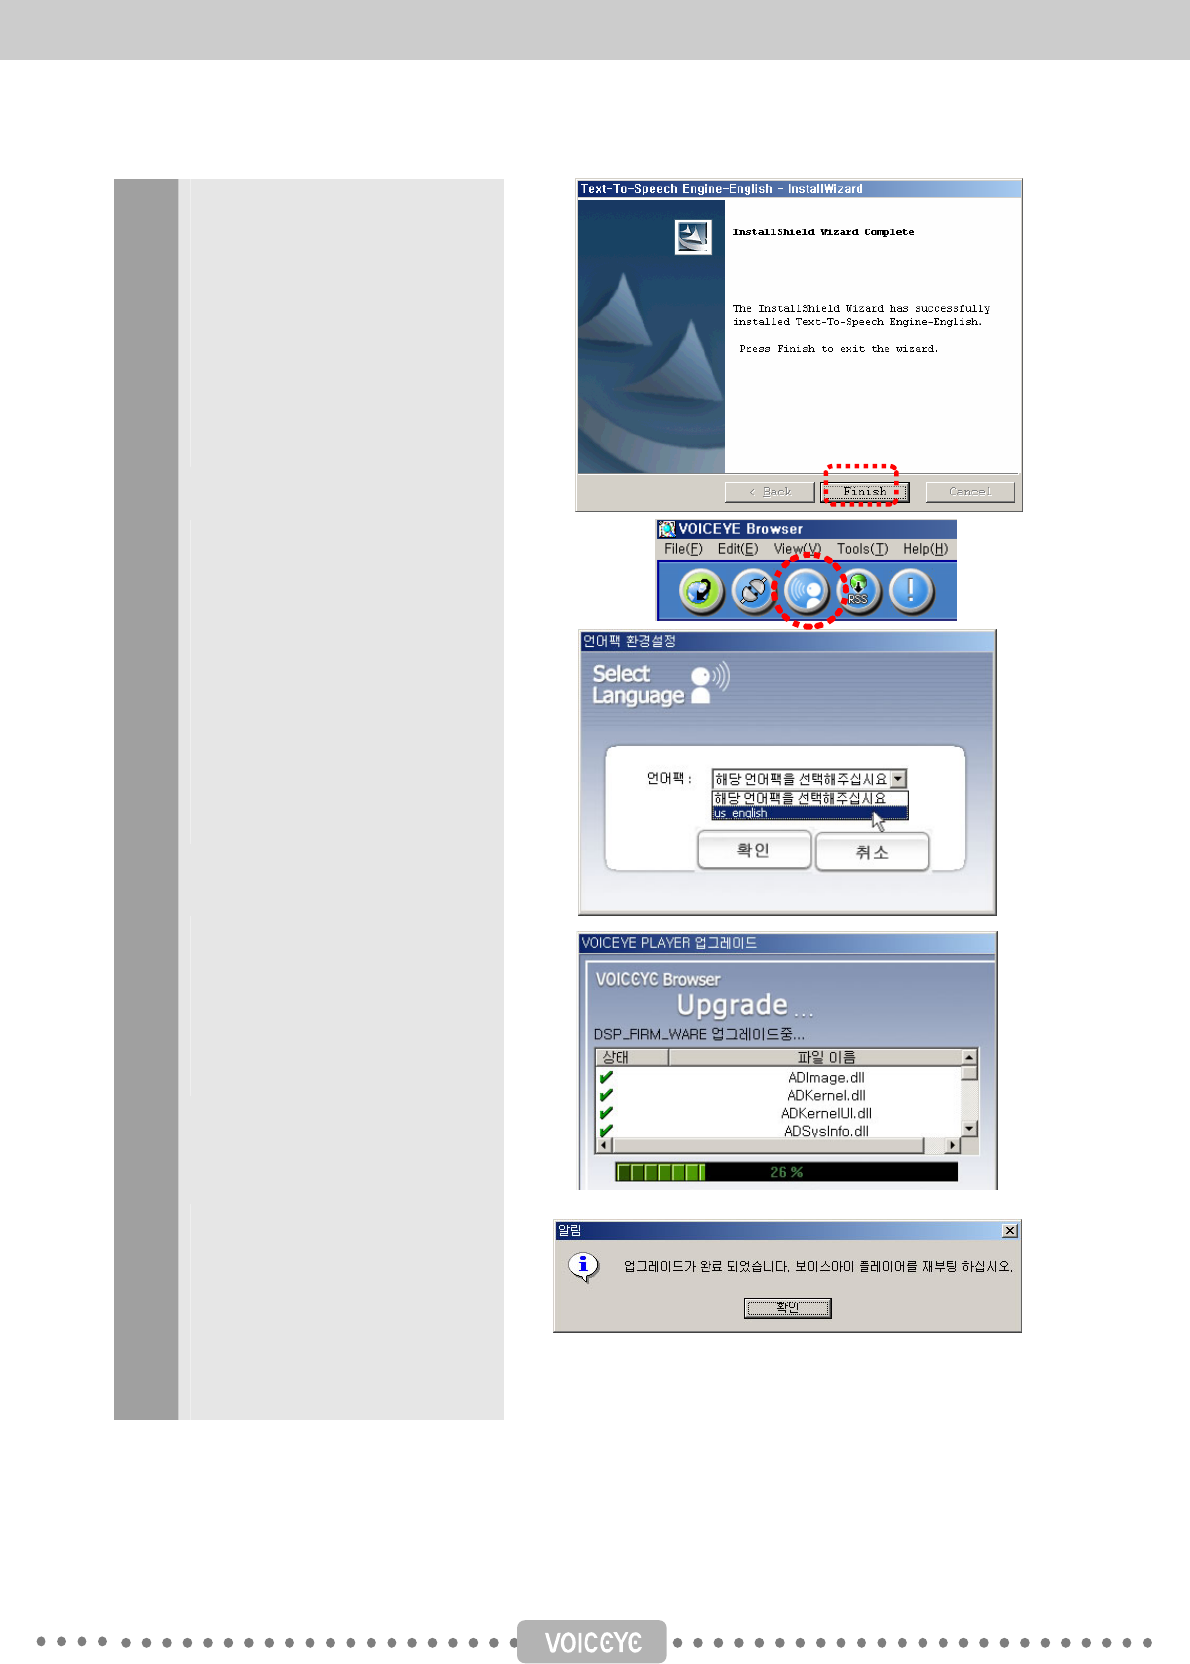
35
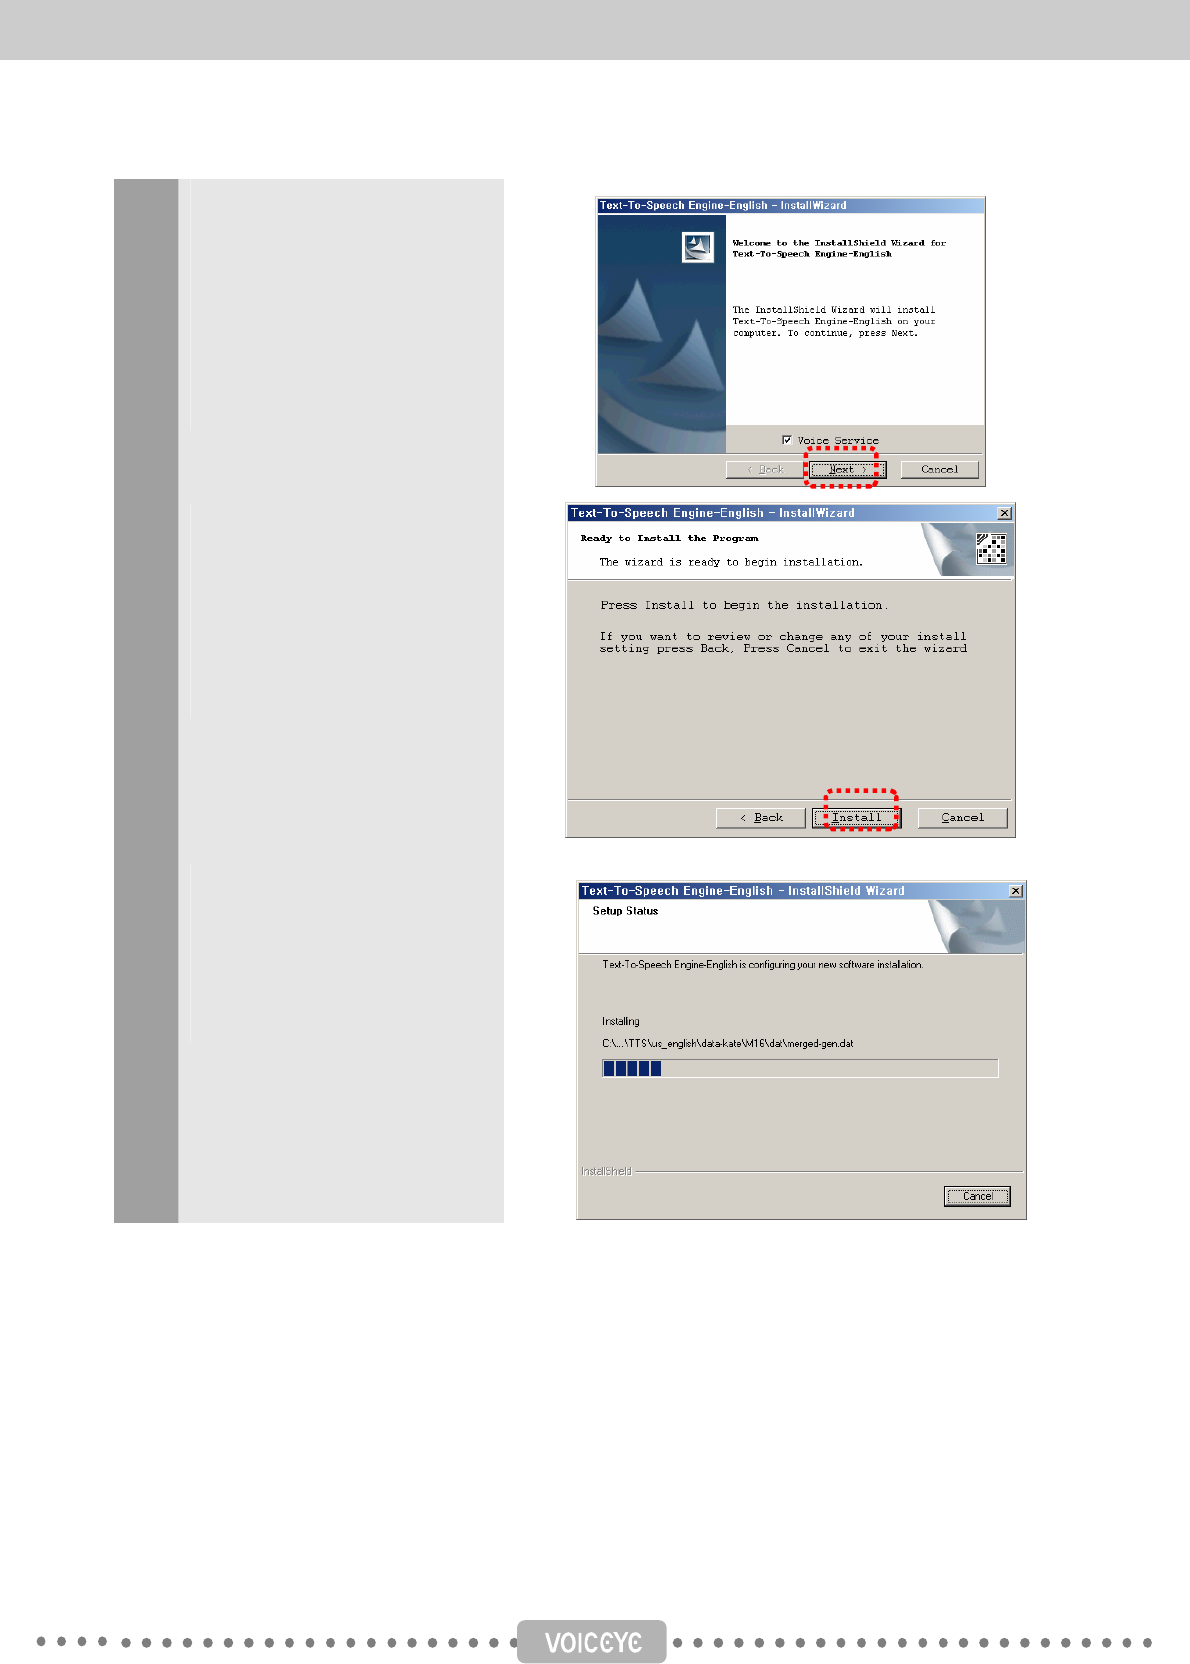
1
Install the English TTS engine.
If you run setup.exe contained in
the CD, the setup screen like in
the figure on the right will appear.
Click “Next.”
2
Now you are ready to install the
program. Click “Install.”
3
The installation will proceed.
36
4
Click “Complete” button after the
installation is complete. Then, if
there is a new version of files
available, they will be updated.
Updating will be discussed in
more detail in the “Updating
programs” section.
5 Click language pack change
button in the VOICEYE Browser.
6
A window for selecting a
language will appear. Select the
language pack you want to use,
and click “OK.”
7
The language pack will be
upgraded.
8 After completing, a message
window telling you its successful
completion will appear. Click
“OK,” and then, reboot the
VOICEYE Player to use the
changed language.
37
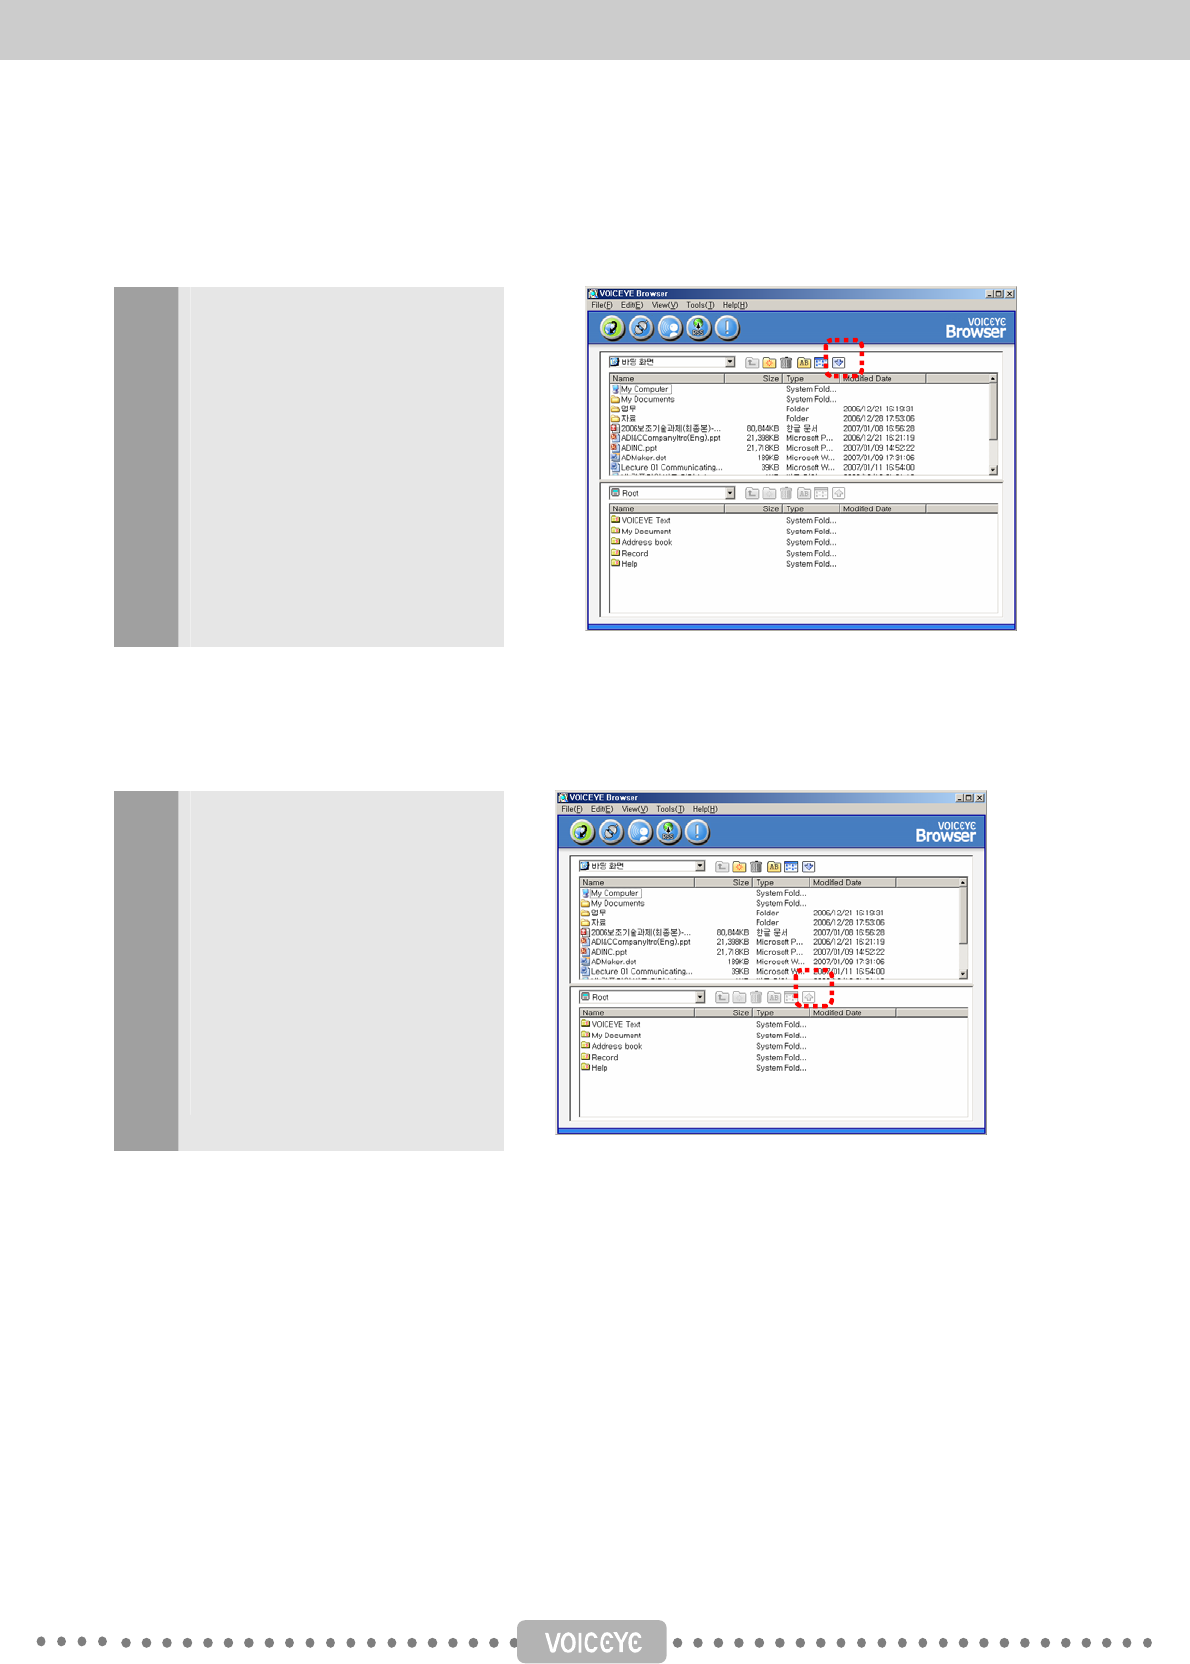
3) Downloading files to the VOICEYE Player
You can download files stored in the computer to the VOICEYE Player. You can listen to the
content of a file in speech in the VOICEYE Player if you download a text file.
Select the files to be downloaded,
and click “Download” button at the
top right of the screen. Or select
“File transfer to the player” in the
File menu. If you copy and paste
a file, please, make sure whether
you are in My Computer Explorer
Window or the VOICEYE Player
Explorer Window.
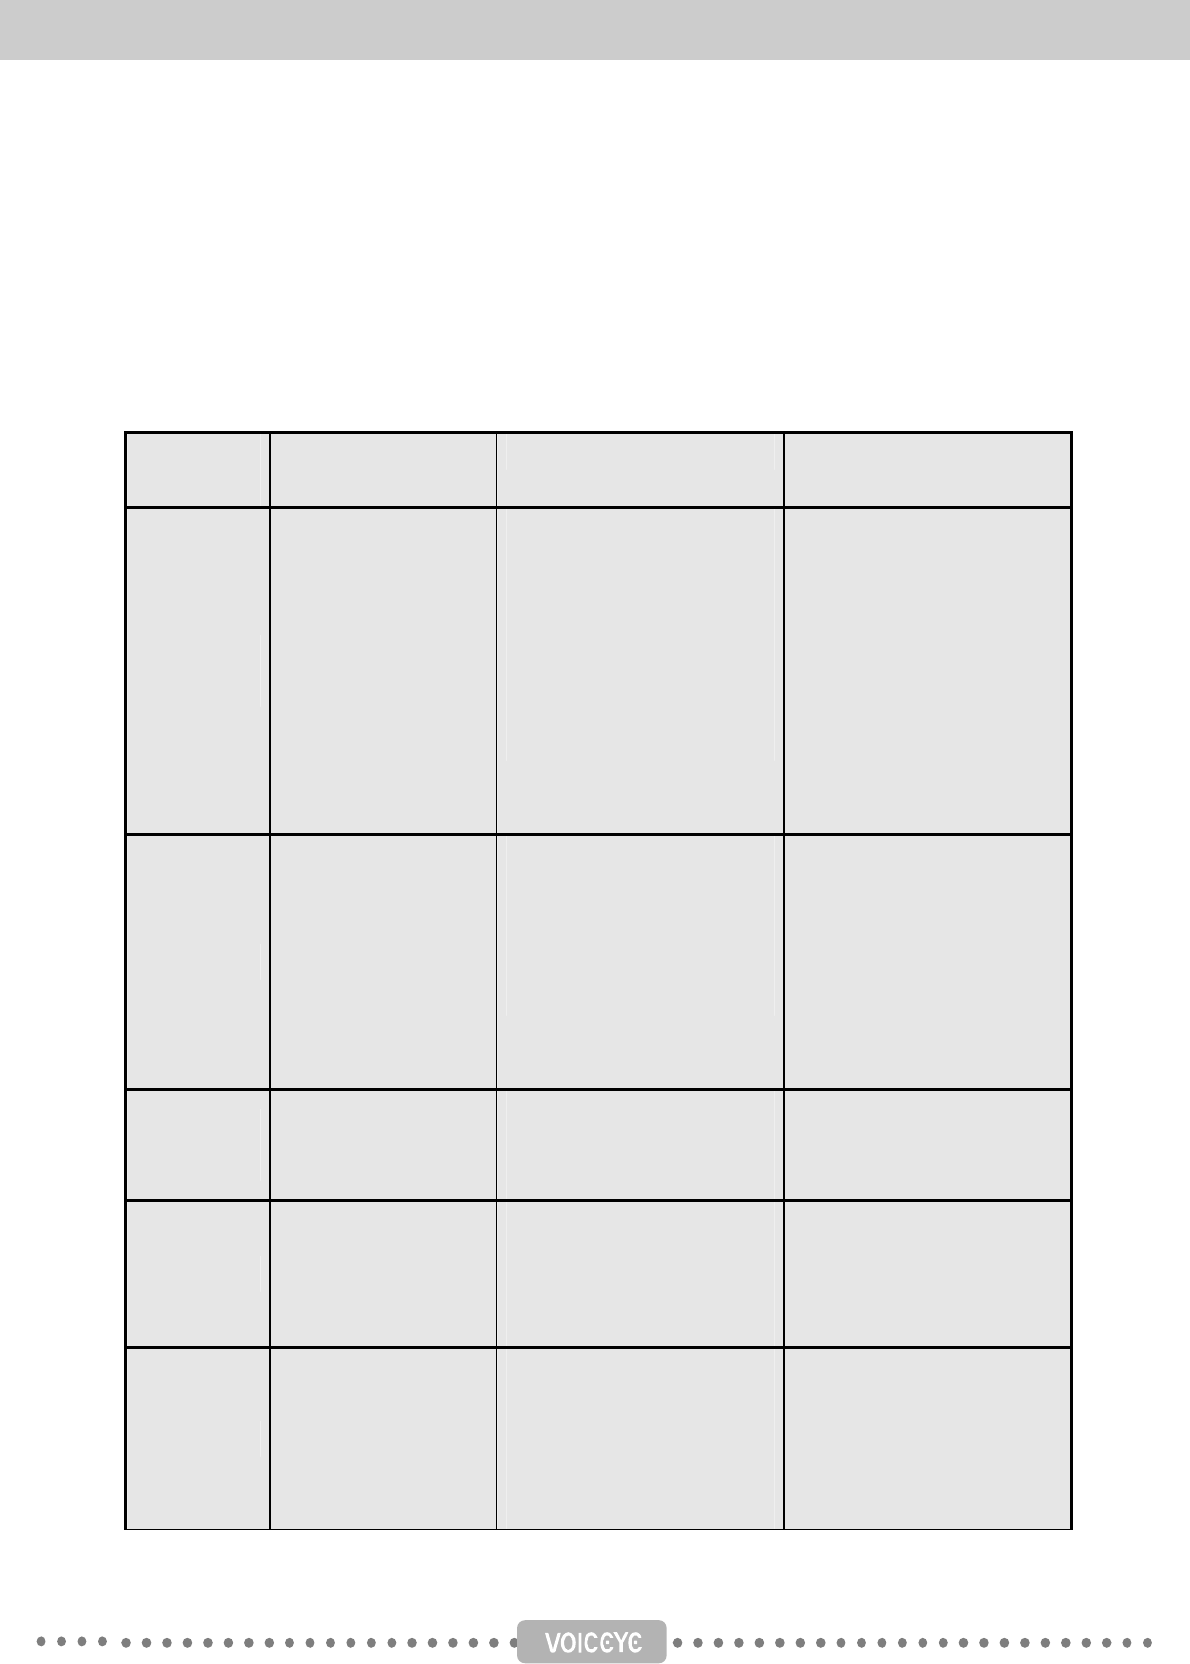
(4) Uploading files to My Computer
You can upload the files stored in the VOICEYE Player to the computer. It is a good idea to back up
your important files stored in the VOICEYE Player to the computer. Sometimes, you might want to
upload files to the computer to share them with other devices.
Select the files you want to
upload, and click “Upload” button
at the top right of the screen. If
you copy and paste a file, please,
make sure whether you are in MY
Computer Explorer Window or in
the VOICEYE Player Explorer
Window.
38
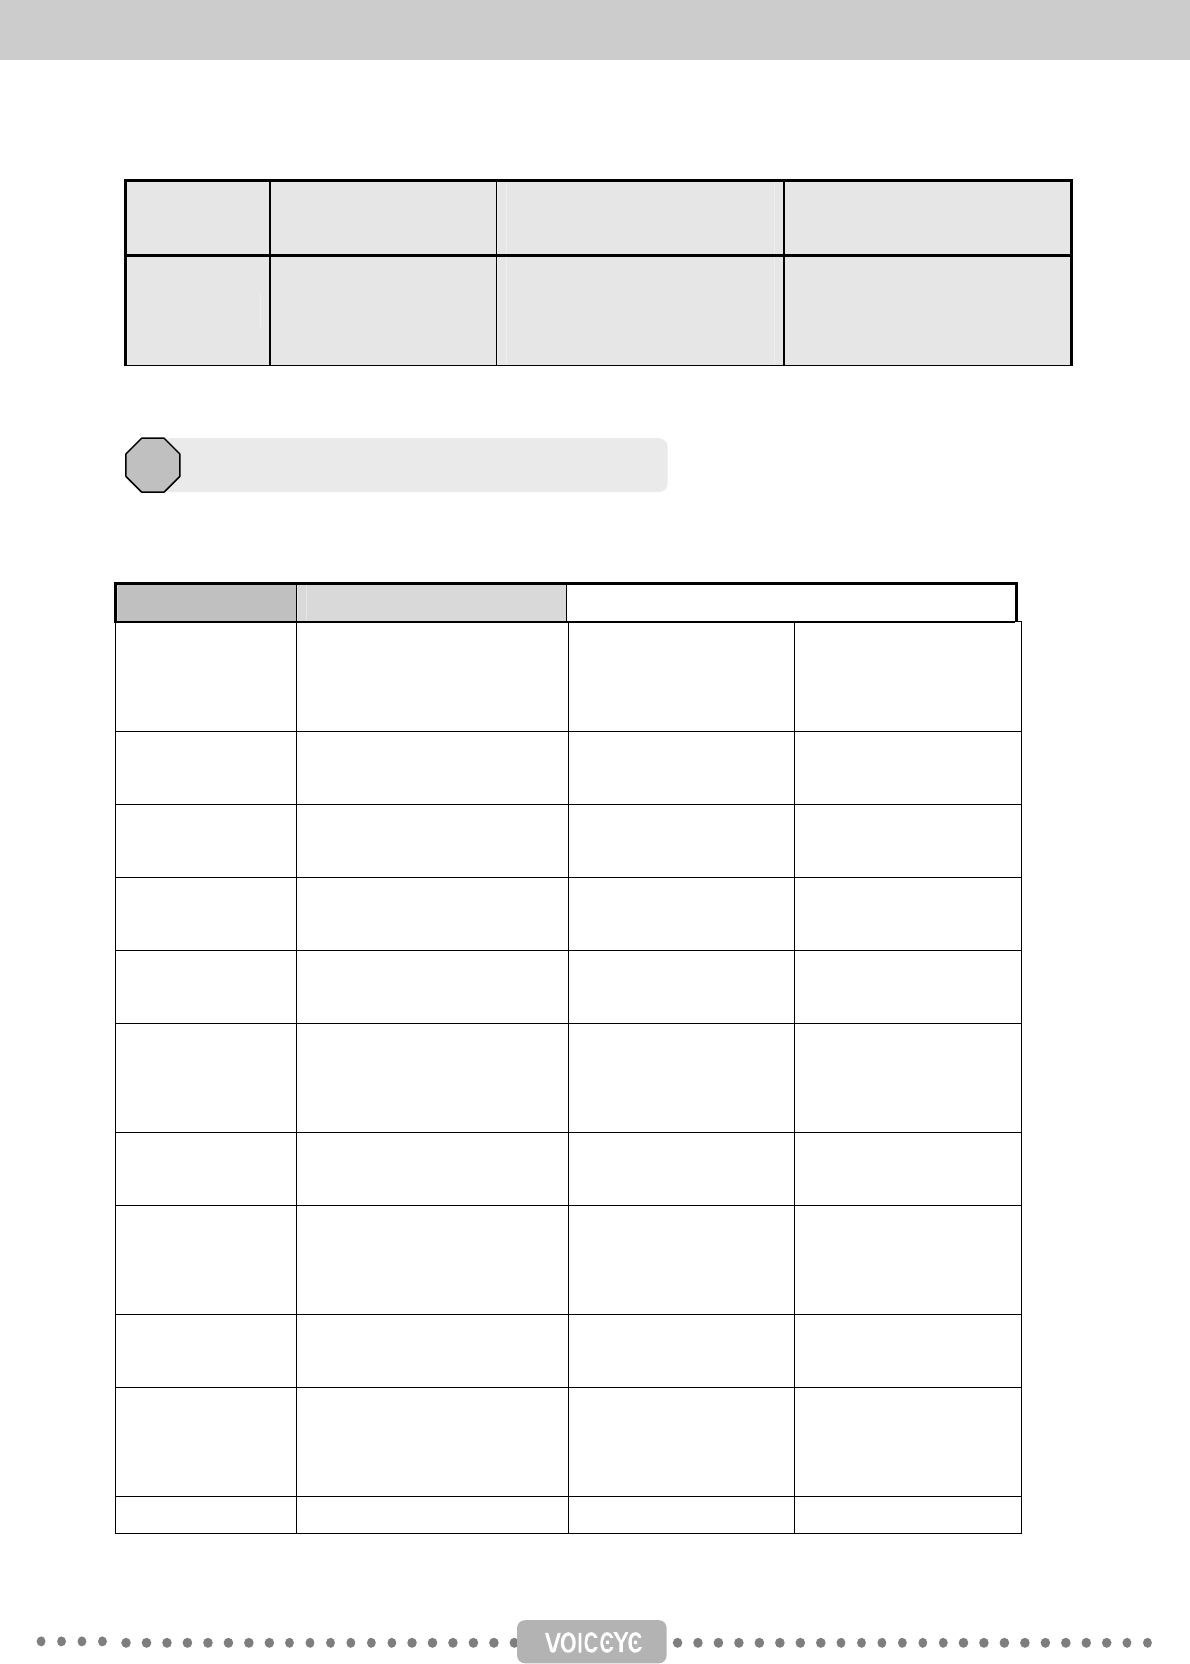
(5) Managing folders and files
There are five system folders in the VOICEYE Player. These folders are built-in system folders in a
sense that you cannot delete or rename them. In the VOICEYE Browser, you can manage the files and
folders in each of these system folders and transfer files between the computer and the player. The
content of each of these folders and the access right is as follows
Main
folder
Stored content and file
name
Access right Comments
VOICEYE
Text
Text data Recognized
and restored from a
VOICEYE
Page number + title.txt
When the same file is
saved in a different
name,
Page number +
title(1).txt
Can delete or rename,
Can transfer files to My
Computer,
Cannot transfer files from My
computer
Cannot access to the
copyright folder
When the content is copyright
protected, a folder named
after the title will be created
under the Copyright folder,
and the files will be saved
in the folder. The copyright
folder can be seen only in
the VOICEYE Player.
My Document
Files downloaded from
My Computer
Filename(0).txt
Filename(1).txt
Filename(2).txt
Can delete or rename it,
Can transfer files between My
Computer and the
VOICEYE Player.
The folder with the same
name as the text file in My
Computer will be created,
and files will be stored in it.
If the file is larger than 6KB
the file will be split into
6KB files and saved.
Address
Book
Address or name card
data
JohnDoe.voc
Can delete or rename files
Can transfer files to and from
My computer
Bookmark
Information about
bookmarks
Is not shown in the VOICEYE
Browser
Can delete files only in the
player
Record
Recorded data
Record_1-
10_00:36:15.pcm
Can delete or rename files
both in the player and in the
Browser
Can transfer files from the
player to My Computer
39
Cannot transfer files from My
computer to the player
Help
Help for the use of the
VOICEYE Player
Can read it in the player
Can transfer files to My
Computer
Provides help for the
beginners of the player
Below, we summarize the functions and actions of each menu item in the VOICEYE Browser.
Menu Menu item Description
File Transfer files to the player Download the files in
My Computer to the
VOICEYE Player
Transfer files to My
computer
Upload the files in the
player to My Computer
New folder Create a new folder in My
Computer
Player Create a new folder in
the VOICEYE Player
Rename Rename the selected
file or folder
Delete Delete the selected
files or folders
Properties Shows the property
window for the
selected file or folder.
Exit Exit the VOICEYE
Browser.
Edit Cut Delete a original file or
folder and place it in
the clipboard
Copy Copies folders and
files.
Paste Paste the files placed
in the clipboard with
copy or cut.
Select all Select all the files in
Menu Index
6
40
the current older
View Detail Show the name, size,
type and date of files
Small Show only the names
of files
Sort Date
Sort files according
to date
Name
Sort files according
to the name
Type
Sort files according
to type
Refresh Refresh the content of
the current folder
Tools Connect to the player Connects to the
VOICEYE Player
Disconnect the player Disconnects the
VOICEYE Player
Language pack change Changes the language
of the TTS engine in
the player
Upgrade Upgrade the VOICEYE
Player system
Browser settings Set whether to
announce menu items
in speech in the
VOICEYE Browser.
41
Chapter 5. Appendix
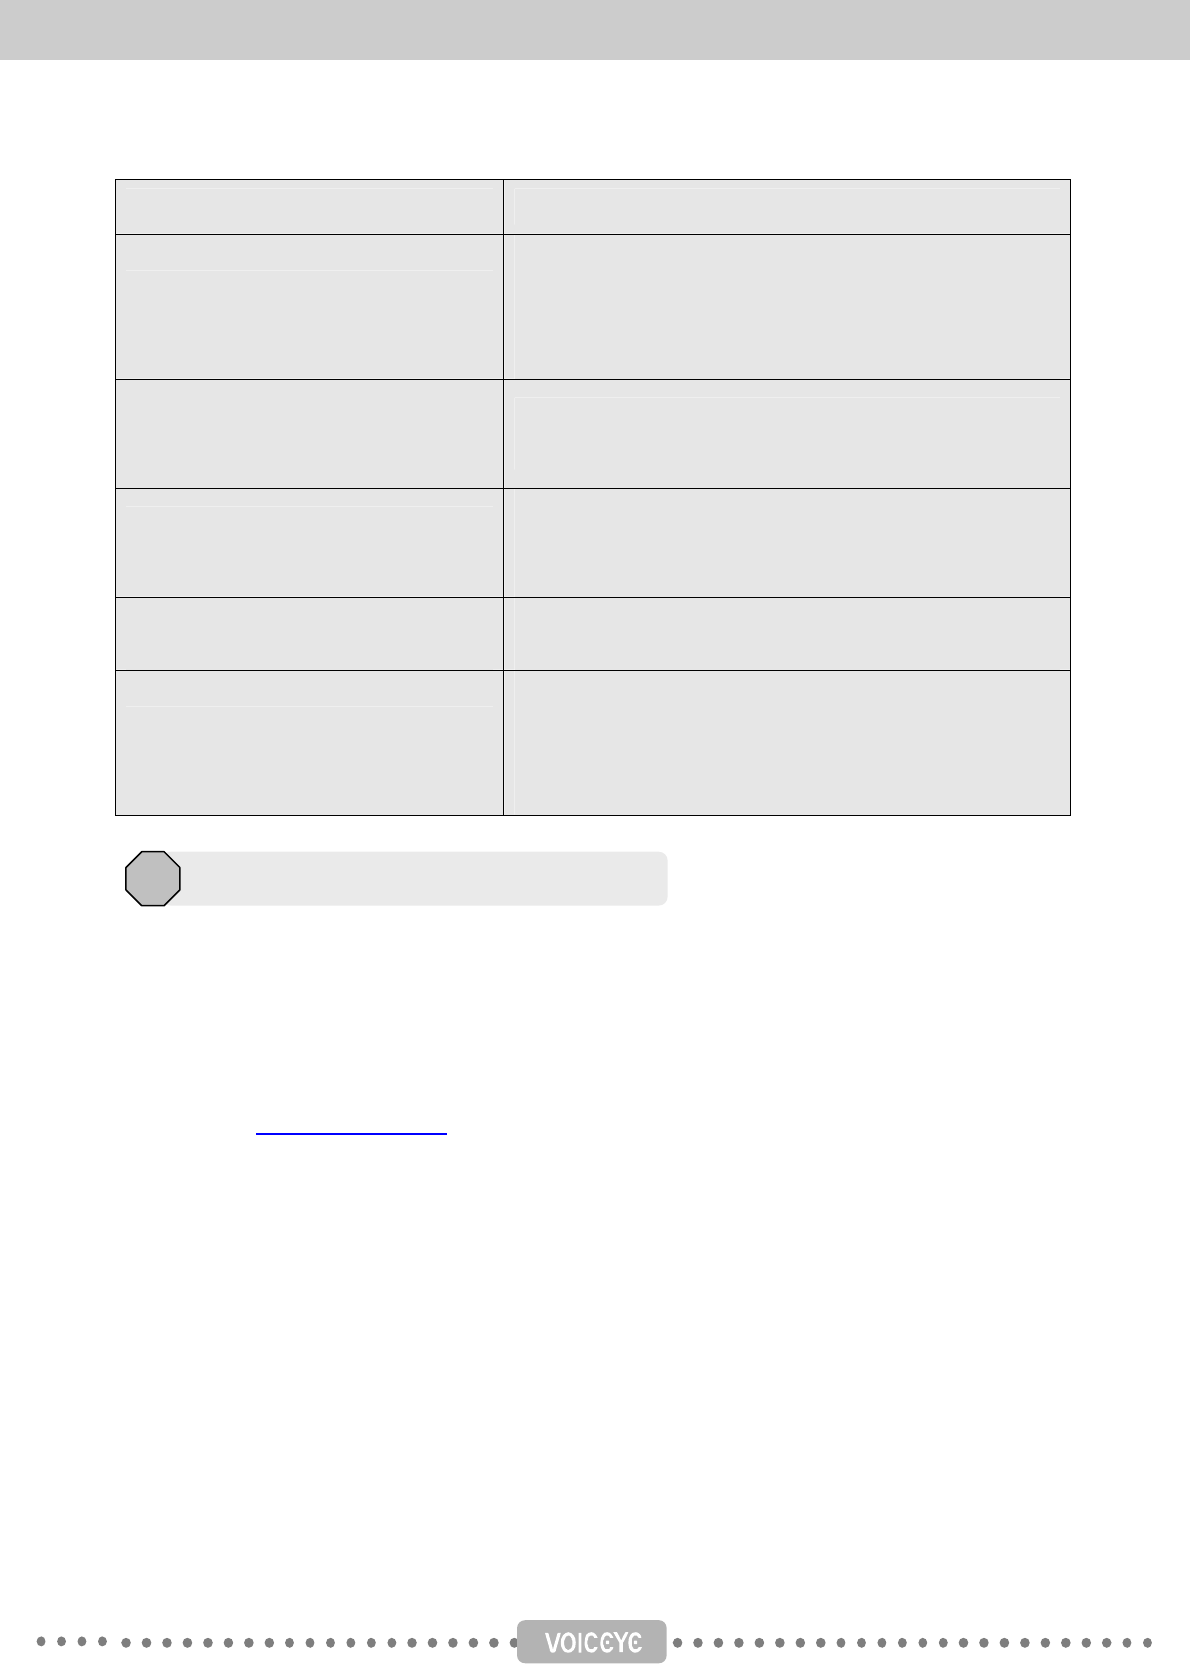
Check the following first if the product is not working properly. If the problem remains after trying these
suggestions, call and ask our customer service.
Troubleshooting
2
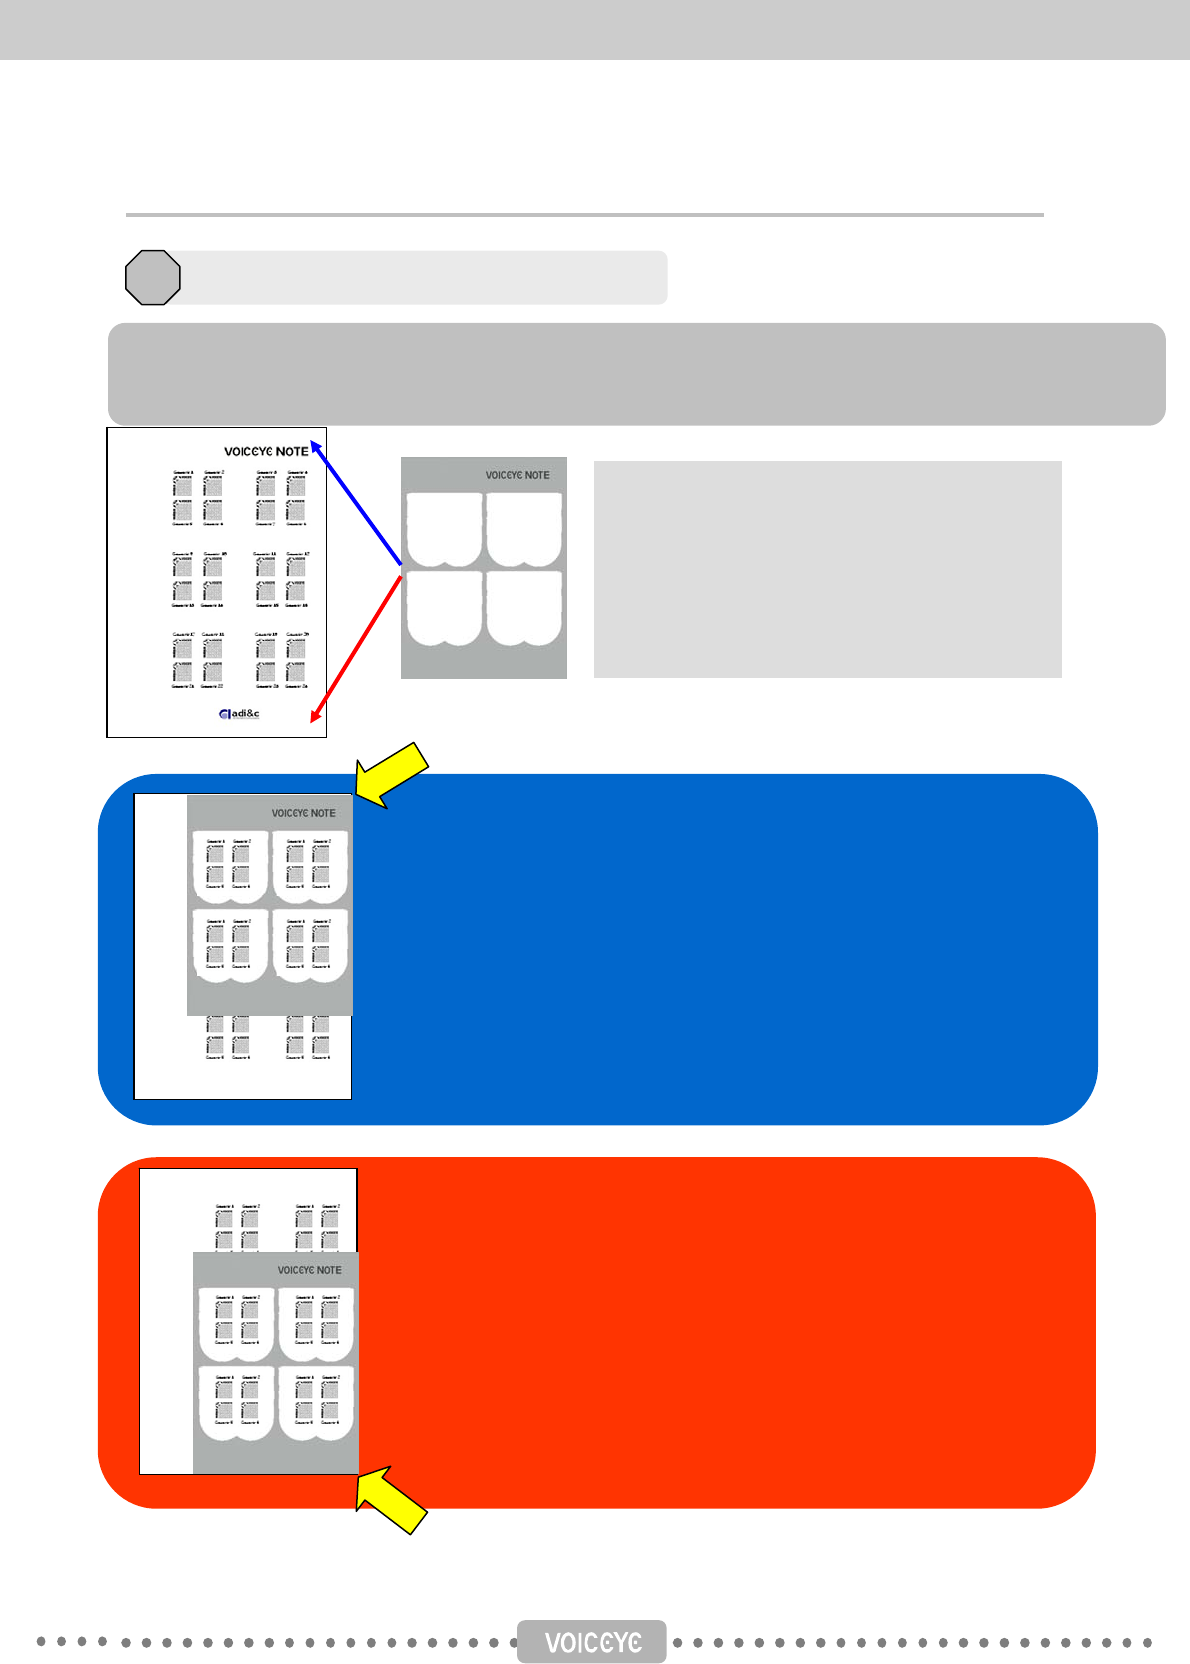
VOICEYE templates are supplementary tools that help users to find the location of a VOICEYE easily. You can
identify the front side of the VOICEYE template with the hole at the top right corner of the template.
VOICEYE note format
Using the VOICEYE Maker program, you can
create VOICEYE in the VOICEYE note format. In
a note format, up to 24 VOICEYE can be
contained in a VOICEYE note format.
Place the VOICEYE Note template on the top right corner of a
document printed in note format.
The VOICEYE Note template holds 16 VOICEYE s in the top
right section.
Place the VOICEYE Note template on the bottom right corner
of a document printed in note format.
The VOICEYE Note template holds 16 VOICEYE s on the
bottom right section.
How to use VOICEYE template 1
42
Problem Solution
I place the VOICEYE scanner on the
VOICEYE, but no action is performed
First, check the remaining battery. If the battery is fully
charged, make sure you are in the VOICEYE mode. If you
are in the “VOICEYE mode,” you should
press the Capture button
Although the above mentioned
problem has been resolved, but I only
hear the failing sound.
Align the top right corner of a page and the back right
bottom corner of the VOICEYE scanner.
How can I prevent the battery from
being quickly discharged?
If you are familiar with the VOICEYE Player, you can
disable the LCD display or TTS information in the “Setup
mode,” to save some battery use.
It is very hard for me to tune the
FM frequency
Make sure that the earphone is connected. You must use
an earphone because it serves as an antenna.
I cannot connect the VOICEYE Player
with the VOICEYE Browser.
Make sure if the VOICEYE Player is connected with the
VOICEYE Browser through a USB cable. Install the driver
in the Tools folder on the VOICEYE Browser CD
while the player is connected.
1) How to request
Phone: 82-2-2025-7750~~7753
Office hours: Monday through Friday, 9:30~18:00, excluding lunch hour (12:00~13:00).
The office will not open during Saturdays and holidays.
We can change this according to the need in our company.
Homepage: www.voiceye.com
Service guide through “Custom service” on our company’s web site, you can obtain the
information about diagnosing the failure of the product and requesting A/S.
Things to remember when you send the product to us by mail.
• Please send us the product warranty together with the part that you request the service
for, after filling out the required form.
• Please, send us only the item for which you can get the service. We do not provide
service for accessories such as a USB cable, an earphone, and the charger.
• We do not take responsibility for the loss or damage to accessories other than the items
we provide service for during shipping and service.
Requesting after-service
3
43
• We provide free service for any failure or damage occurring during normal operation,
within the Product warranty period (1 year). However, you may be charged service fee for
the damage resulting from the user’s fault. Please, refer to the consumer damage
compensation guide in the user’s manual of the product for more detail.
• Verifying the date of the product purchase is the user’s responsibility.
A user should back up data stored in the player before sending it for service. We assume that the data
stored in the product sent for service has been backed up by the user, so we do not back up the data from
the product. Also, we do not take responsibility for the data loss while providing service.
1) Free service
1. Failure or damage of the product occurring during normal use within its warranty period
• Failure or damage requiring serious repair, occurring during normal use within 10 days after its
purchase.
o Product replacement or refunds (However, you can get refunds only from where you
purchase the product.)
• Failure or damage requiring serious repair, occurring within a month after its purchase
o Product replacement
• Failure or damage occurring within its warranty
o Free repair service
• Re-occurring of the same failure or damage that has been repaired three times
o Product replacement when the fourth repair is requested.
2. When parts discontinue within its warranty period, and the parts are required to repair the product
• Failure or damage occurring during normal use within its warranty
o Product replacement
• Failure or damage caused by the user’s misuse within its warranty period
o Product replacement after charging fees corresponding to paid service.
• Failure or damage occurring after its warranty period
o Refund the amount adding 10% of the amount depreciated based on the part warranty.
(2) Paid service
1. Failure of the product after its warranty period
2. Failure caused by the user’s misuse
• Caused by the user’s carelessness (soaking or strong impact)
• Caused by disassembly, self repair or modification
• Caused when repairing in a place other than AD Information Technology service center
Consumer damage compensation guide
4
44
• Caused by the use of accessories or options our company do not endorse
• Caused by any other misuse
3. Other failure
• Failure or damage caused by natural disaster.
• Normal wear and tear (battery, and various accessories)
This product is produced through strict quality assurance and testing process. We, A/D Information
Technology, will replace or repair the product that fails in normal use within the warranty period at no
charge through our customer service center.
This warranty is valid for 1 year from the day of the product purchase. We will charge service fee for
failures after the warranty period or considered to be for paid service even within the warranty period. To
request service, this product warranty must be presented. Please keep the product warranty in a safe
place; it will not be reissued. This warranty is valid within the territory of the United States.
Product name VOICEYE Mate Model VMP-200
Manufacture number
Name Phone Customer
Address
Vendor Name Phone 82-2-2025-
7750
Address 8th Ace Techno Tower #608
191-7 Gurodong
Gurogu, Seoul, Republic of Korea
Date of purchase Warranty
period
1 year
Manufacturer Name Phone 82-2-2025-
7750
Address 8th Ace TechnoTower #608
191-7 Gurodong
Gurogu, Seoul, Republic of Korea
Product Warranty
5
45