AD Information and Communications VPC100 VOICEYE PC MATE User Manual VOICEYE PC manual Eng050810
AD Information & Communications Co., Ltd. VOICEYE PC MATE VOICEYE PC manual Eng050810
Users Manual
Compatible with

2
The content of this manual is subject to change without notice. It is the sole
responsibility of the user to abide by any related or implied copyright laws.
No part of this manual may be reproduced or copied, in any form or by any means,
without the prior written permission of AD Information & Communications Co., Ltd.
A
ll the names of the companies and/or products mentioned in this manual are eithe
r
the registered trademarks or brand names of their lawful owners.
Copyright © 2005 AD Information & Communications
All rights reserved
The content of this manual and VOICEYE Reader program are protected by copyrigh
t
laws and the intellectual property laws.
VOICEYE’s original 2D barcode technology makes it free from copyright infringement
since it offers protection of intellectual property.
Any those texts that are reserved by copyright may not be copied as they are
protected as intellectual property.
1. Introduction
2. Features
3. Safety Precautions
4. Components
5. Product and Function
6. Hardware Specifications
7. System Requirements
Connection and Installation
1. VOICEYE Reader Installation
2. NWC Player Installation
3. TTS Engine Installation
4. Hardware Installation
5. Driver Installation
Quick Guide to using the VOICEYE PC-Mate
1. Getting started with the VOICEYE Reader
2. Detailed Description by Menu
3. Basic Operation
Basic Shortcut Keys
How to Use VOICEYE Note Template
Regulatory Information
Warranty
3
Chapter 1
Chapter 2
Chapter 3
Appendix
Contents
Chapter 1
VOICEYE PC-Mate is an innovative reading device for computers, powered by a unique,
sophisticated 2D barcode technology that uses a TTS engine to access printed material.
This revolutionary reading solution offers a wide range of applications, both for disabled and for non-
disabled people, at home, as well as in fields like education, government, and business.
VOICEYE Scanner captures the VOICEYE symbol that consists of encoded and compressed digital
text information together with its corresponding file and transfers the text data to your PC.
VOICEYE PC-Mate enhances your reading ability by giving you the following features and
advantages:
Universal and versatile features fit many categories ....Real-time TTS player, magnifier,
music player, educational aids such as training for dyslexia and foreign language study,
phonological training, etc.
Bi-modal reading approach: displays words on the screen as they are spoken for easy
following, and supports bi-modal auditory and visual education for all ages.
Highly customized solution: flexible, convenient, and remarkably easy to use. The user
can configure the TTS setting to hear specific letters as he or she designates.
Digital data processing: eliminates the restrictions of analog type of OCR (Optical
Character Recognition) technology, such as high error ratio, high price, etc.
No special hardware is required, except the VOICEYE Scanner, which can be purchased
at a low cost
A wide array of flexible options on your screen: allows you to customize the appearance
of text on your screen, including text font, font size, font/background color
Auto store function retains a history of the last ten files, which can be scanned for easy
review.
Section auto repeat playback: perfect for language study. The word or sentence which
you drag with the mouse is read aloud continuously and repeatedly unless you press the
corresponding key to stop.
Variable speech speed control to suit specific preferences and purposes: useful in
effective phonological training. Speech speed can be controlled in a range of 25 - 400%.
Auto scroll: The texts are automatically scrolled for your reading convenience when you
want to read texts without the computerized voice.
Introduction
1
Features
2
4
Auto capture: captures the VOICEYE symbol automatically, without the push of a button.
The VOICEYE Scanner scans symbols in seconds - even inverted VOICEYE symbols.
Install this product after reading this user’s manual thoroughly.
Connect the VOICEYE Scanner to your PC after installing software.
Do not pull or bend the USB cable as this may cause a product malfunction.
Do not touch the lens. Use a soft cloth or swab to clean the lens.
This icon indicates materials you should take special notice of.
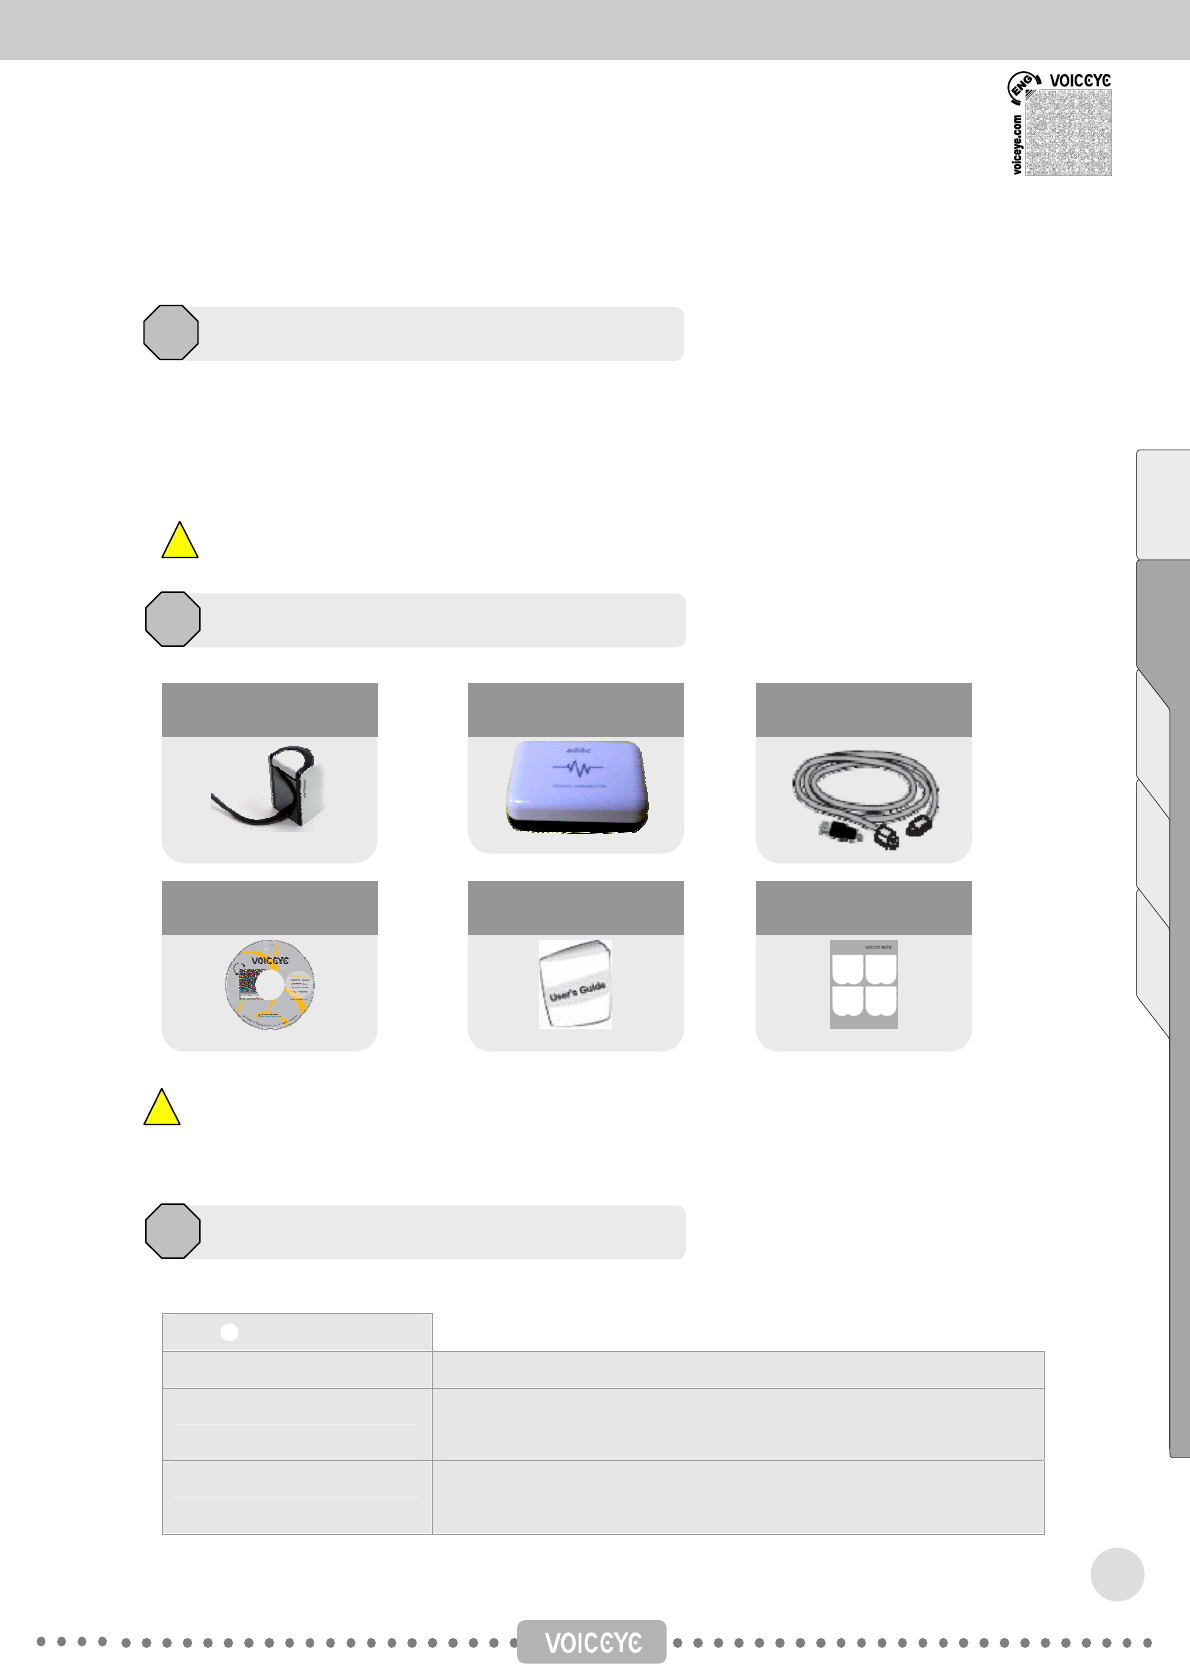
Please make sure that every component of the product is included.
Hardware
VOICEYE Scanner to capture VOICEYE symbol data from printed material
PC Connector to convert VOICEYE image scanned with VOICEYE Scanner to
digital data and transfer it to PC via USB connection
USB cable to supply electric power to PC and transfer VOICEYE image
captured with VOICEYE Scanner to PC.
VOICEYE Scanner Connector USB cable
Software CD User’s manual Note Template
Safety Precautions
3
Components
4
Product and Function
5
5
Contents Chapter 1 Chapter 2 Chapter 3 Appendix
Software
VOICEYE Maker to create VOICEYE symbol
VOICEYE Reader to display and magnify texts on screen after decoding VOICEYE
symbol, which has then been transferred to PC, and read them
aloud.
Text-To-Speech engine to convert text data into a natural-sounding computerized voice
VOICEYE Scanner driver To capture the VOICEYE symbol
Others
User’s Guide to explain how to install and use the product
VOICEYE Note Template
(Optional)
to help the blind find the location of the VOICEYE symbol easily
This product must be used with computer that supports USB 2.0. Please make sure that your
computer meets this condition.
Dimension 43 x 48 x 67 mm, 1.7” x 1.9” x 2.6”
Weight 80g, 0.18 lbs
Image Sensor 1/2 inch CMOS Color SXGA sensor
Color 24bit RGB Color
Pixel Array Size 1280 x 1024 pixels
Exposure Automatic & Manual Control
Signal Noise Ratio 54 dB
Max. Image Transfer Rate 15 FPS (Frame Per Sec)
Interface USB 2.0
USB Cable Length 1.2 m, 3.9’
※Under our policy of continuous improvement, we reserve the right to change specifications and
designs without prior notice.
Hardware Specifications
6
6
OS Windows 2000/2003/XP
CPU Pentium II, minimum of 500 MHz
RAM 64Mb - 128Mb
DB 200Mb - 500Mb
Interface High Speed USB 2.0
Power PC USB port support
System Requirements
7
7
Contents Chapter 1 Chapter 2 Chapter 3 Appendix
Chapter 2
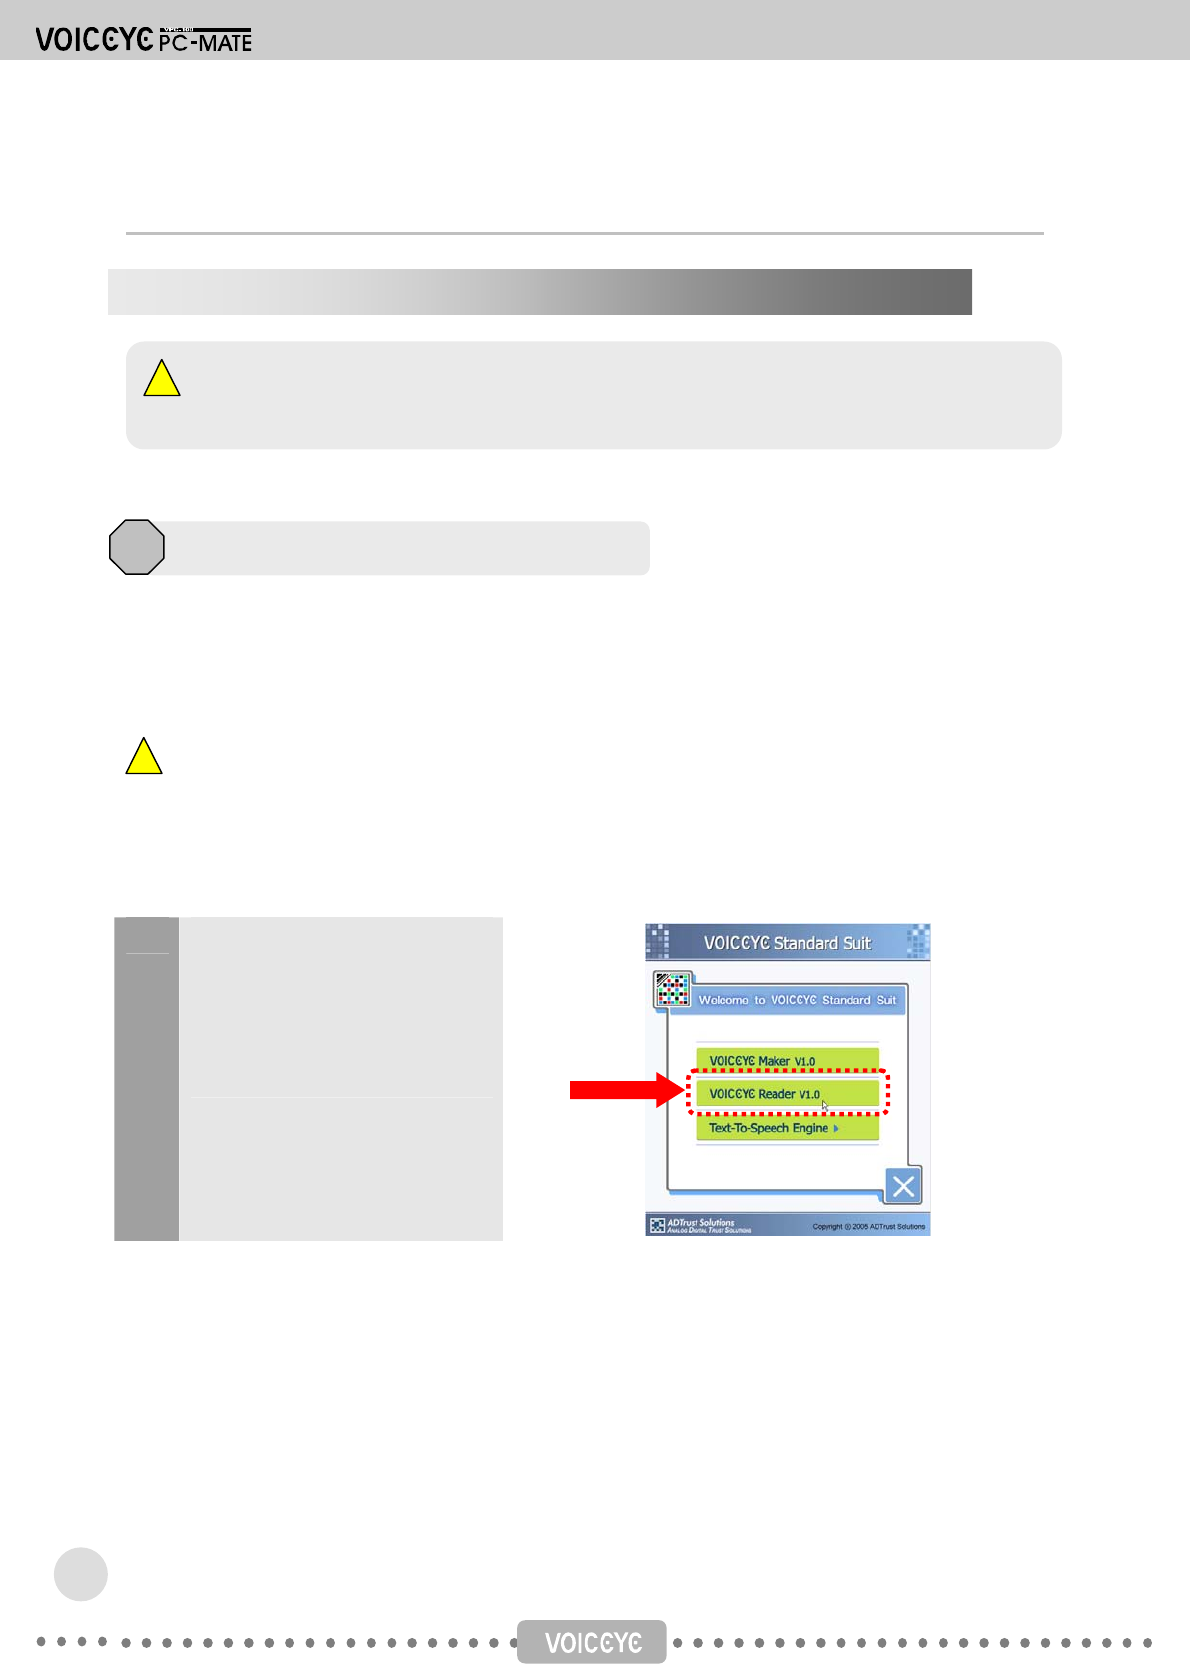
1) After your computer automatically launches the installation CD, click VOICEYE Reader.
2) When the installation is complete, Start > Program > VOICEYE > VOICEYE Reader program group is
created.
If your computer doesn’t automatically launch the CD, start Setup manually. It may not start
automatically depending on your Windows settings.
In this case, run x:\setup.exe or x:\VOICEYE Reader\setup.exe. (where x is the letter of your CD-
ROM drive)
1 When you insert the CD into CD-
ROM drive, the Welcome to
VOICEYE Standard Suit screen
will appear. Click VOICEYE
Reader.
1) Insert the installation CD into your computer’s CD-ROM drive.
2) Next, connect the USB port of VOICEYE Scanner to your PC using the provided USB cable.
VOICEYE Reader Installation
1
Connection and Installation
8
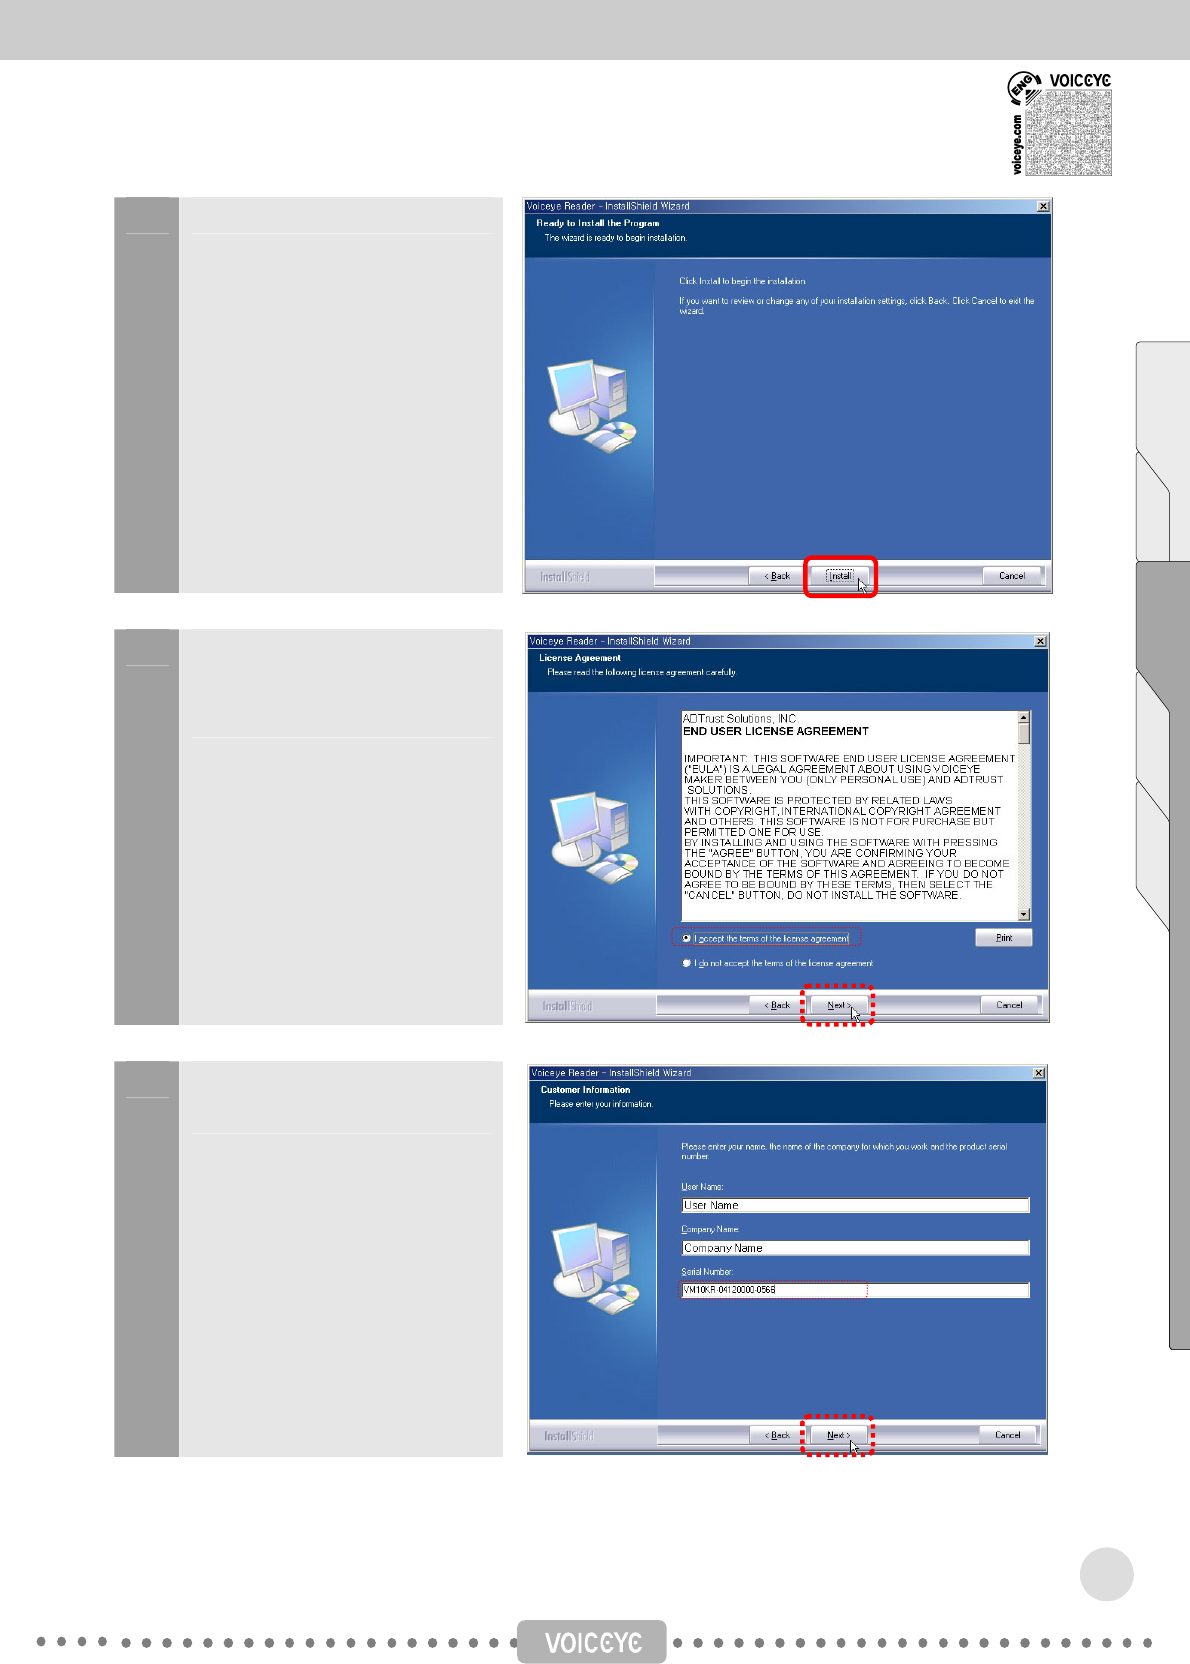
2 Click Install to start.
3 Review the license agreement
and, if you agree, accept it and
click Next.
4 Confirm user name and company
name, and click Next.
9
Contents Chapter 1 Chapter 2 Chapter 3 Appendix
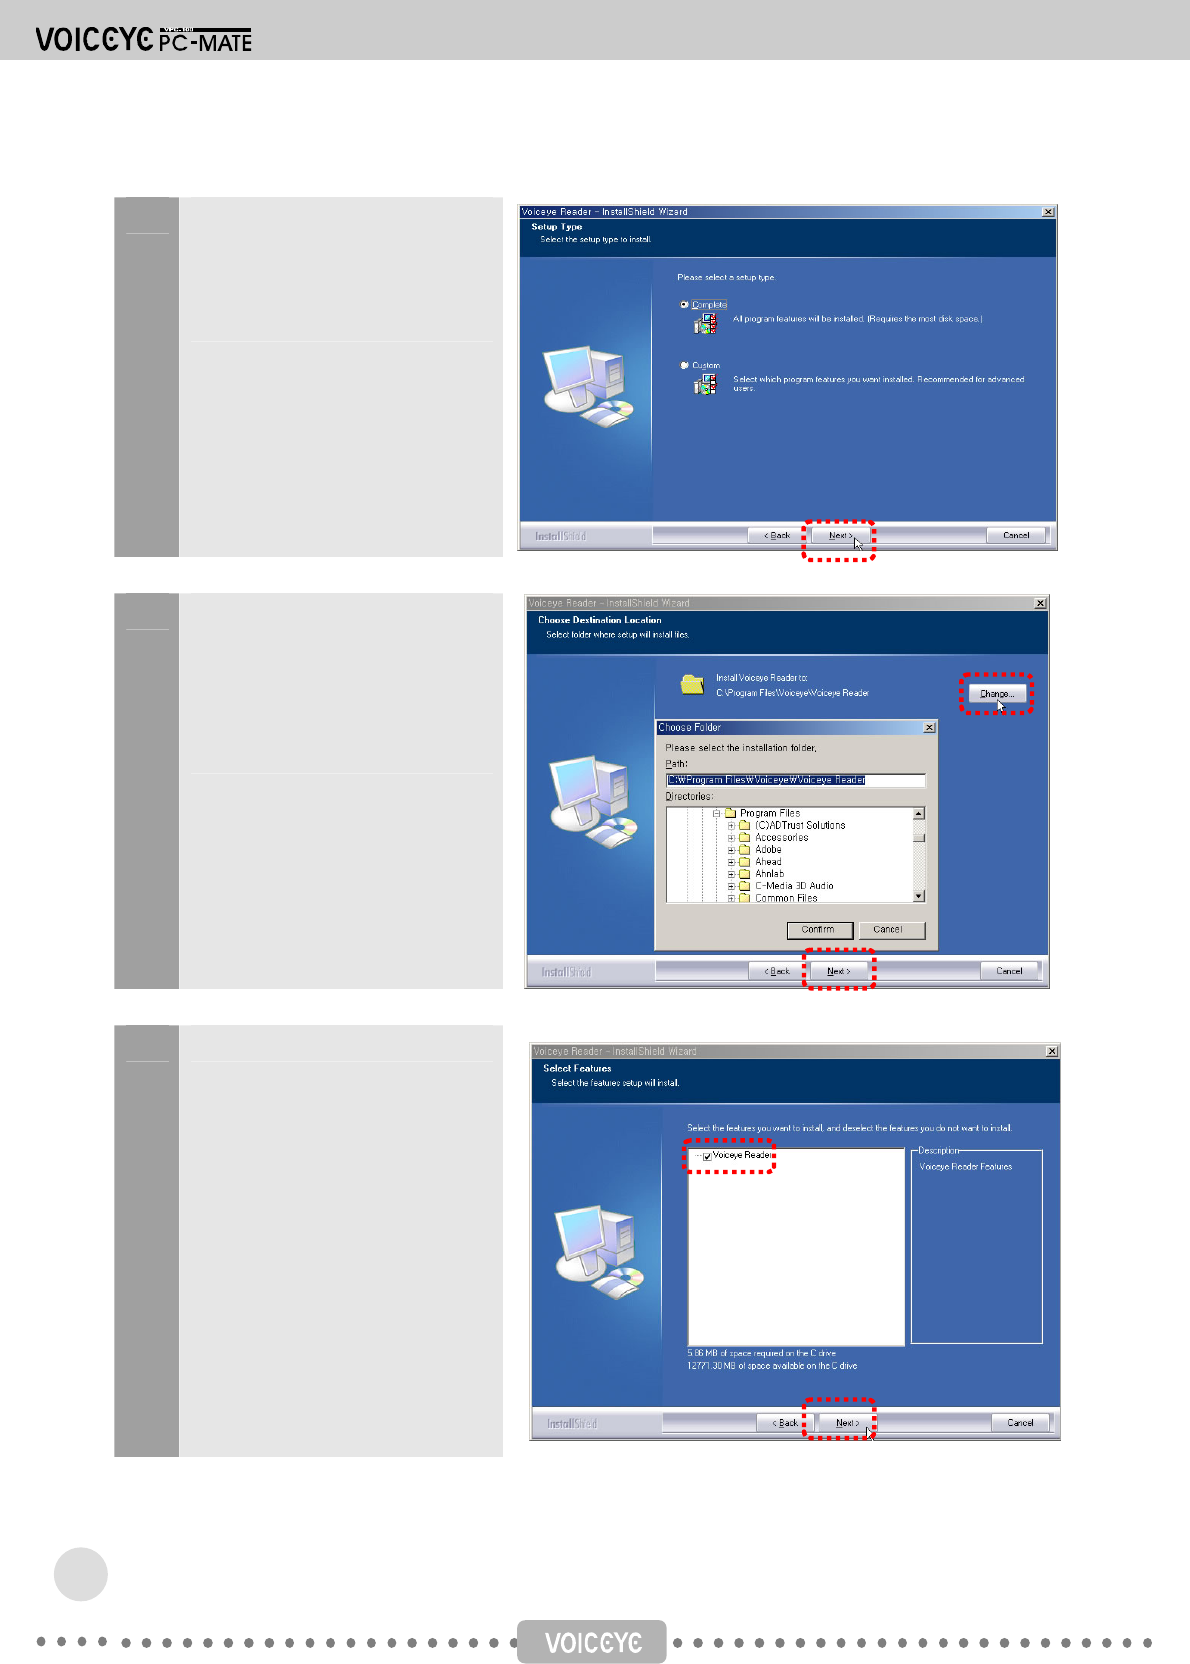
5 Select setup type. Select
Complete to advance to no. 6, or
Custom to advance to no. 5-1
and no. 5-2.
5-1 To change the folder, click the
Change button and select the
folder you want. When you're
finished, press Confirm and then
Next.
5-2 Click Next.
10
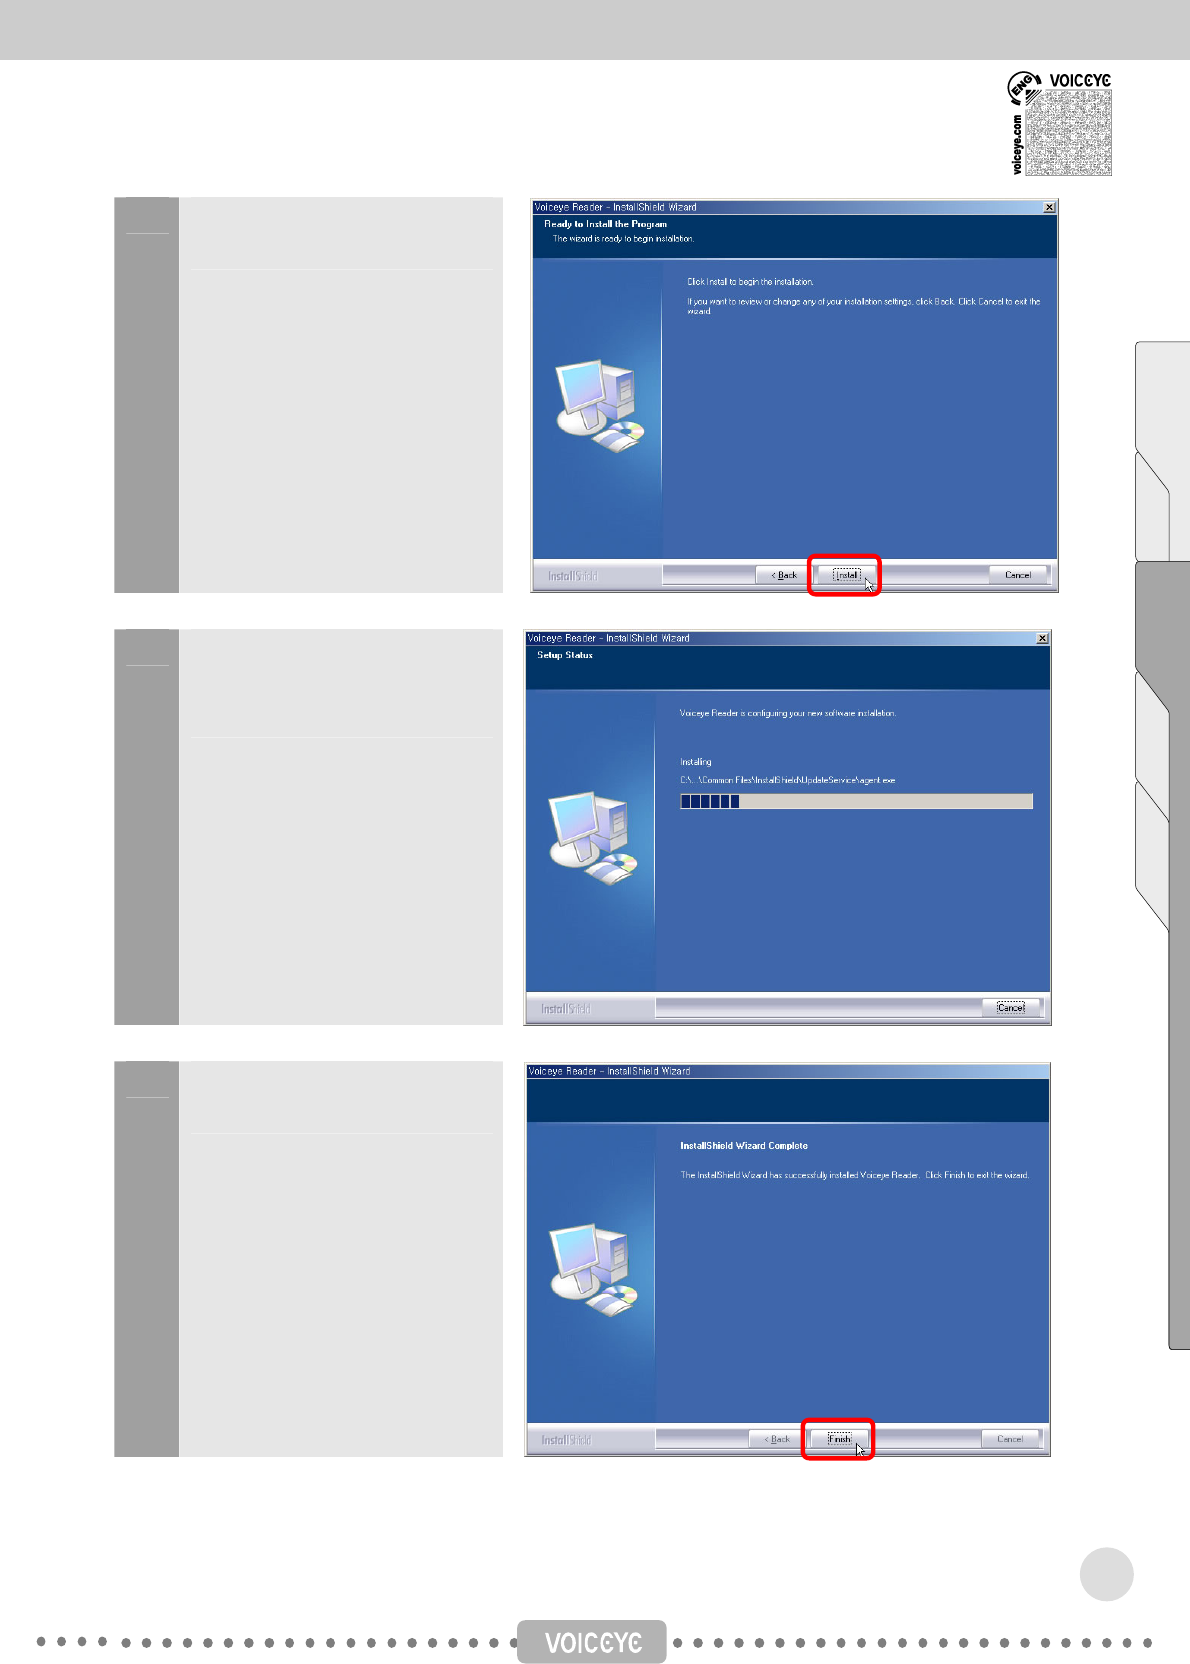
6 The wizard is now ready to begin
installing. Click Install to start.
7 The setup status window appears
and shows the progress of
installation.
8 Click Finish to complete
installation.
11
Contents Chapter 1 Chapter 2 Chapter 3 Appendix
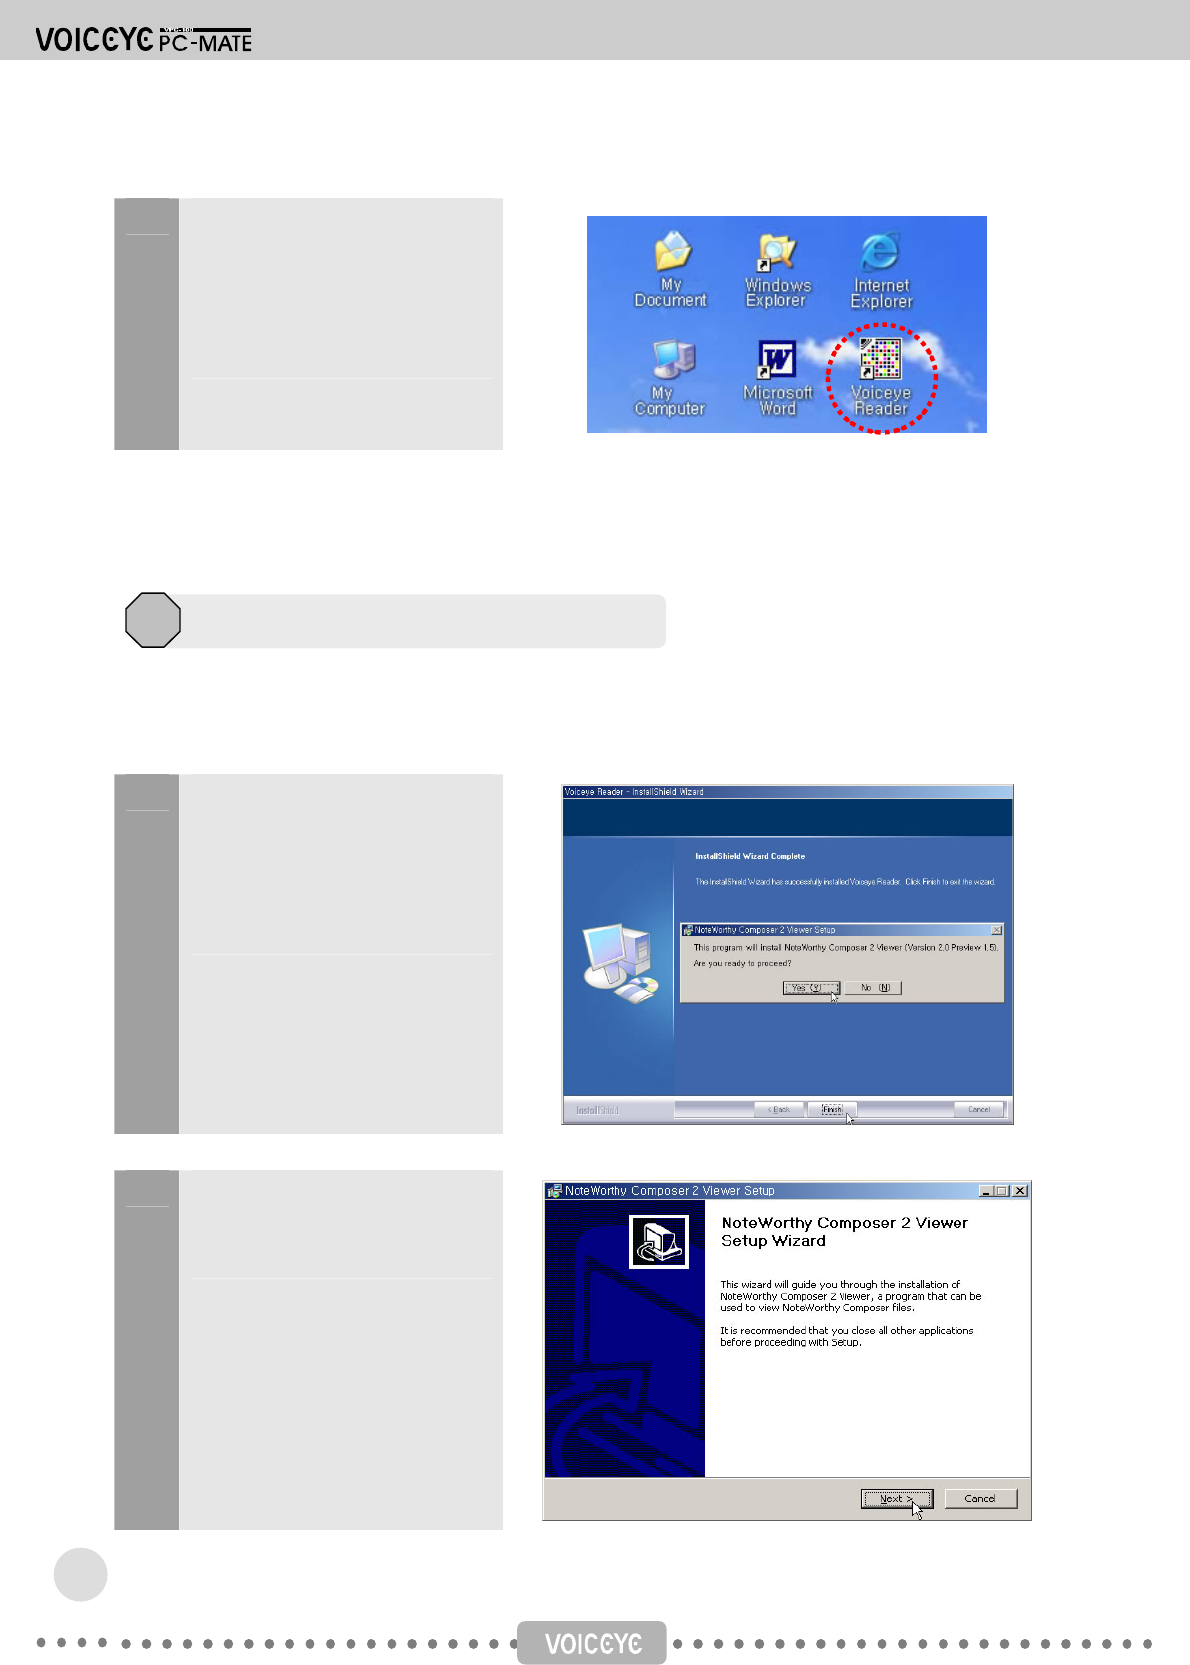
9 The installation is now completed.
The installation program
automatically places a color
barcode shaped icon, VOICEYE
Reader, on the desktop screen.
After you install VOICEYE Reader, you are asked to install the NWC Player. You need to install this in
order to play the music encoded in a VOICEYE symbol.
1 Click Yes to install NWC Player.
You can also install it by double-
clicking the file named
setup_nwc2vwr_p1_5 from the
Tools menu on the CD.
2 NoteWorthyComposer 2 Viewer
Setup Wizard will be started. Click
Next.
NWC Player Installation
2
12
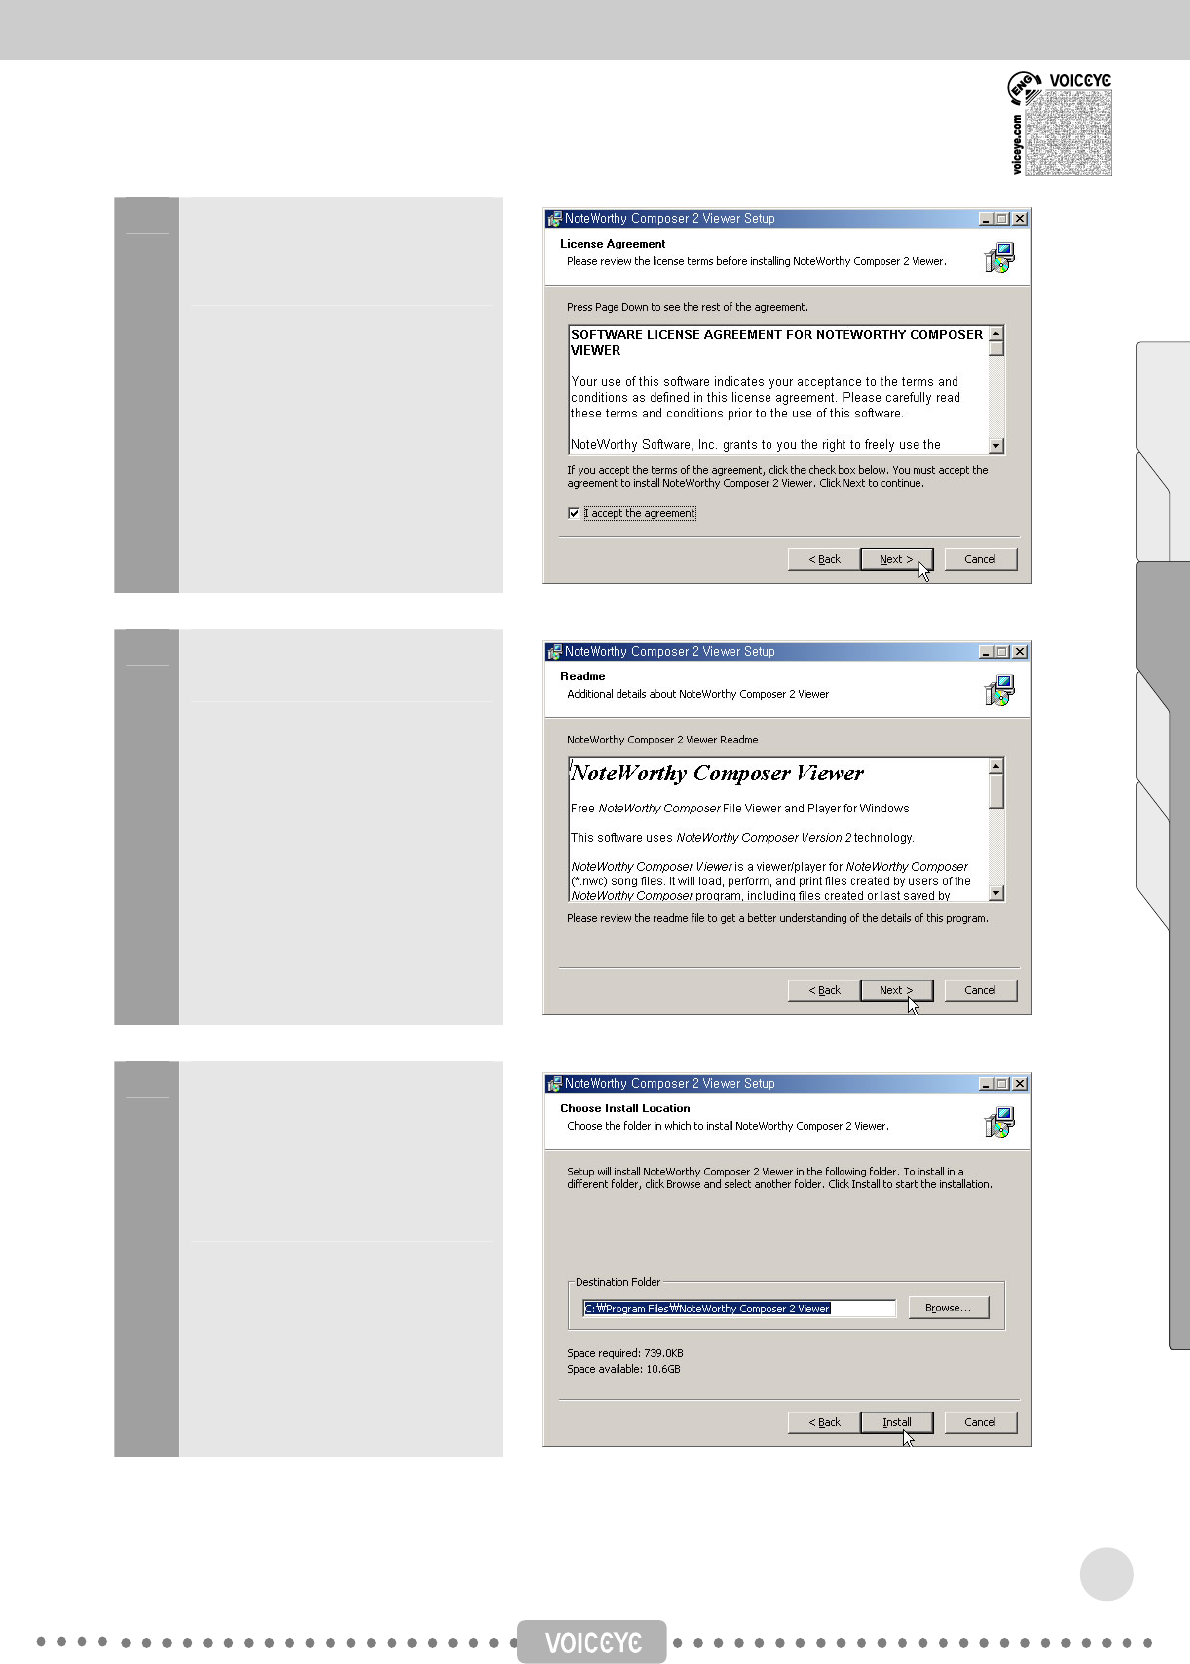
3 Review the license agreement
and, if you agree it, accept it and
click Next.
4 Review the details of this program
and click Next.
5 To change the folder, click the
Browse button and select the
folder where you want to install
the program. When you're
finished, click Install.
Contents Chapter 1 Chapter 2 Chapter 3 Appendix
13
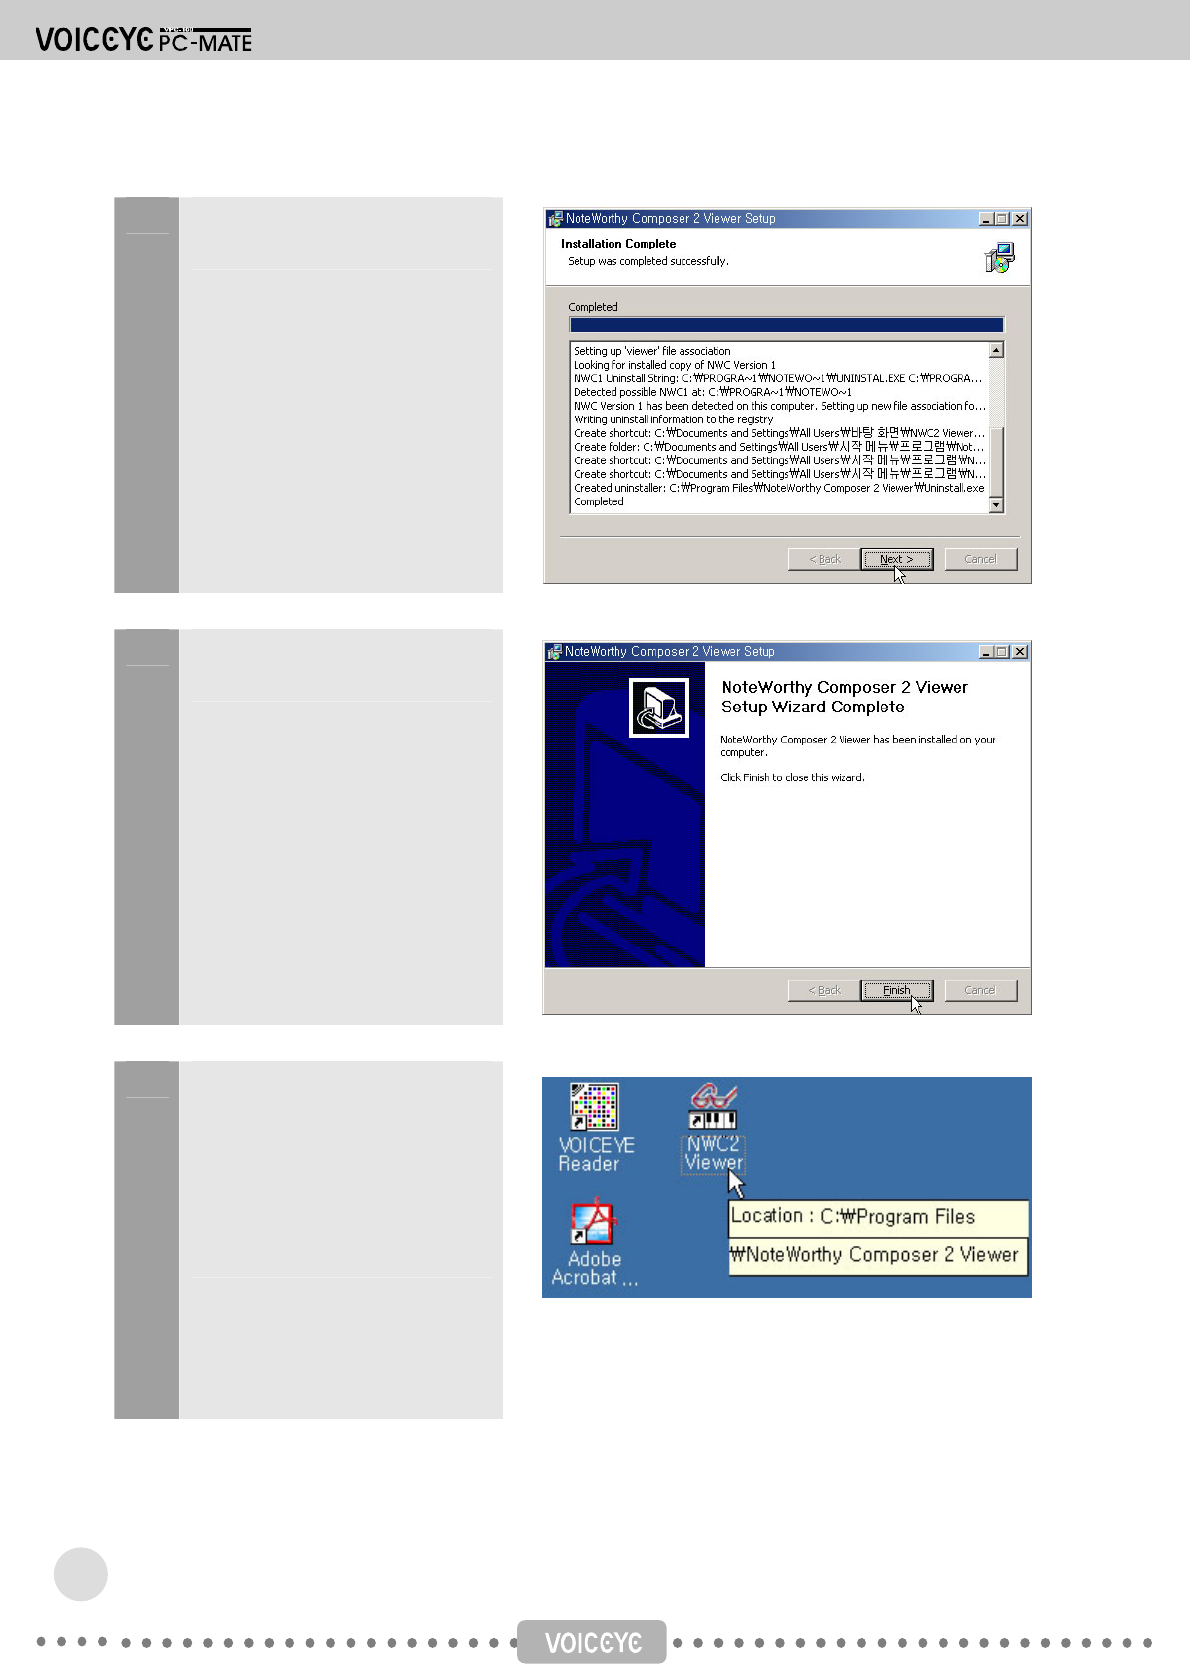
6 The setup status appears. When
finished, click Next.
7 Click Finish to complete
installation.
8 The installation program
automatically places an icon for
NWC2 Viewer on the desktop
screen.
Double-click the NWC2 Viewer
icon.
14
9 NoteWorthy Composer 2 Viewer
will appear.
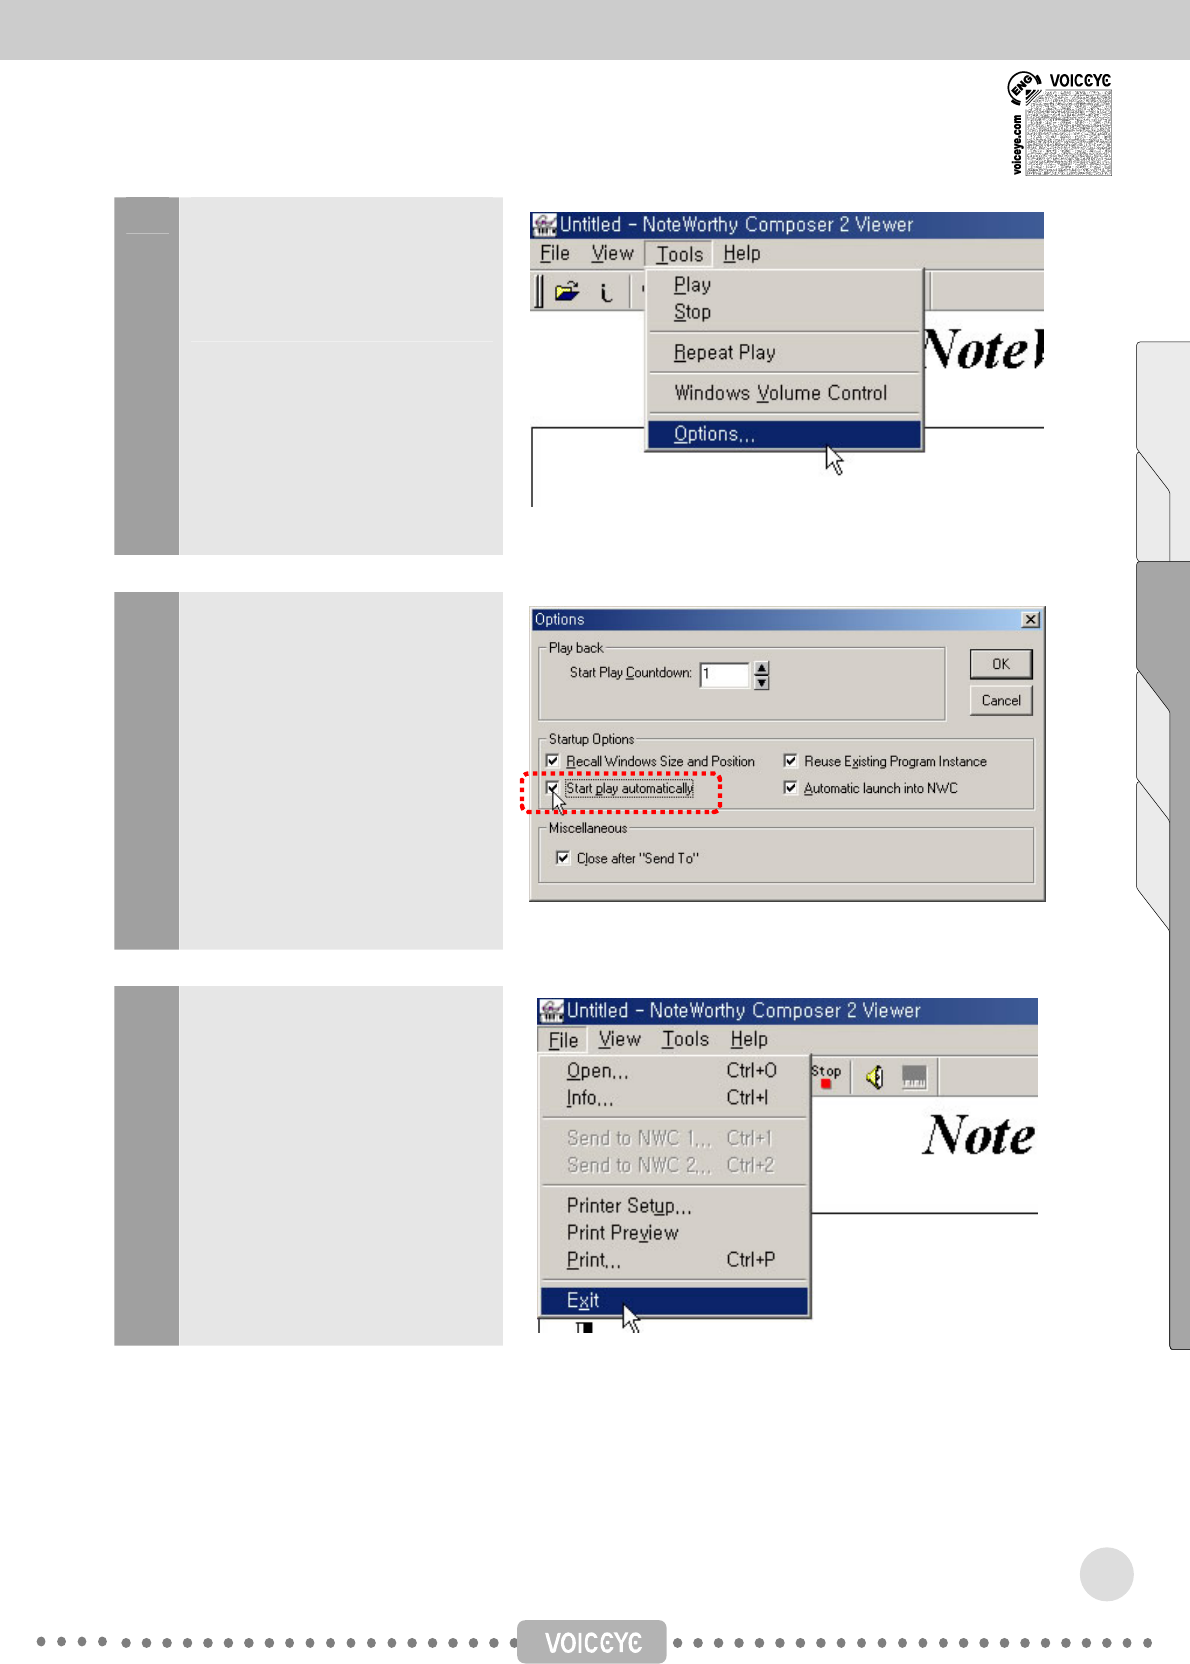
On the Tools menu, click
Options.
10 Check the Start play
automatically box, and then click
OK.
11 Exit the NoteWorthy Composer 2
Viewer.
You have successfully installed
the NWC Player.
Now, go to the Welcome to VOICEYE Standard Suit again to install Text- to-Speech Engine.
Contents Chapter 1 Chapter 2 Chapter 3 Appendix
15
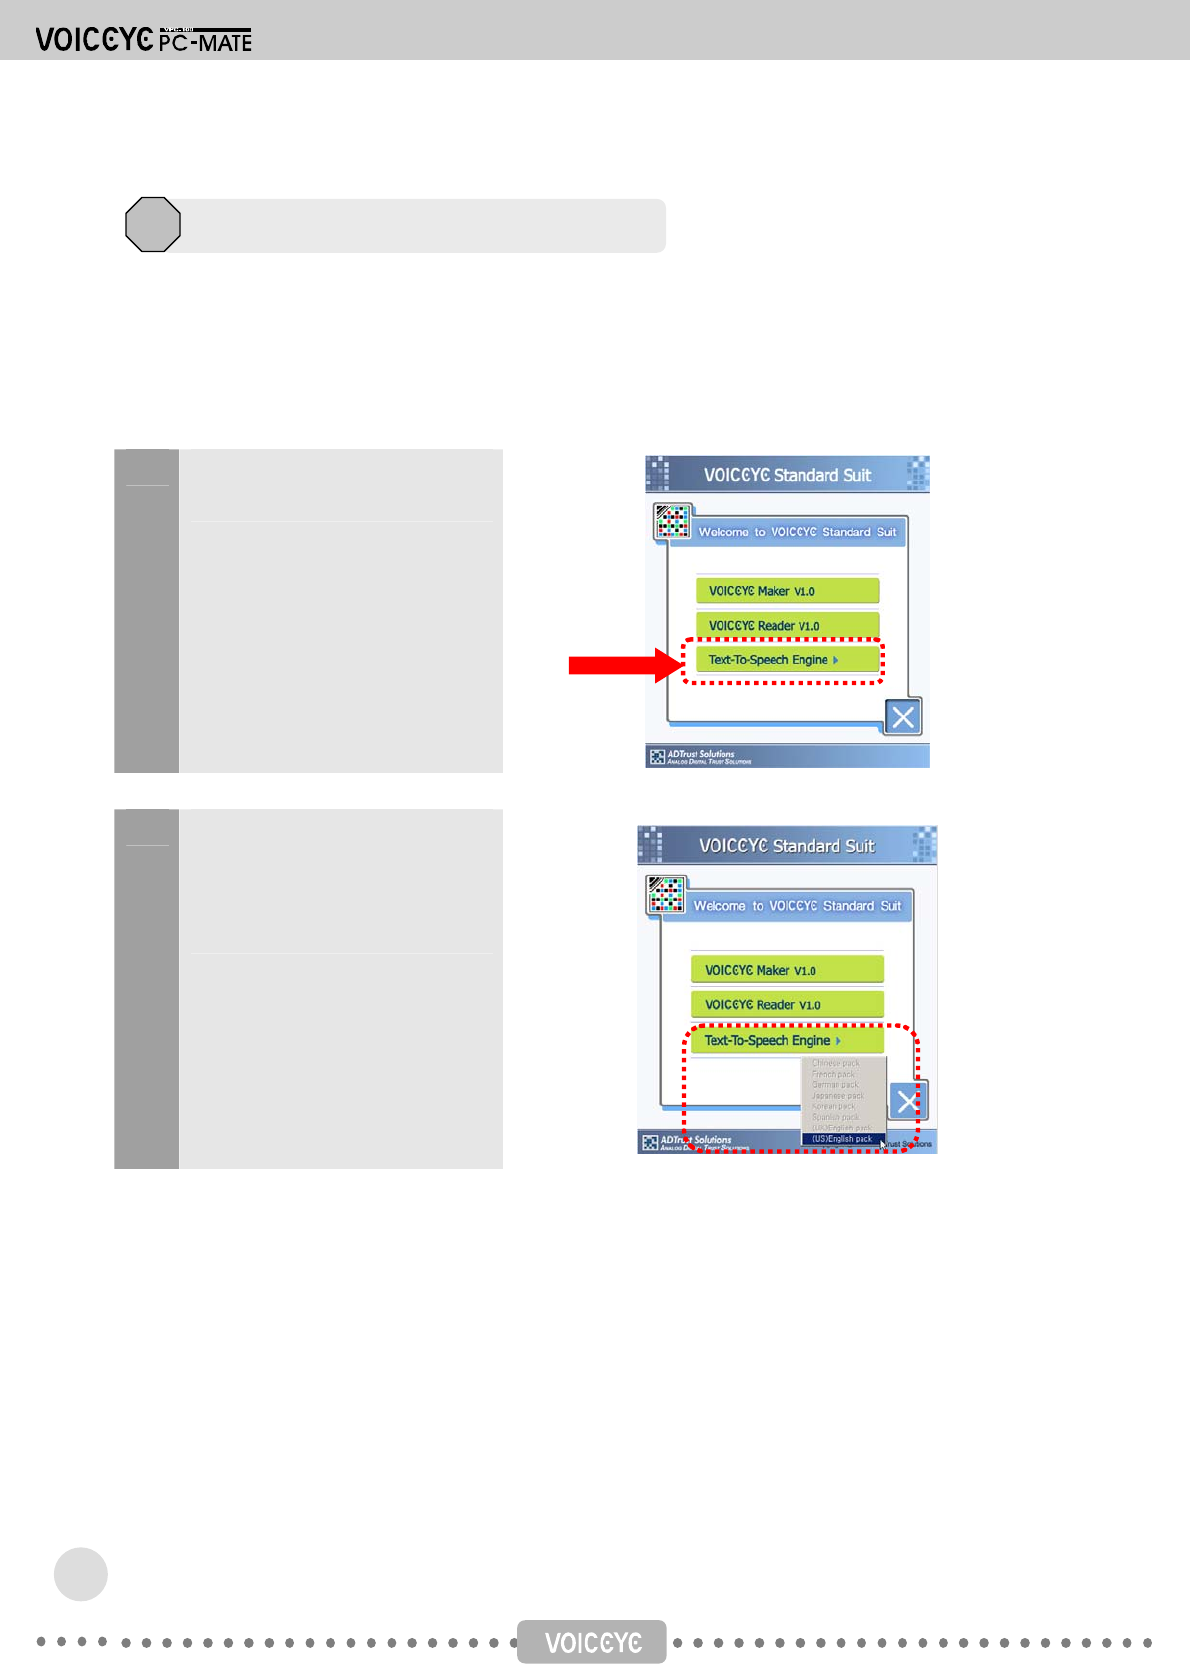
To read the text aloud, you must install the TTS engine.
If you already have the TTS Engine on your computer, you don’t need to install the TTS Engine
again. However, we recommend strongly that you use our TTS engine, which is well suited with our
VOICEYE products.
1 On the Welcome screen, click
TTS Engine.
2 Select the language pack from
the drop-down menu.
TTS Engine Installation
3
16
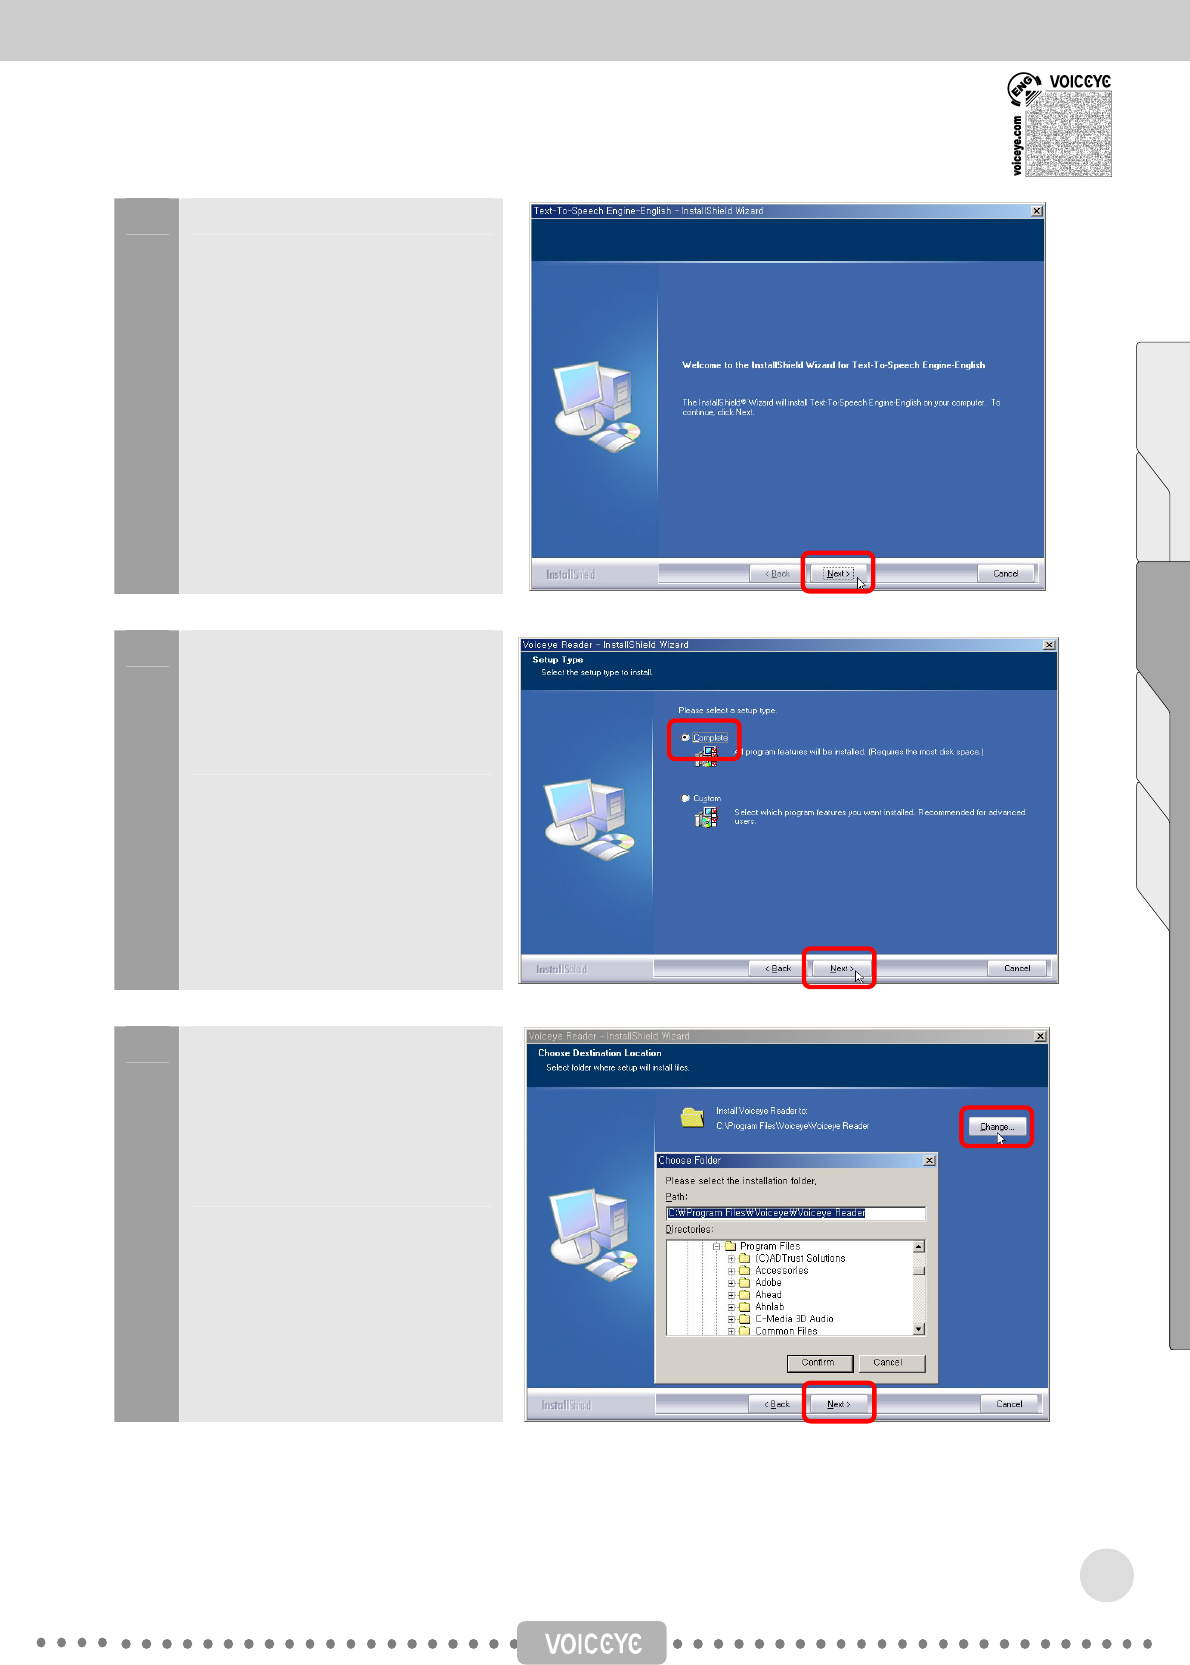
3 Click Next to start.
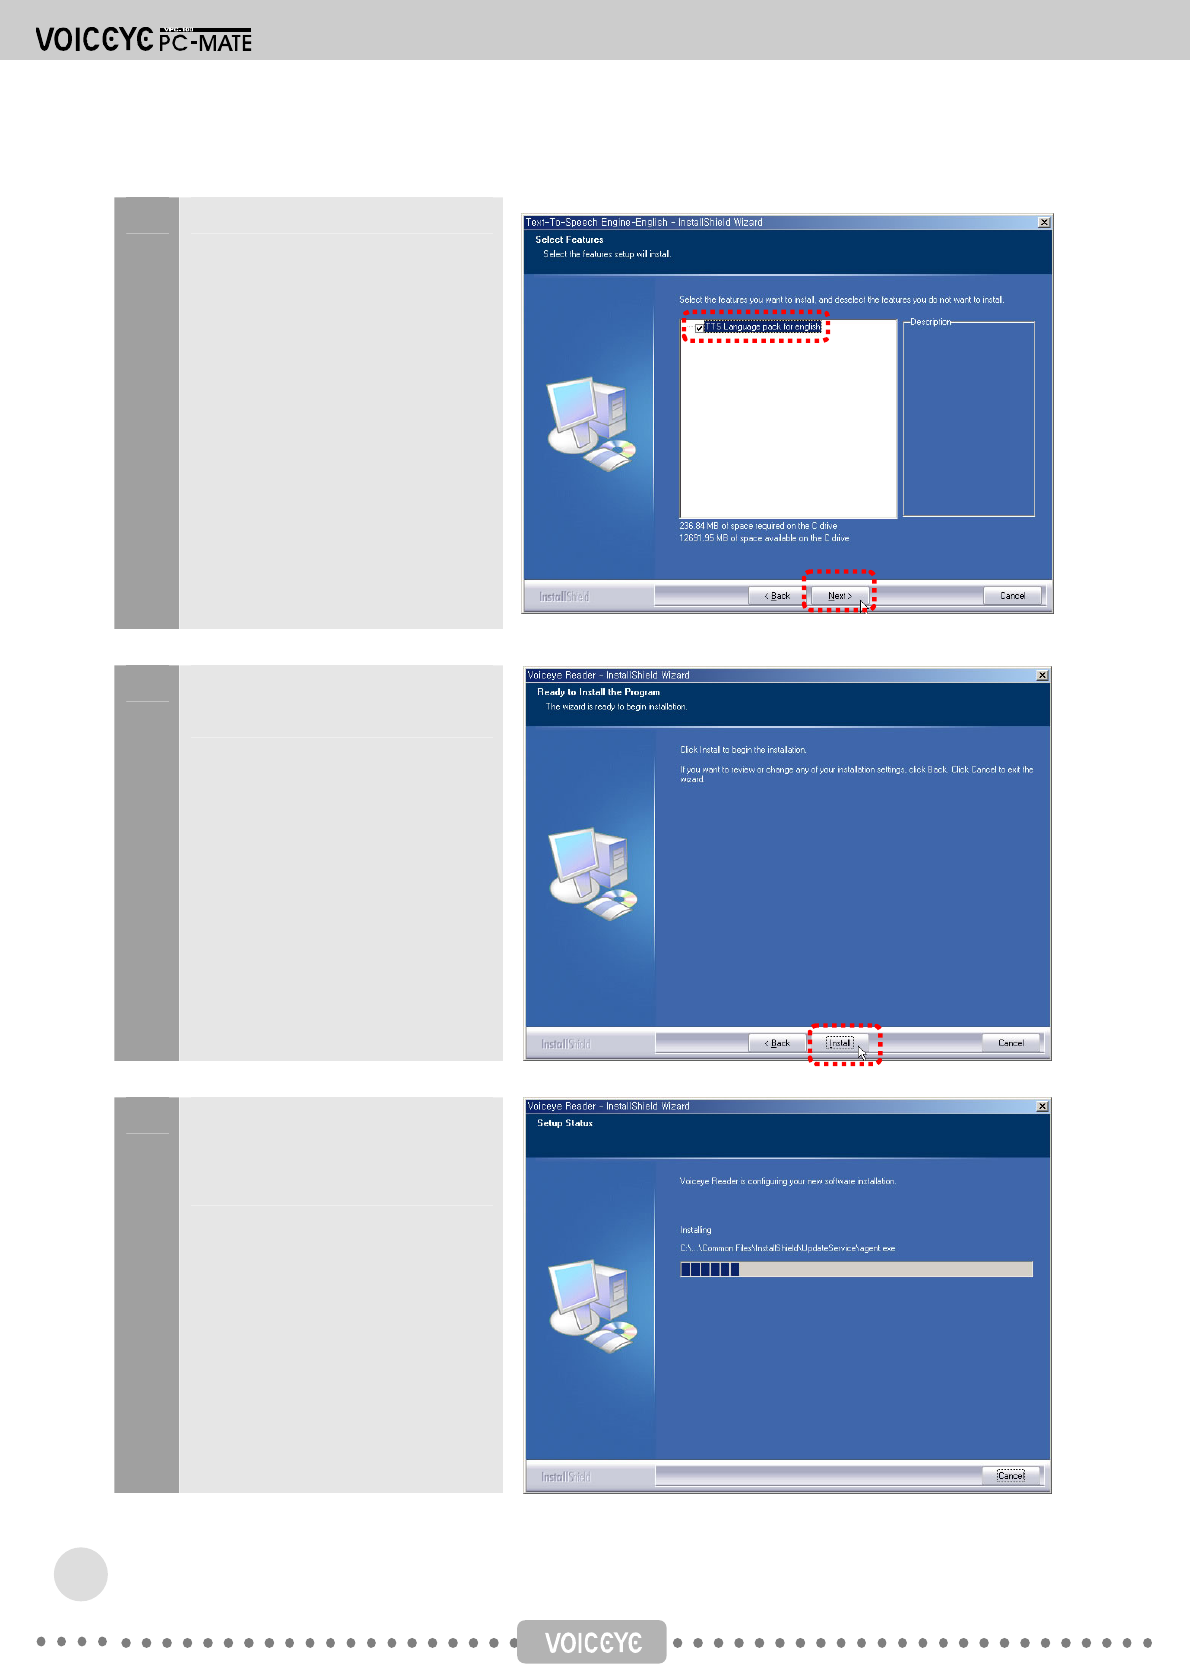
4 Select setup type. Select
Complete to advance to no. 5, or
Custom to advance to no. 4-1
and no. 4-2.
4-1 To change the folder, click the
Change button and select the
folder you want. When you're
finished, press Confirm and then
Next.
17
Contents Chapter 1 Chapter 2 Chapter 3 Appendix
4-2 Click Next.
5 The wizard is now ready to begin
installing. Click Install to start.
6 The setup status window appears
and shows the progress of
installation.
18
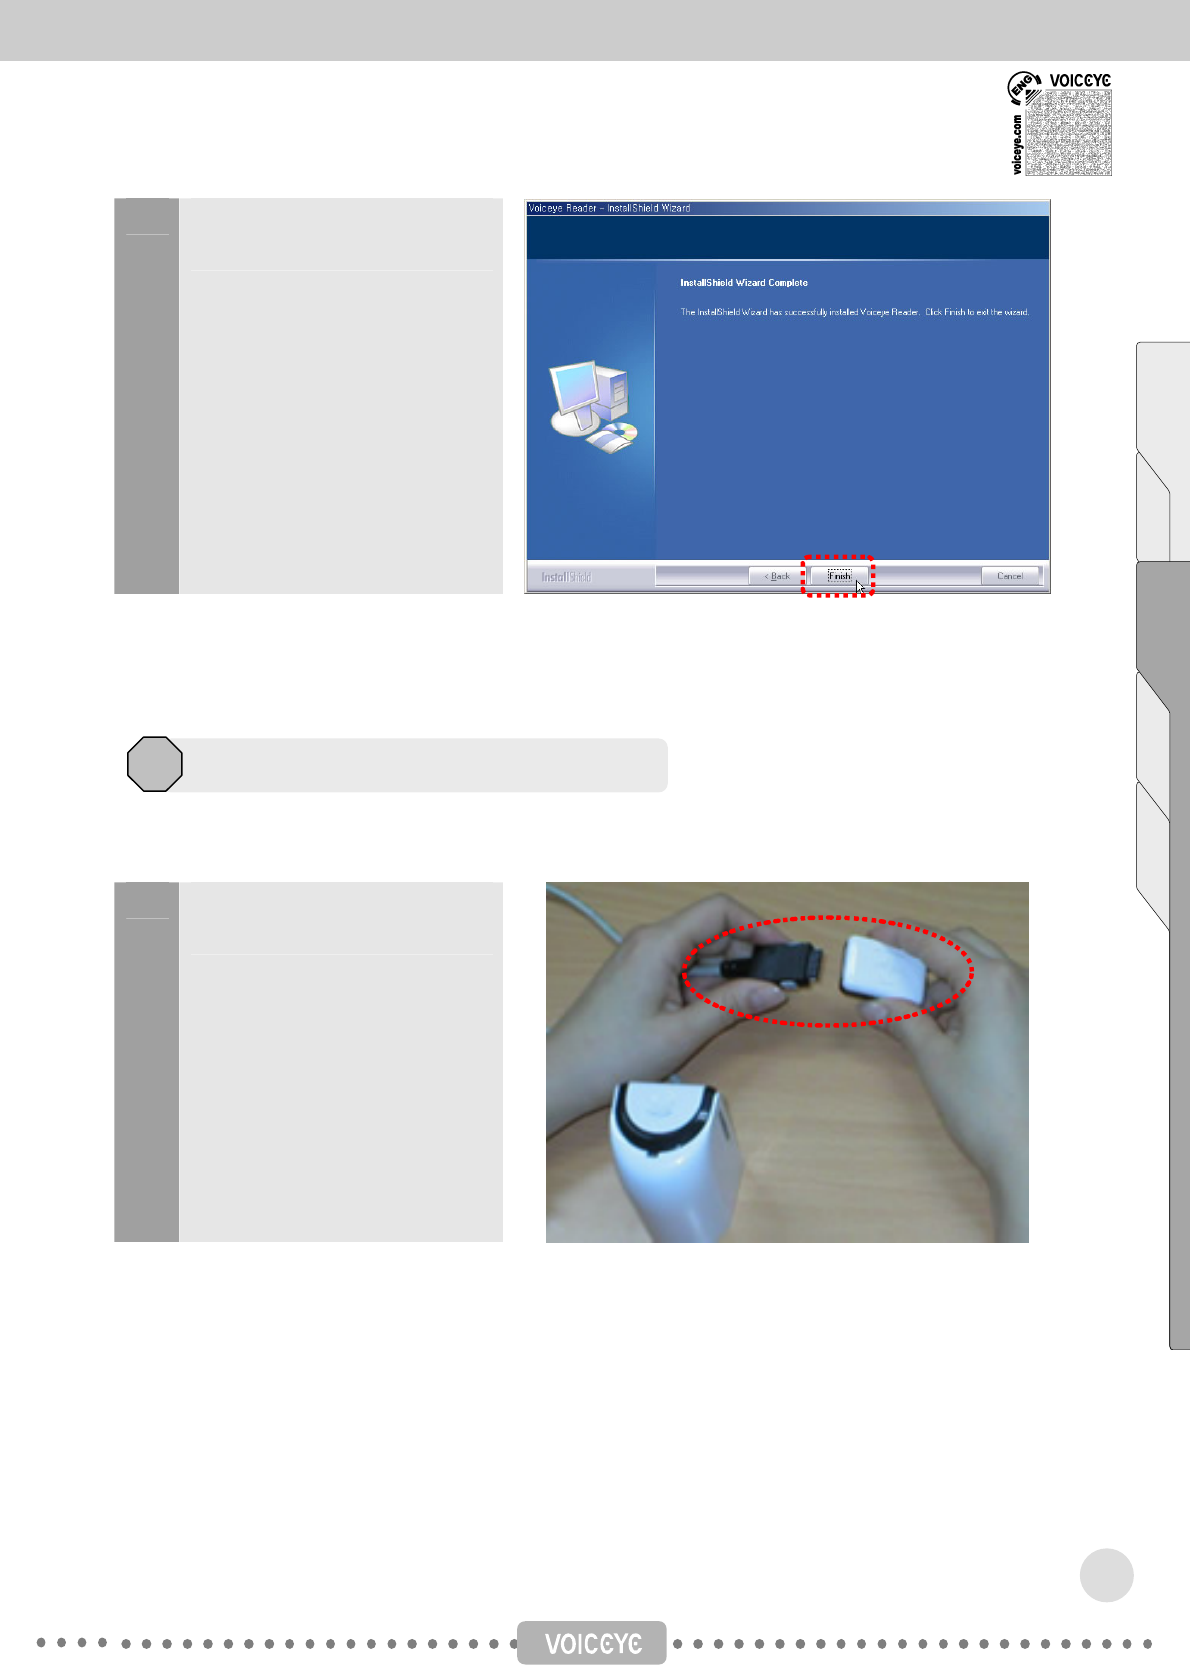
7 Click Finish to complete
installation.
You are now ready to connect VOICEYE Scanner to your PC. (Don’t run VOICEYE Reader at this time.)
Connect the USB port of VOICEYE Scanner to your PC using the provided USB cable.
1 Insert the VOICEYE Scanner
cable into the PC connector.
Hardware Installation
4
19
Contents Chapter 1 Chapter 2 Chapter 3 Appendix
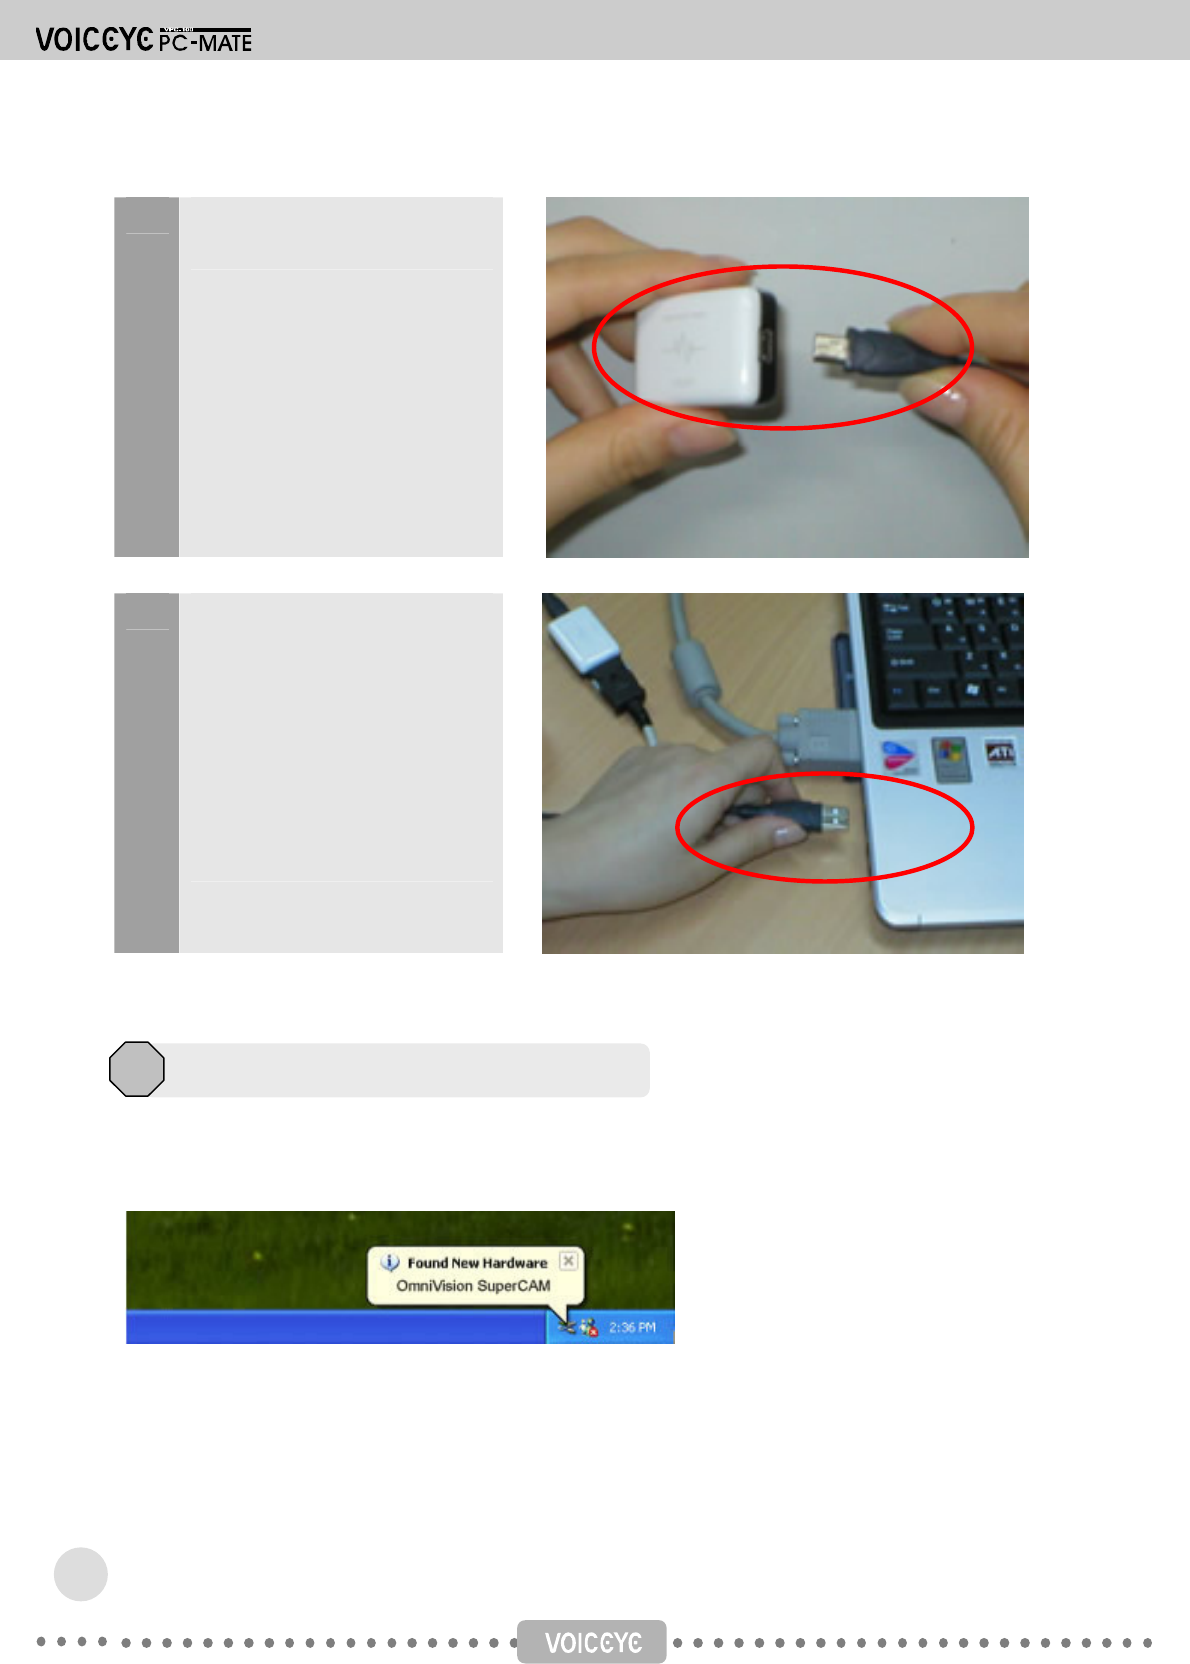
2 Connect the PC Connector to the
USB cable.
3 Insert the USB cable into the
USB port of your computer.
When the VOICEYE Scanner is
connected to the PC via a USB
connection, it will beep at the
same time as the power display
lamp of the Scanner turns yellow.
This installation guides are for Windows XP.
As soon as the USB port of VOICEYE Scanner is connected to your PC using the provided USB cable,
“Found New Hardware” will be prompted.
Driver Installation
5
20
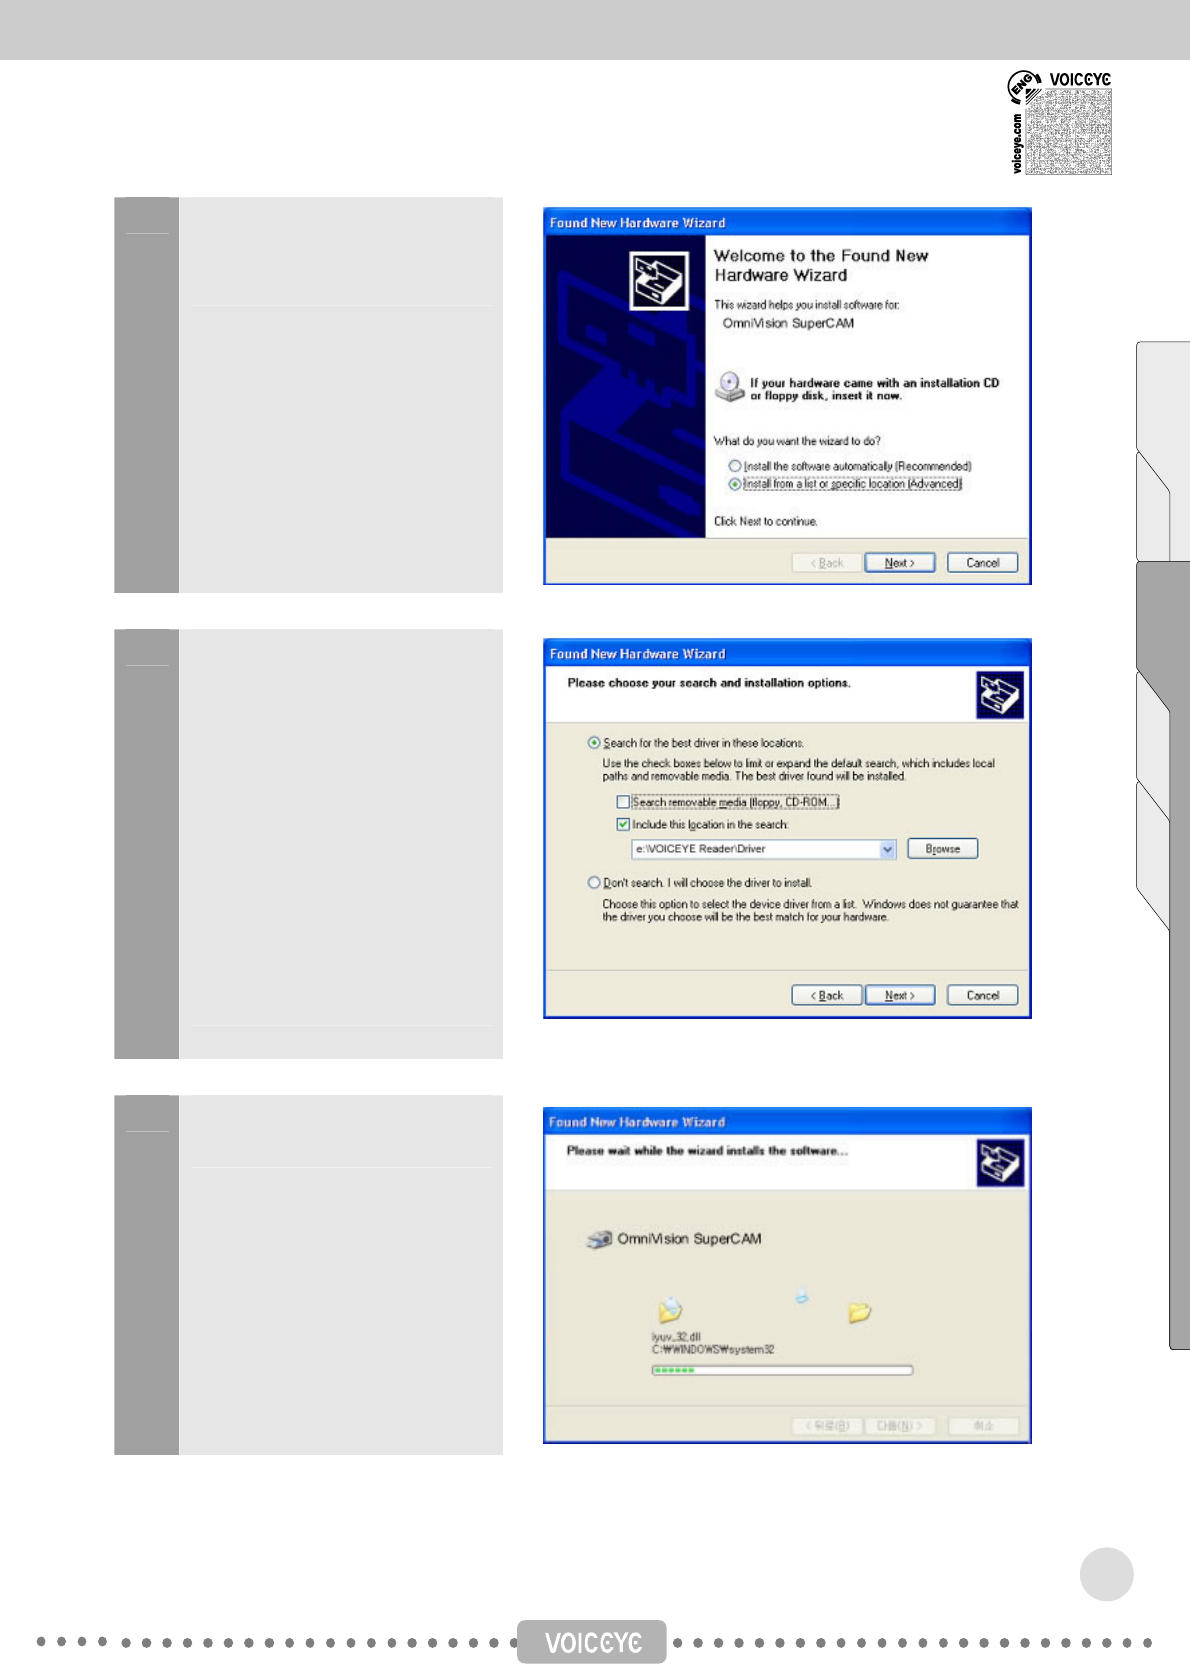
1 Select “Install from a list or
specific location (Advanced)”,
and click Next.
2 Check "Search for the best
driver in these locations" and
“Include the location in the
search”, and click Browse. From
the “Browse” window, select
E:\VOICEYE Reader\Driver.
Click Next.
※ The E:\ drive shown in the
illustration is an example, and it
may be different from the CD
drive name used by your PC.
3 The driver is being installed. The
progress of installation is shown.
21
Contents Chapter 1 Chapter 2 Chapter 3 Appendix
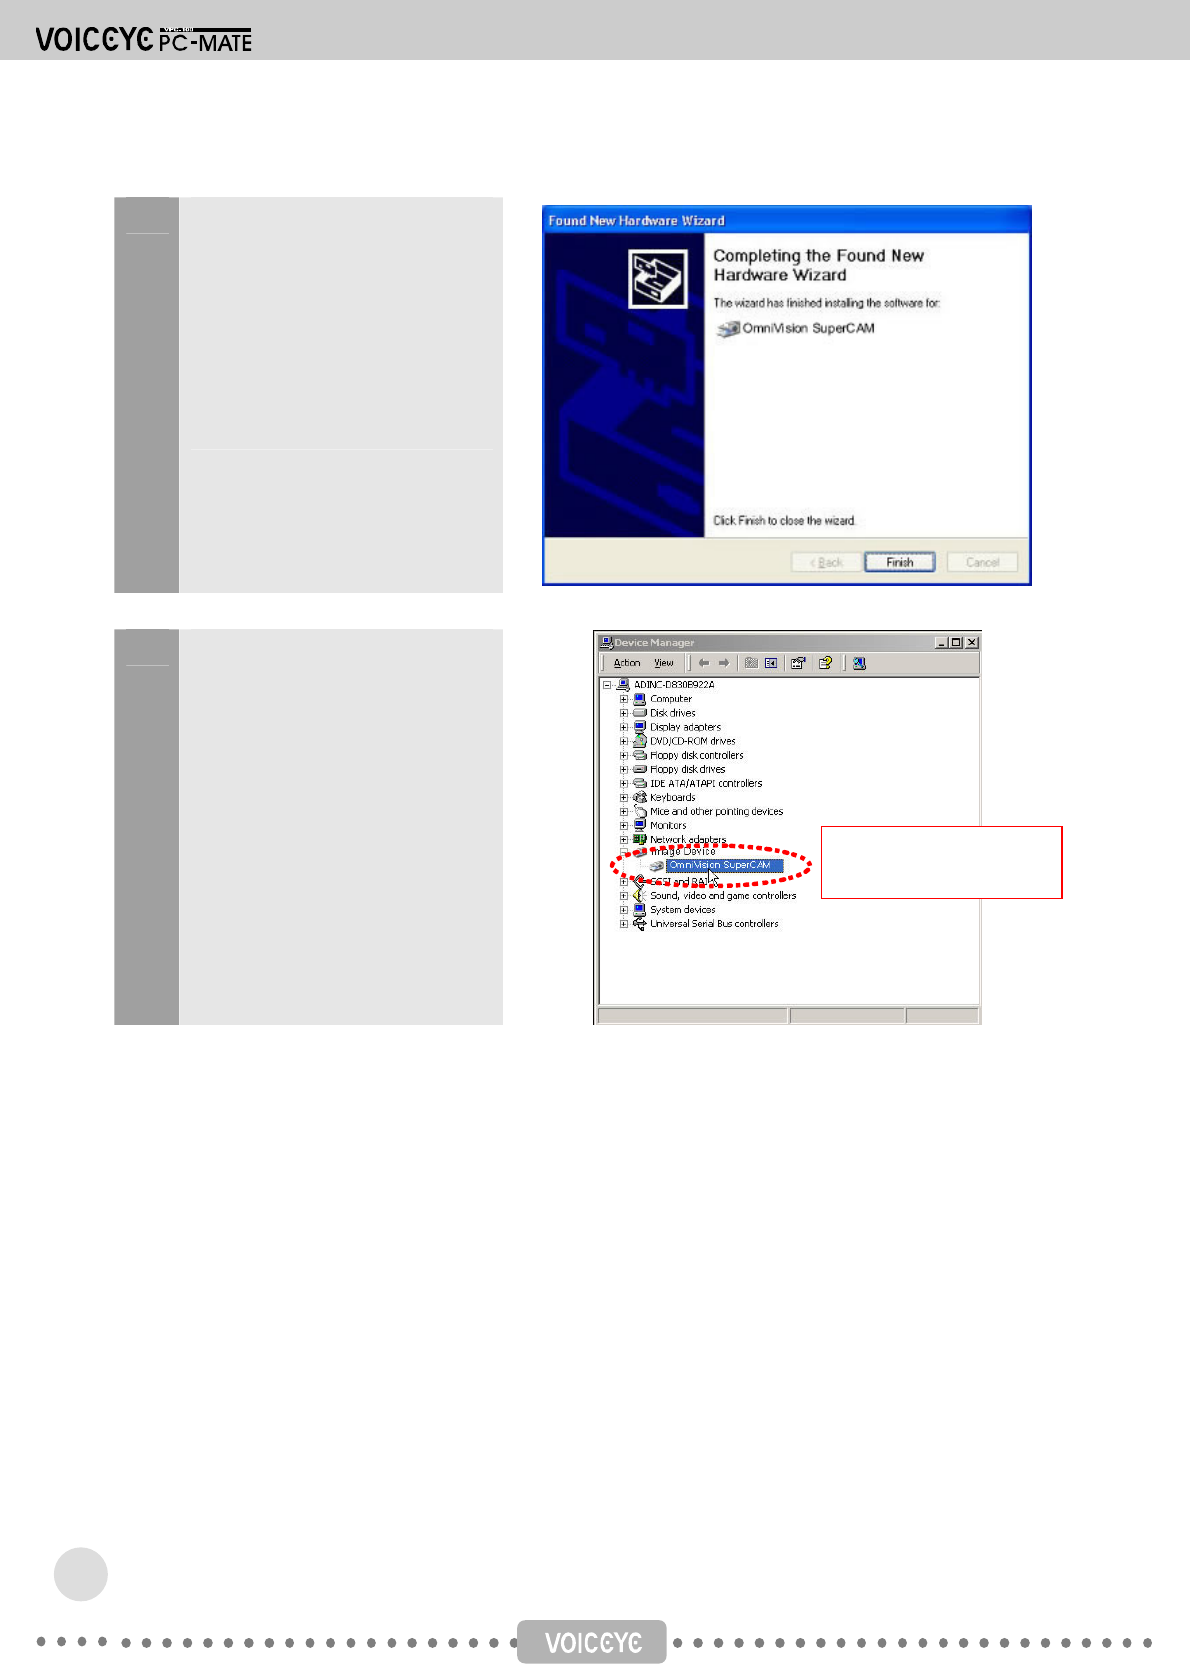
4 The driver files are copied and
installed from the Installation CD.
When the installation finishes, a
message notifying you of its
completion appears as shown in
the picture. Click Finish to
complete the installation.
5 The driver installation message
may not appear on the screen
depending on the status of
Windows. To make sure that the
installation was completed
normally, check for the device,
"OmniVision SuperCam" in “My
Computer” as shown below, or
“Control Panel > System >
Hardware > Device Manager”.
.
The entire setup process has been successfully completed. You are now ready to use the VOICEYE PC-
Mate.
Image Device
OmniVision SuperCam
22
Chapter 3
1.
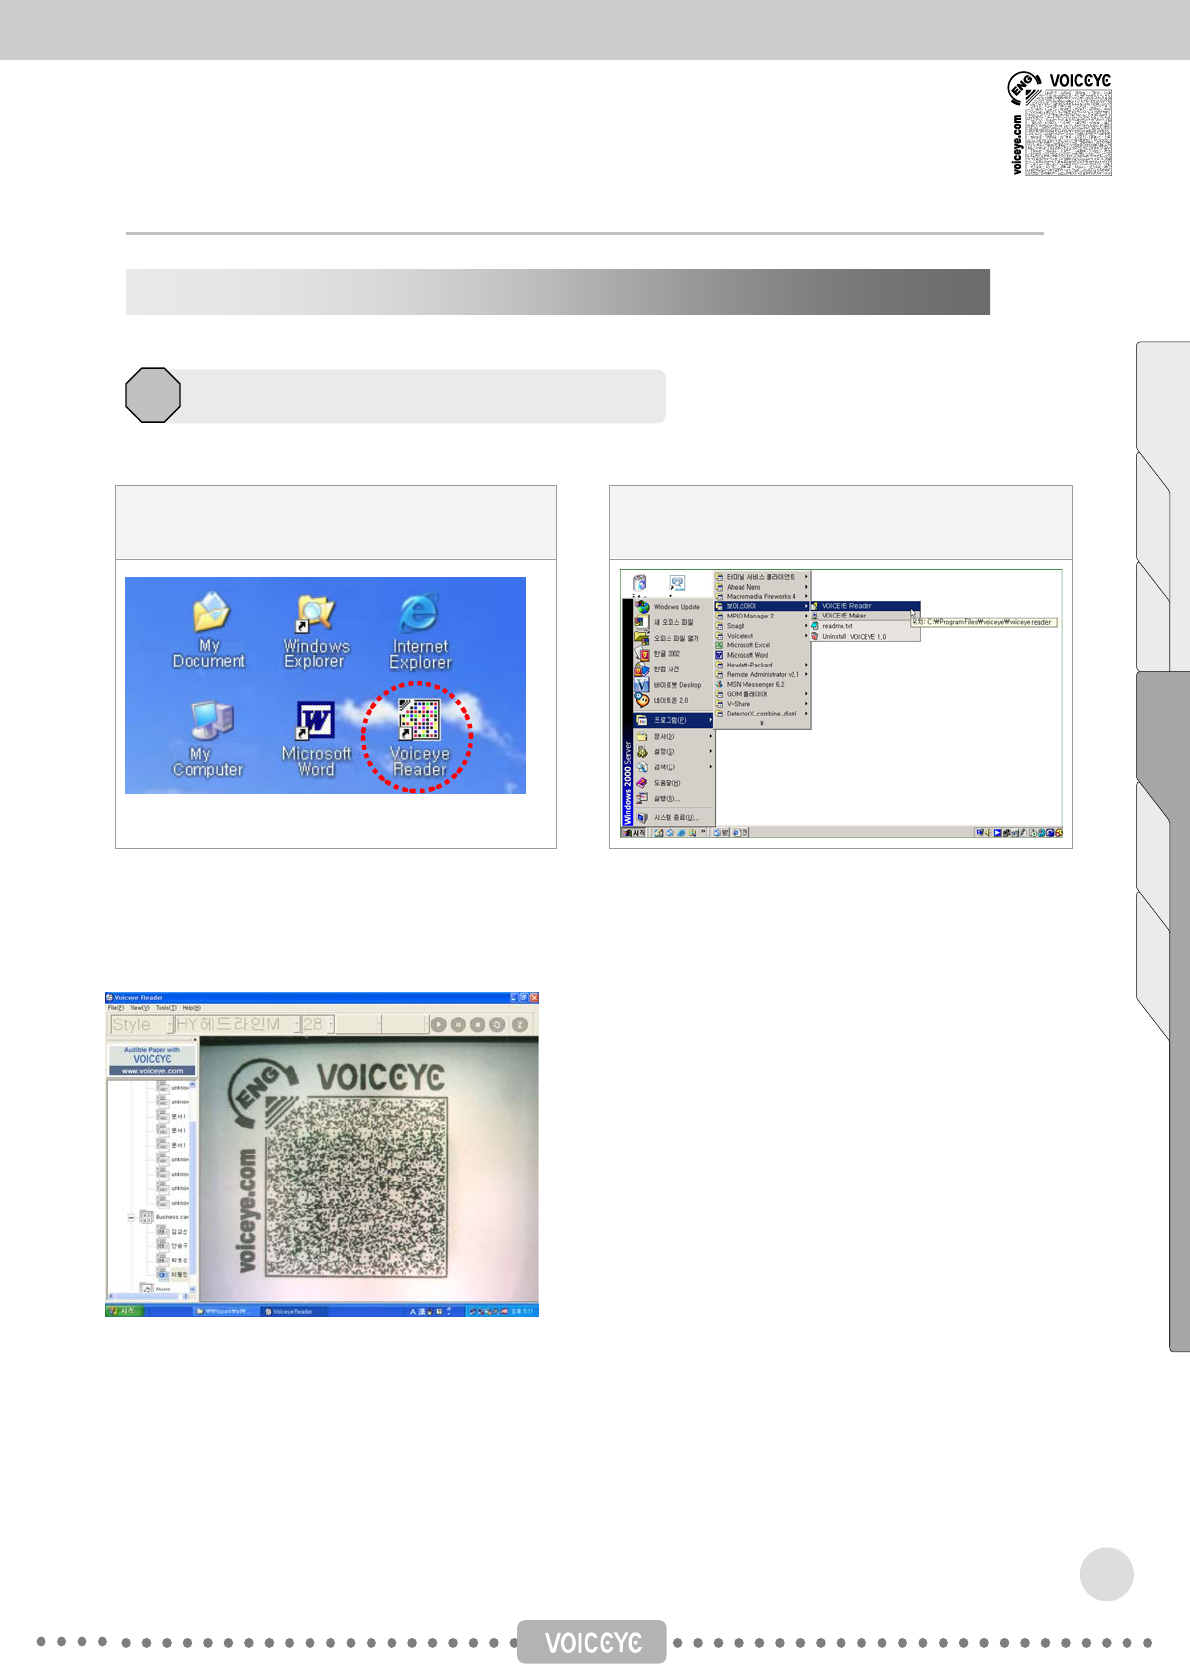
To start VOICEYE Reader, do one of the followings.
Double-click the VOICEYE Reader icon on
your desktop screen.
Click Start on Windows Taskbar > All Programs >
VOICEYE > VOICEYE Reader.
or
The whole view : The following screen will appear when you place the VOICEYE Scanner on a VOICEYE
Symbol.
Getting started with the VOICEYE Reader
1
Quick Guide to Usin
g
VOICEYE PC-Mate
23
Contents Chapter 1 Chapter 2 Chapter 3 Appendix
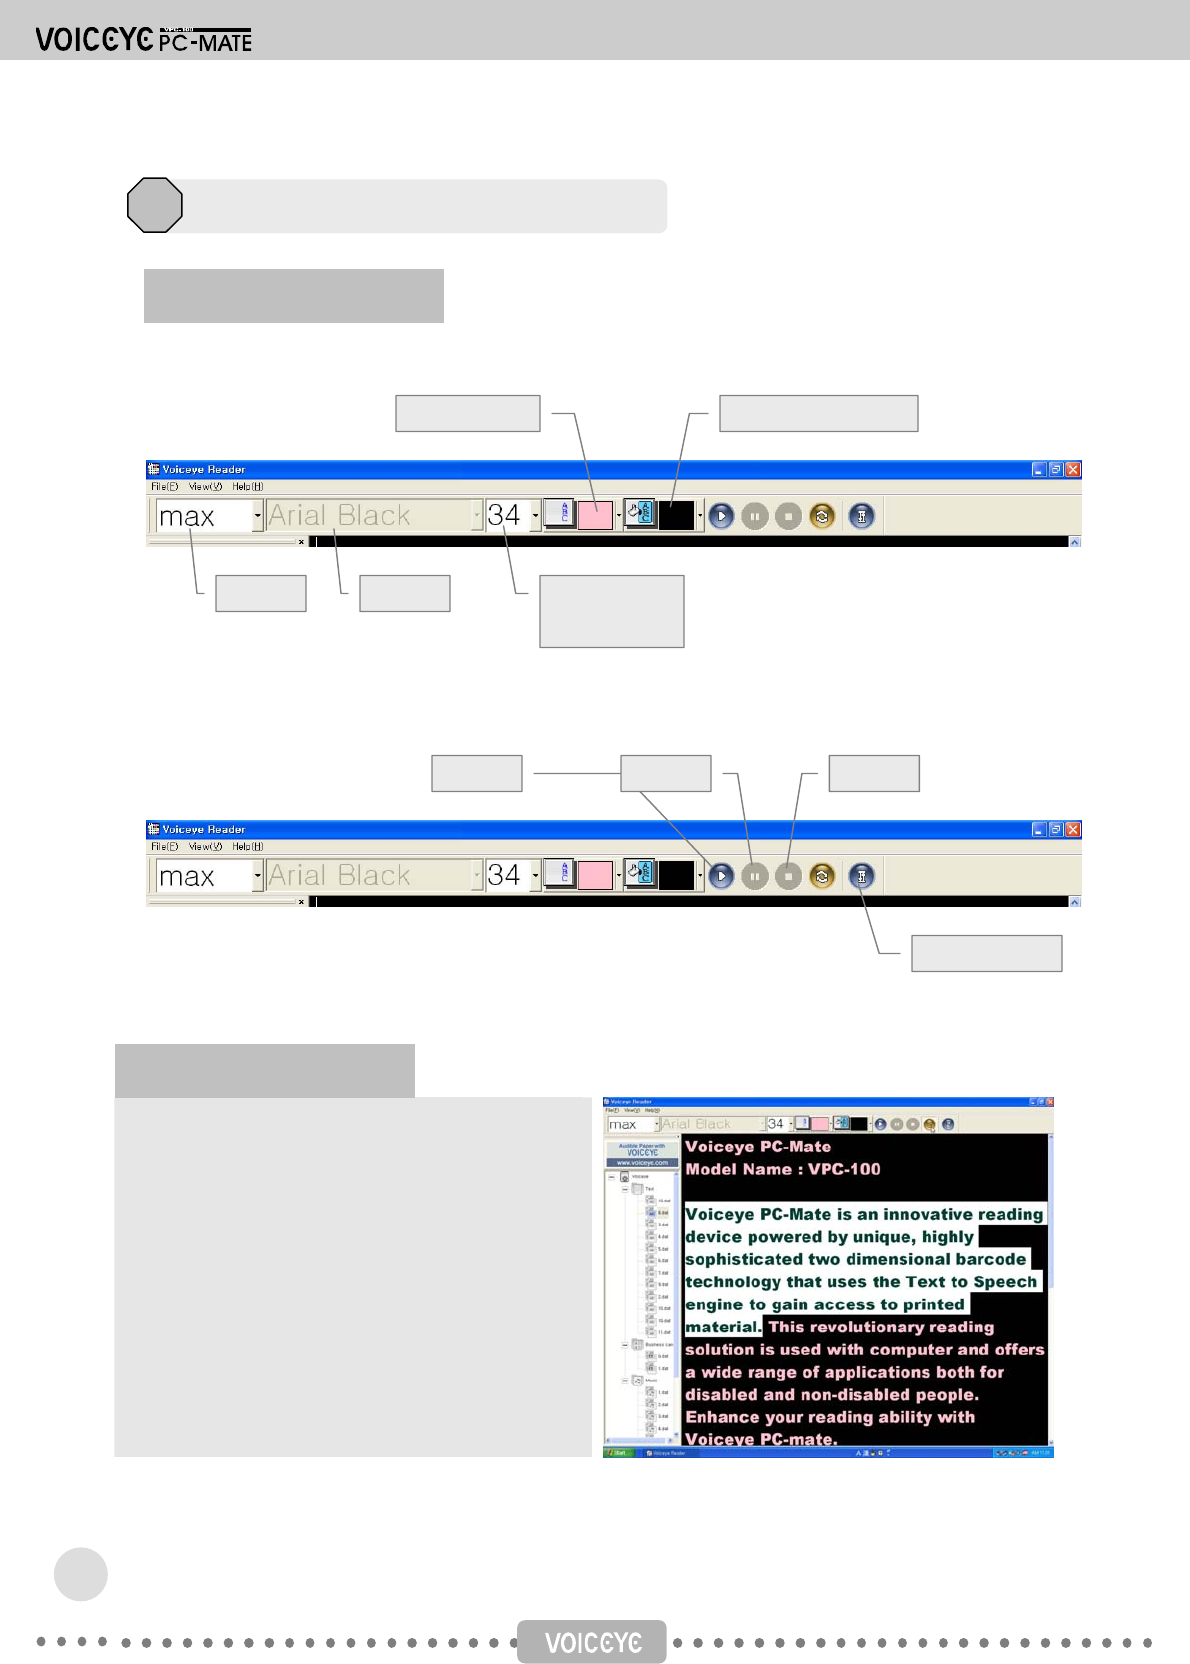
1) View Management Section
2) Player Section
The word or sentence which you drag with the
mouse is read aloud continuously and repeatedly
unless you press the corresponding key to stop.
To set Auto repeat, drag the word/sentence that
you want to adjust with your mouse and then
simply press the auto repeat button on the
taskbar or press the R key.
This audio block starts to play repeatedly. When
you wish to release this feature, press the R key
again.
Font size
(7-72 points)
Play Pause Stop
Auto scroll
Background color Font color
Font
Detailed descriptions by menu
2
Section auto repeat
Taskbar
Style
24
The texts are automatically scrolled for your
reading convenience of reading when you want to
read texts without the computerized voice.
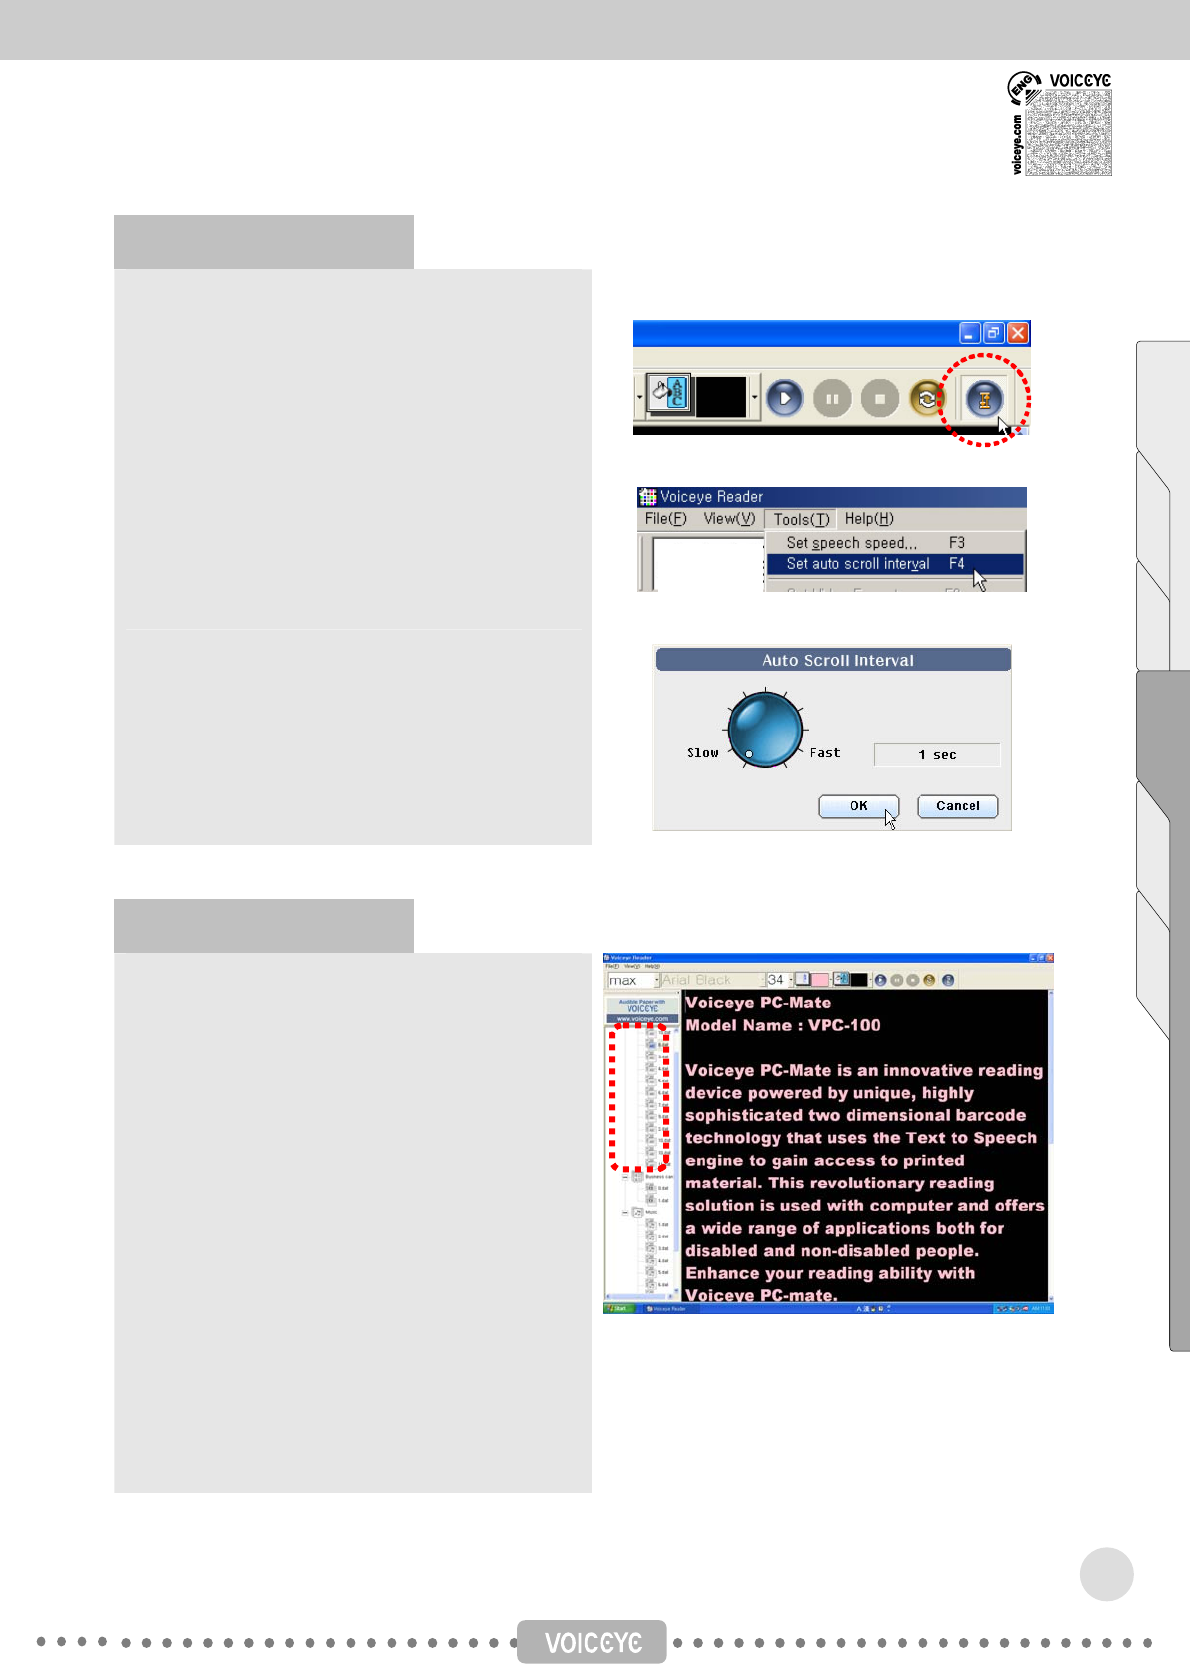
Click the auto scroll icon to set or release the
setting.
Auto Scroll Speed Control
Tools > Set auto scroll interval or click F4
Control the speed with Up/Down Keys.
※ The default speed is 2 seconds.
Click OK.
Auto Scroll Setting
Auto Scroll Speed Control
The VOICEYE Reader program includes features
for auto store function, which enables you to retain
a history of the last ten files decoded for easy
review. By double-clicking the file you want, the
corresponding texts are spoken as they are
displayed.
The folder consists of Text, Business Card and
Music.
Press Ctrl + Shift + T to go to Text folder.
Press Ctrl + Shift + B to go to Business Card
folder.
Press Ctrl + Shift + M to go to Music folder.
After selecting folder, press Ctrl + F1 to F10 to see
the contents of the ten files. These are retained in
the order they were saved.
Auto scroll
Auto store function
25
Contents Chapter 1 Chapter 2 Chapter 3 Appendix

To suit specific preferences and purposes. This
function is useful in effective phonological training.
Speed can be adjusted between 25 and 400%.
Tools > Set speech speed or click F3.
Control with Up/Down Keys or mouse.
※ The default speed is 100%.
Click OK.
Create your own style with your favorite font, font
color, font size, etc.
Tools > Styles and Formatting or click F7.
Click “New Style”. You can create a user name,
and indicate the styles that you want.
Click Apply.
You can configure your own setting for TTS to change the pronunciation of the specific words or to read
aloud the icons, marks, symbols and special characters as you want.
Example) . period (The mark at the end of a sentence can be read as “period”.)
Speech speed control
New Style
Modify Style
Delete Style
Styles and Formatting
26
Customizing TTS
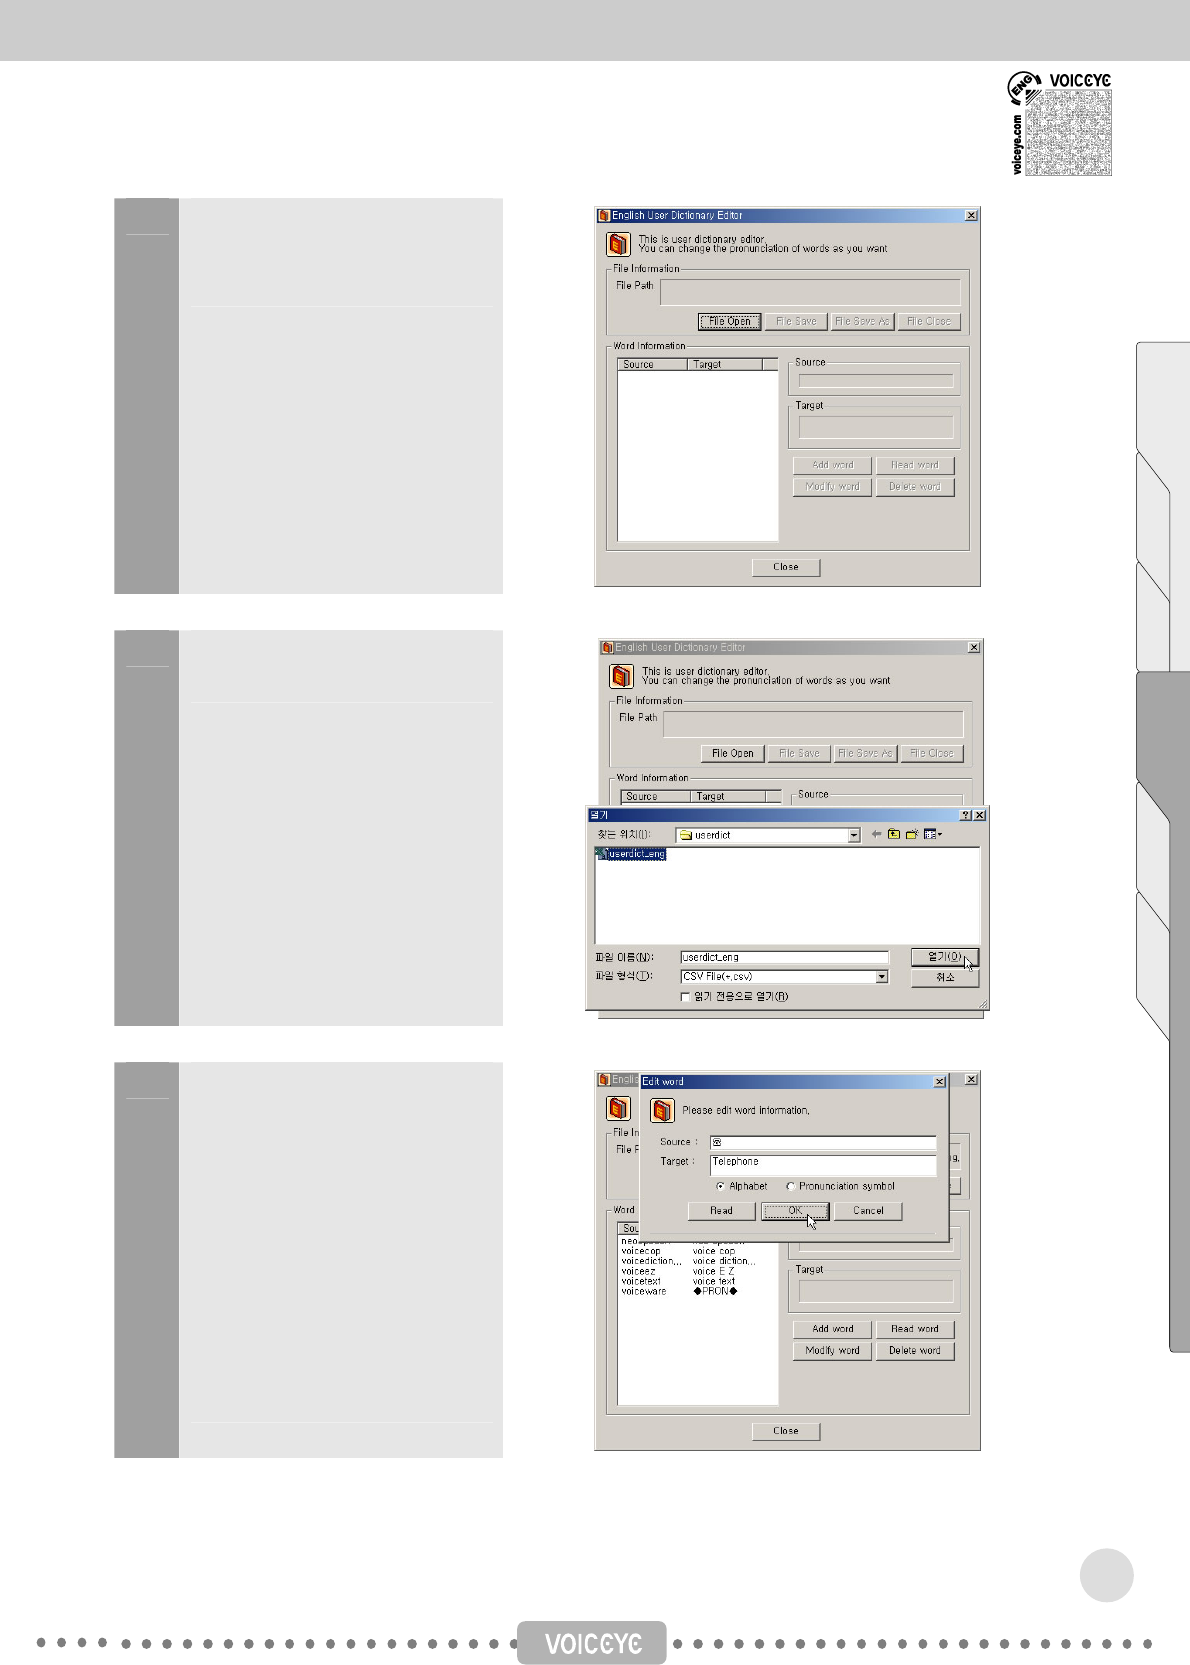
1 Select Tools > Customizing TTS
or just click Ctrl + D keys
together.
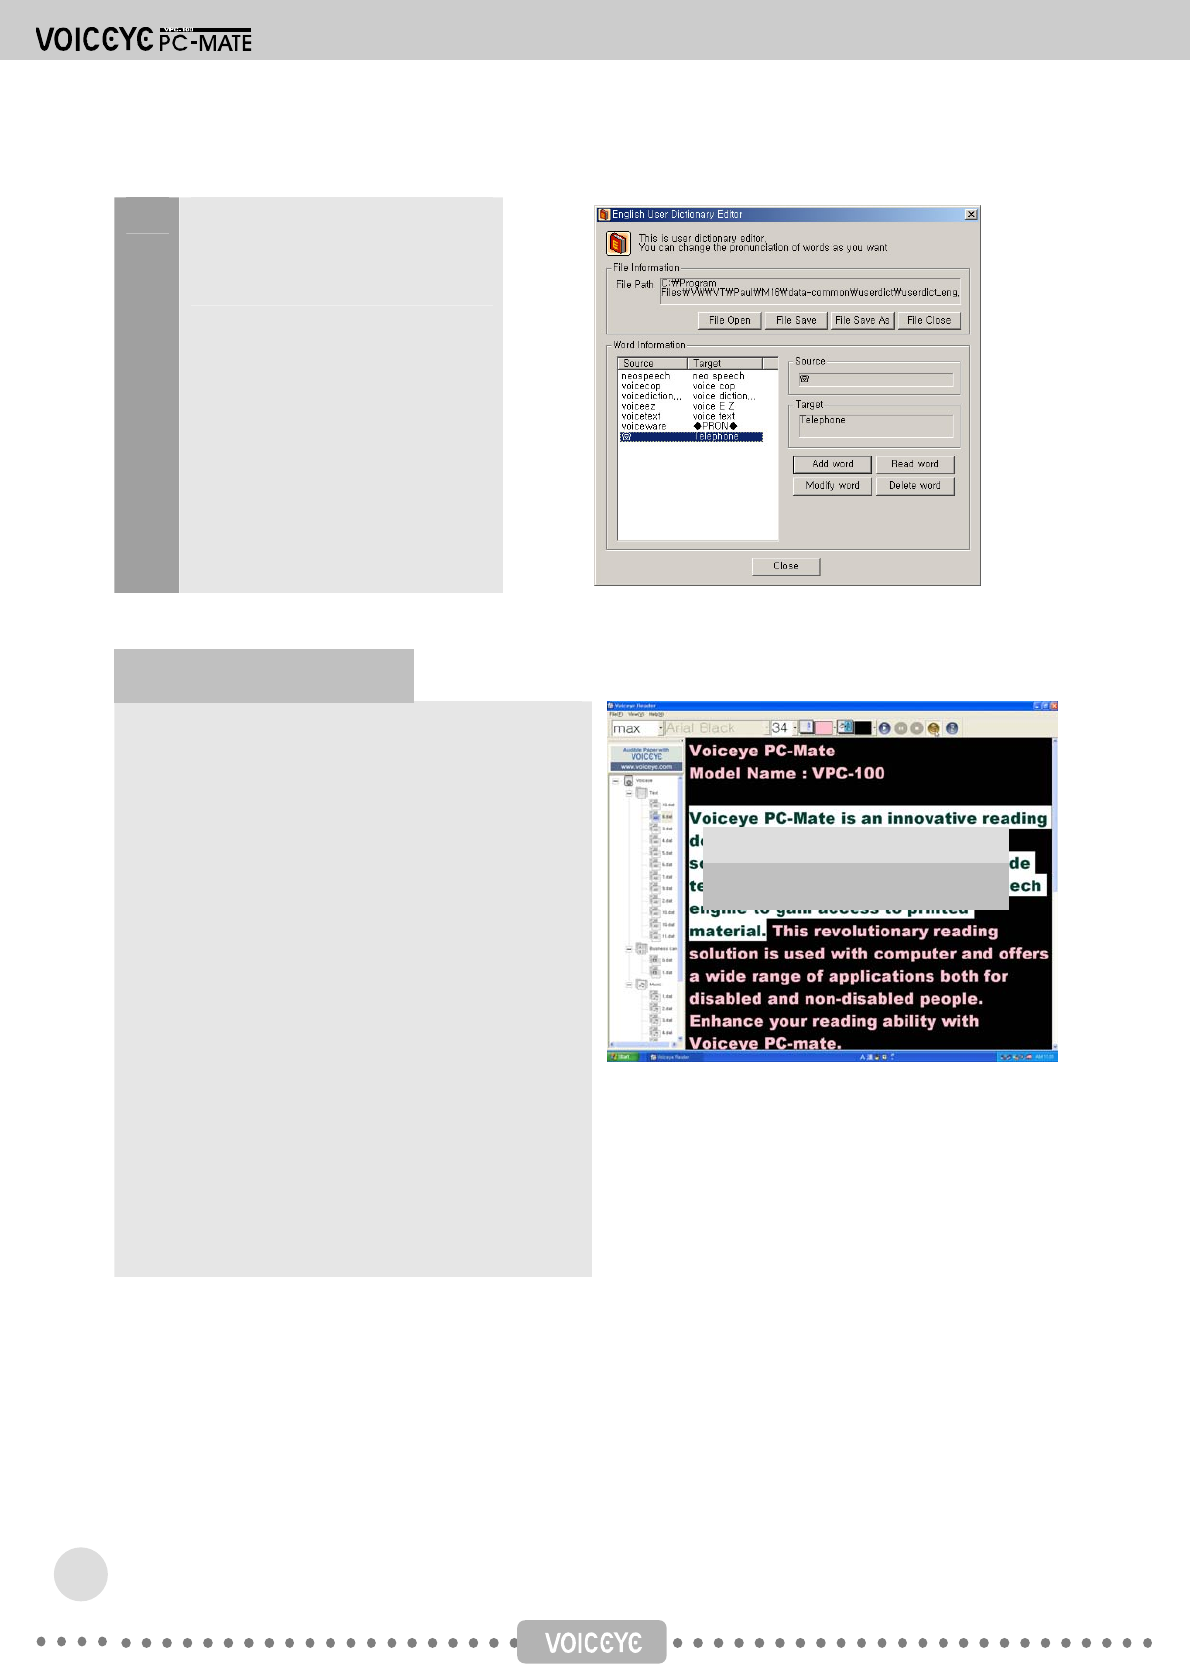
2 Click File Open and then select
userdick_eng.
3 Select Add word. Enter the word
that you want to add in the
Source field and the word that
you want read aloud in the Target
field. When you are finished, click
OK.
After you click File Save, you can
always hear the word that you
input.
27
Contents Chapter 1 Chapter 2 Chapter 3 Appendix
4 Click Read word to hear the word
you designated in advance.
Click Close to finish this function.
This function allows you to start hearing a passage
from any word that you designate. Therefore, you
can save time since you don’t need to hear the
passage from the beginning again.
Just input the word that you want to start hearing
from. The word will automatically be found and the
voice will start reading aloud from that point.
Tools > Options > Find and play
or press Ctrl + F keys
Enter the word that you want to find. The
designated word will be highlighted.
If the word is found more than once, the first word
found will be highlighted. Move the cursor to the
word that you originally designated by pressing F3.
Click Ctrl + R to start reading from the
designated word.
28
Find & Play
Find
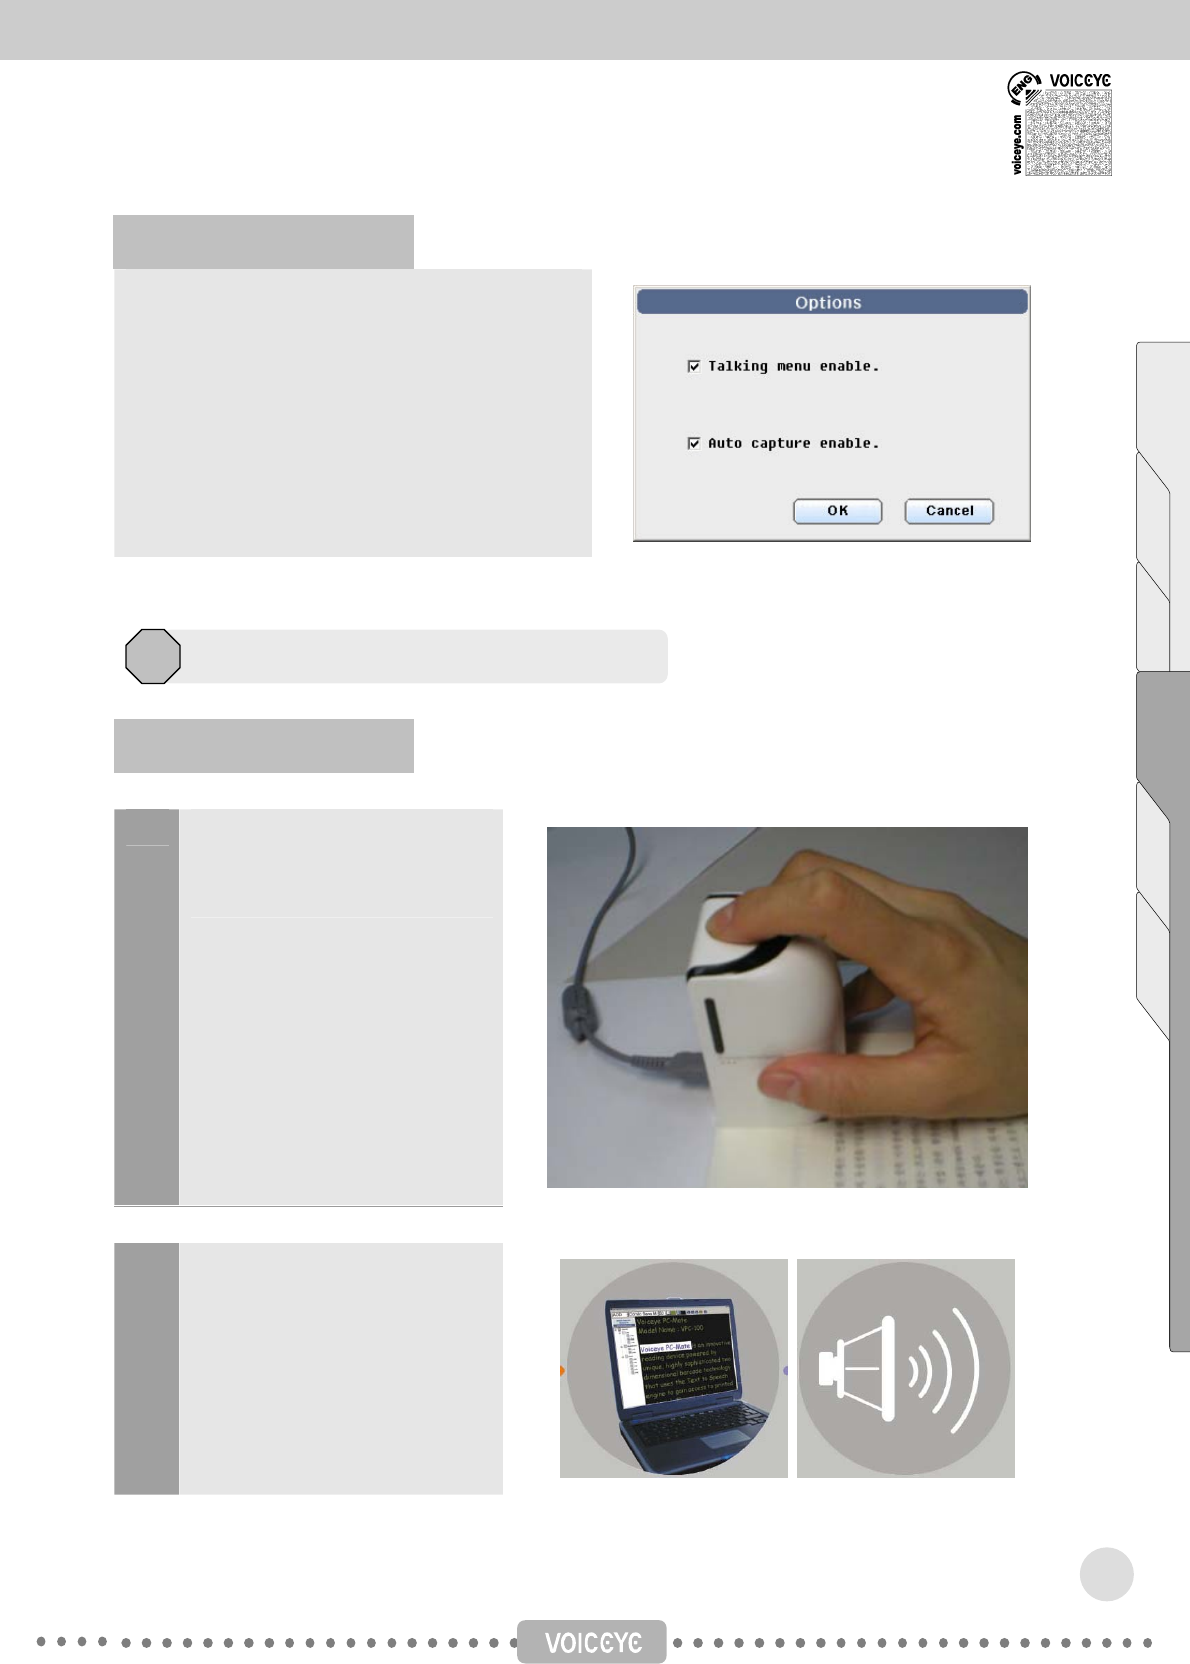
Talking menu and auto capture are selectable as
options. Make your selection and press OK.
Tools > Options or click Alt + Enter
Check “Talking menu enable”. The title of the
selected file is read aloud.
Check “Auto capture enable”. The VOICEYE
symbol is captured automatically by the VOICEYE
scanner without the push of a button.
1 Place the VOICEYE Scanner on a
VOICEYE symbol on printed
material.
2 The VOICEYE Scanner
automatically scans VOICEYE
symbols in a matter of seconds.
The scanner will beep when it is
finished.
Basic Operation
3
Text Reading
Options
29
Contents Chapter 1 Chapter 2 Chapter 3 Appendix
3 The highlighted and spoken
words are displayed
simultaneously.
※ Adjust various options to suit
your specific preferences and
purposes.
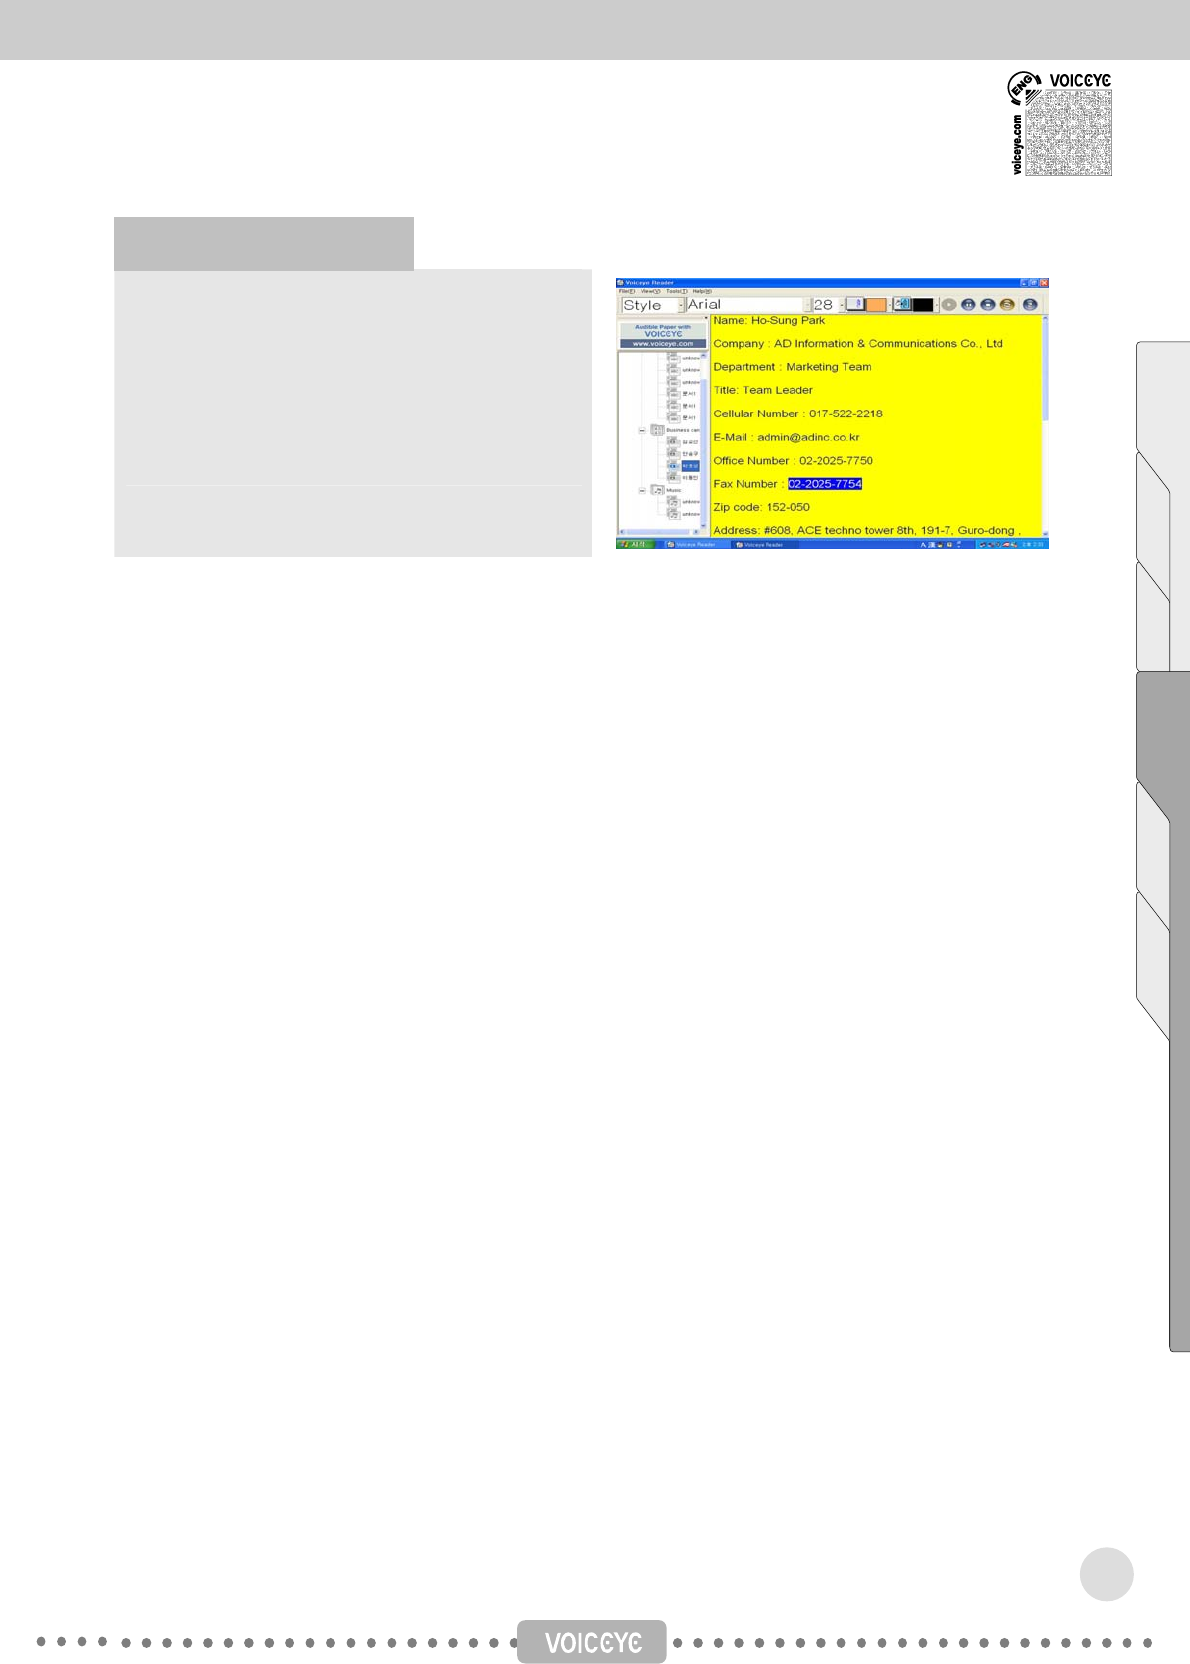
VOICEYE incorporates a low vision magnification
feature that displays magnified text on the screen.
Place the VOICEYE scanner on the texts that you
want to enlarge.
Texts are magnified between 100 and 400 times.
When using it as a magnifier, remove the left and
top viewer by pressing F5 and F6 for a bigger
screen.
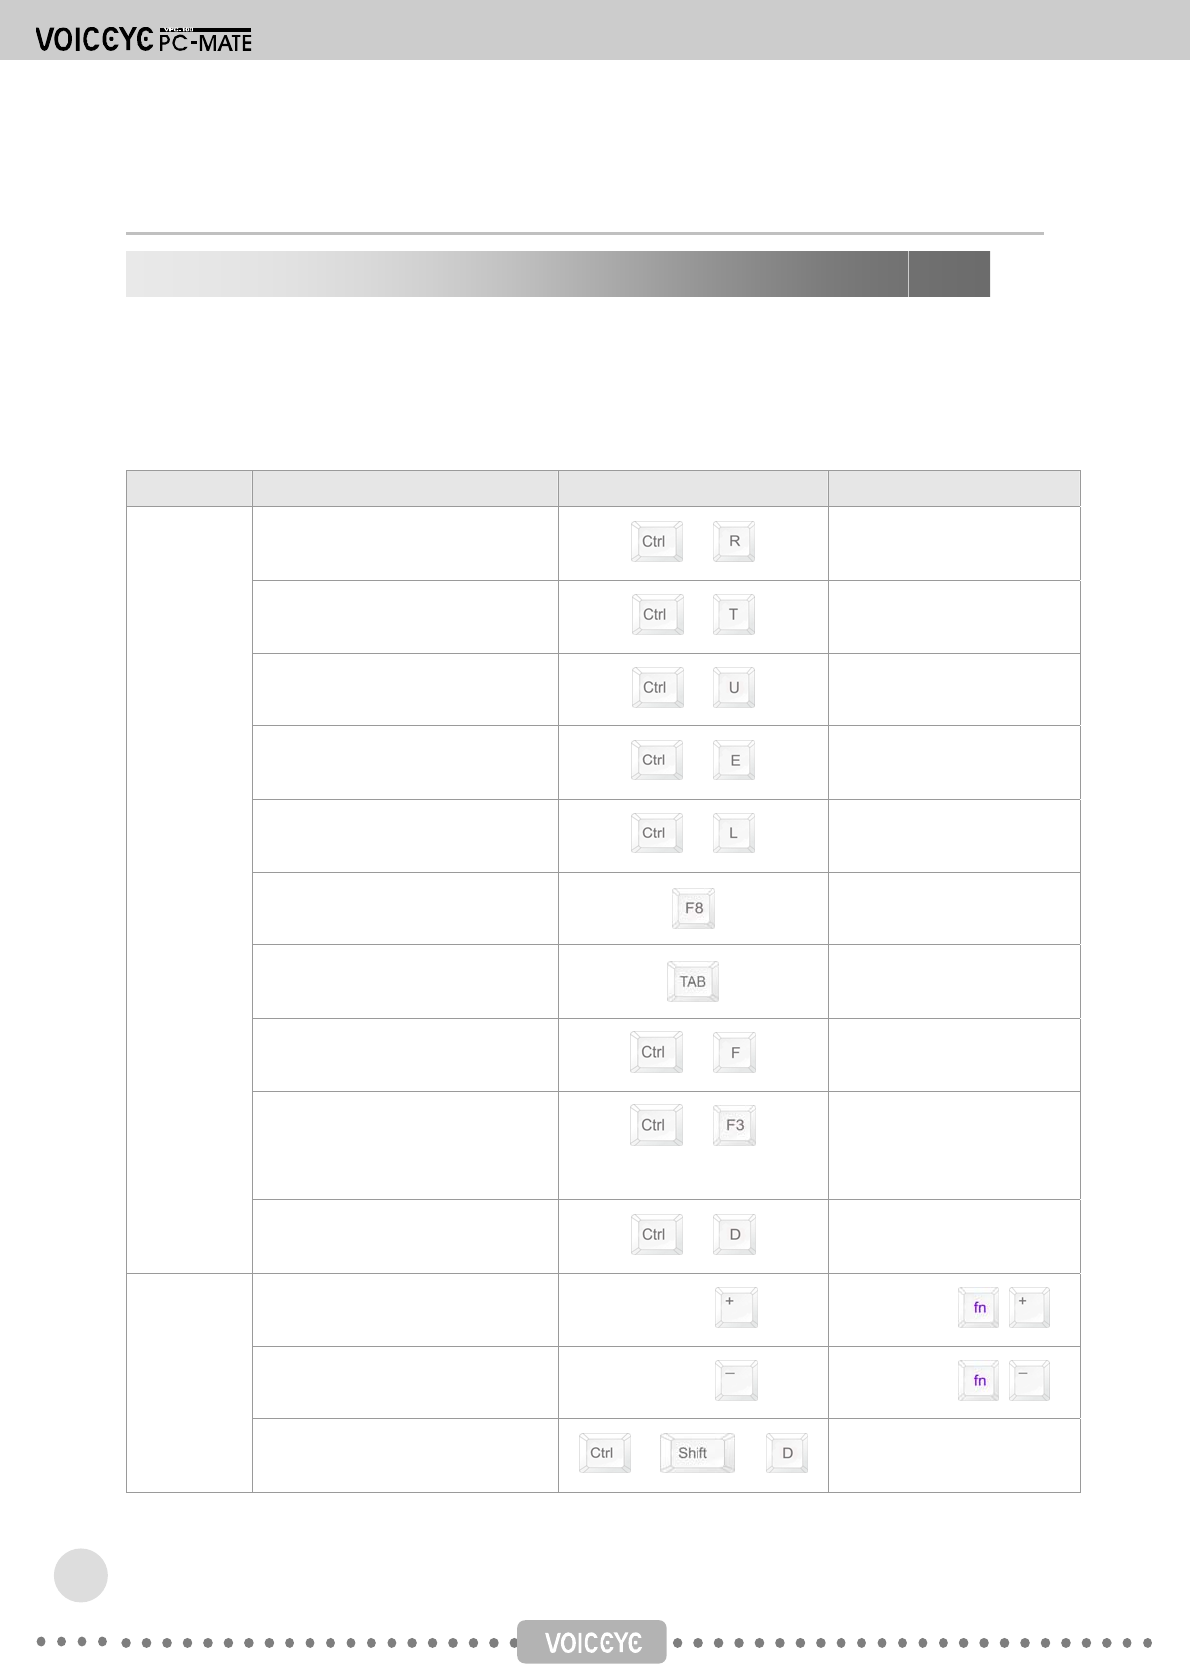
Place the VOICEYE scanner on a VOICEYE
symbol on a musical score, and press Enter.
※ Only audio files such as NWC or MIDI saved in
the VOICEYE symbols can be played.
Digital Magnifier
Music Play
30
Place the VOICEYE scanner on the VOICEYE
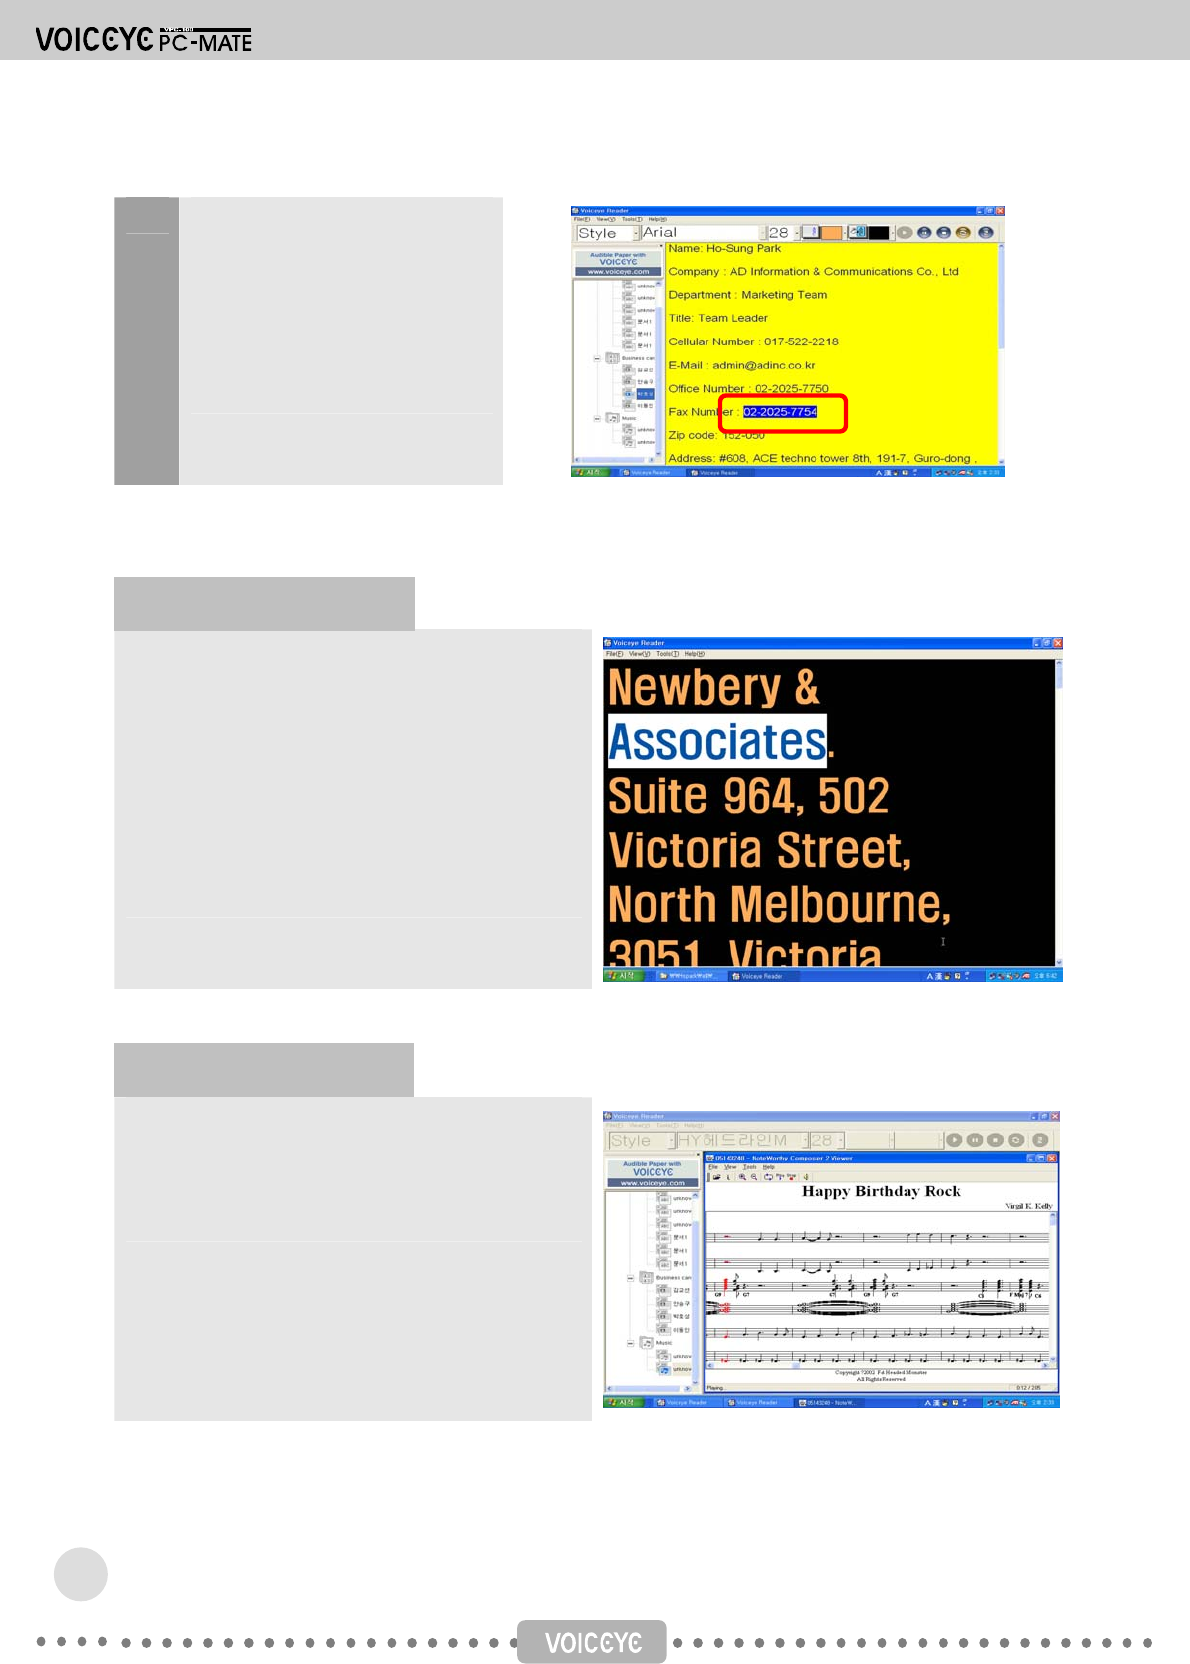
symbol printed on a business card, and press
Enter.
※ VOICEYE stores your name card information
and automatically transfers it into Outlook Express
Address.
Biz card Management
31
Contents Chapter 1 Chapter 2 Chapter 3 Appendix
Appendix
The basic shortcut keys below are a listing of shortcut keys that will work with almost all IBM compatible
computers and software programs. It is highly recommended that all users keep a good reference of the
shortcut keys below and/or try to memorize them. Doing so will dramatically increase the efficiency with
which you can use this program.
Class. Description Shortcut keys Remarks
Play
+
Stop
+
Pause
+
Repeat
+
Auto scroll set/release
+
Word highlight set/release
Style change
Find the designated word and
play from that point +
Move to the next designated
word found and play from that
point
+
Text view
User dictionary edit
+
Zoom in
Numpad (for laptop: +)
Zoom out
Numpad (for laptop: +)
Video view
Default size
+ +
Basic Shortcut Keys
32

Symbol capture
Move to Video screen change
Speech Speed control
Auto scroll interval
Show/hide contents bar
Show/hide toolbar
Set style sheet
Environment setting
+
Select the text folder
+ +
Select the business card folder
+ +
Select the music folder
+ +
After selecting folder,
press + 1 to 10 to
read aloud the contents
of the ten files retained in
the order they were
saved.
Common
keys
Program quit
+
33
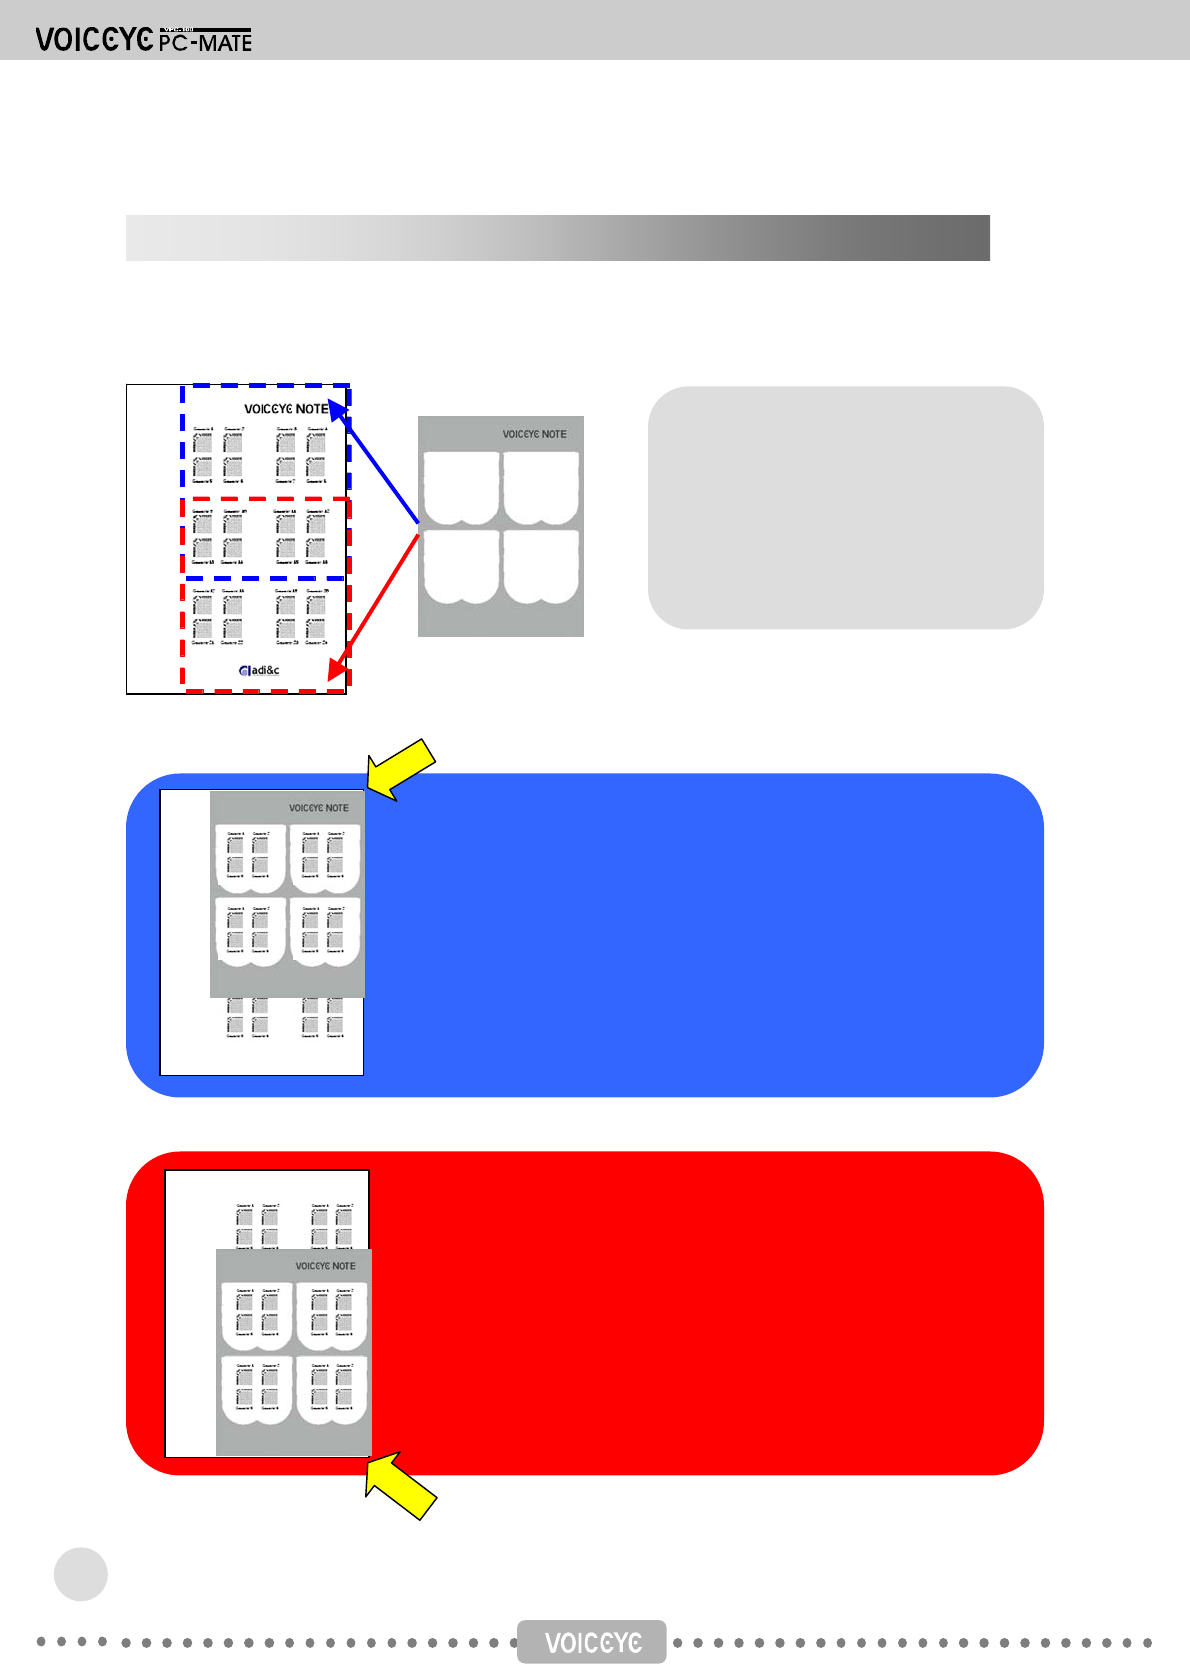
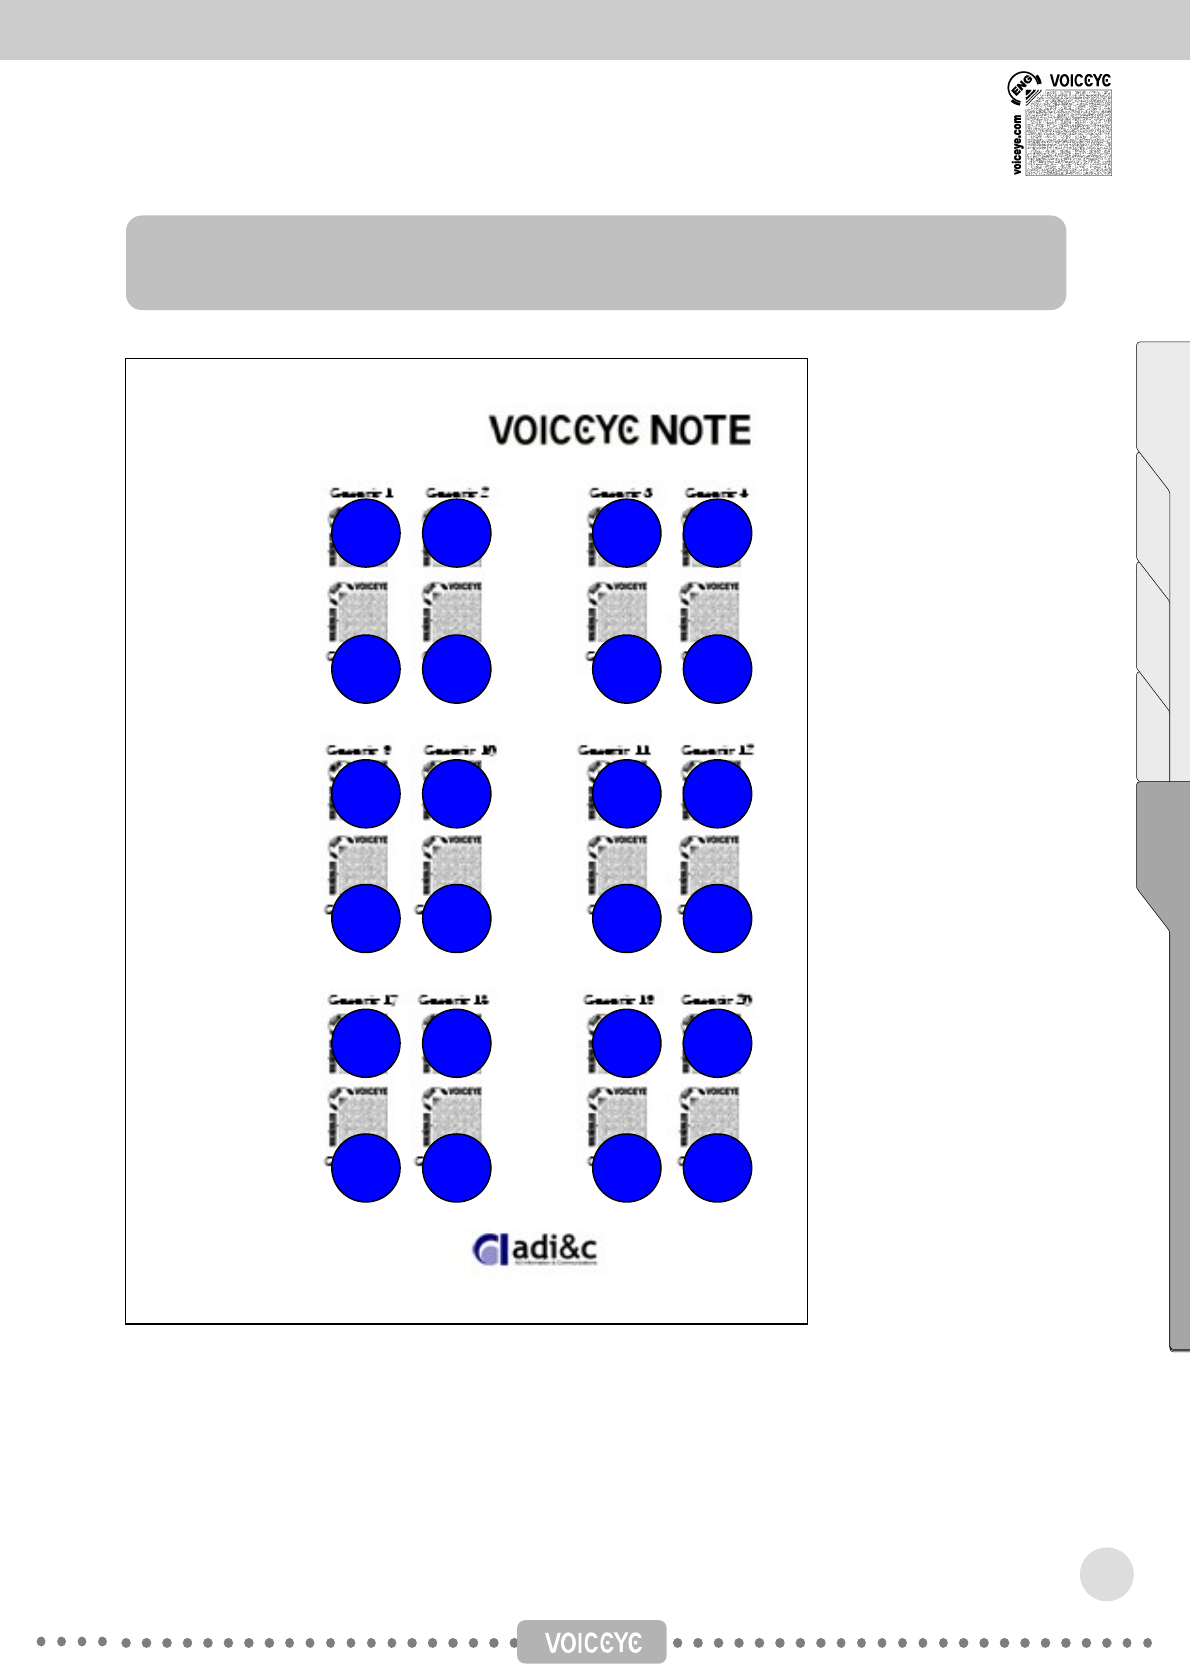
VOICEYE Note Template helps you find the locations where the VOICEYE symbols are printed easily.
The front side of the VOICEYE Note Template is marked by a small hole made on the top right-hand side.
34
How to use VOICEYE Note Template
Place the VOICEYE Note template on the top right corner o
f
a document printed in note format.
The VOICEYE Note template holds 16 VOICEYE symbols in
the top right section.
VOICEYE Note Format
You can print the VOICEYE symbols
as a Note format using VOICEYE
Maker program.
In a VOICEYE Note format, 24
VOICEYE s
y
mbols are included.
Place the VOICEYE Note template on the bottom right corne
r
of a document printed in note format.
The VOICEYE Note template holds 16 VOICEYE symbols on
the bottom right section.
35
In the VOICEYE Note format, the VOICEYE symbols are created in the following order. Therefore,
capture the VOICEYE symbols in the same order.
Contents Chapter 1 Chapter 2 Chapter 3 Appendix
1 2
3 4
5 6
7 8
9 10
11 12
13 14
15 16
17 18
19 20
21 22
23 24
This equipment has been tested and found to comply with the limits for a Class B digital device,
pursuant to Part 15 of the FCC Rules. These limits are designed to provide reasonable
protection against harmful interference in a residential installation. This equipment generates,
uses, and can radiate radio frequency energy and, if not installed and used in accordance with
the instruction manual, may cause harmful interference to radio communications. However,
there is no guarantee that interference will not occur in a particular installation. If this equipment
does cause harmful interference to radio or television reception, which can be determined by
turning the equipment off and on, the user is encouraged to try to correct the interference by one
or more of the following measures:
Reorient or relocate the receiving antenna
Increase the separation between the equipment and receiver
Connect the equipment into an outlet on a circuit different from that to which the receiver is
connected.
Consult the dealer or an experienced radio/TV technician for help.
The CE mark is valid only for products marketed in the
European Union.
For customers in Europe
36
Regulatory Information
FCC Statement
AD Information & Communications Co., Ltd.(ADI&C) is committed to providing you the flawless products
by using the best materials and workmanship available. Our warranty period is one year from the date of
purchase.
If these products prove defective during this warranty period, call Customer Support in order to obtain a
Return Authorization Number.
Be sure to have your proof of purchase when calling. Return requests cannot be processed
without proof of purchase.
When returning a product, mark the Return Authorization Number clearly on the outside of the
package and include your original proof of purchase.
In no event shall ADI&C’s liability exceed the price paid for the products from direct, indirect, special,
incidental, or consequential damages resulting from the use of the product, its accompanying software, or
its documentation. ADI&C does not offer refunds for any product.
ADI&C makes no warranty or representation, expressed, implied, or statutory, with respect to its products
or the contents or use of this documentation and all accompanying software, and specifically disclaims its
quality, performance, merchantabiliy, or fitness for any particular purpose.
ADI&C reserves the right to revise or update its products, software, or documentation without obligation to
notify any individual or entity.
Proof of Purchase
Warranty
#608, Ace Techno Tower 8th, 191-7,
Guro-dong, Guro-gu, Seoul, Korea
Tel: +82 2 2025 7750
Fax: +82 2 2025 7754
www.voiceye.com
Contents Chapter 1 Chapter 2 Chapter 3 Appendix
Purchase Date
37

Memo
38