ADLINK TECHNOLOGY IMT-BT Rugged Tablet User Manual
ADLINK TECHNOLOGY INC. Rugged Tablet Users Manual
Contents
- 1. Users Manual
- 2. User Manual
Users Manual
IMT-BT
Rugged Tablet
User’s Manual
(Windows
Embedded)
Manual
Rev.:
0.10
Preliminary
Revision
Date:
December
29,
2015
Part
No:
TBD
Advance
Technologies;
Automate
the
World.

Revision
History
Revision
Release Date
Description of Change(s)
0.10
29/12/2015
Preliminary release
ii Revision History
Preface
Copyright
2015
ADLINK
Technology
Inc.
This
document
contains
proprietary
information
protected
by
copy-
right.
All
rights
are
reserved.
No
part
of
this
manual
may
be
repro-
duced
by
any
mechanical,
electronic,
or
other
means
in
any
form
without
prior
written
permission
of
the
manufacturer.
Disclaimer
The
information
in
this
document
is
subject
to
change
without
prior
notice
in
order
to
improve
reliability,
design,
and
function
and
does
not
represent
a
commitment
on
the
part
of
the
manufacturer.
In
no
event
will
the
manufacturer
be
liable
for
direct,
indirect,
spe-
cial,
incidental,
or
consequential
damages
arising
out
of
the
use
or
inability
to
use
the
product
or
documentation,
even
if
advised
of
the
possibility
of
such
damages.
Environmental
Responsibility
ADLINK
is
committed
to
fulfill
its
social
responsi-
bility
to
global
environmental
preservation
through
compliance
with
the
European
Union
'
s
Restriction
of
Hazardous Substances
(RoHS)
directive
and
Waste
Electrical
and
Electronic
Equipment
(WEEE)
directive. Environmental
protection
is
a
top
priority
for
ADLINK.
We
have
enforced
measures
to
ensure
that
our
products,
manufacturing
processes,
components,
and
raw
materials
have as
little
impact
on
the
environment
as
possible.
When
products
are
at
their
end
of
life,
our
customers
are
encour-
aged
to
dispose
of
them
in
accordance
with
the
product
disposal
and/or
recovery
programs
prescribed
by
their
nation
or
company.
Battery
Labels
Preface iii
NO
TE:
Trademarks
Product
names
mentioned
herein
are
used
for
identification
pur-
poses
only
and
may
be
trademarks
and/or
register orange
trademarks
of
their
respective
companies.
Conventions
Take
note
of
the
following
conventions
used
throughout
this
manual
to
make
sure
that
users perform
certain
tasks
and
instructions
properly.
Additional information, aids, and tips that help users perform
tasks.
NO
TE:
CAUTION:
Information to prevent minor physical injury, component dam-
age, data loss, and/or program corruption when trying to com-
plete a task.
W
ARNING:
Information to prevent serious physical injury, component
damage, data loss, and/or program corruption when trying to
complete a specific task.
iv Preface

Table
of
Contents
Revision
History......................................................................
ii
Preface....................................................................................
iii
List
of
Figures.......................................................................
vii
List
of
Tables..........................................................................
ix
1
Introduction........................................................................
1
1.1
Overview
..............................................................................
1
1.2
Features...............................................................................
1
1.3
Specifications.......................................................................
2
1.4
Package
Contents
...............................................................
4
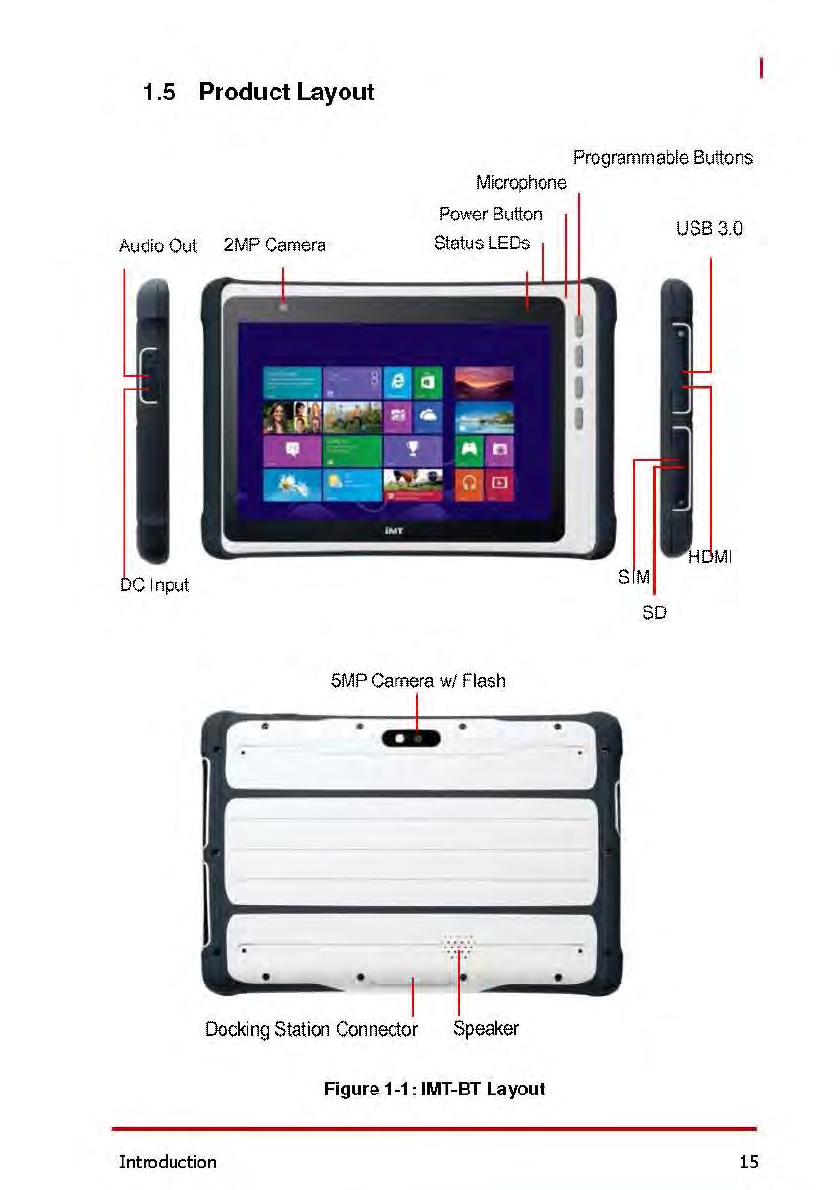
1.5
Product
Layout.....................................................................
5
2
Getting
Started...................................................................
7
2.1
Charging
the
Battery
............................................................
7
2.2
Turning
the
Tablet
On/Off
....................................................
8
3
Using
the
Tablet...............................................................
11
3.1
Initial
Setup
........................................................................
11
3.2
Navigating
the
Touchscreen
..............................................
16
3.3
Using
Windows
Embedded
8.1..........................................
17
3.4
Apps...................................................................................
20
3.5
Entering
Text
.....................................................................
21
3.6
Configuring
the
Programmable
Buttons.............................
22
4
Wireless
Connections......................................................
23
4.1
Airplane
Mode....................................................................
23
4.2
Wi-Fi...................................................................................
24
4.3
Bluetooth............................................................................
25
Table of Contents v

5
External
Connections
.......................................................
29
5.1
USB
Port
............................................................................
29
5.2
HDMI
Display
Output
.........................................................
29
5.3
Using
a
SD
Card
................................................................
30
5.4
Audio
Out
...........................................................................
31
5.5
Docking
Port
Connector.....................................................
32
5.6
Explanation of label symbols..............................................
32
6
Data
Collection
..................................................................
33
6.1
Download
TagWriter
..........................................................
33
7
Care
and
Maintenance
......................................................
37
Important
Safety
Instructions...............................................
39
Getting
Service
......................................................................
41
vi Table of Contents

List
of
Figures
Figure
1-1:
IMT-BT
Layout..................................................................
5
List of Figures vii

This
page
intentionally
left
blank.
viii List of Figures

List
of
Tables
Table
1-1:
IMT-BT
Specifications......................................................
3
Table
1-2:
IMT-BT
Status
LED
Descriptions.....................................
6
List of Tables ix

This
page
intentionally
left
blank.
x List of Tables

1
Introduction
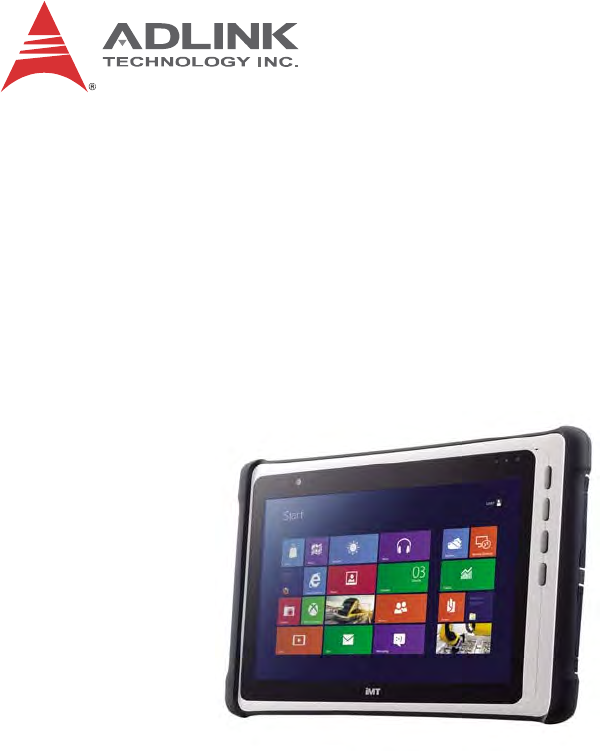
1.1 Overview
The
IMT-BT
Rugged Tablet
is
designed
for
customers
in the
retail
and
field
service
markets
requiring
a
semi-rugged
tablet
running
Windows
Embedded
8.1
to
act
as
a
durable
termi-
nal
with
high
performance
computing
and
versatile
features.
The
IMT-BT
features
a
1.58
GHz
dual-core
Intel®
Celeron®
Processor
N2807
system-on-chip,
reader
functions,
drop
pro-tection.
The device provides the relevant information to the
medical personnel by hand-held using. Patient and surgery data is
stored locally or can be exported to external systems.
The unit shall provide sufficient protection against electric shock.
1.2 Features
►
Intel®
Celeron®
Processor
N2807
dual-core
processor
sys-
tem-on-chip
►
Windows
Embedded
8.1
operating
system
►
10.1”
sunlight
readable
display,
capacitive
touchscreen
►
Wireless
Connectivity:
WLAN:
IEEE
802.11
a/b/g/n
WPAN:
Bluetooth
4.0
►
►

1.3 Specifications
Physical
• Dimensions: 288 x 191 x 18.5 mm (L x W x T)
• Weight: 1150g
Processor
• Intel® Celeron® Processor N2807 (1M Cache, up to
2.16 GHz)
Memory &
Storage
•
4
GB
DDR3
RAM
•
64
GB
eMMC
Display
• 10.1” sunlight readable display, 1280x800 resolution
• Projected capacitive touchscreen
• 700 nits brightness
• 2-points touch
• Corning Gorilla glass (7H hardness)
• HDMI port (Type A)
Buttons
• 1x power button
• 4x programmable buttons
Expansion
Slots
• 1x SIM slot
• 1x SD slot (SDHC up to 64GB, Class 2 to 10)
• 1x USB 3.0 (Type-A)
Wireless LAN
IEEE 802.11 a/b/g/n (combo Mini PCIe half-size card
• WEP, WPA/WPA2, WAPI
• 802.11a: up to 54 Mbps; 802.11b: up to 11 Mbps;
802.11g: up to 54 Mbps; 802.11n: up to 65 Mbps
• Distance: 50 meters indoors, 150 meters outdoors
Wireless PAN
Bluetooth 4.0 (combo Mini PCIe half-size card)
Table 1-1: IMT-BT Specifications

Built-in
Sensors
• G sensor: 3-axis, 2g, at least 8-bits accuracy
• E-Compass: 3-axis, at least 8-bits accuracy
• Gyroscope: 12-bits accuracy
• Illuminance sensor: 0 ~ 100,000 lux
Status LEDs
• Power, Wi-Fi, Charging
Camera
• Back: 5 megapixel color camera with flash, autofocus
• Top: 2 megapixel color camera
Audio
• Speaker, 100dB 1kHz @10 cm, 8 ohms
• Stereo headphone jack (3.5mm)
• Bluetooth headset support
• Built-in microphone
Battery
ADLINK TECHNOLOGY, INC. / IMTBT-B6300L-1
• Li-ion 6300 mAh, 7.4VDC
• Full charge time < 4 hrs
Power Adapter
Sinpro Electronics Co., Ltd. / HPU32A-105
• Input AC 100~240 V, 47-63 Hz
• Output: DC 12V, 2.5A.
OS
• Windows Embedded 8.1
Environmental
• Operating Temperature: 0°C to 30°C
• Charging Temperature: 0°C to 30°C
• Transport / Storage Temperature: -20°C to 60°C
• Operating Humidity: 10% to 90% non-condensing
• Transport / Storage Humidity: 5% to 95% non-condensing
• Drop: 1.0 meters
Ambient air
pressure for
operation,
storage and
transport:
• 700-1013 hPa
Certifications
• CB, CE
• RoHS
• UL/ cUL
Table 1-1: IMT-BT Specifications
1.4 Package Contents
Please
check
that
your
package
contains
the
items
below
.
If
you
discover
damaged
or
missing
items
,
please
contac
t
your
vendor
.
►
IMT-BT
industrial
tablet
►
AC
power
adapter
x1
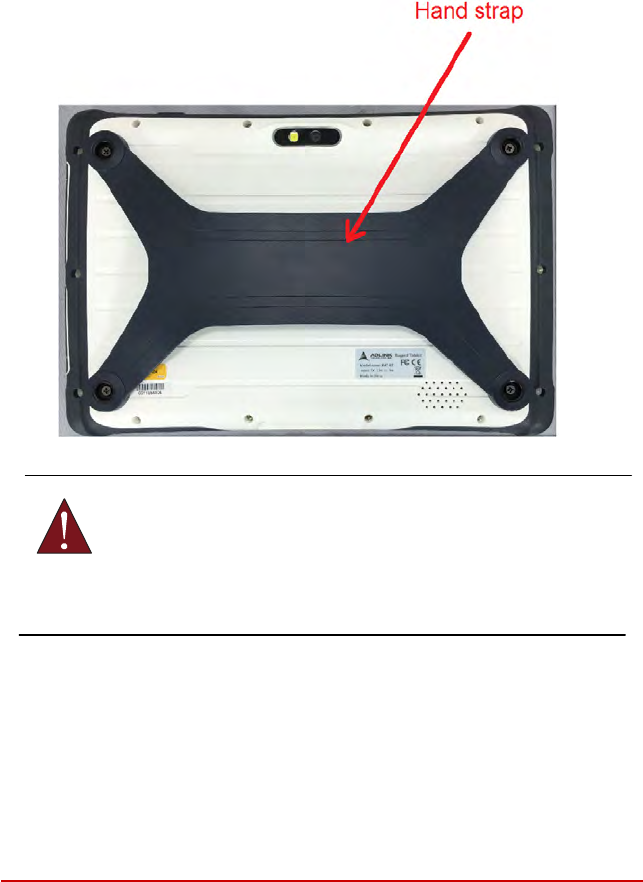
►
Hand
strap
x1
W
ARNING:
DO NOT install or apply power to equipment that is damaged
or if there is missing/incomplete equipment. Retain the ship-
ping carton and packing materials for inspection. Please con-
tact your ADLINK dealer/vendor immediately for assistance.
Obtain authorization from your dealer before returning any
product to ADLINK.
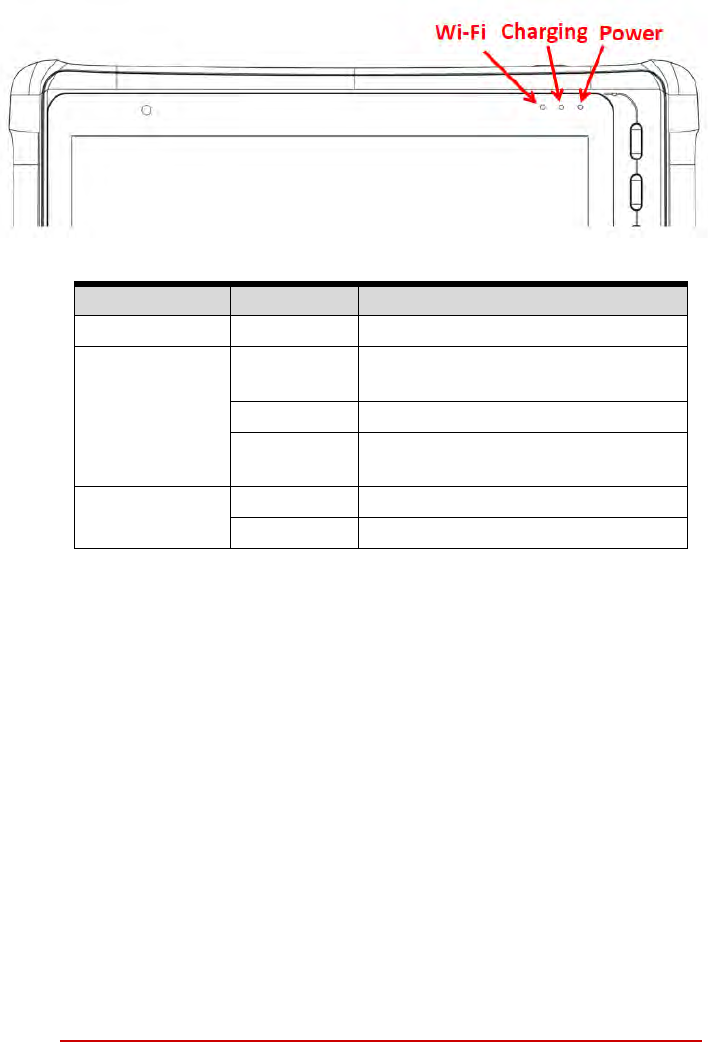
Status
LEDs
L
ED
C
o
l
o
r
S
t
a
tus
Wi-Fi
Green
Connected (flashing when active)
Charging
(when AC adapter
is connected)
Orange
(solid)
Charging
Off
Fully charged
Orange
(flashing)
Abnormal charging condition
Power
Blue
System ON
Amber
Standby (S3)
Table 1-2: IMT-BT Status LED Descriptions
16 Introduction
NO
TE:
2
Getting
Started
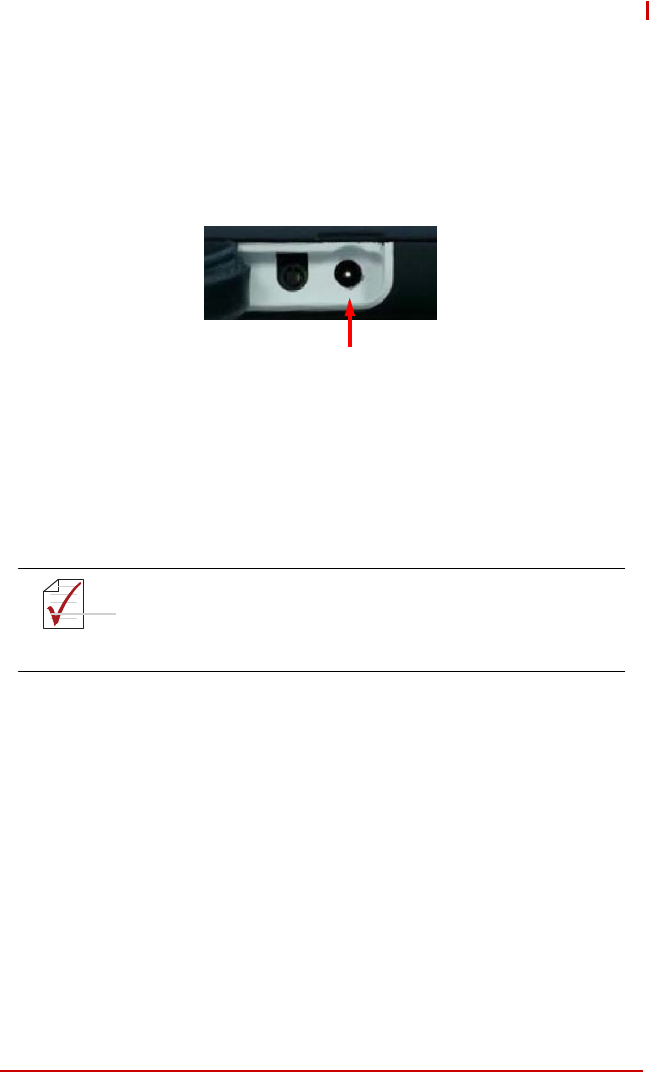
2.1 Charging the Battery
Be
sure
to
fully
charge
the
battery
before
using
your
device
for
the
first
time.
1.
Locate
the
DC
input
socket
on
the
left
side
of
the
tablet
and
open
the
cover.
2.
Insert
the
DC
jack
end
of
the
AC
adapter
into
the
socket
and
the
AC
plug
into
the
wall
socket.
3.
The
power
status
LED
glows
Orange when
charging.
If charging
for
the
first
time,
do
not
disconnect
your
device from
AC
power
until
the
battery
is
fully
charged,
indi- cated
by
the
power
status
LED
glowing
green.
This
may take
up
to
4
hours.
4.
Close
the
cover
when
charging
is
completed.
A blinking power status LED indicates an abnormal charging
condition. Check that the AC adapter is properly inserted into
the DC input socket and that the device is not charging in high
NO
TE:
temperature conditions, resulting in an overheated battery.
CAUTION:
For optimum performance of your battery:
• Only use the AC adapter provided
• Do not charge the battery when the temperature is high
(e.g. in direct sunlight).
• Do not store the device in high temperature environments
• Only charge the battery when its temperature is between
0°C and 30°C
• If you are not using the device for an extended period of time,
be sure to fully charge the battery at least once every two
weeks. Over discharge of the battery can affect its
performance.
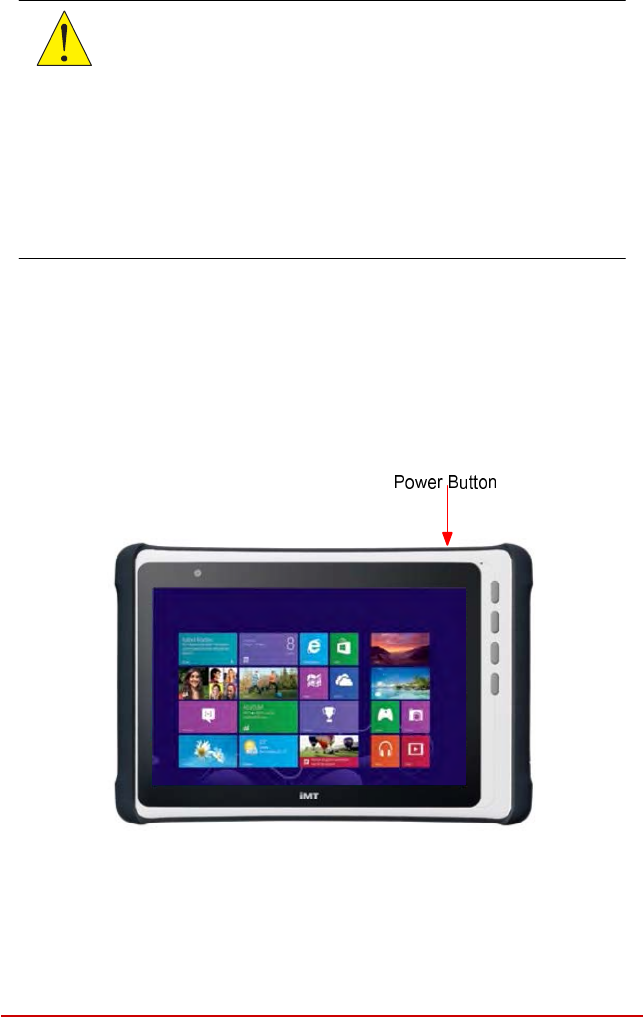
2.2 Turning the Tablet On/Off
Turning
On
Press
and
hold
the
power
switch
for
2-3
seconds
until
the
blue power
status
LED
indicator
turns
on.
NO
TE:
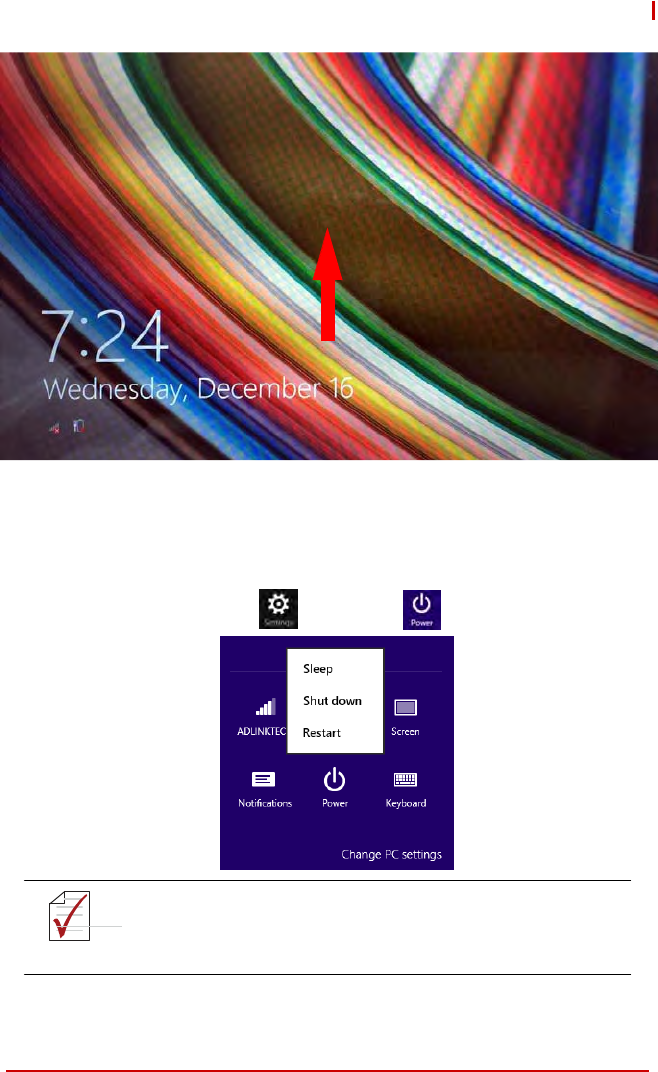
Swipe
upwards
on
the
lock
screen
to
go
to
the
login
screen.
Turning
Off
1. Open
the
Charms
Bar
by
swiping
left
from
the
right edge
of
the
screen.
2. Tap
on
Settings
>
Power
>
then
tap
Shut
down.
To perform a forced shut down, hold the power button down for
5-6 seconds.
NO
TE:
Getting Started 19

Standby
To
manually
put
the
tablet
into
standby
mode
(S3),
briefly
press
the
power
button.
The
display
will
turn
off
and
the
power
status LED
will
change
to
Amber after
a
few
seconds.
To
wake
the
tablet
from
Standby,
tap
the
touchscreen
or
briefly press
the
power
button.
20 Getting Started
3
Using
the
Tablet
This
chapter
describes
how
to
perform
basic
operations
with
the
tablet.
CAUTION:
The device can get uncomfortably warm when used in warm
environments. Take care to protect yourself (e.g. by wearing
gloves). Prolonged body contact can cause discomfort and
potentially a burn.
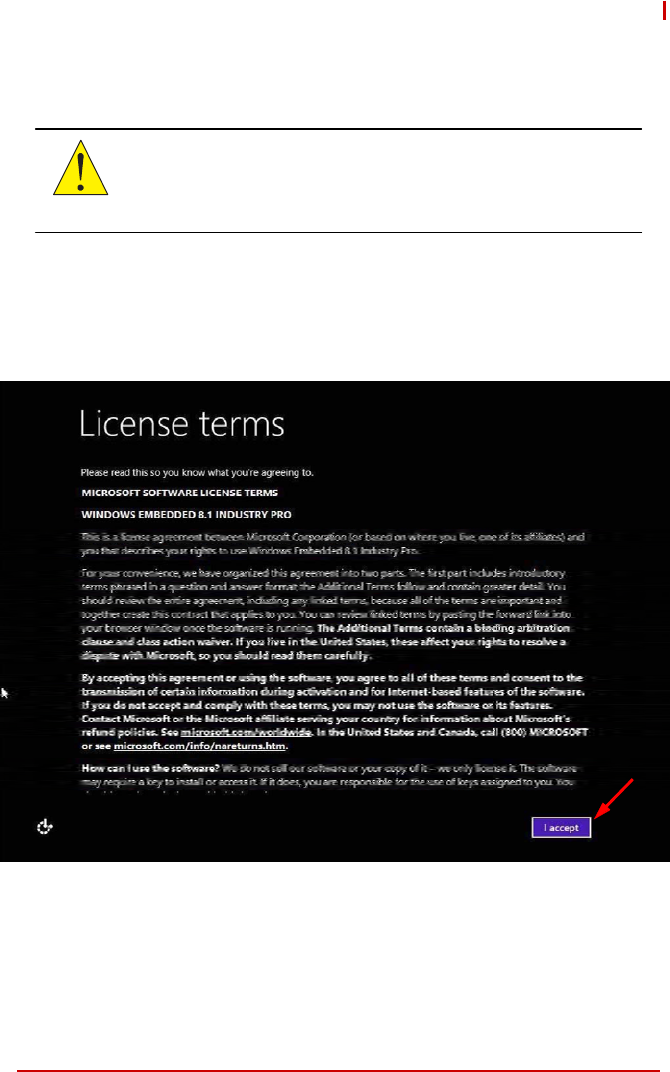
3.1 Initial Setup
After
turning
on
your
device
for
the
first
time,
follow
the
steps below
to
complete
the
initial
setup.
1. Tap
I
accept
to
accept
Windows
licensing
terms.
the
n
t
ap
Nex
t
.
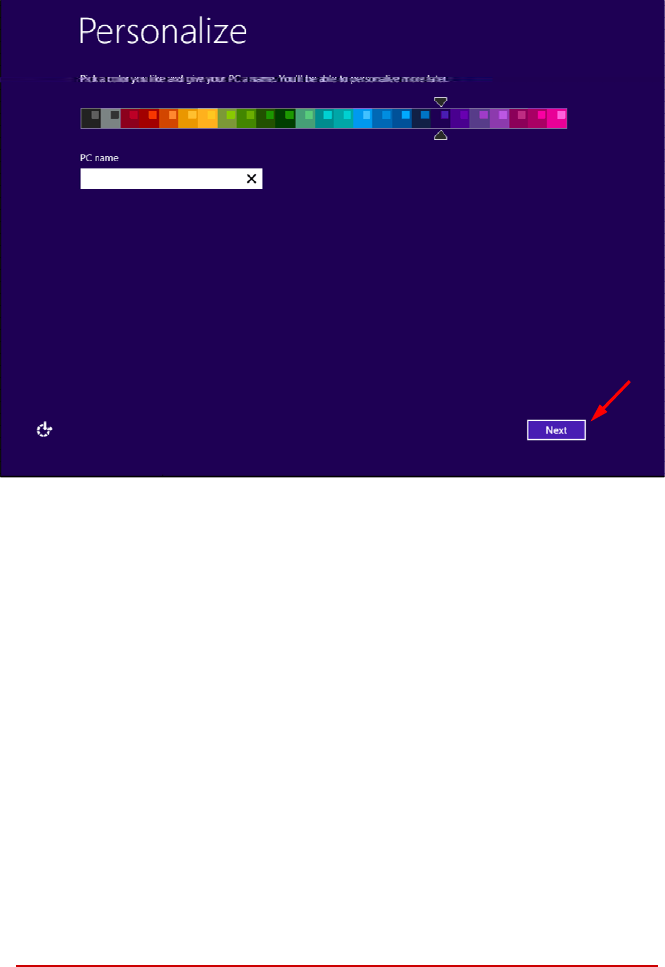
2. On
the
Personalize
screen,
choose
a
background
color.
This
can
be
changed
later
in
Settings.
3. In
the
PC
name
field,
type
a
name
for
your
tablet,
and
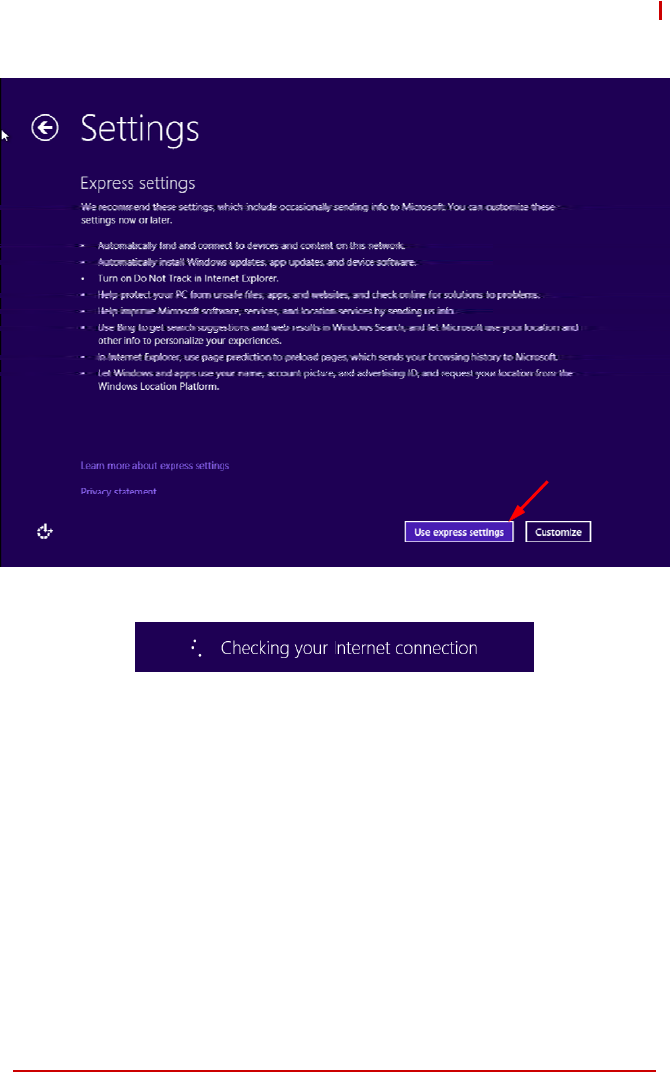
4. On the
Settings
page
screen,
tap
Use
express
settings
for
the
quick
setup.
5. Wait
while
Windows
tries
to
check
your
Internet
connec-
tion.
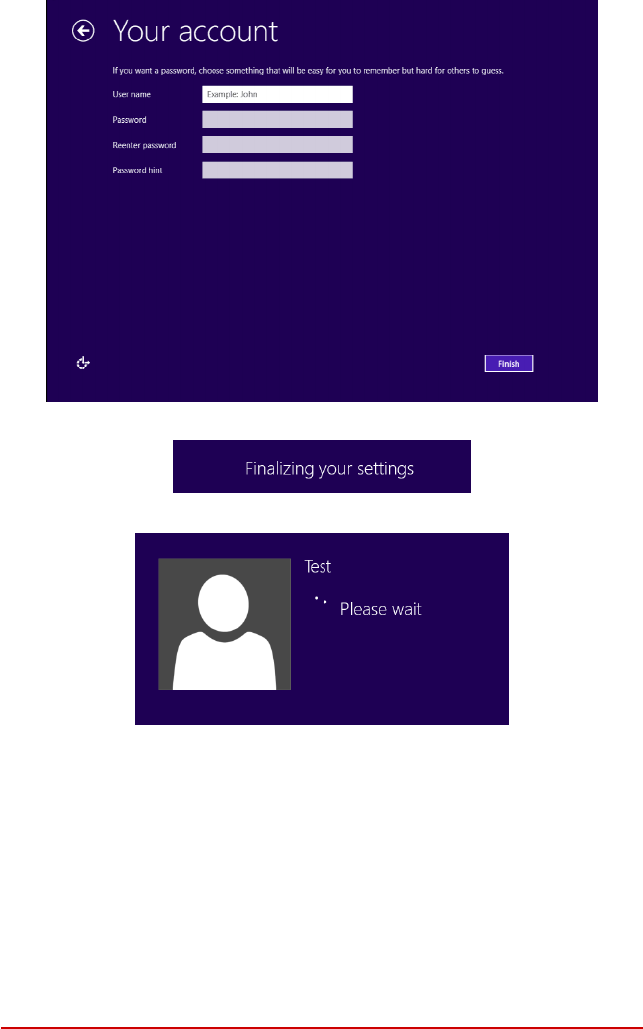
6. On
the
Your
account
screen,
type
your
user
name
and
password
(if
desired)
to
create
a
local
account,
then
tap finish
7. Wait
while
Windows
finalizes
your
settings.
8. At
the
Windows
Sign-in
screen,
enter
the
user
name
and
password
(if
set),
and
then
tap
Enter
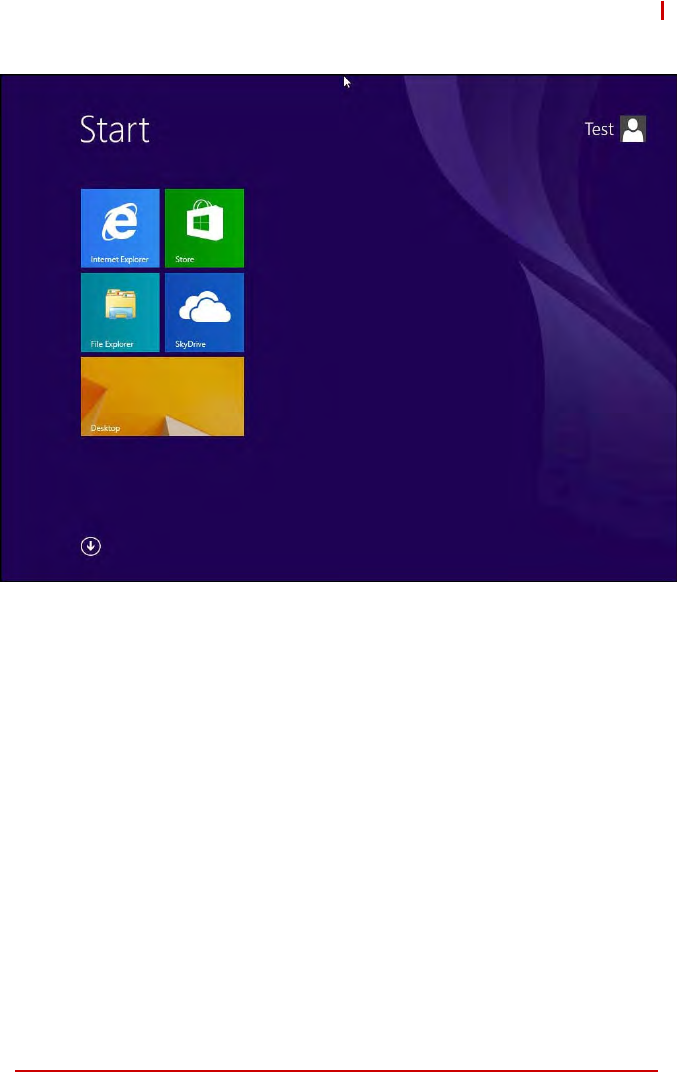
9. After
Windows
finishes
logging in,
you
will
be taken
to the
Start
screen.

3.2 Navigating the Touchscreen
CAUTION:
Be careful not to damage the touchscreen with sharp objects.
Use your finger or a stylus specifically intended for touch-
screens.
The
following
actions
can
be
performed
with
the
touchscreen.
►
Tap:
touch
the
screen
once
►
Press
and
hold:
press
and
hold
on
an
item
to
see
a
list
of
options
available
(similar
to
Windows
right-click)
►
Pinch:
touch
the
screen
with
two
fingers
and
pinch
them
together
to
zoom
in,
spread
them
apart
to
zoom
out
►
Drag:
press
and
hold
an
item,
then
move
across
the
screen
without
lifting
your
finger
(stylus)
to
the
target
location
►
Swipe:
move
your
finger
(stylus)
across
the
screen
without
pausing
when
you
first
touch
it
(e.g.
scrolling
up
and
down)
►
Swipe
from
the
edge:
swipe
your
finger
from
outside
the
edge
onto
the
screen
without
lifting
it
Swipe
from
the
left
edge:
shows
recently
opened
apps;
keep
swiping
to
switch
between
apps.
Swipe
from
the
right
edge:
opens
or
closes
the
Charms
Bar
(Search,
Share,
Start,
Devices,
Settings)
►
Rotate:
Put
two
or
more
fingers
on
an
item
and
turn
your
hand
to
rotate
it.
Not
all
items
can
be
rotated.
Landscape
and
Portrait
View
The
tablet
supports
landscape
and
portrait
view,
and
will
automati-
cally
adjust
the
display
orientation
depending
on
how
it
is
held
our
mounted.
3.3 Using Windows Embedded 8.1
For
detailed
information
on
what
is
new
and
how
to
operate
Win-
dows
Embedded
8.1.
For
more
detailed
information,
please
refer
to
http://windows.microsoft.com/en-us/windows/support
.
After
powering
on
the
tablet,
swiping
upwards
on
the
lock
screen
to
go
to
the
login
screen.
After
login
you
will
see
the
Start
screen.
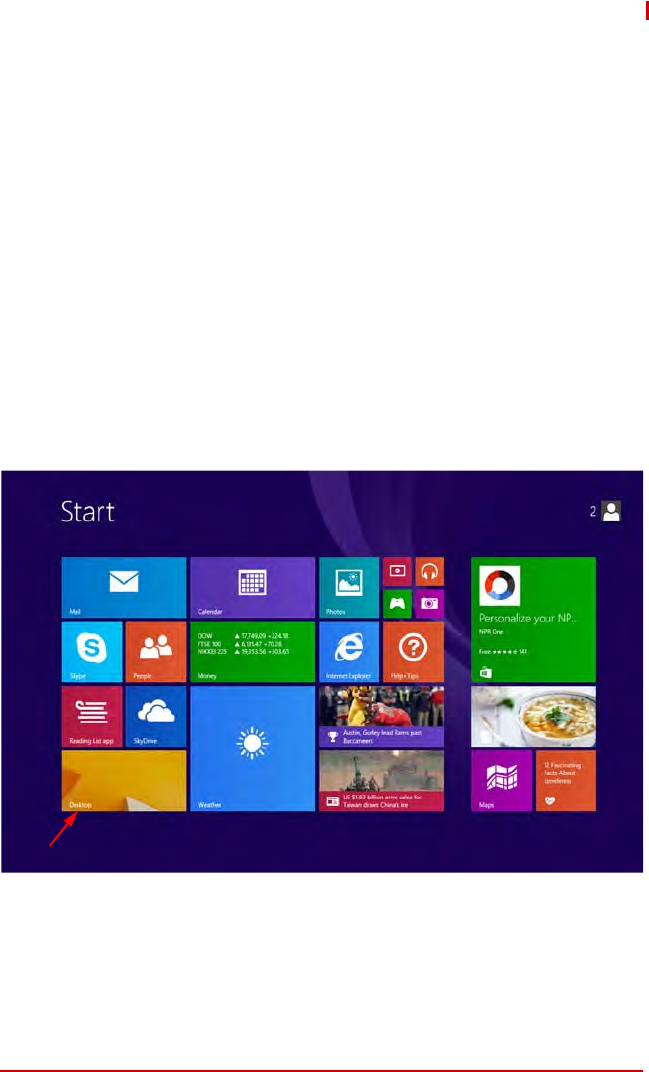
Start
Screen
The
Start
screen
is
the
starting
place
for
everything
you
can
do
in
the
Windows
8.1
operating
system,
providing
access
to
apps,
the
Internet,
device
functions
and
other
important
information.
Tiles
The
Start
screen
is
organized
into
tiles.
Tap
a
tile
to
access
it’s
function
(e.g.
Mail
or
Calendar).
The
Desktop
tile
at
the
lower
left
corner
takes
you
to
the
traditional
Windows
desktop
inter-
face.
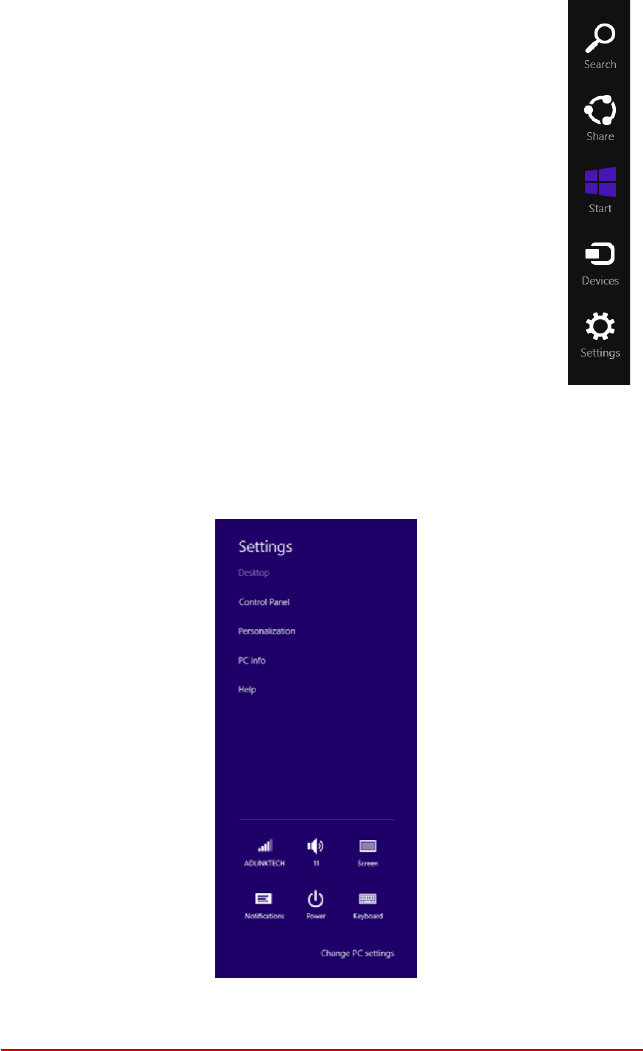
Charms
Bar
The
Charms
Bar
allows
quick
access
to
commonly
used
functions.
Swipe
from
the
right
edge
to
open
it.
►
Search:
Allows
you
to
search
your
tablet
(apps,
settings
and
files),
the
web,
or
within
an
app.
►
Share:
Allows
you
to
share
items
such
as
links
photos.
►
Start:
Takes
you
to
the
Start
screen
or,
if
already
on
the
Start
screen,
returns
you
to
previously
used
app.
►
Devices:
Allows
you
to
manage
your
hardware.
►
Settings:
This
charm
allows
you
to
access
your
tablet’s
settings,
such
as
wireless
connectivity,
volume,
brightness
and
the
settings
menu.
Settings
Tap
Settings
in
the
Charm
Bar
to
access
the
Settings
menu.
Tap
Change
PC
Settings
to
access
more
detailed
menus
such
as
PC
and
Devices
and
Privacy
.
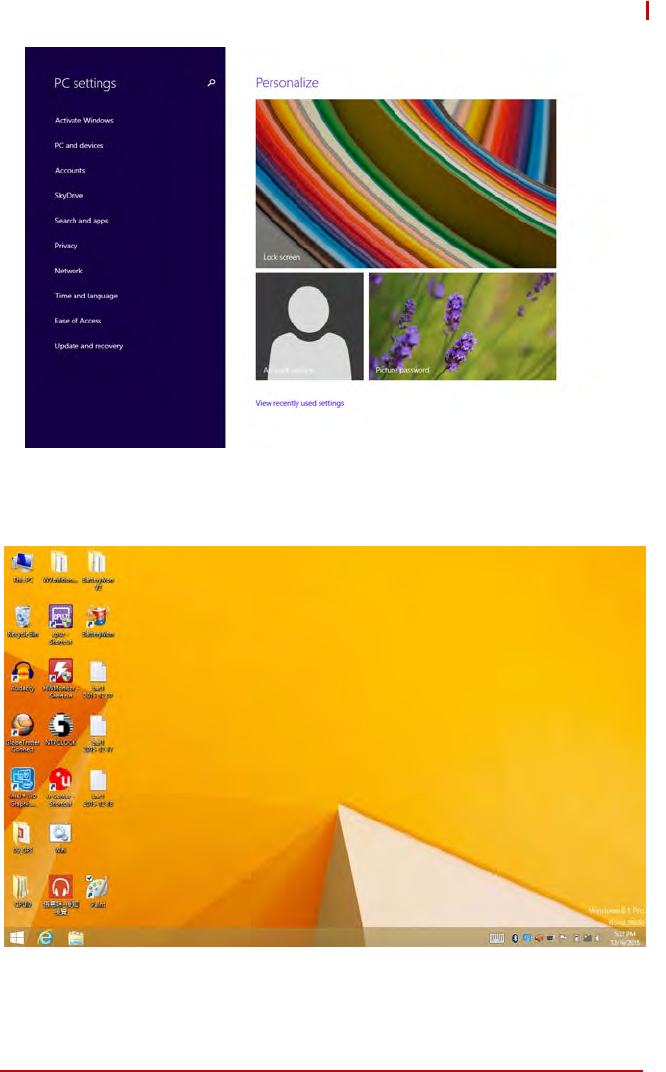
PC
Settings
Desktop
The
traditional
Windows
Desktop
provides
a
familiar
interface
for
Windows users.
Use
the
Charms
Bar
to
return
to
the
Start
screen.
Using the Tablet 29
Sign-in
Options
Windows
offers
a
number
of
sign-in
options,
including
password,
PIN
and
picture
password
authentication
to
prevent
unauthorized
access.
To
set
your
sign-in
option,
open
the
Charms
Bar
and
tap
Settings
>
PC
settings
>
Accounts
>
Sign-in
options
.
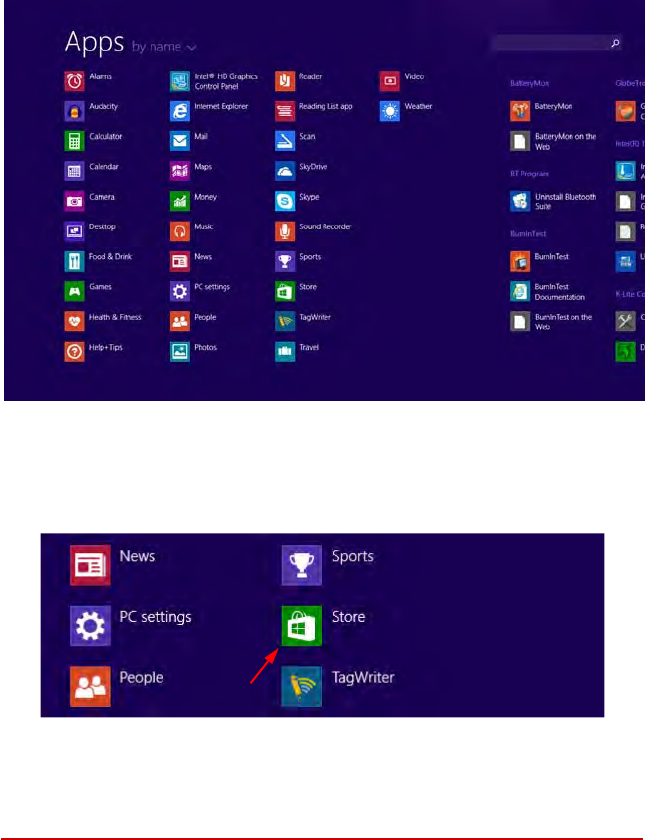
3.4 Apps
From
the
Start
screen,
swipe
upwards
to
access
the
Apps
screen.
Swipe
left
to
view
more
apps
or
use
the
search
bar
at
the
top
right.
Windows
Store
To
access
more
apps
for
your
tablet,
tap
on
the
Windows
Store
tile.
Make
sure
your
tablet
has
a
Wi-Fi
connection
(see
“Wi-Fi”
on
page
24.).
30 Using the Tablet

3.5 Entering Text
You
can
enter
text,
numbers,
and
symbols
using
the
onscreen
key-
board.
The
keyboard
will
appear
when
you
touch
the
input
field
where
you
want
to
enter
text.
To
open
the
keyboard
manually
from
the
desk-
top,
tap
the
keyboard
icon
in
the
system
tray.
To
enter
text,
touch
the
keys
on
the
keyboard
to
type.
To
enter
numbers
or
symbols,
touch
the
Symbols
key
(lower
left
corner)
to
switch
to
the
numbers
and
symbols
keyboard.
Touch
the
Settings
key
(lower
right
corner)
to
split
the
keyboard
or
enter
handwriting
mode.
Using the Tablet 21
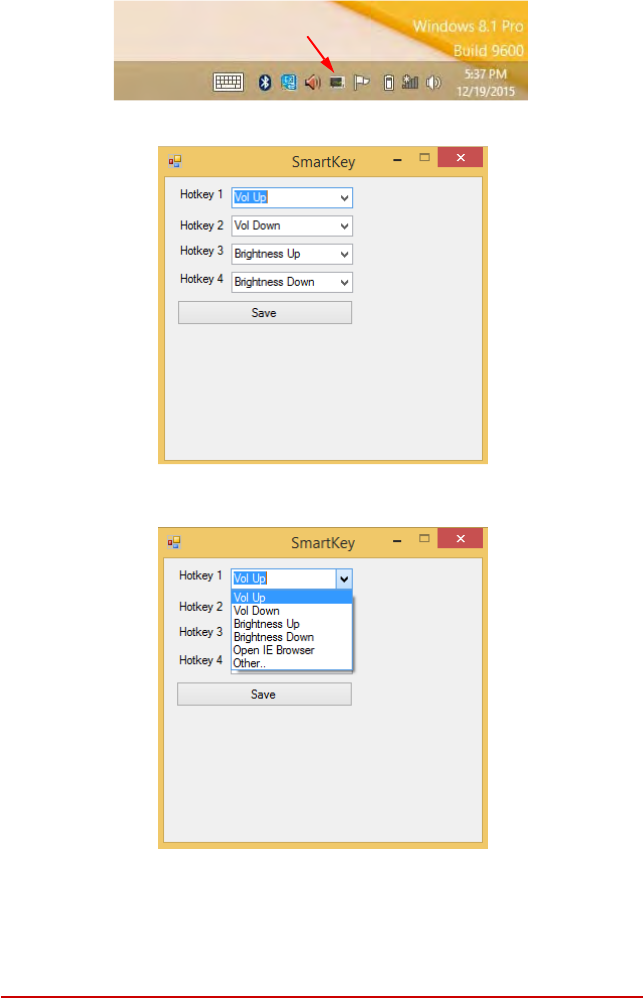
3.6 Configuring the Programmable Buttons
From
the
Desktop,
double-click
the
SmartKey
icon
in
the
system
tray
to
open
the
SmartKey
configuration
utility.
The
default
settings
are
shown
below.
This
page
intentionally
left
blank.
Choose
from
the
available
options
or
select
“Other”
to
set
the
key
to
open
an
program.
22 Using the Tablet
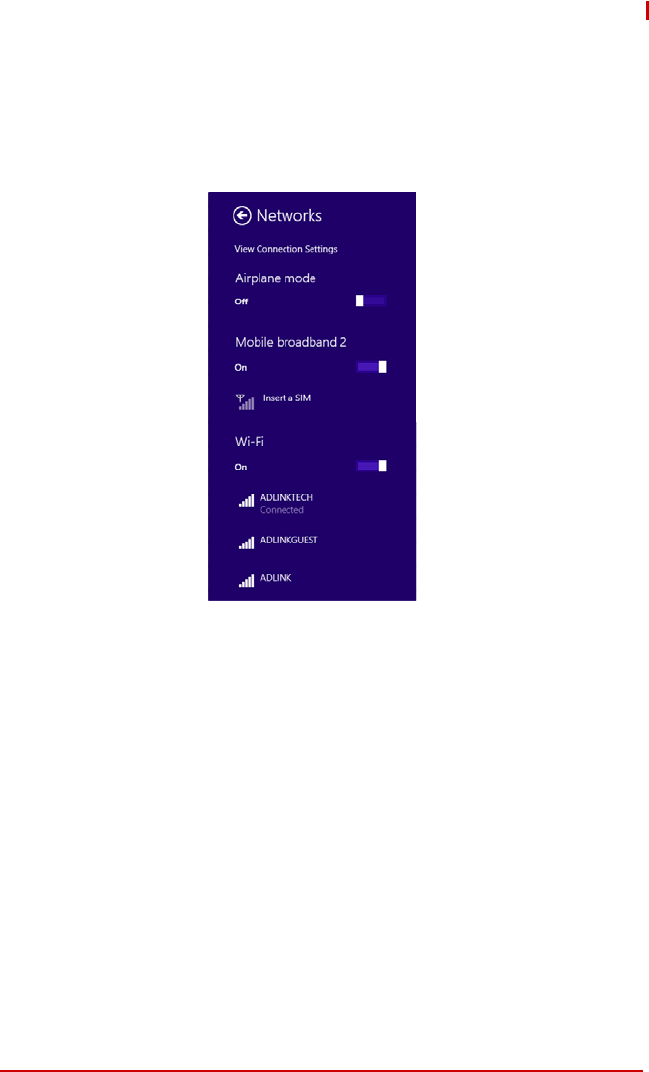
4
Wireless
Connections
The
IMT-BT
supports
wireless
connectivity
via
Wi-Fi,
Bluetooth and
mobile
networks
(optional).
To
turn
on/off
wireless
connectiv- ity,
touch
the
Wi-Fi
icon
from
Settings
in
the
Charms
Bar
or
in
the
Desktop
system
tray.
The
Networks
settings
screen
will
display
on
the
right
hand
side
of
the
screen.
4.1 Airplane Mode
When
it
is
necessary
to
turn
off
all
wireless
radios,
you
can
put
the
tablet
into
Airplane
mode.
To
turn
Airplane
mode
on
or
off,
swipe
left
or
right
to
toggle
the
switch.

NO
TE:
4.2 Wi-Fi
To
turn
Wi-Fi
on
or
off, swipe
left
or
right
to
toggle
the
switch. When
Wi-Fi
is
enabled,
the
tablet
will
scan
for
available
networks and
display
them
on
the
screen.
1. Touch
the
network
you
wish
to
connect
to.
2. If
the
network
is
secured,
you
will
be
prompted
to
enter
a
password.
If
the
network
is
open,
you
will
be
prompted
to confirm
that
you
want
to
connect
to
it.
3. When
the
Wi-Fi
radio
is
turned
on
and
your
device
finds a
network
that
you
previously
connected
to,
it
will
auto-
matically
reconnect
to
it.
When
the
Wi-Fi
radio
is
turned
on
and
your
device
finds
a
network
that
you
previously
connected
to,
it
will
re-connect
to
it.
Leaving the Wi-Fi radio on will consume more power. To save
battery power, turn it off when not in use.
NO
TE:
NO
TE:
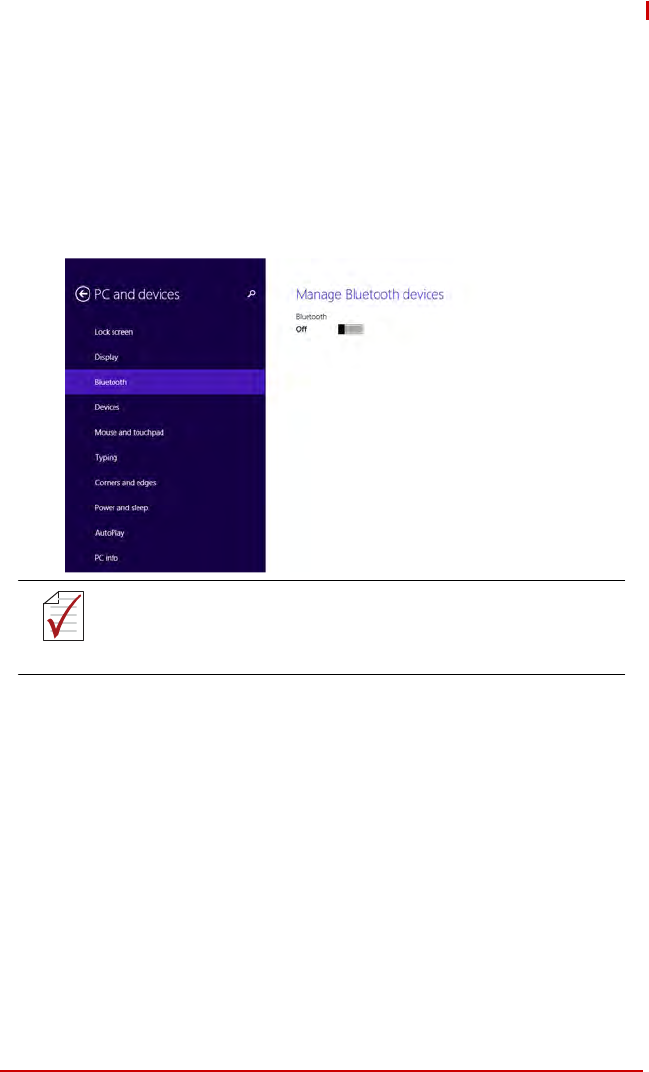
4.3 Bluetooth
Turn
Bluetooth
On/Off
To
turn
Bluetooth
on
or
off,
from
the
Charms
Bar
,
tap
Settings
>
Change
PC
settings
.
Click
on
PC
and
devices
and
then
select
Bluetooth
to
open
Manage
Bluetooth
devices
.
Slide
the
switch
to
turn
Bluetooth
on
or
off.
If
Bluetooth
is
already
turned
on,
you
can
access
the
settings
from
the
Desktop
by
tapping
the
Bluetooth
icon
in
the
system
tray.
Leaving the Bluetooth radio on will consume more power. To
save battery power, turn it off when not in use.
NO
TE:
Pairing
with
a
Bluetooth
Device
The
first
time
you
use
a
new
Bluetooth
device
with
your
tablet,
you
must
“pair”
them,
so
that
they
know
how
to
connect
securely
to
each
other.
Afterwards,
you
will
only
need
to
connect
to
a
previ-
ously
paired
device.
1. Make
sure
that
the
Bluetooth
device
you
wish
to
pair
is
set
as
“discoverable”
and
within
range.
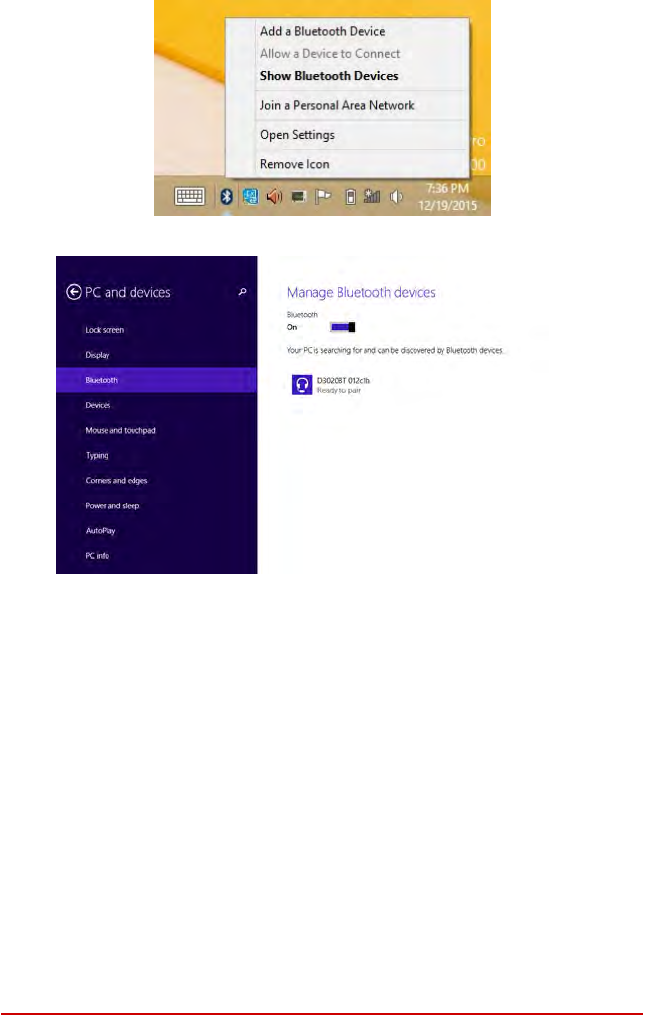
2.
From
the
Desktop,
tap
the
Bluetooth
icon
and
then
tap
Add
a
Bluetooth
Device
to
open
Manage Bluetooth devices
(or
follow
the
steps
above
using
the
Charm
Bar).
3.
Select
the
device
you
wish
to
pair.
4.
The
tablet
will
scan
for
and
display
the
IDs
of
all
avail-
able
Bluetooth
devices
within
range.
5.
On
the
list
of
discovered
devices,
touch
the
ID
of
the device
you
wish
to
pair
with.
6.
If
prompted, enter
the
pass
code
of
the
device
(usually
0000
or
1234).
Refer
to
the
documentation
that
came with
the
device.
7.
If
the
pairing
is
successful,
your
tablet
will
connect
to
the
device.
5
External
Connections
The
IMT-BT
has
a
USB
3.0
port,
an
HDMI
display
output,
SD
card
slot
and
SIM
card
slot
(optional)
on
the
right
side
of
the
tablet,
and
an
audio
output
on
the
left
side.
To
access
the
connectors,
use your
fingernail
to
open
the
protective
covers.
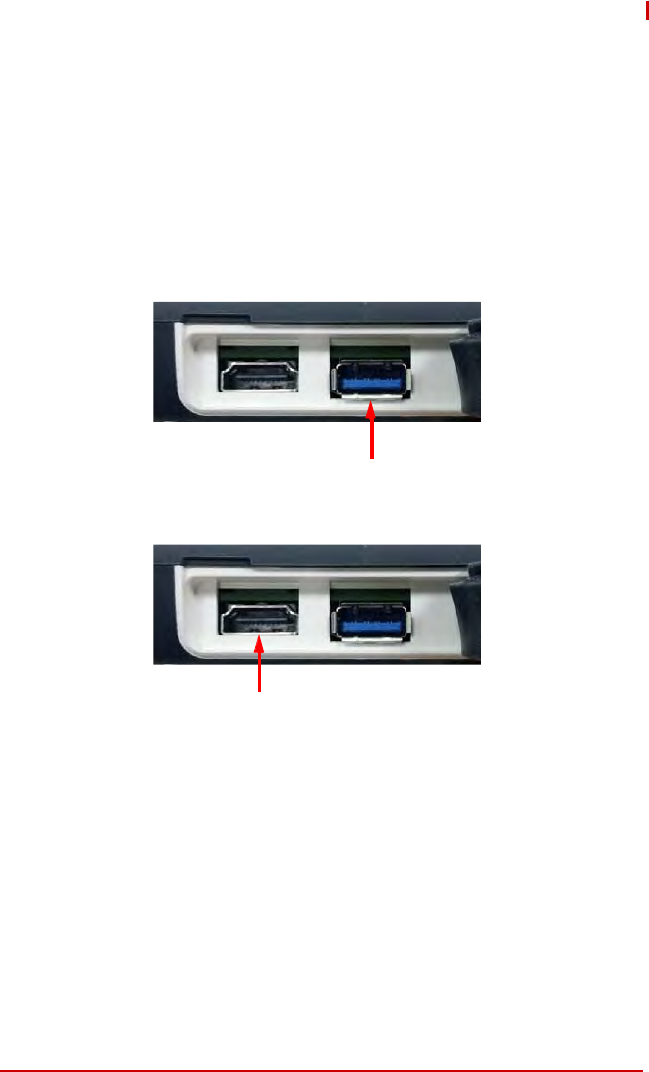
5.1 USB Port
To
connect
a
USB
device
to
the
tablet,
such
as
a
flash
drive
or
external
storage,
use
the
USB
3.0
port
(Type
A)
on
the
right
side
of
the
tablet.
5.2 HDMI Display Output
The
HDMI
(Type
A)
port
is
on
the
right
side
of
the
tablet.

5.3 Using a SD Card
Inserting
an
SD
card
1.
Locate
the
SD
slot
on
the
right
side
of
the
tablet
and open
the
cover.
2.
Insert
the
card
into
the
slot
with
the
contacts
facing
upwards
and
the
label
facing
the
back
of
the
tablet
(refer
to
the
drawing
next
to
the
SD
card
slot).
3.
Close
the
cover.
Removing
a
SD
card
You
can
safely
remove
the
SD
card
when
the
tablet
is
shut down.
If
you
need
to
remove
the
card
while
the
tablet
is
on, eject
the
card
first
to
prevent
corrupting
or
damaging
the
card.
1. Eject
the
SD
card
(if
necessary,
depending
on
your
device
policy
settings)
by
opening
Windows
Explorer
and
locating
the
SD
card
in
“This
Computer”.
Right-
click on
the
SD
card
and
click
“Eject”.
The
“Safe
to
Remove Hardware”
notification
will
appear
in
the
system
tray.
2. Open
the
cover
and
press
the
edge
of
the
card
to
release
it,
then
pull
the
card
out
of
the
slot.
3. Close
the
cover.

5.4 Audio Out
Insert
your
headphone
connector
into
the
3.5
mm
stereo
audio jack
on
the
left
side
of
the
tablet.
External Connections 41
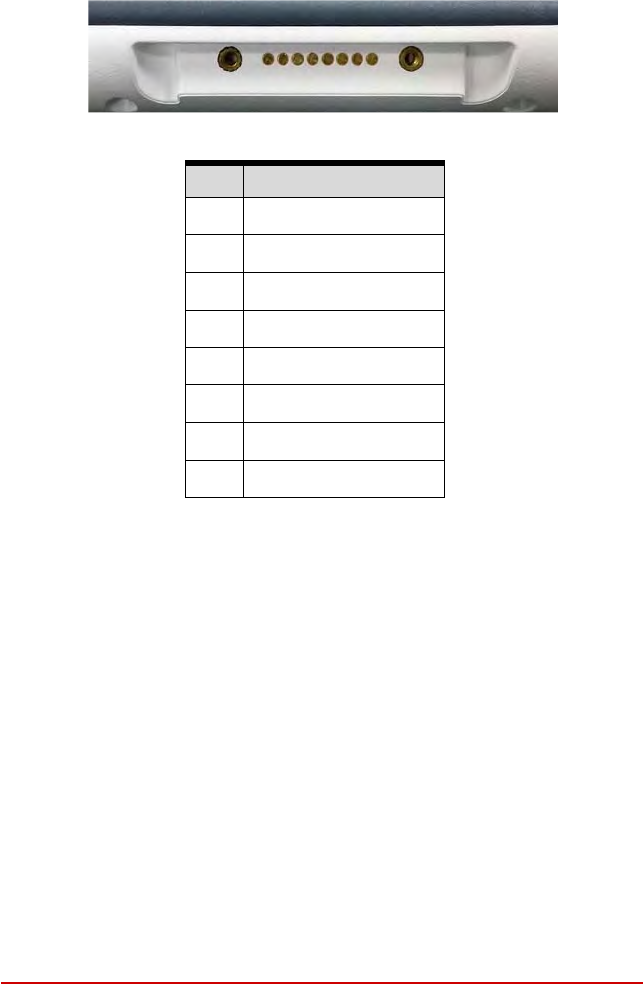
5.5 Docking Port Connector
1 8
42 External Connections
Pin Signal
1 DOCK_12V
2 DOCK_12V
3 DOCK_IO1
4 DOCK_IO2
5 USB_CNP3
6 USB_CNN3
7 GNDP2
8 GNDP2
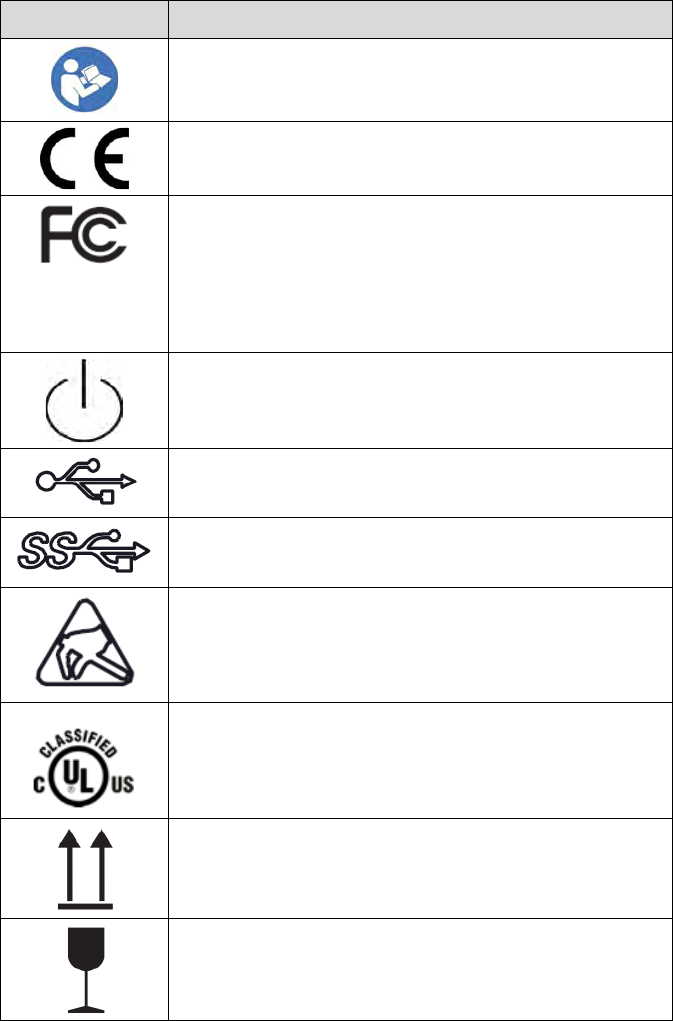
5.6 Explanation of label symbols
Symbol
Meaning
Read the user’s manual and follow all warnings, handling and
safety advice
CE labelling: the CE symbol confirms compliance to all
relevant guidelines and regulations.
FCC labelling: the FCC symbol confirms compliance to all
communication requirements
This device complies with Part 15 FCC Rules. Operation is
subject to the following two conditions: (1) this device may not
cause harmful interference, and (2) this device must accept
any interference received including interference that may
cause undesired operation.
Standby Switch
USB2.0 port
USB3.0 port
ESD waring symbol
MEDICAL – GENERAL MEDICAL EQUIPMENT AS TO
ELECTRICAL SHOCK, FIRE AND MECHANICAL HAZARDS
ONLY IN ACCORDANCE WITH ANSI/AAMI ES 60601-1
AMD (2012) and CAN/CSA-C22.2 No. 60601-1 (2014).
Upright position
Fragile, handle with care
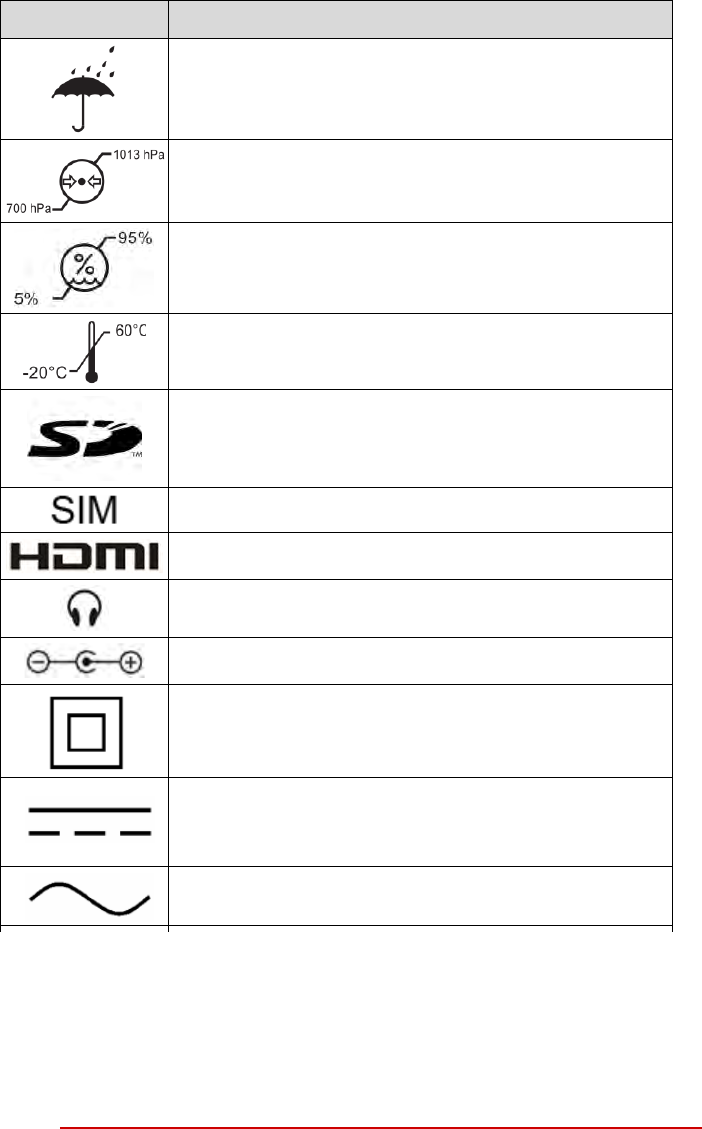
Symbol
Meaning
Keep away from rain
Atmospheric pressure limitation for storage and transport
(700 – 1013hPa)
Humidity limitation for storage and transport (5 – 95%)
Temperature limitation for storage and transport (-20 – 60ºC)
SD card slot
SIM card slot
HDMI port
Headphone jack
DC 12V in
Class II equipment
Direct current
Alternating current
6
Data
Collection
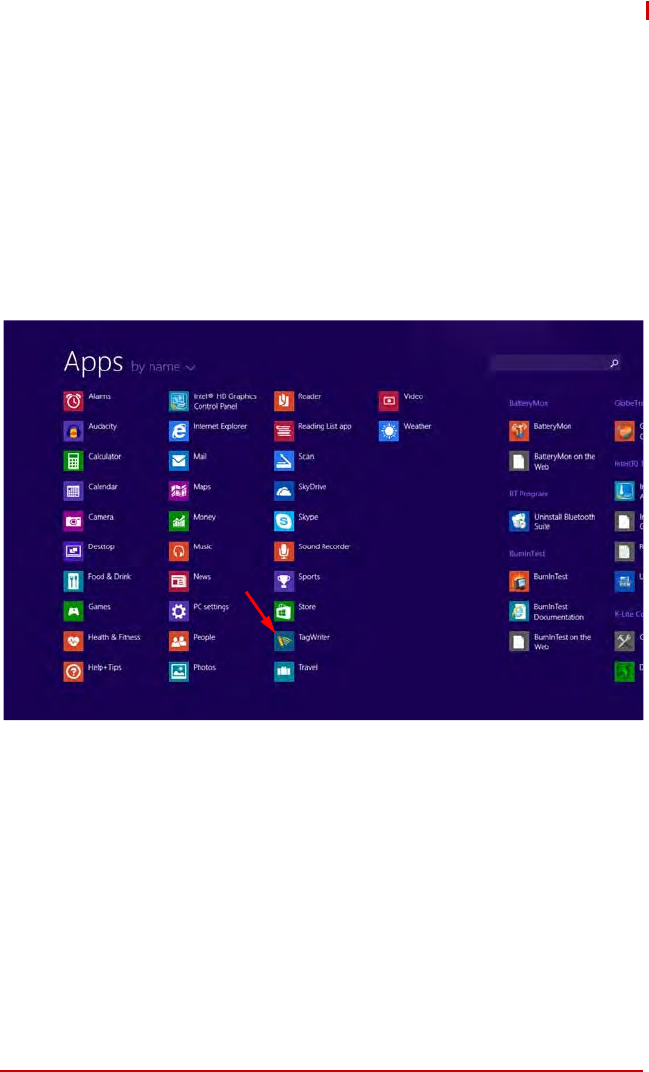
6.1 Download TagWriter
Go
to
the
Windows
Store
following
the
steps
described
on page
20.
Search
for
“NXP
TagWriter”
and
install
the
app.
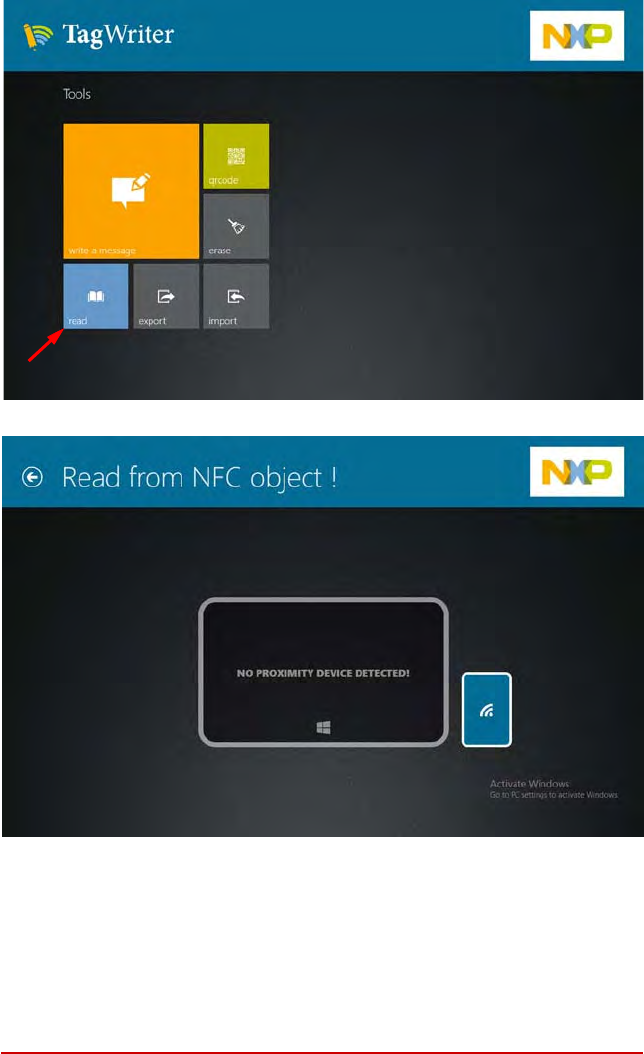
Tap
Read
to
start
scanning
for
tags.

This
page
intentionally
left
blank.
48 Data Collection

7
Care
and
Maintenance
►
Avoid
exposure
to
excessive
moisture
and
extreme
temper-
atures.
►
Avoid
exposure
to
direct
sunlight
or
strong
ultraviolet
light for
extended
periods
of
time.
►
Do
not
place
anything
on
top
of
your
tablet
or
drop
objects
on
your
tablet.
►
Do
not
drop
your
tablet
or
subject
it
to
severe
shock.
►
Do
not
subject
your
tablet
to
sudden
and
severe
tempera-
ture
changes.
This
may
result
in
moisture
condensation
inside
the
unit
and
subsequent
damage.
In
the
event
of
moisture
condensation,
allow
your
tablet
to
dry
out
com-
pletely
before
powering
it
on.
►
Avoid
touching
it
with
sharp
objects
to
prevent
scratches.
►
When the product was dirty, use a soft, lint-free dry cloth to
clean the screen and the exterior of your device.
►
Never
attempt
to
disassemble,
repair
or
make
any
modifica-
tions
to
your
device.
Disassembly,
modification
or
any
attempt
at
repair
could
cause
damage
to
your
device
and
even
bodily
injury
or
property
damage
and
will
void
the
war-
ranty.
►
Do
not
store
or
carry
flammable
liquids,
gases
or
explosive
materials
in
the
same
compartment
as
your
device,
its
parts
or
accessories.
Care and Maintenance 37

This
page
intentionally
left
blank.
38 Care and Maintenance

Important
Safety
Instructions
For
user
safety,
please
read
and
follow
all
instructions
,
WARNINGS
,
CAUTIONS,
and
NOTES
marked
in
this
manual
and
on
the
associated
equipment
before
handling/operating the
equipment.
►
Read
these
safety
instructions
carefully.
►
Keep
this
user’s
manual
for
future
reference.
►
Read
the
specifications
section
of
this
manual
for
detailed
information
on
the
operating
environment
of
this
equipment.
►
To
avoid
electrical
shock
and/or
damage
to
equipment:
Keep
equipment
away
from
water
or
liquid
sources;
Keep
equipment
away
from
high
heat
or
high
humidity;
►
Never
attempt
to
fix
the
equipment.
Equipment
should
only be
serviced
by
qualified
personnel.
►
When
charging the equipment should be installed near an
easily accessible outlet.
► To fully disengage the power to the unit, please disconnect
the power cord from the AC inlet.
► Equipment
must
be
serviced
by
authorized
technicians when:
The
power
cord
or
plug
is
damaged;
Liquid
has
penetrated
the
equipment;
It
has
been
exposed
to
high
humidity/moisture;
It
is
not
functioning
or
does
not
function
according
to
the user’s
manual;
It
has
been
dropped
and/or
damaged;
and/or,
It
has
an
obvious
sign
of
breakage.
Replace the battery only by service personnel. (Refer to
clause 1.3 Specifications for battery info.)
Replacement the battery by inadequately trained
personnel could result in a HAZARD (such as excessive
temperatures, fire or explosion).
► Do
not
use
a
battery
other
than
one
approved
for
your device.
W
ARNING:
Risk of explosion if battery is replaced with one of an incorrect
type. Dispose of used batteries appropriately.
Important Safety Instructions 39

►
Do
not
use
an
AC
adapter
other
than
one
approved
for
your device.
Use
of
another
type
of
AC
adapter
may
result
in malfunction
and/or
danger.
Do
not
use
the
AC
adapter
in
a
high
moisture
environ-
ment.
Never
touch
the
AC
adapter
when
your
hands
or
feet
are
wet.
Allow
adequate
ventilation
around
the
AC
adapter
when using
it
to
operate
the
device
or
charge
the
battery.
Do not
cover
the
AC
adapter
with
paper
or
other
objects
that will
reduce
cooling.
Do
not
use
the
AC
adapter
while
it
is inside
a
carrying
case.
Connect
the
AC
adapter
to
a
proper
power
source.
The
voltage
and
grounding
requirements
are
found
on
the
product
case
and/or
packaging.
Do
not
use
the
AC
adapter
if
the
cord
becomes
dam-
aged
.
Do
not
attempt
to
service
the
adapter.
There
are
no
user
serviceable
parts
inside.
Replace
the
unit
if
it
is
damaged
or
exposed
to
excess
moisture.
When charging the equipment should be installed near
an easily accessible outlet.
To fully disengage the power to the unit, please
disconnect the power cord from the AC inlet.
►
Accessory equipment connected to the analog and digital
interfaces must be in compliance with the respective
nationally harmonized IEC standards (i.e. IEC 60601-1
for medical equipment.) Furthermore all configurations
shall comply with the system standard in IEC 60601-1.
Anyone who connects additional equipment to the signal
input part or signal output part is configuring a medical
system, and is therefore, responsible that the system
complies with the requirements of the system standard
IEC 60601-1. The unit is for exclusive interconnection
with IEC 60601-1 certified equipment in the patient
environment and IEC 60XXX certified equipment
out-side of the patient environment.
40 Important Safety Instructions

Additional information
Intended USER PROFILE:
Aged preference 50-70 (Intended User Profile 1):
Education: - vocational high school graduate
- major in electrical or electronic
- no maximum
Knowledge: - minimum:
- understanding the definition of voltage, current and frequency.
- understanding the definition of Class I (basic insulation) and Class II
(double insulation)
- could recognize the symbols of alternating current (AC), direct current
(DC), protective earth (ground), earth (ground), Class II equipment,
caution, operating instructions, "ON' (power) and "OFF" (power)
- no maximum
Language Skills: Languages as specified in the marketing plan for power supply.
Experience: - minimum:
- under 75 years old: training under surveillance
- other: no special experience needed
- no maximum
Permissible
Impairments:
- mild reading vision impairment or vision corrected to log MAR 0,2 (6/10
or 20/32)
- two arms / hand system capable of guiding and holding device
- average degree of aging-related short term memory impairment
- impaired by 40 % resulting in 60 % of normal hearing at 500 Hz to 2
kHz
Aged preference 30-50 (Intended User Profile 2):
Education: - vocational high school graduate
- major in electrical or electronic
- no maximum
Knowledge: - minimum:
- understanding the definition of voltage, current and frequency.
- understanding the definition of Class I (basic insulation) and Class II
(double insulation)
- could recognize the symbols of alternating current (AC), direct current
(DC), protective earth (ground), earth (ground), Class II equipment,
caution, operating instructions, "ON' (power) and "OFF" (power)
- no maximum
Language Skills: Languages as specified in the marketing plan for power supply.
Experience: - minimum:
- under 50 years old: training under surveillance
- other: no special experience needed
- no maximum
Permissible
Impairments:
- mild reading vision impairment or vision corrected to log MAR 0,2 (6/10
or 20/32)
- two arms / hand system capable of guiding and holding device
- average degree of aging-related short term memory impairment
- impaired by 40 % resulting in 60 % of normal hearing at 500 Hz to 2
kHz
Aged preference 18-30 (Intended User Profile 3):
Education: - vocational high school graduate
- major in electrical or electronic
- no maximum
Knowledge: - minimum:
- understanding the definition of voltage, current and frequency.
- understanding the definition of Class I (basic insulation) and Class II
(double insulation)
- could recognize the symbols of alternating current (AC), direct current
(DC), protective earth (ground), earth (ground), Class II equipment,
caution, operating instructions, "ON' (power) and "OFF" (power)
Language Skills: Languages as specified in the marketing plan for power supply.
Experience: - minimum:
- under 30 years old: training under surveillance
- other: no special experience needed
- no maximum
Permissible
Impairments:
- mild reading vision impairment or vision corrected to log MAR 0,2 (6/10
or 20/32)
- two arms / hand system capable of guiding and holding device
- average degree of aging-related short term memory impairment
EMC Information
Guidance and manufacturer’s declaration
–
electromagnetic emissions
The device is intended for use in the electromagnetic environment specified below. The
customer or the user of the device should assure that it is used in such an environment.
Emissions test Compliance Electromagnetic environment –
guidance
RF emissions
CISPR 11
Group 1 The device uses RF energy only
for its internal function. Therefore,
its RF emissions are very low and
are not likely to cause any
interference in nearby electronic
equipment.
RF emissions
CISPR 11
Class B The device is suitable for use in
all establishments, including
domestic establishments and
those directly connected to the
public low-voltage power supply
network that supplies buildings
used for domestic purposes.
Harmonic emissions
IEC 61000-3-2
Class A
Voltage fluctuations/
flicker emissions
IEC 61000-3-3
Complies
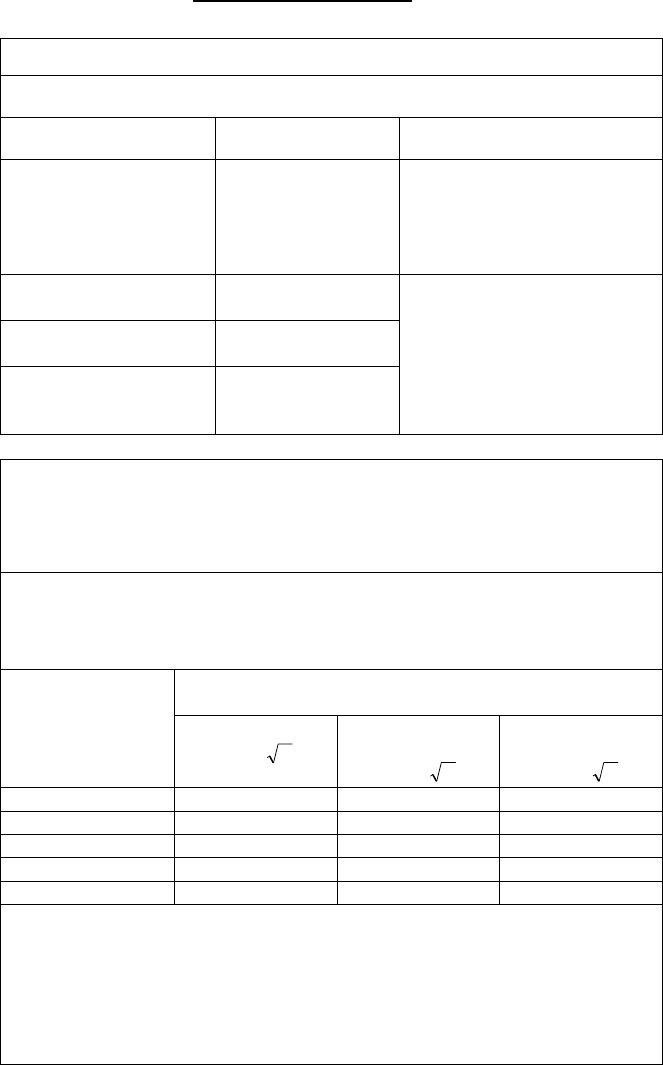
Recommended separation distances between
portable and mobile RF communications equipment and the
device
The device is intended for use in an electromagnetic environment in which radiated RF
disturbances are controlled. The customer or the user of the device can help prevent
electromagnetic interference by maintaining a minimum distance between portable and
mobile RF communications equipment (transmitters) and the device as recommended
below, according to the maximum output power of the communications equipment.
Rated maximum
output power of
transmitter
W
Separation distance according to frequency of transmitter
m
150 kHz to 80 MHz
d = 1,2 P
80 MHz to 800
MHz
d = 1,2 P
800 MHz to 2,5
GHz
d = 2,3 P
0,01 0,12 0,12 0,23
0,1 0,38 0,38 0,73
1 1,2 1,2 2,3
10 3,8 3,8 7,3
100 12 12 23
For transmitters rated at a maximum output power not listed above, the recommended
separation distance d in metres (m) can be estimated using the equation applicable to the
frequency of the transmitter, where P is the maximum output power rating of the
transmitter in watts (W) according to the transmitter manufacturer.
NOTE 1 At 80 MHz and 800 MHz, the separation distance for the higher frequency range
applies.
NOTE 2 These guidelines may not apply in all situations. Electromagnetic propagation is
affected by absorption and reflection from structures, objects and people.

Guid
ance and manufacturer’s declaration
–
electromagnetic immunity
The device is intended for use in the electromagnetic environment specified below. The
customer or the user of the device should assure that it is used in such an environment.
Immunity test IEC 60601
test level
Compliance level
Electromagnetic
environment –
guidance
Electrostatic
discharge (ESD)
IEC 61000-4-2
±6 kV contact
±8 kV air
±6 kV contact
±8 kV air
Floors should be wood,
concrete or ceramic tile.
If floors are covered
with synthetic material,
the relative humidity
should be at least 30 %.
Electrical fast
transient/burst
IEC 61000-4-4
±2 kV for power
supply lines
±1 kV for
input/output
lines
±2 kV for power
supply lines
±1 kV for
input/output
lines
Mains power quality
should be that of a
typical commercial or
hospital environment.
Surge
IEC 61000-4-5
±1 kV line(s) to
line(s)
±2 kV line(s) to
earth
±1 kV line(s) to
line(s)
±2 kV line(s) to
earth
Mains power quality
should be that of a
typical commercial or
hospital environment.
interruptions and
voltage variations
on power supply
input lines
IEC 61000-4-11
<5 % UT
(>95 % dip in UT)
for 0,5 cycle
40 % UT
(60 % dip in UT)
for 5 cycles
70 % UT
(30 % dip in UT)
for 25 cycles
<5 % UT
(>95 % dip in UT)
for 5 sec
<5 % UT
(>95 % dip in UT)
for 0,5 cycle
40 % UT
(60 % dip in UT)
for 5 cycles
70 % UT
(30 % dip in UT)
for 25 cycles
<5 % UT
(>95 % dip in UT)
for 5 sec
Mains power quality
should be that of a
typical commercial or
hospital environment. If
the user of the device
requires continued
operation during power
mains interruptions, it is
recommended that the
device be powered from
an uninterruptible power
supply or a battery.
Power frequency
(50/60 Hz)
magnetic field
IEC 61000-4-8
3 A/m
3 A/m
Power frequency
magnetic fields should
be at levels
characteristic of a
typical location in a
typical commercial or
hospital environment.
NOTE UT is the a.c. mains voltage prior to application of the test level.
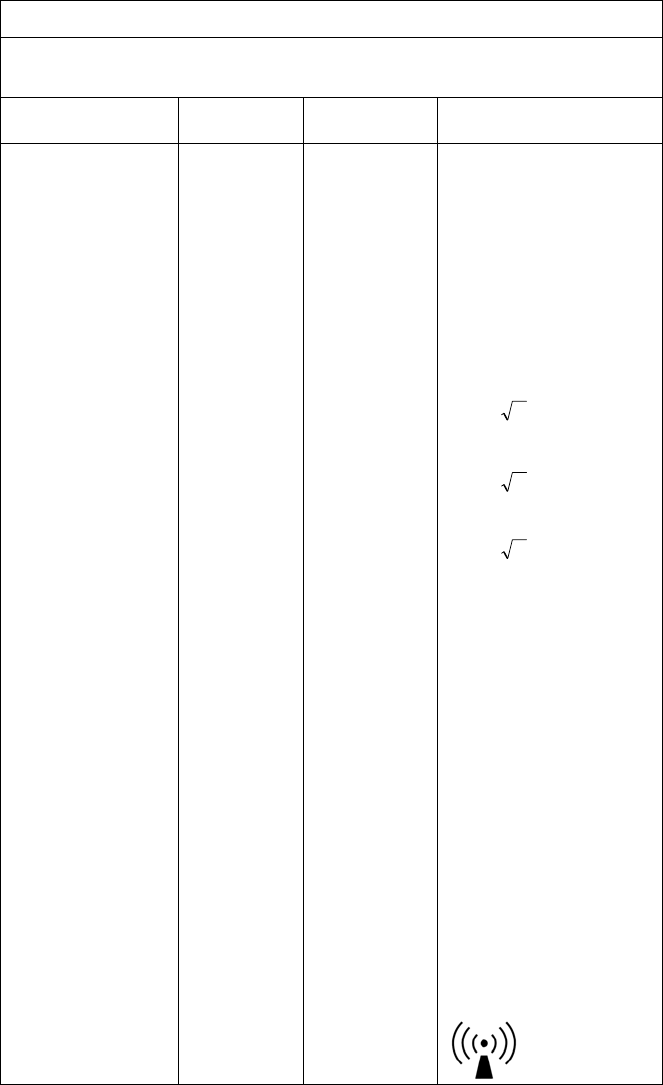
Guidance and manufacturer’s declaration
–
electromagnetic immu
nity
The model device is intended for use in the electromagnetic environment specified below.
The customer or the user of the model device should assure that it is used in such an
environment.
Immunity test IEC 60601
test level
Compliance
level
Electromagnetic
environment – guidance
Conducted RF
IEC 61000-4-6
Radiated RF
IEC 61000-4-3
3 Vrms
150 kHz to 80
MHz
3 V/m
80 MHz to 2,5
GHz
3 Vrms
3 V/m
Portable and mobile RF
communications equipment
should be used no closer to
any part of the device,
including cables, than the
recommended separation
distance calculated from the
equation applicable to the
frequency of the transmitter.
Recommended separation
distance
d = 1,2 P
d = 1,2 P 80 MHz to 800
MHz
d = 2,3 P 800 MHz to 2,5
GHz
where P is the maximum
output power rating of the
transmitter in watts (W)
according to the transmitter
manufacturer and d is the
recommended separation
distance in metres (m).
Field strengths from fixed
RF transmitters, as
determined by an
electromagnetic site survey,
a should be less than the
compliance level in each
frequency range. b
Interference may occur in
the vicinity of equipment
marked with the following
symbol:

NOTE 1 At 80 MHz and 800 MHz, the higher frequency range applies.
NOTE 2 These guidelines may not apply in all situations. Electromagnetic propagation is
affected by absorption
and reflection from structures, objects and people.
a
Field strengths from fixed transmitters, such as base stations for radio
(cellular/cordless) telephones and land mobile radios, amateur radio, AM and FM radio
broadcast and TV broadcast cannot be predicted theoretically with accuracy. To assess
the electromagnetic environment due to fixed RF transmitters, an electromagnetic site
survey should be considered. If the measured field strength in the location in which the
device is used exceeds the applicable RF compliance level above, the device should be
observed to verify normal operation. If abnormal performance is observed, additional
measures may be necessary, such as reorienting or relocating the device.
b Over the frequency range 150 kHz to 80 MHz, field strengths should be less than 3
V/m.
Federal Communication Commission Interference Statement
This equipment has been tested and found to comply with the limits for a Class B digital
device, pursuant to Part 15 of the FCC Rules. These limits are designed to provide
reasonable protection against harmful interference in a residential installation. This
equipment generates, uses and can radiate radio frequency energy and, if not installed and
used in accordance with the instructions, may cause harmful interference to radio
communications. However, there is no guarantee that interference will not occur in a
particular installation. If this equipment does cause harmful interference to radio or
television reception, which can be determined by turning the equipment off and on, the user
is encouraged to try to correct the interference by one of the following measures:
Reorient or relocate the receiving antenna.
Increase the separation between the equipment and receiver.
Connect the equipment into an outlet on a circuit different from that to which the
receiver is connected.
Consult the dealer or an experienced radio/TV technician for help.
This device complies with Part 15 of the FCC rules. Operation is subject to the
following two conditions: (1) this device may not cause harmful interference, and (2)
this device must accept any interference received, including interference that may
cause undesired operation.
This device and its antenna(s) must not be co-located or operating in conjunction with
any other antenna or transmitter.
Any changes or modifications not expressly approved by the party responsible for
compliance could void the user's authority to operate this equipment.
FCC RF Radiation Exposure Statement:
This equipment complies with FCC RF radiation exposure limits set forth for an uncontrolled
environment for body-worn configuration in direct contact to the phantom.
This device complies with FCC radiation exposure limits set forth for an uncontrolled
environment.
RF Exposure Information (SAR)
This device meets the government’s requirements for exposure to radio waves. This device
is designed and manufactured not to exceed the emission limits for exposure to radio
frequency (RF) energy set by the Federal Communications Commission of the U.S.
Government.
The exposure standard for wireless devices employing a unit of measurement is known as
the Specific Absorption Rate, or SAR. The SAR limit set by the FCC is 1.6W/kg.
The FCC has granted an Equipment Authorization for this device with all reported SAR
levels evaluated as in compliance with the FCC RF exposure guidelines. SAR information on
this device is on file with the FCC and can be found under the Display Grant section of
www.fcc.gov/oet/ea/fccid after searching on FCC ID: X4D-IMT-BT.

Getting Service 41
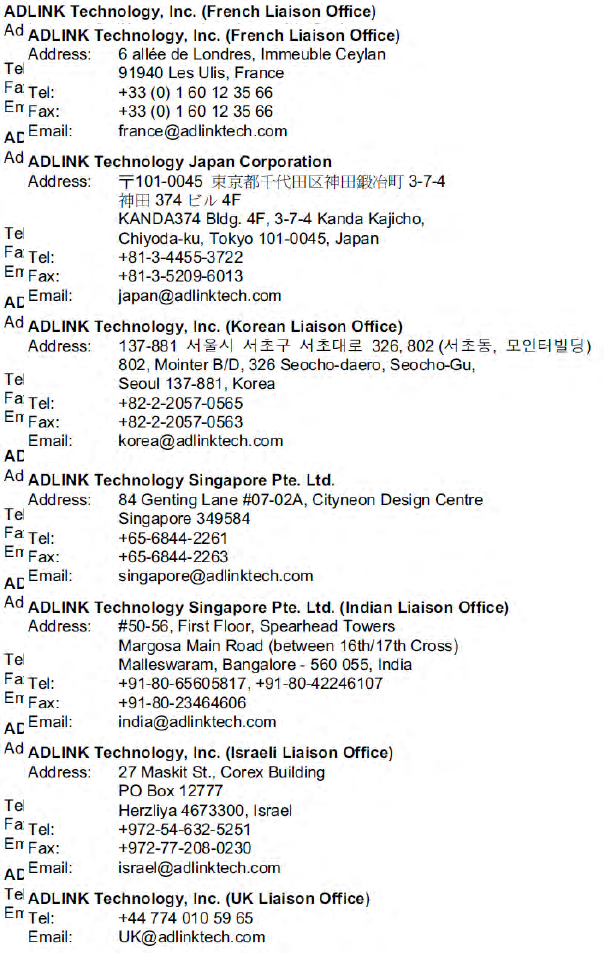
42 Getting Service