Users Manual

6304W ONU Gateway
Configuration Guide
Version 1.01
ubiQuoss Inc.
www.ubiQuoss.com
Specifications and product availability are subject to change without notice.
© 2017 ubiQuoss. All rights reserved.

6304W Configuration Guide
Contents
CHAPTER 1 Getting Started . . . . . . . . . . . . . . . . . . . . . . . . . . . . . . . . . . . .1
CHAPTER 2 Logging into the Web GUI . . . . . . . . . . . . . . . . . . . . . . . . . . .3
CHAPTER 3 Viewing Device Information . . . . . . . . . . . . . . . . . . . . . . . . .7
CHAPTER 4 Viewing WAN Interface Information. . . . . . . . . . . . . . . . . . .9
CHAPTER 5 Configuring WAN Interfaces . . . . . . . . . . . . . . . . . . . . . . . .11
CHAPTER 6 Configuring Wi-Fi . . . . . . . . . . . . . . . . . . . . . . . . . . . . . . . .15
CHAPTER 7 Viewing Wi-Fi Information . . . . . . . . . . . . . . . . . . . . . . . . .19
CHAPTER 8 Configuring Voice Service . . . . . . . . . . . . . . . . . . . . . . . . . .21
CHAPTER 9 Configuring NTP . . . . . . . . . . . . . . . . . . . . . . . . . . . . . . . . .25
CHAPTER 10 Configuring Static Routing. . . . . . . . . . . . . . . . . . . . . . . . . .27
CHAPTER 11 Restarting the Device . . . . . . . . . . . . . . . . . . . . . . . . . . . . . .31
CHAPTER 12 Reverting to the Default Setting . . . . . . . . . . . . . . . . . . . . . .33
CHAPTER 13 Upgrading Software . . . . . . . . . . . . . . . . . . . . . . . . . . . . . . .35
CHAPTER 14 Configuring Backups . . . . . . . . . . . . . . . . . . . . . . . . . . . . . .37


6304W Configuration Guide 1
CHAPTER 1 Getting Started
Default Settings
The following table lists the default settings for the four WAN interfaces to provide
triple play services.
TABLE 1-1. Default Settings
Interface Type VLAN Binding LAN Ports Service
1_TR069_R_VID_400 IPoE 400 TR-069
2_VOICE_R_VID_200 IPoE 200 PHONE1, PHONE2 Voice
3_INTERNET_R_VID_100 IPoE 100 LAN1, Wireless(2.4G/
5G)
Internet
4_OTHER_B_VID_300 Bridge 300 LAN2, LAN3, LAN4 IPTV
Getting Started
26304W Configuration Guide
FIGURE 1-1. Rear View

6304W Configuration Guide 3
CHAPTER 2 Logging into the Web GUI
Logging into the Web GUI
Follow these steps to log into the web GUI.
1Connect your device to LAN 1 or Wireless.
2Launch a web browser.
3Connect to 192.168.1.1. A login screen displays.
4Enter the user name and password. User names and passwords are case-sensi-
tive.
TABLE 2-1. User Names and Default Passwords
Administrator User
User Name admin useradmin
Default Password admin useradmin

Logging into the Web GUI
46304W Configuration Guide
FIGURE 2-1. Login Screen
Changing Passwords
Follow these steps to change a password.
1Connect your device to LAN 1 or Wireless.
2Launch a web browser.
3Connect to 192.168.1.1. A login screen displays.
4Enter the user name and password. The home screen displays.
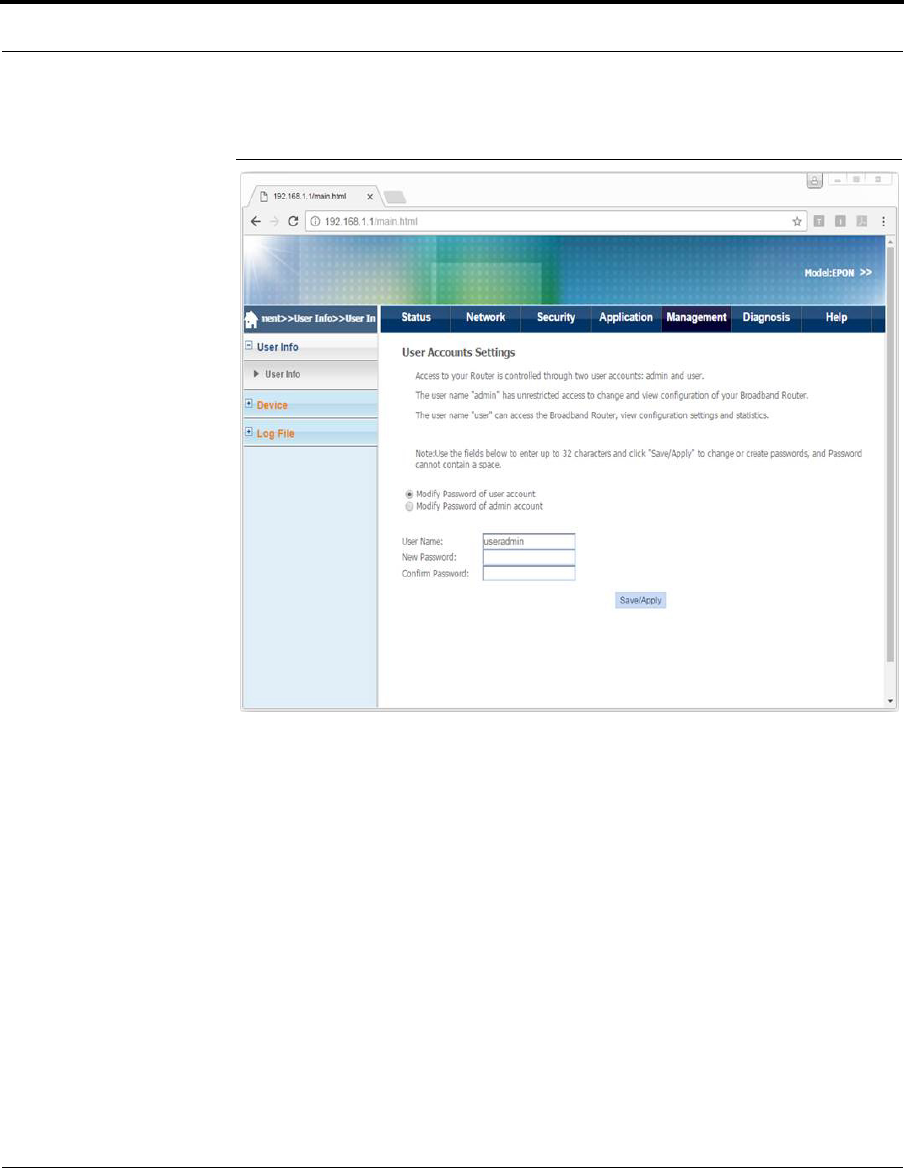
5Select Management > User Info > User Info.
6304W Configuration Guide 5
Changing Passwords
FIGURE 2-2. User Info
6Select whether to change the user or admin password.
7Enter the user name, the new password, and then confirm the password.
8Click Save/Apply.

6304W Configuration Guide 7
CHAPTER 3 Viewing Device Information
Viewing Device Information
Follow these steps to view device information.
1Connect your device to LAN 1 or Wireless.
2Launch a web browser.
3Connect to 192.168.1.1. A login screen displays.
4Enter the user name and password. The home screen displays.
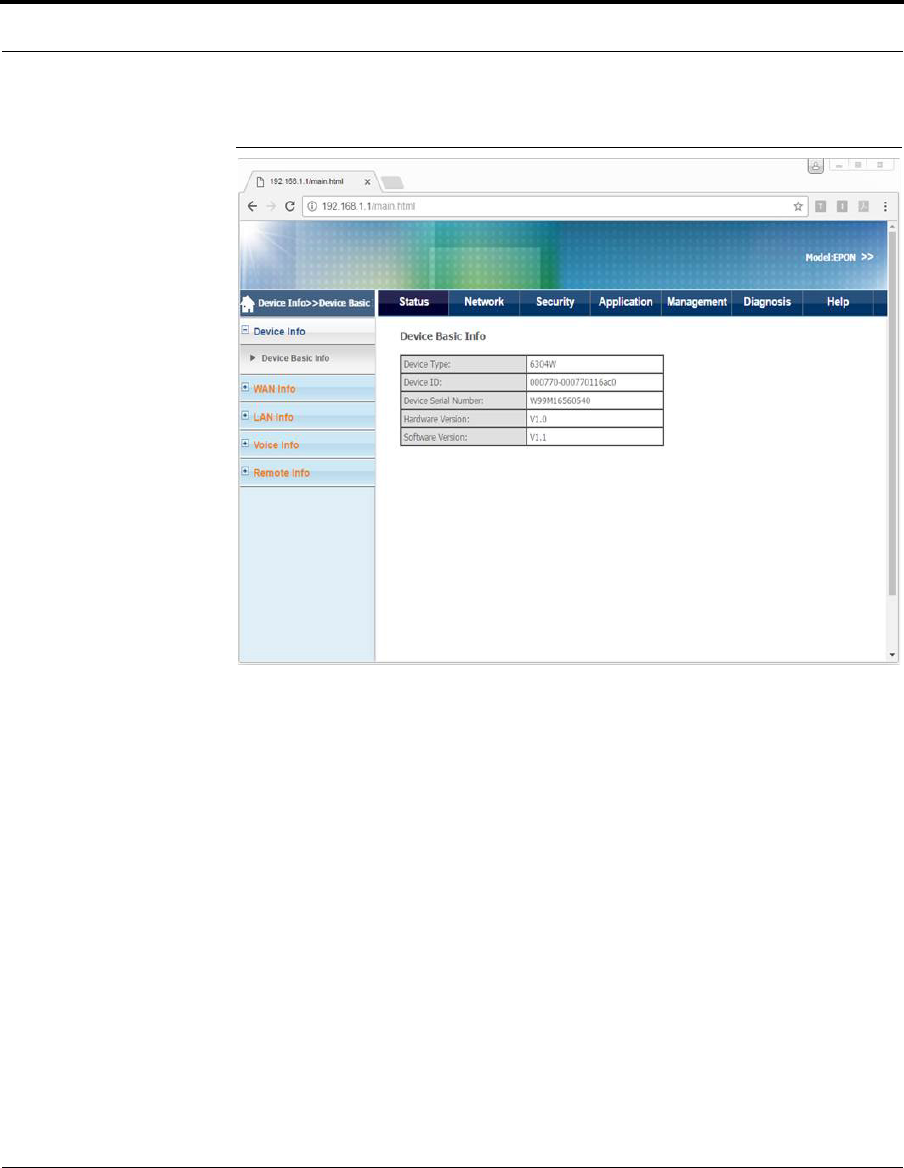
5Select Status > Device Info > Device Basic Info. You can view the device type,
device ID, hardware version, and software version.
Viewing Device Information
86304W Configuration Guide
FIGURE 3-1. Device Basic Info

6304W Configuration Guide 9
CHAPTER 4 Viewing WAN Interface Information
Viewing WAN Interface Information
Follow these steps to view WAN interface information.
1Connect your device to LAN 1 or Wireless.
2Launch a web browser.
3Connect to 192.168.1.1. A login screen displays.
4Enter the user name and password. The home screen displays.
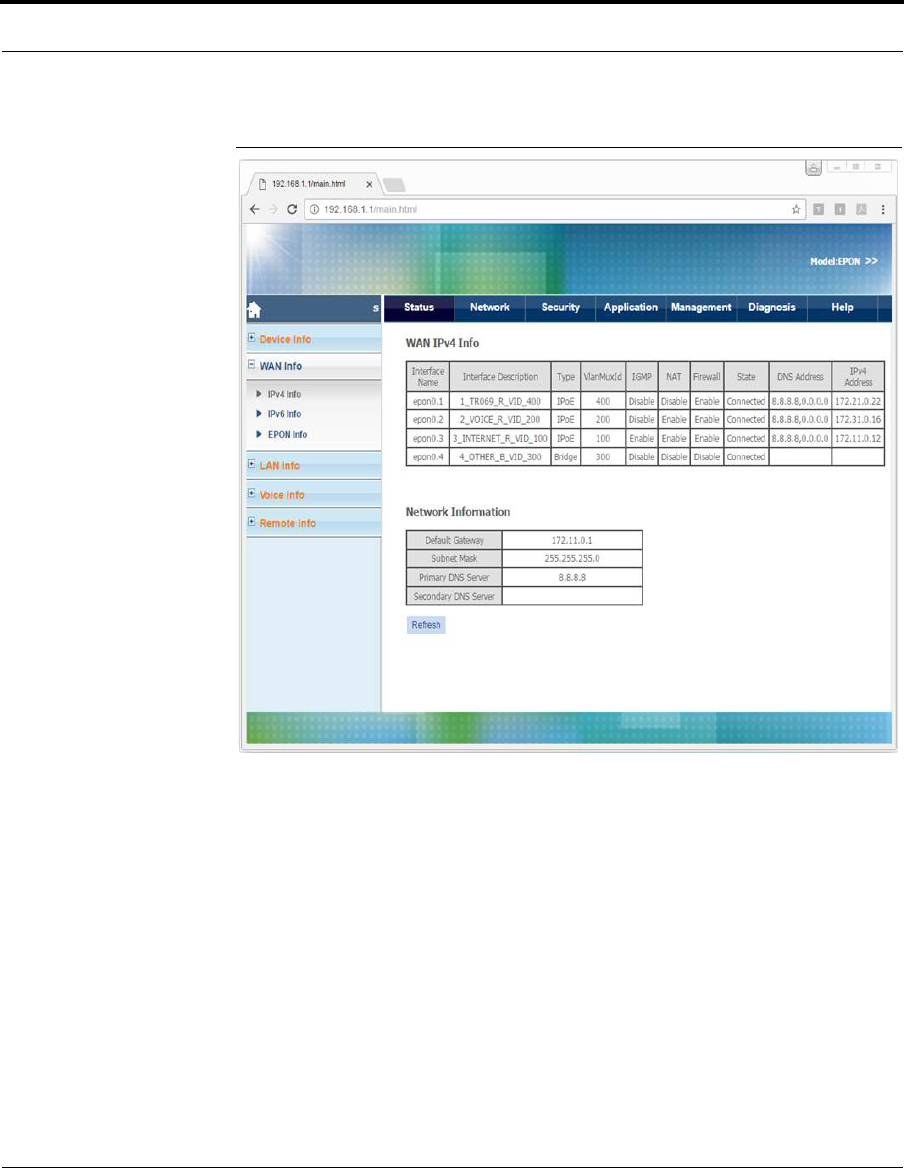
5Select Status > WAN Info > IPv4 Info. You can view the interface description,
type, state, DNS address, and IPv4 address.
Viewing WAN Interface Information
10 6304W Configuration Guide
FIGURE 4-1. IPv4 Info

6304W Configuration Guide 11
CHAPTER 5 Configuring WAN Interfaces
Configuring WAN Interfaces
Follow these steps to configure a WAN interface.
1Connect your device to LAN 1 or Wireless.
2Launch a web browser.
3Connect to 192.168.1.1. A login screen displays.
4Enter the user name and password. The home screen displays.
5Select Network > WAN > WAN Connection. You can add, modify or delete
WAN connection settings.
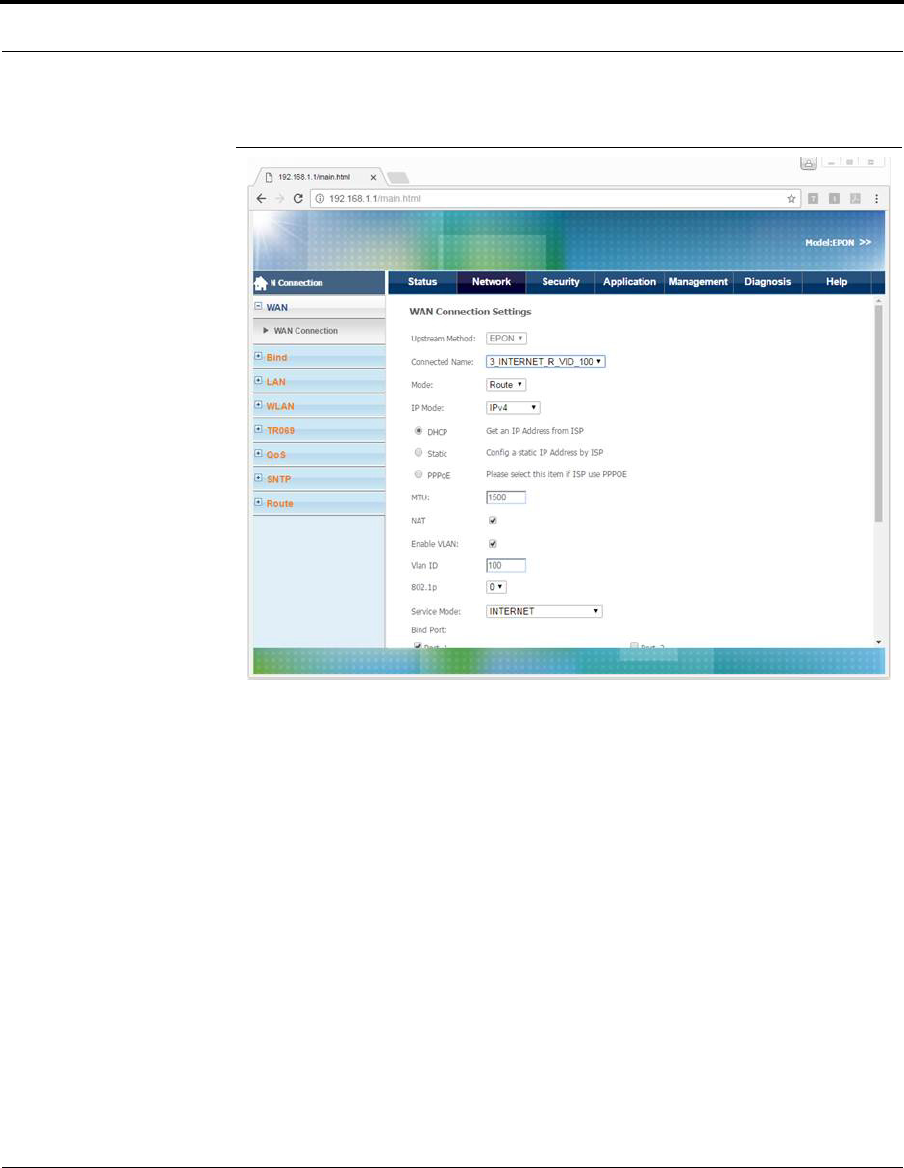
Configuring WAN Interfaces
12 6304W Configuration Guide
FIGURE 5-1. WAN Connection
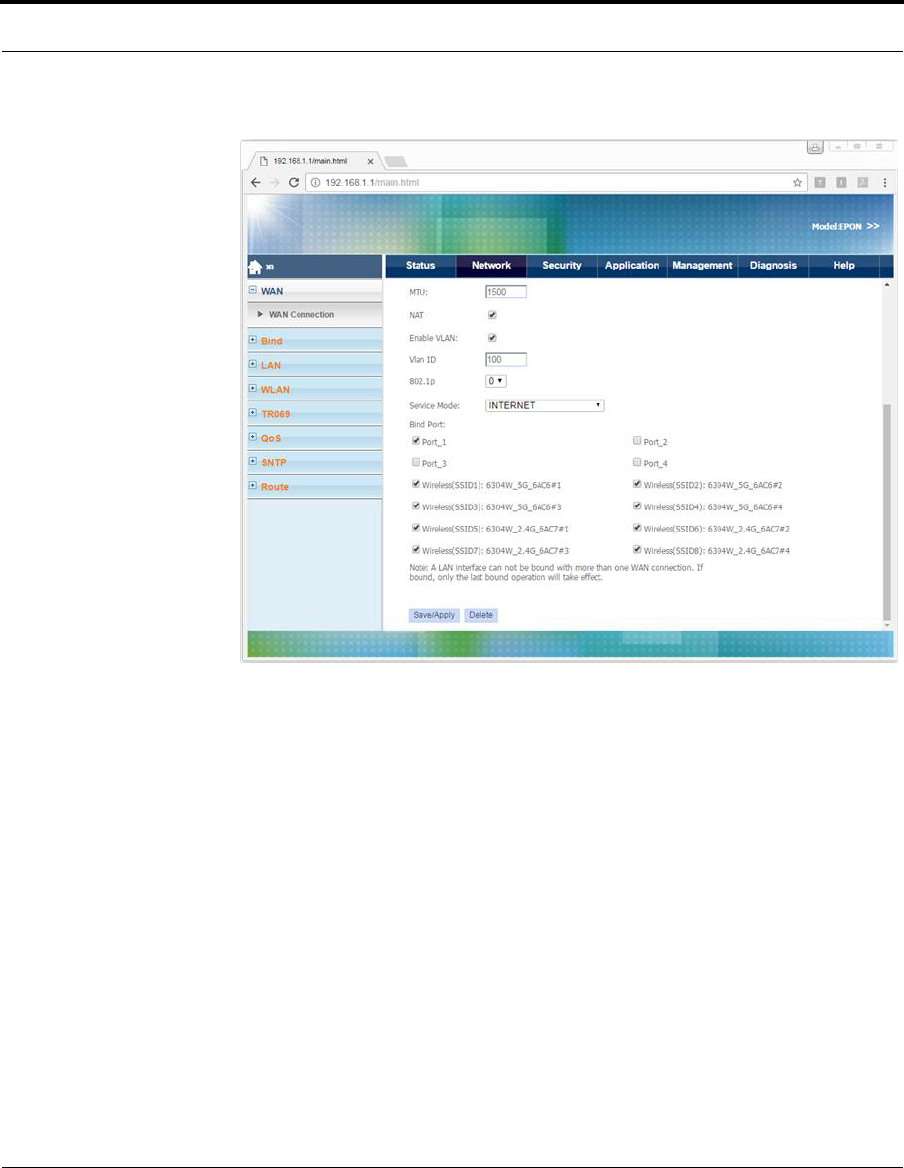
6304W Configuration Guide 13
Configuring WAN Interfaces
•Connection Name
To add a new WAN connection, select Add new WAN.
To modify or delete a WAN connection, select the WAN connection.
•Service Mode
Select from Internet (nat), VoIP (voice), and Other (bridge).
•Binding Port
Select the LAN port to bind to the WAN interface.

Configuring WAN Interfaces
14 6304W Configuration Guide

6304W Configuration Guide 15
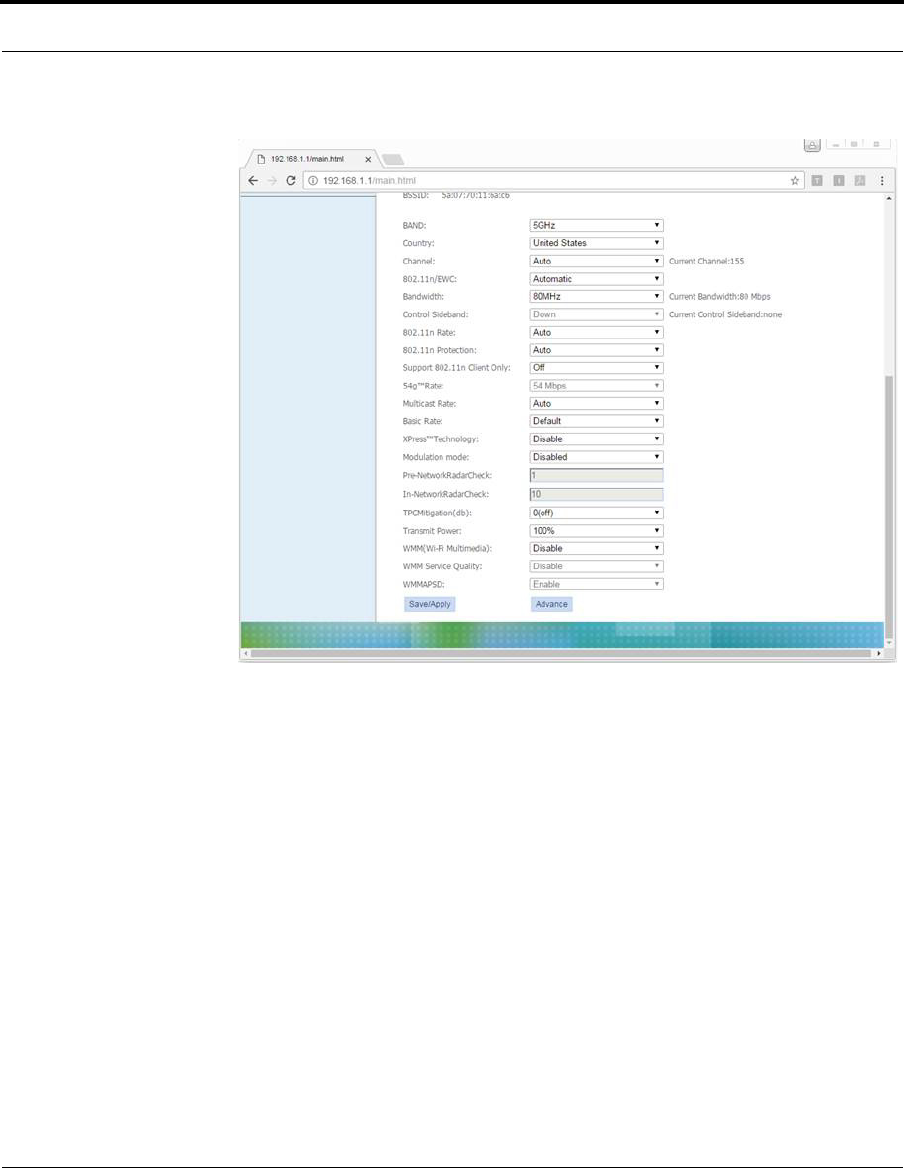
CHAPTER 6 Configuring Wi-Fi
Configuring Wi-Fi
Follow these steps to configure Wi-Fi.
1Connect your device to LAN 1 or Wireless.
2Launch a web browser.
3Connect to 192.168.1.1. A login screen displays.
4Enter the user name and password. The home screen displays.
5Select Network > WLAN > WLAN. You can configure basic Wi-Fi features.
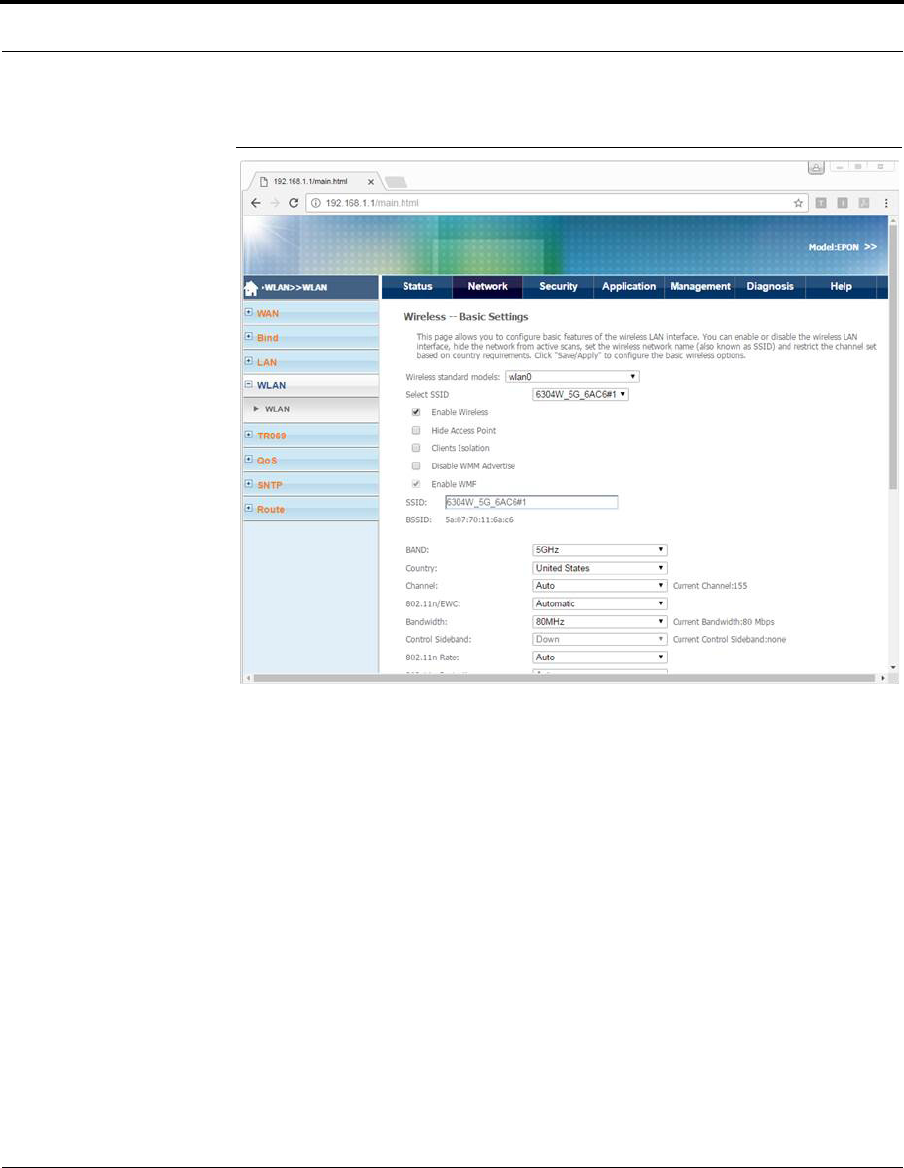
Configuring Wi-Fi
16 6304W Configuration Guide
FIGURE 6-1. WLAN
6304W Configuration Guide 17
Configuring Wi-Fi
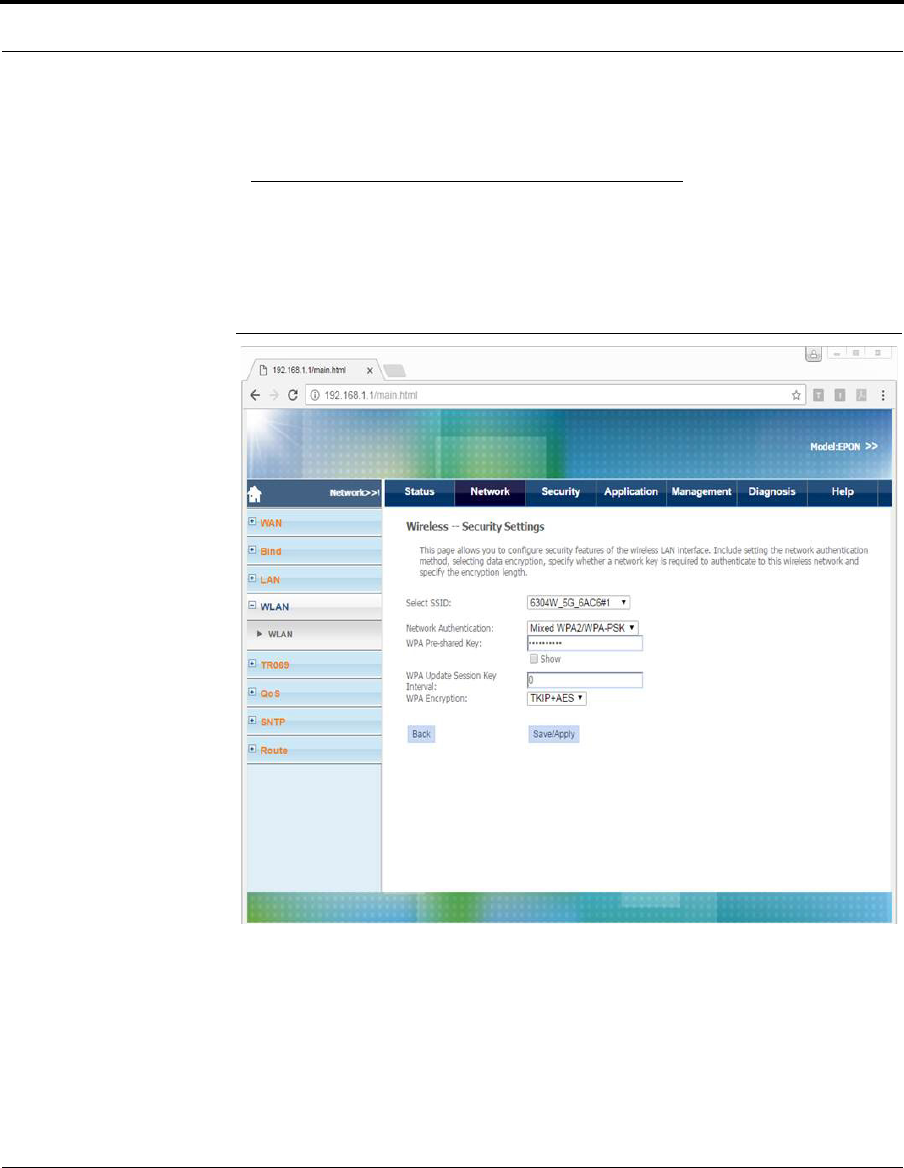
Changing the Wi-Fi Password
Follow these steps to change the Wi-Fi password.
1Connect your device to LAN 1 or Wireless.
2Launch a web browser.
3Connect to 192.168.1.1. A login screen displays.
4Enter the user name and password. The home screen displays.
5Select Network > WLAN > WLAN.
6Click Advance. Security Settings are displayed.
7Select the SSID to change the password for.
The following table lists the default Wi-Fi passwords.
Configuring Wi-Fi
18 6304W Configuration Guide
FIGURE 6-2. Wi-Fi Security Settings
TABLE 6-1. Default Wi-Fi Passwords
Wi-Fi Password
5GHz 1234567890
2.4GHz 12345678

6304W Configuration Guide 19
CHAPTER 7 Viewing Wi-Fi Information
Viewing Wi-Fi Information
Follow these steps to configure Wi-Fi.
1Connect your device to LAN 1 or Wireless.
2Launch a web browser.
3Connect to 192.168.1.1. A login screen displays.
4Enter the user name and password. The home screen displays.
5Select Network > LAN Info> WLAN Info.
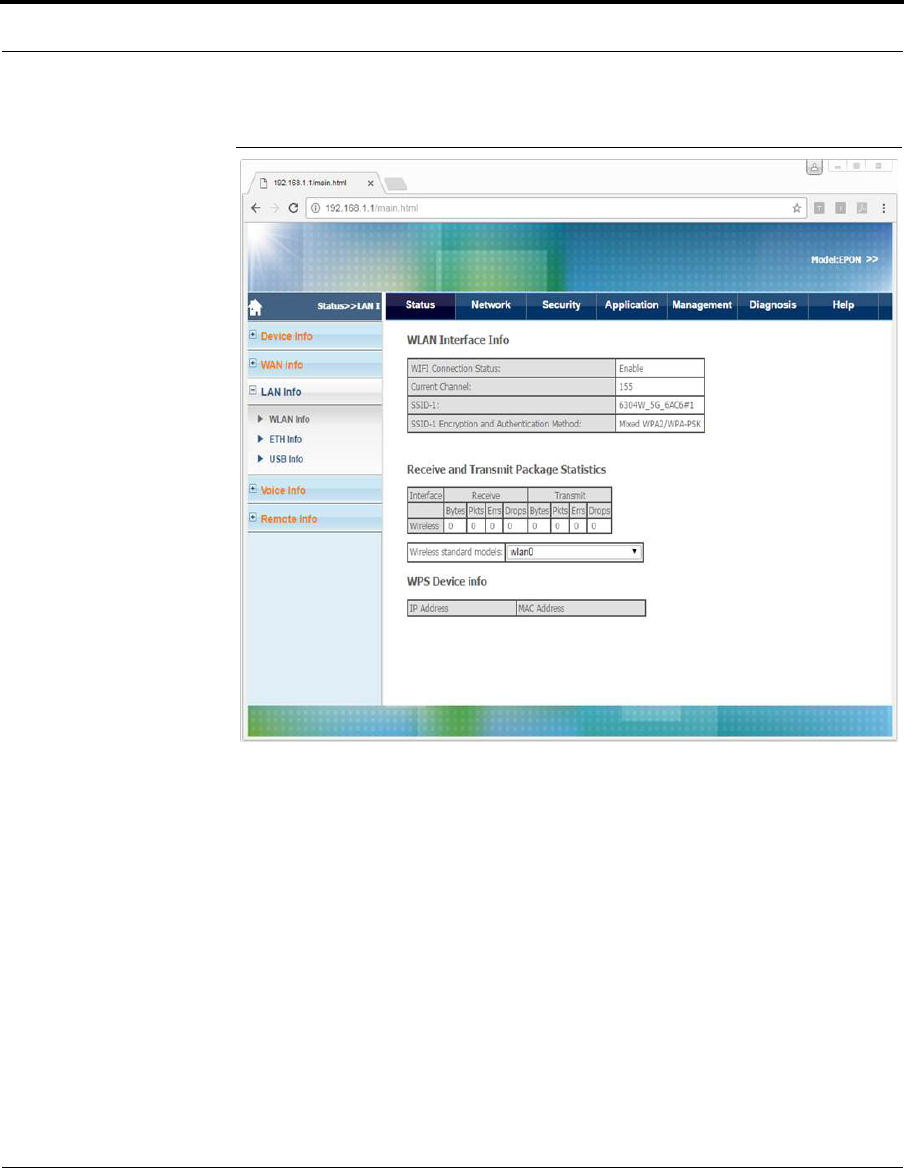
Viewing Wi-Fi Information
20 6304W Configuration Guide
FIGURE 7-1. WLAN Info
•WLAN Interface Info
Displays Wi-Fi interface information.
•WPS Device Info
Displays wireless devices connected to the ONU using the WPS button.

6304W Configuration Guide 21
CHAPTER 8 Configuring Voice Service
Configuring Voice Service
Follow these steps to configure voice service.
1Connect your device to LAN 1 or Wireless.
2Launch a web browser.
3Connect to 192.168.1.1. A login screen displays.
4Enter the user name and password. The home screen displays.
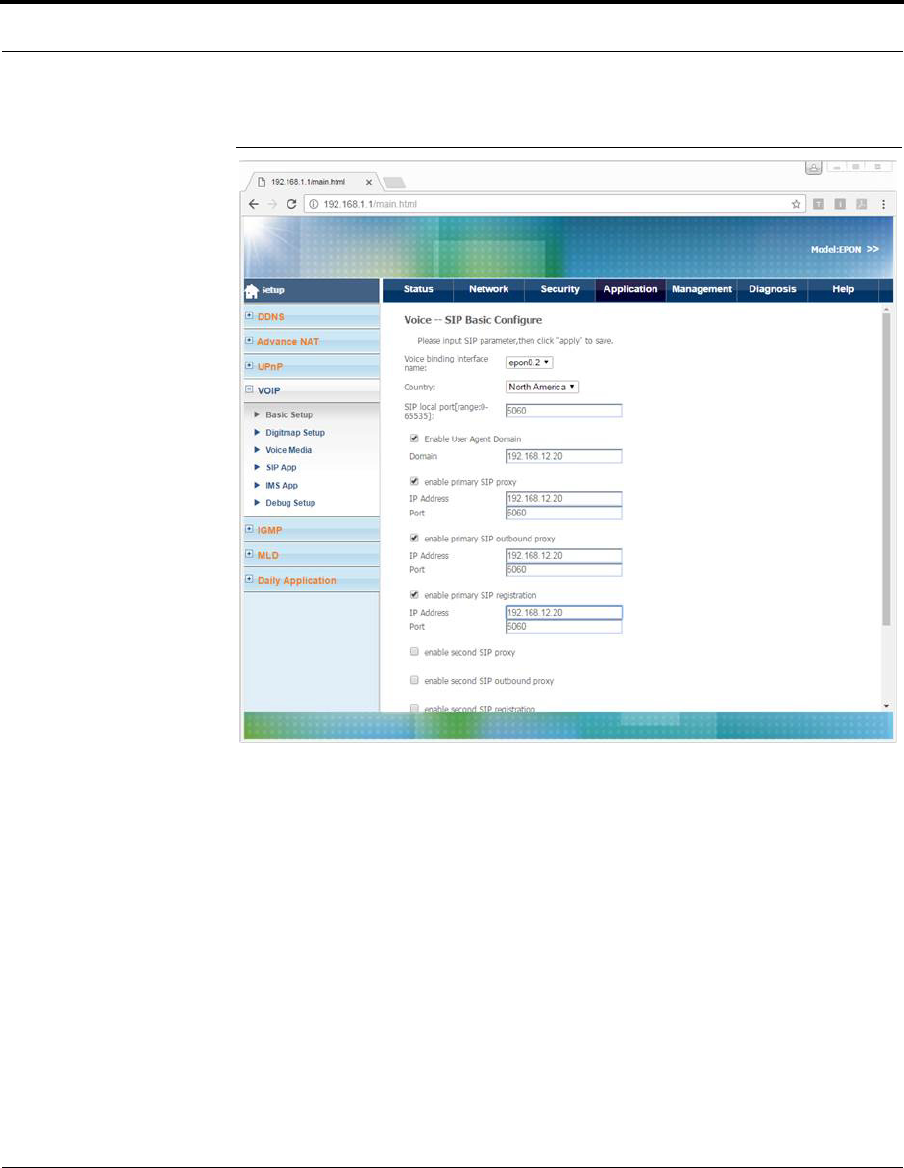
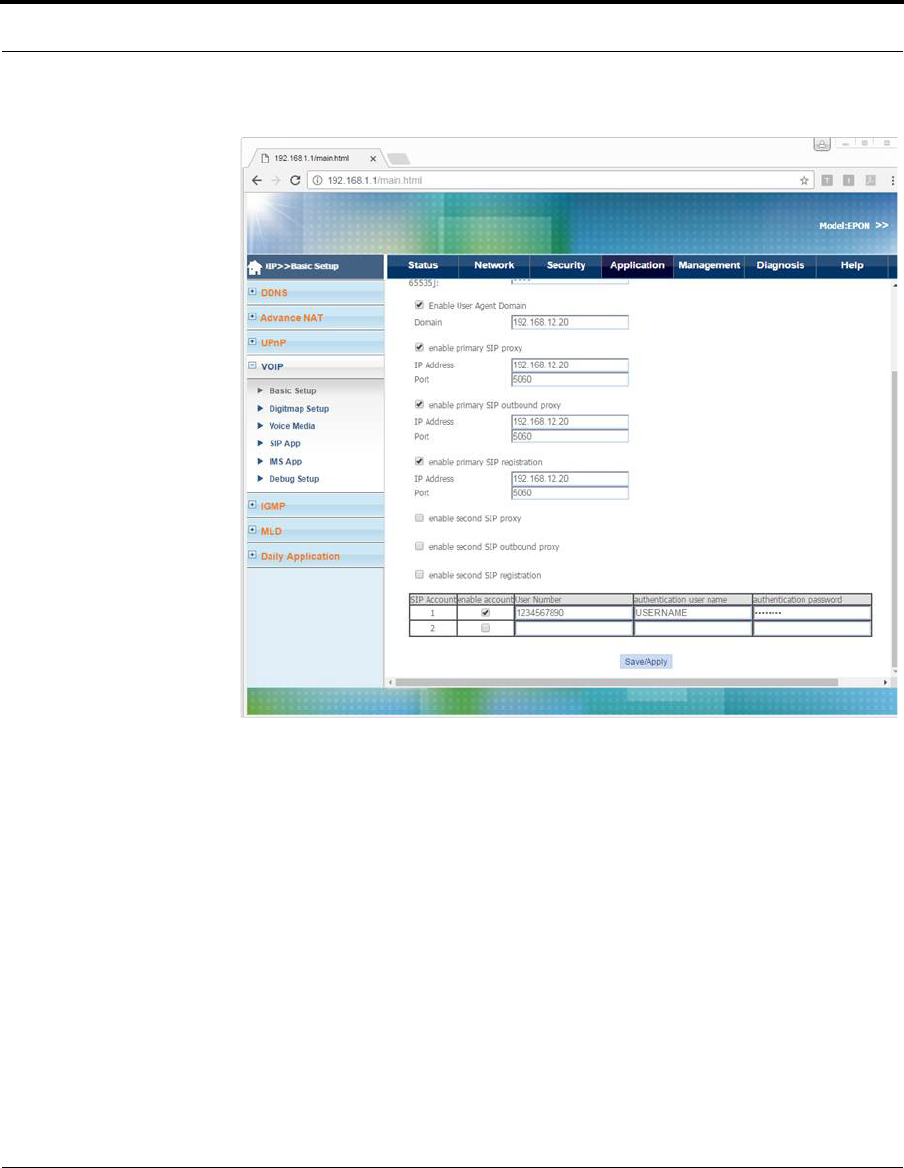
5Select Application > VoIP > Basic Setup. You can configure SIP parameters and
enable or disable SIP accounts.
Configuring Voice Service
22 6304W Configuration Guide
FIGURE 8-1. VoIP > Basic Setup
6304W Configuration Guide 23
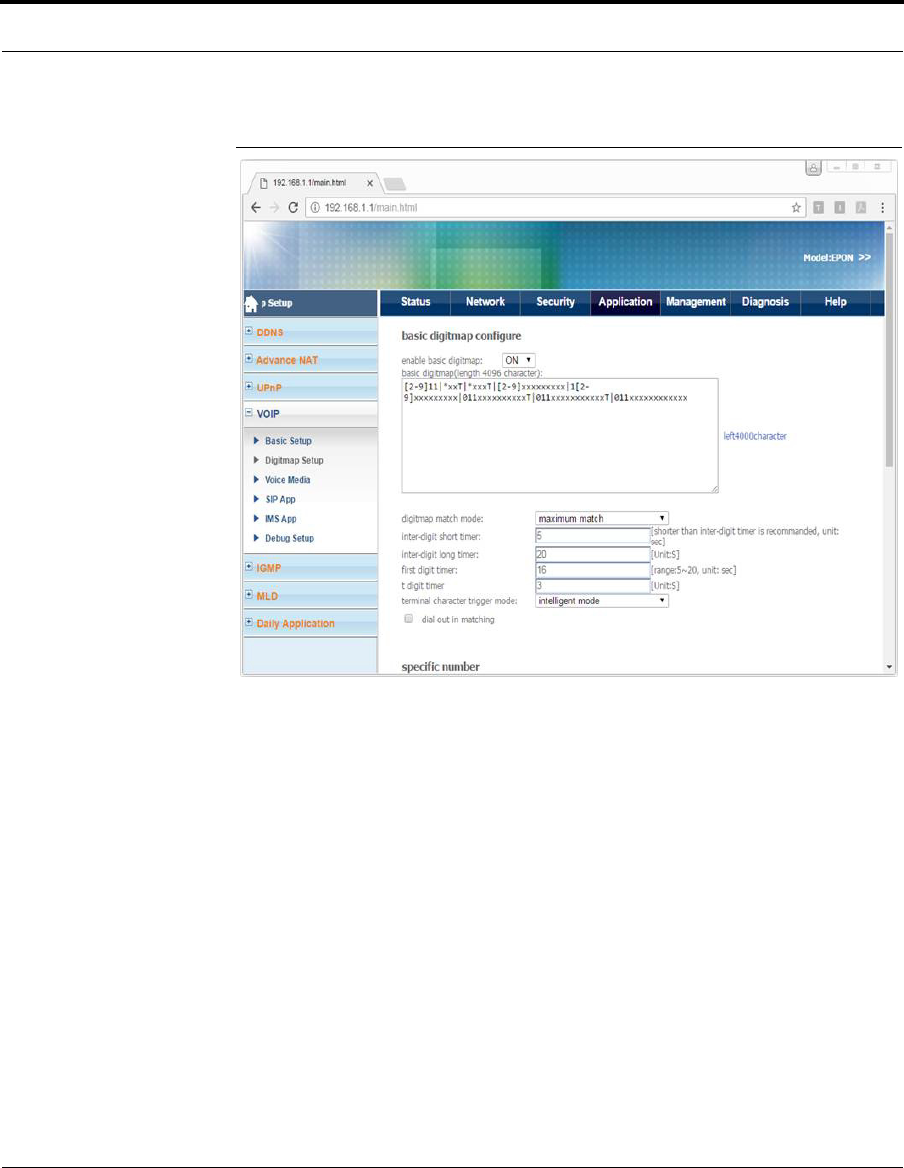
Configuring Voice Service
Configuring Dial Plans
Follow these steps to configure a dial plan.
1Connect your device to LAN 1 or Wireless.
2Launch a web browser.
3Connect to 192.168.1.1. A login screen displays.
4Enter the user name and password. The home screen displays.
5Select Application > VoIP > Digitmap Setup.
Configuring Voice Service
24 6304W Configuration Guide
FIGURE 8-2. VoIP > Digitmap Setup

6304W Configuration Guide 25
CHAPTER 9 Configuring NTP
Configuring NTP
Follow these steps to configure NTP.
1Connect your device to LAN 1 or Wireless.
2Launch a web browser.
3Connect to 192.168.1.1. A login screen displays.
4Enter the user name and password. The home screen displays.
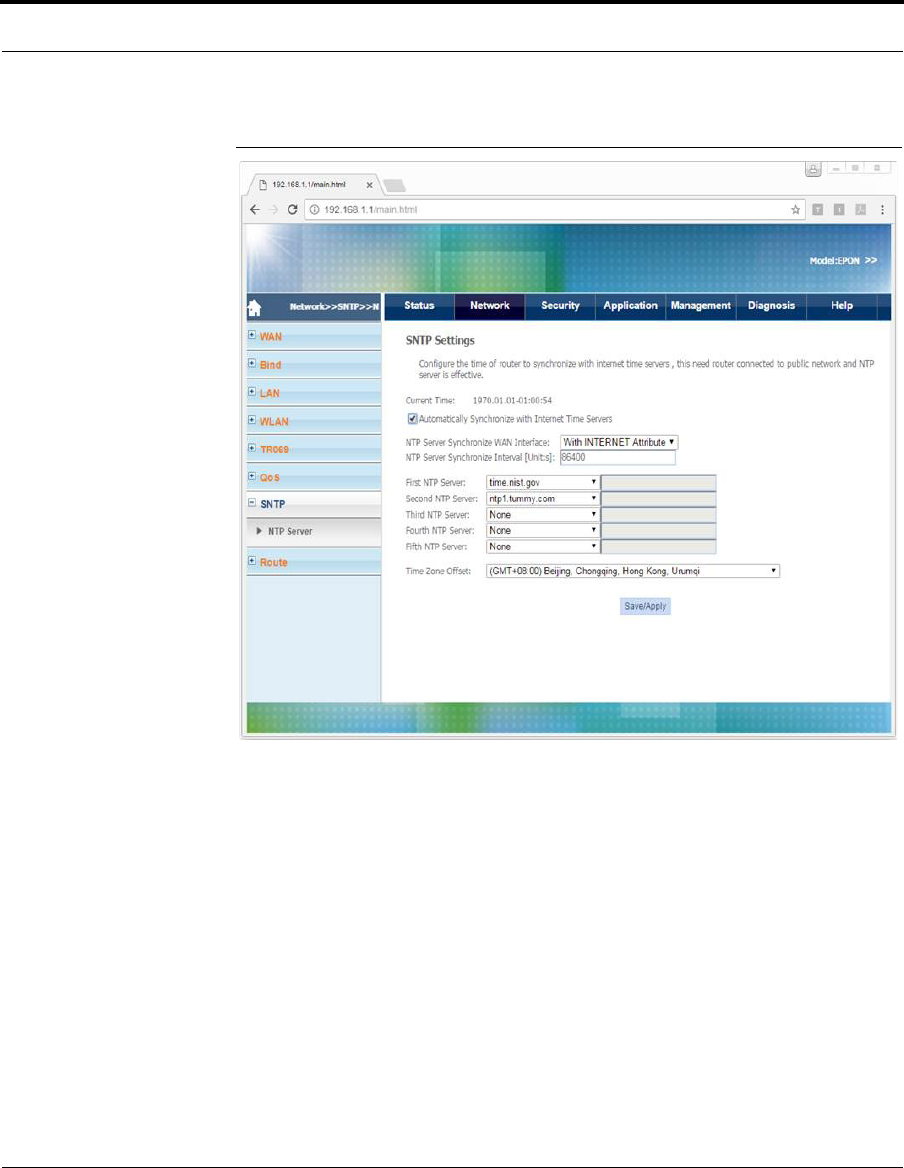
5Select Network > SNTP > NTP Server. You can configure the ONU to
synchronize local time with internet time servers.
Configuring NTP
26 6304W Configuration Guide
FIGURE 9-1. SNTP

6304W Configuration Guide 27
CHAPTER 10 Configuring Static Routing
Configuring Static Routing
Follow these steps to configure static routing.
1Connect your device to LAN 1 or Wireless.
2Launch a web browser.
3Connect to 192.168.1.1. A login screen displays.
4Enter the user name and password. The home screen displays.
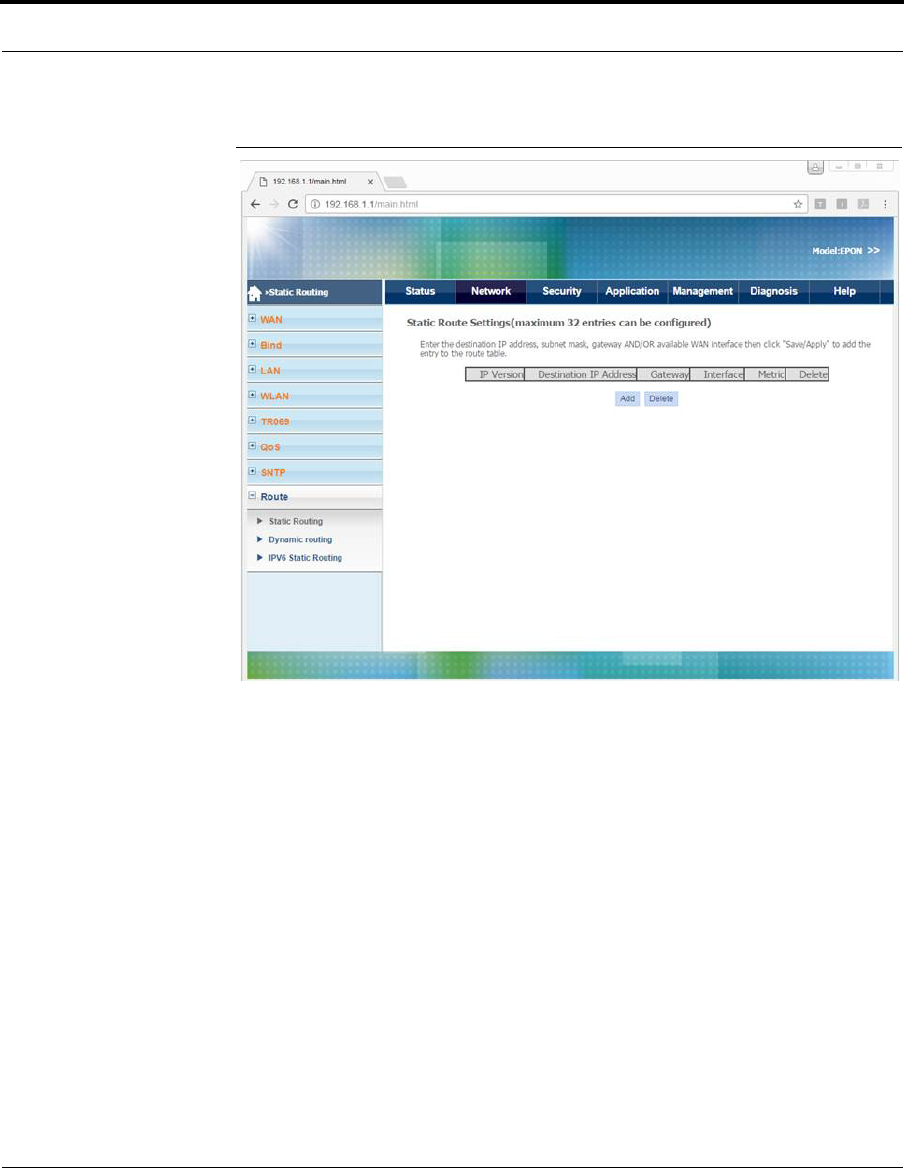
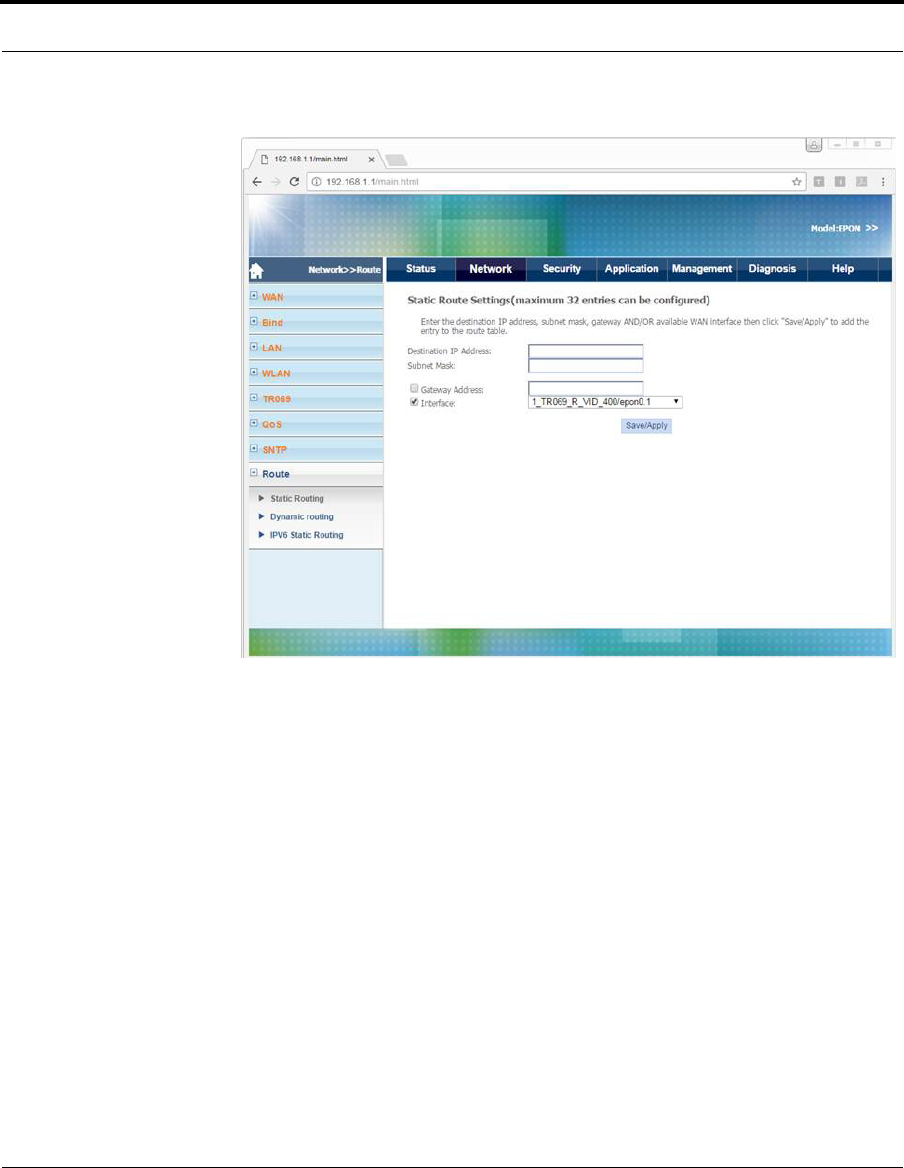
5Select Network > Route > Static Routing. You can configure or delete a static
route.
Configuring Static Routing
28 6304W Configuration Guide
FIGURE 10-1. Route > Static Routing
6304W Configuration Guide 29
Configuring Static Routing

6304W Configuration Guide 31
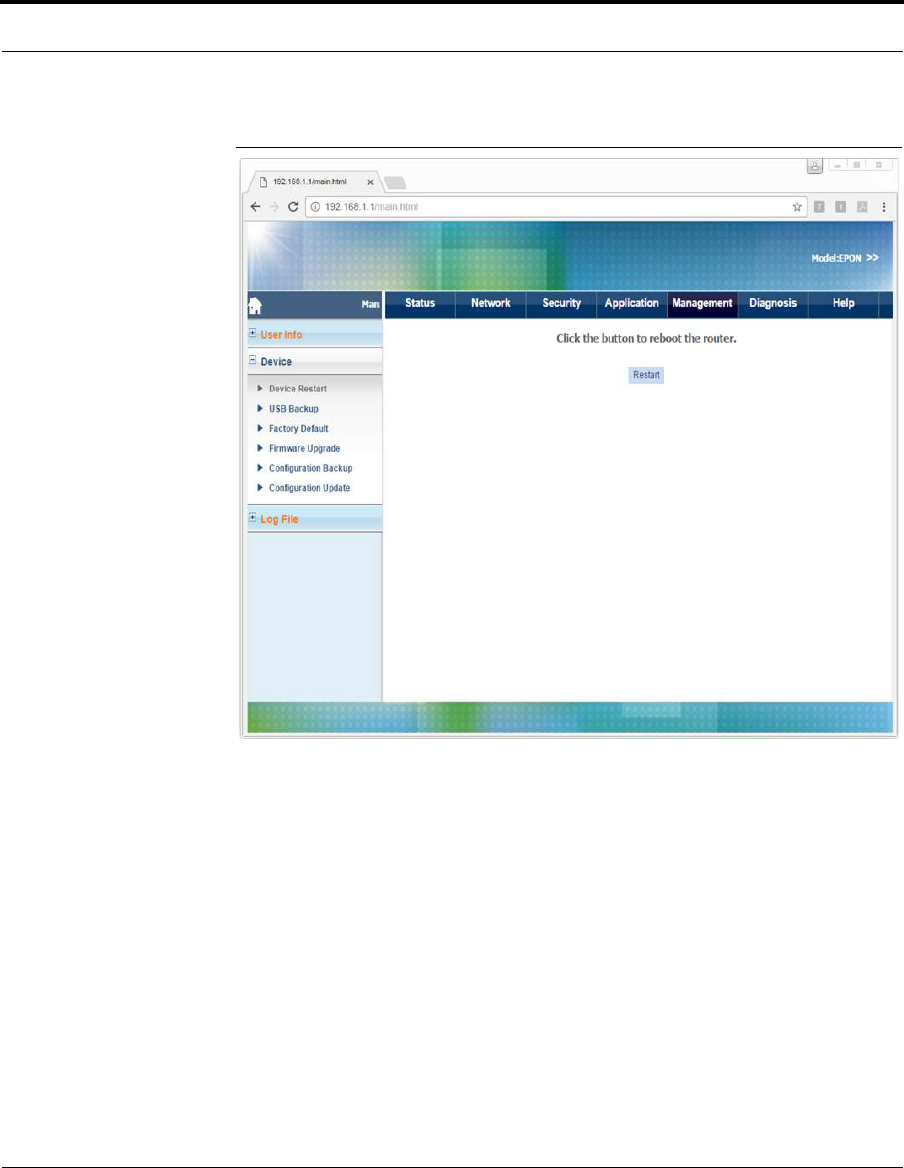
CHAPTER 11 Restarting the Device
Restarting the Device
Follow these steps to restart the device.
1Connect your device to LAN 1 or Wireless.
2Launch a web browser.
3Connect to 192.168.1.1. A login screen displays.
4Enter the user name and password. The home screen displays.
5Select Management > Device> Device Restart.
6Click Restart.
Restarting the Device
32 6304W Configuration Guide
FIGURE 11-1. Device Restart

6304W Configuration Guide 33
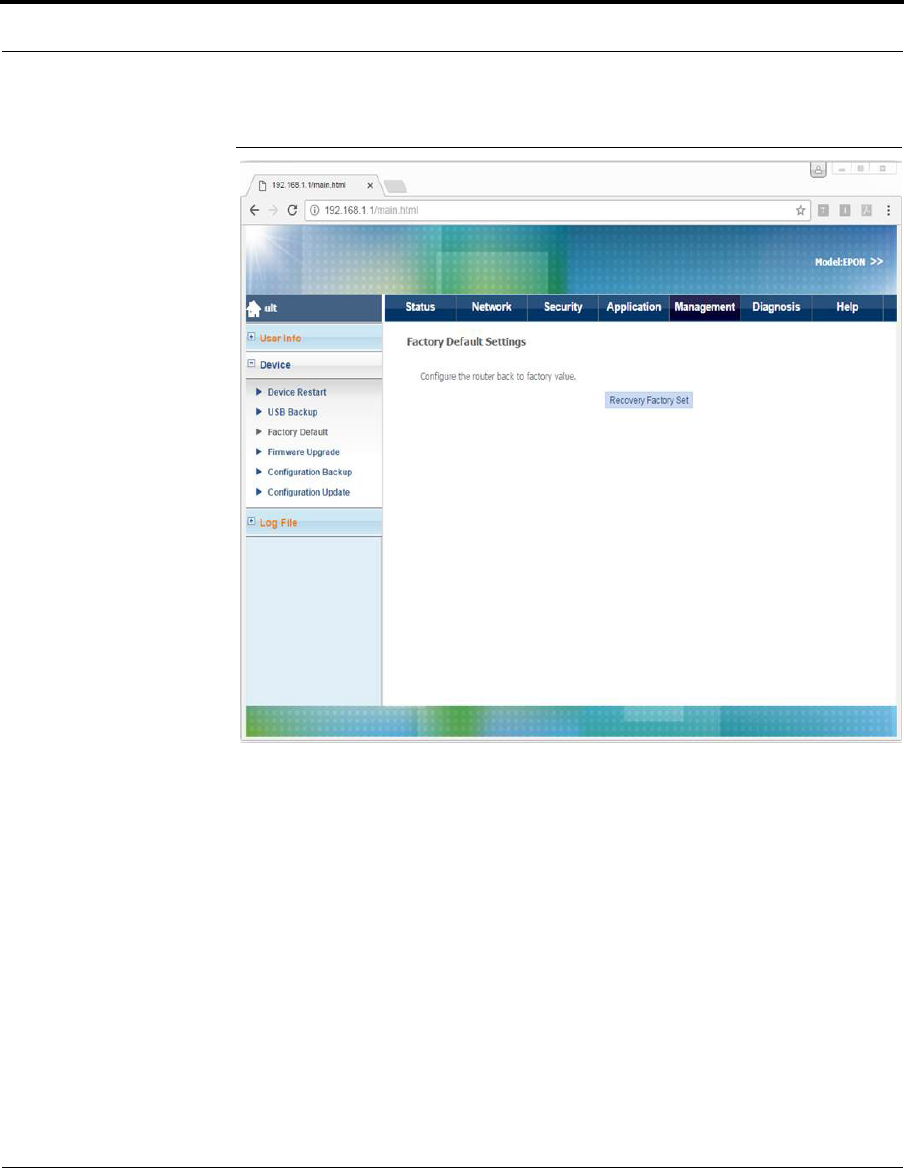
CHAPTER 12 Reverting to the Default Setting
Reverting to the Default Setting
Follow these steps to revert to the default setting.
1Connect your device to LAN 1 or Wireless.
2Launch a web browser.
3Connect to 192.168.1.1. A login screen displays.
4Enter the user name and password. The home screen displays.
5Select Management > Device> Factory Default.
6Click Recovery Factory Set.
Reverting to the Default Setting
34 6304W Configuration Guide
FIGURE 12-1. Factory Default

6304W Configuration Guide 35
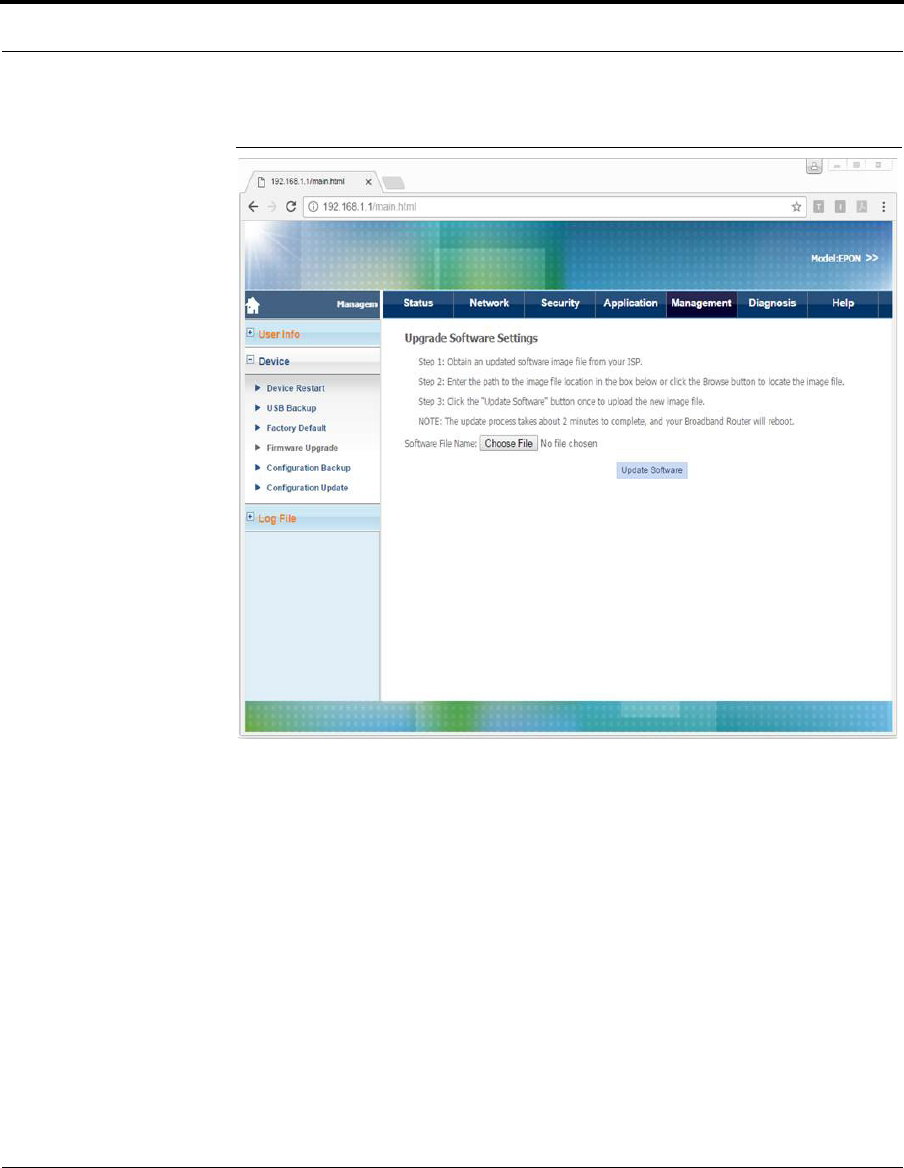
CHAPTER 13 Upgrading Software
Upgrading Software
Follow these steps to upgrade software.
1Connect your device to LAN 1 or Wireless.
2Launch a web browser.
3Connect to 192.168.1.1. A login screen displays.
4Enter the user name and password. The home screen displays.
5Select Management > Device> Firmware Upgrade.
6Choose the file, and then click Upgrade Software.
Upgrading Software
36 6304W Configuration Guide
FIGURE 13-1. Firmware Upgrade

6304W Configuration Guide 37
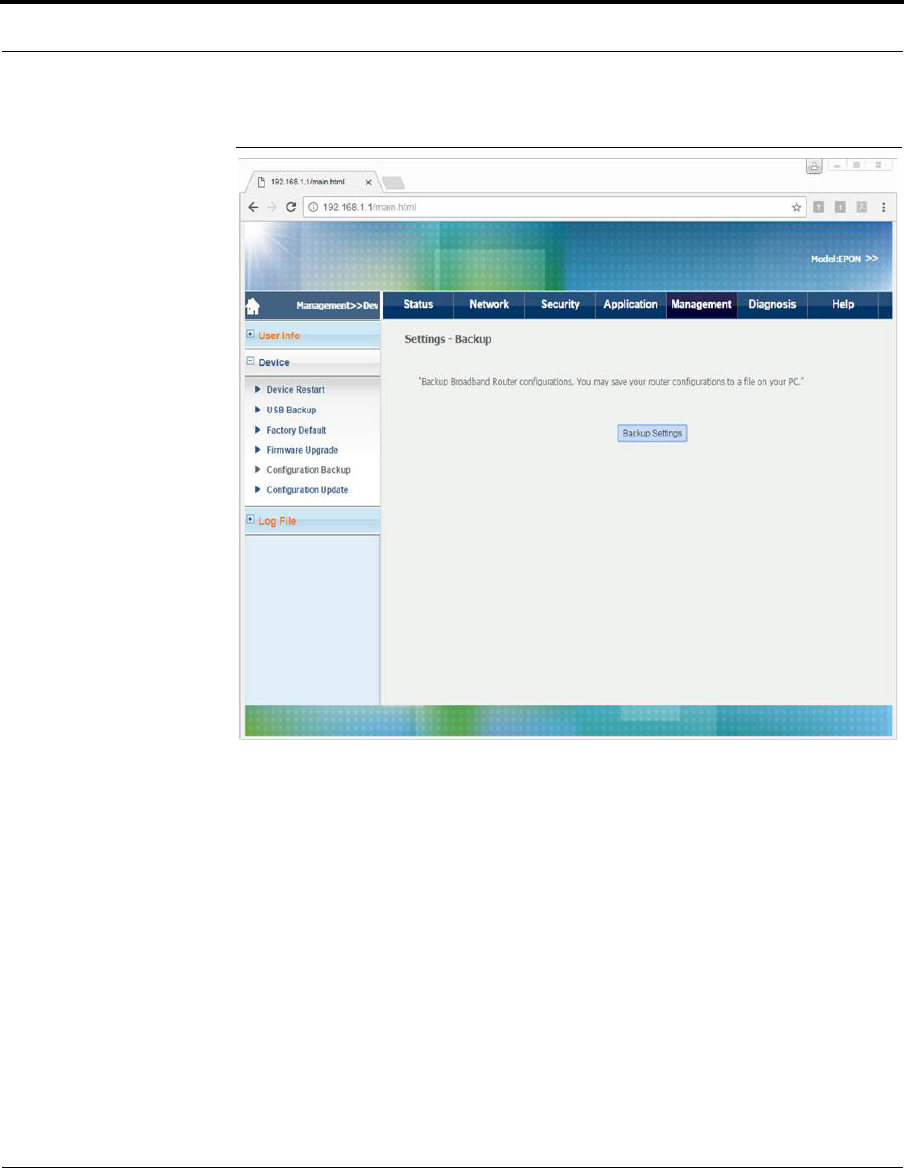
CHAPTER 14 Configuring Backups
Configuring Backups
Follow these steps to configure backups.
1Connect your device to LAN 1 or Wireless.
2Launch a web browser.
3Connect to 192.168.1.1. A login screen displays.
4Enter the user name and password. The home screen displays.
5Select Management > Device> Configuration Backup.
6To save the current configuration to a backup file, click Backup Settings.
Configuring Backups
38 6304W Configuration Guide
FIGURE 14-1. Configuration Backup

6304W Configuration Guide 39
CHAPTER 15 Restoring Configuration Files
Restoring Configuration Files
Follow these steps to restore a configuration file.
1Connect your device to LAN 1 or Wireless.
2Launch a web browser.
3Connect to 192.168.1.1. A login screen displays.
4Enter the user name and password. The home screen displays.
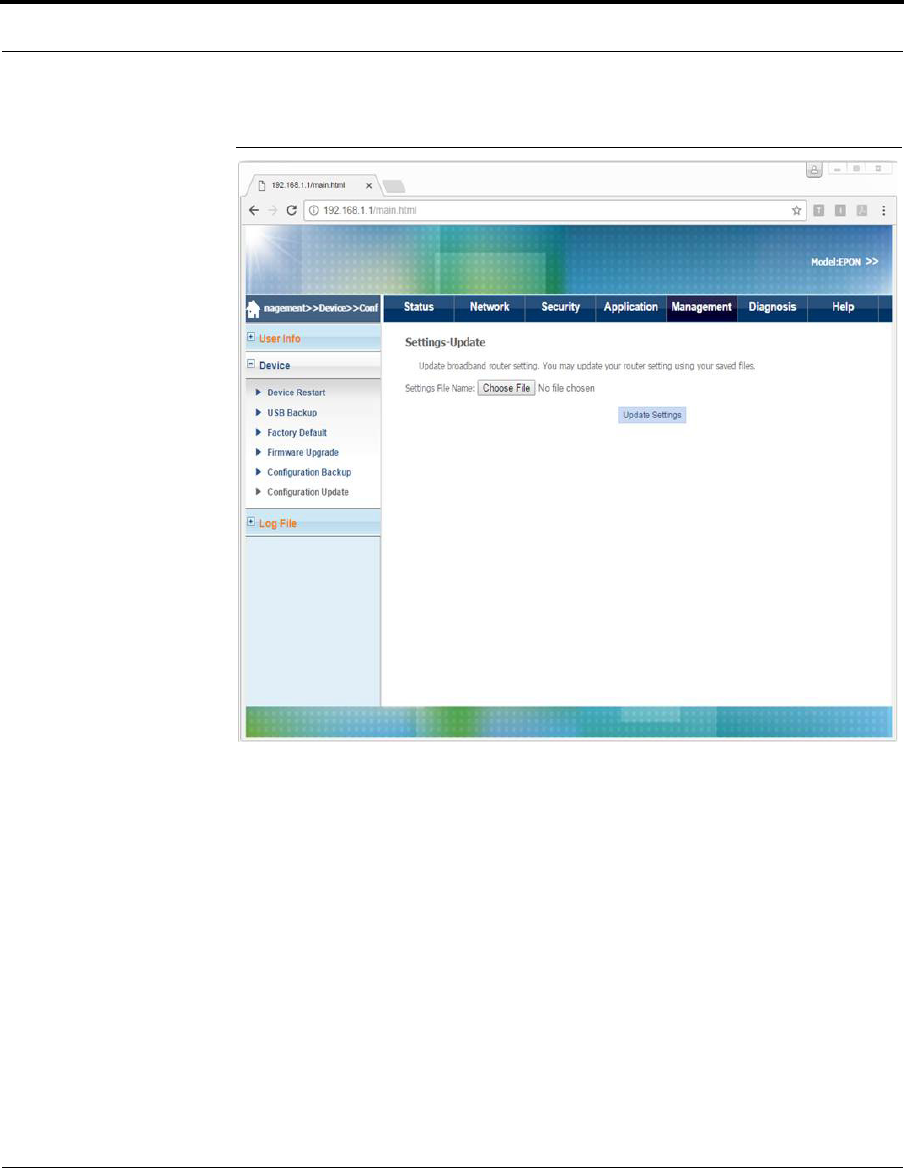
5Select Management > Device> Configuration Update.
6To restore a previously saved configuration file, choose the file, and then click
Update Settings.
Restoring Configuration Files
40 6304W Configuration Guide
FIGURE 15-1. Configuration Update

6304W Configuration Guide 41
CHAPTER 16 Performing Diagnostics
Performing Diagnostics
Follow these steps to perform diagnostic testing.
1Connect your device to LAN 1 or Wireless.
2Launch a web browser.
3Connect to 192.168.1.1. A login screen displays.
4Enter the user name and password. The home screen displays.
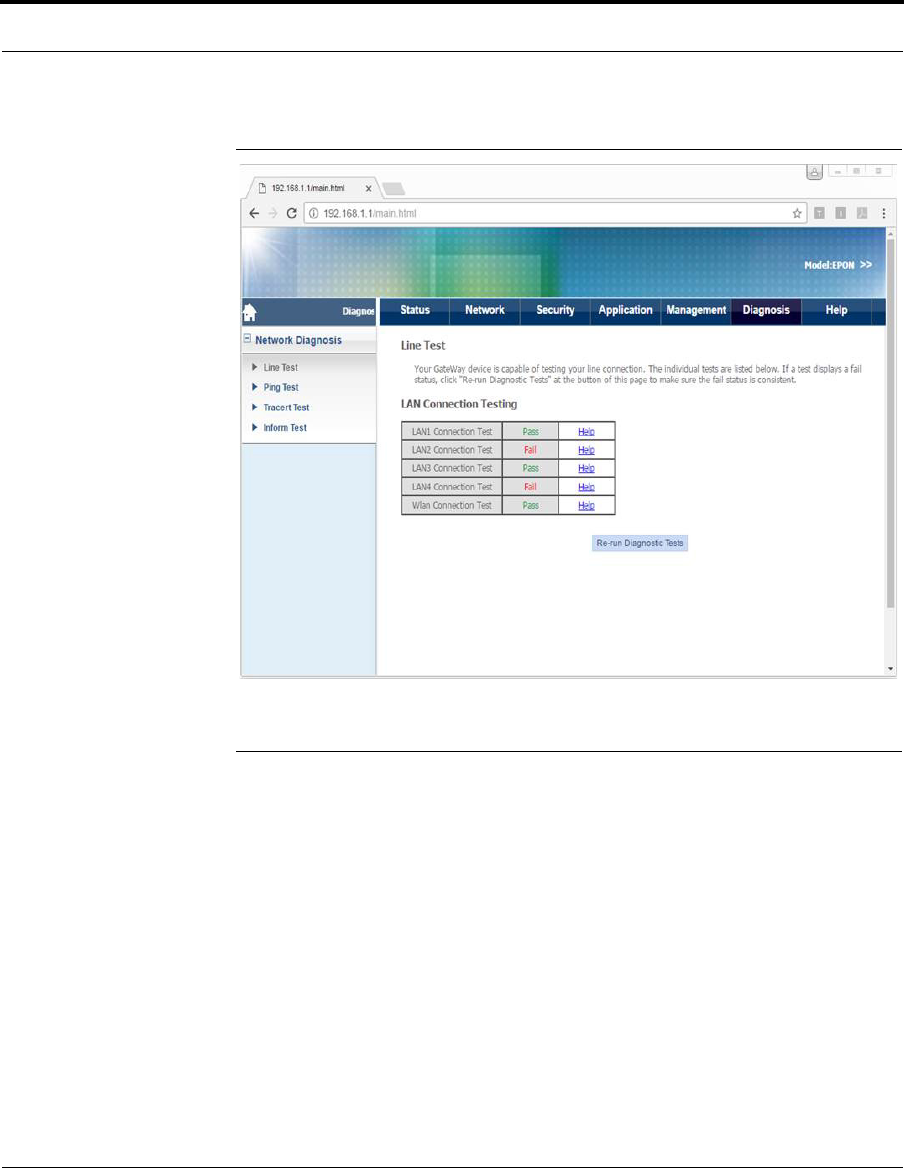
5Select Diagnosis> Network Diagnosis> Line Test. You can view the current sta-
tuses of LAN and Wi-Fi connections.
6To refresh, click Re-run Diagnostic Tests.
Performing Diagnostics
42 6304W Configuration Guide
FIGURE 16-1. Line Test
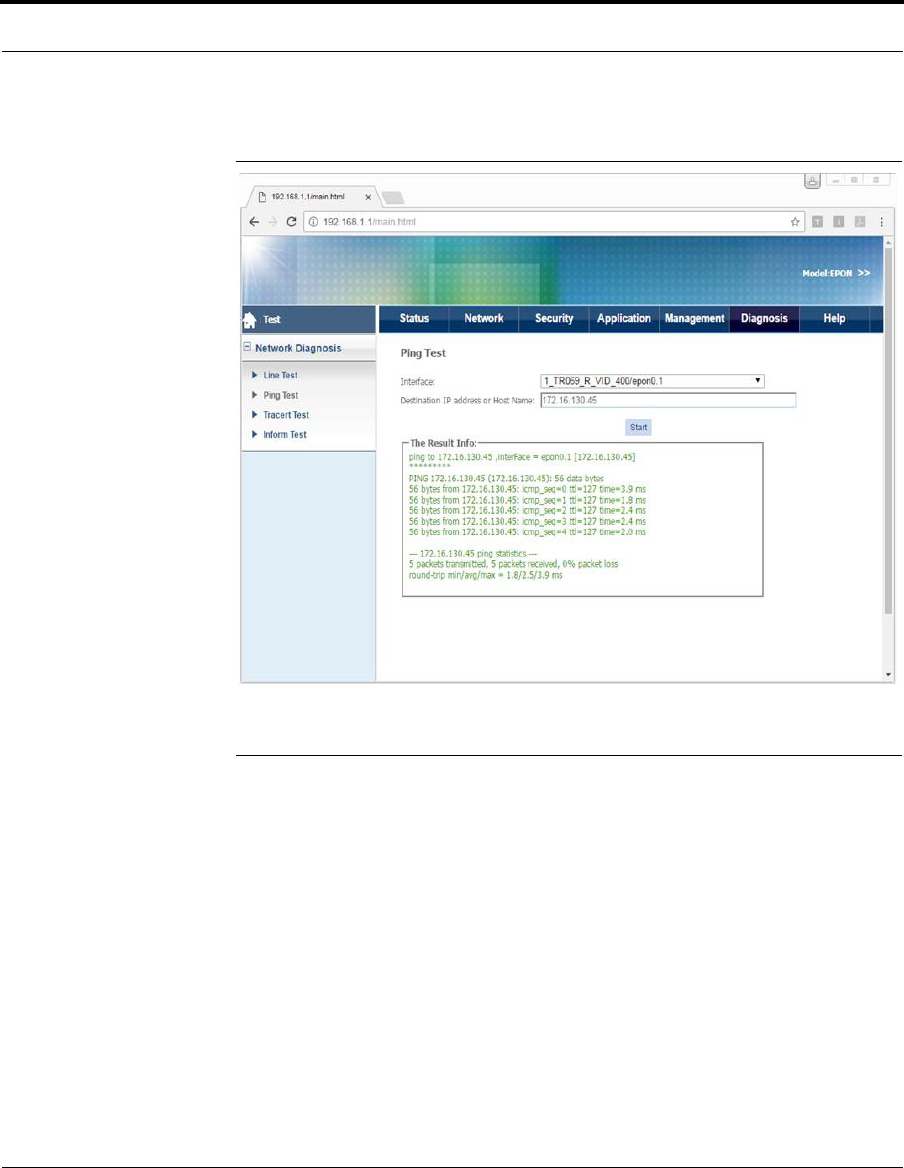
Performing Ping Tests
Follow these steps to perform a ping test.
1Connect your device to LAN 1 or Wireless.
2Launch a web browser.
3Connect to 192.168.1.1. A login screen displays.
4Enter the user name and password. The home screen displays.
5Select Diagnosis> Network Diagnosis> Ping Test.
6Select the Interface.
7Enter the Destination IP address or Host Name.
8Click Start.
6304W Configuration Guide 43
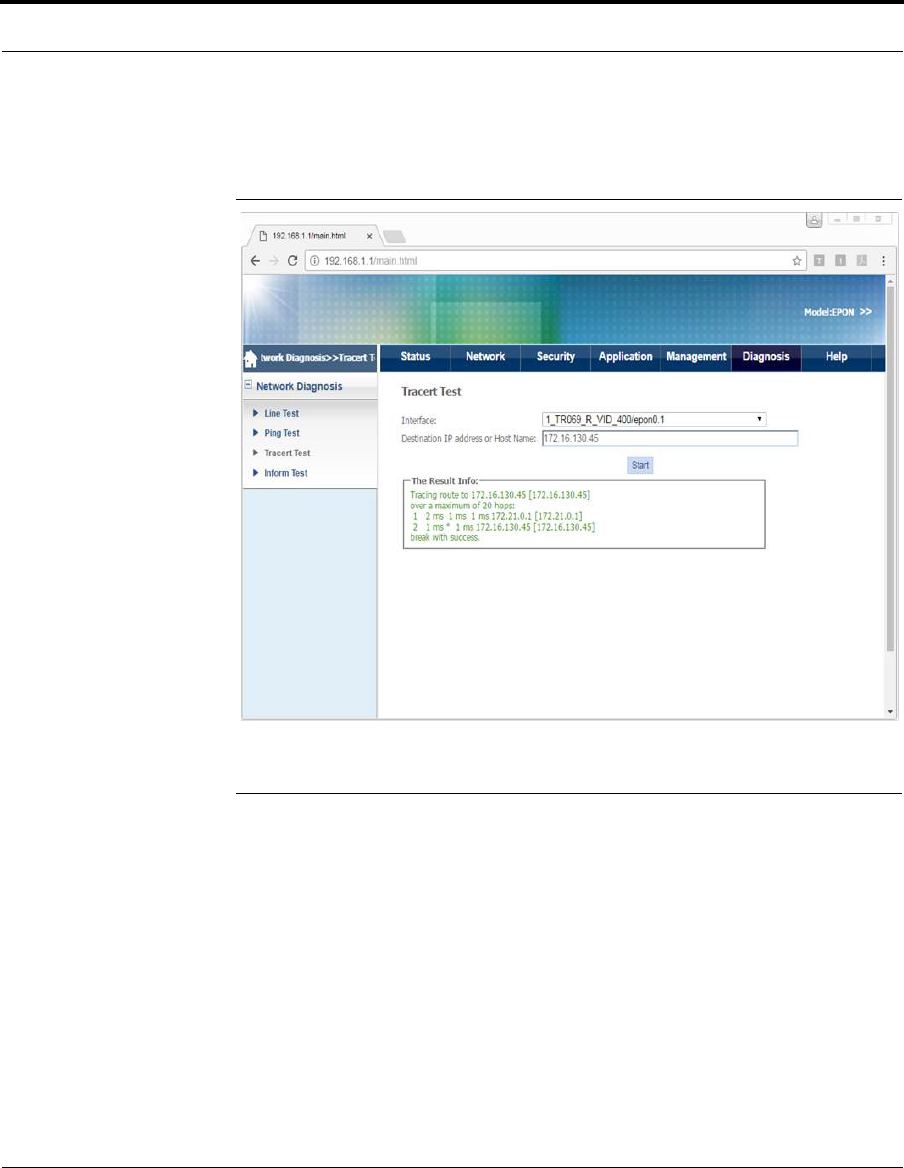
Performing Tracert Tests
FIGURE 16-2. Ping Test
Performing Tracert Tests
A tracert test traces the route of packets from an interface to the destination host.
Follow these steps to perform a tracert test.
1Connect your device to LAN 1 or Wireless.
2Launch a web browser.
3Connect to 192.168.1.1. A login screen displays.
4Enter the user name and password. The home screen displays.
5Select Diagnosis> Network Diagnosis> Tracert Test.
6Select the Interface.
7Enter the Destination IP address or Host Name.
Performing Diagnostics
44 6304W Configuration Guide
8Click Start.
FIGURE 16-3. Tracert Test
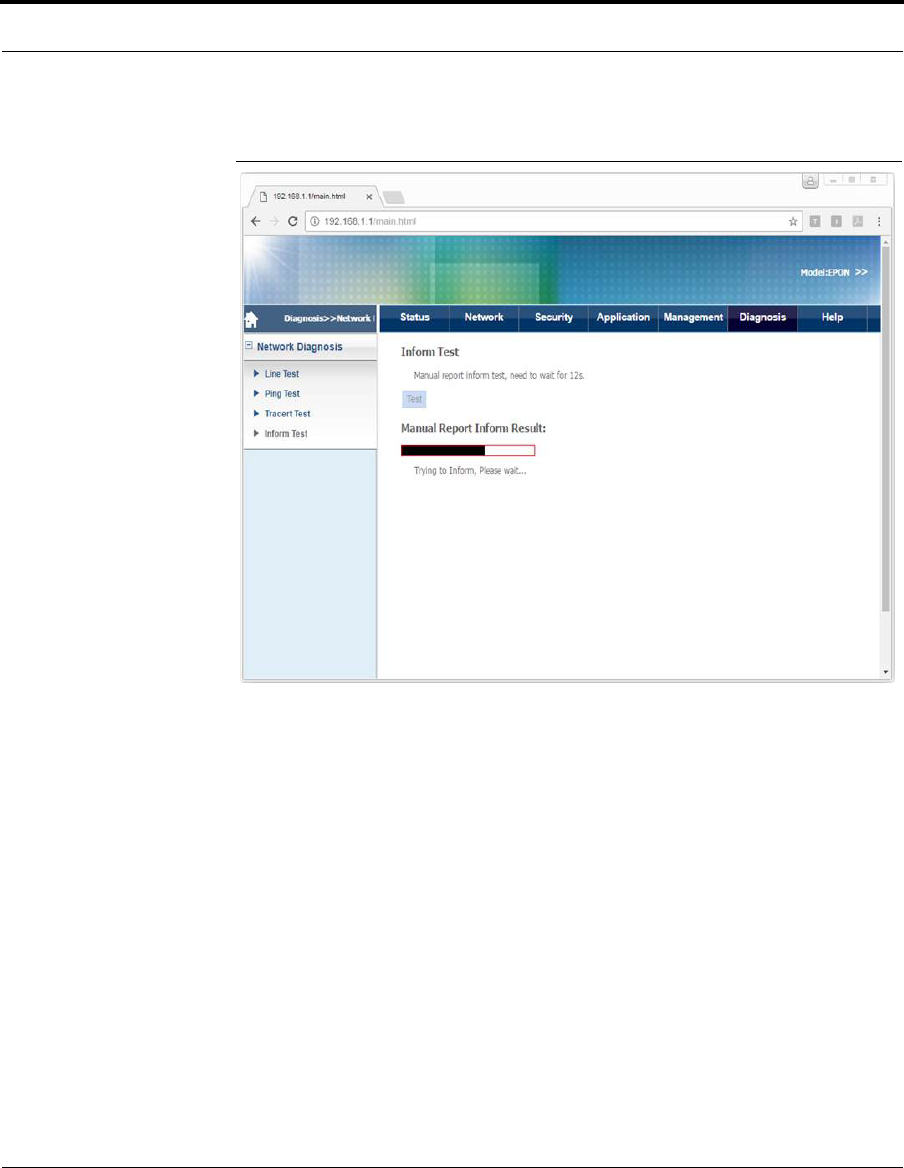
Performing Inform Tests
An inform test sends an inform message to the ACS server.
Follow these steps to perform an inform test.
1Connect your device to LAN 1 or Wireless.
2Launch a web browser.
3Connect to 192.168.1.1. A login screen displays.
4Enter the user name and password. The home screen displays.
5Select Diagnosis> Network Diagnosis> Inform Test.
6Click Test.
6304W Configuration Guide 45
Performing Inform Tests
FIGURE 16-4. Inform Test

6304W ONU Gateway
Installation Guide
Version 1.01
ubiQuoss Inc.
www.ubiQuoss.com
Specifications and product availability are subject to change without notice.
© 2017 ubiQuoss. All rights reserved.

6304W Installation Guide i
Contents
CHAPTER 1 Pre-Installation Considerations . . . . . . . . . . . . . . . . . . . . . . .1
Electric Safety . . . . . . . . . . . . . . . . . . . . . . . . . . . . . . . . . . . . . . . . . . . . . . . . . . . . . . . . . 1
Device Position . . . . . . . . . . . . . . . . . . . . . . . . . . . . . . . . . . . . . . . . . . . . . . . . . . . . . . . . 1
Safety Cautions . . . . . . . . . . . . . . . . . . . . . . . . . . . . . . . . . . . . . . . . . . . . . . . . . . . . . . . . 2
CHAPTER 2 LED Descriptions . . . . . . . . . . . . . . . . . . . . . . . . . . . . . . . . . .3
CHAPTER 3 Buttons and Interfaces . . . . . . . . . . . . . . . . . . . . . . . . . . . . . .5
CHAPTER 4 Installing the ONU . . . . . . . . . . . . . . . . . . . . . . . . . . . . . . . . .7
Connecting the Fiber . . . . . . . . . . . . . . . . . . . . . . . . . . . . . . . . . . . . . . . . . . . . . . . . . . . 7
Connecting the Power Adapter and Power Cord. . . . . . . . . . . . . . . . . . . . . . . . . . . . . 8
Connecting the Ethernet Port . . . . . . . . . . . . . . . . . . . . . . . . . . . . . . . . . . . . . . . . . . . . 8
Connecting the POTS Port . . . . . . . . . . . . . . . . . . . . . . . . . . . . . . . . . . . . . . . . . . . . . . 8
CHAPTER 5 Configuring the ONU. . . . . . . . . . . . . . . . . . . . . . . . . . . . . .11
Accessing the Internet . . . . . . . . . . . . . . . . . . . . . . . . . . . . . . . . . . . . . . . . . . . . . . . . . 11
Setting up WLAN . . . . . . . . . . . . . . . . . . . . . . . . . . . . . . . . . . . . . . . . . . . . . . . . . . . . . 12
Setting Security . . . . . . . . . . . . . . . . . . . . . . . . . . . . . . . . . . . . . . . . . . . . . . . . . . . . . . . 12
Downloading to a USB. . . . . . . . . . . . . . . . . . . . . . . . . . . . . . . . . . . . . . . . . . . . . . . . . 13
Managing the ONU . . . . . . . . . . . . . . . . . . . . . . . . . . . . . . . . . . . . . . . . . . . . . . . . . . . 13
CHAPTER 7 Troubleshooting . . . . . . . . . . . . . . . . . . . . . . . . . . . . . . . . . .15
[Problem 1] The Power LED does not light. . . . . . . . . . . . . . . . . . . . . . . . . . . . . . . . 15
[Problem 2] The Link LED does not light.. . . . . . . . . . . . . . . . . . . . . . . . . . . . . . . . . 15
[Problem 3] The Voice LED does not light. . . . . . . . . . . . . . . . . . . . . . . . . . . . . . . . . 16
APPENDIX A Product Specifications . . . . . . . . . . . . . . . . . . . . . . . . . . . . .17

6304W Installation Guide 1
CHAPTER 1 Pre-Installation Considerations
This chapter provides pre-installation considerations that the user should note
before installing and using the ONU.
Electric Safety
•Ensure that there are no inflammable, conductive or moist objects near the
ONU.
•It is recommended to plug the optical interface into the jacket when it is not in
use. Avoid direct eye exposure to the laser emitted from the optical interface.
Wear safety glasses to protect your eyes.
Device Position
•A running electric device easily generates heat. Ensure that the device is placed
in a well-ventilated environment.
•Keep the device away from heat and water.

Pre-Installation Considerations
26304W Installation Guide
•Ensure that the power supply is reliable. The input voltage fluctuation range
should be lower than 10%. The power plug should not share one socket with a
hair drier, an iron or a refrigerator.
Safety Cautions
•Read the user manual carefully before using the ONU.
•Do not use any accessory that is not shipped with the ONU without prior con-
sent of the manufacturer. This may cause fire or product damage.
•Use the power adapter that is shipped with the ONU.
•Do not place any object on top of the ONU.
•Keep the ONU dry, ventilated, and clean.
•If lightning occurs, unplug the power plug and all connection cables to protect
the ONU against lightning effects.
•Clean the ONU using a soft and dry cloth rather than liquid or atomizers. Turn
off the ONU before cleaning it.
•Turn off the ONU when it is not in use.
•Keep ventilation holes clean and prevent any object from entering ventilation
holes. This may cause short circuit and further cause product damage or fire. Do
not spray liquid on the surface of the ONU.
•Do not open the case of the ONU, especially when it is turned on.
•Before plugging or unplugging the ONU, ensure that the power is off. This is to
avoid surge.
•Be careful when unplugging the ONU, as the transformer may be very hot.
6304W Installation Guide 3
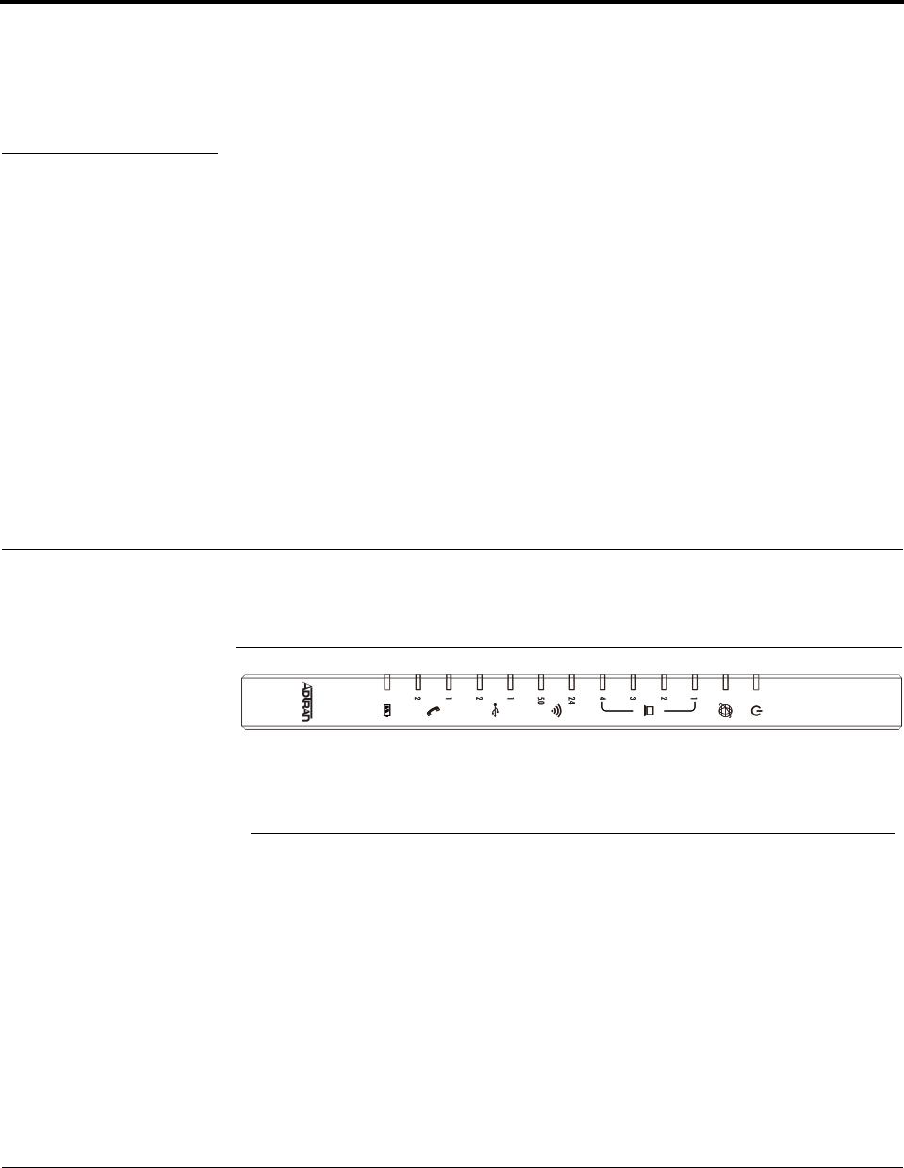
CHAPTER 2 LED Descriptions
This chapter describes conditions indicated by LEDs on the front panel of the ONU.
FIGURE 2-1. Front Panel
TABLE 2-1. LED Descriptions
LED Status Description
Power On Power is on and working.
Off Power is off or there is a power failure.
BAT On Battery is disconnected.
Off Battery is connected.
Internet On Internet is connected and operational.
Off Internet is disconnected.

LED Descriptions
46304W Installation Guide
Link 1-4 On Link is connected and operational.
Blinking Data is being transmitted.
Off Link is disconnected.
Voice 1-2 On Voice is connected and operational.
Blinking Data is being transmitted.
Off Voice is disconnected.
USB On USB is connected and operational.
Blinking Data is being transmitted.
Off USB is disconnected.
TABLE 2-1. LED Descriptions
LED Status Description
6304W Installation Guide 5
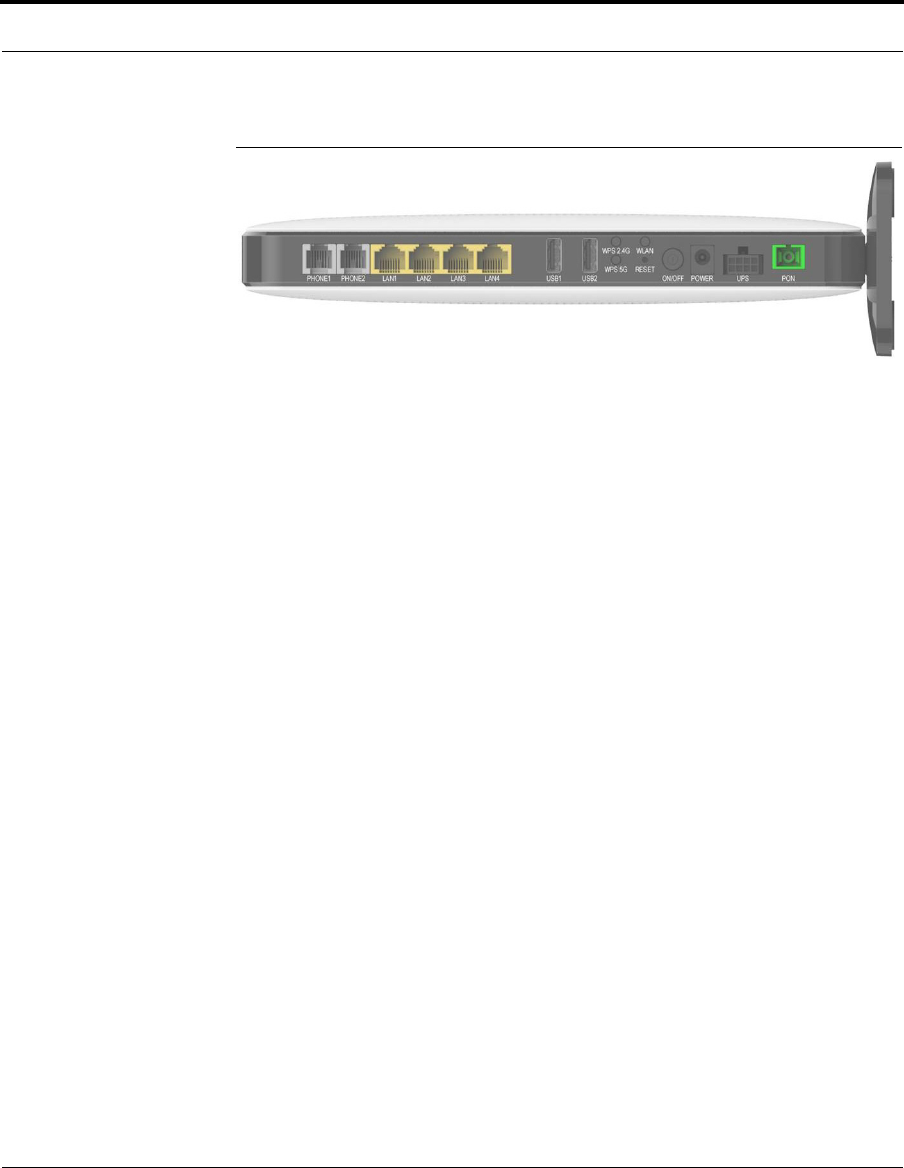
CHAPTER 3 Buttons and Interfaces
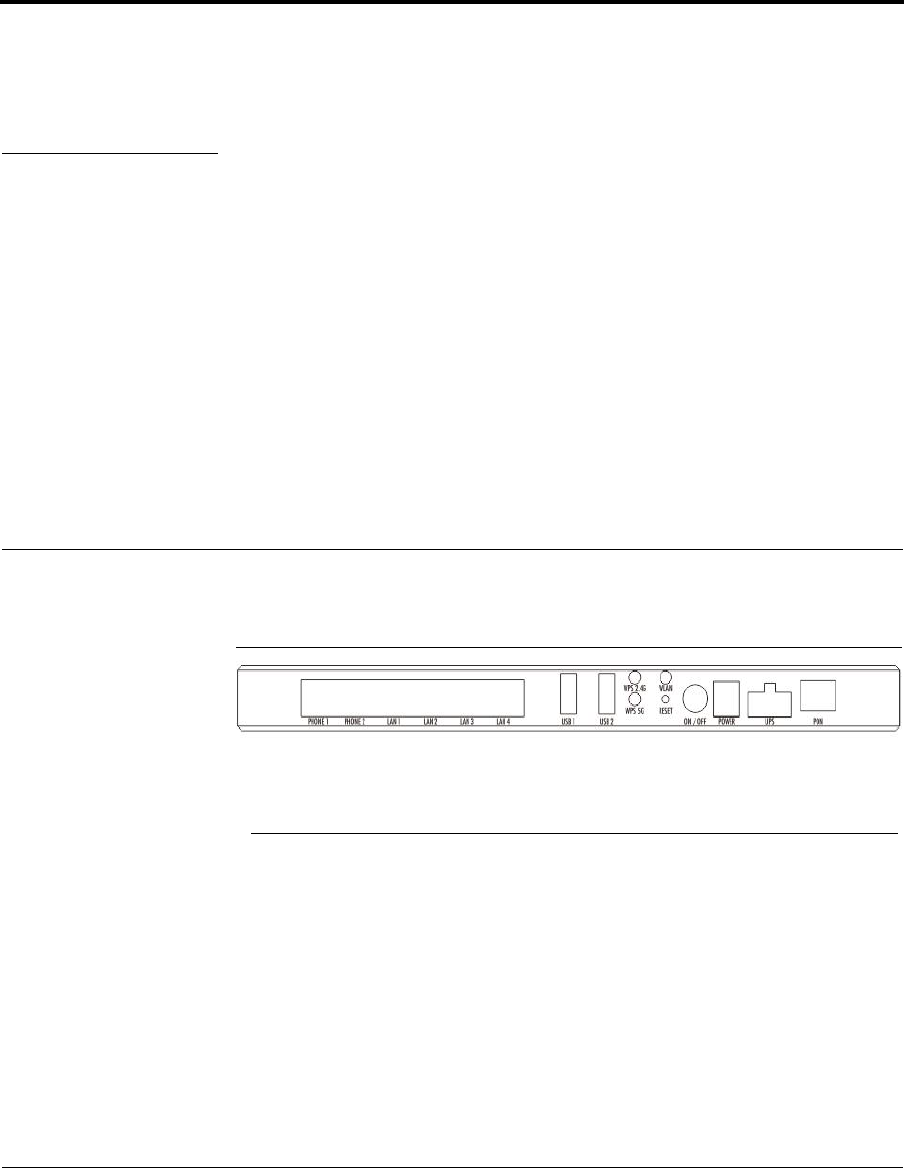
This chapter describes the buttons and interfaces on the rear panel of the ONU.
FIGURE 3-1. Rear Panel
TABLE 3-1. LED Descriptions
Interface/Button Description
PON Fiber port.
RESET Reboots ONU and restores factory default configuration.
POWER DC power connector.
ON/OFF Switch Turns power supply on/off.
POTS 1-2 Telephone interface.
GE 1-4 Ethernet interface.
WLAN Turns WLAN on/off.
WPS-2.4G Connects to Wi-Fi.

Buttons and Interfaces
66304W Installation Guide
WPS-5G Connects to Wi-Fi.
USB USB port.
UPS UPS port.
TABLE 3-1. LED Descriptions
Interface/Button Description

6304W Installation Guide 7
CHAPTER 4 Installing the ONU
This chapter provides instructions on how to install the ONU.
Connecting the Fiber
Before connecting the product to the fiber, you need to install the fiber. Follow these
steps to install the fiber.
1Remove the dust cap from the optical interface.
2Insert the fiber into the flange plate.
3Connect the fiber from the flange plate to the optical interface on the wall.
Note
•When a fiber is not in use, cover the optical interface of the ONU and put the dust
cap back on the optical fiber. Prevent dust pollution or water immersion, as this
may cause damage to the fiber and optical interface of the ONU.
•If fibers need to be fixed during parallel cabling, do not fasten the fibers too tightly.
Avoid fiber extrusion, as this may cause fiber damage.

Installing the ONU
86304W Installation Guide
Connecting the Power Adapter and Power Cord
Follow these steps to connect the power adapter to the ONU.
1Insert one end of the power cord attached with the power adapter into the
POWER connector.
2Press the ON/OFF button to ensure that the power status is ON.
3Check whether the Power LED is on. If it is on, the power supply is normal.
Otherwise, check whether the power cord and the power adapter are correctly
connected.
Follow these steps to connect the UPS to the ONU.
1Insert one end of the power cord attached with the UPS device into the UPS slot.
2Press the ON/OFF button to ensure that the power status is ON.
3Check whether the Power LED is on. If it is on, the power supply is normal. Oth-
erwise, check whether the power cord and the UPS device are correctly con-
nected.
Connecting the Ethernet Port
Follow these steps to connect to the Ethernet port.
1Insert one end of a network cable with an RJ-45 connector into the Ethernet
port.
2Insert the other end of the cable to a PC or Switch.
3Check whether the Link LED is on. If it is on, the link is connected and
operational. Otherwise, check whether the cable is plugged in properly.
Connecting the POTS Port
Follow these steps to connect to the POTS port.
1Insert one end of a cable with an RJ-11 connector into the POTS port.
2Insert the other end of the cable to a telephone.

6304W Installation Guide 9
Connecting the POTS Port
3Check whether the Voice LED is on. If it is on, voice is connected and
operational. Otherwise, check whether the cable is plugged in properly.

6304W Installation Guide 11
CHAPTER 5 Configuring the ONU
This chapter provides instructions on how to configure the ONU.
Accessing the Internet
After you have successfully connected the ONU, you need to configure the ONU so
that it can obtain an IP address.
If the ONU only uses a serial number to access the Internet:
•After connecting the fiber to the ONU, wait approximately two minutes for an
Internet connection to be established.
If the ONU uses a serial number and EPON password to access the Internet:
1Type 192.168.1.1 in the address field of a web browser. A login screen appears.
2Enter the user name and password.
3Click Network > TR069 > EPON Password. A dialog box appears.
4Enter your EPON password in the text box and the click SAVE.
5Wait approximately one minute for an Internet connection to be established.

Configuring the ONU
12 6304W Installation Guide
Setting up WLAN
Follow these steps to set WLAN parameters.
1Type 192.168.1.1 in the address field of a web browser. A login screen appears.
2Enter the user name and password.
3Click Network > WLAN. A dialog box appears.
The following table provides a brief description of WLAN parameters.
Setting Security
Follow these steps to set security.
1Type 192.168.1.1 in the address field of a web browser. A login screen appears.
2Enter the user name and password.
3Click Network > Security. A dialog box appears.
The following table provides a brief description of the available Security features.
TABLE 5-1. WLAN Parameters
Parameter Description
Select SSID Select a WLAN you want to modify.
Network Authentication Select the authentication method. Mixed WPA2/WPA-
PSK is recommended.
WPA Pre-shared Key Enter the WLAN password.
WPA Encryption Select the encryption method. TKIP+AES is
recommended.

6304W Installation Guide 13
Downloading to a USB
Downloading to a USB
Follow these steps to download files to a USB.
1Type 192.168.1.1 in the address field of a web browser. A login screen appears.
2Enter the user name and password.
3Click Network > Family Storage. A dialog box appears.
The following table provides a brief description of the settings required for USB
usage.
Managing the ONU
Follow these steps to manage the ONU.
TABLE 5-2. Security Features
Feature Description
URL Filter Permit or forbid access to specified addresses.
MAC Filter Permit or forbid access to the Internet.
Firewall Level Select from low, middle, high.
DDOS Setup Set up DDOS to enhance security.
TABLE 5-3. USB Settings
Setting Description
User Name User name authorized by the file server that permits the download of
files.
Password User password.
Port Port used.
Remote URL URL that indicates the position of the file.

Configuring the ONU
14 6304W Installation Guide
1Type 192.168.1.1 in the address field of a web browser. A login screen appears.
2Enter the user name and password.
3Click Network > Management. A dialog box appears.
The following table provides a brief description of the Management features.
TABLE 5-4. Management Features
Feature Description
User Info You can change your password.
Device You can restart the ONU.

6304W Installation Guide 15
CHAPTER 7 Troubleshooting
This chapter lists some typical symptoms and check points.
[Problem 1] The Power LED does not light.
Check points:
1Check whether the power cord is properly connected to the POWER connector
and the outlet.
2Check whether the proper power adapter is connected.
[Problem 2] The Link LED does not light.
Check points:
1Check whether the ONU is authorized by the carrier.
2Check whether the proper network cables are used.
3Check whether the network cable connection is working.

Troubleshooting
16 6304W Installation Guide
[Problem 3] The Voice LED does not light.
Check points:
1Check whether the telephone line connection is working.
2Check whether the ONU is on.

6304W Installation Guide 17
APPENDIX A Product Specifications
TABLE A-1. Physical Dimensions
Description Specification
Dimensions
(H x W x D)
1.45 in x 5.58 in x 9.60 in
(37 mm x 141.8 mm x 243.9 mm)
Weight Max. 1.10 lbs (0.5 kg)
TABLE A-2. Electrical Specifications
Specification Operational
Power Adapter Input 12 V/2A, Output power 24W
Power Consumption Max. 15 W

Product Specifications
18 6304W Installation Guide
TABLE A-3. Environmental Specifications
Specification Operational
Temperature -41°F to 113°F
(-5° to 45°C)
Humidity 5 to 95% (non-condensing)
TABLE A-4. Interface Specifications
Description Specification
Interfaces • One optical interface (SC/APC single mode)
• Two RJ-11 interfaces
• Four RJ-45 connectors
TABLE A-5. Data Transmission Rates
Feature Rate
Uplink 1.25 Gbps
Downlink 1.25 Gbps
TABLE A-6. Standard
Feature Standard
EPON IEEE 802.3ah
FCC Regulations
This device complies with part 15 of the FCC Rules. Operation is subject to the following two conditions: (1) This device
may not cause harmful interference, and (2) this device must accept any interference received, including interference that
may cause undesired operation.
N
OTE: This equipment has been tested and found to comply with the limits for a Class B digital device, pursuant to part
15 of the FCC Rules. These limits are designed to provide reasonable protection against harmful interference in a
residential installation. This equipment generates, uses and can radiate radio frequency energy and, if not installed and
used in accordance with the instructions, may cause harmful interference to radio communications. However, there is no
guarantee that interference will not occur in a particular installation. If this equipment does cause harmful interference to
radio or television reception, which can be determined by turning the equipment off and on, the user is encouraged to try
to correct the interference by one or more of the following measures:
—Reorient or relocate the receiving antenna.
—Increase the separation between the equipment and receiver.
—Connect the equipment into an outlet on a circuit different from that to which the receiver is connected.
—Consult the dealer or an experienced radio/ TV technician for help.
Changes or modifications not expressly approved by the manufacturer could void the user’s authority to operate the
equipment.
FCC RF Radiation Exposure Statement
This equipment complies with FCC RF radiation exposure limits set forth for an uncontrolled environment. This device
and its antenna must not be co-located or operating in conjunction with any other antenna or transmitter.
“To comply with FCC RF exposure compliance requirements, this grant is applicable to only Mobile Configurations. The
antennas used for this transmitter must be installed to provide a separation distance of at least 20 cm from all persons and
must not be co-located or operating in conjunction with any other antenna or transmitter.”