ADTRAN SR360N 802.11n ADSL2+ Router User Manual Manual r1
SmartRG, Inc. 802.11n ADSL2+ Router Manual r1
ADTRAN >
Manual r1

SR320n SR360n
User Manual
VER: 1.0

User Manual
i
Contents
1Safety Instructions....................................................................................1
2Overview ..................................................................................................2
2.1Application.............................................................................................2
2.2Features ................................................................................................2
2.3Standards Compatibility and Compliance..............................................3
3Hardware Description and Installation .....................................................5
3.1Hardware Description............................................................................5
3.1.1Front Panel............................................................................5
3.1.2Rear Panel and Side Panel...................................................6
3.2Hardware Installation............................................................................. 7
3.2.1Choosing the Best Location for Wireless Operation .............7
3.2.2Connecting the Device ..........................................................8
4PC Network Configuration and Login..................................................... 10
4.1PC Network Configuration...................................................................10
4.2Logging In to the DSL Router..............................................................12
5Web-Based Management ......................................................................13
5.1Device Information...............................................................................13
5.1.1Summary.............................................................................13
5.1.2WAN ....................................................................................14
5.1.3Statistics ..............................................................................15
5.1.4LAN .....................................................................................15
5.1.5WAN Service.......................................................................15
5.1.6xTM .....................................................................................16
5.1.7xDSL.................................................................................... 16
5.1.8Route...................................................................................19
5.1.9ARP.....................................................................................20
5.1.10DHCP ..................................................................................20
5.2Advanced Setup ..................................................................................20
5.2.1Layer2 Interface ..................................................................22
5.2.2WAN Service.......................................................................25
5.2.3LAN Configuration...............................................................50
5.2.4NAT .....................................................................................56

User Manual
ii
5.2.5Security ...............................................................................60
5.2.6Parental Control ..................................................................63
5.2.7Quality of Service ................................................................65
5.2.8Routing................................................................................68
5.2.9DNS.....................................................................................72
5.2.10DSL .....................................................................................73
5.2.11UPnP...................................................................................74
5.2.12DNS Proxy...........................................................................75
5.2.13Print Server .........................................................................75
5.2.14Packet Acceleration.............................................................76
5.2.15Storage Service...................................................................76
5.2.16Interface Grouping............................................................... 77
5.2.17IP Tunnel .............................................................................78
5.2.18IPSec...................................................................................80
5.2.19Certificate ............................................................................ 82
5.2.20Power Management ............................................................ 86
5.2.21Multicast .............................................................................. 87
5.3Wireless............................................................................................... 88
5.3.1Basic Settings......................................................................89
5.3.2Security ...............................................................................90
5.3.3MAC Filter ...........................................................................98
5.3.4Wireless Bridge ...................................................................99
5.3.5Advanced Settings ............................................................100
5.3.6Station Info ........................................................................103
5.4Diagnostics........................................................................................103
5.4.1Diagnostics........................................................................ 103
5.5Management......................................................................................104
5.5.1Settings .............................................................................105
5.5.2System Log .......................................................................106
5.5.3SNMP Agent......................................................................107
5.5.4TR-69 Client ......................................................................108
5.5.5Internet Time .....................................................................109
5.5.6Access Control ...................................................................111
5.5.7Update Software................................................................ 112

User Manual
iii
5.5.8Reboot............................................................................... 113
6Q&A...................................................................................................... 114

User Manual
1
1 Safety Instructions
Read the following information carefully before operating the device. Please follow
the following precaution items to protect the device from risks and damage caused
by fire and electric power:
Use volume labels to mark the type of power.
Use the power adapter that is packed within the device package.
Pay attention to the power load of the outlet or prolonged lines. An
overburden power outlet or damaged lines and plugs may cause electric
shock or fire accident. Check the power cords regularly. If you find any
damage, replace it at once.
Proper space left for heat dissipation is necessary to avoid any damage
caused by overheating to the device. The holes on the device are designed
for heat dissipation to ensure that the device works normally. Do not cover
these heat dissipation holes.
Do not put this device close to a place where a heat source exits or high
temperature occurs. Avoid the device from direct sunshine.
Do not put this device close to a place where is over damp or watery. Do not
spill any fluid on this device.
Do not connect this device to any PC or electronic product, unless our
customer engineer or your broadband provider instructs you to do this,
because any wrong connection may cause any power or fire risk.
Do not place this device on an unstable surface or support.

User Manual
2
2 Overview
The xDSL Router integrates wireless LAN, USB storage, and 3G WAN services
into one unit. It is designed to provide a simple and cost-effective xDSL Internet
connection for a private Ethernet and 802.11g/802.11b/802.11n wireless network.
The Router combines high-speed xDSL Internet connection, IP routing for the LAN
and wireless connectivity in one package. It is usually preferred to provide high
access performance applications for the individual users, the SOHOs, and the
small enterprises.
The Router is easy to install and use. The Router connects to an Ethernet LAN or
computers via standard Ethernet ports. The xDSL connection is made using
ordinary telephone line with standard connectors. The advanced security
enhancements, packet filtering and port redirection, can help protect your network
from potentially devastating intrusions by malicious agents from outside your
network.
Network and Router management is done through the web-based management
interface that can be accessed through the local Ethernet using any web browser.
You may also enable remote management to enable configuration of the Router via
the WAN interface.
2.1 Application
Home gateway
3G Internet
Wireless LAN
SOHOs
Small enterprises
Higher data rate broadband sharing
Audio and video streaming and transfer
PC file and application sharing
Network and online gaming
USB storage
2.2 Features

User Manual
3
User-friendly GUI for web configuration
Several pre-configured popular games. Just enable the game and the port
settings are automatically configured.
Compatible with all standard Internet applications
Industry standard and interoperable xDSL interface
Simple web-based status page displays a snapshot of system configuration,
and links to the configuration pages
Downloadable flash software updates
Support for up to 8 permanent virtual circuits (PVC)
Support for up to 8 PPPoE sessions
Support RIP v1 & RIP v2
WLAN with high-speed data transfer rates, compatible with IEEE
802.11b/g/n
IP routing and bridging
Asynchronous transfer mode (ATM) and digital subscriber line (DSL) support
Point-to-point protocol (PPP)
Network/port address translation (NAT/PAT)
Quality of service (QoS)
Wireless LAN security: WPA, 802.1x, RADIUS client
Universal plug-and-play(UPnP)
Print server
Web filtering
Management and control
Web-based management (WBM)
Command line interface (CLI)
TR-069 WAN management protocol
Remote update
System statistics and monitoring
DSL router is targeted at the following platforms: DSL modems, wireless
access points and bridge.
2.3 Standards Compatibility and Compliance
Support application level gateway (ALG)
ITU G.992.1 (G.dmt)
ITU G.992.2 (G.lite)

User Manual
4
ITU G.994.1 (G.hs)
ITU G.992.3 (ADSL2)
ITU G.992.5 (ADSL2+)
3G (WCDMA, CDMA2000, TD-SCDMA)
ANSI T1.413 Issue 2
IEEE 802.3
IEEE 802.3u
IEEE 802.11b
IEEE 802.11g
IEEE 802.11n
User Manual
5
3 Hardware Description and Installation
Note:
The figures in this document are for reference only.
3.1 Hardware Description
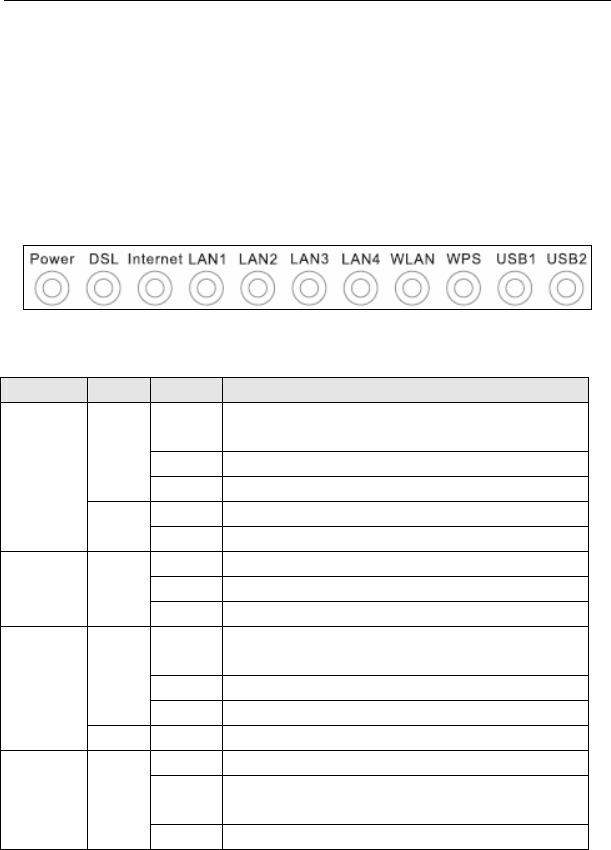
3.1.1 Front Panel
Figure 1 Front panel
The following table describes the indicators on the front panel.
Indicator Color Status Description
On The device is powered on and the device operates
normally.
Blink The software is upgrading.
Green
Off The device is powered off.
On The device is initiating.
Power
Red
Blink The software is upgrading.
On DSL link has established.
Blink The DSL line is training.
DSL Green
Off Device is powered off.
On Internet is synchronized successfully in the route
mode.
Blink Internet data is being transmitted.
Green
Off Ethernet interface is disconnected.
Internet
Red On Authentication has failed.
On The Ethernet interface is connected.
Blink Data is being transmitted through the Ethernet
interface.
LAN
1/2/3/4 Green
Off The Ethernet interface is disconnected.

User Manual
6
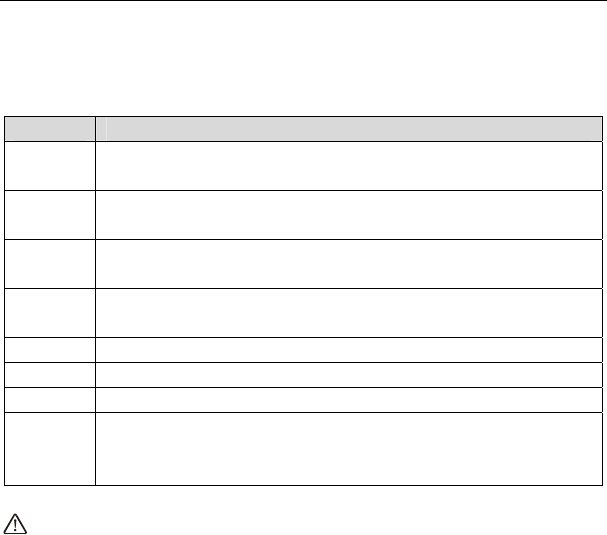
Indicator Color Status Description
On The connection of 3G or USB flash disk has
established.
Blink Data is being transmitted.
USB Green
Off No signal is detected.
On WLAN is enabled.
Blink Data is being transmitted through the wireless
interface.
WLAN Green
Off WLAN is disabled.
On Connection succeeds under Wi-Fi Protected
Setup.
Blink Negotiation is in progress under Wi-Fi Protected
Setup.
WPS Green
Off Wi-Fi Protected Setup is disabled.
3.1.2 Rear Panel and Side Panel
User Manual
7
Figure 2 Rear panel Figure 3 Side
panel
The following table describes the interfaces or the buttons.
Interface Description
DSL RJ-11 port: Connect the router to DSL connector or splitter through
telephone cable.
LAN 4~1 RJ-45 port, for connecting the router to a PC or another network
device.
Reset Press the button for at least 1 second and then release it. System
restores the factory default settings.
USB For connecting the 3G network adapter or other USB storage
devices.
Power Power interface, for connecting the power adapter.
On/Off Power switch.
WLAN WLAN switch, for enabling or disabling the WLAN function.
WPS
This button is used for enabling WPS PBC mode. If WPS is enabled,
press this button, and then the wireless router starts to accept the
negotiation of PBC mode.
Warning:
Do not press the Reset button unless you want to clear the current settings. The
Reset button is in a small circular hole on the rear panel. If you want to restore the
default settings, please press the Reset button gently for 1 second with a fine needle
inserted into the hole and then release the button. The system reboots and returns to
the factory defaults.
3.2 Hardware Installation
3.2.1 Choosing the Best Location for Wireless Operation
Many environmental factors may affect the effective wireless function of the DSL
Router. If this is the first time that you set up a wireless network device, read the
following information:

User Manual
8
The access point can be placed on a shelf or desktop, ideally you should be able to
see the LED indicators in the front, as you may need to view them for troubleshooting.
Designed to go up to 100 meters indoors and up to 300 meters outdoors, wireless
LAN lets you access your network from anywhere you want. However, the numbers of
walls, ceilings, or other objects that the wireless signals must pass through limit signal
range. Typical ranges vary depending on types of materials and background RF
noise in your home or business.
3.2.2 Connecting the Device
Step 1 Connect the DSL port of the router and the Modem port of the splitter
with a telephone cable; connect the phone to the phone port of the
splitter through a cable; and connect the incoming line to the Line port of
the splitter.
The spliiter has three ports:
Line: Connect to a wall phone jack (RJ-11 jack)
Modem: Connect to the Line interface of the router
Phone: Connect to a telephone set
Step 2 Connect the LAN port of the router to the network card of the PC through
an Ethernet cable.
Step 3 Plug the power adapter to the wall outlet and then connect the other end
of it to the Power port of the router.
Note:
If you use 3G WAN service, connect the 3G USB data card to the USB port of
the router.
The followig figure displays the connection of the DSL router, PC, and telephones.

User Manual
9
Figure 4 Connecting the DSL router

User Manual
10
4 PC Network Configuration and Login
4.1 PC Network Configuration
Each network interface on the PC should either be configured with a statically defined
IP address and DNS address, or be instructed to automatically obtain an IP address
using the network DHCP server. DSL router provides a DHCP server on its LAN and
it is recommended to configure your LAN to automatically obtain its IP address and
DNS server IP address.
The configuration principle is identical but should be carried out differently on each
operating system.
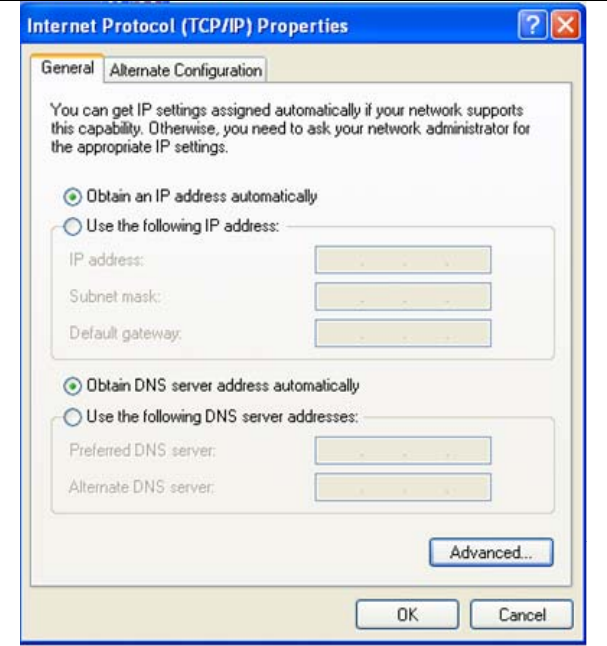
The following displays the TCP/IP Properties dialog box on Windows XP.
User Manual
11
Figure 5 IP and DNS configuration
TCP/IP configuration steps for Windows XP are as follows:
Choose Start > Control Panel > Network Connections.
Right-click the Ethernet connection icon and choose Properties.
On the General tab, select the Internet Protocol (TCP/IP) component and click
Properties.
The Internet Protocol (TCP/IP) Properties window appears.
User Manual
12
Select the Obtain an IP address automatically radio button.
Select the Obtain DNS server address automatically radio button.
Click OK to save the settings.
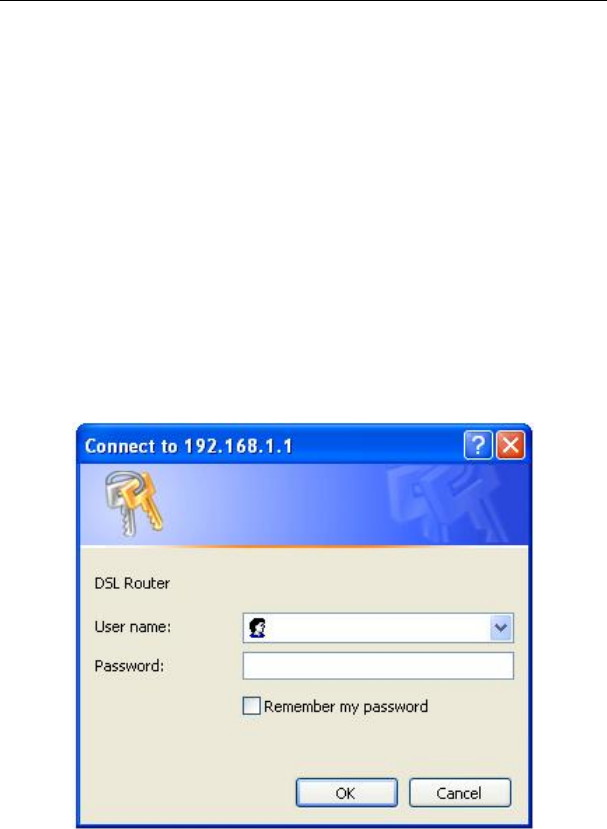
4.2 Logging In to the DSL Router
To log in to the DSL router, do as follows:
Open a Web browser on your computer.
Enter http://192.168.1.1 (the default IP address of the DSL router) in the address
bar. The login page appears.
Enter the user name and the password. The default username and password of the
super user are admin and admin. The username and password of the
common user are user and user. You need not enter the username and
the password again if you select the option Remember my password. It
is recommended to change these default values after logging in to the
DSL router for the first time.
Click OK to log in to the Web page. Otherwise, please click Cancel to exit the login
page.
Figure 6 Login page
User Manual
13
After logging in to the DSL router as a super user, you can query, configure, and
modify all the settings, and diagnose the system.
5 Web-Based Management
This chapter describes how to use Web-based management of the DSL router, which
allows you to configure and control all of DSL router features and system parameters
in a user-friendly GUI.
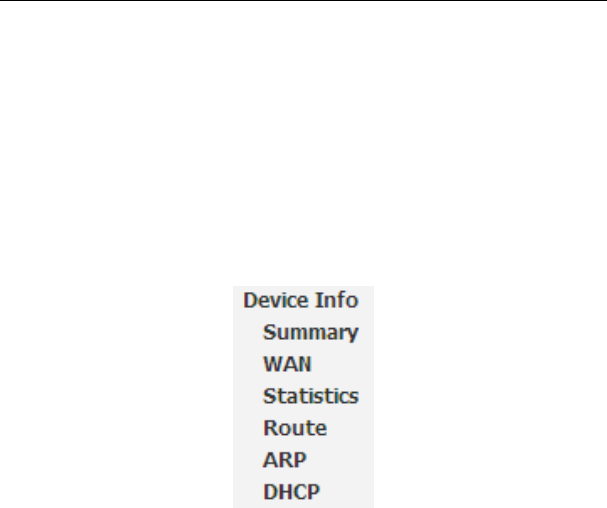
5.1 Device Information
Choose Device Info, and the submenus of Device Info are shown as below:
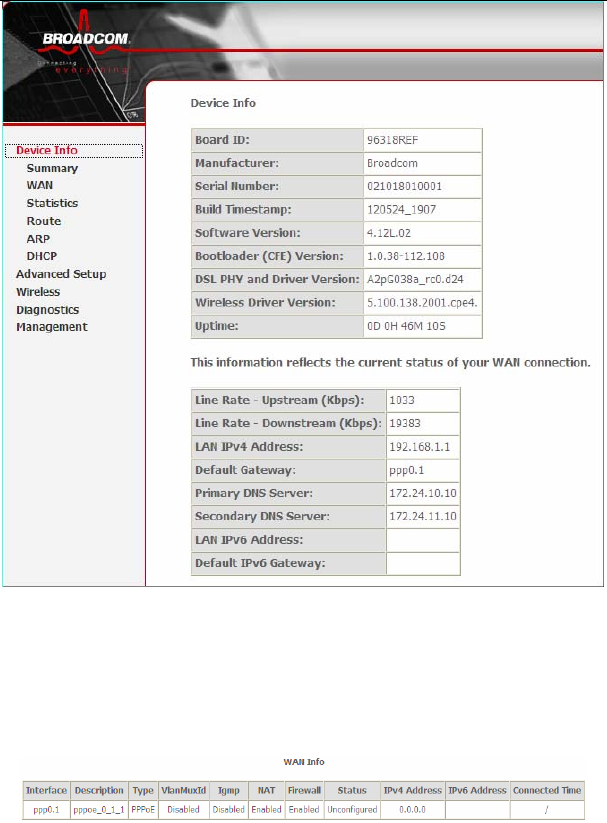
5.1.1 Summary
Choose Device Info > Summary, and the following page appears.
User Manual
14
This page displays the device information such as the board ID, software version, and
the information of your WAN connection such as the upstream rate and the LAN
address.
5.1.2 WAN
Choose Device Info > WAN and the following page appears.
User Manual
15
This page displays the information of the WAN interface, such as the connection
status, and the IP address.
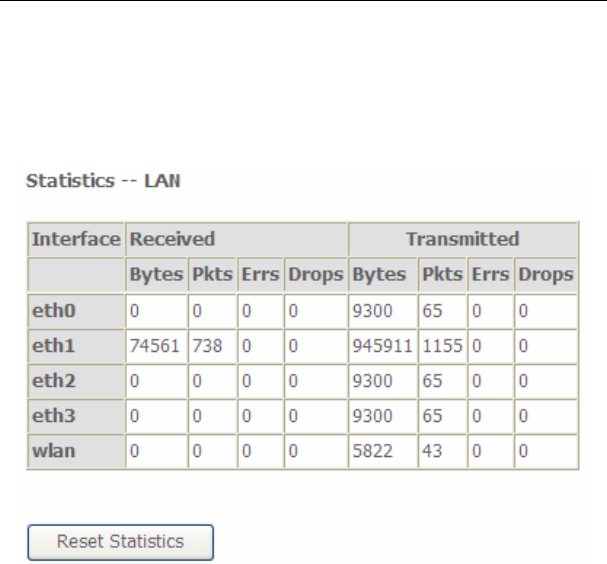
5.1.3 Statistics
5.1.4 LAN
Choose Device Info > Statistics > LAN and the following page appears.
In this page, you can view the statistical information about the recevied and
transmitted data packets of the Ethernet and wireless interfaces.
Click Reset Statistics to restore the values to zero and recount them.
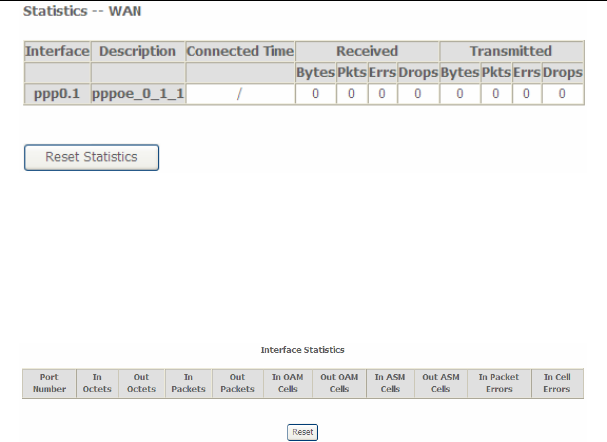
5.1.5 WAN Service
Choose Device Info > Statistics > WAN Service and the following page appears.
User Manual
16
In this page, you can view the statistical information about the recevied and
transmitted data packets of the WAN interface.
Click Reset Statistics to restore the values to zero and recount them.
5.1.6 xTM
Choose Device Info > Statistics > xTM and the following page appears.
In this page, you can view the statistical information about the recevied and
transmitted data packets at the xTM interfaces.
Click the Reset button to restore the values to zero and recount them.
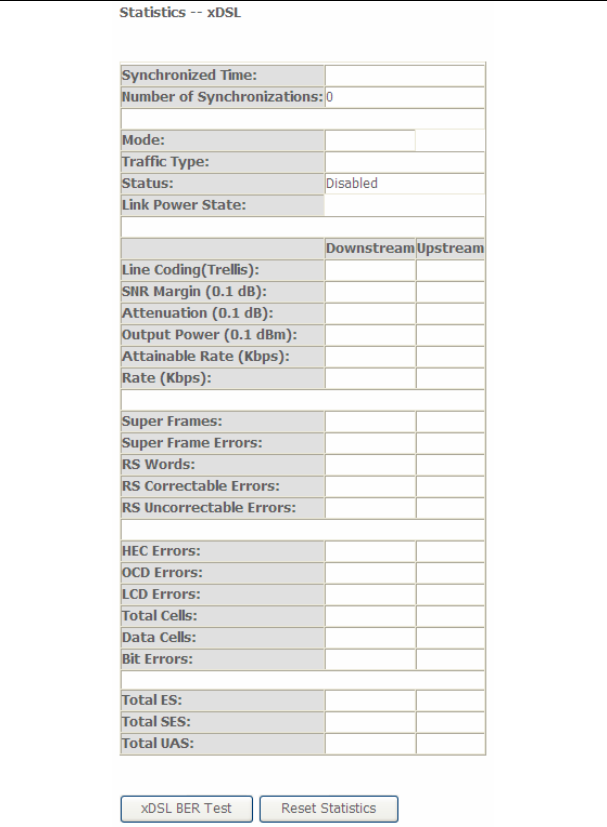
5.1.7 xDSL
Choose Device Info > Statistics > xDSL and the following page appears.
User Manual
17
User Manual
18
In this page, you can view the statistical information about the recevied and
transmitted data packets of the xDSL interfaces.
Click xDSL BER Test to test the xDSL Bit Error Rate.
Click Reset Statistics to restore the values to zero and recount them.
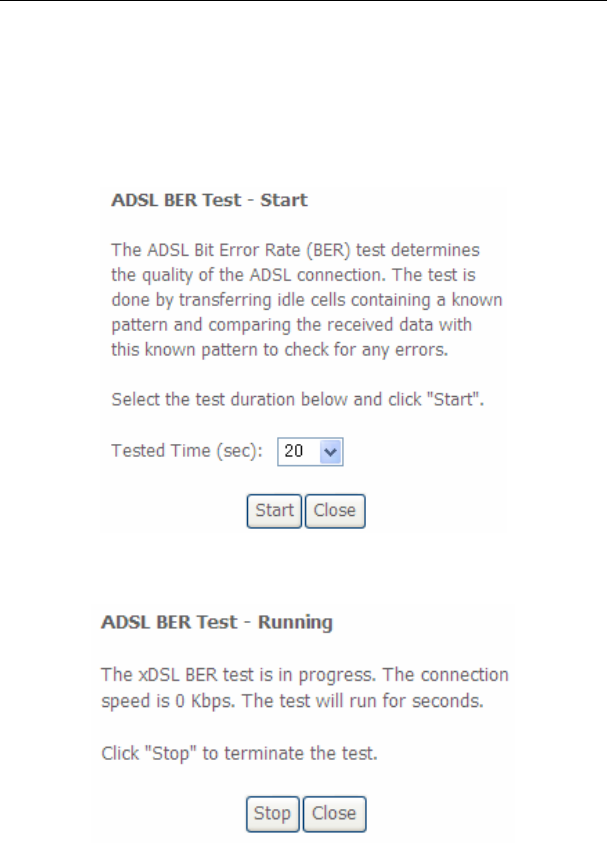
xDSL BER Test
Click xDSL BER Test to perform a bit error rate (BER) test on the DSL line. The test
page is as follows:
The Tested Time (sec) can be 1, 5, 10, 20, 60, 120, 180, 240, 300, or 360. Select a
time in the drop-down list and click Start. The following pages appear.
User Manual
19
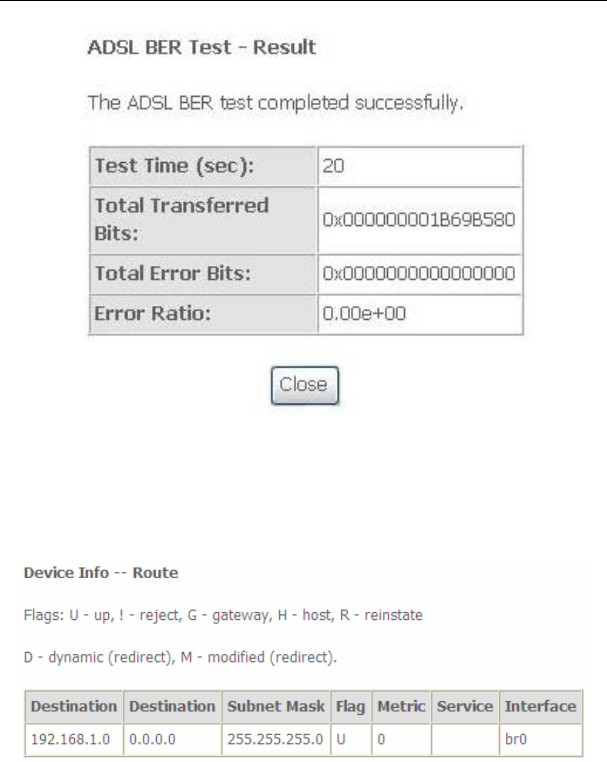
When the ADSL BER test completes, the following page appears.
Note:
If the BER reaches e-5, you cannot access the Internet.
5.1.8 Route
Choose Device Info > Route and the following page appears.
In this page, you can view the route table information.
User Manual
20
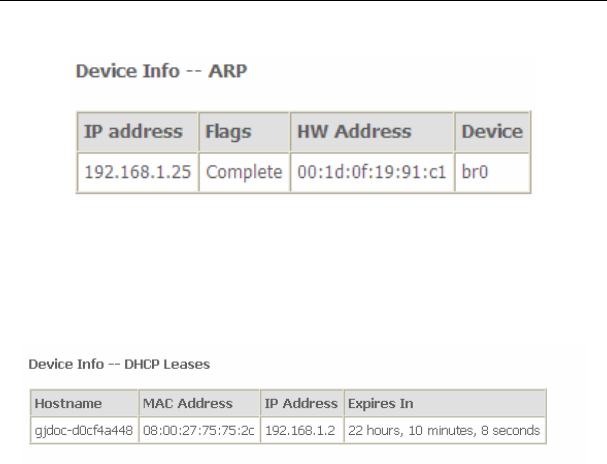
5.1.9 ARP
Choose Device Info > ARP and the following page appears.
In this page, you can view the MAC address and IP address information of the device
connected to the router.
5.1.10 DHCP
Choose Device Info > DHCP and the following page appears.
In this page, you can view the host name, the IP address assigned by the DHCP
server, the MAC address this is corresponding to the IP address, and the DHCP lease
time.
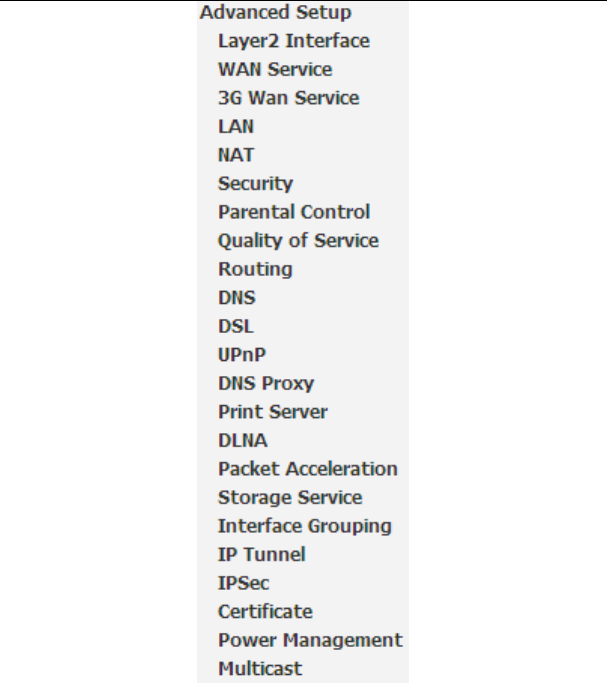
5.2 Advanced Setup
Choose Advanced Setup and the submenus of Advanced Setup are shown as
below:
User Manual
21
User Manual
22
5.2.1 Layer2 Interface
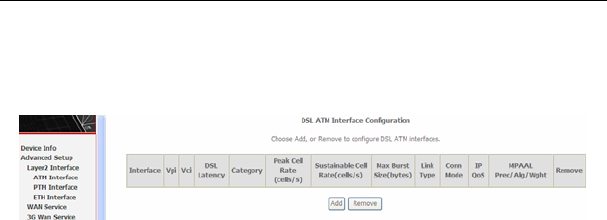
5.2.1.1 ATM Interface
Choose Advanced Setup > Layer2 Interface > ATM Interface . In this page, you
can add or remove to configure DSL ATM Interfaces.
Click Add to add ATM Interface and the following page appears.
User Manual
23
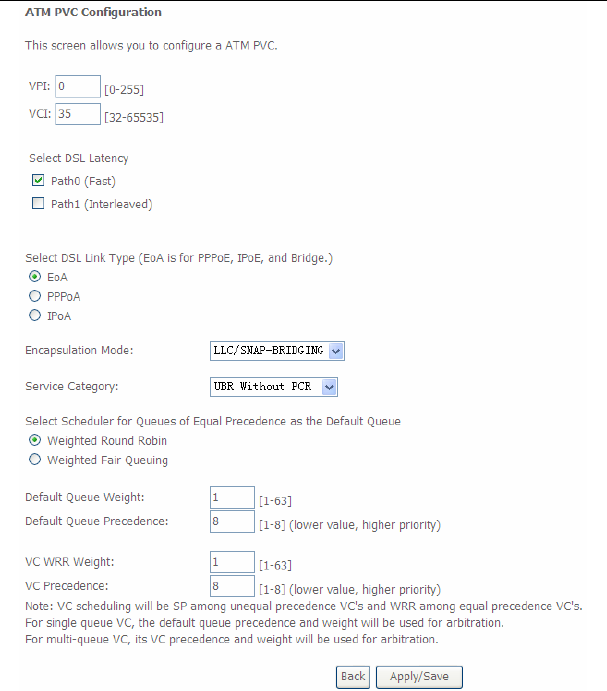
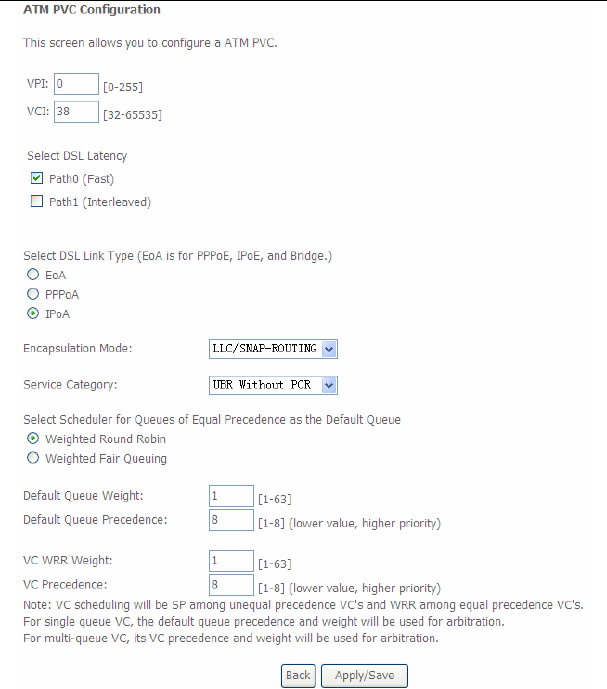
In this page, you can enter this PVC (VPI and VCI) value, and select DSL link type
(EoA is for PPPoE, IPoE, and Bridge.), encapsulation mode, service category.
VPI (Virtual Path Identifier): The virtual path between two points in an ATM
network, and its valid value is from 0 to 255.
VCI (Virtual Channel Identifier): The virtual channel between two points in
an ATM network, ranging from 32 to 65535 (1 to 31 are reserved for known
protocols).
User Manual
24
DSL Link Type: EoA (it is for PPPoE, IPoE, and Bridge), PPPoA, or IPoA
Encapsulation Mode: LLC/SNAP-BRIDGING, or VC/MUX
Service Category: UBR Without PCR, UBR With PCR, CBR, Non Realtime
VBR, Realtime VBR.
Select Scheduler for Queues of Equal Precedence as the Default
Queue: Weighted Round Robin or Weighted Fair Queuing.
Click Apply/Save to save the configuration, and return the following page:
If you want to remove this Interface, please select the Remove check box and click
Remove.
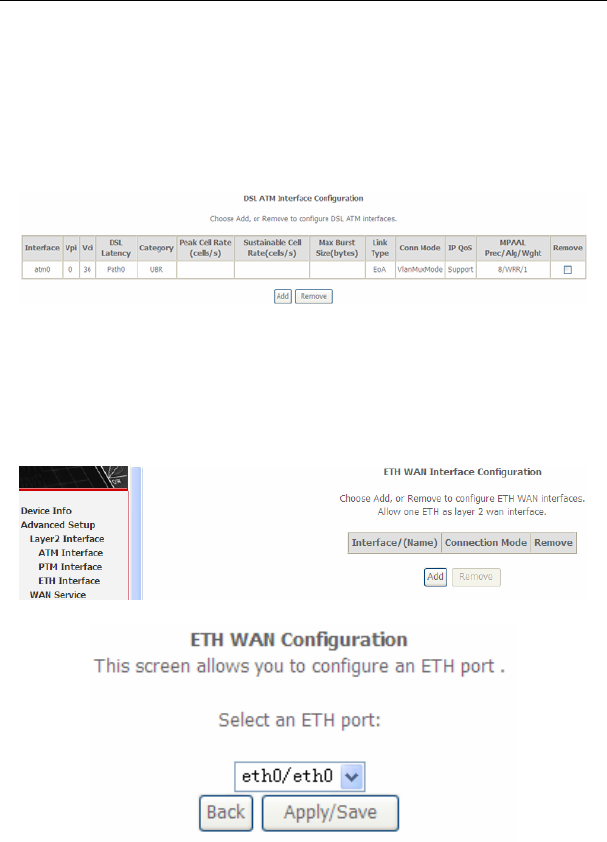
5.2.1.2 ETH Interface
Choose Advanced Setup > Layer2 Interface > ETH Interface, and the following
page appears. In this page, you can add or remove to configure ETH WAN
Interfaces.
Click Add and the following page appears.
User Manual
25
In this page, you can select a ETH port. Click Apply/Save to save configuration.
Note:
If ETH Interface is selected, there are two WAN service types (PPPoE and
IPoE).
5.2.2 WAN Service
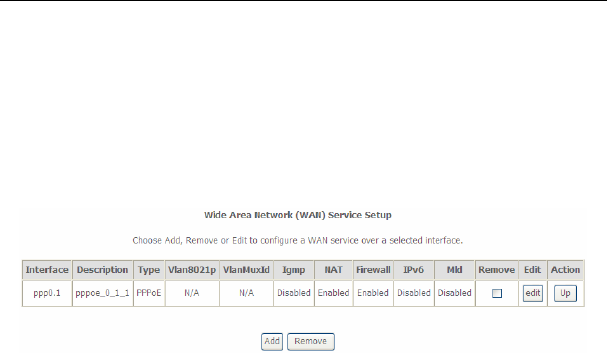
Choose Advanced Setup > WAN Service, and the following page appears.
In this page, you are allowed to add, remove, or edit a WAN service.
5.2.2.1 Adding a PPPoE WAN Service
This section describes the steps for adding the PPPoE WAN service.
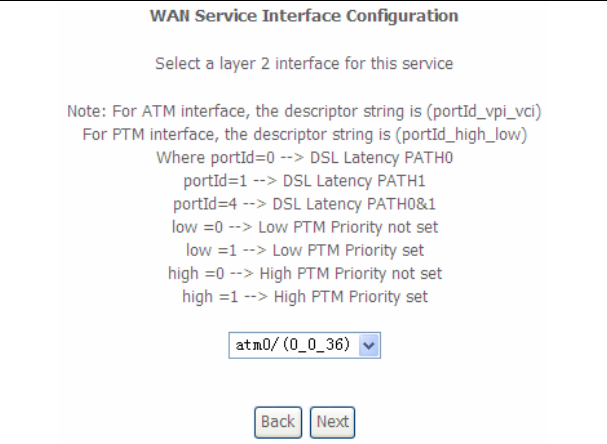
Step1 In the Wide Area Network (WAN) Service Setup page, click the Add
button to display the following page. (At first, you must add a proper ATM
interface for this WAN service.)
User Manual
26
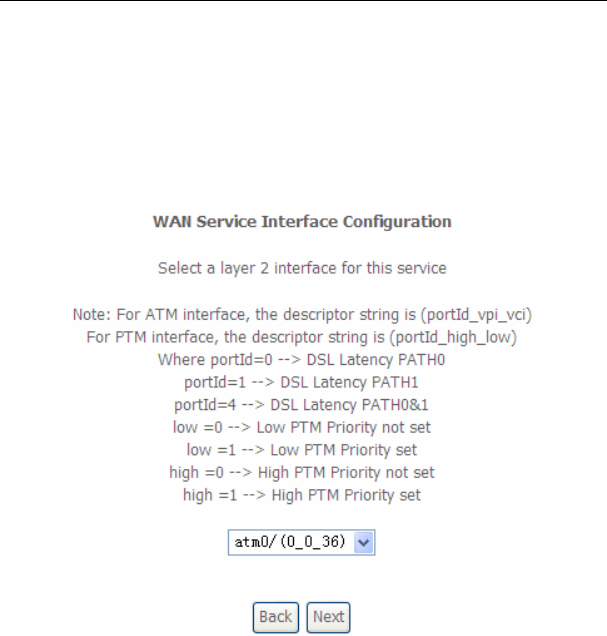
Step2 In this page, you can select a ATM Interface for the WAN service. After
selecting the ATM interface, click Next to display the following page.
User Manual
27
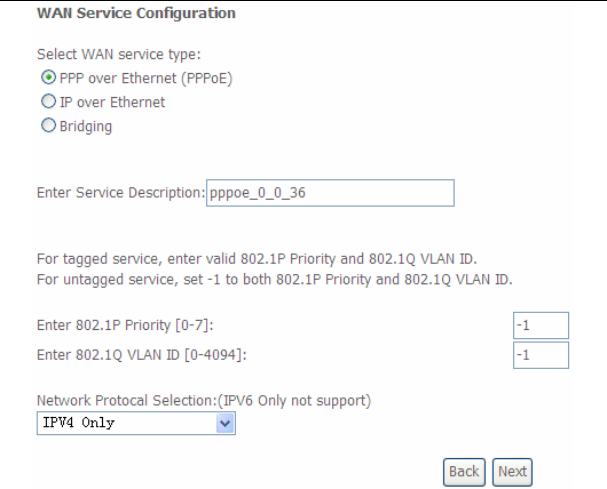
Step3 In this page, select the WAN service type to be PPP over Ethernet
(PPPoE). Click Next to display the following page.
User Manual
28
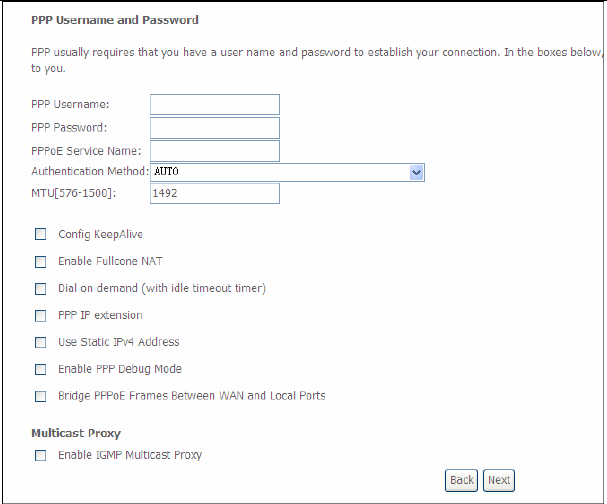
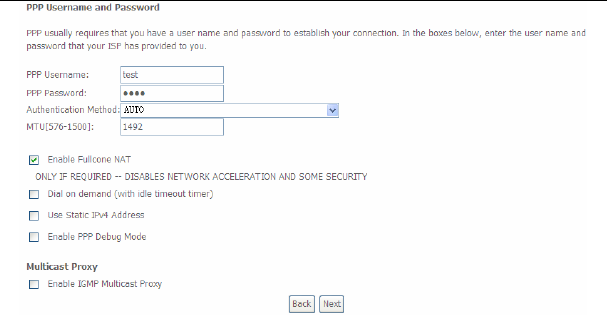
Step4 In this page, you can modify the PPP username, PPP password, PPPoE
service name and authentication method.
PPP Username: The correct user name provided by your ISP.
PPP Password: The correct password provided by your ISP.
PPPoE Service Name: If your ISP provides it to you, please enter it. If not,
do not enter any information.
Authentication Method: The value can be AUTO, PAP, CHAP, or MSCHAP.
Usually, you can select AUTO.
Enable Fullcone NAT:. NAT is one where all requests from the same
internal IP address and port are mapped to the same external IP address
and port. Furthermore, any external host can send a packet to the internal
host, by sending a packet to the mapped external address.
User Manual
29
Dial on demand (with idle timeout timer): If this function is enabled, you
need to enter the idle timeout time. Within the preset minutes, if the modem
does not detect the flow of the user continuously, the modem automatically
stops the PPPoE connection. Once it detects the flow (like access to a
webpage), the modem restarts the PPPoE dialup. If this function is disabled,
the modem performs PPPoE dial-up all the time. The PPPoE connnection
does not stop, unless the modem is powered off and DSLAM or uplink
equipment is abnormal.
PPP IP extension: If you want to configure DMZ Host, you should enable it
first.
Use Static IPv4 Address: If this function is disabled, the modem obtains an
IP address assigned by an uplink equipment such as BAS, through PPPoE
dial-up. If this function is enabled, the modem uses this IP address as the
WAN IP address.
Enable PPP Debug Mode:Enable or disable this function.
Bridge PPPoE Frames Between WAN and Local Ports:Enable or disable
this function.
Enable IGMP Multicast Proxy:If you want PPPoE mode to support IPTV,
enable it.
Step5 After setting the parameters, click Next to display the following page.
User Manual
30
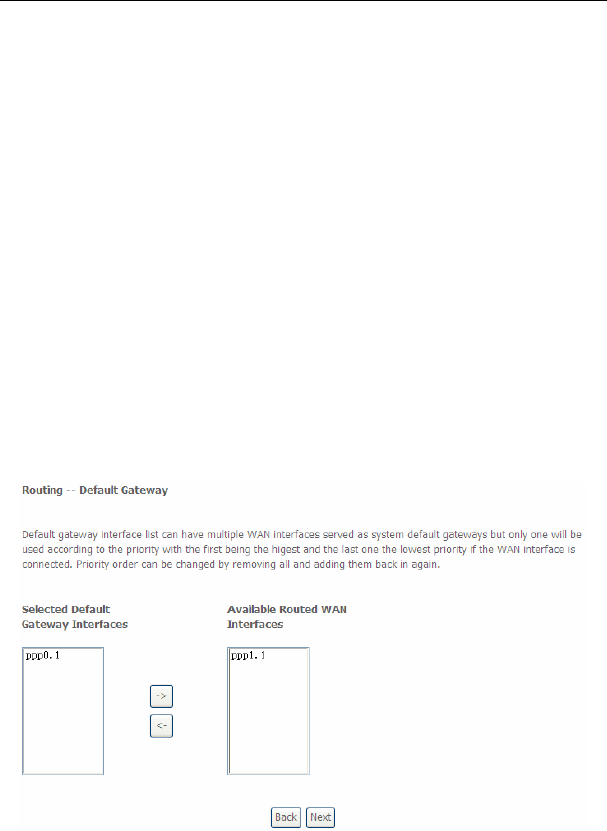
Step6 In this page, select a preferred WAN interface as the system default
gateway and then click Next to display the following page.
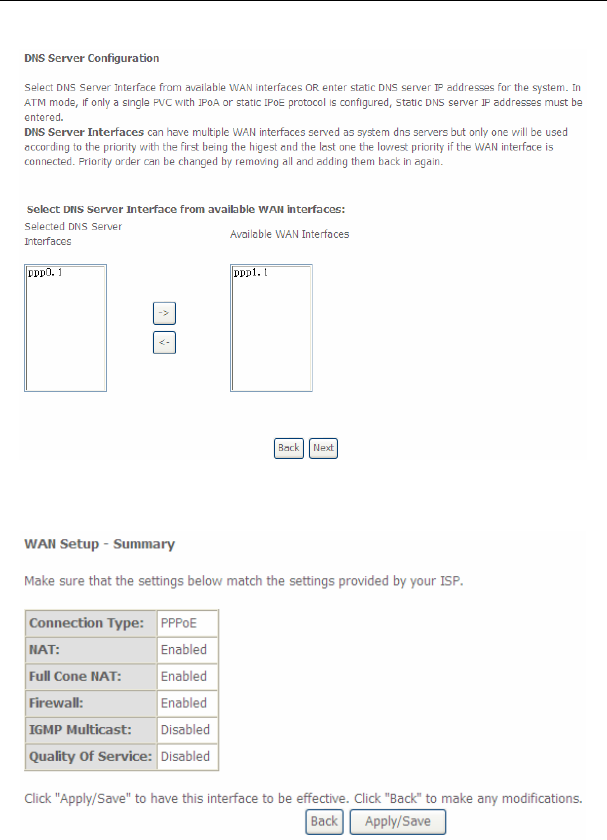
Step7 In this page, you can obtain the DNS server addresses from the selected
WAN interface. Click Next, and the following page appears.
User Manual
31
Step8 In this page, it displays the information about the PPPoE settngs. Click
Apply/Save to save and apply the settings.
5.2.2.2 Adding a MER (IPoE) WAN service
This section describes the steps for adding the MER WAN service.
Step1 In the Wide Area Network (WAN) Service Setup page, click the Add
button to display the following page. (At first, you must add a ATM
interface for this WAN service.)
Step2 Select an ATM Interface, and then click Next to display the following
page.
User Manual
32
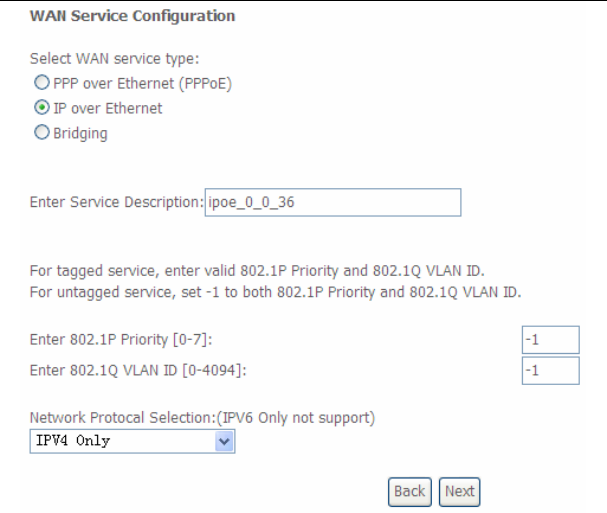
Step3 In this page, select the WAN service type to be IP over Ethernet, enter
the service description for this service. After finishing setting, click Next to
display the following page.
User Manual
33
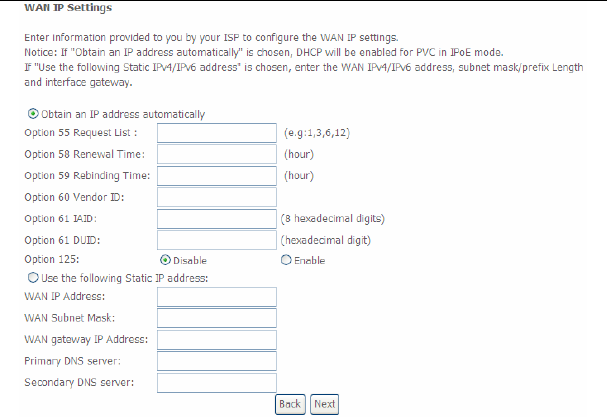
Step4 In this page, you may modify the WAN IP settings. You may select obtain
an IP address automatically or manually enter the IP address provided by
your ISP. Click Next and the following page appears.
Note:
If selecting Obtain an IP address automatically, DHCP will be enabled for PVC in
MER mode.
If selecting Use the following Static IP address, please enter the WAN IP address,
subnet mask and gateway IP address.

User Manual
34
Step5 In this page, you can set the network address translation settings,for
example, enabling NAT, enabling firewall, and enabling IGMP multicast.
After finishing setting, click Next and the following page appears.
Step6 In this page, select a preferred WAN interface as the system default
gateway and then click Next to display the following page.
User Manual
35
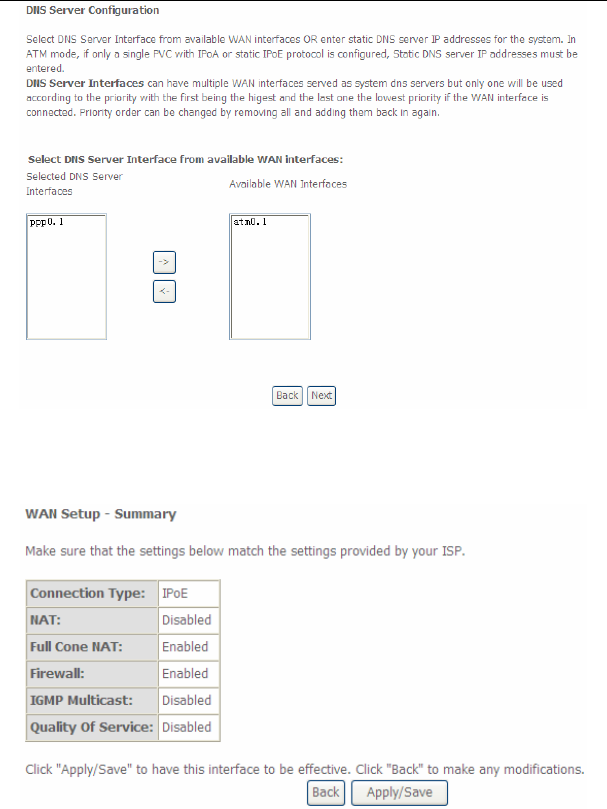
Step7 In this page, you can obtain the DNS server addresses from the selected
WAN interface. After finishing setting, click Next to display the following
page.

User Manual
36
Step8 In this page, it displays the information about the IPoE settngs.Click
Apply/Save to save and apply the settings.
5.2.2.3 Adding a PPPoA WAN service
This section describes the steps for adding the PPPoA WAN service.
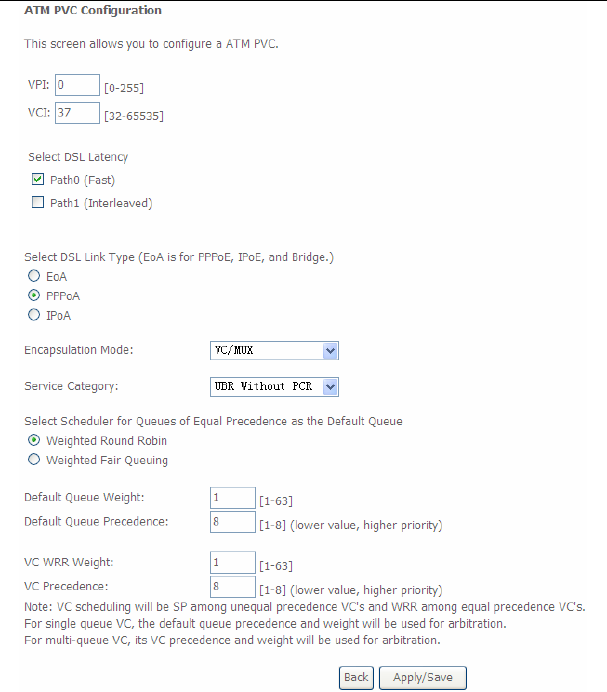
Step1 Choose Advanced Setup > Layer2 Interface > ATM Interface to
dsipaly the DSL ATM Interface Configuration page. In this page, you
need to add a PVC for PPPoA mode. Click the Add button in the DSL
ATM Interface Configuration page to display the following page.
User Manual
37
Step2 Select the DSL link type to be PPPoA, and select the encapsulation
mode to be VC/MUX (according to the uplink equipment). After finishing
setting, click the Apply/Save button to apply the setings.
Step3 Choose WAN Service and click Add to display the following page.
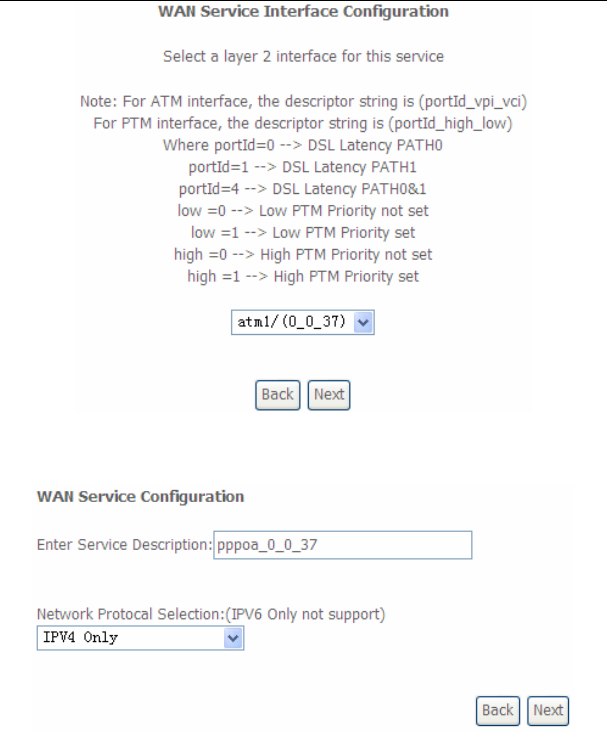
User Manual
38
Step4 Select the proper interface for the WAN service, and then click Next to
display the following page.
Step5 In this page, you may modify the service description. Click Next to
display the following page.
User Manual
39
PPP Username: The correct user name provided by your ISP.
PPP Password: The correct password provided by your ISP.
Authentication Method: The value can be AUTO, PAP, CHAP, or MSCHAP.
Usually, you can select AUTO.
Enable Fullcone NAT:. NAT is one where all requests from the same
internal IP address and port are mapped to the same external IP address
and port. Furthermore, any external host can send a packet to the internal
host, by sending a packet to the mapped external address.
Dial on demand (with idle timeout timer): If this function is enabled, you
need to enter the idle timeout time. Within the preset minutes, if the modem
does not detect the flow of the user continuously, the modem automatically
stops the PPPoA connection. Once it detects the flow (like access to a
webpage), the modem restarts the PPPoA dialup. If this function is disabled,
the modem performs PPPoA dial-up all the time. The PPPoA connnection
does not stop, unless the modem is powered off and DSLAM or uplink
equipment is abnormal.
PPP IP extension: If you want to configure DMZ Host, you should enable it
first.
Use Static IPv4 Address: If this function is disabled, the modem obtains an
IP address assigned by an uplink equipment such as BAS, through PPPoA
User Manual
40
dial-up. If this function is enabled, the modem uses this IP address as the
WAN IP address.
Enable PPP Debug Mode:Enable or disable this function.
Enable IGMP Multicast Proxy: If you want PPPoE mode to support IPTV,
enable it.
Step6 In this page, you can enter the PPP username and PPP password
provided by your ISP. Select the authentication method according to your
requirement. After finishing setting, click Next to display the following
page.
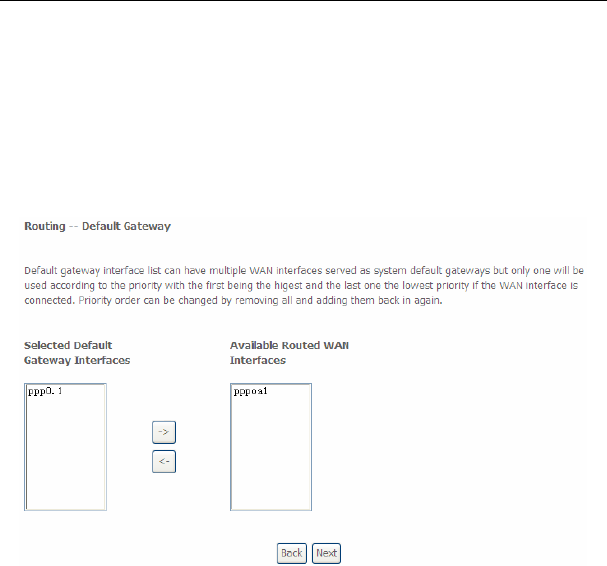
Step7 In this page, select a preferred WAN interface as the system default
gateway and then click Next to display the following page.
User Manual
41
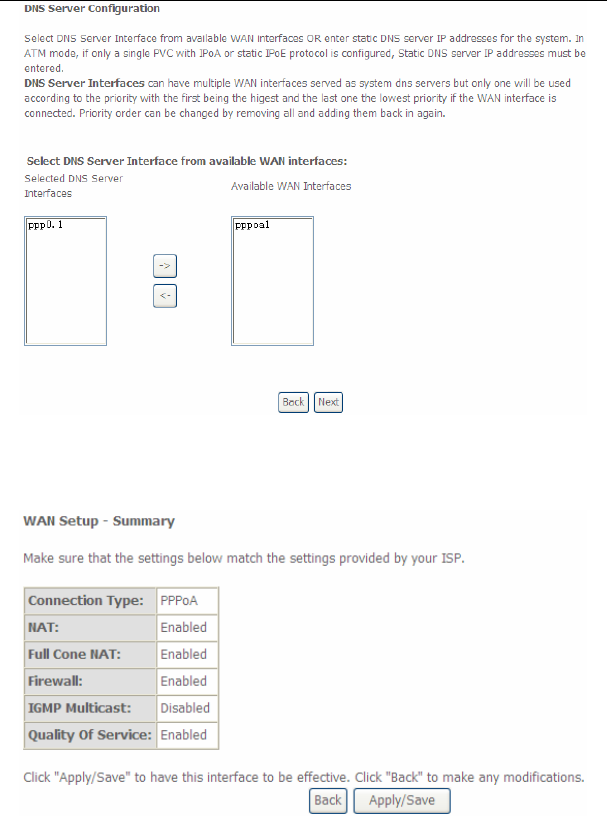
Step8 In this page, you can obtain the DNS server addresses from the selected
WAN interface. After finishing setting, click Next to display the following
page.

User Manual
42
Step9 In this page, it displays the information about the PPPoA settngs.Click
Apply/Save to apply the settings. You can modify the settings by clicking
the Back button if necessary.
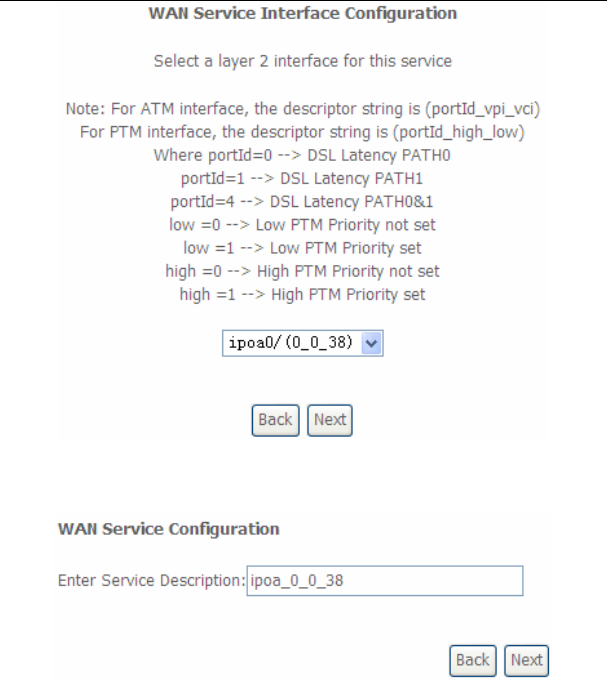
5.2.2.4 Adding an IPoA WAN service
This section describes the steps for adding the IPoA WAN service.
Step1 Choose Advanced Setup > Layer2 Interface > ATM Interface to
dsipaly the DSL ATM Interface Configuration page. In this page, you
need to add a PVC for IPoA mode. Click the Add button in the DSL ATM
Interface Configuration page to display the following page.
User Manual
43
Step2 Select the DSL link type to be IPoA, and select the encapsulation mode
to be LLC/SNAP-ROUTING (according to the uplink equipment). After
finishing setting, click the Apply/Save button to save the settings.
Step3 Choose WAN Service and click Add to display the following page.
User Manual
44
Step4 Select the proper interface for the WAN service ,and then click Next to
display the following page.
Step5 In this page, you may modify the service description. Click Next to
display the following page.
User Manual
45
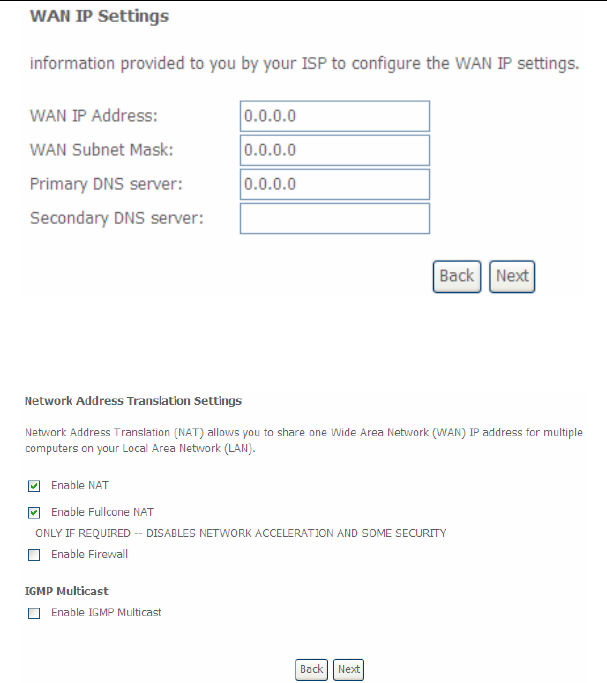
Step6 In this page, enter the WAN IP address, the WAN subnet mask, and
primary DNS server provided by your ISP and then click Next to display
the following page.
In this page, Network Address Translation (NAT) allows you to share one Wide
Area Network (WAN) IP address for multiple computers on your Local Area
Network (LAN).
If you do not want to enable NAT, and wish the user of modem to access the
Internet normally, you need to add a route on the uplink equipment. Otherwise, the
access to the Internet fails. Normally, please enable the NAT function.
User Manual
46
Step7 After finishing setting, click Next to display the following page.
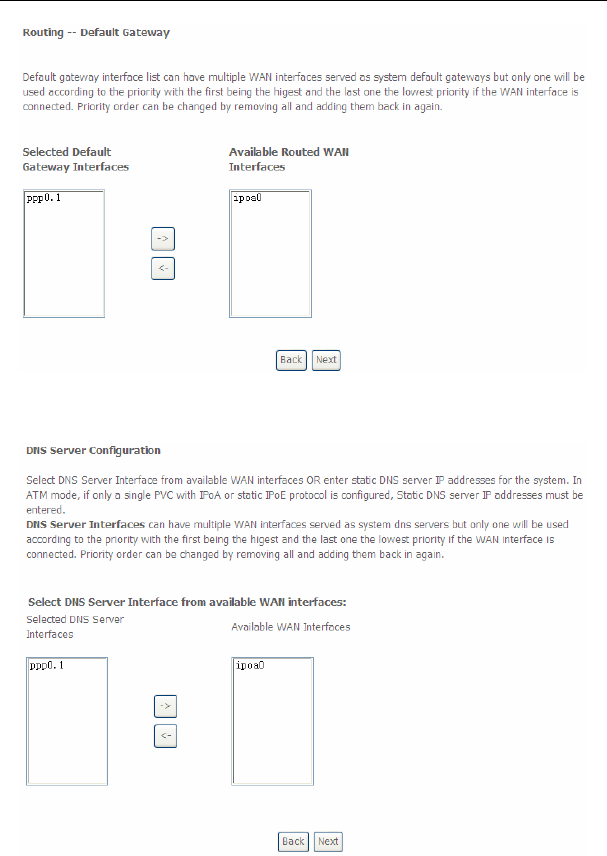
Step8 In this page, select a preferred WAN interface as the system default
gateway and then click Next to display the following page.
User Manual
47
Step9 In this page, you can obtain the DNS server addresses from the selected
WAN interface. After finishing setting, click Next to display the following
page.
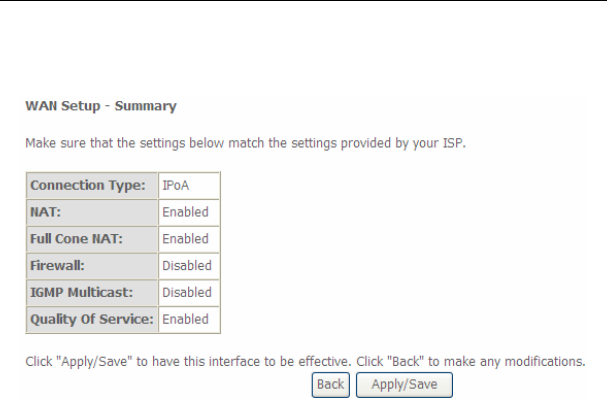
Step10 In this page, it displays the information about the IPoA settngs. Click
Apply/Save to save and apply the settings. You can modify the settings
by clicking the Back button if necessary.
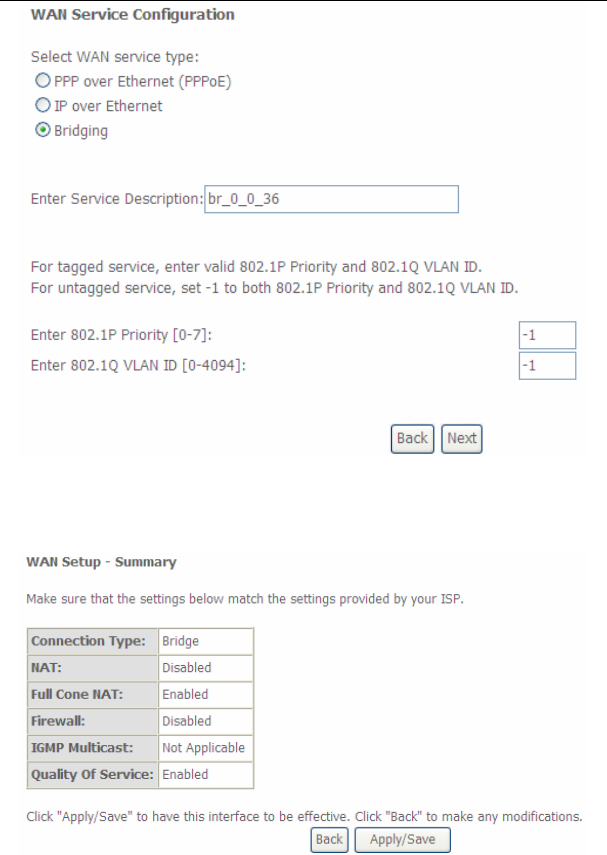
5.2.2.5 Adding a Bridge WAN service
This section describes the steps for adding the Bridge WAN service.
Step1 In the Wide Area Network (WAN) Service Setup page, click the Add
button to display the following page. (At first, you must add a proper ATM
interface for this WAN service.) Click the Add button to display the
following page.

User Manual
48
Step2 Select the proper ATM Interface and then click Next to display the
following page.
User Manual
49
Step3 In this page, you can select the WAN service type, and modify the service
description for this service. After finishing setting, click Next to display the
following page.
User Manual
50
Step4 In this page, it displays the information about the bridge settngs. Click
Apply/Save to save and apply the settings. You can modify the settings
by clicking the Back button if necessary.
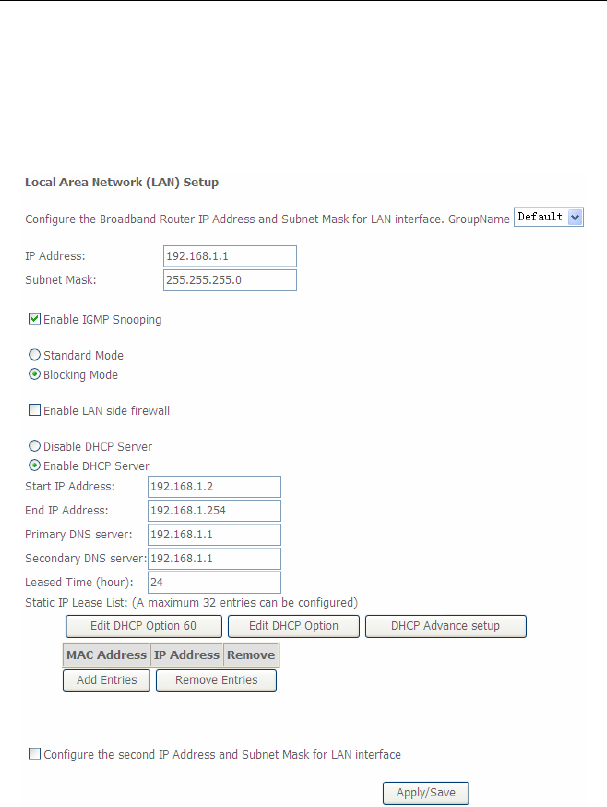
5.2.3 LAN Configuration
Choose Advanced Setup > LAN, and the following page appears.
User Manual
51
In this page, you can configure an IP address for the DSL router, enable IGMP
snooping, enable or disable the DHCP server, edit the DHCP option, configure the
DHCP advanced setup and set the binding between a MAC address and an IP
address.
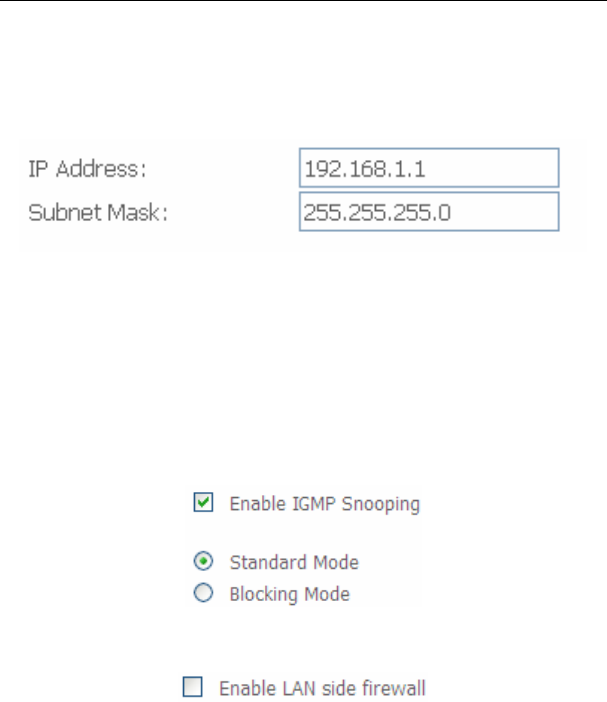
Configuring the Private IP Address for the DSL Router
In this page, you can modify the IP address of the device. The preset IP address is
192.168.1.1.
Enabling IGMP Snooping
IGMP snooping enables the router to forward multicast traffic intelligently, instead of
flooding all ports in the VLAN. With IGMP snooping, the router listens to IGMP
membership reports, queries and leave messages to identify the switch ports that are
members of multicast groups. Multicast traffic will only be forwarded to ports identified
as members of the specific multicast group or groups.
Enabling the LAN Side Firewall
Firewall can prevent unexpected traffic on the Internet from your host in the LAN.
In this page, you can enable or disable the LAN side firewall.
User Manual
52
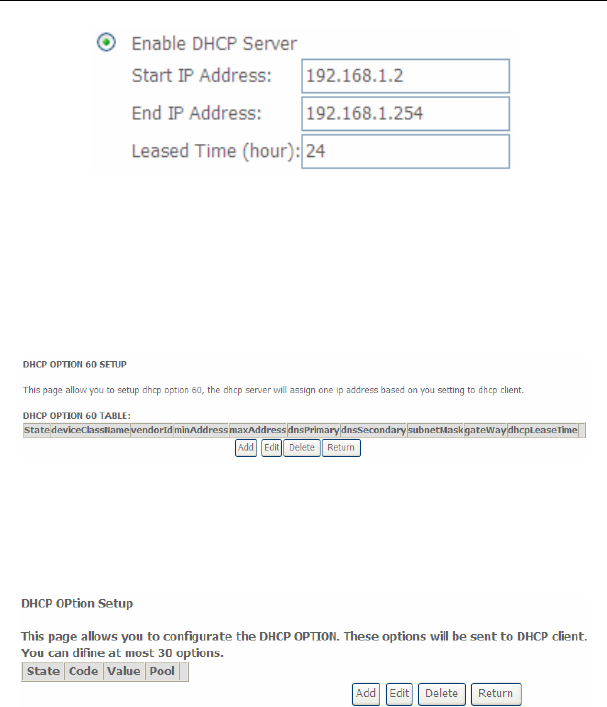
Configuring the DHCP Server
If you enable the DHCP sever, the clients will automatically acquire the IP address
from the DHCP server. If the DHCP server is disabled, you need to manually set the
start IP address, end IP address and the lease time for the clients in the LAN.
Editing the DHCP Option60
Click the Edit DHCP Option60 button in the Local Area Network (LAN) Setup page
to display the DHCP Option60 Setup page.
In this page, you can add, edit or delete the DHCP60 options.
Editing the DHCP Option
Click the Edit DHCP Option button in the Local Area Network (LAN) Setup page to
display the DHCP Option Setup page.
In this page, you can add, edit or delete the DHCP options, and these options will be
sent to the DHCP client.
User Manual
53
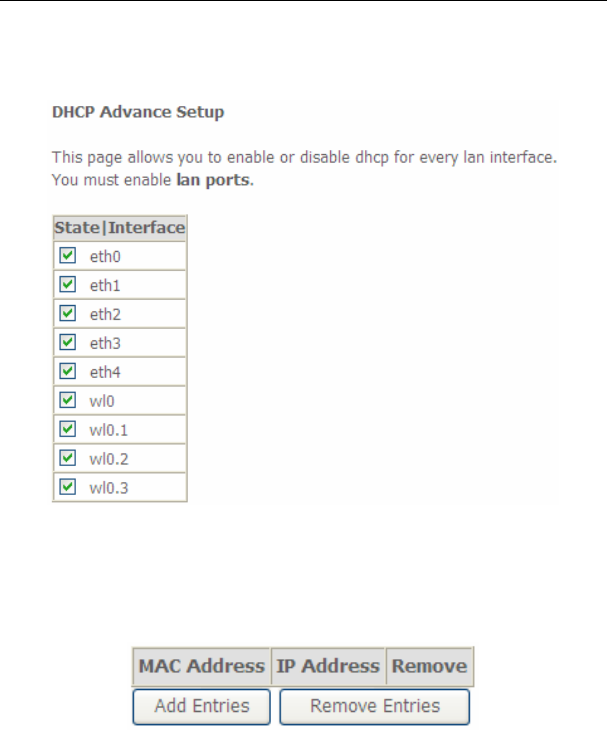
DHCP Advanced Setup
Click the DHCP Advance Setup button in the Local Area Network (LAN) Setup
page to display the following page. In this page, you can enable or disable DHCP for
every LAN interface.
Configuring the DHCP Static IP Lease List
The lease list of static IP address can reserve the static IP addresses for the hosts
with the specific MAC addresses. When a host whose MAC address is in the lease
list of static IP address requests the DHCP server for an IP address, the DHCP server
assigns the reserved IP address to the host.
Click the Add Entries button in the Local Area Network (LAN) Setup page to
display the DHCP Static IP Lease page.
User Manual
54
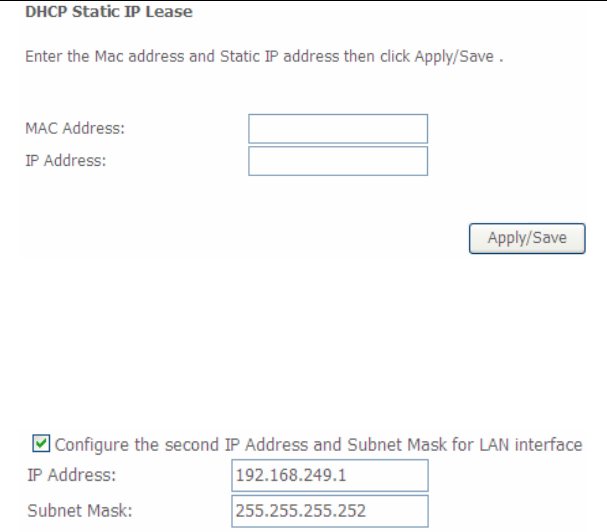
In this page, enter the MAC address of the LAN host and the static IP address that
is reserved for the host, and then click the Apply/Save button to apply the settings.
Configuring the Second IP Address and Subnet Mask for a LAN
Interface
In the Local Area Network (LAN) Setup page, you are allowed to set the second IP
address and the subnet mask for a LAN interface.
After enabling Configure the second IP Address and Subnet Mask for LAN
interface, enter an IP address and a subnet mask for the LAN interface.
After finishing setting, click the Apply/Save button to apply the settings.
5.2.3.1 IPv6 Auto-configuration
Click Advanced Setup > LAN >IPv6 Autoconfig, and the following page appears.

User Manual
55
In this page, you can set an IP address for the DSL IPv6 router, enable the
DHCPv6 server, enable RADVD and enable the MLD snooping function.
Enable DHCPv6 Server: WIDE-DHCPv6 is an open-source implementation
of dynamic host configuration protocol for IPv6 (DHCPv6) originally
developed by the KAME project. The implementation mainly complies with
the following standards: RFC3315, RFC3319, RFC3633, RFC3646,
RFC4075, RFC 4272 etc.
User Manual
56
Enable RADVD: The router advertisement daemon (RADVD) is run by Linux
or BSD systems acting as IPv6 routers. It sends router advertisement
messages, specified by RFC2461, to a local Ethernet LAN periodically and
when requested by a node sending a router solicitation message. These
messages are required for IPv6 stateless auto-configuration.
Enable MLD Snooping: Multicast Listener Discovery Snooping (MLD
Snooping) is an IPv6 multicast constraining mechanism that runs on Layer 2
devices to manage and control IPv6 multicast groups. By analyzing received
MLD messages, a Layer 2 device running MLD Snooping establishes
mappings between ports and multicast MAC addresses and forwards IPv6
multicast data based on these mappings.
After finishing setting, click the Save/Apply button to apply the settings.
5.2.4 NAT
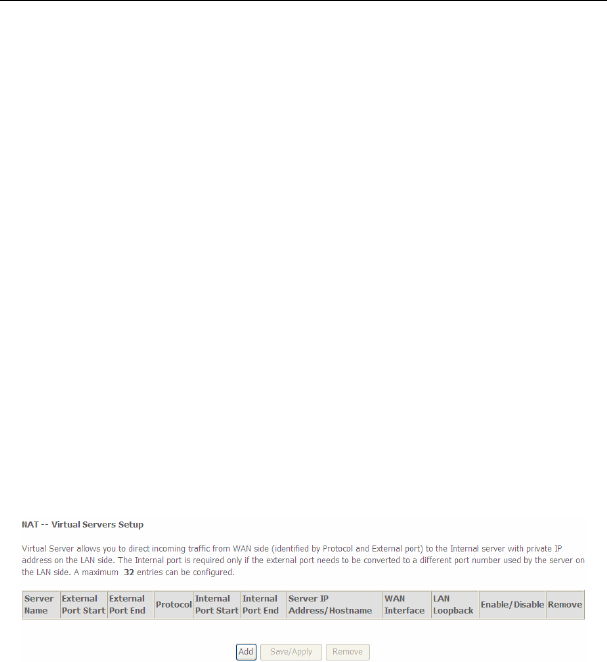
5.2.4.1 Virtual Servers
Firewall can prevent unexpected traffic on the Internet from your host on the LAN.
The virtual server can create a channel that can pass through the firewall. In that
case, the host on the Internet can communicate with a host on your LAN within
certain port range.
Choose Advanced Setup > NAT > Virtual Servers, and the following page
appears.
In this page, you are allowed to add or remove a virtual server entry.
To add a virtual server, do as follows:
Step 1 Click the Add button to display the following page.
User Manual
57
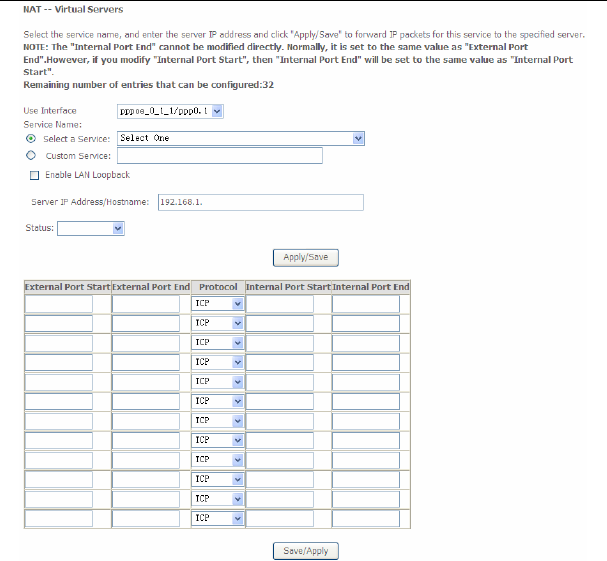
Use interface: Select an interface that you want to configure.
Select a Service: Select a proper service in the drop-down list.
Custom Server: Enter a new service name to establish a user service type.
Server IP Address: Assign an IP address to virtual server.
External Port Start: When selecting a service, the port number will
automatically be displayed. You can modify it if necessary.
External Port End: When selecting a service, the port number will
automatically be displayed. You can modify it if necessary.
Protocol: You may select TCP/UDP, TCP, or UDP in the drop-down list.
Internal Port Start: When selecting a service, the port number will
automatically be displayed. You can modify it if necessary.
User Manual
58
Internal Port End: When selecting a service, the port number will
automatically be displayed. You can modify it if necessary.
Step 2 After finishing setting, click Save/Apply to save and apply the settings.
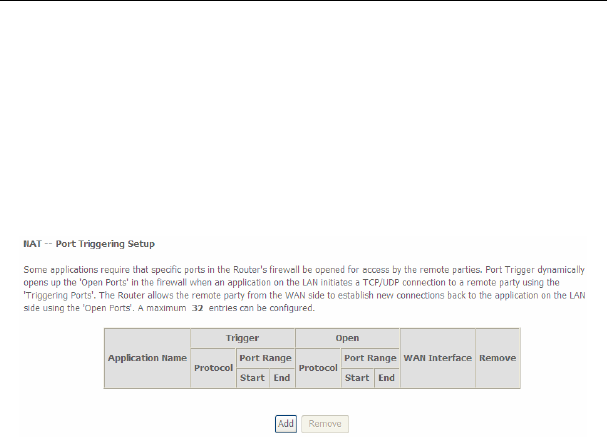
5.2.4.2 Port Triggering
Some applications need some ports to be opened in the firewall for the remote
access. When an application initializes a TCP/UDP to connect to a remote user,
port triggering dynamically opens the open ports of the firewall.
Choose Advanced Settings > NAT > Port Triggering, and the following page
appears.
In this page, you may add or remove an entry of port triggering.
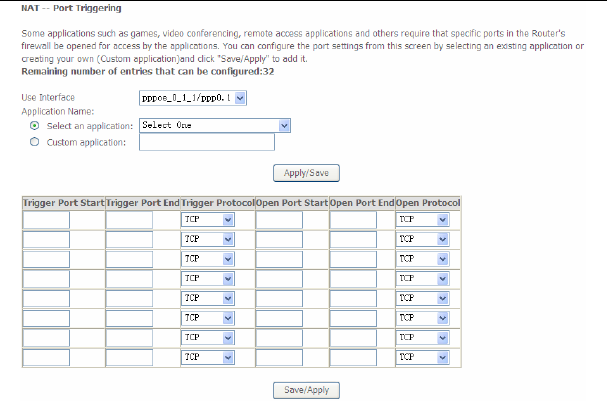
Click the Add button to display the following page.
User Manual
59
Use interface: Select an interface that you want to configure.
Select an application: Select a proper application in the drop-down list.
Custom application: Manually define an application.
Trigger port Start: The start port number that LAN uses to trigger the open
port.
Trigger port End: The end port number that LAN uses to trigger the open
port.
Trigger Protocol: Select the application protocol. You may select TCP/UDP,
TCP, or UDP.
Open Port Start: The start port number that is opened to WAN.
Open Port End: The end port number that is opened to WAN.
Open Protocol: Select the proper protocol that is opened to WAN. You may
select TCP/UDP, TCP, or UDP.
After finishing setting, click Save/Apply to apply the settings.
Note:

User Manual
60
You can use a single port number, several port numbers separated by commas,
port blocks consisting of two port numbers separated by a dash, or any
combination of these, for example 80, 90-140, 180.
5.2.4.3 DMZ Host
DMZ allows all the ports of a PC on your LAN to be exposed to the Internet. Set the
IP address of the PC to be DMZ host, so that the DMZ host will not be blocked by
firewall.
Choose Advanced Setup > NAT > DMZ host to display the following page.
In this page, enter the IP address of the DMZ host.
After finishing the settings, click the Apply/Save button to apply the settings.
If you want to clear the DMZ function of the host, please delete the IP address of
the host in the field of DMZ Host IP Address, and then click the Apply/Save
button.
5.2.5 Security
Firewall
Choose Security > Firewall and the following page appears.
Click Modify Firewall or Remove Firewall to modify or remove the firewall. And
click Modify Rule or Remove Rule to modify or remove the rule.
User Manual
61
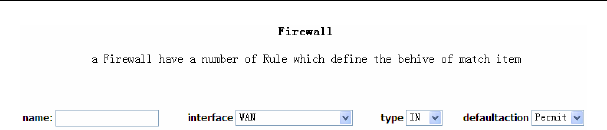
Click Add Firewall, and the following page appears.
name: The name of firewall.
interface: You can select LAN or WAN from the drop-down list.
type: You can select IN or OUT from the drop-down list.
defaultaction: You can select Permit or Drop from the drop-down list.
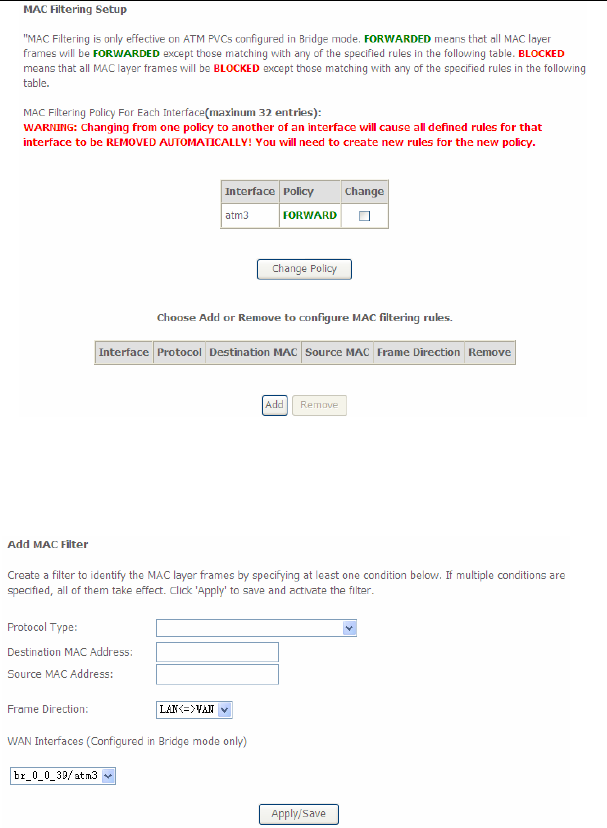
MAC Filtering Setup
In some cases, you may want to manage Layer2 MAC address to block or permit a
computer within the home network. When you enable MAC filter rules, the DSL
router serves as a firewall that works at layer 2.
Note:
MAC filtering is only effective on ATM PVCs configured in bridge mode.
Choose Security > MAC Filtering and the following page appears.
User Manual
62
In this page, you can add or remove the MAC filtering rule. You may change the MAC
filtering policy from FORWARDED to BLOCKED by clicking the Change Policy
button.
Click the Add button to display the following page.
User Manual
63
Protocol Type: Select the proper protocol type.
Destination MAC Address: Enter the destination MAC address.
Source MAC Address: Enter the source MAC address.
Frame Direction: The direction of transmission frame.
WAN Interface (Configured in bridge mode only): Select the proper WAN
interface in the drop-down list.
After finishing setting, click Apply/Save to save and apply the filtering rule.
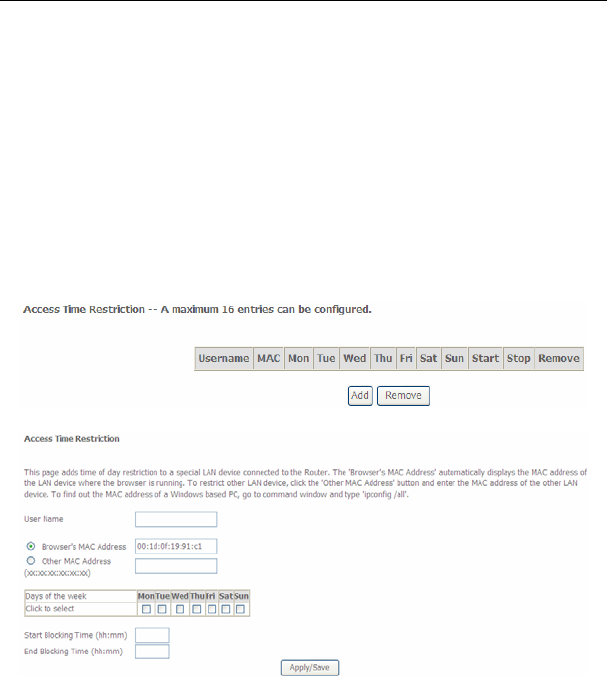
5.2.6 Parental Control
Time Restriction
Choose Advanced Setup > Parental Control > Time Restriction, and the
following page appears.
Click the Add button to display the following page.
This page is used to control the time restriction to a special LAN device that
connects to the DSL router. In this page, se the user name and configure the time
settings.
After finishing setting, click the Apply/Save button to save and apply the settings.

User Manual
64
Url Filter
Click Advanced Setup > Parental Control > Url Filter, and the following page
appears.
Thisp age is used to prevent the LAN users from accessing some Websites in the
WAN.
In this page, you may select the Exclude URL list type or the Include URL list type.
If you select the Exclude URL list type, it means that the URLs in the list are not
accessible. If you select the select the Include URL list type, you are allowed to
access the the URLs in the list.
Click the Add button to display the following page.
In this page, enter the URL address and its corresponding port number. For
example, enter the URL address http://www.google.com and the port number 80,
and then click the Apply/Save button. See the following figure:
User Manual
65
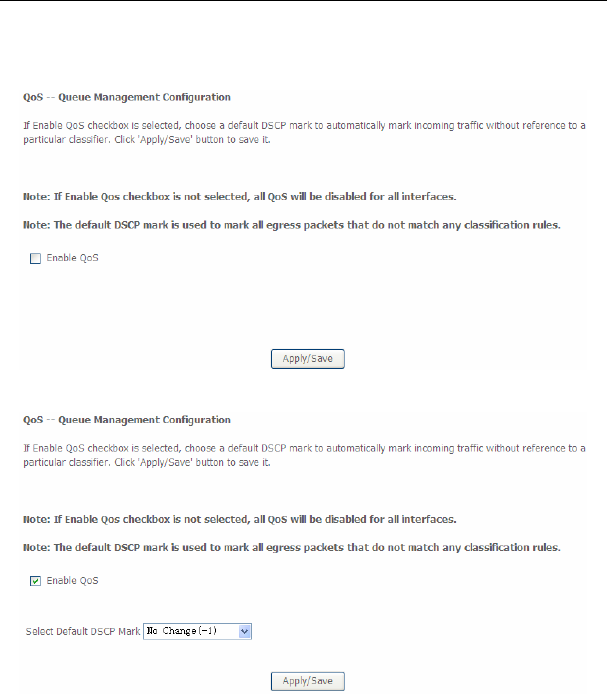
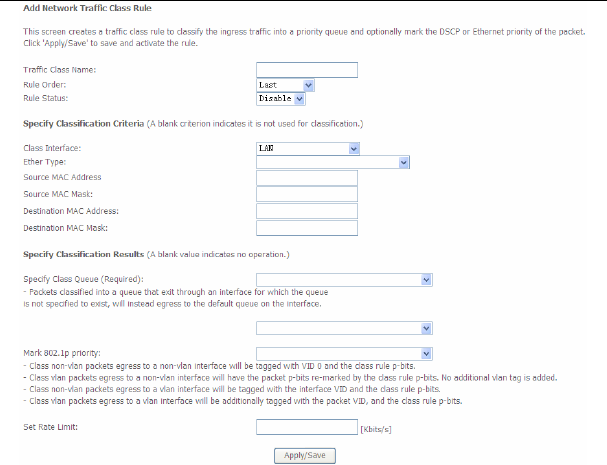
5.2.7 Quality of Service
Enabling QoS
Choose Advance Setup > Quality of Service and the following page appears.
Select Enable QoS to enable QoS and configure the default DSCP mark.
In this page, enable the QoS function and select the default DSCP mark.
After finishing setting, click Apply/Save to save and apply the settings.
Note:
User Manual
66
If the Enable Qos checkbox is not selected, all QoS will be disabled for all
interfaces. The default DSCP mark is used to mark all egress packets that do
not match any classification rules.
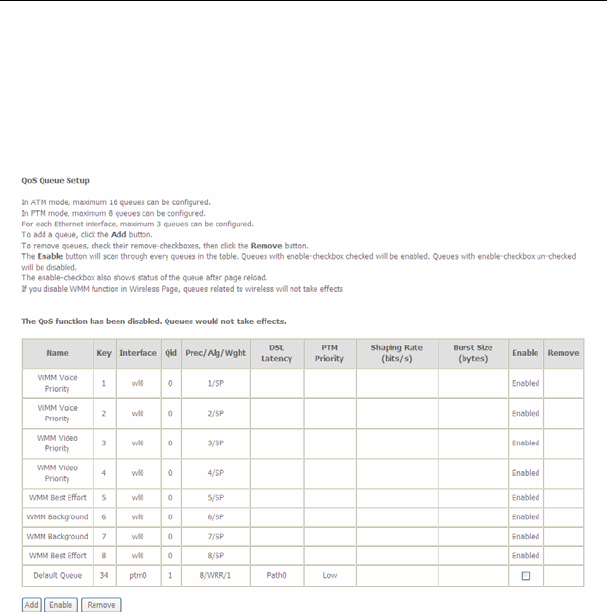
Queue Configuration
Choose Advanced Setup > Quality of Service > QoS Queue, and the following
page appears.
In this page, you can enable, add or remove a QoS rule.
Note:
The lower integer value for precedence indicates the higher priority.
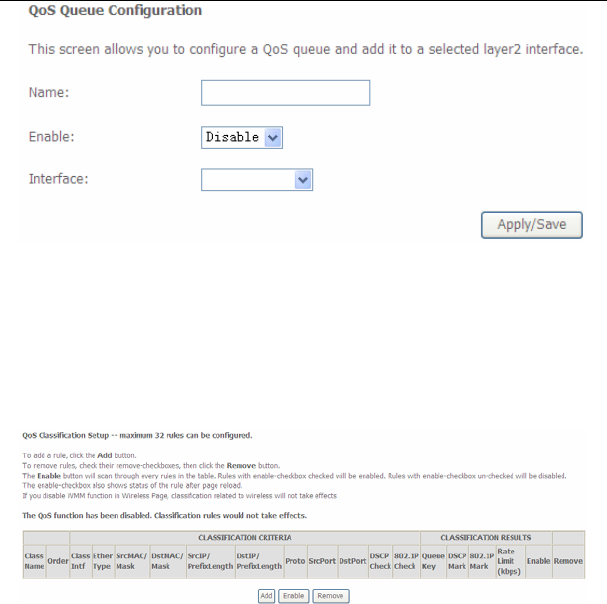
Click the Add button to display the following page.
User Manual
67
Name: Enter the name of QoS queue.
Enable: Enable or disable the QoS queue.
Interface: Select the proper interface for the QoS queue.
After finishing setting, click Apply/Save to save and apply the settings.
QoS Classification
Choose Advanced Setup > Quality of Service > Qos Classification and the
following page appears.
In this page, you can enable, add or remove a QoS classification rule.
Click the Add button to display the following page.
User Manual
68
5.2.8 Routing
Default Gateway
Choose Advanced Setup > Routing > Default Gateway, and the following page
appears.

User Manual
69
In this page, you can modify the default gateway settings.
Select a proper WAN interface in the drop-down list of Selected WAN Interface as
the system default gateway.
After finishing setting, click Apply/Save to save and apply the settings.
Static Route
Choose Advanced Setup > Routing > Static Route and the following page
appears.
In this page, you can add or remove a static routing rule.
Click the Add button to display the following page.
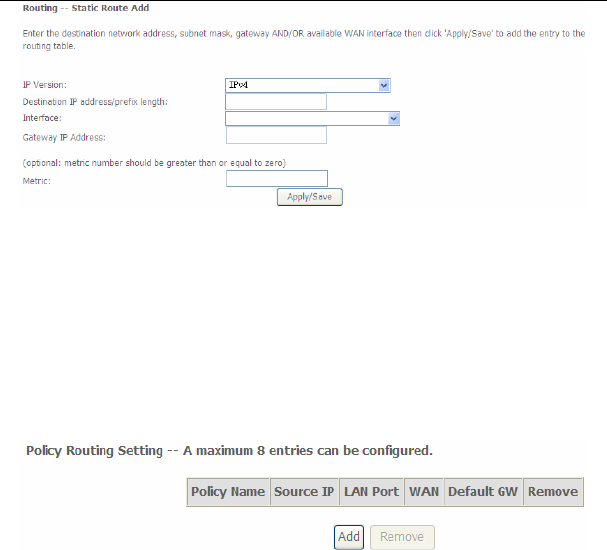
User Manual
70
IP Version: Select the IP version.
Destination IP address/prefix length: Enter the destination IP address.
Interface: select the proper interface for the rule.
Gateway IP Address: The next-hop IP address.
Metric: The metric value of routing.
After finishing setting, click Apply/Save to save and apply the settings.
Policy Routing
Choose Advanced Setup > Routing > Policy Routing and the following page
appears.
In this page, you can add or remove a static policy rule.
Click the Add button to display the following page.
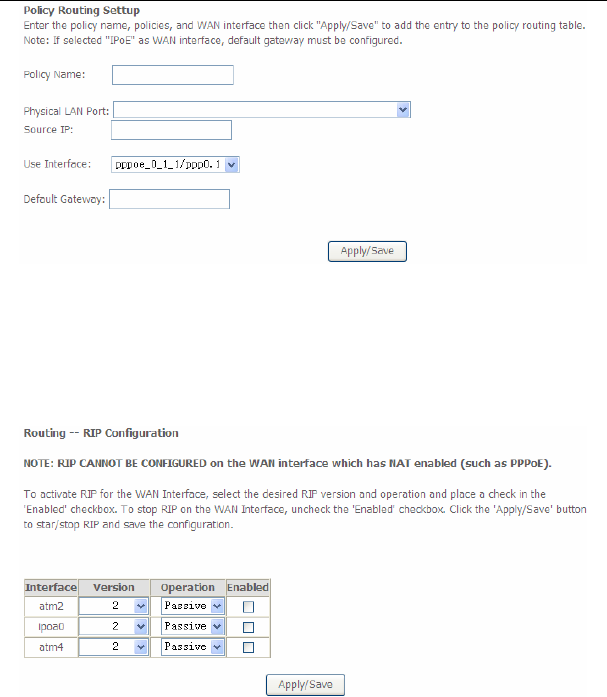
User Manual
71
In this page, enter the policy name, source IP and default gateway, and select the
physical LAN port and interface.
After finishing setting, click Apply/Save to save and apply the settings.
RIP
Choose Advanced Setup > Routing > RIP and the following page appears.
In this page, if you want to configure an individual interface, select the desired RIP
version and operation, and then select the Enabled checkbox for the interface.
After finishing setting, click Apply/Save to save and apply the settings.
User Manual
72
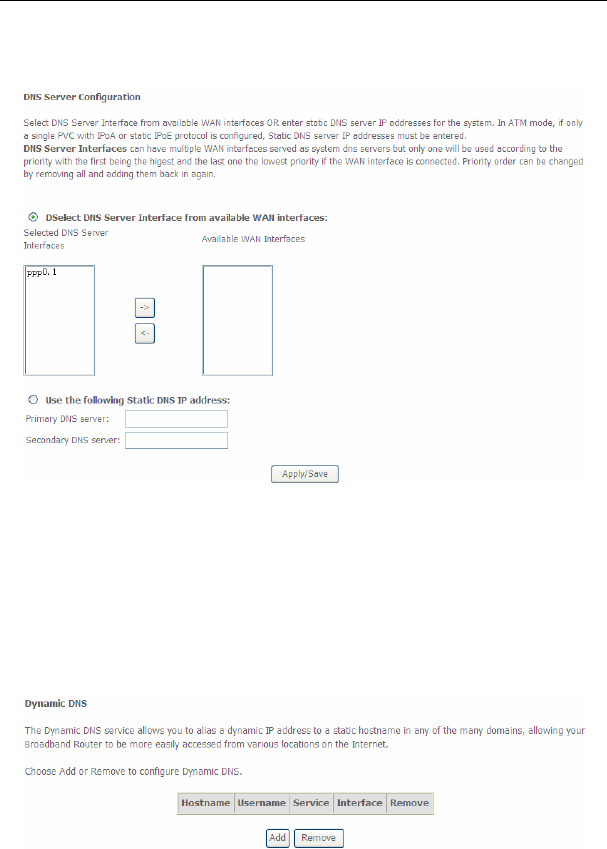
5.2.9 DNS
DNS Server
Choose Advanced Setup > DNS > DNS Server and the following page appears.
In this page, you can select a DNS server interface from the available interfaces,
manually enter the DNS server addresses, or obtain the DNS address from a WAN
interface.
After finishing setting, click Apply/Save to save and apply the settings.
Dynamic DNS
Choose Advanced Setup > DNS > Dynamic DNS and the following page
appears.
User Manual
73
In this page, you are allowed to modify the DDNS settings.
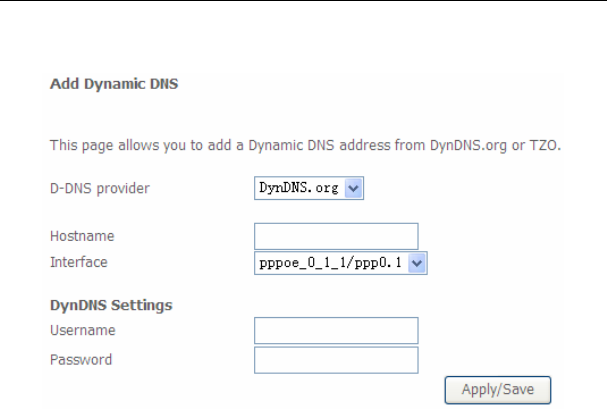
Click the Add button to display the following page.
D-DNS provider: Select a proper DDNS server in the drop-down list.
Hostname: It is the domain name and it can be modified.
Interface: The interface that the packets pass through on the DSL router.
Username: Enter the username for accessing the DDNS management
interface.
Password: Enter the password for accessing the DDNS management
interface.
After finishing setting, click Apply/Save to save and apply the settings.
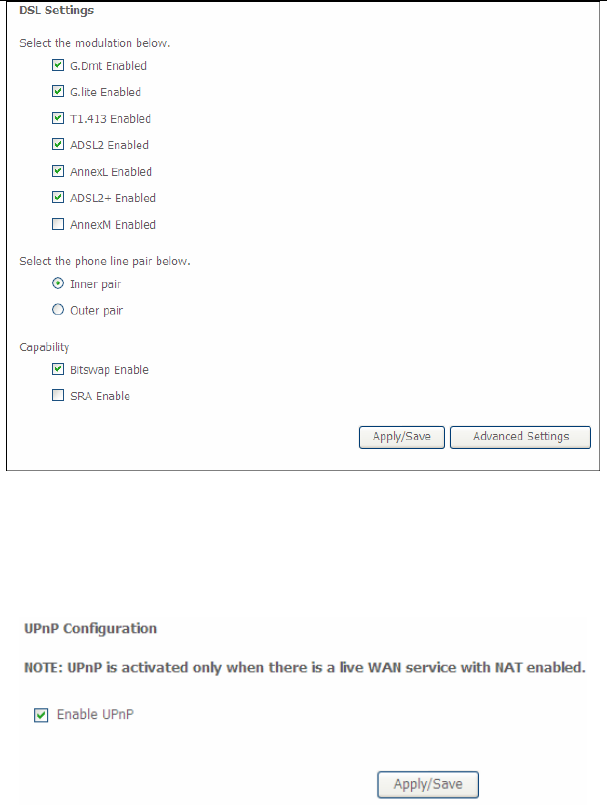
5.2.10 DSL
Choose Advanced Setup > DSL and the following page appears. In this page, you
can view the DSL settings. Usually, you can keep this factory default setting. The
modem negotiates the modulation mode with the DSLAM.
User Manual
74
In this page, you can set the DSL settings. Usually, you do not need to modify the
factory default settings.
After finishing setting, click Apply/Save to save and apply the settings.
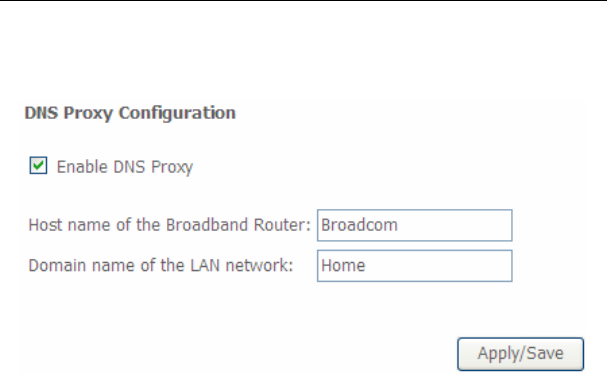
5.2.11 UPnP
Choose Advanced Setup > UPnP and the following page appears.
In this page, you can enable or disable the UPnP function.
User Manual
75
After finishing setting, click Apply/Save to save and apply the settings.
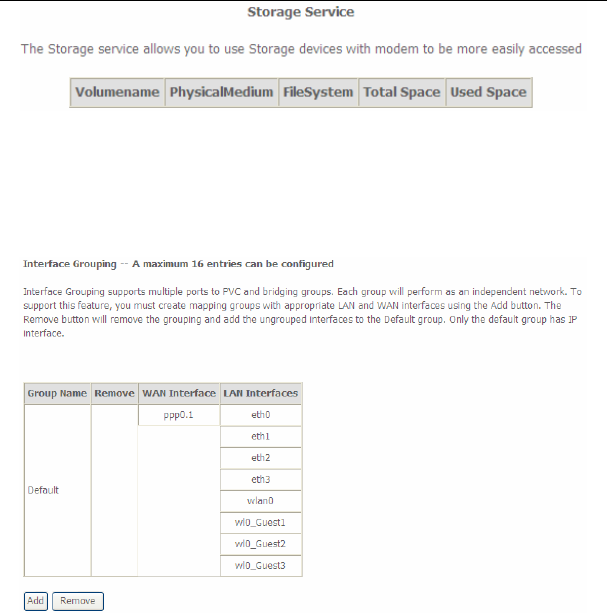
5.2.12 DNS Proxy
Choose Advanced Setup > DNS Proxy and the following page appears.
In this page, you can enable or disable the DNS proxy function.
After enabling the DNS proxy function, enter the host name of the broadband
router and the domain name of the LAN network, and then click Apply/Save to
save and apply the settings.
5.2.13 Print Server
Choose Advanced Setup > Printer Server and the following page appears.

User Manual
76
In this page, you can enable or disable the printer server.
After finishing setting, click Apply/Save to save and apply the settings.
5.2.14 Packet Acceleration
Choose Advanced Setup > Packet Acceleration and the following page appears.
In this page, you can enable packet flow accelerator.
5.2.15 Storage Service
Storage Device Info
Choose Advanced Setup > Storage Service > Storage Device Info and the
following page appears.
User Manual
77
This page is used to display the information of the storage device that connects to
the DSL router.
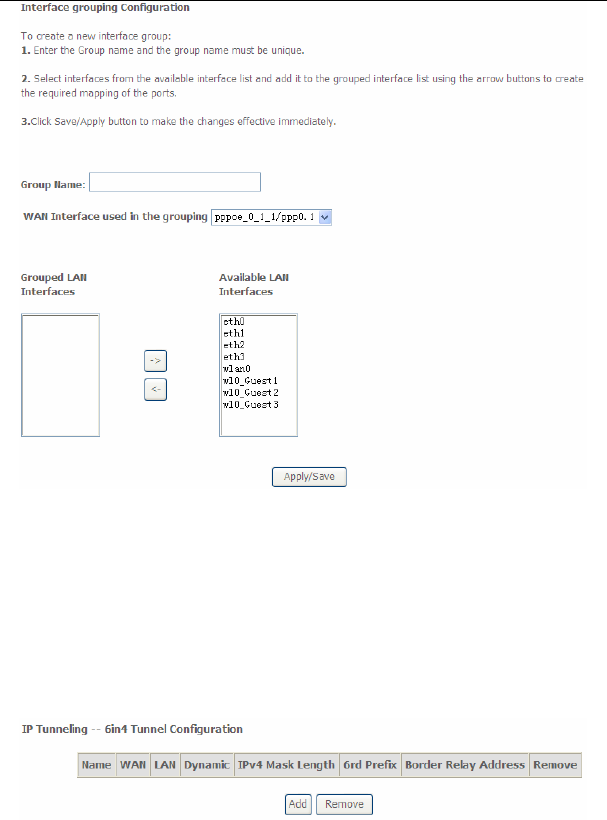
5.2.16 Interface Grouping
Choose Advanced Setup > Interface Grouping and the following page appears.
Interface grouping supports multiple ports to PVC and bridging groups. Each group
will perform as an independent network. To support this feature, you must create
mapping groups with the appropriate LAN and WAN interfaces using the Add
button. The Remove button will remove the grouping and add the ungrouped
interfaces to the default group. Only the default group has IP interface.
Click the Add button to display the following page.
User Manual
78
In this page, please follow the on-screen configuration steps to configure the
parameters of the interface grouping.
After finishing setting, click Apply/Save to save and apply the settings.
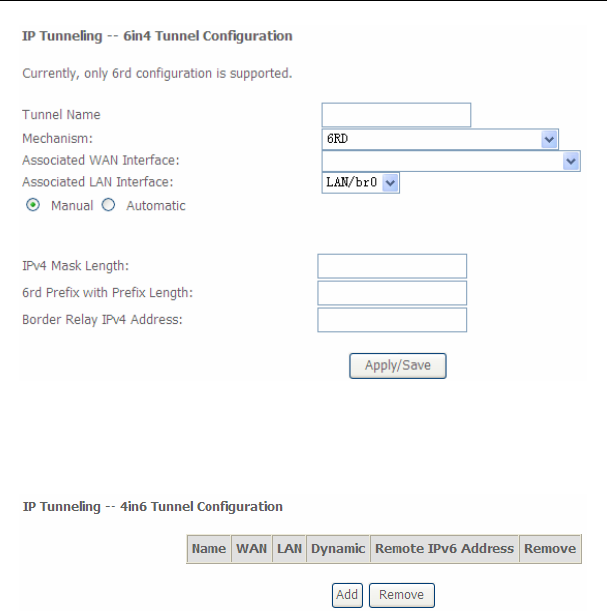
5.2.17 IP Tunnel
5.2.17.1 IPv6 in IPv4
Choose Advanced Setup > IP Tunnel > IPv6inIPv4 and the following page
appears. The default value is IPv6 in IPv4 information.
User Manual
79
Click Add and the following page appears. In this page, you can add a new tunnel.
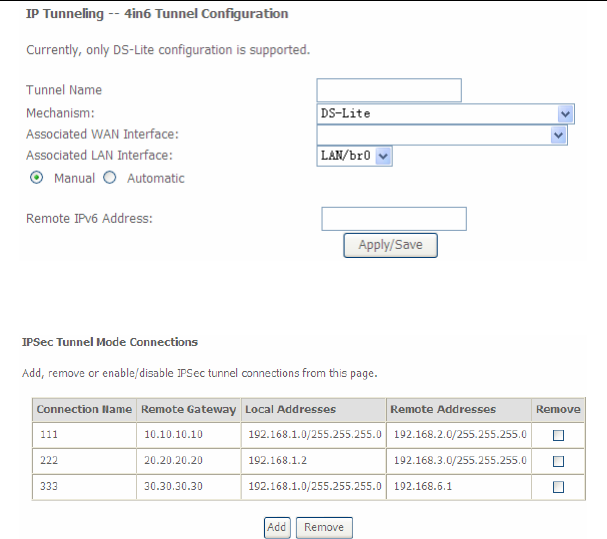
5.2.17.2 IPv4 in IPv6
Choose Advanced Setup > IP Tunnel > IPv4inIPv6 and the following page
appears.
Click Add and the following page appears. In this page, you can add a new tunnel
of IPv4 in IPv6.
User Manual
80
5.2.18 IPSec
Choose Advanced Setup > IPSec and the following page appears.
In this page, you can add or remove the IPSec tunnel connections.
Click the Add button to display the following page.

User Manual
81
In this page, set the parameters such as the IPSec connection name, tunnel mode,
and remote IPSec gateway address.
If you need to configure the advanced settings of this IPSec tunnel connection,
please click the Show Advanced Settings button to display the other parameters.
After finishing setting, click Apply/Save to save and apply the settings.
User Manual
82
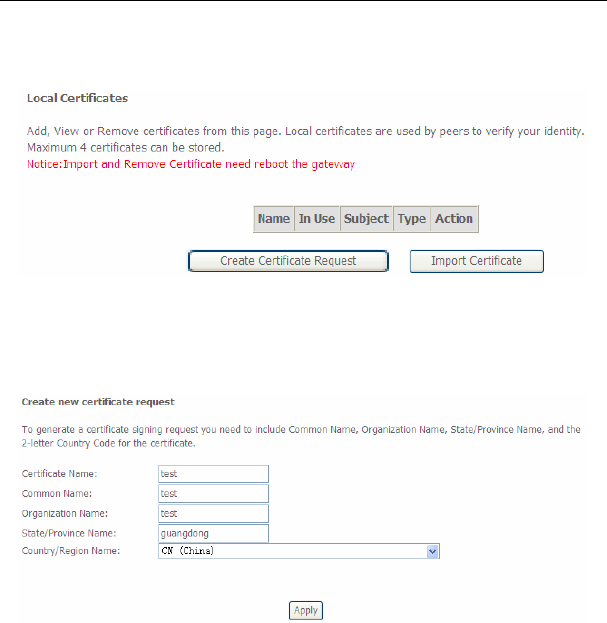
5.2.19 Certificate
Local
Choose Advanced Setup > Certificate > local and the following page appears.
In this page, you can acquire the local certificate by creating a certificate request or
importing a certificate. You may also create or remove a certificate.
Creating a New Certificate Request
Click the Create Certificate Request button to display the following page.
In this page, please set the following parameters.
Certificate name: Set the certificate name.
Common Name: The common name is the "fully qualified domain name,"
(or FQDN) used for DNS lookups of your server (for example,
www.mydomain.com). Browsers use this information to identify your Web
site. Some browsers will refuse to establish a secure connection with your
site if the server name does not match the common name in the certificate.
Please do not include the protocol symbol "http://" or any port numbers or
User Manual
83
pathnames in the common name. Do not use wildcard characters such as *
or ?, and do not use an IP address.
Organization Name: The name of the organization to which the entity
belongs (such as the name of a company).
State/Province Name: This is the name of the state or province where your
organization's head office is located. Please enter the full name of the state
or province.
Country/Region Name: This is the two-letter ISO abbreviation for your
country (for example, GB for the United Kingdom).
After finishing setting, click the Apply button to apply the settings.
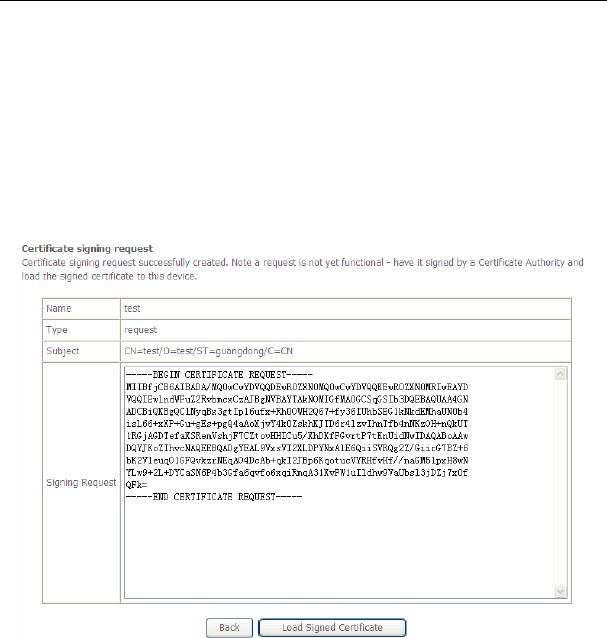
The certificate request needs to be submitted to a certificate authority, which will
sign the request. Then the signed certificate needs to be loaded to the DSL router.
Click Load Signed Certificate in this page, and the following page appears.

User Manual
84
In this page, paste the signed certificate, and then click the Apply button. A new
certificate is created.
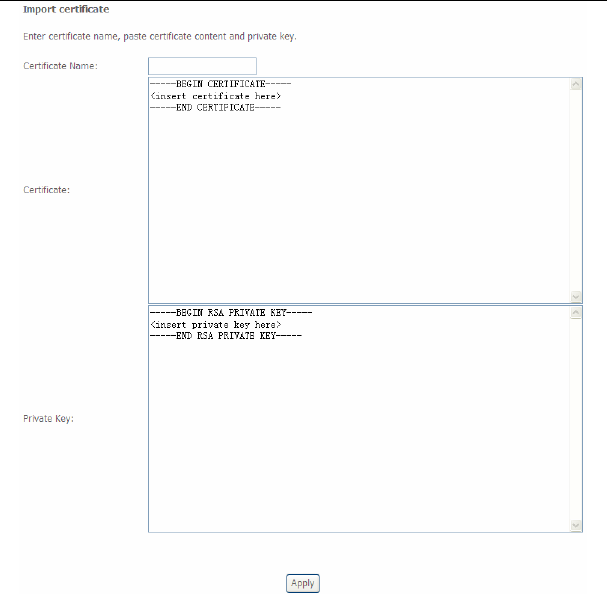
Importing an Existing Local Certificate
To import an existing certificate, click the Import Certificate button to display the
following page.
User Manual
85
In this page, paste the certificate and the private key. Finally, click the Apply button
to import the certificate.
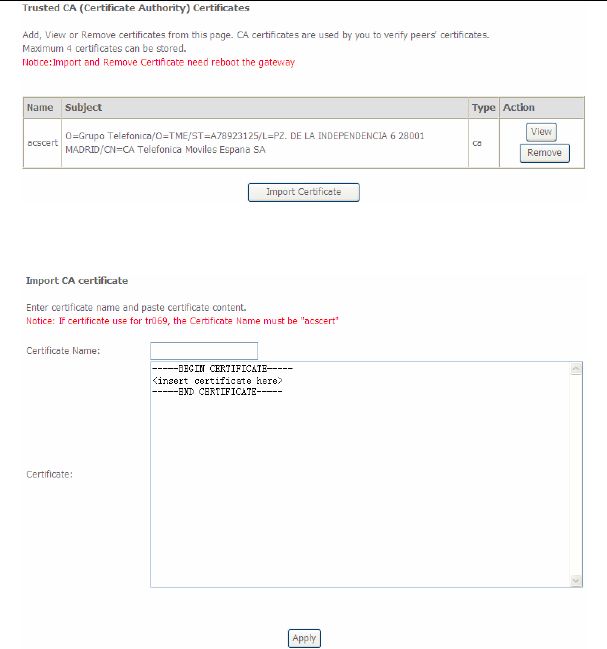
Trusted CA
Choose Advanced Setup > Certificate > Trusted CA and the following page
appears.
User Manual
86
In this page, you may import or remove a CA certificate.
Click the Import Certificate button to display the following page.
In this page, enter the certificate name and paste the certificate content. Finally,
click the Apply button to import the certificate.
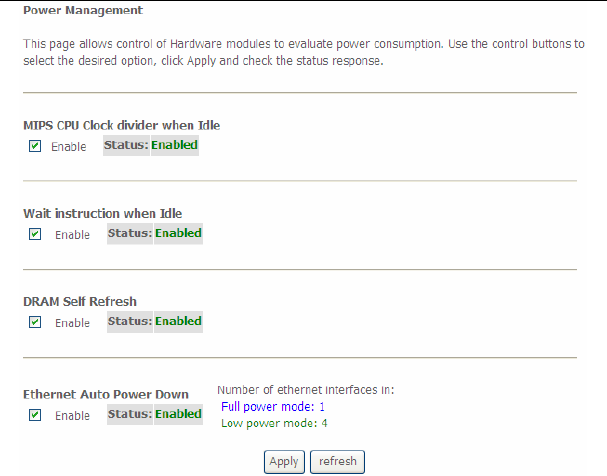
5.2.20 Power Management
Choose Advanced Setup > Power Management and the following page appears.
This page allows control of Hardware modules to evaluate power consumption.
Use the control buttons to select the desired option.
User Manual
87
After proper configurations, click Apply to take the configurations effect.
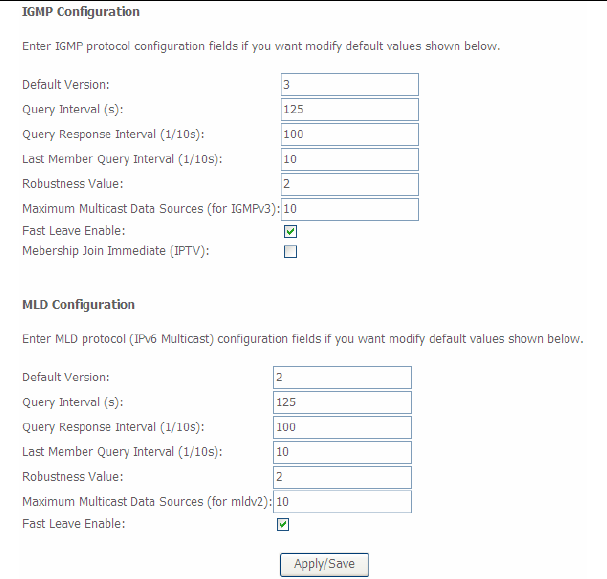
5.2.21 Multicast
Choose Advanced Setup > Multicast and the following page appears.
User Manual
88
In this page, you can configure the multicast parameters.
After finishing setting, click Apply/Save to save and apply the settings.
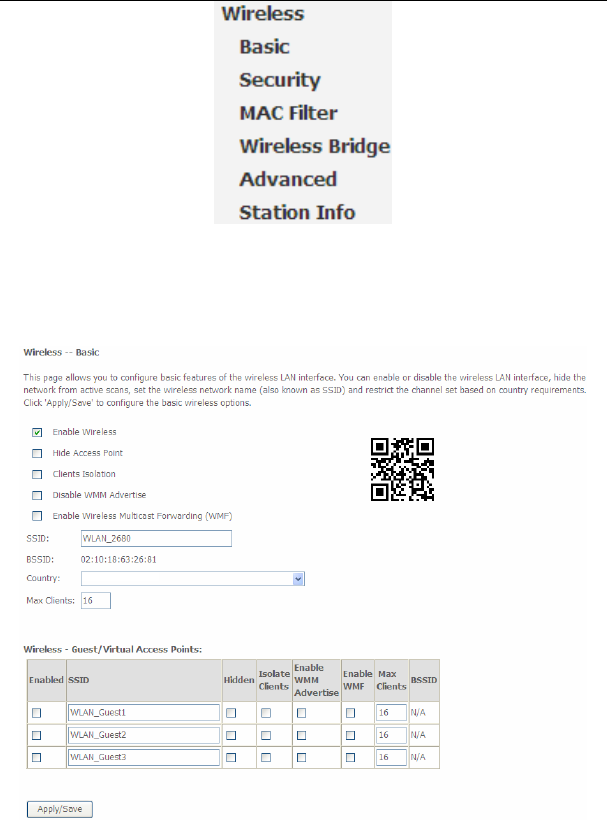
5.3 Wireless
Choose Wireless and the submenus of Wireless are shown as below:
User Manual
89
5.3.1 Basic Settings
Choose Wireless > Basic to display the following page. In this page, the figure in
the right area is 2-dimensional code. It includes the wireless SSID and password.
You can obtain the wireless SSID and password through scanning this figure.

User Manual
90
This page allows you to configure the basic features of the wireless LAN interface.
Enable Wireless: Enable or disable the wireless function.
Hide Access Point: if you want to hide any access point for your router,
select this option, and then a station cannot obtain the SSID through the
passive scanning.
Clients Isolation: When many clients connect to the same access point,
they can access each other. If you want to disable the access between the
clients that connect to the same access point, you can select this option.
Disable WMM Advertise: After enabling this option, the transmission
performance multimedia of the voice and video data can be improved.
Enable Wireless Multicast Forwarding (WMF): After enabling this option,
the transmission quality of video service such as IPTV can be improved.
SSID: For the security reason, you should change the default SSID to a
unique name.
BSSID: Display the MAC address of the wireless interface.
Country: The name of the country with which your gateway is configured.
This parameter further specifies your wireless connection. For example, The
channel will adjust according to nations to adapt to each nation's frequency
provision.
Max Clients: Specify the maximum wireless client stations to be enabled to
link with AP. Once the clients exceed the max vlaue, all other clients are
refused. The value of maximum clients is 16.
Wireless - Guest/Virtual Access Points: If you want to make Guest/Virtual
network function be available, you have to check those boxes in the table
below. In the current software version, three virtual access points can be
configured.
After finishing setting, click Apply/Save to save the basic wireless settings and
make the settings take effect.
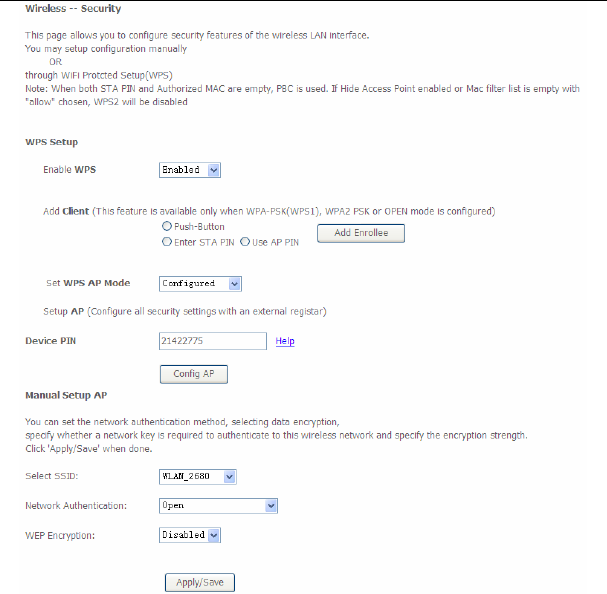
5.3.2 Security
Choose Wireless > Security to display the following page.
User Manual
91
This page allows you to configure the security features of the wireless LAN
interface. In this page, you can configure the network security settings by the Wi-Fi
Protected Setup (WPS) method or setting the network authentication mode.
WPS Setup

User Manual
92
There are 2 primary methods used in the Wi-Fi Protected Setup:
PIN entry, a mandatory method of setup for all WPS certified devices.
– Enter STA PIN: If you select it, you need to enter the station PIN from
client.
– Use AP PIN: The PIN is generated by AP.
Push button configuration (PBC), an actual push button on the hardware or
through a simulated push button in the software. (This is an optional method
on wireless client).
If you are using the PIN method, you will need a Registrar (access point/wireless
router) to initiate the registration between a new device and an active access
point/wireless router. (Note: The PBC method may also need a Registrar when
used in a special case where the PIN is all zeros)
In order to use the push-button for WPS authentication, you must ensure that the
network card support the function. if it supports, you need not to do any
configuration. You can press the WPS button directly to enable the WPS function.
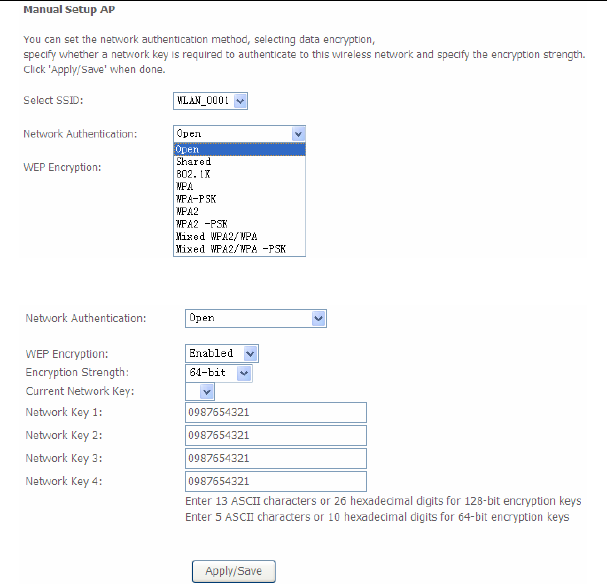
Manual Setup AP
This page provides 9 types of network authentication modes, including Open,
Shared, 802.1X, WPA, WPA-PSK, WPA2, WPA2-PSK, Mixed WPA2/WPA, and
Mixed WPA2/WPA-PSK.
User Manual
93
- Open Mode
Select SSID: Select a SSID for configuring the security settings.
Network Authentication: Select the Open mode.
WEP Encryption: Enable or disable WEP encryption. After enabling this
function, you can set the encryption strength, current network key, and
network keys.
Encryption Strength: You can set 64-bit or 128-bit key.
Current Network Key: The current key that you use.
Network Key1/2/3/4: Set the network key. If it is 128-bit key, you need to
enter 13 ASCII characters or 26 hexadecimal digits. For the 64-bit key, you
need to enter 5 ASCII characters or 10 hexadecimal digits.
User Manual
94
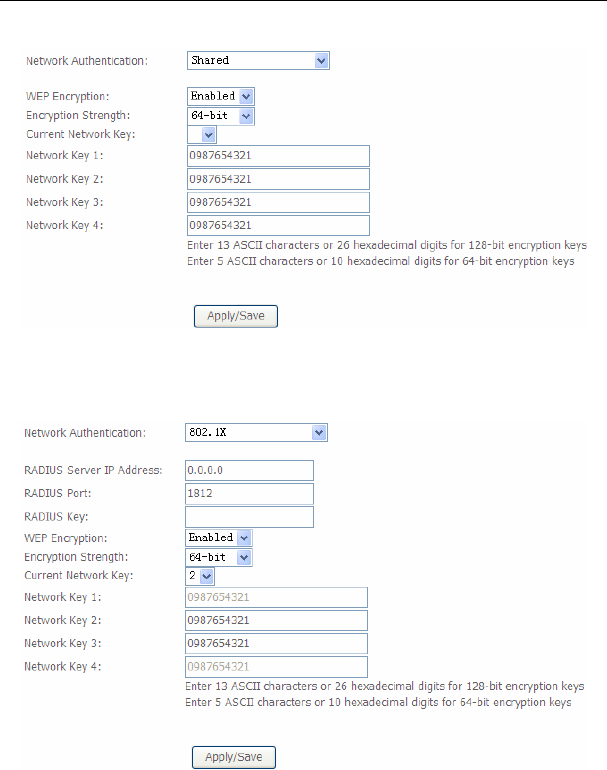
- Shared Mode
The parameters’ description of shared mode, please refer to the Open Mode.
- 802.1x
Select SSID: Select a SSID for configuring the security settings.
Network Authentication: Select the 802.1X in the drop-down list.
User Manual
95
RADIUS Server IP Address: Enter the IP address of the RADIUS server.
RADIUS server is used to authenticate the hosts on the wireless network.
RADIUS Port: The port number that the RADIUS server uses. The default
port number is 1812. You may change it according to the server setting.
RADIUS Key: Set the RADIUS key for accessing the RADIUS server.
WEP Encryption: You can only select Enabled.
Encryption Strength: You can set 64-bit or 128-bit key.
Current Network Key: The current key that you use.
Network Key1/2/3/4: Set the network key. If it is 128-bit key, you need to
enter 13 ASCII characters or 26 hexadecimal digits. For the 64-bit key, you
need to enter 5 ASCII characters or 10 hexadecimal digits.
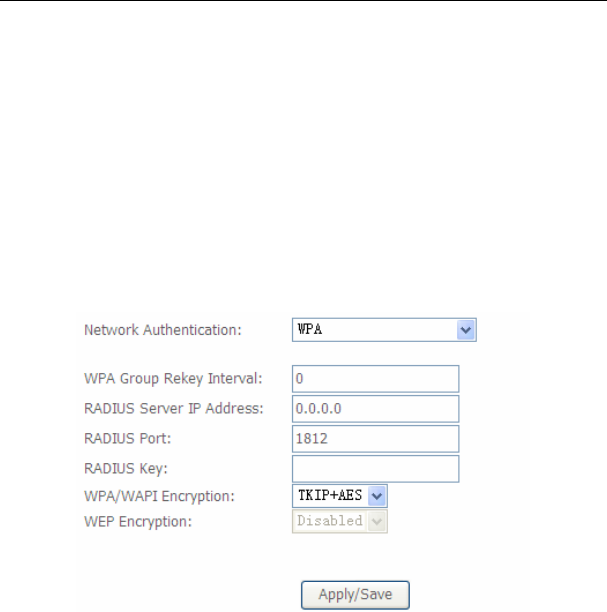
- WPA Mode
Select SSID: Select a SSID for configuring the security settings.
Network Authentication: Select the WPA-PSK mode.
WPA Group Rekey Interval: Setting the interval for renewing key.
RADIUS Server IP Address: Enter the IP address of the RADIUS server.
RADIUS server is used to authenticate the hosts on the wireless network.
RADIUS Port: The port number that the RADIUS server uses. The default
port number is 1812. You may change it according to the server setting.
RADIUS Key: Set the RADIUS key for accessing the RADIUS server.
WPA/WAPI Encryption: You may select AES, or TKIP+AES.
User Manual
96
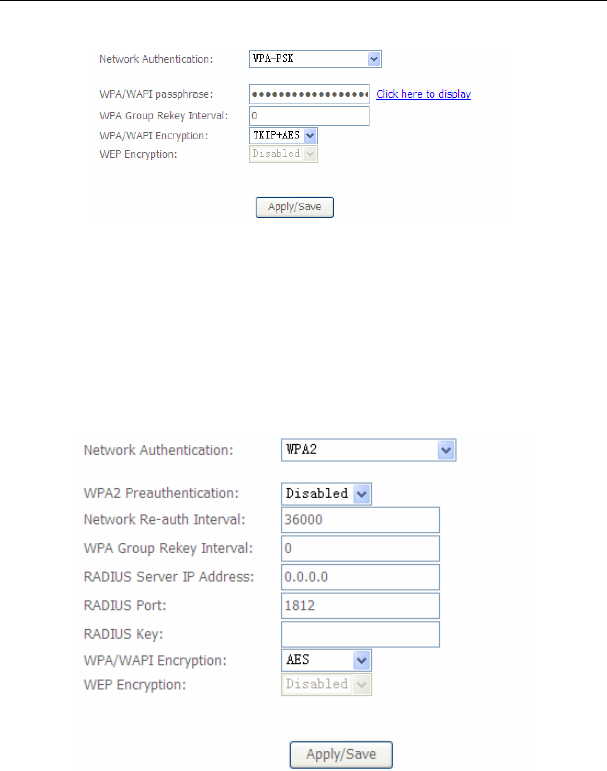
- WPA-PSK Mode
Select SSID: Select a SSID for configuring the security settings.
Network Authentication: Select the WPA-PSK mode.
WPA/WAPI passphrase: The key for WPA encryption. Click the Click here
to display button to display the current key. The default key is 87654321.
WPA Group Rekey Interval: Setting the interval for renewing key.
WPA/WAPI Encryption: You may select AES, or TKIP+AES.
- WPA2 Mode
Select SSID: Select a SSID for configuring the security settings.
Network Authentication: Select the WPA2 mode.

User Manual
97
WPA2 Preauthentication: Enable or disable pre-authentication.
Network Re-auth Interval: Set the network re-auth interval.
WPA Group Rekey Interval: Setting the interval for renewing key.
RADIUS Server IP Address: Enter the IP address of the RADIUS server.
RADIUS server is used to authenticate the hosts on the wireless network.
RADIUS Port: The port number that the RADIUS server uses. The default
port number is 1812. You may change it according to the server setting.
RADIUS Key: Set the RADIUS key for accessing the RADIUS server.
WPA/WAPI Encryption: You may select AES, or TKIP+AES.
- WPA2-PSK
The parameters’ description of WPA2-PSK mode, please refer to the WPA-PSK
mode.
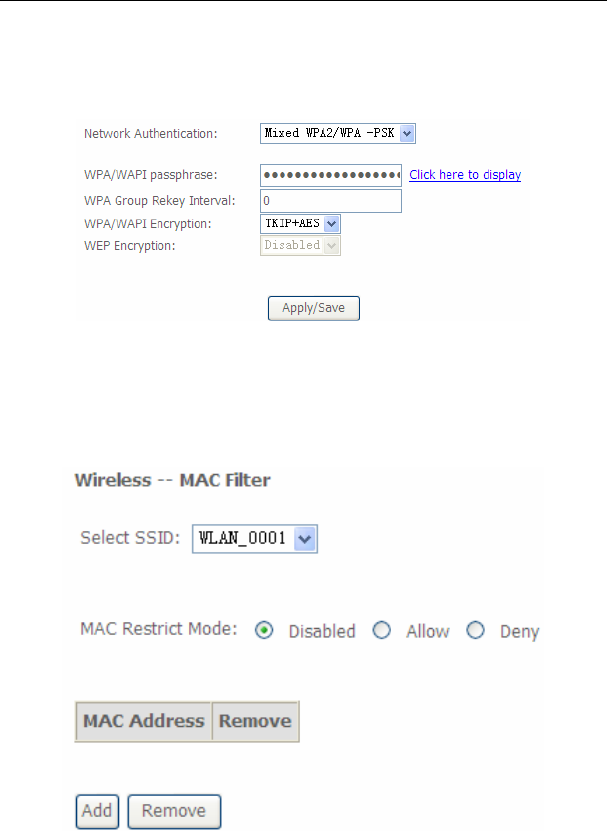
- Mixed WPA2/WPA
User Manual
98
The parameters’ description of Mixed WPA2/WPA mode, please refer to the WPA2
mode.
- Mixed WPA2/WPA-PSK
The parameters’ description of Mixed WPA2/WPA-PSK mode, please refer to the
WPA-PSK mode.
5.3.3 MAC Filter
Choose Wireless > MAC Filter to display the following page.
User Manual
99
This page is used to allow or reject the wireless clients to access the wireless
network of the wireless router.
In this page, you can add or remove the MAC filters.
The MAC restrict modes include Disabled, Allow, and Deny.
Disabled: Disable the wireless MAC address filtering function.
Allow: Allow the wireless clients with the MAC addresses in the MAC
Address list to access the wireless network of the wireless router.
Deny: Reject the wireless clients with the MAC addresses in the MAC
Address list to access the wireless network of the wireless router.
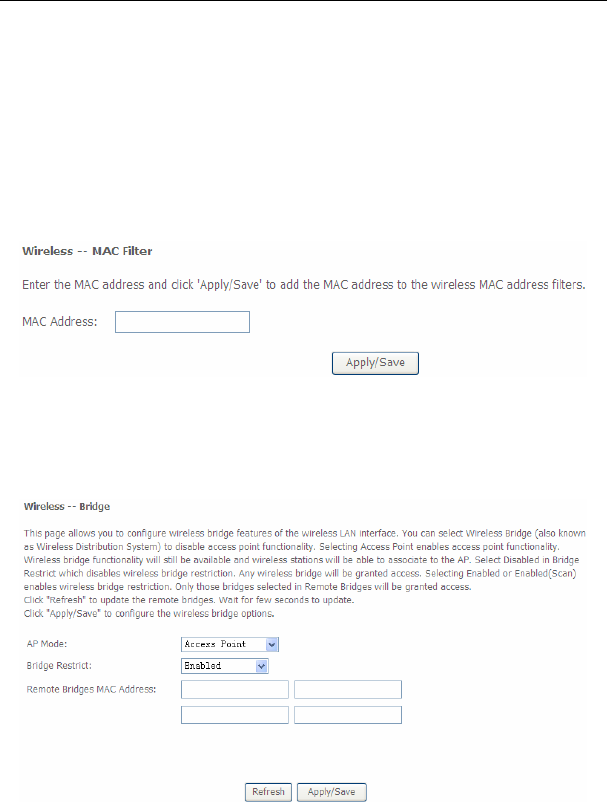
Click the Add button to display the following page.
In this page, enter the MAC address of the wireless client, and then click the
Apply/Save button to add the MAC address to the MAC address list.
5.3.4 Wireless Bridge
Choose Wireless > Wireless Bridge to display the following page.
User Manual
100
This page allows you to configure the wireless bridge features of the wireless LAN
interface.
AP mode: you may select Access Point or Wireless Bridge.
Bridge Restrict: Enable or disable the bridge restrict function.
Remote Bridges MAC Address: Enter the remote bridge MAC address.
After finishing setting, click the Apply/Save button to save and apply the settings.
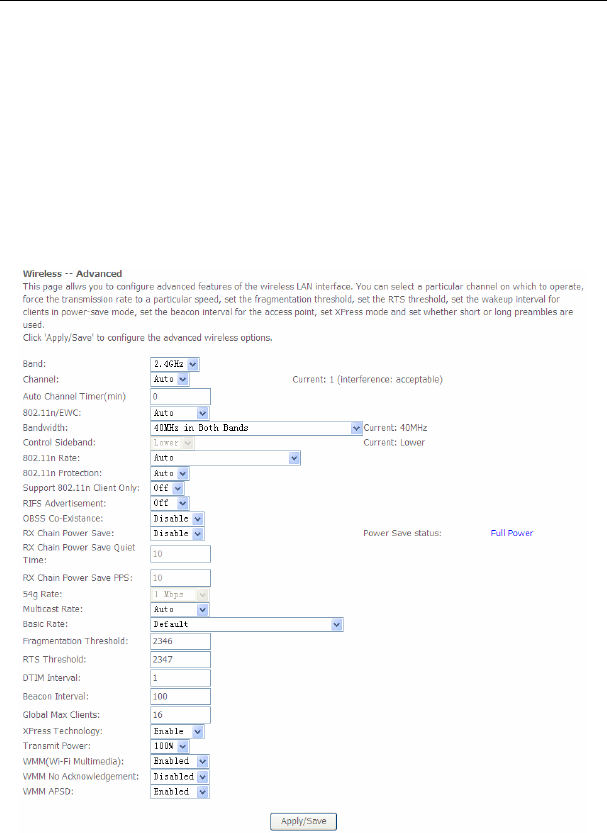
5.3.5 Advanced Settings
Choose Wireless > Advanced to display the following page. This page allows you
to configure the advanced features of the wireless LAN interface. Usually, you do
not need to change the settings in this page.
User Manual
101
Band: You can select 2.4GHz or 5GHz.
Channel: Fill in the appropriate channel to correspond with your network
settings. All devices in your wireless network must use the same channel in
order to work correctly. This router supports auto channeling functionality.
Auto Channel Timer(min): Specifies the timer of auto channelling.
802.11n/EWC: Select disable 802.11n or Auto.
Bandwidth: Select the bandwidth for the network. You can select 20MHz in
Both Bands, 20MHz in 2.4G Band and 40MHz in 5G Band, or 40MHz in
Both Bands.
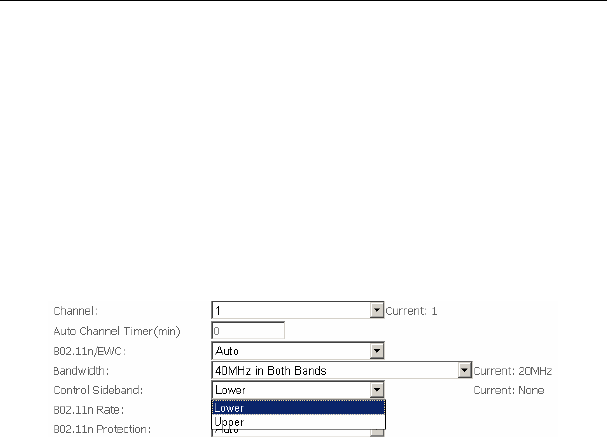
Control Sideband: If you select 20MHz in Both Bands or 20MHz in 2.4G
Band and 40MHz in 5G Band, the service of control sideband does not
work. When you select 40MHz in Both Bands as the bandwidth, the
following page appears. Then you can select Lower or Upper as the value
of sideband. As the control sideband, when you select Lower, the channel is
1~7. When you select Upper, the channel is 5~11.
802.11n Rate: Select the transmission rate for the network. The rate of data
transmission should be set depending on the speed of your wireless network.
You can select from a range of transmission speeds, or you can select Auto
to have the Router automatically use the fastest possible data rate and
enable the Auto-Fallback feature. Auto-Fallback will negotiate the best
possible connection speed between the Router and a wireless client. The
default value is Auto.
802.11n Protection: The 802.11n standards provide a protection method so
802.11b/g and 802.11n devices can co-exist in the same network without
“speaking” at the same time.
Support 802.11n Client Only: Only stations that are configured in 802.11n
mode can associate.
Multicast Rate: Select the multicast transmission rate for the network. The
rate of data transmission should be set depending on the speed of your
wireless network. You can select from a range of transmission speeds, or
you can select Auto to have the Router automatically use the fastest
possible data rate and enable the Auto-Fallback feature. Auto-Fallback will
negotiate the best possible connection speed between the Router and a
wireless client. The default value is Auto.
Basic Rate: Select the basic transmission rate ability for the AP.

User Manual
102
Fragmentation Threshold: Packets that are larger than this threshold are
fragmented into multiple packets. Try to increase the fragmentation
threshold if you encounter high packet error rates. Do not set the threshold
too low, since this can result in reduced networking performance.
RTS Threshold: This value should remain at its default setting of
2347.Should you encounter inconsistent data flow, only minor reductions are
recommended. Should you encounter inconsistent data flow, only minor
reduction of the default value, 2347, is recommended. If a network packet is
smaller than the preset RTS threshold size, the RTS/CTS mechanism will
not be enabled. The Router sends Request to Send (RTS) frames to a
particular receiving station and negotiates the sending of a data frame. After
receiving an RTS, the wireless station responds with a Clear to Send (CTS)
frame to acknowledge the right to begin transmission. The RTS Threshold
value should remain at its default value of 2347.
DTIM Interval: (Delivery Traffic Indication Message) Enter a value between
1 and 255 for the Delivery Traffic Indication Message (DTIM.) A DTIM is a
countdown informing clients of the next window for listening to broadcast
and multicast messages.
Beacon Interval: A beacon is a packet of information that is sent from a
connected device to all other devices where it announces its availability and
readiness. A beacon interval is a period of time (sent with the beacon) before
sending the beacon again. The beacon interval may be adjusted in
milliseconds (ms). Default (100) is recommended.
XPress Technology: Select Enable or Disable. This is a special
accelerating technology for IEEE802.11g. The defaule is Disabled.
Transmit Power: Adjust the transmission range here. This tool can be
helpful for security purposes if you wish to limit the transmission range.
WMM (Wi-Fi Multimedia): Select whether WMM is enable or disabled.
Before you disable WMM, you should understand that all QoS queues or
traffic classes relate to wireless do not take effects.
WMM No Acknowledgement: Select whether ACK in WMM packet. By
default, the 'Ack Policy' for each access category is set to Disable, meaning
that an acknowledge packet is returned for every packet received. This
provides a more reliable transmission but increases traffic load, which
decreases performance. To disable the acknowledgement can be useful for
Voice, for example, where speed of transmission is important and packet
loss is tolerable to a certain degree.
WMM APSD: APSD is short for automatic power save delivery, Selecting
enable will make it has very low power consumption. WMM Power Save is
an improvement to the 802.11e amendment adding advanced power
management functionality to WMM.
Click Apply/Save to configure the advanced wireless options and make the
changes take effect.
User Manual
103
Note:
The advanced wireless setting is only for the advanced user. For the common
user, do not change any settings in this page.
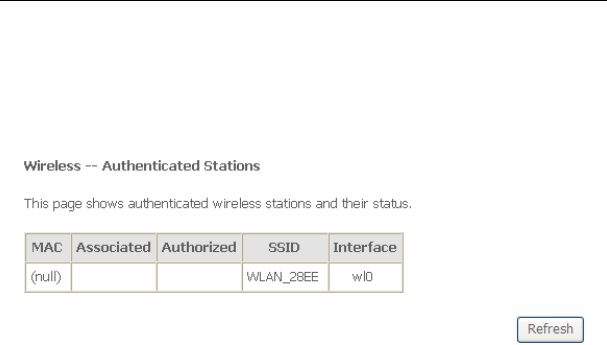
5.3.6 Station Info
Choose Wireless > Station Info to display the following page.
This page shows the authenticated wireless stations and their status.
5.4 Diagnostics
5.4.1 Diagnostics
Click Diagnostics > Diagnostics, and the following page appears.
This page is used to test the connection to your local network, the connection to
your DSL service provider, and the connection to your Internet service provider.
You may diagnose the connection by clicking the Test button or click the Test With
OAM F4 button. If the test continues to fail, click Help and follow the
troubleshooting procedures.

User Manual
104
5.5 Management
Choose Management and the submenus of Management are shown as below:
User Manual
105
5.5.1 Settings
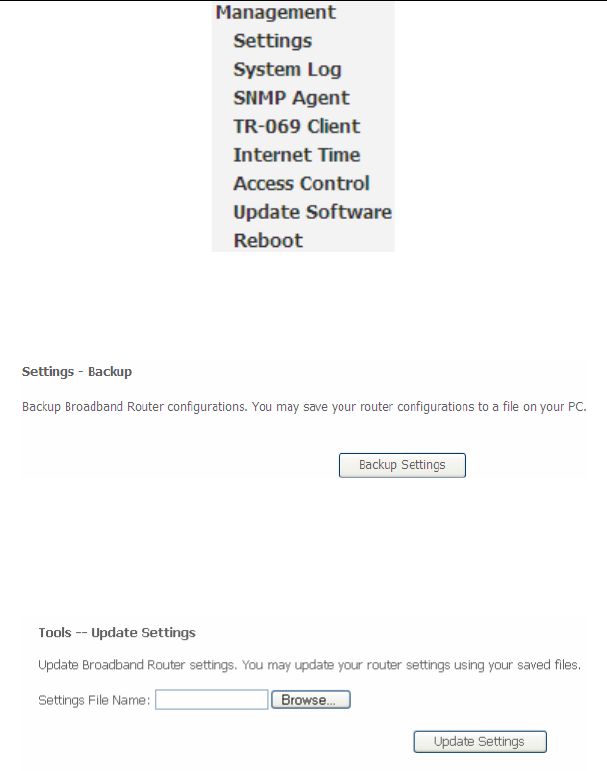
Backup
Choose Management > Settings > Backup to display the following page.
In this page, click the Backup Settings button to save your router’s settings to your
local PC.
Update
Choose Management > Settings > Update, and the following page appears.
In this page, click the Browse… button to select the correct new settings file, and
then click the Update Settings button to update the router’s settings.
User Manual
106
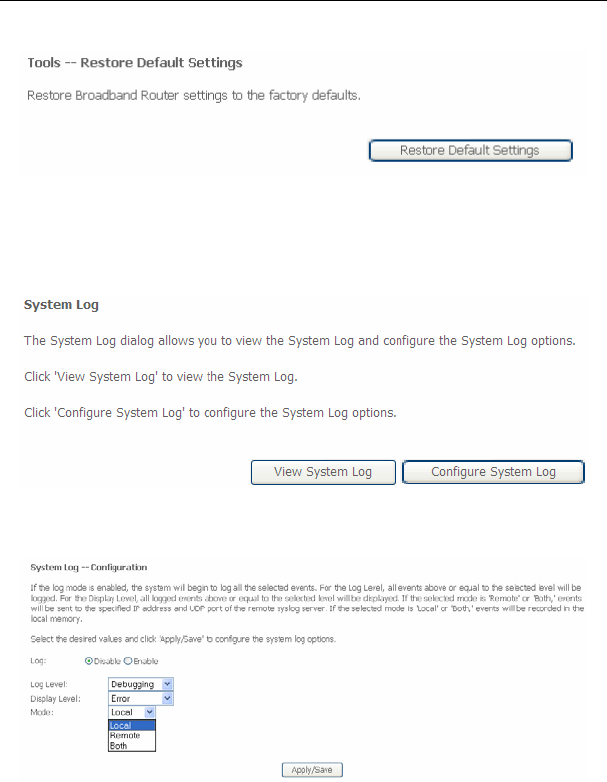
Restore Default
Choose Management > Settings > Restore Default to display the following page.
In this page, click the Restore default settings button, and then system returns to
the default settings.
5.5.2 System Log
Choose Management > System Log to display the following page.
In this page, you are allowed to configure the system log and view the security log.
Configuring the System Log
Click the Configure System Log button to display the following page.
In this page, you can set 3 types of system log modes, including Local, Remote, and
Both.
User Manual
107
Local: When selecting Local, the events are recorded in the local memory.
Remote: When selecting Remote, the events are sent to the specified IP
address and UDP port of the remote system log server.
Both: When selecting Both, the events are recorded in the local memory or
sent to the specified IP address and UDP port of the remote system log
server.
After finishing setting, click the Apply/Save button to save and apply the settings.
Note:
If you want to log all the events, you need to select the Debugging log level.
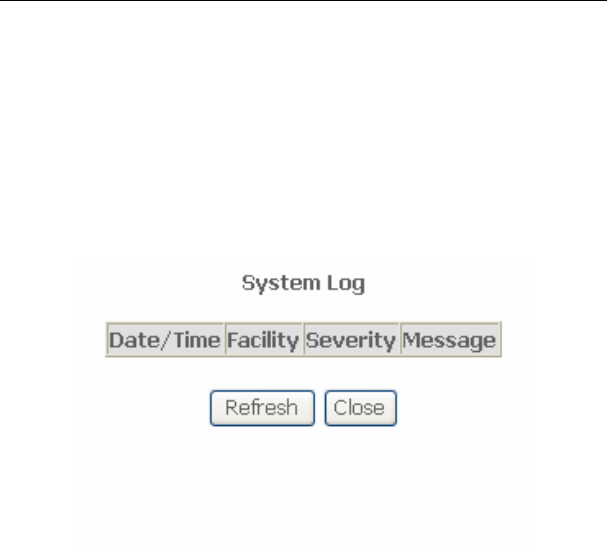
View System Log
Click the View System Log button to display the following page.
In this page, you can view the system log.
Click the Refresh button to refresh the system log. Click the Close button to exit.
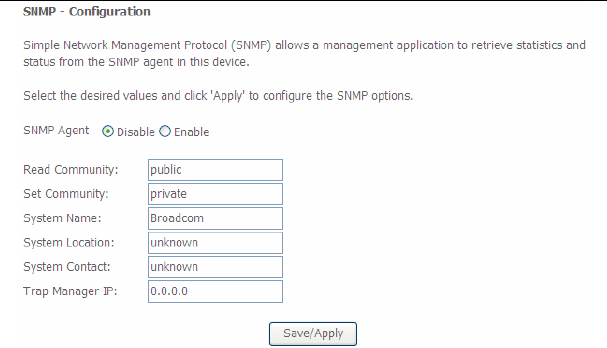
5.5.3 SNMP Agent
Choose Management > SNMP Agent, and the following page appears.
User Manual
108
Simple Network Management Protocol (SNMP) allows a management application to
retrieve statistics and status from the SNMP agent in this device.
In this page, you may enable or disable the SNMP agent and set the parameters such
as the read community, system name and trap manager IP.
After finishing setting, click the Save/Apply button to save and apply the settings.
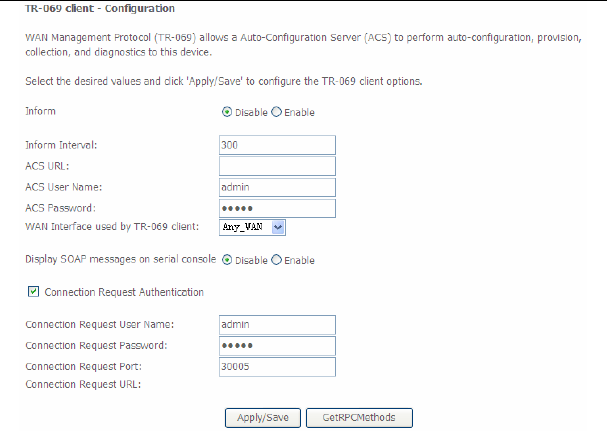
5.5.4 TR-69 Client
Choose Management > TR-069Client to display the following page.
User Manual
109
WAN Management Protocol (TR-069) allows an Auto-Configuration Server (ACS) to
perform auto-configuration, provision, collection, and diagnostics to this device.
In this page, you may configure the parameters such as the ACS URL, ACS
password, and connection request user name.
After finishing setting, click the Apply/Save button to save and apply the settings.
5.5.5 Internet Time
Choose Management > Internet Time to display the following page.
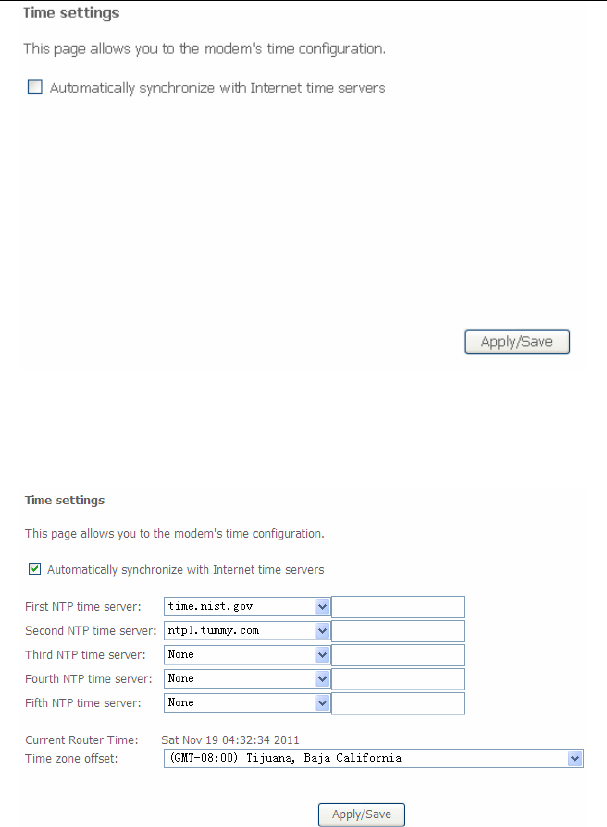
User Manual
110
In this page, you may configure the router to synchronize its time with the Internet
time servers.
After enabling Automatically synchronize with Internet time servers, the following
page appears.
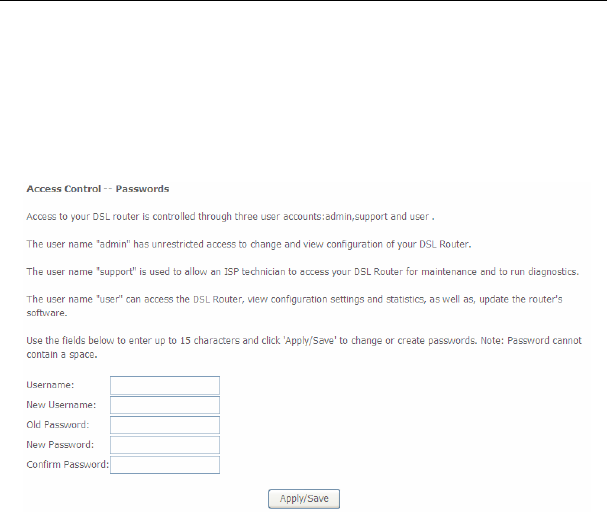
User Manual
111
In this page, set the proper time servers, and then click the Apply/Save button to
save and apply the settings.
5.5.6 Access Control
Passwords
Choose Management > Access Control > Passwords, and the following page
appears.
In the page, you can modify the username and password of different users.
After finishing setting, click the Apply/Save button to save and apply the settings.
Services
Choose Management > Access Control > Services Control and the following page
appears.
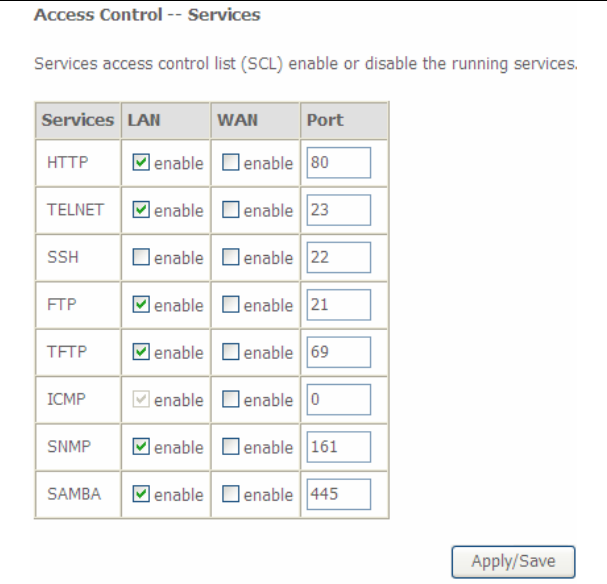
User Manual
112
In this page, you can enable or disable the different types of services.
After finishing setting, click the Apply/Save button to save and apply the settings.
5.5.7 Update Software
Choose Management > Update Software, and the following page appears.
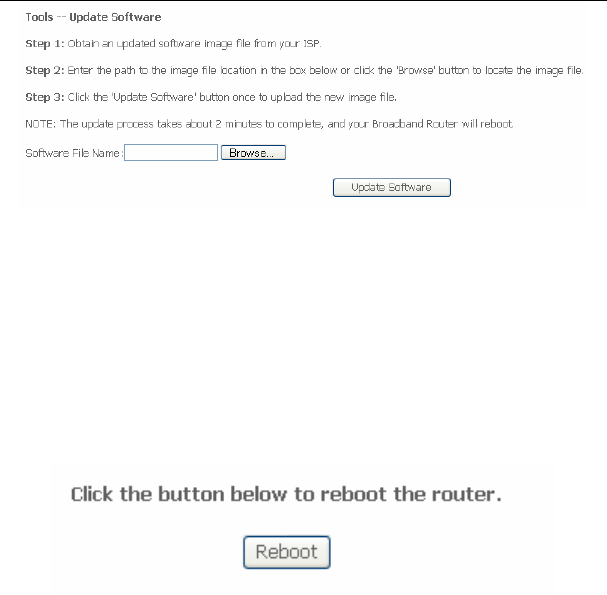
User Manual
113
If you want to upload the software, click the Browse… button to choose the new
software, and then click the Update Software button.
Note:
When software update is in progress, do not shut down the router. After software
update completes, the router automatically reboots.
Please make sure that the new software for updating is correct, and do not use other
software to update the router.
5.5.8 Reboot
Choose Management > Reboot and the following page appears.
In this page, click the Reboot button, and then the router reboots.

User Manual
114
6 Q&A
(1) Q: Why all the indicators are off?
A: Check the following:
The connection between the power adaptor and the power socket.
The status of the power switch.
(2) Q: Why the LAN indicator is off?
A: Check the following:
The connection between the ADSL router and your computer, hub, or
switch.
The running status of your PC, hub, or switch.
(3) Q: Why the DSL indicator is off?
A: Check the connection between the “DSL” port of router and the wall jack.
(4) Q: Why Internet access fails while the DSL indicator is on?
A: Check whether the VPI, VCI, user name, and password are correctly
entered.
(5) Q: Why I fail to access the web configuration page of the DSL router?
A: Choose Start > Run from the desktop, and ping 192.168.1.1 (IP address of
the DSL router). If the DSL router is not reachable, check the type of the
network cable, the connection between the DSL router and the PC, and
the TCP/IP configuration of the PC.
(6) Q: How to load the default settings after incorrect configuration?
A: To restore the factory default settings, turn on the device, and press the
reset button for about 1 second, and then release it. The default IP
address and the subnet mask of the DSL router are 192.168.1.1 and
255.255.255.0, respectively.
User/password of super user: admin/admin
User/password of common user: user/user

User Manual
115
FCC - PART 68
This equipment complies with Part 68 of the FCC rules and the requirements adopted
by the ACTA. On the bottom case of this equipment is a label that contains, among
other information, a product identifier in the format US: VW7DLNANSR360N, and
REN: NAN for this equipment.
This equipment uses the following USOC jacks: RJ-11/RJ45/USB/Power Jacks!
A plug and jack used to connect this equipment to the premises wiring and telephone
network must comply with the applicable FCC Part 68 rules and requirements
adopted by the ACTA. A compliant telephone cord and modular plug is provided with
this product. It is designed to be connected to a compatible modular jack that is also
compliant. See installation instructions for details.
REN (RINGER EQUIVALENT NUMBERS) STATEMENT
Notice: The Ringer Equivalence Number (REN) assigned to each terminal device
provides an indication of the maximum number of terminals allowed to be connected
to a telephone interface. The termination on an interface may consist of any
combination of devices subject only to the requirement that the sum of the Ringer
Equivalence Numbers of all the devices does not exceed 5.
If this equipment VW7DLNANSR360N causes harm to the telephone network, the
telephone company will notify you in advance that temporary discontinuance of
service may be required. But if advance notice isn't practical, the telephone
company will notify the customer as soon as possible. Also, you will be advised of
your right to file a complaint with the FCC if you believe it is necessary.
The telephone company may make changes in its facilities, equipment, operations or
procedures that could affect the operation of the equipment. If this happens the
telephone company will provide advance notice in order for you to make necessary
modifications to maintain uninterrupted service.
If trouble is experienced with this equipment VW7DLNANSR360N , for repair or
warranty information, please contact SmartRG,Inc.. If the equipment is causing harm
to the telephone network, the telephone company may request that you disconnect
the equipment until the problem is resolved.
Connection to party line service is subject to state tariffs. Contact the state public
utility commission, public service commission or corporation commission for
information.
If your home has specially wired alarm equipment connected to the telephone line,
ensure the installation of this VW7DLNANSR360N does not disable your alarm
equipment. If you have questions about what will disable alarm equipment, consult

User Manual
116
your telephone company or a qualified installer.
his product meets the applicable Industry Canada technical specifications. / Le
présent matériel est conforme aux specifications techniques applicables d’Industrie
Canada.
IC-CS03 statement
This product meets the applicable Industry Canada technical specifications. / Le
présent matériel est conforme aux specifications techniques applicables d’Industrie
Canada
The Ringer Equivalence Number (REN) is an indication of the maximum number of
devices allowed to be connected to a telephone interface. The termination of an
interface may consist of any combination of devices subject only to the requirement
that the sum of the RENs of all the devices not exceed five. / L’indice d’équivalence
de la sonnerie (IES) sert à indiquer le nombre maximal de terminaux qui peuvent être
raccordés à une interface téléphonique. La terminaison d’une interface peut consister
en une combinaison quelconque de dispositifs, à la seule condition que la somme
d’indices d’équivalence de la sonnerie de tous les dispositifs n’excède pas cinq.
FCC Statement
This equipment has been tested and found to comply with the limits for a Class B
digital device, pursuant to part 15 of the FCC Rules. These limits are designed to
provide reasonable protection against harmful interference in a residential installation.
This equipment generates, uses and can radiate radio frequency energy and, if not
installed and used in accordance with the instructions, may cause harmful
interference to radio communications. However, there is no guarantee that
interference will not occur in a particular installation. If this equipment does cause
harmful interference to radio or television reception, which can be determined by
turning the equipment off and on, the user is encouraged to try to correct the
interference by one or more of the following measures:
—Reorient or relocate the receiving antenna.
—Increase the separation between the equipment and receiver.
—Connect the equipment into an outlet on a circuit different from that to which the
receiver is connected.
—Consult the dealer or an experienced radio/TV technician for help.
FCC Radiation Exposure Statement
This device complies with FCC radiation exposure limits set forth for an uncontrolled
environment and it also complies with Part 15 of the FCC RF Rules. This equipment
must be installed and operated in accordance with provided instructions and the
antenna(s) used for this transmitter must be installed to provide a separation distance
of at least 20 cm from all persons and must not be co-located or operating in
conjunction with any other antenna or transmitter. End-users and installers must be

User Manual
117
provide with antenna installation instructions and consider removing the
no-collocation statement.
This device complies with Part 15 of the FCC Rules. Operation is subject to the
following two conditions: (1) this device may not cause harmful interference, and (2)
this device must accept any interference received, including interference that may
cause undesired operation.
Caution!
Any changes or modifications not expressly approved by the party responsible for
compliance could void the user's authority to operate the equipment.
Canada Statement
This device complies with Industry Canada licence-exempt RSS standard(s).
Operation is subject to the following two conditions: (1) this device may not cause
interference, and (2) this device must accept any interference, including interference
that may cause undesired operation of the device.
Le présent appareil est conforme aux CNR d'Industrie Canada applicables aux
appareils radio exempts de licence. L'exploitation est autorisée aux deux conditions
suivantes : (1) l'appareil ne doit pas produire de brouillage, et (2) l'utilisateur de
l'appareil doit accepter tout brouillage radioélectrique subi, même si le brouillage est
susceptible d'en compromettre le fonctionnement.
The device meets the exemption from the routine evaluation limits in section 2.5 of
RSS 102 and compliance with RSS-102 RF exposure, users can obtain Canadian
information on RF exposure and compliance.
Le dispositif rencontre l'exemption des limites courantes d'évaluation dans la section
2.5 de RSS 102 et la conformité à l'exposition de RSS-102 rf, utilisateurs peut obtenir
l'information canadienne sur l'exposition et la conformité de rf.
This transmitter must not be co-located or operating in conjunction with any other
antenna or transmitter. This equipment should be installed and operated with a
minimum distance of 20 centimeters between the radiator and your body.
Cet émetteur ne doit pas être Co-placé ou ne fonctionnant en même temps
qu'aucune autre antenne ou émetteur. Cet équipement devrait être installé et
actionné avec une distance minimum de 20 centimètres entre le radiateur et votre
corps.

User Manual
118
This radio transmitter (identify the device by certification number, or model number if
Category II) has been approved by Industry Canada to operate with the antenna
types listed below with the maximum permissible gain and required antenna
impedance for each antenna type indicated. Antenna types not included in this list,
having a gain greater than the maximum gain indicated for that type, are strictly
prohibited for use with this device.
Le présent émetteur radio (identifier le dispositif par son numéro de certification ou
son numéro de modèle s'il fait partie du matériel de catégorie I) a été approuvé par
Industrie Canada pour fonctionner avec les types d'antenne énumérés ci-dessous et
ayant un gain admissible maximal et l'impédance requise pour chaque type
d'antenne. Les types d'antenne non inclus dans cette liste, ou dont le gain est
supérieur au gain maximal indiqué, sont strictement interdits pour l'exploitation de
l'émetteur.
The allowed antenna type
SR360n: Dipole Antenna with 5.0dBi gain(Max)
SR320n: PCB Antenna with 1.0dBi gain(Max)