ADTRAN SR400AC 802.11ac Gigabit Router User Manual
SmartRG, Inc. 802.11ac Gigabit Router Users Manual
ADTRAN >
Users Manual

SMART/RG SR400ac
802.11ac Gigabit Router User Manual
V1.0
SMART/RG SR400ac 802.11ac Gigabit Router User Manual
i
Contents
1Safety Precautions ............................................................................................. 1
2Overview ............................................................................................................ 2
2.1Product Introduction .............................................................................. 2
2.2Packing list ............................................................................................ 2
3Hardware Description and Hardware Installation ............................................... 3
3.1Front Panel and LED Status .................................................................. 3
3.2Side Panel and Interface Description .................................................... 7
3.3Rear Panel and Interface Description ................................................... 8
3.4Hardware Installation ............................................................................. 9
3.4.1System Requirements ................................................................ 9
3.4.2Before You Begin ...................................................................... 10
3.4.3Connecting the Device ............................................................. 10
3.5Operation Range ................................................................................. 10
3.6Roaming .............................................................................................. 10
4TCP/IP Settings and Wireless Connection Introduction ................................... 12
4.1TCP/IP Settings ................................................................................... 12
4.2Wireless Connection Introduction ........................................................ 16
5Logging In to the Web Page ............................................................................. 19
6Web Configuration ........................................................................................... 20
6.1Basic .................................................................................................... 20
6.2LAN ...................................................................................................... 22
6.2.1Basic LAN configuration ........................................................... 22
6.2.2DHCP configuration .................................................................. 23
6.2.3IPv6 configuration ..................................................................... 23
6.2.4Static Routes ............................................................................. 24
6.3WAN .................................................................................................... 24
6.4STATUS ............................................................................................... 27
6.5FILTERS .............................................................................................. 28
6.6ROUTING ............................................................................................ 29
6.7QOS ..................................................................................................... 30
6.8Media ................................................................................................... 32
SMART/RG SR400ac 802.11ac Gigabit Router User Manual
ii
6.9Storage ................................................................................................ 33
6.10Radio ................................................................................................... 34
6.11SSID .................................................................................................... 36
6.12Passpoint ............................................................................................. 38
6.13SECURITY .......................................................................................... 39
6.14WPS .................................................................................................... 40
6.15FIRMWARE ......................................................................................... 42
7Troubleshooting ............................................................................................... 43

SMART/RG SR400ac 802.11ac Gigabit Router User Manual
1
About User Manual
This user manual mainly describes how to install and configure the wireless router.
Organization
This user manual is organized as follows:
Chapter Descriptio
n
Chapter 2 Safety Precautions
Provides
safety
precaution
information
.
Chapter 3 : Overview
Provides a
general
overview
of the
wireless
router, and
the
packing
list.
Chapter 4 : Hardware Description and Hardware Installation
Mainly
describes
the front
and rear
panels of
the
wireless
router and
the

SMART/RG SR400ac 802.11ac Gigabit Router User Manual
2
procedure
for
hardware
installation
.
Chapter 5 : TCP/IP Settings and Wireless Connection Introduction
Describes
how to set
the TCP/IP
and how to
connect
the
wireless
router
wirelessly.
Chapter 6 : Logging In to the Web Page
Describes
how to log
in to the
wireless
router.
Chapter 7 : Web Configuration
Mainly
describes
how to
navigate
through
the Web
pages and
how to
configure
the
parameter
s.
Chapter 0:
Wireless
Interface
Select which wireless interface to
configure.
Provides
the
troublesho

SMART/RG SR400ac 802.11ac Gigabit Router User Manual
3
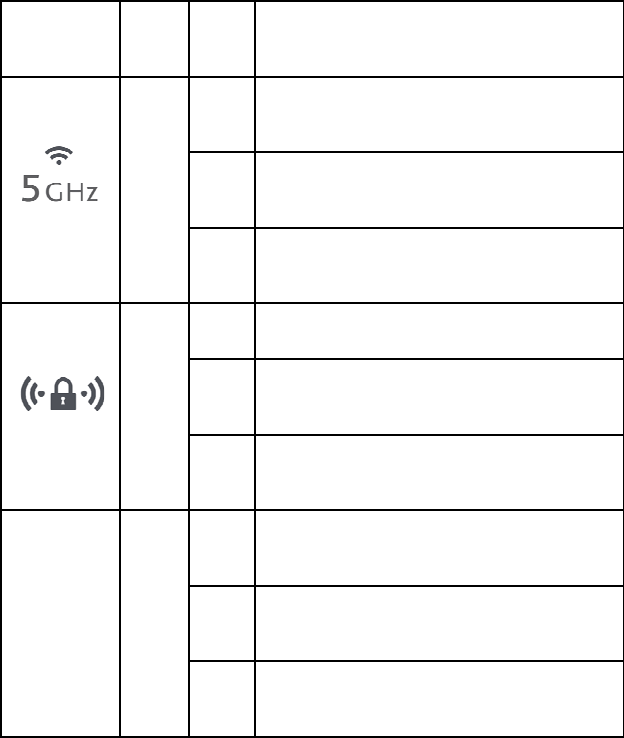
BSS-MAC
(SSID) Select desired BSS to configure
Mode Show whether the BSSID is AP,
WirelessBridge, WET or STA.
BSS Enabled Enable or disable this SSID.
Network Name
(SSID)
Set the Network Name (also known as
SSID) of this network.
Network Type
Select Closed hides the network from
active areas. Select Open reveals the
network to active scans.
AP Isolation
Select On enables AP isolation mode.
When enables, STAs associated to AP
will not be able to communicate with
each other.
Network Bridge Select desired bridge br0 or br1.
BSS Max
Associations
Limit
Set the maximum associations for this
BSS.
WMM Advertise
When WMM is enabled for the radio,
selecting On allows WMM to be
advertised in beacons and probes for this
BSS. Off disables advertisement of
WMM in beacons and probes.
WMF
Choose On to enable Wireless Multicast
Forwarding on this BSS. Off disables the
feature.
DWDS Enable of disable Dynamic Wireless
Bridge mode.
MCAST_REGEN
Choose On to enable Multicast Reverse
Translation on this sta. Off disables the
feature.
Operational Set Operational capabilities mode
oting
information
.
SMART/RG SR400ac 802.11ac Gigabit Router User Manual
4
capabilities
mode required
required for stations to associate to the
BSS supported by the interface: none –
no requirements on joining devices. erp –
devices must advertise ERP (11g)
capabilities to be allowed on a 2G band
BSS. ht – devices must advertise HT
(11n) capabilities to be allowed on the
BSS. vht – devices must advertise VHT
(11ac) capabilities to be allowed on the
BSS.
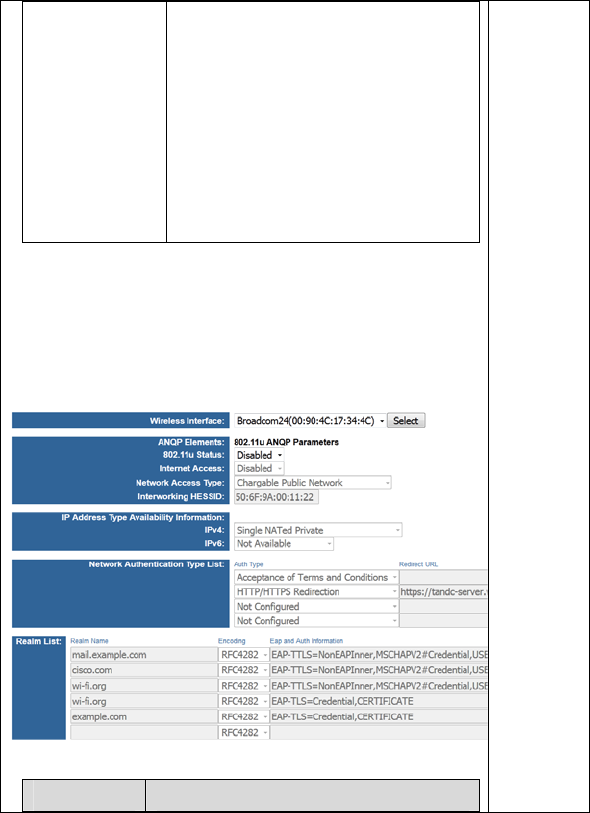
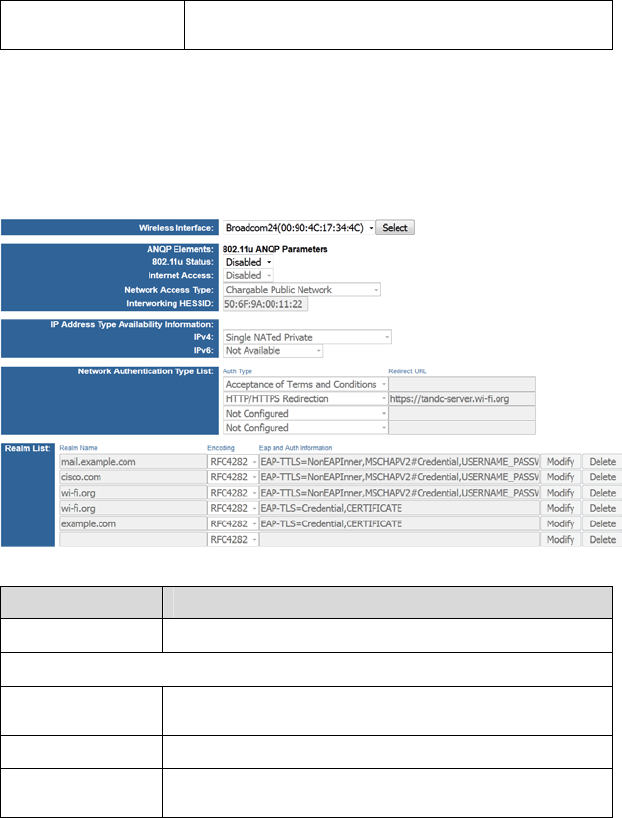
1.1 Passpoint
Click SSID in the navigation bar on the top pane of the page, the
SSID page appears. This page allows you to configure the
Passpoint parameters for each Virtual/Physical interface.
The following table describes parameters in this page:
Field Description

SMART/RG SR400ac 802.11ac Gigabit Router User Manual
5
Wireless
Interface Select which wireless interface to configure.
ANQP Elements: 802.11u ANQP Parameters
802.11status Enable or disable 802.11u Interworking
Capability for this SSID.
Internet
Access
Enable or disable Internet Access capability
for this SSID.
Network
Access Type Network Access Type.
Interworking
HESSID Set Interworking HESSID of this network.
IP Address
Type
Availability
Information
Set IP Address Type Availability Information
to this BSS supported by this interface.
IPv4 Set IPv4 Address Type Avaliability to this
BSS supported by this interface.
IPv6 Set IPv6 Address Type Avaliability to this
BSS supported by this interface.
Network
Authentication
Type List
Set Network Authentication Type List to the
BSS supported by the interface.
Realm List Set NAI Realm List to the BSS supported by
the interface.
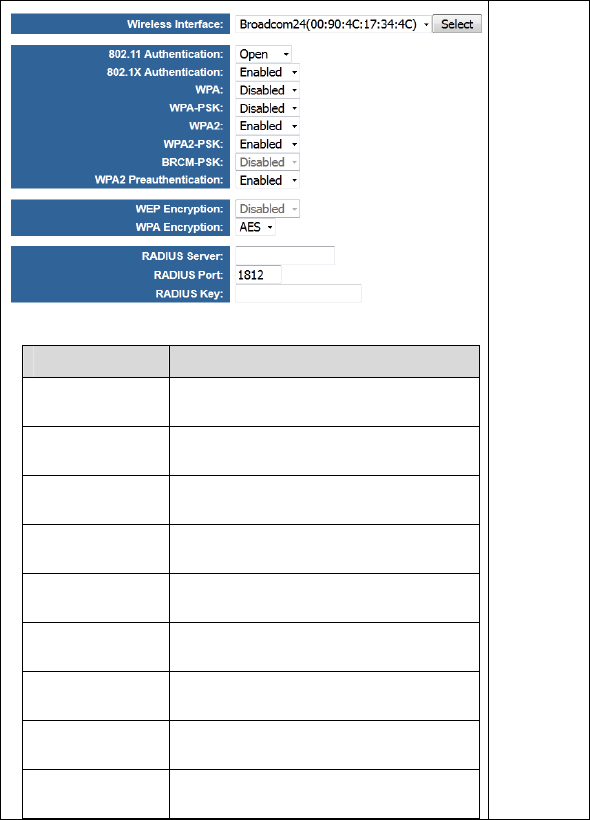
1.2 SECURITY
Click SECURITY in the navigation bar on the top pane of the
page, the SECURITY page appears. This page allows you to
configure security for the wireless LAN interfaces.
SMART/RG SR400ac 802.11ac Gigabit Router User Manual
6
The following table describes parameters in this page:
Field Description
Wireless
Interface
Select which wireless interface to
configure.
802.11
Authentication
Select 802.11 authentication method.
Open or shared.
802.11X
Authentication Select Network anthentication type.
WPA Enable/Disable WPA Authenticated Key
Management suite.
WPA-PSK Enable/Disable WPA-PSK Authenticated
Key Management suite.
WPA2 Enable/Disable WPA2 Authenticated Key
Management suite.
WPA2-PSK Enable/Disable WPA2-PSK
Authenticated Key Management suite.
BRCM-PSK Enable/Disable BRCM-PSK
Authenticated Key Management suite.
WPA2
Preauthentication Enable/Disable WPA2 Preauthentication.
SMART/RG SR400ac 802.11ac Gigabit Router User Manual
7
WEP Encryption Enable/Disable WEP data encryption.
WPA Encryption Select the WPA data encryption
algorithm.
RADIUS Server
Set the IP address of the RADIUS server
to use for authentication and dynamic
key derivation.
RADIUS Port
Set the UDP port number of the RADIUS
server. The port number is usually 1812
or 1645 and depends upon the server.
RADIUS Key Set the shared secret for the RADIUS
connection.
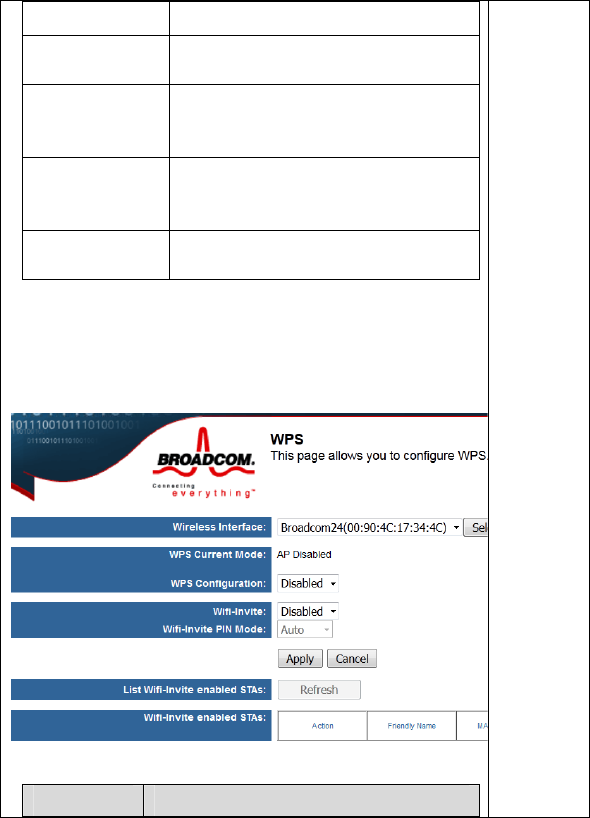
1.3 WPS
Click WPS in the navigation bar on the top pane of the page, the
WPS page appears. This page allows you to configure WPS.
The following table describes parameters in this page:
Field Description

SMART/RG SR400ac 802.11ac Gigabit Router User Manual
8
Wireless
Interface Select which wireless interface to configure.
WPS Current
Mode WPS Current Mode
WPS
Configuration Select WiFi Simple Config mode.
Wifi-Invite Enable or disable Wifi-Invite feature.
Wifi-Invite
PIN Mode
Set the Wifi-Invite PIN Mode to auto or
manual.
List Wifi-Invite
enabled STAs Scan to find Wifi-Invite enabled STAs.
Wifi-Invite
enabled STAs The list of Wifi-Invite enabled STAs
After setting, click Apply to save the settings, click Cancle to
abort the settings.
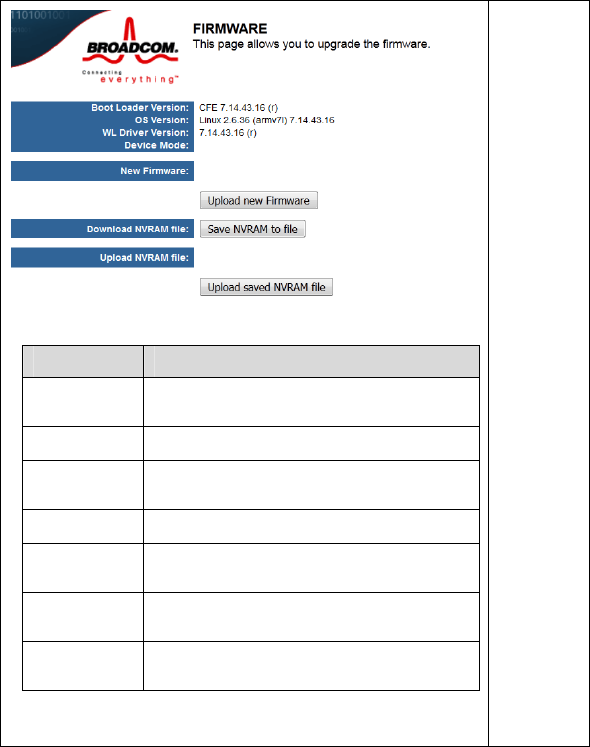
1.4 FIRMWARE
Click FIRMWARE in the navigation bar on the top pane of the
page, the FIRMWARE page appears. This page allows you to
upgrade the firmware.
SMART/RG SR400ac 802.11ac Gigabit Router User Manual
9
The following table describes parameters in this page:
Field Description
Boot Loader
Version Display the current version of Boot Loader.
OS Vertion Display the current version of OS.
WL Driver
Version
Display the current version of Wireless
Driver.
Device Mode Display the current devicemode.
New Fireware Select the new firmware to upload to the
router.
Download
NVRAM file
Push button to save NVRAM variables to
file.
Upload
NVRAM file Enter filename of saved NVRAM file here.
Troubleshooting
SMART/RG SR400ac 802.11ac Gigabit Router User Manual
10
Features
Support IEEE802.11b, IEEE802.11g, IEEE802.11n, IEEE802.11a,
IEEE802.11ac.
Transmission data rate is up to 1900 Mbps
Support WEP and WPA for secure data transmission
Support DHCP server
Support manually configuration of static routing
Support version upgrade through Web page
Support restoring factory default settings
Support demilitarized zone (DMZ)
Support DNS proxy and forwarding
Support QoS
Support UPnP
Support WPS
Support port mapping
Support port triggering
Support access point
Support guest network
Support restricting IP bandwidth
Support filtering by LAN IP Address and Destination Port
Support 3 types of WAN connection modes, including static IP, dynamic IP,
and PPPoE
Support remote access control
Support firewall
Support system status display
Support backup and restoration of configuration file
SMART/RG SR400ac 802.11ac Gigabit Router User Manual
1 1
2 Safety Precautions
Before operating the wireless router, read the following precaution information
carefully:
Use the type of power that user manual marks.
Use the power adapter that is packed within the device package.
Pay attention to the power load of the outlet or the prolonged lines. An
overburden power outlet or damaged lines and plugs may cause electric
shock or fire accident. Check the power cords regularly. If you find any
damage, replace it at once.
Proper space left for heat dissipation is necessary to avoid any damage
caused by overheating to the device.
Do not put this device close to a place where a heat source exits or high
temperature occurs. Avoid the device from direct sunshine.
Do not put this device close to a place where is over damp or watery. Do not
spill any liquid on this device.
Do not connect this device to any PC or electronic product, unless our
customer engineer or your broadband provider instructs you to do this,
because any wrong connection may cause any power or fire risk.
Do not place this device on an unstable surface or support.
SMART/RG SR400ac 802.11ac Gigabit Router User Manual
12
3 Overview
3.1 Product Introduction
The wireless router is a high-performance network access device. It is fully
compatible with IEEE802.11b, IEEE802.11g, IEEE802.11n and IEEE802.11ac
standards. It can provide reliable and convenient access service for individual
users and SOHO (Small Office, Home Office).
3.2 Packing list
Please check whether your packing list includes the following items:
Wireless router x 1
Power adapter (12V DC,3A) x 1

SMART/RG SR400ac 802.11ac Gigabit Router User Manual
13
4 Hardware Description and Hardware Installation
4.1 Front Panel and LED Status
There are 12 LED indicators on the front panel of the wireless router. By observing
their status, you can check whether the device runs normally.

SMART/RG SR400ac 802.11ac Gigabit Router User Manual
14
The following table describes the status of LED indicators on the front panel.
Indicator Color Status Description
power
White
On The device is powered on and the device is
operating normally.
Blink The device is initializing.
Off The device is powered off.
Amber
On The device is in CFE recovery mode.
Blink The software is upgrading or the RESET button
was pressed.
WAN
White
On Ethernet WAN interface is connected at 1000
BASE-T.
Blink Data is being transmitted through the Ethernet
WAN interface.
Off The Ethernet WAN interface is disconnected.
Green
On Ethernet WAN interface is connected at 10/100
BASE-T.
Blink Data is being transmitted through the Ethernet
WAN interface.
Off The Ethernet WAN interface is disconnected.

SMART/RG SR400ac 802.11ac Gigabit Router User Manual
15
Internet
White
On Internet is synchronized successfully in routed
mode.
Blink Internet data is being transmitted.
Off Ethernet WAN interface is disconnected.
Red
On Internet Authentication/Connection has failed.
Off Normally off.
Green
On The Ethernet interface is connected at 10/100
BASE-T.
Blink Data is being transmitted through the Ethernet
interface.
Off The Ethernet interface is disconnected.
USB 1
White
On
The connection of 3G/4G dongle or USB flash
disk is established @ USB 2.0 Low-Speed
(480Mbps)
Blink Data is being transmitted.

SMART/RG SR400ac 802.11ac Gigabit Router User Manual
16
Off
No USB device is connected or someone clicked
the Safely Remove Hardware button, and it is
now safe to remove the attached USB device.
USB2
White
On
The connection of 3G/4G dongle or USB flash
disk is established @ USB 3 High-Speed
(5Gbps).
Blink Data is being transmitted @ USB 3.0 High-Speed
(5Gbps).
Off
No USB device is connected or someone clicked
the Safely Remove Hardware button, and it is
now safe to remove the attached USB device.
Green
On
The connection of 3G/4G dongle or USB flash
disk is established @ USB 2.0 Low-Speed
(480Mbps).
Blink Data is being transmitted @ USB 2.0 Low-Speed
(480Mbps).
Off
No USB device is connected or someone clicked
the Safely Remove Hardware button, and it is
now safe to remove the attached USB device.
2.4GHz
White
On The 2.4GHz WiFi radio is operating.
Blink The router is sending/receiving WiFi traffic on
2.4GHz band.
SMART/RG SR400ac 802.11ac Gigabit Router User Manual
17
Off The 2.4GHz WiFi radio is off/disabled.
5GHz
White
On The 5GHz WiFi radio is operating.
Blink The router is sending/receiving WiFi traffic on
5GHz band.
Off The 5GHz WiFi radio is off/disabled.
WPS
White
On WPS pairing process was successful.
Blink WPS pairing process is active.
Off WPS pairing process is inactive.
LAN 1/2/3/4 White
On The Ethernet interface is connected at 1000
BASE-T.
Blink Data is being transmitted through the Ethernet
interface.
Off The Ethernet interface is disconnected.
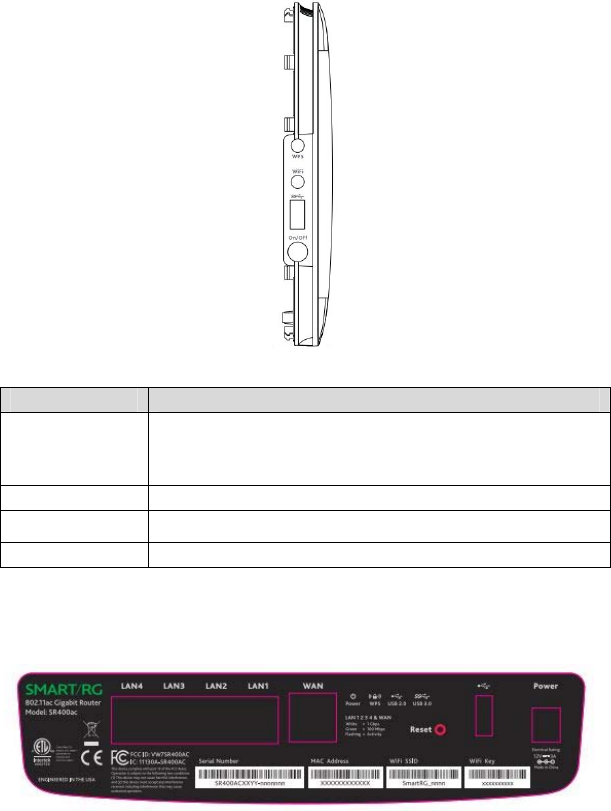
4.2 Side Panel and Interface Description
SMART/RG SR400ac 802.11ac Gigabit Router User Manual
18
The following table describes interfaces and buttons on the side panel.
Interface/Button Description
WPS
This button is used for enabling WPS PBC mode. When WPS
is enabled, press this button, and the AP starts to accept
negotiation of PBC mode.
Wifi Turn on/off Wifi.
USB3.0 USB 3.0 interface.
On/Off Turn/off the router.
4.3 Rear Panel and Interface Description

SMART/RG SR400ac 802.11ac Gigabit Router User Manual
19
The following table describes interfaces and buttons on the side panel.
Interface/Button Description
LAN1/LAN2/
LAN3/LAN4
RJ45 LAN interfaces, for connecting hub, switch, or computer
in a LAN.
WAN RJ45 WAN interface, for connecting WAN or the uplink
network devices.
Reset
Use a fine needle to press Reset gently for 3-6 seconds and
then release the button. The system reboots and restores to
the factory defaults.
USB 2.0 USB 2.0 interface.
Power Power socket, for connecting the power adapter.
Caution:
Do not press Reset unless you want to clear the current settings. The
Reset button is in a small circular hole on the rear panel. If you want to
restore the default settings, please press Reset gently for 3-6 seconds with
a fine needle inserted into the hole and then release the button. The
system reboots and restores to the factory default settings.
The power specification is 12V, 3A. If the power adapter does not match
the specification, the device may be damaged.
4.4 Hardware Installation
4.4.1 System Requirements
Before installing the device, please ensure that the following items are ready:
At least one Ethernet RJ45 cable (10/100/1000Base-T)
One wireless router
A PC is already installed with the TCP/IP protocol and the PC can access the
Internet.
SMART/RG SR400ac 802.11ac Gigabit Router User Manual
20
4.4.2 Before You Begin
Before you install the device, please pay attention to the following items:
When the device is connected to a computer, hub, router or switch, the
Ethernet cable should be less than 100 meters.
Do not place this device on an unstable surface or support. Do not put this
device on the ground.
Keep the device clean. Avoid the device from direct sunshine. Avoid any
metal in the device.
Place the device in the center of the area, and try to optimize the wireless
coverage.
4.4.3 Connecting the Device
To connect the device, do as follows:
Step 1 Connect one end of the RJ45 cable to the LAN interface of the wireless
router.
Step 2 Connect the other end of the RJ45 cable to your PC.
Step 3 Connect the power adapter to the power socket of the wireless router.
4.5 Operation Range
The operation range of the wireless router depends on the actual environment. The
path and effect of signal transmission vary according to the deployment in a house
or an office.
4.6 Roaming
Suppose that several wireless routers run in the same network. Each wireless
router serves as a BSS that has its coverage range. One wireless client (for
example, a notebook PC or PDA) can realize roaming from one AP to another AP
accurately. In that case, the wireless client can communicate with the other devices
within the coverage range of the wireless router.
We suggest indoor use.
SMART/RG SR400ac 802.11ac Gigabit Router User Manual
21
To realize roaming in the coverage range of the wireless router by a wireless client,
you need to set the APs properly as follows:
Set the same SSID for different APs.
The SSIDs of all the computers and PDAs should be consistent with that of
APs.
All the BSSs must use the same wireless channel.
If the encryption function is enabled, all wireless routers must be configured
with the same encryption mode and encryption key for establishing connection.
Wireless routers must keep coverage of uninterrupted wireless signals in the
whole operation environment. Hence, please put wireless routers to the
appropriate places.
SMART/RG SR400ac 802.11ac Gigabit Router User Manual
22
5 TCP/IP Settings and Wireless Connection
Introduction
5.1 TCP/IP Settings
By default, the LAN IP address of the wireless router is 192.168.1.1, the subnet
mask is 255.255.255.0, and the DHCP server is enabled.
It is recommended to set the network adapter to Obtain an IP address
automatically. Then, your PC obtains the TCP/IP settings, including the IP
address, subnet mask, gateway, and DNS address automatically through the
wireless router. If you know the settings of the current LAN interface, you can
manually set the TCP/IP properties of the network adapter, so that your PC can
communicate with the wireless router.
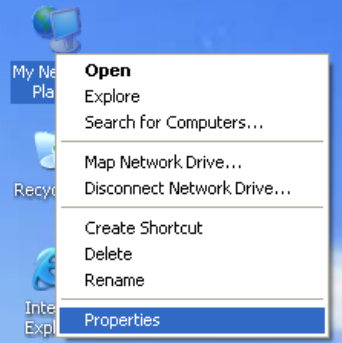
To manually set the network adapter, do as follows:
Step 1 Right-click the icon of My Network Places and choose Properties from
the menu. The Network Connections window appears.
SMART/RG SR400ac 802.11ac Gigabit Router User Manual
23
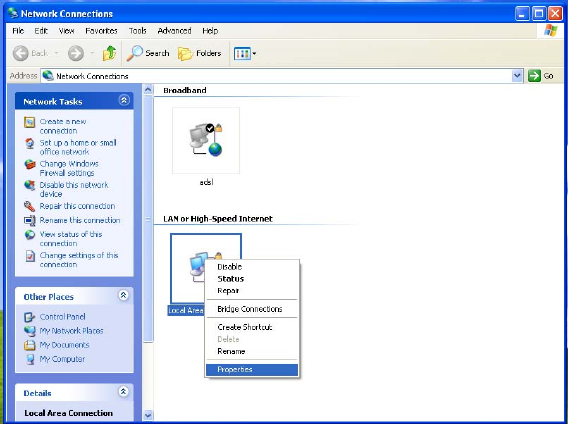
Step 2 Right-click the network adapter icon and choose Properties from the
menu. The Local Area Connections Properties window appears.
Note:
If multiple network cards are installed on your PC, a window other than the
Local Area Connections Properties window may appears.
Step 3 Double-click Internet Protocol (TCP/IP) and the Internet Protocol
(TCP/IP) Properties window appears.
SMART/RG SR400ac 802.11ac Gigabit Router User Manual
24
Step 4 Select Use the following IP address and enter the IP address of the
network adapter. The IP address must be 192.168. 1.X (X is a number in
the range of 2 to 254). If you want to access the Internet through a
wireless router, you need to enter the default gateway and IP address of
the DNS server correctly.
SMART/RG SR400ac 802.11ac Gigabit Router User Manual
25
Step 5 Set the subnet mask and click OK.
Step 6 After setting, you can ping the default IP address of the wireless router,
to check whether the current connection between the PC and the
wireless router is normal. Choose Start > Run from the desktop and
enter ping 192.168.1.1. See the following figure:
SMART/RG SR400ac 802.11ac Gigabit Router User Manual
26
Note:
192.168.1.1 in the ping command is the default IP address of the LAN interface.
If the IP address changes, enter the current IP address instead.
Step 7 If the PC can ping through the default IP address of the wireless router,
the following page appears, indicating that the connection between your
PC and the wireless router is normal.
5.2 Wireless Connection Introduction
By default, the AP function of the wireless router is enabled. If you use a wireless
network adapter, do as follows to establish the connection:

SMART/RG SR400ac 802.11ac Gigabit Router User Manual
27
Step 1 Enable the wireless network adapter on your PC and ensure that the
Wireless Zero Configuration tool is available. Right-click the Wireless
Network Connection icon and choose View Available Wireless
Networks from the menu.
Step 2 In the Wireless Network Connection page, click Refresh network list
and the network list is refreshed. The default SSID of the wireless router
is Broadcom24 (2.4G) or Broadcom58 (5.8G). Select the wireless
router that you want to connect and click Connect. The default wireless
security mode is None, and you can connect the wireless router directly
without the encryption key in this mode. If the wireless router is
encrypted, you need to enter the correct key to connect to the wireless
router.
Step 3 If you are not sure of the available SSID, please log in to the Web page
of the wireless router, and view the SSID in the SSID page of the
wireless settings.
SMART/RG SR400ac 802.11ac Gigabit Router User Manual
28
Note:
After your wireless network card connects to the wireless router successfully,
usually, you should set the network adapter to Obtain an IP address
automatically. The configuration of wireless connection is now complete.
SMART/RG SR400ac 802.11ac Gigabit Router User Manual
29
6 Logging In to the Web Page
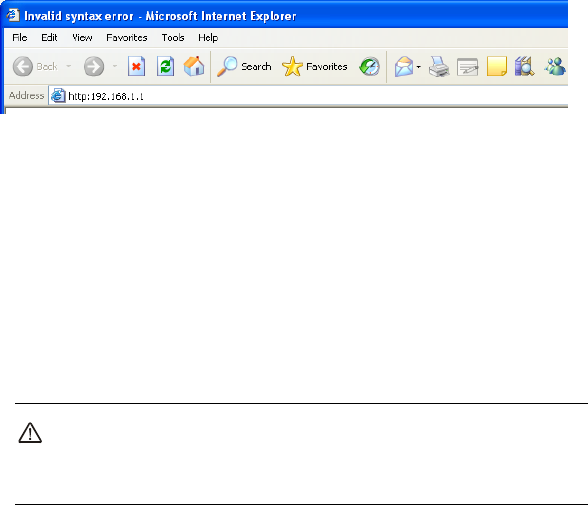
Run the Internet Explorer (IE), enter http://192.168.1.1/ (the default IP address of
the wireless router) in the address bar, and press Enter.
In the pop-up window, enter the user name and password, and click Login.
Note:
The default user name is void and the default password is admin.
After logging in to the Web page, you can view, configure and modify the router
settings. To make the settings and changes take effect, you need to reboot the
wireless router sometimes.
Caution:
If you are managing the wireless router through the Web page, do not cut
off the power supply. Otherwise, the device may be damaged.
SMART/RG SR400ac 802.11ac Gigabit Router User Manual
30
7 Web Configuration
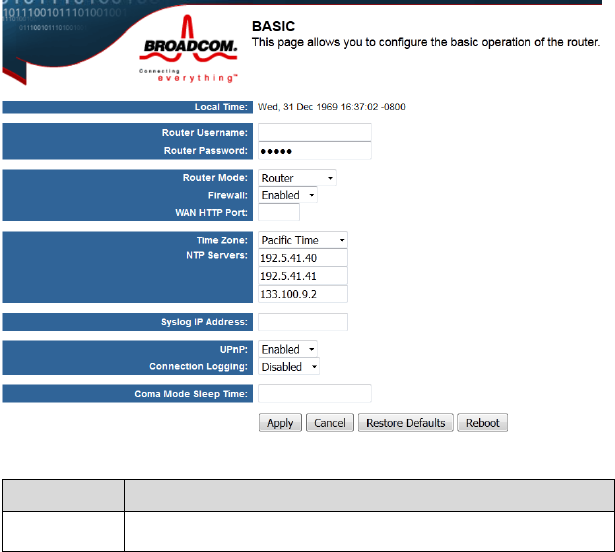
7.1 Basic
You can set the basic operation of the router by following this wizard. To configure
the basic operation, do as follows:
Step 1 After login, click Basic in the navigation bar on the top pane of the page.
The Basic page appears.
The following table describes parameters in this page:
Field Description
Local Time Show the local time as kept in the router.

SMART/RG SR400ac 802.11ac Gigabit Router User Manual
31
Field Description
Router
Username
Set the username for access to these configuration pages.
Router
Password
Set the password for access to these configuration pages, Leave
this filed and Router Username blank to disable access control.
Router Mode Choose Router or Access Point here.
Firewall Sets whether the firewall shoule be disabled, Connetctions from
the WAN are allowed if the firewall is disabled.
WAN HTTP
Port
Sets the HTTP prot to use for remote access to these
configuration pages. Leave this field blank to disable remote
access.
Time Zone Set the tme zone of this locale. You may choose Pacific Time,
Mountain Time, Central Time, Eastern Time here.
NTP Server Set the IP address of the NTP servers to use for time
synchronization.
Syslog IP
Address
System log messages will be sent to this IP address.
UPnP Set whether Universal Plug and Play (UPnP) is enabled.
Connection
Logging
Sets which connections through the router shoule be logged.
Seletcing Denied enables logging of denied connections. Select
Accepted enables logging of accepted connections. Select Both
enables logging of both denied and accepted connections.
Coma Mode
Sleep Time
Set the coma mode interval in seconds before reset.
SMART/RG SR400ac 802.11ac Gigabit Router User Manual
32
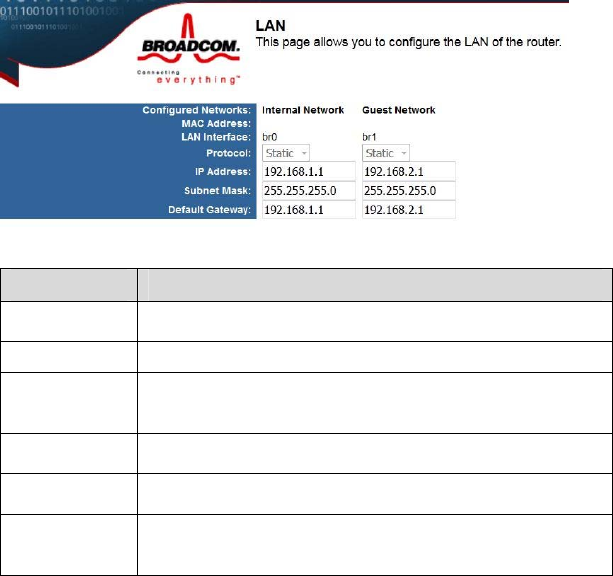
7.2 LAN
Click LAN to switch to LAN configuration page. In this page, you can configure the
parameters of the LAN port. You can modify the IP address of the LAN port
according to the actual network environment. This router supports Guest Network,
so you can set LAN configuration on both Internel Network and Guest Network.
7.2.1 Basic LAN configuration
The following table describes parameters in this picture:
Field Description
MAC Address Show the MAC address of LAN interface
LAN Interface Selects interfaces for LAN
Protocol Set the method to use to obtain an IP address of the LAN
interface
IP Address Set the IP address of the LAN interface
Subnet Mask Set the IP netmask of the LAN interface
Default
Gateway
Set the default gateway of the LAN interface
SMART/RG SR400ac 802.11ac Gigabit Router User Manual
33
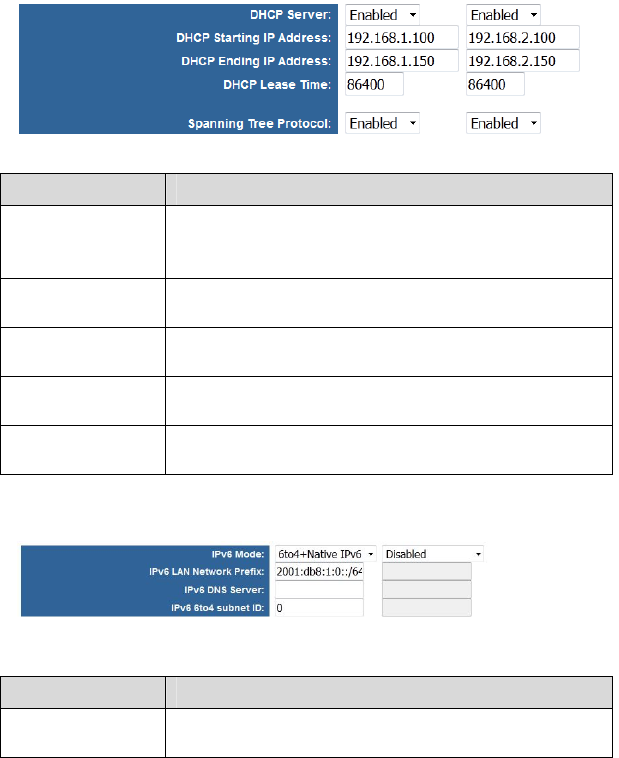
7.2.2 DHCP configuration
The following table describes parameters in this picture:
Field Description
DHCP Server If it is set Enabled, the router serves as the DHCP server
and automatically assigns IP addresses for all connected
computers.
DHPC Starting IP
Address
The first address in a consecutive IP address pool.
DHCP Ending IP
Address
The last address in a consecutive IP address pool.
DHCP Lease Time After the DHCP lease time elapsed, the router automatically
assigns new IP addresses for all connected computers.
Spanning Tree
Protocol
Enable/Disable Spanning Tree Protocol
7.2.3 IPv6 configuration
This router support IPv6, you can set IPv6 configuration in this page. The following
table describes these parameters:
Field Description
IPv6 Mode If it is set Disabled, IPv6 function is denied. To use IPv6,
choose 6to4 only, native IPv6 Only or 6to4+Native IPv6.
SMART/RG SR400ac 802.11ac Gigabit Router User Manual
34
Field Description
6to4 is an Internet transition mechanism for migrating
from IPv4 to IPv6, a system that allows IPv6 packets to be
transmitted over an IPv4 network (generally the
IPv4 Internet) without the need to configure explicittunnels.
IPv6 LAN Network
Prefix
Set IPv6 LAN Network Prefix here.
IPv6 DNS Server If you want to surf the Internet through IPv6, IPv6 DNS
Server must be set.
IPv6 6to4 subnet ID Set the 6to4 subnet ID(0-65535).
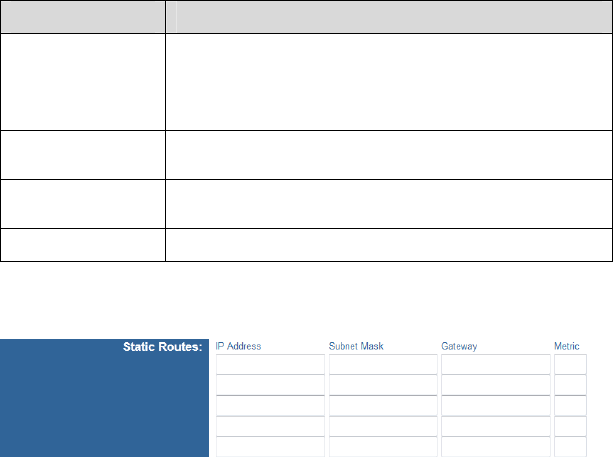
7.2.4 Static Routes
Static routes is a form of routing that occurs when a router uses a
manually-configured routing entry, rather than information from a dynamic routing
traffic.You can set the Static Routes for Internal Network and Guest Network in this
page.
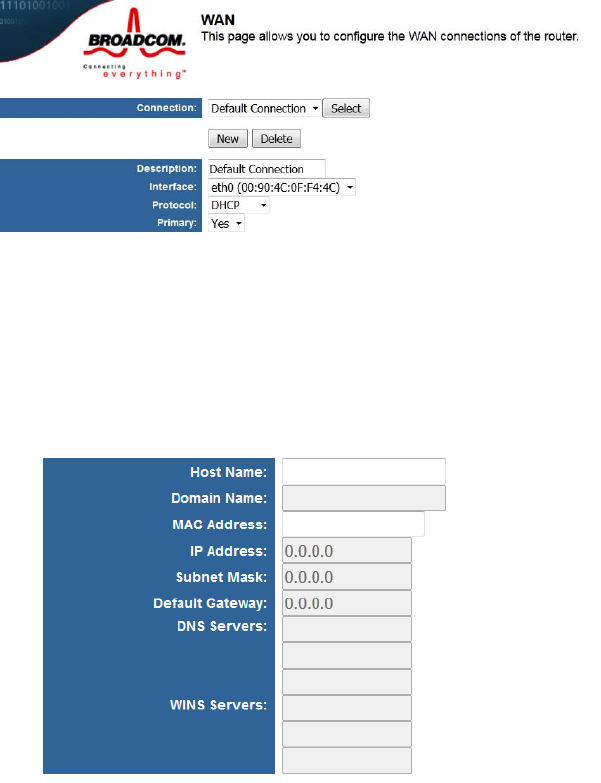
7.3 WAN
Click WAN in the navigation bar on the top pane of the page, the WAN page
appears. The router supports 3 modes of WAN connection, including DHCP, Static,
or PPPoE. In this page, you can select the appropriate WAN connection and
configure the relevant parameters according to the actual requirements.
SMART/RG SR400ac 802.11ac Gigabit Router User Manual
35
DHCP
If you select DHCP, the router automatically obtains IP address, subnet mask,
and IP address of the gateway from the ISP. Select this connection mode if the ISP
does not provide any IP network parameters.
Static IP (Fixed)
If the ISP provides the information of the IP address, subnet mask, gateway, and
DNS server, select Static. For detailed settings, refer to your ISP.
SMART/RG SR400ac 802.11ac Gigabit Router User Manual
36
The following table describes parameters in the above picture:
Field Description
Host Name Some ISPs require that a host name be provided when
requesting an IP address through DHCP.
Domain Name Set the domain name to be provided to LAN clients who
request an IP address through DHCP
MAC Address Some ISPs require that a specific MAC address be used.
Also known as MAC address cloning, this feature allows you
to set the MAC address of the WAN interface.
IP Address Enter the WAN IP address provided by the ISP. It cannot be
null.
Subnet Mask Enter the WAN subnet mask provided by the ISP. It varies
depending on the network type. It is usually 255.255.255.0
(Class C).
Default Gateway Enter the IP address of the gateway provided by the ISP. It is
the IP address used for connecting to the ISP.
DNS Servers Set the IP address of the DNS servers to use for resolving
host names.
WINS Servers Set the IP address of the WINS servers to use for resolving
NetBIOs names.
After setting, click Apply to save the settings.
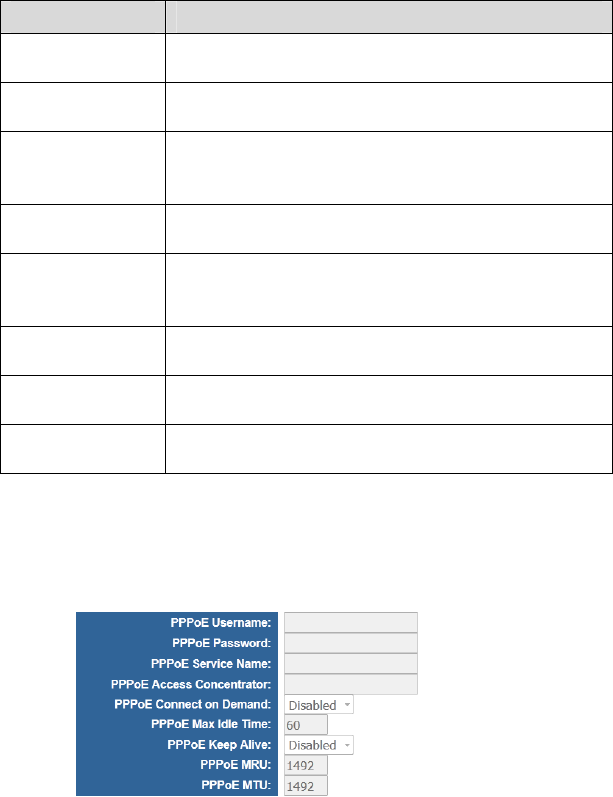
PPPoE
If the ISP provides the user name and password for PPPoE dialup, select PPPoE.

SMART/RG SR400ac 802.11ac Gigabit Router User Manual
37
The following table describes parameters in this page:
Field Description
PPPoE Username Set the username to use when authenricating with a PPPoE
server.
PPPoE Password Set the password to use when authenticating with a PPPoE
server
PPPoE Server
Name Set the PPPoE server name.
PPPoE Access
Concentrator Set the name of the PPPoE access concentrator.
PPPoE Connect on
Demand
Set whether the PPPoE link should be automatically
disconnected if no traffic has been observed for the period
specified by PPPoE Max Idle Time.
PPPoE Max Idle
Time
Set the number of seconds to wait before disconnecting the
PPPoE link if PPPoE Connect On is Enabled.
PPPoE Keep Alive
Set whether PPPoE link should be automatically restored if it
is lost. This setting has no effect if PPPoE Connect On
Demand is Enabled.
PPPoE MRU Set the maximum number of bytes that the PPPoE interface
will receive in a single Ethernet frame.
PPPoE MTU Set the maximum number of bytes that the PPPoE interface
will transmit in a single Ethernet frame.
After setting, click Apply to save the settings.
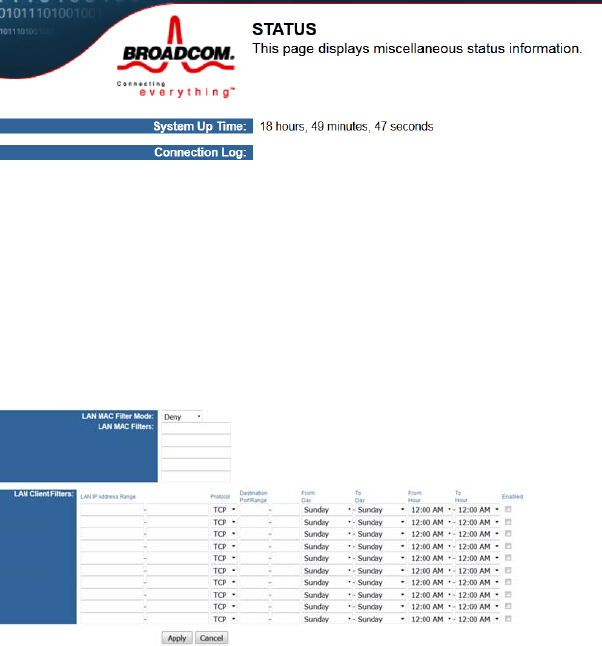
7.4 STATUS
Click STATUS in the navigation bar on the top pane of the page, the STATUS page
appears. You can check the system up time since the router was booted and the
log of recent connection attempts.
SMART/RG SR400ac 802.11ac Gigabit Router User Manual
38
7.5 FILTERS
Click FILTERS in the navigation bar on the top pane of the page, the FILTERS
page appears. This page allows you to configure LAN filters for the router. The LAN
machines affected by the filters will not be able to communicate through the WAN
but will be able to communicate with each other and with the router itself.
SMART/RG SR400ac 802.11ac Gigabit Router User Manual
39
The following table describes parameters in this page:
Field Description
LAN MAC Fiter
Mode
Select whether clients with the specified MAC address are
allowed of denied access to the router and the WAN
LAN MAC Fiters
Filter packets from LAN machines with the specified MAC
address. The MAC address format is XX: XX: XX: XX: XX:
XX: XX: XX
LAN Client Filters Filter packets from IP addresses destinined to certain port
ranges during the specified times.
After setting, click Apply to save the settings.
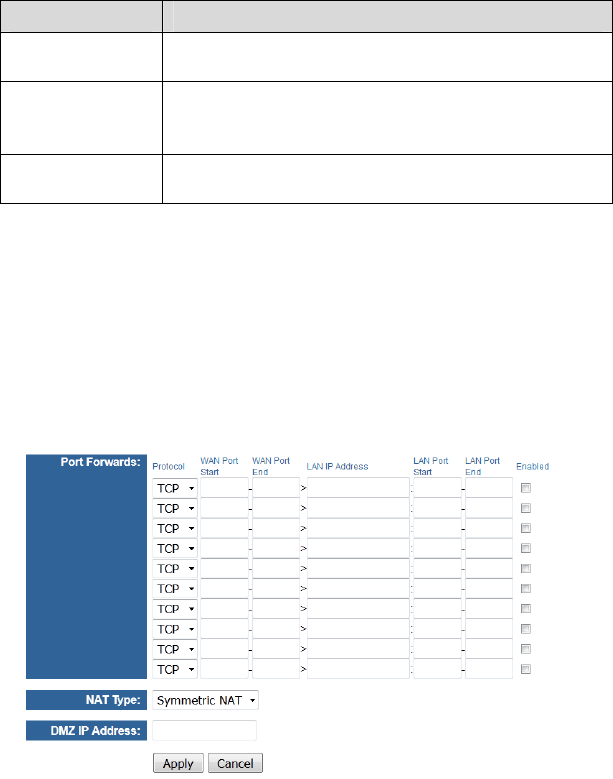
7.6 ROUTING
Click ROUTING in the navigation bar on the top pane of the page, the ROUTING
page appears.This page allows you to configure port forwarding for the router.
Requests to the specified WAN port range will be forwarded to the port range of the
LAN machine. You may also configure static routes here.
SMART/RG SR400ac 802.11ac Gigabit Router User Manual
40
The following table describes parameters in this page:
Field Description
Port Forwards
Forward packets destined to ports in the first range to the
LAN machine with the specified IP address. You may
optionally specify a second range (the range may not
overlap and must be the same size).
NAT Type Symmetric NAT is more secured, Cone NAT traversal
technology like Teredo.
DMZ IP Address Forward all other incoming WAN packets to the LAN
machine with the specified IP address.
After setting, click Apply to save the settings, click Cancle to abort the settings.
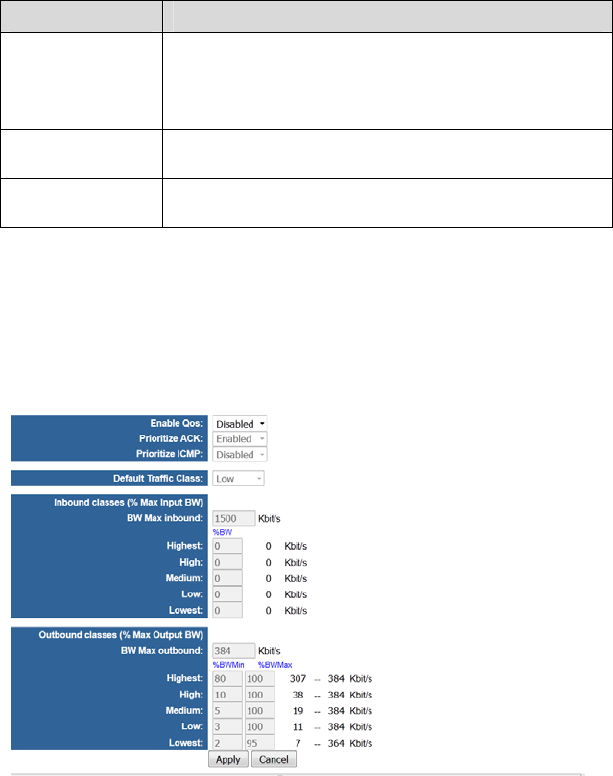
7.7 QOS
Click QOS in the navigation bar on the top pane of the page, the QOS page appears.
This page allows you to configure the new Broadcom IQos feature.

SMART/RG SR400ac 802.11ac Gigabit Router User Manual
41
The following table describes parameters in this page:
Field Description
Enable Qos Enable the Qos feature.
Prioritizes ACK Prioritize the transmit ACK packets.
Prioritize ICMP Prioritize the ICMP packets (PING replies, etc).
Default Traffic
Class IQos default traffic class for unclassified traffic.
Inbound Classes (% Max Input BW)
BW Max inbound Set the maximum bw for inbound traffic.
Highest Highest Priority settings in percent of max BW
High High Priority settings in percent of max BW
Medium Medium Priority settings in percent of max BW
Low Low Priority settings in percent of max BW
lowest Lowest Priority settings in percent of max BW
Outbound classes (% Max Output BW)
BW Max outbound: Set the maximum bw for outbound traffic.
Highest Highest Priority settings in percent of max BW
High High Priority settings in percent of max BW
Medium Medium Priority settings in percent of max BW
Low Low Priority settings in percent of max BW
lowest Lowest Priority settings in percent of max BW
After setting, click Apply to save the settings, click Cancle to abort the settings.
SMART/RG SR400ac 802.11ac Gigabit Router User Manual
42
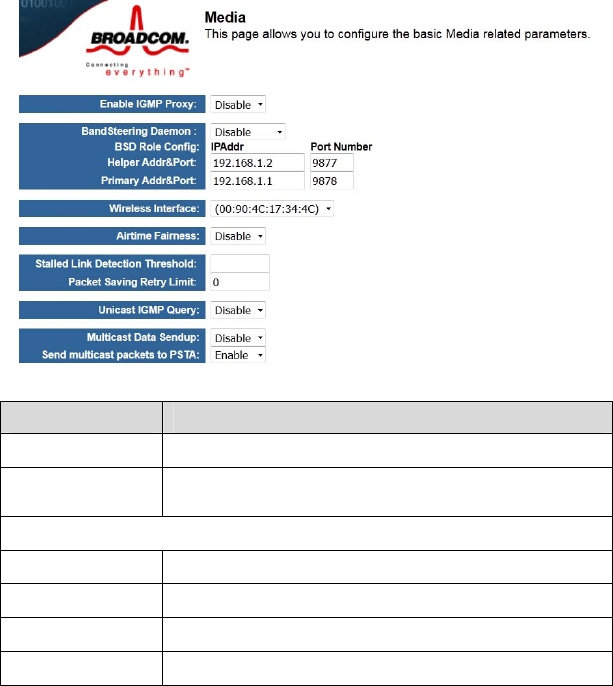
7.8 Media
Click Media in the navigation bar on the top pane of the page, the Media page
appears. This page allows you to configure the basic Media related parameters.
The following table describes parameters in this page:
Field Description
Enable IGMP Proxy Enable IGMP Proxy in AP mode: 0: disable; 1: enable.
BandSteering
Daemon
Role of BandSteering Daemon: 0: disable; 1: primary;
2:helper; 3: standalone.
BSD Role Config
Helper Addr&Port BAD Helper Addr and Port.
Primary Addr&Port BAD Primary Addr and Port.
Wireless Interface Select which Interface to configure.
Airtime Fairness Provide Airtime Fairness between multiple links.
SMART/RG SR400ac 802.11ac Gigabit Router User Manual
43
Field Description
Stalled Link
Detection
Threshold
Stalled Link Detection Threshold, 0 to disable.
Packet Saving
Retry Limit Set PsPretend retry limit, 0 to disable.
Unicast IGMP
Query Convert multicast IGMP mac packet to unicast mac packet.
Multicast Data
Sendup
Send (sendup) multicast packets from EMF/WMF to host
always.
Send multicast
packets to PSTA Send multicast packets to PSTA.
After setting, click Apply to save the settings, click Cancle to abort the settings.
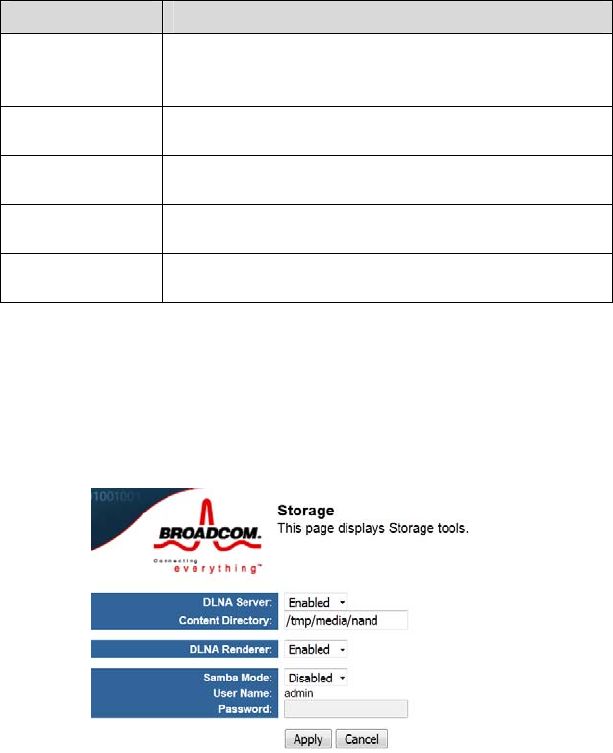
7.9 Storage
Click Storage in the navigation bar on the top pane of the page, the Storage page
appears. This page displays Storage tools.
SMART/RG SR400ac 802.11ac Gigabit Router User Manual
44
The following table describes parameters in this page:
Field Description
DLNA Server Set whether DLNA Server is enabled.
Content Directory Tell DLNA Server which directory is going to scan.
DLNA Renderer Set whether DLNA Renderer is enabled.
Samba Mode Set Samba Mode.
User Name Samba User Name.
Password Set samba password for remote connection.
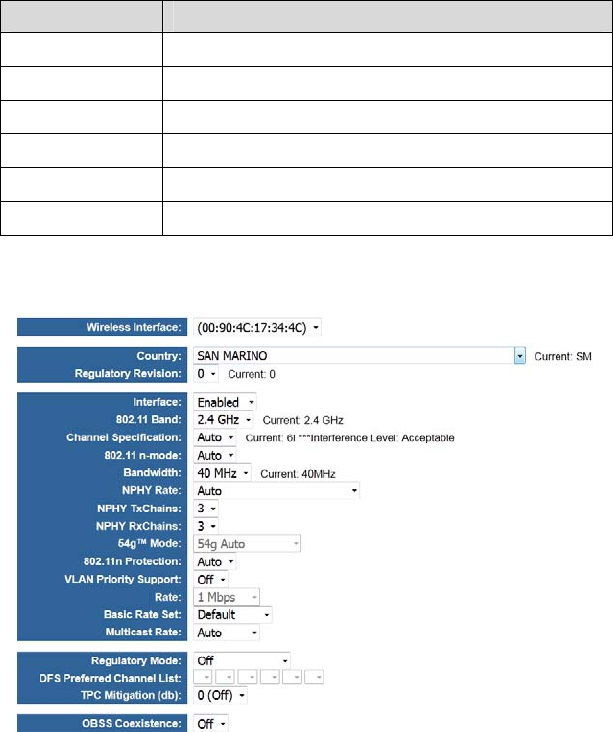
7.10 Radio

SMART/RG SR400ac 802.11ac Gigabit Router User Manual
45
Click Radio in the navigation bar on the top pane of the page, the Radio page
appears. This page allows you to configure the Physical Wireless interfaces.
The following table describes parameters in this page:
Field Description
Wireless Interface Select which wireless interface to configure.
Country Restrinct the channel set based on country requirements.
Interface Enable or disable the wireless interface.
802.11 Band Select a channel specification.
Channel
Specification Select a Channel Specification.
802.11 n-mode Enale/disable 802.11 N supply.
Bandwidth Select channel Bandwidth.
NPHY Rate Select NPHY Rate (MCS Index).
NPHY TxChains Select number of transmit chains to use.
NPHY RxChains Select number of receive chains to support.
54g™ Mode
Set the mode to 54g Auto for the widest compatibility. Set
the mode to 54g Performance for the fastest performance
among 54g certified equipment. Set the mode to 54g LRS
if you are experiencing difficulty with legacy 802.11b
equipment.
802.11n Protection
In Automode the AP will use RTS/CTS to improve
802.11n performance in mixed 802.11n/a/b/g networks.
Turn protection off to maximize 802.11n throughput under
most conditions.
VLAN Priority
Support Advertise packet priority using VLAN tag.
Rate Force the transmission rate for the AP to a particular
speed.
SMART/RG SR400ac 802.11ac Gigabit Router User Manual
46
Field Description
Basic Rate Set Select the basic rates that wireless clients must support.
Multicast Rate Force the multicast/broadcast transmission rate for the
AP to a particular speed.
Regulatory Mode Select a regulatory mode to use.
TPC Mitigation (db) Power Mitigation factor (in db).
OBSS Coexistence Enable/disable Overlapping BSS Coexisistence aka
20/40 Coex.
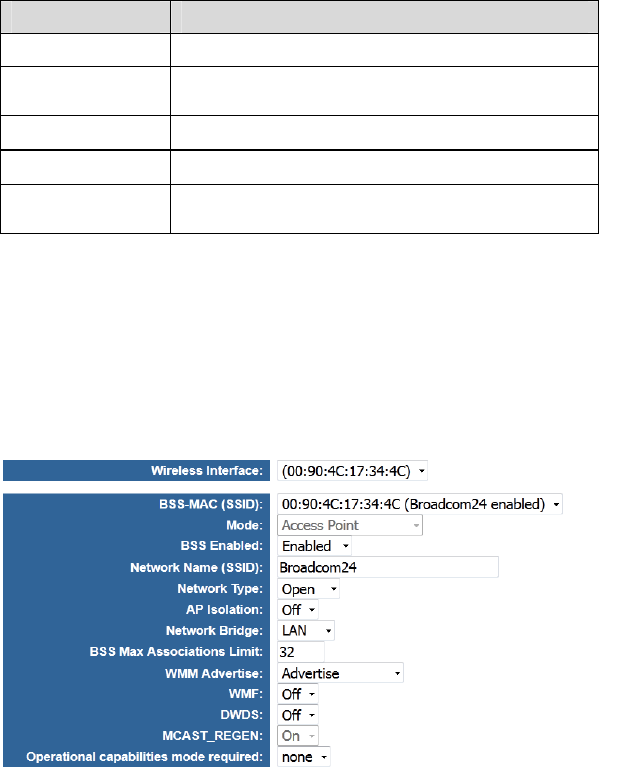
7.11 SSID
Click SSID in the navigation bar on the top pane of the page, the SSID page
appears. This page allows you to configure the Virtual interfaces for each Physical
interface.

SMART/RG SR400ac 802.11ac Gigabit Router User Manual
47
The following table describes parameters in this page:
Wireless Interface Select which wireless interface to configure.
BSS-MAC (SSID) Select desired BSS to configure
Mode Show whether the BSSID is AP, WirelessBridge, WET or
STA.
BSS Enabled Enable or disable this SSID.
Network Name (SSID) Set the Network Name (also known as SSID) of this
network.
Network Type Select Closed hides the network from active areas. Select
Open reveals the network to active scans.
AP Isolation
Select On enables AP isolation mode. When enables,
STAs associated to AP will not be able to communicate
with each other.
Network Bridge Select desired bridge br0 or br1.
BSS Max Associations
Limit Set the maximum associations for this BSS.
WMM Advertise
When WMM is enabled for the radio, selecting On allows
WMM to be advertised in beacons and probes for this
BSS. Off disables advertisement of WMM in beacons and
probes.
WMF Choose On to enable Wireless Multicast Forwarding on
this BSS. Off disables the feature.
DWDS Enable of disable Dynamic Wireless Bridge mode.
MCAST_REGEN Choose On to enable Multicast Reverse Translation on
this sta. Off disables the feature.
Operational
capabilities mode
required
Set Operational capabilities mode required for stations to
associate to the BSS supported by the interface: none –
no requirements on joining devices. erp – devices must
advertise ERP (11g) capabilities to be allowed on a 2G
band BSS. ht – devices must advertise HT (11n)
capabilities to be allowed on the BSS. vht – devices must
SMART/RG SR400ac 802.11ac Gigabit Router User Manual
48
advertise VHT (11ac) capabilities to be allowed on the
BSS.
7.12 Passpoint
Click SSID in the navigation bar on the top pane of the page, the SSID page
appears. This page allows you to configure the Passpoint parameters for each
Virtual/Physical interface.
The following table describes parameters in this page:
Field Description
Wireless Interface Select which wireless interface to configure.
ANQP Elements: 802.11u ANQP Parameters
802.11status Enable or disable 802.11u Interworking Capability for this
SSID.
Internet Access Enable or disable Internet Access capability for this SSID.
Network Access
Type Network Access Type.
SMART/RG SR400ac 802.11ac Gigabit Router User Manual
49
Field Description
Interworking
HESSID Set Interworking HESSID of this network.
IP Address Type
Availability
Information
Set IP Address Type Availability Information to this BSS
supported by this interface.
IPv4 Set IPv4 Address Type Avaliability to this BSS supported by
this interface.
IPv6 Set IPv6 Address Type Avaliability to this BSS supported by
this interface.
Network
Authentication Type
List
Set Network Authentication Type List to the BSS supported
by the interface.
Realm List Set NAI Realm List to the BSS supported by the interface.
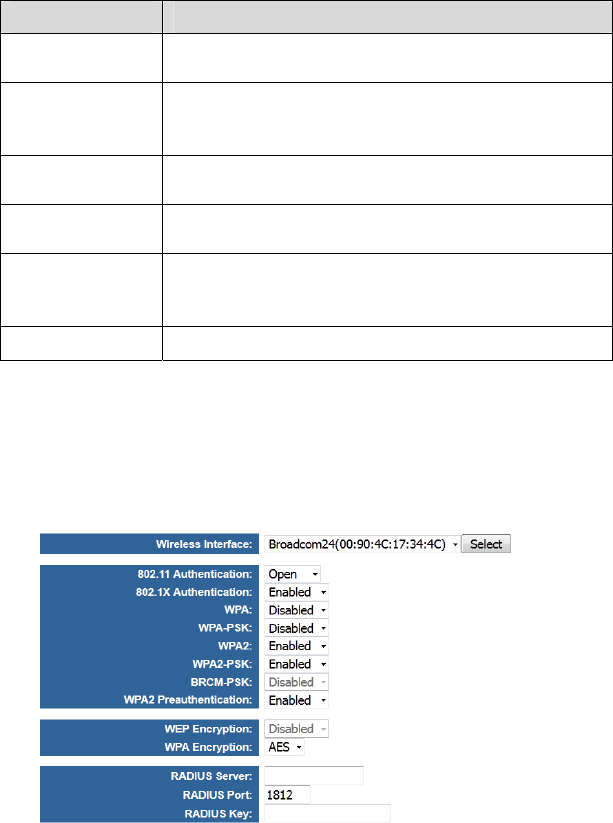
7.13 SECURITY
Click SECURITY in the navigation bar on the top pane of the page, the SECURITY
page appears. This page allows you to configure security for the wireless LAN
interfaces.

SMART/RG SR400ac 802.11ac Gigabit Router User Manual
50
The following table describes parameters in this page:
Field Description
Wireless Interface Select which wireless interface to configure.
802.11
Authentication Select 802.11 authentication method. Open or shared.
802.11X
Authentication Select Network anthentication type.
WPA Enable/Disable WPA Authenticated Key Management suite.
WPA-PSK Enable/Disable WPA-PSK Authenticated Key Management
suite.
WPA2 Enable/Disable WPA2 Authenticated Key Management
suite.
WPA2-PSK Enable/Disable WPA2-PSK Authenticated Key Management
suite.
BRCM-PSK Enable/Disable BRCM-PSK Authenticated Key Management
suite.
WPA2
Preauthentication Enable/Disable WPA2 Preauthentication.
WEP Encryption Enable/Disable WEP data encryption.
WPA Encryption Select the WPA data encryption algorithm.
RADIUS Server Set the IP address of the RADIUS server to use for
authentication and dynamic key derivation.
RADIUS Port
Set the UDP port number of the RADIUS server. The port
number is usually 1812 or 1645 and depends upon the
server.
RADIUS Key Set the shared secret for the RADIUS connection.
7.14 WPS
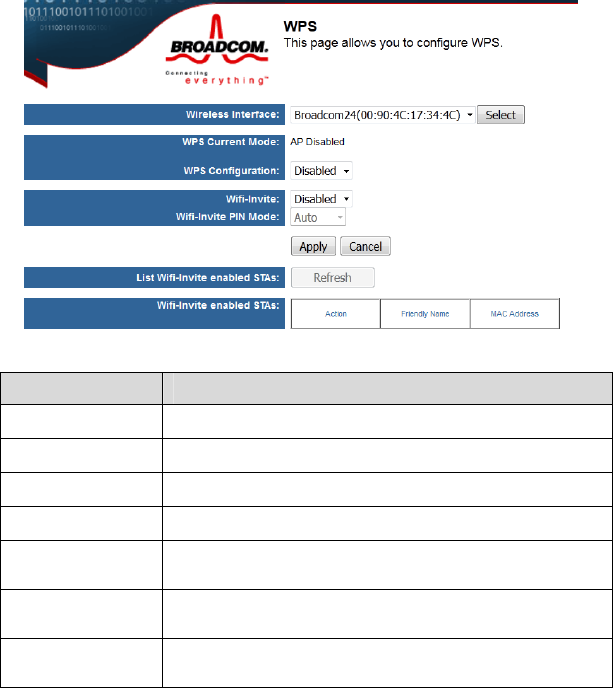
Click WPS in the navigation bar on the top pane of the page, the WPS page appears.
This page allows you to configure WPS.
SMART/RG SR400ac 802.11ac Gigabit Router User Manual
51
The following table describes parameters in this page:
Field Description
Wireless Interface Select which wireless interface to configure.
WPS Current Mode WPS Current Mode
WPS Configuration Select WiFi Simple Config mode.
Wifi-Invite Enable or disable Wifi-Invite feature.
Wifi-Invite PIN
Mode Set the Wifi-Invite PIN Mode to auto or manual.
List Wifi-Invite
enabled STAs Scan to find Wifi-Invite enabled STAs.
Wifi-Invite enabled
STAs The list of Wifi-Invite enabled STAs
After setting, click Apply to save the settings, click Cancle to abort the settings.
SMART/RG SR400ac 802.11ac Gigabit Router User Manual
52
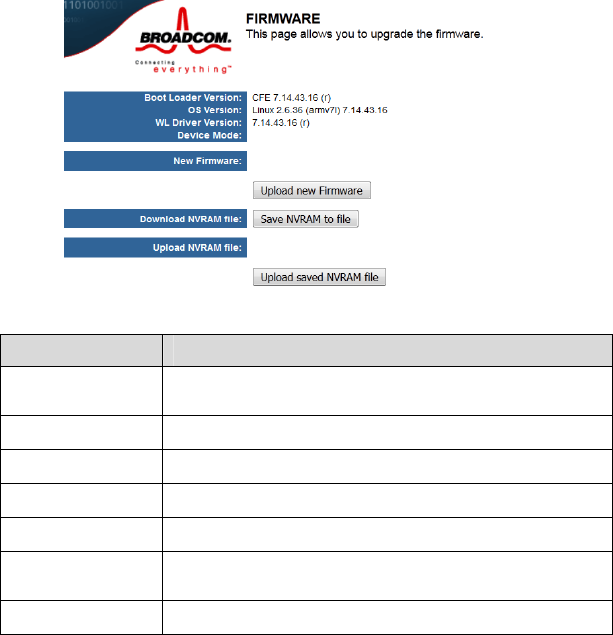
7.15 FIRMWARE
Click FIRMWARE in the navigation bar on the top pane of the page, the
FIRMWARE page appears. This page allows you to upgrade the firmware.
The following table describes parameters in this page:
Field Description
Boot Loader
Version Display the current version of Boot Loader.
OS Vertion Display the current version of OS.
WL Driver Version Display the current version of Wireless Driver.
Device Mode Display the current devicemode.
New Fireware Select the new firmware to upload to the router.
Download NVRAM
file Push button to save NVRAM variables to file.
Upload NVRAM file Enter filename of saved NVRAM file here.
SMART/RG SR400ac 802.11ac Gigabit Router User Manual
53
8 Troubleshooting
Failure to configure the router through a web browser
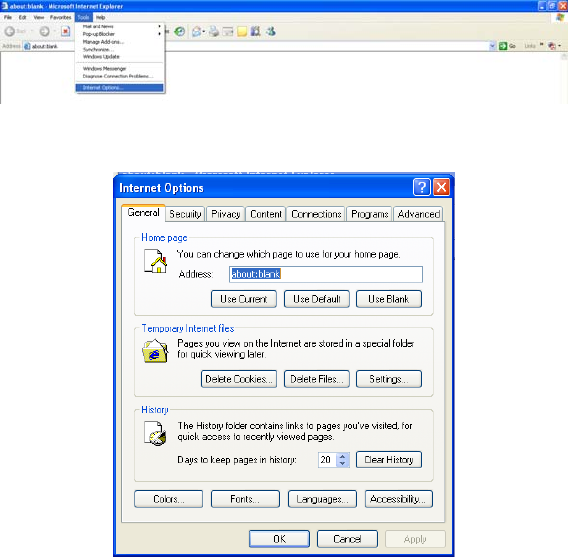
(1) Open the Web browser (for example, IE) and choose Tools > Internet Options
from the main menu.
(2) Click Delete Cookies and Delete Files.
Failure to establish wireless network connection
Because the router is beyond the wireless coverage.
SMART/RG SR400ac 802.11ac Gigabit Router User Manual
54
(1) Place the router near the customer premises equipment (CPE).
(2) Try modifying the channel setting.
Because of authentication problems.
(1) Use a computer of wired connection to connect the router.
(2) Check the network security settings.
(3) Try hard reset on the router.
Because the router cannot be detected.
(1) Try hard reset on the router and test again.
(2) Check the settings of the wireless network.
(3) Check the settings of SSID and encryption.
Failure to connect to the Internet through the wireless router
(1) Place the router to the wireless area where the CPE can connect.
(2) Check whether the wireless network card connects to the correct AP (base
station).
(3) Check whether the wireless channel accords with the channel specified in your
country or region.
(4) Check the encryption settings.
(5) Check whether your ADSL cable is connected to the correct network interfaces.
(6) Replace with a new network cable to connect to the router.
Failure to access the Internet
(1) Check whether the status of indicators on the ADSL modem and the wireless
router is normal.
(2) Check whether the WAN indicator is on. If the WAN indicator is off, check
whether the cable connected to the WAN interface is loose.
(3) When the Link indicator keeps on but does not blink, the router is connected to
the Internet.
(4) Reboot your computer.
(5) Set the AP again.
(6) Check whether the WAN indicator is on.
(7) Check the encryption settings of the wireless network.
(8) Check whether the PC that connects to the router can obtain the IP address
through either the wireless network or the cable network.
SMART/RG SR400ac 802.11ac Gigabit Router User Manual
55
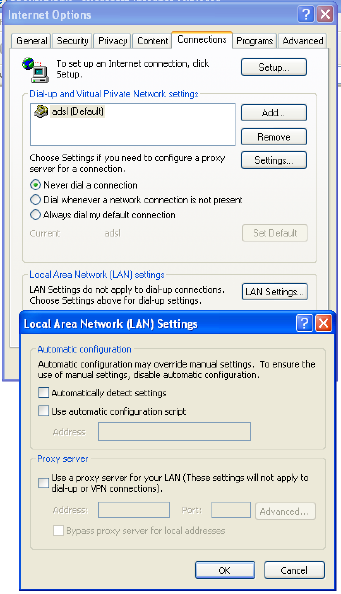
(9) Check the LAN settings of your Internet options, and do not use a proxy server
for your LAN. See the following figure:
SMART/RG SR400ac 802.11ac Gigabit Router User Manual
56
FCC Caution:
Any Changes or modifications not expressly approved by the party
responsible for compliance could void the user's authority to
operate the equipment.
This device complies with part 15 of the FCC Rules. Operation is
subject to the following two conditions: (1) This device may not
cause harmful interference, and (2) this device must accept any
interference received, including interference that may cause
undesired operation.
Note: This equipment has been tested and found to comply with the
limits for a Class B digital device, pursuant to part 15 of the FCC
Rules. These limits are designed to provide reasonable protection
against harmful interference in a residential installation. This
equipment generates, uses and can radiate radio frequency energy
and, if not installed and used in accordance with the instructions,
may cause harmful interference to radio communications. However,
there is no guarantee that interference will not occur in a particular
installation. If this equipment does cause harmful interference to
radio or television reception, which can be determined by turning the
equipment off and on, the user is encouraged to try to correct the
interference by one or more of the following measures:
SMART/RG SR400ac 802.11ac Gigabit Router User Manual
57
—Reorient or relocate the receiving antenna.
—Increase the separation between the equipment and receiver.
—Connect the equipment into an outlet on a circuit different from
that to which the receiver is connected.
—Consult the dealer or an experienced radio/TV technician for help.
FCC Radiation Exposure Statement:
This equipment complies with FCC radiation exposure limits
.This equipment should be installed and operated with minimum distance
20cm between the radiator& your body.
This transmitter must not be co-located or operating in conjunction
with any other antenna or transmitter.
IC warning
This device complies with Industry Canada license-exempt RSS
standard(s). Operation is subject
to the following two conditions:
(1) This device may not cause interference, and
(2) This device must accept any interference, including interference that
may cause undesired operation of the device.
Le présent appareil est conforme aux CNR d'Industrie
Canada applicables aux appareils radio exempts de licence.
L'exploitation est autorisée aux deux conditions suivantes :
(1) l'appareil nedoit pas produire de brouillage, et
(2) l'utilisateur de l'appareil doit accepter tout brouillage
SMART/RG SR400ac 802.11ac Gigabit Router User Manual
58
radioélectrique subi, même si le brouillage est susceptible
d'en compromettre le fonctionnement.
The device is compliance with RF exposure limits, users
can obtain Canadian information on RF exposure and compliance.
Le présent appareil est conforme Après examen de ce matériel aux conformité ou aux limites d’intensité de
champ RF, les utilisateurs peuvent sur l’exposition aux radiofréquences et la conformité
and compliance d’acquérir les informations correspondantes.
This Class B digital apparatus complies with Canadian ICES-003.
Cet appareil numérique de la classe B est conforme à la norme NMB-003
du Canada.