ADTRAN SR555A 802.11ac VDSL2 Bonding IAD User Manual SR655ac Gateway Quick Start Guide

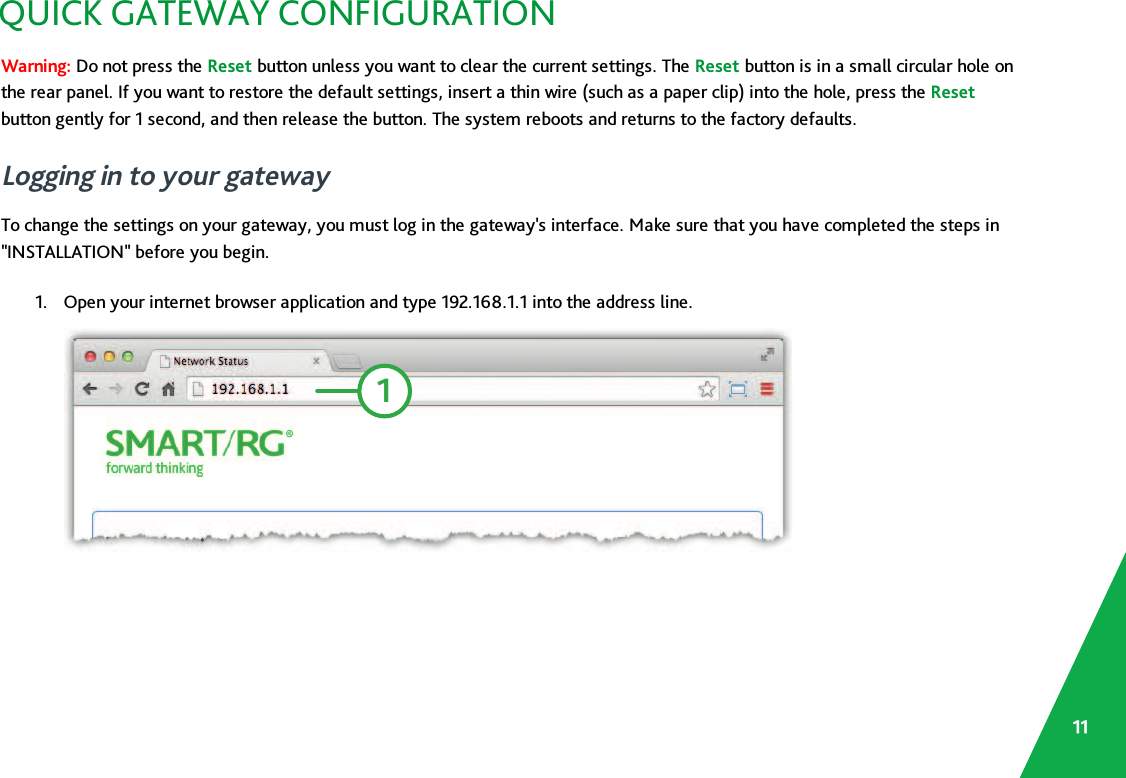
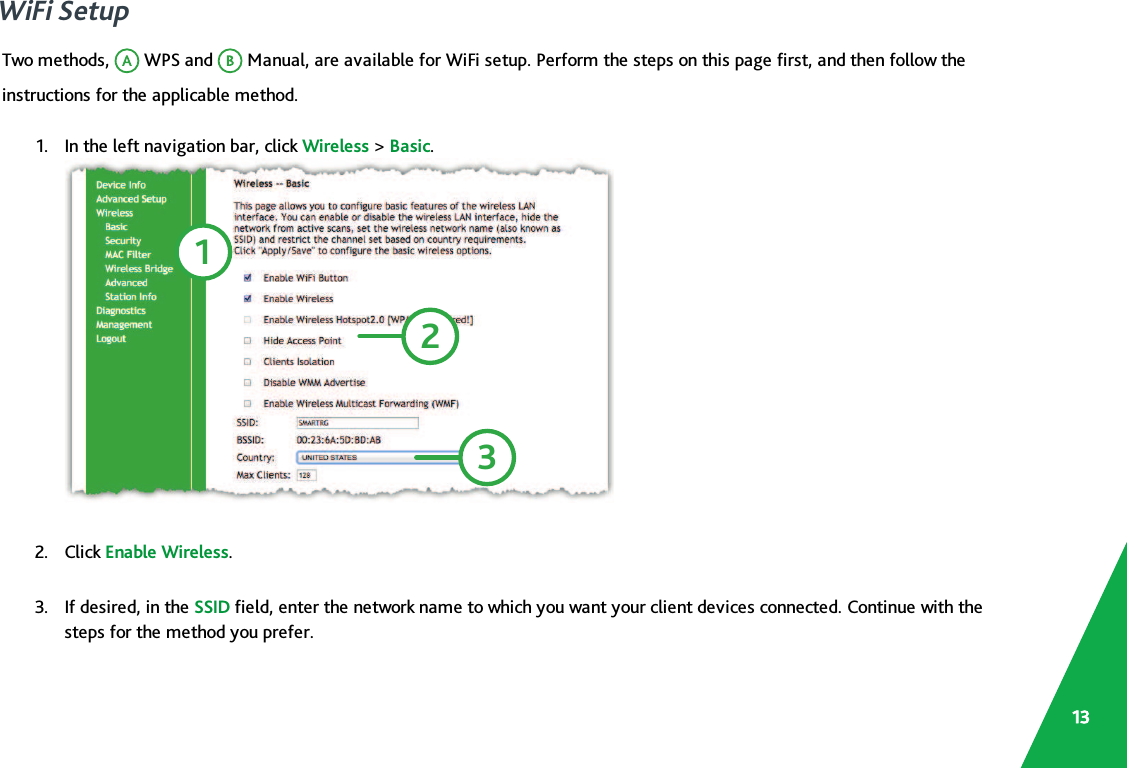
SmartRG, Inc. 802.11ac VDSL2 Bonding IAD SR655ac Gateway Quick Start Guide

Contents

10 user manual sr655ac

Quick Start GuideSR655acThis Quick Start Guide shows you how to set up and start using your new gateway.
Important Safety InstructionsWhen using your telephone equipment, basic safety precautions should always be followed to reduce the risk of fire, electric shock and injury topersons, including the following:1. Do not use this product near water, for example, near a bath tub, wash bowl, kitchen sink or laundry tub, in a wet basement or neara swimming pool.2. Avoid using a telephone (other than a cordless type)during an electrical storm. There may be a remote risk of electric shock fromlightning.3. Do not use the telephone to report a gas leak in the vicinity of the leak.4. CAUTION - To Reduce the risk of fire, use only No. 26 AWG or larger telecommunication line cord.The socket-outlet shall be installed near the equipment and shall be easily accessible.Importantes Mesures de Sécuritétre prises pendant l’utilisation de matérial téléphonique afin de réduire les risques d’incendie,de choc électriqueêCertaines mesures de sécuritédoivent et de blessures. En voici quelquesunes:1. Ne pas utiliser l’appareil près de l’eau, p.ex., près d’une baignoire, d’un lavabo, d’un évier de cuisine, d’un bac à laver, dans un sous-sol humide ouprès d’une piscine.2. Éviter d’utiliser le téléphone (sauf s’il s’agit d’un appareil sans fil) pendant un orage électrique. Ceci peut présenter un risque de choc électriquecausé par la foudre.3. Ne pas utiliser l’appareil téléphonique pour signaler une fuite de gaz s’il est situé près de la fuite.4. ATTENTION - Pour réduire les risques d’incendie, utiliser uniquement des conducteurs de télécommunications 26 AWG aude sectionsupérleure.le socle de prise de courant doit être installé à proximité du matériel et doit être aisément accessible.
FCC StatementsFCC - Part 68This equipment complies with Part 68 of the FCC rules and the requirements adopted by the ACTA. On the bottom case of this equipment is a labelthat contains, among other information, a product identifier in the format US: VW7DL01BSR655A.This indicates a REN (Ringer Equivalency Value) of0.18.This equipment uses the following USOC jacks: RJ-11/RJ45/USB/Power Jacks.A plug and jack used to connect this equipment to the premises wiring and telephone network must comply with the applicable FCCPart 68 rules andrequirements adopted by the ACTA. A compliant telephone cord and modular plug is provided with this product. It is designed to be connected to acompatible modular jack that is also compliant. See installation instructions for details.Ringer Equivalency Number StatementREN=0.18The Ringer Equivalence Number (REN) indicates the maximum number of devices allowed to be connected to a telephoneinterface. The termination of an interface may consist of any combination of devices subject only to the requirement that the sumof the RENs of all the devices not exceed five.L'indice d'équivalence de la sonnerie (IES) sert à indiquer le nombre maximal de terminaux qui peuvent être raccordés à uneinterface téléphonique. La terminaison d'une interface peut consister en une combinaison quelconque de dispositifs, à la seulecondition que la somme d'indices d'équivalence de la sonnerie de tous les dispositifs n'excède pas 5.Notice: The Ringer Equivalency Number (REN) assigned to each terminal device provides an indication of the maximum number of terminals allowedto be connected to a telephone interface. The termination on an interface may consist of any combination of devices subject only to the requirementthat the sum of the Ringer Equivalence Numbers of all the devices does not exceed 5.3
If this equipment causes harm to the telephone network, the telephone company will notify you in advance that temporary discontinuance of servicemay be required. But if advance notice isn't practical, the telephone company will notify the customer as soon as possible. Also, you will be advised ofyour right to file a complaint with the FCC if you believe it is necessary.The telephone company may make changes in its facilities, equipment, operations or procedures that could affect the operation of the equipment. Ifthis happens the telephone company will provide advance notice in order for youto make necessary modifications to maintain uninterrupted service.If trouble is experienced with this equipment, for repair or warranty information, please contact SmartRG,Inc. If the equipment is causing harm to thetelephone network, the telephone company may request that you disconnect the equipment until the problem is resolved.Connection to party line service is subject to state tariffs.Contact the state public utility commission, public service commission or corporationcommission for information.If your home has specially wired alarm equipment connected to the telephone line, ensure the installation of this device does not disable your alarmequipment. If you have questions about what will disable alarm equipment, consult your telephone company or a qualified installer.IC CS-03 statementThis product meets the applicable Industry Canada technical specifications.Le présent matériel est conforme aux specifications techniques applicables d’Industrie Canada.The Ringer Equivalence Number (REN) is an indication of the maximum number of devices allowed to be connected to a telephone interface. Thetermination of an interface may consist of any combination of devices subject only to the requirement that the sum of the RENs of all the devices notexceed five. / L’indice d’équivalence de la sonnerie (IES) sert à indiquer le nombre maximal de terminaux qui peuvent être raccordés à une interfacetéléphonique. La terminaison d’une interface peut consister en une combinaison quelconque de dispositifs, à la seule condition que la somme d’indicesd’équivalence de la sonnerie de tous les dispositifs n’excède pas cinq.
FCC - Part 15This equipment has been tested and found to comply with the limits for a Class B digital device, pursuant to part 15of the FCCRules.These limits aredesigned to provide reasonable protection against harmful interference in a residential installation. This equipment generates, uses and can radiateradio frequency energy and, ifnot installed and used in accordance with the instructions, may cause harmful interference to radio communications.However, there is no guarantee that interference will not occur in a particular installation. If this equipment does cause harmful interference to radioor television reception, which can be determined by turning the equipment off and on, the user is encouraged to try to correct the interference byone or more of the following measures:lReorient or relocate the receiving antenna.lIncrease the separation between the equipment and receiver.lConnect the equipment into an outlet on a circuit different from that to which the receiver is connected.lConsult the dealer or an experienced radio/TV technician for help.FCC Radiation Exposure StatementThis device complies with FCC radiation exposure limits set forth for an uncontrolled environment and it also complies with Part 15 of the FCC RFRules. This equipment must be installed and operated in accordance with provided instructions and the antenna(s)used for this transmitter must beinstalled to provide a separation distance of at least 20 cm from all persons and must not be co-located or operating in conjunction with any otherantenna or transmitter. End-users and installers must be provide with antenna installation instructions and consider removing the no-collocationstatement.This device complies with Part 15of the FCCRules.Operation is subject to the following two conditions: (1) this device may not cause harmfulinterference, and (2) this device must accept any interference received, including interference that may cause undesired operation.Caution!Any changes or modifications not expressly approved by the party responsible for compliance could void the user's authority to operate theequipment.5
Canada StatementThis device complies with Industry Canada licence-exempt RSS standard(s). Operation is subject to the following two conditions: (1) this device maynot cause interference, and (2) this device must accept any interference, including interference that may cause undesired operation of the device.Le présent appareil est conforme aux CNR d'Industrie Canada applicables aux appareils radio exempts de licence. L'exploitation est autorisée aux deuxconditions suivantes :(1) l'appareil ne doit pas produire de brouillage, et (2) l'utilisateur de l'appareil doit accepter tout brouillage radioélectrique subi,même si le brouillage est susceptible d'en compromettre le fonctionnement.The device meets the exemption from the routine evaluation limits in section 2.5 of RSS 102 and compliance with RSS-102 RF exposure, users canobtain Canadian information on RF exposure and compliance.Le dispositif rencontre l'exemption des limites courantes d'évaluation dans la section 2.5 de RSS 102 et la conformité à l'exposition de RSS-102 rf,utilisateurs peut obtenir l'information canadienne sur l'exposition et la conformité de rf.This transmitter must not be co-located or operating in conjunction with any other antenna or transmitter. This equipment should be installed andoperated with a minimum distance of 20 centimeters between the radiator and your body.Cet émetteur ne doit pas être Co-placé ou ne fonctionnant en même temps qu'aucune autre antenne ou émetteur. Cet équipement devrait êtreinstallé et actionné avec une distance minimum de 20 centimètres entre le radiateur et votre corps.This radio transmitter (identify the device by certification number, or model number if Category II)has been approved by Industry Canada to operatewith the antenna types listed below with the maximum permissible gain and required antenna impedance for each antenna type indicated. Antennatypes not included in this list, having a gain greater than the maximum gain indicated for that type, are strictly prohibited for use with this device.Le présent émetteur radio (identifier le dispositifpar son numéro de certification ouson numéro de modèle s'il fait partie du matériel de catégorie I) aété approuvé par Industrie Canada pour fonctionner avec les types d'antenne énumérés ci-dessous et ayant un gain admissible maximal etl'impédance requise pour chaque type d'antenne. Les types d'antenne non inclus dans cette liste, ou dont le gain est supérieur augain maximal indiqué,sont strictement interdits pour l'exploitation de l'émetteur.
EMC Compliance StatementThis Class A digital apparatus complies with Canadian ICES-003.Cet appareil numérique de la classe A est conforme à la norme NMB-003 du Canada.5GHz5150-5250 MHz band is restricted to indoor operations only.7
INSTALLATIONLocate the splitter cable that is included with your SmartRG gateway. It has three ports.1. Connect the splitter as follows:a. Connect the DSL port of the gateway and the Modem port of the splitter with a telephone cableb. Connect the phone to the Phone port of the splitter with a telephone cablec. Connect the incoming line to the Line port of the splitter.2. Connect a LAN port of the gateway to the network card of the PC using an Ethernet cable.3. Plug the power adapter to the wall outlet and then connect the other end of it to the Power port of the gateway.4. Turn on the unit by pressing the On/Off button on the side of the gateway.Note: If you use 3G WAN service, connect the 3G USB data card to the USB port of the gateway. If you use the Ethernet uplink,connect to the WAN interface using an Ethernet cable. You cannot use the xDSL uplink, 3G WAN service, and Ethernet uplink at thesame time.Your gateway is now automatically being set up to connect to the Internet. This process may take a few minutes to completebefore you can begin using your Internet applications (browser, email, etc.).If you are unable to connect to the Internet, confirm that all cable connections are in place and the gateway’s power is turned on.
WANModemLineRJ11PhonePhone DSL USBCOAXDC/INLAN 3G USB Data Card / LTERJ451a1c1b239
 POWER DSL INTERNET WAN LAN 1-4 2.4 GHZ 5 GHZ USB 1-2 WPS DSL sync in progressDSL sync acquired and gateway onlineWi-Fi enabled on modemData transferWPS setup procedure in progressUSB device connected / data transfer       Internet authentication/connection has failedDevice in CFE mode for recovery : Green    : Blinking / Active     : Red   LED INDICATORSThe LEDs on the SR655ac can assist youin better understanding the current stateof your gateway.
QUICK GATEWAY CONFIGURATIONWarning: Do not press the Reset button unless you want to clear the current settings. The Reset button is in a small circular hole onthe rear panel. If you want to restore the default settings, insert a thin wire (such as a paper clip) into the hole, press the Resetbutton gently for 1 second, and then release the button. The system reboots and returns to the factory defaults.Logging in to your gatewayTo change the settings on your gateway, you must log in the gateway's interface. Make sure that you have completed the steps in"INSTALLATION" before you begin.1. Open your internet browser application and type 192.168.1.1 into the address line.111
2. The login dialog appears. Enter the factory default credentials shown below and click OK.User Name: admin Password: adminNote: Your service provider may use other settings. Contact your provider for details.3. At the bottom of the page, click Manage gateway (advanced). The gateway interface appears, showing the Device Infosummary page.Configuring the WAN manuallyIf the automatic connect process is unsuccessful, refer to the Advanced Setup >Layer 2 Interface and WAN Services sections ofthe SmartRG SR655ac Gateway User Manual to manually establish a connection.
WiFi SetupTwo methods, WPS and Manual, are available for WiFi setup. Perform the steps on this page first, and then follow theinstructions for the applicable method.1. In the left navigation bar, click Wireless >Basic.1232. Click Enable Wireless.3. If desired, in the SSID field, enter the network name to which you want your client devices connected. Continue with thesteps for the method you prefer.13
WPS MethodIf the device you wish to connect to the Internet via your gateway supports the WPS secure WiFi connection method, follow thesesteps.1. In the left navigation bar, click Wireless >Security.2. Select Enable WPS and click Apply/Save to commit your selection.3. Within 2 minutes, activate WPS on the 3rd party device to which you wish to connect. The device may have a pushbuttonon its exterior or a software interface is used to initiate WPS connection. To learn how to use the WPS feature on yourclient device, refer to its documentation.Your device should now be connected to your gateway wirelessly using WPS. If you encounter problems with the WPS setup such asconnection failure, refer to your client device for further instructions.
Manual MethodSet up your gateway’s parameters first, then follow these steps.1. In the left navigation bar, select Wireless >Security and scroll down to the Manual Setup AP section.2. If your gateway supports multiple wireless networks, select the SSID of the network you wish to configure. You will needthis ID for step 7.3. Select the desired Network Authentication. Make sure that the host devices you intend to use support the selectedauthentication type.4. Choose a WPA Passphrase and type it in to this field. You will need this passphrase for step 7.5. Select any desired encryption preferences in the lower three fields.6. Click Apply / Save.7. Follow the WiFi connection instructions provided with your client device to connect to the gateway. Use the SSID name youselected in Step 2. Then enter the passphrase that you entered in step 4 in the appropriate location on the network setupscreen of your WiFi client device.15
OPTIONAL WALL MOUNTUsing a Phillips-head screwdriver, remove the mount from its presentlocation on the bottom of the gateway.Slide the mount onto the back of the gateway. Tighten the screwlocated in the bottom of the mount.Using the template below, mount the two included screws to the wall.Using screw anchors is recommended.Slide the back of the mount down on the screws.GatewayFront1/16” (2-3mm) Screw Anchor4 1/8”  (104mm)
RECORD YOUR SR655ac WIFI SETTINGSPredefined wireless settings If you change the preset wireless settingsWiFi network name (SSID)Network key (password)ADDITIONAL SUPPORTIf you require further instructions, please contact your local ISP Support.SMARTRG INC. ALL RIGHTS RESERVED. COPYRIGHT 2016 ©17

Navigation menu