AGL GP15 Laser Levelling System with Remote User Manual GP15 OM 1006a
AGL Corporation Laser Levelling System with Remote GP15 OM 1006a
AGL >
Users Manual
GradoPlane 15
Operator’s Manual
Operation Instructions
Mode d’emploi
Istruzioni per l‘uso

2
Content
General information...........................................................................................3
Safety information .............................................................................................4
FCC Warning.....................................................................................................5
Charging the instrument ....................................................................................6
Keypad: .............................................................................................................7
Indications in the display: ..................................................................................7
Starting up the instrument .................................................................................8
Entering a grade................................................................................................8
Tilt Function.......................................................................................................9
Rotation speed ..................................................................................................9
Mask mode........................................................................................................9
Scan Mode ........................................................................................................9
Manual Mode...................................................................................................10
Operation with the remote control ...................................................................10
Change of batteries of the remote control .......................................................10
Special functios ...............................................................................................11
Remote Control Menu .....................................................................................12
Checking the calibration ..................................................................................13
Safety information: ..........................................................................................13
Positions of laser warning labels .....................................................................14
Specifications: .................................................................................................15
Warranty and service ......................................................................................16
3
General information
The GradoPlane 15 is a self levelling laser instrument for height measurement
and surveying. A dual grade percentage of +/-10% can be entered directly and will
be level automatically.
The instrument has the possibility to work with a laser spot or a scan beam. A high
working range and a stable beam allows work with machine control units with
rotation speed of 600 and 800 RPM.
The GradoPlane 15 instrument is waterproof and can be used outside in the
elements.
An optional radio remote control is offered that can work all functions of the laser
and has the same display as the laser instrument.
Version QL125s stehen über eine weitere vertikale Laserebene weitere
Sonderfunktionen,
wie eine Zielfindung mit dem
optionalen zur Verfügung.
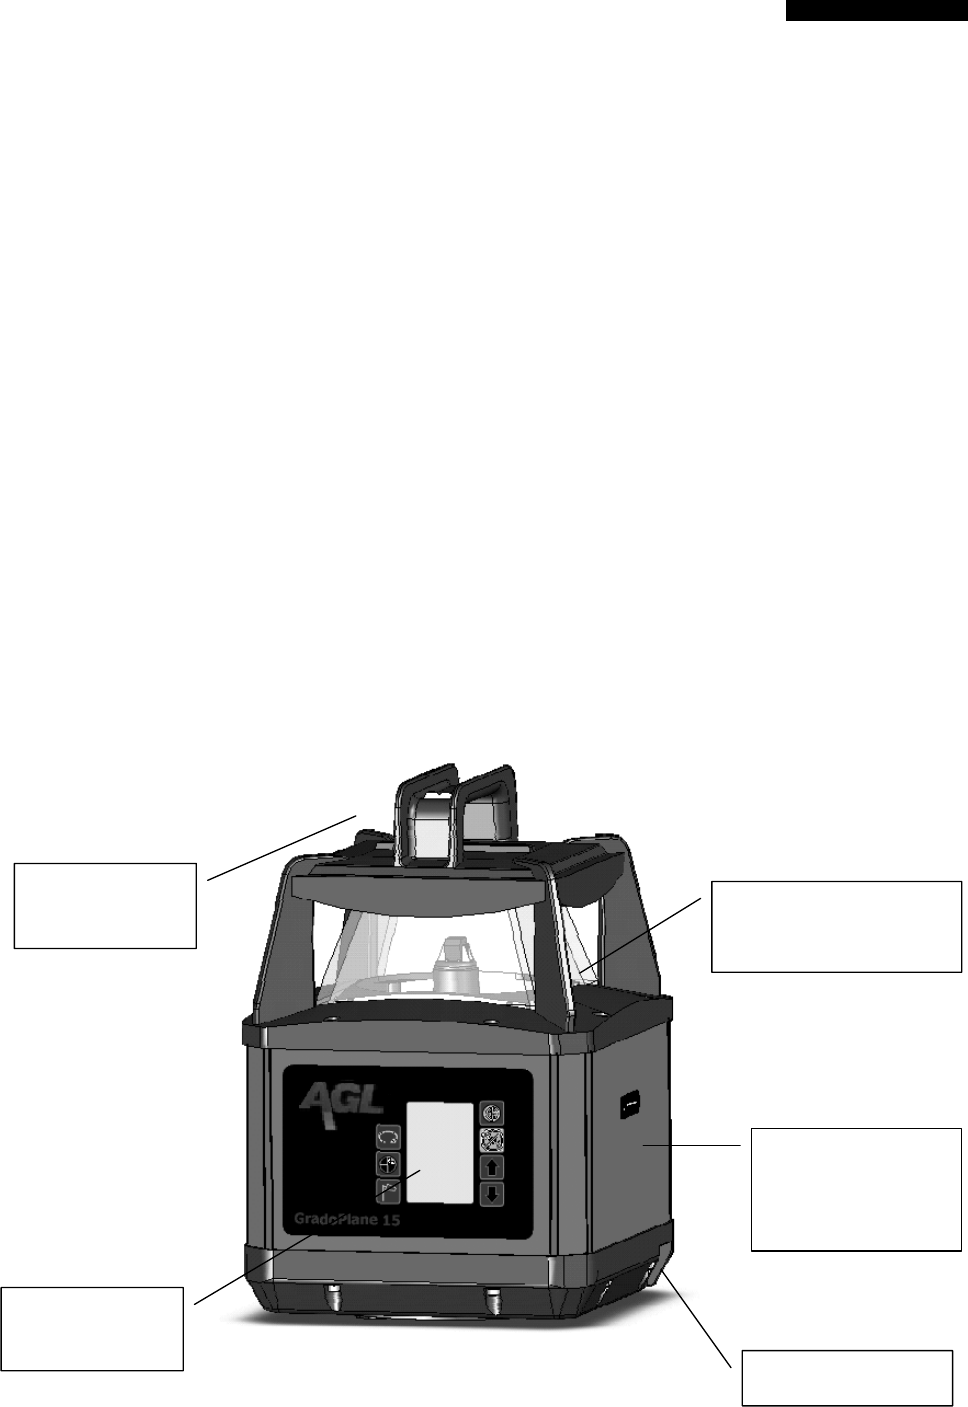
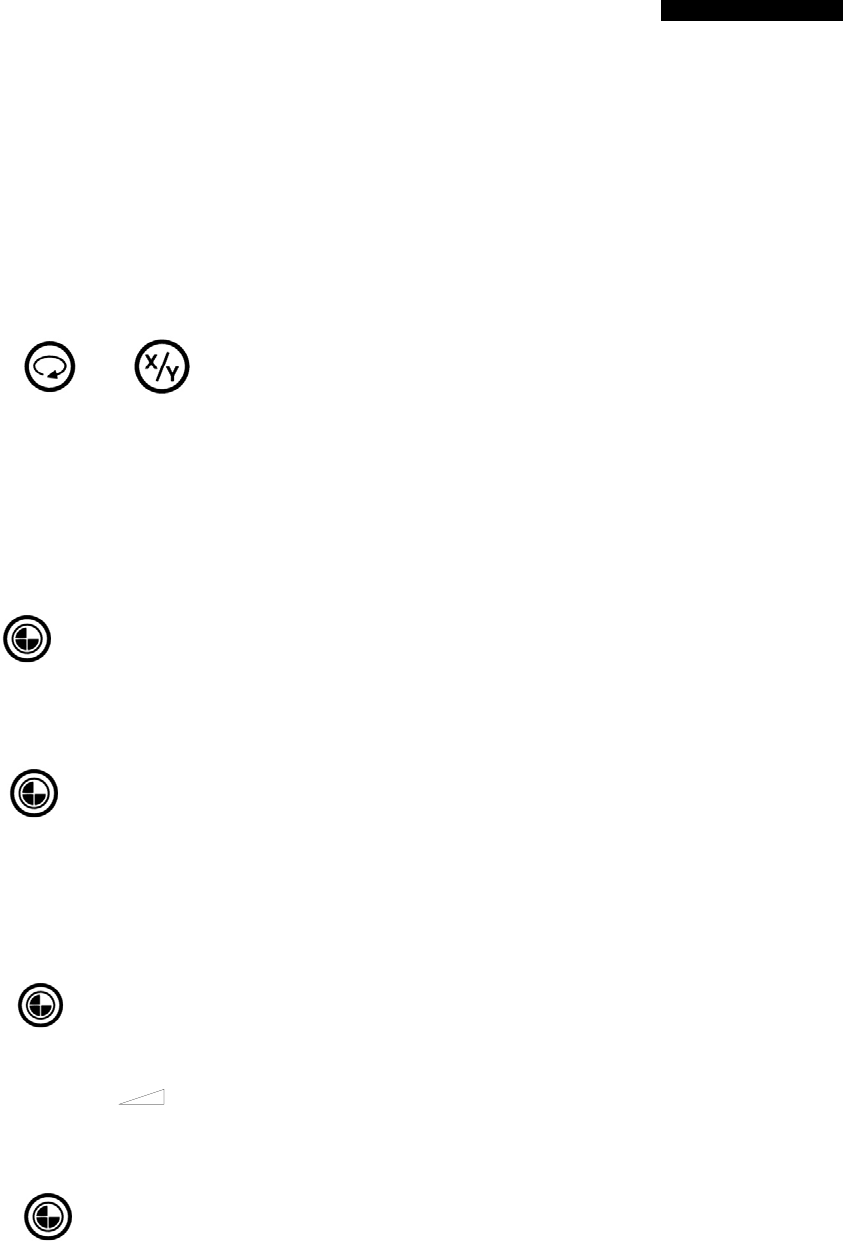
Charge socket
Keypad and
display
Carrying
handle Top Housing and
Glass
Warning Label
and FCC/IC
Label
4
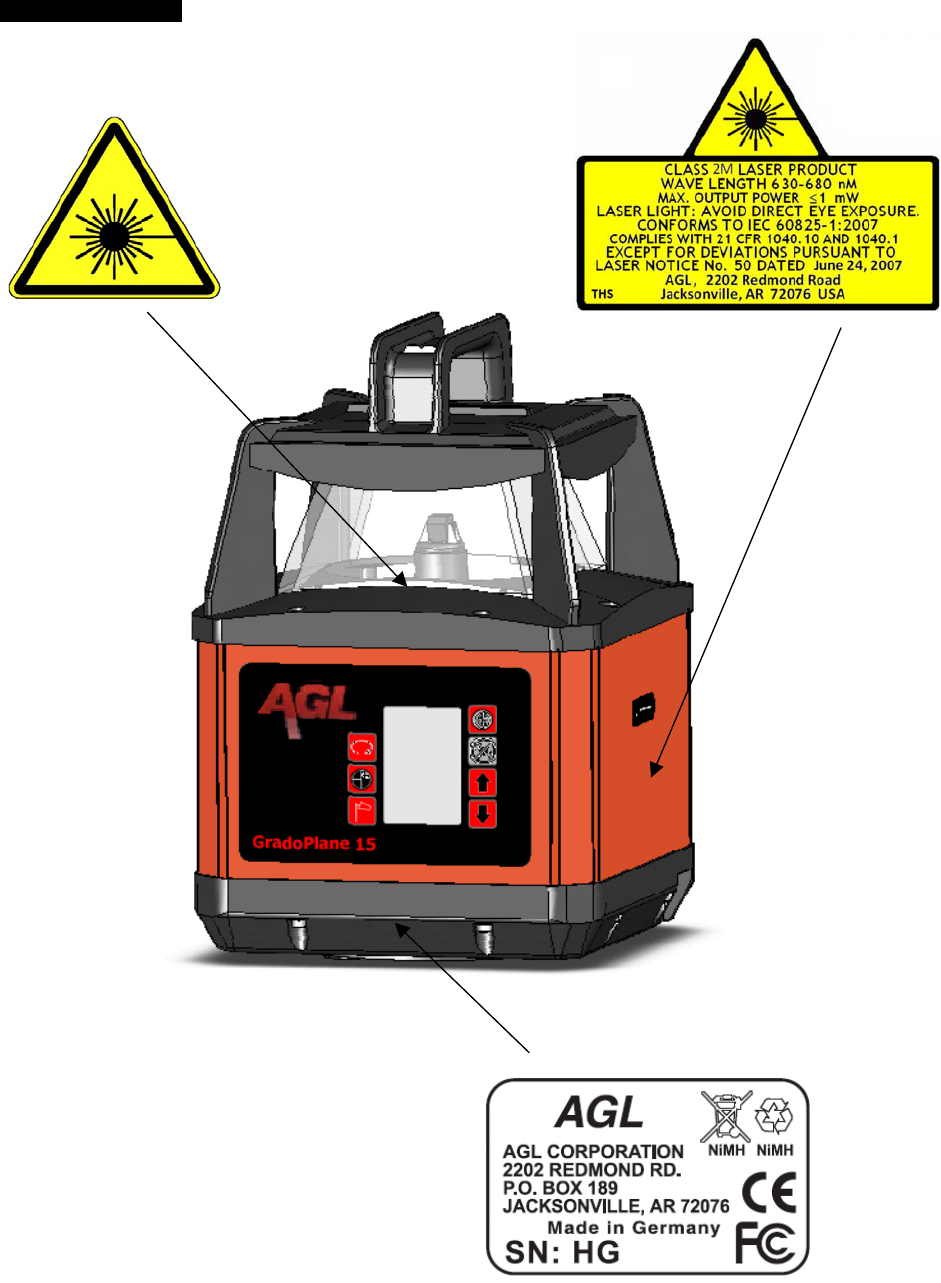
Safety information
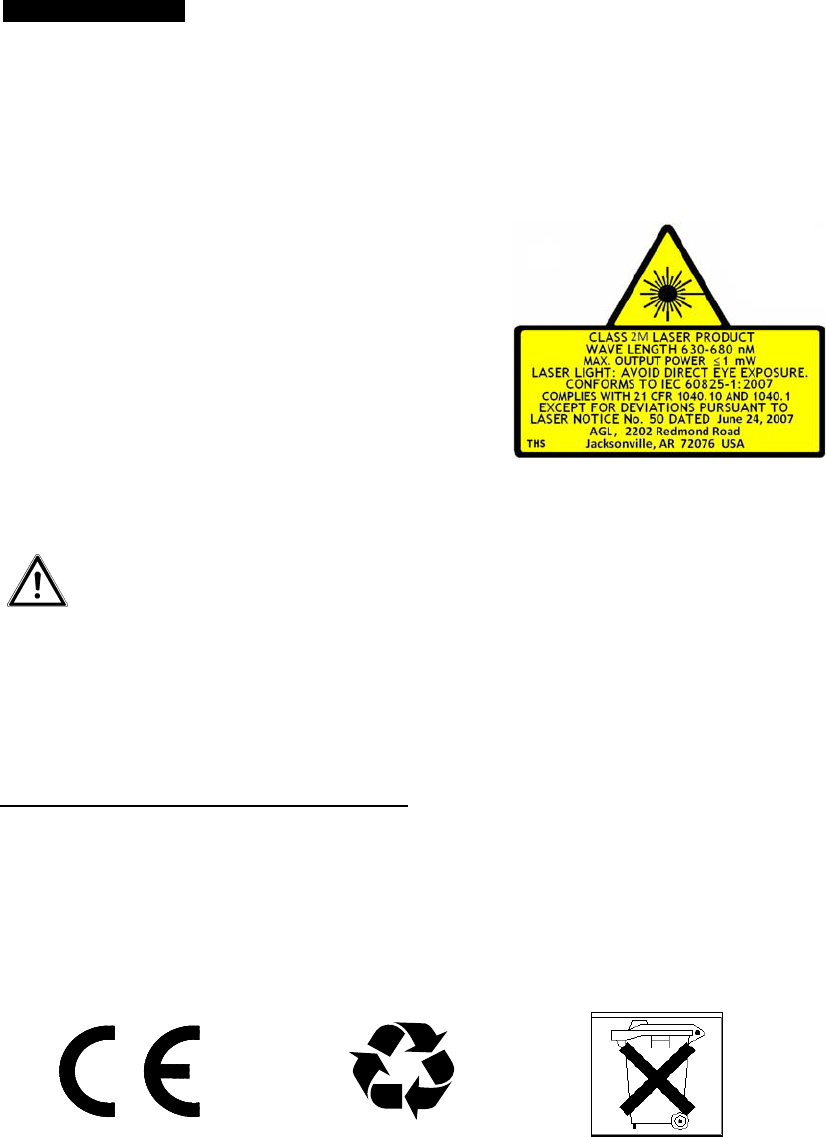
Laser Safety
The GradoPlane 15 laser instrument is a class 2M laser according to EN 60825-
1:2007. Follow the instructions on the warning labels which are shown in the
following illustration:
GradoPlane 15:
635nm, P ≤ 1mW
Laser Class 2M
(IEC 60825-1 2007)
Do not remove the attached warning labels. The manufacturer and its dealers are
not liable for any defects and its consequences from this removal.
Attention! Do not disassemble the instrument. Inappropriate repairs can
cause hazardous laser radiation. Only AGL certified service centers are
entitled to repair these products. In the case of inappropriate repair or modification
malfunctions are possible also without external visible damages.
CE and disposal remarks
CE-marking (European regulation):
The instruments GradoPlane 15, including accessories, comply with the
regulations of permission for low voltage and electromagnetic compatibility.
Attention: This instrument contains NiMH batteries. NiMH batteries must be
recycled or disposed properly (WEEE-Reg.-Nr. DE 23874031).

5
INFORMATION TO USER
This device complies with Part 15 of the FCC Rules. Operation is subject to the
following two conditions: (1) This device may not cause harmful interference, and
(2) This device must accept any interference received, including interference that
may cause undesired operation.
This equipment has been tested and found to comply with the limits for Class B
Digital Device, pursuant to Part 15 of the FCC Rules. These limits are designed
to provide reasonable protection against harmful interference in a residential
installation. This equipment generates and can radiate radio frequency energy
and, if not installed and used in accordance with the instructions, may cause
harmful interference to radio communications. However, there is no guarantee
that interference will not occur in a particular installation. If this equipment does
cause harmful interference to radio or television reception, which can be
determined by turning the equipment off and on, the user is encouraged to try to
correct the interference by one or more of the following measures.
• Reorient or relocate the receiving antenna
• Increase the separation between the equipment and receiver
• Connect the equipment into an outlet on a circuit different from that to which
the receiver is connected
• Consult the dealer or an experienced radio/TV technician for help
Any changes or modifications not expressly approved by the party responsible for
compliance could void the user’s authority to operate the equipment.
------------
To comply with FCC RF exposure compliance requirements, a separation
distance of at least 20 cm must be maintained between the antenna of this device
and all persons. This device must not be co-located or operating in conjunction
with any other antenna or transmitter. Do not install in a location such that this
device will be within 20 cm of all persons.
To comply with Industry Canada RF exposure compliance requirements, a
separation distance of at least 20 cm must be maintained between the antenna of
this device and all persons. This device must not be co-located or operating in
conjunction with any other antenna or transmitter. Do not install in a location such
that this device will be within 20 cm of all persons. For the hand held remote, do
not transmit while close to the body or while in one’s pocket or holster.
See Industry Canada RSS 102 for Radio Frequency (RF) Exposure Compliance
of Radiocommunication Apparatus for exposure compliance.

6
Charging the instrument
The GradoPlane 15 laser has integrated rechargeable batteries.
Connect the charger to an AC outlet and attach the plug at the charge socket.
The battery symbol in the display is shown while the charging procedure is active.
If the charging is finished, the battery shows three full blocks. The instrument has
a charge controller inside, so not to overcharge, if the unit is not monitored. The
maximum charging time is 5 hours.
Use the charger only in interior and dry rooms!
Attention: Avoid the use of the charger at fuel powered current
generators. High voltage peaks may damage the charger.

7
Keypad:
ON-OFF Switch
Change the rotation speed of the laser
Masking mode, turns off the laser beam in the selected
sectors
Wind sensitivity, decreases the sensitivity against
vibrations, in the Display MRS (motion resistant system)
is shown
Enters a grade in X and Y direction:
X/Y button press once for X direction, press again for
entering the Y value
Indications in the display:
Grade
value X
Grade
value Y
Masking
Rotation
Levelling
MRS/Windy
Function
Failure
Out of Level Fault
Manual Mode
Rot.Speed
Scan Line
Grade mode
Battery Status
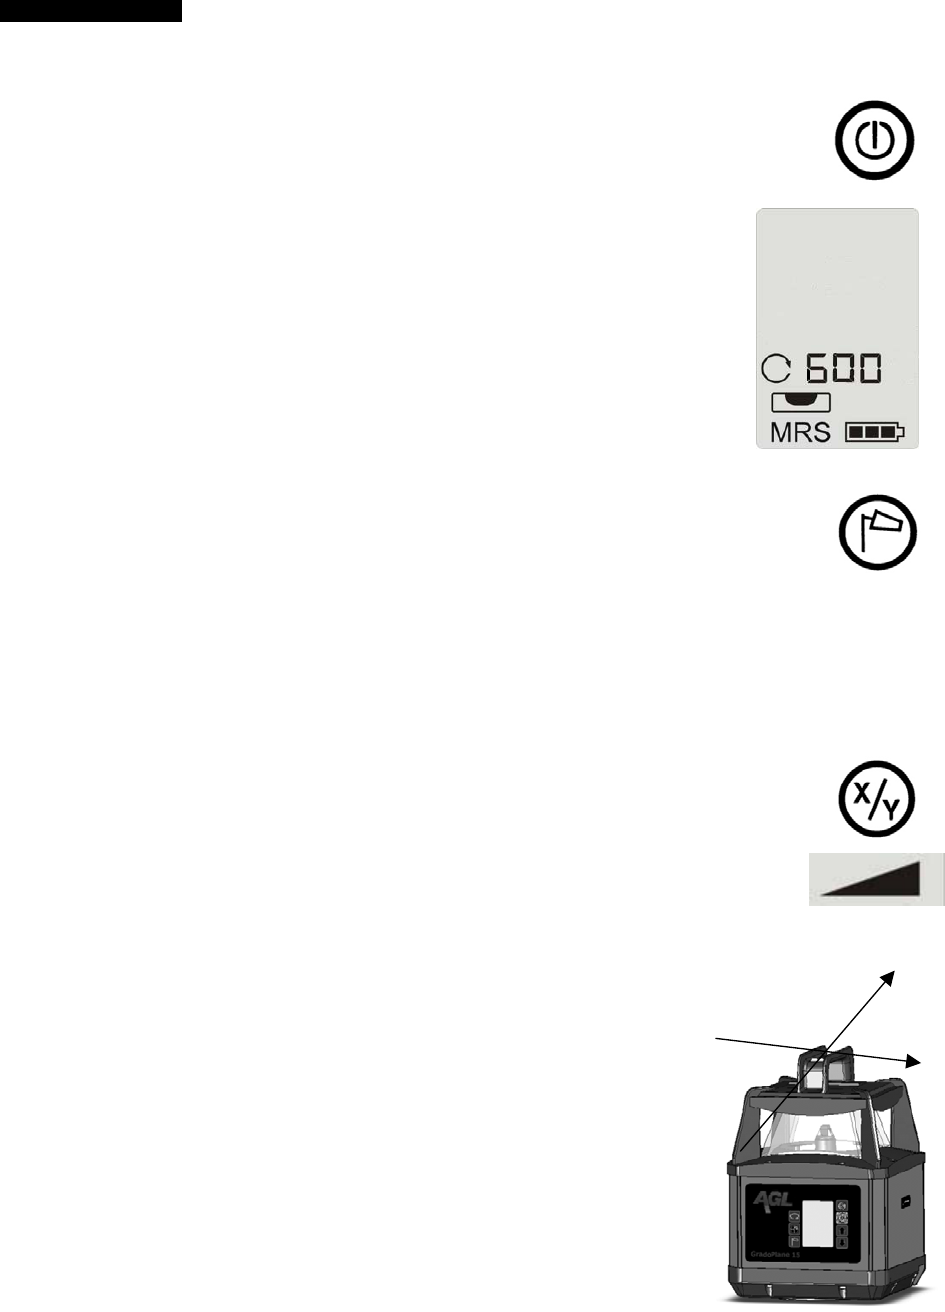
8
X
Y
Starting up the instrument
Place the instrument on a tripod in a horizontal position. Turn the
laser on with the Power Button button..
In the display a flashing level bubble is shown as long as the
laser is self levelling. When this is finished the symbol turns off.
The actual rotation speed and the battery condition are shown
in the display.
In this mode without an entered grade, the MRS/Windy function can
be activated. This decreases the sensitivity against vibrations i.e. by
wind.
Entering a grade
To enter a grade press the X/Y button
The instrument switches to the grade mode and the last used values
are shown in the display.
When the work has to be done with these values, just wait until the
instrument has self levelled.
To change the grade values press again the X/Y button. The x% is
flashing and the grade can be changed with the arrow keys
between –10% and +10%. To set the grade fast to zero; press
both arrow keys simultaneously.
Now the grade can be entered in the Y direction. Pressing
the X/Y button again enters this value and the instrument
starts to self level. When the grade is reached the rotation
of the heads starts.
In the grade mode it is not possible to activate the
MRS/Windy mode.

9
2 Sek.
+
2 Sec.
Tilt Function in grade mode
If the laser while working with grades is tilted or disturbed the laser will
stop and in the display the failure symbol will flash.
By pressing the X/Y and rotation button for 2 seconds at the
instrument or the remote control the levelling will be done again
and the laser will again start to work. In this case please check the
correct position of the laser instrument at you original bench mark.
When the laser is working in horizontal mode without grades and the
tilt alarm is active, it has to be turned off and on again.
Rotation speed
The laser speed can be changed from 0 RPM, 600RPM to 800RPM.
This offers a stable signal for a machine control systems. To work with
a laser spot, press gain the rotation button. The laser spot then can be
moved with the arrow keys.
Mask mode
In the mask mode the laser beam can be switched off in different
sections. This function is used to avoid interference with different laser.
It also avoids glare when in use e.g. at a motorway.
To turn on the mask function, press the mask button. The laser beam is
masked in a range of 90°. By pressing again the button it changes to
180° and then to 270°.
With the arrow buttons the masked sector can be changed to the
needed direction. In the scan mode and laser spot mode the mask function is
deactivated.
To turn off the mask mode, the laser has to be switched off.
Scan Mode
In the scan mode the laser beam projects a line. This has an advantage
when working interior as there is no receiver necessary. The line can be
moved with the arrow keys. Pressing the button gain will increase the
laser line length. To switch back to rotation press the rotation button..

10
2 Sec.
Manual Mode
To use the instrument also for larger grades , e.g. roofs, it is possible to
switch off the automatic levelling. To activate this manual mode press
and hold the on button for at least 2 seconds. The display shows the
hand symbol. Now the laser can be inclined manually and the fine
alignment can be done with the arrow keys. Therefore press the X/Y
button to move the x direction, press the button again to move the y
direction. In the manual mode there is no tilt control for the position.
Operation with the remote control
With the optional available remote control all
functions of the laser can be controlled. Just the
manual mode can not be activated to avoid an
unintentional use. Turn on the remote control by
pressing any key. The display shows the same
symbols as the laser instrument.
If the laser has stopped in grade mode (Tilt control)
the X/Y and rotation button can be pressed
simultaneously for 2 seconds to confirm and restart
the laser.
If a V and three bars are shown, there is no
communication with the laser possible.
This can have the following reasons:
- The laser instrument is turned off
- The communication channel is different (see special functions)
- The distance to the laser is too large
The remote control turns off after one minute without use. This time can be
changed (see special functions). To switch off the laser and the remote control,
hold both arrow keys pressed for 2 seconds.
Do not transmit while in pocket or when held close to the body.
Change of batteries of the remote control
The battery symbol on the remote refers to the batteries in the remote, not the
laser. If the battery symbol is flashing, the batteries are empty. Take off the battery
cover and replace the batteries with new ones. Always use two new batteries size
AAA (LR03) from same type. Do not mix old and new batteries as their power will
decrease.
11
Special functions:
The following functions can be adjusted in the GRADOPLANE 15:
- Maximum rotation speed
- Change of the communication channel
- Grade enter in percent or per mill
Menu GRADOPLANE 15: (Info -and Adjustment menu)
Buttons and pressed for 5 Seconds.
Info-Menu: Display InF
With arrow keys scroll Info’s:
1. (GDP Programm Version) z.B. G-2440; 14.1
2. (BDNS Programm Version) z.B. b-0709; 12.1
3. Display Serial Number
Press button for next step in the menu:
Rotation speed (Max. RPM): Display 600 or 800
With Arrow keys choose max RPM 600 or 800
Button to store and change to next menu step
Com.-Channel remote control FB 2: Display e.g. Fb 5
With arrow keys choose channel 1 - 17.
(Default setting: channel 1)
Radio com. off: channel 0
Button to store and change to next menu step
Function % (percent of grade) / ‰ (percent of mil)
Display symbol flashing
For % -function press key ▲ (% - is standard)
For ‰ –function press key ▼
Button to store and end
12
Menu remote control:
To change the function in the remote control hold the arrow down key button pressed
and then press the arrow up key multiple (as described below):
+ 3 x Serial number: Display e.g. 135350
+ 4 x Software Version: Display e.g. 600527
+ 5 x Com-channel: Display CH 1-17 ²
With Arrow keys choose 0 to 17
(FB2 default setting channel 1)
Button to store and change to next menu step²
Automat. Power off. Display APO ²
With Arrow keys choose from 5 to 600 seconds (default setting
60 Sec.)
Key to store
+ 7 x Display battery voltage RC
+ 9 x Radio Module test
13
Checking the calibration
The laser instrument should be checked, like all measure instruments, before use.
The inspection can be carried out most easily by doing a reverse measurement.
Therefore do the following steps:
Set up the instrument onto a stable fixing.
Turn the laser on and let it level.
Mount the receiver in a fixed distance, i.e. at 100’ (30 m), and move it onto the
laser plane (display middle).
Now turn the instrument around each 90° and let the instrument level.
Measure in each case the difference to the first height.
If the deviation is smaller than ±1/16” (± 2mm), the instrument is within the
specification.
In case of larger deviations the instrument has to be calibrated.
Safety information:
Proper use:
The instrument is for aligning in the desired direction and the grade.
The instrument is used with a rechargeable NiMH battery.
The control of the instrument can be done with a radio controlled remote.
The unit may not be suitable for different application and may not function as
intended with non-approved modifications or accessories. Opening the laser or
making any other modifications may adversely affect the intended function.
Danger: The use in an aggressive or explosive environment (especially gas
bearing pipes) is strictly prohibited!
Warning: Never short circuit the battery contacts with any metal parts or
hold the battery under water. In case of a short circuit the battery can get
extremely hot and there is a risk of injury and fire.
Warning: Never try to charge the battery with chargers that are not supplied
from the manufacturer.
14
Positions of laser warning labels
[JCS1]
[JCS2]

15
Specifications:
GRADOPLANE 15 :
Laser Diode: 635nm
Laser class: 2M (IEC60825-2007)
Levelling range: ± 5°
Grade range: grade ± 10% in X and Y direction
Working range: 1500 ft (450m)
Accuracy: ± 1/16” @ 100’ or 10 arc sec (± 4,8 mm @ 100m)
at 68°F (20°C)
Working temperature: 14°F / 122°F (-10°C / +50°C)
Rotations speed: 0 / 600 / 800 RPM
Battery: NiMH-battery
-12V DC current with optional cable
Working hours: ~20 h
Charging time: maximum 5 hours
Protection class: IP67 (water and dustproof)
Dim./weight: 7”x7”x10.2” / 7 lbs (176x176x260 mm / 3,2 Kg)
Charger :
Input: 100-240V AC / 47-63Hz
output: 12V / 2A
Use the charger only in interior dry rooms!!!
Design and specifications are subject to change without prior notice

16
Warranty and service
You have received a CE marked product that was checked in our works. In case
of any claims please contact your AGL dealer or AGL Construction Lasers
directly. In case of own attempts of repair as well as detectable improper
treatment the claim for warranty is invalid. Please always use the original transport
case for shipment.
The user is responsible for the regular checking of the instrument by the
manufacturer or one of its authorized service center. A calibration interval of one
year is recommended. The manufacturer and its representatives are not
responsible for any damages resulting of using a maladjusted instrument. From
that we recommend checking the instrument, like any other measuring instrument,
before use (reverse direction measurement).
AGL Construction Lasers
2202 Redmond Rd.
Jacksonville, AR 72076
Tel.: (800) 643-9696
Fax: (501) 982-0880
www.agl-lasers.com