AISOLUTION KDC270 Barcode Scanner User Manual
AISOLUTION CO., LTD. Barcode Scanner
User Manual

Copyright © KOAMTAC Inc. 2017
KDC User Manual
Rev 2.85T.A3 (KDC20/30/410/411/415/420/421/425/430)
3.x7.A3 (KDC100/200/250/270/300/350/350WA/450/470)
A01.05.08 (KDC500)

koamtac.com
KDC User Manual
INTRODUCTION
2
Table of Contents
WARRANTY POLICY ...................................................................................................... 17
1. INTRODUCTION ..................................................................................................... 19
1.1 KDC Package Contents ........................................................................................................... 20
1.2 KDC Characteristics ................................................................................................................. 22
1.3 Keypad Functionality for KDC350 ........................................................................................ 26
1.4 Keypad Functionality for KDC500 ........................................................................................ 27
1.5 Input data by using a keypad (KDC350) ............................................................................. 29
1.6 Turn on the power of KDC20/30/270/350/400/470/500 ................................................. 30
2. INSTALLATION ........................................................................................................ 32
2.1 Bluetooth Pairing ..................................................................................................................... 32
Preparing for Pairing ................................................................................................................................ 32
Pairing .............................................................................................................................................................. 34
2.2 KOAMTAC Installation Wizard .............................................................................................. 40
Windows 7, 8 & 10 ..................................................................................................................................... 40
Android ............................................................................................................................................................ 42
iPad/iPhone/iPod Touch ....................................................................................................................... 42
3. OPERATING YOUR KDC ........................................................................................ 44
3.1 Getting Started ......................................................................................................................... 44
Attaching a Lanyard or Hand Strap to a KDC ............................................................................. 44
Charge KDC Battery ................................................................................................................................. 45
Configure KDC ............................................................................................................................................ 45
3.2 Basics .......................................................................................................................................... 48

koamtac.com
KDC User Manual
INTRODUCTION
3
Reading Barcodes..................................................................................................................................... 48
Read Barcodes with GPS Coordinates (KDC250G/350G) ................................................... 49
Reading HF RFID Tags (KDC450/470) ............................................................................................ 50
Inputting Data by Using a Keypad (KDC350) .............................................................................. 50
Read Magnetic-Stripe (MS) Card(KDC500) ................................................................................. 51
Read Integrated Chip (IC) Card(KDC500) ..................................................................................... 51
Synchronizing data to the host device ........................................................................................... 51
3.3 KDC Menu ................................................................................................................................. 52
KDC Mode Menu ....................................................................................................................................... 76
View Data Menu ......................................................................................................................................... 76
Set Barcodes Menu .................................................................................................................................. 76
Code Options Menu ................................................................................................................................. 76
Scan Options Menu ................................................................................................................................. 77
Data Process Menu .................................................................................................................................. 80
BT Config Menu – KDC20/30/200/250/270/300/350/400/470/500.................................. 86
BT Service Menu – KDC20/30/200/250/270/300/350/400/470/500 ................................ 88
GPS Config Menu – KDC250G/350G ............................................................................................... 89
USB Mode Menu– 100M/200M/250M/270/300M/350 ........................................................... 90
NFC Config Menu – KDC350N/411N/415N/421N/425N/500 ............................................ 92
UHF Config Menu – KDC450U ............................................................................................................ 92
WIFI Config Menu (KDC350F) ............................................................................................................. 93
CDMA Config Menu (KDC350WA CDMA) .................................................................................... 94
MSR Config Menu – KDC415/425/430/500 .................................................................................. 95
ICCR Config Menu – KDC500 .............................................................................................................. 98
SystemConfig Menu................................................................................................................................. 99
Key Mgmt Menu– KDC500 .................................................................................................................. 103
Sensitive Menu – KDC500 ................................................................................................................... 104
3.4 LED Status ............................................................................................................................... 106
3.5 Empty Battery ......................................................................................................................... 106
KDC100/200/250/270/300/350 ......................................................................................................... 106
KDC20/30/400/470 .................................................................................................................................. 106

koamtac.com
KDC User Manual
INTRODUCTION
4
KDC500 ......................................................................................................................................................... 107
3.6 Buffer Full ................................................................................................................................ 107
3.7 Reset Feature (100/200/250/300) or Power-on/off
(KDC20/30/270/350/400/470/500) ................................................................................................. 108
3.8 Replace Battery ...................................................................................................................... 109
4. BLUETOOTH -KDC20/30/200/250/270/300/350/400/470/500 ................ 110
4.1 Bluetooth Config .................................................................................................................... 110
Connect Device ........................................................................................................................................ 110
Auto Connect ............................................................................................................................................. 111
Auto Reconnect ........................................................................................................................................ 111
Auto Power On
........................................................................................................................................... 111
PWR ON Time
............................................................................................................................................ 111
Auto Power Off
........................................................................................................................................... 112
Beep Warning
............................................................................................................................................ 112
PWR OFF Time
.......................................................................................................................................... 112
PowerOFF Msg
.......................................................................................................................................... 112
MAC Address
.............................................................................................................................................. 112
FW Version
................................................................................................................................................... 113
Wakeup Nulls
............................................................................................................................................. 113
Autolock Time
............................................................................................................................................ 113
HID Keyboard
............................................................................................................................................. 113
HID Initial and Inter-Character Delay
.............................................................................................. 113
Control Character Transmission in HID mode ......................................................................... 113
Function Key Transmission in HID mode ................................................................................... 114
Disconnect/Reconnect/BT(HID) Toggle ..................................................................................... 114
4.2 Bluetooth Service ................................................................................................................... 116
Power
.............................................................................................................................................................. 116
Pairing
............................................................................................................................................................ 116
Discovering
.................................................................................................................................................. 117

koamtac.com
KDC User Manual
INTRODUCTION
5
Connect To .................................................................................................................................................. 117
HID Sync....................................................................................................................................................... 117
Tips .................................................................................................................................................................. 117
Auto Pairing
.................................................................................................................................................. 118
5. SYNCHRONIZATION .......................................................................................... 119
5.1 KTSync Menu .......................................................................................................................... 120
5.2 File Menu ................................................................................................................................. 122
Connect to KDC ........................................................................................................................................ 122
Synchronize ................................................................................................................................................ 123
Erase KDC Memory ................................................................................................................................ 123
Bluetooth ...................................................................................................................................................... 124
Configuration ............................................................................................................................................. 125
Synchronization Settings .................................................................................................................. 126
Destination of Data ................................................................................................................................. 126
Synchronization Methods ................................................................................................................... 127
Current KDC Wedge Method ............................................................................................................ 128
Synchronization Options ..................................................................................................................... 129
Application Options ................................................................................................................................ 130
5.3 Barcode & KDC Settings ...................................................................................................... 131
Select Symbologies and Symbology Options.......................................................................... 131
Data Editing Option ................................................................................................................................ 132
5.4 Other Settings ........................................................................................................................ 133
5.5 Mobile pKTSync ..................................................................................................................... 135
5.6 Android aKTSync .................................................................................................................... 136
KDC and Android Pairing..................................................................................................................... 136
Launch KTSync ......................................................................................................................................... 136
Keyboard Wedge ..................................................................................................................................... 139
5.7 iPad/iPhone/iPod Touch KTSync ........................................................................................ 140

koamtac.com
KDC User Manual
INTRODUCTION
6
KDC20i/30i/200i/250i/270i/270i/350i/400i/470i/500i
connection using MFi mode140
iKTSync Settings ...................................................................................................................................... 140
How to Connect and Reconnect MFi Mode using UP Keys ............................................. 141
How to use Keyboard Wedge with iKTSync ............................................................................. 142
5.8 Blackberry bKTSync ............................................................................................................... 144
5.9 KTSync for Mac OS X ............................................................................................................ 146
Connect Button ......................................................................................................................................... 147
Disconnect Button .................................................................................................................................. 147
Synchronize Button ................................................................................................................................ 147
Clear Button ................................................................................................................................................ 147
Settings Button .......................................................................................................................................... 147
6. APPLICATION GENERATION ............................................................................ 151
6.1 Application Generation ......................................................................................................... 152
Generate Application ............................................................................................................................. 152
Data Filter Settings .................................................................................................................................. 153
Application Download and Execution .......................................................................................... 156
6.2 Predefined Applications ....................................................................................................... 157
Master/Slave .............................................................................................................................................. 157
Pick/Bin ......................................................................................................................................................... 158
DB Lookup Application ......................................................................................................................... 161
Inventory Application ............................................................................................................................. 163
7. TROUBLESHOOTING ......................................................................................... 165
8. WARRANTY ........................................................................................................... 168
9. CONTACT INFORMATION ................................................................................. 170
10. APPENDIX A – BARCODE & SCAN OPTIONS .................................... 171
10.1 Symbologies ............................................................................................................................ 171

koamtac.com
KDC User Manual
INTRODUCTION
7
Bookland EAN vs. EAN-13 ................................................................................................................... 172
Add-on Symbologies ............................................................................................................................. 172
10.2 Code Options (KDC20/100/200/250/270L/270D/410/411/415/470L/470D) .............. 173
Reverse Direction .................................................................................................................................... 174
Symbology Conversion ........................................................................................................................ 174
Verification of Optional “Check Digit” ............................................................................................ 175
Transmission of “Check Digit” ........................................................................................................... 175
Resolution of Inconsistencies ........................................................................................................... 176
10.3 Miscellaneous Barcode Information ................................................................................... 177
Height of a Linear Barcode ................................................................................................................ 177
Check Characters .................................................................................................................................... 177
Prevent Interleave 2 of 5 Partial Reading .................................................................................... 177
Data Buffer Full ......................................................................................................................................... 178
11. APPENDIX B –FAQ ........................................................................................... 179
11.1 Symbology .............................................................................................................................. 179
11.2 Host Interface ......................................................................................................................... 180
11.3 Battery ...................................................................................................................................... 180
11.4 Memory ................................................................................................................................... 181
11.5 Programming .......................................................................................................................... 182
12. APPENDIX J – PRODUCT SPECIFICATION ................................................... 183
12.1 KDC270 .................................................................................................................................... 183
List of Figures
Figure 1 - How to turn on the power in KDC20/30/350/400/500 ................................................................... 31

koamtac.com
KDC User Manual
INTRODUCTION
8
Figure 2 - Selecting a Bluetooth device type from the KDC menu ................................................................. 33
Figure 3 - Selecting Pairing mode in KDC ................................................................................................................... 34
Figure 4 - Pairing mode button ........................................................................................................................................ 34
Figure 5 - Pairing menu shortcut button in KDC500 .............................................................................................. 35
Figure 6 - Finding Bluetooth MAC Address ................................................................................................................ 37
Figure 7 - Connecting KDC with a smart phone by scanning Bluetooth MAC Address Barcode ..... 38
Figure 8 - Location of KDC Menu and use of buttons (KDC100/200/250/300) ...................................... 46
Figure 9 - Location and use of buttons on a keypad (KDC350) ....................................................................... 46
Figure 10 - Location and use of buttons on a keypad (KDC500) ..................................................................... 46
Figure 11 - KDC Display ........................................................................................................................................................ 48
Figure 12 - Scanning barcodes using KTSync ........................................................................................................ 48
Figure 13 - Location for reading NFC Tag ................................................................................................................. 50
Figure 14 - Delete Function in KDC20/30 .................................................................................................................... 76
Figure 15 - Replacing a Battery ...................................................................................................................................... 109
Figure 16 - KTSync® Synchronizer Initial Screen ..................................................................................................... 120
Figure 17 - File Menu........................................................................................................................................................... 121
Figure 18 – Setting Menu .................................................................................................................................................. 121
Figure 19 - Application Menu .......................................................................................................................................... 122
Figure 20 - About Menu ..................................................................................................................................................... 122
Figure 21 - COM Port Selection for KDC.................................................................................................................... 122
Figure 22 - Bluetooth Device Registry ......................................................................................................................... 124
Figure 23 – Configuration .................................................................................................................................................. 125
Figure 24 - KTSync Synchronization Settings ........................................................................................................... 126
Figure 25 - Barcode & KDC Settings, Symbologies, Data Editing and Scan Options ........................... 131
Figure 26 - KTSync® Confirmation Settings .............................................................................................................. 133
Figure 27 - KDC Menu in KTSync ................................................................................................................................... 134
Figure 28 - Mobile pKTSync ............................................................................................................................................. 135
Figure 29 - Android aKTSync............................................................................................................................................ 138
Figure 30 - iPad/iPhone/iPod touch KTSync ............................................................................................................. 141

koamtac.com
KDC User Manual
INTRODUCTION
9
Figure 31 - Blackberry bKTSync ...................................................................................................................................... 145
Figure 32 - Application Menu .......................................................................................................................................... 151
Figure 33 - Application Warning Window ................................................................................................................. 151
Figure 34 - Application Generation Menu ................................................................................................................. 152
Figure 35 - Data Filter Settings ....................................................................................................................................... 154
Figure 36 - Master/Slave Application Settings ......................................................................................................... 158
Figure 37 - Master/Slave Application Flow Chart ................................................................................................... 158
Figure 38 - Pick/BIN Application Menu ..................................................................................................................... 159
Figure 39 - Pick/BIN Application Flow Chart .......................................................................................................... 160
Figure 40 - DB Lookup Application Menu ................................................................................................................. 162
Figure 41 – Inventory Application .................................................................................................................................. 164

koamtac.com
KDC User Manual
INTRODUCTION
10
List of Tables
Table 1 - Features of KDC
.................................................................................................................................................... 19
Table 2 - Number of hours required to fully charge a KDC Battery
............................................................. 45
Table 3 - KDC Menu
............................................................................................................................................................... 75
Table 4 - KDC30/300/350C/420/450/500C Minimum Barcode Length
...................................................... 79
Table 5 - Explanation of LEDs
........................................................................................................................................ 106
Table 6 - Troubleshooting Techniques
..................................................................................................................... 167
Table 7 - Symbologies Supported by KDC
.............................................................................................................. 172
Table 8 - Add-on for EAN-13 Symbology
................................................................................................................. 173
Table 9 - Add-on for EAN-8 Symbology
.................................................................................................................... 173
Table 10 - Symbology Conversion
............................................................................................................................... 175
Table 11 - Verification of Optional "Check Digit"
.................................................................................................. 175
Table 12 - Transmission of "Check Digit"
................................................................................................................. 176
Table 13 - Resolution of Inconsistencies
.................................................................................................................. 176
Table 14 – Symbologies supported by KDCKDC30/300/350C/420/425/500C
.................................. 179
Table 15 – Symbologies supported by KDC
............................................................................................................. 179
Table 16 – Symbologies supported by KDC
............................................................................................................. 179

koamtac.com
KDC User Manual
INTRODUCTION
11
COPYRIGHT, LICENSE, and WARNING PAGE
Copyright 2002-2017 by KOAMTAC, Inc. All rights reserved.
No part of this publication may be reproduced or used in any form, or by any electrical
or mechanical means, without permission in writing from KOAMTAC, Inc. The material
in this manual is subject to change without notice. KOAMTAC reserves the right to
make changes to any product to improve reliability, function, or design. KOAMTAC
does not assume any product liability arising out of, or in connection with, the
application or use of any product, circuit, or application described herein. Follow all
warnings and instructions marked on manual and units. Use only the power source
specified in this manual or marked on the units.
KDC® is a registered trademark and property of KOAMTAC, Inc.
KoamTac® is a registered trademark and property of KOAMTAC, Inc.
KTSync® is a registered trademark and property of KOAMTAC, Inc.
KoamTacON® is a registered trademark and property of KOAMTAC, Inc.
SmartSled® is a registered trademark and property of KOAMTAC, Inc.
TO PREVENT FIRE OR SHOCK HAZARD, DO NOT EXPOSE THIS UNIT TO ANY TYPE OF MOISTURE.
DO NOT LOOK DIRECTLY INTO LASER OR POINT THE LASER INTO ANOTHER PERSON’S EYES.
EXPOSURE TO THE BEAM MAY CAUSE EYE DAMAGE.
CAUTION:
Changes or modifications not expressly approved by the manufacturer responsible
for compliance could void the user’s authority to operate the equipment.

koamtac.com
KDC User Manual
INTRODUCTION
12
Patents:
Certain KDC Products may be covered by the following issued US patents numbers 7769917,
7954710, 8126399, 8295368, 8346979, 8347366, 8371506, 8483614, 8832323; Korea patents
numbers 10-1383407, 10-1354252 and may be patent pending elsewhere, UK publications
GB2492615, GB2514746; Korea publication 1020120128598.



koamtac.com
KDC User Manual
INTRODUCTION
16
Laser Compliance
KDC20/100/200/250/270L/350L/410/411/415/470L
Complies with US 21 CFR 1040.10 and 1040.11 except for
deviations pursuant to laser notice no. 50, dated June 24, 2007 and
IEC 60825-1 (Ed. 2.0)
Complies with IEC60825-1:1993 + A1:1997 + A2:2001
Battery Warning
This device contains a rechargeable NiMH. Never throw the battery into a fire,
as that could cause the battery to explode.
Never short-circuit the battery by bringing the terminals in contact with another
metal object. This could cause personal injury, a fire, and/or damage to the
battery.
Never dispose of used batteries with other ordinary solid wastes. Batteries
contain toxic substances.
Dispose of used batteries in accordance with the prevailing community
regulations that apply to the disposal of batteries. Cover the metal terminals
with insulating tape (this is to prevent accidental short-circuiting).
Never expose the battery to any liquid.
Always keep the battery out of reach of infants or small children.
Never shock the battery by dropping it or throwing it.
Dispose of a spent or damaged battery promptly.
WARNING: RISK OF EXPLOSION IF BATTERY IS REPLACED BY AN INCORRECT TYPE.
DISPOSE OF USED BATTERIES ACCORDING TO THE INSTRUCTIONS.

koamtac.com
KDC User Manual
INTRODUCTION
17
Product Disposal
This device should not be placed in municipal waste. Please check local regulations
for disposal of electronic products.
Bluetooth®
Core Specification: 2.1+EDR
Apple®
Made for iPhone, Made for iPod, Made for iPad
Samsung®
Compatible with Galaxy Series
Warranty Policy
KOAMTAC ONE YEAR LIMITED WARRANTY
KOAMTAC products are warranted to be free from defects in materials or workmanship
for one (1) year from the date of purchase from an authorized dealer of KOAMTAC
products. Within this period, we will, at our sole discretion, repair or replace any
components that fail in normal use. Such repairs or replacement will be made at no
charge to you for parts and/or labor, provided that you shall be responsible for any
transportation charges. Replacement products may be new or refurbished at our
discretion.
This warranty does not apply to: (i) cosmetic damage, such as scratches, nicks, stains
and dents; (ii) consumable parts, such as batteries, unless product damage has
occurred due to a defect in materials or workmanship; (iii) damage caused by

koamtac.com
KDC User Manual
INTRODUCTION
18
accident, abuse, misuse, water (in excess of specifications), flood, fire, or other acts of
nature or external causes; (iv) damage caused by service performed by anyone who is
not an authorized service provider of KOAMTAC; or (v) damage to a product that has
been modified or altered without the prior written permission of KOAMTAC.
Repairs have a ninety (90) day warranty. If the unit sent in is still under its original
warranty, then the new warranty will be the longer of ninety (90) days or the balance of
the original one year warranty.
THE WARRANTIES AND REMEDIES CONTAINED HEREIN ARE EXCLUSIVE AND IN
LIEU OF ALL OTHER WARRANTIES EXPRESS, IMPLIED, OR STATUTORY, INCLUDING
ANY LIABILITY ARISING UNDER ANY WARRANTY OF MERCHANTABILITY OR FITNESS
FOR A PARTICULAR PURPOSE, STATUTORY OR OTHERWISE. Subject to applicable
law, in no event shall our liability exceed the purchase price of the Hardware.
RETURN
For warranty returns, you must pack your KOAMTAC product in its original packaging
and include all accessories and documentation. We reserve the right to charge for any
damage to the KOAMTAC product, and missing part fees may apply.
Please contact Customer Service prior to returning any product to receive a return
authorization form and RMA number. You will be responsible for, and pre-pay, all return
shipping charges and shall assume all risk of loss or damage to product while in
transit to us. We recommend that you use a traceable method of shipping for your
protection. We will pay for shipping to return any product to you.
Email us at rma@koamtac.com to obtain an RMA number. Once you have obtained
the RMA number, please send us your purchased KOAMTAC product with the RMA
number clearly marked on the outside of the package and on the shipping slip if you
choose to use traceable carriers such as UPS or FEDEX. Shipping fees for returns are
your responsibility. Return shipping instructions and return address will be included in
your RMA document provided by KOAMTAC.

koamtac.com
KDC User Manual
INTRODUCTION
19
1. Introduction
Congratulations on purchasing a revolutionary KOAMTAC KDC.
KOAMTAC’s KDC works with a wide variety of portable applications. Use it
independently or as a PC, PDA, or smartphone/tablet accessory. (*KDC350WA:
KDC350WA follows KDC350 unless mentioned explicitly)
FEATURES
KDC20
KDC30
KDC100
KDC200
KDC250
KDC270
KDC300
KDC350
*KDC350
WA
KDC400
KDC450
KDC470
KDC500
USB
CONNECTIONS
1
1
2
1
1
1
1
1
1
2
2
1
1
RECHARGEABLE
BATTERY
YES
YES
YES
YES
YES
YES
YES
YES
YES
YES
YES
YES
YES
SCAN ENGINE
Laser/
CCD
Imager
Laser
Laser
Laser
Laser/
CCD/
Imager
Imager
Laser/
CCD/
Imager
CCD/
Imager
Laser/
Imager
Imager
Laser/
CCD/
Imager
CCD/
Imager
AUTOMATIC
DATA UPLOAD
YES
YES
YES
YES
YES
YES
YES
YES
YES
YES
YES
YES
YES
MAXIMUM
STORED
BARCODE
(EAN13)
7,680
7,680
409,600
409,600
409,600
409,600
409,600
409,600
409,600
4,096
409,600
409,600
153,600
KTSync®
SOFTWARE
YES
YES
YES
YES
YES
YES
YES
YES
YES
YES
YES
YES
YES
SDK
YES
YES
YES
YES
YES
YES
YES
YES
YES
YES
YES
YES
YES
SUPPORTS
WINDOWS
XP, 7, 8 & 10
YES
YES
YES
YES
YES
YES
YES
YES
YES
YES
YES
YES
YES
ANDROID,
BLACKBERRY,
IOS, WINDOWS
PHONE 8.1 & 10
YES
YES
NO
YES
YES
YES
YES
YES
YES
YES
YES
YES
YES
BLUETOOTH
YES
YES
NO
YES
YES
YES
YES
YES
YES
YES
YES
YES
YES
GPS
NO
NO
NO
NO
YES
NO
NO
YES
NO
NO
NO
NO
NO
NFC
NO
NO
NO
NO
NO
NO
NO
YES
NO
YES
NO
NO
YES
RFID(HF)
NO
NO
NO
NO
NO
NO
NO
NO
NO
NO
YES
YES
NO
UHF
NO
NO
NO
NO
NO
NO
NO
NO
NO
NO
YES
YES
NO
MSR
NO
NO
NO
NO
NO
NO
NO
NO
NO
YES
NO
NO
YES
ICCR
(IC CARD
READER)
NO
NO
NO
NO
NO
NO
NO
NO
NO
NO
NO
NO
YES
USB DISK
NO
NO
YES
YES
YES
YES
YES
YES
YES
NO
NO
NO
NO
USB HID
YES
YES
YES
YES
YES
YES
YES
YES
YES
NO
NO
NO
NO
WIFI
NO
NO
NO
NO
NO
NO
NO
YES
NO
NO
NO
NO
NO
CDMA
NO
NO
NO
NO
NO
NO
NO
NO
YES
NO
NO
NO
NO
Table 1 - Features of KDC

koamtac.com
KDC User Manual
INTRODUCTION
20
1.1 KDC Package Contents
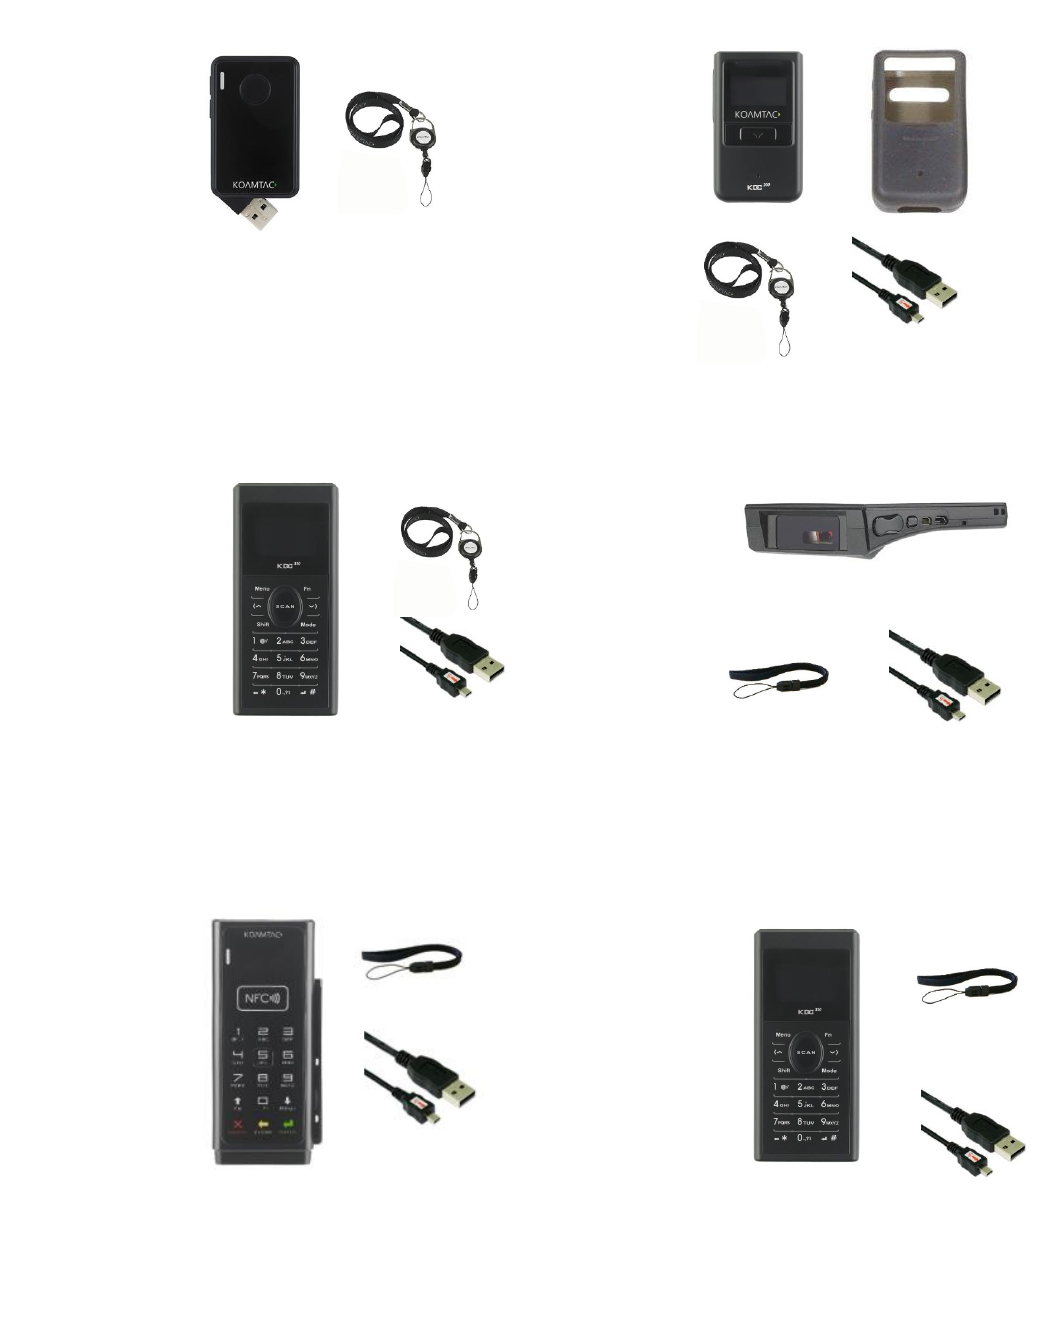
The standard KDC package contains:
1. One KDC
2. USB Cable
KDC20/30 (N/A)
KDC100/200/250/300/350 (8pin Ultra-mini USB Cable)
KDC270/400/450/470/500 (5pin Micro USB Cable)
3. One Lanyard (KDC20/30/100/200/250/300/270/350) or One Hand Strap
(KDC400/450/470/500)
4. One KDC Protective Rubber Boot (KDC100/200/250/300).
The following KDC accessories are available to purchase at koamtac.com or by
contacting a local reseller.
Protective Rubber Boots for KDC20/30/350.
SmartSled® cases for KDC200/250/300/400/450/470.
Charging Cradles for
KDC20/30/100/200/250/300/270/350/411/421/430/450/470/500
Finger Trigger Gloves for KDC200/250/300/270/350
Finger Trigger Glove Adaptor for KDC200/250/300/270/350
KDC350/470/500 Hardpack Battery Charging Adaptor
KDC500 SmartSled® Adaptor
KDC Batteries
KDC400/450/470 SmartSled® cases and KDC500 SmartSled Adaptors are
sold separately.
Depending on the distributor, package contents may vary
.
Note
koamtac.com
KDC User Manual
INTRODUCTION
21
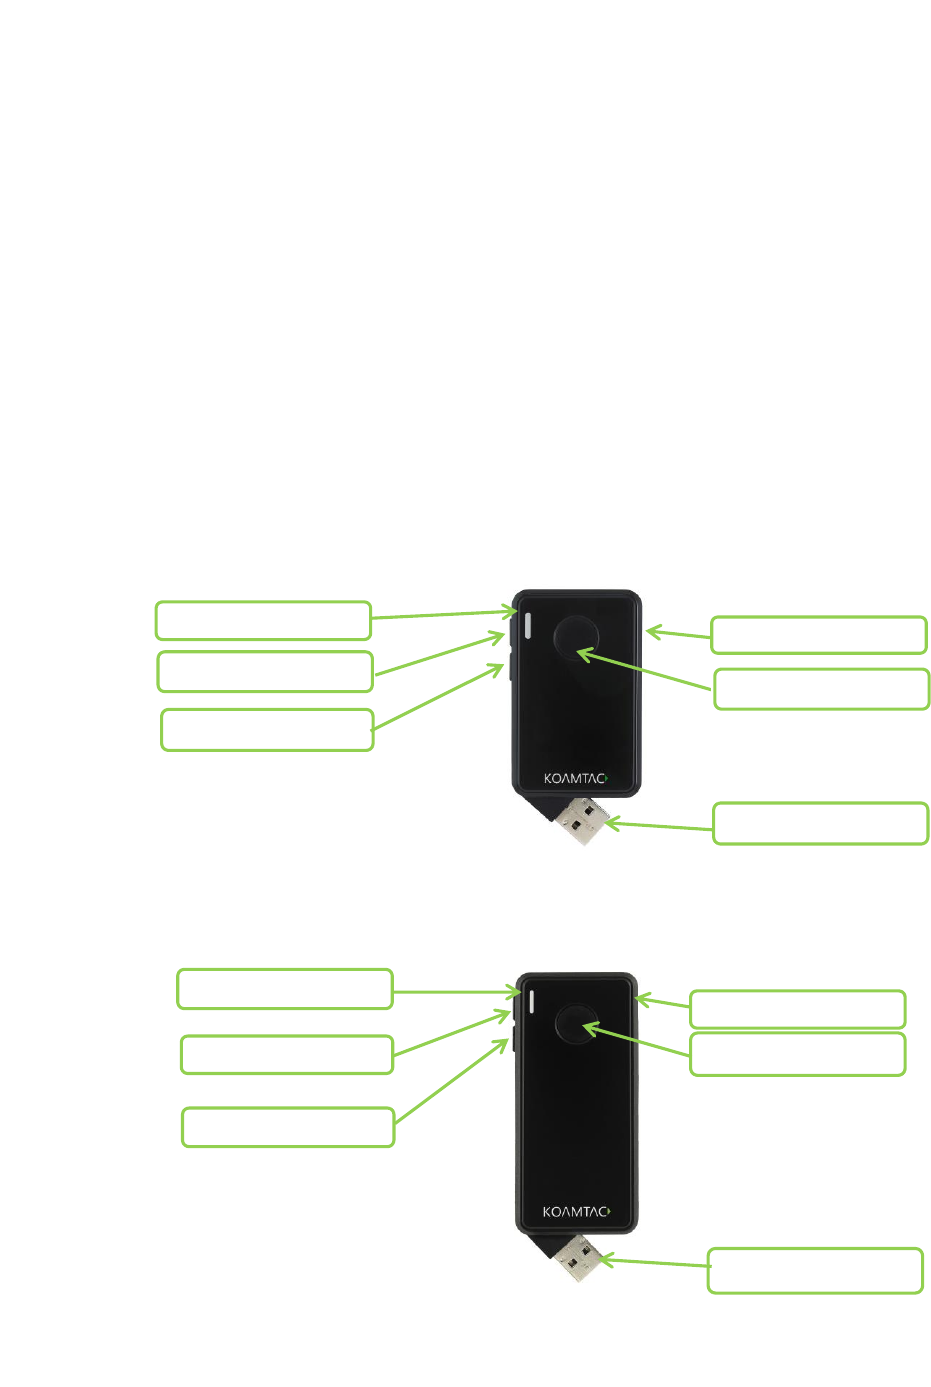
KDC20/30
Package Contents
KDC100/200/250/300
Package Contents
KDC270/KDC350
Package Contents
KDC400/450 /470
Package Contents
KDC500
Package Contents
KDC350WA
Package Contents
koamtac.com
KDC User Manual
INTRODUCTION
22
1.2 KDC Characteristics
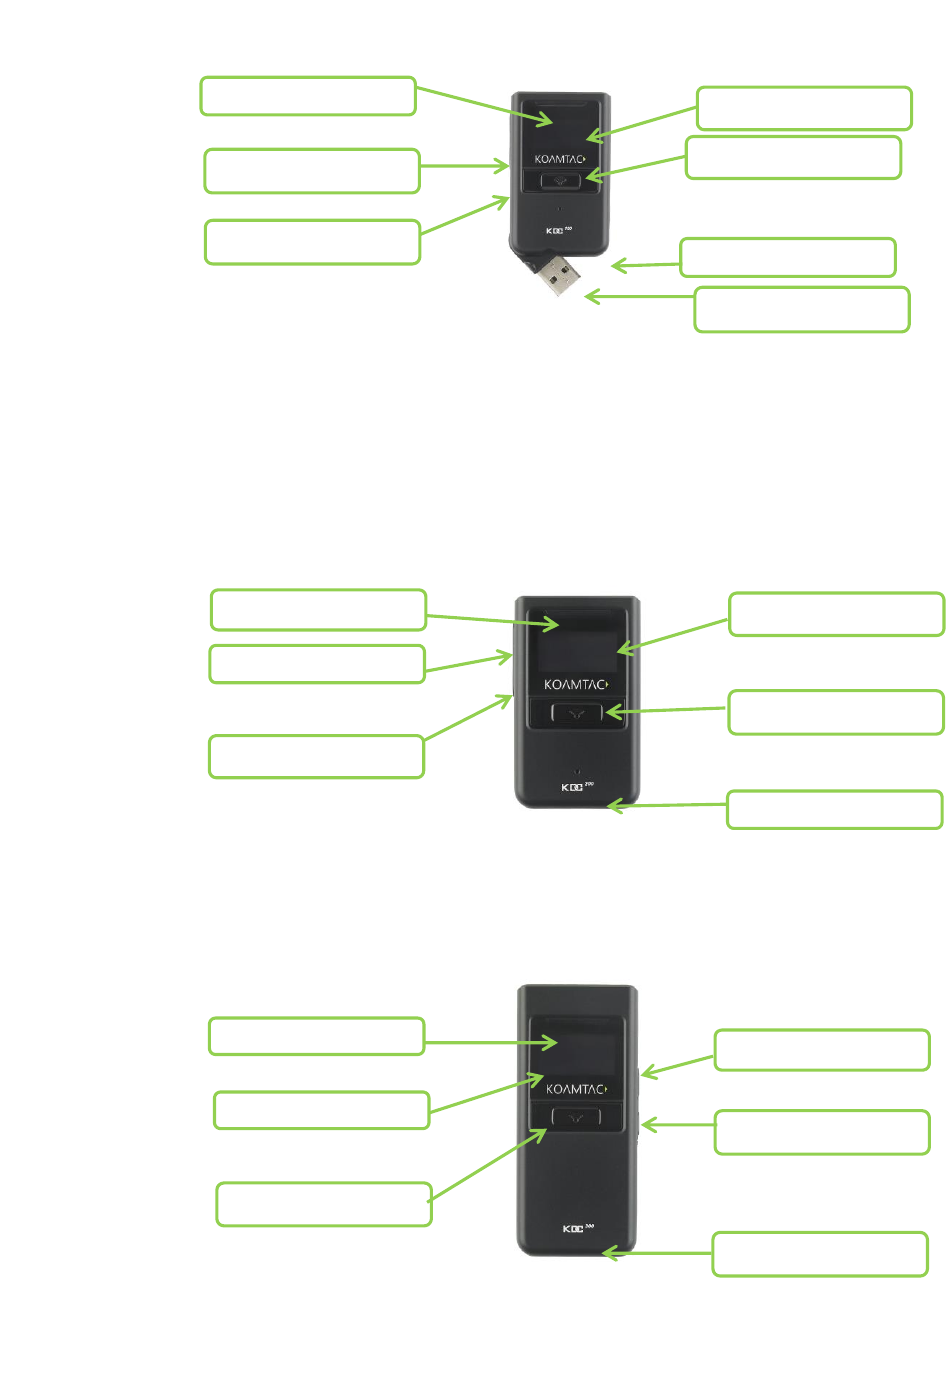
Before using the KDC, the user should become familiar with its physical characteristics.
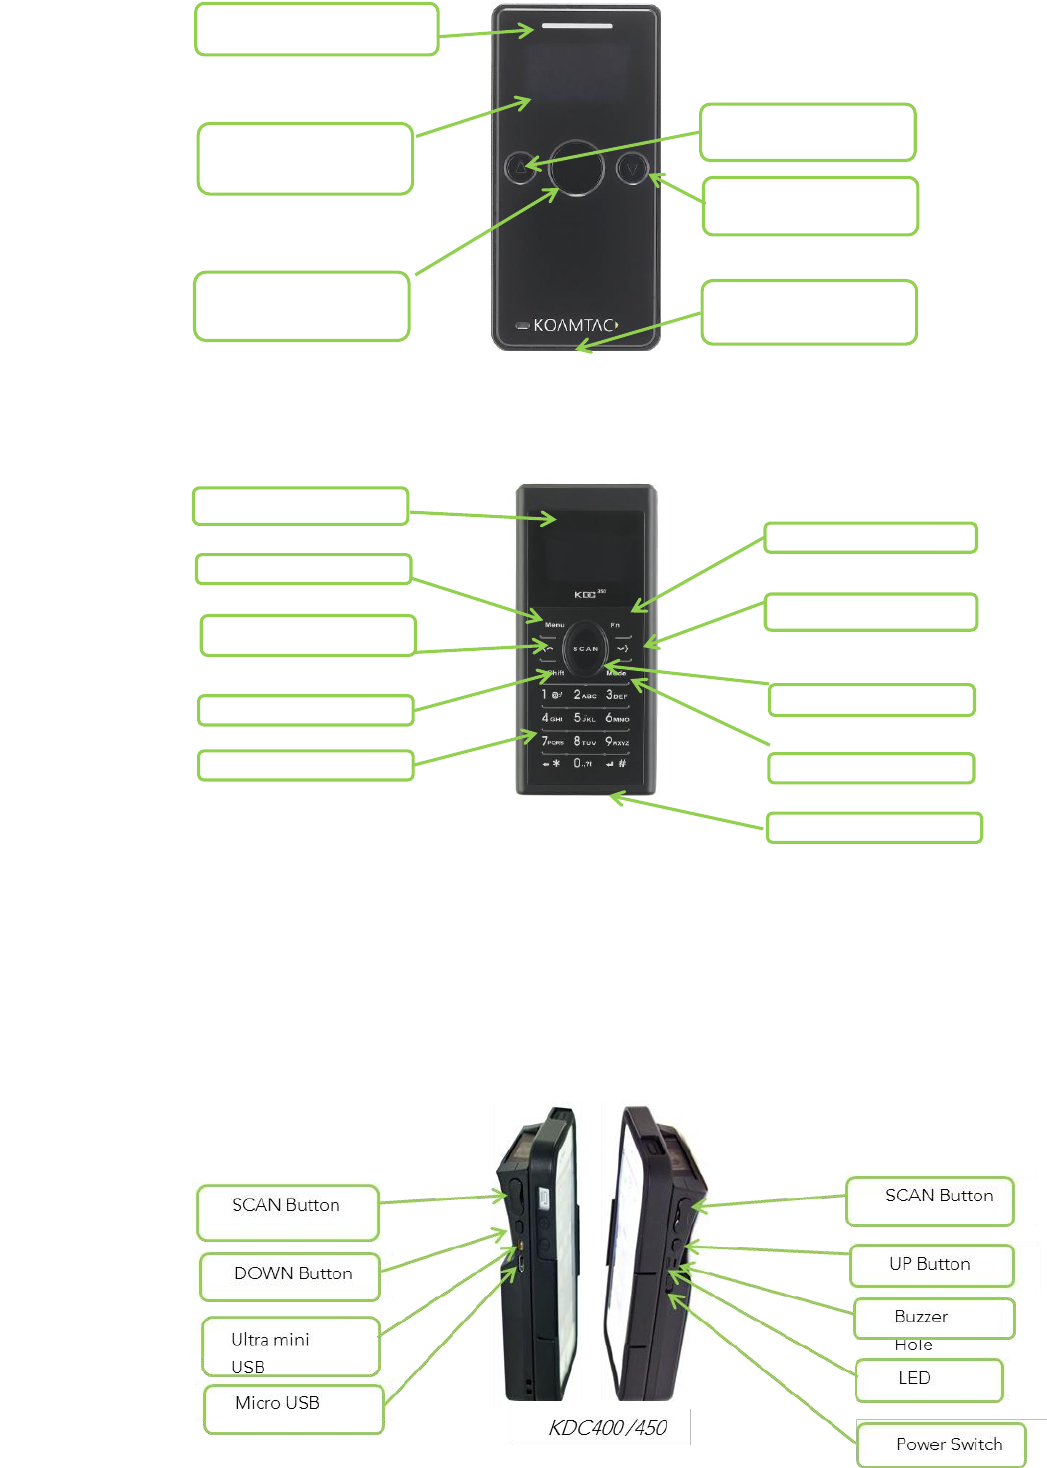
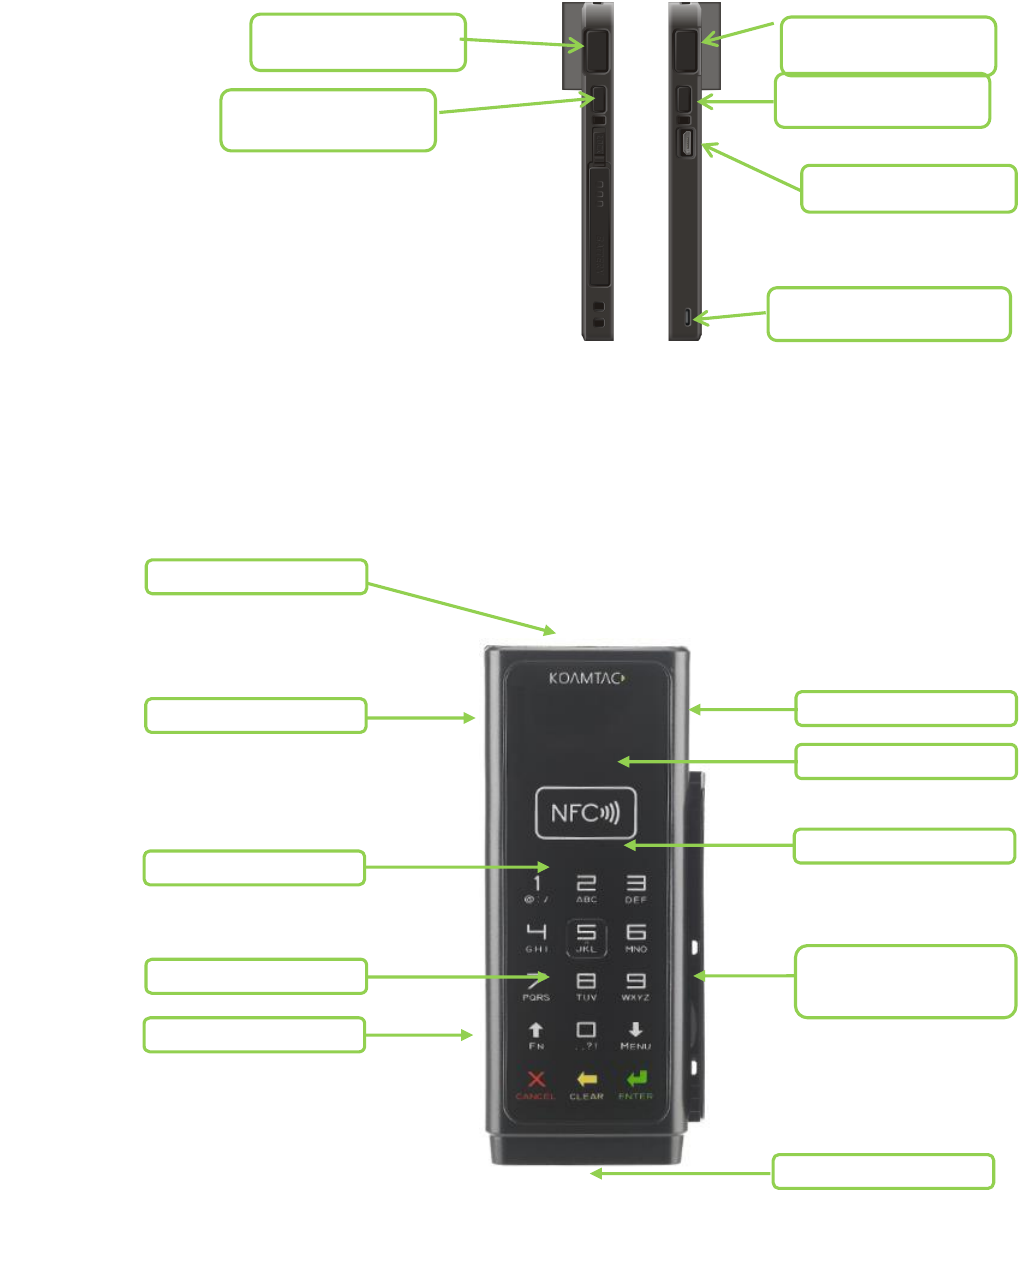
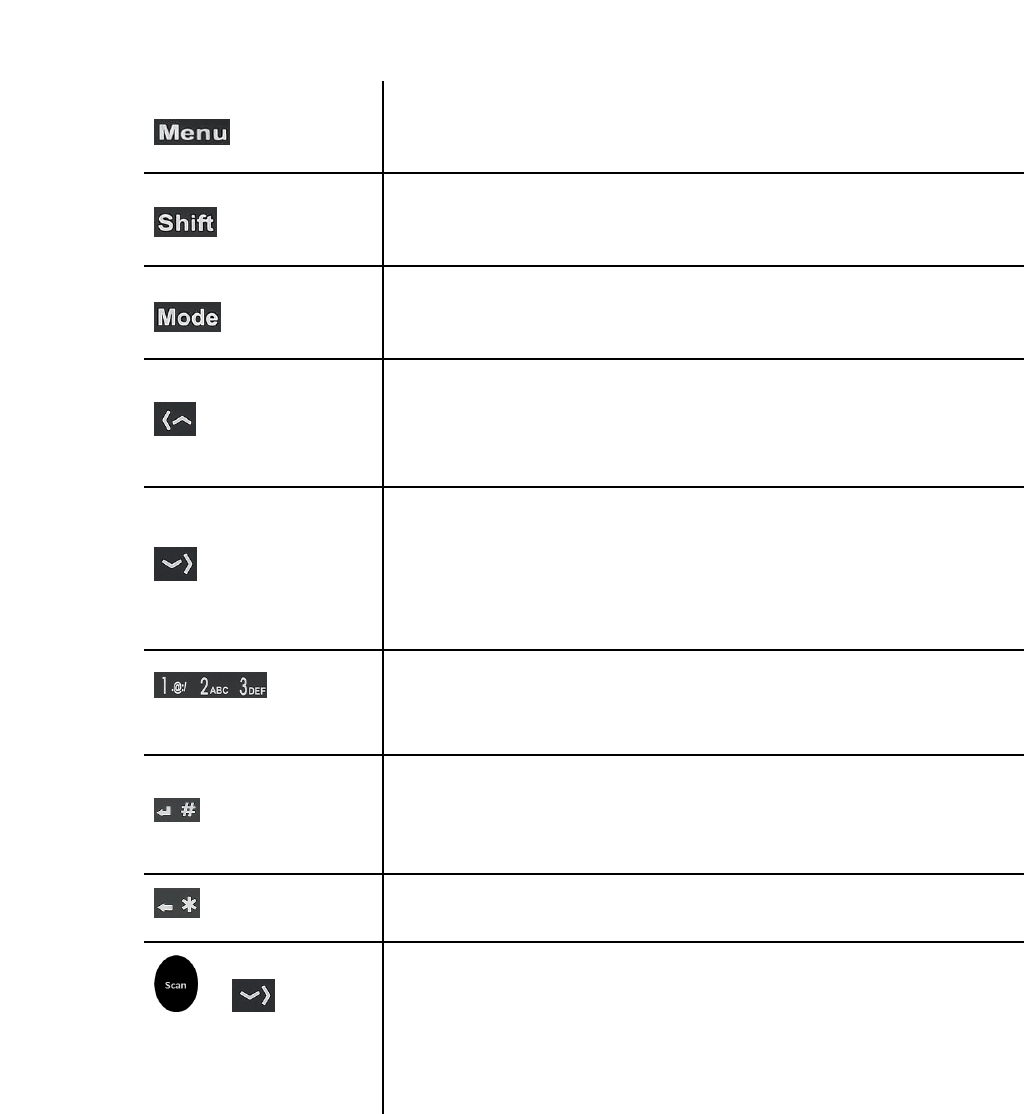
Refer to Figure 2, 3, 4, and 5 below. These figures indicate the placement of the SCAN,
UP, DOWN and DELETE buttons, OLED display, LED, and ports on the KDC.
Although KDC models consist of similar buttons and LEDs, each model has different
characteristics for its own purpose of use. The KDC20/30/100 includes a swing-out
USB connector and the KDC350/500 has a keypad.
KDC20/30 Barcode Reader and Data Collector
Type A USB Swing Out
UP Button
Green/Red/Orange LEDs
SCAN Button
DELETE Button
DOWN Button
KDC20
KDC30
Green/Red/Orange LEDs
DELETE Button
UP Button
SCAN Button
DOWN Button
Type A USB Swing Out
koamtac.com
KDC User Manual
INTRODUCTION
23
KDC100 Barcode Reader and Data Collector
KDC200/250/300/270/350 Barcode Reader and Data Collector
Green/Red/Orange LEDs
OLED Display
SCAN Button
Ultra-mini USB Port
DOWN Button
UP Button
Green/Red/Orange LEDs
OLED Display
SCAN Button
Ultra-mini USB Port
DOWN Button
UP Button
Green/Red/Orange LEDs
Type A USB Swing Out
OLED Display
SCAN Button
Ultra-mini USB Port
DOWN Button
UP Button
KDC100
KDC200
KDC250/300
koamtac.com
KDC User Manual
INTRODUCTION
24
KDC400/450/470 Barcode Reader and Data Collector
UP Button
DOWN Button
SCAN Button
Ultra-mini USB Port
KDC350
Keypad
Shift Button
Menu Button
Green/Red/Orange LEDs
Mode Button
Function Button
KDC270
Micro USB Port
UP Button
OLED Display
Scan Button
DOWN Button
Green/Red/Orange LEDs
koamtac.com
KDC User Manual
INTRODUCTION
25
KDC500 Mobile POS
1D/2D Barcode Scanner
Left SCAN Button
Right SCAN Button
OLED Display
Secure Touch Keypad
ICCR (IC Card Reader)
Magnetic-Stripe
Card Reader
Micro USB
NFC Reader
Green/Red/Orange LEDs
KDC500
Micro USB Port
UP Button
Left Scan Button
Right Scan Button
DOWN Button
Green/Red/Orange LEDs
KDC470
koamtac.com
KDC User Manual
INTRODUCTION
26
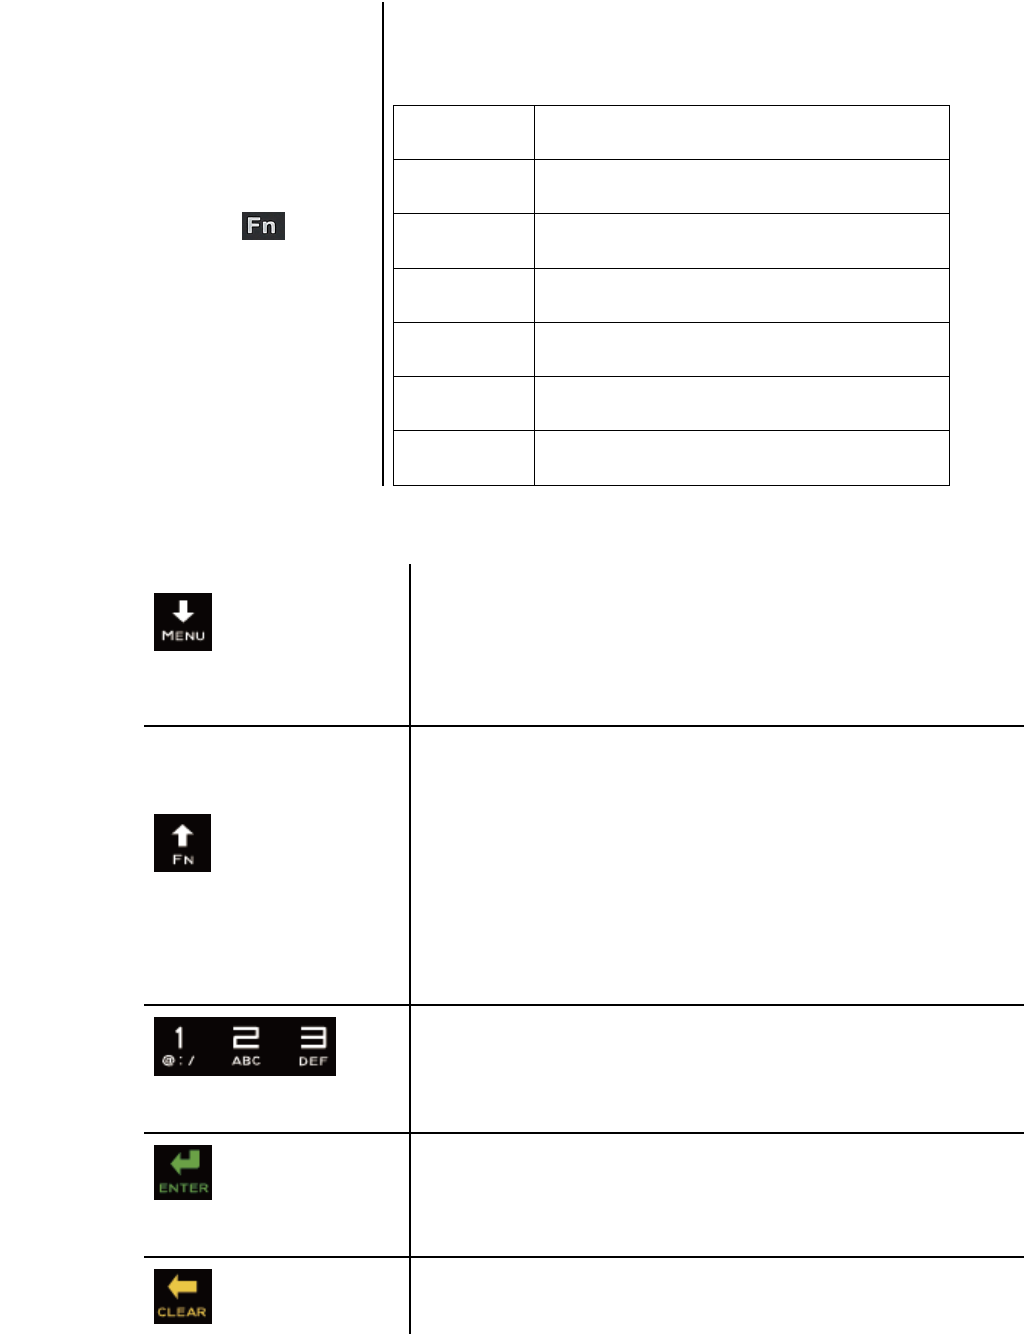
1.3 Keypad Functionality for KDC350
Enables the user to enter or exit the KDC Menu. While in
menu mode, press once to exit.
Enables the user to change character input mode from
capital letters to small letters, and vice versa.
Enables the user to switch between ABC and number input
mode.
(UP button)
While in the KDC menu, press this button to go up on the
selection bar. While on the main screen, press this button
and the KDC will try to connect to a BT host device.
(DOWN button)
While in the KDC menu, press this button to go down on
the selection bar. While on the main screen, press this
button to toggle the iOS soft keyboard (if the KDC is
connected in HID-iOS mode).
(Number button)
Input numbers or characters
(Enter button)
Press to finish data input (if “Enter Key” option is disabled).
Press to finish data input and move cursor to next line (if
“Enter Key” option is enabled).
(Delete button)
Press to delete the last character or number input
+
(Power On/Off
button)
Press both Scan button and Down button for more than 5
seconds at the same time to turn KDC350 power on and off.
koamtac.com
KDC User Manual
INTRODUCTION
27
(Function button)
This button may be used in conjunction with a number key
to control the KDC settings shown below.
FN + 1
Keypad light On/Off
FN + 2
GPS Power On/Off (KDC350G series only)
FN + 3
NFC Power On/Off (KDC350N series only)
FN + 4
Enter Bluetooth Pairing Mode
FN + 5
Bluetooth Power On/Off
FN + 6
Change Bluetooth profile
FN + 0
Factory Default
1.4 Keypad Functionality for KDC500
(Menu/Down button)
While in the KDC500 menu, press this button to scroll
down the selection bar. While on the main screen, press
this button for 5 seconds then the KDC500 will enter the
KDC500 menu mode.
(FN/Up button)
While in the KDC500 menu, press this button to scroll up
the selection bar. While on the main screen, press this
button for 5 seconds then the KDC500 will enter the
KDC500 BT Service menu.
While the KDC500 waits for Alpha-Numeric key entry, this
button allows the user to switch between ABC and
number input mode.
(Number button)
Input numbers or characters
(Enter button)
Press to finish data input.
Press to delete the last character or number input.

koamtac.com
KDC User Manual
INTRODUCTION
28
(Delete button)
(Cancel button)
Press to cancel data input.
koamtac.com
KDC User Manual
INTRODUCTION
29
Num
123_
Shift Abc
123_
Shift Abc
123K
Abc
123K
Abc
123Koamtac
Do you want
To cancel ?
Yes No
Abc
123Koamtac
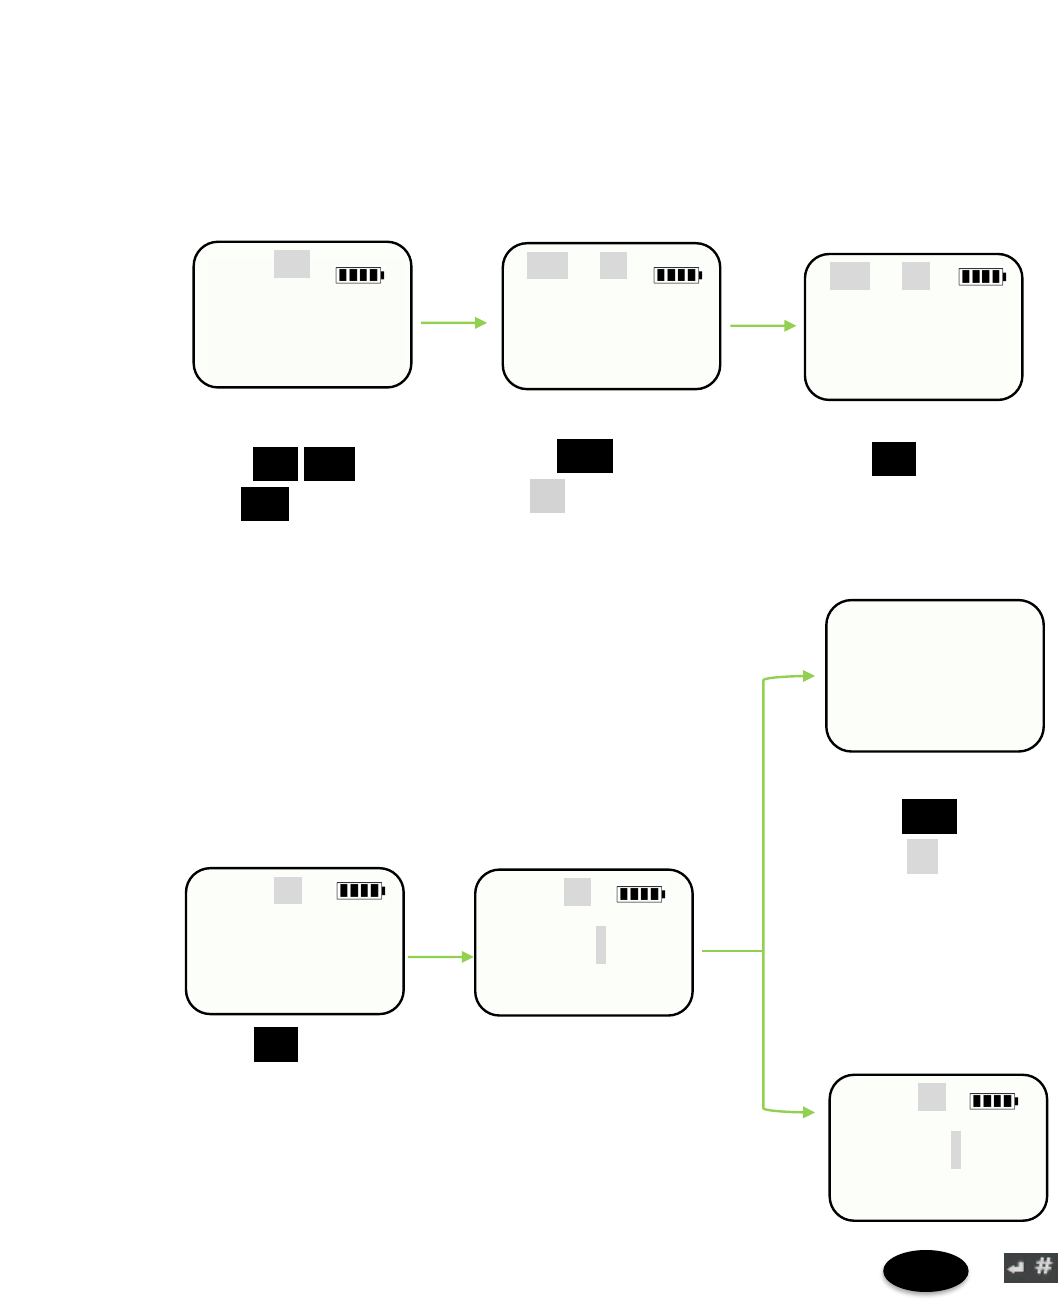
1.5 Input data by using a keypad (KDC350)
When the KDC350 shows a blank main screen, you may start pressing numbers
or characters of the barcode data that needs to be input.
See an example below: How to save the barcode data “123Koamtac”.
Cancel
Press the keys for
remaining letters.
Press 1@:/,2ABC
and 3DEF on the
keypad.
Press Mode to switch
to Abc mode.
Press 5JKL on the
keypad
Press Shift on the
keypad to change
to lower case mode.
Press Menu and
select Yes to cancel
input.
Press or
button to save barcode
data.
SCAN
Save
koamtac.com
KDC User Manual
INTRODUCTION
30
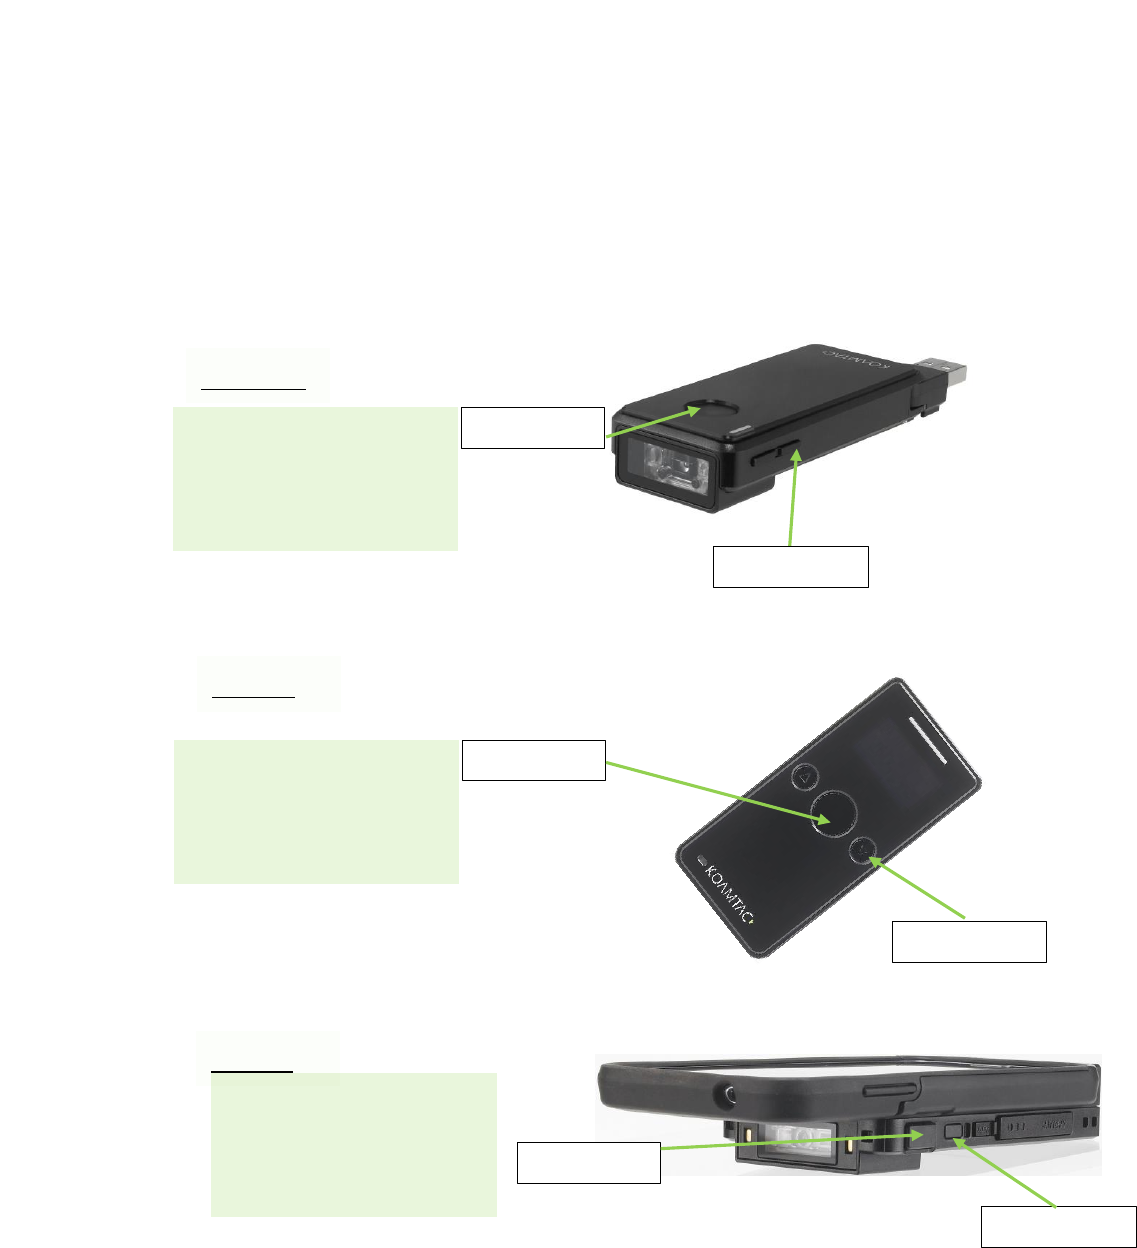
1.6 Turn on the power of KDC20/30/270/350/400/470/500
KDC20/30/270/350/400/470/500 have power on/off switch. Please turn on the power
first before using the device.
Press SCAN and DOWN
buttons simultaneously
for 5 seconds. The user
will hear a beep sound
when it is turned on.
SCAN Button
DOWN Button
KDC20/30
Press SCAN and DOWN
buttons simultaneously
for 5 seconds. The user
will hear a beep sound
when it is turned on.
SCAN Button
KDC270
DOWN Button
Press SCAN and DOWN
buttons simultaneously
for 5 seconds. The user
will hear a beep sound
when it is turned on.
KDC470
DOWN Button
SCAN Button
koamtac.com
KDC User Manual
INTRODUCTION
31
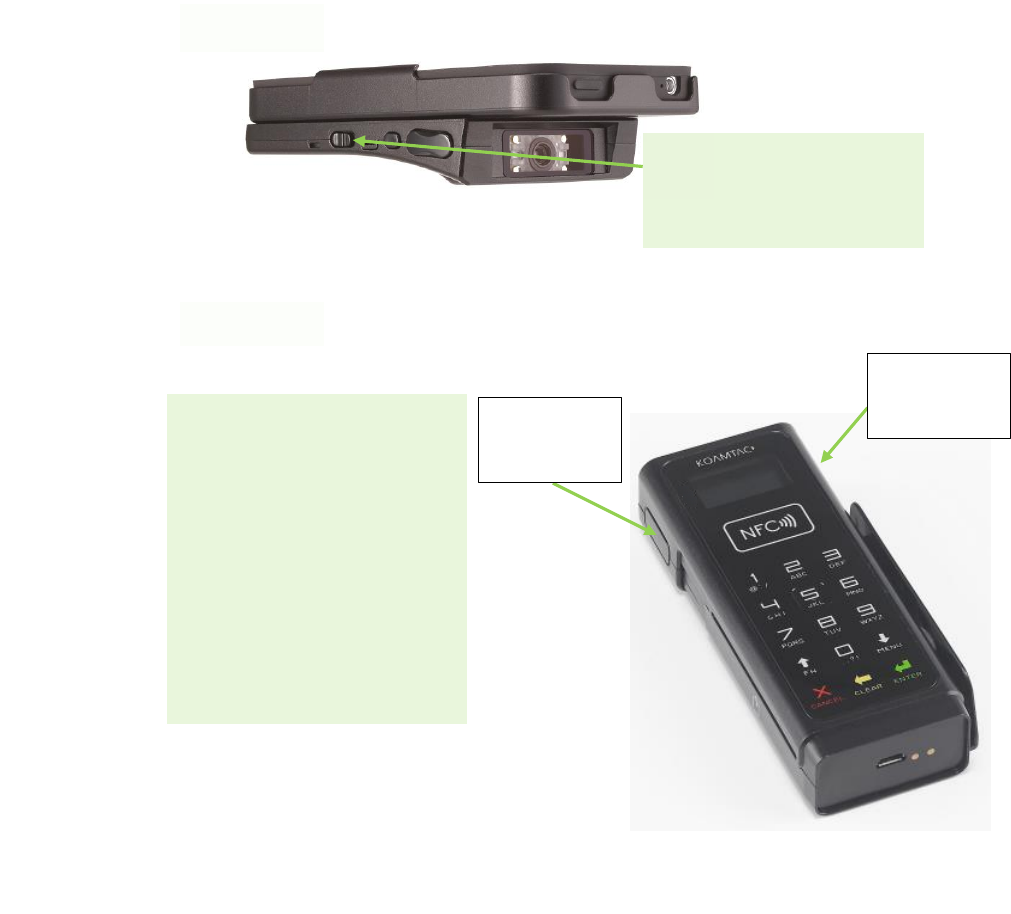
Slide POWER button to
the right.
Figure 1 - How to turn on the power in KDC20/30/270/350/400/470/500
KDC400
KDC500
Press Left and Right SCAN
buttons simultaneously for
5 seconds. The user will
see a KOAMTAC logo in
the display and hear a
beep sound when it is
turned on.
Left SCAN
Button
Right SCAN
Button
KDC User Manual Installation
32
2. Installation
2.1 Bluetooth Pairing
The KDC may read and store barcode data independently, but it may also be used in
conjunction with a PC, PDA, or smart device.
In order to read barcode data with your KDC wirelessly, the user must first pair the KDC
and smart device via Bluetooth. If previously paired and no changes have been made
in the smart device’s Bluetooth settings, the smart device will always recognize the KDC
that has previously been paired. However, if changes have been made, the user may
need to go through the pairing process again. The user may also refer to Chapter 4.
Bluetooth for more information about Bluetooth pairing.
Preparing for Pairing
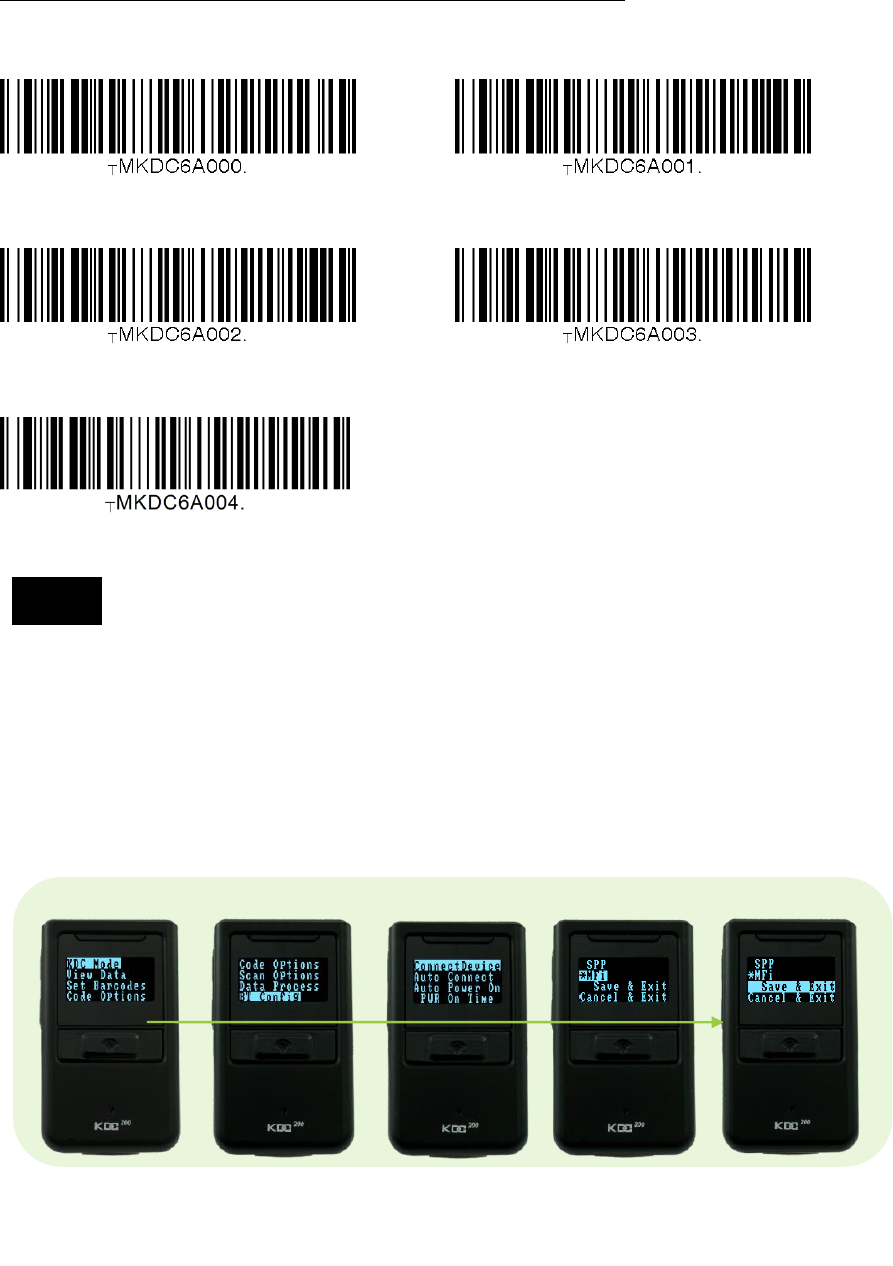
Select a Bluetooth profile. There are two ways to set up a Bluetooth profile. The user
may establish a Bluetooth profile manually (on the scanner) or by scanning a
programming barcode as shown below.
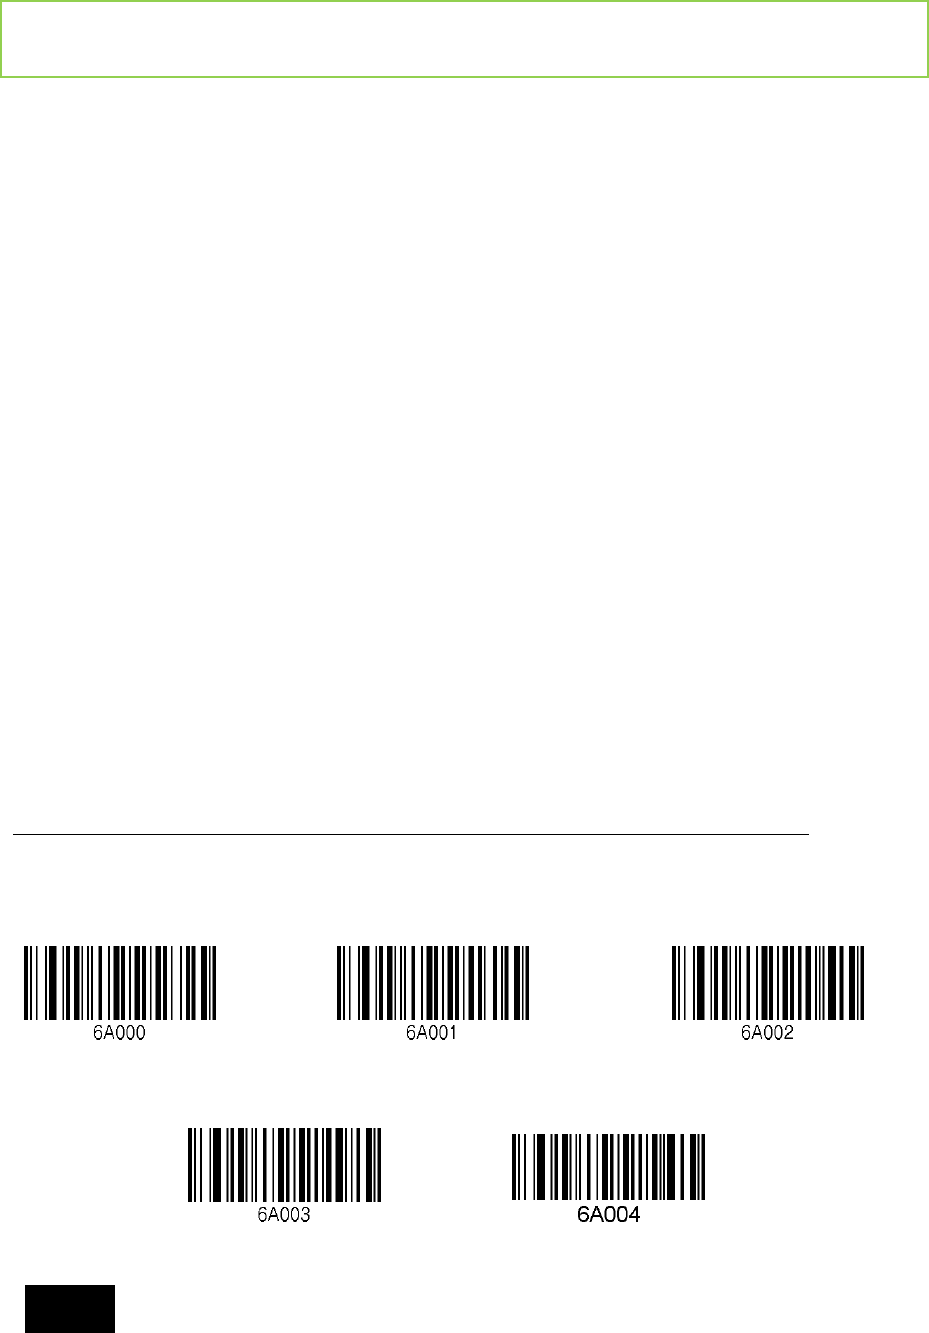
KDC 20/100/200/250/270L/270D/350L/410/411/415/470L/470D/500L (1D)
Bluetooth Profile SPP Bluetooth Profile HID iOS Bluetooth Profile MFi
Bluetooth Profile SPP2.0 Bluetooth Profile HID normal
For PCI PTS compliance, KDC500L supports only Bluetooth Profile SPP
and MFi.
Note
KDC User Manual Installation
33
KDC30/300/270C/350C/420/421/425/450/470C/500C (2D)
Bluetooth Profile SPP Bluetooth Profile HID iOS
Bluetooth Profile MFi Bluetooth Profile SPP2.0
Bluetooth Profile HID normal
For PCI PTS compliance, KDC500C supports only Bluetooth Profile SPP
and MFi.
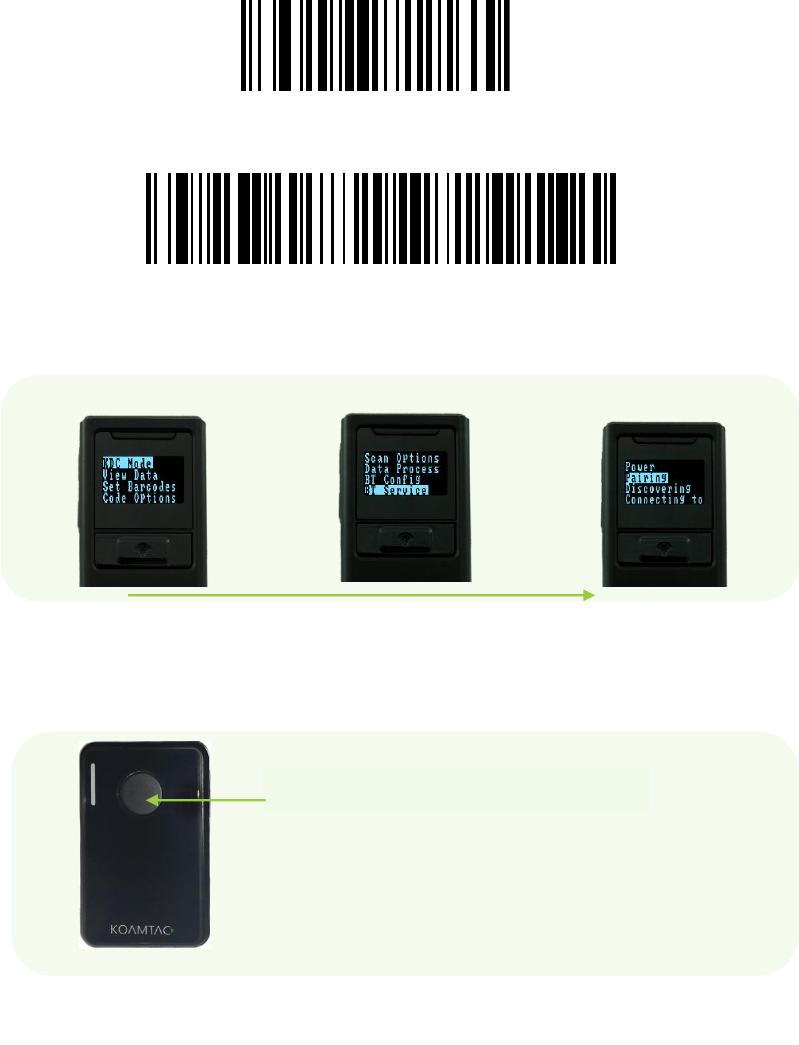
Some KDCs are equipped with an LCD screen (KDC100/200/250/300/270/350/500), the
user may select a Bluetooth profile from the ConnectDevice menu as shown below.
KDC Menu BT Config Connect Device MFi Save & Exit
Figure 2 - Selecting a Bluetooth device type from the KDC menu
Note
KDC User Manual Installation
34
Pairing
First Option: Connect the KDC from a host (PC or Smart Device)
This method is recommended for first-time users or when the user is only connecting a
few KDCs.
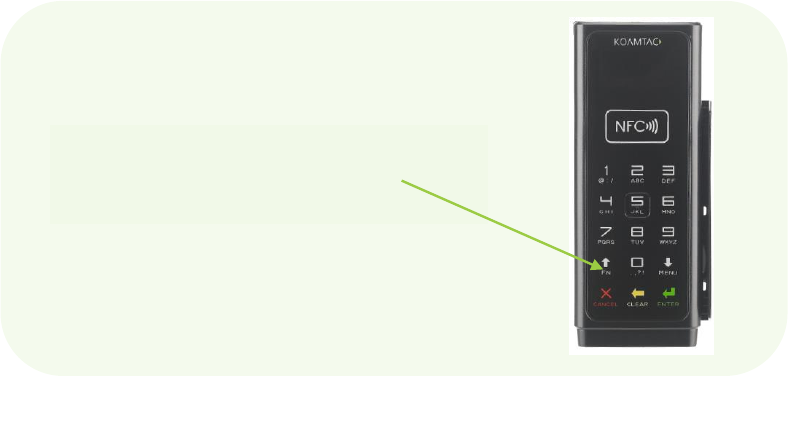
1. Put the KDC into Pairing mode
Select the correct pairing barcode and scan below for your KDC model, or
KDC 20/100/200/250/270L/270D/350L/410/411/415/470L/470D/500L (1D)
KDC30/300/270C/350C/420/421/425/470C/500C (2D)
Pairing
Select Pairing from the KDC menu.
From the KDC Menu Select BT Service Select Pairing
Press the Scan button for three seconds in order to enter into Pairing mode.
Figure 3 - Selecting Pairing mode in KDC
Press SCAN Button for 5 seconds
Figure 4 - Pairing mode button
KDC User Manual Installation
35
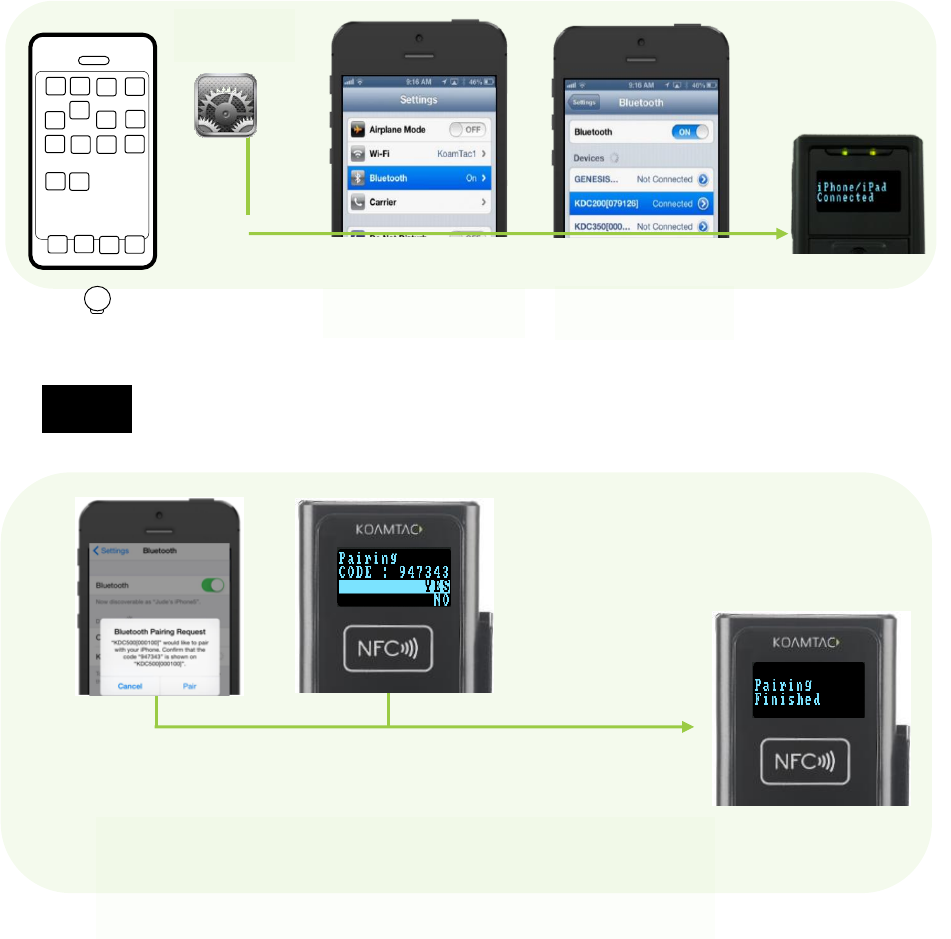
Figure 5 - Pairing menu shortcut button in KDC500
For the KDC500, press the FN button for five seconds in order to directly enter the
BT Service menu while it is not in the sleep mode.
Press FN Button for 5 seconds while
KDC500 is not the sleep mode
KDC User Manual Installation
36
2. On the host device, go to Settings -> Bluetooth, and select the KDC that needs to
be paired. The KDC and host device will now communicate with each other.
For PCI PTS compliance, KDC500 requires Numeric Comparison method.
3. After it has been installed, open KTSync and it will automatically find and connect to
the KDC. (Refer to 2.2 KOAMTAC Installation Wizard for more information about
installing KTSync).
Settings
Tap Bluetooth
Tap the KDC
Note
If the host device and KDC500 shows the same 6digit
number, press Pair/YES button on each device.
KDC User Manual Installation
37
Second Option: Connect the host device from the KDC by scanning a
Special Bluetooth MAC Address barcode
This method is recommended for advanced users or when the application or process
requires the pairing of multiple KDCs to multiple host devices on a regular basis.
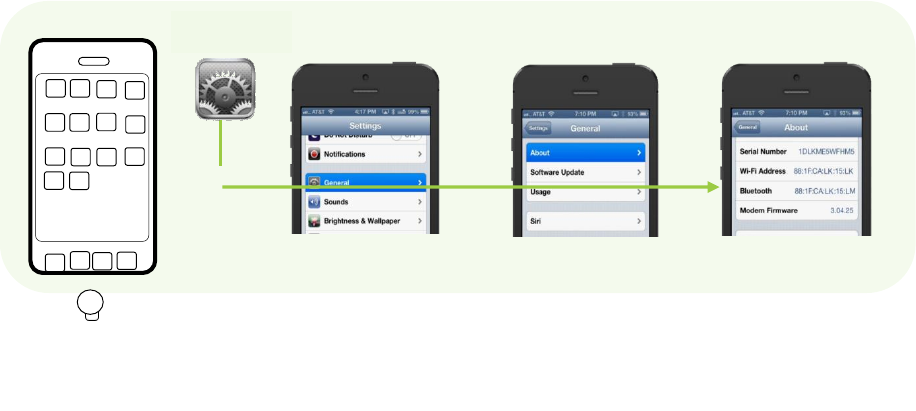
1. Find the Bluetooth MAC Address of the host device.
Tap on General Tap on About Bluetooth address
2. Create the Bluetooth MAC Address Barcode according to the format below as an
example based on “http://www.terryburton.co.uk/barcodewriter/generator/”.
For 1D scanners like
KDC20/200/250/270L/270D/350L/410/411/415/470L/470D/500L,
Bluetooth MAC Address: 1234567890AB
Barcode Type (Symbology): Code 128
Contents: ^FNC3651234567890AB
Options: parsefnc
For 2D scanners like KDC30/300/270C/350C/420/421/425/450/470C/500C,
Bluetooth MAC Address: 1234567890AB
Barcode Type (Symbology): QR Code
Contents: ^022M^013KDC651234567890AB.
Options: eclevel=M parse
Settings
Figure 6 - Finding Bluetooth MAC Address
KDC User Manual Installation
38
3. Print the Bluetooth MAC Address
Note:
2D barcode scanners such as the
KDC30/270C/300/350C/420/421/425/450/470C/500C models may read barcodes
that have been printed QR barcodes that are on a LCD screen.
1D CCD barcode scanners may read barcodes that have been printed barcodes
that are on a LCD screen.
1D laser barcode scanners such as the
KDC20/100/200/250/270L/270D/350L/410/411/415/470L/470D/500L models are
not designed to read barcodes from a LCD screen and will only read printed
barcodes.
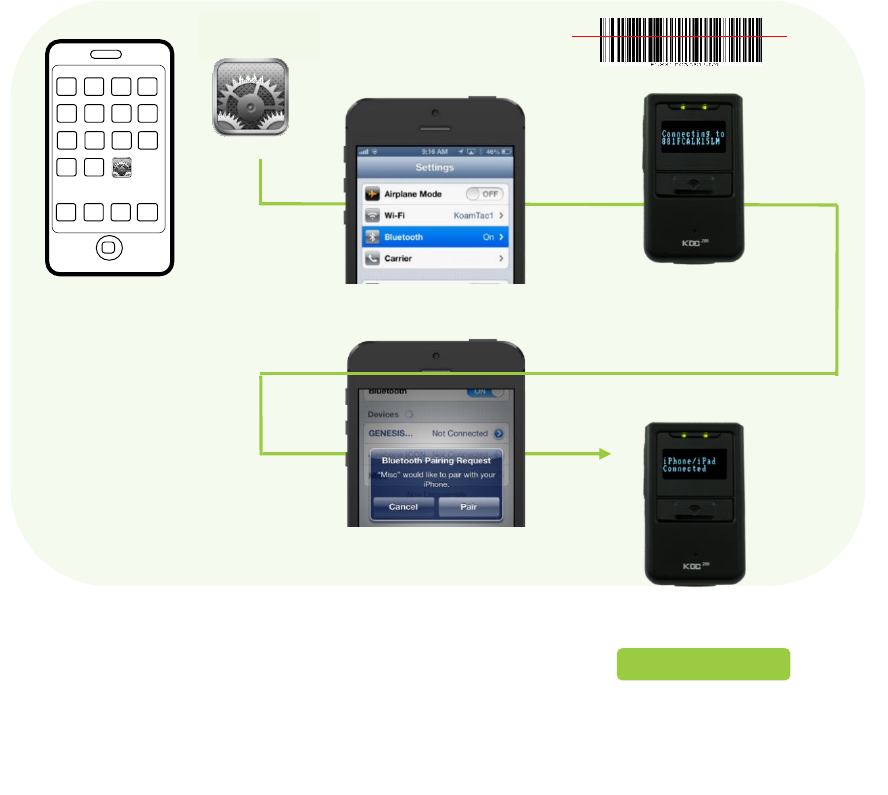
4. Connect the KDC to the host device by scanning the Bluetooth MAC Address
Barcode.
Tap on Bluetooth
Scan the BT MAC Address
Barcode
Tap on Pair
Complete!
Settings
Figure 7 - Connecting KDC with a smart phone by scanning Bluetooth MAC Address Barcode
KDC User Manual Installation
39
5. Open KTSync after it has been installed, and it will automatically find the KDC and
connect. (Refer to 2.2 KOAMTAC Installation Wizard for more information about
installing KTSync)
KDC User Manual Installation
40
2.2 KOAMTAC Installation Wizard
Windows 7, 8 & 10
WARNING: DO NOT CONNECT KDC TO USB PORT PRIOR TO DRIVER
INSTALLATION
1. Insert KOAMTAC Installation CD into the computer’s CD drive.
2. Click Start icon then My Computer icon. A list of devices on the computer
will be displayed, including the disk drive containing the KOAMTAC
Installation CD.
3. Click on the KOAMTAC Installation CD icon, then the Setup directory. Click
on the PC_Setup.exe file, which will execute the KTSync Setup Wizard.
If the KTSync Setup Wizard locates an older version of KTSync on the
computer, the user will be prompted to remove the older program before
installing the new version. Select Remove KTSync then click Finish. When
removal is complete, click Close. Go to Step 2 to run KTSync Setup Wizard.
KTSync Setup Wizard
To install KTSync, follow the steps shown in the images below.
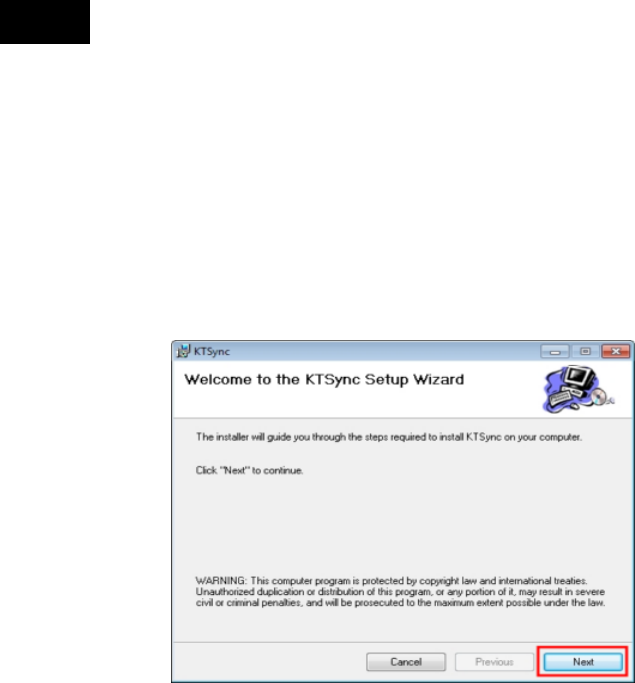
1. In the KTSync Setup Wizard window, click Next.
Note
KDC User Manual Installation
41
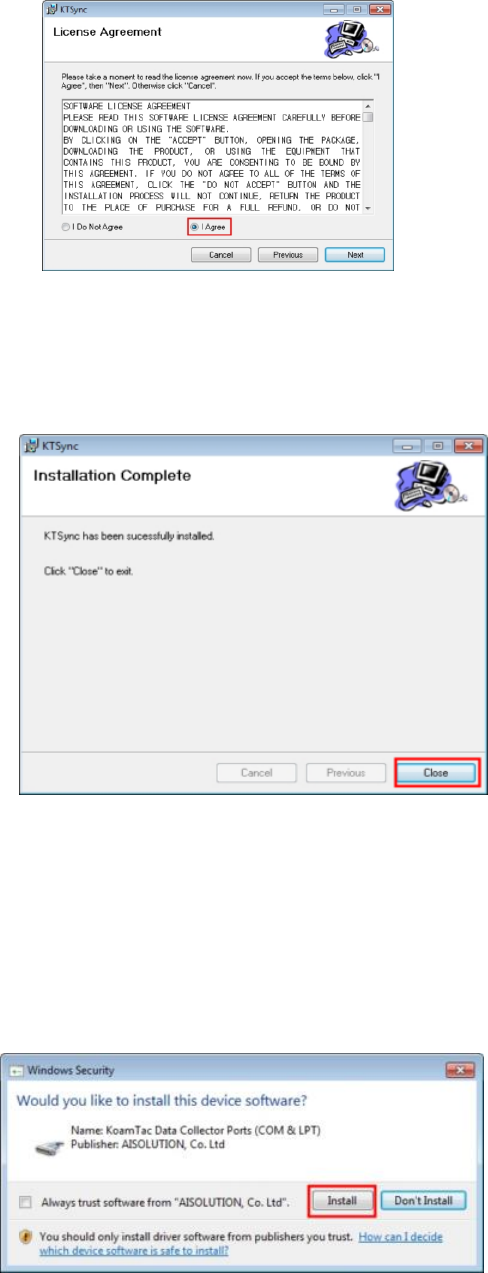
2. In the License Agreement window, select “I Agree” and click Next.
3. In the KTSync Installation Complete window, click Close and wait for the Device
Driver Installation Wizard.
4. In the Windows Security window, click Install to complete installation.
KDC User Manual Installation
42
Connect KDC to Computer
Using the USB cable included with the KDC or built-in swing out USB connector, follow
the directions below.
1. Connect KDC to PC.
2. Wait until the computer beeps and/or displays the message
Found
New Hardware.
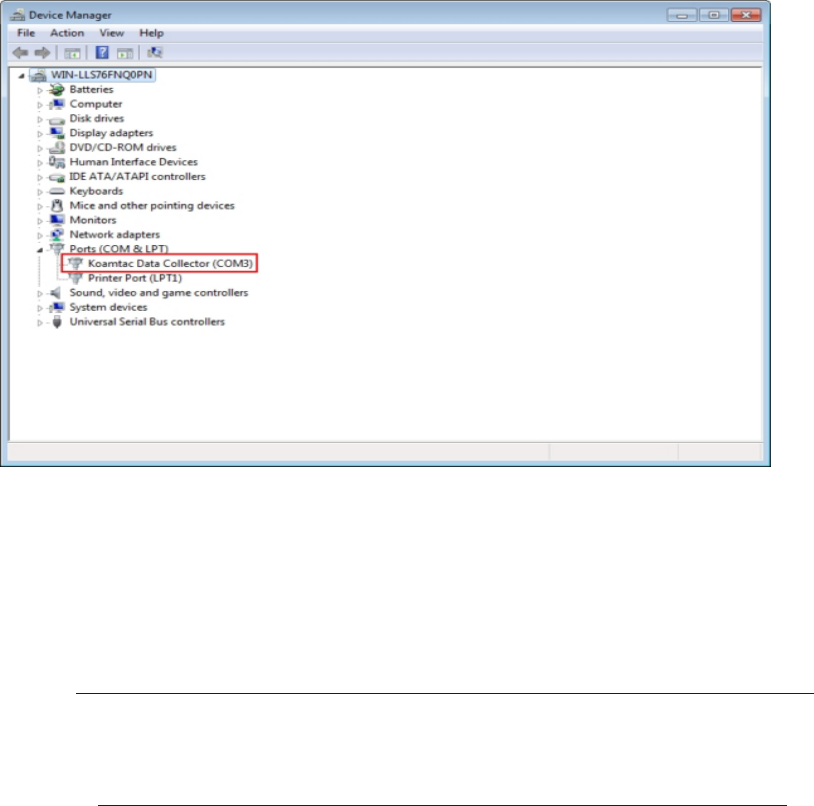
Verify COM Port Address
The installed COM Port may be verified in Device Manager.
Android
Download and install KTSync from the Android Play Store.
https://play.google.com/store/apps/details?id=com.koamtac.ktsync&hl
BlackberryDownload and install KTSync from the Blackberry App World.
http://appworld.blackberry.com/webstore/content/16861?lang=en
iPad/iPhone/iPod Touch
Download and install KTSync from the Apple App Store.
KDC User YOUR KDC
44
3. Operating your KDC
3.1 Getting Started
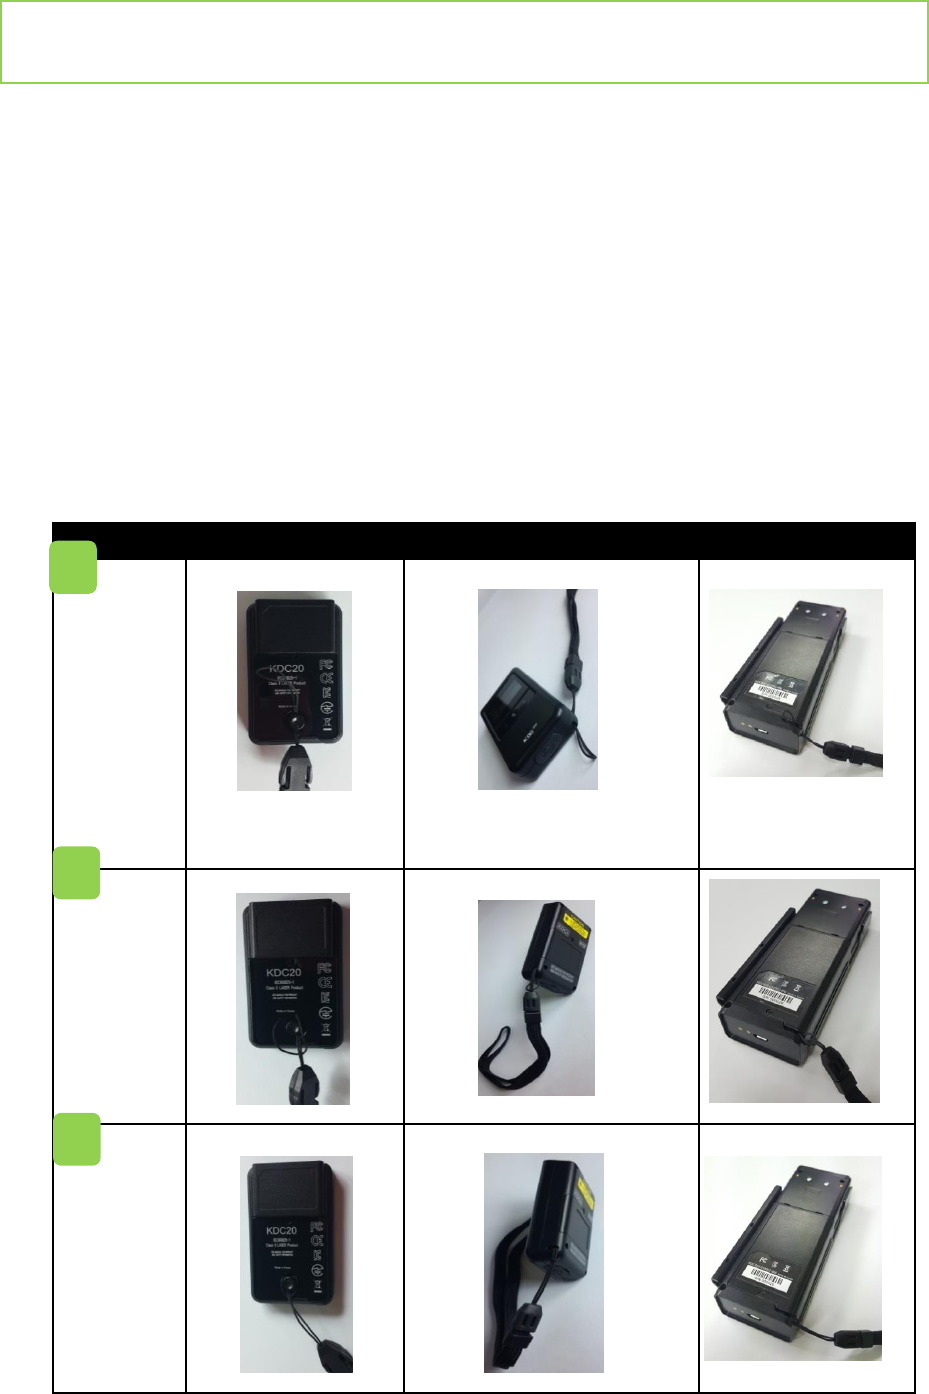
Attaching a Lanyard or Hand Strap to a KDC
To prevent possible damage to the KDC, we STRONGLY recommend wearing it
around the neck or hand, using the included lanyard or hand strap. In addition, the
user should not swing the KDC by its lanyard or hand strap. Impact with another
object may cause the KDC to malfunction or damage.
To attach a lanyard/hand strap:
KDC20/30
KDC100/200/270/300/350/400/470
KDC500
Fit the thin
end of the
lanyard
through
the pillar of
the KDC.
Guide the
thick end
of strap
through
the thin
loop.
Pull the
strap tight
to secure.
1
2
3

KDC User YOUR KDC
45
Charge KDC Battery
Prior to using the KDC, the user should charge the battery. Follow the instructions
below.
1. Connect the KDC cable to the mini USB connector on the KDC.
2. Connect the KDC cable to the Type A USB connector on the computer.
3. The KDC battery will begin charging. Within a few minutes, the two small LEDs
(three LEDs in case of KDC500) on the front panel will illuminate orange. When
the battery is fully charged, the LEDs will illuminate green.
Configure KDC
The KDC is designed to meet the data collection requirements of many different
industries in a variety of dynamic situations. To deliver the best performance in these
diverse environments, the KDC is designed to be configured quickly and easily.
However, to perform at its optimum level, the KDC must be configured properly. Until
the user is familiar with the KDC configuration settings, it is recommended that the
user DOES NOT modify the KDC settings. The KDC may be configured by using three
different methods, which are explained in Section 3.3 – KDC Menus, Chapter 5 –
Synchronization, and Appendix C/D – Special Barcodes.
CONFIGURATION METHODS FOR THE KDC100/200/250/300/270/350/500
KDC Menu
KTSync Software
Special Barcodes
KDC100
KDC20/200
KDC30/250/300/270
KDC350
KDC400/470
KDC500
2 Hours
2 Hours
4 Hours
5 Hours
5 Hours
5 Hours
Table 2 - Number of hours required to fully charge a KDC Battery
KDC User YOUR KDC
46
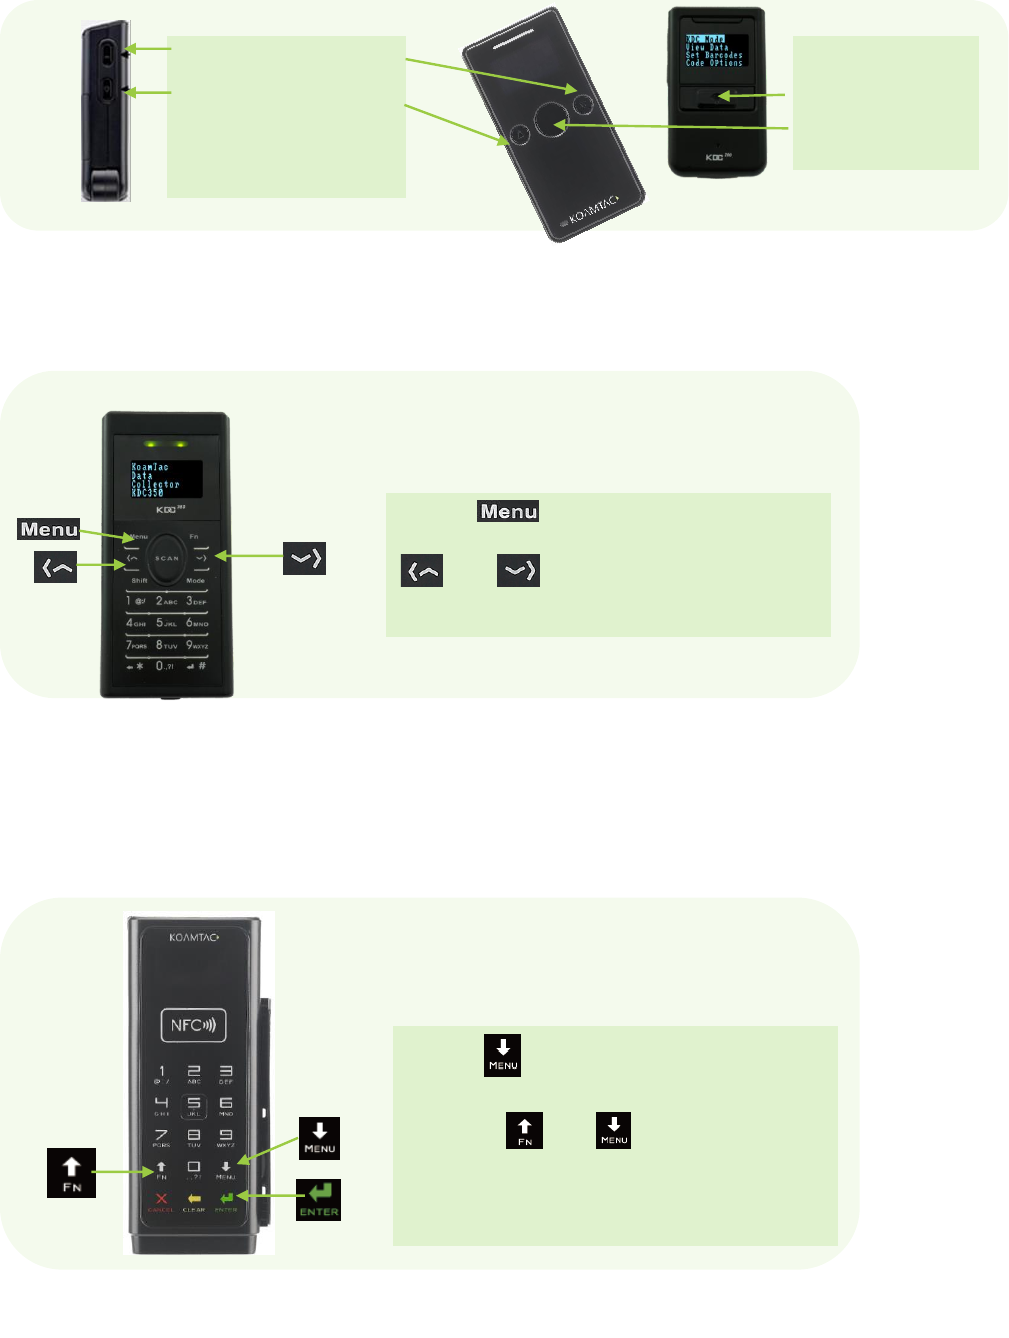
Figure 8 - Location of KDC Menu and use of buttons (KDC100/200/250/270/300)
Select one of the
menus by pressing
the Scan Button.
Press the Up and DOWN
Buttons simultaneously to
access the KDC menu.
Move the menu bar up and
down by pressing Up and
Down Buttons.
Press the Button to access the KDC menu.
Move the menu bar up and down by pressing the
and Buttons, and configure the KDC by
pressing the SCAN Button to select a menu.
Figure 9 - Location and use of buttons on a keypad (KDC350)
Press the Button for 5 seconds to access the
KDC menu. Move the menu bar up and down by
pressing the and Buttons, and configure
the KDC by pressing the SCAN Button to select a menu.
Figure 10 - Location and use of buttons on a keypad (KDC500)
KDC User YOUR KDC
47
CONFIGURATION METHODS FOR KDC20/30/400/470
KTSync Software
Special Barcodes
KDC User YOUR KDC
48
3.2 Basics
Reading Barcodes
To read a barcode using the KDC, simply point the KDC at a barcode and press the
scan button. Be sure to point the scan engine window at the barcode, not at the user’s
face, and make sure to position the light beam on the barcode.
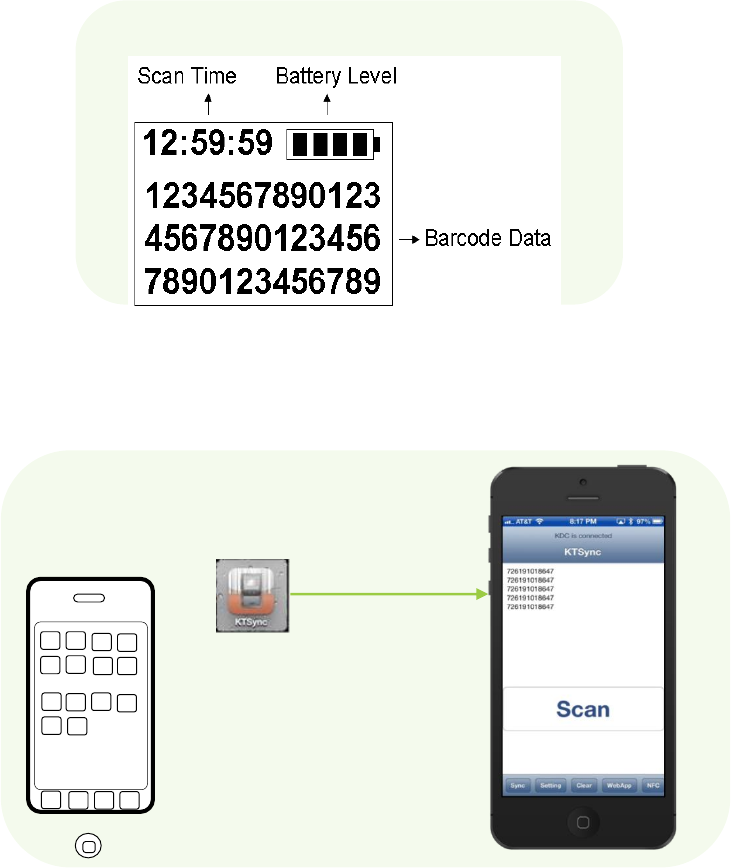
If a barcode has been successfully scanned, the user will hear one short beep and the
LEDs will illuminate green. The scanned barcode data will be displayed on the KDC
screen, along with the scan time and battery level.
Depending on the configuration of
the KDC, other information may also be displayed.
Figure 12 - Scanning barcodes using KTSync
Figure 11 - KDC Display

KDC User YOUR KDC
49
If scanning was unsuccessful, the user will hear two short beeps, the LEDs will
illuminate red, and the message
Failed reading
will display. If this is the case, the user
should point the KDC at the barcode and press the scan button while trying the
following suggestions:
Modify the angle of the KDC in relation to the barcode, making the angle more
wide or narrow as needed. (Laser Model)
Modify the distance between the barcode and the KDC, moving closer or
further away as needed.
Check the option settings defined in the KDC menu section and change
options as needed.
Check to see that the barcode’s width does not exceed the light beam’s width,
and vice versa.
Read Barcodes with GPS Coordinates (KDC250G/350G)
The KDC350G may add GPS coordinates after the barcode data. To do so, the user
may follow the below instructions.
Because of the characteristics of GPS, this function is only available when
outdoors.
1. Go to GPS Power in GPS Menu and select Enable.
2. Check to see if the KDC is successfully acquiring GPS data by selecting
Acquire Test in GPS Menu.
When the user selects the Acquire Test, an
‘Acquiring’
message will appear on
the screen. If this is the first test, check to make sure the ‘Acquired’ message
appears within 90 seconds of acquiring GPS signal.
3. Go to SystemConfig in the KDC Menu and select GPS data in Display Format.
4. After finishing the configuration, scan a barcode as explained in 3.2.1 Reading
Barcodes.
When the user has successfully scanned a barcode, the barcode data and GPS
coordinate will appear on the KDC screen.
For more information, refer to 3.3 Menu - GPS Config (KDC250G/350G).
Note
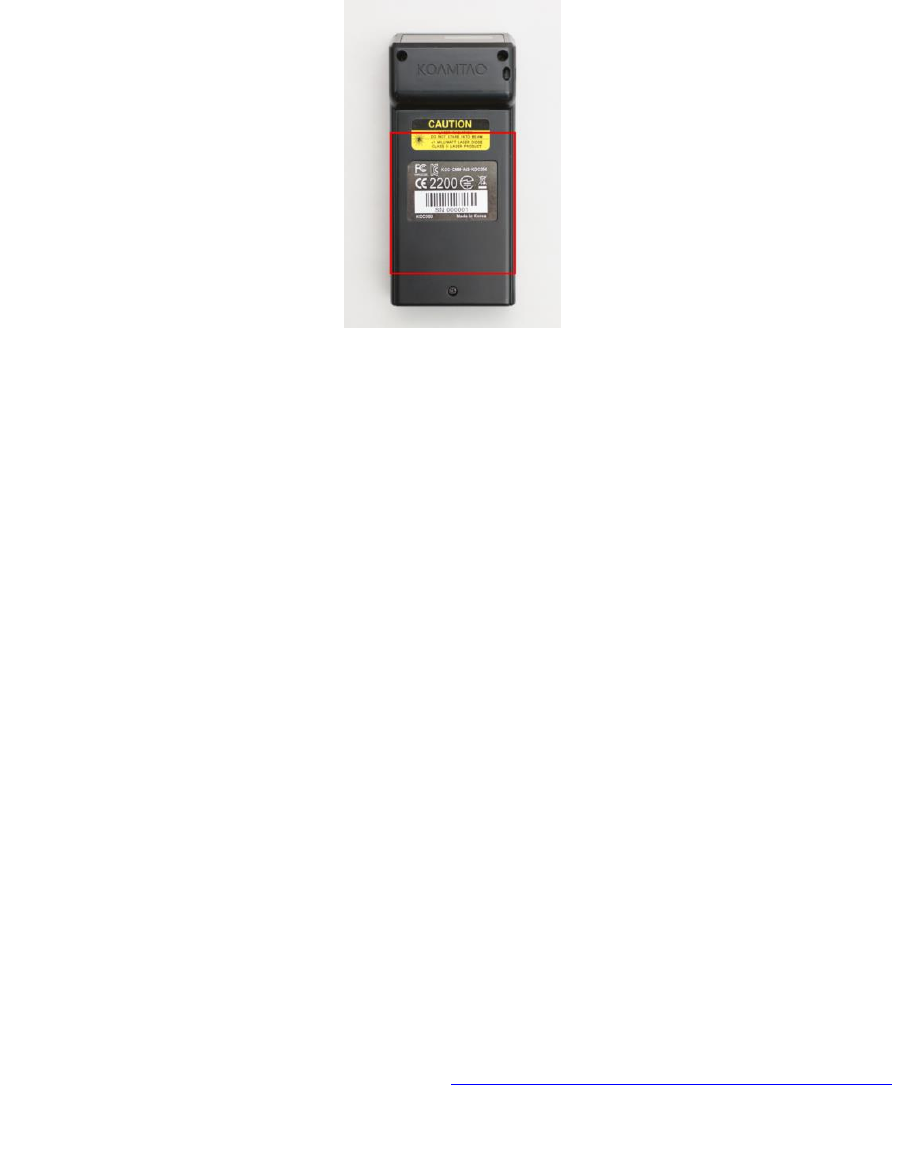
KDC User YOUR KDC
50
Reading NFC Tags (KDC350N/400N/KDC500)
1. Enable the NFC Power option in the NFC Config menu.
2. Touch the NFC tag to the back of the KDC350N/400N case (or NFC logo on the front
of the KDC500 case), and make sure the tag and case are within 5cm of each other.
Figure 13 - Location for reading NFC Tag
3. The KDC will show the NFC tag UID and the user will hear a short beep if it has
been read successfully.
Reading HF RFID Tags (KDC450/470)
The KDC450/470 may virtually read any ISO/IEC 14443 A or B compliant smartcards, or
ISO/IEC 15693 compliant HF RFID tags.
To read a HF RFID tag, touch the RFID card to the back of the KDC450/470 case, and
make sure the tag and case are within 5cm of each other. The user will hear a short
beep if it has been read successfully.
Inputting Data by Using a Keypad (KDC350)
The KDC350 Enables users to input barcode data by using its keypad. The user may
switch between Num mode and Abc mode by using the Mode button.
To switch between uppercase and lowercase letters, the user may press the Shift
button while in Abc mode. To save the data input, press the Enter or SCAN button. For
data input, press the Menu button. Refer to 1.5 Input data by using a keypad (KDC350)
for more detailed information about the process.

KDC User YOUR KDC
51
Read Magnetic-Stripe (MS) Card(KDC500)
1. The paired host application sends a command to enable the MS Card Reader.
2. Swipe MS Card either top to bottom or bottom to top. Make sure the magnetic stripe
of the card face to the KDC500.
3. The KDC500 will send the MS card data to the paired host application and the user
will hear a short beep if it has been read successfully.
Read Integrated Chip (IC) Card(KDC500)
1. The paired host application sends a command to enable the IC Card Reader.
2. Insert IC Card into the IC Card slot located in the left side of KDC500. Make sure the
IC of the card face to up.
3. The KDC500 will send the IC card data read to the paired host application.
Synchronizing data to the host device
Use the KTSync program to synchronize barcode data from the KDC to the host device.
Please refer to Chapter 5. Synchronization for details.

KDC User YOUR KDC
52
3.3 KDC Menu
Top Menu
Sub Menu
Options
KDC20
KDC30
KDC100
KDC200
KDC250
KDC300
KDC350L
KDC350C
KDC Mode
Normal
Default
Default
Default
Default
Default
Default
Default
Default
Application
N/A
N/A
Custom
Application
Custom
Application
Custom
Application
Custom
Application
Custom
Application
Custom
Application
View Data
View/Delete
N/A
N/A
View/Delete
Data
View/Delete
Data
View/Delete
Data
View/Delete
Data
View/Delete
Data
View/Delete
Data
Set
Barcodes
(20/
100/ 200/
250/
350L)
EAN13
Enabled/
Disabled
Enabled
N/A
Enabled
Enabled
Enabled
N/A
Enabled
N/A
EAN8
Enabled/
Disabled
Enabled
N/A
Enabled
Enabled
Enabled
N/A
Enabled
N/A
UPCA
Enabled/
Disabled
Enabled
N/A
Enabled
Enabled
Enabled
N/A
Enabled
N/A
UPCE
Enabled/
Disabled
Enabled
N/A
Enabled
Enabled
Enabled
N/A
Enabled
N/A
CODE39
Enabled/
Disabled
Enabled
N/A
Enabled
Enabled
Enabled
N/A
Enabled
N/A
ITF14
Enabled/
Disabled
Enabled
N/A
Enabled
Enabled
Enabled
N/A
Enabled
N/A
CODE128
Enabled/
Disabled
Enabled
N/A
Enabled
Enabled
Enabled
N/A
Enabled
N/A
I2of5
Enabled/
Disabled
Enabled
N/A
Enabled
Enabled
Enabled
N/A
Enabled
N/A
CODABAR
Enabled/
Disabled
Enabled
N/A
Enabled
Enabled
Enabled
N/A
Enabled
N/A
GS1-128
Enabled/
Disabled
Enabled
N/A
Enabled
Enabled
Enabled
N/A
Enabled
N/A
CODE93
Enabled/
Disabled
Enabled
N/A
Enabled
Enabled
Enabled
N/A
Enabled
N/A
CODE35
Enabled/
Disabled
Enabled
N/A
Enabled
Enabled
Enabled
N/A
Enabled
N/A
BooklandEAN
Enabled/
Disabled
Disabled
N/A
Disabled
Disabled
Disabled
N/A
Disabled
N/A
EAN13withAddon
Enabled/
Disabled
Disabled
N/A
Disabled
Disabled
Disabled
N/A
Disabled
N/A
EAN8withAddon
Enabled/
Disabled
Disabled
N/A
Disabled
Disabled
Disabled
N/A
Disabled
N/A
UPCAwithAddon
Enabled/
Disabled
Disabled
N/A
Disabled
Disabled
Disabled
N/A
Disabled
N/A
UPCEwithAddon
Enabled/
Disabled
Disabled
N/A
Disabled
Disabled
Disabled
N/A
Disabled
N/A
GS1 Omni
Enable/
Disable
Disabled
N/A
Disabled
Disabled
Disabled
N/A
Disabled
N/A
GS1 Limited
Enable/
Disable
Disabled
N/A
Disabled
Disabled
Disabled
N/A
Disabled
N/A
GS1 Expanded
Enable/
Disable
Disabled
N/A
Disabled
Disabled
Disabled
N/A
Disabled
N/A
Set
Barcodes
(30/300/
350C)
1D Symbology
Codabar
N/A
Enabled
N/A
N/A
N/A
Enabled
N/A
Enabled
Code 11
N/A
Enabled
N/A
N/A
N/A
Enabled
N/A
Enabled
Code 32
N/A
Enabled
N/A
N/A
N/A
Enabled
N/A
Enabled
Code 39
N/A
Enabled
N/A
N/A
N/A
Enabled
N/A
Enabled
Code 93
N/A
Enabled
N/A
N/A
N/A
Enabled
N/A
Enabled
Code 128
N/A
Enabled
N/A
N/A
N/A
Enabled
N/A
Enabled
EAN-8
N/A
Enabled
N/A
N/A
N/A
Enabled
N/A
Enabled
EAN-13
N/A
Enabled
N/A
N/A
N/A
Enabled
N/A
Enabled
GS1
Composit
N/A
Enabled
N/A
N/A
N/A
Enabled
N/A
Enabled
I2of5
N/A
Enabled
N/A
N/A
N/A
Enabled
N/A
Enabled
Matrix 2of5
N/A
Enabled
N/A
N/A
N/A
Enabled
N/A
Enabled
MSI
N/A
Enabled
N/A
N/A
N/A
Enabled
N/A
Enabled
Plessey
N/A
Enabled
N/A
N/A
N/A
Enabled
N/A
Enabled
PosiCode
N/A
Enable
N/A
N/A
N/A
Enabled
N/A
Enabled
GS1 Omni
N/A
Enabled
N/A
N/A
N/A
Enabled
N/A
Enabled
GS1
Limited
N/A
Enabled
N/A
N/A
N/A
Enabled
N/A
Enabled
GS1
Expanded
N/A
Enabled
N/A
N/A
N/A
Enabled
N/A
Enabled
S2of5 Ind
N/A
Enabled
N/A
N/A
N/A
Enabled
N/A
Enabled
S2of5 IATA
N/A
Enabled
N/A
N/A
N/A
Enabled
N/A
Enabled
TLC39
N/A
Enabled
N/A
N/A
N/A
Enabled
N/A
Enabled
Telepen
N/A
Enabled
N/A
N/A
N/A
Enabled
N/A
Enabled
Trioptic
N/A
Enabled
N/A
N/A
N/A
Enabled
N/A
Enabled

KDC User YOUR KDC
53
UPCA
N/A
Enabled
N/A
N/A
N/A
Enabled
N/A
Enabled
UPCE0
N/A
Enabled
N/A
N/A
N/A
Enabled
N/A
Enabled
UPCE1
N/A
Enabled
N/A
N/A
N/A
Enabled
N/A
Enabled
2D Symbology
AztecCode
N/A
Enabled
N/A
N/A
N/A
Enabled
N/A
Enabled
AztecRune
s
N/A
Enabled
N/A
N/A
N/A
Enabled
N/A
Enabled
Codablock
F
N/A
Enabled
N/A
N/A
N/A
Enabled
N/A
Enabled
Code16K
N/A
N/A
N/A
N/A
N/A
Enabled
N/A
Enabled
Code49
N/A
N/A
N/A
N/A
N/A
Enabled
N/A
Enabled
DataMatrix
N/A
Enabled
N/A
N/A
N/A
Enabled
N/A
Enabled
MaxiCode
N/A
Enabled
N/A
N/A
N/A
Enabled
N/A
Enabled
MicroPDF
N/A
Enabled
N/A
N/A
N/A
Enabled
N/A
Enabled
PDF417
N/A
Enabled
N/A
N/A
N/A
Enabled
N/A
Enabled
QRCode
N/A
Enabled
N/A
N/A
N/A
Enabled
N/A
Enabled
HanXin
Code
N/A
Enabled
N/A
N/A
N/A
Enabled
N/A
Enabled
Postal Codes
Postnet
N/A
Enabled
N/A
N/A
N/A
Enabled
N/A
Enabled
PlanetCod
e
N/A
Enabled
N/A
N/A
N/A
Enabled
N/A
Enabled
UK Post
N/A
Enabled
N/A
N/A
N/A
Enabled
N/A
Enabled
Mayada
Post
N/A
Enabled
N/A
N/A
N/A
Enabled
N/A
Enabled
Kix Post
N/A
Enabled
N/A
N/A
N/A
Enabled
N/A
Enabled
Australia
Post
N/A
Enabled
N/A
N/A
N/A
Enabled
N/A
Enabled
Japan Post
N/A
Enabled
N/A
N/A
N/A
Enabled
N/A
Enabled
China Post
N/A
Enabled
N/A
N/A
N/A
Enabled
N/A
Enabled
Korea Post
N/A
Enabled
N/A
N/A
N/A
Enabled
N/A
Enabled
OCR
OCR Off
N/A
Enabled
N/A
N/A
N/A
Enabled
N/A
Enabled
OCR A
N/A
Disabled
N/A
N/A
N/A
Disabled
N/A
Disabled
OCR B
N/A
Disabled
N/A
N/A
N/A
Disabled
N/A
Disabled
OCR
Passport
N/A
Disabled
N/A
N/A
N/A
Disabled
N/A
Disabled
OCR MICR
N/A
Disabled
N/A
N/A
N/A
Disabled
N/A
Disabled
OCR SEMI
N/A
Disabled
N/A
N/A
N/A
Disabled
N/A
Disabled
Barcode
Options
(20/100
/200/250
/350L)
CodaBar_NoStartSto
pChars
Enabled/
Disabled
Disabled
N/A
Disabled
Disabled
Disabled
N/A
Disabled
N/A
UPCE_as_UPCA
Enabled/
Disabled
Disabled
N/A
Disabled
Disabled
Disabled
N/A
Disabled
N/A
EAN8_as_EAN13
Enabled/
Disabled
Disabled
N/A
Disabled
Disabled
Disabled
N/A
Disabled
N/A
UPCE_as_EAN13
Enabled/
Disabled
Disabled
N/A
Disabled
Disabled
Disabled
N/A
Disabled
N/A
ReturnCheckDigit
Enabled/
Disabled
Disabled
N/A
Disabled
Disabled
Disabled
N/A
Disabled
N/A
VerifyCheckDigit
Enabled/
Disabled
Disabled
N/A
Disabled
Disabled
Disabled
N/A
Disabled
N/A
UPCA_as_EAN13
Enabled/
Disabled
Disabled
N/A
Disabled
Disabled
Disabled
N/A
Disabled
N/A
I2of5_VerifyCheckDig
it
Enabled/
Disabled
Disabled
N/A
Disabled
Disabled
Disabled
N/A
Disabled
N/A
Code39_VerifyCheck
Digit
Enabled/
Disabled
Disabled
N/A
Disabled
Disabled
Disabled
N/A
Disabled
N/A
I2of5_ReturnCheckDi
git
Enabled/
Disabled
Disabled
N/A
Disabled
Disabled
Disabled
N/A
Disabled
N/A
Code39_ReturnChec
kDigit
Enabled/
Disabled
Disabled
N/A
Disabled
Disabled
Disabled
N/A
Disabled
N/A
UPCE_ReturnCheck
Digit
Enabled/
Disabled
Enabled
N/A
Enabled
Enabled
Enabled
N/A
Enabled
N/A
UPCA_ReturnCheck
Digit
Enabled/
Disabled
Enabled
N/A
Enabled
Enabled
Enabled
N/A
Enabled
N/A
EAN8_ReturnCheckD
igit
Enabled/
Disabled
Enabled
N/A
Enabled
Enabled
Enabled
N/A
Enabled
N/A
EAN13_ReturnCheck
Digit
Enabled/
Disabled
Enabled
N/A
Enabled
Enabled
Enabled
N/A
Enabled
N/A
Barcode
Options
(30/300/
350C)
Codabar
Tx
StartStop
(Enabled/
Disabled)
N/A
Disabled
N/A
N/A
N/A
Disabled
N/A
Disabled
Check
Digit
(DoNotVeri
fy/VerfyDO
NotTX/Veri
fyDoTx)
N/A
DoNotVerify
N/A
N/A
N/A
DoNotVerify
N/A
DoNotVerify
Concatena
te(Disable
N/A
N/A
N/A
N/A
N/A
Enabled
N/A
Enabled

KDC User YOUR KDC
54
d/Enabled/
Required)
Code39
Tx
StartStop
(Enabled/
Disabled)
N/A
Disabled
N/A
N/A
N/A
Disabled
N/A
Disabled
Check
Digit(DoNo
tVerify/Verf
yDONotTX
/VerifyDoT
x)
N/A
DoNotVerify
N/A
N/A
N/A
DoNotVerify
N/A
DoNotVerify
Append
(Enabled/
Disabled)
N/A
N/A
N/A
N/A
N/A
Disabled
N/A
Disabled
Full
ASCII(Enab
led/Disabl
ed)
N/A
Disabled
N/A
N/A
N/A
Disabled
N/A
Disabled
I2of5
Check
Digit
(DoNotVeri
fy/VerfyDO
NotTX/Veri
fyDoTx)
N/A
DoNotVerify
N/A
N/A
N/A
DoNotVerify
N/A
DoNotVerify
Code11
Check
Digit
(2 digits/1
digit)
N/A
2 digits
N/A
N/A
N/A
2 digits
N/A
2 digits
Code128
Concatena
te(Disable
d/Enabled)
N/A
Disabled
N/A
N/A
N/A
Disabled
N/A
Disabled
Telepen
Output(Ori
ginal/AIM)
N/A
Always AIM
N/A
N/A
N/A
AIM
N/A
AIM
UPCA
VerifyChkD
gt(Enabled
/Disabled)
N/A
Always
Enabled
N/A
N/A
N/A
Enabled
N/A
Enabled
NumberSy
s(Enabled/
Disabled)
N/A
Enabled
N/A
N/A
N/A
Enabled
N/A
Enabled
2DgtAdden
da(Enable
d/Disabled
)
N/A
Disabled
N/A
N/A
N/A
Disabled
N/A
Disabled
5DgtAdden
da(Enable
d/Disabled
)
N/A
Disabled
N/A
N/A
N/A
Disabled
N/A
Disabled
Req.
Addenda
(Enabled/
Disabled)
N/A
N/A
N/A
N/A
N/A
Disabled
N/A
Disabled
Sep.
Addenda
(Enabled/
Disabled)
N/A
N/A
N/A
N/A
N/A
Enabled
N/A
Enabled
Coupon
Code
(Enabled/
Disabled)
N/A
N/A
N/A
N/A
N/A
Enabled
N/A
Enabled
UPCE
Expand
(Enabled/
Disabled)
N/A
Disabled
N/A
N/A
N/A
Disabled
N/A
Disabled
Req.
Addenda
(Enabled/
Disabled)
N/A
N/A
N/A
N/A
N/A
Disabled
N/A
Disabled
Sep.
Addenda
(Enabled/
Disabled)
N/A
N/A
N/A
N/A
N/A
Enabled
N/A
Enabled
Check
Digit
(Enabled/
Disabled)
N/A
Enabled
N/A
N/A
N/A
Enabled
N/A
Enabled
NumberSy
s(Enabled/
Disabled)
N/A
Enabled
N/A
N/A
N/A
Enabled
N/A
Enabled
2DgtAdden
da(Enable
d/Disabled
)
N/A
Disabled
N/A
N/A
N/A
Disabled
N/A
Disabled
5DgtAdden
da(Enable
d/Disabled
)
N/A
Disabled
N/A
N/A
N/A
Disabled
N/A
Disabled

KDC User YOUR KDC
55
EAN-13
EAN-8
VerifyChkD
gt(Enabled
/Disabled)
N/A
Enabled
N/A
N/A
N/A
Enabled
N/A
Enabled
2DgtAdden
da(Enable
d/Disabled
)
N/A
Disabled
N/A
N/A
N/A
Disabled
N/A
Disabled
5DgtAdden
da(Enable
d/Disabled
)
N/A
Disabled
N/A
N/A
N/A
Disabled
N/A
Disabled
Req.
Addenda
(Enabled/
Disabled)
N/A
N/A
N/A
N/A
N/A
Disabled
N/A
Disabled
Sep.
Addenda
(Enabled/
Disabled)
N/A
N/A
N/A
N/A
N/A
Enabled
N/A
Enabled
ISBN
Trans.
(Enabled/
Disabled)
N/A
Disabled
N/A
N/A
N/A
Disabled
N/A
Disabled
VerifyChkD
gt(Enabled
/Disabled)
N/A
Enabled
N/A
N/A
N/A
Enabled
N/A
Enabled
2DgtAdden
da(Enable
d/Disabled
)
N/A
Disabled
N/A
N/A
N/A
Disabled
N/A
Disabled
5DgtAdden
da(Enable
d/Disabled
)
N/A
Disabled
N/A
N/A
N/A
Disabled
N/A
Disabled
Req.
Addenda
(Enabled/
Disabled)
N/A
Disabled
N/A
N/A
N/A
Disabled
N/A
Disabled
Sep.
Addenda
(Enabled/
Disabled)
N/A
Enabled
N/A
N/A
N/A
Enabled
N/A
Enabled
MSI
Tx
CheckChar
(Enabled/
Disabled)
N/A
Disabled
N/A
N/A
N/A
Disabled
N/A
Disabled
PosiCode
A and
B/A&B
LimitedA/A
&B
LimitedB
N/A
N/A
N/A
N/A
N/A
A&B
LimitedB
N/A
A&B
LimitedB
GS1
UPCEAN
Ver.(Enabl
ed/Disable
d)
N/A
N/A
N/A
N/A
N/A
Disabled
N/A
Disabled
GS1
Emulation
(No
Emulate/
GS1 128
Emul/GS1
Emulate)
N/A
N/A
N/A
N/A
N/A
No Emulate
N/A
No Emulate
PostNet
Tx
CheckChar
(Enabled/
Disabled)
N/A
N/A
N/A
N/A
N/A
Disabled
N/A
Disabled
PlanetCode
Tx
CheckChar
(Enabled/
Disabled)
N/A
N/A
N/A
N/A
N/A
Disabled
N/A
Disabled
Scan
Options
Scan Angle
Narrow/
Wide
Wide
(Laser only)
N/A
Wide
Wide
Wide
N/A
Wide
(Opticon
Laser only)
N/A
Filter
Normal/
High
Normal
(Laser only)
N/A
Normal
Normal
Normal
N/A
Normal
(Opticon
Laser only)
N/A
Time Out
.5 seconds
to 10
seconds
2 second(s)
2 second(s)
2 second(s)
2 second(s)
2 second(s)
2 second(s)
2 second(s)
2 second(s)
Min. Barcode Length
2 to 36
characters
4 chars
N/A
4 chars
4 chars
4 chars
N/A
4 chars
N/A
Min. Barcode Length
2 to 48
characters
N/A
N/A
N/A
N/A
N/A
4 chars
N/A
4 chars
Security Level
1 to 4 level
2 level
N/A
2 level
2 level
2 level
N/A
2 level
N/A
Image Capture
Enabled/
Disabled
N/A
N/A
N/A
N/A
N/A
Disabled
N/A
Disabled

KDC User YOUR KDC
56
Auto Trigger
Enabled/
Disabled
Disabled
Disabled
Disabled
Disabled
Disabled
Disabled
Disabled
Disabled
Reread Delay
Continuou
s, Short,
Medium,
Long, Extra
Long
Medium
Medium
Medium
Medium
Medium
Medium
Medium
Medium
Finger Trigger
Enabled/Di
sabled
N/A
N/A
Enabled
Enabled
Enabled
N/A
Enabled
N/A
Partial Display
Start
Position
1
1
1
1
1
1
1
1
No. of
Char(s)
0 chars
0 chars
0 chars
0 chars
0 chars
0 chars
0 chars
0 chars
Action
Select
Select
Select
Select
Select
Select
Select
Select
Data
Process
Wedge / Store
Wedge Onl
y
Wedge &
Store
Always
Default
Default
Default
Default
Default
Default
Default
Default
Store Only
Save if
Sent
Save if Not
Sent
Data Format
Barcode
only
Default
Default
Default
Default
Default
Default
Default
Default
Packet
Data
Data Editor/ Prefix
Data Editor/ Suffix
Data Editor/ AIM ID
None/In
Prefix/In
Suffix
None
None
None
None
None
None
None
None
Data Editor/ Partial
Data
Start
Position
1
1
1
1
1
1
1
1
No. of
Char(s)
0 chars
0 chars
0 chars
0 chars
0 chars
0 chars
0 chars
0 chars
Action
Select
Select
Select
Select
Select
Select
Select
Select
Handshake
Enable/
Disabled
Disabled
Disabled
Disabled
Disabled
Disabled
Disabled
Disabled
Disabled
Terminator
None, CR,
LF, CR+LF,
Tab, Right
Arrow, Left
Arrow,Dow
n Arrow,
Up Arrow
CR+LF
CR+LF
CR+LF
CR+LF
CR+LF
CR+LF
CR+LF
CR+LF
Chk Duplicate
Enabled/Di
sabled
Disabled
Disabled
Disabled
Disabled
Disabled
Disabled
Disabled
Disabled
Enter Key
Enabled/Di
sabled
N/A
N/A
N/A
N/A
N/A
N/A
Disabled
Disabled
Extend Key
Enabled/
Disabled
N/A
N/A
N/A
N/A
N/A
N/A
Disabled
Disabled
Age Verify
Verification
Enabled/
Disabled
N/A
Disabled
N/A
N/A
N/A
Disabled
N/A
Disabled
Age
Default
N/A
21
N/A
N/A
N/A
21
N/A
21
BT Config
Connect Device
(Non Mfi mode)
SPP
Default
Default
N/A
Default
Default
Default
Default
Default
HID iOS
N/A
SPP2.0
N/A
HID
normal
N/A
Connect Device
(Mfi mode )
SPP
N/A
MFi
Default
Default
N/A
Default
Default
Default
Default
Default
Auto Connect
Enabled
/Disabled
Disabled
Disabled
N/A
Disabled
Disabled
Disabled
Disabled
Disabled
Auto Reconnect
Enabled/
Disabled
Disabled
Disabled
N/A
Disabled
Disabled
Disabled
Disabled
Disabled
Auto Power On
Enabled/
Disabled
Disabled
Disabled
N/A
Disabled
Disabled
Disabled
Disabled
Disabled
Auto Power
On/Power On Time
disabled,
1sec to
10second(
s)
Disabled
Disabled
N/A
Disabled
Disabled
Disabled
Disabled
Disabled
Auto Power Off
Enabled/
Disabled
Disabled
Disabled
N/A
Disabled
Disabled
Disabled
Disabled
Disabled
Auto Power Off/Beep
Warning
Enabled/
Disabled
Disabled
Disabled
N/A
Disabled
Disabled
Disabled
Disabled
Disabled
Auto Power
Off/Power Off Time
1 to 30
minutes
Disabled
Disabled
N/A
Disabled
Disabled
Disabled
Disabled
Disabled

KDC User YOUR KDC
57
PowerOff Msg
Enabled/Di
sabled
Disabled
Disabled
N/A
Disabled
Disabled
Disabled
Disabled
Disabled
MAC Address
12
Characters
Bluetooth
MAC
Address
N/A
BT FW Version
v1.2.xrt
Bluetooth
Firmware
Version
N/A
Wakeup Nulls
Enabled/Di
sabled
Disabled
Disabled
N/A
Disabled
Disabled
Disabled
Disabled
Disabled
Connect Alert
Enabled/Di
sabled
Disabled
Disabled
N/A
Disabled
Disabled
Disabled
Disabled
Disabled
BT Toggle
Enabled/Di
sabled
Enabled
Enabled
N/A
Enabled
Enabled
Enabled
Enabled
Enabled
DisconnectBtn
Enabled/Di
sabled
Enabled
Enabled
N/A
Enabled
Enabled
Enabled
Enabled
Enabled
HID AutoLock
disabled,1,
2,3,4,5,10,1
5 minutes
1 minutes
1 minutes
N/A
1 minutes
1 minutes
1 minutes
1 minutes
1 minutes
HID Keyboard
US,Germa
n,French
,Italian,Spa
nish
US
US
N/A
US
US
US
US
US
HID Delay/Initial
Disabled,
1,2,3,5,10
secs
Disabled
Disabled
N/A
Disabled
Disabled
Disabled
Disabled
Disabled
HID Delay/Inter char
Disabled,1
0, 20, 30,
50,
100msec
Disabled
Disabled
N/A
Disabled
Disabled
Disabled
Disabled
Disabled
HID Ctrl Char
Disabled,
Alt+Numpa
d,
^+Charact
er, Replace
to |
Disabled
Disabled
N/A
Disabled
Disabled
Disabled
Disabled
Disabled
BT Service
Power
Enabled/
Disabled
Enabled
Enabled
N/A
Enabled
Enabled
Enabled
Enabled
Enabled
Pairing
Pairing
neighborin
g
Bluetooth
devices
N/A
Discovering
Discoverin
g
neighborin
g
Bluetooth
devices
N/A
Connecting to
View
Connect to
Bluetooth
device
N/A
HID Sync
N/A
Auto Pairing
Enabled/Di
sabled
Enabled
Enabled
N/A
Enabled
Enabled
Enabled
Enabled
Enabled
USB Config
(M model)
USB Mode
Disabled/
USB Disk/
USB HID
Disabled
Disabled
Disabled
Disabled
Disabled
Disabled
Disabled
Disabled
NFC Config
(N model)
NFC Power
Enabled/
Disabled
N/A
N/A
N/A
N/A
N/A
N/A
Enabled
Enabled
Data Format
Barcode
only/Packe
t Data
N/A
N/A
N/A
N/A
N/A
N/A
Packet Data
Packet Data
UID Only
Enabled/
Disabled
N/A
N/A
N/A
N/A
N/A
N/A
N/A
N/A
GPS Config
(G model)
GPS Power
Disabled
N/A
N/A
N/A
N/A
Disabled
N/A
Disabled
Disabled
Power Mode
Normal/Po
wer Save
N/A
N/A
N/A
N/A
Normal
N/A
Normal
Normal
Bypass Data
Enabled/
Disabled
N/A
N/A
N/A
N/A
Disabled
N/A
Disabled
Disabled
Acqurie Test
N/A
N/A
N/A
N/A
N/A
Reset GPS
N/A
N/A
N/A
N/A
N/A
System
Config
Memory Size(3.0+
only)
0.5/6.5, 1/6,
2/5, 3/4,
4/3, 5/2,
6/1, 70
N/A
N/A
0.5M/6.5M
0.5M/6.5M
0.5M/6.5M
0.5M/6.5M
0.5M/6.5M
0.5M/6.5M
Memory Status
No. of
Stored
Barcodes

KDC User YOUR KDC
58
Free
Memory
Available
Reset Memory
Memory
(Empties
Data)
Application
Memory
BT Registry
(KDC100
Not use)
Auto Erase
Enabled/
Disabled
Disabled
Disabled
Disabled
Disabled
Disabled
Disabled
Disabled
Disabled
Sleep Timeout
Disabled,
1sec to
10minute(s
)
5 second(s)
5 second(s)
5 second(s)
5 second(s)
5 second(s)
5 second(s)
5 second(s)
5 second(s)
Date / Time
YYYY:MM:
DD &
HH:MM:SS
Battery
% of
Battery
Charge
Available
Version
Firmware
Version &
Serial No.
Button Lock
Enabled/
Disabled
Disabled
Disabled
Disabled
Disabled
Disabled
Disabled
Disabled
Disabled
Beep Alert
/Beep Sound
Enabled/
Disabled
Enabled
Enabled
Enabled
Enabled
Enabled
Enabled
Enabled
Enabled
Beep Alert /Power
On Beep
Enabled/
Disabled
Enabled
Enabled
Enabled
Enabled
Enabled
Enabled
Enabled
Enabled
Beep Alert /Beep On
Connect
Enabled/
Disabled
Enabled
Enabled
Enabled
Enabled
Enabled
Enabled
Enabled
Enabled
Beep Alert /Beep On
Scan
Enabled/
Disabled
Enabled
Enabled
Enabled
Enabled
Enabled
Enabled
Enabled
Enabled
Beep Volume
Low/High
Low
Low
Low
Low
Low
Low
Low
Low
Mfi
( i-chip installed)
Enabled/Di
sabled
Enabled
Enabled
N/A
Enabled
Enabled
Enabled
Enabled
Enabled
Vibrator
Enabled/
Disabled/
Config
Disabled
Disabled
N/A
N/A
N/A
N/A
Disabled
Disabled
Auto Exit
Enabled/
Disabled
N/A
N/A
Enabled
Enabled
Enabled
Enabled
Enabled
Enabled
Port Status
Enabled/
Disabled
N/A
N/A
Enabled
Enabled
Enabled
Enabled
Enabled
Enabled
Display Format
Time &
Battery /
Type &
Time /
Type &
Battery /
Memory
Status /
GPS
Data(KDC2
50
only)/Barc
ode Only/
Graphic
N/A
N/A
Time &
Battery
Time &
Battery
Time &
Battery
Time &
Battery
Time &
Battery
Time &
Battery
Menu Barcode
Enabled/
Disabled
N/A
Disabled
N/A
N/A
N/A
Disabled
N/A
Disabled
Scrolling
Enabled/
Disabled
N/A
N/A
Enabled
Enabled
Enabled
Enabled
Enabled
Enabled
Brightness
1 to 15
level(8
level)
N/A
N/A
8 level
8 level
8 level
8 level
8 level
8 level
Keypad
Enabled/
Disabled
N/A
N/A
N/A
N/A
N/A
N/A
Enabled
Enabled
Language
(FW Version 3.x only)
None/
US(English
)/
French/
Italian/
Spanish/
Korean/
Japanese
N/A
N/A
None
None
None
None
None
None
Factory Default
Restores
Default
Settings
MSR Config
Data Format
MSR Data
Only
N/A
N/A
N/A
N/A
N/A
N/A
N/A
N/A
Packet
Data
N/A
N/A
N/A
N/A
N/A
N/A
N/A
N/A

KDC User YOUR KDC
59
Use Track1
Enabled/
Disabled
N/A
N/A
N/A
N/A
N/A
N/A
N/A
N/A
Use Track2
Enabled/
Disabled
N/A
N/A
N/A
N/A
N/A
N/A
N/A
N/A
UseTrack3
Enabled/
Disabled
N/A
N/A
N/A
N/A
N/A
N/A
N/A
N/A
Beep on error
reading
Enabled/
Disabled
N/A
N/A
N/A
N/A
N/A
N/A
N/A
N/A
Encrypt MSR Data
Enabled/
Disabled
N/A
N/A
N/A
N/A
N/A
N/A
N/A
N/A
AES Key Length
128bit/192
bit/256bit
N/A
N/A
N/A
N/A
N/A
N/A
N/A
N/A
Card Type
ISO/OTHE
R 1/AAMVA
N/A
N/A
N/A
N/A
N/A
N/A
N/A
N/A
Track Separator
None/Spa
ce/Comm
a/Semicol
on/CR/LF/
CR&LF/Ta
b
N/A
N/A
N/A
N/A
N/A
N/A
N/A
N/A
Attach Start/End
Sentinel
N/A
N/A
N/A
N/A
N/A
N/A
N/A
N/A
Partial Data Start
Position
N/A
N/A
N/A
N/A
N/A
N/A
N/A
N/A
Partial Data Length
N/A
N/A
N/A
N/A
N/A
N/A
N/A
N/A
Partial Data Action
Erase/
Select
N/A
N/A
N/A
N/A
N/A
N/A
N/A
N/A
WIFI Config
Power
N/A
N/A
N/A
N/A
N/A
N/A
Enable
Enable
AP
SSID
N/A
N/A
N/A
N/A
N/A
N/A
Empty
Empty
Passcode
N/A
N/A
N/A
N/A
N/A
N/A
Empty
Empty
Server
IP Address
N/A
N/A
N/A
N/A
N/A
N/A
0.0.0.0
0.0.0.0
Server
URL
Address
N/A
N/A
N/A
N/A
N/A
N/A
Empty
Empty
Server
Port
Number
N/A
N/A
N/A
N/A
N/A
N/A
80
80
Server >
Protocol
UDP/TCP/
HTTP GET/
HTTP Post
N/A
N/A
N/A
N/A
N/A
N/A
HTTP Post
HTTP Post
Server > SSL
Enabled/
Disabled
N/A
N/A
N/A
N/A
N/A
N/A
Disabled
Disabled
Server
Server
Page
N/A
N/A
N/A
N/A
N/A
N/A
Empty
Empty
Resp. Timeout
1/2/3/4/5/
6/7/8/9/10
sec
N/A
N/A
N/A
N/A
N/A
N/A
10 sec
10 sec
Connect
Connectin
g to AP
N/A
N/A
N/A
N/A
N/A
N/A
Auto Connect
Enabled/
Disabled
N/A
N/A
N/A
N/A
N/A
N/A
Disabled
Disabled
Send Stored
Enabled/
Disabled
N/A
N/A
N/A
N/A
N/A
N/A
Enabled
Enabled
Version
APP
MAC
N/A
N/A
N/A
N/A
N/A
N/A

KDC User YOUR KDC
60
Top Menu
Sub Menu
Options
KDC410/
411
KDC415
KDC420/
421
KDC425
KDC430
KDC450
KDC500L
KDC500C
KDC Mode
Normal
Default
Default
Default
Default
Default
Default
N/A
N/A
Application
N/A
N/A
N/A
N/A
N/A
N/A
N/A
N/A
View Data
View/Delete
N/A
N/A
N/A
N/A
N/A
N/A
View/Delete
Data
View/Delete
Data
Set Barcodes
(410/411/415
/500L)
EAN13
Enabled/
Disabled
Enabled
Enabled
N/A
N/A
N/A
N/A
Enabled
N/A
EAN8
Enabled/
Disabled
Enabled
Enabled
N/A
N/A
N/A
N/A
Enabled
N/A
UPCA
Enabled/
Disabled
Enabled
Enabled
N/A
N/A
N/A
N/A
Enabled
N/A
UPCE
Enabled/
Disabled
Enabled
Enabled
N/A
N/A
N/A
N/A
Enabled
N/A
CODE39
Enabled/
Disabled
Enabled
Enabled
N/A
N/A
N/A
N/A
Enabled
N/A
ITF14
Enabled/
Disabled
Enabled
Enabled
N/A
N/A
N/A
N/A
Enabled
N/A
CODE128
Enabled/
Disabled
Enabled
Enabled
N/A
N/A
N/A
N/A
Enabled
N/A
I2of5
Enabled/
Disabled
Enabled
Enabled
N/A
N/A
N/A
N/A
Enabled
N/A
CODABAR
Enabled/
Disabled
Enabled
Enabled
N/A
N/A
N/A
N/A
Enabled
N/A
GS1-128
Enabled/
Disabled
Enabled
Enabled
N/A
N/A
N/A
N/A
Enabled
N/A
CODE93
Enabled/
Disabled
Enabled
Enabled
N/A
N/A
N/A
N/A
Enabled
N/A
CODE35
Enabled/
Disabled
Enabled
Enabled
N/A
N/A
N/A
N/A
Enabled
N/A
BooklandEAN
Enabled/
Disabled
Disabled
Disabled
N/A
N/A
N/A
N/A
Disabled
N/A
EAN13withAddon
Enabled/
Disabled
Disabled
Disabled
N/A
N/A
N/A
N/A
Disabled
N/A
EAN8withAddon
Enabled/
Disabled
Disabled
Disabled
N/A
N/A
N/A
N/A
Disabled
N/A
UPCAwithAddon
Enabled/
Disabled
Disabled
Disabled
N/A
N/A
N/A
N/A
Disabled
N/A
UPCEwithAddon
Enabled/
Disabled
Disabled
Disabled
N/A
N/A
N/A
N/A
Disabled
N/A
Set Barcodes
(420/421/425
/450/500C)
1D Symbology
Codabar
N/A
N/A
Enabled
Enabled
N/A
Enabled
N/A
Enabled
Code 11
N/A
N/A
Enabled
Enabled
N/A
Enabled
N/A
Enabled
Code 32
N/A
N/A
Enabled
Enabled
N/A
Enabled
N/A
Enabled
Code 39
N/A
N/A
Enabled
Enabled
N/A
Enabled
N/A
Enabled
Code 93
N/A
N/A
Enabled
Enabled
N/A
Enabled
N/A
Enabled
Code 128
N/A
N/A
Enabled
Enabled
N/A
Enabled
N/A
Enabled
EAN-8
N/A
N/A
Enabled
Enabled
N/A
Enabled
N/A
Enabled
EAN-13
N/A
N/A
Enabled
Enabled
N/A
Enabled
N/A
Enabled
GS1
Composit
N/A
N/A
Enabled
Enabled
N/A
Enabled
N/A
Enabled
I2of5
N/A
N/A
Enabled
Enabled
N/A
Enabled
N/A
Enabled
Matrix 2of5
N/A
N/A
Enabled
Enabled
N/A
Enabled
N/A
Enabled
MSI
N/A
N/A
Enabled
Enabled
N/A
Enabled
N/A
Enabled
Plessey
N/A
N/A
Enabled
Enabled
N/A
Enabled
N/A
Enabled
PosiCode
N/A
N/A
Enabled
Enabled
N/A
Enabled
N/A
Enabled
GS1 Omni
N/A
N/A
Enabled
Enabled
N/A
Enabled
N/A
Enabled
GS1
Limited
N/A
N/A
Enabled
Enabled
N/A
Enabled
N/A
Enabled
GS1
Expanded
N/A
N/A
Enabled
Enabled
N/A
Enabled
N/A
Enabled
S2of5 Ind
N/A
N/A
Enabled
Enabled
N/A
Enabled
N/A
Enabled
S2of5 IATA
N/A
N/A
Enabled
Enabled
N/A
Enabled
N/A
Enabled
TLC39
N/A
N/A
Enabled
Enabled
N/A
Enabled
N/A
Enabled
Telepen
N/A
N/A
Enabled
Enabled
N/A
Enabled
N/A
Enabled
Trioptic
N/A
N/A
Enabled
Enabled
N/A
Enabled
N/A
Enabled
UPCA
N/A
N/A
Enabled
Enabled
N/A
Enabled
N/A
Enabled
UPCE0
N/A
N/A
Enabled
Enabled
N/A
Enabled
N/A
Enabled
UPCE1
N/A
N/A
Enabled
Enabled
N/A
Enabled
N/A
Enabled
2D Symbology
AztecCode
N/A
N/A
Enabled
Enabled
N/A
Enabled
N/A
Enabled
AztecRune
s
N/A
N/A
Enabled
Enabled
N/A
Enabled
N/A
Enabled
Codablock
F
N/A
N/A
Enabled
Enabled
N/A
Enabled
N/A
Enabled
Code16K
N/A
N/A
Enabled
Enabled
N/A
Enabled
N/A
Enabled
Code49
N/A
N/A
Enabled
Enabled
N/A
Enabled
N/A
Enabled

KDC User YOUR KDC
61
DataMatrix
N/A
N/A
Enabled
Enabled
N/A
Enabled
N/A
Enabled
MaxiCode
N/A
N/A
Enabled
Enabled
N/A
Enabled
N/A
Enabled
MicroPDF
N/A
N/A
Enabled
Enabled
N/A
Enabled
N/A
Enabled
PDF417
N/A
N/A
Enabled
Enabled
N/A
Enabled
N/A
Enabled
QRCode
N/A
N/A
Enabled
Enabled
N/A
Enabled
N/A
Enabled
HanXin
Code
N/A
N/A
Enabled
Enabled
N/A
Enabled
N/A
Enabled
Postal Codes
Postnet
N/A
N/A
Enabled
Enabled
N/A
Enabled
N/A
Enabled
PlanetCod
e
N/A
N/A
Enabled
Enabled
N/A
Enabled
N/A
Enabled
UK Post
N/A
N/A
Enabled
Enabled
N/A
Enabled
N/A
Enabled
Mayada
Post
N/A
N/A
Enabled
Enabled
N/A
Enabled
N/A
Enabled
Kix Post
N/A
N/A
Enabled
Enabled
N/A
Enabled
N/A
Enabled
Australia
Post
N/A
N/A
Enabled
Enabled
N/A
Enabled
N/A
Enabled
Japan Post
N/A
N/A
Enabled
Enabled
N/A
Enabled
N/A
Enabled
China Post
N/A
N/A
Enabled
Enabled
N/A
Enabled
N/A
Enabled
Korea Post
N/A
N/A
Enabled
Enabled
N/A
Enabled
N/A
Enabled
OCR
OCR Off
N/A
N/A
Enabled
Enabled
N/A
Enabled
N/A
Enabled
OCR A
N/A
N/A
Disabled
Disabled
N/A
Disabled
N/A
Disabled
OCR B
N/A
N/A
Disabled
Disabled
N/A
Disabled
N/A
Disabled
OCR USC
N/A
N/A
Disabled
Disabled
N/A
Disabled
N/A
Disabled
OCR MICR
N/A
N/A
Disabled
Disabled
N/A
Disabled
N/A
Disabled
OCR SEMI
N/A
N/A
Disabled
Disabled
N/A
Disabled
N/A
Disabled
Barcode
Options
(410/411/415
/500L)
CodaBar_NoStartSt
opChars
Enabled/
Disabled
Disabled
Disabled
N/A
N/A
N/A
N/A
Disabled
N/A
UPCE_as_UPCA
Enabled/
Disabled
Disabled
Disabled
N/A
N/A
N/A
N/A
Disabled
N/A
EAN8_as_EAN13
Enabled/
Disabled
Disabled
Disabled
N/A
N/A
N/A
N/A
Disabled
N/A
UPCE_as_EAN13
Enabled/
Disabled
Disabled
Disabled
N/A
N/A
N/A
N/A
Disabled
N/A
ReturnCheckDigit
Enabled/
Disabled
Disabled
Disabled
N/A
N/A
N/A
N/A
Disabled
N/A
VerifyCheckDigit
Enabled/
Disabled
Disabled
Disabled
N/A
N/A
N/A
N/A
Disabled
N/A
UPCA_as_EAN13
Enabled/
Disabled
Disabled
Disabled
N/A
N/A
N/A
N/A
Disabled
N/A
I2of5_VerifyCheckDi
git
Enabled/
Disabled
Disabled
Disabled
N/A
N/A
N/A
N/A
Disabled
N/A
Code39_VerifyChec
kDigit
Enabled/
Disabled
Disabled
Disabled
N/A
N/A
N/A
N/A
Disabled
N/A
I2of5_ReturnCheck
Digit
Enabled/
Disabled
Disabled
Disabled
N/A
N/A
N/A
N/A
Disabled
N/A
Code39_ReturnChe
ckDigit
Enabled/
Disabled
Disabled
Disabled
N/A
N/A
N/A
N/A
Disabled
N/A
UPCE_ReturnCheck
Digit
Enabled/
Disabled
Enabled
Enabled
N/A
N/A
N/A
N/A
Enabled
N/A
UPCA_ReturnCheck
Digit
Enabled/
Disabled
Enabled
Enabled
N/A
N/A
N/A
N/A
Enabled
N/A
EAN8_ReturnCheck
Digit
Enabled/
Disabled
Enabled
Enabled
N/A
N/A
N/A
N/A
Enabled
N/A
EAN13_ReturnChec
kDigit
Enabled/
Disabled
Enabled
Enabled
N/A
N/A
N/A
N/A
Enabled
N/A
Barcode
Options
(KDC420/425
/450/500C)
Codabar
Tx
StartStop
(Enabled/
Disabled)
N/A
N/A
Disabled
Disabled
N/A
Disabled
N/A
Disabled
Check
Digit
(DoNotVeri
fy/VerfyDO
NotTX/Veri
fyDoTx)
N/A
N/A
DoNotVerify
DoNotVerify
N/A
DoNotVerify
N/A
DoNotVerify
Concatena
te(Disable
d/Enabled/
Required)
N/A
N/A
Enabled
Enabled
N/A
Enabled
N/A
Enabled
Code39
Tx
StartStop
(Enabled/
Disabled)
N/A
N/A
Disabled
Disabled
N/A
Disabled
N/A
Disabled
Check
Digit(DoNo
tVerify/Verf
yDONotTX
/VerifyDoT
x)
N/A
N/A
DoNotVerify
DoNotVerify
N/A
DoNotVerify
N/A
DoNotVerify
Append
N/A
N/A
Disabled
Disabled
N/A
Disabled
N/A
Disabled

KDC User YOUR KDC
62
(Enabled/
Disabled)
Full
ASCII(Enab
led/Disabl
ed)
N/A
N/A
Disabled
Disabled
N/A
Disabled
N/A
Disabled
I2of5
Check
Digit
(DoNotVeri
fy/VerfyDO
NotTX/Veri
fyDoTx)
N/A
N/A
DoNotVerify
DoNotVerify
N/A
DoNotVerify
N/A
DoNotVerify
Code11
Check
Digit
(2 digits/1
digit)
N/A
N/A
2 digits
2 digits
N/A
2 digits
N/A
2 digits
Code128
Concatena
te(Disable
d/Enabled)
N/A
N/A
Disabled
Disabled
N/A
Disabled
N/A
Disabled
Telepen
Output(Ori
ginal/AIM)
N/A
N/A
AIM
AIM
N/A
AIM
N/A
AIM
UPCA
VerifyChkD
gt(Enabled
/Disabled)
N/A
N/A
Enabled
Enabled
N/A
Enabled
N/A
Enabled
NumberSy
s(Enabled/
Disabled)
N/A
N/A
Enabled
Enabled
N/A
Enabled
N/A
Enabled
2DgtAdden
da(Enable
d/Disabled
)
N/A
N/A
Disabled
Disabled
N/A
Disabled
N/A
Disabled
5DgtAdden
da(Enable
d/Disabled
)
N/A
N/A
Disabled
Disabled
N/A
Disabled
N/A
Disabled
Req.
Addenda
(Enabled/
Disabled)
N/A
N/A
Disabled
Disabled
N/A
Disabled
N/A
Disabled
Sep.
Addenda
(Enabled/
Disabled)
N/A
N/A
Enabled
Enabled
N/A
Enabled
N/A
Enabled
Coupon
Code
(Enabled/
Disabled)
N/A
N/A
Enabled
Enabled
N/A
Enabled
N/A
Enabled
UPCE
Expand
(Enabled/
Disabled)
N/A
N/A
Disabled
Disabled
N/A
Disabled
N/A
Disabled
Req.
Addenda
(Enabled/
Disabled)
N/A
N/A
Disabled
Disabled
N/A
Disabled
N/A
Disabled
Sep.
Addenda
(Enabled/
Disabled)
N/A
N/A
Enabled
Enabled
N/A
Enabled
N/A
Enabled
Check
Digit
(Enabled/
Disabled)
N/A
N/A
Enabled
Enabled
N/A
Enabled
N/A
Enabled
NumberSy
s(Enabled/
Disabled)
N/A
N/A
Enabled
Enabled
N/A
Enabled
N/A
Enabled
2DgtAdden
da(Enable
d/Disabled
)
N/A
N/A
Disabled
Disabled
N/A
Disabled
N/A
Disabled
5DgtAdden
da(Enable
d/Disabled
)
N/A
N/A
Disabled
Disabled
N/A
Disabled
N/A
Disabled
EAN-13
VerifyChkD
gt(Enabled
/Disabled)
N/A
N/A
Enabled
Enabled
N/A
Enabled
N/A
Enabled
2DgtAdden
da(Enable
d/Disabled
)
N/A
N/A
Disabled
Disabled
N/A
Disabled
N/A
Disabled
5DgtAdden
da(Enable
d/Disabled
)
N/A
N/A
Disabled
Disabled
N/A
Disabled
N/A
Disabled
Req.
Addenda
N/A
N/A
Disabled
Disabled
N/A
Disabled
N/A
Disabled

KDC User YOUR KDC
63
(Enabled/
Disabled)
Sep.
Addenda
(Enabled/
Disabled)
N/A
N/A
Enabled
Enabled
N/A
Enabled
N/A
Enabled
ISBN
Trans.
(Enabled/
Disabled)
N/A
N/A
Disabled
Disabled
N/A
Disabled
N/A
Disabled
EAN-8
VerifyChkD
gt(Enabled
/Disabled)
N/A
N/A
Enabled
Enabled
N/A
Enabled
N/A
Enabled
2DgtAdden
da(Enable
d/Disabled
)
N/A
N/A
Disabled
Disabled
N/A
Disabled
N/A
Disabled
5DgtAdden
da(Enable
d/Disabled
)
N/A
N/A
Disabled
Disabled
N/A
Disabled
N/A
Disabled
Req.
Addenda
(Enabled/
Disabled)
N/A
N/A
Disabled
Disabled
N/A
Disabled
N/A
Disabled
Sep.
Addenda
(Enabled/
Disabled)
N/A
N/A
Enabled
Enabled
N/A
Enabled
N/A
Enabled
MSI
Tx
CheckChar
(Enabled/
Disabled)
N/A
N/A
Disabled
Disabled
N/A
Disabled
N/A
Disabled
PosiCode
A and
B/A&B
LimitedA/A
&B
LimitedB
N/A
N/A
A&B
LimitedB
A&B
LimitedB
N/A
A&B
LimitedB
N/A
A&B
LimitedB
GS1
UPCEAN
Ver.(Enabl
ed/Disable
d)
N/A
N/A
Disabled
Disabled
N/A
Disabled
N/A
Disabled
GS1
Emulation
(No
Emulate/
GS1 128
Emul/GS1
Emulate)
N/A
N/A
No Emulate
No Emulate
N/A
No Emulate
N/A
No Emulate
PostNet
Tx
CheckChar
(Enabled/
Disabled)
N/A
N/A
Disabled
Disabled
N/A
Disabled
N/A
Disabled
PlanetCode
Tx
CheckChar
(Enabled/
Disabled)
N/A
N/A
Disabled
Disabled
N/A
Disabled
N/A
Disabled
Scan Options
Power
Enabled/
Disabled
N/A
N/A
N/A
N/A
N/A
N/A
Disabled
Disabled
Scan Angle
Narrow/
Wide
Wide
Wide
N/A
N/A
N/A
N/A
N/A
N/A
Filter
Normal/
High
Normal
Normal
N/A
N/A
N/A
N/A
N/A
N/A
Time Out
.5 seconds
to 10
seconds
2 second(s)
2 second(s)
2 second(s)
2 second(s)
N/A
2 second(s)
2 second(s)
2 second(s)
Min. Barcode
Length
2 to 36
characters
4 chars
4 chars
N/A
N/A
N/A
N/A
4 chars
N/A
Min. Barcode
Length
2 to 48
characters
N/A
N/A
4 chars
4 chars
N/A
4 chars
N/A
4 chars
Security Level
1 to 4 level
2 level
2 level
N/A
N/A
N/A
N/A
N/A
N/A
Image Capture
Enabled/
Disabled
N/A
N/A
Disabled
Disabled
N/A
Disabled
N/A
N/A
Auto Trigger
Enabled/
Disabled
Disabled
Disabled
Disabled
Disabled
N/A
Disabled
Disabled
Disabled
Reread Delay
Continuou
s, Short,
Medium,
Long, Extra
Long
Medium
Medium
Medium
Medium
N/A
Medium
Medium
Medium
Finger Trigger
Enabled/Di
sabled
N/A
N/A
N/A
N/A
N/A
N/A
N/A
N/A
Partial Display
Start
Position
N/A
N/A
N/A
N/A
N/A
N/A
1
1
No. of
Char(s)
N/A
N/A
N/A
N/A
N/A
N/A
0 chars
0 chars

KDC User YOUR KDC
64
Action
N/A
N/A
N/A
N/A
N/A
N/A
Select
Select
Data Process
Wedge / Store
Wedge Onl
y
Wedge &
Store
Always
Default
Default
Default
Default
Default
Default
Default
Default
Store Only
Save if
Sent
Save if Not
Sent
Data Format
Barcode
only
Default
Default
Default
Default
N/A
Default
Packet
Data
Default
Default
Data Editor/Prefix
Data Editor/Suffix
Data Editor/AIM ID
None/In
Prefix/In
Suffix
None
None
None
None
N/A
None
None
None
Data Editor/Partial
Data
Start
Position
1
1
1
1
N/A
1
1
1
No. of
Char(s)
0 chars
0 chars
0 chars
0 chars
N/A
0 chars
0 chars
0 chars
Action
Select
Select
Select
Select
N/A
Select
Select
Select
Handshake
Enable/
Disabled
Disabled
Disabled
Disabled
Disabled
N/A
Disabled
N/A
N/A
Terminator
None, CR,
LF, CR+LF,
Tab, Right
Arrow, Left
Arrow,Dow
n Arrow,
Up Arrow
CR+LF
CR+LF
CR+LF
CR+LF
CR+LF
CR+LF
CR+LF
CR+LF
Chk Duplicate
Enabled/
Disabled
Disabled
Disabled
Disabled
Disabled
N/A
Disabled
Disabled
Disabled
Enter Key
Enabled/
Disabled
N/A
N/A
N/A
N/A
N/A
N/A
Disabled
Disabled
Extend Key
Enabled/
Disabled
N/A
N/A
N/A
N/A
N/A
N/A
Disabled
Disabled
Age Verify
Verification
Enabled/
Disabled
N/A
N/A
Disabled
Disabled
N/A
Disabled
N/A
N/A
Age
Default
N/A
N/A
21
21
N/A
21
N/A
N/A
BT Config
ConnectDevice
(Non Mfi mode)
SPP
Default
Default
Default
Default
Default
Default
N/A
N/A
HID iOS
N/A
N/A
SPP2.0
N/A
N/A
HID
normal
N/A
N/A
ConnectDevice
(Mfi mode )
SPP
MFi
Default
Default
Default
Default
Default
Default
Default
Default
Auto Connect
Enabled
/Disabled
Disabled
Disabled
Disabled
Disabled
Disabled
Disabled
N/A
N/A
Auto Reconnect
Enabled/
Disabled
Disabled
Disabled
Disabled
Disabled
Disabled
Disabled
Disabled
Disabled
Auto Power On
Enabled/
Disabled
Disabled
Disabled
Disabled
Disabled
Disabled
Disabled
Disabled
Disabled
Auto Power
On/Power On Time
disabled,
1sec to
10second(
s)
Disabled
Disabled
Disabled
Disabled
Disabled
Disabled
N/A
N/A
Auto Power Off
Enabled/
Disabled
Disabled
Disabled
Disabled
Disabled
Disabled
Disabled
N/A
N/A
Auto Power
Off/Beep Warning
Enabled/
Disabled
Disabled
Disabled
Disabled
Disabled
Disabled
Disabled
N/A
N/A
Auto Power
Off/Power Off Time
1 to 30
minutes
Disabled
Disabled
Disabled
Disabled
Disabled
Disabled
N/A
N/A
PowerOff Msg
Enabled/Di
sabled
Disabled
Disabled
Disabled
Disabled
Disabled
Disabled
N/A
N/A
MAC Address
12
Characters
Bluetooth
MAC
Address
BT FW Version
v1.2.xrt
Bluetooth
Firmware
Version
Wakeup Nulls
Enabled/Di
sabled
Disabled
Disabled
Disabled
Disabled
Disabled
Disabled
N/A
N/A

KDC User YOUR KDC
65
Connect Alert
Enabled/Di
sabled
N/A
N/A
N/A
N/A
N/A
N/A
N/A
N/A
BT Toggle
Enabled/Di
sabled
Enabled
Enabled
Enabled
Enabled
Enabled
Enabled
N/A
N/A
DisconnectBtn
Enabled/Di
sabled
Disabled
Disabled
Disabled
Disabled
Disabled
Disabled
N/A
N/A
HID AutoLock
disabled,1,
2,3,4,5,10,1
5 minutes
1 minutes
1 minutes
1 minutes
1 minutes
1 minutes
1 minutes
N/A
N/A
HID Keyboard
US,Germa
n,French
,Italian,Spa
nish
US
US
US
US
US
US
N/A
N/A
HID Delay/Initial
Disabled,
1,2,3,5,10
secs
Disabled
Disabled
Disabled
Disabled
Disabled
Disabled
N/A
N/A
HID Delay/Inter
char
Disabled,1
0, 20, 30,
50,
100msec
Disabled
Disabled
Disabled
Disabled
Disabled
Disabled
N/A
N/A
HID Ctrl Char
Disabled,
Alt+Numpa
d,
^+Charact
er, Replace
to |
Disabled
Disabled
Disabled
Disabled
Disabled
Disabled
N/A
N/A
BT Service
Power
Enabled/
Disabled
Enabled
Enabled
Enabled
Enabled
Enabled
Enabled
Enabled
Enabled
Pairing
Pairing
neighborin
g
Bluetooth
devices
Discovering
Discoverin
g
neighborin
g
Bluetooth
devices
N/A
N/A
Connecting to
View
Connect to
Bluetooth
device
Disconnect
N/A
N/A
N/A
N/A
N/A
N/A
HID Sync
N/A
N/A
Auto Pairing
Enabled/
Disabled
Enabled
Enabled
Enabled
Enabled
Enabled
Enabled
Enabled
Enabled
USB Config
(M model)
USB Mode
Disabled/
USB Disk/
USB HID
N/A
N/A
N/A
N/A
N/A
N/A
N/A
N/A
NFC Config
(N model)
NFC Power
Enabled/
Disabled
Enabled
Enabled
Enabled
Enabled
N/A
N/A
Disabled
Disabled
Data Format
Barcode
only/Packe
t Data
Packet Data
Packet Data
Packet Data
Packet Data
N/A
N/A
N/A
N/A
UID Only
Enabled/
Disabled
N/A
N/A
N/A
Disabled
N/A
N/A
N/A
N/A
GPS Config
(G model)
GPS Power
Disabled
N/A
N/A
N/A
N/A
N/A
N/A
N/A
N/A
Power Mode
Normal/Po
wer Save
N/A
N/A
N/A
N/A
N/A
N/A
N/A
N/A
Bypass Data
Enabled/
Disabled
N/A
N/A
N/A
N/A
N/A
N/A
N/A
N/A
Acqurie Test
N/A
N/A
N/A
N/A
N/A
N/A
N/A
N/A
Reset GPS
N/A
N/A
N/A
N/A
N/A
N/A
N/A
N/A
System
Config
Memory Size(KDC5
00)
0.5/2.5, 1/2,
2/1, 3/0
N/A
N/A
N/A
N/A
N/A
N/A
0.5/2.5
0.5/2.5
Memory Status
No. of
Stored
Barcodes
N/A
N/A
N/A
N/A
N/A
N/A
Free
Memory
Available
N/A
N/A
N/A
N/A
N/A
N/A
Reset Memory
Memory
(Empties
Data)
N/A
N/A
N/A
N/A
N/A
N/A
Application
Memory
N/A
N/A
N/A
N/A
N/A
N/A
N/A
N/A
BT Registry
(KDC100
Not use)
N/A
N/A
N/A
N/A
N/A
N/A
N/A
N/A
Auto Erase
Enabled/
Disabled
Enabled
Enabled
Enabled
Enabled
Enabled
Enabled
Enabled
Enabled
Sleep Timeout
Disabled,
1sec to
5 second(s)
5 second(s)
5 second(s)
5 second(s)
5 second(s)
5 second(s)
5 second(s)
5 second(s)

KDC User YOUR KDC
66
10minute(s
)
Date / Time
YYYY:MM:
DD &
HH:MM:SS
N/A
N/A
N/A
N/A
N/A
N/A
N/A
N/A
Battery
% of
Battery
Charge
Available
N/A
N/A
N/A
N/A
N/A
N/A
Version
Firmware
Version &
Serial No.
N/A
N/A
N/A
N/A
N/A
N/A
Button Lock
Enabled/
Disabled
N/A
N/A
N/A
N/A
N/A
N/A
N/A
N/A
Beep Alert
/Beep Sound
Enabled/
Disabled
Enabled
Enabled
Enabled
Enabled
Enabled
Enabled
Enabled
Enabled
Beep Alert /Power
On Beep
Enabled/
Disabled
Enabled
Enabled
Enabled
Enabled
Enabled
Enabled
Enabled
Enabled
Beep Alert /Beep
On Connect
Enabled/
Disabled
Enabled
Enabled
Enabled
Enabled
Enabled
Enabled
Enabled
Enabled
Beep Alert /Beep
On Scan
Enabled/
Disabled
Enabled
Enabled
Enabled
Enabled
Enabled
Enabled
Enabled
Enabled
Beep Alert
/BeepOnMSCard
Enabled/
Disabled
N/A
N/A
N/A
N/A
N/A
N/A
Enabled
Enabled
Beep Alert
/BeepOnICCard
Enabled/
Disabled
N/A
N/A
N/A
N/A
N/A
N/A
Enabled
Enabled
Beep Alert
/BeepOnNFCCard
Enabled/
Disabled
N/A
N/A
N/A
N/A
N/A
N/A
Enabled
Enabled
Beep Volume
Low/High
Low
Low
Low
Low
Low
Low
Low
Low
Mfi
( i-chip installed)
Enabled/Di
sabled
Enabled
Enabled
Enabled
Enabled
Enabled
Enabled
N/A
N/A
Auto Exit
Enabled/
Disabled
N/A
N/A
N/A
N/A
N/A
N/A
Enabled
Enabled
Port Status
Enabled/
Disabled
N/A
N/A
N/A
N/A
N/A
N/A
Enabled
Enabled
Display Format
Time &
Battery /
Type &
Time /
Type &
Battery /
Memory
Status /
GPS
Data(KDC2
50
only)/Barc
ode Only
N/A
N/A
N/A
N/A
N/A
N/A
Time &
Battery
Time &
Battery
Menu Barcode
Enabled/
Disabled
N/A
N/A
Disabled
Disabled
N/A
Disabled
Disabled
Disabled
Scrolling
Enabled/
Disabled
N/A
N/A
N/A
N/A
N/A
N/A
N/A
N/A
Brightness
1 to 15
level(8
level)
N/A
N/A
N/A
N/A
N/A
N/A
8
8
Keypad
Enabled/
Disabled
N/A
N/A
N/A
N/A
N/A
N/A
Disabled
Disabled
Language
US(English
)/
Korean/
Japanese
N/A
N/A
N/A
N/A
N/A
N/A
US(English)
US(English)
Factory Default
Restores
Default
Settings
MSR Config
Power
Enabled/
Disabled /
N/A
N/A
N/A
N/A
N/A
N/A
Disabled
Disabled
Data Format
MSR Data
Only
N/A
Default
N/A
Default
Default
N/A
N/A
N/A
Packet
Data
N/A
N/A
N/A
N/A
N/A
Use Track1
Enabled/
Disabled
N/A
Enabled
N/A
Enabled
Enabled
N/A
Enabled
Enabled
Use Track2
Enabled/
Disabled
N/A
Enabled
N/A
Enabled
Enabled
N/A
Enabled
Enabled
Use Track3
Enabled/
Disabled
N/A
Enabled
N/A
Enabled
Enabled
N/A
Enabled
Enabled
Null Check Track1
Enabled/
Disabled
N/A
N/A
N/A
N/A
N/A
N/A
Disabled
Disabled
Null Check Track2
Enabled/
Disabled
N/A
N/A
N/A
N/A
N/A
N/A
Enabled
Enabled
Null Check Track3
Enabled/
Disabled
N/A
N/A
N/A
N/A
N/A
N/A
Disabled
Disabled
Beep on error
reading
Enabled/
Disabled
N/A
Disabled
N/A
Disabled
Disabled
N/A
Enabled
Enabled
Encrypt MSR Data
Enabled/
N/A
Disabled
N/A
Disabled
Disabled
N/A
N/A
N/A

KDC User YOUR KDC
67
Disabled
AES Key Length
128bit/192
bit/256bit
N/A
128bit
N/A
128bit
N/A
N/A
N/A
N/A
Card Type
ISO/OTHE
R 1/AAMVA
N/A
ISO
N/A
ISO
ISO
N/A
ISO
ISO
Track Separator
None/Spa
ce/Comm
a/Semicol
on/CR/LF/
CR&LF/Ta
b
N/A
None
N/A
None
None
N/A
N/A
N/A
Attach Start/End
Sentinel
N/A
Enabled
N/A
Enabled
Enabled
N/A
Enabled
Enabled
Partial Data Start
Position
N/A
1
N/A
1
1
N/A
N/A
N/A
Partial Data Length
N/A
0
N/A
0
0
N/A
N/A
N/A
Partial Data Action
Erase/
Select
N/A
Select
N/A
Select
Select
N/A
N/A
N/A
ICCR Config
Power
Enabled/
Disabled /
N/A
N/A
N/A
N/A
N/A
N/A
Disabled
Disabled
IFD Number
N/A
N/A
N/A
N/A
N/A
N/A
Config Number
N/A
N/A
N/A
N/A
N/A
N/A
Key Mgmt
Stored Keys
N/A
N/A
N/A
N/A
N/A
N/A
Inject Keys
N/A
N/A
N/A
N/A
N/A
N/A
Sensitive/
Set
Date/Time
Date
N/A
N/A
N/A
N/A
N/A
N/A
Time
N/A
N/A
N/A
N/A
N/A
N/A
Sensitive/
Set Self-Test
N/A
N/A
N/A
N/A
N/A
N/A
Sensitive/
Set
Passwords
1st Password
N/A
N/A
N/A
N/A
N/A
N/A
2nd Password
N/A
N/A
N/A
N/A
N/A
N/A
Sensitive/
Key Mgmt
Stored Keys
N/A
N/A
N/A
N/A
N/A
N/A
Inject Keys
N/A
N/A
N/A
N/A
N/A
N/A
Clear Keys
N/A
N/A
N/A
N/A
N/A
N/A
Sensitive/
Card Encrypt
Plaintext /
TDES /
AES
N/A
N/A
N/A
N/A
N/A
N/A
AES
AES
UHF
Configuration
(UHF model)
UHF Power
Enabled/
Disabled
N/A
N/A
N/A
N/A
N/A
Disabled
N/A
N/A
Power On Time
500ms/1se
c/1.5sec/2
sec/2.5sec
/3sec/3.5s
ec/4sec/4.
5sec/5sec
N/A
N/A
N/A
N/A
N/A
1 second
N/A
N/A
Power Off Time
500ms/1se
c/1.5sec/2
sec/2.5sec
/3sec/3.5s
ec/4sec/4.
5sec/5sec
N/A
N/A
N/A
N/A
N/A
1.5 second
N/A
N/A
Power Level
0/1/2/3/4/
5/6/7
N/A
N/A
N/A
N/A
N/A
0
N/A
N/A
Data Format
Hexa
Decimal /
Binary
N/A
N/A
N/A
N/A
N/A
Hexa
Decimal
N/A
N/A
Top Menu
Sub Menu
Options
KDC270L
KDC270D
KDC270C
KDC470L
KDC470D
KDC470C
KDC Mode
Normal
Default
Default
Default
Default
Default
Default
Application
Custom
Application
Custom
Application
Custom
Application
N/A
N/A
N/A
View Data
View/Delete
View/
Delete Data
View/
Delete Data
View/
Delete Data
N/A
N/A
N/A
Set Barcodes
(270L/270D/
470L/470D)
EAN13
Enabled/
Disabled
Enabled
Enabled
N/A
Enabled
Enabled
N/A
EAN8
Enabled/
Disabled
Enabled
Enabled
N/A
Enabled
Enabled
N/A
UPCA
Enabled/
Disabled
Enabled
Enabled
N/A
Enabled
Enabled
N/A
UPCE
Enabled/
Disabled
Enabled
Enabled
N/A
Enabled
Enabled
N/A
CODE39
Enabled/
Disabled
Enabled
Enabled
N/A
Enabled
Enabled
N/A
ITF14
Enabled/
Disabled
Enabled
Enabled
N/A
Enabled
Enabled
N/A

KDC User YOUR KDC
68
CODE128
Enabled/
Disabled
Enabled
Enabled
N/A
Enabled
Enabled
N/A
I2of5
Enabled/
Disabled
Enabled
Enabled
N/A
Enabled
Enabled
N/A
CODABAR
Enabled/
Disabled
Enabled
Enabled
N/A
Enabled
Enabled
N/A
GS1-128
Enabled/
Disabled
Enabled
Enabled
N/A
Enabled
Enabled
N/A
CODE93
Enabled/
Disabled
Enabled
Enabled
N/A
Enabled
Enabled
N/A
CODE35
Enabled/
Disabled
Enabled
Enabled
N/A
Enabled
Enabled
N/A
BooklandEAN
Enabled/
Disabled
Disabled
Disabled
N/A
Disabled
Disabled
N/A
EAN13withAddon
Enabled/
Disabled
Disabled
Disabled
N/A
Disabled
Disabled
N/A
EAN8withAddon
Enabled/
Disabled
Disabled
Disabled
N/A
Disabled
Disabled
N/A
UPCAwithAddon
Enabled/
Disabled
Disabled
Disabled
N/A
Disabled
Disabled
N/A
UPCEwithAddon
Enabled/
Disabled
Disabled
Disabled
N/A
Disabled
Disabled
N/A
Set Barcodes
(270C/470C)
1D Symbology
Codabar
N/A
N/A
Enabled
N/A
N/A
Enabled
Code 11
N/A
N/A
Enabled
N/A
N/A
Enabled
Code 32
N/A
N/A
Enabled
N/A
N/A
Enabled
Code 39
N/A
N/A
Enabled
N/A
N/A
Enabled
Code 93
N/A
N/A
Enabled
N/A
N/A
Enabled
Code 128
N/A
N/A
Enabled
N/A
N/A
Enabled
EAN-8
N/A
N/A
Enabled
N/A
N/A
Enabled
EAN-13
N/A
N/A
Enabled
N/A
N/A
Enabled
GS1
Composit
N/A
N/A
Enabled
N/A
N/A
Enabled
I2of5
N/A
N/A
Enabled
N/A
N/A
Enabled
Matrix 2of5
N/A
N/A
Enabled
N/A
N/A
Enabled
MSI
N/A
N/A
Enabled
N/A
N/A
Enabled
Plessey
N/A
N/A
Enabled
N/A
N/A
Enabled
PosiCode
N/A
N/A
Enabled
N/A
N/A
Enabled
GS1 Omni
N/A
N/A
Enabled
N/A
N/A
Enabled
GS1
Limited
N/A
N/A
Enabled
N/A
N/A
Enabled
GS1
Expanded
N/A
N/A
Enabled
N/A
N/A
Enabled
S2of5 Ind
N/A
N/A
Enabled
N/A
N/A
Enabled
S2of5 IATA
N/A
N/A
Enabled
N/A
N/A
Enabled
TLC39
N/A
N/A
Enabled
N/A
N/A
Enabled
Telepen
N/A
N/A
Enabled
N/A
N/A
Enabled
Trioptic
N/A
N/A
Enabled
N/A
N/A
Enabled
UPCA
N/A
N/A
Enabled
N/A
N/A
Enabled
UPCE0
N/A
N/A
Enabled
N/A
N/A
Enabled
UPCE1
N/A
N/A
Enabled
N/A
N/A
Enabled
2D Symbology
AztecCode
N/A
N/A
Enabled
N/A
N/A
Enabled
AztecRune
s
N/A
N/A
Enabled
N/A
N/A
Enabled
Codablock
F
N/A
N/A
Enabled
N/A
N/A
Enabled
Code16K
N/A
N/A
Enabled
N/A
N/A
Enabled
Code49
N/A
N/A
Enabled
N/A
N/A
Enabled
DataMatrix
N/A
N/A
Enabled
N/A
N/A
Enabled
MaxiCode
N/A
N/A
Enabled
N/A
N/A
Enabled
MicroPDF
N/A
N/A
Enabled
N/A
N/A
Enabled
PDF417
N/A
N/A
Enabled
N/A
N/A
Enabled
QRCode
N/A
N/A
Enabled
N/A
N/A
Enabled
HanXin
Code
N/A
N/A
Enabled
N/A
N/A
Enabled
Postal Codes
Postnet
N/A
N/A
Enabled
N/A
N/A
Enabled
PlanetCod
e
N/A
N/A
Enabled
N/A
N/A
Enabled
UK Post
N/A
N/A
Enabled
N/A
N/A
Enabled
Mayada
Post
N/A
N/A
Enabled
N/A
N/A
Enabled
Kix Post
N/A
N/A
Enabled
N/A
N/A
Enabled
Australia
Post
N/A
N/A
Enabled
N/A
N/A
Enabled
Japan Post
N/A
N/A
Enabled
N/A
N/A
Enabled

KDC User YOUR KDC
69
China Post
N/A
N/A
Enabled
N/A
N/A
Enabled
Korea Post
N/A
N/A
Enabled
N/A
N/A
Enabled
OCR
OCR Off
N/A
N/A
Enabled
N/A
N/A
Enabled
OCR A
N/A
N/A
Disabled
N/A
N/A
Disabled
OCR B
N/A
N/A
Disabled
N/A
N/A
Disabled
OCR USC
N/A
N/A
Disabled
N/A
N/A
Disabled
OCR MICR
N/A
N/A
Disabled
N/A
N/A
Disabled
OCR SEMI
N/A
N/A
Disabled
N/A
N/A
Disabled
Barcode
Options
(270L/270D/
470L/470D)
CodaBar_NoStartSt
opChars
Enabled/
Disabled
Disabled
Disabled
N/A
Disabled
Disabled
N/A
UPCE_as_UPCA
Enabled/
Disabled
Disabled
Disabled
N/A
Disabled
Disabled
N/A
EAN8_as_EAN13
Enabled/
Disabled
Disabled
Disabled
N/A
Disabled
Disabled
N/A
UPCE_as_EAN13
Enabled/
Disabled
Disabled
Disabled
N/A
Disabled
Disabled
N/A
ReturnCheckDigit
Enabled/
Disabled
Disabled
Disabled
N/A
Disabled
Disabled
N/A
VerifyCheckDigit
Enabled/
Disabled
Disabled
Disabled
N/A
Disabled
Disabled
N/A
UPCA_as_EAN13
Enabled/
Disabled
Disabled
Disabled
N/A
Disabled
Disabled
N/A
I2of5_VerifyCheckDi
git
Enabled/
Disabled
Disabled
Disabled
N/A
Disabled
Disabled
N/A
Code39_VerifyChec
kDigit
Enabled/
Disabled
Disabled
Disabled
N/A
Disabled
Disabled
N/A
I2of5_ReturnCheck
Digit
Enabled/
Disabled
Disabled
Disabled
N/A
Disabled
Disabled
N/A
Code39_ReturnChe
ckDigit
Enabled/
Disabled
Disabled
Disabled
N/A
Disabled
Disabled
N/A
UPCE_ReturnCheck
Digit
Enabled/
Disabled
Enabled
Enabled
N/A
Enabled
Enabled
N/A
UPCA_ReturnCheck
Digit
Enabled/
Disabled
Enabled
Enabled
N/A
Enabled
Enabled
N/A
EAN8_ReturnCheck
Digit
Enabled/
Disabled
Enabled
Enabled
N/A
Enabled
Enabled
N/A
EAN13_ReturnChec
kDigit
Enabled/
Disabled
Enabled
Enabled
N/A
Enabled
Enabled
N/A
Barcode
Options
(270C/470C)
Codabar
Tx
StartStop
(Enabled/
Disabled)
N/A
N/A
Disabled
N/A
N/A
Disabled
Check
Digit
(DoNotVeri
fy/VerfyDO
NotTX/Veri
fyDoTx)
N/A
N/A
DoNotVerify
N/A
N/A
DoNotVerify
Concatena
te(Disable
d/Enabled/
Required)
N/A
N/A
Enabled
N/A
N/A
Enabled
Code39
Tx
StartStop
(Enabled/
Disabled)
N/A
N/A
Disabled
N/A
N/A
Disabled
Check
Digit(DoNo
tVerify/Verf
yDONotTX
/VerifyDoT
x)
N/A
N/A
DoNotVerify
N/A
N/A
DoNotVerify
Append
(Enabled/
Disabled)
N/A
N/A
Disabled
N/A
N/A
Disabled
Full
ASCII(Enab
led/Disabl
ed)
N/A
N/A
Disabled
N/A
N/A
Disabled
I2of5
Check
Digit
(DoNotVeri
fy/VerfyDO
NotTX/Veri
fyDoTx)
N/A
N/A
DoNotVerify
N/A
N/A
DoNotVerify
Code11
Check
Digit
(2 digits/1
digit)
N/A
N/A
2 digits
N/A
N/A
2 digits
Code128
Concatena
te(Disable
d/Enabled)
N/A
N/A
Disabled
N/A
N/A
Disabled

KDC User YOUR KDC
70
Telepen
Output(Ori
ginal/AIM)
N/A
N/A
AIM
N/A
N/A
AIM
UPCA
VerifyChkD
gt(Enabled
/Disabled)
N/A
N/A
Enabled
N/A
N/A
Enabled
NumberSy
s(Enabled/
Disabled)
N/A
N/A
Enabled
N/A
N/A
Enabled
2DgtAdden
da(Enable
d/Disabled
)
N/A
N/A
Disabled
N/A
N/A
Disabled
5DgtAdden
da(Enable
d/Disabled
)
N/A
N/A
Disabled
N/A
N/A
Disabled
Req.
Addenda
(Enabled/
Disabled)
N/A
N/A
Disabled
N/A
N/A
Disabled
Sep.
Addenda
(Enabled/
Disabled)
N/A
N/A
Enabled
N/A
N/A
Enabled
Coupon
Code
(Enabled/
Disabled)
N/A
N/A
Enabled
N/A
N/A
Enabled
UPCE
Expand
(Enabled/
Disabled)
N/A
N/A
Disabled
N/A
N/A
Disabled
Req.
Addenda
(Enabled/
Disabled)
N/A
N/A
Disabled
N/A
N/A
Disabled
Sep.
Addenda
(Enabled/
Disabled)
N/A
N/A
Enabled
N/A
N/A
Enabled
Check
Digit
(Enabled/
Disabled)
N/A
N/A
Enabled
N/A
N/A
Enabled
NumberSy
s(Enabled/
Disabled)
N/A
N/A
Enabled
N/A
N/A
Enabled
2DgtAdden
da(Enable
d/Disabled
)
N/A
N/A
Disabled
N/A
N/A
Disabled
5DgtAdden
da(Enable
d/Disabled
)
N/A
N/A
Disabled
N/A
N/A
Disabled
EAN-13
VerifyChkD
gt(Enabled
/Disabled)
N/A
N/A
Enabled
N/A
N/A
Enabled
2DgtAdden
da(Enable
d/Disabled
)
N/A
N/A
Disabled
N/A
N/A
Disabled
5DgtAdden
da(Enable
d/Disabled
)
N/A
N/A
Disabled
N/A
N/A
Disabled
Req.
Addenda
(Enabled/
Disabled)
N/A
N/A
Disabled
N/A
N/A
Disabled
Sep.
Addenda
(Enabled/
Disabled)
N/A
N/A
Enabled
N/A
N/A
Enabled
ISBN
Trans.
(Enabled/
Disabled)
N/A
N/A
Disabled
N/A
N/A
Disabled
EAN-8
VerifyChkD
gt(Enabled
/Disabled)
N/A
N/A
Enabled
N/A
N/A
Enabled
2DgtAdden
da(Enable
d/Disabled
)
N/A
N/A
Disabled
N/A
N/A
Disabled
5DgtAdden
da(Enable
N/A
N/A
Disabled
N/A
N/A
Disabled

KDC User YOUR KDC
71
d/Disabled
)
Req.
Addenda
(Enabled/
Disabled)
N/A
N/A
Disabled
N/A
N/A
Disabled
Sep.
Addenda
(Enabled/
Disabled)
N/A
N/A
Enabled
N/A
N/A
Enabled
MSI
Tx
CheckChar
(Enabled/
Disabled)
N/A
N/A
Disabled
N/A
N/A
Disabled
PosiCode
A and
B/A&B
LimitedA/A
&B
LimitedB
N/A
N/A
A&B
LimitedB
N/A
N/A
A&B
LimitedB
GS1
UPCEAN
Ver.(Enabl
ed/Disable
d)
N/A
N/A
Disabled
N/A
N/A
Disabled
GS1
Emulation
(No
Emulate/
GS1 128
Emul/GS1
Emulate)
N/A
N/A
No Emulate
N/A
N/A
No Emulate
PostNet
Tx
CheckChar
(Enabled/
Disabled)
N/A
N/A
Disabled
N/A
N/A
Disabled
PlanetCode
Tx
CheckChar
(Enabled/
Disabled)
N/A
N/A
Disabled
N/A
N/A
Disabled
Scan Options
Power
Enabled/
Disabled
N/A
N/A
N/A
N/A
N/A
N/A
Scan Angle
Narrow/
Wide
Wide
N/A
N/A
Wide
N/A
N/A
Filter
Normal/
High
Normal
N/A
N/A
Normal
N/A
N/A
Time Out
.5 seconds
to 10
seconds
2 second(s)
2 second(s)
2 second(s)
2 second(s)
2 second(s)
2 second(s)
Min. Barcode
Length
2 to 36
characters
4 chars
4 chars
N/A
4 chars
4 chars
N/A
Min. Barcode
Length
2 to 48
characters
N/A
N/A
4 chars
N/A
N/A
4 chars
Security Level
1 to 4 level
2 level
N/A
N/A
2 level
N/A
N/A
Image Capture
Enabled/
Disabled
N/A
N/A
Disabled
N/A
N/A
Disabled
Auto Trigger
Enabled/
Disabled
Disabled
Disabled
Disabled
Disabled
Disabled
Disabled
Reread Delay
Continuou
s, Short,
Medium,
Long, Extra
Long
Medium
Medium
Medium
Medium
Medium
Medium
Finger Trigger
Enabled/Di
sabled
N/A
N/A
N/A
N/A
N/A
N/A
Partial Display
Start
Position
1
1
1
N/A
N/A
N/A
No. of
Char(s)
0 chars
0 chars
0 chars
N/A
N/A
N/A
Action
Select
Select
Select
N/A
N/A
N/A
Data Process
Wedge / Store
Wedge Onl
y
Wedge &
Store
Always
Default
Default
Default
Default
Default
Default
Store Only
Save if
Sent
Save if Not
Sent
Data Format
Barcode
only
Default
Default
Default
Default
Default
Default
Packet
Data
Data Editor/Prefix
Data Editor/Suffix

KDC User YOUR KDC
72
Data Editor/AIM ID
None/In
Prefix/In
Suffix
None
None
None
None
None
None
Data Editor/Partial
Data
Start
Position
1
1
1
1
1
1
No. of
Char(s)
0 chars
0 chars
0 chars
0 chars
0 chars
0 chars
Action
Select
Select
Select
Select
Select
Select
Handshake
Enable/
Disabled
Disabled
Disabled
Disabled
Disabled
Disabled
Disabled
Terminator
None, CR,
LF, CR+LF,
Tab, Right
Arrow, Left
Arrow,Dow
n Arrow,
Up Arrow
CR+LF
CR+LF
CR+LF
CR+LF
CR+LF
CR+LF
Chk Duplicate
Enabled/
Disabled
Disabled
Disabled
Disabled
Disabled
Disabled
Disabled
Enter Key
Enabled/
Disabled
N/A
N/A
N/A
N/A
N/A
N/A
Extend Key
Enabled/
Disabled
N/A
N/A
N/A
N/A
N/A
N/A
Age Verify
Verification
Enabled/
Disabled
N/A
N/A
Disabled
N/A
N/A
Disabled
Age
Default
N/A
N/A
21
N/A
N/A
21
BT Config
ConnectDevice
(Non Mfi mode)
SPP
Default
Default
Default
Default
Default
Default
HID iOS
SPP2.0
HID
normal
ConnectDevice
(Mfi mode )
SPP
MFi
Default
Default
Default
Default
Default
Default
Auto Connect
Enabled
/Disabled
Disabled
Disabled
Disabled
Disabled
Disabled
Disabled
Auto Reconnect
Enabled/
Disabled
Disabled
Disabled
Disabled
Disabled
Disabled
Disabled
Auto Power On
Enabled/
Disabled
Disabled
Disabled
Disabled
Disabled
Disabled
Disabled
Auto Power
On/Power On Time
disabled,
1sec to
10second(
s)
Disabled
Disabled
Disabled
Disabled
Disabled
Disabled
Auto Power Off
Enabled/
Disabled
Disabled
Disabled
Disabled
Disabled
Disabled
Disabled
Auto Power
Off/Beep Warning
Enabled/
Disabled
Disabled
Disabled
Disabled
Disabled
Disabled
Disabled
Auto Power
Off/Power Off Time
1 to 30
minutes
Disabled
Disabled
Disabled
Disabled
Disabled
Disabled
PowerOff Msg
Enabled/Di
sabled
Disabled
Disabled
Disabled
Disabled
Disabled
Disabled
MAC Address
12
Characters
Bluetooth
MAC
Address
BT FW Version
v1.2.xrt
Bluetooth
Firmware
Version
Wakeup Nulls
Enabled/Di
sabled
Disabled
Disabled
Disabled
Disabled
Disabled
Disabled
Connect Alert
Enabled/Di
sabled
N/A
N/A
N/A
N/A
N/A
N/A
BT Toggle
Enabled/Di
sabled
Enabled
Enabled
Enabled
Disabled
Disabled
Disabled
DisconnectBtn
Enabled/Di
sabled
Disabled
Disabled
Disabled
Disabled
Disabled
Disabled
HID AutoLock
disabled,1,
2,3,4,5,10,1
5 minutes
1 minutes
1 minutes
1 minutes
1 minutes
1 minutes
1 minutes
HID Keyboard
US,
German,
French
,Italian,
Spanish
US
US
US
US
US
US
HID Delay/Initial
Disabled,
1,2,3,5,10
secs
Disabled
Disabled
Disabled
Disabled
Disabled
Disabled
HID Delay/Inter
char
Disabled,1
0, 20, 30,
Disabled
Disabled
Disabled
Disabled
Disabled
Disabled

KDC User YOUR KDC
73
50,
100msec
HID Ctrl Char
Disabled,
Alt+Numpa
d,
^+Charact
er, Replace
to |
Disabled
Disabled
Disabled
Disabled
Disabled
Disabled
BT Service
Power
Enabled/
Disabled
Enabled
Enabled
Enabled
Enabled
Enabled
Enabled
Pairing
Pairing
neighborin
g
Bluetooth
devices
Discovering
Discoverin
g
neighborin
g
Bluetooth
devices
Connecting to
View
Connect to
Bluetooth
device
Disconnect
N/A
N/A
N/A
N/A
N/A
N/A
HID Sync
Auto Pairing
Enabled/
Disabled
Enabled
Enabled
Enabled
Enabled
Enabled
Enabled
USB Config
(M model)
USB Mode
Disabled/
USB Disk/
USB HID
Disabled
Disabled
Disabled
N/A
N/A
N/A
NFC Config
(N model)
NFC Power
Enabled/
Disabled
N/A
N/A
N/A
N/A
N/A
N/A
Data Format
Barcode
only/Packe
t Data
N/A
N/A
N/A
N/A
N/A
N/A
UID Only
Enabled/
Disabled
N/A
N/A
N/A
N/A
N/A
N/A
GPS Config
(G model)
GPS Power
Disabled
N/A
N/A
N/A
N/A
N/A
N/A
Power Mode
Normal/Po
wer Save
N/A
N/A
N/A
N/A
N/A
N/A
Bypass Data
Enabled/
Disabled
N/A
N/A
N/A
N/A
N/A
N/A
Acqurie Test
N/A
N/A
N/A
N/A
N/A
N/A
Reset GPS
N/A
N/A
N/A
N/A
N/A
N/A
System
Config
Memory Size
0.5/6.5, 1/6,
2/5,3 /4,
4/3, 5/2,
6/1, 7/0
0.5/6.5
0.5/6.5
0.5/6.5
0.5/6.5
0.5/6.5
0.5/6.5
Memory Status
No. of
Stored
Barcodes
Free
Memory
Available
Reset Memory
Memory
(Empties
Data)
Application
Memory
N/A
N/A
N/A
BT Registry
Auto Erase
Enabled/
Disabled
Enabled
Enabled
Enabled
Enabled
Enabled
Enabled
Sleep Timeout
Disabled,
1sec to
10minute(s
)
5 second(s)
5 second(s)
5 second(s)
5 second(s)
5 second(s)
5 second(s)
Date / Time
YYYY:MM:
DD &
HH:MM:SS
Battery
% of
Battery
Charge
Available
Version
Firmware
Version &
Serial No.
N/A
N/A
N/A
N/A
N/A
N/A
Button Lock
Enabled/
Disabled
Disabled
Disabled
Disabled
Disabled
Disabled
Disabled
Beep Alert
/Beep Sound
Enabled/
Disabled
Enabled
Enabled
Enabled
Enabled
Enabled
Enabled

KDC User YOUR KDC
74
Beep Alert /Power
On Beep
Enabled/
Disabled
Enabled
Enabled
Enabled
Enabled
Enabled
Enabled
Beep Alert /Beep
On Connect
Enabled/
Disabled
Enabled
Enabled
Enabled
Enabled
Enabled
Enabled
Beep Alert /Beep
On Scan
Enabled/
Disabled
Enabled
Enabled
Enabled
Enabled
Enabled
Enabled
Beep Alert
/BeepOnMSCard
Enabled/
Disabled
N/A
N/A
N/A
N/A
N/A
N/A
Beep Alert
/BeepOnICCard
Enabled/
Disabled
N/A
N/A
N/A
N/A
N/A
N/A
Beep Alert
/BeepOnNFCCard
Enabled/
Disabled
N/A
N/A
N/A
N/A
N/A
N/A
Beep Volume
Low/High
Low
Low
Low
Low
Low
Low
Mfi
( i-chip installed)
Enabled/Di
sabled
Enabled
Enabled
Enabled
Enabled
Enabled
Enabled
Auto Exit
Enabled/
Disabled
Enabled
Enabled
Enabled
N/A
N/A
N/A
Port Status
Enabled/
Disabled
Enabled
Enabled
Enabled
N/A
N/A
N/A
Display Format
Time &
Battery /
Type &
Time /
Type &
Battery /
Memory
Status /
GPS
Data(KDC2
50
only)/Barc
ode Only
Time &
Battery
Time &
Battery
Time &
Battery
N/A
N/A
N/A
Menu Barcode
Enabled/
Disabled
N/A
N/A
Disabled
N/A
N/A
Disabled
Scrolling
Enabled/
Disabled
Enabled
Enabled
Enabled
N/A
N/A
N/A
Brightness
1 to 15
level(8
level)
8
8
8
N/A
N/A
N/A
Keypad
Enabled/
Disabled
N/A
N/A
N/A
N/A
N/A
N/A
Language
None/
US(English
)/
French/
Italian/
Spanish/
Korean/
Japanese
None
None
None
N/A
N/A
N/A
Factory Default
Restores
Default
Settings
MSR Config
Power
Enabled/
Disabled /
N/A
N/A
N/A
N/A
N/A
N/A
Data Format
MSR Data
Only
N/A
N/A
N/A
N/A
N/A
N/A
Packet
Data
N/A
N/A
N/A
N/A
N/A
N/A
Use Track1
Enabled/
Disabled
N/A
N/A
N/A
N/A
N/A
N/A
Use Track2
Enabled/
Disabled
N/A
N/A
N/A
N/A
N/A
N/A
Use Track3
Enabled/
Disabled
N/A
N/A
N/A
N/A
N/A
N/A
Null Check Track1
Enabled/
Disabled
N/A
N/A
N/A
N/A
N/A
N/A
Null Check Track2
Enabled/
Disabled
N/A
N/A
N/A
N/A
N/A
N/A
Null Check Track3
Enabled/
Disabled
N/A
N/A
N/A
N/A
N/A
N/A
Beep on error
reading
Enabled/
Disabled
N/A
N/A
N/A
N/A
N/A
N/A
Encrypt MSR Data
Enabled/
Disabled
N/A
N/A
N/A
N/A
N/A
N/A
AES Key Length
128bit/192
bit/256bit
N/A
N/A
N/A
N/A
N/A
N/A
Card Type
ISO/OTHE
R 1/AAMVA
N/A
N/A
N/A
N/A
N/A
N/A
Track Separator
None/Spa
ce/Comm
a/Semicol
on/CR/LF/
CR&LF/Ta
b
N/A
N/A
N/A
N/A
N/A
N/A

KDC User YOUR KDC
75
Attach Start/End
Sentinel
N/A
N/A
N/A
N/A
N/A
N/A
Partial Data Start
Position
N/A
N/A
N/A
N/A
N/A
N/A
Partial Data Length
N/A
N/A
N/A
N/A
N/A
N/A
Partial Data Action
Erase/
Select
N/A
N/A
N/A
N/A
N/A
N/A
ICCR Config
Power
Enabled/
Disabled /
N/A
N/A
N/A
N/A
N/A
N/A
IFD Number
N/A
N/A
N/A
N/A
N/A
N/A
Config Number
N/A
N/A
N/A
N/A
N/A
N/A
Key Mgmt
Stored Keys
N/A
N/A
N/A
N/A
N/A
N/A
Inject Keys
N/A
N/A
N/A
N/A
N/A
N/A
Sensitive/
Set
Date/Time
Date
N/A
N/A
N/A
N/A
N/A
N/A
Time
N/A
N/A
N/A
N/A
N/A
N/A
Sensitive/
Set Self-Test
N/A
N/A
N/A
N/A
N/A
N/A
Sensitive/
Set
Passwords
1st Password
N/A
N/A
N/A
N/A
N/A
N/A
2nd Password
N/A
N/A
N/A
N/A
N/A
N/A
Sensitive/
Key Mgmt
Stored Keys
N/A
N/A
N/A
N/A
N/A
N/A
Inject Keys
N/A
N/A
N/A
N/A
N/A
N/A
Clear Keys
N/A
N/A
N/A
N/A
N/A
N/A
Sensitive/
Card Encrypt
Plaintext /
TDES /
AES
N/A
N/A
N/A
N/A
N/A
N/A
UHF
Configuration
(UHF model)
UHF Power
Enabled/
Disabled
N/A
N/A
N/A
N/A
N/A
N/A
Power On Time
500ms/1se
c/1.5sec/2
sec/2.5sec
/3sec/3.5s
ec/4sec/4.
5sec/5sec
N/A
N/A
N/A
N/A
N/A
N/A
Power Off Time
500ms/1se
c/1.5sec/2
sec/2.5sec
/3sec/3.5s
ec/4sec/4.
5sec/5sec
N/A
N/A
N/A
N/A
N/A
N/A
Power Level
0/1/2/3/4/
5/6/7
N/A
N/A
N/A
N/A
N/A
N/A
Data Format
Hexa
Decimal /
Binary
N/A
N/A
N/A
N/A
N/A
N/A
Table 3 - KDC Menu
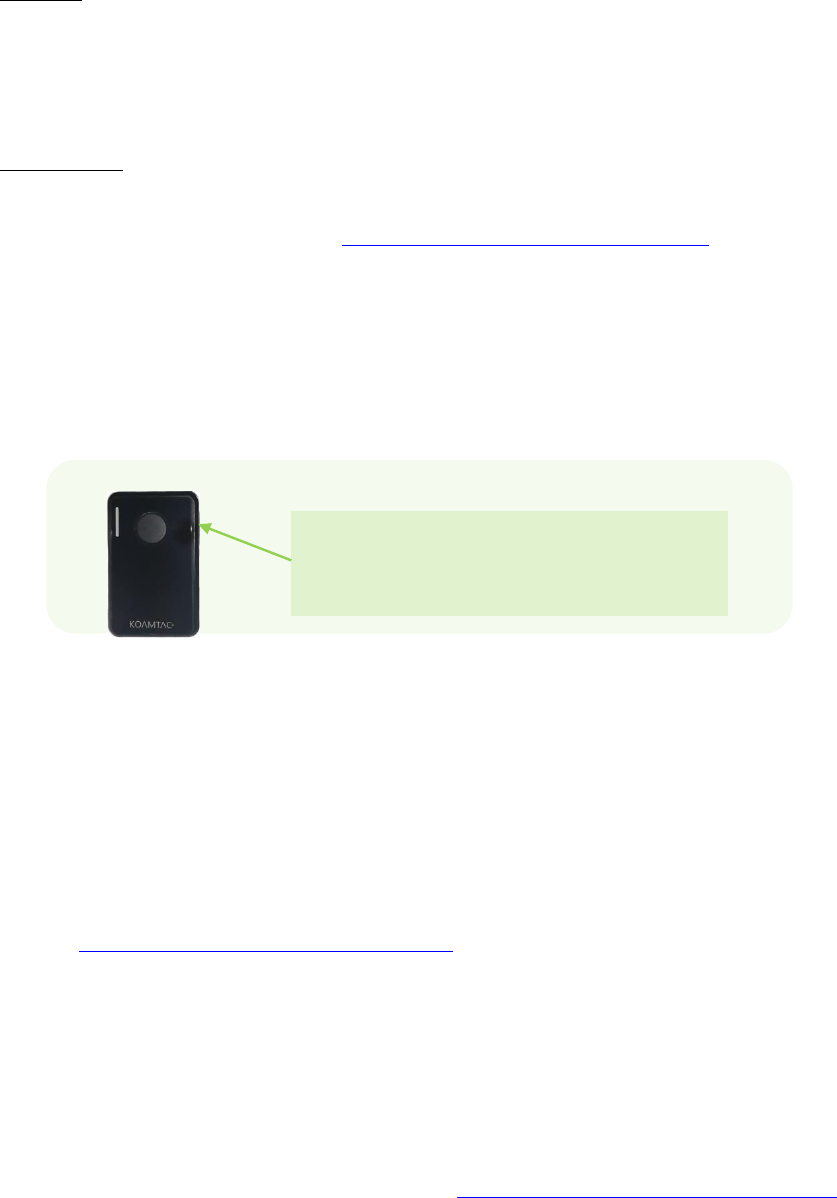
KDC User YOUR KDC
76
KDC Mode Menu
The KDC Mode Menu has two options – Normal Mode and Application Mode.
Normal
This is the default mode that provides basic barcode scanning. In normal mode,
barcode data may be manipulated directly through the KDC or through KTSync during
the synchronization process.
Application
This mode enables the user to run the user application created by the Application
Generation Tool, as described in Chapter 6 Application Generation.
View Data Menu
This menu option enables the user to view and/or delete barcodes stored in the KDC.
In the case of the KDC20/30, you may delete the last scanned barcode by pressing the
DELETE button on the right side of the unit.
Set Barcodes Menu
This menu lists all the barcode symbologies supported by the KDC and enables the
user to select the barcode symbologies to be scanned. For maximum scan
performance, you should select only the symbologies that you will be scanning. Please
refer to 10. Appendix A – 10.1 Symbologies for a detailed listing of symbologies
supported by the KDC.
Code Options Menu
The KDC supports various Code Options, including Transmission of Start and Stop
Characters, Symbology Conversion, Verification of Optional Check Character, and
Transmission of Check Digit. Please refer to 10. Appendix A – 10.2 Code Options for a
detailed explanation of each option.
Press the Delete button to delete the
last scanned barcode.
Figure 14 - Delete Function in KDC20/30

KDC User YOUR KDC
77
Scan Options Menu
Power(KDC500 only)
Users may choose to turn the Scan Engine Power on or off. Select between Enable
and Disable.
Scan Angle
(Opticon laser model only)
This option enables the user to configure the laser beam angle to the barcode. There
are two options for scan angle: Wide and Narrow. Wide is 54o and Narrow is 27o. The
default is wide.
Filter
(Opticon laser model only)
This menu enables the user to change the Filter mode from Normal to High for poor
quality barcodes. The default is Normal.
Timeout
In this menu, you may set the scan timeout. The timeout options are from 500ms up to
10 seconds. The default is 2 seconds.
Minimum Barcode Length
This option enables the user to set a barcode length from 2 characters to 36 characters
(KDC20/100/200/250/270L/270D/350L/410/411/415/470L/470D/500L) or 2 characters
to 48 characters (KDC30/270C/300/350C/420/421/425/450/470C/500C). It is strongly
recommended that you maximize the minimum barcode length setting to prevent
possible errors.
The default minimum barcode length of
KDC20/100/200/250/270L/270D/350L/410/411/415/470L/470D/500L is 4
characters.
The default minimum barcode length of
KDC30/270C/300/350C/420/421/450/470C/500C is as follows:
Minimum (Default)
Maximum (Default)
1D
Symbology
Codabar
2(4)
60(60)
Code 11
1(4)
80(80)
Code 32
-
-
Code 39
0(0)
48(48)
Code 93
0(0)
80(80)
Code 128
0(0)
80(80)
EAN-8
-
-

KDC User YOUR KDC
78
EAN-13
-
-
GS1 Composite
-
-
I2of5
2(4)
80(80)
Matrix 2of5
1(4)
80(80)
MSI
4(4)
48(48)
Plessey
4(4)
48(48)
PosiCode
2(4)
80(48)
GS1 Omni
-
-
GS1 Limited
-
-
GS1 Expanded
4(4)
74(74)
S2of5 Ind
1(4)
48(48)
S2of5 IATA
1(4)
48(48)
TCL39
-
-
Telepen
1(1)
60(60)
Trioptic
-
-
UPCA
-
-
UPCE0
-
-
UPCE1
-
-
2D
Symbology
AztecCode
1(1)
3750(3750)
AztecRunes
CodablockF
1(1)
2048(2048)
Code16K
0(1)
160(160)
Code49
1(1)
81(81)
DataMatrix
1(1)
1500(1500)
MaxiCode
1(1)
150(150)
MicroPDF
1(1)
366(366)
PDF417
1(1)
2750(2750)
QRCode
1(1)
3500(3500)
HanXin Code
-
-
Postal Codes
Postnet
-
-
PlanetCode
-
-
UK Post
-
-
Mayada Post
-
-
Kix Post
-
-
Australia Post
-
-
Japan Post
-
-
China Post
2(4)
80(80)
Korea Post
2(4)
80(48)
OCR
OCR Off
-
-
OCR A
-
-
OCR B
-
-

KDC User YOUR KDC
79
OCR Passport
-
-
OCR MICR
-
-
OCR SEMI
-
-
Image Capture
(KDC30/270C/300/350C/420/421/425/450/470C)
This option enables the user to capture an image in JPEG format in C:\myData folder.
You should enable the image capture option first, and then press the Scan button to
start the aiming. A green aiming light will illuminate and an image will be taken upon
release of the Scan button. KDC will disable the image capture option if the user
presses the scan button for 5 seconds.
Security Level
(Laser Model only)
This menu enables the user to ensure an accurate barcode reading by setting the
number of times the KDC will read a barcode. Security Level is set from 1 up to 4. The
higher security level means readings are more reliable; however, some performance
degradation is likely. For poor quality barcodes, we recommend increasing the security
level. The default is 2.
Auto Trigger
Once enabled, Auto Trigger enables the user to scan a barcode automatically. You
may adjust reread delay from continuous to extra-long. Auto Trigger mode always
enables the duplicate check option.(1D Model only)
USB cable insertion requirement is removed from FW2.85/86.O and FW
3.02.
You may exit the auto trigger mode by pressing the scan button for 3
seconds.
Reread Delay
You may adjust the reread delay from continuous to extra-long.
Partial Display
This option enables the user to display partial data. You may define the start position
and number of characters to be displayed.
Table 4 - KDC30/270C/300/350C/420/450/470C/500C Minimum Barcode Length
Note

KDC User YOUR KDC
80
Data Process Menu
Wedge/Store
The KDC provides five modes of data transmission in keyboard wedging mode.
Wedge Only: Barcode data is NOT stored in memory but transmitted to the
host.
Wedge & Store Only: Barcode data is stored in memory and transmitted to the
host.
Store Only: Barcode data is stored in memory but NOT transmitted to the host.
Save if Sent: If data transmission is successful, barcode data is stored in
memory.
Save if Not Sent: If data transmission is NOT successful, barcode data is
stored in memory.
Data Format
The KDC provides two data formats, Barcode Only and Packet Data.
Barcode Only: The KDC transmits scanned barcodes only. You may
incorporate appropriate data transmission error detection and correction
mechanisms in this mode. KDC supports a selection of various termination
characters for Barcode Only format. You may select <NONE>, <CR>, <LF>,
<CR+LF> or <TAB> as the termination character.
Packet Data: KDC transmits packet data with checksum to minimize
transmission errors. KTSync sets Data Format to Packet Data format upon
execution.
You may change Data Format to Barcode Only if you would prefer to use
the Barcode Only mode. However, the KDC would stay in Packet Data
mode if KTSync is aborted abnormally. If this is the case, you may have to
change the KDC back to Barcode Only mode manually.
Barcode Index: KDC20i/30i/200i/250i/300i/270i/350i/400i/470i/500i add 4
bytes barcode index to maintain last synchronized barcode information.
- This optional index would be added if data format is “Packet Data”.
- 4 bytes index would be added before “@” when responding to “p”
Note
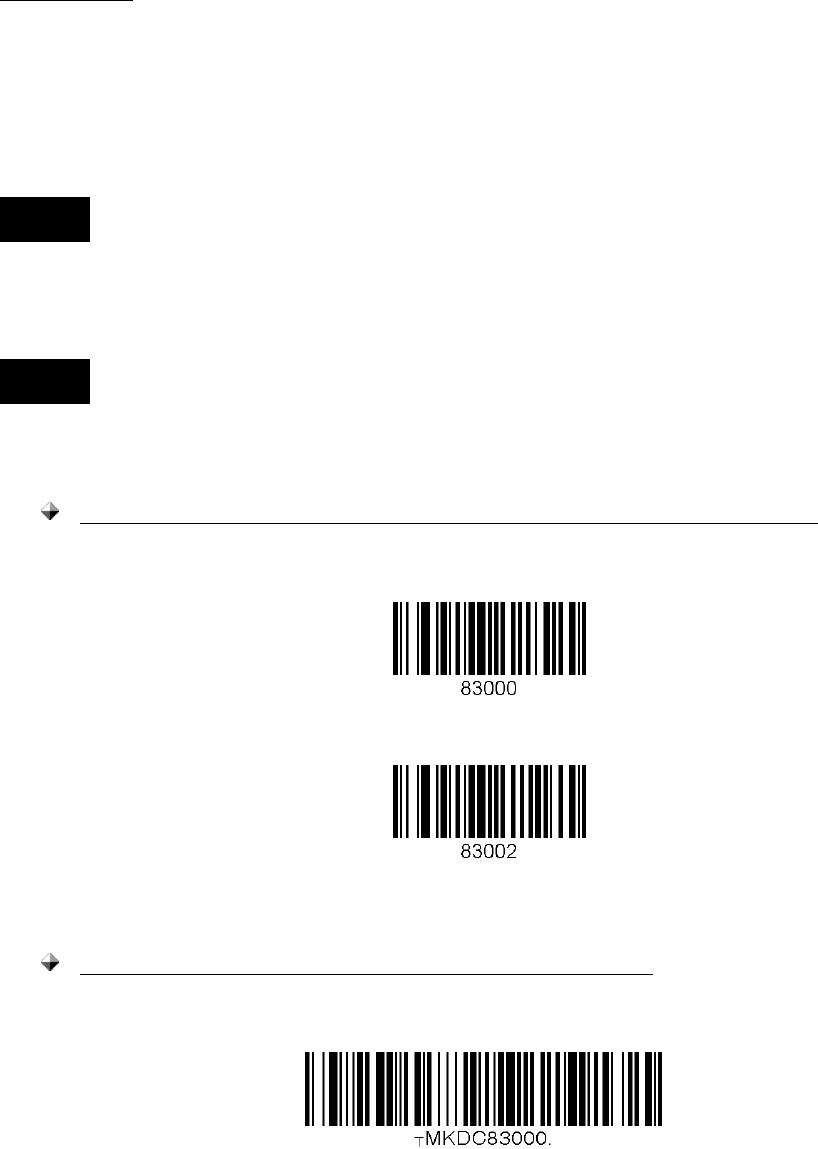
KDC User YOUR KDC
81
command.
- 4 bytes index plus “@” character would be added after checksum
byte if the user scans a barcode and wedges to the host.
Data Editor
The KDC provides various data editing options.
Prefix - Enables user to add a prefix to scanned data that may then be wedged
to the host. The Prefix must be defined in the KTSync. The maximum length for
a Prefix is 11 characters.
This Prefix option is different from the Prefix option in KTSync, which
attaches the prefix to data during synchronization.
The user may also define the prefix by scanning characters defined in
Appendix C&D(E&F for KDC500). as shown below in the special barcodes.
KDC20/100/200/250/270L/270D/350L/410/411/415/470L/470D/500L
Prefix Enter Start
Prefix/Suffix Enter Finish
KDC30/270C/300/350C/420/421/425/450/470C/500C
Prefix Enter Start
Note
Note
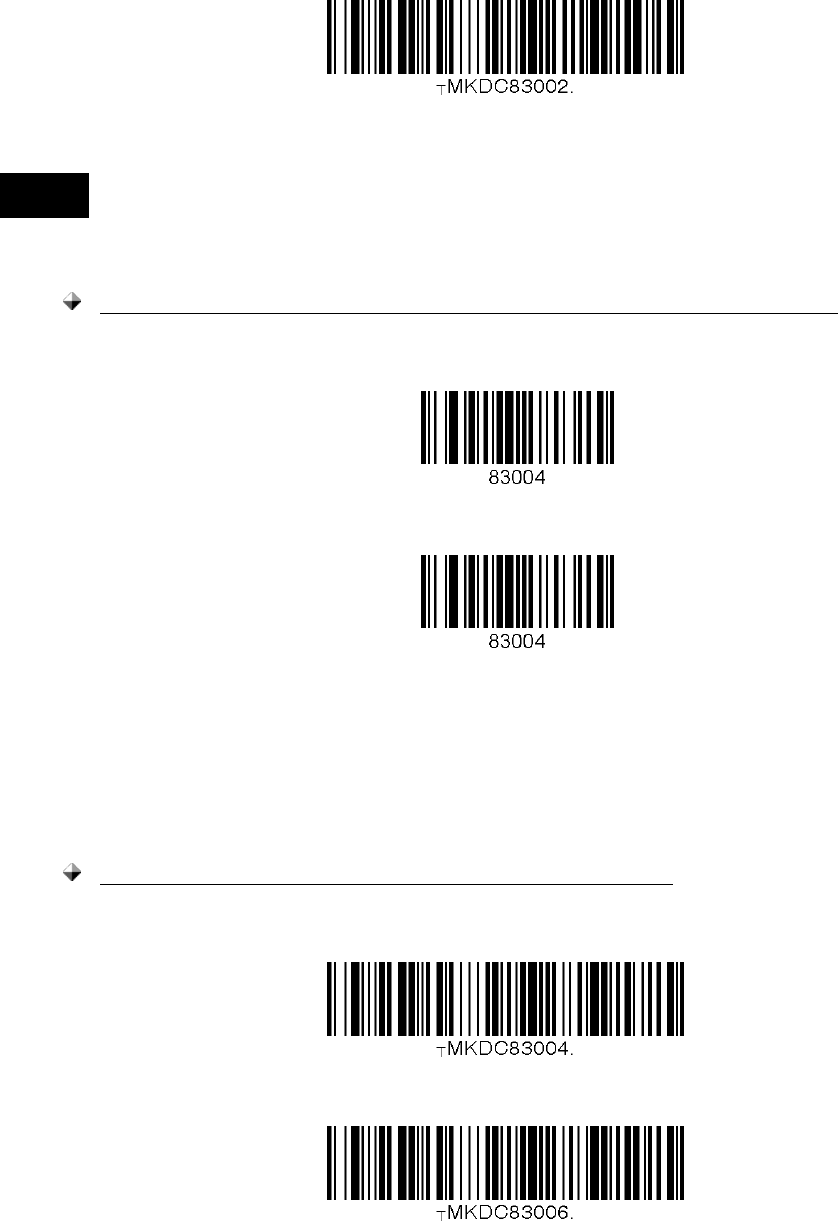
KDC User YOUR KDC
82
Prefix/Suffix Enter Finish
Users may also delete or display current prefixes by scanning the following
special barcodes.
KDC20/100/200/250/270L/270D/350L/410/411/415/470L/470D/500L
Delete Prefix
Display Prefix
KDC30/270C/300/350C/420/421/425/450/470C/500C
Delete Prefix
Display Prefix
Note
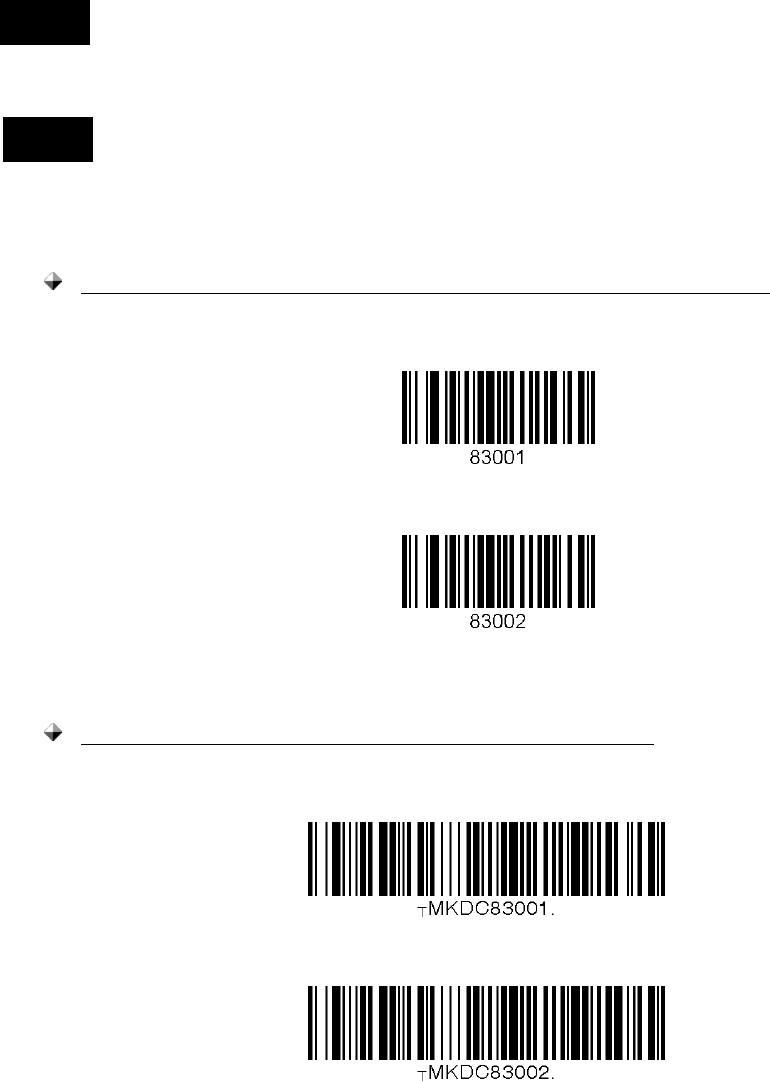
KDC User YOUR KDC
83
Suffix - Enables the user to add a suffix to scanned data, which may then be
wedged to the host. The suffix must be defined in the KTSync. The maximum
length for a suffix is 11 characters.
This Suffix option is different from the Suffix option in KTSync, which
appends the suffix to data during synchronization.
The user may also define the suffix by scanning characters defined in
Appendix C&D(E&F for KDC500). as shown below in the special barcodes.
20/100/200/250/270L/270D/350L/410/411/415/470L/470D/500L
Suffix Enter Start
Prefix/Suffix Enter Finish
KDC30/270C/300/350C/420/421/425/450/470C/500C
Suffix Enter Start
Prefix/Suffix Enter Finish
Note
Note
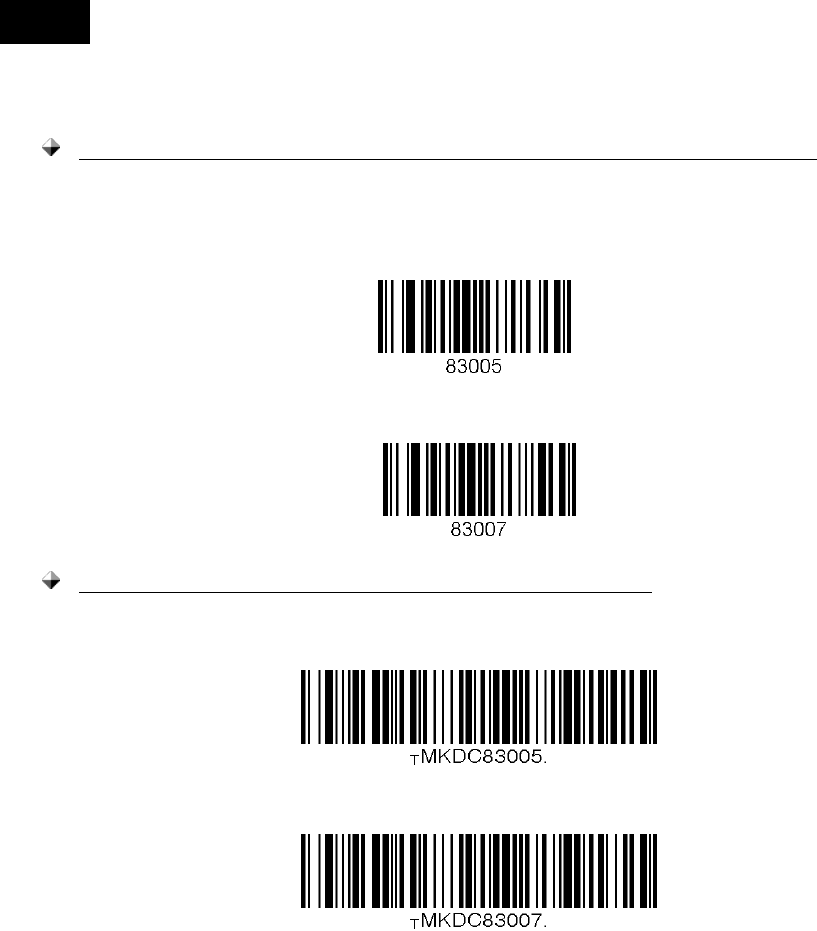
KDC User YOUR KDC
84
The user may also delete or display a current suffix by scanning the
following special barcodes.
KDC20/100/200/250/270L/270D/350L/410/411/415/470L/470D/500L
Delete Suffix
Display Suffix
KDC30/270C/300/350C/420/421/425/450/470C/500C
Delete Suffix
Display Suffix
AIM ID - Enables the user to add AIM ID to scanned data, which may then be
wedged to the host. AIM ID can be added to the end of a Prefix or Suffix.
Partial Data: Enables the user to store and/or transfer partial data. The user
defines the start position and number of characters to be stored and/or
transferred. The user also can select if taking or erasing the characters
selected with Start position and No of char(s).
Start position
This option specifies the start position of data.
No of char(s)
This option specifies the length of data. The ‘0’ means all data.
Note

KDC User YOUR KDC
85
Action
This option selects if erasing or taking the specified data.
Handshake(Deprecated)
KDC provides Handshake mode when Data Format is set to Packet Data.
Handshake Mode will increase the reliability of barcode data transmission.
The default mode for Handshake is disabled.
Data transmission speed is slower when Handshake Mode is enabled.
Terminator
The KDC supports various termination characters when the Data Format mode is set
to Barcode only. Select <NONE>, <CR>, <LF>, <CR+LF>, or <TAB> as the termination
character. The default terminator is <CR+LF>. The Up/Down/Left/Right arrow
terminator is also available for HID mode.
Chk Duplicate
This option prevents you from collecting duplicate data.
Enter Key
(KDC350/500 only)
This option determines the behavior of the ‘#’ key on the keypad.
If this option is enabled, the ‘#’ key acts as a keyboard enter key.
The ‘#’ key finishes the current data input, and stores/sends input data
according to the menu settings of Wedge/Store.
The cursor moves to next line after the current data input is complete,
regardless of whether there is a data input or not.
The screen is scrolled up one line if the ‘#’ key is pressed on the last line of
KDC screen.
If ‘Shift’ is enabled, remember that the ‘#’ key will input the ‘#’ character.
Extend Key
(KDC350/500 only)
This option enables users to enter more symbols by using keypad.
Age Verification
(KDC30/270C/300/350C/420/421/425/450/470C)
This option enables to verify age by reading driver license.

KDC User YOUR KDC
86
BT Config Menu – KDC20/30/200/250/270/300/350/400/470/500
The KDC supports
Bluetooth
Ver2.1+EDR. Before utilizing the advantages of Bluetooth
functionality with the KDC, the user should become familiar with Bluetooth connectivity
and its impact on the host environment.
To configure your KDC for Bluetooth functionality, you may use the KDC Menus.
Below is a listing of the Bluetooth options and their settings. The default settings for
these options have been set to increase the usability of Bluetooth technology without
compromising the KDC battery usage.
IMPORTANT: We strongly recommend NOT changing these settings until
the user has fully tested the Bluetooth connection between the KDC and
the host device.
For more detailed information regarding Bluetooth functionality with the KDC, please
refer to Chapter 4. BLUETOOTH.
ConnectDevice
You may choose the Bluetooth device type in this option.
HID normal - KDC20(i)/30(i)/200(i)/250(i)/270(i)/300(i)/350(i)/400(i)/470(i)
HID iOS - KDC20(i)/30(i)/200(i)/250(i)/270(i)/300(i)/350(i)/400(i)/470(i)
SPP2.0 - KDC20(i)/30(i)/200(i)/250(i)/270(i)/300(i)/350(i)/400(i)/470(i)
SPP - KDC20(i)/30(i)/200(i)/250(i)/270(i)/300(i)/350(i)/400(i)/470(i)/500(i)
MFi - KDC20i/30i/200i/250i/270i/300i/350i/400i/470i/500i
Auto Connect
Enabled or Disabled(KDC500 doesn’t support)
Auto Reconnect
Enabled or Disabled
Auto Power On
Enabled or Disabled(KDC500 doesn’t support)
PWR On Time
Disabled, 1 to 10 seconds(KDC500 doesn’t support)
Auto Power Off
Enabled or Disabled (KDC250G/350G should use option in system menu)

KDC User YOUR KDC
87
(KDC500 doesn’t support)
Beep Warning
Enabled or Disabled(KDC500 doesn’t support)
PWR Off Time
1 to 30 Minutes(KDC500 doesn’t support)
PowerOff Msg
Enabled or Disabled(KDC500 doesn’t support)
MAC Address
When users select this option, KDC displays 12 characters
Bluetooth
MAC Address.
FW Version
This option displays
Bluetooth
Firmware Version
Wakeup Nulls
Enabled or Disabled(KDC500 doesn’t support)
BT Toggle
Enable or Disable iOS device soft keyboard or Connect/Disconnect Bluetooth.
(KDC500 doesn’t support)
BT Disconnect Button
Enable or Disable Bluetooth disconnection by pressing down button for 3 seconds.
(KDC500 doesn’t support)
HID AutoLock
Disabled, 1, 2, 3, 4, 5, 10, 15 minutes(KDC500 doesn’t support)
HID Keyboard
Users may select a keyboard language in HID mode. KDC supports five languages:
English, German, French, Spanish, and Italian. (KDC500 doesn’t support)
HID Initial Delay
In this menu, users may define the initial delay between 1 second to 10 seconds
before data transmission in HID mode(KDC500 doesn’t support)
HID Inter-character Delay
This option enables users to define the inter-character delay between 10msec to

KDC User YOUR KDC
88
100msec in HID mode(KDC500 doesn’t support)
HID Control Character
This option helps users to map control characters to ALT+Numlock or
^+Character_or ‘|’. (KDC500 doesn’t support)
BT Service Menu – KDC20/30/200/250/270/300/350/400/470/500
Power
Users may choose to turn Bluetooth Power on or off. Select between Enable and
Disable.
Pairing Mode
This option Enables user to enter pairing mode by simply selecting this menu.
The KDC enters into pairing mode so that the host
Bluetooth
device may
search for it.
The KDC may exit pairing mode if the user presses the SCAN button or if it fails
to pair with the
Bluetooth
host device within 90 seconds.
Discovering
When users choose this menu, KDC searches for nearby
Bluetooth
devices. (KDC500
doesn’t support)
Connecting To
This option enables the user to inquire to a registered
Bluetooth
device. (KDC500
doesn’t support)
Disconnect
This option enables the user to disconnect KDC from the paired
Bluetooth
device.
(KDC500 only)
HID Sync
KDC transmits all stored data to the host over HID profile if HID Sync option is enabled.
(KDC500 doesn’t support)
Auto Pairing
Enables or Disable the automatic Host Bluetooth type detection (SPP or MFi).(i Model
only)

KDC User YOUR KDC
89
GPS Config Menu – KDC250G/350G
Barcode and GPS data format
The GPS enabled model adds the GPS coordinate after the barcode data, if GPS data
is available. The GPS data starts with “<G|P/S]” and ends with “:”. For example, the GPS
enabled model would record barcode “1234567890” , GPS coordinate
“4354.45275,N;07925.81993,W” and Altitude data “208.7,M”as
“1234567890<G|P/S]4354.45275,N;07925.81993,W
,208.7,M:” in the barcode data field.
GPS Menu
GPS Power: Turning GPS Power on or off
Users may enable or disable the GPS Power.
The GPS module consumes extensive battery power. To conserve battery
power, it is strongly recommended to turn off the GPS option when the GPS
enabled model is not being used for an extended period of time.
It is also recommended to use the GPS Auto Power Off option in the
SystemConfig menu. This option automatically turns off the GPS power if a
barcode is not scanned for a period of time.
Power Mode: The user may choose the type power consumption for the GPS
function.
Users may extend the battery life of the GPS enabled model in Power Save
mode.
Users should use normal mode if accurate GPS data is required.
The KDC350G will last about 15 hours in normal non-bypass data mode
and 18 hours in power save non-bypass data mode.
The KDC350G will last about 7 hours in normal bypass data mode and 8
hours in power save bypass data mode.
Bypass Data: Enabled or Disabled
This option should be disabled if users wish to record the GPS data with a
scanned barcode data.

KDC User YOUR KDC
90
The KDC will bypass GPS data to the host if the bypass option is enabled.
The KDC becomes a Bluetooth GPS receiver if this bypass data option is
selected.
Acquire Test: Select to acquire GPS signal.
Reset GPS: Reset KDC GPS module.
GPS Hot Key
The KDC250G/350G provides the following hot keys for convenient GPS operations:
GPS Acquire Test Cancellation
Users may cancel the GPS acquire test by pressing the SCAN button
during the test.
GPS Data Append Cancellation
Users may cancel GPS data append by pressing SCAN button if GPS data
is not available immediately.
Users should hold the SCAN button for more than 3 seconds to cancel
GPS data append.
USB Mode Menu– 100M/200M/250M/270/300M/350
Disabled
When this option is selected, KDC enters into USB Serial mode.
USB Disk
This option enables the user to change to USB Disk mode and barcode data that KDC
scanned is stored into a file in flash disk when this option is selected.
KDC100M/200M/250M/300M/350 may be used as USB Disk with 4MB or 8MB space
and KDC270 may be used as USB Disk with 8MB space.
USB HID
When this option is enabled, KDC enters into USB HID mode.

KDC User YOUR KDC
91
Disk Format
This option is available in USB Disk mode and Enables users to format KDC USB Disk.
Data Format
This option is available in USB Disk mode.
Data
Data Time
Data Type
Data Time Type
Changing the “USB Mode” option will erase all data in KDC memory.
Make sure to back up your data before changing this option.
KTSync may not recognize the KDC if the KDC is in “USB DISK” mode or “USB
HID” mode.
Note

KDC User YOUR KDC
92
NFC Config Menu – KDC350N/411N/415N/421N/425N/500
NFC Power
Turning NFC Power on or off
Options: Enable/Disable
Data Format
Options: Data only/Packet data.(KDC500 doesn’t support)
UID Only
Enable or Disable UID Only menu
The KDC only sends UID data to the host device when the KDC is in UID Only
mode.
(KDC500 doesn’t support)
UHF Config Menu – KDC450U
UHF Power
Turning UHF Module Power On or Off
Options: Enable/Disable
Power On Time
Specify the power on time duration of UHF module.
Options: 500ms/1sec/1.5sec/2sec/2.5sec/3sec/3.5sec/4sec/4.5sec/5sec
Power Off Time
Specify the power off time duration of UHF module.
Options: 500ms/1sec/1.5sec/2sec/2.5sec/3sec/3.5sec/4sec/4.5sec/5sec
Power Level
Specify the UHF module power level to determine the power strength of antenna. 7
means the most power strength.
Options: 0/1/2/3/4/5/6/7
Data Format
Specify the data format of UHF data when it is transmitted from KDC to Host.
Options: Binary / Hexa Decimal

KDC User YOUR KDC
93
Smart Hopping
It enables KDC450U to find an optimized UHF channel and can be initiated by reading
a special barcode.
WIFI Config Menu (KDC350F)
KDC350F WiFi model can send and receive data to/from host by using the following
protocols.
UDP
TCP
HTTP_GET
HTTP_POST
In UDP/TCP mode, KDC350F will support full duplex mode, meaning is the KDC350F
will be ready to get data from host all the time.
Power
Turns the Wi-Fi Module Power ON and OFF.
AP
Set AP SSID.
Set AP Passcode.
Server
Configure the following server information
IP Address
URL Address
Port Number
Protocol (UDP/TCP/HTTP-GET/HTTP-POST)
SSL(Security)
Server Page
Connect
Connect to AP and server.
Auto Connect

KDC User YOUR KDC
94
Enable/Disable KDC to reconnect to AP & Server when it detects disconnection
from AP and Server.
Send Stored
Enable/Disable KDC to send stored data when sending a new read data.
CDMA Config Menu (KDC350WA CDMA)
KDC350WA CDMA model can send and receive data to/from host by using the
following protocols if and only if the device is activated and the Verizon network is
available.
UDP
TCP
HTTP_GET
HTTP_POST
In UDP/TCP mode, KDC350WA will support full duplex mode, meaning is the
KDC350WA will be ready to get data from host all the time.
Power
Turns the CDMA Module Power ON and OFF.
Provisioning
Activates the device under Verizon CDMA network.
Server
Configure the following server information
IP Address
URL Address
Port Number
Protocol (UDP/TCP/HTTP-GET/HTTP-POST)
SSL(Security)
Server Page
Resp. Timeout
Connect
Connect to Server.

KDC User YOUR KDC
95
Disconnect
Disconnect from Server.
Auto Connect
Enable/Disable KDC to reconnect to Server when it detects disconnection from
Server.
Send Stored
Enable/Disable KDC to send stored data when sending a new read data.
Information
Displays CDMA module firmware version, the CDMA number, MEID, and IP
address.
MSR Config Menu – KDC415/425/430/500
Power(KDC500 only)
Turning MSR(Magnetic-Stripe Card Reader) on or off
Options: Enabled/Disabled
Data Format(KDC415/425/430 only)
Enables/Disables whether KDC415/425/430 sends with packet data or not.
Options: Enabled/Disabled
Use Track
The user may select which track(1/2/3) data to read from the MS Card.
Track 1 : Enabled/Disabled
Track 2 : Enabled/Disabled
Track 3 : Enabled/Disabled
Null Check(KDC500 only)
The user may select which track(1/2/3) data should not be null. When this option is
enabled for a Track and the read data is null, MS Card read fail occurs.

KDC User YOUR KDC
96
Track 1 : Enabled/Disabled
Track 2 : Enabled/Disabled
Track 3 : Enabled/Disabled
Beep On Error
When this option is enabled, KDC makes a beep sound when it fails to read a MS card.
Encrypt MSR Data(KDC415/425/430 only)
If enabled, KDC415/425/430 sends MSR data with AES encrypted.
Options: Enabled/Disabled
AES Key length(KDC415/425/430 only)
Specify the AES key length.
Options: 128bits/192bits/256bits
Card Type
The user may select which type of MS card to read.
ISO
OTHER 1
AAMVA
JIS(KDC500 only)
Track Separator(KDC415/425/430 only)
Specify the separator which will be added between track data
Options: None, Space, Comma, Semicolon, CR, LF, CR&LF, Tab
Attach SS/ES
When this option is enabled, KDC does not exclude the Start Sentinal(SS) and End
Sentinal(ES) control characters in the track data when it sends the card data to the
connected Host device.
Partial Data(KDC415/425/430 only)
Enables the user to transfer partial MSR data. The user defines the start position and
KDC User YOUR KDC
97
number of characters to be transferred.
Start position
This option specifies the start position of data.
No of char(s)
This option specifies the length of data. The ‘0’ means all data.
Action
This option selects if erasing or taking the specified data.

KDC User YOUR KDC
98
ICCR Config Menu – KDC500
Power
Turning ICCR(IC Card Reader) on or off
Options: Enable/Disable
IFD Number
This option shows the EMV IFD(Interface Device) number.
Config Number
The option shows the stored EMV Contact Configuration number.

KDC User YOUR KDC
99
SystemConfig Menu
Memory Size (3.0+ version only, KDC500 doesn’t support)
The user may select how much memory to divide between normal data memory and
application database memory.
The KDC will erase all stored data upon changing the partition size.
The user should enter the following key sequence to change the partition.
UP button + UP button + DOWN button + DOWN button + SCAN button
Memory Status
In this option, users may checks the number of stored barcodes and memory usage.
Reset Memory
In this option, users may reset KDC memory by erasing all stored barcodes,
applications, and BT registry. KDC500 only erase all stored barcodes.
Auto Erase
If enabled, this feature erases stored barcodes on the KDC once the ‘Buffer Full’
condition is reached.
Sleep Timeout
This option Enables users to set the amount of time the KDC waits before going to
sleep
(when not being used).
Auto Power Off (KDC250G/350G)
Bluetooth: Enabled/Disabled
GPS: Enabled/Disabled
Power Off Time:0(Never), 5, 10, 20, 30, 60, 120 minutes
Date/Time
In this option, users may set the date and time of the KDC, which may also be set using
KTSync.(except KDC500)
Battery
This option shows the current status of battery power level.
Version
This option shows the KDC firmware version and serial number.
KDC500 displays only firmware version.

KDC User YOUR KDC
100
Serial Number(KDC500 only)
KDC500 displays the serial number
Button Lock
This option enables the user to lock or unlock the KDC scan and scroll
buttons.(KDC500 doesn’t support)
Beep Alert
Beep Sound: Enables or disables KDC beep sound.
Power On Beep: Enables or disables beep sound when KDC power is on.
Beep On Connect: Enables or disables beep sound when KDC is connected to
the host.
Beep On Scan: Enables or disables beep sound when KDC is scanning.
Beep On MS Card (KDC500 only) : Enables or disables beep sound when KDC
reads a MS Card.
Beep On IC Card (KDC500 only) : Enables or disables beep sound when KDC
reads an EMV Contact Card.
Beep On NFC Card (KDC500 only) : Enables or disables beep sound when
KDC reads an NFC Tag or EMV Contactless Card.
Beep Volume
This option enables the user to adjust the beep volume from High to Low.
MFi Mode (KDC20i/30i/200i/250i/270i/300i/350i/400i/470i)
This option Enables user to enable or disable MFi mode. MFi mode supports SPP and
MFi Bluetooth profiles. Non-MFi mode supports SPP, SPP2.0, HID iOS and HID normal.
Vibrator(KDC20/30/270/350)
Enables, disables and configure KDC vibrator.
There are two additional options for KDC vibrator configuration.
o Scan Success Specify the number of vibration when scan
successfully.
o Scan Failure Specify the number of vibration when scan failed.
Auto Exit
This option enables KDC to automatically exit KDC Menus.

KDC User YOUR KDC
101
Port Status
This option enables users to enable or disable KDC port messages.
Display Format
There are various selections of display format; Time & Battery, Type & Time, Type &
Battery, Memory Status, Barcode only and Graphics.
The Graphics option enables to display ‘O’ for scan success and ‘X’ for scan failure.
Menu Barcode
This option enables users to enable or disable Honeywell special barcodes
(KDC300/350C/500C only).
Scrolling
This option enables users to enable or disable display scrolling for a barcode with
more than 40 characters.(KDC500 doesn’t support)
Brightness
This option enables users to adjust brightness of display.
Keypad(KDC350/500)
This option enables users to enter data by using keypad.
Language(Version 3.0+, KDC500)
This option enables users to select KDC display languages.
The supported languages are as following.
None – Languages is not supported. Default is an English.
US(English)
French
Italian
Spanish
Korean
Japanese
KDC500 only supports US(English), Korean and Japanese.

KDC User YOUR KDC
102
Factory Default
By selecting this option, users may reset KDC options to factory default settings.
KDC User YOUR KDC
103
Key Mgmt Menu– KDC500
Stored Keys : Displays all the encryption keys stored in the KDC500.
Inject Keys : In this menu, the user can inject the necessary encryption keys
via Key Loader device.

KDC User YOUR KDC
104
Sensitive Menu – KDC500
KDC500 Sensitive menu has sub menus which can impact on the KDC500 security
services. KDC500 requires two passwords for the Sensitive menu group access in order
to ensure only authorized people can utilize the sensitive services. The default
passwords are 0000000 and 11111111.
For PCI PTS compliance, the default passwords should be changed prior to
use. Without the default passwords change, KDC500 declines all the
payment related service requests; such as MS Card Read, IC Card Insertion,
PIN Entry, etc.
Set Date/Time
In this menu, the user can set the date and time of the KDC500.
Set Self-Test
The user can set the time for the Self-Test in this menu. In PCI PTS, it requires to
perform the Self-Test(Firmware and stored key authentication) at least once in 24
hours.
Set Passwords
In this menu, the user can change the current passwords to access the Sensitive
Menu.
Key Mgmt
Stored Keys : Displays all the encryption keys stored in the KDC500.
Inject Keys : In this menu, the user can inject the necessary encryption keys
via Key Loader device.
Clear Keys : In this menu, the user can clear all the encryption keys stored in
the KDC500 except the Firmware Update Authentication key which is loaded
during the manufacturing process.
Card Encrypt
Note
KDC User YOUR KDC
105
This menu allows user to choose the encryption algorithm for the sensitive card data
from the list below.
Plaintext
T-DES
AES

KDC User YOUR KDC
106
3.4 LED Status
Table 5 - Explanation of LEDs
3.5 Empty Battery
KDC100/200/250/270/300/350
The KDC will display the message
Empty Battery Connect USB
when the battery is
empty. Please charge the KDC IMMEDIATELY to prevent any interruptions while it is
collecting data.
KDC20/30/400/470
Under 30% - Orange LED flickers at 1-second-intervals for 5 seconds every
minute.
Under 20% - Orange LED flickers at 1-second-intervals for 10 seconds every
minute.
Under 10% - Red LED flickers in 1- second-interval for 10 seconds every minute,
and the user will hear a beeping sound.
LED Color
Status
Green
Successful Reading
USB is connected and battery is fully
charged.
MFi mode in pairing mode.
Orange
Low battery
USB is connected and battery is
charging
HID mode is in pairing mode. (except
KDC500)
Red
No reading
SPP mode is in pairing mode.
KDC User YOUR KDC
107
KDC500
Under 10% (Low) Displays the message
Low Battery Please Charge
. KDC500
is still functional, but charge the KDC500 IMMEDIATELY to prevent any
interruptions while it is collecting data.
Under 5% (Empty) - Displays the message
Empty Battery Please Charge
.
KDC500 is not functional any longer.
3.6 Buffer Full
The KDC will display the message
Buffer Full
when there is no more space in the flash
memory or the number of collected barcodes reaches the maximum number of stored
barcode. To prevent the loss of data, you should synchronize the data then reset the
memory when this message is displayed.
The 4MB/8MB version KDC reaches the Buffer Full condition in the following
situations:
0.5MB Partition - Collected data size reaches 0.5MB or collected number is
25,600
1MB Partition - Collected data size reaches 1MB or collected number is 51,200
2MB Partition - Collected data size reaches 2MB or collected number is 102,400
3MB Partition - Collected data size reaches 3MB or collected number is 153,600
4MB Partition - Collected data size reaches 4MB or collected number is 204,800
5MB Partition - Collected data size reaches 5MB or collected number is 256,000
6MB Partition - Collected data size reaches 6MB or collected number is 307,200
7MB Partition - Collected data size reaches 7MB or collected number is 358,400
8MB Partition - Collected data size reaches 8MB or collected number is 409,600

KDC User YOUR KDC
108
3.7 Reset Feature (100/200/250/300) or
Power-on/off (KDC20/30/270/350/400/470/500)
The Reset feature enables the user to restart the KDC100/200/250/300 if necessary,
without losing any stored barcode data or option settings. To reset the KDC, follow the
below steps.
1. Press the DOWN and SCAN buttons simultaneously for 5 seconds.
2. When the LEDs illuminate orange, release the buttons.
3. The KDC initial screen, KoamTac Data Collector KDC, displays when reset is
complete.
The KDC stores collected data into flash memory and will not lose data nor
the KDC settings during the reset process.
If you are using the KDC20/30/270/350/470, you may turn the power on and off by
pressing the DOWN and SCAN button simultaneously for 5 seconds. When the LED
light is green, you may release the buttons and the power will be on. When you turn off
the KDC20/30/270/350/470, you will hear a beep sound after pressing the DOWN and
SCAN buttons simultaneously.
If you are using the KDC400 (except KDC470) you may turn the power on and off by
sliding the power switch.
If you are using the KDC500, you can turn the power on and off by pressing the left and
right SCAN buttons simultaneously for 5 seconds. When the display shows KOAMTAC
logo, you may release the buttons and the power will be on. When you turn off the
KDC500, you will see the display shows blank after pressing the left and right SCAN
buttons simultaneously.
Note
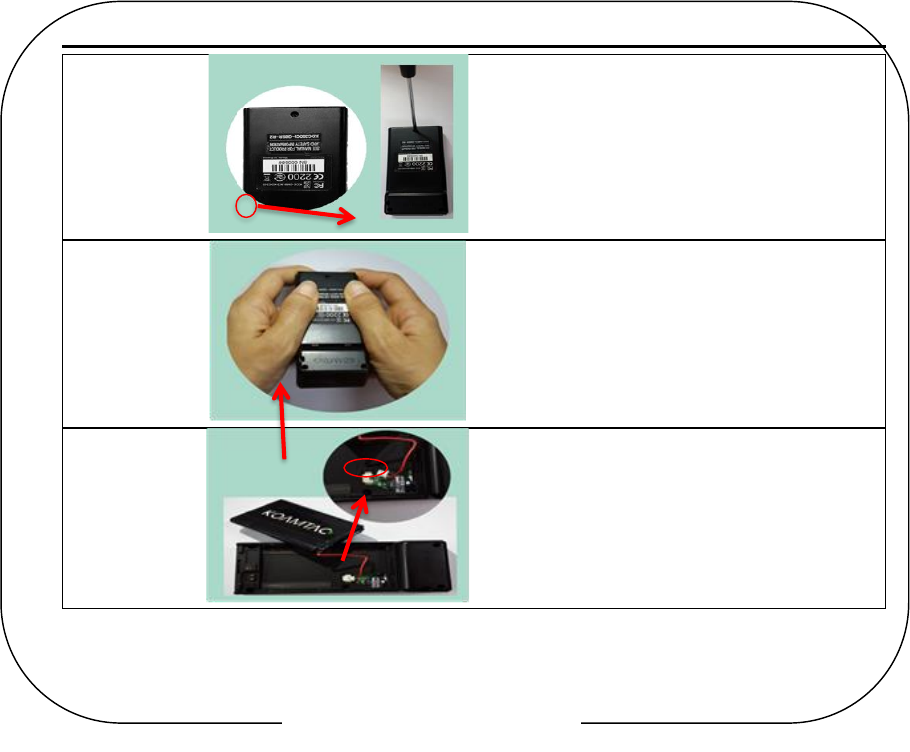
KDC User YOUR KDC
109
1
Unscrew the screw indicated by
the arrow.
2
Remove the battery cover by
pulling it down.
3
Remove the battery.
Pull out the 2 pin connecter
gently.
3.8 Replace Battery
Each KDC comes with a rechargeable, Lithium-polymer (KDC20/100/200) or Lithium-
ion (KDC30/250/300/270/350/400/470/500) battery. The battery may be recharged
from any USB port or KDC charging cradle, and may be recharged about 300 times
before it needs to be replaced. KOAMTAC recommends replacing the battery annually,
as a declining battery will cause noticeable performance degradation in the KDC.
Replacement batteries may be purchased from a KDC reseller. Batteries should be
disposed of properly as according to the WEEE regulation. The steps for replacing a
battery are as follows.
1. Disassemble the KDC back cover by unscrewing the middle screw.
2. Remove the old battery and replace with a new battery.
3. Reassemble the back cover.
Figure 15 - Replacing a Battery

KDC User Manual BLUETOOTH
110
4. Bluetooth -
KDC20/30/200/250/270/300/350/400/470/500
The KDC20/30/200/250/270/300/350/400/470 supports HID (Human Interface Device)
normal, HID iOS, SPP (Serial Port Profile) and SPP2.0 profiles. The KDC500 supports
SPP only. The KDC20i/30i/200i/250i/270i/300i/350i/400i/470i/500i supports MFi (Made
for iPhone/iPad/iPod touch) profiles too. They are compatible with the following
Bluetooth stacks:
BlueSoleil
Broadcom (Widcomm)
Microsoft Windows XP, Vista, 7, 8, 10, and Mobile 5.0+
Toshiba
For PCI PTS compliance, KDC500 can support only SPP and MFi profiles.
The KDC200/250/270/300/350/500’s
Bluetooth
options may be configured by using the
KDC menu, PC KTSync and special barcodes. The KDC20/30/400/470’s Bluetooth
options may be configured by using the PC KTSync and special barcodes.
4.1 Bluetooth Config
Connect Device
The KDC supports both Serial Port Profile (SPP) and Human Interface Device Profile
(HID). The user may choose amongst SPP2.0, SPP (2.1), HID normal, or HID iOS profiles
to communicate with the host device. An additional MFi (Made for iPhone/iPad/iPod
touch) option is available for KDC20i/30i/200i/250i/270i/300i/350i/400i/470i/500i models
when MFi mode is enabled.(SystemConfig Menu). KDC500i doesn’t have MFi mode
option and supports MFi by default.
If the BT Toggle option(KDC500 doesn’t support) in BT Config is enabled, the user may
connect and disconnect the Bluetooth connection with the host device by pressing the
UP and DOWN buttons. It normally takes 3 seconds to connect and 1 second to
disconnect. This is a very useful feature for iPhone and iPad applications.
Note

KDC User Manual BLUETOOTH
111
The user may also enable and disable the iPhone and iPad soft keyboard instantly by
using this BT Toggle option in HID mode.
The UP button shows the Bluetooth connection status and the DOWN button shows the
time when this option is disabled.
The user should first un-pair the KDC from the Bluetooth host to change the
Connect Device setting on the scanner to a different Bluetooth profile.
Auto Connect
This feature enables the KDC to automatically connect to the host device when the
KDC is powered on. KDC500 doesn’t support Auto Connect.
IMPORTANT: Until the host device and the KDC have been fully tested, it is strongly
recommended that this feature be set to ‘Disabled’, because a host device that does not
support this feature could cause problems, such as power loss or upload delays.
The KDC automatically tries to connect to the host 10 times within the
duration of two minutes when
Bluetooth
power is ON,
Bluetooth
is
disconnected, Auto Connect is enabled, and system Sleep Timeout is set
to 5 seconds.
Auto Reconnect
This feature enables the KDC to automatically connect to the host device when the
KDC is disconnected from a host.
The KDC tries to connect automatically to the host 10 times within the
duration of two minutes if Bluetooth is disconnected.
Auto Power On
The Auto Power On option Enables the KDC to automatically power on Bluetooth
when the SCAN button is pressed. The default setting is Disabled. KDC500 doesn’t
support this option.
Users should press the scan button for the duration defined in the BT Config
Power-on time option. The host program may have to open the COM port
again in order to be reconnected with the KDC.
PWR ON Time
The PWR On Time option works in conjunction with the Auto Power On option. The
default value is Disabled. If the KDC Bluetooth power is off, you may turn on the
Note
Note
Note
Note
KDC User Manual BLUETOOTH
112
Bluetooth power by pressing the SCAN button for the PWR On Time option value.
KDC500 doesn’t support this option.
Auto Power Off
The Auto Power Off option works in conjunction with the PWR Off Time option. This
option Enables the KDC to power off Bluetooth automatically when the KDC is NOT
CONNECTED to the host for the time duration specified in the PWR Off Time option.
KDC500 doesn’t support this option.
The default for this option is disabled. It is strongly recommended to keep it enabled to
maximize the operation time of the KDC. If Auto Power Off is Enabled, Bluetooth may
be manually powered off before the specified time in the PWR off time option.
It is recommended to enable ‘Auto Power On’ option if this option is enabled. User
doesn’t need to turn on the Bluetooth power manually with this configuration.
Beep Warning
The KDC beeps to warn user to power off the Bluetooth if this option is enabled with
five short beeps when the following condition meets..
1. Bluetooth power is ON
2. KDC is disconnected
3. Auto Power Off is DISABLED
KDC500 doesn’t support this option.
PWR OFF Time
The PWR Off Time option works in conjunction with the Auto Power Off option. If Auto
Power Off is Enabled, the KDC powers off Bluetooth when the duration of time
specified in the PWR Off Time option is met and the KDC is NOT CONNECTED to the
host. The time setting for this option is from one (1) minute to 30 minutes. The default
is five (5) minutes. KDC500 doesn’t support this option.
PowerOFF Msg
The KDC sends a Bluetooth power off message “BTOFF” to the host when KDC is
connected from host if this option is enabled. KDC500 doesn’t support this option.
MAC Address
The user may verify the KDC Bluetooth MAC Address.
KDC User Manual BLUETOOTH
113
FW Version
The user may verify the KDC Bluetooth firmware version in this menu.
Wakeup Nulls
The KDC sends three leading Null bytes to wake up the
Bluetooth
connected device.
This feature may be disabled if the
Bluetooth
connected device does not require
additional bytes to wake up. KDC500 doesn’t support this option.
Autolock Time
The iPhone/iPad/iPod touch loses incoming Bluetooth data while in sleep mode. To
prevent data loss, you may set the KDC Autolock time to the same Autolock time of your
iPhone/iPad/iPod touch, to use the automatic wakeup feature in HID mode. KDC500
doesn’t support this option.
If the Autolock time is set to more than one minute and the barcode scan interval is larger
than the auto-lock time, there will be a one second delay of barcode transmission. The
auto-lock time would be set as 0, 1, 2, 3, 4, 5, 10, 15 minutes. 0 means the
iPhone/iPad/iPod touch never enters sleep mode. This option may not need from iOS 5.x.
HID Keyboard
The user may select an international keyboard – English, German, French, Spanish, or
Italian. It is also required to set the host keyboard with the same keyboard as selected
in this menu. KDC500 doesn’t support this option.
HID Initial and Inter-Character Delay
Certain applications may not process HID input fast enough and may lose some
characters during transmission. Users should increase initial and inter-character delay
to prevent data loss during HID transmission. KDC500 doesn’t support this option.
HID Initial Delay: Defines the initial delay between 1 sec to 10 sec before
data transmission in HID mode.
HID Inter-character Delay: Defines the inter-character delay between
10msec to 100msec in HID mode.
Control Character Transmission in HID mode
Control characters between ASCII values 0x00 and 0x1F may be replaced by the
ALT+Numpad or ^+Character or replaced with ‘|'. KDC500 doesn’t support this option.

KDC User Manual BLUETOOTH
114
Disabled Transmit the original control character.
Alt+Numpad Transmit Alt+ ASCII value from Numpad.
^+Character Control characters would be substituted as shown in the
following table.
Replacement to | Control characters would be substituted as “|”.
Control
Char
Transmit
Chars
Control
Char
Transmit
Chars
Control
Char
Transmit
Chars
Control
Char
Transmit
Chars
0x01
^A
0x0B
^K
0x14
^T
0x1D
^]
0x02
^B
0x0C
^L
0x15
^U
0x1E
^^
0x03
^C
0x0E
^N
0x16
^V
0x1F
^_
0x04
^D
0x0F
^O
0x17
^W
0x05
^E
0x10
^P
0x18
^X
0x06
^F
0x11
^Q
0x19
^Y
0x07
^G
0x12
^R
0x1A
^Z
0x09
^I
0x13
^S
0x1C
^\
Function Key Transmission in HID mode
The user may send F1 to F12 function keys by scanning special barcodes in HID mode.
KDC500 doesn’t support this option.
Disconnect/Reconnect/BT(HID) Toggle
The user may disconnect or reconnect the Bluetooth connection, and toggle the soft
keyboard using side buttons. KDC500 doesn’t support this option.
Bluetooth
Profile
UP Key
DOWN Key
(DisconnectBTN
disabled)
DOWN Key
(DisconnectBTN
enabled)
SPP
Reconnect
Does nothing
Releases BT
connection
HID iOS
Reconnect
Soft Keyboard Toggle
if pressing less than
3sec
Soft Keyboard Toggle
if pressing less than
3sec,

KDC User Manual BLUETOOTH
115
Some SPP host doesn’t support Reconnection from KDC.
Releases BT
connection
MFi
Reconnect
Does nothing
Releases BT
connection
SPP 2.0
Reconnect
Does nothing
Releases BT
connection
HID
normal
Reconnect
Does nothing
Releases BT
connection
Note

KDC User Manual BLUETOOTH
116
4.2 Bluetooth Service
Power
The POWER option enables the user to Enable or Disable the Bluetooth functionality of
the KDC. To use Bluetooth, this option must be set to enable.
However, like all devices enabled for Bluetooth, the KDC will constantly search to
connect with a Bluetooth host when set to enable. Constant searching for Bluetooth
devices increases power consumption.
Unless you are using Bluetooth with your KDC, this option should be set to disable.
IMPORTANT: To prevent unnecessary power problems, it is strongly recommended that
the POWER option be set to disable if the KDC is idle for an extended period of time.
Pairing
Before you are able to use Bluetooth, the KDC must be paired with the host device. This
pairing process needs to be completed only once with each host device. After pairing,
the host device will always recognize the KDC as a Bluetooth device, unless the
Bluetooth configuration is modified. If it is modified, you may need to pair the devices
again.
IMPORTANT: The host device must be configured for Bluetooth before it may be
paired to the KDC.
KDC with Bluetooth Spec2.1+EDR does not prompt Pin code entry menu.
To pair the KDC20/30/200/250/270/300/350/400/470 with the host, follow these
instructions:
1. Select Pairing from the Bluetooth menu. The message “Pairing started…”
will be displayed.
2.
The “Pairing Done” message will display when the Bluetooth connection
is successfully
established. The connection must be established before the
pairing timeout of 90 seconds.
If “Pairing failed...” message displays, the Bluetooth connection with the
host device failed. If the message “Connected” displays, a Bluetooth
connection is established.
It is possible for the message “Pairing failed...” to display on the KDC while
the host device displays the “Connected” message. If this occurs, a
Note

KDC User Manual BLUETOOTH
117
Bluetooth connection has been established.
For KDC500 paring with the host, Numeric Comparions pairing method is required for
PCI PTS complicance. See the section 2.1 Bluetooth Paring for the details.
Discovering
KDC200/250/270/300/350 starts to search for neighboring
Bluetooth
devices if the
Discovering menu is executed. It will take about 30 seconds to finish searching and to
list available neighboring
Bluetooth
devices. Another option is to enter the
corresponding Bluetooth MAC address in the KTSync Bluetooth menu, instead of
waiting for the KDC to search for neighborhood
Bluetooth
devices. KDC20/30/400/470
only supports via KTSync configuration. KDC500 doesn’t support this feature.
Connect To
This option lets you easily connect the KDC to
Bluetooth
devices that have been either
previously registered in KTSync under the File Menu or discovered/connected from the
KDC
Bluetooth
Service menu. KDC20/30/400/470 only supports via KTSync
configuration. KDC500 doesn’t support this feature.
There could be an interoperability issue depending on the corresponding
device Bluetooth stack. The master Bluetooth device may request that you
to follow the master Bluetooth device’s security procedures, if the KDC tries
to connect to the master Bluetooth device.
HID Sync
The user may synchronize stored barcode data over HID using the HID Sync option.
The KDC will start to transmit all stored barcode data upon execution of the HID Sync
option. KDC500 doesn’t support this feature.
Tips
Pair and connect KDC20i/30i/200i/250i/270i/300i/350i/400i/470i and iOS4.0+ in HID iOS
mode
Users have to disable the MFi option in System > MFi menu and change
the Bluetooth profile to HID-iOS to use HID Bluetooth profiles
.
Note
Note
KDC User Manual BLUETOOTH
118
Users have to RESET the iPhone/iPad/iPod touch in order to change HID
to MFi mode, and vice versa, after removing a previous KDC connection.
KDC with Bluetooth Spec2.1+EDR does not prompt Pin code entry menu.
KDC with Bluetooth Spec. 2.1+EDR stack does not require 4 or 6 digits PIN
digits entry
Follow the below steps in order to pair and connect KDC models for MFi and iOS4.0+ in
HID mode.
1. Go to the MFi menu of KDC SystemConfig Menu
2. Change MFi option to Disabled
3. Change ConnectDevice to HID iOS mode
4. Remove previous KDC connection and RESET the device
5. Change KDC to Pairing mode
6. The iPhone/iPad/iPod touch will find a new device as
Keyboard
7. Click
Keyboard
device
iOS Soft Keyboard Toggling using BT Toggle Option.
Users need to select the option to use this feature in BT Config>BT Toggle. Press the DOWN
button to toggle a soft keyboard.
Auto Pairing
For SPP and MFi mode, user used to select host profile before pairing. However, user
doesn’t need to select host device profile if this option is enabled. KDC automatically
detects if host device is a SPP or MFi mode. This option is supported from KDC
Bluetooth firmware version 2.2.O.

KDC User Manual SYNCHRONIZATION
119
5. Synchronization
When barcode data is collected, it must be uploaded to your application. KTSync,
which is bundled with the KDC, is a software that Enables barcode data to be
uploaded to any PC, PDA, or smartphone running Android 2.1+, Apple iOS3.1.3+,
Blackberry,Mac and Windows XP/Vista/7/8/10/Mobile 5.0+. It has three major
functions. (Windows XP/Vista/7/8/10 version supports all of the following features.
Tablet, PDA and Smartphone versions support only limited features of PC KTSync.)
Synchronization - Provides data upload functionality to your applications.
Keyboard Emulator - Enables scanned data to be uploaded directly into your
application as if the data were being entered manually with a keyboard.
Application Generation - Enables users to create custom applications or
download predefined applications such as Master-Slave, Pick/Bin, DB Lookup
and Inventory.
Additional functions include:
Prefix and Suffix add-ons to eliminate manual data entry.
Symbology and Scan Option selections.
Barcode Wedging options.
KDC Menu configurations.
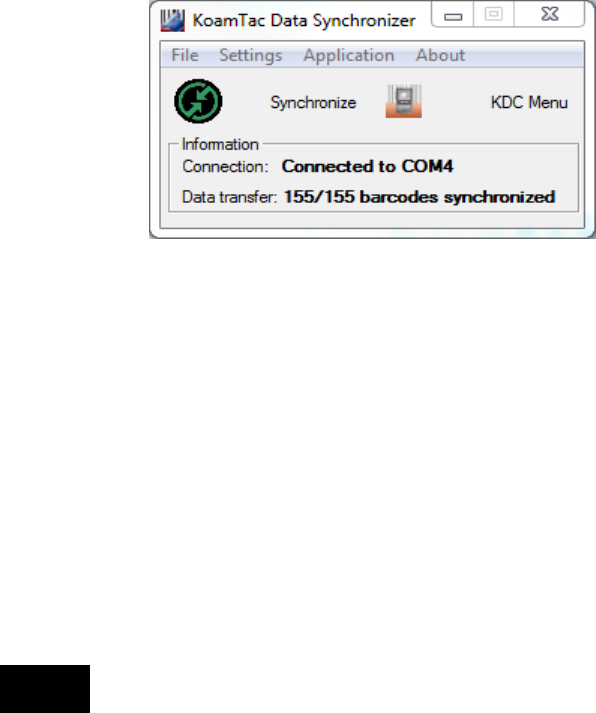
KDC User Manual SYNCHRONIZATION
120
5.1 KTSync Menu
KTSync was installed on your PC during the initial installation process. Before data
may be uploaded to any host device, KTSync must be launched on the host and
configured to recognize the KDC. The following screen displays when KTSync is
launched:
File Menu
Connect: This option displays the Serial port (COM#) assigned to KDC. You
may also use this option to manually assign the Serial port. The Serial port
assigned to KDC may be found under Windows Device Manager. The port
assignment is used by KTSync for synchronizing data from the KDC to the host.
Synchronize: This option manually tells the KDC to synchronize data with the
host. While data is being synchronized, KTSync menu options are unavailable
Please do not use your computer during data synchronization.
Bluetooth: This option is not available on KDC100/KDC500. Users may register
a MAC address to be directly connected by
KDC20/30/200/250/270/300/350/400/470.
Configuration: This option Enables users to set different KDCs with same
settings by exporting and importing settings from one KDC to the other.
Exit: This option ends the KTSync program. You must re-run KTSync before you
may synchronize data on the KDC.
Note
Figure 16 - KTSync® Synchronizer Initial
Screen
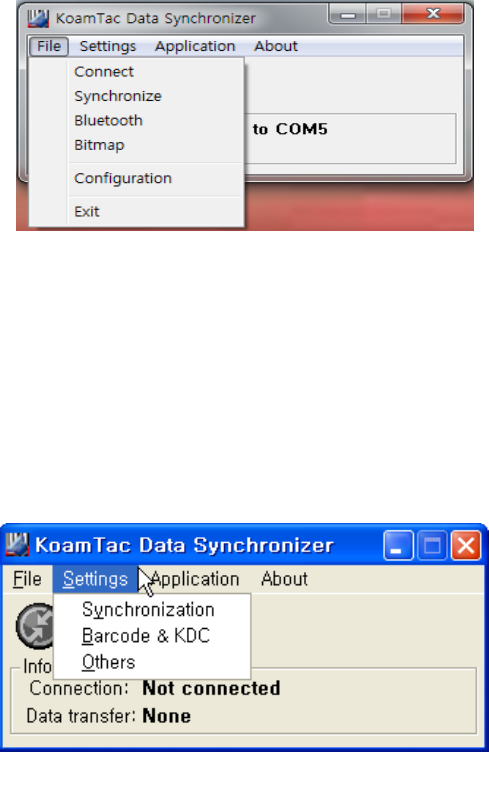
KDC User Manual SYNCHRONIZATION
121
Settings Menu
Synchronization: Select Synchronize options.
Barcode & KDC: Select Barcode and KDC options.
Others: Select Auto Connection and/or Synchronization Confirmation options.
Application Menu(KDC500 doesn’t support Application)
Generation: Create user application or download predefined application.
DB Lookup: Enables users to download DB into KDC and display barcode
description field.
Master/Slave: The user defines a master barcode for comparison with one or
more slave barcodes.
Pick/BIN: The user defines Pick ID and the barcode symbology for comparison
with a defined Bin.
Inventory: Users may count inventories. Inventory description will be displayed
if inventory DB is downloaded into the KDC.
Figure 18 – Setting Menu
Figure 17 - File Menu
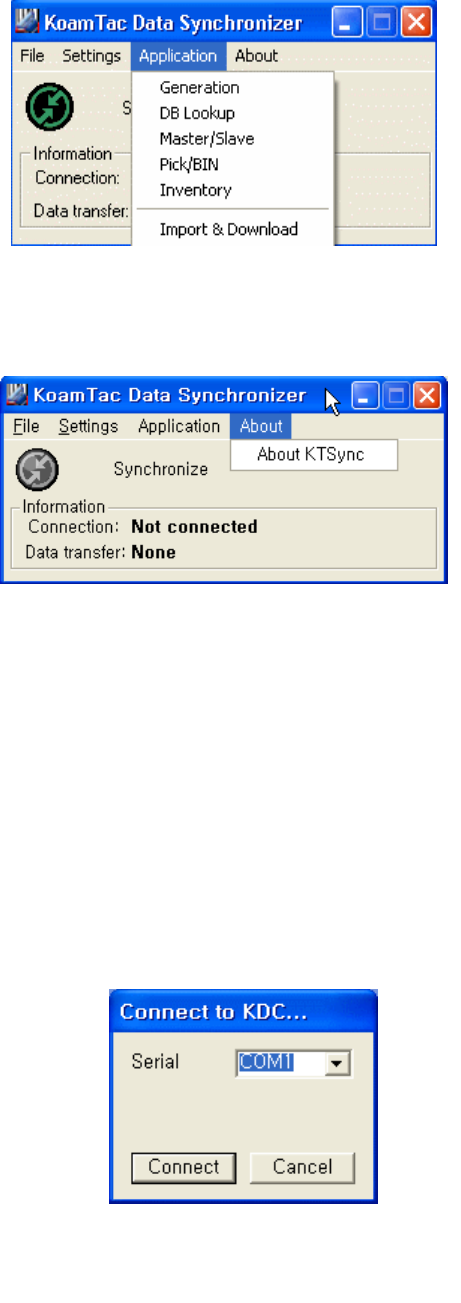
KDC User Manual SYNCHRONIZATION
122
About Menu - KTSync - Version Information
5.2 File Menu
Connect to KDC
The KDC automatically connects to a COM port when connected to the PC’s USB port.
If needed, the user may manually assign the KDC COM port by using the KTSync
Connection submenu under the File menu.
The COM port assignment is found in the Windows Device Manager.
Figure 20 - About Menu
Figure 19 - Application Menu
Figure 21 - COM Port Selection for KDC

KDC User Manual SYNCHRONIZATION
123
KTSync will not connect to the KDC if it is in the KDC Menus. You must EXIT
from the KDC Menus.
If KTSync fails to connect automatically to the KDC, please follow these
steps:
1. Exit KTSync.
2. Check to make sure that you have connected the KDC to a USB port on
your PC.
3. Make sure that the user is using the cable provided with the KDC.
4. Check to make sure that the KDC is not in KDC Mode Menu.
5. Restart KTSync.
You may manually assign the COM port using KTSync Connect option
under the File menu.
Synchronize
Located under the File Menu, this option enables the user to manually synchronize
data on KDC with the host. This option is similar to clicking on the Synchronize button
in the KoamTac Data Synchronizer box.
Erase KDC Memory
Erase all stored data in the KDC internal memory.
Note
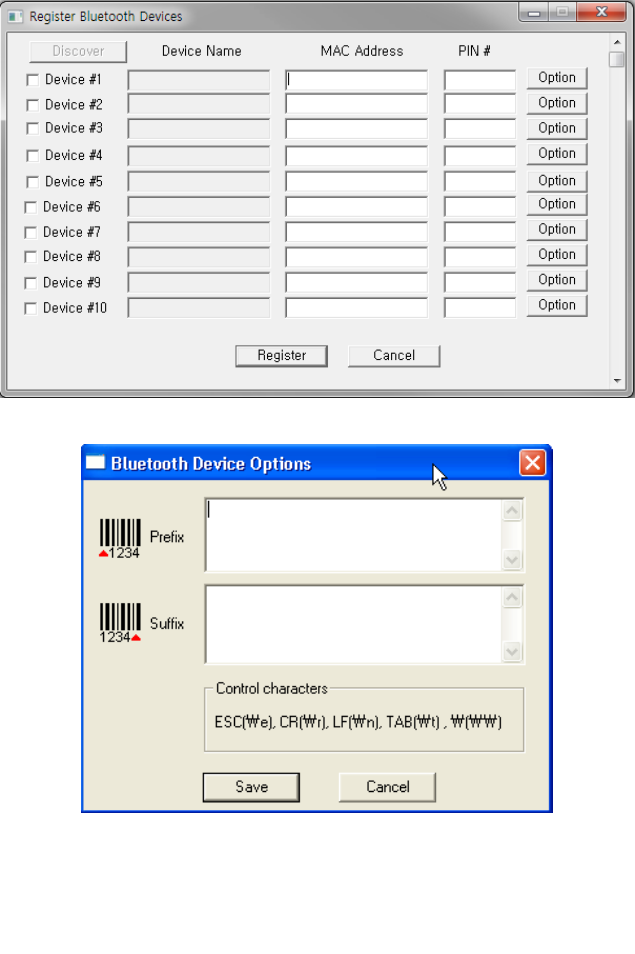
KDC User Manual SYNCHRONIZATION
124
Bluetooth
This menu option enables the user to register up to ten Bluetooth devices, including
their MAC address, PIN #, and optional prefixes or suffixes. This option enables direct
Bluetooth connection between KDC and other Bluetooth devices, such as a
Bluetooth
printer. The user should choose a
Bluetooth
device to be connected in “Connect to”
menu in KDC
Bluetooth
Service menu.(KDC500 doesn’t support this feature)
Figure 22 - Bluetooth Device
Registry
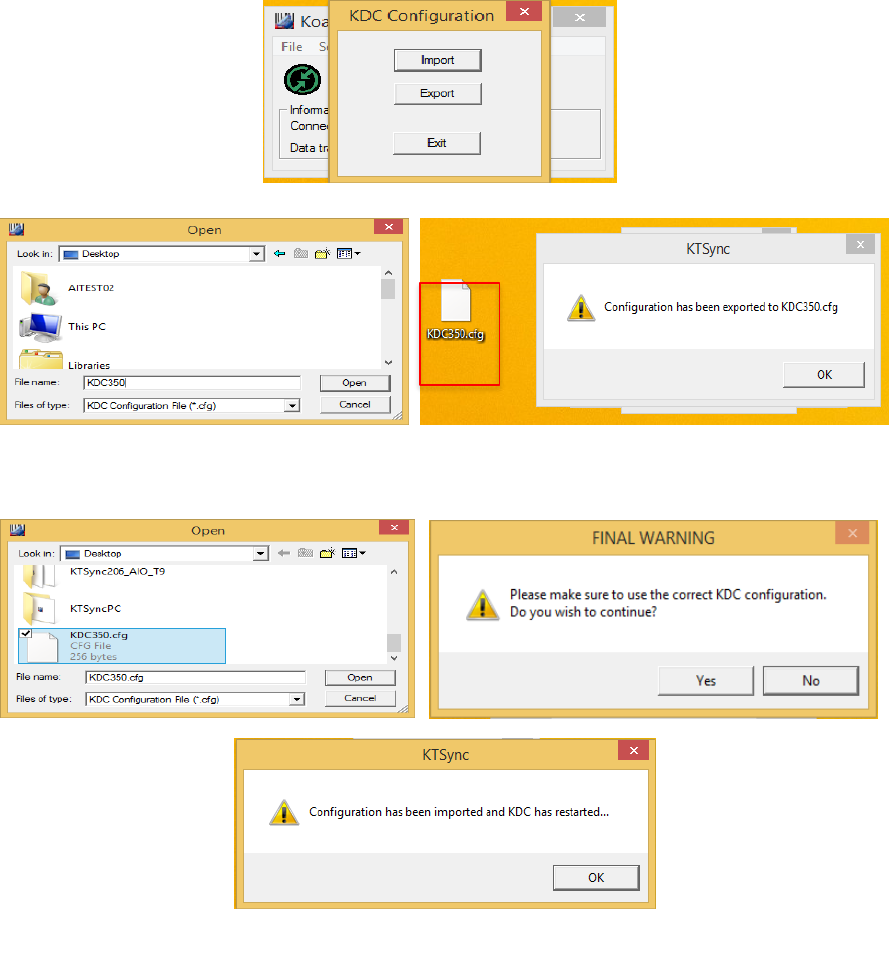
KDC User Manual SYNCHRONIZATION
125
Configuration
This menu is useful for the users who need to configure different KDCs with same
settings. In this menu, you may export settings from a KDC to your computer and
import it to other KDCs.
When you select Configuration in File menu, you will need to choose either Export or
Import. First, select Export. You name the settings file, press Open, and it is exported to
your computer. Second, connect a different KDC to your computer and import the
settings file to the KDC by selecting Import in the Configuration menu. Once
configuration has been finished, KDC will restart.
Export
Import
Figure 23 – Configuration
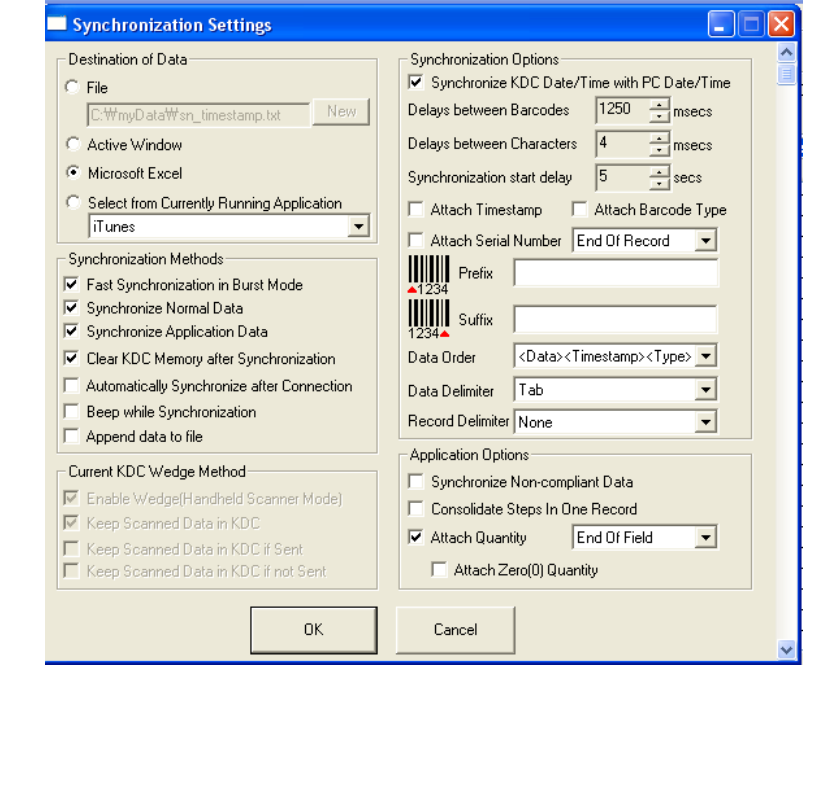
KDC User Manual SYNCHRONIZATION
126
Synchronization Settings
KTSync provides several synchronization options for synchronizing data from your KDC
to host devices.
Destination of Data
When barcode data is uploaded to the host device, you must assign a destination for
the data. Destination of Data options include:(This option is applied to only Windows
XP/Vista/7/8/10)
Figure 24 - KTSync Synchronization Settings

KDC User Manual SYNCHRONIZATION
127
File - This option means data will be saved in the assigned filename. You may
select a different target directory by clicking the New icon. The default directory is
C:\MyData\sn_timestamp.txt. If this directory is not created, you will be prompted to
create it before data may be uploaded to a file.
Active Window - This option means scanned barcode data is sent directly to the
active program running on your device as if the data is being entered directly from
a keyboard.
Microsoft Excel - This option means barcode data is being imported directly into
Microsoft’s Excel. Various parameters may be set when uploading data to Excel.
Select from Current Running Application – This option enables the user to select a
currently running application for data synchronization.
• Data synchronization begins immediately if “Automatically
Synchronize after Connection” is selected. If not selected, data
synchronization is started manually by the user.
• Users SHOULD NOT operate the PC during the synchronization
process. It may interrupt the process causing unreliable results.
Synchronization Methods
Fast Synchronization in Burst Mode
The KDC may synchronize data to a host device in Burst mode or Sequential mode.
Burst mode provides the fastest synchronization process but could result in error in a
poor
Bluetooth
environment. Fast synchronization in Burst mode is only recommended
with USB connection.
Synchronize Normal Data
If Synchronize Normal Data option is selected, the KDC will synchronize only Normal
Data in KDC memory. If the user wants all data in KDC memory synchronized, the user
should select Synchronize Normal Data and Synchronize Application Data.
Synchronize Application Data
If Synchronize Application Data option is selected, the KDC will synchronize only
Application Data in KDC memory. If the user want all data in KDC memory
synchronized, the user should select Synchronize Normal Data and Synchronize
Application Data.
Clear KDC Memory after Synchronization
Note

KDC User Manual SYNCHRONIZATION
128
If this option is selected, the stored barcode data is cleared from the KDC memory after
synchronization.
It is important to clear the KDC memory periodically to prevent a Buffer Full
message. Buffer Full prevents the KDC from storing additional data. Stored
barcode data may also be deleted using the Reset Memory feature on the KDC.
Automatically Synchronize after Connection
This option lets the user automatically synchronize collected data immediately to the
computer when the KDC is connected to the host.
IMPORTANT: Before selecting this option, remember to configure all options
properly.
Data synchronization may be done manually by clicking the synchronize icon if
this option is not selected.
Beep while Synchronization
The user may enable or disable the beep tone during the synchronization process. If
this option is selected, a beep is sounded every time barcode data is synchronized.
The KDC beeps 5 times when the synchronization process is complete.
Append Data to File
If the user has specified a file name and Append data to File option is enabled, KTSync
will append data to the existing file instead of creating a new file.
Current KDC Wedge Method
The KDC may be configured in one of five wedge/store modes:
Wedge Only - Scanned data is transmitted to the host. The KDC does not store
scanned data.
Wedge & Store - Scanned data is stored in the KDC and transmitted to the
host.
Store Only - Scanned data is stored in the KDC but NOT transmitted to the
host.
Save if Sent - Scanned data is stored in the KDC ONLY if transmission to the
host is successful.
Save if Not Sent - Scanned data is stored in the KDC ONLY if transmission to
the host is unsuccessful.

KDC User Manual SYNCHRONIZATION
129
Enable Wedge (Handheld Scanner Mode)
This option will be checked if Wedge Only or Wedge & Store option is selected.
Keep Scan Data in KDC
This option will be checked if Store Only or Wedge & Store option is selected.
Synchronization Options
Synchronize KDC Time with PC Time when Connected
This option enables the user to synchronize the KDC date and time with the host date
and time. Synchronization of date and time occurs after the data is uploaded to the
host device.
Delays
The user may set transmission delays between barcodes and characters during the
synchronization process. It is important to set proper delays to prevent errors during
the transmission of collected barcodes. Some Windows applications, such as Excel,
require longer delay times.
Attachments
Timestamp, Barcode Type, and Serial Number may be attached to the scanned
barcode by selecting these options. The Serial Number of the KDC may be attached
to the Start or End of Record.
Prefix and Suffix
Enter the characters the user wants to attach to the front (Prefix) or back (Suffix)
of the barcode in the Prefix and Suffix fields.
The character set is any combination of ASCII characters including
alphanumeric, line feed (“\n”), and carriage return (“\r”).
Order and Delimiter
Select Order of Data – Type, Data, and Timestamp
Select the Delimiter between Data – Tab, Space, Comma, and Semicolon
Select the Delimiter between Records – None, LF, CR, Tab, and <LF & CR>

KDC User Manual SYNCHRONIZATION
130
Application Options
Synchronize Non-Compliant Data
The KDC will synchronize both compliant and non-compliant data (filtered data) if
Synchronize Non-Compliant Data option is Enabled.
Consolidate Steps in One Record
KTSync will consolidate the data collected in Step 1 with the data collected in Step 2
and/or Step 3. When Consolidate Steps in One Record is enabled, data will be
consolidated into one record instead of individual data records for each step. If this
option is enabled, non-complete records, i.e. three steps were defined but data was
only collected for two steps, will be discarded.
Attach Quantity
If this option is enabled, quantity will be attached to the left or right of the data.
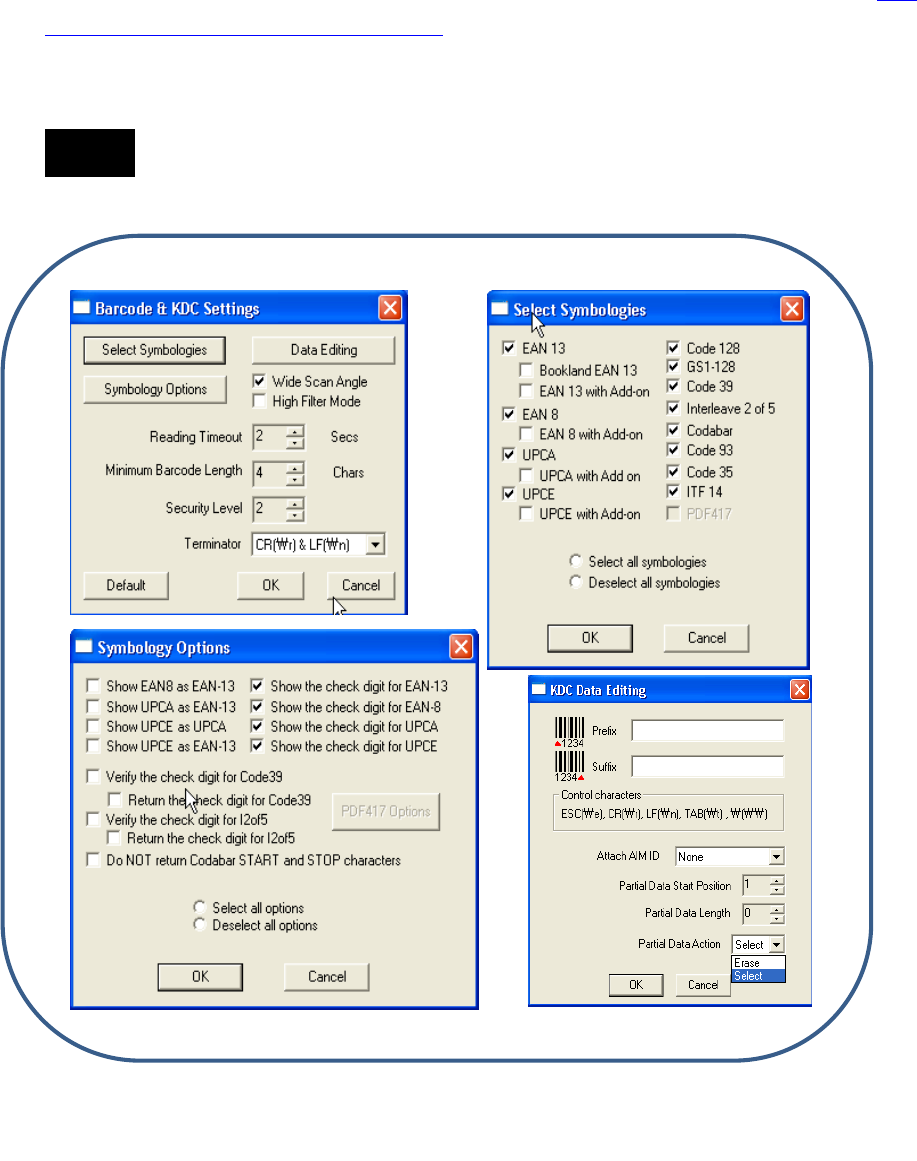
KDC User Manual SYNCHRONIZATION
131
5.3 Barcode & KDC Settings
KTSync enables the user to configure the KDC Scan Options and Barcode Settings.
The configuration options for the KDC using KTSync are similar to the Set Barcodes,
Code Options, Data Editing and Scan Options on the KDC Menu. Please refer to 11.
Appendix A – Barcode & Scan Options for proper barcode settings for the application.
The user must configure barcode and scan options properly for optimal
KDC performance.
Note
Figure 25 - Barcode & KDC Settings, Symbologies, Data Editing and Scan Options

KDC User Manual SYNCHRONIZATION
132
Select Symbologies and Symbology Options
The process for scanning and reading barcodes is delicate and complicated. Although
your KDC is equipped with a high performance scan engine, if configured incorrectly it
may not perform at its peak performance level. To ensure its high performance, the
KDC comes configured to optimize its scan engine technology. Unless you clearly
understand the impact of your changes to the KDC settings, please do not change
factory default settings. Please refer to Appendix A for details. Pressing the Default icon
will reset all symbology related options to factory default settings.
Data Editing Option
Prefix
- Enables the user to add a prefix to scanned data that may then be stored in
KDC or wedged to the host. The Prefix format must be defined in the data format menu
of KTSync. The maximum length for a Prefix is 11 characters.
This Prefix option is different from the Prefix option in KTSync that appends
the prefix to data during synchronization.
Suffix
- Enables the user to add a suffix to scanned data, which may then be stored in
KDC or wedged to the host. The Suffix must be defined in the data format menu of
KTSync. The maximum length for a Suffix is 11 characters.
This Suffix option is different from the Suffix option in KTSync that appends
the suffix to data during synchronization.
AIM ID
- Enables the user to add AIM ID to scanned data, which may then be stored in
KDC or wedged to the host. AIM ID must be defined in data format menu of KTSync.
AIM ID is either added to the end of Prefix or Suffix.
Partial Data
: Enables the user to display and store partial data. The user defines the
start position and number of characters to be displayed and stored.
Select the
x
characters from
y
position
Set Partial Data Start Position to
y
, Partial Data Length to
x,
Partial Data
Note
Note
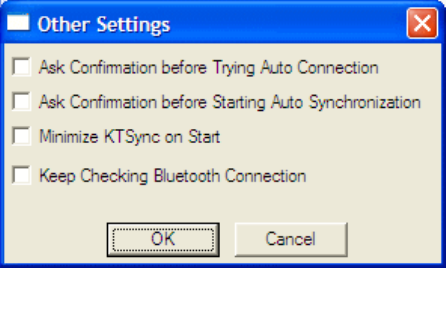
KDC User Manual SYNCHRONIZATION
133
Action to Select.
Partial Data Length
0
selects all characters from
y
position.
Erase the
x
characters from
y
position
Set Partial Data Start Position to
y
, Partial Data Length to
x,
Partial Data
Action to Erase.
Partial Data Length
0
erases all characters from
y
position.
5.4 Other Settings
Other options under the Settings menu allow the user to select four additional settings:
Ask Confirmation before Trying Auto Connection prevents unintentional
launch of KTSync.
Ask Confirmation before Starting Auto Synchronization prevents
unintentional synchronization of data.
Minimize KTSync on Start will minimize KTSync and send it to the tray upon
execution.
Keep Checking
Bluetooth
Connection Enables reconnection of KDC once
Bluetooth
signal is detected. This feature is useful when moving to or from
Bluetooth
host device frequently. KTSync will automatically reconnect
Bluetooth
connection when the user enter an effective
Bluetooth
network
range.
(Not Available on KDC100)
To select any of these settings, click on the box to the left of the setting. A check mark
() will display next to the setting to indicate that it is selected.
Figure 26 - KTSync® Confirmation Settings
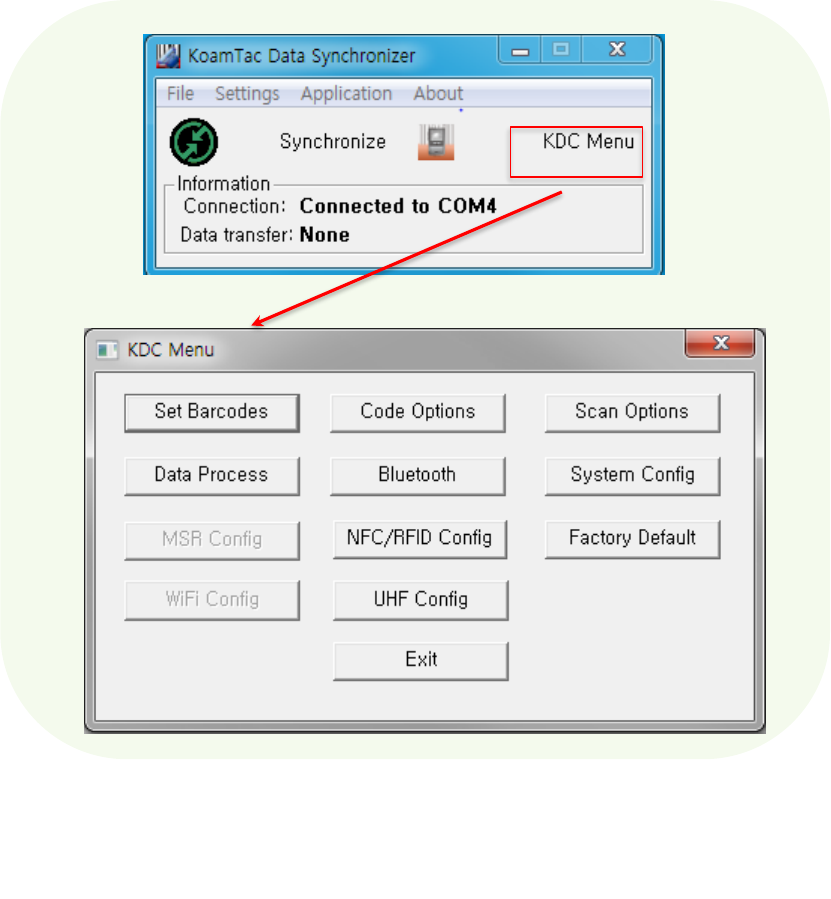
KDC User Manual SYNCHRONIZATION
134
KDC Menu in KTSync
After connecting KDC to PC with a USB cable, run KTSync on your PC and you will see
KDC Menu on the right side of KTSync window. Click KDC Menu, and you may
configure your KDC in KDC Menu window, as shown below.
Figure 27 - KDC Menu in KTSync
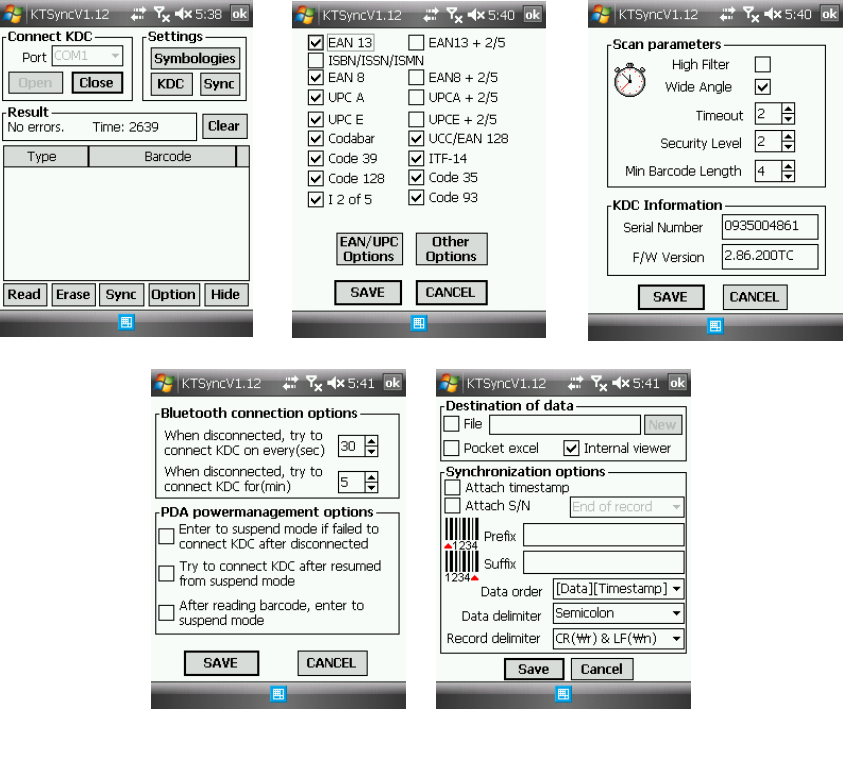
KDC User Manual SYNCHRONIZATION
135
5.5 Mobile pKTSync
pKTSync provides limited functionality for Pocket PC 2003 and Mobile 5.0+ users.
1. Synchronization - Provides data upload functionality to your applications.
2. Keyboard Emulator - Enables scanned data to be uploaded directly into your
application as if the data were being entered manually on a keyboard.
For detailed explanations of these functions, please refer to earlier sections of this
chapter.
WARNING: The user must assign the correct COM port to KDC before using
pKTSync. Please refer to the mobile device manual for details on Bluetooth pairing
and COM port assignment methods.
Figure 28 - Mobile pKTSync

KDC User Manual SYNCHRONIZATION
136
5.6 Android aKTSync
The KTSync provides limited functionality of PC aKTSync to Android users.
aKTSync only supports Android devices with 2.1+ OS version and that are
compatible with BluetoothChat application.
KDC with Bluetooth Spec2.1+EDR doesn’t prompt Pin code entry menu.
KDC and Android Pairing
1. Pairing
Select SPP Bluetooth profile from the KDC ConnectDevice submenu in BT
Config menu.
Search KDCxxx from Android and pair the two devices.
If SPP2.0 is selected, KDCxxx PIN code is “0000”.
2. Connection
Click Connect icon in aKTSync.
Android will list paired
Bluetooth
devices and the user should select the
target KDC.
3. Synchronization: Provides data upload functionality to the applications.
4. Settings: The user may change various Synchronization options in the settings
menu.
5. Wedging: The user may wedge barcode data to any Android application. Press
the home key and launch the target application.
Launch KTSync
1. Download and install aKTSync from the Android Play Store.
2. Change KDC Bluetooth ConnectDevice option to
SPP.
3. Execute Android
Bluetooth
device scan option and KDC
Bluetooth
pairing option.
A. Execute KDC
Bluetooth
Pairing option.
B. Launch Settings on the Android device.
Note
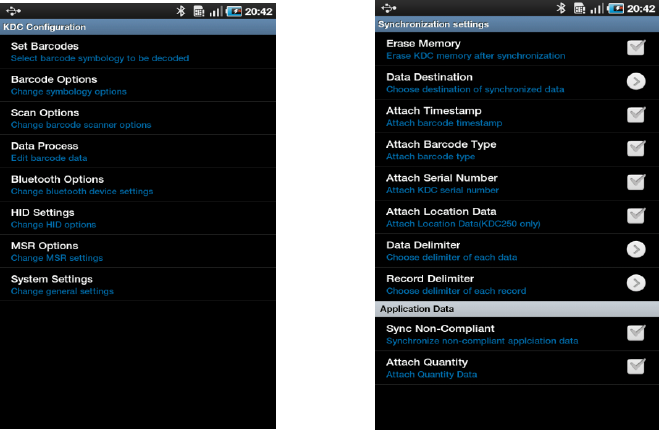
KDC User Manual SYNCHRONIZATION
137
C. Select Wireless and Networks.
D. Click on Bluetooth Settings.
E. Click on Scan devices.
F. The Android device will display the KDC model and 6 digits of the serial number.
4. Press the KDC list entry, enter “0000” PIN code, and press OK.
5. When paired, the Android device will display “
Paired but not connected”
.
6. Launch aKTSync program.
A. Press menu key and select the Connect option on the top left.
B. From the list of paired devices, choose the KDC to use.
C. On the top menu bar of aKTSync, you will see a message “
connecting”
, and then
“
connected”
.
D. On the KDC display, you will see “Pairing Succeeded!!!” and then “Bluetooth
Connected”.
E. Select Settings option on the bottom left to change KTSync setting.
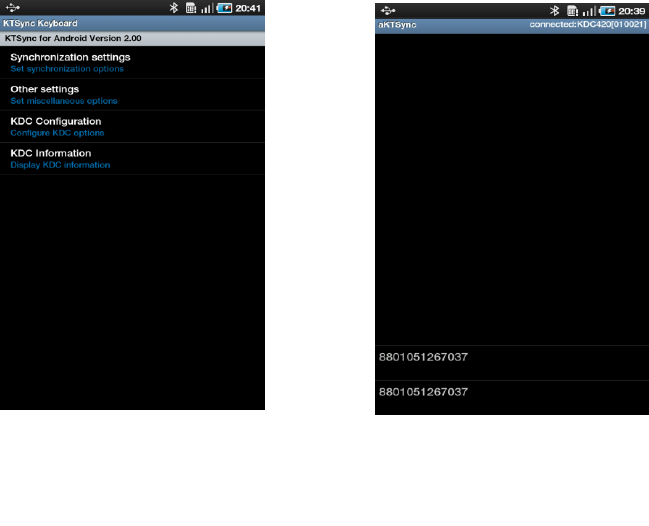
KDC User Manual SYNCHRONIZATION
138
Figure 29 - Android aKTSync
KDC User Manual SYNCHRONIZATION
139
Keyboard Wedge
1. Launch Settings on the Android device.
2. Select Language and Keyboard (or Input method).
3. Select KTSync Keyboard.
4. Launch the application and touch the input box to focus.
5. The barcode will be wedged to the input box upon scanning a barcode.

KDC User Manual SYNCHRONIZATION
140
5.7 iPad/iPhone/iPod Touch KTSync
The KTSync for iPad/iPhone/iPod touch provides limited functionality of PC KTSync for
iPad, iPhone and iPod touch users.
1. The KDC supports SPP and MFi Bluetooth profiles.
2. The iPhone/iPad/iPod touch should use MFi Bluetooth profiles. MFi is the default
profile of KDCi models.
3. Download the KTSync program from the App Store.
4. Enable the iPhone/iPad/iPod touch Bluetooth power from the Setting > General
> Bluetooth menu.
• Users have to disable MFi option in System > MFi menu to use HID
Bluetooth profiles.
• Users have to RESET the iPhone/iPad/iPod touch to change “HID to MFi
mode” or “vice versa” after removing previous KDC connection.
KDC with Bluetooth Spec2.1+EDR does not prompt Pin code entry menu.
KDC20i/30i/200i/250i/270i/270i/350i/400i/470i/500i
connection
using MFi mode
1. Download and install KTSync from the Apple App Store.
http://itunes.apple.com/us/app/ktsync/id372916602?mt=8
2. Pair KDC and iOS Device
3. Launch KTSync and configure Settings.
iKTSync Settings
iKTSync provides following Settings menu.
Synchronization - The user may configure Synchronization options, such as
destination of data, data formation and delimiters.
Other settings - Users may configure KDC350 GPS module, disconnection
options and soft trigger button.
Note
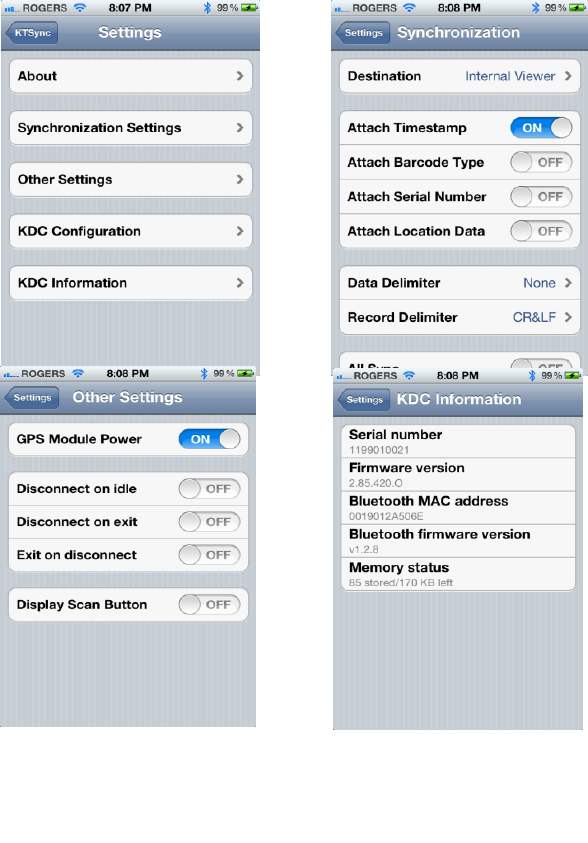
KDC User Manual SYNCHRONIZATION
141
How to Connect and Reconnect MFi Mode using UP Keys
1. The user needs to select the option to use this feature in the BT Config > BT Toggle.
2. Press the UP button to connect or reconnect to the iPhone/iPad/iPod touch.
Figure 30 - iPad/iPhone/iPod touch KTSync
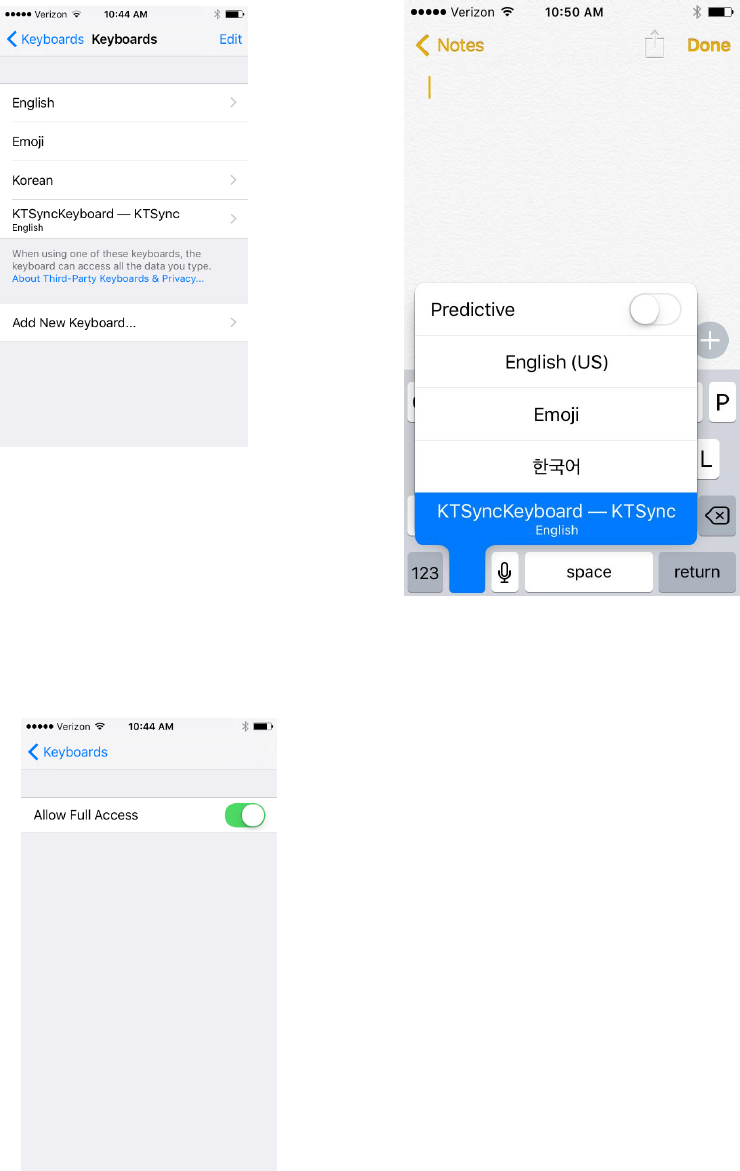
KDC User Manual SYNCHRONIZATION
142
How to use Keyboard Wedge with iKTSync
1. Navigate to the iPhone/iPad/iPod Settings > General > Keyboard > Keyboards >
Add New Keyboard... > Select the KTSync keyboard to be added.
2. Select the KTSync Keyboard > Allow Full Access.
KDC User Manual SYNCHRONIZATION
143
3. Open up the application you want to scan into, and tap on the screen so the on-
screen keyboard appears. Tap and hold on the globe icon located to the left of
the spacebar. Select the KTSync Keyboard & begin scanning!
Note: The KDC must be connected to KTSync & the KTSync keyboard must be
selected in order for this to work.

KDC User Manual SYNCHRONIZATION
144
5.8 Blackberry bKTSync
The bKTSync provides limited functionality of PC KTSync for Blackberry users.
KDC with Bluetooth Spec2.1+EDR does not prompt Pin code entry menu.
1. Download and install bKTSync from the Blackberry App World.
http://appworld.blackberry.com/webstore/search/ktsync?lang=en
2. Go to Blackberry Options > Applications menu and enable Input Simulation option.
3. Change KDC Bluetooth profile in ConnectDevice option to SPP.
4. Execute Blackberry
Bluetooth
manager and KDC
Bluetooth
pairing option:
A. Execute KDC Bluetooth Pairing option.
B. Launch the Blackberry Bluetooth manager and select “Search”. The KDC model
and 6 digits of the serial number will be displayed.
C. Highlight the KDC and press the Enter or Select Key.
D. Enter “0000” PIN code and press the Enter or Select Key.
E. The Blackberry will display “Pairing with KDC” and then”complete.”
F. Close the Blackberry Bluetooth manager.
5. Go to Downloads folder and execute KTSync.
6. The user may configure KDC options in KDC settings and Symbologies Settings menu.
7. Go to KTSync Synchronization Settings and select Destination. To send collected
barcode data as an email attachment, choose Email Attachment as destination and
enter in the email address, subject, and body message that the user want to send. The
user may enter multiple email addresses using the semicolon (;) separator.
8. To scan barcodes into any application (like email, notes, worksheet or web browser), press
the menu key and select Running in the background option. bKTSync will maintain the
connection and place the scanned barcode data wherever the cursor is flashing.
Note
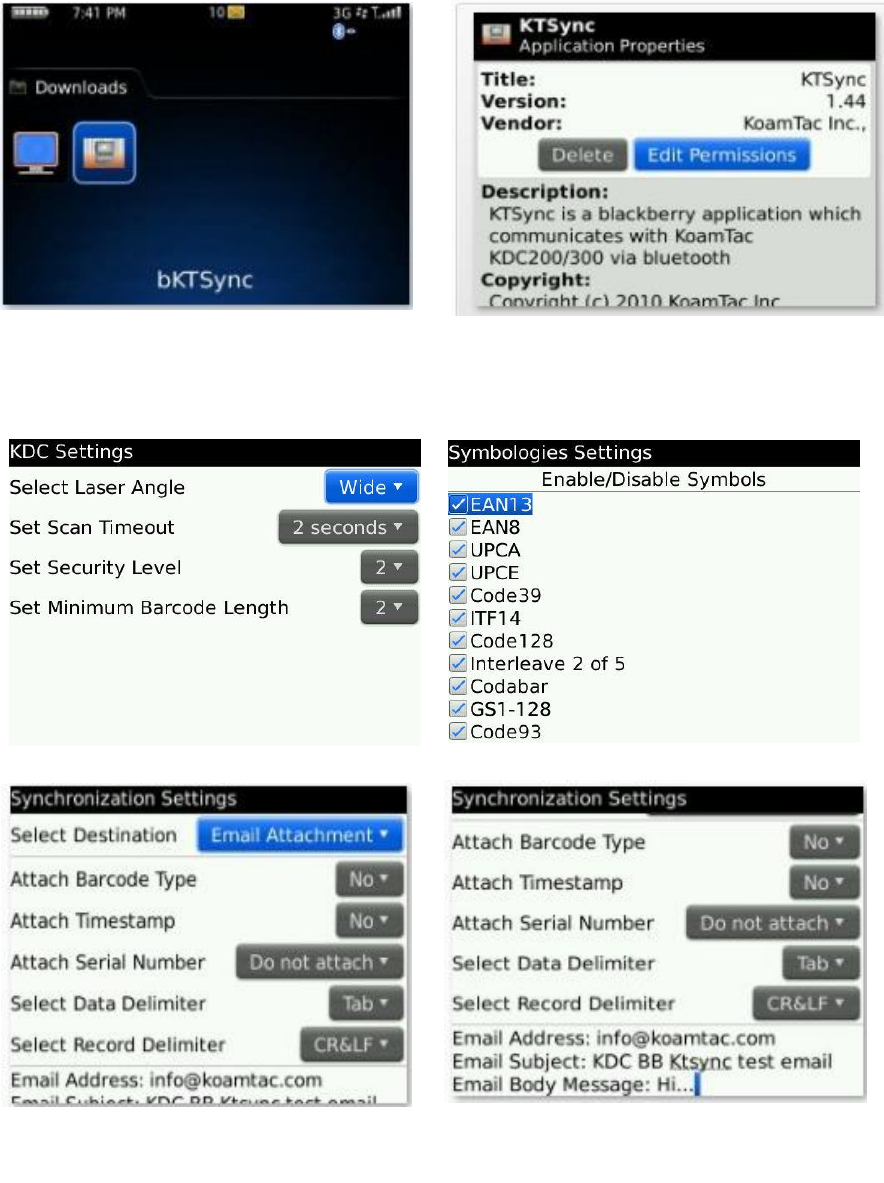
KDC User Manual SYNCHRONIZATION
145
Figure 31 - Blackberry bKTSync
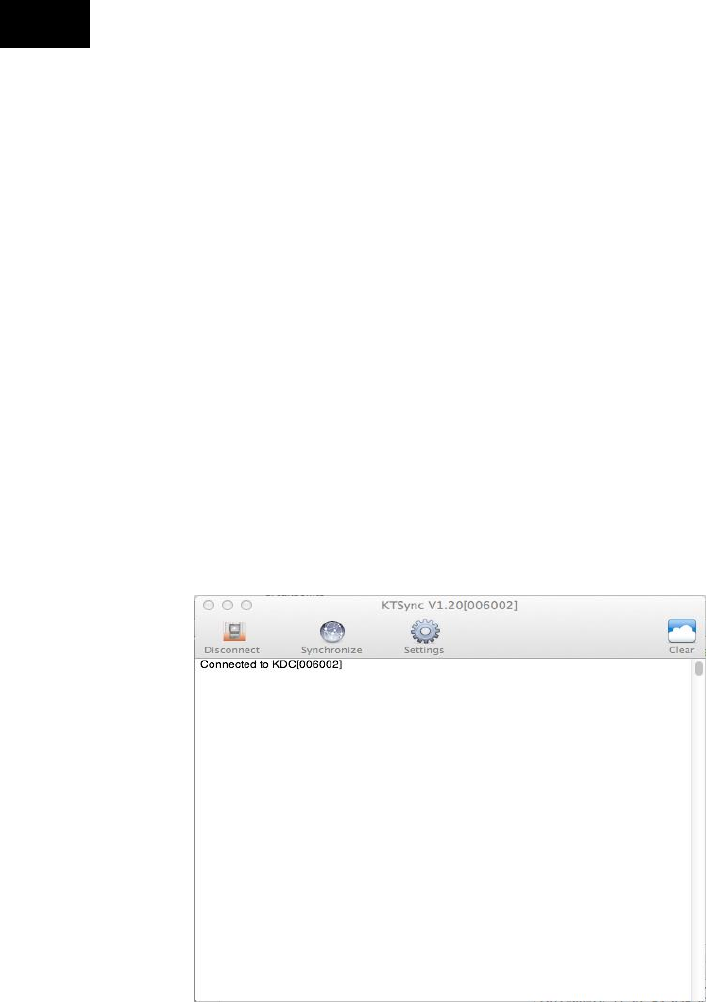
KDC User Manual SYNCHRONIZATION
146
5.9 KTSync for Mac OS X
The KTSync Mac OS X version provides limited functionality of PC Windows KTSync for
Mac OS X users.
KTSync for Mac OS X version supports both Bluetooth SPP profile and
USB connection. The user should pair KDC with Mac before using the
KTSync program via Bluetooth connection.
Mac OS X version KTSync is built as a X86 binary application and works
with the Intel-based Mac. It is verified on Mac PC running Mac OS X 10.6.5
and later versions.
KTSync Mac OS X version supports the following features:
Keyboard wedge function to a file, internal viewer, active window, and user
application.
Synchronization to a file, internal viewer, active window, and user
application.
Automatic connection and disconnection on USB port.
The user will see the following initial KTSync screen upon launching the program.
KTSync will connect automatically if KDC is plugged in a USB port or if KDC is paired.
Note
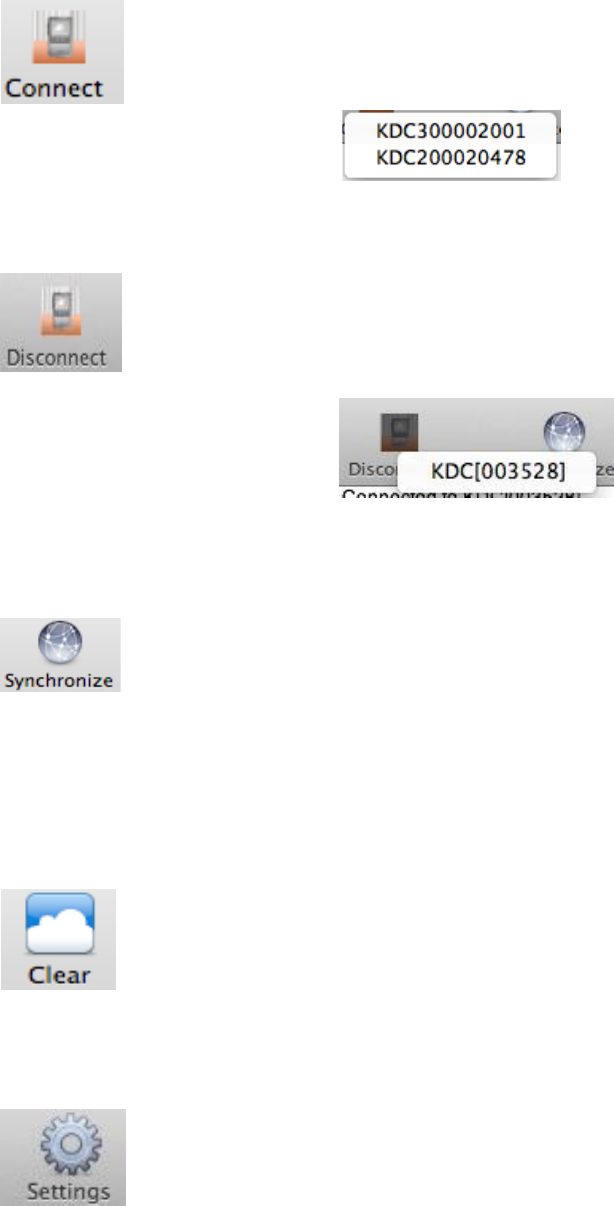
KDC User Manual SYNCHRONIZATION
147
Connect Button
The user may connect the Mac with the KDC that is paired or plugged
into the USB port by clicking the Connect button. The following screen
will be displayed when this button is pressed, and KTSync will start to
connect to the selected KDC.
Disconnect Button
KTSync changes Connect button to Disconnect button once the KDC is
connected. The user may disconnect the KDC manually by selecting
connected KDC on the following screen.
Synchronize Button
The user may start the synchronization process by pressing the
Synchronize button. The user may select the destination of barcode data
in the settings menu. There are 4 selectable destinations: File, Internal
viewer, Active window, and User application.
Clear Button
The user may press this button to clear the KTSync internal viewer.
Settings Button
The user may configure synchronization options on the following
screen by pressing the Settings button.
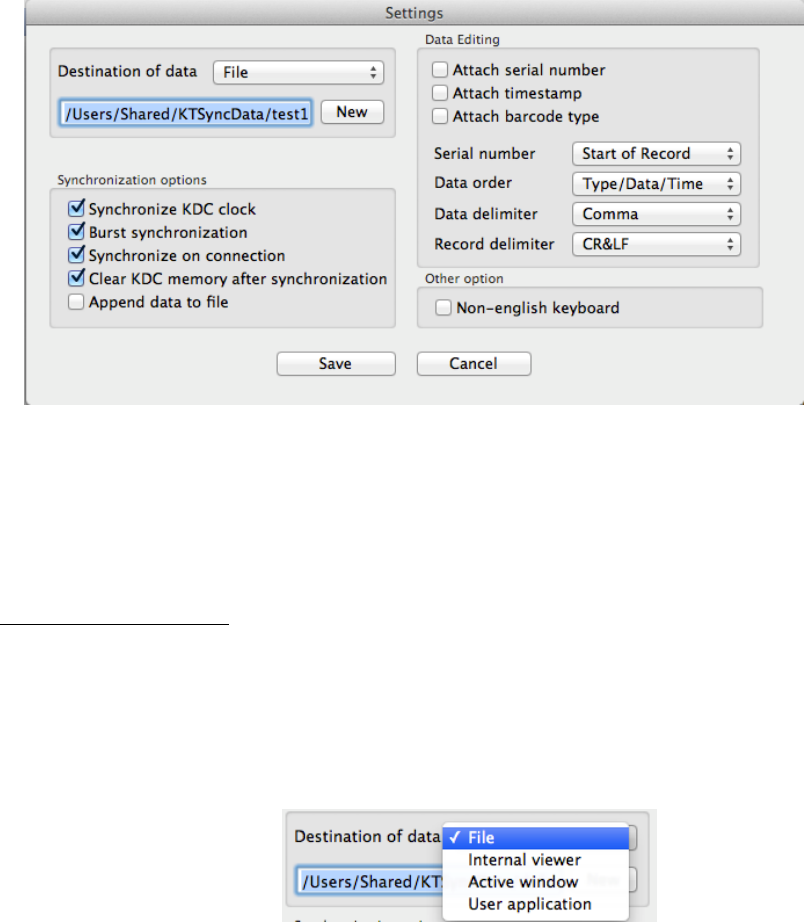
KDC User Manual SYNCHRONIZATION
148
Destination of Data
The KTSync program wedges or downloads barcode data to one of the
following four destinations:
File: The KTSync makes a file name based on 3.11 if file name is specified as
an “sn_timestamp.txt”. The default directory is /Users/Shared/KTSyncData
directory. The user may define another directory or another filename by
clicking the “New” button. The maximum file path length is 128 characters.
Internal Viewer: The KTSync displays barcode data in KTSync internal text
viewer.
Active Window: The KTSync sends barcode data to current active window if
Active window option is selected.
User Application: The user may define the target application by pressing the
“New” button. The maximum application name path length is 128 characters.

KDC User Manual SYNCHRONIZATION
149
Synchronization Options
Synchronize KDC Clock
KTSync will set the KDC’s date and time with Mac PC date and time when the
KDC is connected to Mac, if this option is enabled.
Burst Synchronization
KTSync will synchronize barcode data from KDC in burst mode. Otherwise,
KTSync would synchronize barcode data one by one. This option is enabled
by default and maynot be disabled.
Synchronization on Connection
KTSync will automatically synchronize barcode data from the KDC when the
KDC is connected, if this option is enabled.
Clear KDC Memory After Synchronization
KTSync clears barcode data stored in the KDC’s memory once
synchronization has finished, if this option is enabled.
Append Data to File
KTSync appends synchronized data to existing file specified on destination. If
file does not exist then KTSync creates a new file.
Data Edition
Attach Serial Number
The KTSync will add a KDC serial number to barcode data. This option is
enabled by default and maynot be disabled.
Attach Time Stamp
The KTSync would add timestamp to barcode data. This option is enabled by
default and maynot be disabled.
Attached Barcode Type
The KTSync would add barcode type to barcode data. This option is enabled
by default and maynot be disabled.
Serial Number

KDC User Manual SYNCHRONIZATION
150
When Attach serial number is enabled, this option determines when to attach
serial number. “Start of record” means to attach at the front of record and “End
of record” means to attach to the end of record.
Data Order
This option specifies the order of data (Barcode Type, Barcode Data and
Timestamp) in the record.
Data Delimiter
This option is used to select a character to be added between barcode data,
serial number and timestamp and/or barcode type. User may select one of the
following: None, Tab, Space, Comma and Semicolon as the data delimiter.
The Comma is selected as the data delimiter by default.
Record Delimiter
This option is used to select a character to be added at the end of the barcode
record. The user may select one of None, CR, LF, TAB, and CR&LF as the
record delimiter. The CR&LF is selected as the record delimiter by default.
Other Options
Non-English Keyboard
This option is used when the barcode data has non-English characters and a
non-English keyboard.
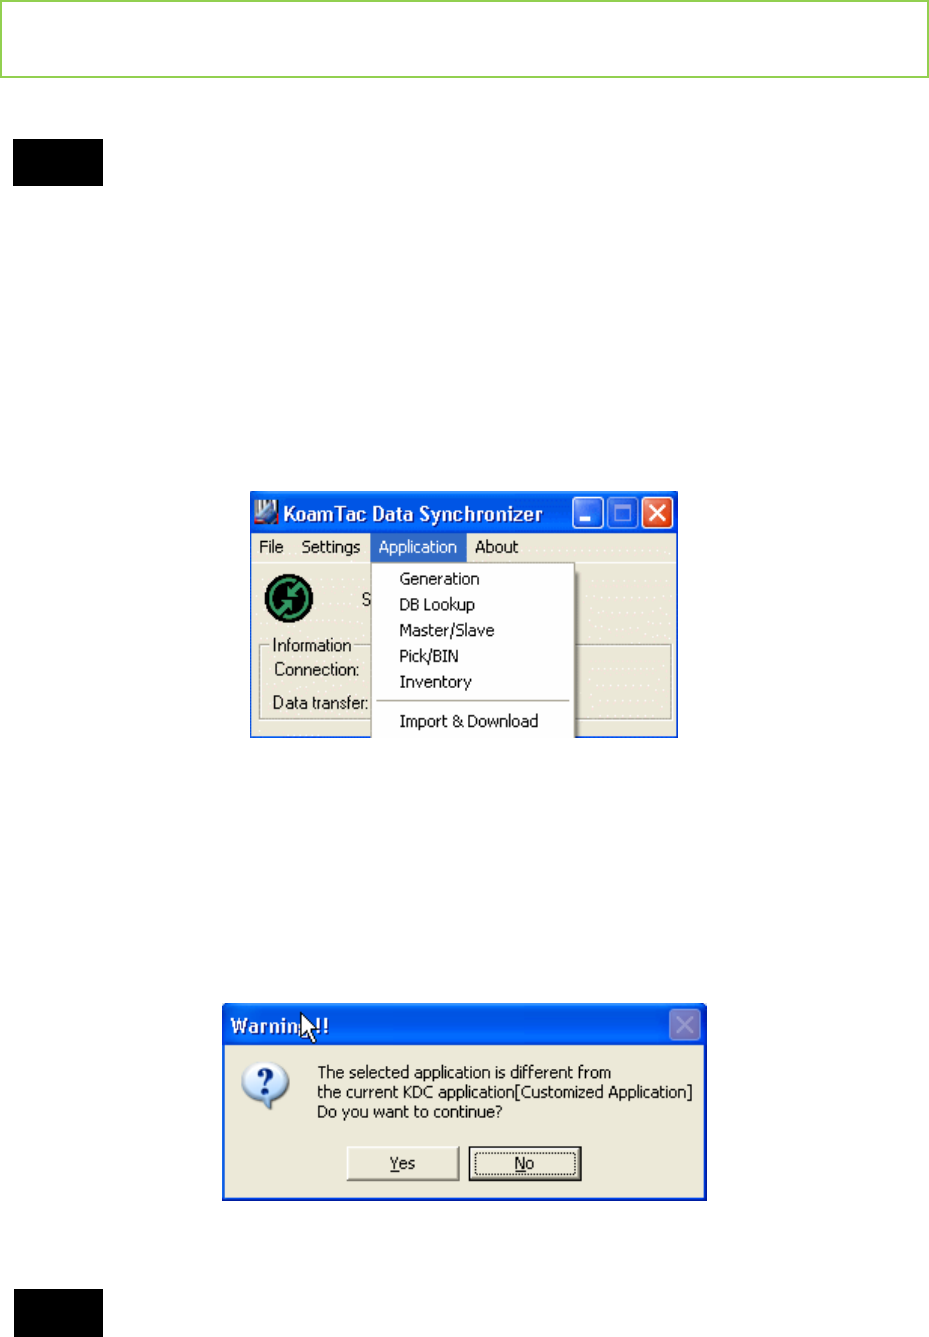
151
6. Application Generation
KDC FW2.85 does not support the Application Generation feature. Users
should upgrade FW2.85 to FW2.86 or FW3.0+ to use Application Generation
feature.
When you select the Application menu from the KTSync, the user may choose from the
following five Applications: Generation, DB Lookup, Master/Slave, Pick/BIN, and
Inventory. Users may also download saved programs using the Import & Download
option.
When the Application tool is selected, the KDC will beep once to acknowledge a
connection between the KDC and the Application tool. The following KTSync warning
window will pop up if the downloaded application in KDC does not match with KTSync
application tool.
KDC will wedge barcode data to the host in application mode if “wedge and
store always” option in data process menu is selected and KDC firmware
version is higher than 2.86.xxx.G or 3.0+.
Note
Note
Figure 32 - Application Menu
Figure 33 - Application Warning Window
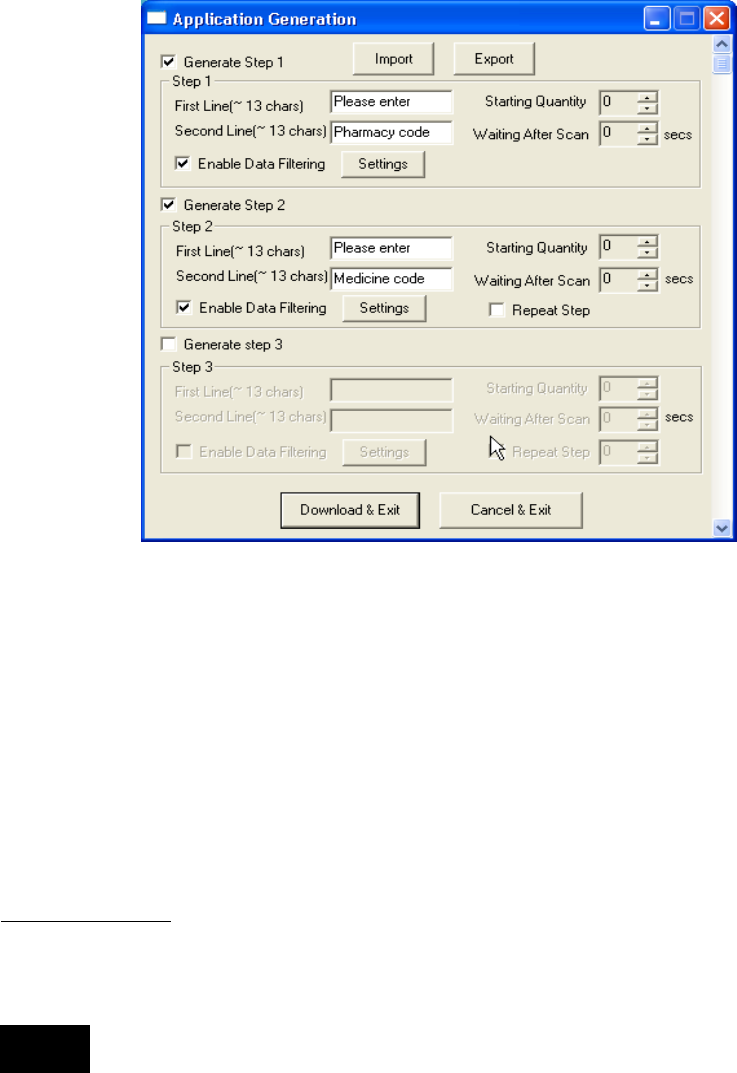
152
6.1 Application Generation
KDC Application Generation tool is a robust feature that enables the user to create
custom applications for collecting and managing barcode data. To create a custom
application, select the Generation submenu from the Application menu in KTSync®.
Generate Application
Generate step
1 - To generate a custom application, click on the Generate Step 1
box. This enables the user to define the user prompts and data collection settings for
Figure 34 - Application Generation Menu
Note
153
Step 1 of the custom application. Below is a description of each field. These prompts
are the same when selecting Generate step 2 and Generate step 3.
The custom application may include only Step 1.
First line
Enter up to 13 characters; these will display on the first line of the KDC.
Second line
Enter up to 13 characters; these will display on the second line of the KDC.
Starting quantity
Enter a predefined start quantity for each scanned barcode. The start
quantity may be defined from 1 to 128. Use the up or down side key to
choose the desired quantity.
Waiting to scan
Enter the number of seconds the KDC pauses before the user prompts
display. During this timeout period, the user may modify the quantity. If this
field is set to zero, the quantity field may not be adjusted. This field may be
defined from “-1” to “30” seconds. “-1” second enables infinite waiting of user
quantity input.
Enable data filter
Check this box to enable the data filtering option. Data filtering enables the
user to predefine different aspects of the barcode data the user are
collecting.
Data Filter Settings
When the user select Enable data filtering, the user must click on the Settings button to
select the Data filter setting. The options for the Data filter settings are the same for
Step1, Step 2, and Step 3.
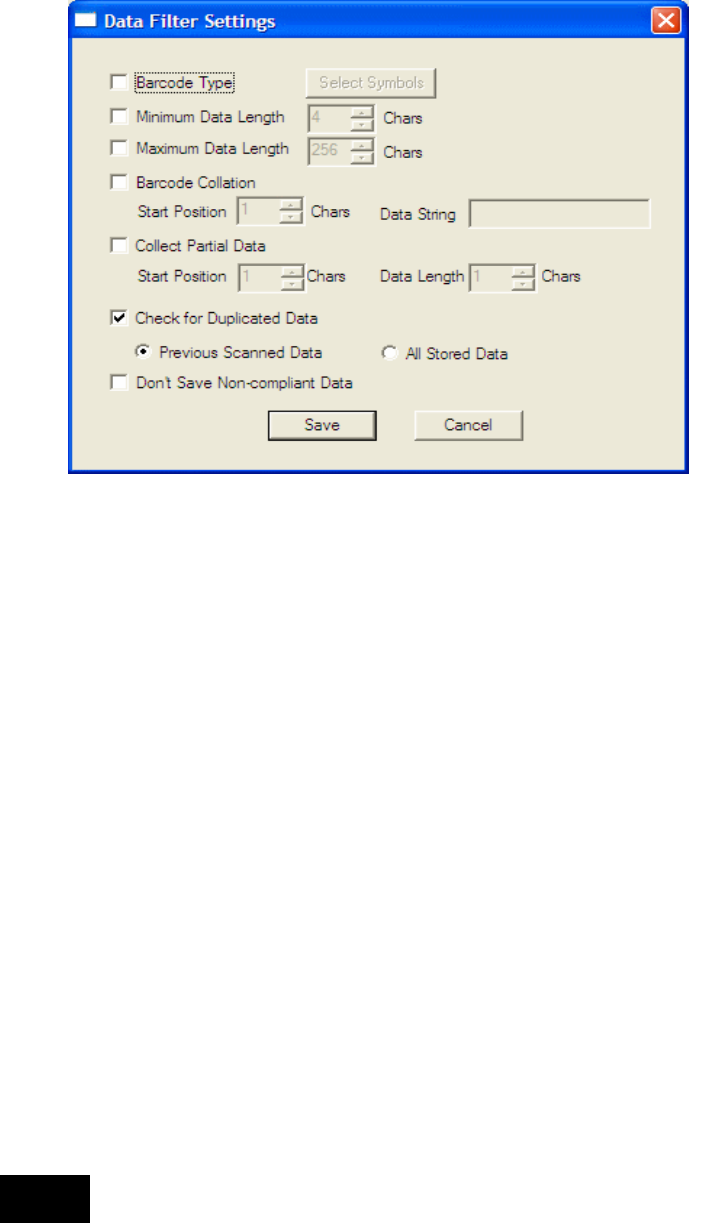
154
Barcode Type
This field enables the user to select the type of barcodes the KDC will collect.
When the user clicks on the box, Select Symbols is enabled. A listing of the
symbologies supported by the KDC will display. To select a barcode
symbology, click on the box associated with the symbology.
Minimum Data Length
This field enables the user to define the minimum length of the scanned
barcode. The length may be between 2 and 36 (1D models), 2 and 48 (2D
models) characters. If the user scans a barcode that has a length of less than
the defined length, the barcode data is not collected.
The default KDC minimum barcode length defined in scan option is
4. Therefore, users should change KDC minimum barcode length to
2 or 3 to define minimum data length to 2 or 3.
Figure 35 - Data Filter Settings
Note
155
Maximum Data Length
This field enables the user to define the maximum length of a scanned barcode.
The defined length may be between 2 and 256 characters. If the user scans a
barcode that has a length is greater than the defined length, the barcode data is
not collected.
Barcode Collation
This option enables the user to define a data string that the KDC will use to
compare scanned barcodes.
Starting Position – This is the start position of the scanned barcode data
to be compared with the defined data string.
Data String – This is the defined value to be compared with scanned
barcode data. This value may be up to 32 characters.
Collect Partial Data
This option enables the user to define partial barcode data to be collected when
a barcode is scanned. Only the partial data will be stored in the KDC.
Start position – This is the starting position that the KDC will use when
collecting scanned barcode data.
Data Length – This is the length of partial data to be stored by the KDC.
Check for Duplicated Data
This option enables the user to prevent the collection of duplicate data.
Previous Scanned Data – This option enables the user to compare the
scanned barcode with the previously scanned barcode and treat it as
non-compliant data if the user scanned the same barcode twice.

156
All Stored Data – This option enables the user to compare the scanned
barcode with stored barcode data and treat it as non-compliant data if
the same barcode already scanned and stored.
Do not Save Non-Compliant Data
This field tells the KDC how to manage non-compliant data based on the
defined data filtering fields. If this field is enabled, non-compliant data is NOT
stored in the KDC. If this option is not enabled, non-compliant data is stored.
Generate step 2
To include another step in the data collection process, click the box, Generate step 2.
This step has the same options as Step 1. In this step, the user have the option of
repeating step 2 by clicking the box, Repeat Step.
This field is disabled when the application has three steps.
Generate step 3
To include a third step, click the box, Generate step 3. This step has the same options
as step 1 and 2. In this step, the user has the option to repeat steps 2 or 3.
Application Download and Execution
Before running your application, it must be downloaded to KDC.
1. Click the “Download” icon from Application Generation Window.
2. Change KDC from Normal mode to Application mode.
A. Press two side buttons simultaneously to enter menu mode.
B. Select KDC mode and enter scan button.
C. Change to Application mode.
D. Save and exit from menu mode.
3. KDC will run in normal mode if you do not change to Application mode
after downloading the application.
4. If you want to delete the downloaded application in your KDC, select App.
Data in Reset Memory after you go to System Config in KDC Menu.
Note
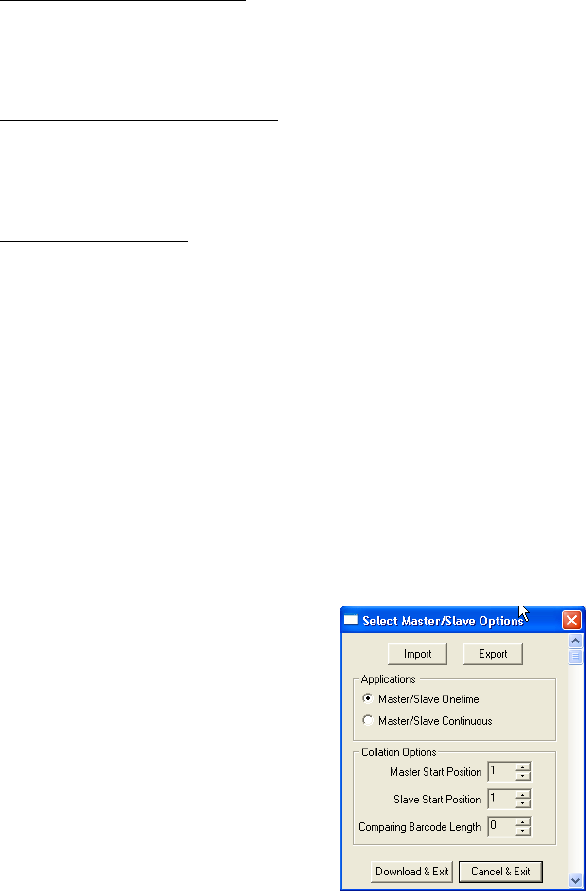
157
6.2 Predefined Applications
KTSync provides four Predefined Applications: Master/Slave, Pick/Bin, DB Lookup and
Inventory.
Master/Slave
Master/Slave predefined application enables you to define a
master
barcode for
comparison with one or more
slave
barcodes. The predefined application may be run
once or continuously. Within either setting, you may define a substring for comparison
of master and slave barcodes.
Master/Slave Onetime
Define one
master
barcode and compare it with one
slave
barcode.
Master/Slave Continuous
Define one
master
barcode and compare it with multiple
slave
barcodes.
Collation Options
Works in either Onetime or Continuous Mode to compare a substring within the
master and slave barcodes.
Master start position - Select the numeric position of start substring character
in Pick barcode, 1 to 255.
Slave start position - Select the numeric position of start substring character in
Pick barcode, 1 to 255.
Comparing Barcode Length - Number of characters to be compared, 0 to 255.
0 means all characters.
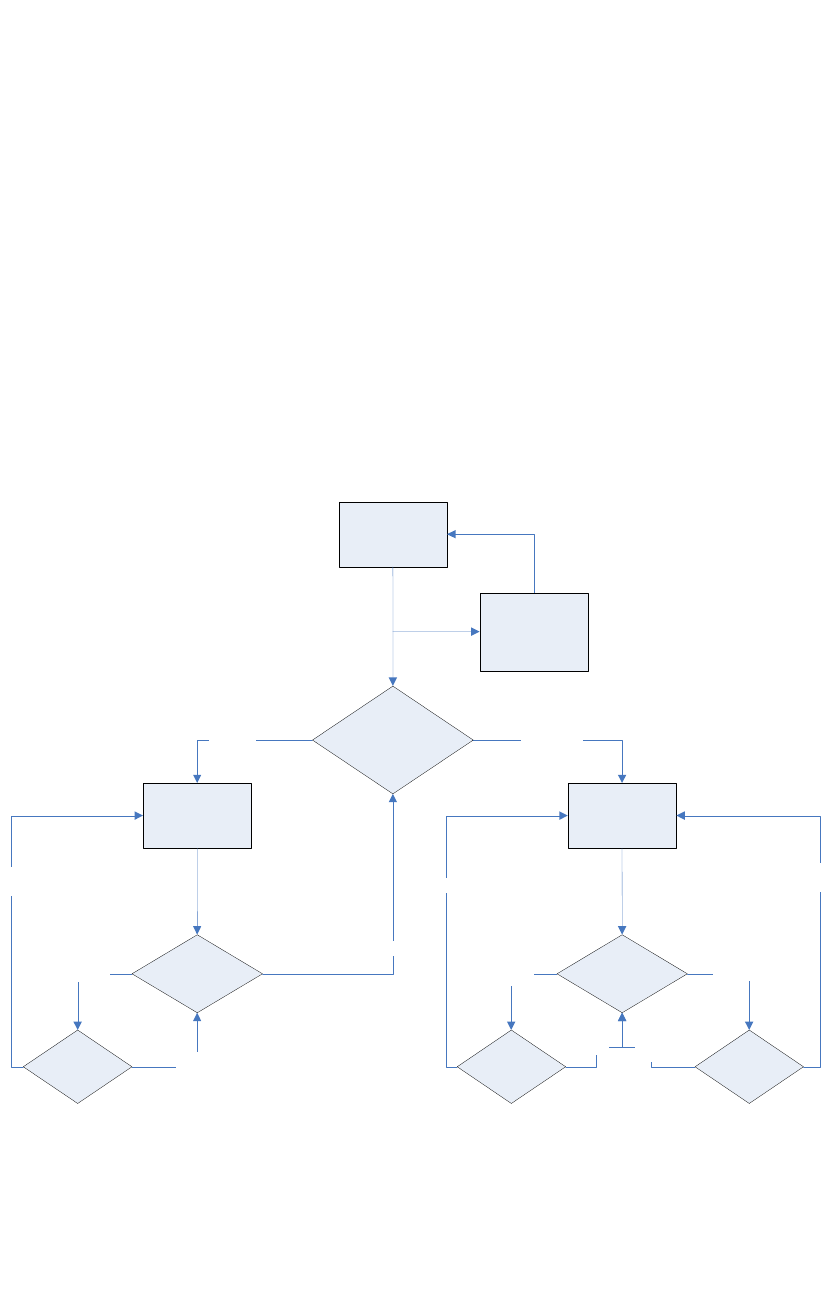
158
Pick/Bin
The Pick/Bin predefined application is a special version of the Master/Slave
predefined application. The Pick/Bin application enables you to define the Pick ID
and the barcode symbology for comparison with a defined Bin.
Number of ID and Symbology
Define Pick ID characters from 1 to 32 and the barcode symbology.
Figure 37 - Master/Slave Application Flow Chart
Collation
:
Define substring to
be compared
.
Default is entire
barcode
Scan Master
Barcode
Scan Master
Barcode
Onetime
Continuous
Select MS Mode
:
(
Onetime
,
Continuous
)
Scan Check
Barcode
KDC Mode
Up or Down
Key
?
Mismatched
Matched
Up
Key
Down
Key
Scan Check
Barcode
Up or Down
Key
?
Matched
Mismatched
Up Key
?
No
Yes
Down
Key
Up
Key
Figure 36 - Master/Slave Application Settings
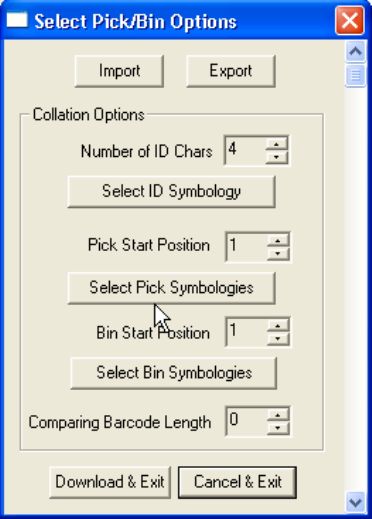
159
Pick Start Position and Symbology
Select numeric position of start substring character in Pick barcode from 1
to 255 and the barcode symbology.
Bin Start Position and Symbology
Select the numeric position of start substring character in Bin barcode from
1 to 255 and the barcode symbology.
Comparing Barcode Length
Select the number of characters to be compared from 0 to 255. 0 means all
characters.
Figure 38 - Pick/BIN Application Menu
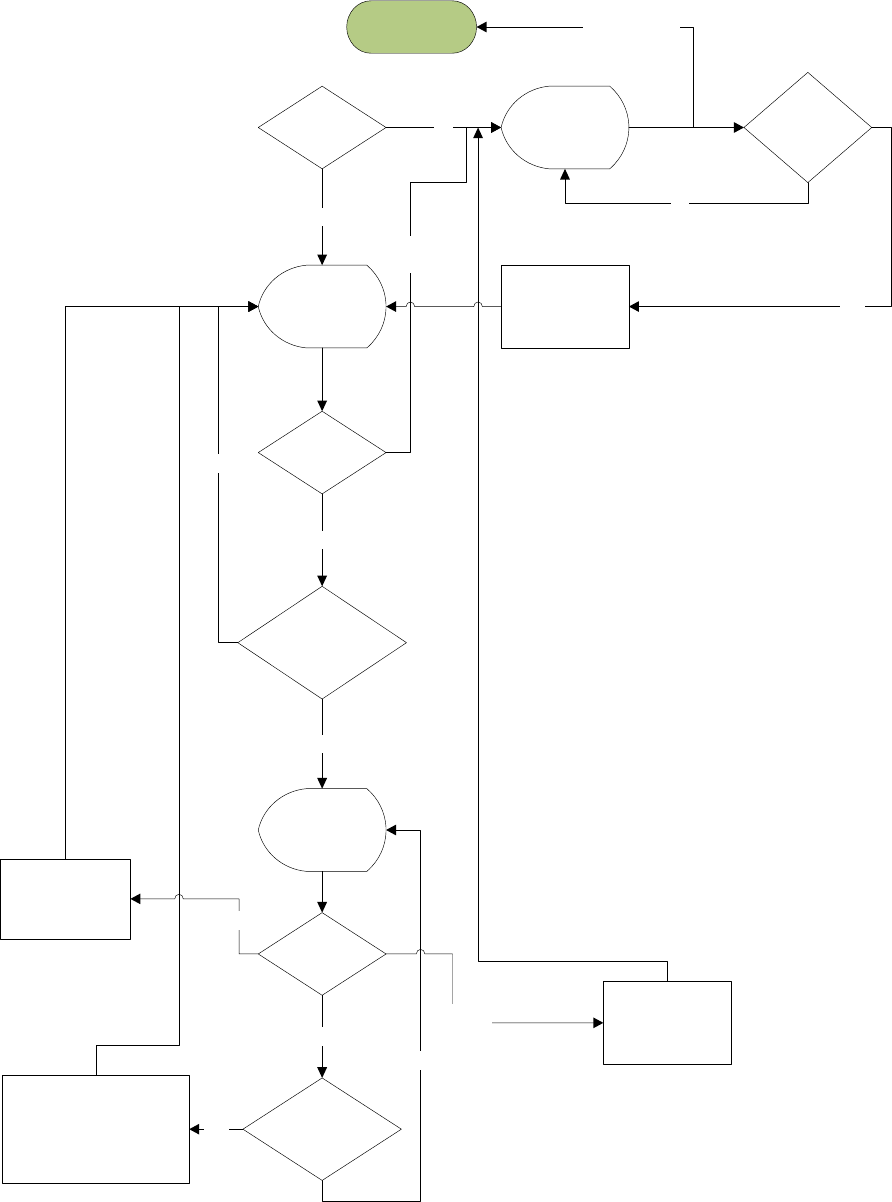
160
User ID
Defined Scan User ID Valid User ID
Store User ID
Please
scan Pick data
User Input
Valid Barcode
Please scan
Bin data
User Input
Barcode
Match?
No
Yes
Yes
No
Up
Side Key
Scan button
Yes
No
Up
Side Key
Scan button
Yes
No
Ignore Scanned
Pick Label
Timeout
Ignore Scanned
Pick Label
Store
User ID,
KDC Serial Number,
Timestamp,
Pick Barcode
Exit to KDC Menu <Up>+<Down>
Figure 39 - Pick/BIN Application Flow Chart

161
DB Lookup Application
The DB Lookup application enables the user to download a database to the KDC that
may then be utilized for advanced AUTO-ID applications, such as displaying
additional data after scanning a barcode. For example, using our DB Lookup
application, you may download a product database including information such as
description, price, and stock quantity. With the advanced data functionality built-in
to the KDC, you may easily display product price, description, and stock level after the
product’s barcode is scanned.
Functionality of DB Lookup Application (based on the firmware version v2.86 and
v3.0+)
The database size may not exceed 800 records (v2.86) / 61,440 records (v3.0+).
The maximum record size is 128 bytes.
Each record may have up to 4 fields, including the barcode, which is the
primary key.
The maximum field size is 39 characters.
Quantities may be entered by pressing the UP or DOWN scroll buttons after DB
fields are displayed.
Quantity may be 1 to 128.
The user may create a database using Microsoft Excel.
1. Excel file must be saved as .txt.
2. Records should be separated by CR/LF.
3. Fields should be separated by TAB.
4. Database should end with CR/LF.
5. Last 4 bytes of database should be CR/LF/CR/LF.
DB Lookup Fields and Settings (based on the firmware version v2.86 and v3.0+)
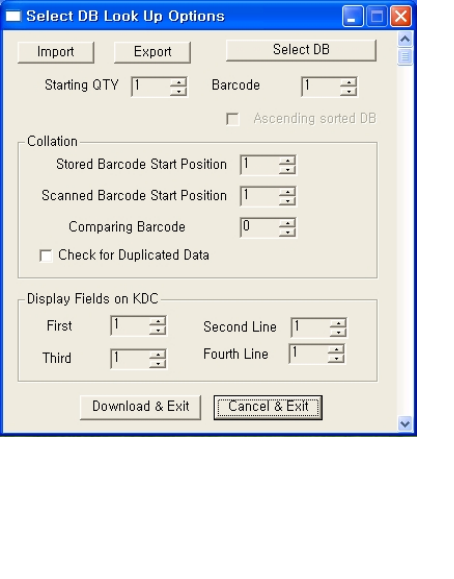
162
Download DB to KDC - Downloads user created database to KDC.
Starting Quantity - Enter predefined start quantity for each scanned barcode.
The start quantity may be defined from 1 to 128 and may be adjusted using UP
or DOWN buttons.
Barcode Field - Select the position of barcode field in database from 1 to 4.
Stored Barcode Start Position - Select the numeric position of start substring
character of barcode in database from 1 to 39.
Scanned Barcode Start Position - Select the numeric position of start
substring character of scanned barcode from 1 to 39.
Comparing Barcode Length - Number of characters to be compared from 0 to
255 where 0 is all characters.
Display on KDC - Define database fields to be displayed on KDC. KDC may
display one to three fields. KDC will display one field in two or three lines, if
same field is specified in line entering option.
Figure 40 - DB Lookup Application Menu

163
Inventory Application
The Inventory application enables the user to count inventories by scanning inventory
barcodes. This application will increase inventory item count if the same item is
scanned. Users may also download an inventory database to the KDC. If inventory
DB is downloaded, KDC will display inventory description.
Functionality of Inventory Application (based on the firmware version v2.86 and
v3.0+)
The inventory may not exceed 800 items (v2.86) / 61,440 items (v3.0+).
The maximum record size is 128 bytes.
Each record may have up to 4 fields, including the barcode, which is the primary
key.
The maximum field size is 39 characters.
Quantities 1 to 32786 may be entered by pressing the UP or DOWN buttons after
inventory is scanned.
Starting Quantity may be 1 to 128.
Min/Max. Data Length is between 2 to 256 (1D models) or 4 to 256 (2D
models).
Barcode Collation Start Position is between 1 to 256.
The length of Collation Data String is between 1 to 30.
Collect Partial Data Start Position is between 1 to 256.
Collect Partial Data Length is between 1 to 256.
Users may create an inventory database using Microsoft Excel.
Excel file must be saved as .txt.
Click User Inventory DB option to display inventory description.
Click Do not add non-existing item into DB if one do not wish to add new
items into inventory DB.
The number of Barcode Data Field is between 1 to 4.
The position of Display Filed is between 1 to 4.
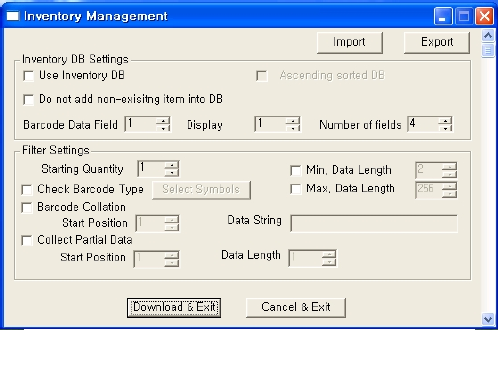
164
Figure 41 – Inventory Application

165
7. Troubleshooting
ISSUE
CAUSE
SOLUTION
KDC not working
Dead battery
Charge battery by connecting
KDC to your PC using the
included cable
Hardware
failure
Contact distributor for technical
support
KDC not
charging
Bad battery
Replace battery – Contact Local
Distributor
Poor USB port
USB port doesn’t supply proper
current to KDC
- Charge KDC using a different
USB port on your PC
Failed reading
Damaged
barcode
Scan a different barcode
Out of scan
range
Move the scanner closer to
barcode
Move scanner farther from the
barcode
Incorrect
angle
Change the angle of scanner to
barcode
Symbology
not
supported
Contact KOAMTAC -
www.KOAMTAC.com for
possibility of custom symbology
support
Scan options
Check scan option settings
Dirty scan
window
Clean scan window
Damaged
scan
window
Replace scan window
KDC reads
wrong
barcode
Dirty scan
window
Clean scan window
Damaged
scan
window
Replace scan window

166
Poor quality
barcode
Select only necessary barcodes
Increase minimum barcode
length
Increase security level
Can’t
communicate
with PC, PDA,
or smartphone
USB cable is
not
connected
properly
Check cable connection between
KDC and host device
Software is
not
working
properly
Reload the software
COM
configuratio
n
Check COM port configurations
LED blinks
yellow
Low battery
power
Charge the battery by connecting
KDC to PC.
KDC will lose collected data if the
battery is empty.
Buffer Full
Message
Full Memory
Clear the Memory using
Synchronization program
Empty Battery
Message
Empty battery
Connect USB immediately.
Synchronize the collected data
and charge KDC
Abnormal
KTSync
Operation on
DELL PC
Quickset
Utility
Disable Quickset Utility before
using KTSync.
Dell Quickset utility interrupts
normal KTSync operation
WSED Utility
Disable WSED Wireless
enable/disable utility
delete the folder C:\Program
Files\WSED, which contains a file
WSED.exe, with the same icon as
in the taskbar
Delete the registry entry
KEY_LOCAL_MACHINE
\SOFTWARE\Microsoft\Windows
\CurrentVersion\Run\WSED

167
Touch Keypad not
working
(KDC500)
Foreign
Object
detected
Clear any foreign object
(including your finger) placed on
the touch keypad and reset KDC.
Hardware
failure
Contact distributor for technical
support
Compromise
Message
displayed
(KDC500)
Security
Attack
detected
Contact distributor for technical
support
Table 6 - Troubleshooting Techniques

168
8. Warranty
LIMITED WARRANTY AND DISCLAIMERS
BY OPENING THE PACKAGE OF THIS PRODUCT YOU AGREE TO BECOME BOUND BY THE
LIABILITY AND WARRANTY CONDITIONS AS DESCRIBED BELOW.
UNDER ALL CIRCUMSTANCES, THIS MANUAL SHOULD BE READ ATTENTIVELY, BEFORE
INSTALLING AND OR USING THE PRODUCT.
Serial Number
A serial number appears on the KDC label. This official registration number is strictly related to
the device purchased. Make sure that the serial number appearing on your KDC is not
removed. Removing the serial number will affect the warranty conditions and liability
disadvantageously, so please maintain the label with serial number on the KDC. Units with the
serial number label removed should not be operated.
Warranty/Warranty Period/Liability
KOAMTAC, Inc. (“KOAMTAC”) manufactures its hardware products in accordance with industry-
standard practices. Unless otherwise agreed in a contract, KDC is warranted for a period of one
year after purchase, covering defects in material and workmanship except rechargeable battery.
KOAMTAC will repair or, at its opinion, replace products that prove to be defective in material or
workmanship under proper use during the warranty period. KOAMTAC will not be liable in cases
(i) in which the unit has been repaired or altered unless done or approved by KOAMTAC, (ii) in
which the unit has not been maintained in accordance with any operating or handling
instructions supplied by KOAMTAC, (iii) in which the unit has been subjected to unusual physical
or electrical stress, misuse, abuse, power shortage, negligence or accident or (iv) in which the
unit has been used other than in accordance with the product operating and handling
instructions. Preventive maintenance is the responsibility of the customer and is not covered
under this warranty. Under no circumstance will KOAMTAC be liable for any direct, indirect,
consequential or incidental damages arising out of use or inability to use either the hardware or
software, even if KOAMTAC has been informed about the possibility of such damages.
Warranty Coverage and Procedure
During the warranty period, KOAMTAC will repair or replace defective products returned to
KOAMTAC warehouse. International customers should contact the local KOAMTAC office or
support center. If warranty service is required, KOAMTAC will issue a Return Material
Authorization Number. Products must be shipped in the original or comparable package,
169
shipping and insurance charges prepaid. KOAMTAC will ship the repaired or replacement
product freight and insurance prepaid. Customer accepts full responsibility for its software and
data including the appropriate backup thereof. Repair or replacement of a product during
warranty will not extend the original warranty term.
CAUTION: Changes or modifications not expressly approved by the manufacturer responsible
for compliance could void the user’s authority to operate the equipment.
170
CORPORATE HEADQUARTERS
116 Village Blvd., Suite 305
Princeton, NJ 08540, USA
Phone: 609-256-4700, FAX: 609-228-4373
Email: support@koamtac.com
For more information, visit our website - www.koamtac.com
9. Contact Information

BARCODE & SCAN OPTIONS
171
10. Appendix A –
Barcode & Scan Options
The process for scanning and reading barcodes is delicate and complicated. Although
the KDC is equipped with a high performance scan engine, if configured incorrectly, it
may not perform at its peak performance level. To ensure its high performance, the
KDC comes configured to optimize its scan engine technology. Unless you clearly
understand the impact of your changes to the KDC settings, please do not change
factory default settings.
10.1 Symbologies
KOAMTAC’s KDC products support most major barcode symbologies including 1D, 2D,
Postal, and OCR-Fonts. Below is the list of the barcode symbologies supported by the
KDC with respect to each model’s particular area of support. To ensure superior scan
performance, remember to select only the required symbologies.
KDC20/100/200/250/270L/270D/3
50L/410/411/415/470L/470D/500L
KDC30/270C/300/350C/420/421/
425/450/470C/500C
1D
Barcodes
EAN13, EAN8, UPCA, UPCE,
Bookland EAN, EAN13 with Addon,
EAN8 with Add-on, UPCA with Add-
on, UPCE with Add-on, Interleave 2
of 5, ITF14, Code128, Codabar, GS1-
128, Code39, Code93, & Code35
Codabar, Code11, Code32,
Code39, Code128, EAN8, EAN13,
GS1-128, I2of5, MSI, Plessey,
PosiCode, GS1 DATABAR OMNI,
GS1 Limited, GS1 Expanded,
S2of5IA, S2of5ID, TLC39, Telepen,
Trioptic, UPCA, & UPCE
2D
Barcodes
N/A
AztecCode, AztecRunes,
CodablockF,Code 16K, Code49,
DataMatrix, MaxiCode, MicroPDF,
PDF417, & QRCode and
HanXin Code
Postal
Barcodes
N/A
AusPost, MayadaPost, ChinaPost,
JapanPost, KoreaPost, KixPost,
Planet Code, Postnet (US), &
UKPost

BARCODE & SCAN OPTIONS
172
OCR
Fonts
N/A
OCR-A, OCR-B, OCRUSCurrency,
OCRMICRE13B, & OCRSEMIFONT
Bookland EAN vs. EAN-13
Bookland EAN, which includes ISBN, ISSN, and ISMN, is supported by the KDC. This
group of symbologies is essentially an EAN-13 barcode with fixed prefixes; 977 for ISSN,
978 for ISBN, and 979 for ISMN. If EAN-13 and Bookland EAN are both enabled,
Bookland EAN takes precedence. Bookland EAN does not have any options. The
Bookland EAN barcode does not contain any groupings – that is, there are no hyphens
or separators. Thus, the ISBN 957-630-239-0 is transmitted as 9576302390.
Add-on Symbologies
By default, the 2 or 5 digit add-on symbols with a UPCE, UPCA, EAN-8, and EAN-13
barcode are neither decoded nor transmitted. Transmission for these specific
symbologies is enabled by setting the appropriate
withAddon
options. There are 4
withAddon
options, one for each symbology:
UPCEwithAddon
UPCAwithAddon
EAN8withAddon
EAN13withAddon
The decoding of add-on symbols are defined by the following table, which explains the
process for EAN-13 symbols.
Table 7 - Symbologies Supported by KDC
Mode
Behavior
Value of flags
Auto-
discrimination
If add-on symbol is present, then it is
also decoded; otherwise, only the
EAN-13 symbol is decoded.
true
true
With add-on
Only EAN-13 barcodes with 2 or 5 add-
on symbols are decoded.
false
true

BARCODE & SCAN OPTIONS
173
The add-on symbol is appended to the EAN-13 barcode. The process is similar for
UPCE, UPCA, and EAN-8 barcodes. Note that all the UPCE, UPCA, EAN-8, and EAN-13
formatting and conversion options are in effect. The following table should help explain
the effect of various options for EAN-8 barcode 12345670 + 12.
Barcode
EAN8_as_EAN13
EAN8_Retur
nCheckDigit
EAN13_ReturnC
heckDigit
1234567012
False
True
N/A
123456712
False
0000012345671
2
True
N/A
False
0000012345670
12
True
The add-on symbol contains neither a check digit nor a terminating guard band. Every
effort has been made to reduce the decoding error; however, it is likely to decode a
partial scan of a 5-digit add-on symbol as a 2-digit add-on symbol. It is strongly
recommended that the minimum security level be set at 2 while decoding add-on
symbols. Since the decoder takes a conservative view on the add-on symbols, it is
likely that the add-on symbol will be missed in the auto-discrimination mode. Auto-
discrimination mode should then be avoided.
10.2 Code Options
(KDC20/100/200/250/270L/270D/410/411/415/470L/470D)
The KDC supports the following barcode options:
Without add-
on
The add-on symbol is ignored.
true
false
Table 8 - Add-on for EAN-13 Symbology
Table 9 - Add-on for EAN-8 Symbology

BARCODE & SCAN OPTIONS
174
Transmission of start and stop characters
Reverse direction
Symbology conversion
Verification of optional check character
Transmission of check digit
Transmission of Start and Stop Characters
For Codabar symbols, the user may choose not to transmit the start and stop symbols,
the NOTIS Editing. By default, they are transmitted. Setting the field
CodaBar_NoStartStopChars to true disables the transmission.
Reverse Direction
This option may be selected if direction oriented symbologies are designated, such as
Code35.
Symbology Conversion
By default the EAN-8, UPCE, and UPCA symbols are transmitted in their native
format. However, it is possible to show them in a different format. The user may
choose to display UPCE symbols as either UPC-A or EAN-13 symbols, EAN-8
symbols as EAN-13 symbols, or UPC-A symbols as EAN-13 symbols. The following
table shows the effect of setting various options.
Option
EAN-8
UPC-A
UPC-E
All others
EAN8_as_EAN13
Converted to
EAN-13
No effect
No effect
No effect
UPCA_as_EAN13
No effect
Converted to
EAN-13
No effect
UPCE_as_EAN13
No effect
No effect
Converted to
EAN-13
BARCODE & SCAN OPTIONS
175
UPCE_as_UPCA
No effect
No effect
Converted to
UPC-A
Verification of Optional “Check Digit”
Code39 and Interleave 2 of 5 have an optional check digit, which, by default, is not
verified. Changing the option VerifyCheckDigit to true may enable their verification,
or the user may enable the verification for individual symbologies. If the check digit
verification fails, the barcode is not transmitted.
Transmission of “Check Digit”
By default, the check digit – optional or mandatory – is not transmitted. Its transmission
may be enabled for all symbologies by enabling ReturnCheckDigit option.
Option Selected
Is the check digit returned?
ReturnCheckDigit
Yes
Yes
Yes
Yes
Yes
Yes
EAN13_ReturnCheckDigit
Yes
No
effect
No
effect
No
effect
No
effect
No
effect
EAN8_ReturnCheckDigit
No
effect
Yes
No
effect
No
effect
No
effect
No
effect
UPCA_ReturnCheckDigit
No
effect
No
effect
Yes
No
effect
No
effect
No
effect
Table 10 - Symbology Conversion
Option Selected
Verify Code39 check digit
Verify I2of5 check digit
VerifyCheckDigit
Yes
Yes
Code39_VerifyCheckDigit
Yes
No effect
I2of5_VerifyCheckDigit
No effect
Yes
Table 11 - Verification of Optional "Check
Digit"
BARCODE & SCAN OPTIONS
176
UPCE_ReturnCheckDigit
No
effect
No
effect
No
effect
Yes
No
effect
No
effect
Code39_ReturnCheckDigit
No
effect
No
effect
No
effect
No
effect
Yes
No
effect
I2of5_ReturnCheckDigit
No
effect
No
effect
No
effect
No
effect
No
effect
Yes
Resolution of Inconsistencies
Three types of inconsistencies could arise in the assignment of symbology options.
The decoder has pre-defined strategies to resolve these inconsistencies: If
UPCE_as_EAN13 is true, then UPCE_as_UPCA is ignored.
If symbology conversion is selected but the target symbology is not enabled, then the
decoder still outputs the symbol in the target symbology. For example, suppose UPC-E
is enabled and UPCE_as_EAN13 is true but EAN-13 is disabled. All UPC-E symbols will
be shown as EAN-13 and EAN-13 options (if specified) will be applied. For the two
symbologies that have optional check digits, Code39 and Interleave 2 of 5, the decoder
will always transmit the check digit if the verification is disabled.
Verify Check
Digit
Return Check
Digit
Description
Disabled
Enabled or
Disabled
Check digit is not verified but is transmitted
Enabled
Disabled
Check digit is verified but is not transmitted
Enabled
Enabled
Check digit is verified and is transmitted
Table 12 - Transmission of "Check Digit"
Table 13 - Resolution of Inconsistencies
BARCODE & SCAN OPTIONS
177
10.3 Miscellaneous Barcode Information
Height of a Linear Barcode
Industry standards suggest a height of either 6.5mm or 15% of the symbol length,
whichever is greater. Symbols of less than recommended heights may cause
recognition problems.
Check Characters
Yes, we recommend the use of check-characters in barcodes. Operating without
check-characters is not safe and will lead to errors that are costly to correct. Using
check-characters positively affects data integrity, especially when character density is
at the limits and/or image quality is not at its best.
Prevent Interleave 2 of 5 Partial Reading
A partial scan of an Interleave 2 of 5 symbols may decode and cause incorrect data to
be read. To prevent partial scans on long symbols, the user should include bearer bars.
These bars run along the top and bottom edges of the barcode in the scanning
direction. If a partial scan of the barcode occurs, the scanning beam will hit the bearer
bar and will not decode. The bearer bar must touch the top and bottom of all the bars
and must be at least 3 times as wide.
Another solution for the short scanning problem is to fix all Interleave 2 of 5 symbols to
a set number of digits. Zeros may be used to pad the data to the set number of digits.
The application program would then be set to only accept scans of the correct number
of digits.
Finally, a check digit may be used. The Interleave 2 of 5 symbology has an optional
check character that uses a weighted Modulo 10 scheme. The check character is the
last character in the symbol and should be checked by the decoder and then
transmitted with the data. Since Interleave 2 of 5 must always have an even number of
digits, the leftmost character may need to be a zero when the check character is
added. The standard check digit is calculated by assigning alternating 3,1,3,1… weights
to respective data digits. These weights are then multiplied by their respective data
digits and the products are summed. The check digit is the digit that needs to be

BARCODE & SCAN OPTIONS
178
added to the sum to make it an even multiple of 10. An example would be if the sum of
the products was 37, then the check digit would be 3.
Equation to Determining Potential Number of Stored Barcodes
The number of barcodes that may be stored in the KDC memory depends on the size of
the barcodes.
Example: In case of EAN-13, it takes up 20 bytes. The maximum number of EAN-13
barcodes that may be saved is STORAGE_SIZE/20. For example, in case of 4MB, it may
store maximum 204,800 barcodes and in case of 8MB, it may store maximum 409,600
barcodes.
Data Buffer Full
When the data buffer is full, the KDC displays a message, Buffer Full, ignoring any
command to scan barcodes. The user must reset the data buffer to continue data
collection.

KDC User Manual MULTIPLE SPECIAL BARCODES
179
11. Appendix B –FAQ
11.1 Symbology
Q: What barcode symbologies are supported by the KDC?
A: The KDC20/100/200/250/270L/270D/350L/410/411/415/470L/470D/500L support 1D
barcode only. KDC30/270C/300/350C/420/421/425/450/470C/500C support most
major 1D, 2D barcode symbologies and OCR.
Table 15 – Symbologies supported by KDC
Table 16 – Symbologies supported by KDC
KDC30/270C/300/350C/420/421/
425/450/470C/500C
2D Barcodes
AztecCode, AztecRunes, CodablockF,
Code16K, Code49, DataMatrix,
MaxiCode, MicroPDF, PDF417,
QRCode, and HanXin Code
1D Barcodes
Codabar, Code11, Code32, Code39,
Code128, EAN8, EAN13, GS1-128,
I2of5, MSI, Plessey, PosiCode, GS1
DATABAR OMNI, GS1 Limited, GS1
Expanded, S2of5IA, S2of5ID, TLC39,
Telepen, Trioptic, UPCA, and UPCE
Postal Barcodes
AusPost, CanadaPost, ChinaPost,
JapanPost, KoreaPost, KixPost, Planet
Code, Postnet (US), and UKPost
OCR Fonts
OCR-A, OCR-B, OCRPassport,
OCRMICRE13B, and OCRSEMIFONT
Table 14 – Symbologies supported
by
KDCKDC30/300/350C/420/425/50
0C
2D Barcodes
AztecCode, AztecRunes, CodablockF,
KDC20/100/200/250/270L/270D/350L
/410/411/415/470L/470D/500L
1D Barcodes
EAN13
EAN8
UPCA
UPCE
Bookland EAN
EAN13 with Add-on
EAN8 with Add-on
UPCA with Add-on
UPCE with Add-on
Interleave 2 of 5
ITF14
Code128
Codabar
GS1-128
Code39
Code93
Code35
KDC20/100/200/250/350L/350D/410/
415/500D
1D Barcodes
EAN13
EAN8
KDC User Manual MULTIPLE SPECIAL BARCODES
180
11.2 Host Interface
Q: What interface ports are supported by the KDC?
A: The KDC100 has two USB ports: Swing-out Type A and Ultra-mini USB ports that
support USB to Serial protocol. KDC200/250/300/350/400(except KDC470) have one
Ultra-mini USB port that supports USB to Serial protocol and Bluetooth that supports
HID/SPP/MFi
Bluetooth
profiles. KDC270 and KDC470 have one Micro USB port.
KDC20/30 have one Swing-out Type A USB port which supports USB to Serial protocol
and Bluetooth with HID, SPP and MFi
Bluethooth
profiles. KDC500 has one micro USB
port that supports USB to Serial protocol and Bluetooth that supports SPP/MFi
Bluetooth
profile.
11.3 Battery
Q: How long will the KDC battery last before it needs to be replaced?
A: The battery on the KDC may be charged at least 300 times before it needs to be
replaced.
Q: How long does it take to charge the KDC?
A: It takes about 2 hours to charge the KDC20/100/200, 4 hours to charge the
KDC30/250/300/270, and 5 hours to charge the KDC350/400/470/500.
Q: How many barcodes may a fully charged KDC scan?
A: If the user scans a barcode every 1 seconds, KDC100/30 scans more than 12,000
barcodes, KDC20 scans more than 11,000 barcodes, KDC200 scans more than 8,500
barcodes, KDC250/270L/270D scans more than 33,000 scans, KDC270C/300 scans
more than 22,000 scans and 2D models of KDC350/400/470/500 scan more than
40,000.
Q: How long will the KDC battery lasts in the sleep mode?
A: KDC100 lasts more than 75 days. KDC20/200 lasts more than 2 days while
connected in Bluetooth and 60 days if not connected in Bluetooth.
KDC250/270L/270D lasts 7 days while connected in Bluetooth and 120 days if not
connected in Bluetooth. KDC30/270C/300 last more than 25 days while connected in
Bluetooth and 5 days if not connected in Bluetooth. KDC350 lasts more than 12 hours
while GPS is active and Bluetooth is connected, 7 days while GPS is not active and
Bluetooth is connected, and 20 days while GPS is not active and Bluetooth is not

KDC User Manual MULTIPLE SPECIAL BARCODES
181
connected. KDC410/415/420/425/430/470 last more than 8 days while connected in
Bluetooth and 20 days while if not connected in Bluetooth. KDC450/470 lasts more
than 4 hours while reading RFiD tag continuously every second and Bluetooth is
connected, 5 days if reading RFiD tag casually and Bluetooth is connected. KDC500
lasts more 7 days while connected in Bluetooth and 10 days if not connected in
Bluetooth.
Q: May I replace the KDC battery?
A: Yes. The KDC has a separate compartment for the battery that may be opened
easily with a driver. KDC batteries may be purchased at www.KOAMTACstore.com or
from local KDC reseller.
11.4 Memory
Q: How many barcodes may be stored in the KDC?
A: 4MB version of KDC100M/200M/250M/300M/350 may store maximum of 204,800
barcodes and 8MB version and KDC270/470 may store maximum of 409,600
barcodes . KDC20/30 have 150KB data memory which may store maximum 7,680
barcodes. KDC41x/42x has 80KB data memory and may store maximum 4,096
barcodes. KDC500 has 3MB data memory which may store maximum 153,600
barcodes.
Q: May I download stored barcodes or wedge barcodes to my application?
A: Yes. KTSync® is keyboard wedging, application generation, DB look up, and
inventory program bundled with the KDC200/250/270/300/350, which supports host
devices running on Android®, iPhone/iPad/iPod touch, Blackberry®, Windows®
XP/Vista/7/8/10/Mobile 5.0+. KTSync® provides keyboard wedging program only for
KDC20/30/400/470. KDC100 and KDC500 only supports Windows XP/Vista/7 version.
Q: Does the KDC support
Android®
,
iPhone/iPad/iPod touch®
,
Blackberry®
, Mac
®
and
Windows®
devices?
A: KTSync® currently supports Android®, iPhone/iPad/iPod touch, Blackberry®, Mac® and
Windows® devices.
KDC User Manual MULTIPLE SPECIAL BARCODES
182
11.5 Programming
Q: May the KDC be programmed by a KOAMTAC partner?
A: Yes. KOAMTAC’s Application Generation tool provides an enhanced programming
environment for developing custom applications for the KDC.
1. KDC supports, at most, three step data collection processes, including the
ability to perform various data functionality features.
2. KDC’s database lookup function provides enhanced data processes, enabling
the KDC to display database results with or without scanned barcode data.
3. KDC may display a message from the Host by enabling two-way
communications and a messaging application.
Q: Does KOAMTAC provide customization services for the KDC?
A: Yes. Custom applications or projects may be developed by KOAMTAC engineers.
This service is provided for an additional fee to KOAMTAC. For more information
regarding this service, please contact KOAMTAC.
Q: May a partner develop a PC or Smartphone application for the KDC?
A: A software development kit for Windows® XP/Vista/7/8/10/Mobile 5.0+ and Android is
available on KOAMTAC support page. Android®, iPhone/iPad/iPod touch, Blackberry®, a

KDC User Manual MULTIPLE SPECIAL BARCODES
183
12. Appendix J – Product Specification
12.1 KDC270
Main Processor
ARM7, 32bits
Memory
256KB for Firmware, 64KB for RAM, 8MB for User Data
RTC
Quartz RTC
LED
1 Tri-Color LED
Display
1.01” OLED(128x64)
Buttons
1 Scan Button and Up/Down Button
Battery
Li-ion 3.7 V 650 mAh
Charging
Micro USB cable or Charging Cradle
Scan engine
1D Laser & CCD
2D Imager
Interface
Bluetooth V2.1+EDR, Class 2, SPP/MFi/HID
Micro USB 5 Pin
Size
40 x 82 x 18mm
Weight
57.5g
Ingress Protection
Rating
IP65
Drop Spec
5 feet (1.5m)
Operating
-4○F(-20○C) ~ 122○F(50○C)
Storage
-4○F(-20○C) ~ 140○F(60○C)
Humidity
5% ~ 95%(noncondensing)
High Internal
Frequency
X-tal: 26 MHz
