AISOLUTION KDC300 Barcode Reader User Manual KDC300 User Manual 2 73
AISOLUTION CO., LTD. Barcode Reader KDC300 User Manual 2 73
User manual

KDC300
User Manual
Rev. 1.73

KDC300 User Manual
1
Copyright, License and Warning page
Copyright© 2008 by KoamTac, Inc. All rights reserved
No part of this publication may be reproduced or used in any form, or by any electrical or mechanical
means, without permission in writing from KoamTac, Inc.
The material in this manual is subject to change without notices.
KoamTac reserves the right to make changes to any product to improve reliability, function, or design.
KoamTac doesn’t assume any product liability arising out of, or in connection with, the application or use
of any product, circuit, or application described herein.
Follow all warnings and instructions marked on manual and units
Use only the power source specified in this manual or marked on the units
TO PREVENT FIRE OR SHOCK HAZARD, DO NOT EXPOSE THIS UNIT TO ANY TYPE OF
MOISTURE
DO NOT LOOK DIRECTLY INTO LASER or point the laser into another person’s eyes. Exposure to
the beam MAY CAUSE EYE DAMAGE.
Caution RF EXPOSURE INFORMATION.
A minimum separation distance of 7.9 inches (20cm) must be maintained between the user and the
external antenna of repeater to satisfy FCC RF exposure requirements. For more information about RF
exposure, please visit the FCC
CAUTION
Changes or modifications not expressly approved by the manufacturer responsible for compliance could
void the user’s authority to operate the equipment
WARNING
This device complies with part 15 of the FCC Rules. Operation is subject to the following two conditions:
(1) This device may not cause harmful interference, and (2) this device must accept any interference
received, including interference that may cause undesired operation.
INFORMATION TO USER:
This equipment has been tested and found to comply with the limit of a Class B digital device, pursuant to
Part 15 of the FCC Rules. These limits are designed to provide reasonable protection against harmful
interference in a residential installation. This equipment generates, uses and can radiate radio frequency
energy and, if not installed and used in accordance with the instructions, may cause harmful interference
to radio communications. However, there is no guarantee that interference will not occur in a particular
installation; if this equipment does cause harmful interference to radio or television reception, which can
be determined by turning the equipment off and on, the user is encouraged to try to correct the
interference by one or more of the following measures:
1. Reorient / Relocate the receiving antenna.
2. Increase the separation between the equipment and receiver.
3. Connect the equipment into an outlet on a circuit difference from that to which the receiver is connected.
4. Consult the dealer or an experienced radio/TV technician for help
CAUTION
RISK OF EXPLOSION IF BATTERY IS REPLACED BY AN INCORRECT TYPE.
DISPOSE USED BATTERIES ACCORDING TO THE INSTRUCTIONS
KDC300 User Manual
2
Table of Contents
1. KDC300 Introduction ..................................................................................................................... 4
2. Installation and Operation.......................................................................................................... 5
2.1 Unpacking.................................................................................................................................... 5
2.2 Installation .................................................................................................................................. 6
Affix the neck strap to KDC300
........................................................................................... 6
Copy the Provided Programs into your PC
..................................................................... 6
Connect KDC300 USB connector to your PC
................................................................ 6
Charge the battery
...................................................................................................................... 7
Configure KDC300 options and system settings
........................................................ 7
2.3 Location of buttons................................................................................................................. 9
2.4 Basic Operation ...................................................................................................................... 10
Reading barcodes
..................................................................................................................... 10
Upload barcode data to PC.
................................................................................................. 10
2.5 KDC300 Menus ........................................................................................................................ 11
KDC Mode
...................................................................................................................................... 18
View Data Menu
......................................................................................................................... 19
Set Barcodes Menu
.................................................................................................................. 19
Barcode Options Menu
........................................................................................................... 19
Scan Options Menu
................................................................................................................... 19
Data Process Menu
................................................................................................................... 19
Bluetooth Menu
.......................................................................................................................... 20
System Menu
............................................................................................................................... 20
2.6 LED Status................................................................................................................................. 22
2.7 Empty Battery.......................................................................................................................... 22
2.8 Buffer Full................................................................................................................................... 22
2.9 Reset............................................................................................................................................. 23
2.10 Replacing Battery ............................................................................................................... 24
3. Bluetooth ........................................................................................................................................... 25
3.1 Power On/Off Bluetooth Power ....................................................................................... 25
3.2 Auto Power Off Bluetooth.................................................................................................. 25
3.3 PWR OFF Time ......................................................................................................................... 25
3.4 Auto Power On Bluetooth .................................................................................................. 26
3.5 Pairing KDC300 to Host Device...................................................................................... 26
KDC300 User Manual
3
3.6 Connecting KDC300 to Host Device ............................................................................ 26
3.7 Auto Connecting KDC300 to Host Device on Power On .................................... 27
3.8 Beep Warning ........................................................................................................................... 27
4. Synchronization.............................................................................................................................. 28
4.1 Connection ................................................................................................................................29
4.2 Synchronization ...................................................................................................................... 30
Select destination of data
.................................................................................................... 31
Select Synchronization Method
......................................................................................... 32
Current KDC Wedge Methods
.............................................................................................. 33
Select Synchronization Options
........................................................................................ 34
4.3 Barcode Selection ................................................................................................................. 35
4.4 Confirmation ............................................................................................................................. 37
5. Master-Slave barcode compare application ................................................................... 38
6. Troubleshooting ............................................................................................................................. 39
7. Warranty............................................................................................................................................. 41
Appendix A. Barcode and Scan Options................................................................................ 43
A.1 System Information.............................................................................................................. 43
A.2 Miscellaneous Barcode Information............................................................................ 43
Appendix B. FAQ ................................................................................................................................45
B.1 Symbology.................................................................................................................... 45
B.2 Host Interface............................................................................................................ 45
B.3 Battery........................................................................................................................... 45
B.4 Memory.......................................................................................................................... 46
B.5 Programming .............................................................................................................. 46
KDC300 User Manual
4
1. KDC300 Introduction
KoamTac data collector KDC300 is a compact, light and powerful reader with a rechargeable battery,
OLED display, large memory and connections to PC, PDA and cell phone using Bluetooth and
Serial/USB cable.
KDC300 is well suited for a variety of portable applications. It can be used as an accessory to a PDA or
cell phone as well as an independent data collector.
The key features of KDC300 are
• Bright OLED display
• Bluetooth V2.0+EDR, Class2, SPP (Serial Port Profile)
• Built in ultra mini USB connector
• Rechargeable Li-Ion battery with separate installation space for easy replacement
• Powered by Honeywell Adpatus® Technology
• Auto uploading scanned data to the host device upon connecting either USB-serial or
generic serial cable to one of USB connectors
• Large data memory
• Bundled synchronization and wedging software allows PC and PDA programs to accept
scanned barcodes as if the barcode had been entered from the keyboard as well as to
download collected barcodes from KDC300.
KDC300 also provides seamless integration of barcode capability into your application by providing a user
friendly data synchronization software and application software development kit.
KDC300 User Manual
5
2. Installation and Operation
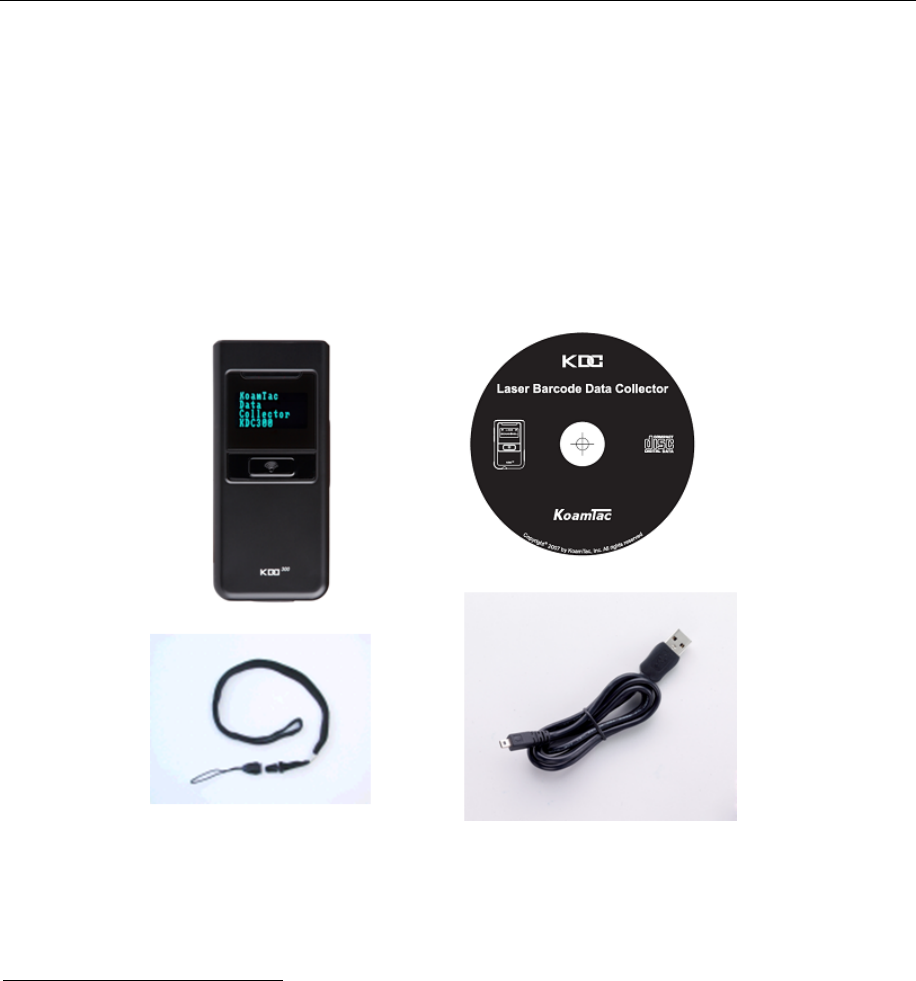
2.1 Unpacking
The standard KDC300 package1 contains:
z One KDC300,
z One USB cable,
z One Neck strap and
z One CD containing the software and user manual.
1The package content may vary by region.

KDC300 User Manual
6
2.2 Installation
Prior to installing the included software on your PC, verify that your system meets the minimum system
requirements.
1. Microsoft Windows operating system: XP or Vista
2. Free space on hard drive of 512 MB.
3. Accessible USB port for connecting KDC300 to your computer
4. 256M byte memory or larger.
Affix the neck strap to KDC300
Use the included neck strap properly to avoid dropping the unit.
Fit the small thin cord of the strap around the pillar of the KDC300 and loop the thick cord of the strap
through the thin loop in order to attach the neck strap.
Wear the neck strap when carrying the product to avoid dropping the unit.
Do not swing the product around on the strap, since contact with another object may damage the unit and
cause it to malfunction.
Copy the Provided Programs into your PC
Create a directory for KTSync program.
Copy the “KTSync.exe” program from the CD to the new directory on your hard drive.
It is recommended that you also copy “KTReader.inf” and “KDC300.User.Manual.pdf” into the same
directory.
Connect KDC300 USB connector to your PC
Connect KDC300 to PC USB port. Use the included USB extension cable if needed.
The “New hardware found” message will pop up.
Follow the prompts and select the option to search for the best driver for your device.
Please select the directory containing the “KTReader.inf” file and continue hardware installation
procedure.
A message will pop-up that new hardware is found and recognized as a serial device.
KDC300 User Manual
7
Charge the battery
The battery is charged by connecting KDC300 to a USB port. It takes about four hours to fully charge the
battery. The front panel LED will illuminate in orange during the battery charge. The front panel LED will
illuminate in green when the battery is fully charged.
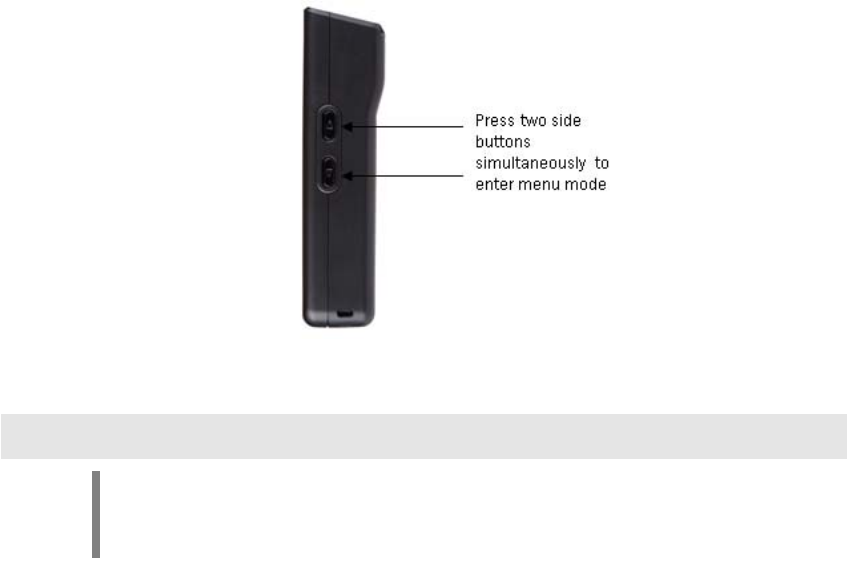
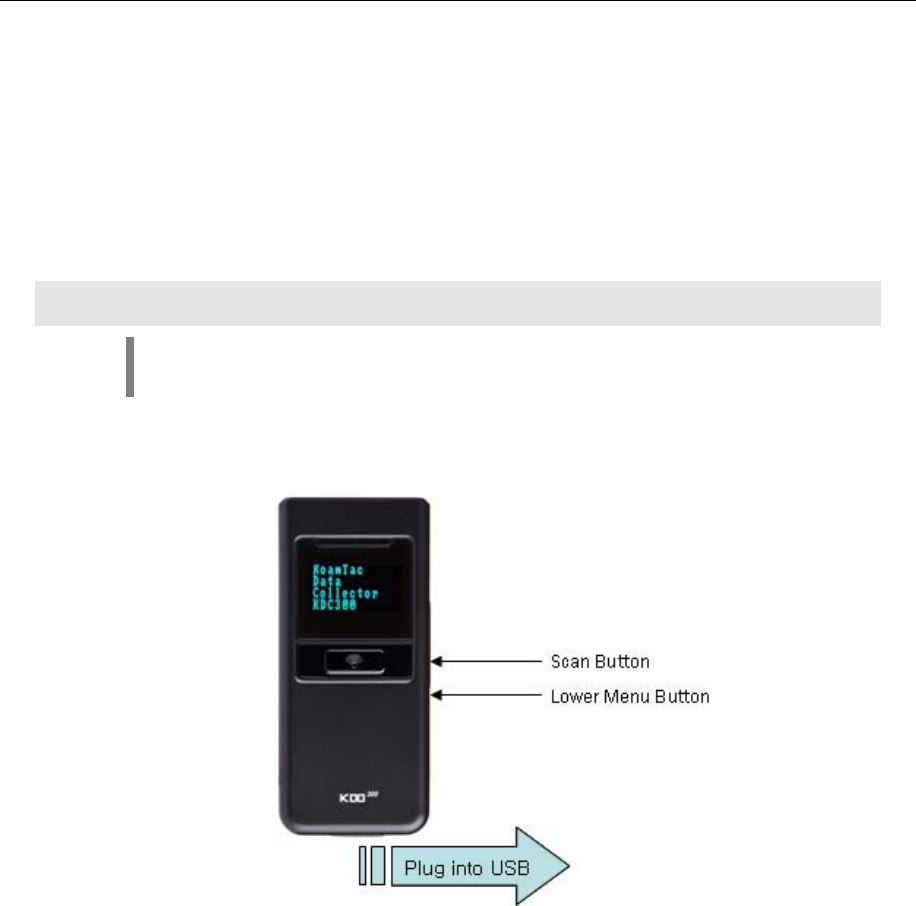
Configure KDC300 options and system settings
User can access menu selection mode by pushing both buttons on the left side of the KDC300
simultaneously.
z Please set KDC300 options properly for the best performance.
z Please refer KDC300 menus section for the details on options.
Note
User also can configure KDC300 from KTSync program as well as
reading special barcodes. Please refer to Chapter 4 Synchronization
and Appendix C for the detailed description of each option
KDC300 User Manual
8
KDC300 User Manual
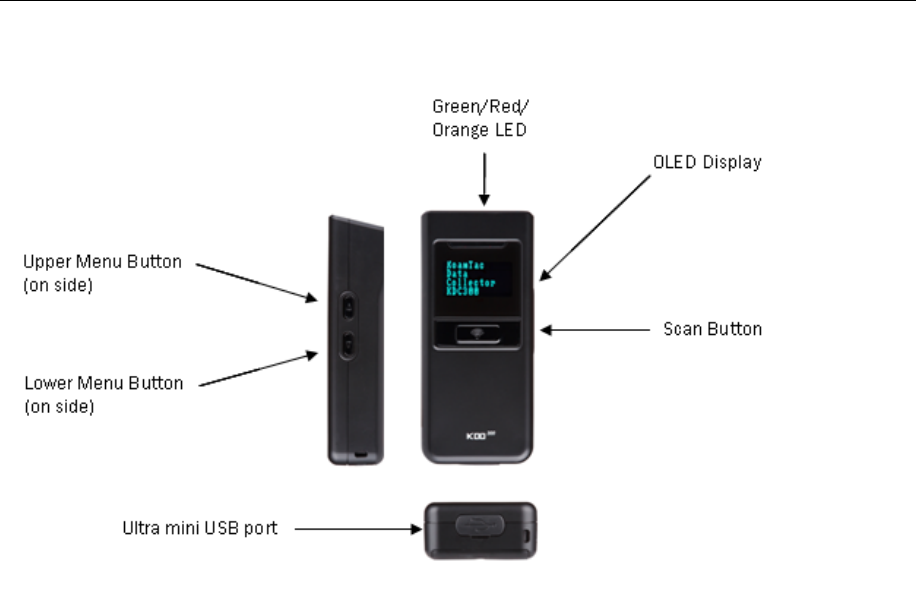
9
2.3 Location of buttons
KDC300 User Manual
10
2.4 Basic Operation
Reading barcodes
Point KDC300 to the barcode and press the scan button.
A high beeper tone will be heard and the front panel LED will illuminate in green upon a successful scan.
A low beeper tone will be heard and the front panel LED will illuminate in red upon an unsuccessful scan.
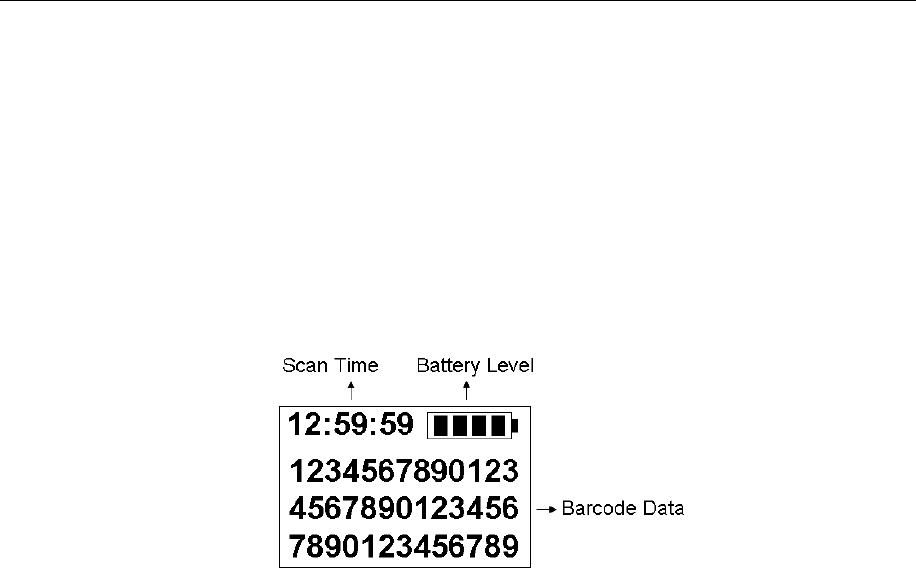
The scanned barcode will be displayed, along with time stamp and battery level.
KDC300 provides two additional display format including barcode type & time, and barcode type and
battery.
When the barcode cannot be read, try the following:
z Check if the width of barcode label does not exceed the width of the light beam.
z Change the angle between the barcode and KDC300.
z Change the distance between the barcode and KDC300.
z Check option settings defined in KDC300 menu section.
Upload barcode data to PC.
Use the included KTSync synchronization program to upload barcode data from KDC300 to your PC.
Please refer to Chapter 4 for the details of Synchronization process.

KDC300 User Manual
11
2.5 KDC300 Menus
User can access menu selection mode by pressing both buttons on the left side of KDC300
simultaneously. The table below summarizes KDC300 menus. Please refer to Chapter 4 for the details of
each option.
Note
User should set KDC300 optional parameters properly for the best
scanning result.
z Set proper security level. To increase the reliability ,user can set the security level to a number
higher than 1 (the default value) up to 4. If the security level is n, then the decoder will keep
reading the barcode until it decodes the same value n times.
z Select only necessary barcodes to increase the reliability further.
z Maximize the minimum barcode length. Small barcode length such as 2 or 3 can result in some
errors.
Level 1 Level 2 Level 3 Level 4/Note
Normal Standard KDC100
Mode
Onetime Onetime Barcode
Comparing Mode
Continuous Continuous Barcode
Comparing Mode
KDC Mode
Collation Select comparing digits
View Data View/Delete Review and delete stored data

KDC300 User Manual
12
Codabar
Code11
Code32
Code39
Code93
Code128
EAN8
EAN13
EANUCC
I2of5
Matrix2of5
MSI
Plessey
PosiCode
RSS-14
RSSLimit
RSSExpand
S2of5ID
S2of5IA
TLC39
Telepen
Trioptic
UPCA
UPCE0
Set Barcodes 1D
UPCE1

KDC300 User Manual
13
AztecCode
AztecRunes
CodablockF
Code 16K
Code49
DataMatrix
MaxiCode
MicroPDF
PDF417
2D
QRCode
Postnet
PlanetCode
UKPost
CanadaPost
KixPost
AusPost
JapanPost
ChinaPost
Postal
KoreaPost
OCR OFF
OCRA
OCRB
OCRUSCurrcy
OCRMICRE13B
OCR
OCRSEMIFONT

KDC300 User Manual
14
TxStartStop
DoNotVerify
VerifyDoNotTx
Check Digit
VerifyDoTx
Disabled
Enabled
Codabar
Concatenate
Required
Tx StartStop
DoNotVerify
VerifyDoNotTx
Check Digit
VerifyDoTx
Append
Code39
FullASCII
DoNotVerify
VerifyDoNotTx
I2of5 Check Digit
VerifyDoTx
1 digit
Code11 Check Digit 2 digits
Code128 Concatenate
AIM
Telepen Output Original
VerifyChkDgt
NumberSys
2DgtAddenda
5DgtAddenda
Req. Addenda
Sep. Addenda
(Bar)Code
Options
UPCA
Coupon Code

KDC300 User Manual
15
Expand
Req. Addenda
Sep. Addena
Check Digit
NumberSys
2DgtAddenda
UPCE
5DgtAddenda
VerifyChkDgt
2DgtAddenda
5DgtAddenda
Req. Addenda
Sep. Addena
EAN-13
ISBN Trans.
VerifyChkDgt
2DgtAddenda
5DgtAddenda
Req. Addenda
EAN-8
Sep. Addena
MSI Tx CheckChar
AandB
A&B LimitedA
PosiCode
A&B LimitedB
UCCEAN VER.
RSS Emulate
128 Emulate
EANUCC Emulation
No Emulate
PostNet Tx CheckDgt
PlanetCode Tx CheckDgt

KDC300 User Manual
16
Time Out 0.5sec..10sec
Min. Length 2..36
Scan Options
Sec. Level 1..4
Wedge Only
Wedge & Store
Store Only
Wedge & Store if Sent
Wedge / Store
Wedge & Store if Not
Sent
Barcode only
Data Format Packet data
Handshake Enable/Disable
Handshake
Data Process
Terminator
Termination character
for data only wedging –
None, CR, LF, CR+LF,
Tab
Power Enable/Disable
Pairing Enter Pairing Mode
Auto Connect Enable/Disable
Auto PowerOff Enable/Disable
Auto PowerOn Enable/Disable
Beep Warning Enable/Disable
Bluetooth
PWR OFF Time 1min ~ 30min

KDC300 User Manual
17
Memory Status # of stored barcode,
amount of remaining
memory
Reset Memory Empty data memory
Sleep Timeout Disable.. 10min.
Date / Time YYYY:MM:DD,
HH:MM:SS
Battery % left
Version FW version. Serial
Number
Button Lock Enabled/Disabled
Beep Sound Enabled/Disabled
Auto Menu Exit Enabled/Disabled
Port Status Enabled/Disabled
Display Format Time&Battery,
Type&Time,
Type&Battery
System
Factory Default Restore factory default
settings
KDC300 User Manual
18
KDC Mode
KDC300 supports standard data collection mode and special application modes.
z Normal: Normal is the default KDC300 data collection mode.
z Onetime, Continuous, Collation: This is the special barcode checking application. User can
define the master barcode and compare other barcodes with the master barcode either onetime
or in continuous mode. User also can define compare strings within master and slave barcodes.

KDC300 User Manual
19
View Data Menu
User can browse and delete scanned barcodes in View Data menu if there are stored barcodes in
KDC300.
Set Barcodes Menu
KDC300 supports most of the popular barcode symbologies. However, it is important to select only the
required symbologies to provide the best scan performance. Please refer Honeywell 5x80 User Manual
for the details of supporting symbologies.
Barcode Options Menu
KDC300 supports various barcode options including transmission of start and stop characters, symbology
conversion, verification of optional check character, and transmission of check digit. Please refer
Honeywell 5x80 User Manual for the details of each option.
Scan Options Menu
z Timeout: User can set scanning timeout up to 10 sec. Default timeout is 2 sec.
z Minimum barcode length: User can set the smallest barcode size up to 36. It is strongly
recommended to maximize the minimum length to prevent possible wrong readings. Default is 4.
Data Process Menu
Wedge/Store - KDC300 provides five modes of data transmission.
z Wedge Only: KDC300 doesn’t store scanned barcode in the memory and just transmits it to the
host
z Wedge & Store: KDC300 stores scanned data in the memory and transmits it to the host
z Store Only: KDC300 stores scanned data in the memory but doesn’t transmit it to the host.
z Wedge & Store if Sent: KDC300 stores scanned data in the memory if it transmits to the host
successfully
z Wedge & Store if Not Sent: KDC300 stores scanned data in the memory if it fails to transmit it to

KDC300 User Manual
20
the host
Data Format - KDC300 provides two data formats
z Barcode Only: KDC300 transmits scanned barcode only. User may incorporate proper data
transmission error detection and correction mechanism in this mode.
− KDC300 supports various terminations characters for barcode only format
− User can select <NONE>, <CR>, <LF>, <CR+LF> or <TAB> as the termination
character
z Packet Data: KDC300 transmits packet data with checksum to minimize transmission error.
KTSync program operates in Packet Data mode and user shouldn’t change this option while
using KTSync program.
Handshake - KDC300 provides handshake mode when sending packet data
z Handshake mode will increase the reliability of packet data transmission.
z The default is disable handshake mode.
Terminator – KDC300 supports various termination characters when KDC300 wedges barcode in data
only format.
z User can select <NONE>, <CR>, <LF>, <CR+LF> or <TAB> as the termination character
when KDC300 wedges barcode in data only format.
Bluetooth Menu
KDC300 supports a wide range of Bluetooth features to increase usability as well as to minimize the
power usage. Please refer to Chapter 3 for details on Bluetooth functions.
System Menu
z Memory Status: User can check the number of stored barcodes and memory usage in this menu.
z Reset Memory: This menu enables user to erase all stored barcodes.
z Sleep Timeout: KDC300 goes to sleep mode after scanning barcode to minimize the power
consumption. Default sleep timeout is 5 sec.
z Date/Time: User can set current date and time in this menu. KTSync program also provides
automatic date and time synchronization with PC date and time function.
z Battery: This menu shows the current status of battery power level.
KDC300 User Manual
21
z Version: This menu shows the firmware version number and KDC300 serial number.
z Button Lock: User can lock/unlock KDC scan and side buttons.
z Beep Sound: User can enable/disable KDC beep sound.
z Port Status: User can enable/disable Bluetooth, Serial and USB connection/disconnection
messages.
z Display Format: User can select one of the following display format
Time & Battery (Default)
Type & Time
Type & Battery
z Factory Default: User can reset options to factory default.

KDC300 User Manual
22
2.6 LED Status
LED Color Status
Green z Successful Reading
z USB is connected and battery is fully charged
Orange z Low battery
z USB is connected and battery is charging
Red z No reading
z Empty battery
2.7 Empty Battery
KDC300 will display “Empty Battery Connect USB” message if the battery becomes empty. User should
synchronize the data immediately to prevent the loss of collected data.
2.8 Buffer Full
KDC300 will display “Buffer Full” message if the size of collected data reaches 200K byte or collects
10,240 barcodes. User should synchronize and clear the memory to continue data collection using the
KTSync synchronization program.
KDC300 User Manual
23
2.9 Reset
User can reset KDC300 as follows:
z Plug KDC300 USB connector to PC USB port.
z Press lower menu button and scan button simultaneously for 5 seconds.
z Release lower menu button and scan button once LED becomes yellow.
z Initial screen (“KoamTac Data Collector KDC300”) is displayed once the unit is reset.
Note
KDC300 stores collected data into flash memory and wouldn’t lose
the data during reset process.
KDC300 User Manual
24
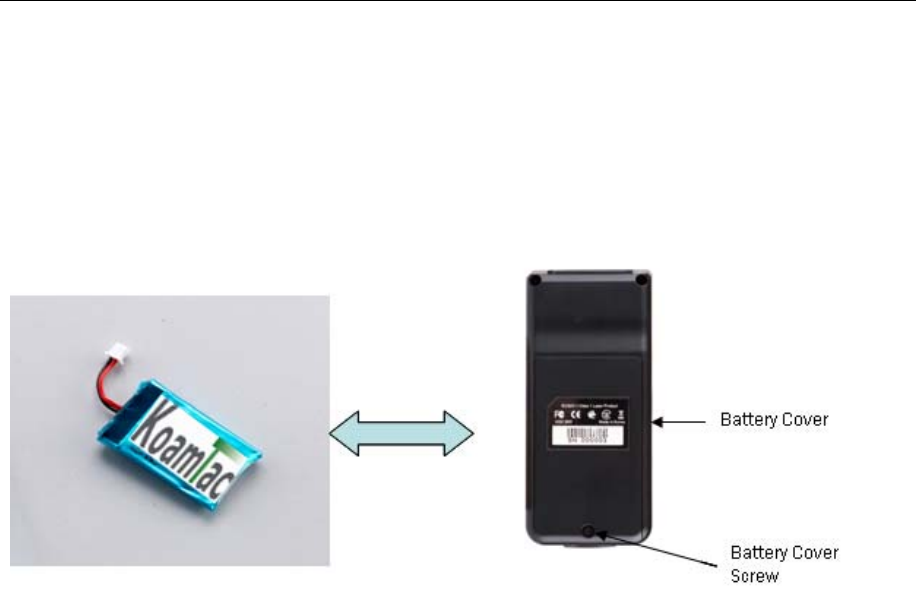
2.10 Replacing Battery
User can purchase a new Li-polymer rechargeable battery from local distributor and replace the Li-
polymer rechargeable battery as follows:
z Disassemble back cover (Unscrew middle screw only)
z Replace battery and assemble back cover

KDC300 User Manual
25
3. Bluetooth
KDC300 supports generic Bluetooth COM port and compatible with following Bluetooth stacks.
z BlueSoleil
z Broadcom (Widcomm)
z Microsoft Windows XP SP2, Vista and Mobile
z Toshiba
KDC300 may be able to connect to other Bluetooth stacks supporting SPP (Serial Port Profile) other than
listed above.
3.1 Power On/Off Bluetooth Power
Bluetooth data transmission is a very power consuming process and careful power management is
required. It is strongly recommended to POWER OFF Bluetooth if KDC300 is not going to be used for an
extended period.
3.2 Auto Power Off Bluetooth
User can Enable/Disable Auto Bluetooth Power Off feature in Auto PowerOff menu. The default is Enable
and it is strongly recommended to keep it Enable to maximize the KDC300 operation time.
If Auto PowerOff is enabled, KDC300 powers off Bluetooth if KDC300 is NOT CONNECTED to the Host
for the duration defined in PWR OFF Time menu. User can power on Bluetooth manually once powered
off.
3.3 PWR OFF Time

KDC300 User Manual
26
If Auto PowerOff is enabled, KDC300 powers off Bluetooth if KDC300 is NOT CONNECTED to the Host
during the time duration defined in this option. User can set Auto power off time between 1minute to 30
minutes.
3.4 Auto Power On Bluetooth
User can Enable/Disable Auto Bluetooth Power On feature in Auto PowerOff menu. The default is Disable.
If Auto PowerOn is enabled, KDC300 powers on Bluetooth if KDC300 Bluetooth power is off and user
triggers scan button. Host program may have to open COM port again to reconnect to KDC300.
3.5 Pairing KDC300 to Host Device
User should pair KDC300 with Host Device first. This paring process doesn’t have to be repeated once
Host device recognizes KDC300.
User can set KDC300 to paring mode by selecting Pairing menu.
z “Paring started” message will be displayed once entering pairing mode.
z Enter PIN “0000” once requested by Host
z “Pairing success” message is displayed once host sets up Bluetooth connection successfully
before pairing timeout (60sec).
z “Pairing failed” message is displayed if failed to setup a Bluetooth connection with Host.
User can ignore this message if Host shows “Connected” message
KDC300 doesn’t show “Pairing success” message unless Host opens corresponding
Bluetooth COM port
3.6 Connecting KDC300 to Host Device
User should connect KDC300 to host device before using Bluetooth feature. Please refer to host device
manual for the proper Bluetooth connection procedure.
KDC300 would display “Bluetooth connected” message once connected with host device.

KDC300 User Manual
27
3.7 Auto Connecting KDC300 to Host Device on
Power On
KDC300 can be connected to host device automatically upon Power On Bluetooth if Auto Connect is
Enabled. The default is Disabled and discouraged to use this feature unless fully tested with host device.
Some host devices do not support this feature and will result delay and power loss if Enabled but not
connected automatically.
3.8 Beep Warning
KDC300 beeps the Bluetooth connection status.
z High short beep tone will be played once Bluetooth is connected.
z Low short beep tone will be played once Bluetooth is disconnected.
KDC300 will beep 5 times with short beep if
z “Beep Warning is ENABLED” and
z “Auto PowerOff is DISABLED” and
z “KDC300 is DISCONNECTED from HOST” and
z “Bluetooth power is ON”.
KDC300 will beep for one second if Bluetooth power becomes OFF by Auto PowerOff option

KDC300 User Manual
28
4. Synchronization
KTSync has two major functions – Synchronization and Keyboard Emulation. KoamTac Synchronization
provides data upload functions to any Windows XP application. Keyboard Emulator enters scanned data
directly into any XP application programs as if it was manually typed on the keyboard. KTSync also
provides the following additional functions:
z Prefixes, suffixes add function which further eliminates the need for manual data entry
z Symbology and Scan Option selector
z Barcode Wedging.
You will see the following screen when launching KTSync application.
File Menu
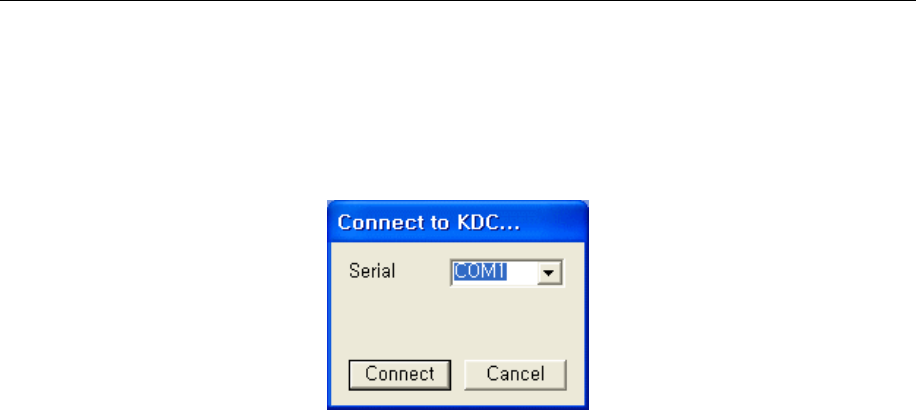
z Connect : Manually select the com port used by KTSync program to the KDC300 com port.
KDC300 com port can be found in the Windows Device Manager.
z Synchronize: Synchronize KDC300 data with host manually
Setting Menu
z Synchronize: Select Synchronize options
z Barcode & KDC: Select Barcode and KDC options
z Confirmation: Select auto connection and/or synchronization confirmation options.
About Menu
z KTSync version information
KDC300 User Manual
29
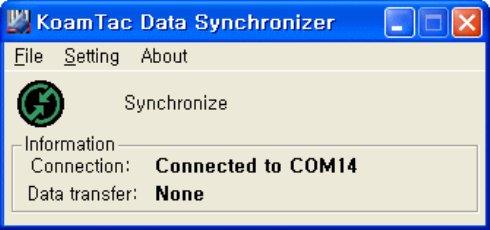
4.1 Connection
The KoamTac KDC300 connects to com port automatically once it is connected to PC USB port. User can
also manually assign the KTSync com port to the KDC300 com port using Connection submenu under
File menu if needed..
z KDC300 com port can be found in the Windows Device Manager.
z The KTSync program will not connect to KDC300 if KDC300 is in Menu mode.
z If KTSync program fails to connect automatically to KDC300
− Exit KTSync program
− Ensure KDC300 is properly connected to the PC by one of the USB ports and that it is
not in menu mode
− Start KTSync program once again.
KDC300 User Manual
30
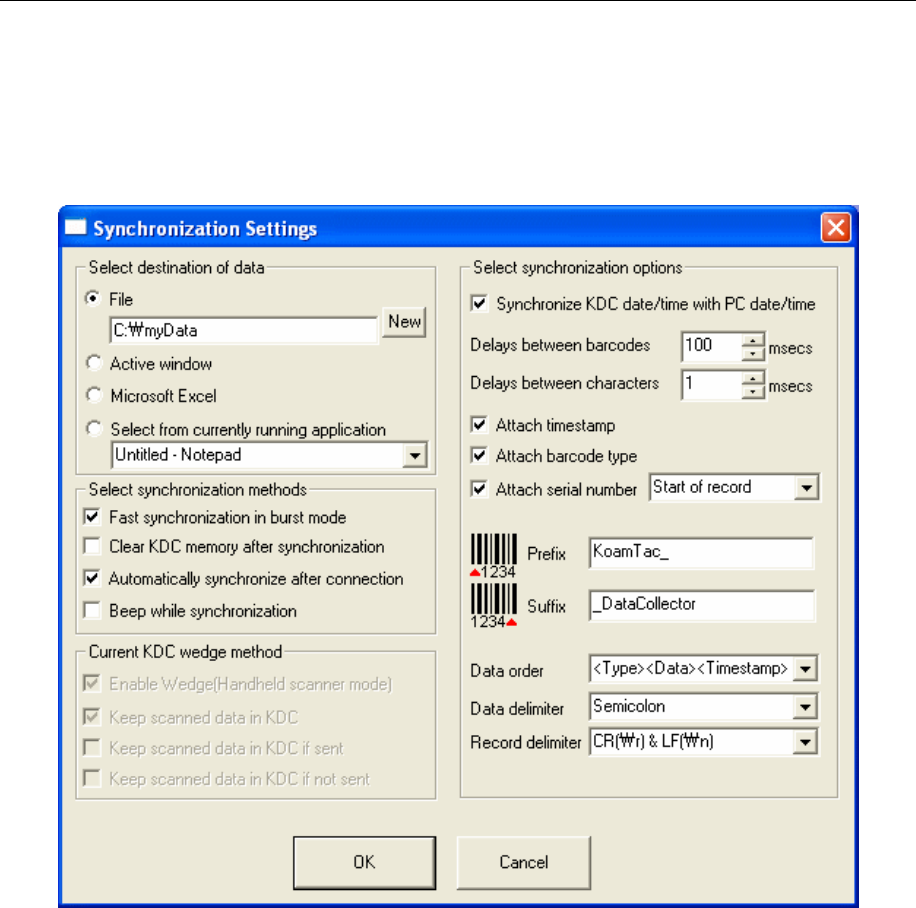
4.2 Synchronization
KDC300 provides several synchronization options with hosts such as PC, PDA and Cell phone. The
standard package includes the software for Windows XP/Vista synchronization. If you need cell phone or
PDA integration, please contact your local representative. User can configure various Synchronization
and Keyboard Emulation (Wedge mode) functions in the “Synchronization Settings” option.

KDC300 User Manual
31
Select destination of data
z File
− User can save the collected data into a file
− The target directory and filename can be selected by clicking “New” icon.
− “C:\MyData” is the default directory
z Active window
− If this method is selected then scanned barcodes are passed to the active program as if the
barcode had been entered from the keyboard
z Microsoft Excel
− Users should select this method to import barcode data into Microsoft Excel.
z Select from current running application
− User can select a currently running program to which the KDC300 data will be synchronized.
Note
- Data synchronization can be set to automatically after connection,
or manually
- User should not operate the PC during the synchronization
process. It can interrupt synchronization process and will result in
undesired behavior
KDC300 User Manual
32
Select Synchronization Method
There are two synchronization options that user can select.
Fast Synchronization in burst mode
User can synchronize KDC300 with PC in burst mode or handshaking mode. Burst mode provides faster
synchronization process if selected destination of data is a file.
Clear KDC300 memory after synchronization
User can clear KDC300 memory after synchronization if this option is selected. KDC300 can store
maximum 10,240 or 200K byte barcode data.
z It is important to clear KDC300 memory periodically to prevent memory full status which will prevent
user from storing additional data.
z Data can be deleted using KDC300 menu options if this option is not selected.
Automatically synchronize after connection
User can synchronize collected data with PC automatically by selecting this option.
z It is important to configure other synchronization options properly before performing an automatic
synchronization operation.
z Data synchronization can be done manually by clicking synchronize icon if this option is not selected.
Beep while synchronization
User can enable or disable beep tone during the synchronization process. KTSync program generates a
beep tone for each barcode data coming from KDC300 if beep tone is enabled. It beeps 5 times once
KTSync finishes synchronization process.
KDC300 User Manual
33
Current KDC Wedge Methods
This section shows current KDC300 Wedge/Store option under Data process menu. KDC300 can be
configured in one of the following five Wedge/Store modes:
z Wedge Only - The scanned data is transmitted to the host. KDC300 does not store scanned
data.
z Wedge & Store - The scanned data is stored in the KDC300 and transmitted to the host.
z Store Only - The scanned data is stored in the KDC300 and not transmitted scanned data to the
host.
z Wedge & Store if Sent - The scanned data is stored in the KDC300 if it is transmitted to the
host successfully.
z Wedge & Store if Not Sent - The scanned data will only be stored in KDC300 if the KDC300 is
unable to transmit to the host successfully.
Enable Wedge (Handheld scanner mode)
Enable Wedge (Handheld scanner mode) would be marked if either Wedge only or Wedge & Store
option is selected.
Keep Scanned Data in KDC
Keep scanned data in KDC would be marked if either Store only or Wedge & Store option is selected.
KDC300 User Manual
34
Select Synchronization Options
Synchronize KDC300 time with PC time when connected
This option enables user to synchronize KDC300 date and time with host computer date and time.
KDC300 date and time would be synchronized with PC date and time once connected to PC.
Delays
User can set transmission delays between barcodes and characters during the synchronization process.
It is important to set proper delays to prevent errors during the transmission of collected barcodes. Some
Windows applications such as Excel require longer delay time.
Prefix and Suffix
• Enter the characters you want to append in the prefix and suffix field.
• The character set would be any combination of ASCII characters including alphanumeric, line fee
(“\n”) and carriage return (“\r”)
Order and Delimiter
• User can select the order of data – Type, Data, Timestamp
• User can select the delimiter between data – Tab, Space, Comma, Semicolon
• User can select the delimiter between records – None, LF, CR, Tab, LF & CR
KDC300 User Manual
35
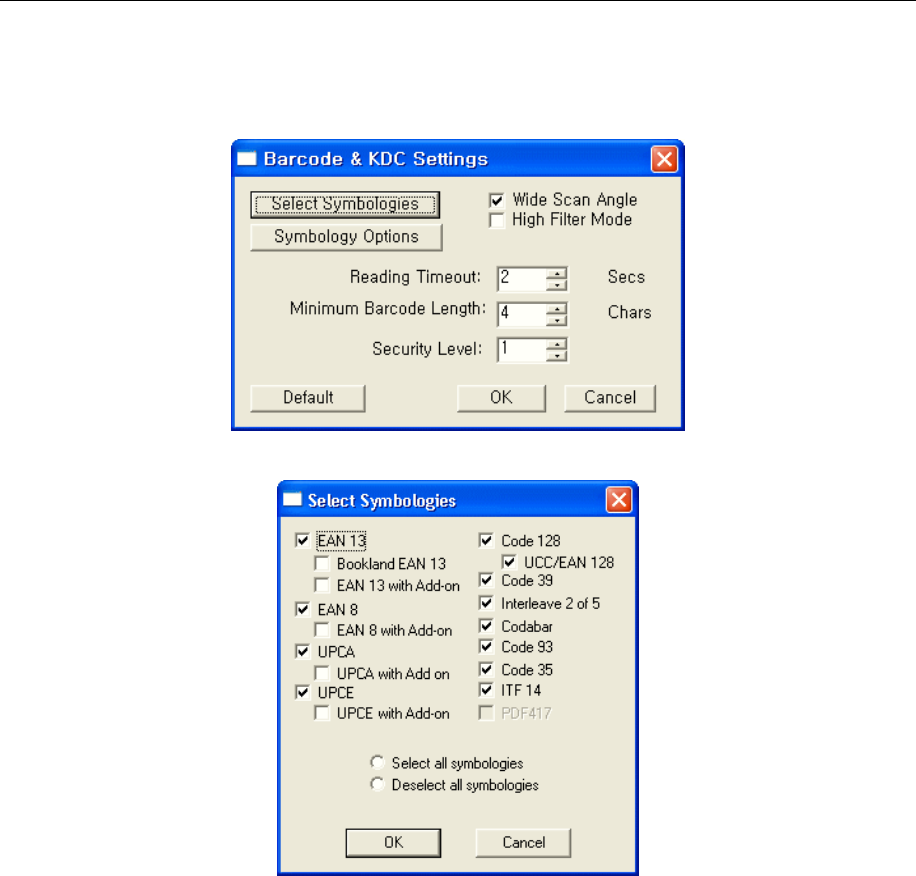
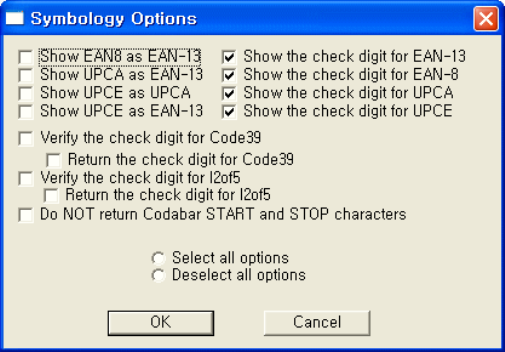
4.3 Barcode Selection
User can configure barcode options in the Scan Module Settings menu. Please refer to Appendix A for
the proper settings of barcode options for your application It is very important to configure proper barcode
options for the best performance.
KDC300 User Manual
36
KDC300 User Manual
37
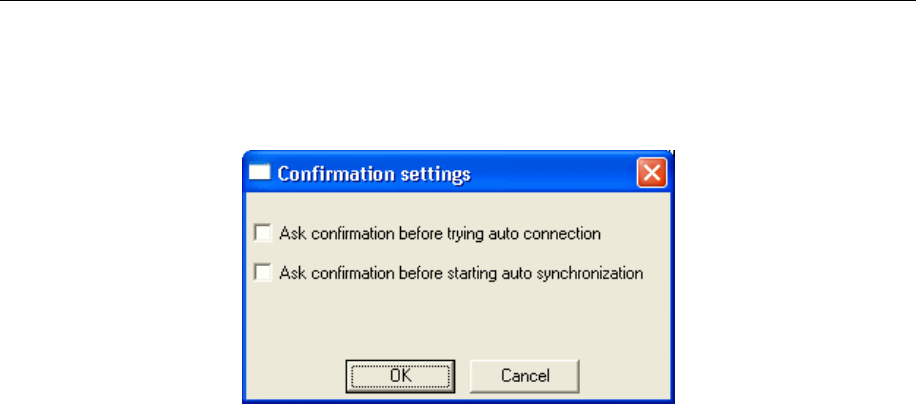
4.4 Confirmation
Auto connection and auto synchronization window will pop up if user selects the following confirmation
options.

KDC300 User Manual
38
5. Master-Slave barcode compare
application
KDC mode supports master-slave barcode compare application as well as normal data collection process.
User can define master barcode and comparing it with slave barcodes in this application.
User can define one master barcode and compare it with one slave barcode repeatedly in Onetime mode.
One master barcode and multiple barcodes can be compared in continuous mode.
Collation menu allowing user comparing substring within a barcode instead of entire barcode string. User
can start character position and number of characters to be compared in the collation menu.
The following flow chart shows master-slave application operation flow. User can go back to KDC mode
menu by pressing <Up> and <Down> key simultaneous during master-slave barcode comparing process.
Collation:
Define substring to
be compared.
Default is entire
barcode
Scan Master
Barcode Scan Master
Barcode
Onetime Continuous
Select MS Mode:
(Onetime,
Continuous)
Scan Check
Barcode
KDC Mode
Up or Down
Key?
Mismatched
Matched
Up
Key
Down
Key
Scan Check
Barcode
Up or Down
Key?
Matched Mismatched
Up Key?
No
Yes
Down
Key
Up
Key

KDC300 User Manual
39
6. Troubleshooting
Problem Possible Cause Possible Solution
Dead battery Charge the battery by connecting USB cable to
PC
KDC is dead
Hardware failure Contact technical support
Bad battery Replace the battery
Poor USB port USB port doesn’t supply proper current to KDC
Charge KDC using other USB port
Damaged barcode Try to scan a different barcode
Out of scan range Move the scanner closer or farther from the
barcode
Incorrect angle Change the angle until the scanner reads the
barcode
Not supported
symbology
Contact sales for the possibility of custom
symbology support
KDC is not charging
KDC does not scan a
barcode
Scan options Check the option settings
Dirty Scan Window Clean the scan window
Damaged Scan
Window
Replace the scan window
Scanner reads wrong
barcode
Failed reading
Dirty Scan Window Clean the scan window
Damaged Scan
Window
Replace the scan window
Poor quality printing Select only necessary barcodes
Increase the minimum barcode length
Increase security level
Cable is not
connected properly
Check the proper connection of cable between
scanner and PC, PDA and cell phone
Can’t communicate
with PC, PDA or cell
phone
Can’t communicate
with PC, PDA or cell
phone Bluetooth is not
connected
Check the Bluetooth connection between KDC300
and host device.
LED blinks yellow Software is not
working properly
Reload the software
Buffer Full Message COM configuration Check COM port configurations

KDC300 User Manual
40
LED blinks yellow Low battery Charge the battery by connecting USB cable to
PC
Will lose collected data if the battery is empty.
KDC300 User Manual
41
7. Warranty
LIMITED WARRANTY AND DISCLAIMERS
BY OPENING THE PACKAGE OF THIS PRODUCT YOU AGREE TO BECOME BOUND BY THE
LIABILITY AND WARRANTY CONDITIONS AS DESCRIBED BELOW.
UNDER ALL CIRCUMSTANCES THIS MANUAL SHOULD BE READ ATTENTIVELY, BEFORE
INSTALLING AND OR USNG THE PRODUCT.
Serial number
A serial number appears on the KDC300 label. This official registration number is strictly related to the
device purchased. Make sure that the serial number appearing on your KDC 200 is not removed.
Removing the serial number will affect the warranty conditions and liability disadvantageously, so please
be strict at maintaining the label with serial number on the KDC300. Units with the serial number label
removed should not be operated.
Warranty/Warranty period/Liability
KoamTac, Inc. (“KoamTac”) manufactures its hardware products in accordance with industry-standard
practices. Unless otherwise agreed in a contract, KDC300 is warranteed for a period of one year after
purchase, covering defects in material and workmanship except rechargeable battery. KoamTac will
repair or, at its opinion, replace products that prove to be defective in material or workmanship under
proper use during the warranty period. KoamTac will not be liable in cases (i) in which the unit has been
repaired or altered unless done or approved by KoamTac, (ii) in which the unit has not been maintained
in accordance with any operating or handling instructions supplied by KoamTac, (iii) in which the unit has
been subjected to unusual physical or electrical stress, misuse, abuse, power shortage, negligence or
accident or (iv) in which the unit has been used other than in accordance with the product operating and
handling instructions. Preventive maintenance is the responsibility of the customer and is not covered
under this warranty. Under no circumstance will KoamTac be liable for any direct, indirect, consequential
or incidental damages arising out of use or inability to use either the hardware or software, even if
KoamTac has been informed about the possibility of such damages.
Warranty Coverage and Procedure
During the warranty period, KoamTac will repair or replace defective products returned to KoamTac’s
warehouse. International customers should contact the local KoamTac office or support center. If
warranty service is required, KoamTac will issue a Return Material Authorization Number. Products must
be shipped in the original or comparable package, shipping and insurance charges prepaid. KoamTac will
ship the repaired or replacement product freight and insurance prepaid. Customer accepts full
responsibility for its software and data including the appropriate backup thereof. Repair or replacement of
a product during warranty will not extend the original warranty term.

KDC300 User Manual
42
Contact Information
116 Village Blvd. Suite 200, Princeton, NJ 08540, USA
TEL: +1-908-734-4335, FAX: +1-609-226-4373
Email: info@koamtac.com
URL: www.koamtac.com
WARNING
CAUTION: Changes or modifications not expressly approved by the manufacturer responsible for
compliance could void the user’s authority to operate the equipment

KDC300 User Manual
43
Appendix A. Barcode and Scan Options
A.1 System Information
User can set up sleep time between 0.5 and 10 seconds. Please set up correct date and time before
using the KDC300 for the first time, after replacing the battery or after resetting the device.
User can check the memory and battery status in the system menu. The installed firmware version and
device serial number can also be verified in the system menu.
A.2 Miscellaneous Barcode Information
How tall should a linear barcode symbol be?
Industry standards suggest a height of either 6.5mm or 15% of the symbol length, whichever is greater.
Symbols of lesser than recommended heights may cause recognition problems.
Should I use check characters?
Yes, we recommend the use of check-characters in barcodes. Operating without check-characters is not
safe and will lead to errors that are costly to correct. Using check-characters positively effects data
integrity especially when character density is at the limits and/or image quality is not at it's best.
How many barcodes can we store?
The number of barcodes that can be stored in these bytes depends on the size of the barcodes
Example: : If only UPCA barcodes are scanned and the check digit is not transmitted, then each barcode
takes up 11 (barcode data) + 2 (total bytes) + 2 (length and type) + 4 (time stamp) = 19 bytes. The
maximum number of UPCA barcodes that can be saved is 204,800/19 =10,778. However, the maximum
number of barcodes that can be stored is 10,240. Therefore, KDC300 can store 10,240 UPCA barcodes.
If different length barcodes are mixed, then a user cannot compute a priori the maximum number of
barcodes that can be stored.
KDC300 User Manual
44
What happens when the data buffer is full?
When the buffer is full, KDC300 displays buffer full message and ignores the command to scan barcodes.
User should clear the buffer to continue the data collection.

KDC300 User Manual
45
Appendix B. FAQ
B.1 Symbology
Q: What kinds of barcode symbologies are supported by KDC300?
A: KDC300 supports all major 1D and 2D barcodes plus OCRs.
B.2 Host Interface
Q: What are the supporting interface ports on KDC300?
A: KDC300 supports serial, USB-Serial and Bluetooth SPP.
Q: What Bluetooth protocol stacks are supported by KDC300?
A: KDC300 supports all major Bluetooth stacks such as Toshiba®, Widcomm®, Bluesoleil® and Microsoft®.
KDC300 can be connected to other Bluetooth stacks supporting SPP (Serial Port Profile) other than listed
above
B.3 Battery
Q: How many charge cycles for the battery life?
A: More than 300 times.
Q: How many barcodes can a fully charged KDC300 read?
A: KDC300 can scan more than 20,000 barcodes with bluetooth connection.
Q: How long does it take to charge KDC300?
A: About four hours from empty status.
Q: How long battery lasts in the sleep mode?
A: KDC300 will last more than two days if bluetooth power is ON and connected to a host device in
normal sleep mode. It will last more than a week in deep sleep mode

KDC300 User Manual
46
Q: Can a user replace KDC300 battery?
A: Yes. KDC300 has separate compartment for battery and user can open and change the battery using
basic tools.
B.4 Memory
Q: How can I download stored barcode or wedge barcodes to my application?
A: KoamTac provides free synchronization and wedging software for Microsoft® Windows XP, Vista and
Mobile5.0+.
Q: Does KDC300 support Blackberry®, Symbian®, Apple® and Palm® devices?
A: KoamTac provides synchronization and wedging software only for Microsoft® Windows XP, Vista and
Mobile5.0+ devices. User can write the application for Blackberry, Symbian, Apple, Palm and other OS
using KDC300 SDK. User may purchase SerialMagic® software from Serialio. SerialMagic provides
barcode wedging capability between KDC300 and Blackberry, Symbian, Apple and Palm devices.
B.5 Programming
Q: Can a partner program KDC300 menu?
A: KDC300 doesn't support programming environment to customers currently. Simple application
generator utility is scheduled to be released in 1Q 2009.
Q: Can KoamTac provide custom menu service?
A: Yes. Custom menu can be developed by KoamTac engineers. KoamTac provides paid service for
custom menu for the projects.
Q: Can a partner develop PC or PDA application for KDC300?
A: KoamTac provides free SDK for PC and PDA to partners. Partner can use DLL and demo program
source code included in SDK for custom application.