AKG Acoustics HT4025M Wireless Microphone User Manual Quick start guide for single receiver set
AKG Acoustics GmbH Wireless Microphone Quick start guide for single receiver set
Contents
- 1. Quick start guide for single receiver set
- 2. Quick start guide for dual receiver set
Quick start guide for single receiver set
08/15/5061614
© 2015 HARMAN International Industries, Incorporated. All rights reserved. AKG is a trademark of AKG Acoustics GmbH, registered in the United States and/or
other countries. Features, specications and appearance are subject to change without notice.
www.akg.com
AKG ACOUSTICS GMBH LAXENBURGER STRASSE 254, 1230 VIENNA, AUSTRIA
AKG ACOUSTICS, U.S. 8500 BALBOA BOULEVARD, NORTHRIDGE, CA 93129, U.S.A.
FCC STATEMENT
Only for frequencies designed for use in the USA.
(Receiver complies to Part 15, transmitter to Part 74):
This equipment has been tested and found to comply with the limits for a Class B digital device, pursuant to Parts 74 and 15 of the FCC Rules. These limits
are designed to provide reasonable protection against harmful interference in a residential installation. This equipment generates, uses, and can radiate radio
frequency energy and, if not installed and used in accordance with the instructions, may cause harmful interference to radio communications. However,
there is no guarantee that interference will not occur in a particular installation. If this equipment does cause harmful interference to radio or television recep-
tion, which can be determined by turning the equipment off and on, the user is encouraged to try to correct the interference by one or more of the following
measures:
• Reorient or relocate the receiving antenna.
• Increase the separation between the equipment and the receiver.
• Connect the equipment into an outlet on a circuit different from that to which the receiver s connected.
• Consult the dealer or an experienced radio/TV technician for help.
Shielded cables and I/O cords must be used for this equipment to comply with the relevant FCC regulations.
Changes or modications not expressly approved in writing by AKG Acoustics may void the user’s authority to operate this equipment.
Printed in China (P.R.C.)
DE Dieses Produkt entspricht den in der Komformitätserklärung angegebenen Normen.
Sie können die Konformitätserklärung auf www.akg.com herunterladen oder per E-Mail an sales@akg.com anfordern.
EN This product conforms to the standards listed in the Declaration of Conformity.
To order a free copy of the Declaration of Conformity, visit www.akg.com or contact sales@akg.com.
FR Ce produit est conforme aux normes citées dans la Déclaration de Conformité,
dont vous pouvez prendre connaissance en consultant le site www.akg.com ou en adressant un e-mail à sales@akg.com.
ES Este aparato corresponde a las normas citadas en la declaración de conformidad.
Esta última está disponible en el sitio www.akg.com o puede ser solicitada al correo electrónico sales@akg.com.
KONFORMITÄTSERKLÄRUNG / DECLARATION OF CONFORMITY / DÉCLARATION DE CONFORMITÉ / DECLARACIÓN DE CONFORMIDAD
TECHNISCHE DATEN / TECHNICAL DATA / SPÉCIFICATIONS / DATOS TÉCNICOS
Modell / Model / Modèle / Modelo WMS40 MINI
Typ / Type / Type / Tipo Drahtloses Mikrofonsystem / Wireless Microphone System /
Système microphone sans l / Sistema de microfonía inalámbrica
Drahtloskanäle pro Gerät / Wireless channels within device /
Canaux sans l par appareil / Canales inalámbricos por dispositivo 1
Audioübertragungsbandbreite / Audio bandwidth /
Bande passante audio / Ancho de banda de transmisión de audio 30 - 20.000 Hz (+/- 3 dB)
Klirrfaktor bei 1 kHz / THD at 1 kHz /
Facteur de distortion pour 1 kHz / Coeciente de distorsión a 1 kHz 0,8 %
Signal/Rauschabstand / Signal/noise ratio / Rapport signal/bruit / Relación señal/ruido 107 db(A)
Sendeleistung / Transmission power / Puissance d‘émission / Potencia de transmisión 10 mW
Reichweite (Sichtverbindung) / Radio range (line of sight) /
Portée (propagation en ligne droit) / Alcance (contacto visual) 20 m (65 ft.)
Spannungsversorgung / Power requirement
Tension d‘alimentation / Tensión de alimentación
HT40 MINI, PT40 MINI: 1x 1,5 V Batterie Größe AA / 1x 1.5 V AA size battery /
1x pile 1,5 V type AA / 1x pila de 1,5 V tamaño AA
Betriebsdauer / Battery life / Autonomie / Horas de servicio 30 h
Audioausgang / Audio outputs /
Sortie audio / Salida de audio
SR40 MINI: 1x 6,3 mm Klinke symmetrisch / 1x balanced ¼“ (6.3 mm) jack /
1x prise jack symétrique 6,3 mm / 1x 6,3 mm jack balanceado
Betriebstemperatur / Operating temperature range /
Plage des températures de fonctionnement / Gama de temperaturas de funcionamiento -10 - 55 °C (14 - 131 °F)
Abmessungen / Dimensions / Dimensions / Dimensiones
SR40 MINI: 133 x 132 x 42 mm (5.24 x 5.20 x 1.65“)
HT40 MINI: 230 x 52,5 mm (9.06 x 2.07“)
PT40 MINI: 75 x 65 x 22 mm (2.95 x 2.36 x 0.87“)
Nettogewicht / Net weight / Poids net / Peso neto SR40 MINI: 464 g (16.4 oz), HT40 MINI: 192 g (6.8 oz), PT40 MINI: 54 g (1.9 oz)
Warning: Using this equipment is subject to permission as required by law. Some countries may not
require such permission. Please contact your local telecommunications authority for further information.
QUICK
START
GUIDE WMS40 MINI
WIRELESS MICROPHONE SYSTEM
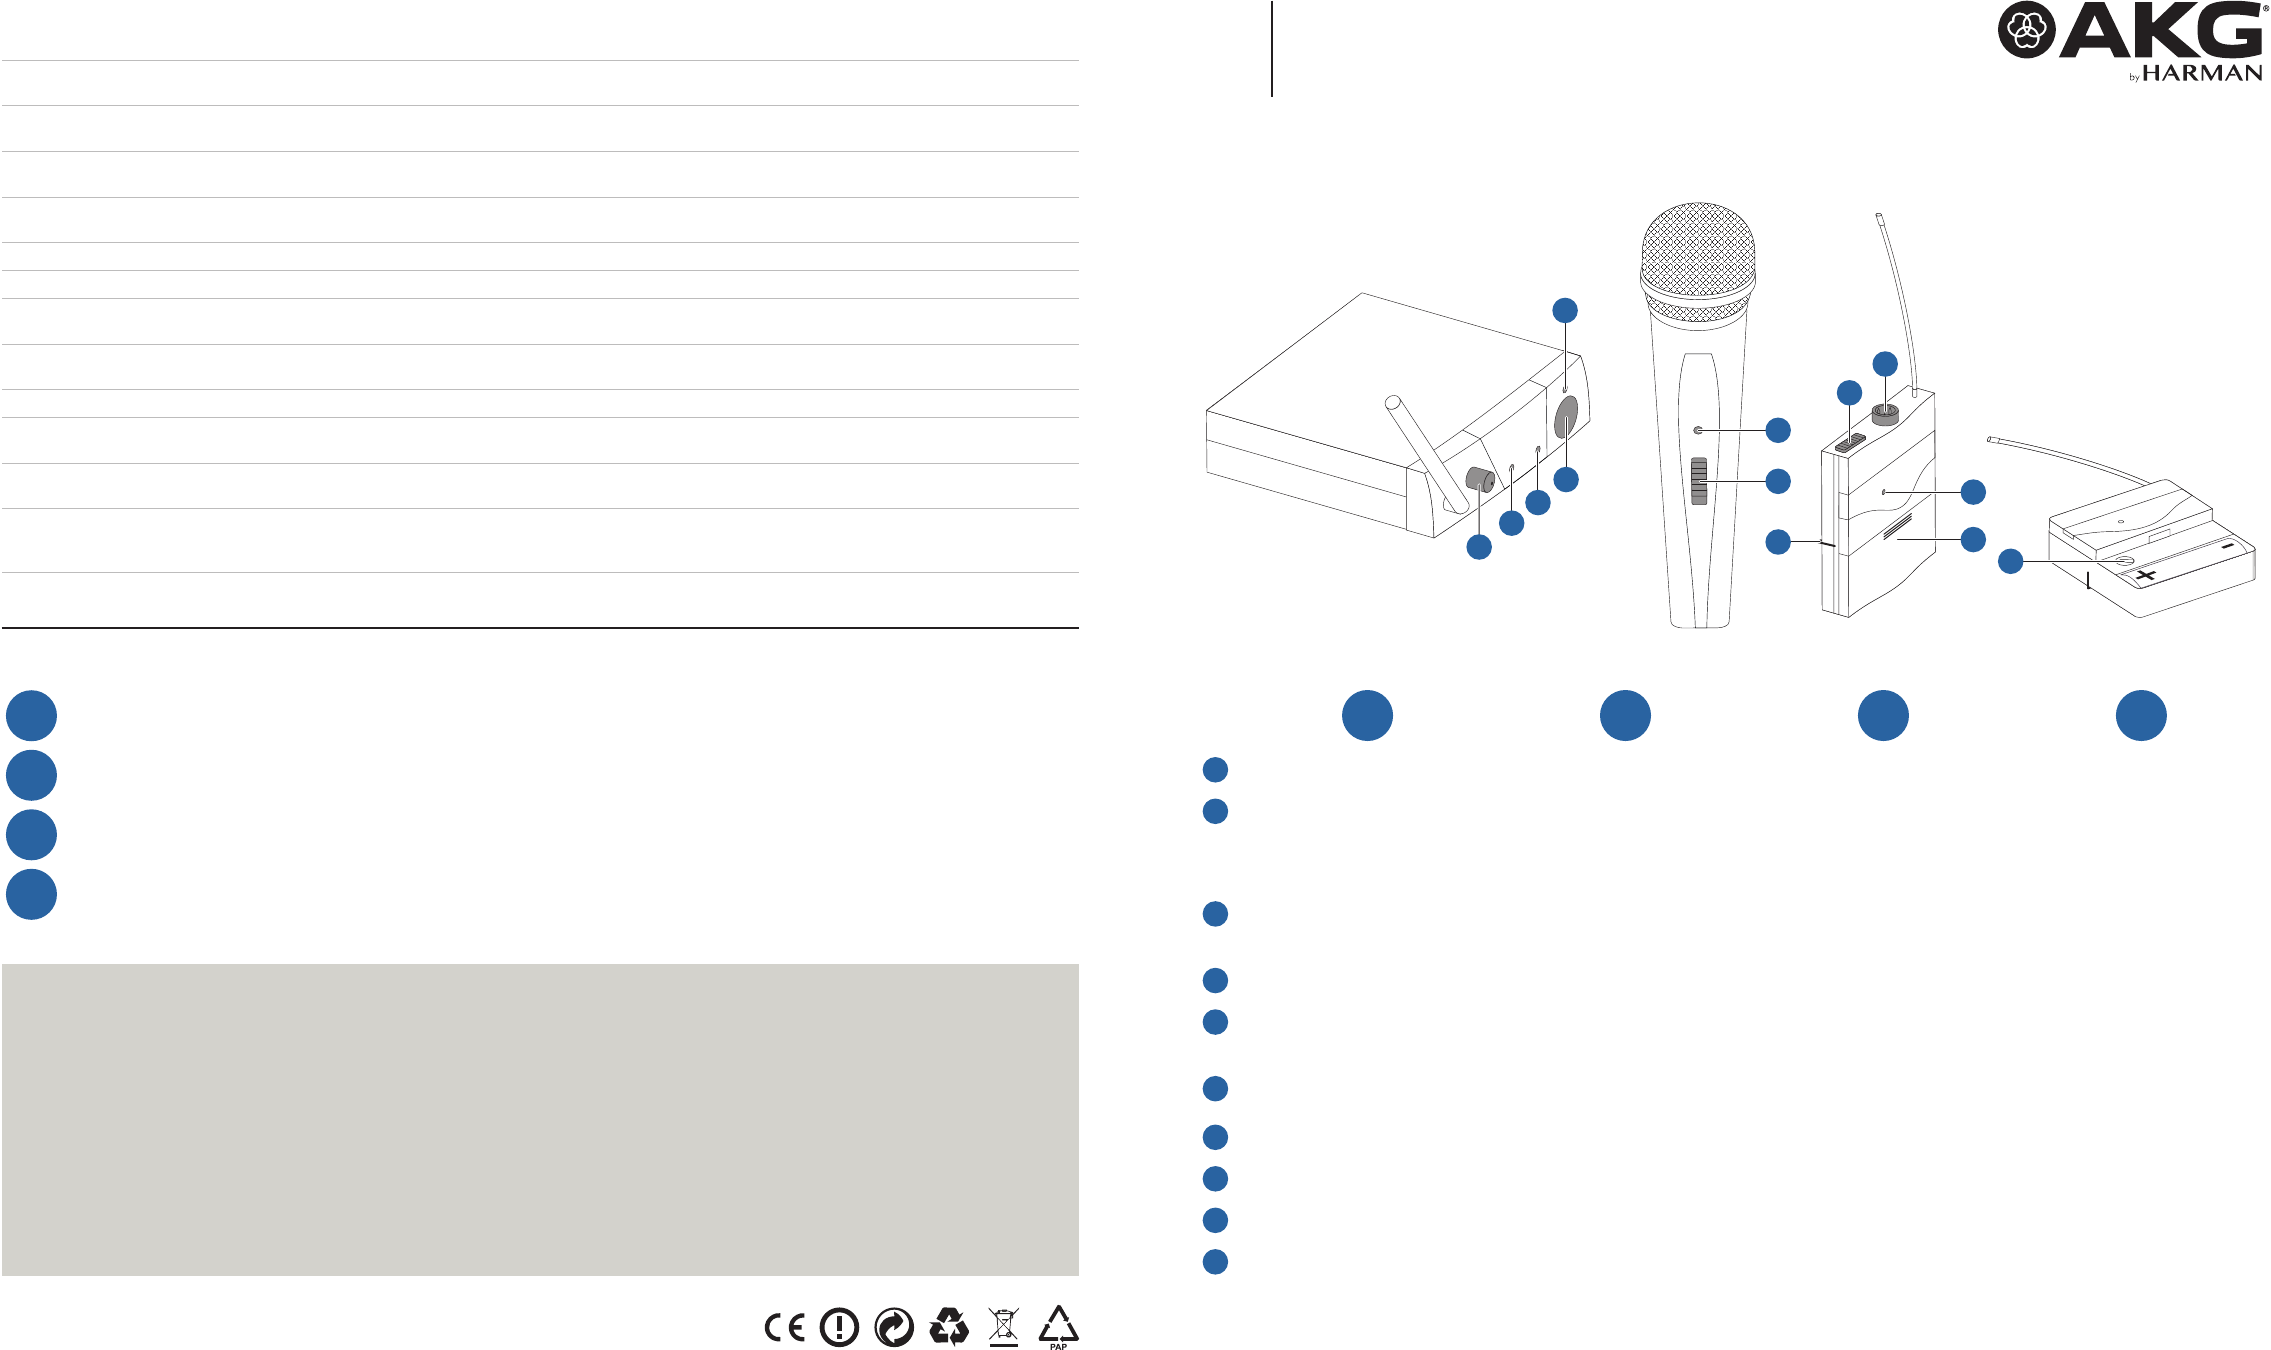
BEDIENELEMENTE / CONTROLS / COMMANDES / CONTROLES: SR40 MINI - HT40 MINI - PT40 MINI
DE EN FR ES
1Lautstärkeregler Volume control Contrôle de volume Control de volumen
2RF OK leuchtet, wenn der Emp-
fänger ein Signal ausreichender
Stärke empfängt; bei keinem oder
zu schwachem Signal leuchtet RF
OK nicht
RF OK lights up if the receiver is
receiving a sufciently strong signal;
RF OK will not light up if a signal is
not being received or the signal is
too weak
RF OK s‘allume lorsque le récep-
teur reçoit un signal sufsamment
puissant; en cas de signal absent
ou faible, RF OK ne s‘allume pas
RF OK se enciende cuando el
receptor recibe una señal lo
bastante fuerte; si no hay señal o
ésta es muy débil, el RF OK no se
enciende
3AF CLIP leuchtet wenn der Audio-
pegel zu hoch ist
AF CLIP lights up if the audio level
is too high
AF CLIP s‘allume lorsque le niveau
sonore est trop fort
AF CLIP se enciende cuando los
niveles de audio son demasiado
elevados
4Ein/Aus Taste On/Off button Touche Marche/Arrêt Tecla Con/Des
5Kontroll-LED für Betriebsbereit-
schaft und Batteriekapazität
LED indicating readiness for opera-
tion and battery capacity
LED de contrôle pour la disponibi-
lité à l‘usage et la capacité des piles
LED de control para la disponibi-
lidad de servicio y la capacidad de
la batería
6Ein/Aus Schieberegler mit
MUTE-Funktion
On/Off slide control with MUTE
function
Curseur Marche/Arrêt avec fonc-
tion MUTE
Control deslizante Conectar/Des-
conectar con función MUTE
7Mini-XLR-Eingangsbuchse Mini-XLR input jack Prise d‘entrée mini XLR Toma de entrada mini-XLR
8Gürtelspange Belt clip Clip de ceinture Clip de cinturón
9Batteriefachdeckel Battery compartment cover Couvercle du compartiment à pile Tapa de la batería
10 GAIN Potentiometer zum An-
passen des Eingangspegels
GAIN potentiometer for adjusting
the input level
Potentiomètre de GAIN pour
adapter le niveau d‘entrée
GAIN Potenciómetro para ajustar
los niveles de entrada
SR40 MINI
HT40 MINI
PT40 MINI
5
7
6
4
3
2
1
5
5
9
8
10
6
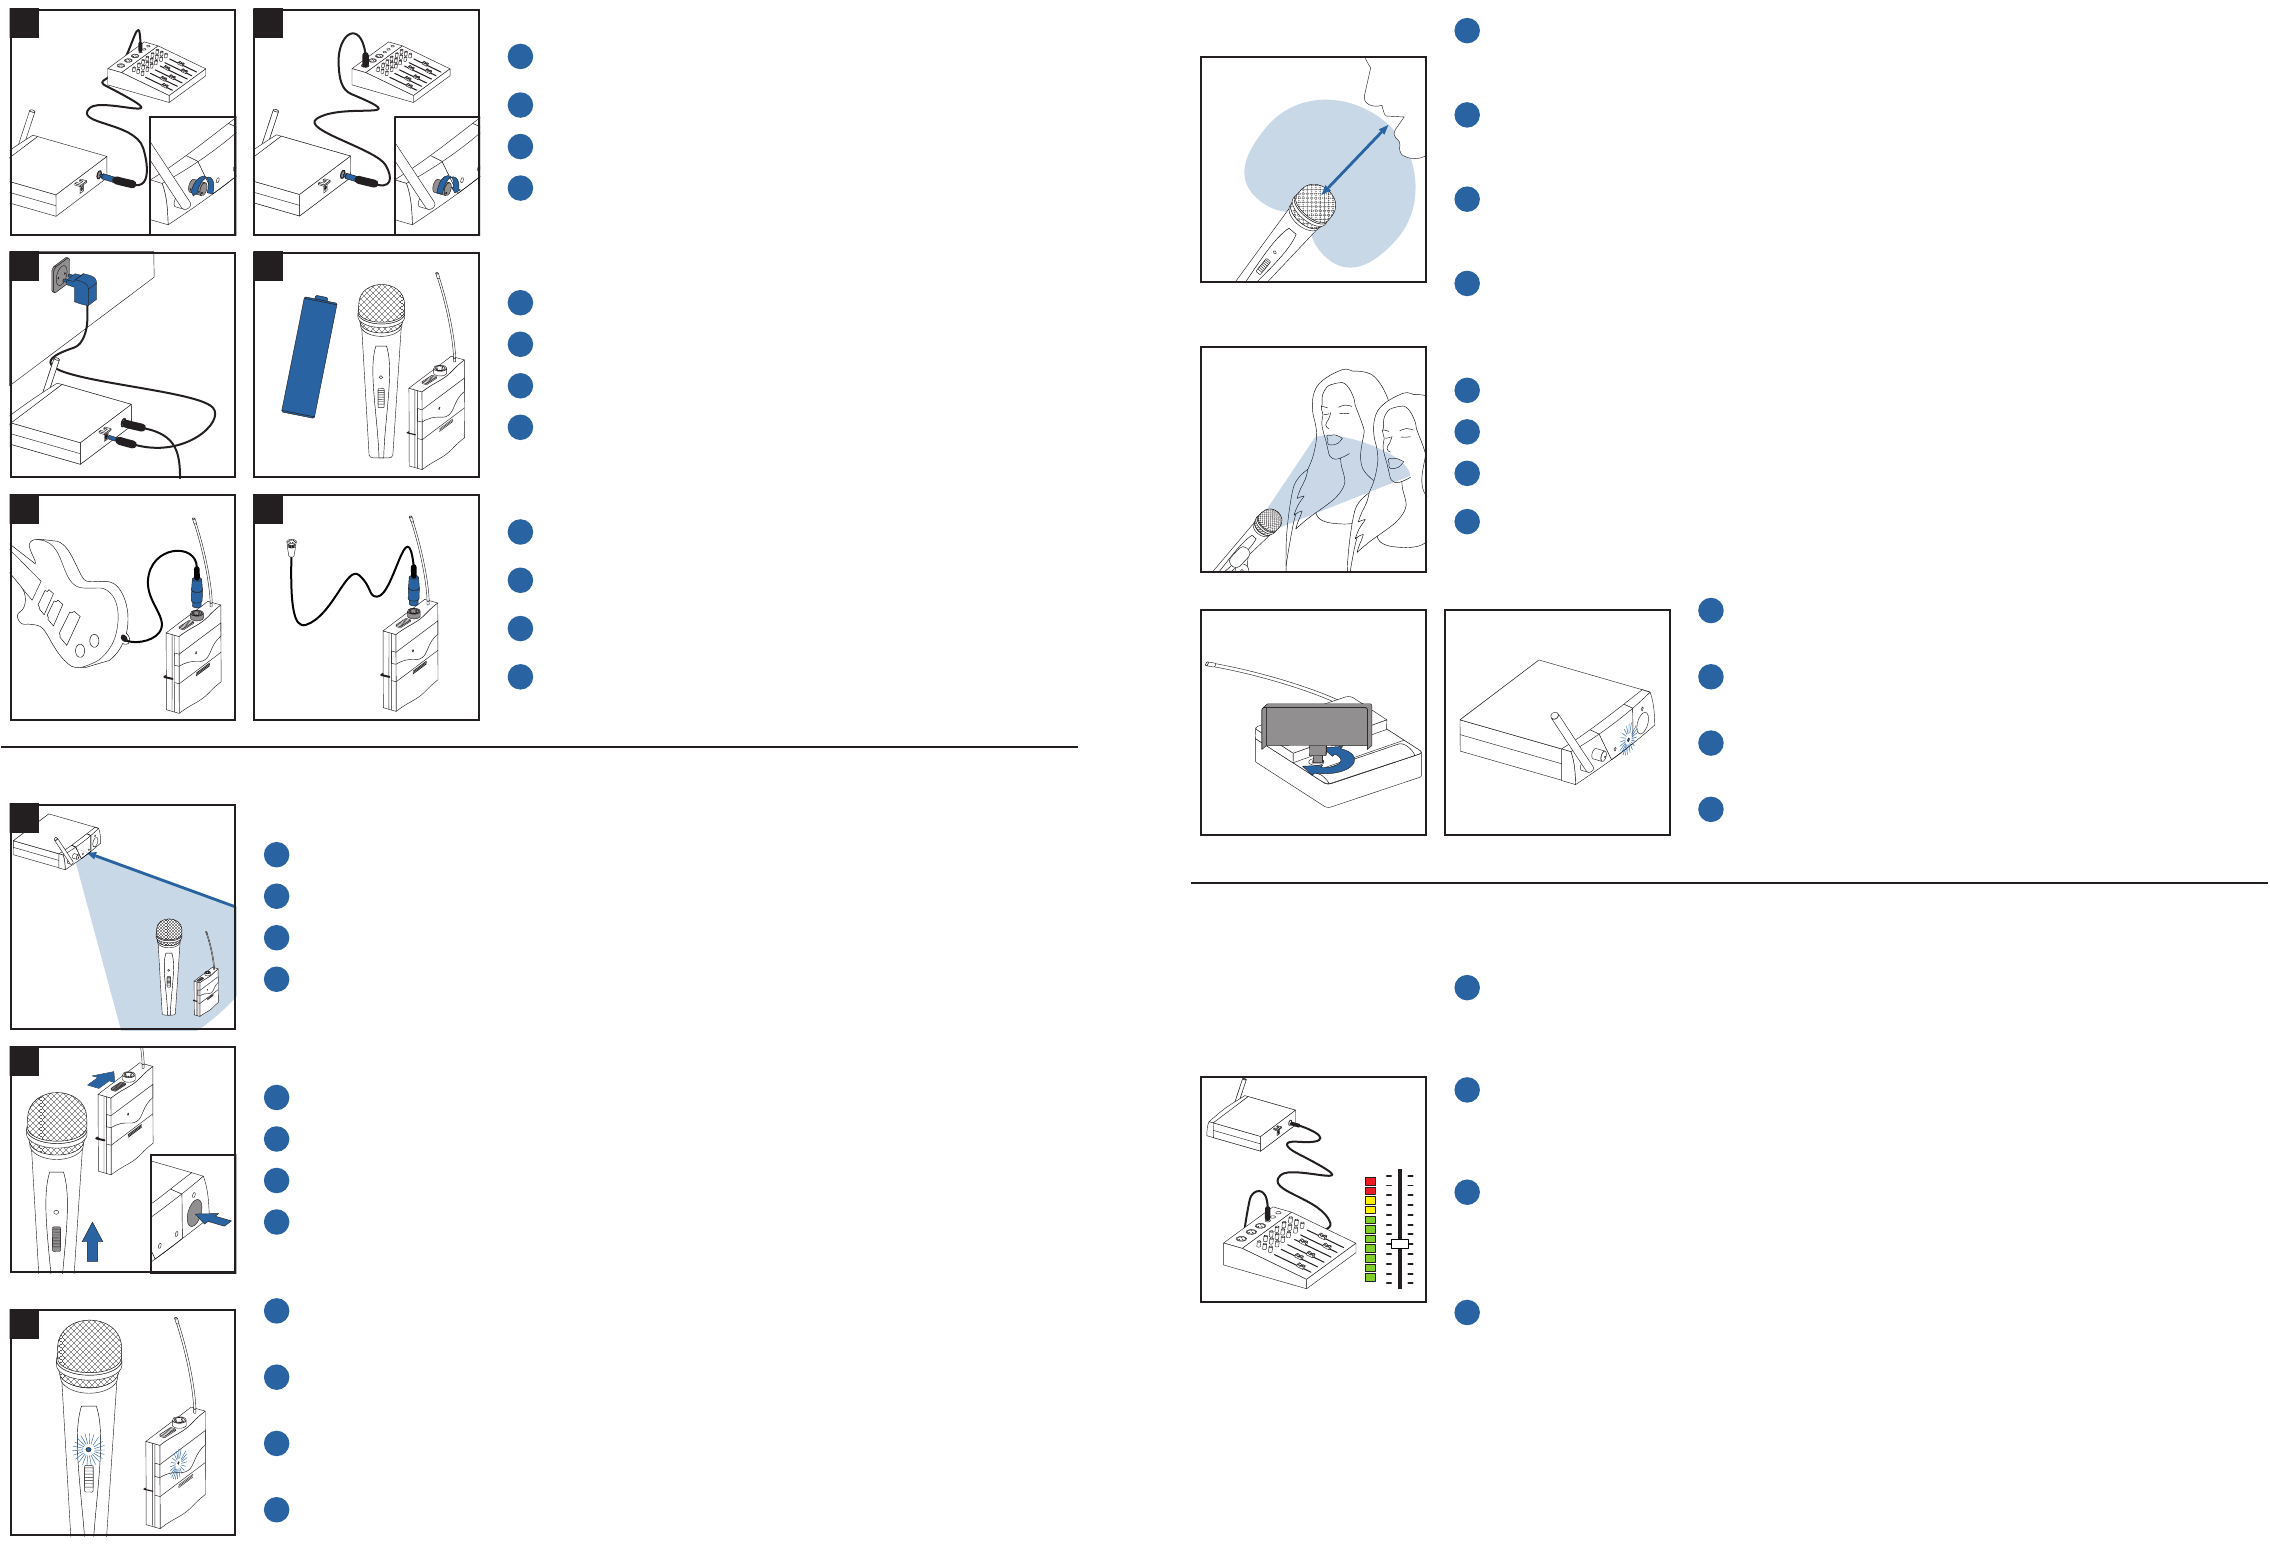
SETUP
max. 3 m
1
1
DE Empfänger an symmetrischen ODER asymmetrischen Eingang
anschließen!
EN Connect receiver to a balanced OR unbalanced input!
FR Brancher le récepteur sur l‘entrée symétrique OU asymétrique!
ES Conectar el receptor a la entrada balanceada O desbalanceada!
2
2
DE Empfänger an das Netz anschließen und Batterie in den Sender einlegen.
EN Connect receiver to the mains and insert battery in the transmitter.
FR Brancher le récepteur sur le réseau et introduire la pile dans l‘émetteur.
ES Conectar el receptor a la red y colocar la batería en el transmisor.
3
3
DE Instrument oder Mikrofon an den Mini-XLR-Stecker
des Taschensenders anschließen.
EN Connect instrument or microphone to the mini-XLR jack
of the bodypack transmitter.
FR Brancher l‘instrument ou le microphone sur la che mini XLR
de l‘émetteur du poche.
ES Conectar el instrumento o micrófono en la clavija mini-XLR
del transmisor de petaca.
BETRIEB / OPERATION / FONCTIONNEMENT / FUNCIONAMIENTO
min. 3 – 5 m
1
DE Mindestabstand zwischen Sender und Empfänger beachten.
EN Observe minimum distance between transmitter and receiver.
FR Respecter la distance minimale entre l‘émetteur et le récepteur.
ES Respetar la distancia mínima entre el transmisor y el receptor.
ON
ON
2
DE Empfänger und Sender einschalten.
EN Switch on receiver and transmitter.
FR Mettre en marche le récepteur et l‘émetteur.
ES Conectar el receptor y el transmisor.
3
DE Grün: Batterie ist ok und der Sender betriebsbereit
Rot: Batterie bald austauschen
kein Aueuchten: Batterie austauschen
EN Green: battery is OK and transmitter is operational
Red: replace battery soon
Does not light up: replace battery now
FR Vert: la pile est opérationnelle et l‘émetteur prêt à l‘usage
Rouge: remplacer bientôt la pile
aucune lumière: remplacer la pile
ES Verde: la batería está bien y el transmisor está listo
Rojo: cambiar la batería pronto
ningún destello: cambiar la batería
TIPPS & TRICKS / TIPS & TRICKS / CONSEILS & ASTUCES / CONSEJOS & TRUCOS
< 5 cm
DE Bei Mikrofonen mit einer nierenförmigen Richtcharakteristik erfolgt die größte Dämpfung des Schalls bei 180°.
Deshalb werden diese Mikrofone bevorzugt eingesetzt, wo sich eine Störschallquelle oder ein Lautsprecher
unmittelbar gegenüber dem Sprecher bendet. Ein Besprechungsabstand unter 5 cm verleiht Ihrer Stimme einen
voluminösen und bassbetonten Klang.
EN In the case of microphones with a cardioid polar pattern, most sound attenuation occurs at 180°. These micro-
phones should therefore preferably be used where there is an interference noise source or a loudspeaker directly
opposite the speaker. Holding the microphone less than 5 cm from your mouth will give your voice a voluminous
and punchy quality.
FR Quant aux microphones avec directivité cardioïde, l‘atténuation plus importante du son a lieu à 180°. C‘est
pourquoi ces microphones sont utilisés de préférence là où une source de bruit sonore ou un haut-parleur se
trouvent immédiatement en face de celle ou celui qui parle. Une distance du microphone de moins de 5 cm
confère à votre voix un son volumineux où les basses sont accentuées.
ES En micrófonos con patrón polar cardioide se consigue un mayor amortiguamiento de las ondas a 180°. Por eso
es preferible utilizar estos micrófonos, en los que una fuente de perturbación del sonido se encuentra justo en
frente del locutor. Si habla a menos de 5 cm, su voz adquirirá un tono voluminoso de bajos acentuados.
< 35°
DE Lassen Sie nie mehr als 2 Personen in ein Mikrofon singen. Der Einfallswinkel sollte nie größer als 35° sein!
EN Never let more than 2 people sing into one microphone. The angle of incidence should never be more than 35°!
FR Ne laissez jamais chanter plus de 2 personnes dans un microphone. L‘angle d‘incidence ne devrait jamais
dépasser 35°!
ES No deje que canten nunca más de dos personas en el micrófono. El ángulo de incidencia nunca debe ser supe-
rior a los 35°!
+
-
LOW
HIGH
DE Stellen Sie die Eingangsempndlichkeit am Taschensender PT40 MINI,
mit dem im Batteriefachdeckel integrierten Schraubendreher ein: Wenn AF
CLIP häug leuchtet, stellen Sie das Potentiometer am PT40 MINI kleiner.
EN Adjust the input sensitivity on the PT40 MINI bodypack transmitter using
the screwdriver included in the battery compartment cover: If AF CLIP
lights up frequently, reduce the potentiometer setting on the PT40 MINI.
FR Réglez la sensibilité d‘entrée de l‘émetteur de poche PT40 MINI à l‘aide
du tournevis intégré dans le couvercle du compartiment à pile: Si AF CLIP
s‘allume trop souvent, baissez le potentiomètre du PT40 MINI.
ES En el transmisor de petaca PT40 MINI, ajuste la sensibilidad de entrada
con el destornillador integrado en la tapa de la batería: Si el AF CLIP se
enciende frecuentemente, reduzca el potenciómetro del PT40 MINI.
LAUTSTÄRKE-EINSTELLUNGEN – MISCHPULT / VOLUME CONFIGURATION – AUDIO-MIXER /
REGLAGE DU VOLUME – CONSOLE DE MIXAGE / CONFIGURACIÓN DE VOLUMEN – MESA DE MEZCLAS
DE Passen Sie den Audiopegel mit dem Volume-Button an Ihr angeschlossenes Gerät an. Für optimale Ergebnisse
empfehlen wir einen möglichst hohen Eingangspegel um einen optimalen Signal-Rauschabstand zu erhalten.
Beachten Sie jedoch, dass die Pegelanzeige auch bei lautem Besprechen des Mikrofons nie in den roten Bereich
gerät, da es sonst zu unangenehm klingenden Verzerrungen kommen kann. Erhöhen Sie den Eingangspegel
vorsichtig bis die Pegelanzeige gerade nicht rot aueuchtet.
EN Adjust the Volume control on the instrument you have connected. For best results we recommend using the hig-
hest possible input level in order to obtain the best possible signal-to-noise ratio. However, even when someone
is speaking loudly into the microphone you should take care to ensure that the level indicator never moves into
the red zone; failure to do so can result in unpleasant distortion. Carefully increase the input level until the level
indicator is just below the red zone.
FR À l‘aide du bouton du volume, adaptez le niveau sonore en fonction de l‘appareil raccordé. Pour des résultats
optimaux, nous recommandons un niveau d‘entrée le plus haut possible permettant d‘obtenir un écart optimal
entre signal et bruit. Veillez cependant à ce que l‘indicateur de niveau n‘entre jamais dans la plage rouge, même
en parlant fort dans le microphone, car autrement des distorsions désagréables à l‘ouïe pourraient apparaître.
Augmentez doucement le niveau d‘entrée au maximum sans pour autant faire passer au rouge l‘indicateur de
niveau.
ES Regule los niveles de audio con el botón de volumen en su equipo conectado. Para unos resultados óptimos, le
recomendamos unos niveles de entrada lo más altos posible para conseguir la mejor relación señal/ruido. Sin
embargo, tenga en cuenta que el nivel de audio nunca llega a la zona roja incluso aunque se hable alto en el
micrófono, ya que de lo contrario puede provocar distorsiones que suenen desagradables. Aumente el nivel de
entrada con cuidato tan alto como sea posible pero sin que el indicador del nivel de audio se encienda de color
rojo.