AKUVOX VPR48G Video Phone User Manual VP R48G Akuvox
AKUVOX (XIAMEN) NETWORKS CO., LTD. Video Phone VP R48G Akuvox
AKUVOX >
Users Manual

1
VPR48GUserManual
Content
1Welcome...................................................................................6
2ProductOverview......................................................................8
2.1Instruction........................................................................................................8
2.2TechnicalSpecification.....................................................................................9
2.3EquipmentAppearanceAndInterfaceDescription.......................................10
2.3.1InterfaceDescription...........................................................................11
2.3.2KeypadDescription.............................................................................11
2.4Indicators........................................................................................................12
3Installation..............................................................................13
3.1EquipmentPackaging.....................................................................................13
3.2ConnectingVideoPhone...............................................................................13
3.3InstallationConsiderations............................................................................14
4GettingStarted........................................................................15
4.1BasicOperation..............................................................................................15
4.1.1MainScreenInstruction......................................................................15
4.1.2StatusAndNotificationsInstruction...................................................15
4.1.3UsingTheTouchscreen.......................................................................16
4.1.4StartupAndShutdown........................................................................17
4.1.5View/TurnOffNotifications..............................................................17
4.2ConnectingToNetworkAndWiFi................................................................18
4.2.1ConfiguringStaticIP............................................................................18
4.2.2ConfiguringDHCP................................................................................20
4.2.3ConfiguringWiFi................................................................................21
4.3SIPAccountConfiguration..............................................................................24
4.3.1AddAccount........................................................................................25
4.3.2SIPAccountON/OFF...........................................................................27
4.3.3Modify/RemoveSIPAccount..............................................................27
4.4Sound¬ification......................................................................................28
4.4.1Volumes...............................................................................................29
4.4.2Interruptions.......................................................................................30
4.4.3Phoneringtone...................................................................................31
4.4.4Defaultnotificationringtone...............................................................32
4.4.5OtherSounds......................................................................................32
4.5AudioSettings................................................................................................32
4.6VideoSettings................................................................................................33
4.7CallSettings....................................................................................................35
4.7.1Alwaysforwarding&ForwardingNumber.........................................35
4.7.2Callforwardingbusy&ForwardingNumber......................................36
4.7.3NoAnswerForwarding&ForwardingNumber..................................36
4.7.4Timeout..............................................................................................36
4.7.5DoNotDisturb....................................................................................37
4.7.6CallWaiting.........................................................................................37
4.7.7Playtone..............................................................................................37
4.7.8Intercom..............................................................................................37
4.7.9Hotline.................................................................................................38
4.8DialPlan.........................................................................................................38
4.9AutoProvision................................................................................................39
4.10Personalize...................................................................................................40
4.10.1LogLevel............................................................................................40
4.10.2HookMode.......................................................................................40
4.11RebootManager..........................................................................................40
4.11.1Reboottime......................................................................................40
4.11.2Statusoftime....................................................................................41
4.11.3Statusofactive..................................................................................41
4.11.4Rebootsettings.................................................................................41
4.12Date&Time.................................................................................................41
4.13PersonalizationSettings...............................................................................44
4.13.1Wallpaper..........................................................................................44
4.13.2Widgets.............................................................................................44
4.13.3Shortcuts...........................................................................................46
4.13.4ModifyExtendedBar........................................................................47
4.13.5Ringtone............................................................................................47
4.14Backup&Reset............................................................................................48
5Function..................................................................................49
5.1CallFunction...................................................................................................49
5.1.1MakeACall.........................................................................................49
5.1.2DialingOutFromContactList.............................................................50
5.1.3ReceiveACall......................................................................................52
5.1.4CallOptions.........................................................................................53
5.1.5CallRecords.........................................................................................56
5.2Contacts.........................................................................................................59
5.2.1LocalPhoneBook................................................................................60
5.2.2BroadsoftPhoneBook........................................................................61
5.2.3RemotePhoneBook...........................................................................62
5.2.4LDAP....................................................................................................62
5.2.5Group..................................................................................................62
5.3BLF..................................................................................................................63
5.4Intercom.........................................................................................................65
5.5CallReturn......................................................................................................66
5.6BLFList............................................................................................................67
5.7Pickup&GroupPickup...................................................................................67
5.8ACD.................................................................................................................68
5.9HotDesking....................................................................................................69
5.10Conference...................................................................................................70
5.10.1Create3wayconference..................................................................70
5.11Transfer........................................................................................................72
5.11.1BlindTransfer....................................................................................72
5.11.2AttendedTransfer.............................................................................73
5.12KeypadInput................................................................................................74
5.13WebpageBrowser........................................................................................74
5.13.1OpenTheWebpage..........................................................................75
5.14Camera.........................................................................................................76
5.14.1PhotographMode.............................................................................76
5.15Gallery..........................................................................................................78
5.15.1ViewPhoto&Picture&Video.........................................................78
5.16Bluetooth.....................................................................................................79
5.16.1TurningBluetoothOn/Off................................................................80
5.16.2ChangingBluetoothDeviceName....................................................80
5.16.3ParingVPR48GWithABluetoothDevice........................................80
5.16.4UnpairingABluetoothDevice.........................................................81
5.17USB...............................................................................................................81
5.18Calendar.......................................................................................................82
5.18.1AddAnAccount.................................................................................83
5.18.2ViewCalendar...................................................................................83
5.18.3NewActivities...................................................................................83
5.18.4EditActivities.....................................................................................84
5.18.5DeleteActivities................................................................................84
5.19Clock.............................................................................................................84
5.19.1Alarm.................................................................................................85
5.19.2CountdownTimer.............................................................................87
5.19.3Stopwatch.........................................................................................88
5.20Gmail............................................................................................................89
5.20.1AddANewGmailAccount................................................................89
5.21Music............................................................................................................90
5.22Explorer........................................................................................................91
5.23VideoPlayer.................................................................................................92
5.23 Others.......................................................................................................94
5.23.1ApkInstall..........................................................................................94
6SoftwareUpgrade...................................................................95
6.1ImmediateUpdate.........................................................................................95
6.1.1SelectOtherUpgradePackage............................................................96
6.1.2LocalUpdate.......................................................................................96
6.1.3RemoteUpdate...................................................................................97
6.2AutoUpdatePeriod.......................................................................................98
6.3Upgradeontheweb......................................................................................99
6.4CheckUpdateAfterSystemPowerOn...........................................................99
7SystemMaintenance.............................................................101
7.1SystemStateInspection...............................................................................101
7.2IPQuery........................................................................................................101
7.3SIPAccountRegistrationQuery...................................................................102
7.4Backup&Reset............................................................................................103
7.5FailureProcess.............................................................................................103
8WebInterface........................................................................105
8.1Weblogin.....................................................................................................105
8.2Status>Basic................................................................................................105
8.3Account>Basic.............................................................................................107
8.4Account>Advanced.....................................................................................109
8.5Network>Advanced....................................................................................114
8.6Phone>Time................................................................................................115
8.7Phone>Preference......................................................................................115
8.8Phone>CallFeature....................................................................................116
8.9Phone>Audio..............................................................................................121
8.10Phone>Video............................................................................................123
8.11Phone>ExtKey..........................................................................................124
8.12Phone>Tone.............................................................................................125
8.13Phone>ReplaceRule.................................................................................126
8.14Phone>DialPlan........................................................................................127
8.15Phone>ActionURL....................................................................................129
8.16Phone>Multicast.......................................................................................131
8.17PhoneBook>LocalBook............................................................................132
8.18PhoneBook>RemoteBook........................................................................134
8.19PhoneBook>CallLog.................................................................................135
8.20PhoneBook>LDAP.....................................................................................136
8.21PhoneBook>Broadsoft..............................................................................137
8.22Upgrade>Basic..........................................................................................138
8.23Upgrade>Advanced...................................................................................138
8.24Security>Basic...........................................................................................141
8.25Security>Advanced...................................................................................142

6
1 Welcome
Thank you for purchasing Akuvox VP-R48G Multimedia VoIP Phone. The VP-R48G is
an innovative smart desk phone loaded with tremendous value for business
communications as well as unprecedented power for advanced custom business
applications development and personalization. Featuring Android 5.1 system, a 7
inch capacitive touch screen TFT LCD, a 1.3M CMOS sensor camera, Bluetooth,
integrated PoE and Wireless, VP-R48G provides excellent user experiences such as
high quality video phone, smooth internet surfing, various 3rd party applications and
daily information. Built with advanced security protection for privacy, this
Multimedia VoIP Phone also features broad interoperability with most 3rd party SIP
based devices, IPPBX and major IMS platforms. The VP-R48G represents the future
multimedia terminal in modern Internet age.
This user manual is designed to help you understand how to configure and
manage the VP-R48G Multimedia VoIP Phone. Besides demonstrating how to install
this unit with ease, this manual will explain how to fully utilize the phone’s voice
calling features as well as explore all the built-in feature-rich applications.
Any Changes or modifications not expressly approved by the party responsible for
compliance could void the user’s authority to operate the equipment. This device
complies with part 15 of the FCC Rules. Operation is subject to the following two
conditions: (1) This device may not cause harmful interference, and (2) this device
must accept any interference received, including interference that may cause
undesired operation.
Note: This equipment has been tested and found to comply with the limits for a Class
B digital device, pursuant to part 15 of the FCC Rules. These limits are designed to
provide reasonable protection against harmful interference in a residential
installation. This equipment generates uses and can radiate radio frequency energy
and, if not installed and used in accordance with the instructions, may cause harmful
7
interferencetoradiocommunications.However,thereisnoguaranteethatinterference
will not occur in a particular installation. If this equipment does cause harmful
interference to radio or television reception, which can be determined by turning the
equipmentoffandon,theuserisencouragedtotrytocorrecttheinterferencebyoneor
more of the following measures: —Reorient or relocate the receiving antenna.
—Increase the separation between the equipment and receiver. —Connect the
equipment into an outlet on a circuit different from that to which the receiver is
connected.—Consultthedealeroranexperiencedradio/TVtechnicianforhelp.
FCCRadiationExposureStatement:
ThisequipmentcomplieswithFCCradiationexposurelimitssetforthforanuncontrolled
environment.
This transmitter must not be colocated or operating in conjunction with any other
antennaortransmitter.
This equipment should be installed and operated with minimum distance 20cm between the
radiator & your body.

8
2 ProductOverview
2.1 Instruction
VPR48GisanAndroidbasedmultimediaterminalwitha7inchtouchscreenanda
1.3MCMOSsensorcamera.ItsupportsH.264/H.263codecswithadaptivebandwidth
adjustment.The7 inch touchscreenoffersexcellentuser experiences such ashigh
quality videophone, smooth internet surfing, various Android Apps and daily
information.
VPR48G provides 2 Ethernet ports, 1USB, 1HDMI, and one 3.5mm headset/audio
port.

9
2.2 TechnicalSpecification
Model VPR48G
GraphicDisplay z7inchcapacitivetouchscreenTFTLCD,1024x600pixels,16:9wide
screenaspectratio
Camera z1.3megapixelsCMOScamera,freerotation
NetworkProtocol zSIPRFC3261,TCP/UDP/IP,PPPOE,RTP/RTCP
OperationSystem zAndroid5.1
VoiceCodec zG.711A/U,G.729,G.722ē
zAMRNB,AMRWB,OPUS
VideoCodec zH.263,H.264
DTMFModes zInband,RFC2833,SIPINFO
AudioFeatures zVAD,CNG,EchoCancellerG.165/G.168
VideoFeatures
zQCIF,CIF,4CIF,VGA,720P
zVideobitrate:64kbps~2Mbps
zPIP
zFullScreen
zlocalvideoON/OFFcontrol
zImageCodecġJPEG,GIF,PNG,BMP
Others
zDownloadcontentfromthespecifiedserver
zInformationreceiving,storing,andrenderingcapabilities
zWebbrowser
zContactsandCallrecordsmanagement
zSupportplayinglocaloronlinevideo
NetworkInterface zDualswitched10/100/1000Mbpsport,supportingIEEE802.az
EnergyEfficientEthernet;optionalPoE
WiFi zIEEE802.11b/g/n
Expansion
Interface zUSB2.0,3.5mmheadsetjack,HDMI
IPassignment zStaticIP,DHCP,PPPoE
Management zLCDMenuConfiguration,TR069,WebUI
Dimension z240×192×106mm

10
2.3 EquipmentAppearanceAndInterfaceDescription
Figure11R48GFrontView
Figure12R48GRearView

11
USB
HDMI
Headset
Figure13R48GProfileView
2.3.1 InterfaceDescription
Interface Description
Camera Adjustablecamerashootingangle,rotatedownthecamerato"off"
angle.
USBinterface ExternalUSBstoragedevice
Headset Connectto3.5mmstereoheadphone,headsetdevice
HDMI UseHDMIcabletooutputthevideotoaTVscreen
LAN Networkinterfacecanbeconnectedtoahub,switchorothernetwork
accessdevices.ItalsosupportsPOE(PoweroverEthernet).
PC SharethenetworkaccessfromLANport,andforPCandother
equipmentconnection
Power Connectto12Vadapter,Powersupply
Handset Connecttohandset
Lock LockthevideophonewithaLaptoplock
Note:IfPoweroverEthernetisbeingused,donotplugintheACadapter.
2.3.2 KeypadDescription
Interface Description
Power Turnon/offtheLCD,Reboot,Silentmode
Suspend Turnon/offtheLCD,Reboot,Silentmode

12
Volume Press+or–forthephonevolumeadjustment
StandardKeypad Inputthenumberorsymbol
FunctionKey
Delete Deleteacharacterbeforethecursor
OK Samefunctionwithsoftkeyboard"Enter"key
Message Optional
Contact EnterIntothecontactslist,youcanviewthelocalcontact
Conference Thefirstpartyisheldinthecase,accordingtoa
conferencekey,thefirstpartycanbecombinedtoachieve
atripartitemeeting
Hold Toholdacallduringthecall
Transfer Totransferthecurrentcalltothethirdparty
Mute Theotherpartycannotheardthevoiceduringthecall
Home
Return to the main screen,and long press,it will display
recentlyusedapplications
Menu TocalluptheSystemorprogramsetupmenu
Back Returntothepreviousmenu
Speaker Speaker
2.4 Indicators
IndicatorName Icon Status Description
Power
ON Systemisunderworking
OFF Systemisnotworking
NetworkConnection
ON NetworkďLANPortĐisconnected
OFF NetworkďLANPortĐisdisconnected
Information
Flashing ContainsMissCallsorUnreadMessage
OFF Normalstatus

13
3 Installation
3.1 EquipmentPackaging
Name Quantity
MainCase 1
Handset 1
PhoneCord 1
PowerAdapter 1
EthernetCable 1
QuickStartGuide 1
3.2 ConnectingVideoPhone
zConnectiondiagram

14
zConnectingtoNetwork
UsethematchednetworkcabletoconnecttheLANPortofthevideophonetothe
RouterorSwitch.Viewingthetoprightcornerofthescreen,iftheindicatorlight
ison,networkcableisconnectedproperly.
zConnectingtoPC
UsethematchednetworkcabletoconnectthePCPortofthevideophonetothePC.
ThePCcanaccesstotheinternetnetworkviaPCPortofthevideophone.
3.3 InstallationConsiderations
Thisproductisadesktopproduct,andherearesomesafetyrecommendationsabout
theinstallationandtheusage:
zDonotuse this productnearwater,suchas:bath,washbasin,kitchensinkand
otherdampplacesandsoon;
zPlacethedeviceinaplaceawayfromheat;
zPlacethedeviceawayfromtrafficareastopreventcollisions;
zPleaseusetheequipmentwiththematchingpoweradapterorPOE;

15
4 GettingStarted
4.1 BasicOperation
4.1.1 MainScreenInstruction
zStatus bar, at the top of the screen, displaying the status of system
information.
zShortcuts, at the bottom of the screen, user can drag a shortcut to this
region to achieve the replacement of the shortcut. Supports max four
shortcuts.
4.1.2 StatusAndNotificationsInstruction
Thestatusbarinmainscreenisdividedintotwozones,notificationareaandstatus
area,asshownbelow:
16
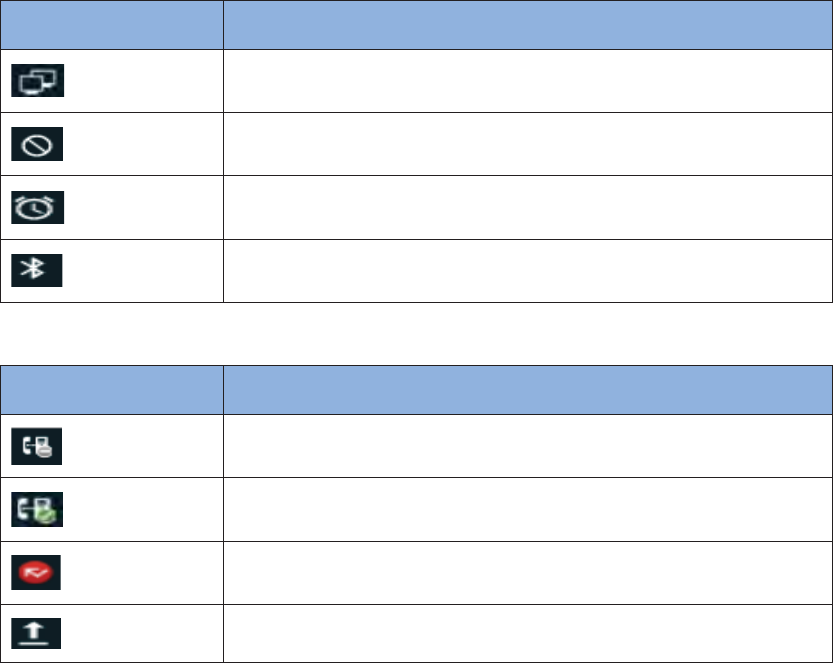
StatusArea
Icon Description
Networkisconnected
Slidemode(Soundisoff)
Alarmclockisset
Bluetoothisopened
NotificationArea
Icon Description
SIPaccountisunregistered
SIPaccountisregistered
Missedcall
uploading
4.1.3 UsingTheTouchscreen
zTap
To select items on the screen (e.g., setting options, apps); to press onscreen
buttons;totypelettersandsymbolsusingtheonscreenkeyboard.
zTouchandHold
Touch the item on the screen and hold it without lifting your finger from the
screentillanactionoccurs.
Forexample,touchandholdonapicturetobringupoperationoptions.
zDrag
Touchandhold anitemforafewsecondsfirst.Once theitemhasaredframe
activated,oramoveoptionshowsup,keepyourfingeronthescreenandmove
ituntilthetargetpositionisreached.Thenliftyourfingeruptorelease.

17
zSlide
Moveyourfingerfastacrossthescreentoslide.Toviewdifferentidlescreensor
menupages,slideleftorright;toviewthestatusbarontopofthescreen,place
yourfingeronthebarandslideitdown.Ifyourfingerstaysonthescreenfortoo
long,theitemmaybeselectedandslidingwon’toccur.
zDoubleclick
Click on the screen twice in quick succession, for example, when user surfs in
browser,youcanquicklyclicktwiceonthepage,thepagecanbeenlarged.
zPinch
Placetwofingersonthescreen,thenpinchthemtogether(zoomout)orspread
themapart(zoomin).Thiscouldbeusedinapicture.
4.1.4 StartupAndShutdown
zStartup
Connecttothepowersupply,thesystemautomaticallystartsup.
zShutdown
If you do not use the device, directly remove the power supply, to save
electricity.
zReboot
Ifyouneedtorestartthedevice,accordingtothefollowingsteps:
1)Pressandholdthe"Power"buttonuntilthepopup"Options"menu.
2)Clickthe"Reboot"
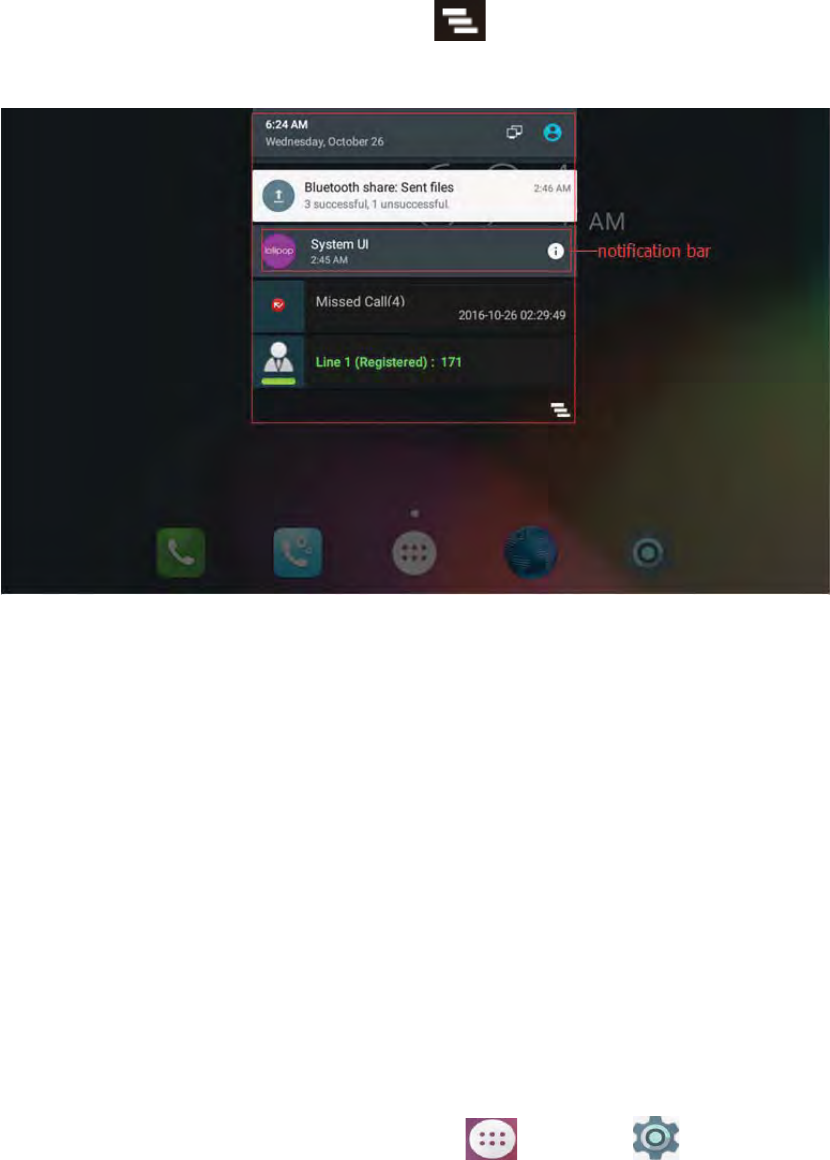
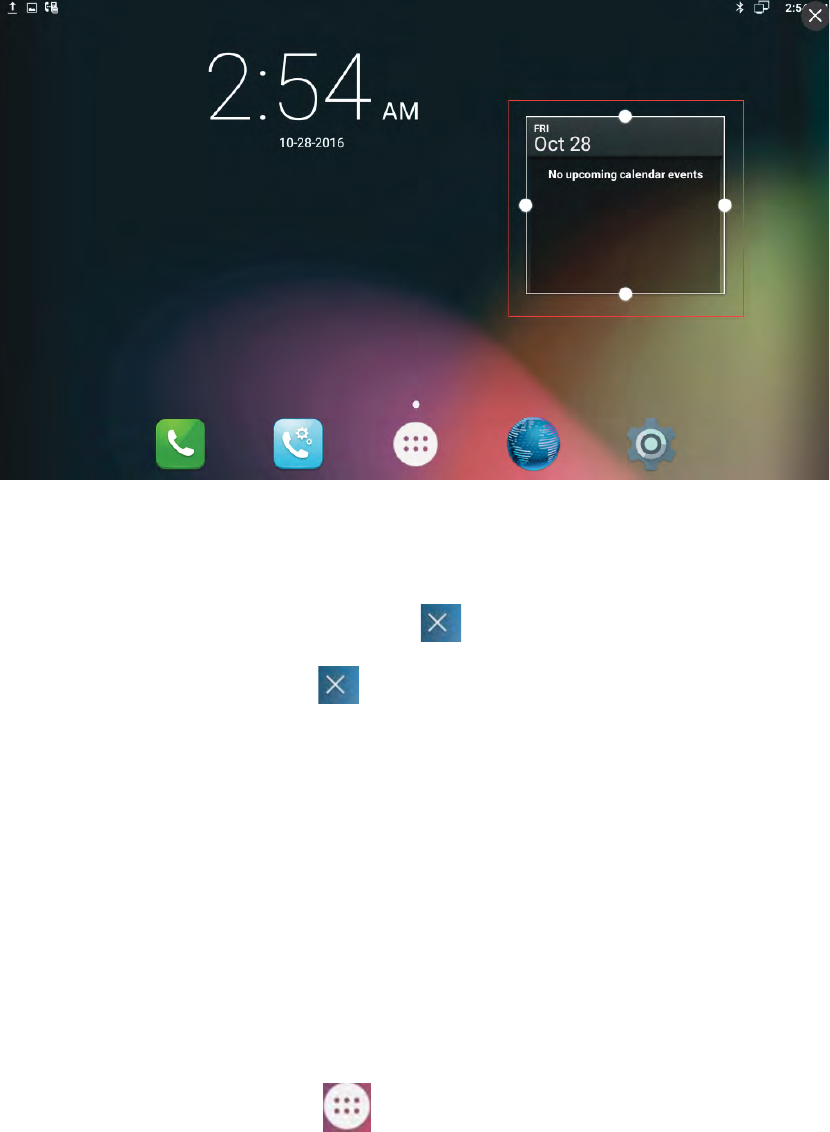
4.1.5 View/TurnOffNotifications
zToviewnotifications,dragdownthestatusbar,thenclicktheeachnotification
bartoviewthedetailnotification.
zTouch and hold one of notifications bar until the icon appear, tap the
icon toentertheprioritysettinginterface.
18
zTo turn off notifications, simply drag down the middle of the idle screen to
display notifications, click on the icon to clear up the notice. As shown
below.
4.2 ConnectingToNetworkAndWiFi
VPR48G supports a variety of network connections (Ethernet, Wireless) and the
device Network connections includes three modes, Static IP, DHCP, WiFi access.
DHCPisthedefaultconfiguration.ThedeviceconnectionsincludeEHSheadset,USB
andBluetoothdevice.
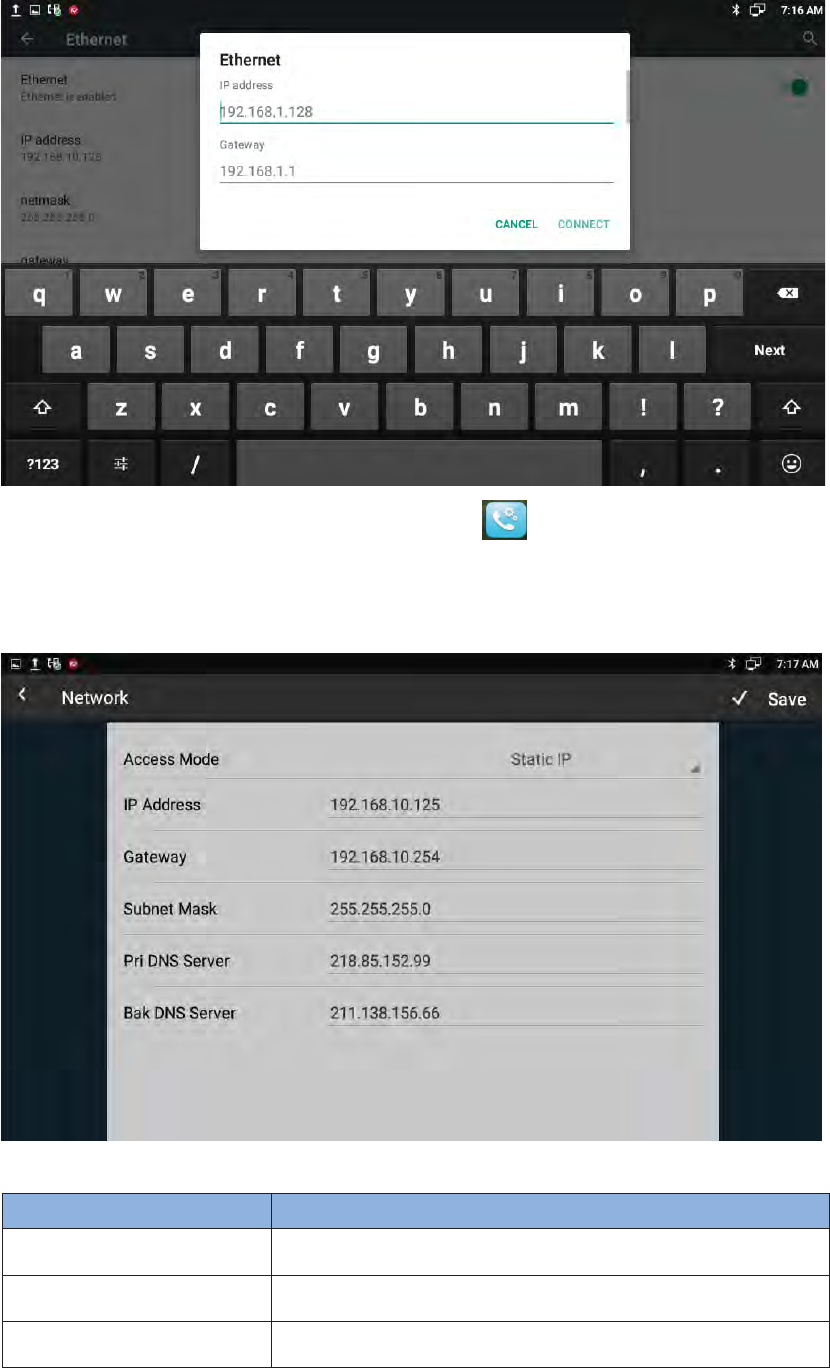
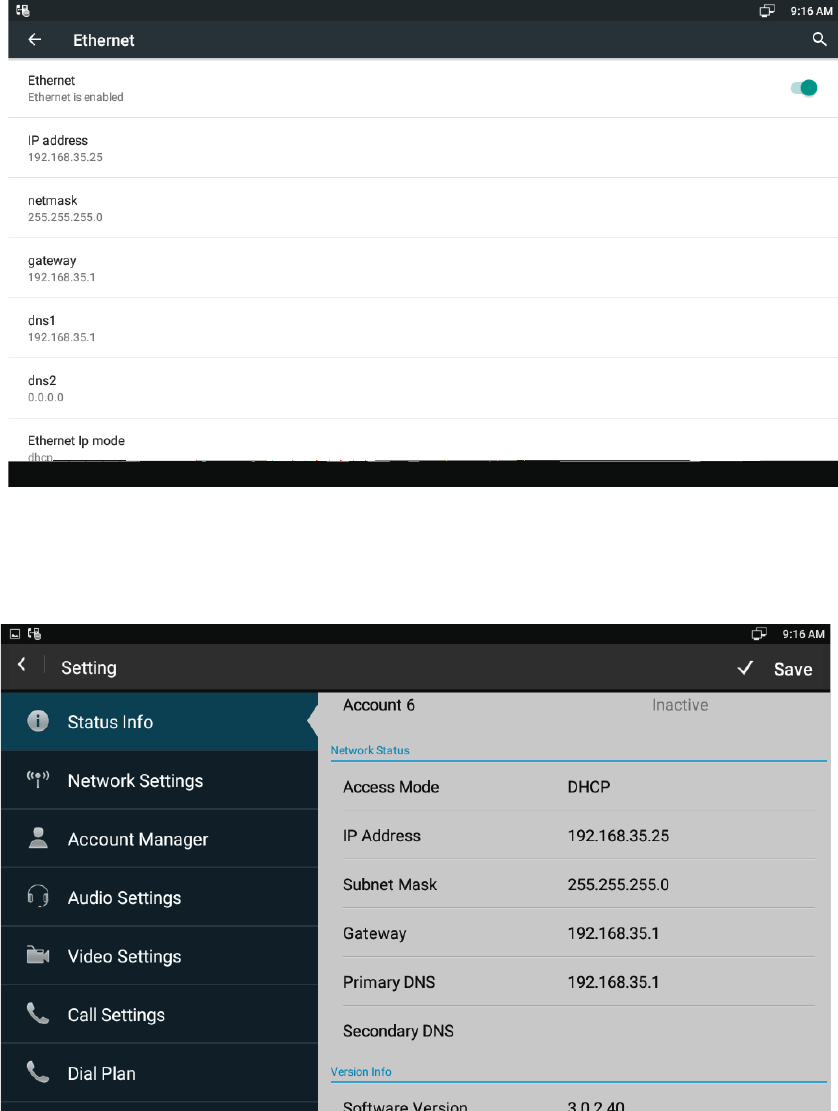
4.2.1 ConfiguringStaticIP
You can select one of the following methods to enter the static IP configuration
interface:
zMode 1: In the main screen, tap icon > Settings > Wireless &
Networks>More>Ethernet>EthernetIpmode>checkstatic.
Configurationpageisshownasbelowġ
19
zMode 2: In the main screen, tap icon > Network Settings > LAN
Type>AccessMode>choseStaticIP.
Configurationpageisshownasbelowġ
Configurationparameterspecificationġ
Parameter Specification
IPaddress settheIPaddressofthedevice
SubnetMask setthesubnetmaskofthedevice
DefaultGateway setthedefaultgateway
20
DNSServer settheDNSaddress
AlternativeDNSServer setthebackupDNSaddress
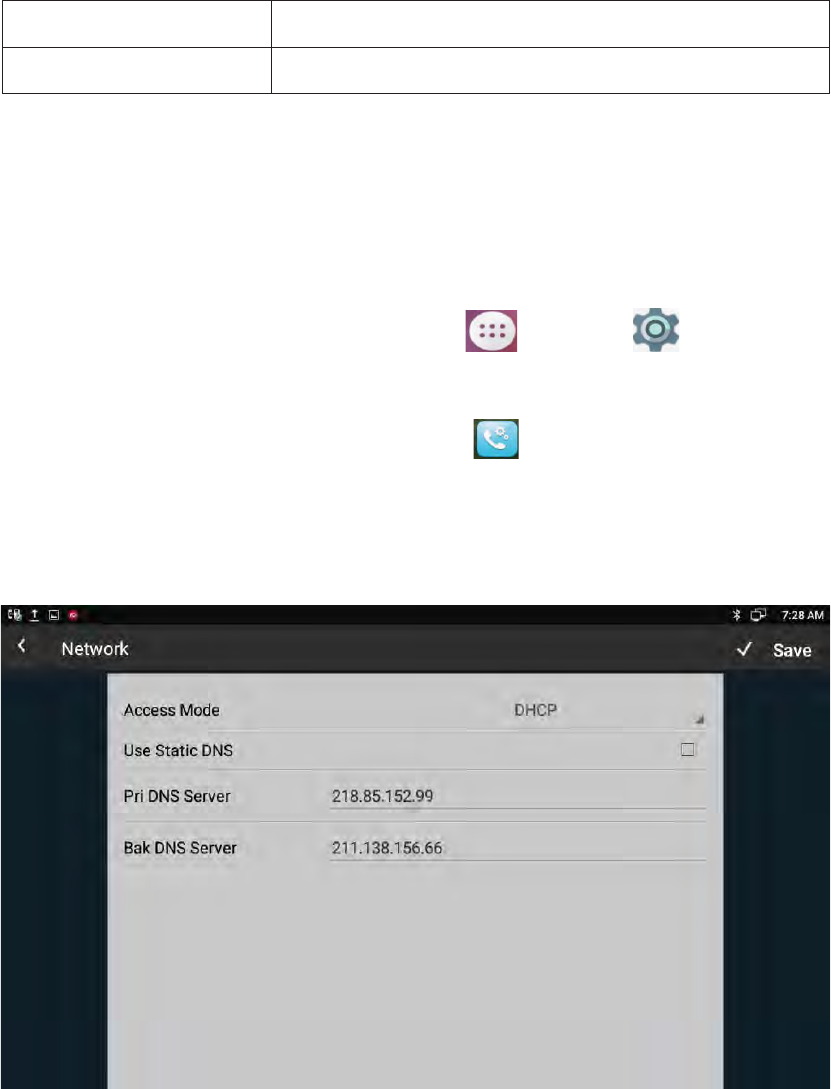
4.2.2 ConfiguringDHCP
You can select one of the following methods to enter the DHCP configuration
interface:
zMode 1: In the main screen, tap icon > Settings > Wireless &
Networks>More>Ethernet>EthernetIpmode>checkdhcp.
zMode 2: In the main screen, tap cion >Network Settings>Network
Management>LANType>AccessMode>choseDHCP.
Configurationpageisshownasbelowġ
Note:
1) There is a item of Use static DNS at the second bar, when checked, you can
modifytheprimaryDNSaddressandSecondaryDNSaddress.
2) IfDHCPisfailed,theIPaddresswillshowas:0.0.0.0.
21
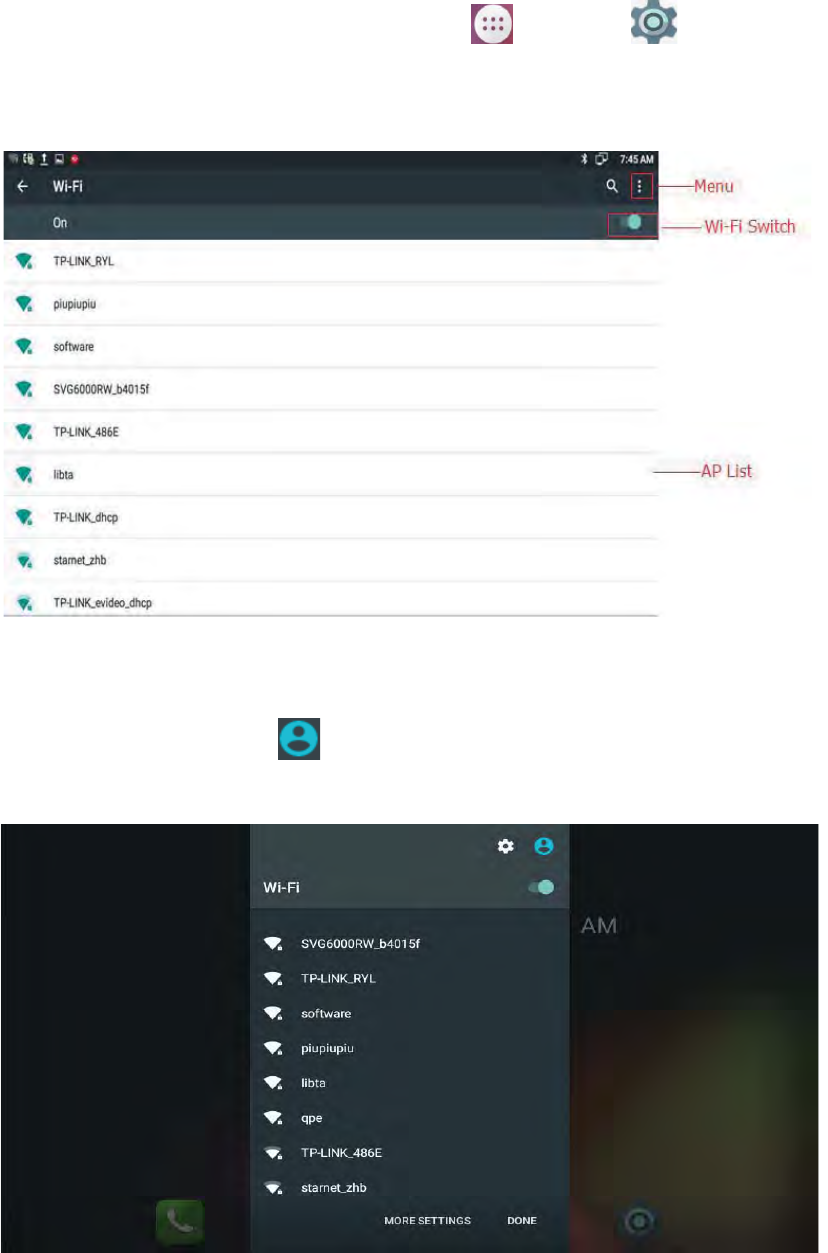
4.2.3 ConfiguringWiFi
YoucanselectoneofthefollowingmethodstoentertheWiFiconfiguration:
zMode 1: In the main screen, tap icon > Settings > Wireless &
Networks>WiFi.
Configurationpageisshownasbelowġ
zMode2:Inthemainscreen,dragdownthemiddleoftheidlescreento display
notifications>tapicon >tapWiFi.
Configurationpageisshownasbelowġ
22
1) When the WiFi switch is turned on, the video phone can list and display all
WiFiAPsearchedintheenvironment.
2) When connects to available AP in the environment, if a WiFi AP is without
passwordprotection,thereisno lock icon on WiFisignal,itwillautomatically
connectwhenclicked.
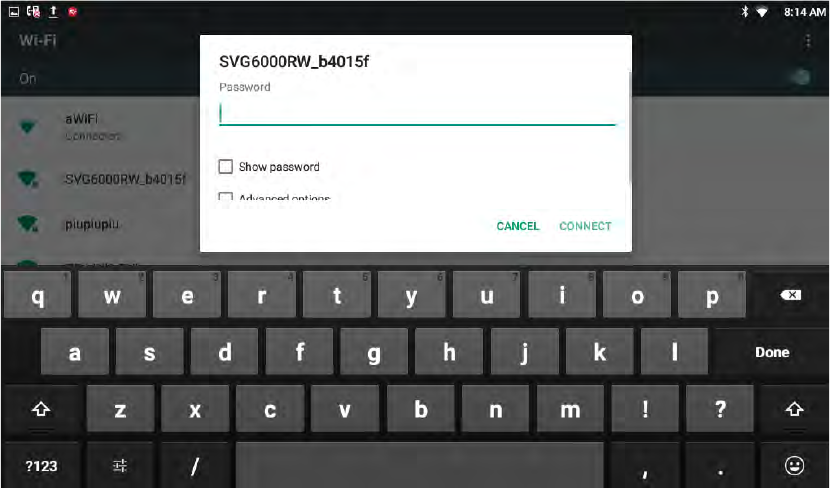
3) Ifa WiFi APis encryption,WiFisignal willbe addedthelock icon, and when
checked, it will pop up a dialog box to enter a password. If the password is
incorrect,theconnectionwillnotbesuccessful.Asshownbelow:
4) checkShowadvancedoptions,draguptothemodifyProxyserverandIPmode.
ProxySettings
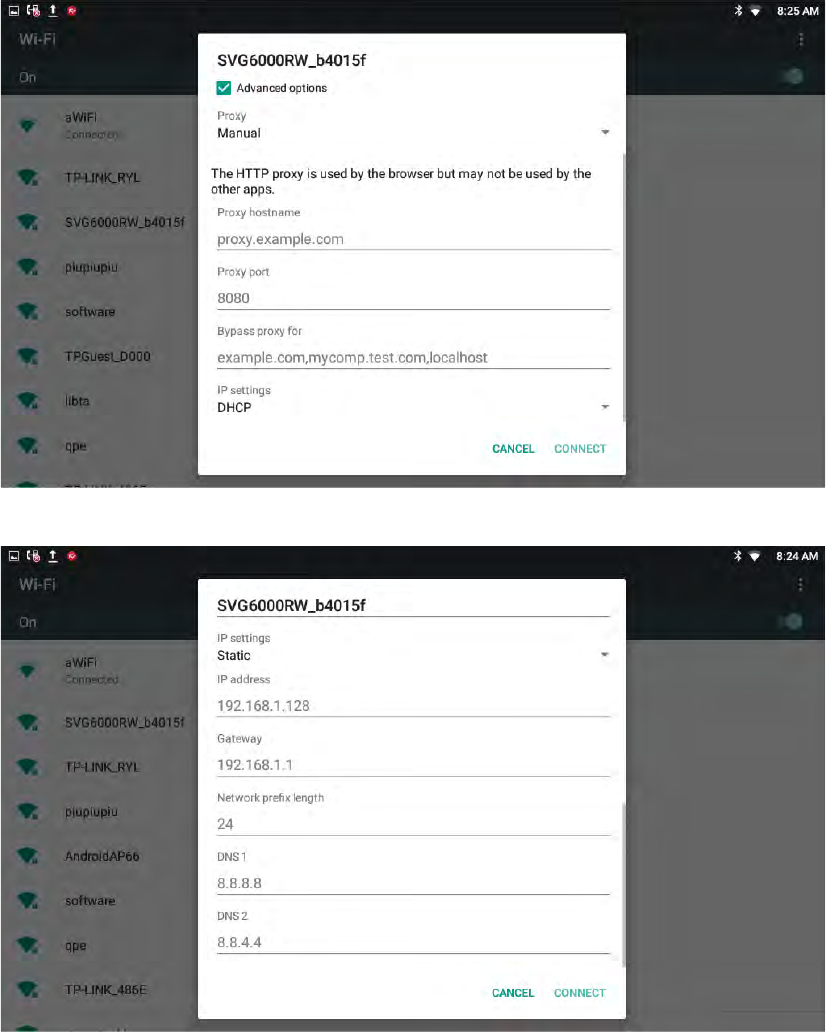
23
IPsettings(StaticIP):
5) Tap the connected WiFi AP, it will popup a dialog box, you can forget the
networkormodifythenetwork.TouchandholdonthenonconnectedWiFiAP,
itwillpopupadialogbox,andyoucanclickandconnecttonetwork.
6) ClickMenu,youcandotheoperationssuchas:addnetworksetting,refreshthe
WiFiAPlistandAdvancedsetting.
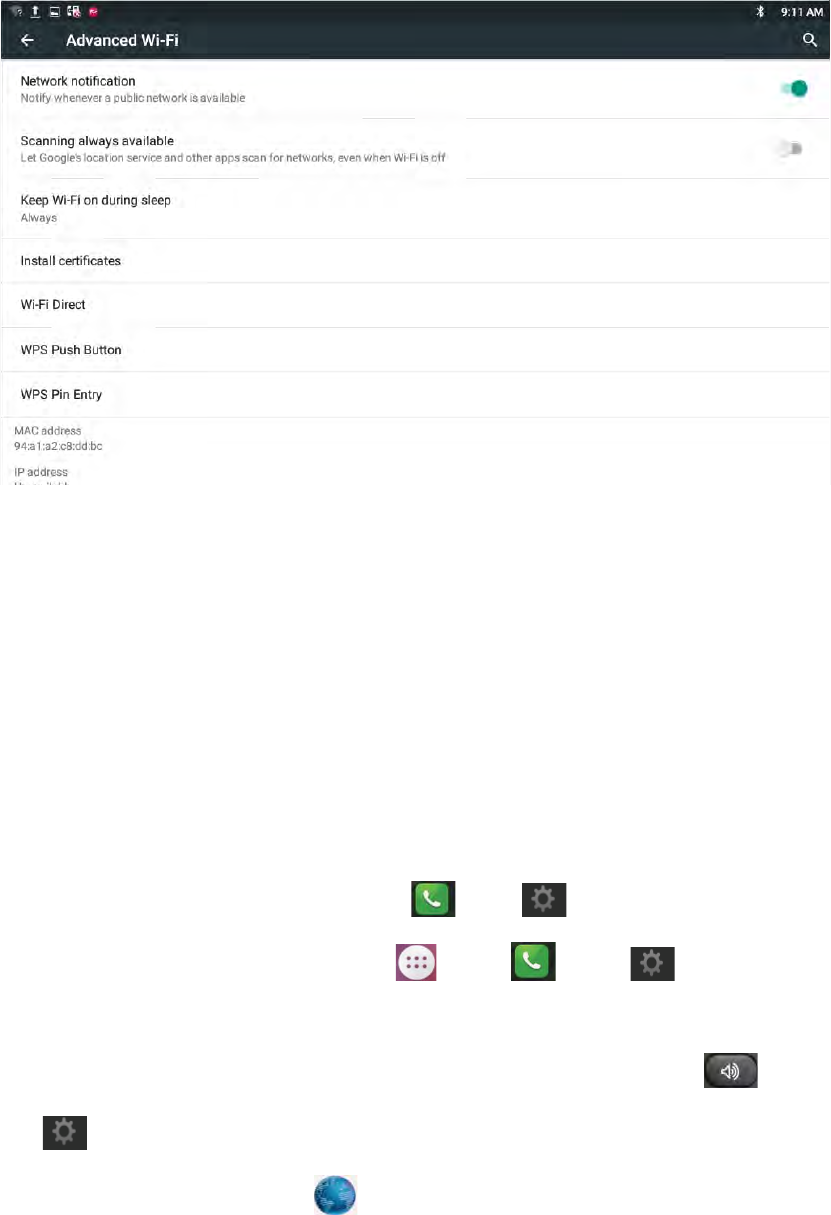
7) InAdvancedMenu,shownasbelow:
24
a. CheckNetworknotification,itwillnotifyyouwhenanopennetworkisavailable;
b. CheckScanningalwaysavaible,letgoogle’slocationserviceandotherappsscan
fornetworks,evenwhenWiFiisoff.
c. ViewtheWiFiMacaddressandIPaddress;
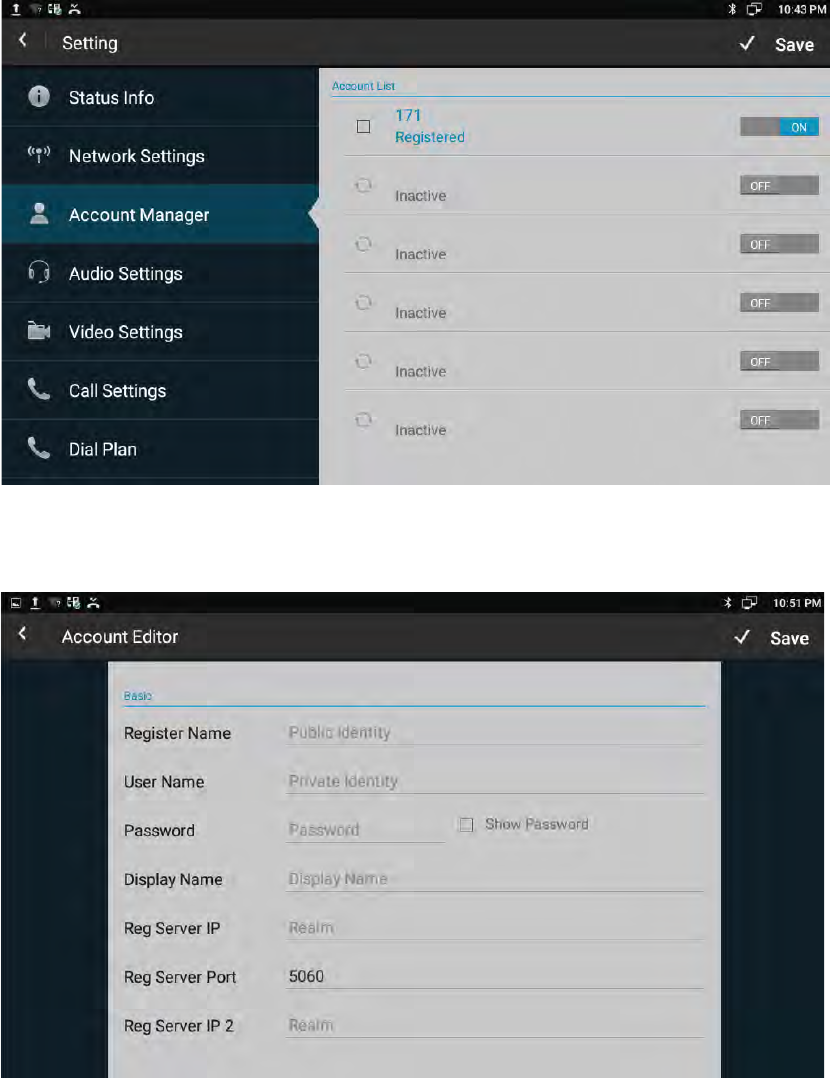
4.3 SIPAccountConfiguration
YoucanselectoneofthefollowingmethodstoentertheSIPaccountconfiguration:
zMode1:Inthemainscreen,tapicon >click -> clickAccountManager.
zMode 2: In the main screen, tap > click > click ->click Account
Manager.
zMode 3: Directly pick up the handset or press Speaker button > click
->clickAccountManager.
zMode4:ClickBrowsericon ,inputIPaddresstoenterlogininterface.Input
usernameandpassword(default:admin;admin),clickLoginlabel.Gotothepath:
Account>Basic.
25
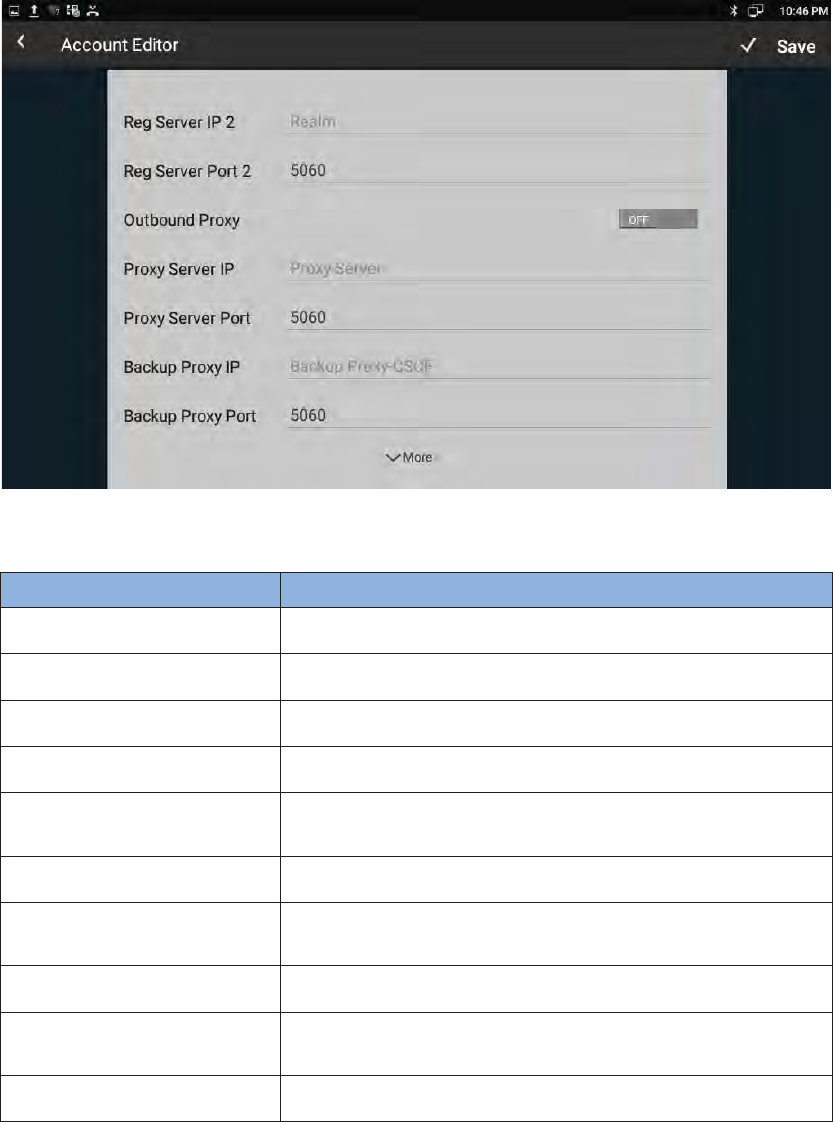
4.3.1 AddAccount
ClickanaccounttoenterAccountEditorinterface.
26
Configurationparametersaredescribedasfollows:
Parameter Specification
RegisterName SIPAccoutIDprovidedbyISP
UserName SIPUserNameprovidedbyISP
Password SIPPasswordprovidedbyISP
DisplayName SIPDisplayname
RegServerIP SIP Register Server, format: domain/IP, for example:
194.168.1.2
RegServerPort Thedefaultportis5060.
ProxyServerIP SIP Proxy Server, format: domain/IP, for example:
194.168.1.2
ProxyServerPort Thedefaultportis5060.
BackupProxyIP SIP Backup Proxy Server, format: domain/IP,for example:
194.168.1.2
BackupProxyPort Thedefaultportis5060.
Afteralltheparametersareconfigured,Click"save"buttontosavetheconfigurations,
thenthesipaccountisaddedsuccessfully.Thenactivetheaccount.
27
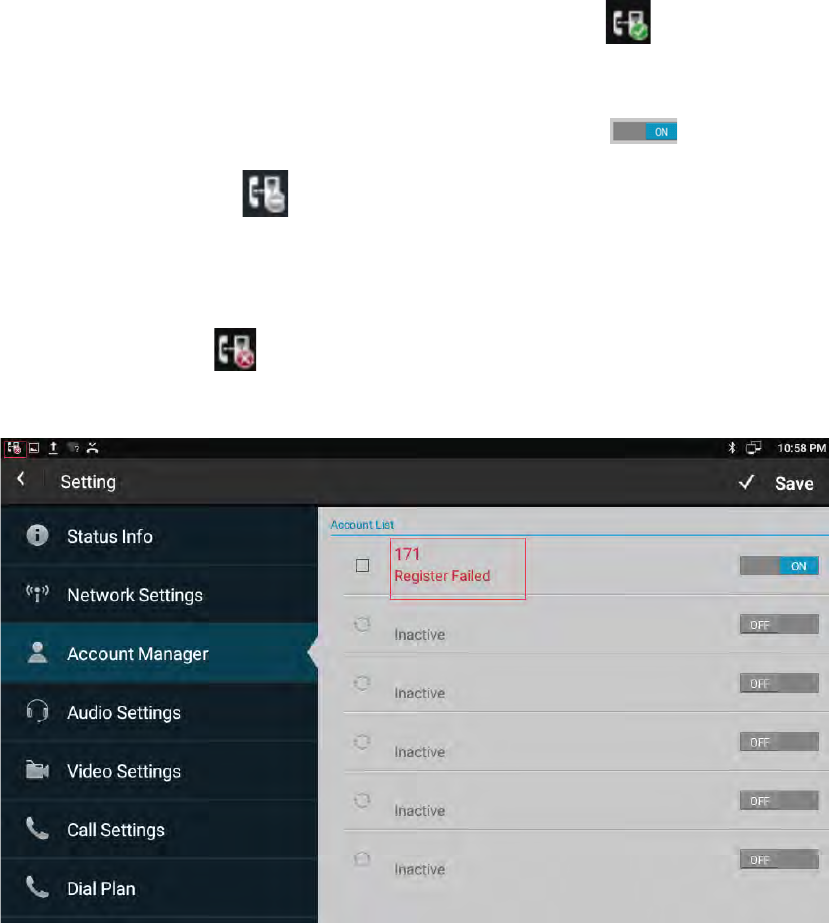
4.3.2 SIPAccountON/OFF
After SIP account is configured and registered successfully, it will display the
prompt ”Registered” in the Account Manager, and the icon will be displayed
onthestatusbar.
If you want to disable the registered account, tap the icon to change the
accountstatus,theicon willbeshownonthestatusbar.
If the sip account is failed to register, the failure code will be displayed under the
account, and then you can check with the account configuration or network
connection.Theicon willbeshownonthestatusbar.Asshownbelow:
4.3.3 Modify/RemoveSIPAccount
1) Modifythesipaccount:Directlyclicktheaccounttomodify.
28
2) Removethesipaccount:Clicktheboxoftheaccountwhichyouwanttodelete,
thenonthebottomoftheaccountlistwilldisplaythelabel“ClearAccount”,tap
thislabeltoremovetheselectedaccount.
4.4 Sound¬ification
YoucanselectoneofthefollowingmethodstoentertheSoundconfiguration:
zMode 1: In the main screen, tap shortcut icon > Device> Sound &
notification.
zMode 2: In the main screen, click > Settings > Device> Sound &
notification.
zMode 3: Drag down the status bar, click the icon on the status bar >tap
icon >Device>Sound¬ification.
Configurationpageisshownasbelowġ
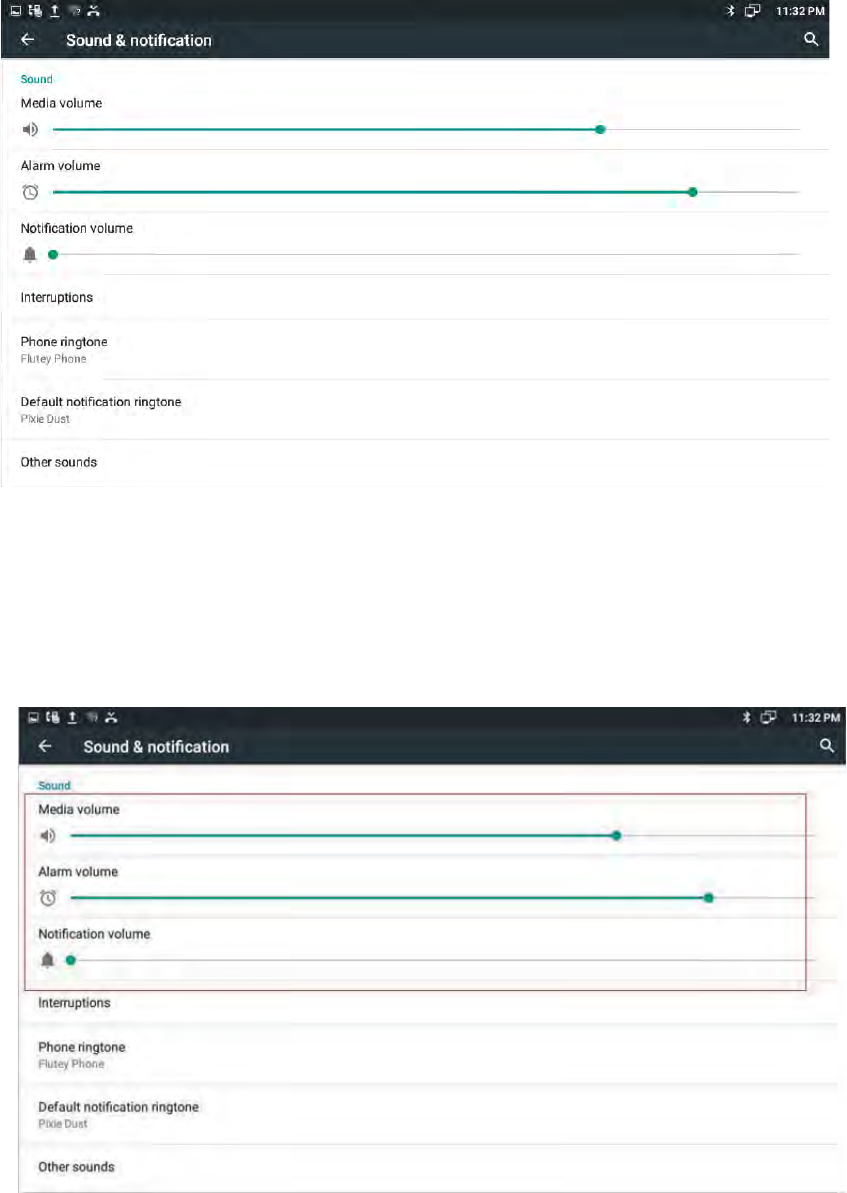
29
IncludingVolume,RingtoneandNotification.
4.4.1 Volumes
InSound¬ificationpage,thevolumeconfigureisshownasbelowġ
zVolumeoptionsincludeMedia,Alarmclock,Notification.
zYoucandirectlyclickavolumelocationtoadjustthevolume.
zThe volume settings,you can also press thekeyboard volume button ”+
”toincrease or decrease the volume.Usually,volume button is
30
toadjustforringtone or notification volume, but in
thebroadcastmedia,pressingvolumebuttonistoadjustformediavolume.
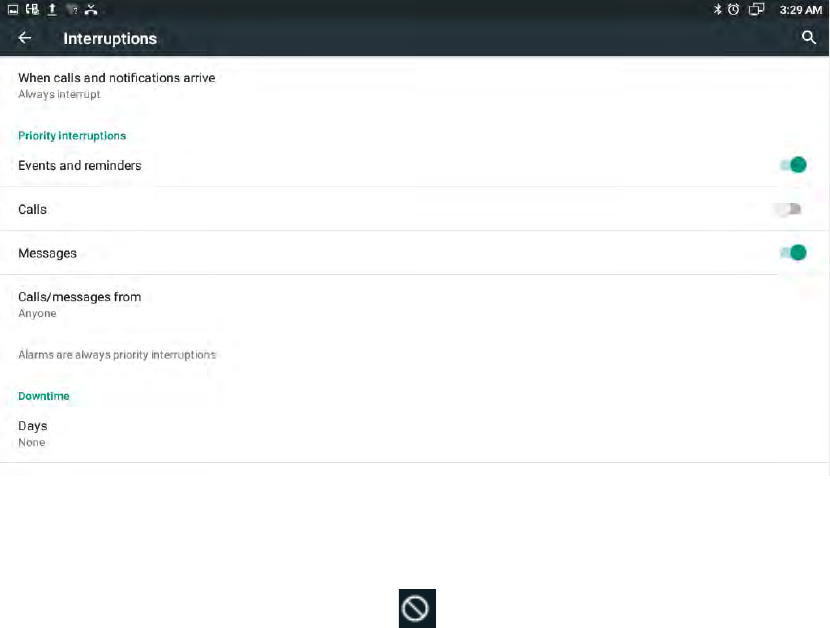
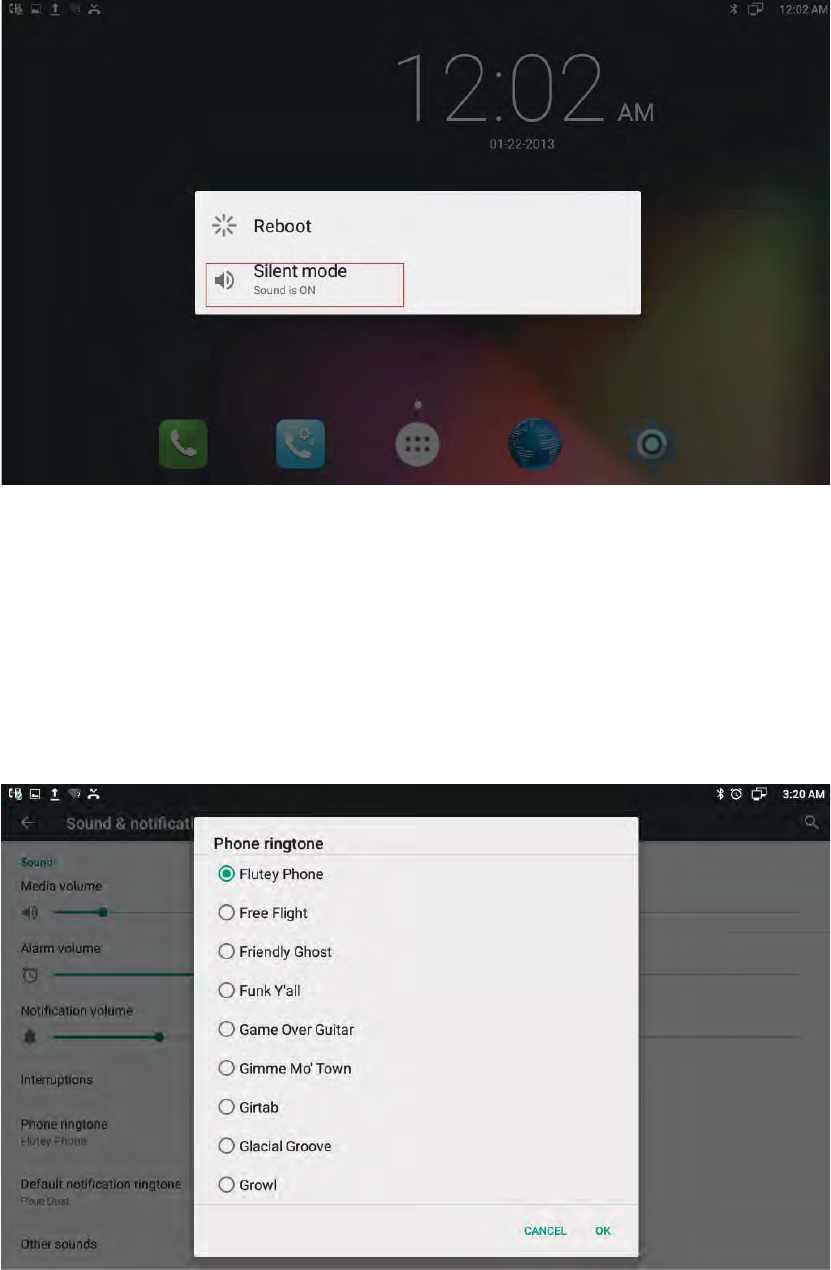
4.4.2 Interruptions
In the Sound & notification interface, click the Interruptions bar, enter the
interruptions setting interface. If the user open the Silent mode, can enter the
interruptioninterfacetosetpriorityeventorprioritytimeallowinterrupt.
TouchandholdthePowerbutton,taptheSilentmodebarinthepopupmenuto
changethestatus.Thesilentmodeicon willbedisplayedontherightsideof
thestatusbar.Asshowninthepicturebelow:
31
4.4.3 Phoneringtone
IntheSound¬ificationinterface,clickthePhoneringtonebartopopupdefault
ringtonesettinginterface.Clicktheringtoneyouwanttoset,afterthe selection, it
willringashorttime.Finally,click"OK".Settinginterfaceshownasbelow:

32
4.4.4 Defaultnotificationringtone
In the Sound & notification interface, click the Default notification ringtone bar to
pop up the phone default notification ringtone setting interface. Click the ringtone
youwanttoset,aftertheselection,itwillringashorttime.Finally,click"OK".Setting
interfaceshownasbelow.
4.4.5 OtherSounds
IfyouwanttoenableScreenlookingsoundsandTouchsounds,pleasegotoOther
Soundsconfigurationpagetoclickthecorrespondsound.Screenlockingsoundsand
Touchsoundsareenabledindefaultconfiguration.Shownasbelow.
4.5 AudioSettings
TosetupthecorrespondingaudioparametersandVolume.
33
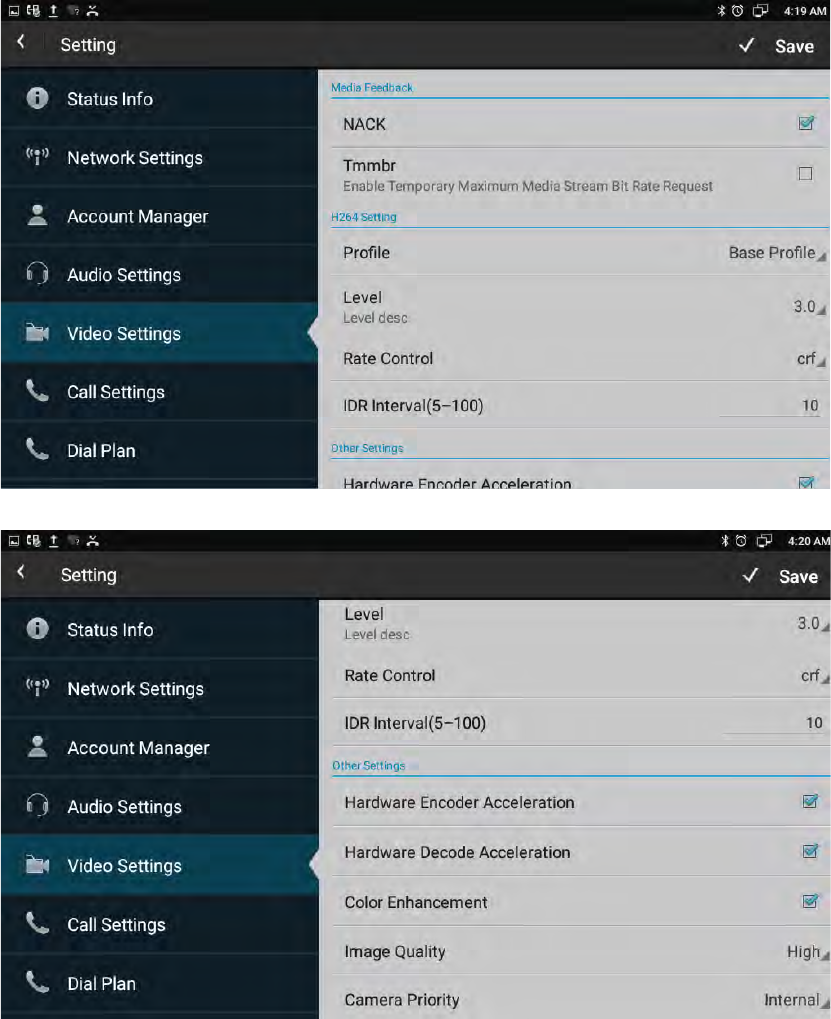
4.6 VideoSettings
Toconfigurethevideocorrespondingparameters.
34
35
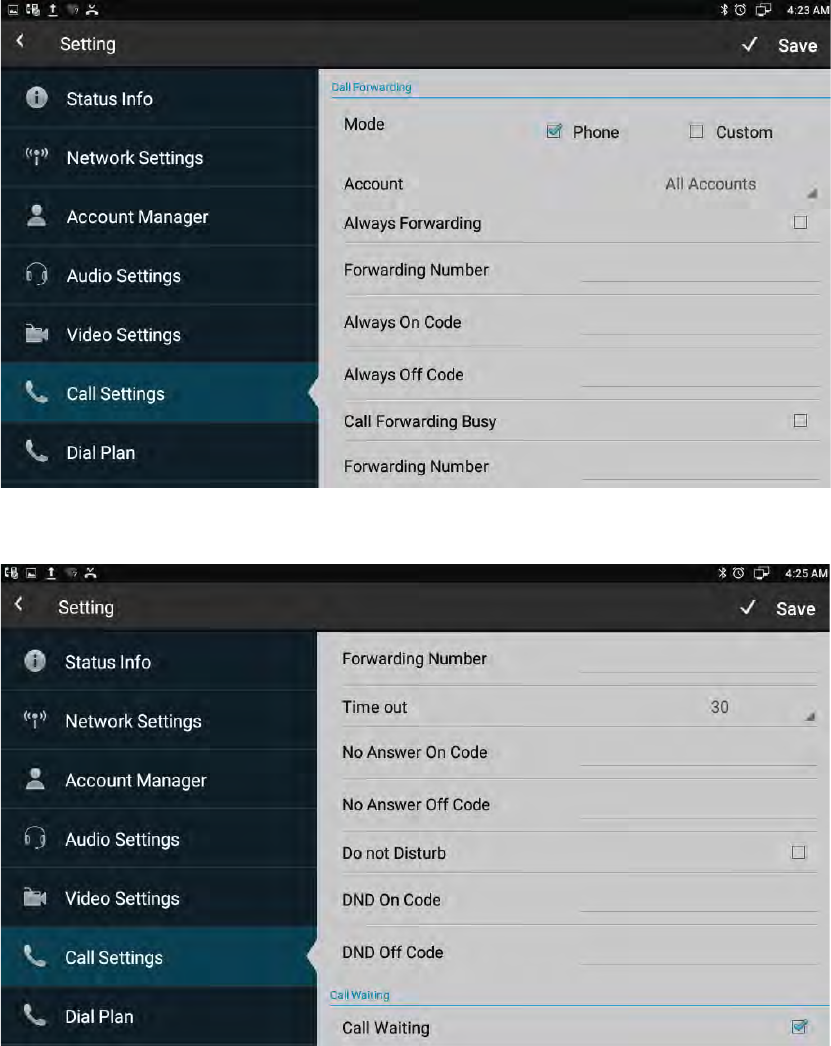
4.7 CallSettings
4.7.1 Alwaysforwarding&ForwardingNumber
Alltheincomingcallswillbeforwardedunconditionallytospecifiednumber.
Configurationonthephone:
36
1. PhoneSettings>CallSettings>CallForwarding>AlwaysForwarding
2. SelectthedesiredaccountontheAccountbar.
3. ChecktoenableAlwaysForwardingfeature.
4. InputtheforwardnumberintotheForwardingNumberbar.
4.7.2 Callforwardingbusy&ForwardingNumber
Theincomingcallswillbeforwardedtospecifiednumberwhenthephoneisbusy.
Configurationonthephone:
1. PhoneSettings>CallSettings>CallForwarding>CallForwardingBusy
2. SelectthedesiredaccountontheAccountbar.
3. ChecktoenableCallForwardingBusyfeature.
4. InputtheforwardnumberintotheForwardingNumberbar.
4.7.3 NoAnswerForwarding&ForwardingNumber
Theincomingcallswillbeforwardtothespecifiednumberwhentheringtoneistime
outwithoutanswer.
Configurationonthephone:
1. PhoneSettings>CallSettings>CallForwarding>NoAnswerForwarding
2. SelectthedesiredaccountontheAccountbar.
3. ChecktoenableNoAnswerForwardingfeature.
4. InputtheforwardnumberintotheForwardingNumberbar.
4.7.4 Timeout
Setupthenoanswerforwardingtime.Whenthecallisbeyondthetime(thedefault
is30seconds)withoutanswer,itwillforwardtothetargetnumber.Therangevalue
is0to120second.
37
4.7.5 DoNotDisturb
DND function is to prevent foreign phone from disturbing, If open DND, external
phonecallisunabletocallin,turnedoffbydefault.
Configurationonthephone:
1. PhoneSettings>CallSettings>DonotDisturb
2. SelectthedesiredaccountontheAccountbar.
3. ChecktoenableDonotDisturbfeature.
4.7.6 CallWaiting
Ifenablecallwaitingfeature,afterestablishmentofaconversation,thereisathird
party call in, then video phone will have a new call tips, the incoming call will be
displayedontheconversationinterface,usercanchoosetoanswerorrejectthecall.
Ifdisablethecallwaitingfeature,thethirdpartywillpromptabusytone.Callwaiting
featureenablebydefault.
Configurationonthephone:
1. PhoneSettings>CallSettings>CallWaiting
ʹǤ EnableCallWaitingfeature.
4.7.7 Playtone
The caller will hear the tone when waiting. Different SIP server supports different
playtone.
4.7.8 Intercom
Itisusedtoanswertheincomingcallautomaticallyafteruserssetuptheintercom
function.Indefaultsituation,thephonewillanswertheintercomcallautomatically,
thespeaker’svoicecanbeheardbyintercomoriginator.Usercansetthephoneto
38
enablesilentmodewhenautoanswertheintercomcallandtheintercomoriginator
willnothearspeaker’svoice.
4.7.9 Hotline
Enable the Hotline feature allows the phone to call out a defined number
automatically, without input any number by manual in dialup interface. Hotline
DelayTimeistosetthecalloutdelayvalue.Therangevalueis0to5second.
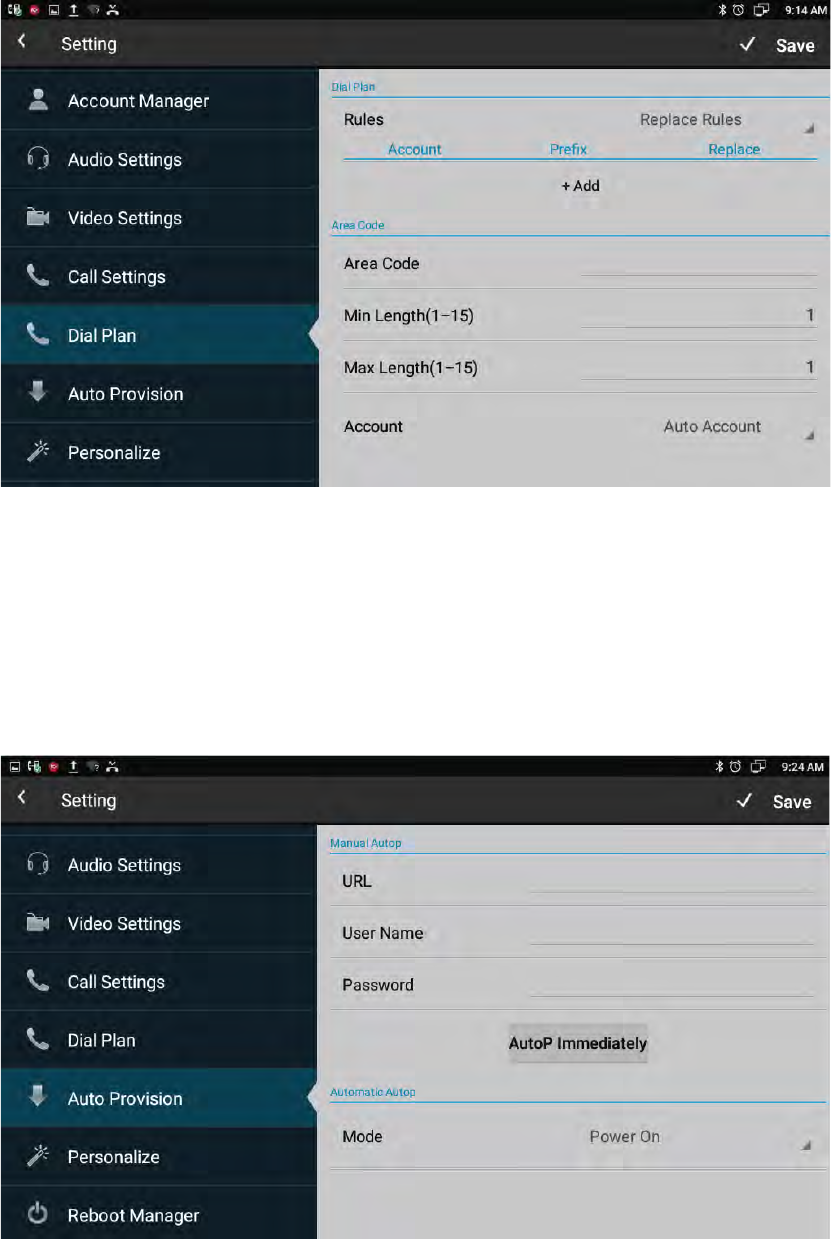
4.8 DialPlan
Rules:AllowusertoselectReplaceRulesorDialNowtodisplayoredit.
RulesModify:Allowusertomodifyselectedrulesinformation,forreplacerule,you
canmodifyrelatedaccounts,prefixnumberandreplacenumber.
AreaCode:AreacodesarealsoknownasNPAs(NumberingPlanAreas).Theyusually
indicatedifferentgeographicalareas within one country. If entered numbersmatch
the predefined area code rule, the IP phone will automatically prefix outgoing
numberwithareacode.
Note:Thereisonlyoneareacoderulesupported.
39
4.9 AutoProvision
Phonecanbeconfiguredtoresynchronizeitsinternalconfigurationstatetomatcha
remote profile periodically and on power up by contacting a normal provisioning
server(NPS)oranaccesscontrolserver(ACS).
40
4.10 Personalize
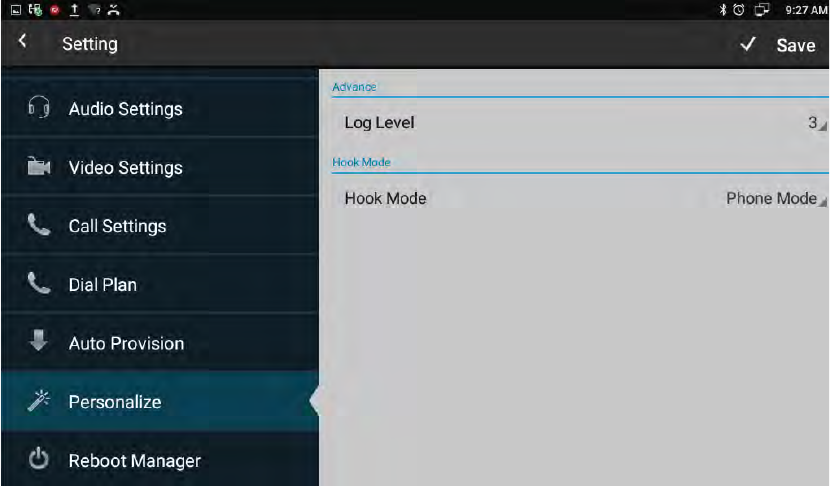
4.10.1 LogLevel
The Log levelis divided intoseven levels: EMERG, ALERT, CRIT, ERR, WARNING,
NOTICE, INFO, DEBUG,logclass is fromlow to high.The default setting is
EMERG,whichisthelowestgradelog.
4.10.2 HookMode
HookModeisdividedintoPhoneMode,Disable,AppMode,AutoMode.Thedefault
modeisPhoneMode.
4.11 RebootManager
4.11.1 Reboottime
Usercansetuptherebootdateandhouryouwant.
41
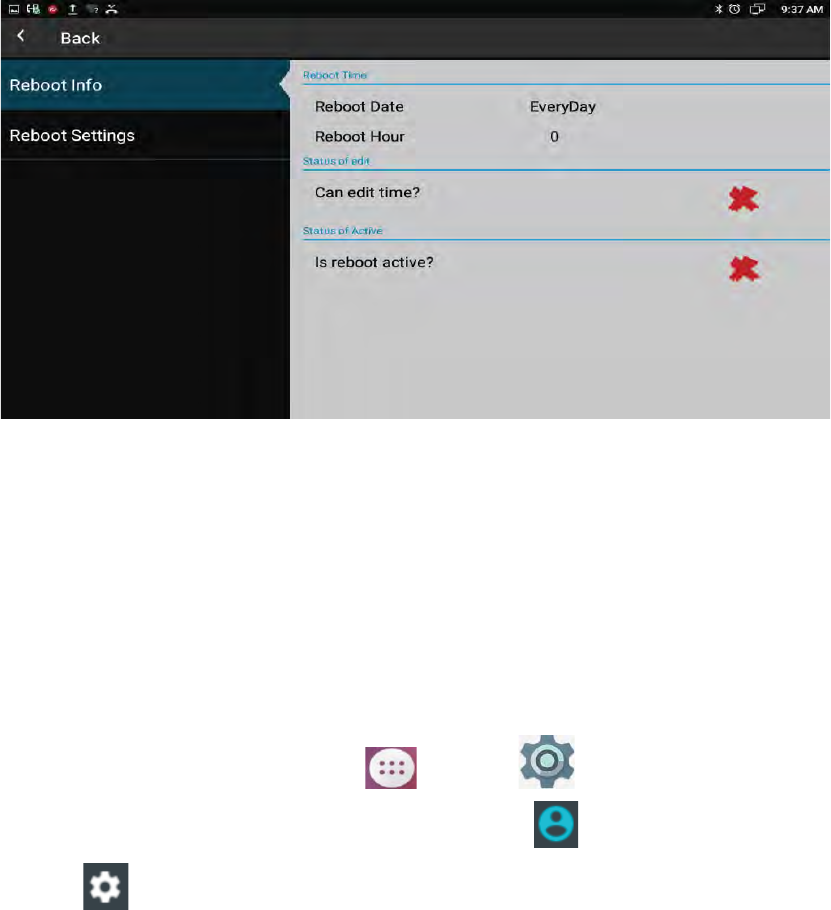
4.11.2 Statusoftime
Ifthestatusisenable,userscaneditthereboottimeyouwant.
4.11.3 Statusofactive
Enable/disabletherebootfunction
4.11.4 Rebootsettings
Setthereboottime.Disablethisfeaturebydefault.
4.12 Date&Time
YoucanselectoneofthefollowingmethodstoenterDate&Timeconfiguration:
zMode1:Inthemainscreen,tap >Settings >System>Date&time.
zMode 2: Drag down the status bar, click icon on the status bar >tap
icon >System>Date&time
Theconfigurationpageisshownasbelow.
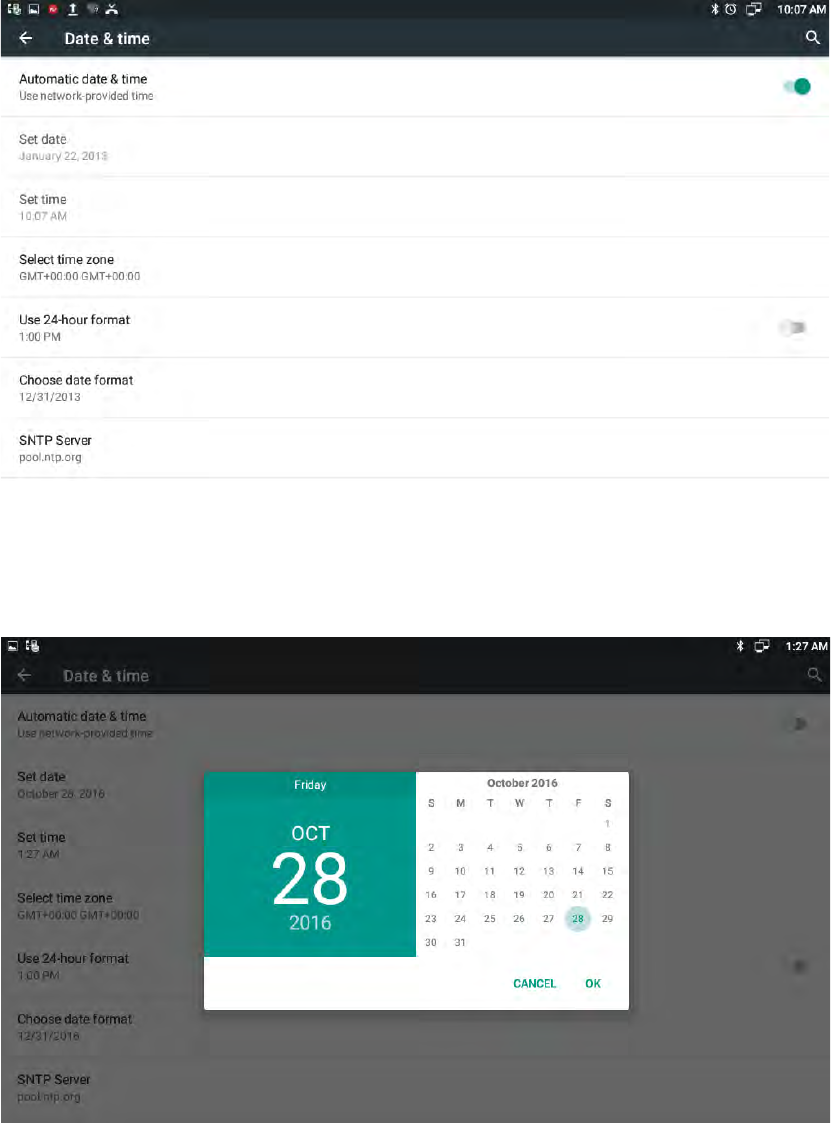
42
Ifuserwanttomanuallysetthedateandtime,firstly,tapAutomaticdata&timebar
todisablestatus,andthensetthedate,time,selectatimezone.
TapSetdatebartopopupdatesetinterface.Asshownbelow.
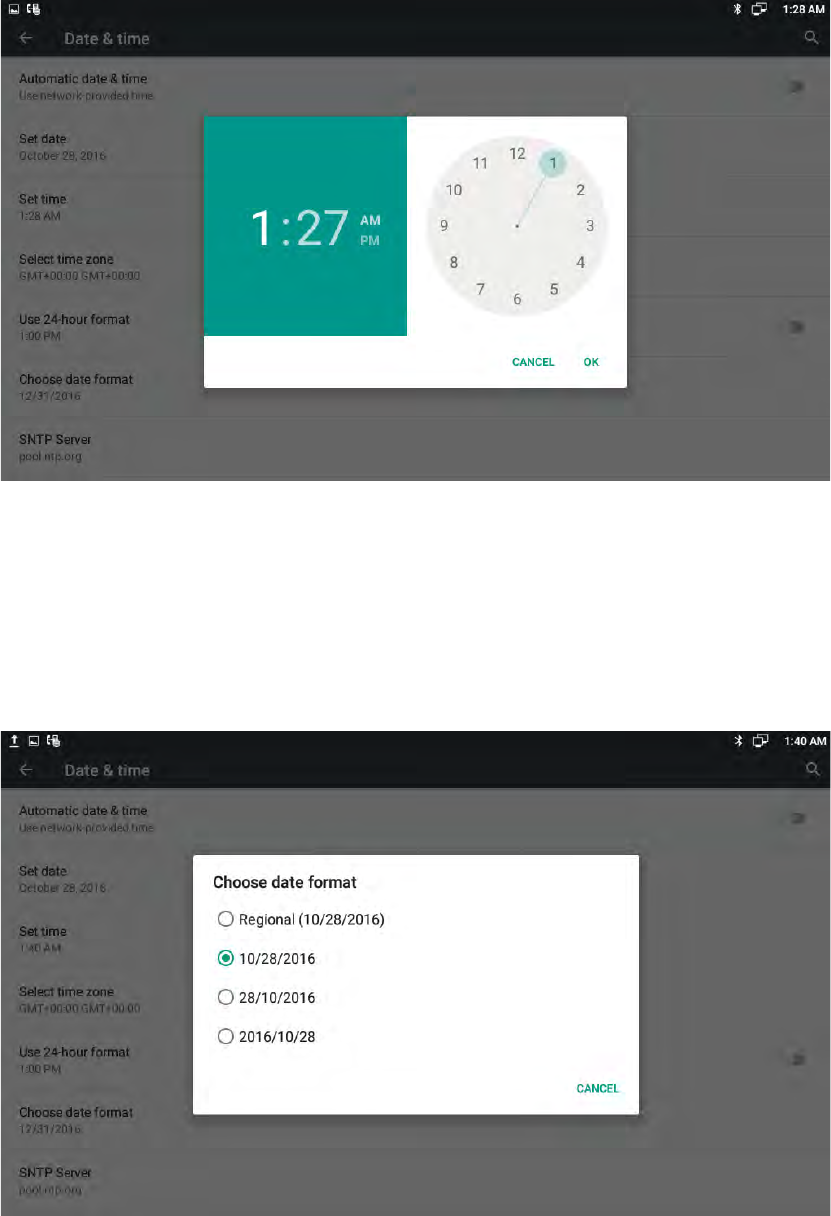
TapSettime.Timesettingsasshownbelow.
43
Tap the Use 24hour format bar to change the hour format displayed, 1:00 PM
formatbydefault.
Tap the Choose date format bar to pop up the date format selection interface.
Month/day/yeardateformatbydefault.Shownasbelow.
44
4.13 PersonalizationSettings
Accordingtopersonalizedsettings,usercansettheequipmentmorecharacteristic.
4.13.1 Wallpaper
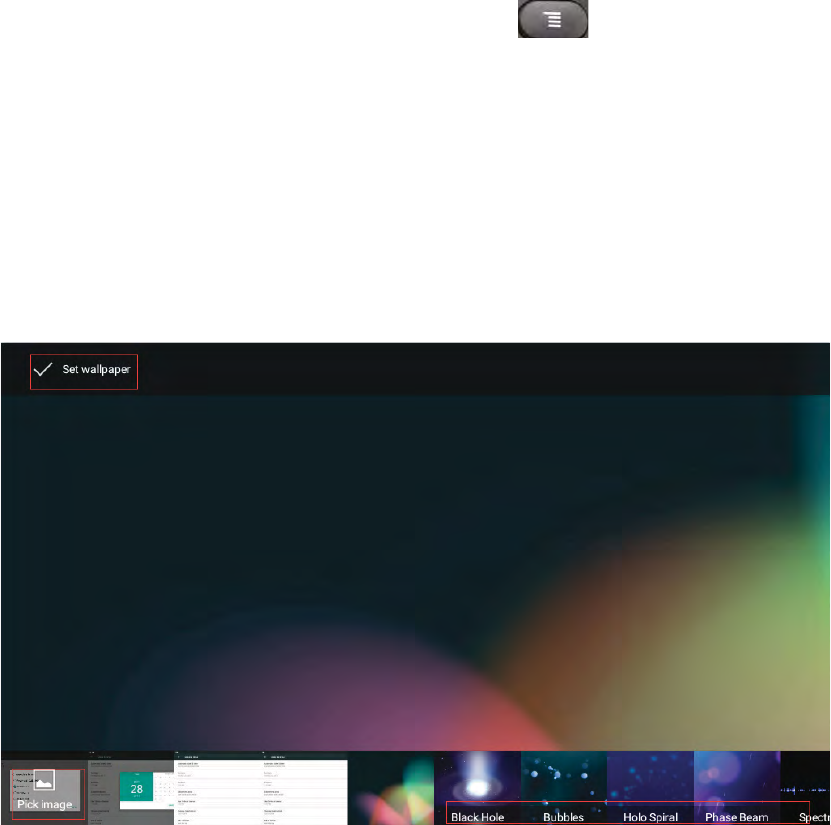
Usercanusethefollowingwaystosetthefavoritewallpaper.
Mode 1: In the main screen, Press Menu button on the keyboard> tap
WALLPAPERSicon.
Mode 2: In the main screen, touch and hold on the blank part of desktop> tap
WALLPAPERSicon.
On the bottom of the screen displayed the default wallpapers, tap Pick image can
enter the gallery to select the picture. Click the Set wallpaper to save the change.
Configurationinterfaceshownasbelow.
4.13.2 Widgets
Widgetscanbeconvenientforuseruse,usercanselectfromtheavailableoptions.

45
4.13.2.1 AddAWidget
Usercanusethefollowingwaystoaddthewidgets.
Mode1:Inthemainscreen,PressMenubutton onthekeyboard>tapthe
WIDGETSicon.
Mode 2: In the main screen, touch and hold on the blank part of desktop> tap
WIDGETSicon.
Each widget hasindicated thename andthe location,touch and hold to pick up
awidget,moveittothedesignatedlocationonthedesktop,thenmovefingersaway
fromthescreen.Slideright/lefttochangetheextendedscreen.Shownasbelow.
4.13.2.2 ModifyAnAddedWidget
Ifuserwanttomodifythelocationofaddedwidgetsonthedesktop,touchandhold
thewidgetuntiltheicon appearsontheupperleftcornerofthescreen,drag
thewidgettothecorrespondingpositionofthedesktop.
If user want to change the space size of added widgets on the desktop, touch and
holdthewidgetuntiltheicon appearsontheupperleftcornerofthescreen,
thenmovefingersawayfromthescreen,thewidgetwillappearframeborder.User
46
cancontrolthewhitepointtodragthebordertochangethesizeofthewidgetframe.
And then only need to press Back button on the keyboard to save the change. As
shownbelow:
4.13.2.3 DeleteAWidget
Touchandhold the widget until theicon appearsontheupper left cornerof
the screen, drag the widget to location until the widget turn red, then move
fingersawaytodeletethewidget.
4.13.3 Shortcuts
UsercanaddtheshortcutssuchasApplication,Webpagebookmarksandtheother
applicationstothemainscreendesktop.
4.13.3.1 AddAShortcut
In the main screen,clickicon ,touch and holda shortcut, put it to the
designatedlocationonthedesktop,thenmovefingersawaythemainscreen.
47
4.13.3.2 ModifyAShortcut
Ifuserwanttomodifythelocationofshortcutonthedesktop,holdtheshortcutuntil
the icon appears on the upper left corner of the screen, you can drag the
shortcuttothecorrespondingpositionofthedesktop.
4.13.3.3 DeleteAShortcut
Touchandholdtheshortcutuntiltheicon appearsontheupperleftcornerof
thescreen,dragtheshortcutto locationuntiltheshortcutturnred,thenmove
fingersawaytodeletetheshortcut.
4.13.4 ModifyExtendedBar
usercanmodifythequickstartprogramontheextendedbaratthe bottomofthe
screen.Thedefaultextendedbarasshownbelow:
In the main screen, hold the shortcut until the icon appearson theupper left
cornerofthescreen,dragtheshortcutto locationtodeletetheshortcut.Also
canreplacethedefaultshortcutwithanothershortcut.
4.13.5 Ringtone
User can select the ringtone provided by phone default, can download music from
theInternet,andthensetthefavoritemusicasaringtone.
If user choose the ringtone provided by phone default, please refer to Sound &

48
notificationsettings.
IfuserchoosethemusicdownloadedfromtheInternetasaringtone,pleasefollow
thebelowsteps:
1) Click >Musicicon .
2) ViewthemusiclistinApp,touchandholdamusic,andthenInthepopupmenu
options,clickUseasphoneringtone.
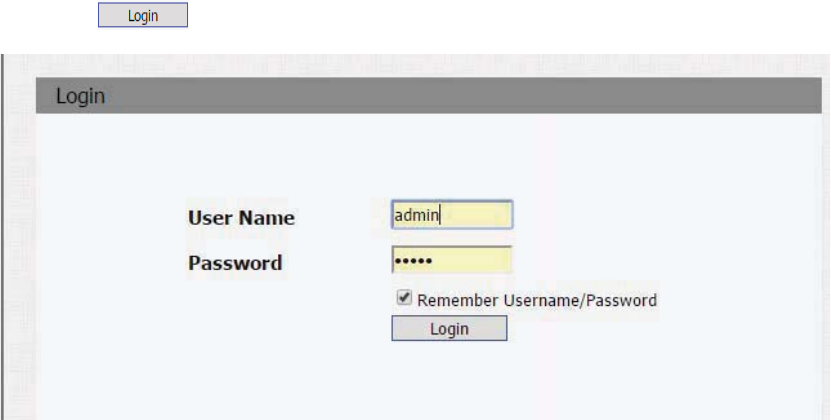
4.14 Backup&Reset
1) ClickSetting .
2) Personal>TapBackup&reset.
3) Personaldata>clickFactorydatareset.
4) CheckEraseSDcard>clickRESETDEVICElabel>tapERASEEVERYTHINGlabel.

49
5 Function
5.1 CallFunction
R48G phone supports audio calls and video calls. User can use the SIP account to
make a call, also can use IP direct make a call. SIP account configuration refers to
chapter4.3
5.1.1 MakeACall
User can directly dial from the keypad, select from the contact list or from call
recordstocalloutthenumber.
Usercanchooseoneofthefollowingstepstoenterintothedialinginterface.
Mode1:Directlypickupthehandset.
Mode2:PressSpeakerbuttononthekeypad.
Mode3:Inthemainscreen,Clickicon .
Mode4:Inthemainscreen,selecticon >tapicon .
5.1.1.1 DialOutDirectly
1) By pressing the number keys on the dial interface or directly pressing the
numberonkeypad.Todeleteanumber,presstheicon onthedialinterface,
orpressDeletebuttononthekeypad.
2) Ifyouwanttomakeanaudiocall,clickAudioCalllabel.Ifuserswanttomakea
videocall,clickVideoCalllabel.
Dialinginterfaceisshownasbelow:
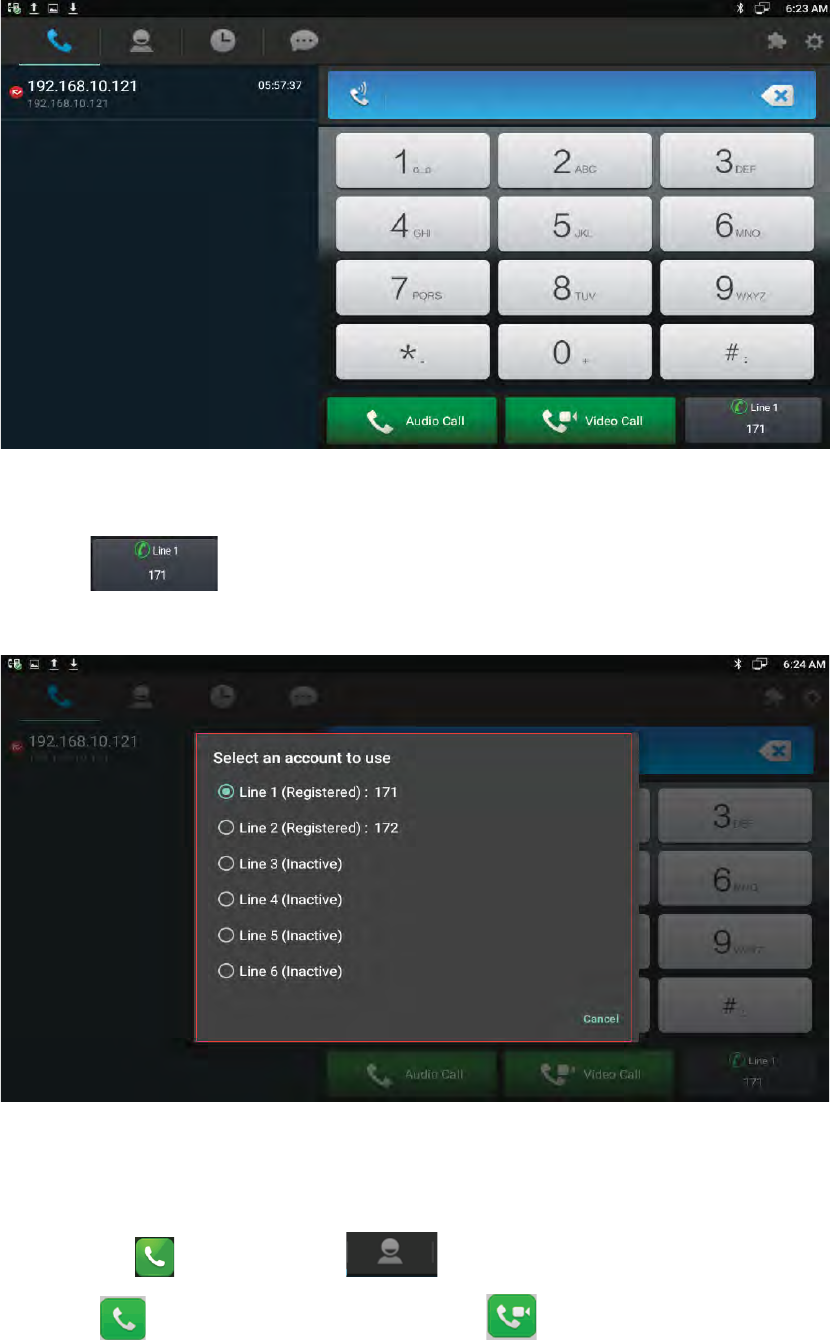
50
3) IfregisteredmultipleavailableSIPaccounts,whenfinishingdialing,usercanclick
line label to choose the outgoing account for the number, as
shownbelow.
5.1.2 DialingOutFromContactList
1) Tapicon >Clicktheicon >LabelPhoneBook>AllContacts.
2) Click labeltomakeanaudiocall,click labeltomakeavideocall,or
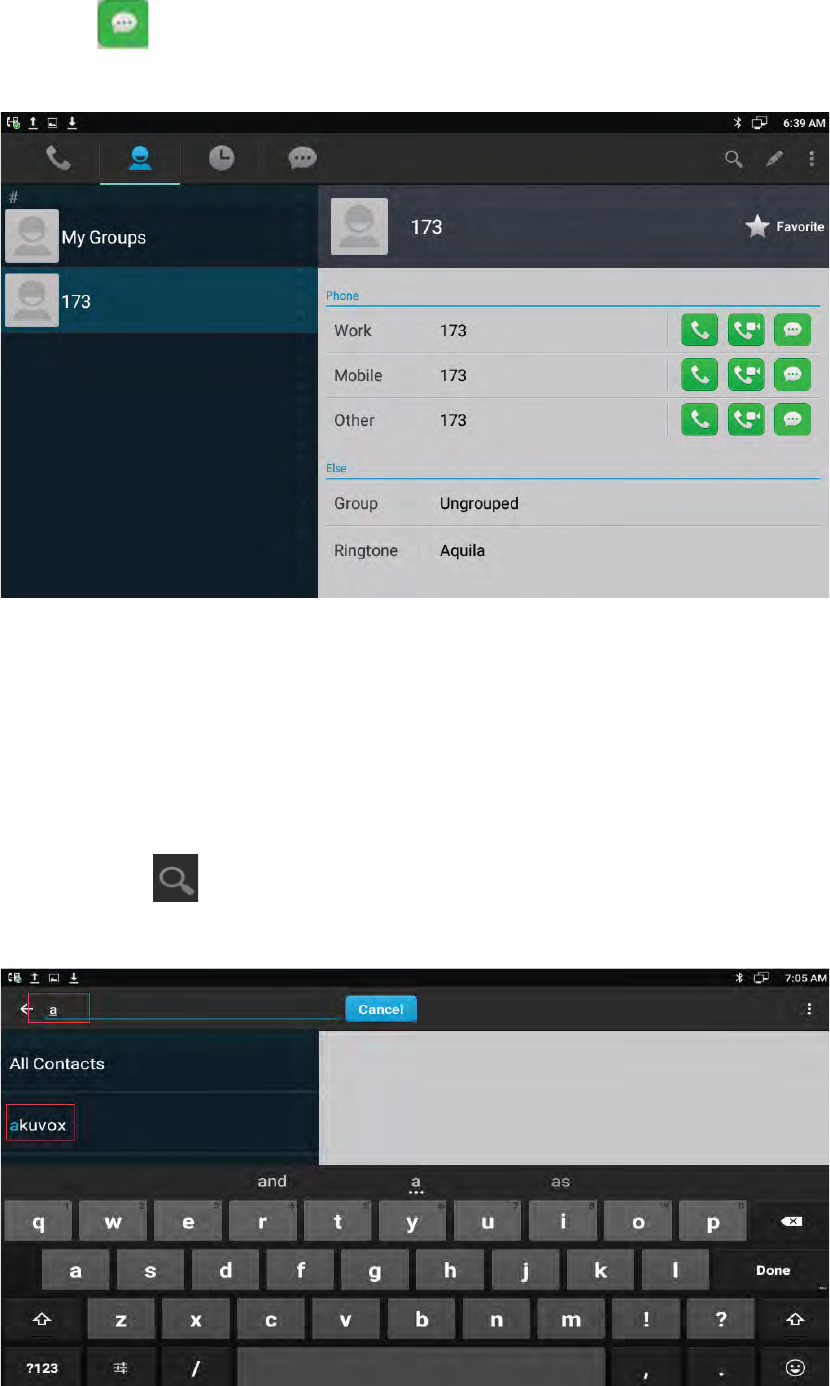
51
click labeltosendthemessage.
Contactisshownasbelowġ
5.1.2.1 ContactsFuzzyMatchingQuery
Phonesupportscontactsfuzzymatchingqueried,intuitive,concisedialinginterface
for the intelligent input, greatly reducing the number of buttons, achieve rapid,
effectivepositioningsearch,avoidduplicationofinvalidoperation,savingtime.
Tapsearchicon toenterthesearchinterface.Enterthekeysymbolornumber
tosearchthecontact.Theresultwillbedisplayedontheleftlist.Shownasbelow.
52
5.1.3 ReceiveACall
Incoming calls include audio and video calls. If the caller has been stored in the
contacts, it will show the contact name, otherwise the caller number will be
displayed.
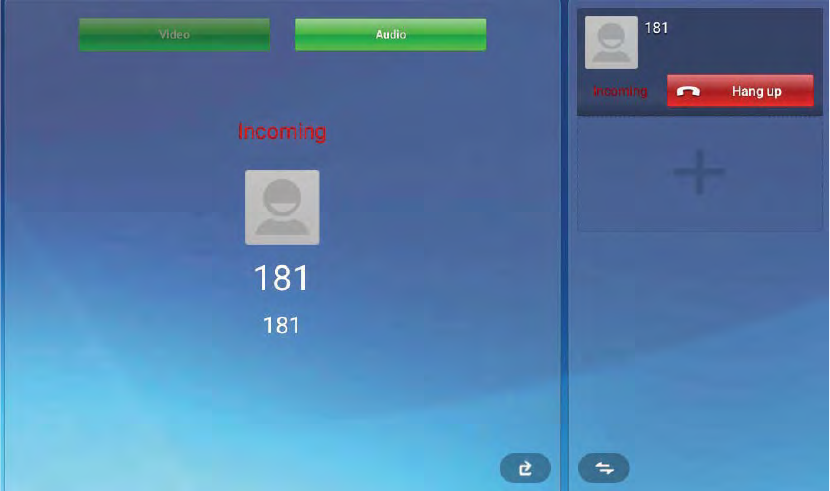
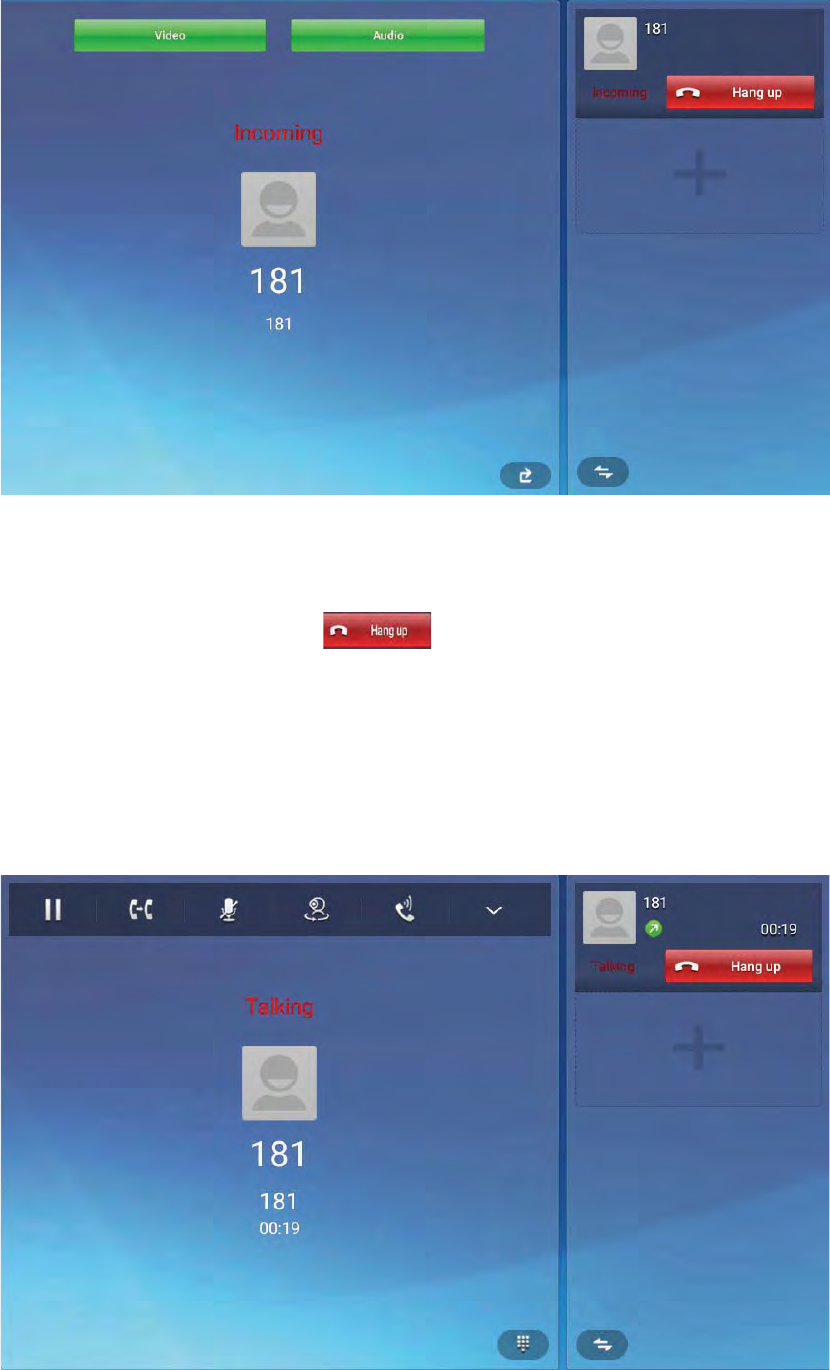
5.1.3.1 AnswerACall
1) Answeranaudiocall
When receiving an audio call, click Audio label or pick up the handset or press
speakerbuttononthekeypadtoanswer.Asshownbelowġ
2) Answeravideocall
Whenreceivinganvideocall,clickAudiolabeltoestablishtheaudiocall,clickVideo
labeltoestablishthevideocall.Asshownbelowġ
53
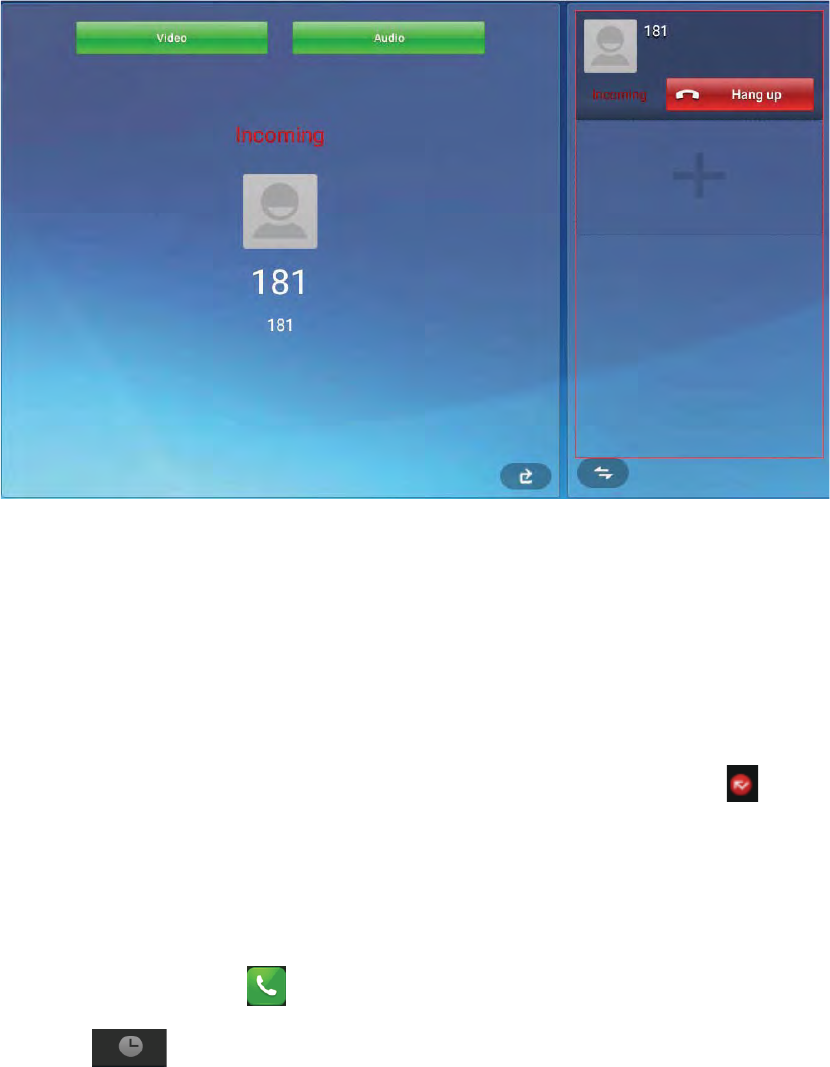
5.1.3.2 RejectACall
Ifuserwanttorejectacall,click labelincallinginterface.
Ifuserwanttorejectacallfromanumber,youcanaddthenumbertotheblacklist.
5.1.4 CallOptions
During the audio conversation, the default call options shown as below.

54
Calloptionsaredescribedasbelow.
Clickthebuttontoholdthecurrentcall.
Clickthebuttontoresumethecurrentcall.
Clickthebuttontoentertheestablishtransferinterface
Clickthebuttontomute
Clickthebuttontoresumemute
Clickthebuttontosendavideorequest/closethevideo
Handsetmode
Speakermode
Headsetmode
Clickthebuttontoopentheextendedicons
Clickthebuttontoclosetheextendedicons
Clickthebuttontoentertheestablishconferenceinterface
Clickthebuttontostartrecord
Clickthebuttontostoprecord
Duringtheaudioconversation,thedefaultcalloptionsshownasbelow.
55
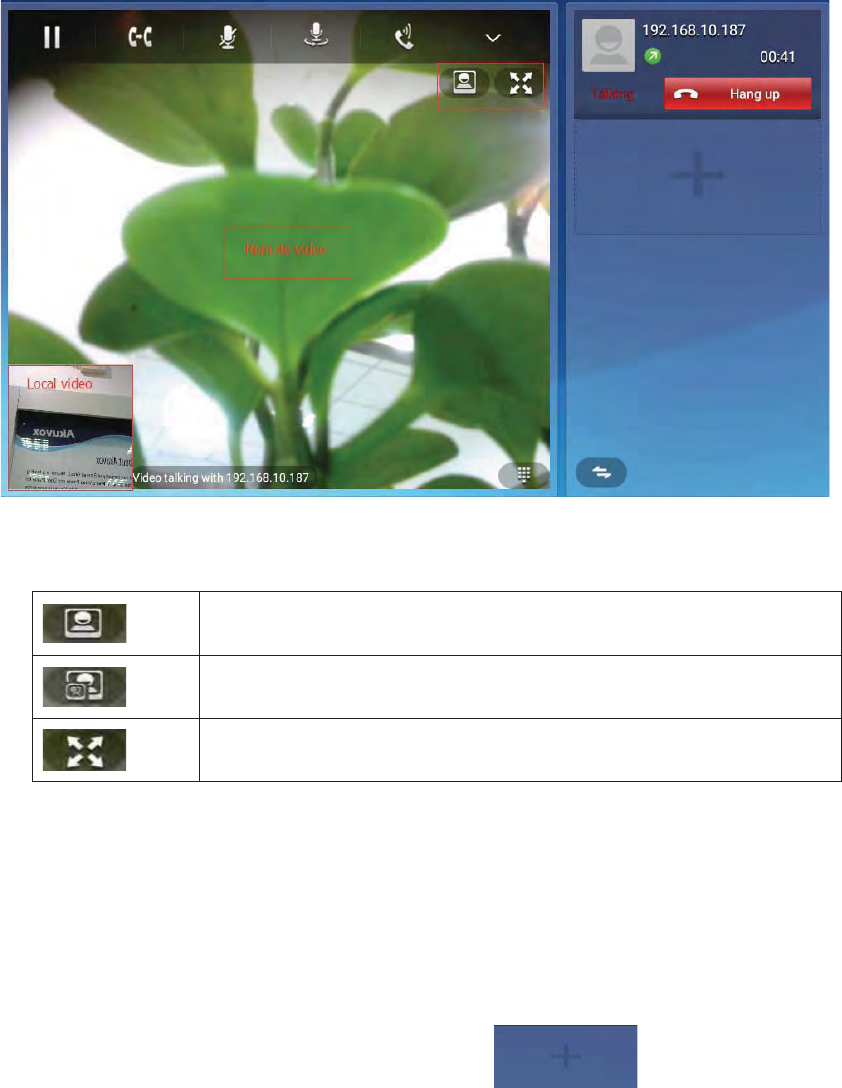
Videooptionsaredescribedasbelow.
Supportlocalandremotevideodisplayed
Supportremotevideodisplayed
Clicktoopenfullscreen/exitfullscreen
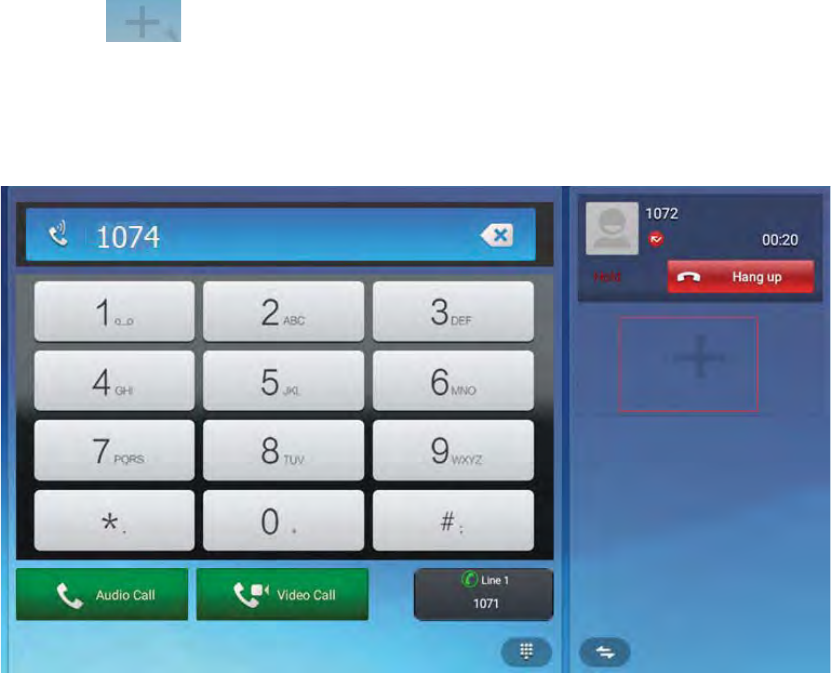
5.1.4.1 MultipleCalls
zThe Phone supports more than 3 line calls. The line information is on the
rightsideofcallinterface.
zDuring a call, user can click on the icon to add a new call.
Andwhenclickonthisbutton,thecurrentcallwillbehold.
zDuringacall,usercanclickonanylineinthelisttoresumethecall.
56
5.1.5 CallRecords
5.1.5.1 ViewCallRecords
When got a missed call, the screen will display the missed call notification in
above status bar. User can drag down to open the notification list, then click the
missedcallnotificationtoviewcallrecords.
Usercanalsodirectlythroughthedialinginterfacetoviewcallrecords:
1) Inthemainscreen,click
2) Clickicon .
Shownasbelow.
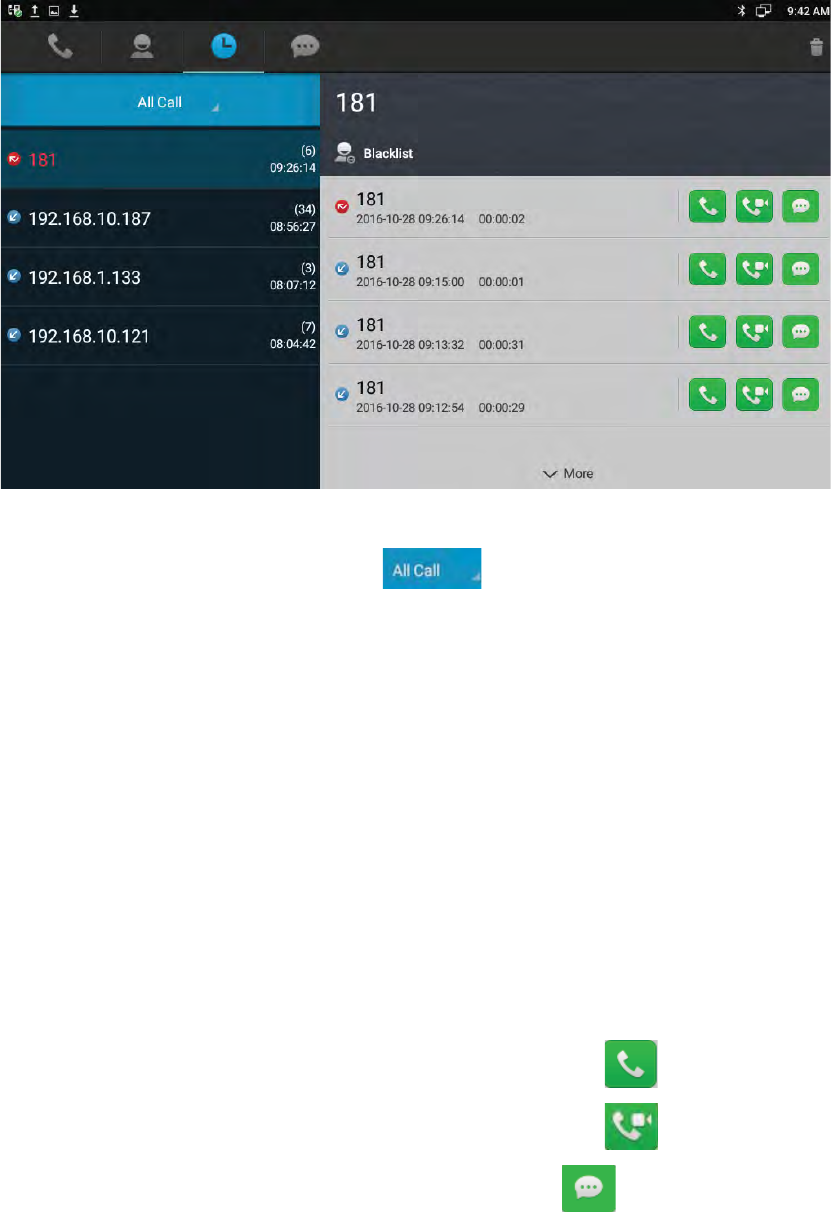
57
3) Usercanclickthedropdownlist tochoosethecallrecordtypes,it
supportsfor AllCall, Missed Call, ReceivedCall, DialedCalland Forwarded Call
fivetypesofcallinformation.
4) Call records are shown on the left. Click the number or contact, and user can
viewallthecallrecordsdetailsontheright.
5.1.5.2 CallFromCallRecords
InAllCall,MissedCall,ReceivedCall,DialedCallorForwardedCallinterface,usercan
Followingthebelowstepstoinitiateacall.
1) Clickacontactoranumberontheleftlist.
2) Ifyouwanttoinitiateanaudiocalldirectly,clicktheicon incallrecords.
3) Ifyouwanttoinitiateanaudiocalldirectly,clicktheicon incallrecords.
4) Ifyouwanttosendamessagedirectly,clicktheicon incallrecords.
5.1.5.3 DeleteCallRecords
z Todeleteonecallrecord,stepsasbelow:
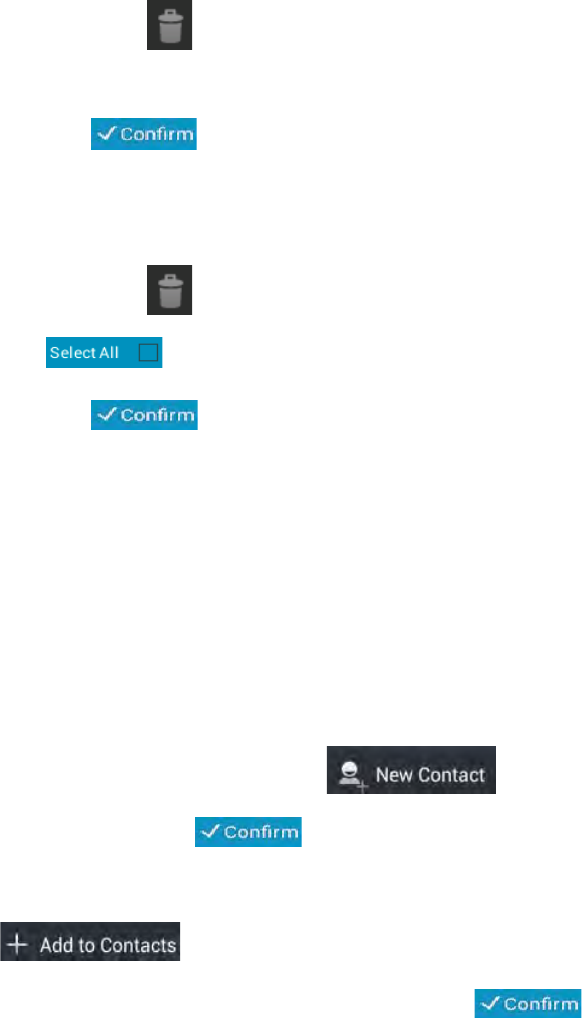
58
1) Longpressthecallrecordyouwanttodelete.
2) Popupamenu,pressConfirmlabeltoconfirmthedeletion.
zTodeletemultiplecallrecords,stepsasbelow:
1) Presstheicon onthetoprightcornerofthescreen.
2) Checktherecordsontheleftlist.
3) Clickicon .
zTodeleteallcallrecords,stepsasbelow.
1) Presstheicon onthetoprightcornerofthescreen.
2) Tap onthebottomleftofthescreen.
3) Clickicon .
5.1.5.4 AddAContactFromCallRecords
Tosave a number from the call records,or merge the number into theexisting
contactnumberlist.Dothefollowingoperations.
1) Clickthenumberonthecallrecordslist.
2) Toaddanewcontact,clickicon ,anewcontacteditpagewill
popup. Clickicon .
3) To mergethe number into theexisting contact number list, click icon
, selecttheexistingcontactand thenclick Confirm label to
save.Willenterthecontacteditpage,clickicon .
59
5.2 Contacts
Following method to enter into Contacts interface. Enter the dialing interface, and
thenclicktheicon .
60
5.2.1 LocalPhoneBook
Usercanview,audiocall,videocall,add,edit,deletetheLocalcontacts.
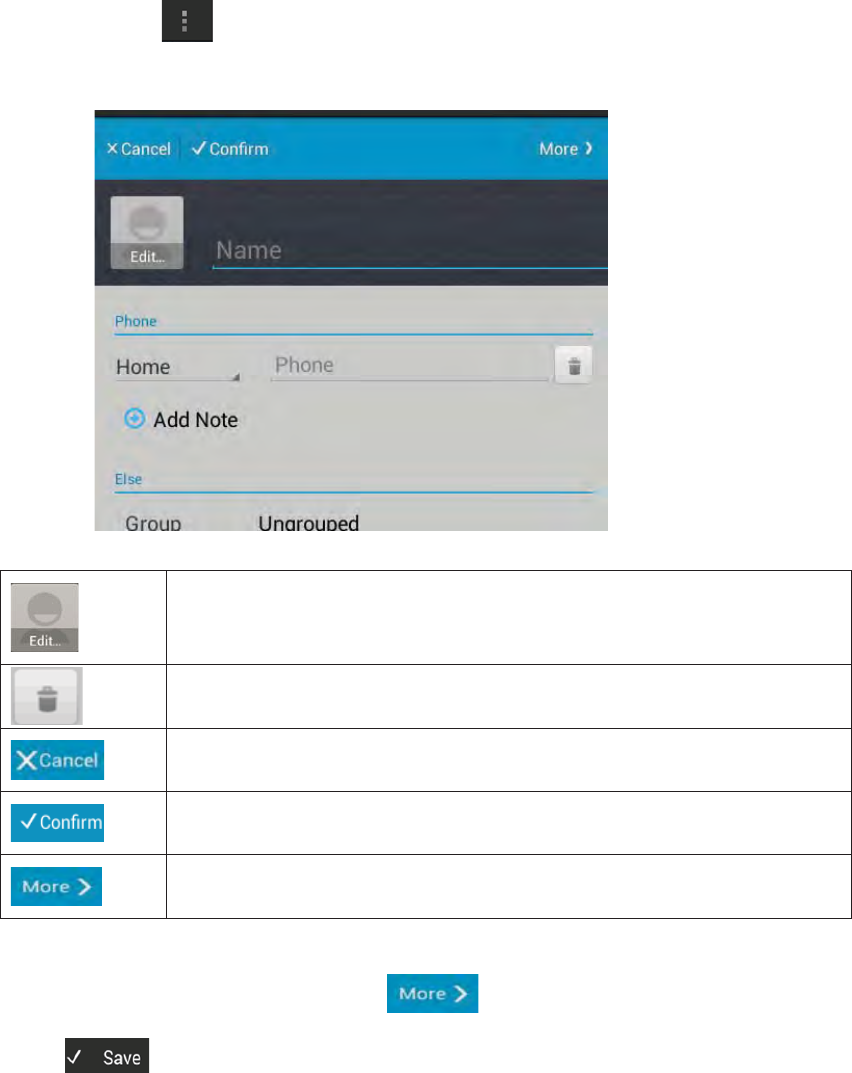
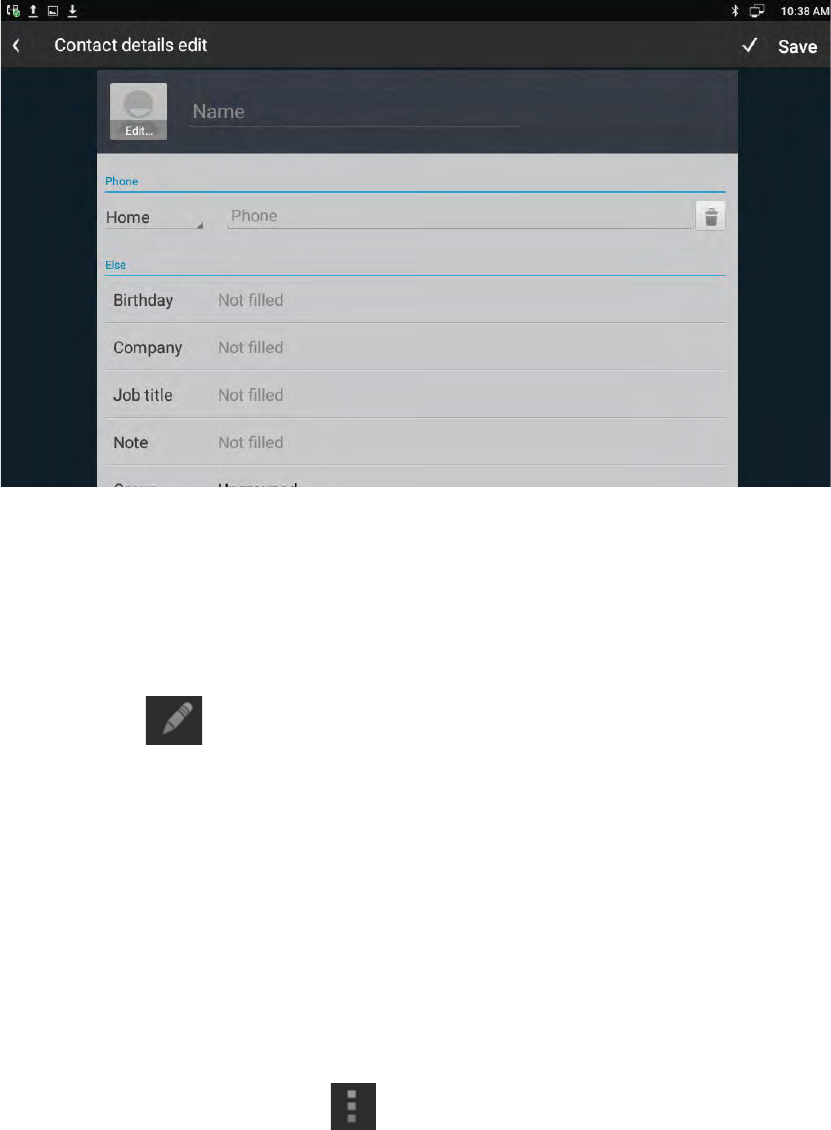
5.2.1.1 AddANewContact
Click the icon on the top right corner, and click New Contact label in the
dropdownwindow.Thenewcontactinterfaceisasshown:
Editthecontactphoto,Browsetheimagefrom“TakePhoto”or“Choose
photofromGallery”
Deletethenote
Canceltheedit
Savethemodify
Clickthelabelshowmoreinformationtoedit
Toaddsomemoreinformation,click ,popupthepageofcontactdetails,
click tosave.Asbelowshown.
61
5.2.1.2 ModifyTheContact
1) Selectthecontactneedtomodifyinthecontactlist.
2) Clickicon .
3) Enterintocontacteditpage,editthecontactinformation.
5.2.1.3 DeleteTheContact
Followingmethodstodeletethecontacts.
zTouch and hold the contact need to delete from contact list, and tap Confirm
labelinthepopupRemoveContactdialogbox.
zSelect the contact, click icon , select Remove label, check the contact and
clickConfirmlabeltodelete.
5.2.2 BroadsoftPhoneBook
To setup Broadsoft contact. For Broadsoft PhoneBook’s server address, port,
username and password, user need to consult the Broadsoft service provider for
62
furtherinformation.
5.2.3 RemotePhoneBook
Accesstheremotephonebook,addthecontactstothelocalphonebookfromthe
remotephonebookormakecallsfromtheremotephonebook.5URLsofremote
phonebookisavailabletoset.
zSettheremotephonebookviawebinterface.
1) AccessPhoneBook>RemotePhoneBook.
2) InputURLofphonebook.
3) Inputthephonebookname.
4) ClicktheSubmitkeytosave.
zEntertheremotephonebookviaphoneinterface.
1) Accesscontactsettinginterface>clickRemotephonebook.
2) SelecttherelevantRemoteGroupandpresstheEntersoftkey.Thephonewill
loadtheremotegroupinformation,andtheLCDwilldisplaythecontactsofthis
remotegroup.
5.2.4 LDAP
TosetupLDAPcontact.ItoftenuseOpenLDAPservertogetthecontact.Forsetting
details,pleaseconsultwithyoursystemadministratorforfurtherinformation.
5.2.5 Group
Group, it will be convenient for you to have contact group management. Contacts
shouldatleastbelongtoagroup,thedefaultisnogroup.

63
5.2.5.1 AddANewGroup
1) Access contact setting interface> Local Phone Book> tap icon on the
upperrightofthescreen.SelectNewGrouplabel.
2) Inputanewgroupnameinpopupdialogbox.
3) ClickConfirmlabeltosave.Thegroupwillbedisplayedontheleftlist.
5.2.5.2 RenameAGroup
1) Clickthegroupwanttorename>clickicon toentereditpage.
2) Inputthenewnamedirectly.
3) ClickConfirmlabeltosave.
5.2.5.3 RemoveAGroup
1) Touchandholdthegroup>clickConfirmlabelinpopupdialogbox.
(Note
ġ
thesystemdefaultgroupcannotbedeleted)
5.2.5.4 EditAGroup
1) Clickthegrouptoentereditpage.
2) Click Edit Member>check the member> tap Confirm label to delete, or touch
andholdtheexistedmember,itwillpopupaprompttodeletethemember.
5.3 BLF
Busy Lamp Field (BLF) is used to monitor a specific user for status changes on IP
phones. For example, user can configure a BLF key on a supervisor’s phone to
monitorthephoneuserstatus(busyoridle).Whenthemonitoreduserplacesacall,
abusyindicatoronthesupervisor’sphoneindicatesthattheuser’sphoneisinuse.
Enterthedialinterface,clickBLFbutton.
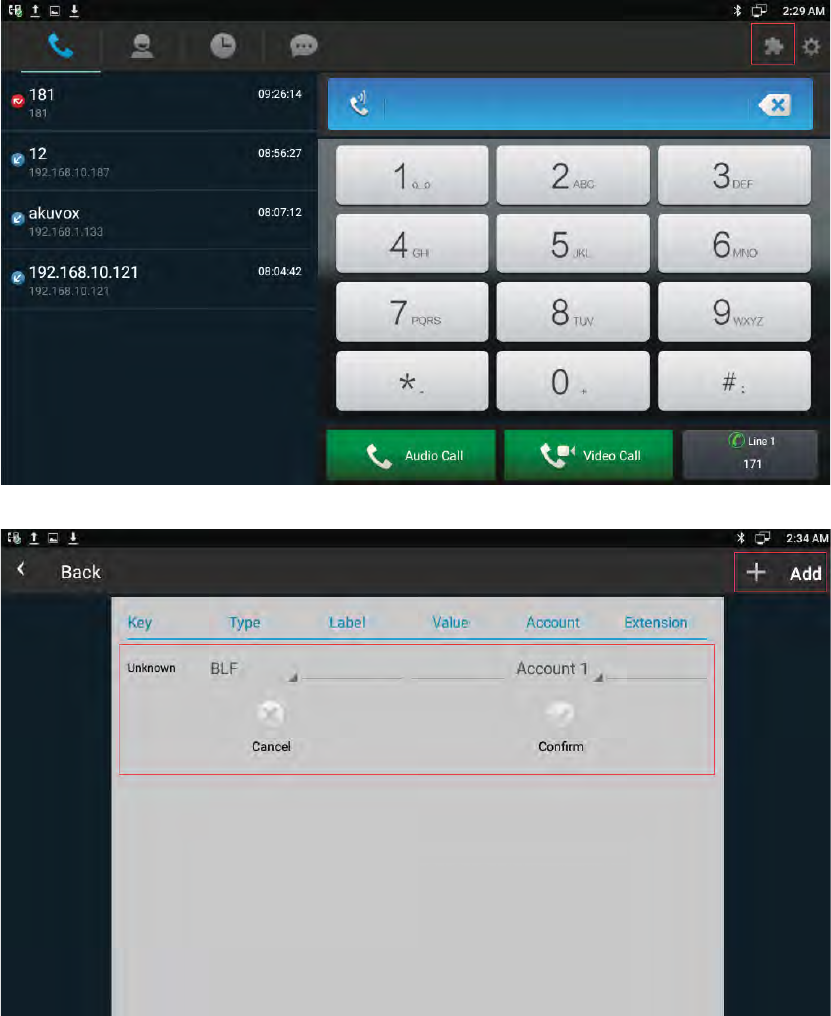
64
Note
ġ
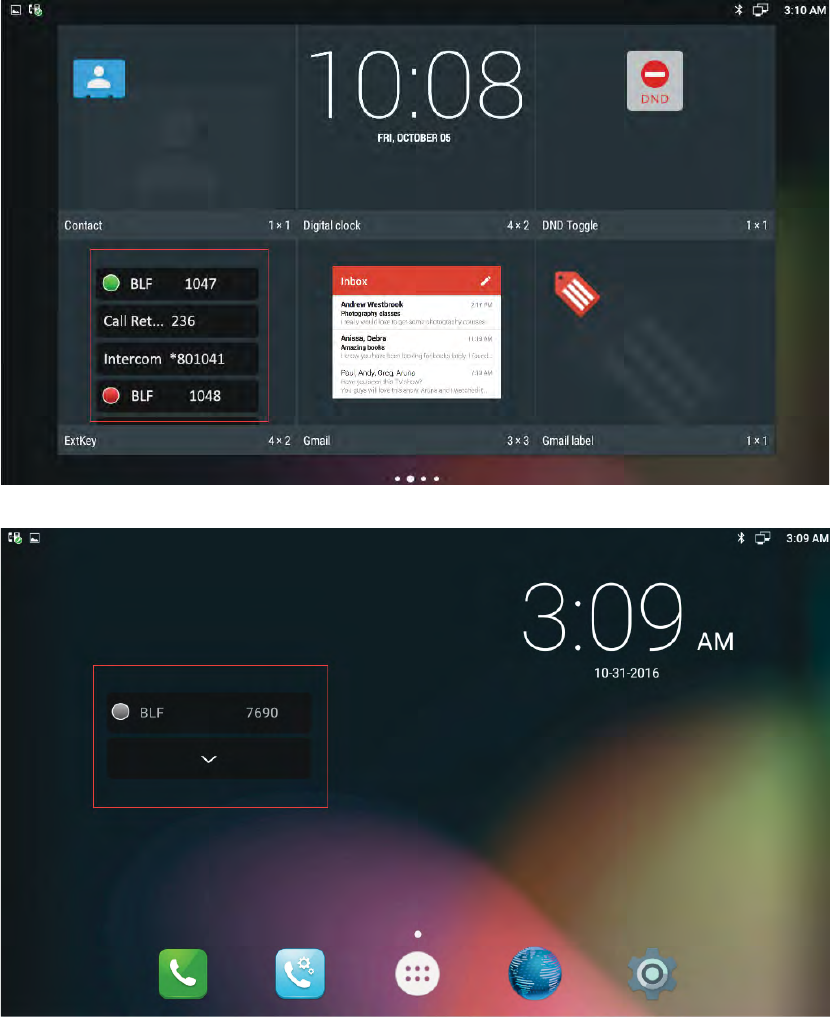
AfterfinishBLFKeyconfiguration,dragExtKeyfromtheWIDGETStothemain
interface.Asshownbelow.
65
5.4 Intercom
SelectTypeasIntercom,enterintercomcodeinValue.Choosetheavailedaccount.
ToclickConfirmtosave.
Note:DifferentSIPserverhasdifferentcodes.
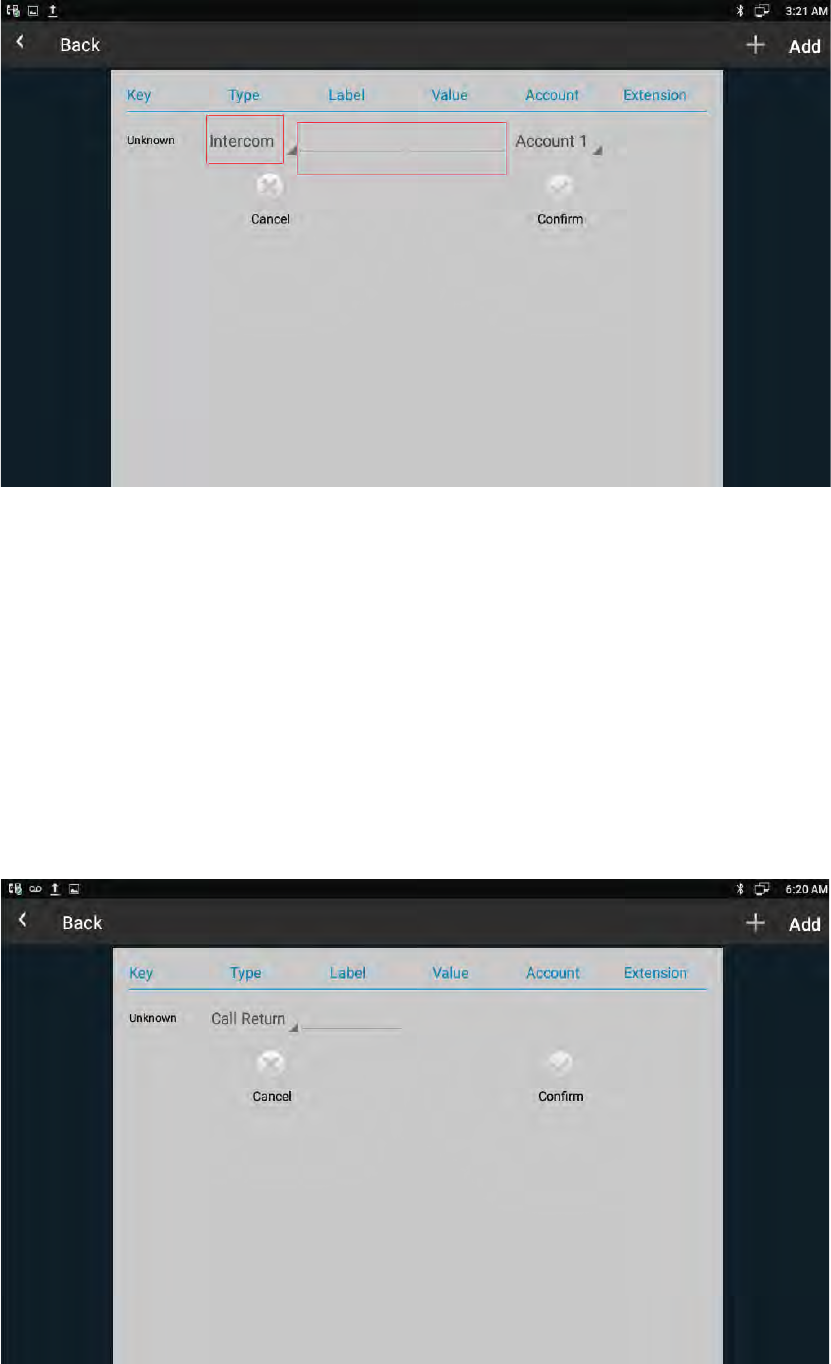
66
1. PresstheIntercomkeywhenthephoneisavailable.Thephonewillconnectthe
extensionnumberofremoteuserautomatically.
2. The phone enable silent mode when picking up the intercom call so that the
otherwillnothearyou.
5.5 CallReturn
Thisfunctioncanbeusedtocallthelatestdialedcallrecordautomatically.
67
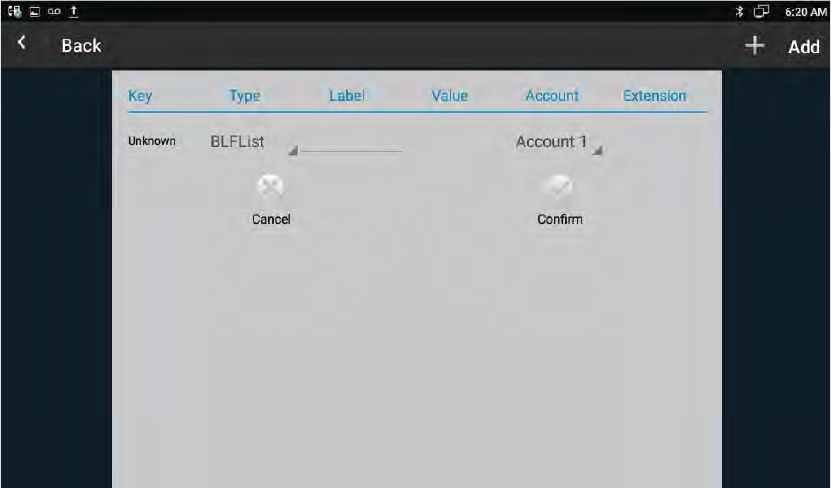
5.6 BLFList
BLFList
˖
WhileusingBroadSoftplatform,theaccountswhicharemonitoredbythe
sipphonewillreplythesubscribenewsintheformofxmllisttoimproveefficiency.
BLFListCode
˖
WhileusingBroadSoftplatform,configuretheBLFLISTCODEˈcanPick
upcallorBargeincall.
Note: BLFListCode is supported by Broadsoft platform, Please consult your
administratorfurtherinformation.
5.7 Pickup&GroupPickup
Usercanuse pickuptoanswerotherusers’incomingcall. Thephone Akuvox R48G
supportsspecifiedpickupandgrouppickup.
zSpecifiedpickup
Specified pickup can answer specified user’s incoming calls. When the user of
specified pickup number is off or busy, user can press the pickup key to answer
incomingcallinsteadofthespecifiednumber.
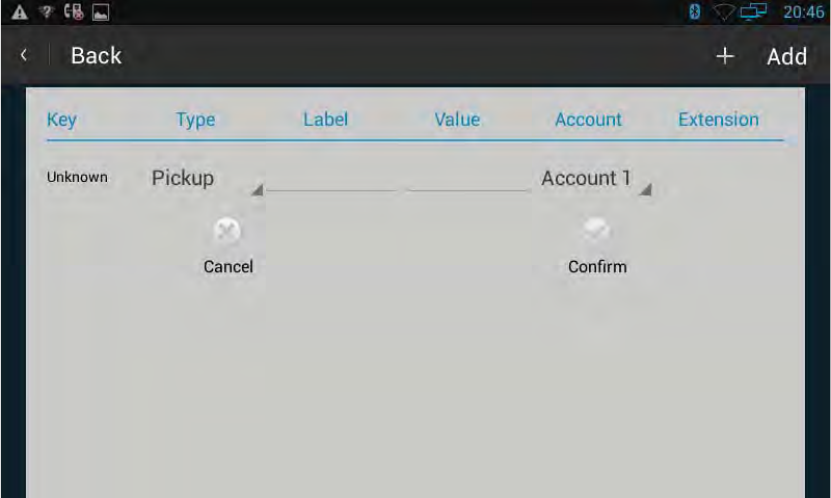
68
zGrouppickup
Group pickup can answer group’s user incoming calls. When anyone in group
receivesanincomingcall,usercanpressthegrouppickupkeytoanswer.
Note:Pressthe grouppickuponlytoanswerline 1incomingcallif therearemany
linesincomingcallsingroup.
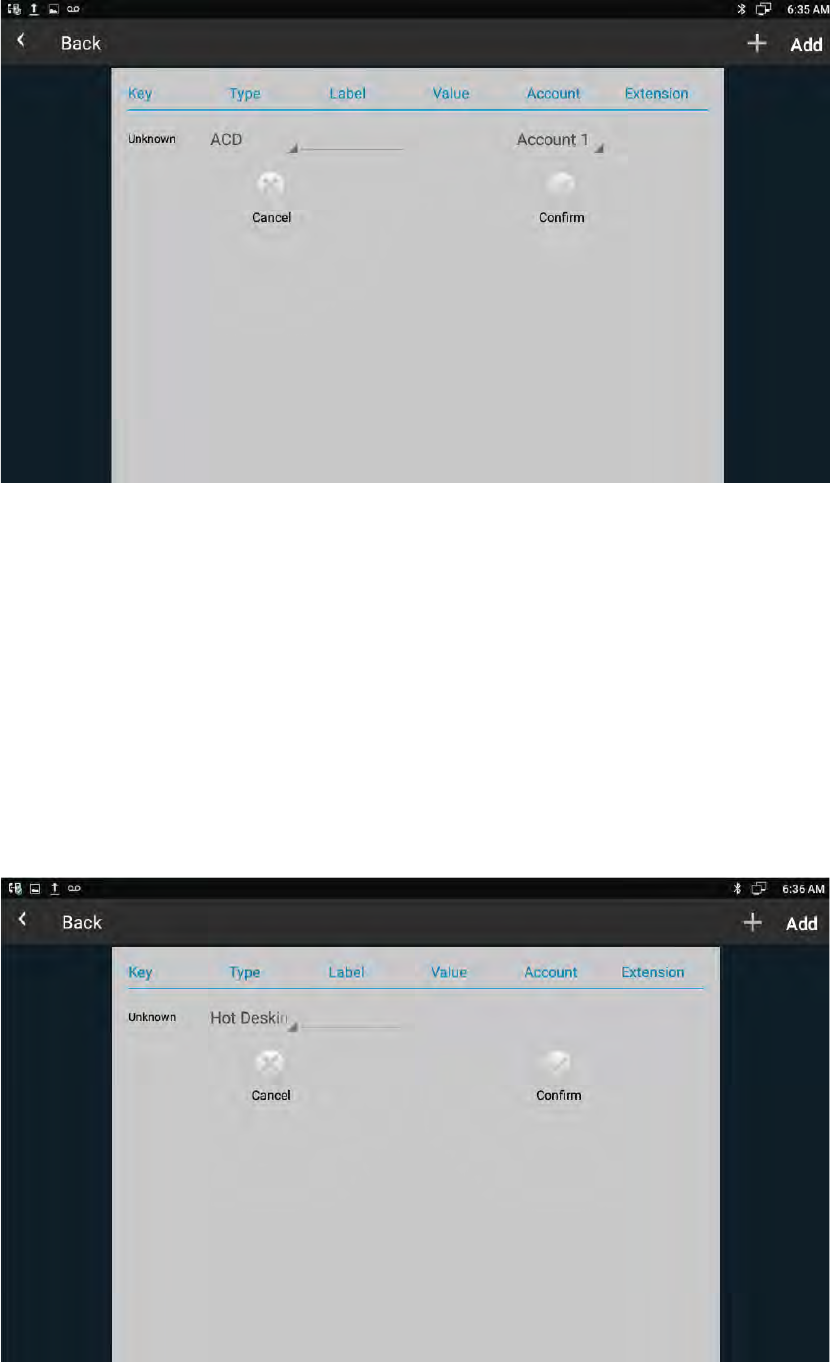
5.8 ACD
AutomaticCallDistribution(ACD)enablesorganizationstomanagealargenumberof
phonecallsonanindividualbasis.ACDenablestheuseofIPphonesinacallcenter
role by automatically distributing incoming calls to available users, or agents. ACD
dependsonsupportfromaSIPserver.ACDisdisabledonthephonebydefault.User
needtoenableitonaperlinebasisbeforeloggingintotheACDsystem.
69
5.9 HotDesking
In some working place, the people are always walking around. HotDesking feature
will make the staffs login his account on any computer in the company. In some
publicplaces,theworkingpeopleisnotfixed,anyonecanuseHotDeskingforlogging
his account, and setting the phones to the familiar mode, such as the remote
functionofthecomputer.
70
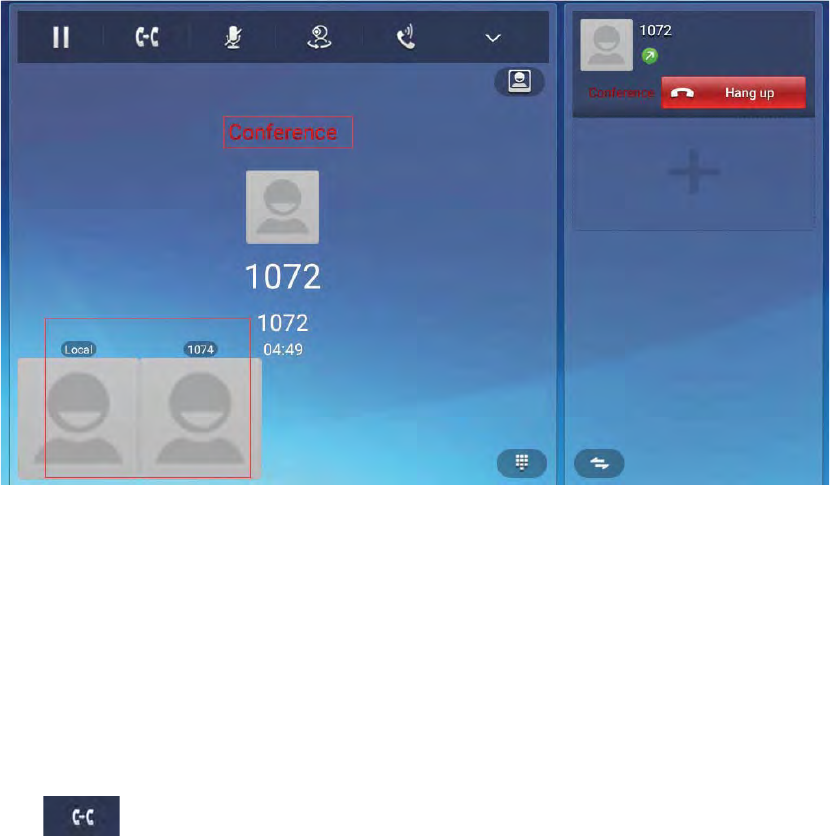
5.10 Conference
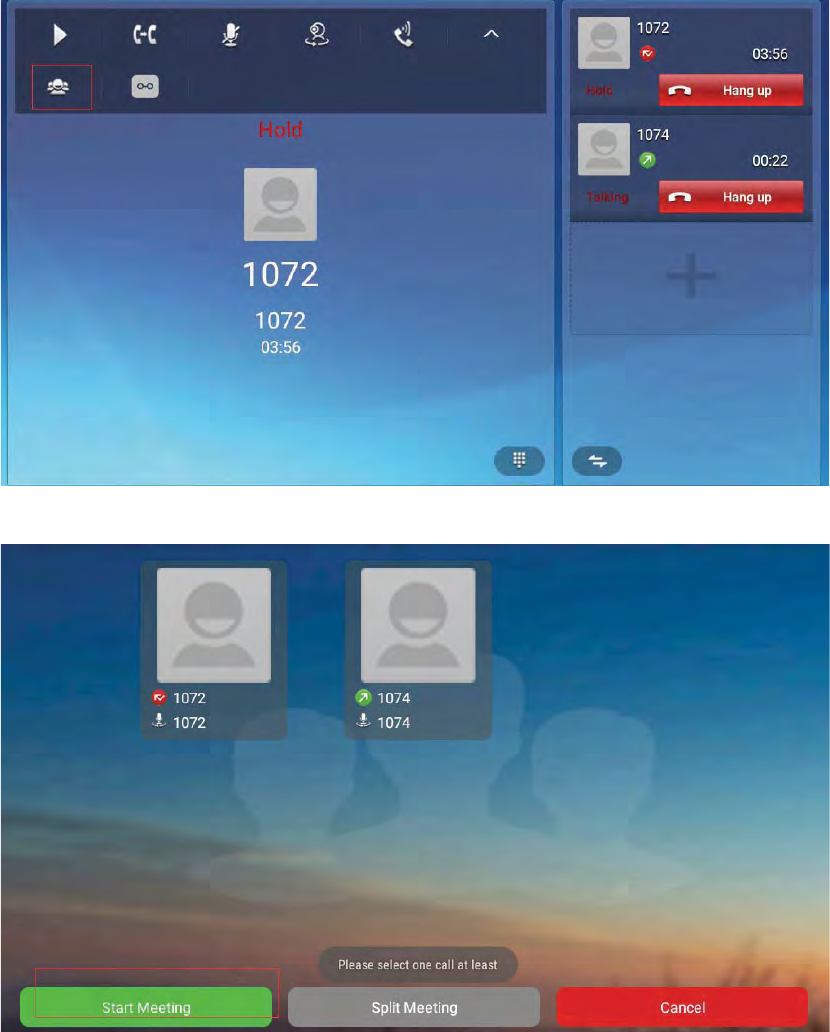
User can use the conference feature to hold a 3way conference by pressing the
Conferencesoftkeytoinvitethecurrenttalkingandonelinetalkingheldtoattend
conference.
5.10.1Create3wayconference
1. Createtalkingwithfirstparty;
2. Press tocreateanewtalking;
3. InputthenumberofsecondpartyandpresstheVideoCallorAuidoCalltomake
acall;
4. When the second party answers the call, press the Conference softkey or the
Conferencekeyonthekeypadtostart3wayconference.
71
72
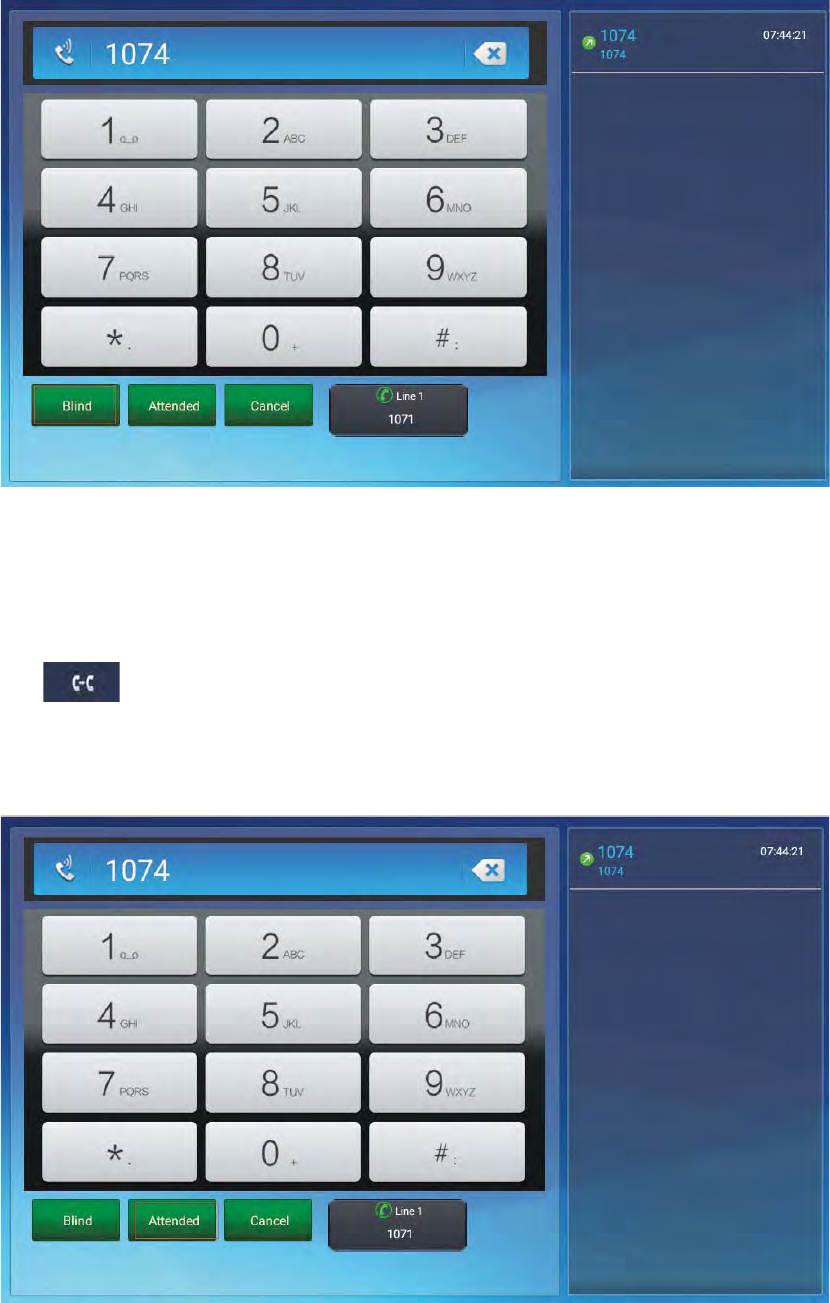
5.11 Transfer
5.11.1BlindTransfer
WhentheIPphoneblindtransfersacall.
1. During the first way conversation, press transfer key on the keypad or click
entertheconfigurationinterface.
2. Enterthetransfernumber,thenclickBlindlabeltotransferthenumber.
Configurationinterfaceshownasbelow.
73
5.11.2AttendedTransfer
1. During the first way conversation, press transfer key on the keypad or click
entertheconfigurationintserface.
2. Enterthetransfernumber,thenclickAttendedlabeltotransferthenumber.
Configurationinterfaceshownasbelow.

74
3. Whenthethirdpartyanswered,press tocomfirmthetransfer.Shown
asbelow.
5.12 KeypadInput
Onlynumbers,*and#canbeinputbykeypad.ThedefaultInputmethodisAndroid
keyboard.Usercanalsodownloadthepreferredinputmethodfromtheinternet.
5.13 WebpageBrowser
Thissectiondescribesthedefaultwebbrowserinthevideophone,andusercanalso
downloadthepreferredbrowserthroughtheinternet.
Usercanuseoneofthefollowingmethodstorunthebrowser:
zMode1:Inthemainscreen,click .
zMode2:Inthemainscreen,click > .
75
5.13.1 OpenTheWebpage
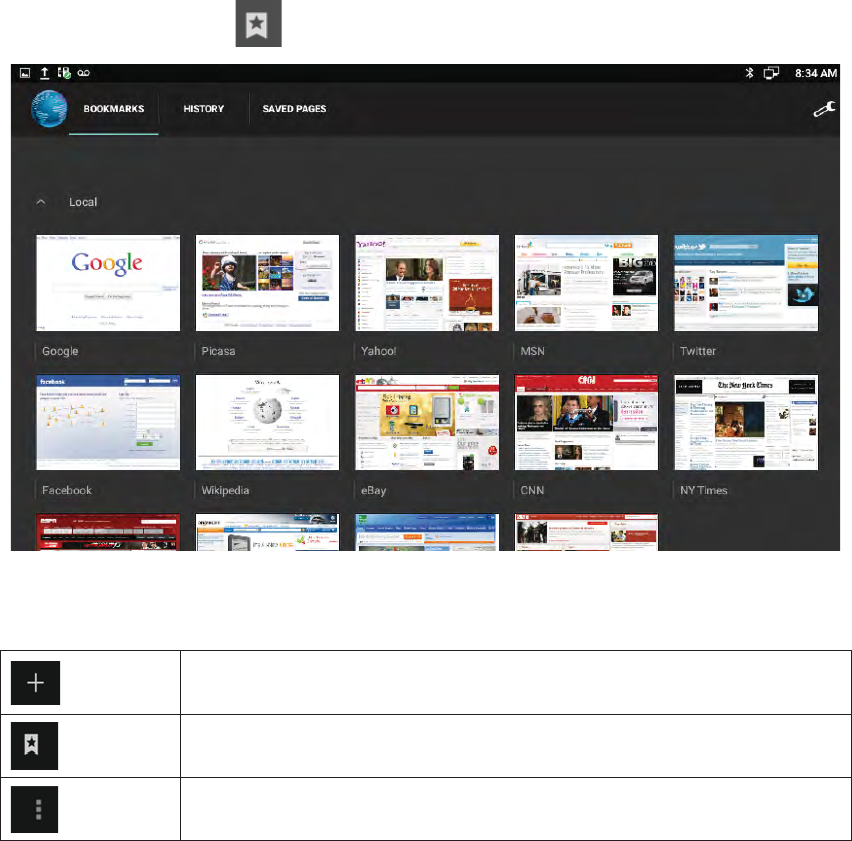
5.13.1.1 BrowserAddressBar
Runthebrowser,entertheURLintheaddressbarordirectinputtheinformationto
search.Aftertheinput,usercanclick“Go”onthesoftkeyboardtocomplete.
5.13.1.2 BookmarkAndBrowsingHistory
Runthebrowser,click toviewthebookmark&history&savedpages.
Icondescriptionshownasbelow.
Addanewwebpage
Viewthebookmarkandbrowsinghistory
Others
76
5.14 Camera
1. Inthemainscreen,click > .
2. Sliderightonthescreen,viewthephotosandvideosin“Gallery”.
5.14.1 PhotographMode
Turnonthecamera,andthedefaultmodeisphotographmode.
5.14.1.1 BasicSetting
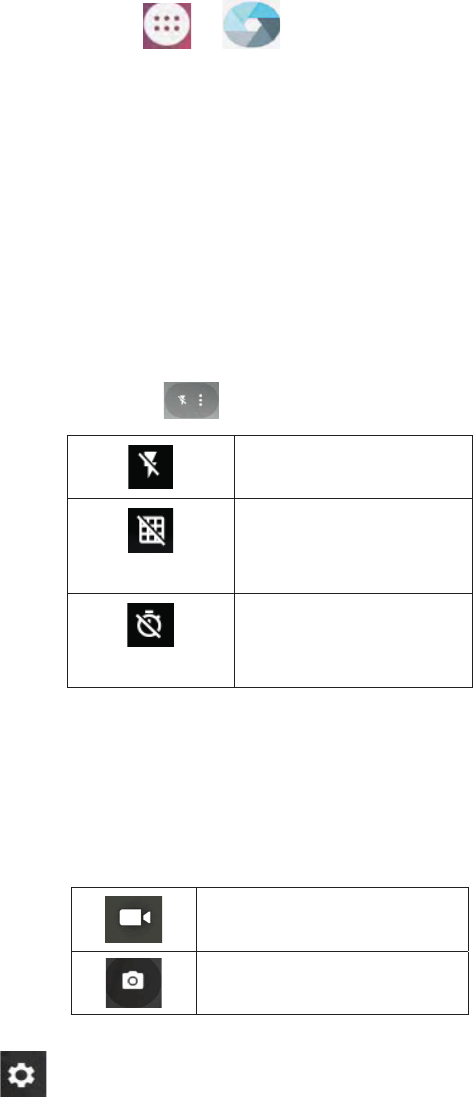
Clickontherightuppercorner popupthemenuontherightlist.
nonsupport
Clicktoenable/disable
thereferencegrid
Clicktosetthedelay
shuttertotakephotos
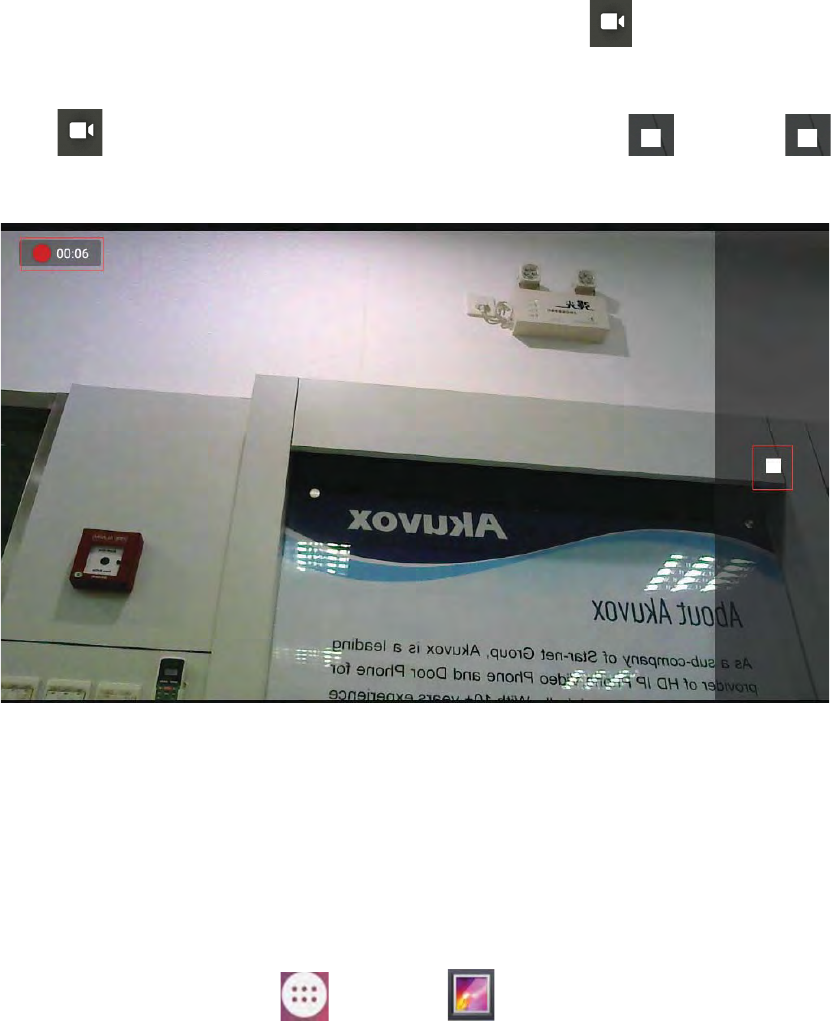
5.14.1.2 ModeSwitch
Sliderightonthescreentoswitchthemode.
Videomode
Photomode
Clickicon ontherightuppercornertoentertherelatedparameterssetting
interface.
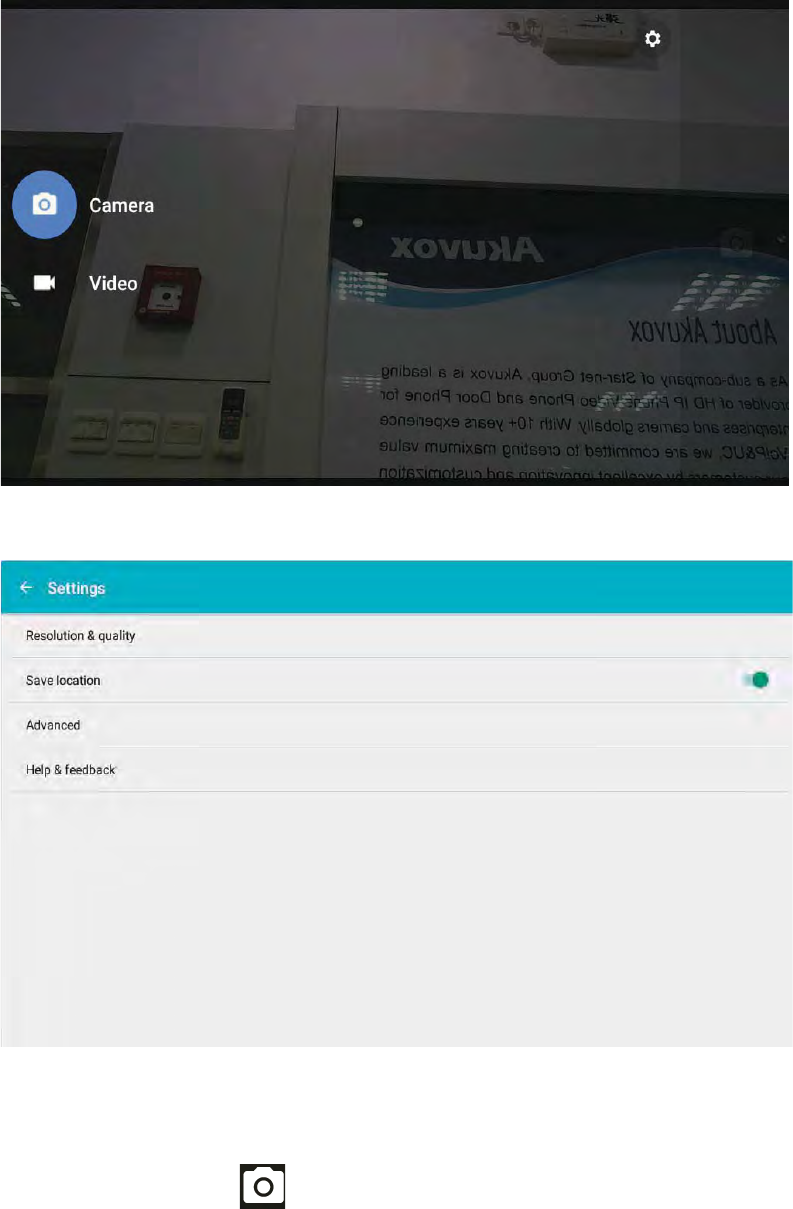
77
User can enter to set the resolution & quality to set the camera & video
parameter.
5.14.1.3 TakeAPhotograph
User canclick the button on the right sideto take pictures. Ifuser want
toadjust the focal length, usetwo fingers topress on the
screen,shrinkageorexpansiontoadjustthefocallength.
78
5.14.1.4 TakeAVideo
Slide right on the screen to switch the mode. Click icon to switch to video
mode.
Click ontherightside,videostartswhentheiconturnsto .Andclick
tostopthevideorecordingandsave.Shownasbelow.
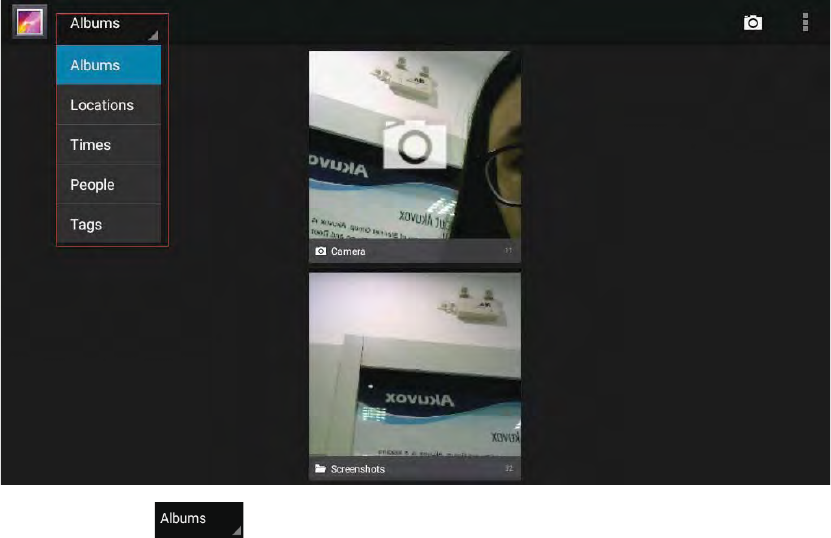
5.15 Gallery
User can use Gallery toview photosor videos, and user can also view the picture
orvideodownloadedfromtheInternet.usercaneditthephotoorpictureandsetit
aswallpaper.
Inthemainscreen,clickicon >clickicon .
5.15.1 ViewPhoto&Picture&Video
Enterthegallery,usercanviewallphotos,picturesinthedevice,asshownbelow.
79
Click the icon on the upper left corner, can viewphotos and videosin
groupsinthedropdownlist.Clickonthefoldertoviewallthephotos.
While viewing photos,user can usetwo fingersto press on the screen,
shrinkageorexpansiontoshrinkorenlargetheimage.
5.16 Bluetooth
Bluetooth is a proprietary, open wireless technology standard for exchanging data
overshortdistancesfromfixedandmobiledevices,creatingpersonalareanetworks
withhighlevelsofsecurity.OnVPR48G,userscoulduseBluetoothtotransferfiles,
share contact information with other Bluetooth portable devices by installing
BluetoothApplication,oruseBluetoothheadsetformakingcalls.
ToconnecttoaBluetoothdevice, turn on VPR48G’sBluetoothradiofirst.Thefirst
timewhenusinga new Bluetoothdevicewiththe VPR48G,“pair”the device with
VPR48Gsothatbothdevicesknowhowtoconnectsecurelytoeachother.Afterthat,
userscouldsimplyconnecttoapareddevice.TurnoffBluetoothifit’snotused.
Bluetooth related settings are under VPR48G’s Settings application Wireless &
networks.

80
5.16.1 TurningBluetoothOn/Off
zPressonscreen >clickicon .
zClickonWireless&Networks.
zClickorunticktheoptionforBluetooth.
5.16.2 ChangingBluetoothDeviceName
TheVPR48Guses“VPR48G”asBluetoothdevicenamebydefault.Thedevicename
will be visible to other devices when connecting them. Follow the steps below to
changethename:
zPressonscreen >clickicon .
zClickonWireless&Networks.
zClickonBluetooth.
zClickonBluetoothsettingsicon , popupadragdownboxselectRenamethis
devicetoenteranewname.Oncedone,clickRENAMElabeltosave.
5.16.3 ParingVPR48GWithABluetoothDevice
BeforeconnectingVPR48GwithotherBluetoothdevice,usersmustpairthemfirst.
Theywillstaypairedafterwardsunlesstheyareunpaired.
zPressonscreen >clickicon .
zClickonWireless&Networks.
zClickonBluetooth.
zOpen the Bluethooth. The VPR48G scans and displays the IDs of all available
Bluetooth devices in range. If the device user would like to pair with does not
show up in the list, ensure that the other device is turned on and set to be
discoverable.

81
zIftheVPR48Gstopsscanningbeforetheotherdeviceisready,turnofftheR48G
Bluethooth,thenturnonagain.
zThe discovered device will show in the available devices list with device ID.
MakesuretheBluetoothdeviceisactiveinpairingmode.Thentaponthedevice
IDontheVPR48Gtopairthem.Confirmthepasskeyinthepromptedmessage
(ifany).OrifPINisrequired,pleaserefertothedevice’sdocumentationorother
procedurestoobtainthePIN.
5.16.4 UnpairingABluetoothDevice
After successfully paired, the VPR48G will show in Paired devices bar with paired
devicename.
Once it’s connected, users can tap icon ,then click FORGET to unpair the
connecteddevice.
5.17 USB
ThevideophonesupportsUSBconnectionforkeyboardandUSBstoragedevices.To
use USB keyboard, simply plug it into the USB port on the right side of the video
phoneanditwillbereadytouse.
ToconnectandaccessUSBstoragedevice:
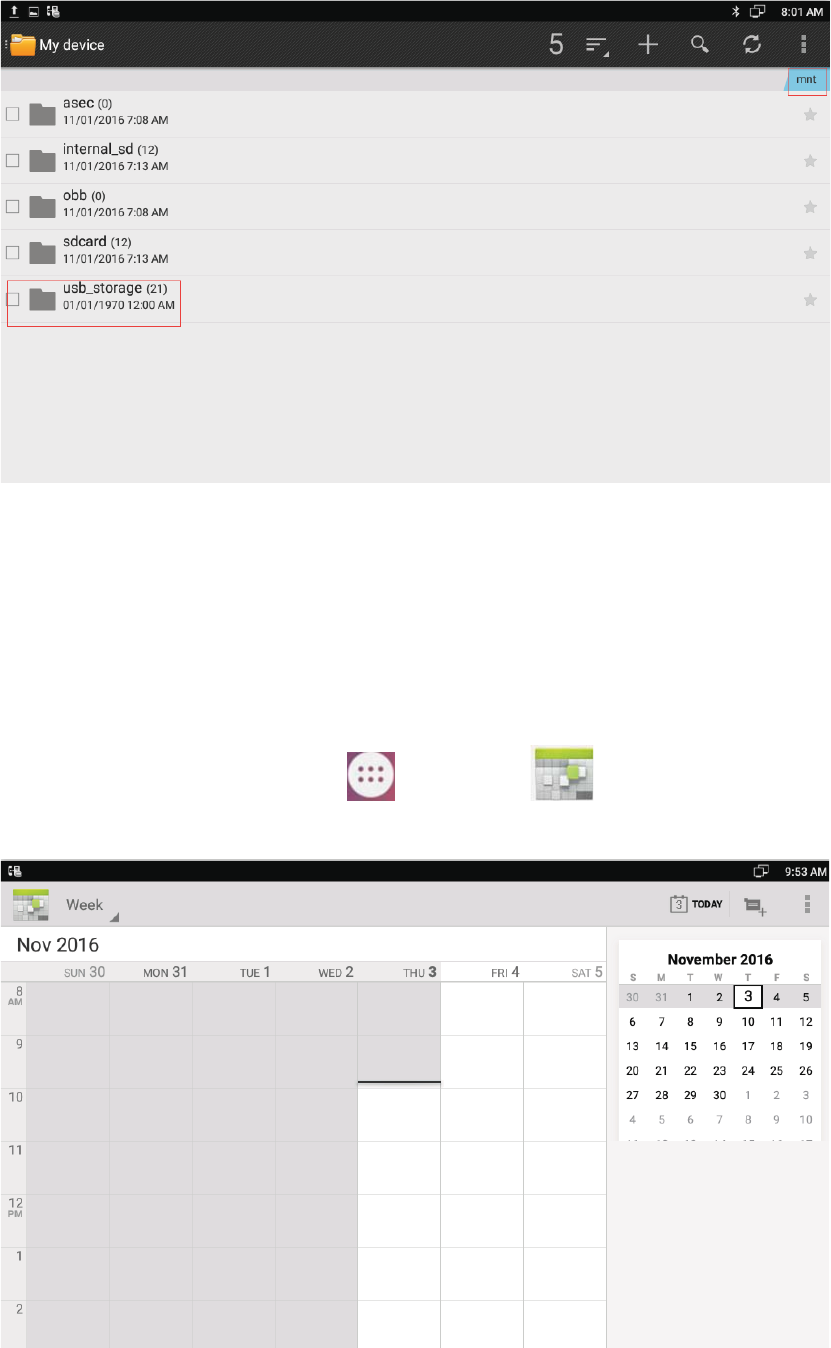
zInsertUSBstoragedeviceintoUSBportattherightsideofvideophone.
zItwilltakeafewsecondsforthevideophonetopreparetheconnection.
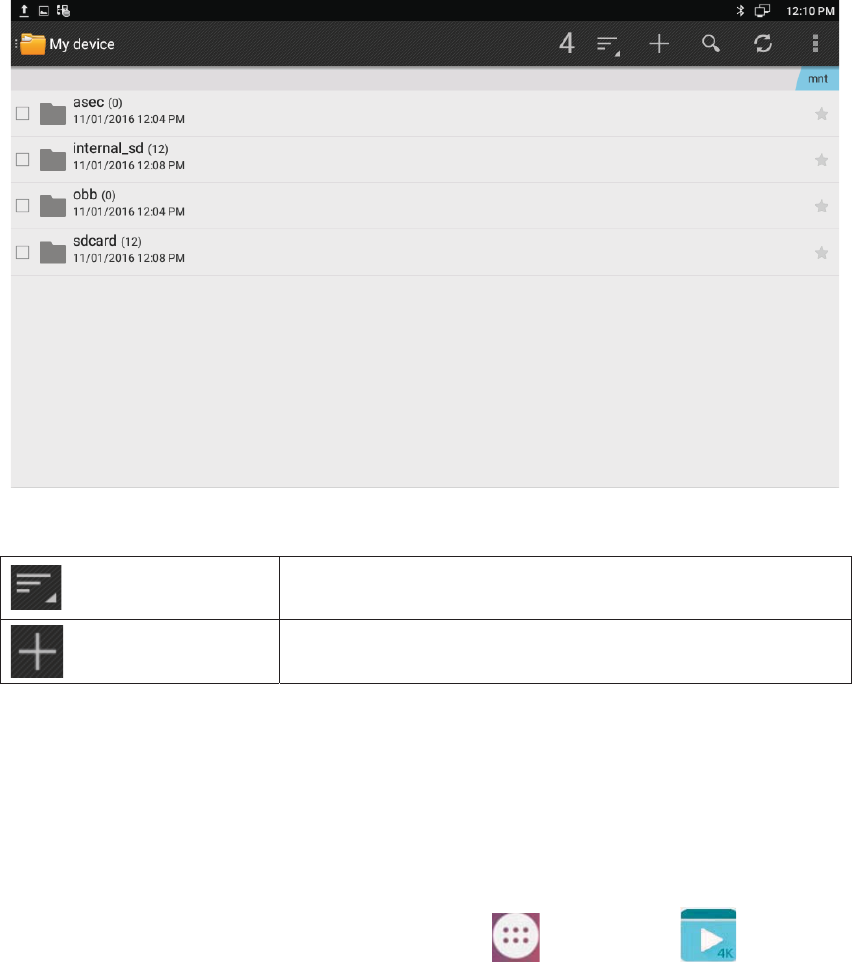
zTo access USB storage, click on the main screen > click Explorer icon
>click mnton the rightuppur corner>clickusb_storage,toaccessand
manageyourdata.Shownasbelow.
82
5.18Calendar
Tostartthecalendarġ
zInthemainscreenēclickicon >Calendar .
Asshownbelowġ
83
Ifonedayhasactivity,colorwillappearonthecalendartoremind.
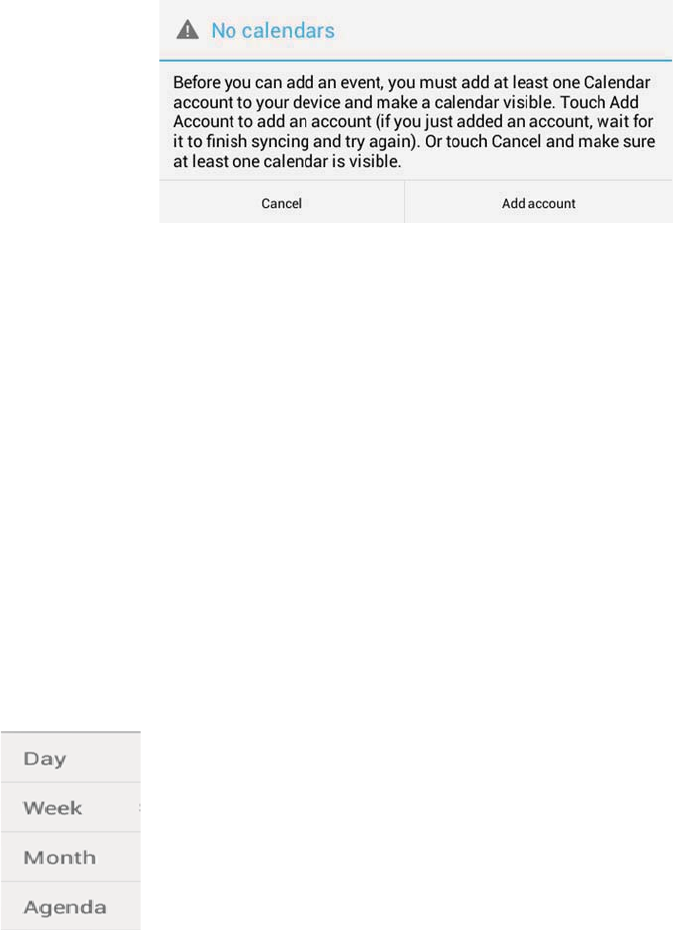
5.18.1 AddAnAccount
Whileusingthecalendaratthefirsttime,itwillremindyoutoaddanaccount.
Click”Addaccount”toaddanaccount,andthensynchronizealltheschedulesofthe
accounttothecalendar.
5.18.2 ViewCalendar
The calendarwill display weeklyby default, and you can slidethe calendar up and
down to view thedifferent weeks.In order toview the activitiesor create the new
activities,youcanalsomakethecalendardisplaydailyormonthly.Whileusingdaily
ormonthlydisplaying,youcanslidethecalendarleftandrighttoviewthedifferent
dayormonth.
Click the date on the upper left corner, it will display the dropdown list
, Calendar displaying mode can be selected as daily, weekly or
monthly.
5.18.3 NewActivities
WhileCalendarisdisplayingasdailyorweekly,youcanusethefollowingmethodsto

84
createathenewactivity:
zClickonthedate,andthenclickonthetimeperiod;
zClickon ;
1) Inputthedetailsoftheactivity,
2) Click“Done”tofinish.
5.18.4 EditActivities
Youcanclickonscheduleneededtobemodifiedtoedittheschedule.
5.18.5 DeleteActivities
Whileviewingtheactivity,youcanclick“DELETE”ontheupperrightcornertodelete
theactivity.
5.19Clock
EntertheClock:
zInthemainscreen,click >Clockicon .
Asshownbelow.

85
Description:
Alarm
Defaultrealtime
Countdowntimer
Stopwatch
TimezoneOthers
Otherssetting
5.19.1 Alarm
Usercanaddoneormultiplealarms:
1) Click .
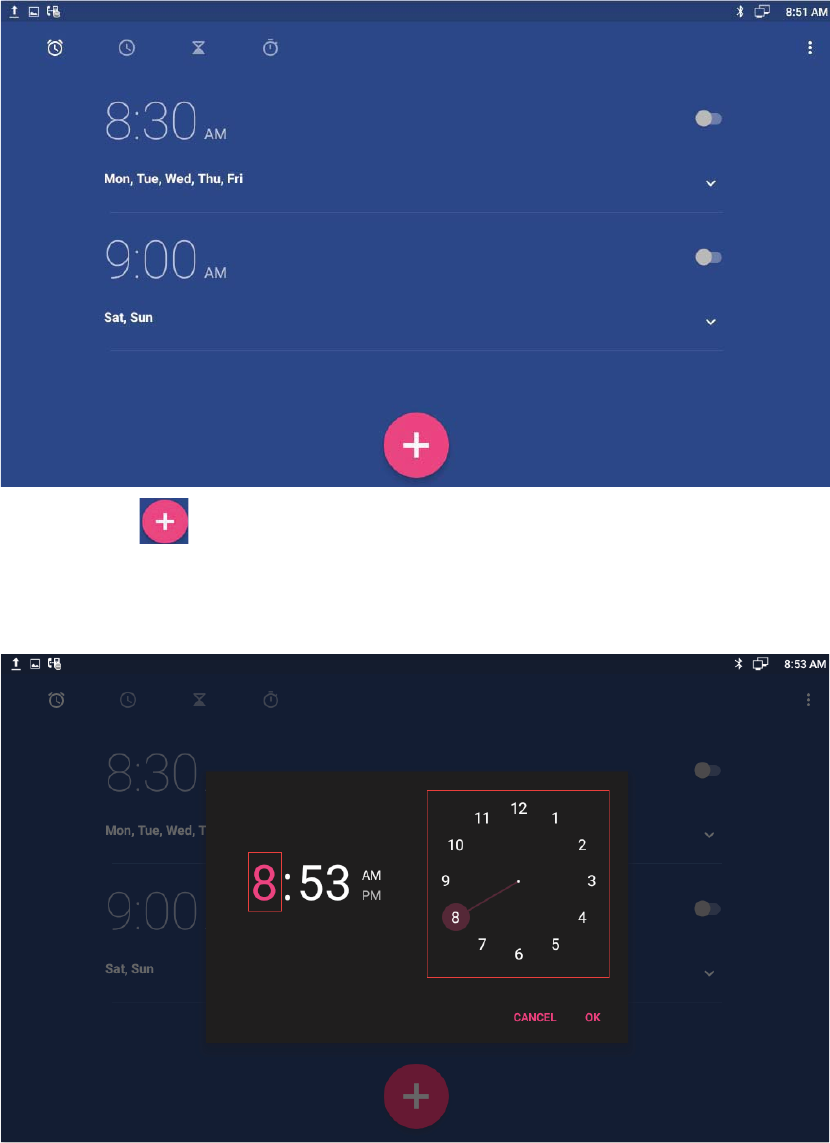
86
2) Clickicon .
3) To set the hour and minute, click the digit on the right side to set hour and
minute.
4) Thenusercanselectenableordisablerepeatthealarminsomedaysofaweek,
selecttheringtoneofthealarmandeditdisplaylabel.Ifnotmodify,willpresent
tomorrowasdefault.
87
5.19.1.1 Enable/DisableAlarm
Usercanclickicon toenableordisablethealarm.
Note:Ifpoweroffthephone,thealarmwillalsobeoff.
5.19.1.2 ModifyAlarm
If user want to modify the status of the alarm, including time, repeat data, alarm
ringtone,candirectlyclickonthealarm.
5.19.1.3 DeleteAlarm
InAlarmpage,userclickthealarm,afterpopupthedialogbox,select todelete
thealarm.
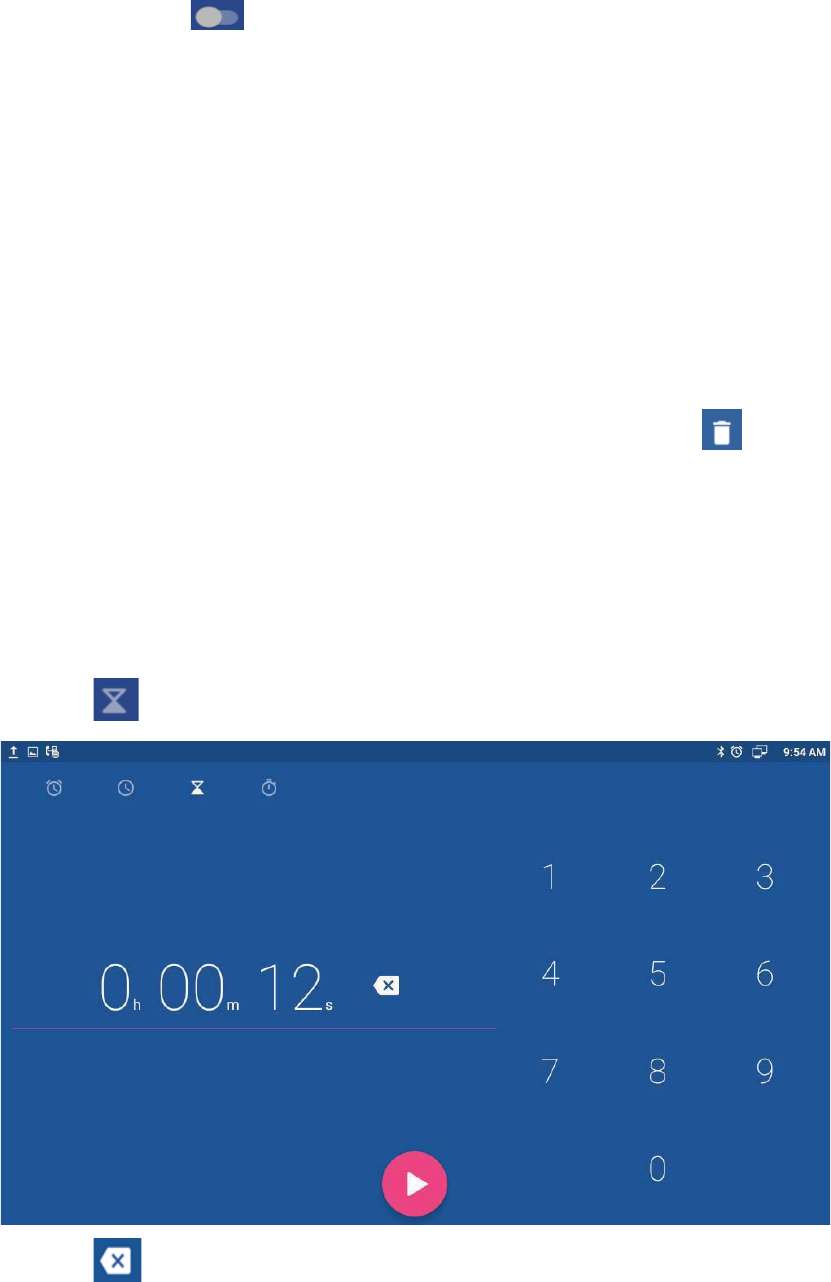
5.19.2 CountdownTimer
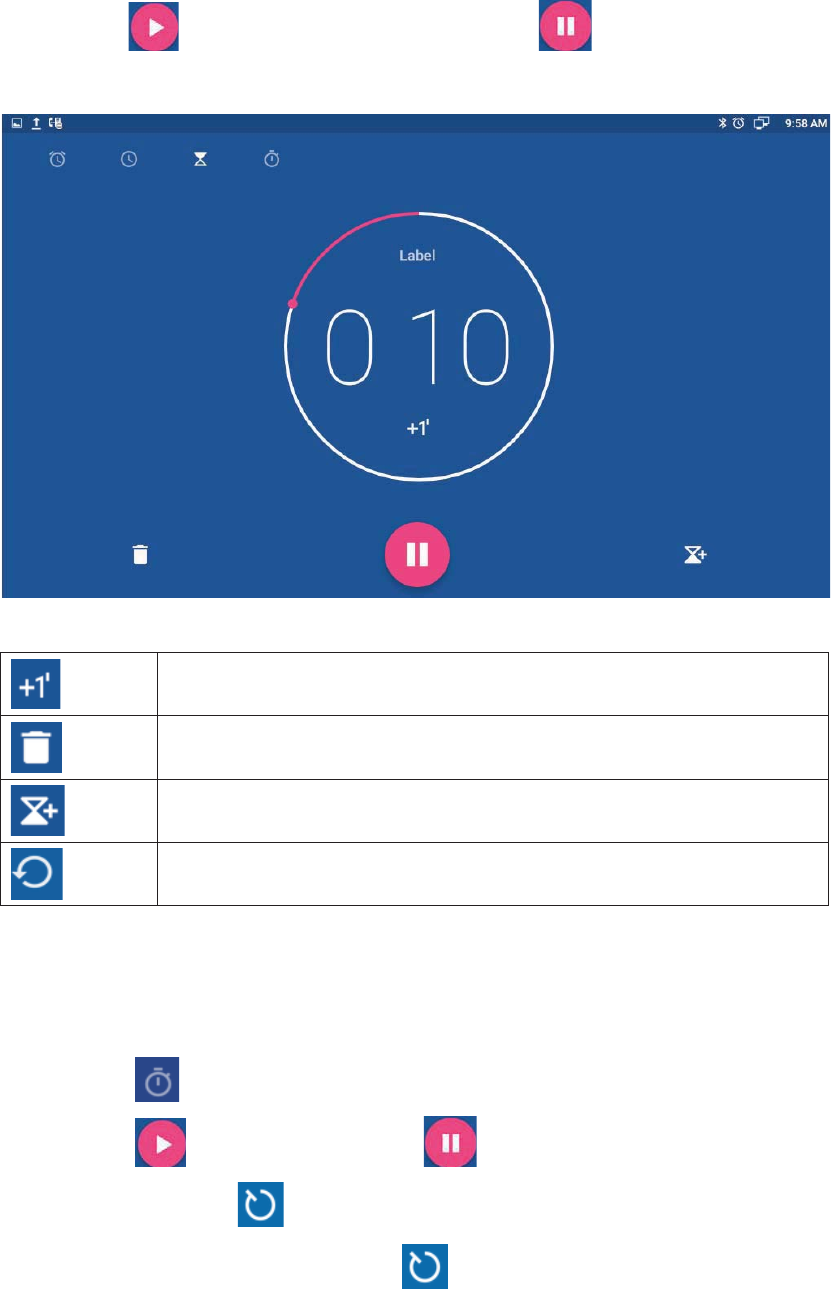
1) Click .Clickthedigitontherightside.Showasbelow.
2) Click todeletethedigits.
88
3) Clickicon tostartthecountdowntimer.Click tostopthetime.
Theotherbuttonsaredescribedasfollowed.
Clicktoaddoneminutetocountdowntimer
Clicktodeletethecurrentcountdowntimer
Clicktoaddanothercountdowntimer
Clicktoresetthecountdowntimer
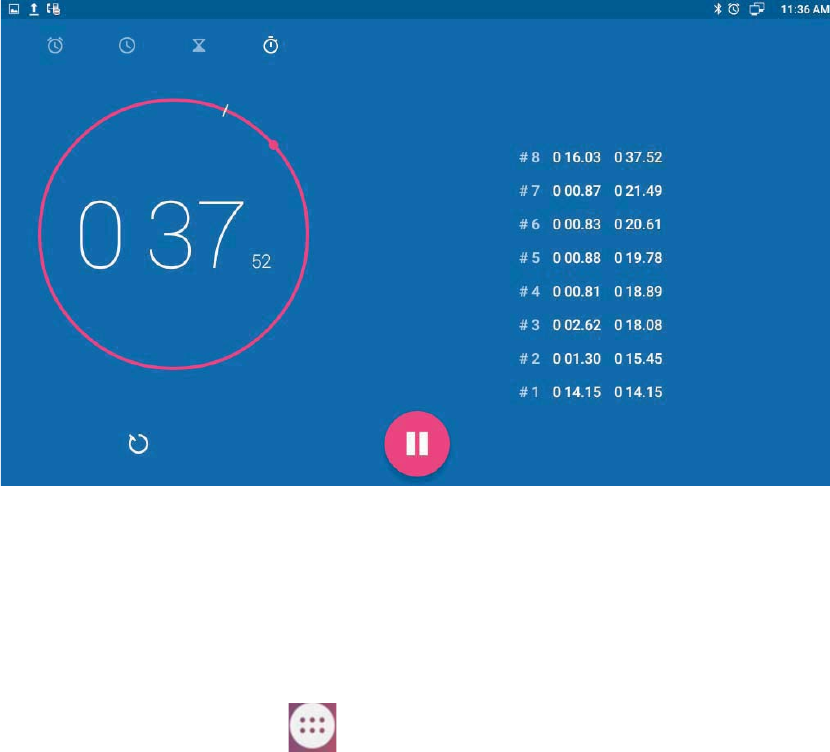
5.19.3 Stopwatch
1) Clickicon .
2) Clickicon tostartthetime.Click tostopthetime.
3) Innormal,clickicon torememberthecorrespondingtime.
4) Whenthetimeisonhold,clickicon toresetthetimer.
89
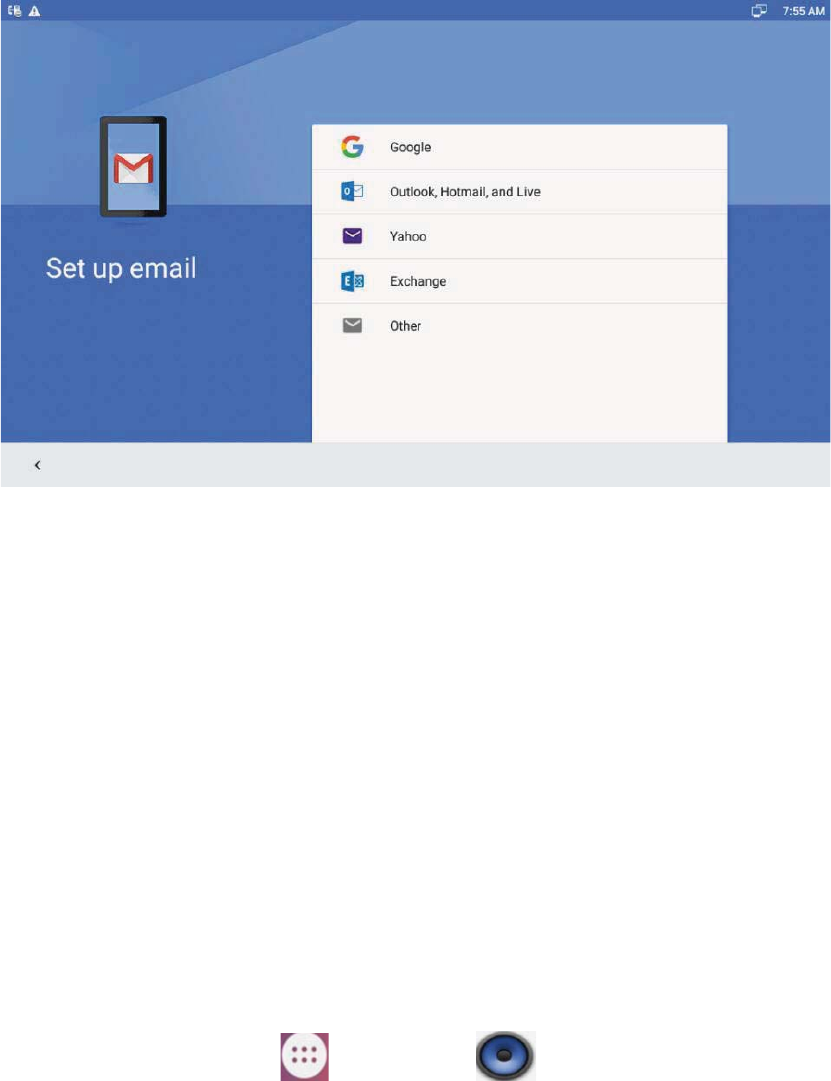
5.20 Gmail
EmailApplicationcanletyouusePOP3orIMAPservicetosendandreceiveemail.
StartEmailġ
zInthemainscreen,click >Email
5.20.1 AddANewGmailAccount
Make sure the email account has enabled POP3 or IMAP service, and you can add
manyaccounts.
Pleasechooseoneofthefollowingmethodstostart:
zIfyouhaven’taddedanemailaccountyet,whilestartingtheemail
application,youwillbeaskedtosetupyouraccount,asshownbelow
90
zIf you have already set up an email account, In the main Email page, Press
“Menu” button, and then click “Account”, and last press ”Menu” to “Add
Account”.
1. Inputtheemailaccountandpassword,andthenclick“Next”;
2. If there is noaccount typein the equipment databaseyou want to set, the
devicewillrequireyoutoentermoredetailedinformation(thereceivingserver
settingsandoutgoingserversettings).
3. Inputtheaccountnameandyourname,clickOK.
5.21Music
Inthemainscreen,clickicon >Musicicon .
Themusicpageisshownasbelow.
91
UsercanclickthelabelsofArtists,AlbumsorSongstoviewallsongs,vieworplaythe
songsfromtheplaylists.
Toviewthecurrentlyplayingsong,clicktheNowplayinglabeltoview.
5.22 Explorer
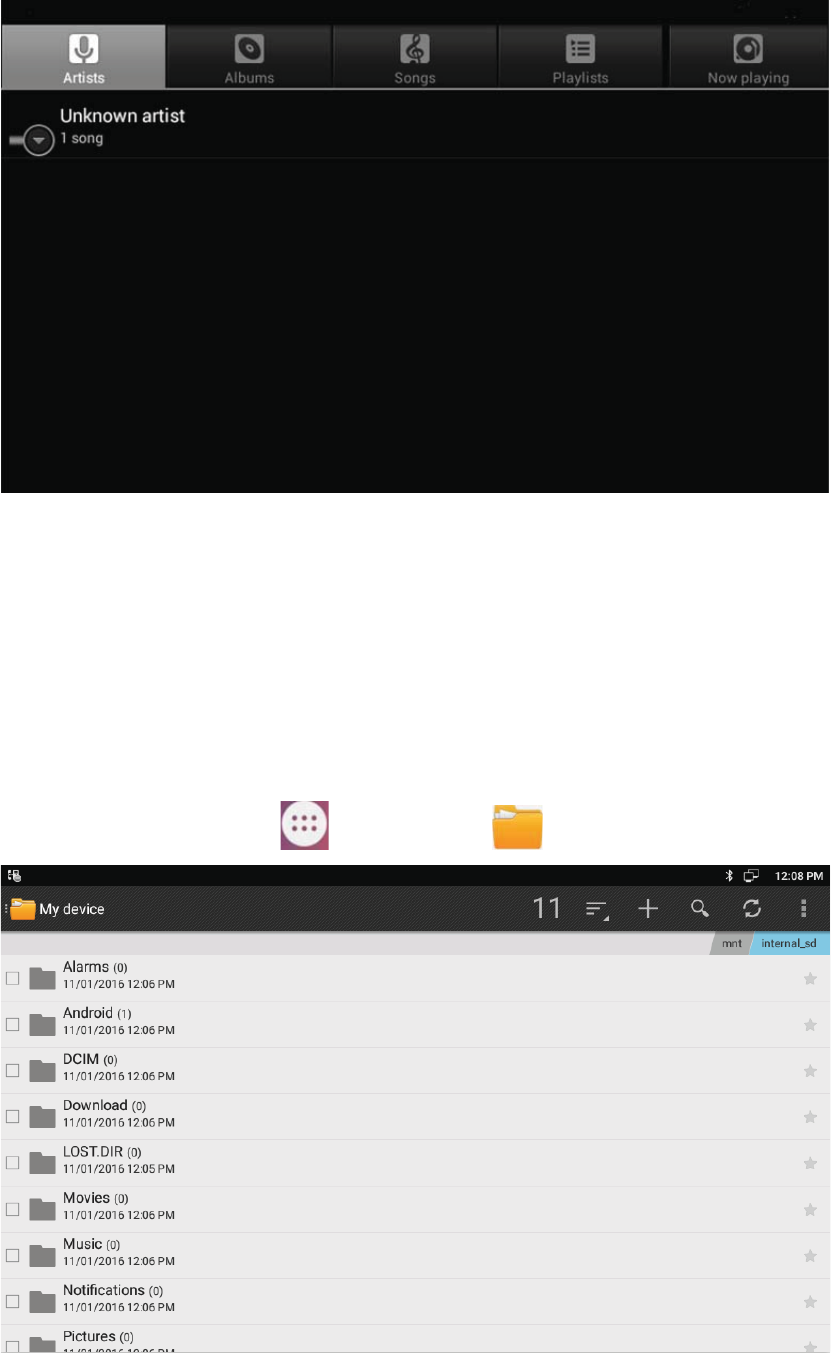
Usercanuseexplorertomanagethefilesinthedevice.
Inthemainscreen,clickicon >Explorericon .Asshownbelow.
92
Clickmnttoentertoshowasbelow.If insert theUSBdevice, willdislpayedin this
layer.Shownasbelow.
Clicktomodifythesort:byname,time,size,type
Clicktocreatanewfolderorphotofolder
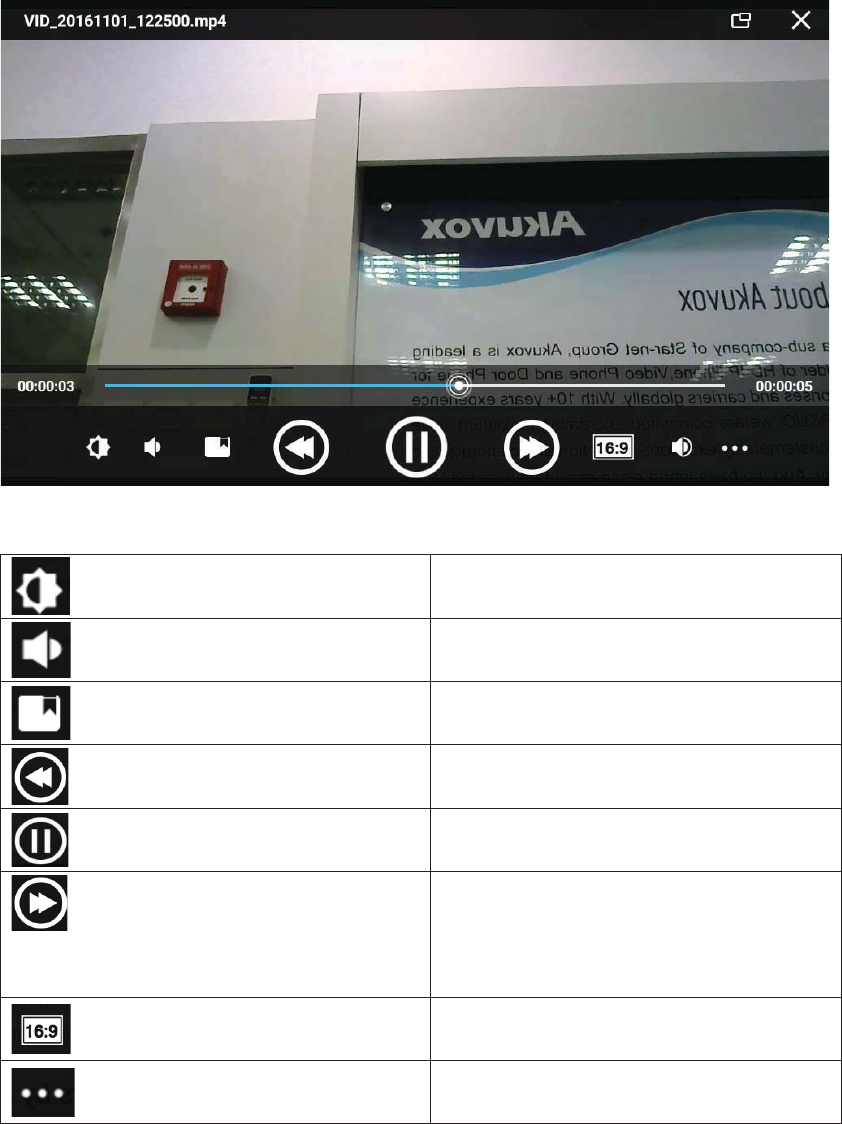
5.23 VideoPlayer
Usercanusevideoplayertoplaylocalvideos.
Torunthevideoplayer:Inthemainscreen,click >Videoicon .
Afterentering,usercanclickonthelistofvideostowatch.Asshownbelow:
93
ScreenBrightnessAdjustment
Clicktoadjustthevolume
ClicktoaddintotheBookmark.
Thepreviousvideo,andlongpresstomake
videofastbackward.
Hold/Play.
The next video, and long press to make
video fast forward. Screensize
adjustment,four type of video sizes:
originalsize,fullscreen,16:9,4:3
Screensize adjustment,four type of video
sizes:originalsize,fullscreen,16:9.
Others
94
5.23 Others
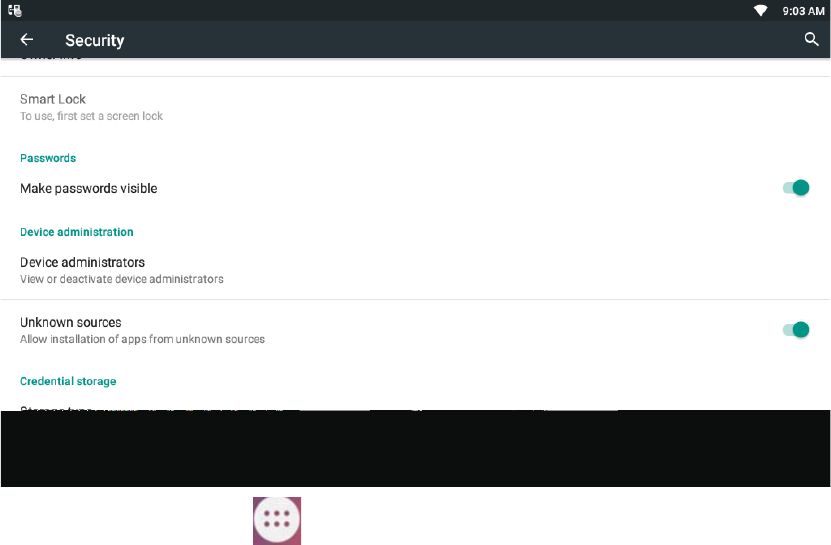
5.23.1 ApkInstall
User need open phone permission before installing. Go to the path:
Settings>Security,enableUnknownsources.
Inthemainscreen,click >Explorer.SelecttheApkyouwanttoinstall,follow
heprompttooperate.
95
6 SoftwareUpgrade
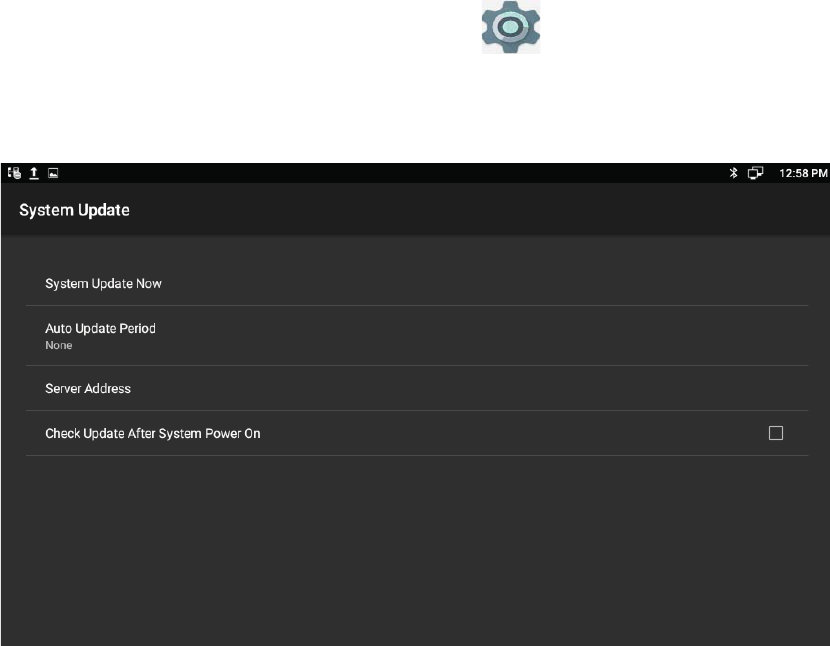
6.1 ImmediateUpdate
Chooseonewaybelowtoenterthesystemupgradeinterface:
zIn the main screen, press “Menu” on board > System Settings > System >
AboutMultimediaTerminal>SystemUpgrade>SystemUpdateNow
zIn the main screen, tap on settings icon > System > About device
>SystemUpdate>SystemUpdateNow.
Updateinterfaceasshown.
Three ways to update immediately: Local Update, Select other upgrade package,
RemoteUpgrade,asshownbelow.
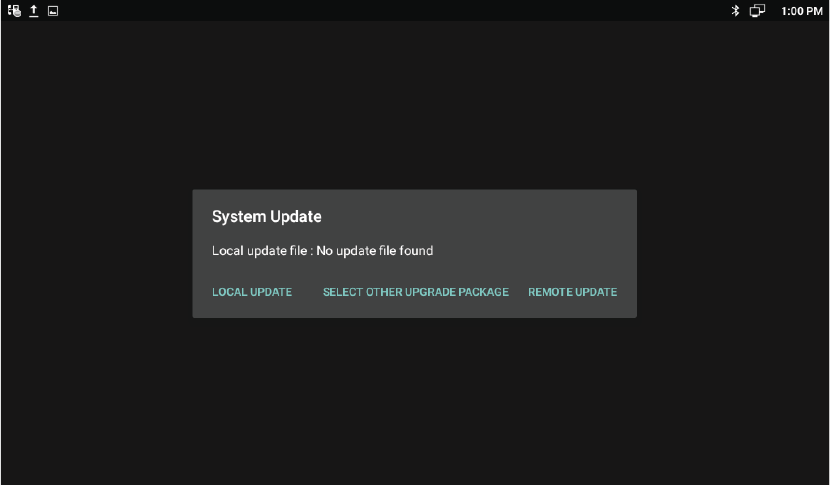
96
6.1.1 SelectOtherUpgradePackage
1) ViaUSBtoUpgrade
PutupgradepackageintoUSB,insertUSB,thenclick“Selectotherupgradepackage”,
find“/mut/usb_storage”,findtheupgradepackage,thenclick“OK”toupgrade.
2) ViaInternalMemorytoUpgrade
UseUSBtocopytheupgradepackageintoInternalMemory,thenpress“Selectother
upgrade package”, find “/mnt/sdcard”ēfind upgrade document, then click “OK” to
upgrade.
6.1.2 LocalUpdate
1) ViaUSBtoUpgrade
Changethenameofupgradepackageintoupgrade.zip,thencopyitintoUSB,insert
USB,entertheupgradeinterface,userwillfindthepathofupgradepackage,because
videophonehassearcheditautomatically,click“LocalUpdate”tostartupgrading.
2) ViabuiltinSDCardtoupgrade
First,changethenameofupgradepackageintoupgrade.zip,thencopyitintoUSB,
97
and then use USB to copy the upgrade package into Internal Memory, enter the
upgrade interface, you will find the path of upgrade
package:/mut/sdcard/upgrade.zip, because video phone has searched it
automatically,press“LocalUpdate”tostartupgrading.
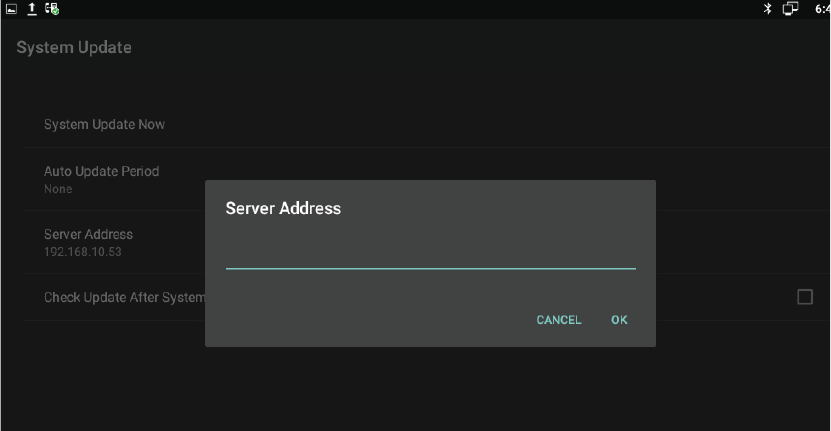
6.1.3 RemoteUpdate
1) Enter the interface in figure 51, click “Server Address”, and input the server
addressthatcontainsupgradepackage.Asshownbelow:
2)Click“RemoteUpgrade”,videophonewillcheckthenewversionautomatically.If
existanewversion,itwillprompt.Press“OK”todownloadupgradedocument.
3)Afterfinishdownloading,itprompts“Downloadupdateimagesuccess!Youneed
to restart system for update! ”, press reboot now, and then system will upgrade
automatically.Asshownbelow:
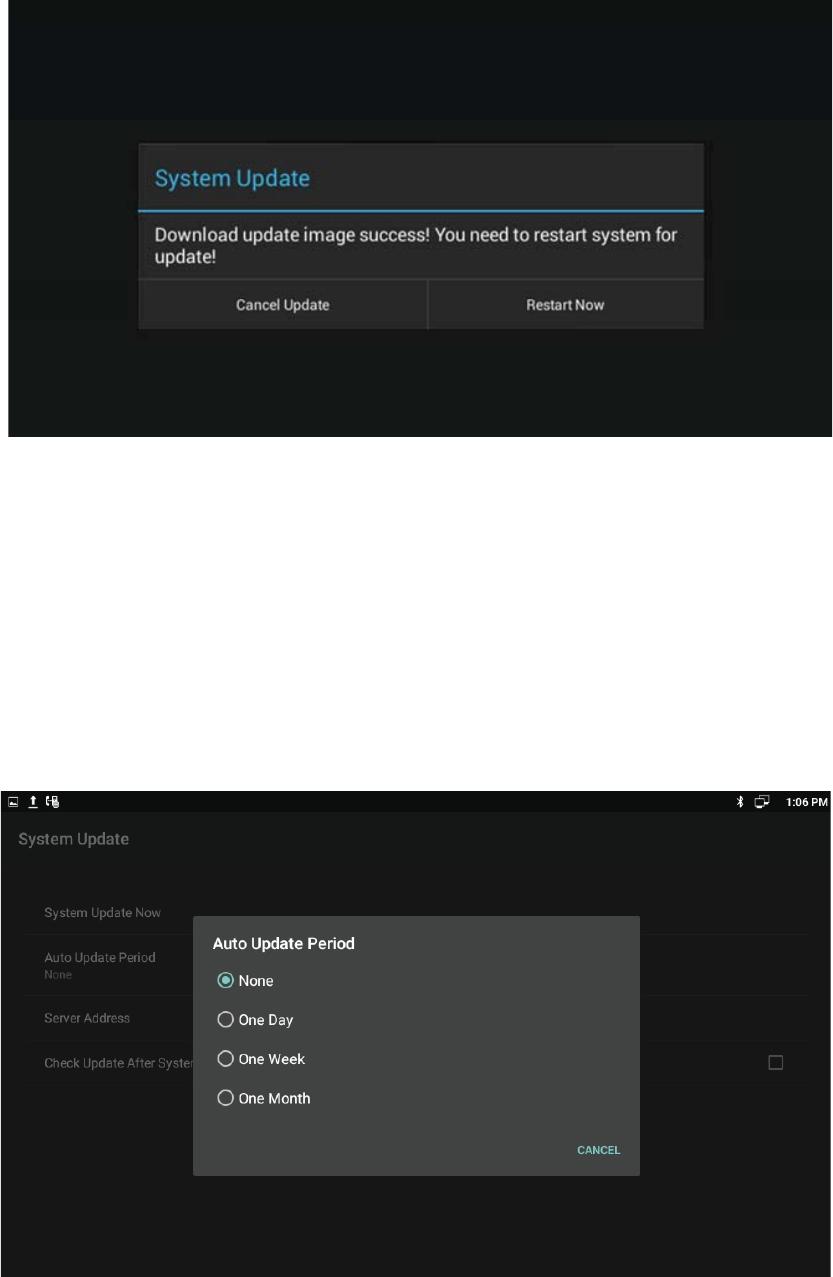
98
6.2 AutoUpdatePeriod
AutoUpdatePeriodincludesfourmodes:None,OneDay,OneWeek,andOneMonth.
Theterminalwilldetectthenewversionautomaticallyintime,ifthereis,thestatus
barwillshow“Thereisanewversion,pleaseupdate!”.Clickanddownloadtheimage
forupgrade.
Asshownbelow:
99
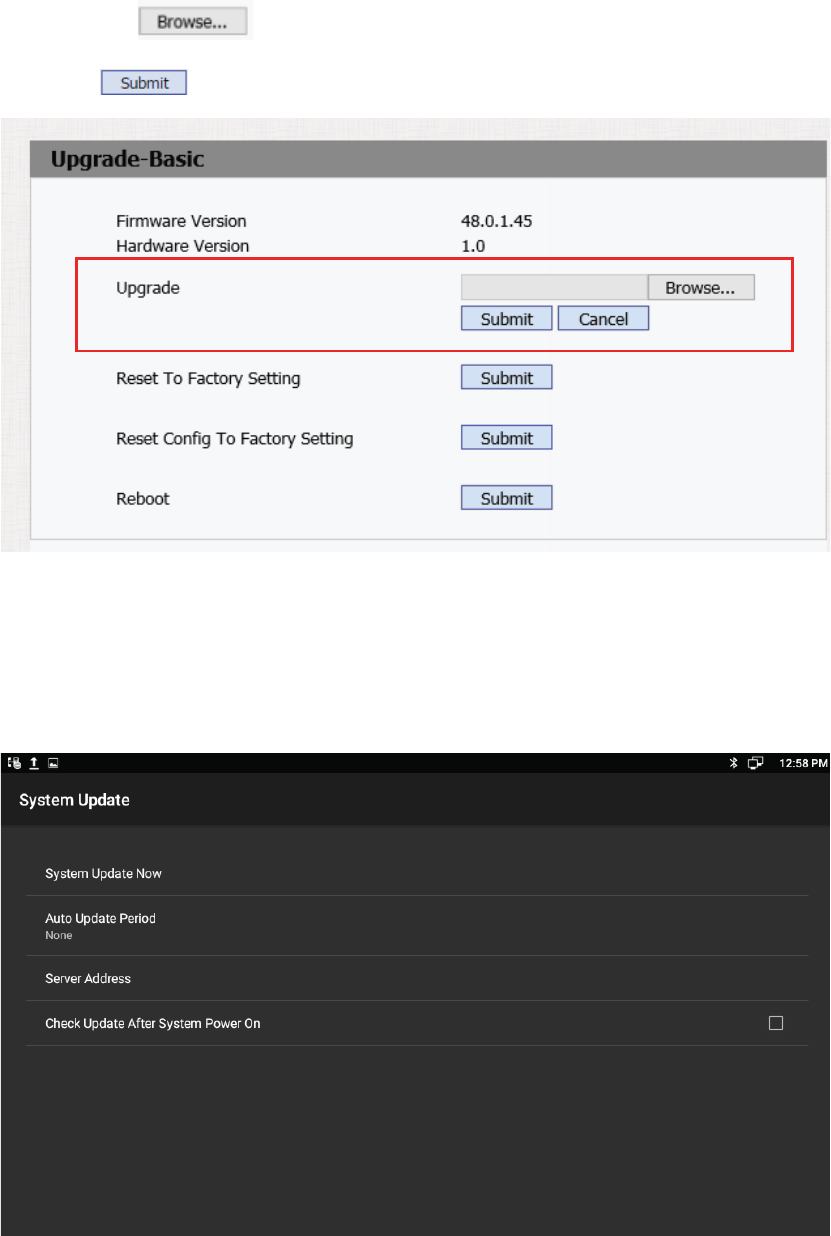
6.3 Upgradeontheweb
1) ClickUpgrade>Basic.
2) Clickthe labeltoselecttheversiontoupgrade.
3) Click tosave.
6.4 CheckUpdateAfterSystemPowerOn
Click“CheckUpdateAfterSystemPowerOn”.Shownasbelow.
100
Every time user power on, the system will check the new version automatically. If
there is a new one, the status bar will notice: “System has new version, please
updatenow!”,clickanddownloadtheimageforupgrade.

94
7 SystemMaintenance
7.1 SystemStateInspection
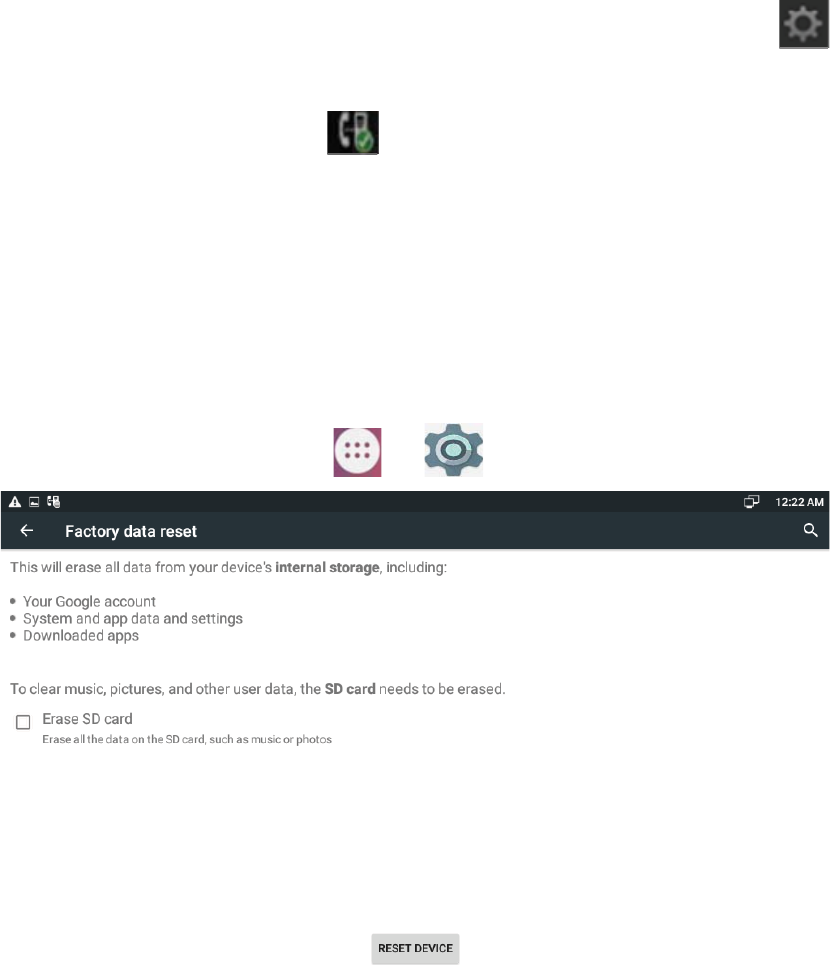
Mode1:Inthemainscreen,click >Statusinfo>Versioninfo
Mode2:Inthemainscreen,click > >Aboutdevice
Itwilldisplayphonestatus,softwareversionandhardwareversioninthisitem.
7.2 IPQuery
Mode1:Inthemainscreen,press,click ->Statusinfo>NetworkStatus
Mode2:Inthemainscreen,click > >More>Ethernet
Mode 3: Press Speaker button or pick up toenter the dialing interface, click
onupperrightcorner>enterthesettinginterface,checkStatusInfo;
Mode4:Slidedownthetopleft ,clicktheaccount,enterthesettinginterface,
checkStatusInfo;
Mode1andMode2cancheckIPaddress,subnetmask,gateway,DNSserveretc.in
Ethernet.
102
Mode 3 and Mode 4 can check the corresponding network information in setting
interface.
7.3 SIPAccountRegistrationQuery
Youcanchooseone ofthefollowingmethods toenterthe SIP accountregistration
query.Iftheaccountissuccessfullyregistered,theiconwillbelightupinnotification
areaofphone.
103
Mode 1: Press Speaker button or pick up toenter the dialing interface, click
onupperrightcorner,checkAccountManager.
Mode2:Slidedownthetopleft ,clicktheaccount,enterthesetupinterface,
checkAccountManager.
7.4 Backup&Reset
Mode 1: In the main screen, press "Menu" key on the hard keyboard> System
Settings>Backup&reset
Mode2:Inthemainscreen,click > >Backup&reset
Select“EraseSDcard”,click“RESETDEVICE”,thenthephonewillrestoreto factory
settings.
7.5 FailureProcess
Failure1:PowerLEDisoff

104
zPleasecheckwhethertheadapterfitsthisproductrequirement;
zPleasecheckwhethertheoutletisworkingproperly.
Failure2:Novoicewhenpickupthehandset
zPleasecheckwhethertheconnectionofhandsetisworkingproperly;
zPleaseadjustthevolume+keyonkeyboardwhenoffhookthephone,Observe
the display of “volume” prompt. Please pay attention that the volume key in
onhookandoffhook situation is to adjustthe ring volumeandmediavolume
(callvolume)separately.Thesetwoadjustmentsareunrelated.Adjustthe
volumewon’tchangecallvolumewhenonhookthephone.
Failure3:Phonecan’tdialproperly
zPlease check whether there is at the topright of screen. If not, please
checkwhetherthecableinLANportisloose;
zPlease check the IP address of phone via configuration (go to 4.2, “network
configuration”);
zIfit’snowinLAN,pleasecheckwhethertheIPaddressofphoneisconflictwith
otherdevicesinthesameLAN.
zIfthe network connection is properly,pleasecheckwhether the icon of
successful registration is in the notification area. If there is no explanation of
configurationfailure,pleasecontactnetworkadministratortorecoverit.
Failure4:Noringingwhenincomingacall
zPleasemakesurethehandsetiscompletelyhungonthebase
zPleaseadjustthevolume+keyonkeyboardwhenonhookthephone,Observe
the display of “volume” prompt. Please pay attention that the volume key in
onhookandoffhook situation is to adjustthe ring volumeandmediavolume
(callvolume)separately.Thesetwoadjustmentsareunrelated.Adjustthe
volumewon’tchangeringvolumewhenoffhookthephone.
105
8 WebInterface
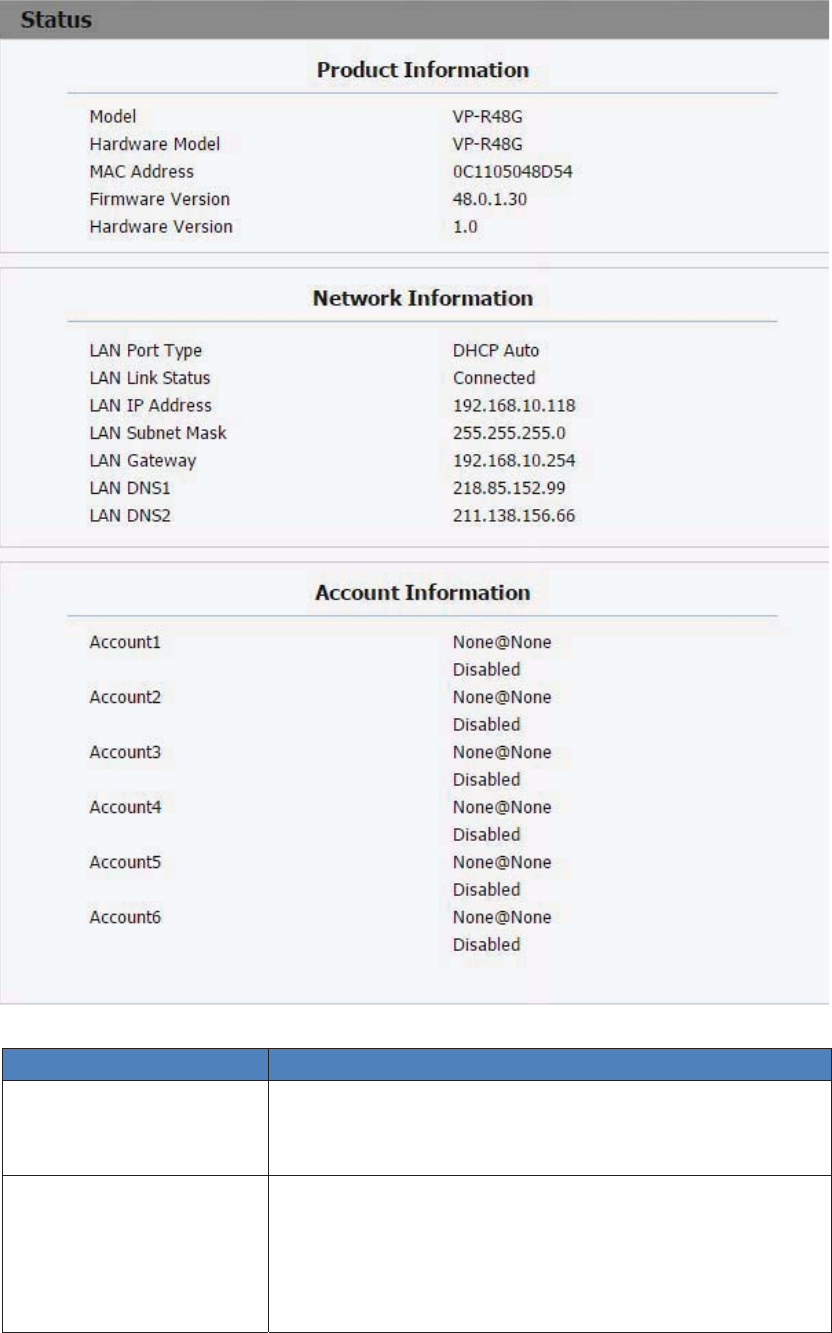
8.1 Weblogin
1. Openthebrowseronthecomputer.
2. InputtheIPaddressintheaddressbar.
3. Entertheusernameandpassword(username:admin,password:admin),then
click .
8.2 Status>Basic
ClickStatus>Basictocheckthephoneinformation.
106
Sections Description
ProductInformation To display the device’s information such as Model name,
MACaddress(IPdevice’sphysicaladdress),HardwareModel,
FirmwareversionandHardwarefirmware.
NetworkInformation Todisplaythedevice’sNetworkingstatus(LANPort),suchas
Port Type(which could be DHCP/Static), Link Status, IP
Address,SubnetMask,Gateway,PrimaryDNS
server,SecondaryDNSserver.
107
AccountInformation To display device’s Account information and Registration
status (account username, registered server’s address,
Registerresult).
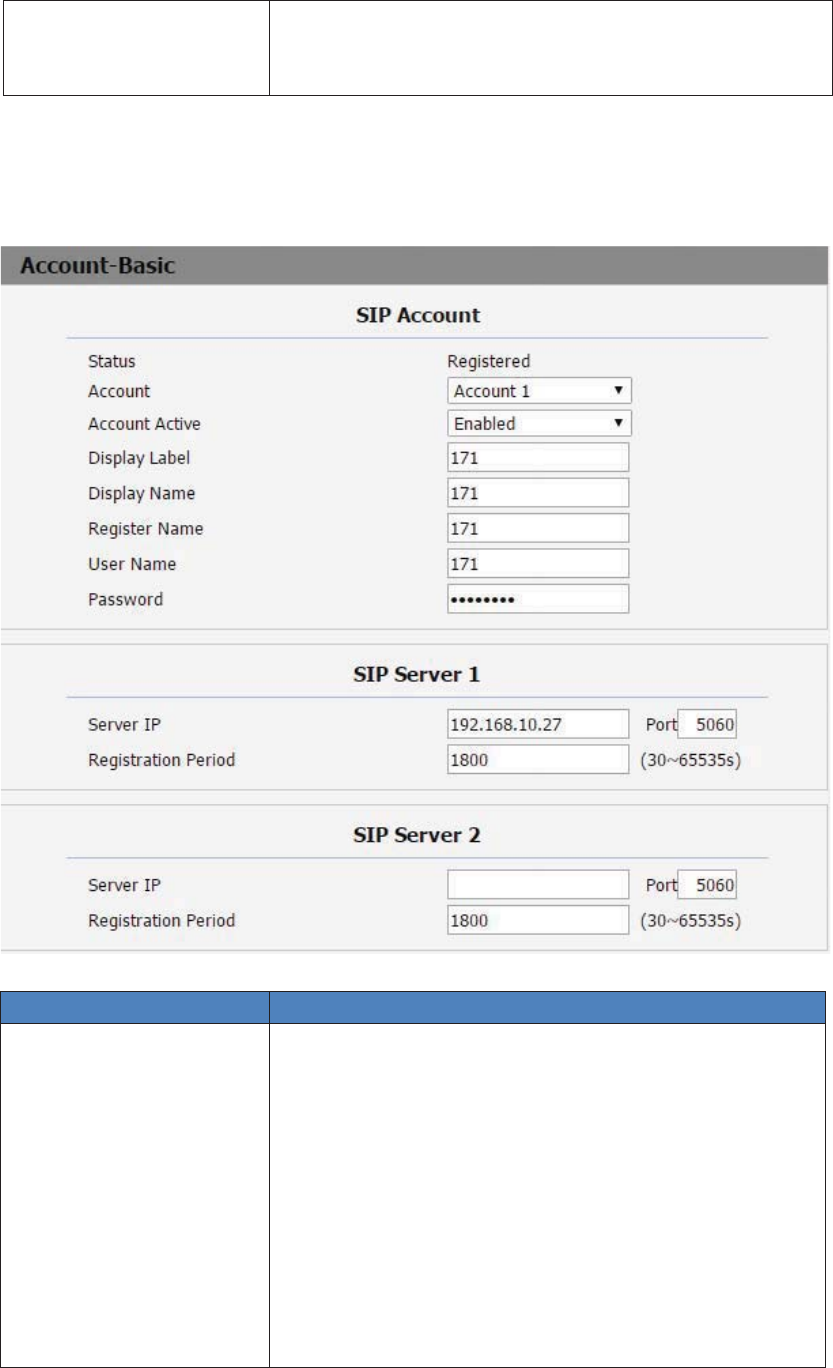
8.3Account>Basic
Sections Description
SIPAccount TodisplayandconfigurethespecificAccountsettings.
zStatus:Todisplayregisterresult.
zDisplay Label: Which is displayed on the phone’s LCD
screen.
zDisplayName:Whichissenttotheothercallpartyfor
displaying.
zRegister Name: Allocated by SIP server provider, used
forauthentication.
zUserName:AllocatedbyyourSIPserverprovide,used
forauthentication.
zPassword:Usedforauthorization.
108
Sections Description
SIPServer1 TodisplayandconfigurePrimarySIPserversettings.
zServerIP:SIPserveraddress,itcouldbeanURLorIP
address.
zRegistration Period: The registration will expire after
Registration period, the IP phone will reregister
automaticallywithinregistrationperiod.
SIPServer2 TodisplayandconfigureSecondarySIPserversettings.
This is for redundancy, if registering to Primary SIP server
fails, the IP phone will go to Secondary SIP server for
registering.
Note:SecondarySIPserverisusedforredundancy,itcanbe
left blank if there is not redundancy SIP server in user’s
environment.
OutboundProxyServer TodisplayandconfigureOutboundProxyserversettings.
An outbound proxy server is used to receive all initiating
request messages and route them to the designated SIP
server.
Note: If configured, all SIP request messages from the IP
phonewillbesenttotheoutboundproxyserverforcefully.
TransportType TodisplayandconfigureTransporttypeforSIPmessage
zUDP: UDP is an unreliable but very efficient transport
layerprotocol.
zTCP:Reliablebutlessefficienttransportlayerprotocol.
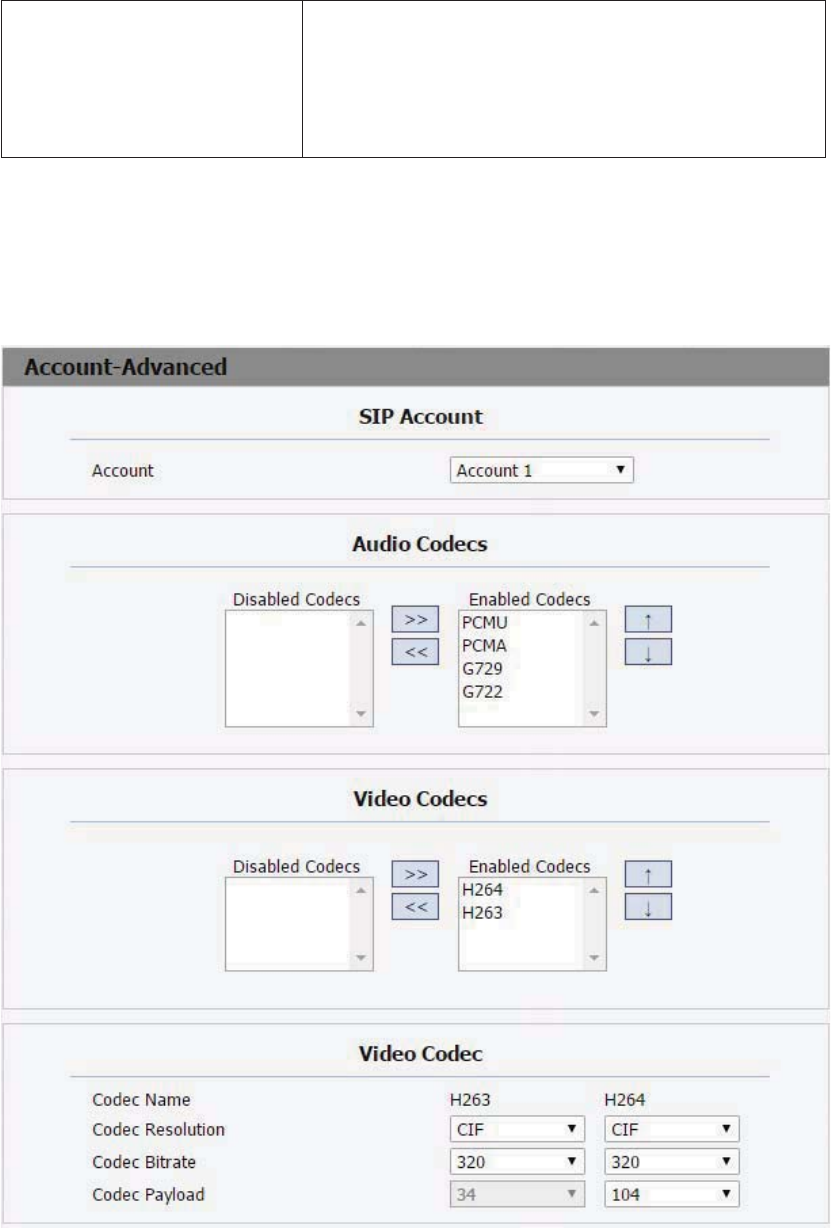
109
8.4 Account>Advanced
NAT To display and configure NAT(Net Address Translator)
settings.
zSTUN:ShortforSimpleTraversalofUDPoverNATS,
asolutiontosolveNATissues.
Note:Bydefault,NATisdisabled.
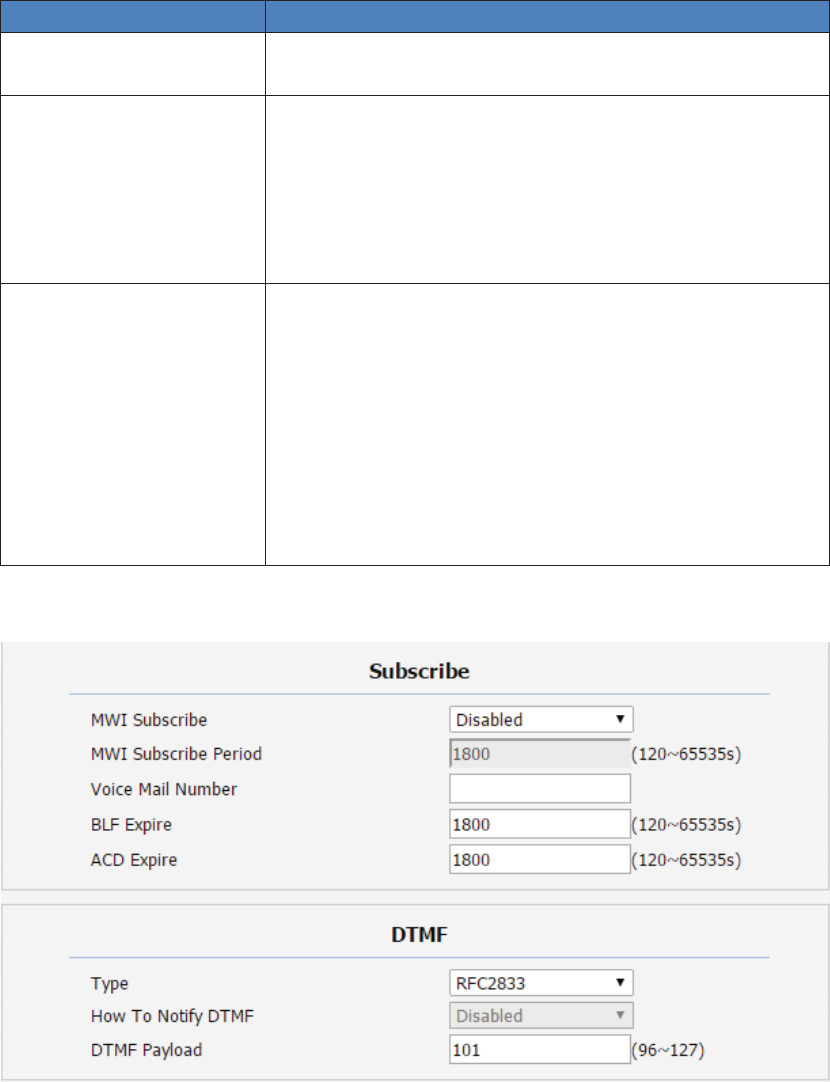
110
Sections Description
SIPAccount To display current Account settings or to select which
accounttodisplay.
AudioCodecs Todisplayandconfigureavailable/unavailableAudiocodecs
list.
Codecmeanscoderdecoderwhichisusedtotransferanalog
signaltodigitalsignalorvoiceversa.
Familiar codecs are PCMU(G711U), PCMA(G711A), G722
(widbandthcodecs),G729andsoon.
VideoCodecs Todisplayandconfigureavailable/unavailableVideocodecs
list.
Videocodec is usedto transferanalog signal todigital.We
cansupport2videocodecH263,H264
zCodec Resolution: It can support QCIF, CIF, VGA, 4CIF,
720P.
zCodec Bitrate: The lowest bitrate is 128, the highest
bitrateis2048.
zCodecpayload:From90119.
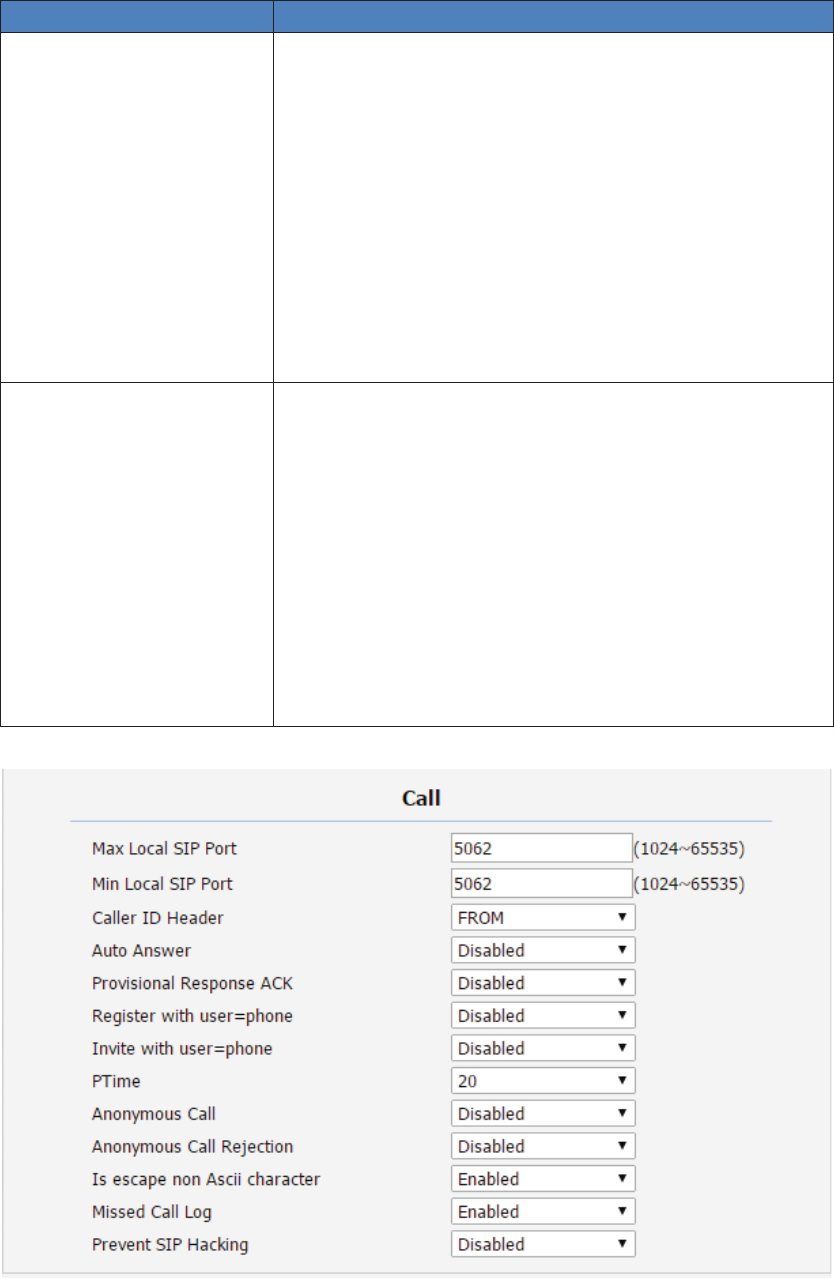
111
SectionsDescription
Subscribe Todisplayorconfiguresessiontimersettings.
zActive:Toenableordisablethisfeature,Ifenable,the
ongoing call will be disconnected automatically once
thesessionexpiredunlessit’sbeenrefreshedbyUACor
UAS.
zSessionExpire:Configuresessionexpiretime.
zSession Refresher: To configure who shouldbe
responseforrefreshingasession.
Note: UAC means User Agent Client, here stands for IP
phone. UAS means User Agent Server, here stands for SIP
server.
DTMF TodisplayandconfigureDTMFsettings.
zType:SupportInband,Info,RFC2833ortheir
combination.
zHowToNotifyDTMF:Only availablewhen DTMFType
isInfo/Info+Inband/Info+RFC2833.
zDTMFPayload:ToconfigurepayloadtypeforDTMF.
Note: By default, DTMF type is RFC2833 which is the
standard. Type Inband uses inband frequency to indicate
DTMF tone which is most used to be compatible to
traditionaltelephoneserver.TypeInfouseSIPInfomessage
toindicateDTMFmessage.
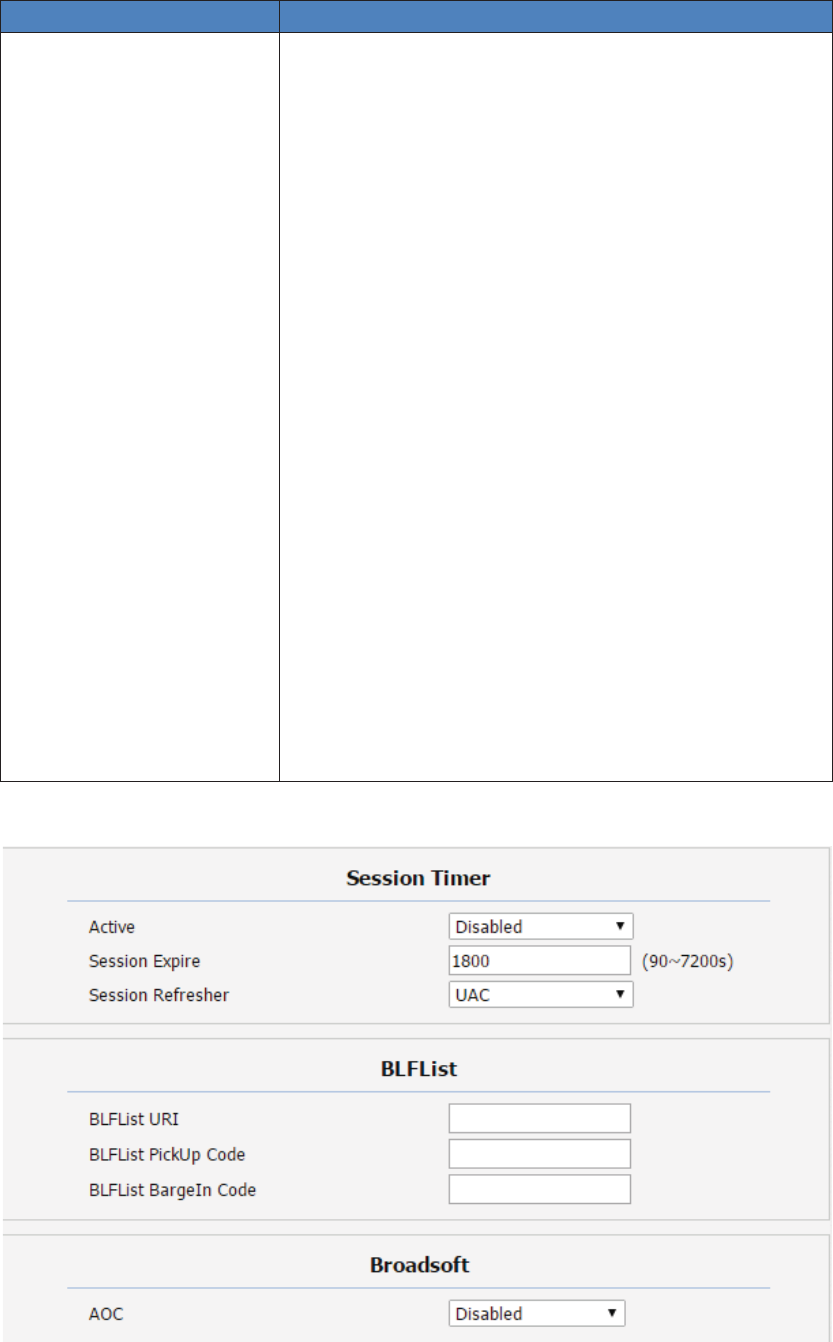
112
SectionsDescription
Call Todisplayandconfigurecallrelatedfeatures.
zMax Local SIP Port: To configure maximum local sip
portfordesignatedaccount.
zMin Local SIP Port: To configure minimum local sip
portfordesignatedaccount.
zCaller ID Header: To configure which Caller ID format
tofetchfordisplayingonPhoneUI.
zAuto Answer: If enabled, IP phone will be
autoanswered when there is an incoming call for
designatedaccount.
zProvisional Response ACK: 100% reliability for all
provisionalmessage,thismeansitwillsendACKevery
time the IP phone receive a provisional SIP message
fromSIPserver.
zUser=phone: If enabled, IP phone will send
user=phonewithinSIPmessage.
zAnonymous Call: If enabled, all outgoing call for the
designatedaccountwillbeanonymousnumber.
zAnonymous Call Rejection: If enabled, all incoming
anonymousoutcallforthedesignatedaccountwillbe
rejected.
zMissedCallLog:Todisplaythemisscalllog.
zPrevent SIP Hacking: Enable to prevent SIP from
hacking.
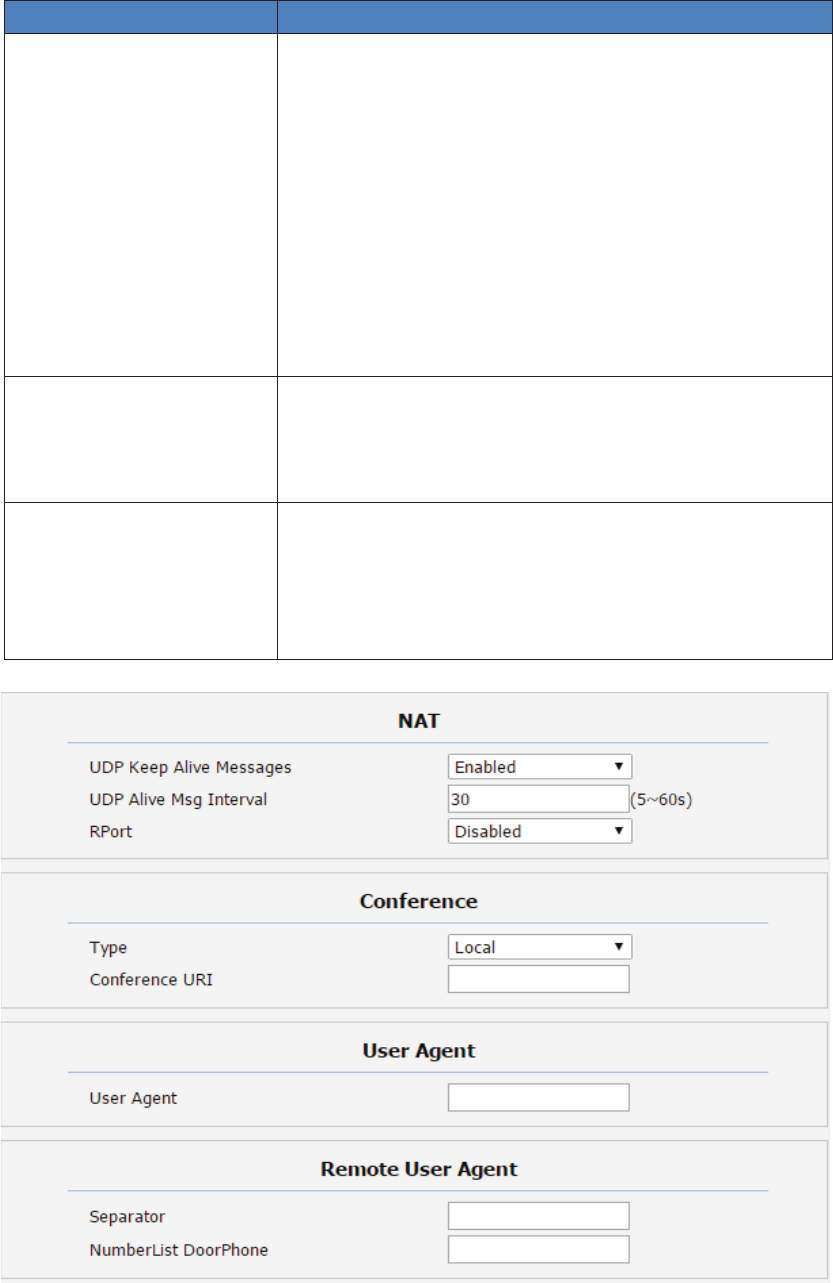
113
SectionsDescription
SessionTimer Todisplayorconfiguresessiontimersettings.
zActive:Toenableordisablethisfeature,Ifenable,the
ongoing call will be disconnected automatically once
thesessionexpiredunlessit’s been refreshedbyUAC
orUAS.
zSessionExpire:Configuresessionexpiretime.
zSession Refresher: To configure who should be
responseforrefreshingasession.
Note: UAC means User Agent Client, here stands for IP
phone. UAS means User Agent Server, here stands for SIP
server.
BLFList TodisplayorconfigureBLFListURIaddress.
zBLFListURI:BLFListisshortforBusyLampFieldList.
zBLFListPickUpCode:TosettheBLFpickupcode.
zBLFListBargeInCode:TosettheBLFbargeincode.
Broadsoft TodisplayorconfigureBroadsoftAOCfeature.
zAOC: A feature used to be accounting on Broadsoft
platform.
Note: Please consult your administrator further
information.
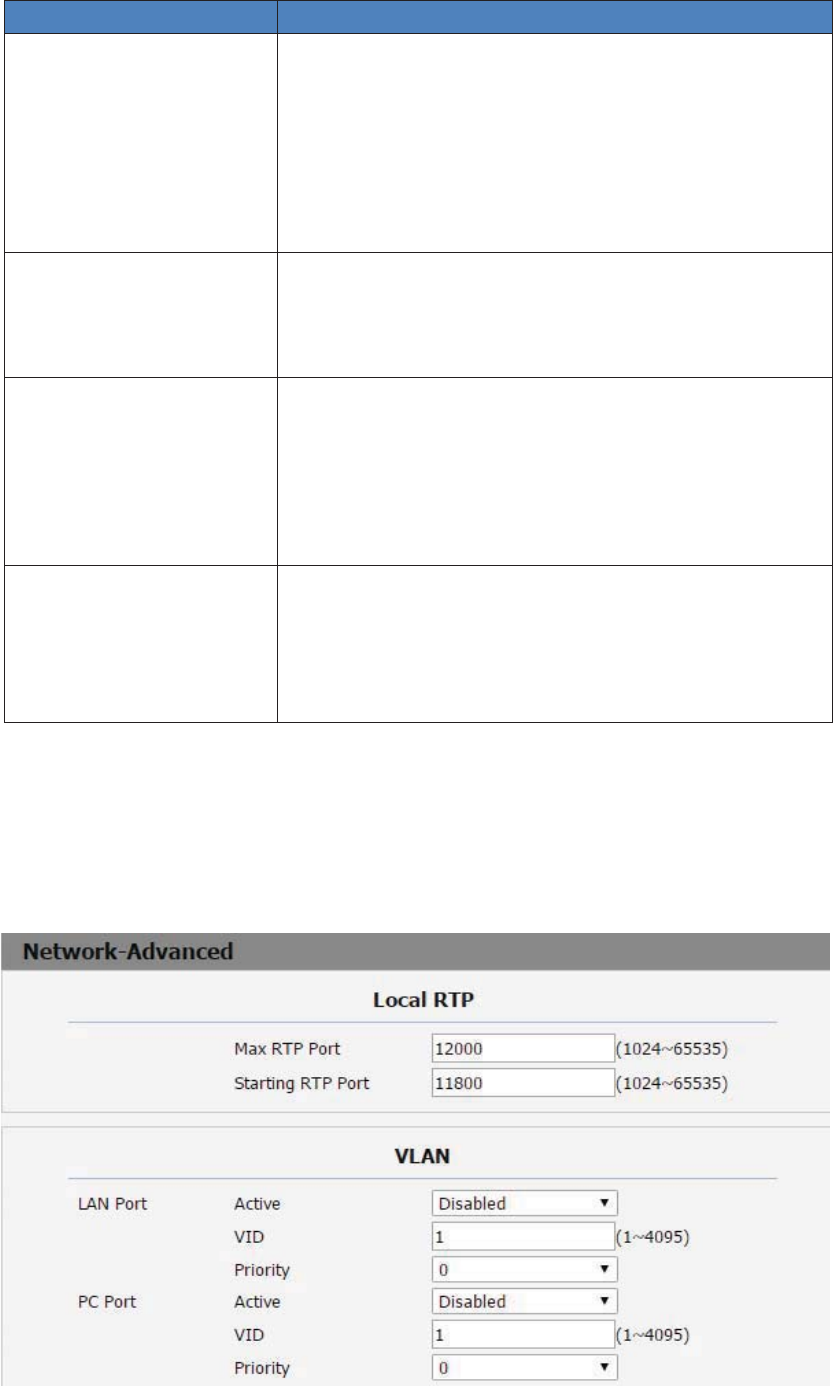
114
8.5 Network>Advanced
SectionsDescription
Net TodisplayNATrelatedsettings.
zUDP Keep Alive message: If enabled, IP phone will
sendUDPkeepalivemessageperiodicallytorouterto
keepNATportalive.
zUDPAliveMsgInterval:Keepalivemessageinterval.
zRport:RemotePort,ifenabled,itwilladdRemotePort
intooutgoingSIPmessagefordesignatedaccount.
Conference ToselectLocalornetworkconference.
zType:Toselectdesiredconferencetype
zConference URI: If network conference is selected, a
networkconferenceURIisneededtobeinput.
UserAgent One cancustomizeUser Agentfield in the SIP message;If
user agent is set to specific value, user could see the
informationfromPCAP. Ifuseragentisnot set bydefault,
user could see the company name, model number and
firmwareversionfromPCAP
RemoteUserAgent This feature need to be used with Auto Anser Doorphone
Delay.Gotothepath:Phone>CallFeature.
zSeparator:Setupaseparater,suchas“,”,“*”or“#”to
separatemanydoorphoneaccount.
zNumberList DoorPhone: Fill multiple doorphone number .
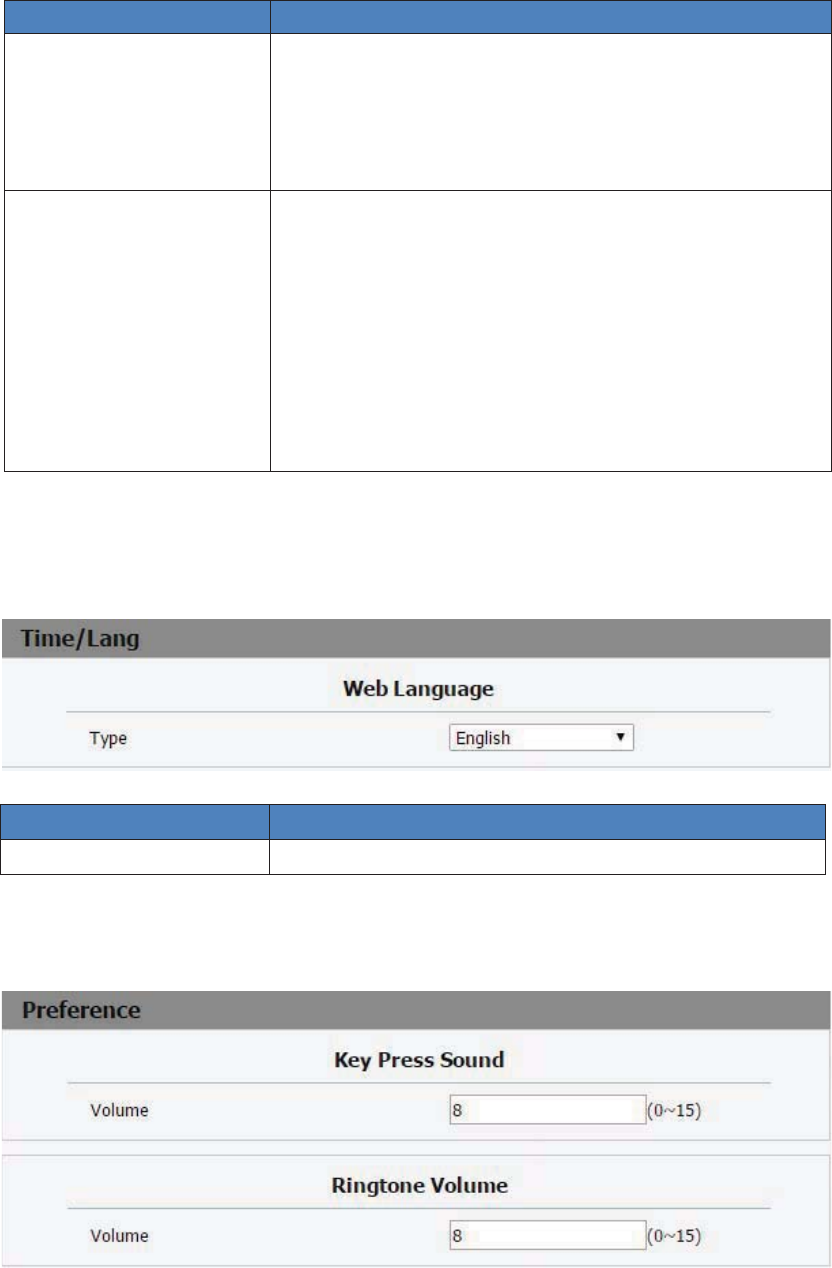
115
Sections Description
LocalRTP TodisplayandconfigureLocalRTPsettings.
zMax RTP Port: Determine the maximum port that RTP
streamcanuse.
zMin RTP Port: Determine the minimum port that RTP
streamcanuse.
VLAN TodisplayandconfigureVLANsettings.
zLAN Port/PC Port: You can configure VLAN setting for
bothportsrespectively.
zActive: To enable or disable VLAN feature for
designatedport.
zVID:ToconfigureVLANidfordesignatedport.
zPriority:ToselectVLANpriorityfordesignatedport.
Note: Please consult your administrator for specific VLAN
settingsinyournetworkingenvironment.
8.6 Phone>Time
Sections Description
WebLanguage Tochoosetheweblanguage.Englishbydefault.
8.7 Phone>Preference
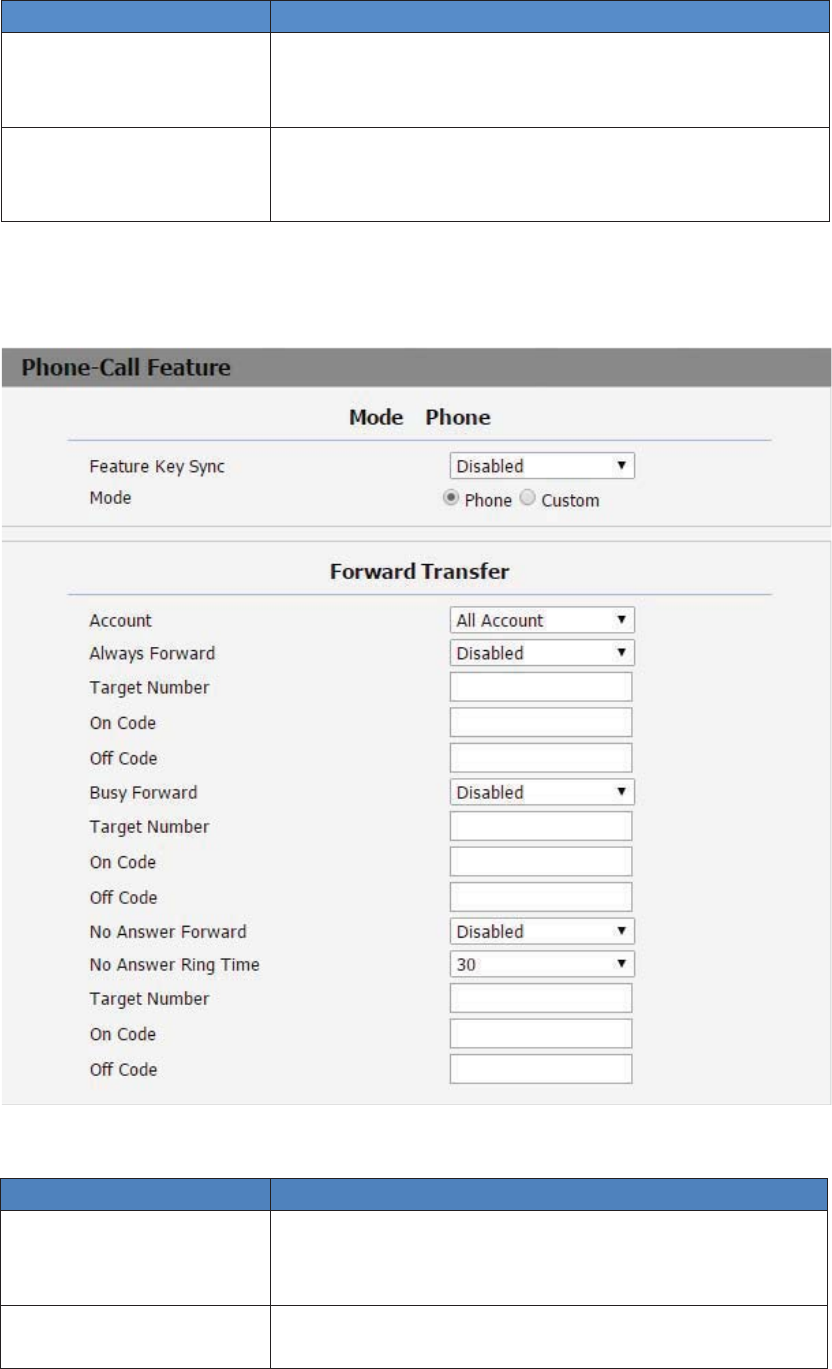
116
Sections Description
KeyPressSound Toconfigurethesoundvolumeforkeypress.
zVolume: The valid volume range is from 0~15,by
defaultit’s8.
RingtoneVolume Toconfigurethesoundvolumeforringtone.
zVolume: The valid volume range is from 0~15,by
defaultit’s8.
8.8 Phone>CallFeature
Sections Description
ModePhone Toenableordisablefeaturekeysync.
zFeatureKeySync:Toenableordisablefeaturekeysync.
zMode:Selectthedesiredmode.
ForwardTransfer TodisplayandconfigureForwardsetting.
Note: There are three types of forward: Always Forward,
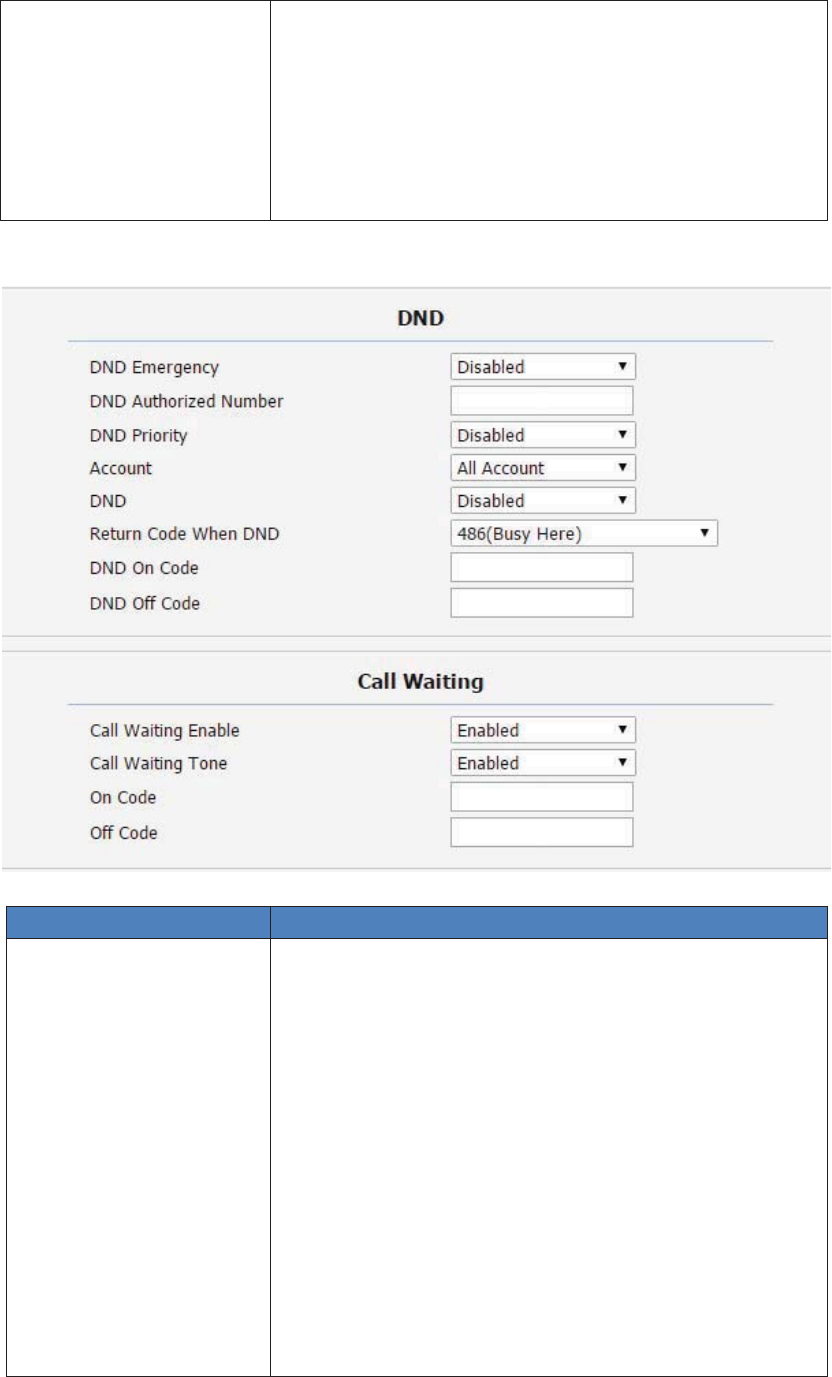
117
BusyForwardandNoanswerForward.
zAlwaysForward:Anyincomingcallwillbeforwardedin
anysituation.
zBusyForward:AnyincomingcallwillbeforwardedifIP
phoneisbusy.
zNo answer Forward: Any incoming call will be
forwardedifit’snoanswerafteraspecifictime.
SectionsDescription
DNDzDND(Do Not Disturb) allows IP phones to ignore any
incomingcalls.
zDND Emergency: Enable this function, users can still
receivethecallfromDNDAuthorizednumberwhenin
emergencysituation.
zDND Authorized Number: R48G supports multiple
authorizednumbers.Pleaseusecommatoseparate.
zDND Priority: Enable this function. If you enable DND
and Forward function in the same time, the DND
priorityishigherthanForwardfunction.
zAccount:SelectaaccountforDNDfunction
zDND:Enablethisfunction
zReturn Code when DND: Determine what response
code should be sent back to server when there is an
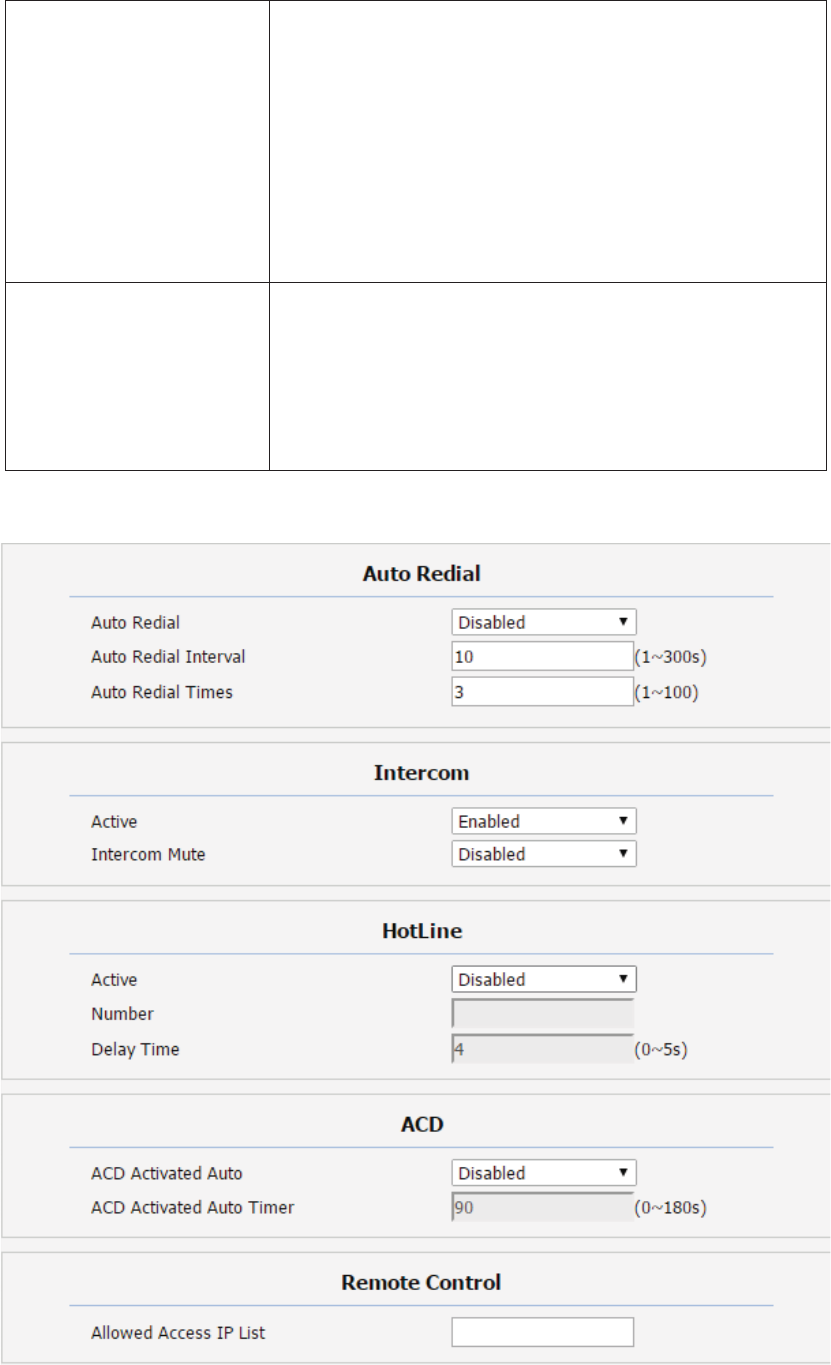
118
incomingcallifDNDon.
zDND On Code: The Code used to turn on DND on
server’s side, if configured, IP phone will send a SIP
messagetoservertoturnonDNDonserversideifyou
pressDNDwhenDNDisoff.
zDND Off Code: The Code used to turn off DND on
server’s side, if configured, IP phone will send a SIP
messagetoservertoturnoffDNDonserversideifyou
pressDNDwhenDNDison.
CallWaiting ToenableordisableCallWaiting.
zCall Waiting Enable: If enabled, it allows IP phones to
receive a new incoming call when there is already an
activecall.
zCall Waiting Tone: If enabled, it allows IP phones to
playthecallwaitingtonetothewaitingcallee.

119
SectionsDescription
AutoRedial Auto redial allows IP phones to redial an unsuccessful call
fordesignatedtimeswithindesignatedinterval.
zAutoRedial:Toenableordisableautoredialfeature.
zAuto Redial Interval: Determine the interval between
twoconsecutiveattempts.
zAuto Redial Times: Determine how many times to
redial.
Intercom Intercom allow user to establish a call directly with the
callee.
zActive:ToenableordisableIntercomfeature.
zIntercom Mute: If enabled, once the call established,
thecalleewillbemuted.
Hotline HotLineallowsusertocalloutadefinednumber
automaticallyafterhearingthedailtonewithoutdialingany
number.
zActive:ToenableordisableHotLinefeature.
zNumber:TosetadefinedHotLinenumber.
zDelay Time: To set the automatically call out interval
afterhearingthedailtone.
ACD ACD(AutomaticCallDistribution)ismostusedincallcenter
market,itallowsIPphonetologinthesystemwithmultiple
statussothatthesystemcoulddistributeanincomingcalls
toavailableuseroragents.
zACDActivatedAuto:Ifenabled,Agentstatuswillturnto
available automatically within a designated
time(decidedbyACDActivatedAutoTimer).
zACD Activated Auto Timer: To configure interval when
willAgentstatusbecomesavailableautomatically.
zACDPwdRequired:ToenabletheACDpassword.
RemoteControl Remote Control allows specific host to interact with IP
phone by sending HTTP or HTTPS requests. The specific
action could be answering an incoming call, hangup an
ongoingcallandsoon.
zAllowed Access IP List: To configure the allowed host
address.
zNote:Fornow,IPphonecanonlysupportIPaddress,IP
addresslistandIPaddresspatternasallowedhosts
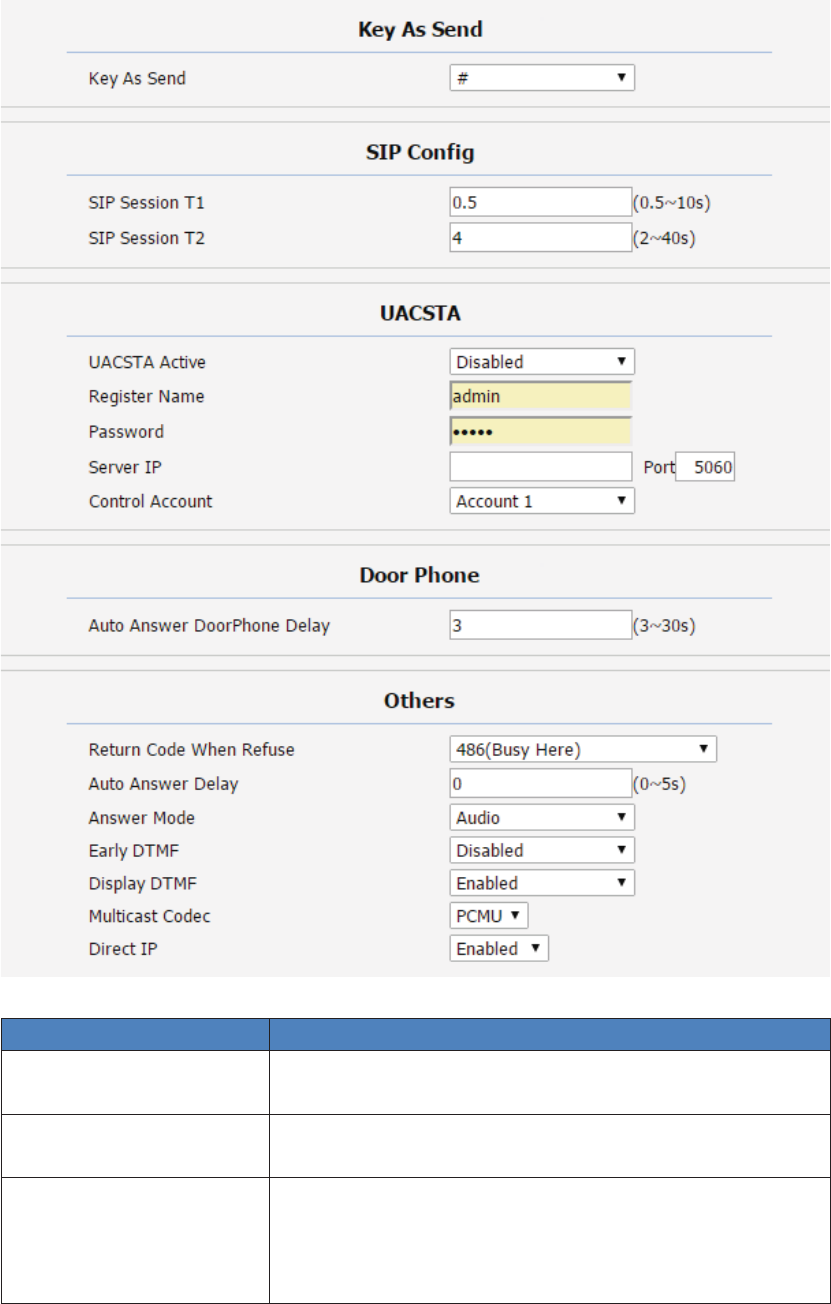
120
SectionsDescription
KeyAsSend KeyAsSendallowsyoutodisablesendkeyorassignpound
keyassendkey.
SIPConfig SetuptheSIPprotocolpackageinterval.T2ismaximum.The
intervalshouldbelargertheT1,butlessthenT2.
UACSTA Using CSTA for SIP phone user agents. It can control some
featuresofcalling.UACSTAisusedtosendECMA323(CSTA
XML) information during SIP calling. The default status is
disabled.
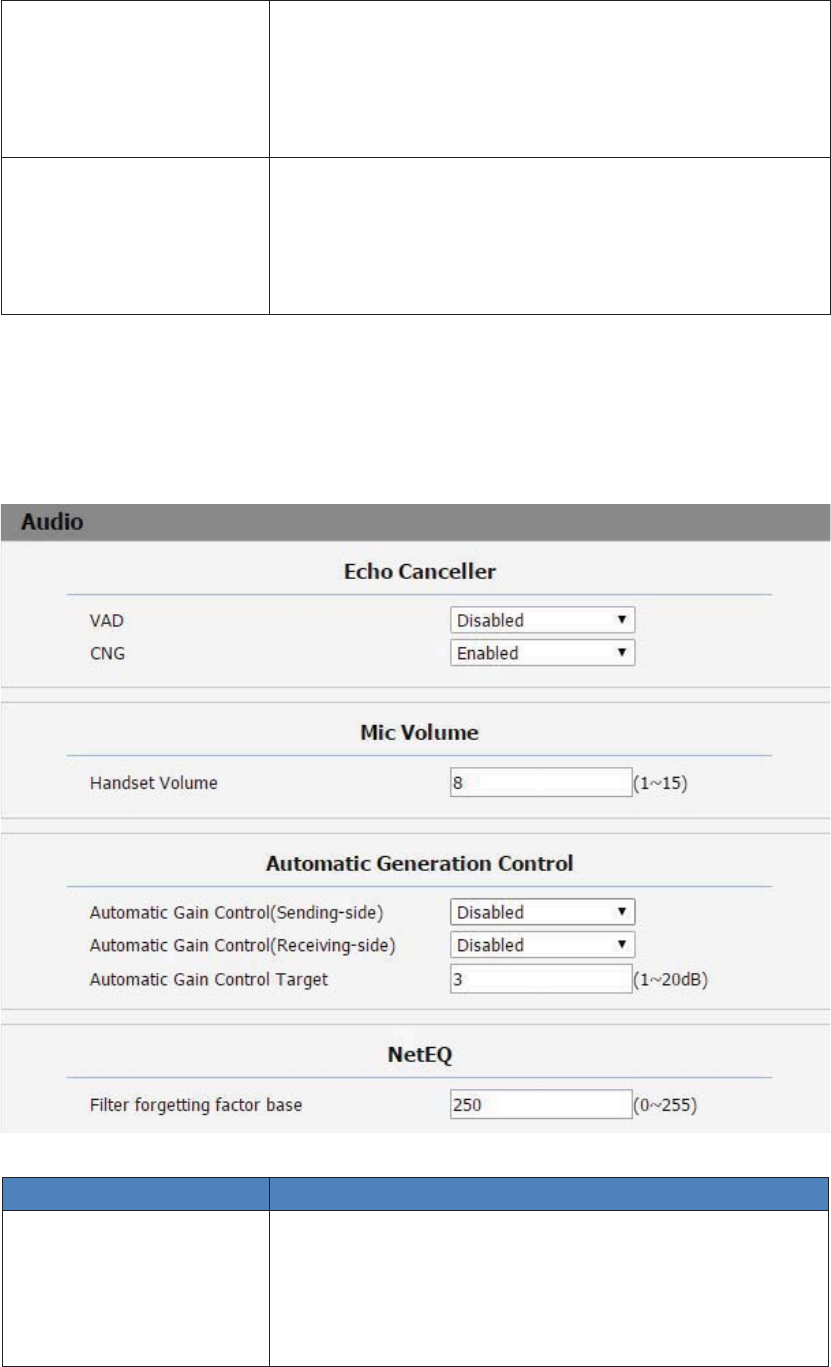
121
DoorPhoneWhenthereisanincomingcallfromdoorphone,setupthe
delayautoanswertime,R48Gwillautoanswerthecallafter
thetimeout.
Note:ifyouenable Auto Answerfunction,thisfeature will
benotavailable.
Others zReturn Code When Refuse: Allows user to assign
specific code as return code to SIP server when an
incomingcallisrejected.
zAuto Answer Delay: To configure delay time before an
incomingcallisautomaticallyanswered.
8.9 Phone>Audio
Sections Description
EchoCanceller EchoCanceller:Toremoveacousticechofromavoice
communicationinordertoimprovethevoicequality.
zVAD(VoiceActivityDetection):AllowIPphonetodetect
thepresenceorabsenceofhumanspeechduringacall.
Whendetectingperiodof “silence”,VADreplacesthat

122
silence efficiently with special packets that indicate
silenceisoccurring.Itcanfacilitatespeechprocessing,
and deactivate some processes during nonspeech
section of an audio session. It can avoid unnecessary
coding or transmission of silence packets in VoIP
applications, saving on computation and network
bandwidth.
zCNG(Comfort Noise Generation): Allow IP phone to
generate comfortable background noise for voice
communications during periods of silence in a
conversation.It is a partofthesilence suppression or
VADhandlingforVoIPtechnology.CNG,inconjunction
withVADalgorithms,quicklyrespondswhenperiodsof
silence occur and inserts artificial noise until voice
activity resumes. The insertion of artificial noise gives
theillusion of a constanttransmission stream, sothat
backgroundsoundisconsistentthroughoutthecalland
thelistenerdoesnotthinkthelinehasreleased.
MicVolume ToconfigureMicrophonevolumeforhandsetmode.
Automatical Generation
Control
R48Gwillautoadjustamplificationcircuitgainviasignal.
zAutomatic Gain Control(Sendingside): Disabled by
default
zAutomatic Gain Control(Receivingside): Disabled by
default
zAutomaticGainControlTarget:Rangefrom1to20dB.
3dBbydefault.
NetEQ Filter forgetting factor base: Range from 0~255. 250 by default.
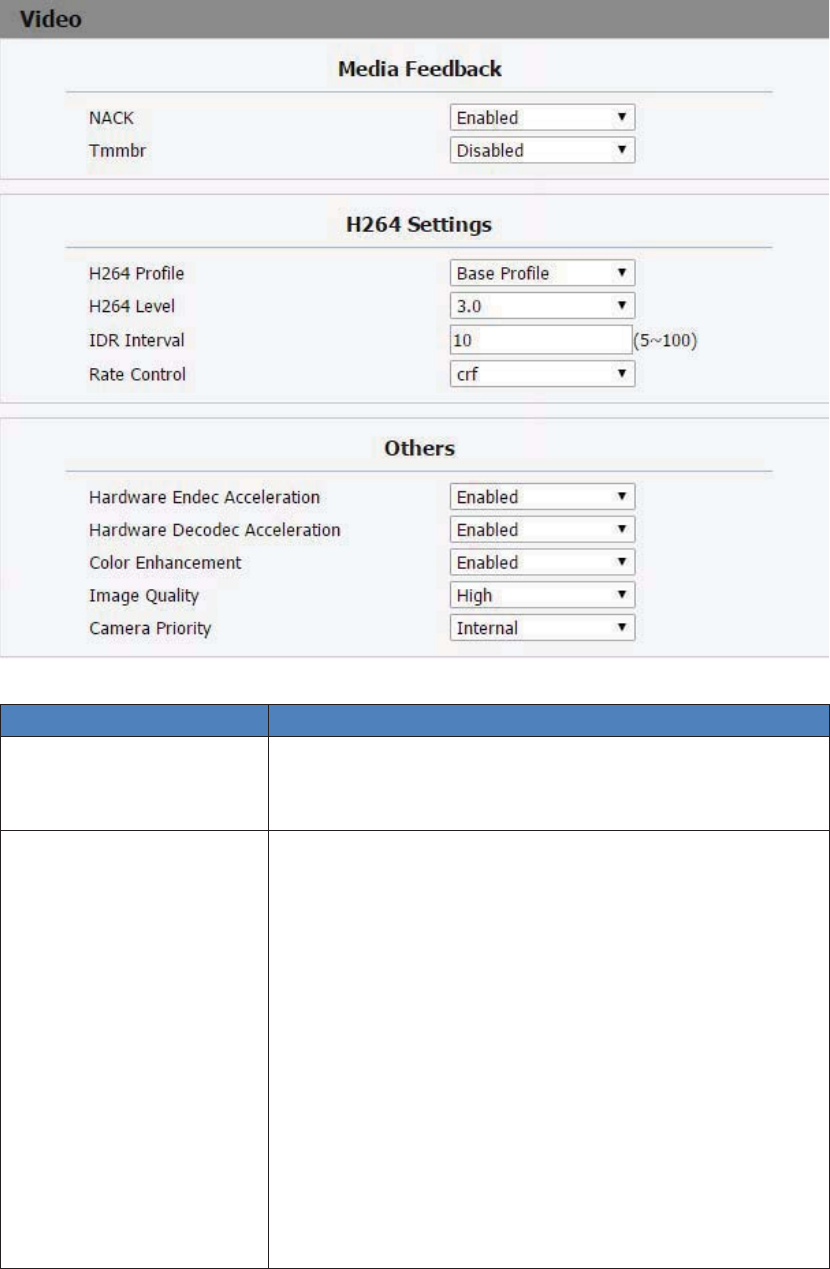
123
8.10 Phone>Video
Sections Description
MediaFeedback zNACK:Enabledittofiltermosaic.
zTmmbr: Send the maximum temporary rate request.
Disabledbydefault.
H264Settings H264:Avideostreamcompressionstandard.Differentfrom
H263, it provides an approximately identical level of video
streamqualitybutahalfbitrate.Thistypeofcompressionis
sometimescalledMPEG4part10.
TosetupcorrespondingH264videoparameters.
zH264Profile:Thereare4modesBaseǃMainǃHighǃ
Extendprofile.Differentprofilesmakesdifferentcoding
functionandvideoquality.
zH264 Level: Different profiles has corresponding Level
value.
zIDR Interval:IDR means Instantaneous Decoding
Refresh.Itisusedtocontroltheprocessofcodingand
decoding.
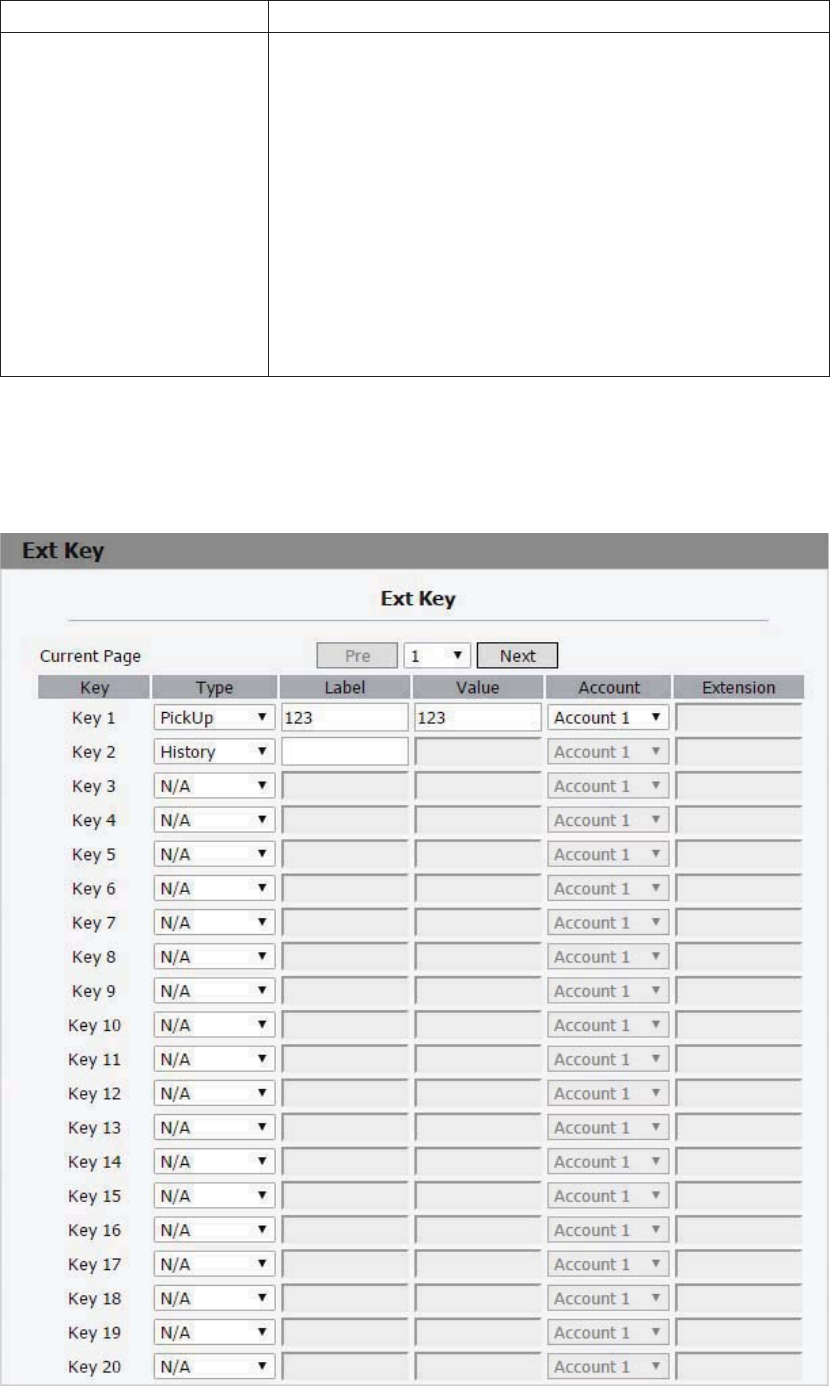
124
zRateControl:ChooseoneH264videorate.
Others zHardware Endec Acceleration: This function is used to
solve the image issue. User can enable the Hardware
EndecAccelerationwhenyouneed.
zHardwareDecodecAcceleration:Disabledbydefault.
zColor Enhancement: To increase the phone display
color.Enabledbydefault.
zImage Quality: User can select Low, MiddleorHigh
mode.
zCamera Priority: R48G can connect extra camera. If
R48G has 2 cameras , please setup the priority for
externalcameraorinternalone.
8.11 Phone>ExtKey
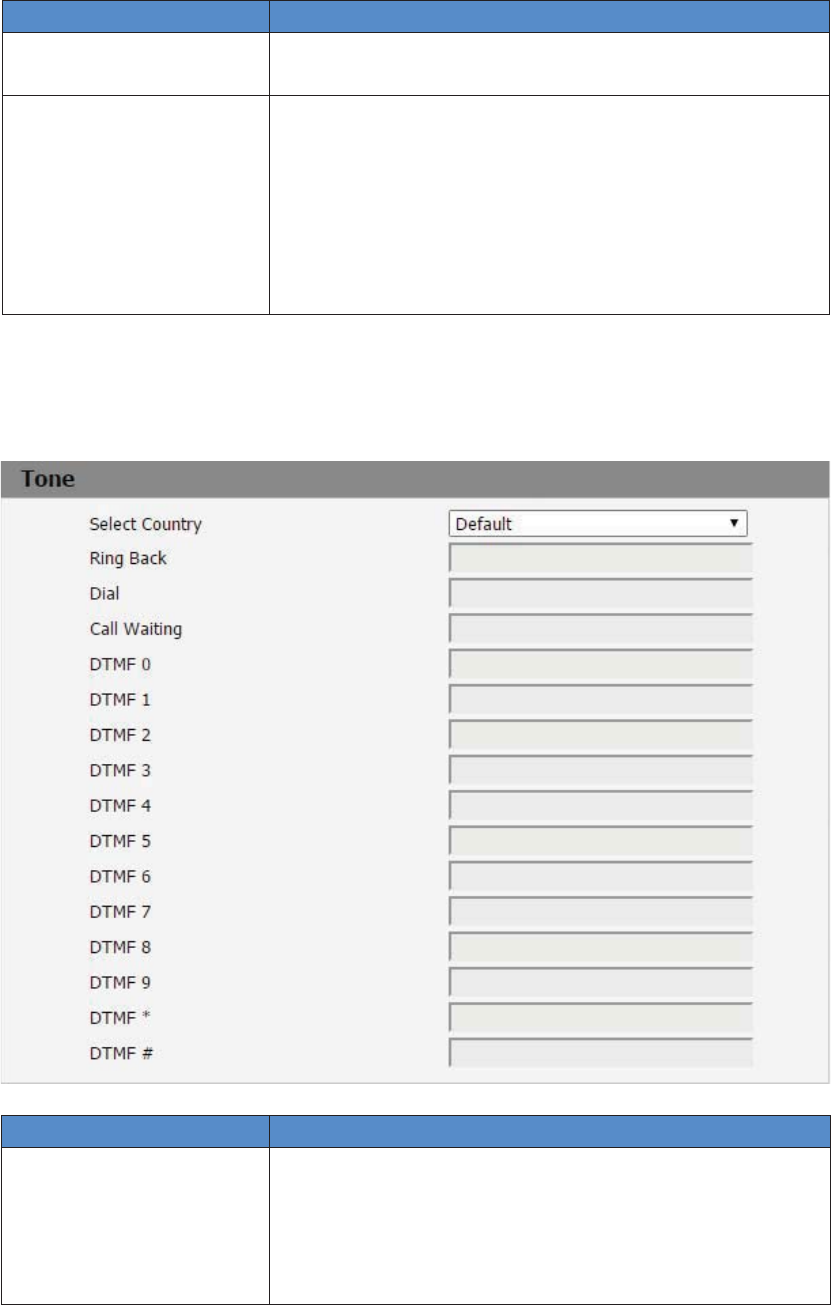
125
Sections Description
CurrentPage R48G can support 4 pages Ext Key. 20 Ext Keys for each
page.
Key Allowsusertoassignspecificfeaturetothedesignatedkey
onexpansionmodule.
Forkeys,theavailablefeaturelist:
DND,Menu,MSG,Status,Book,Fwd,PickUp,GroupPickUp,
Intercom, Speed Dial, History, Favorites, Redial, Account,
ACD, BLF, BLFList,Call Return, Hot Desking, Record, XML
Browser,DTMF.
8.12 Phone>Tone
Sections Description
Tone Allows user to select a specialized tone sets (classified by
countries)ortocustomizeowntones.
Note:Availablecountrytonessetsare:
China,Spain,Luxembourg,Sweden,Taiwan,Belgium,Denmark,
Finland,Germany,Netherlands,Norway,Portugal.
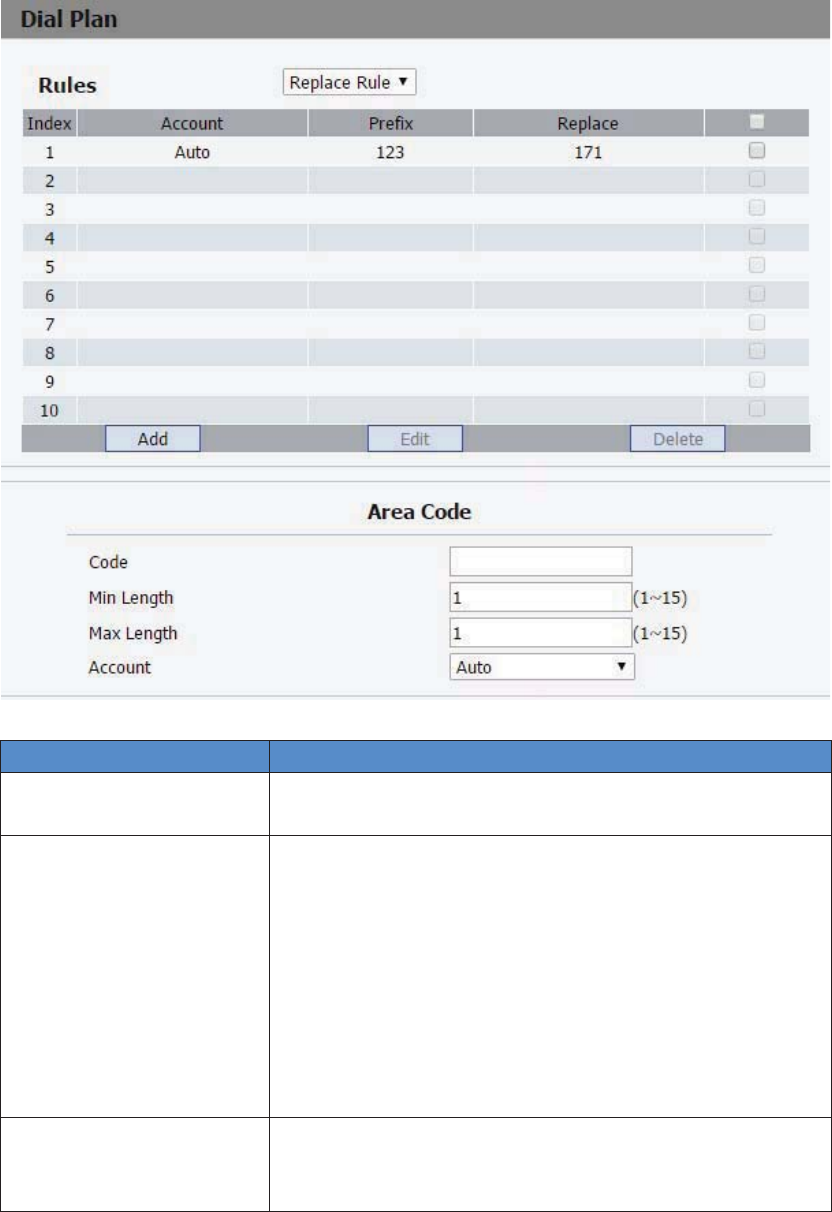
126
8.13 Phone>ReplaceRule
Sections Description
Rules Allow user to select Replace rule or Dialnow to display or
edit.
RulesModify Allow user to modify selected rules information. Once you
dialprefixvalue,itwillcalloutReplacenumber.
zClickAddtoaddnewreplacerules.
zSelectaccountforthereplacerule
zInputasuitableprefixvalue.Enterthereplacenumber.
zClickSubmittosave.
Allreplaceruleswillshowinthelist.Userscaneditordelete
theexitedreplacerules.
AreaCode AreacodesarealsoknownasNPAs(NumberingPlanAreas).
Theyusuallyindicatedifferentgeographicalareaswithinone
country.Ifenterednumbersmatchthepredefinedarea
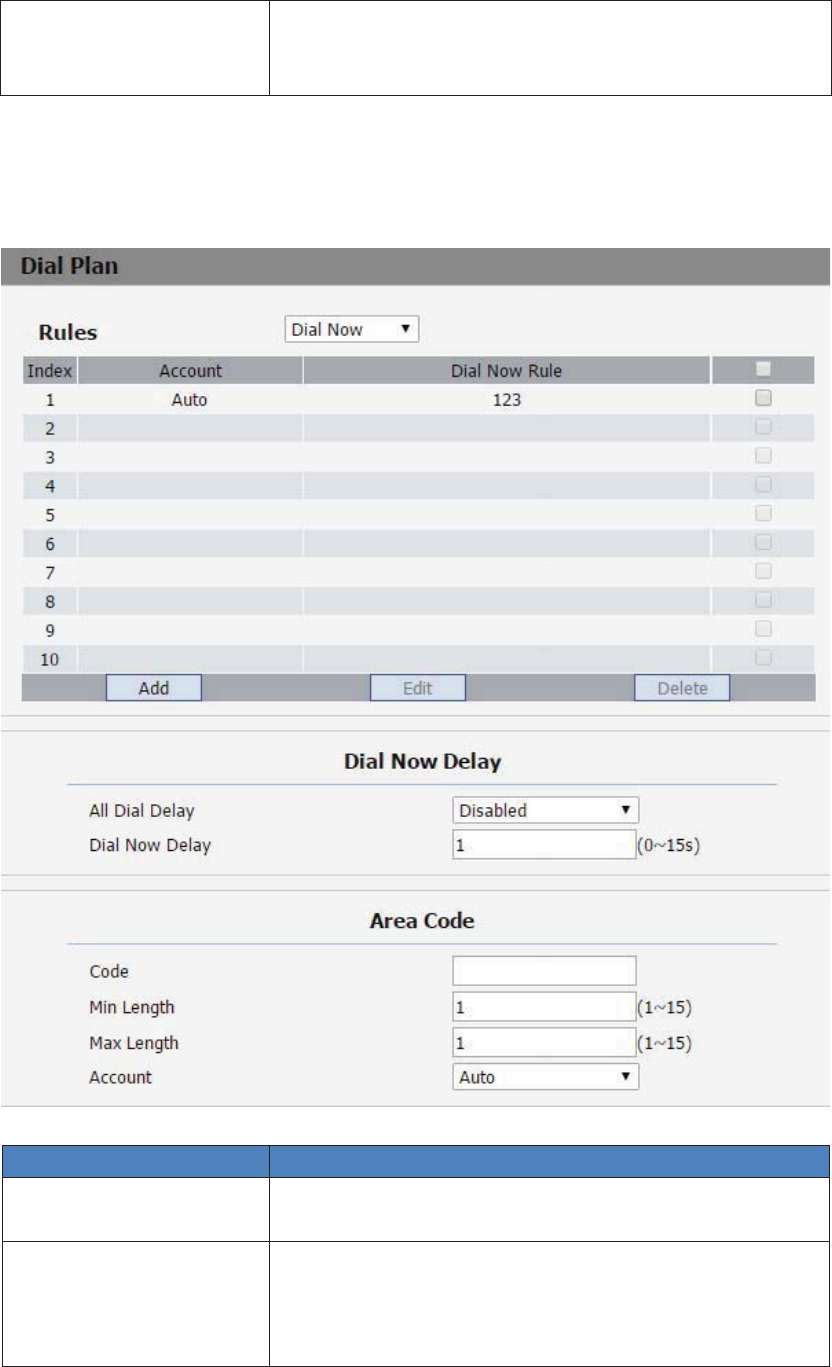
127
code rule, the IP phone will automatically prefix outgoing
numberwithareacode.
Note:Thereisonlyoneareacoderulesupported.
8.14 Phone>DialPlan
Sections Description
Rules Allow user to select Replace rule or Dialnow to display or
edit.
DialNowDelay Allowuserconfiguredialnowdelaytimefordialnow.
It means user can configure the IP phone to dial out the
phone number automatically after the designated delay
timeifitmatchanydialnowrule.

128
RulesModify Allow user to modify selected rules information, for
dialnow rule, user can modify related accounts, Dial now
Ruleitself.
z ClickAddtoaddnewdialnownumber.
z Selecttherelatedaccountfordialnow.
z EnterthenumberinDialNowRulearea.
z Clicksubmittosave.
Alldialnownumberswillshowinthelist.Userscaneditor
deletetheexiteddialnownumber.
AreaCode AreacodesarealsoknownasNPAs(NumberingPlanAreas).
They usually indicate different geographical areas within
onecountry.Ifenterednumbersmatchthepredefinedarea
code rule, the IP phone will automatically prefix outgoing
numberwithareacode.
Note:Thereisonlyoneareacoderulesupported.
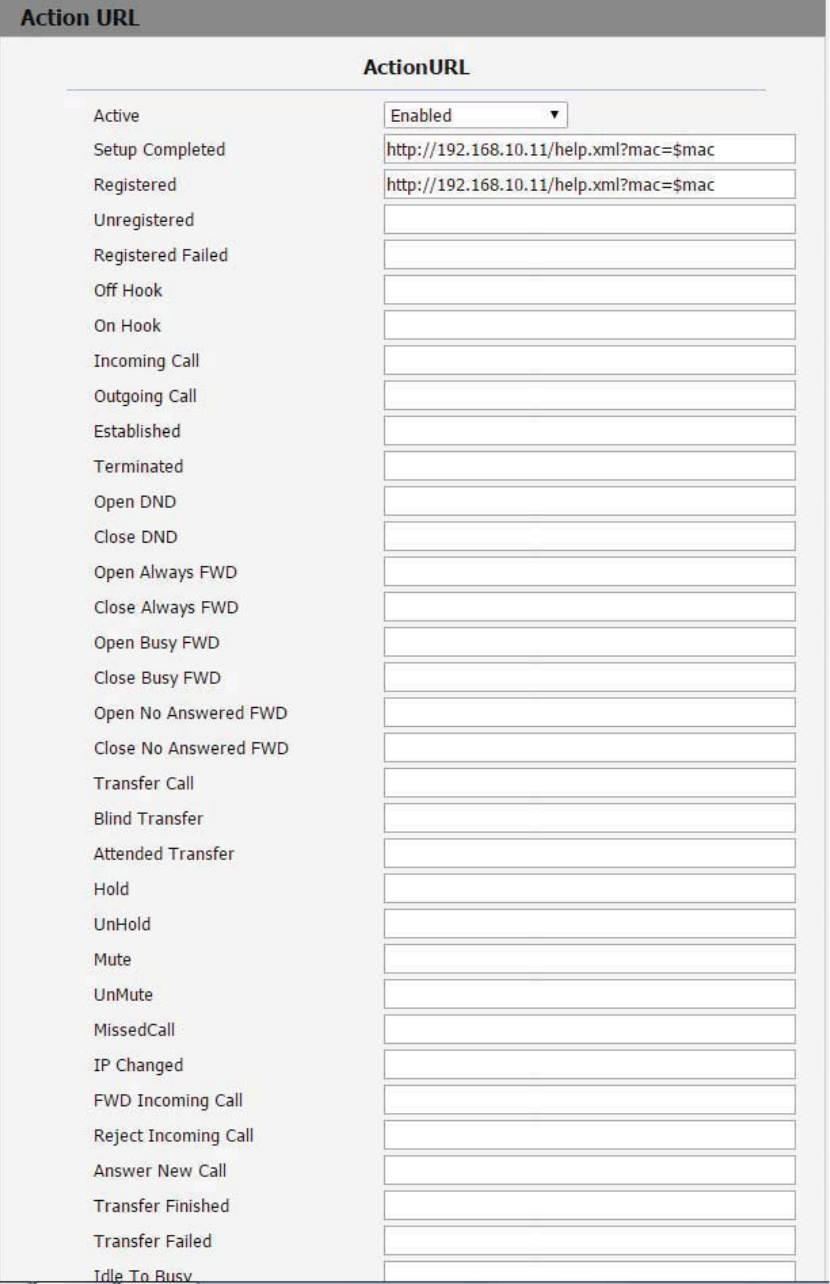
129
8.15 Phone>ActionURL

130
Sections Description
ActionURL TodisplayandconfigureActionURLsettings.
SetupCompleted:WhentheIPphonecompletesstartup.
zRegistered:WhentheIPphonesuccessfullyregistersan
account.
zUnregistered: When the IP phone logs off the
registeredaccount.
zRegisterFailed:WhentheIP phonefailstoregisteran
account.
zOffHook:WhentheIPphoneisoffhook.
zOnHook:WhentheIPphoneisonhook.
zIncomingCall:WhentheIPphonereceivesanincoming
call.
zOutgoingCall:WhentheIPphoneplacesacall.
zEstablished:WhentheIPphoneestablishesacall.
zTerminated:WhentheIPphoneterminatesacall.
zOpenDND:WhentheIPphoneenablestheDNDmode.
zClose DND: When the IP phone disables the DND
mode.
zOpenAlwaysForward:WhentheIPphoneenablesthe
alwaysforward.
zCloseAlwaysForward:WhentheIPphonedisablesthe
alwaysforward.
zOpen Busy Forward: When the IP phone enables the
busyforward.
zClose Busy Forward: When the IP phone disables the
busyforward.
zOpenNoAnswerForward:WhentheIPphoneenables
thenoanswerforward.
zCloseNoAnswerForward:WhentheIPphonedisables
thenoanswerforward
zTransferCall:WhentheIPphonetransfersacall.
zBlindTransfer:WhentheIPphoneblindtransfersacall.
zAttended Transfer: When the IP phone performs the
semiattended/attendedtransfer.
zHold:WhentheIPphoneplacesacallonhold.
zUnHold:WhentheIPphoneretrievesaholdcall.
zMute:WhentheIPphonemutesacall.
zUnMute:WhentheIPphoneunmutesacall.
zMissedCall:WhentheIPphonemissesacall.
zIP Changed: When the IP address of the IP phone
changes.
zFWD Incoming Call: When the IP phone forwards an
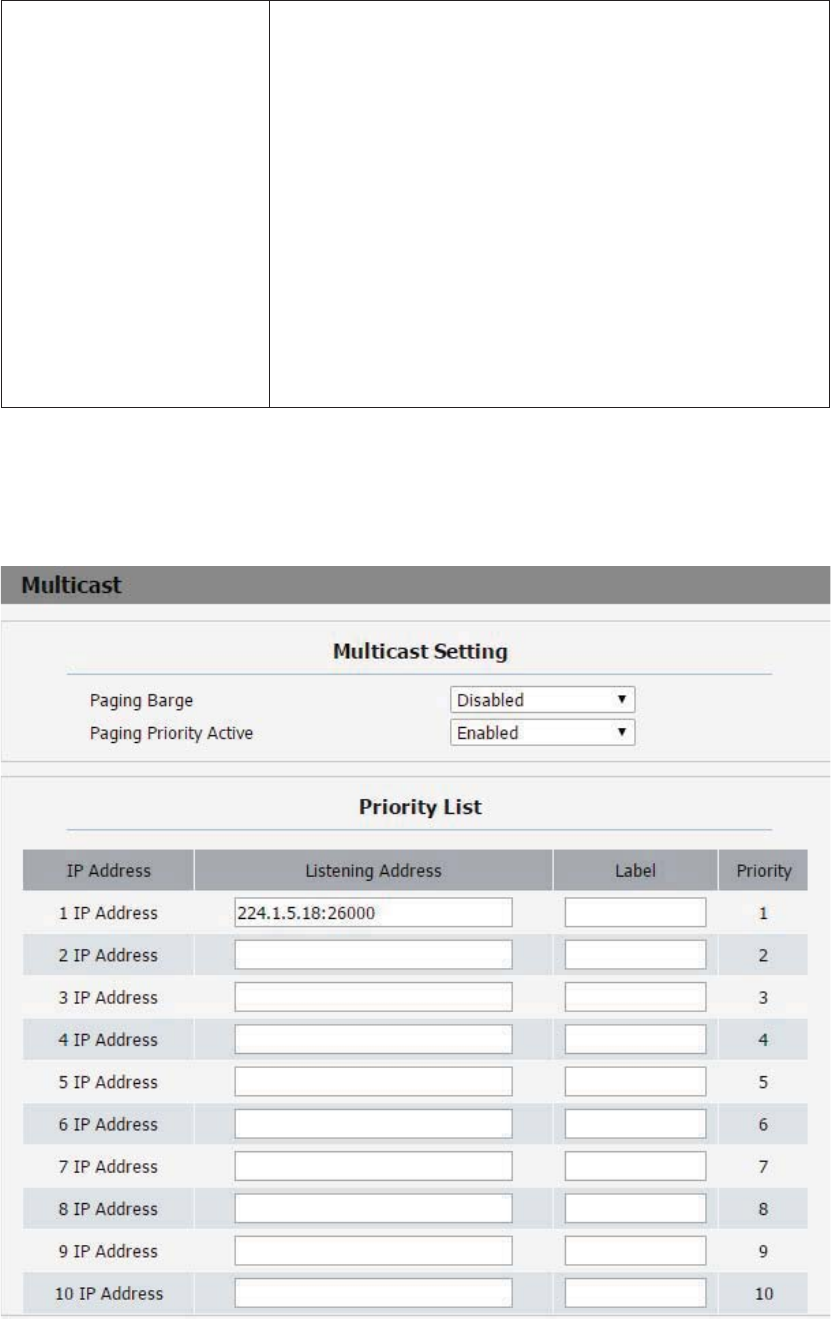
131
incomingcall.
zReject Incoming Call: When the IP phone rejects an
incomingcall.
zAnswer New Call: When the IP phone answers a new
call.
zTransfer Finished: When the IP phone completes to
transferacall.
zTransfer Failed: When the IP phone fails to transfer a
call.
zIdle To Busy:When the state of the IP phonechanges
fromidletobusy.
zBusy To Idle: When the state of phone changes from
busytoidle.
8.16 Phone>Multicast
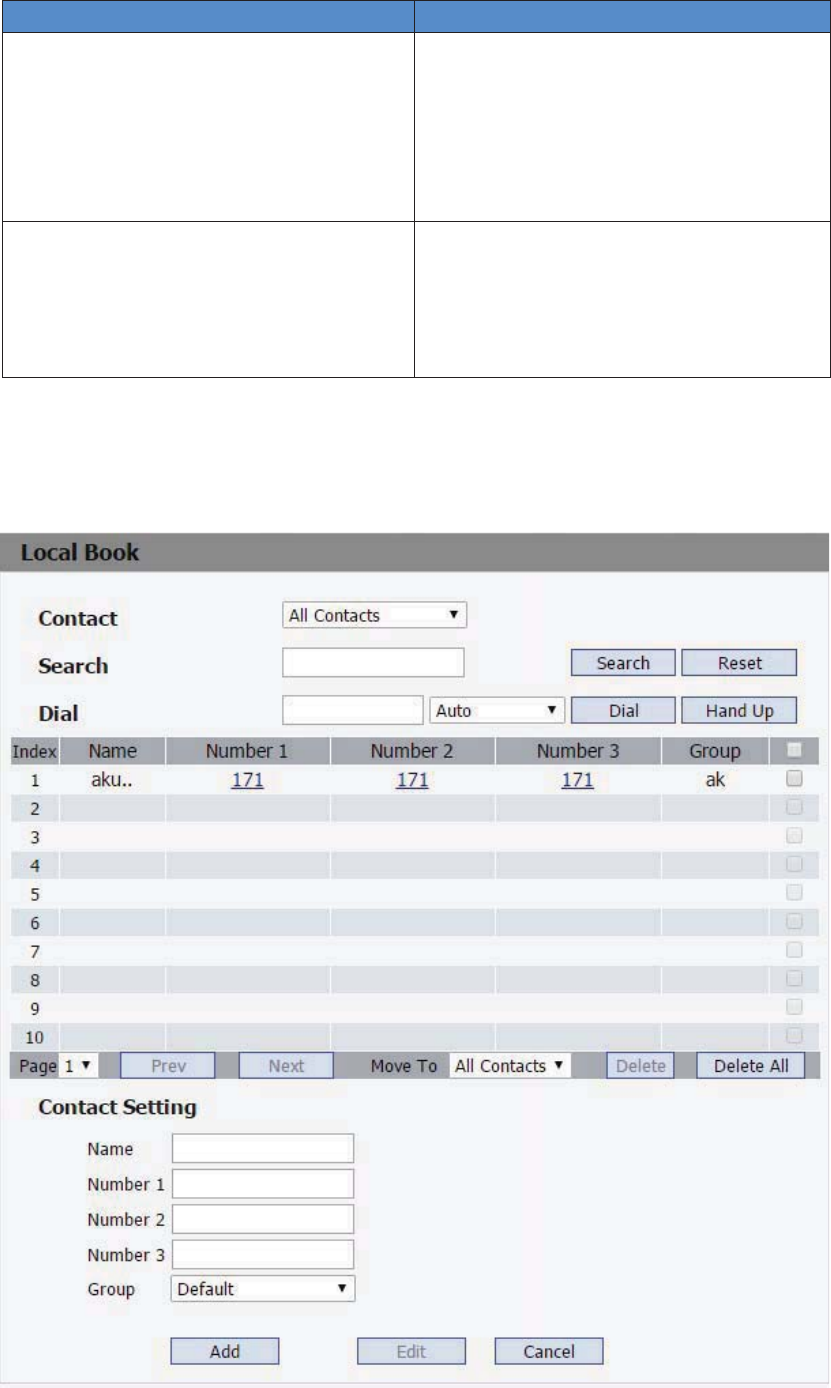
132
SectionsDescription
MulticastSetting To display and configure the Multicast
setting.
zPaging Barge: Setup the priority
quantity.
zPagingpriorityActive:Enableodisable
themulticast.
PriorityList Tosetupthemulticastparameters.
zListeningAddress:EntertheIPaddress
youneedtolisten
zLabel ˖ Input the label for each
listeningaddress
8.17 PhoneBook>LocalBook
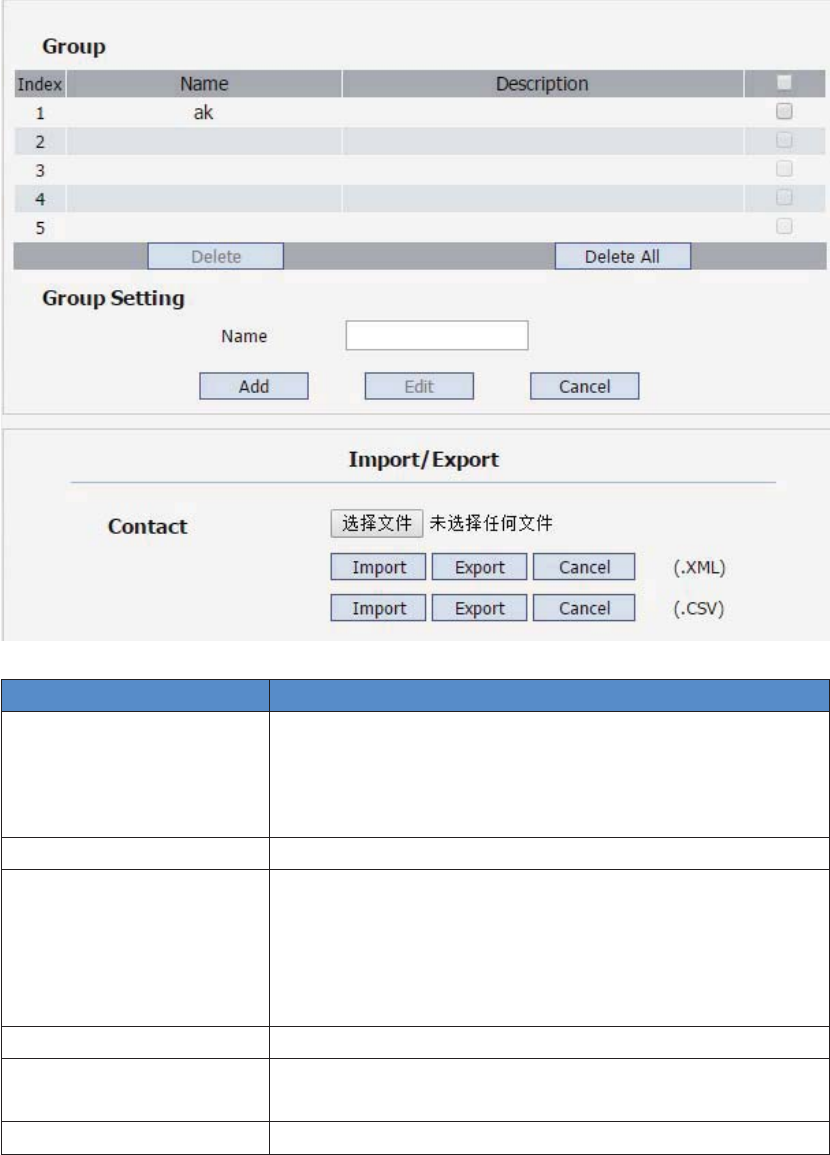
133
Sections Description
Contact Todisplayandselectlocalcontacttype.
zAllContacts:Todisplayoreditalllocalcontacts.
zFavorites:Todisplayoreditfavoritescontacts.
zBlackList:Todisplayblacklistcontacts.
Search Tosearchdesignatedcontactsfromlocalphonebook.
Dial TodialoutacallorhangupanongoingcallfromWebUI.
Note:Forthisfeature,youneedtohavetheremotecontrol
privilege to control IP phone via Web UI. Please refer to
section “Remote Control” in the Web UI>Phone>Call
Featurepage.
Group TodisplayoreditGroupcontacts.
GroupSetting To display or change Group name, related ringtone or
description.
Import/Export Toimportorexportthecontactorblacklistfile.
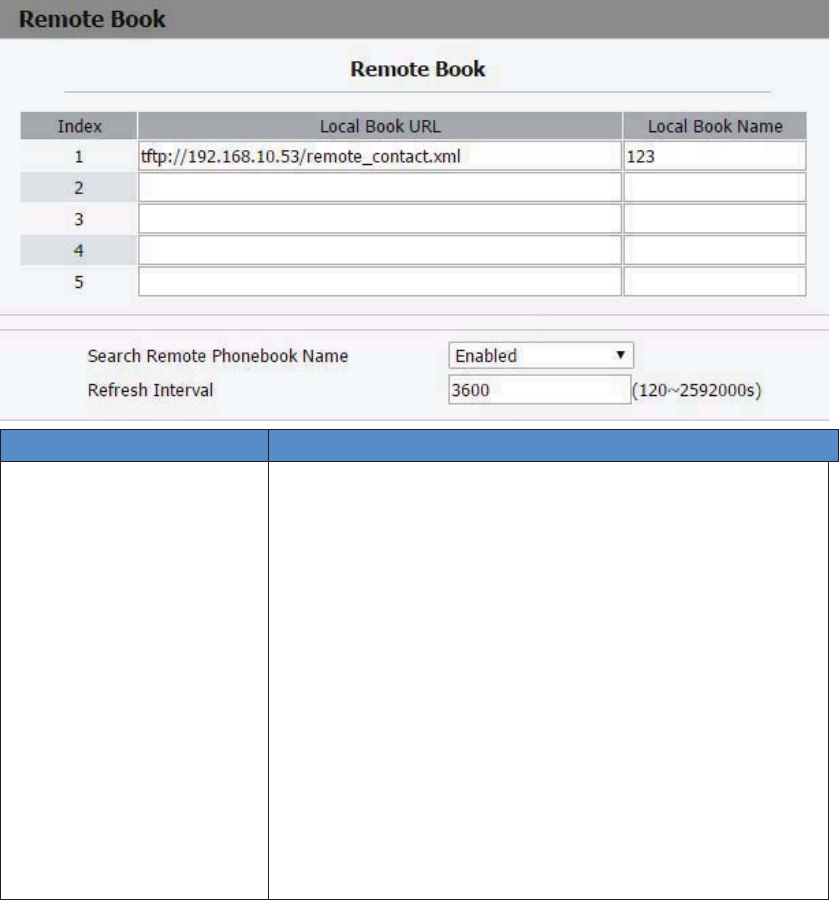
134
8.18 PhoneBook>RemoteBook
Sections Description
RemoteBook TodisplayandconfigureRemoteBooksettings.
zIndex: To select desired Remote Book item to display
andconfigure.
zLocal Book URL: To configure remote book server
address
zLocal Book Name: To configure display remote book
nameonPhoneUI
zSearchRemotePhonebookName:Toenableordisable
searchremotephonebookname
zSearchFlashInterval:Tosetinterval(Rangefrom120s
to2592000s)
Note: IP phone supports at most 5 remote books. Please
refer to your administrator for how to establish a remote
bookserverandhowtocreateremotebookxmlfile.
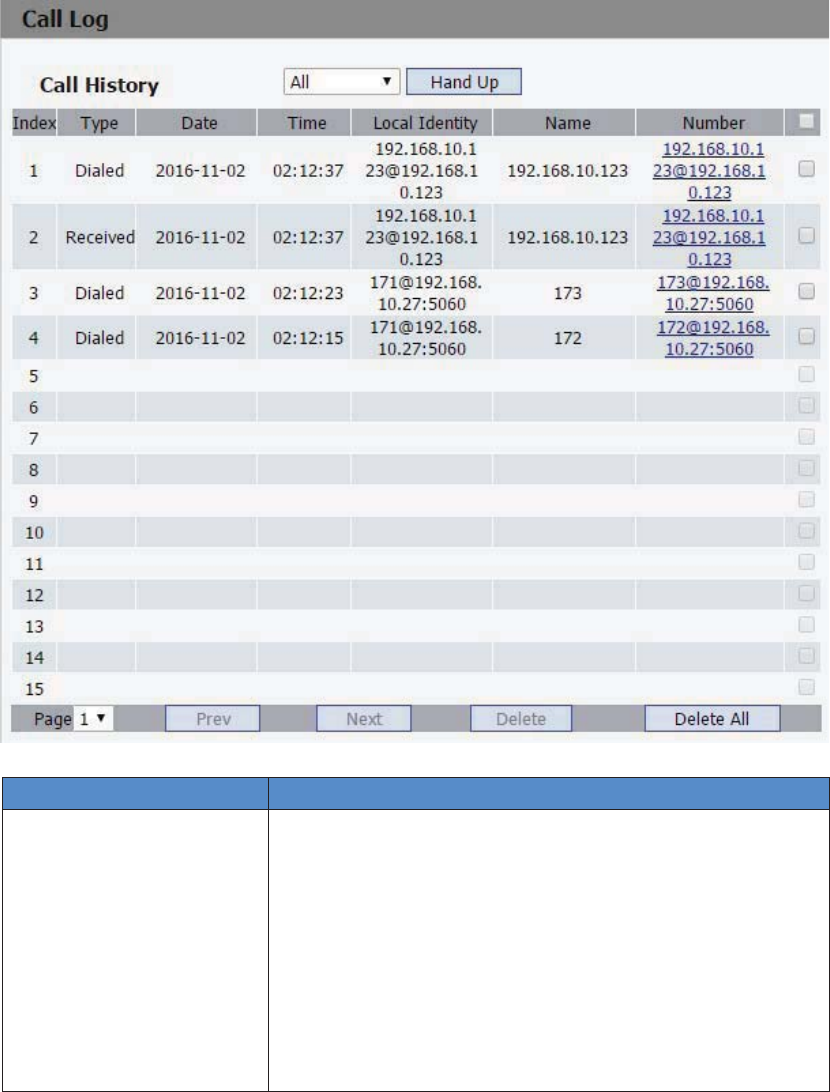
135
8.19 PhoneBook>CallLog
Sections Description
CallHistory Todisplaycallhistoryrecords.
Available call history types are All calls, Dialed calls,
Receivedcalls,Missedcalls,Forwardedcalls.
zHangUp: To click to hangup ongoing call on the IP
phone.
Note: For “HangUp” feature, you needto have the remote
controlprivilegetocontrolIPphoneviaWebUI.Pleaserefer
to section “Remote Control” in the Web UI>Phone>Call
Featurepage.
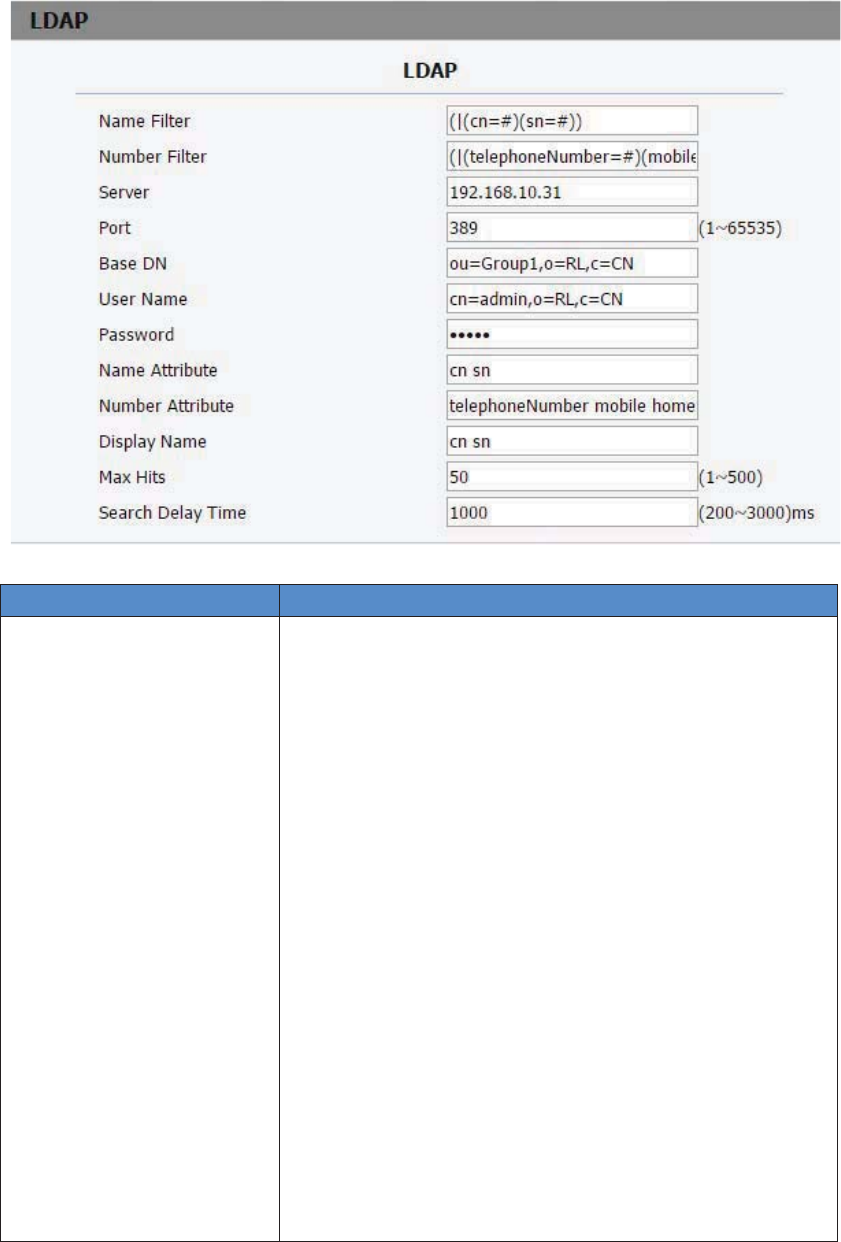
136
8.20 PhoneBook>LDAP
Sections Description
LDAP TodisplayandconfigureLDAPphonebooksettings.
zNameFilter:ThesettingsusedtotellLDAPserverwhat
nameattributestosearch.
zNumber Filter: The settings used to tell LDAP server
whatnumberattributestosearch.
zServer:ToconfigureLDAPserver’saddress.
zPort:ToconfigureLDAPserver’sport.
zBase DN: To configure searching base DN on LDAP
server.
zUserName:ToconfigureusernameforaccessingLDAP
server.
zPassword: To configure password for accessing LDAP
server.
zName Attribute: To configure which name attributes
shouldbefeedbackfromLDAPserver.
zNumber Attribute: To configure which number
attributesshouldbefeedbackfromLDAPserver.
zDisplayName:ToconfiguredisplaynameonPhoneUI
whenthereisanysearchingresultfromLDAPserver.
zMax Hits: To configure the maximum size of result
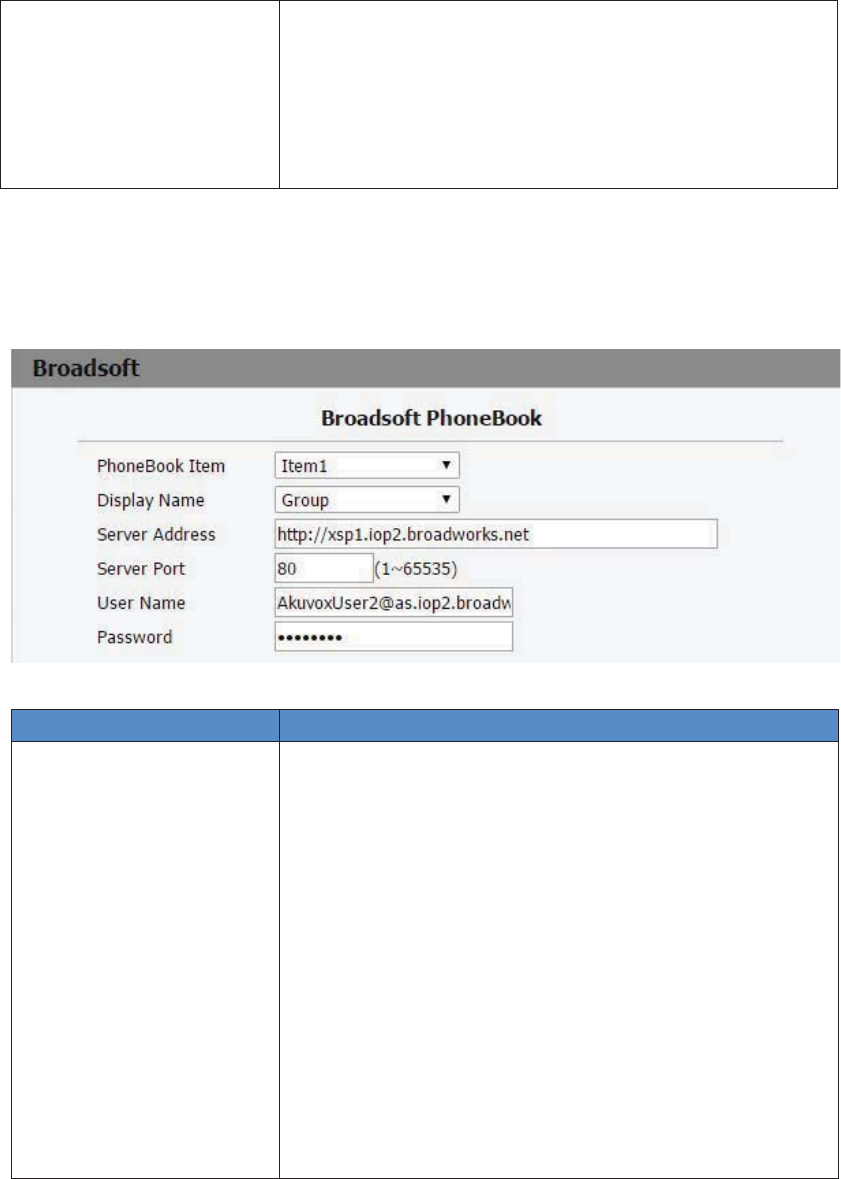
137
responsefromLDAPserver.
zSearch Delay Time: To configure delay time before
initiateLDAPsearchingrequestafteryouinputavalue
fromPhoneUI.
Note: For setting details,please consult with your system
administratorforfurtherinformation.
8.21 PhoneBook>Broadsoft
Sections Description
BroadsoftPhoneBook TodisplayandconfigureBroadsoftPhoneBooksettings.
zPhoneBookItem:Toselectspecificitemtoconfigure.
zDisplay Name: The name displayed at IP phone’s LCD
screenwhenaccessedviaPhoneUI.
zServerAddress:BroadsoftPhoneBookserver’saddress.
zServerPort:BroadsoftPhoneBookserver’sport.
zUser Name: Username used to access Broadsoft
PhoneBookserver.
zPassword: Password used to access Broadsoft
PhoneBookserver.
Note: IP phone supports at most 5 Broadsoft PhoneBook
items. For Broadsoft PhoneBook’s server address, port,
username and password, you need to consult your
Broadsoftserviceproviderforfurtherinformation.
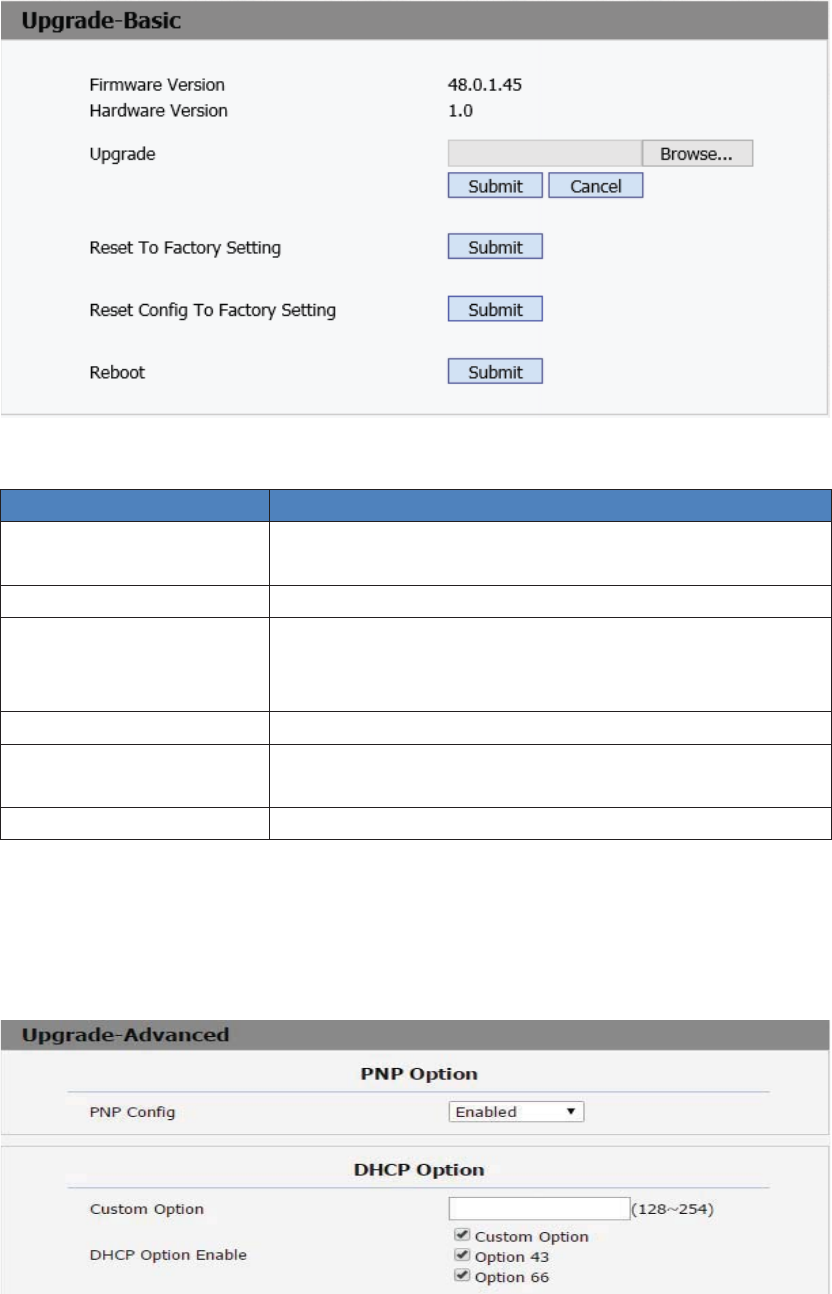
138
8.22 Upgrade>Basic
Sections Description
Firmwareversion To display firmware version, firmware version starts with
MODELname.
HardwareVersion TodisplayHardwareversion.
Upgrade To select upgrading zip file from local or a remote server
automatically.
Note:Pleasemakesureit’srightfileformatforrightmodel.
ResettoFactorySetting TosetupR48Gtofactorysetting.
Reset Config to Factory
Setting
Tosetuptheconfigurationfiletofactorysetting.
Reboot Clickthesubmittorebootthedevice
8.23 Upgrade>Advanced
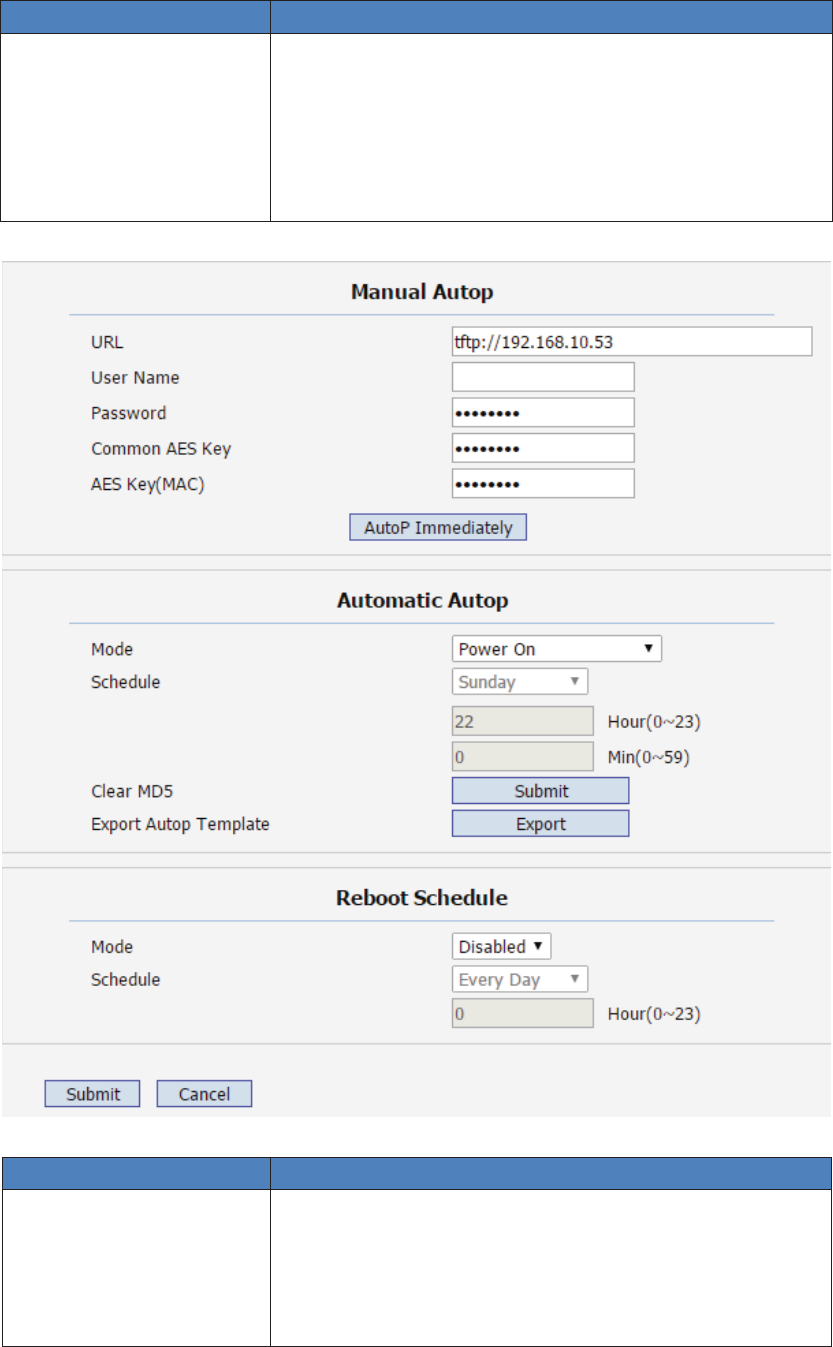
139
Sections Description
PNPOption TodisplayandconfigurePNPsettingforAutoProvisioning.
zPNP:PlugandPlay,oncePNPisenabled,thephonewill
send SIP subscription message to PNP server
automatically to get Auto Provisioning server’s
address.Bydefault,thisSIPmessageissenttomulticast
address224.0.1.75(PNPserveraddressbystandard).
SectionsDescription
ManualAutoP Todisplayandconfiguremanualupdateserver’ssettings.
zURL:Autoprovisioningserveraddress.
zUser name: Configure if server needs an username to
access,otherwiseleftblank.
zPassword: Configure if server needs a password to
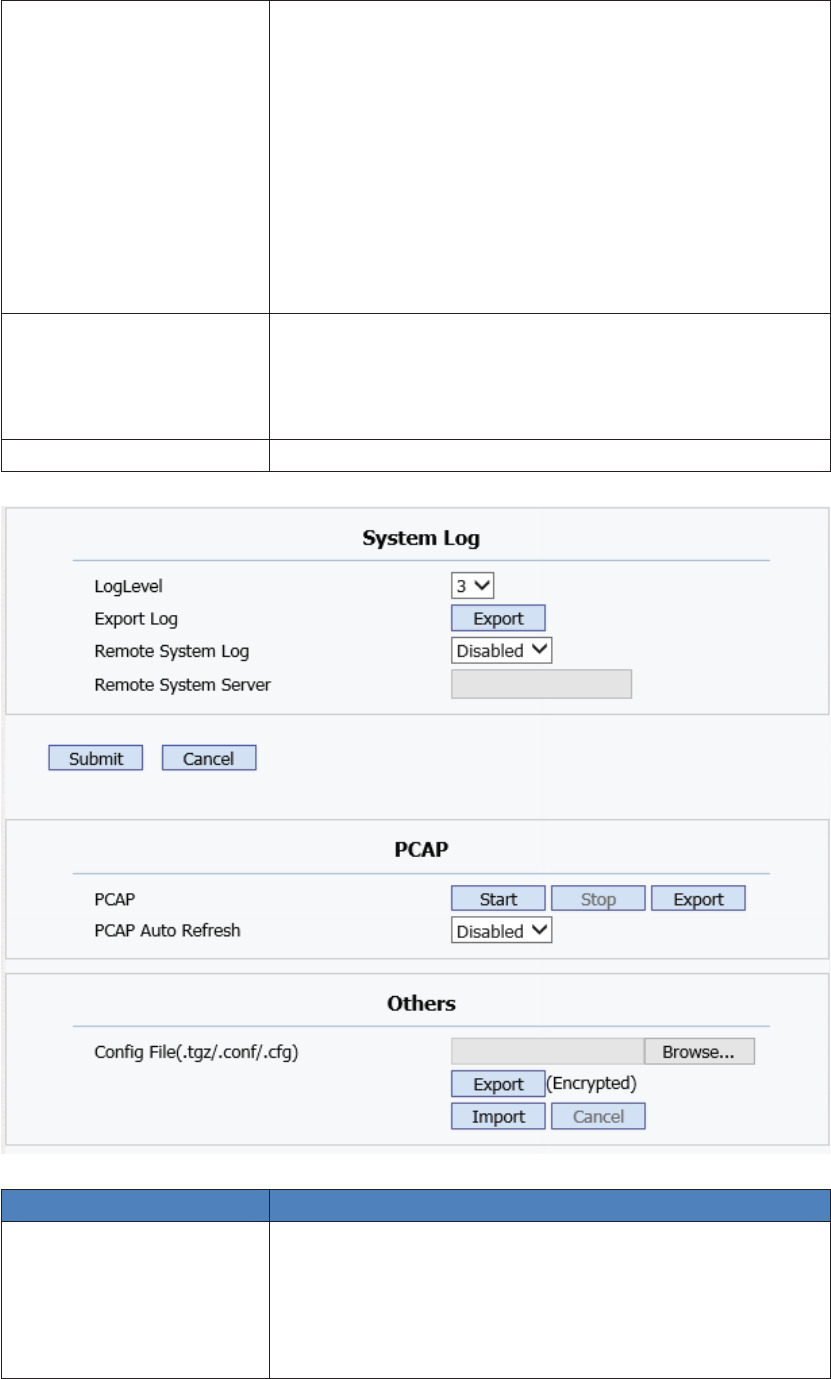
140
access,otherwiseleftblank.
zCommon AES Key: Used for IP phone to decipher
commonAutoProvisioningconfigurationfile.
zAES Key (MAC): Used for IP phone to decipher
MACoriented auto provisioning configuration file(for
example, file name could be 0c1105888888.cfg if IP
phone’sMACaddressis0c1105888888).
Note:AESisoneofmanyencryption,itshouldbeconfigure
only configure filed is ciphered with AES, otherwise left
blank.
AutomaticAutoP TodisplayandconfigureAutoProvisioningmodesettings.
ThisAutoProvisioningmodeisactuallyselfexplanatory.
For example, mode “Power on” means IP phone will go to
doProvisioningeverytimeitpowerson.
RebootSchedule Enabletosettherebootatdesignedtime.
SectionsDescription
SystemLog Todisplaysysloglevelandexportsyslogfile.
zSysloglevel:Fromlevel0~7.Thehigherlevelmeansthe
more specific syslog is saved to a temporary file. By
default,it’slevel3.
zExportLog:Clicktoexporttemporarysyslogfiletolocal
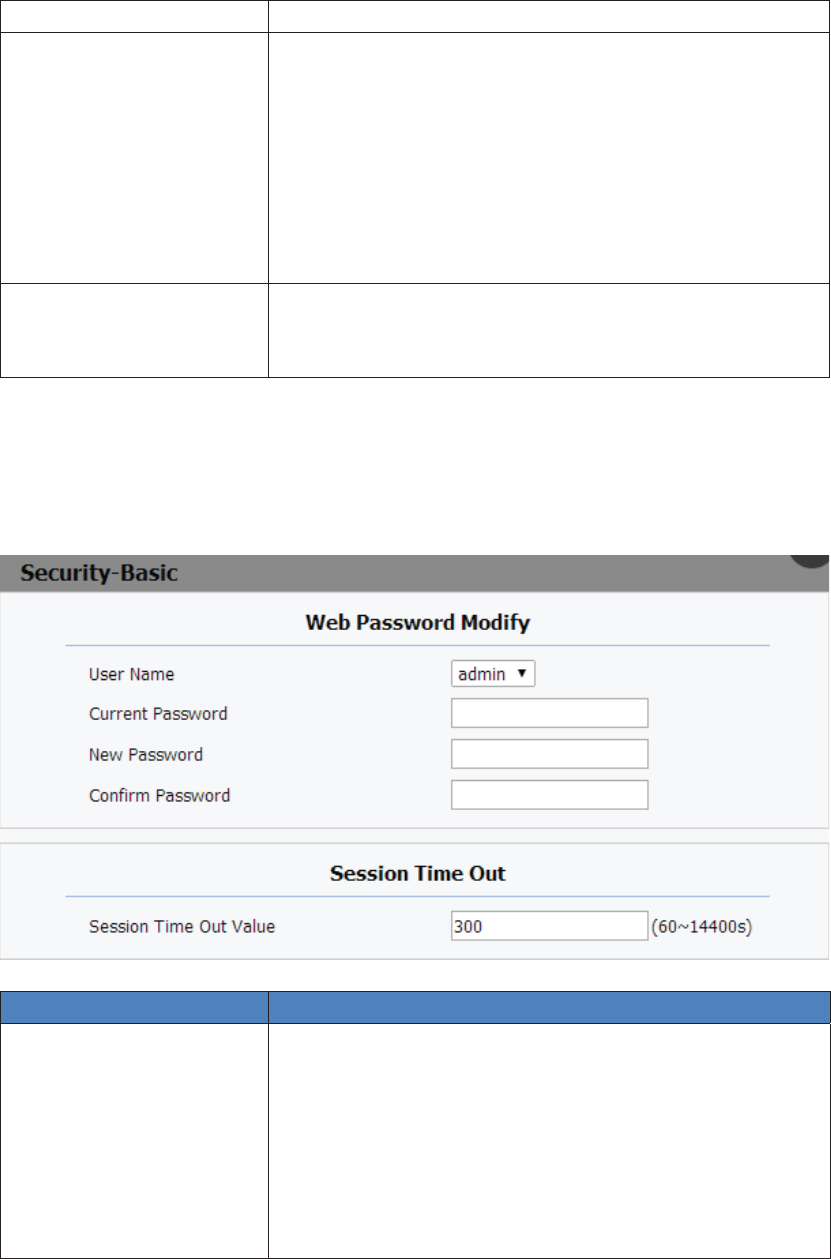
141
PC.
PCAP Tostart,stoppacketscapturingortoexportcapturedPacket
file.
zStart: To start capturing all the packets file sent or
receivedfromIPphone.
zStop:Tostopcapturingpackets.
Note: IP phone will save captured packets file to a
temporary file, this file maximum size is 1M(megabytes),
andwilltopcapturingoncereachingthismaximumsize.
Others Todisplayorconfigureothersfeaturesfromthispage.
zConfig file: To export or import configure file for IP
phone.
8.24 Security>Basic
Sections Description
WebPasswordModify Tomodifyuser’spassword.
zUser Name: Choose the character you are.(admin or
user)
zCurrentPassword:Thecurrentpasswordyouused.
zNewPassword:Inputnewpasswordyouintendtouse.
zConfirmPassword:Repeatthenewpassword.
Note:Securityisconfigurableviawebonly.
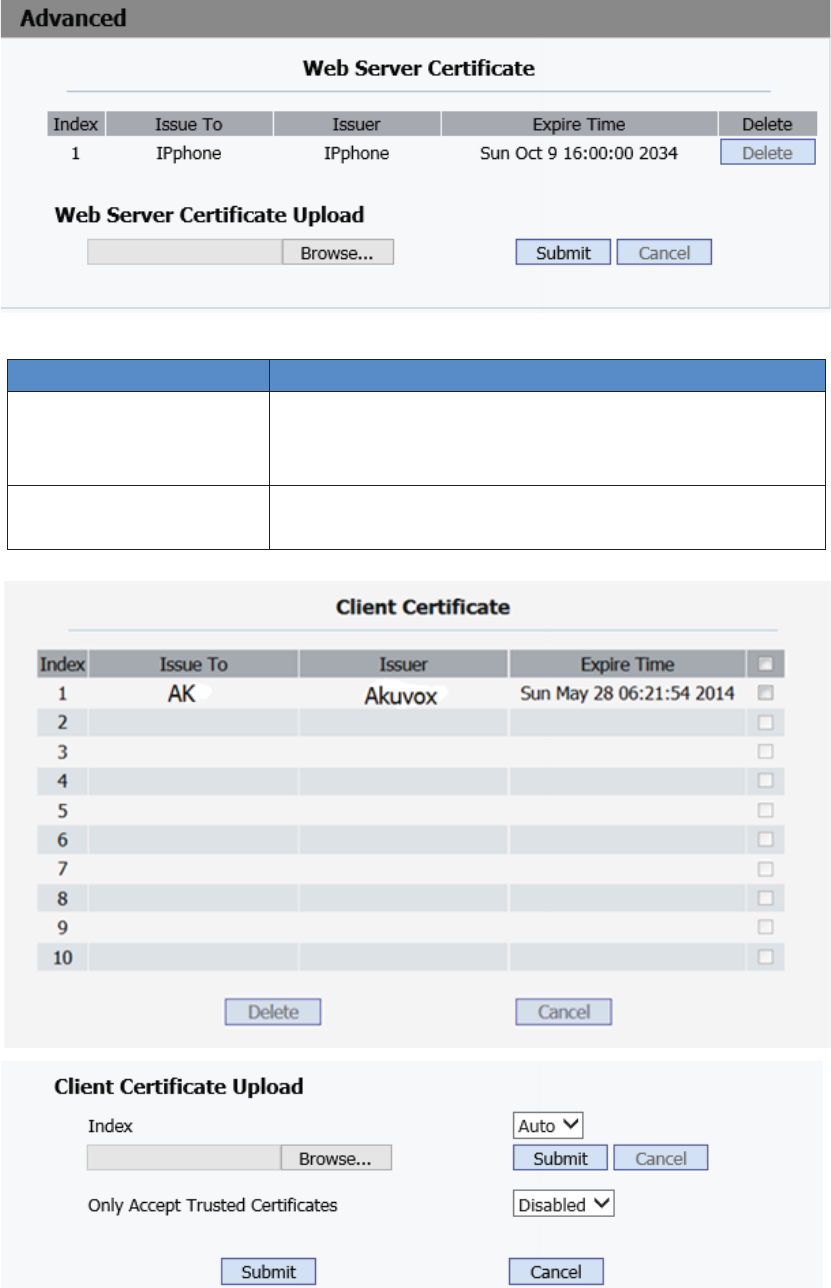
142
8.25 Security>Advanced
Sections Description
WebServerCertificate TodisplayordeleteCertificatewhichisusedwhenIPphone
isconnectedfromanyincomingHTTPsrequest.
Note:Thedefaultcertificatecouldnotbedeleted.
WebServerCertificate
Upload
To upload a certificate file which will be used as server
certificate.

143
SectionsDescription
ClientCertificate To display or delete Certificates which is used when IP
phoneisconnectingtoanyHTTPsserver.
ClientCertificateUpload Touploadcertificatefiles,thisisusedasclientcertificate.
zOnly Accept trusted Certificates: If this option is
enabled,onlytrustedcertificateswillbeaccepted.